


POWER MOP
INSTRUCTION MANUAL
Catalog Number: PM1000
Mop Mode |
Scrubbing |
|
Mode |
THANK YOU FOR CHOOSING BLACK & DECKER!
GO TO WWW.BLACKANDDECKER.COM/NEWOWNER
TO REGISTER YOUR NEW PRODUCT.
BEFORE RETURNING THIS PRODUCT
FOR ANY REASON PLEASE CALL
1-800-544-6986
BEFORE YOU CALL, HAVE THE CATALOG No.AND DATE CODEAVAILABLE. IN MOST CASES,A BLACK & DECKER REPRESENTATIVE CAN RESOLVE THE PROBLEM OVER THE PHONE. IF YOU HAVEA
SUGGESTION OR COMMENT, GIVE USACALL. YOUR FEEDBACK IS VITALTO BLACK & DECKER.
To purchase a box of replacement “No Touch” Cleaning Pads (Model #PM-DP) or a replacement brush, call 1-888-678-7278, see fig. 2 (6).
Key Information You Should Know
•Use only Household Cleaners that are “water like” and are appropriate for the types of floors you are cleaning. Do not use cleaners with pine agents or other oil based products.
•Install Cleaning Pad and Scrubbing Brush before use.
•Use only with AA alkaline batteries.
SAVE THIS MANUAL FOR FUTURE REFERENCE.
CONSERVER LE PRÉSENT GUIDE À TITRE DE RÉFÉRENCE.
VEA EL ESPAÑOL EN LA CONTRAPORTADA.
INSTRUCTIVO DE OPERACIÓN, CENTROS DE SERVICIO Y PÓLIZA DE GARANTÍA. ADVERTENCIA: LÉASE ESTE INSTRUCTIVO ANTES DE USAR EL PRODUCTO.
Catalog Number: PM1000 |
FORM NO. 90503695 REV. 1 |
PRINTED IN CHINA |
Copyright © 2007 Black & Decker |
(MAR. ‘07) |
|
 WARNING: Important Safety Warnings and Instructions
When using electrical appliances, basic safety precautions should always be followed, including the following:
PLEASE READ AND UNDERSTAND ALL INSTRUCTIONS CAREFULLY BEFORE USING THE UNIT.
 WARNING: Some cleaning products contain chemicals known to the State of California to cause cancer, birth defects or other reproductive harm.
When using the Power Mop, be sure to read cleaning product labels for any Proposition 65 warnings. Follow directions on containers of all such products.
 WARNING: INSTRUCTIONS PERTAINING TO A RISK OF FIRE, ELECTRIC SHOCK, OR INJURY TO PERSONS
•Close supervision is necessary when any appliance is used near children. Do not allow to be used as a toy.
•Never spray towards your face or in the direction of another person.
•Never place your mouth on the nozzle or attempt to prime the sprayer by sucking through the nozzle.
•DO NOT SPRAY GASOLINE, SOLVENTS, ACIDS, CAUSTICS, POISONS, OILS, FLAMMABLE LIQUIDS OR SIMILAR PRODUCTS. Personal injury could result from burns, fire, or inhalation of or contact with such liquids.
•Do not operate in the presence of explosives and/or flammable fumes or liquids.
•Always wear eye protection when using the Power Mop with irritating substances. You may also want to use rubber gloves. Read and follow manufacturer’s instructions on the cleaning agent you use.
•Never use this product over your head.
•Always store unit indoors.
•Keep hair, loose clothing, jewelry, and all parts of body away from moving parts.
•Do not insert attachments/accessories when unit is running.
•Store out of reach of children.
•This appliance is intended for household use only and not for commercial or industrial use.
•Use only as described in this manual. Use only Black & Decker recommended attachments.
•Use extra caution when cleaning on stairs.
•Keep work areas well lit.
•Do not use to absorb or scrub any toxic substances, flammable or combustible liquids such as gasoline or use in areas where they may be present.
•Do not use without Scrub Brush and Cleaning Pad installed.
•Any electronic or electrical appliance should not be stored in or exposed to areas of high heat or humidity. Do not store your Power Mop close to stoves, radiators, furnaces or in a bathroom or bathing area.
•Do not contact moving parts.
1 |
Functional Description |
||
1. Main Unit |
|||
|
2. Handle Section |
||
|
3. Thumb Screw |
||
|
4. Batteries |
||
2 |
5. Brush |
||
6. “No Touch” Cleaning Pads |
|||
|
|||
|
7. Pad Holder |
||
|
Description fonctionnelle |
||
|
1. |
Unité principale |
|
|
2. |
Section de la poignée |
|
3 |
3. |
Vis de serrage |
|
|
4. |
Piles |
|
|
5. |
Brosse |
|
|
6. |
Tampons nettoyants « sans |
|
|
1 |
mains » |
|
|
Porte-tampon |
||
|
7. |
||
|
4 |
|
|
|
Descripción de las funciones |
||
|
1. |
Unidad principal |
|
|
2. |
Sección del mango |
|
|
3. |
Tornillo de ajuste |
|
|
4. |
Baterías |
|
|
5. |
Cepillo |
|
|
6. Almohadillas de limpieza |
||
|
|
“No Touch” |
|
5 |
7. |
Sujetador de almohadillas |
|
|
|
||
2 |
|
|
|
|
9 |
|
|
|
8 |
|
|
3 |
|
|
|
2 |
10 |
|
|
|
|
||
|
11 |
|
|
4 |
|
|
|
12 |
|
|
|
3 |
13 |
|
|
|
|
||
5 |
5 |
|
|
|
|
||
6 |
|
|
|
|
2 |
|
|
|
2 |
|
|
1 |
|
|
|
1 |
|
|
|
7 |
|
|
|
|
14 |
|
|
7 |
|
|
|
8 |
15 |
9 |
A |
10 |
|
16 |
||
|
||
7 |
C |
|
10 |
||
17 |
|
|
6 |
|
|
11 |
|
|
1” |
|
25 cm |
12 |
|
B |
2 |
12D |
|
2 |
|
1 |
|
12 |
|
2 |
|
13 |
19 |
18 |
SAVE THESE INSTRUCTIONS
INSTALLATION
Features
* Depending on model purchased, your unit |
appear exactly as shown. |
* BEFORE FIRST USE remove all components |
the packaging and familiarize yourself |
with them to help you with the assembly and operation of your Power Mop.
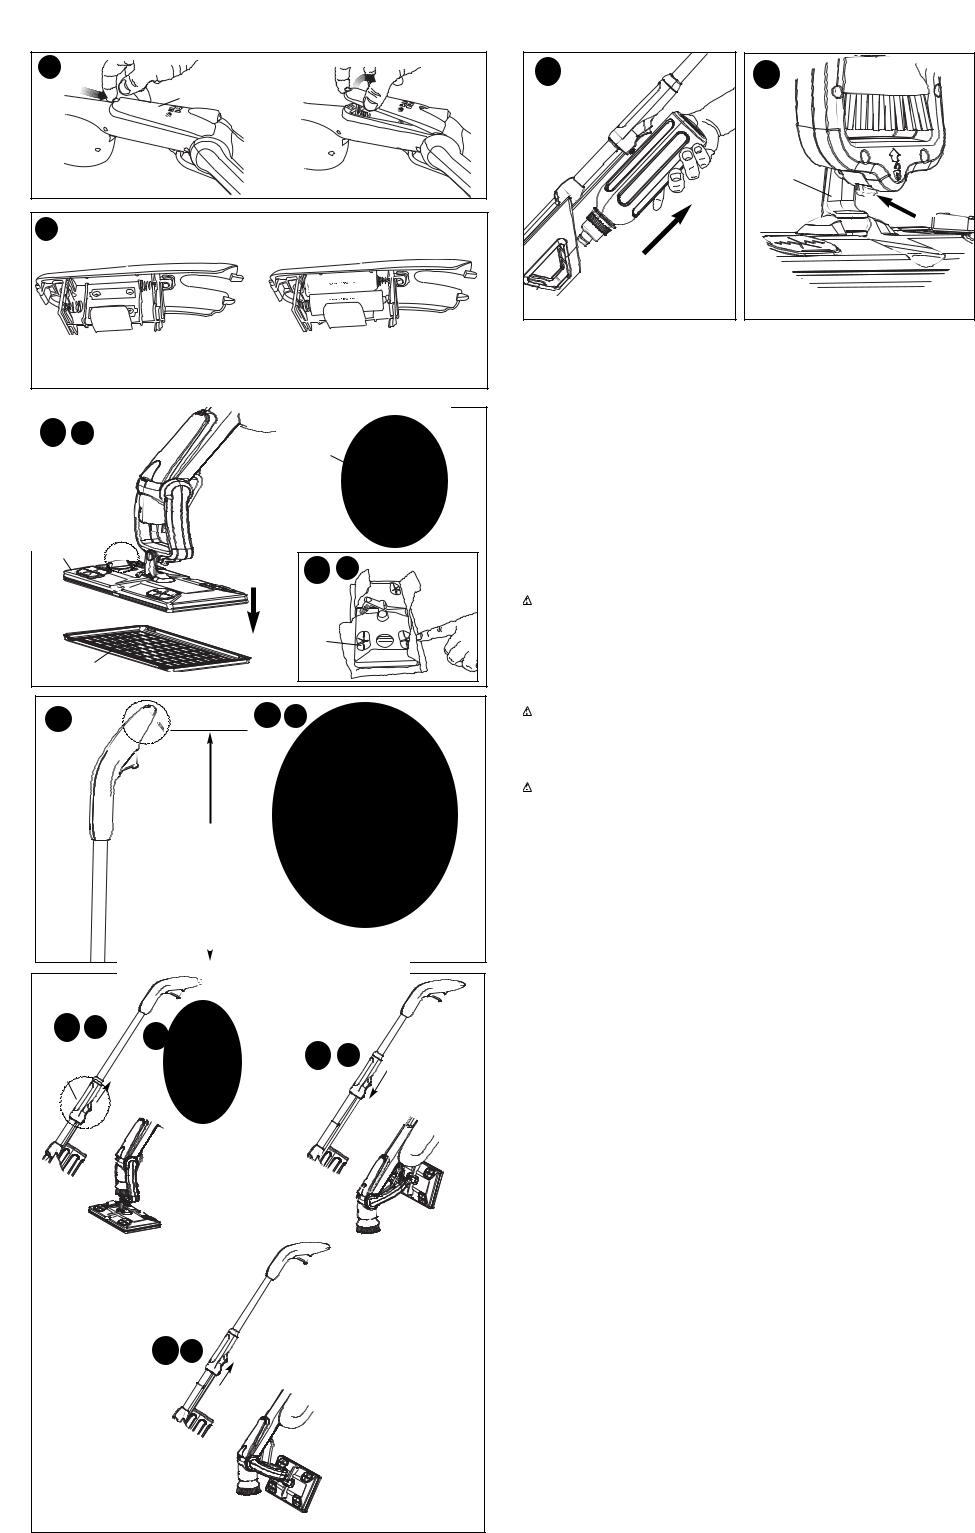
Assembling the Power Mop Unit
• Snap Yoke Rod (8) into the Conversion Bar |
as shown in Fig. 2. |
• Install the Handle Section (2) by ensuring that |
Connector Key (10) matches the shape of |
the Notch in the Main Unit Tube (11) before inserting and snapping in place. Push Handle |
|
Section until you hear a “click” sound to |
properly assembled with Main Unit Tube. |
(see Fig. 3) |
|
• Unscrew Thumbscrew (3) from Slider (12) |
Conversion Bar (13) into Slider as |
shown in Fig. 4. Re-install Thumbscrew and |
tighten. |
• Install the Brush (5) by lining up the shape of |
of the accessory with the shaft and |
push it on, until it snaps in place. See Fig. 5 |
reference. To remove the Brush, simply pull it |
off. |
|
WARNING: Do not attach/remove |
unit is running. |
• Convert the unit from Scrubbing Mode to |
as shown in Fig. 6. |
• Install Pad Holder (7) to Yoke (14) as shown |
7. Push it in until you hear a “click” |
sound. |
|
Battery Installation
Note: Before installing batteries, ensure the |
is in Mop Mode. See section How to |
|
Convert the Unit for proper mode conversion. |
|
|
|
batteries as they may become hot if the |
|
|
|
of time. |
|
Remove the Battery Compartment (15) by |
the tab and rotating up as shown in |
|
Fig. 8. Insert four fresh alkaline AA batteries making sure to match (+) and (-) terminals |
|
|
correctly. Insert batteries as shown in Fig. 9 |
with the ones close to cover first. |
|
Re-install the battery compartment into unit. |
alkaline batteries only. |
|
WARNING: Batteries can explode, or |
can cause injury or fire. To reduce |
|
this risk: |
|
• Carefully follow all instructions and warnings |
battery label and package. |
|
• Always insert batteries correctly with regard |
(+ and -), marked on the battery and |
|
|
the equipment. |
|
• |
Do not short battery terminals. |
|
• |
Do not charge batteries. |
|
• |
Do not mix old and new batteries. Replace all |
at the same time with new batteries of |
|
the same brand and type. |
|
• |
Remove dead batteries immediately and |
per local codes. |
• |
Do not dispose of batteries in fire. |
|
• |
Keep batteries out of reach of children. |
|
• Remove batteries if the device will not be |
several months. |
|
• Transporting batteries can possibly cause |
battery terminals inadvertently come in |
|
|
contact with conductive materials such as |
hand tools and the like. The US |
|
Department of Transportation Hazardous |
Regulations (HMR) actually prohibit |
|
transporting batteries in commerce or on |
.e. packed in suitcases and carryon |
|
luggage) UNLESS they are properly |
short circuits. So when transporting |
|
individual batteries, make sure that the |
are protected and well insulated |
|
from materials that could contact them and |
short circuit. |
Installation and Ejection of “No |
Cleaning Pads |
|
“No Touch” Pad Installation
1.To attach the Cleaning Pad the Power Mop needs to be in Mop Mode. See section How to Convert the Unit for proper mode
2. |
Place the Cleaning Pad (6) on the floor with |
fabric side touching the floor surface as |
|
shown in Fig. 10A. |
|
3. |
Bring the Pad Holder (7) over the Cleaning |
and insert it inside the Cleaning Pad. |
4. |
Apply a small pressure on the Pad Holder |
the pad in place. |
Cleaning Pad Ejection |
|
|
1. |
To eject, raise the Pad Holder above the |
turn the Pad Holder Knob (16) |
|
(Fig. 10B) in the direction indicated by the |
|
2. |
Dispose of the Cleaning Pad |
|
Note: It might be possible to recycle the |
Pad in your area. Verify with your local |
|
recycling organization to inquire about it. |
|
|
The Power Mop also accepts common |
pads as well as common washable and |
|
reusable pads (i.e. Microfiber cloths). These |
can readily be found in most retail |
|
stores. |
|
|
Installation and Removal of Generic Cleaning Pads
To install Generic Pads: |
|
|
1. |
Lay the pad flat on the floor. |
|
2. |
Center the Pad Holder of the Power Mop |
over the pad on the floor. |
3. |
Wrap the edges of the pad around the |
Pad Holder to reach the Rubber |
|
Grippers (17) found on the top of the Pad |
as shown in Fig. 10C. |
4. |
Insert the edges of the pads, one at a time, |
each of the 4 Rubber Grippers found on |
|
top of the Pad Holder. Use your finger to |
|
5. |
To remove dirty pad, simply pull pad out of Rubber Grippers. |
|
Hanging the Unit
1.Find a stud within the wall where the unit will rest.
2.Insert a 2” (63.5 mm) finishing nail at 45 degree from at least 52” (1321 mm) to the floor. The nail head should extend 1” (25 mm) from the wall. See Fig. 11 and 11A for details.
OPERATING INSTRUCTIONS
How to Convert the Unit
12A - Mop Mode
12B - Scrubbing Mode
12C - Brush Installation / Removal Mode
 Loading...