


Getting Started Guide
BlackBerry® Curve™

Table of Contents
Welcome to AT&T 5
What’s in the Box? 5
Set up Your BlackBerry Curve 6
Insert a Memory Card 6
Insert the Battery 7
Charge the Battery 7
Learn to Navigate 8
Setup Wizard 9
Email Setup 12
Send an Email 15
Use the Phone 16
Make a Phone Call 16
Set up Voice Mail 17
Check Your Voice Mail Messages From Your BlackBerry
Send an SMS Text Message 18
Take and Send a Picture Using MMS 19
Browse the Web 20
Go to Web Pages 21
Curve 17
2
BlackBerry® Curve
™

Manage Appointments and Contacts 22
Schedule an Appointment 22
Add a Contact 23
Use Push To Talk 24
Set up Push to Talk 24
Confirm Push to Talk is On 24
Add a Push to Talk contact 25
Make and Receive a Push to Talk Call 26
Load and Play Music and Videos and Shop Online 27
Load MP3 and Video Files 27
Play MP3 Files 28
AT&T Mobile Music
29
AT&T Mall 30
TeleNav GPS Navigator 31
TeleNav GPS Navigator v5.1 for BlackBerry Curve 31
Download and Installation Instructions 32
Login Instructions 33
Generate A Route 34
Exiting TeleNav GPS Navigator 34
BlackBerry® Curve
™
3

Use Bluetooth® Services 35
Pair a Bluetooth Accessory
35
Synchronize Your BlackBerry Curve With Your Computer 36
BlackBerry® Desktop Software 36
What You Need 36
Setup instructions 37
Synchronize Data Between Your BlackBerry Device 40
and Your Computer
Troubleshooting 41
Tips and Tricks 45
Accessories 47
Icons and Indicators 50
BlackBerry Curve Key Functions 52
Applications 53
Find More information 54
4
BlackBerry® Curve
™

Welcome to AT&T
What’s in the Box?
What’s in the Box?
Remove the following items from the box to help you set up your
BlackBerry Curve.
Getting Started Guide
BlackBerry® Curve™
Getting Started Guide
BlackBerry® User Tools CD
Includes User Guide,
BlackBerry End User/Software
License Agreement and
warranty information for your
BlackBerry Curve.
BlackBerry Curve
Travel Charger
USB Sync Cable
Stereo Headset
Rechargeable
Battery
BlackBerry® Curve
™
5
5

Steps?
6
Takes?
1 minute
NOTE:
A microSD memory
card is strongly
recommended for
storing media files
like your music,
photos, videos
to help optimize
memory management
and avoid memory
shortages that result
in deletion of emails
and calendar entries.
6
Set Up Your BlackBerry Curve
Insert a Memory Card (Optional)
Insert a Memory Card (Optional)
™
Use a microSD
memory available on your BlackBerry Curve
for storing media files such as your ring tones,
videos, pictures, or songs*.
1. Slide off the battery cover.
2. Slide the memory card holder door toward
its hinges to unlock it.
3. Lift the memory card holder door.
4. Insert the memory card into the slots in
the memory card holder door so that the
metal connectors on the card align with
the metal contacts on your BlackBerry
Curve when the memory card holder
door is closed.
5. Close the memory card holder door.
6. Slide the memory card door away from its hinges to lock it.
*Additional charges may apply for downloadable content. Your use of third party
products and services shall be governed by and subject to you agreeing to the terms of
separate software licenses, if any, for those products or services. Any third party products
or services that are provided with RIM’s products and services are provided “as is” RIM
and/or AT&T make no representation, warranty or guarantee whatsoever in relation to
the third party products and services and assume no liability whatsoever in relation to
the third party products and services even if RIM and/or AT&T have been advised of
the possibility of such damages or can anticipate such damages. microSD is a SanDisk
trademark.
memory card to extend the
1
2
43
BlackBerry® Curve
™

Insert & Charge the Battery
Insert the Battery
1. Press the battery cover release
button on the back of the
BlackBerry Curve and slide
off the battery cover.
2. Insert the battery so that the metal
contacts on the battery align with
the metal contacts on your
BlackBerry Curve.
3. Slide the battery cover back onto the
BlackBerry Curve so that the cover
lies flat and clicks into place.
Charge the Battery
4. Pull the plug blades down on the travel charger.
5. Connect the small USB end of the travel charger
cable to the USB port on the side of your
BlackBerry Curve.
6. Plug the travel charger into a power outlet.
7. Charge the battery to full power.
CAUTION: Use only those accessories approved by Research In Motion (RIM). Using any
accessories not approved by RIM for use with this particular BlackBerry device model
might invalidate any approval or warranty applicable to the device might result in the nonoperation of the device and might be dangerous.
BlackBerry® Curve
™
Steps?
7
Note:
If the battery
is charged, the
BlackBerry Curve
should turn on. If
the device does not
turn on, charge the
battery. Charging
the battery can take
an hour or longer.
If you have an
available USB
port on your
computer and you
have installed the
BlackBerry
Desktop Software,
you can use the USB
cable that came
with your device to
connect your device
to your computer
for charging. For
more information,
see the “Sync your
BlackBerry Curve
with your
Computer” topic.
®
7
Note:
To save battery
power your
BlackBerry Curve
screen is set to
Timeout (go dark
or dim) after 30
seconds. If the
screen goes dark or
dims simply press
any key to view the
screen again.
Set Up Your BlackBerry Curve
Learn to Navigate
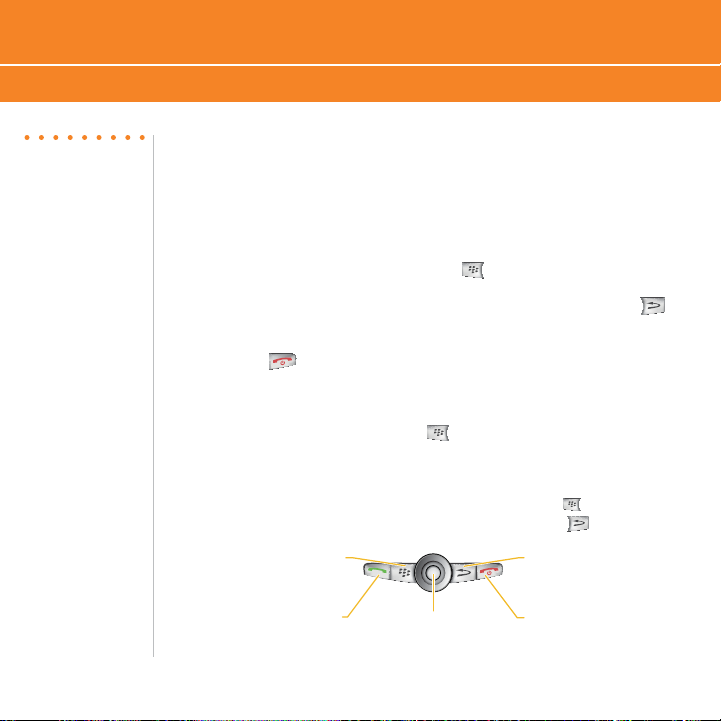
Learn How to Use the Keys on Your BlackBerry Device
1. To move the cursor in any direction and highlight items,
roll the Trackball.
2. To select an item or follow a link, click the Trackball.
3. To open a menu, press the Menu key .
4. To close a menu or move back a screen, or press the Escape key .
5. To leave an application and return to the Home screen, press the
End key . The next time that you open the application, you are
returned to the same location in the application.
6. To open a menu of all the available actions for a highlighted item in an
application, press the Menu key .
7. If you click an item with more than one common available action, a
short menu of these available actions appears. To view more available
actions for the highlighted item, press the Menu key or click Full
Menu. To close the short menu, press the Escape key .
Menu key
Open the menu in
an application
Open the phone. Call a
highlighted phone number
Send key
Trackball
Roll to move around a screen
Click (press) to select an item
8
Escape key
Move back a screen
Close a menu
End/Power key
End a call. Turn off the device.
Return to the Home screen
BlackBerry® Curve
™
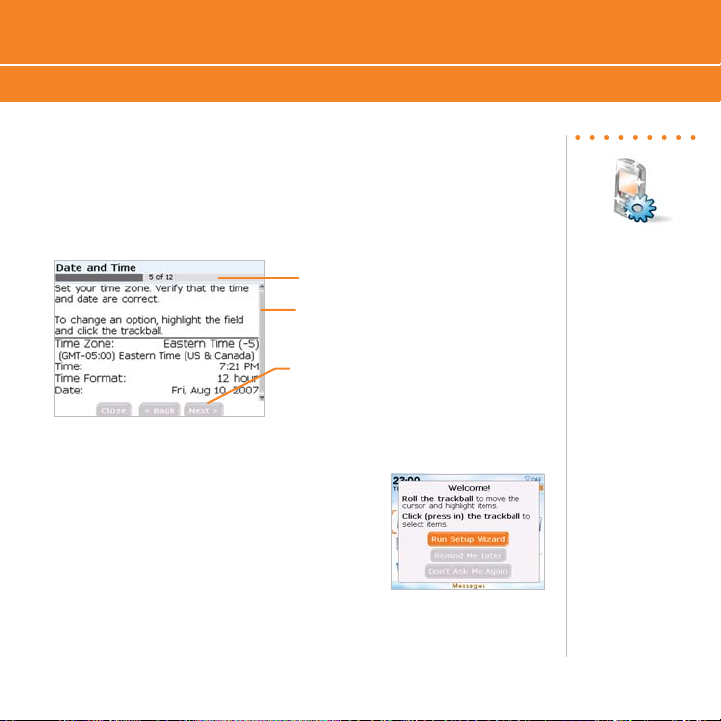
Setup Wizard
Setup Wizard
The BlackBerry Curve contains a Setup Wizard designed to help you
quickly and easily set up and personalize your BlackBerry Curve.
Introduction to BlackBerry Curve
Progress indicator
More indicator
Roll the trackball down to see
more text on the screen
Close, Back and Next buttons
Click to move between screens
in the Setup Wizard
The introduction to the BlackBerry Curve
section of the Setup Wizard will help you
choose your language, set up the date and
time, and orient you to some of the important
keys/functions on your BlackBerry Curve.
BlackBerry® Curve
™
Takes?
5 - 10 minutes
Note:
As you complete the
Setup Wizard, look for
the progress indicator
to tell you how many
screens you have
completed. The more
indicator tells you if
there is more to see
on the screen and
the buttons along the
bottom allow you to
navigate through the
Setup Wizard.
9
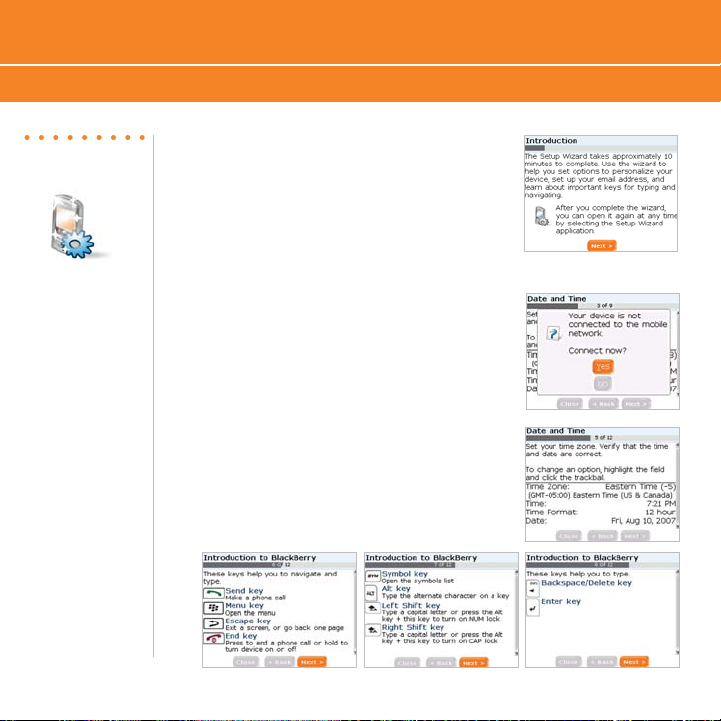
Note:
You can exit the
Setup Wizard at any
time and return to
where you left off by
selecting BlackBerry
Setup from the
Home screen and
then choosing
Setup Wizard.
Set Up Your BlackBerry Curve
Setup Wizard
1. If the Setup Wizard did not launch
automatically, on the Home screen, click
BlackBerry Setup. Click Setup Wizard.
2. In the Setup Wizard, use the trackball to
scroll up and down on the screens and
highlight input fields or buttons. Click
(press) the trackball to select fields or
buttons.
2. Click Yes if asked if you want to
connect to the wireless network.
3. Select a language.
4. To set your time zone, highlight the current
time zone and click the trackball. Scroll
to find your time zone and click again to
select it.
5. Review the navigation keys and click Next.
10
BlackBerry® Curve
™

Setup Wizard
6. Enter your owner information
and click Next.
7. Select the display font and
click Next.
Note:
If your SIM card
currently has contacts
saved to it, you will
be prompted to
import them to the
BlackBerry Curve.
To import the
contacts click Yes
then click Next.
BlackBerry® Curve
™
11
Steps?
8
Takes?
10 - 15 minutes
Note:
To set up your
BlackBerry® Internet
Service email using a
web browser on your
computer, visit
att.com/blackberrystart.
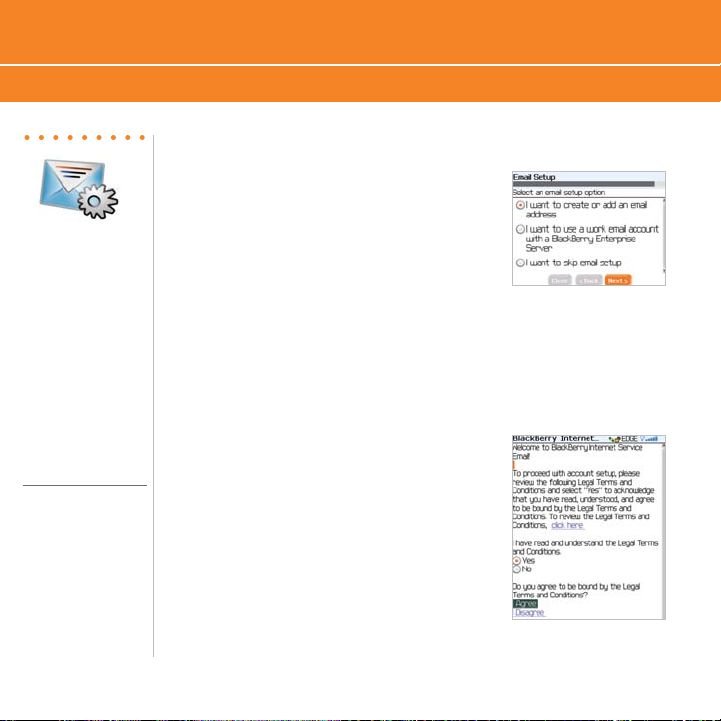
Email Setup
Email Set Up
Email Set Up
1. To access email setup directly, on the
Home screen, click BlackBerry Setup.
Click Personal Email Setup. Verify that
you have turned on the connection to the
wireless network.
2. Click Next.
3. To view the terms of the BlackBerry®
Internet Service end user agreement,
click Click Here.
12
BlackBerry® Curve
™
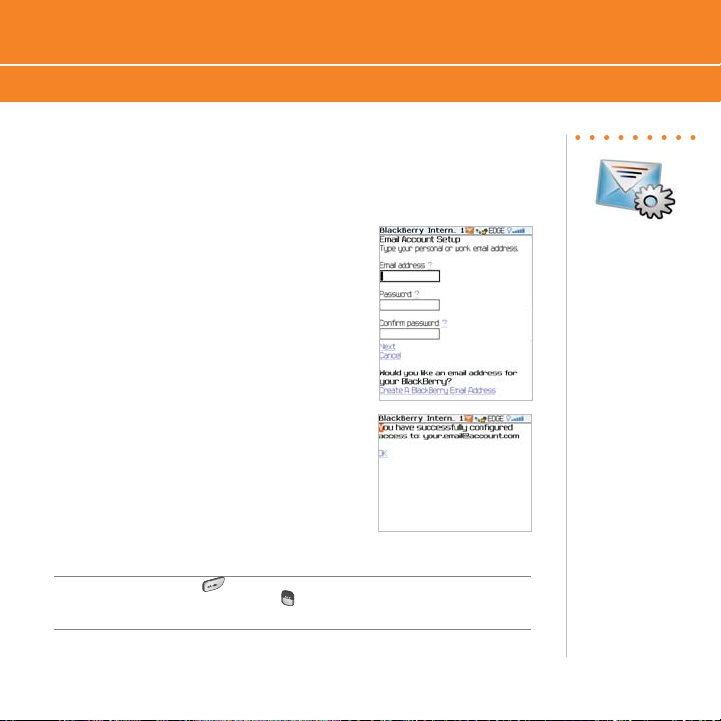
Email Set Up
4. Please read the terms and conditions carefully. To accept the terms
of the license agreement, select the Yes option. Click I Agree.
5. Type the email address information
for the existing supported email
account that you want to add and
click Next.
6. After the confirmation displays,
click OK.
Typing Tips: To capitalize a letter, hold the letter key until the capitalized letter appears
or press the
such as @ and period [.], press the ALT key and press the appropriate letter key.
Right Shift key and press the appropriate letter key. To insert symbols
BlackBerry® Curve
™
13

Email Setup
Email Setup
7. On the summary screen perform one of the
following actions:
To create a new email address for
•
your BlackBerry Curve, click Create A
BlackBerry Email Address.
•
To add another existing supported email
address (up to 10) click Add An Email
Account.
To exit the email setup website,
•
press the Menu key . Click Close.
8. You have now completed the Setup Wizard.
On the Setup Wizard Complete screen
perform one of the following actions:
• To read shortcuts and information about
personalizing your device, click Next.
• To exit the Setup Wizard, click Close.
Note: Once you add a supported email account (up to 10) using the email setup
application, messages sent to that account will also appear in the messages list on your
BlackBerry Curve. Also, when you send a message from your device, it will be sent using
the email address of that account.
14
BlackBerry® Curve
™
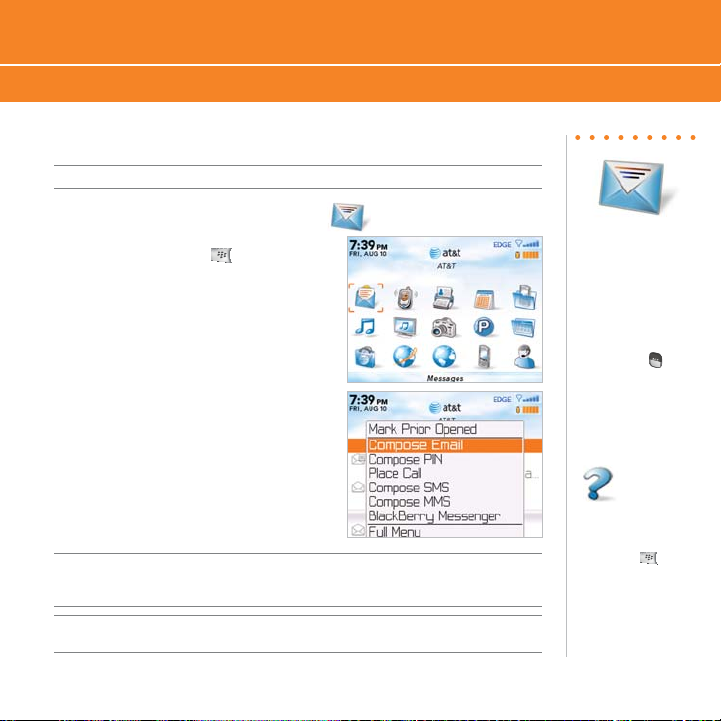
Send an Email
Send an Email
Send an Email
Make sure that you have set up an email account using the Setup Wizard.
1. On the Home screen, click Messages .
2. Press the Menu key .
3. Click Compose Email.
4. In the To field, perform one of the
following actions:
Type an email address.
•
Type a contact name.
•
Type part of a contact name.
•
Click a contact.
5. Type a message.
6. Click the Trackball.
7. Click Send.
If you have associated your BlackBerry Curve with more than one supported email address,
use the Send Using field (found by pressing the Menu key) to select the email address that
you want to use to send the email message.
Note: You must set up an email account on your BlackBerry Curve device to send email. To
learn how to set up a supported email account, refer to Email Setup in the Setup Wizard.
BlackBerry® Curve
™
Steps?
7
Note: To insert
symbols such as @
and period [.], press
the ALT key and
press the appropriate
letter key.
More Info
To learn more about
Email Features, while
in Messages, press
the Menu key.
Click Help.
15

Steps?
3
Note:
To turn the
speakerphone
on or off during
a call, press the
Speakerphone
key, or click the
trackball and then
click Activate
Speakerphone/
Handset.
Make a Phone Call
1. On the Home screen or in
the Phone application,
perform one of the
following actions:
Type a phone number
•
Type part of a contact name.
•
Highlight a contact or
phone number.
2. Press the Send key .
3. To end the call, press the End key .
Use the Phone
Make a Phone Call
16
BlackBerry® Curve
™

Set up Voice Mail
Set Up Voice Mail
1. Press and hold the 1 key
on your BlackBerry Curve to
connect to the AT&T voice
mail system.
2. Create your password.
Steps?
4
3. Record your name.
4. Record a greeting.
Check Your Voice Mail Messages From Your
BlackBerry Curve
1. Press and hold the 1 key .
2. Follow the voice prompts.
BlackBerry® Curve
™
More Info
To learn more about
Voice Dialing features,
while in Voice Dialing,
press the Menu
key. Click Help.
Note: There is no
need to hold down
the Left Shift key or
ALT key when dialing
a phone number.
Steps?
2
17

Send an SMS Text Messages
Send an SMS Text Message
1. On the Home screen, click Messages .
2. Press the Menu key .
Send an SMS Text Message
Steps?
7
18
3. Click Compose SMS Text.
4. Perform one of the following actions:
If the contact is not in your address
•
book, click Use Once. Type an SMS
phone number (include the country
code and area code).
Click the Trackball.
If the contact is in your address
•
book, click a contact.
5. Type a message.
6. Click the Trackball.
7. Click Send.
BlackBerry® Curve
™

Take and Send a Picture Using MMS
Take a Picture
Take a Picture
1. On the Home screen, click Camera .
2. Click the Trackball.
Note: The picture is automatically saved to your Media folder which can be accessed
through the Media
3. If you would like to send the picture to a contact, click
the Mail icon
4. Click Send As MMS.
5. Select the contact you wish to send it to and click the Trackball.
6. Type a subject, then click the Trackball.
7. Click Send.
Note: Your use of the camera application on your BlackBerry Curve may be prohibited
or restricted at certain times. Use the camera application responsibly and abide by all
applicable laws, rules and regulations.
application from the Home screen.
.
Steps?
7
More Info
To learn more about
Camera features,
while in the Camera
application, press the
Menu
key. Click Help.
BlackBerry® Curve
™
19

Steps?
5
Note:
The Go To dialog box
tracks the web pages
that you type. To
access a web page on
the list, highlight and
click the address with
the Trackball.
Not all web sites
are designed for
browsing on a handheld device and may
not be accessible,
look or function in
the same way as they
would on a computer.
20
Browse the Web
Go to Web Pages
Go to Web Pages
There are two browsers that come with your BlackBerry Curve: the
MEdia™ Net Browser and an Internet Browser. Use the MEdia Net
Browser to access your favorite content (weather, news...) and download
ringtones or other personalization items*. Go to the Quick Start Guide
in the box to find out more information about MEdia Net. Use the
Internet Browser to access web sites.
1. On the Home screen click Browser .
MEdia Net
Browser
*Additional charges may apply for down-loadable content.
Your use of third party products and services shall be governed by and subject to you
agreeing to the terms of separate software licenses, if any, for those products or services.
Any third party products or services that are provided with RIM’s products and services
are provided “as is”. RIM and/or AT&T make no representation, warranty or guarantee
whatsoever in relation to the third party products and services and assume no liability
whatsoever in relation to the third party products and services even if RIM and/or AT&T have
been advised of the possibility of such damages or can anticipate such damages.
BlackBerry® Curve
™

Browse the Web
Go to Web Pages
2. On a bookmark page, press the Menu key .
MEdia Net Home Page Browser Home Page
3. Click Go To….
4. In the dialog box that appears, type
the URL (web address, e.g. att.com)
that you wish to go to.
5. Click the Trackball.
To insert a period, press the Space key . To insert a slash, press the Right Shift
key and the period key.
BlackBerry® Curve
™
21

Manage Appointments and Contacts
Schedule an Appointment
Schedule an Appointment
Steps?
6
More Info
To learn more about
Calendar features,
while in the Calendar
application, press the
Menu
key. Click Help.
22
1. On the Home screen, click Calendar
.
2. Press the Menu key .
3. Click New.
4. Type the appointment information.
5. Click the Trackball.
6. Click Save.
Note: To change calendar views, press the Menu key and select the desired view.
BlackBerry® Curve
™

Add a Contact
Add a Contact
1. On the Home screen,
click Address Book .
2. Press the Menu key .
3. Click New Address.
4. Type the contact information.
5. Click the Trackball.
6. Click Save.
BlackBerry® Curve
™
Steps?
6
Takes?
1 minute
23

Steps?
4
Use Push to Talk
Set up Push to Talk
Push to Talk
Push to Talk (PTT) is a digital walkie-talkie type of service that allows you
to instantly reach others by eliminating the dialing and ringing steps
in a regular cellular call. PTT calls can be made to one person or to a
group of people.
Note:
You must have a PTT
subscription to set
up and use the PTT
service.
Push to Talk
initialization might
take a few minutes
to complete.
More Info
To learn more about
Push to Talk service,
visit att.com/
pushtotalk.
24
Set up Push to Talk
1. On the Home screen, click Push to Talk or
press the PTT Convenience key on the left side
of the BlackBerry Curve.
2. Click Yes to initialize PTT.
3. Type a name that is up to 20 characters in length.
This will be your PTT user name.
4. Click OK.
Confirm PTT is On
On the Home screen, click Push to Talk.The bottom
of the PTT Menu screen reads PTT is On.
BlackBerry® Curve
™

Use Push to Talk
Add a Push to Talk Contact
Add a Push to Talk contact
Individuals and group members that you add to your PTT contact list
must have a PTT capable AT&T device and subscribe to AT&T Push to
Talk service.
When you add a PTT contact, the contact can accept, decline, or defer
your invitation.
1. On the Home screen,
click Push to Talk .
2. Click Add Contact.
3. Type the contact information
and Click OK.
4. The BlackBerry Curve will now
send the invitation to your
new contact. You will see an
icon appears to indicate that
your invitation is in progress.
BlackBerry® Curve
™
Steps?
4
25

Steps?
3
Make and Recieve a Push to Talk Call
Make a Push to Talk Call
1. Press and release the PTT key to display your PTT contacts.
2. Use the trackball to highlight the contact you wish to reach then press
and hold the PTT key to establish a connection.
3. When the BlackBerry Curve beeps, you can perform one of the
following actions:
Note:
You need to add a
Push to Talk contact
before you can make
a Push to Talk call.
Steps?
2
26
• To speak, press and hold the PTT key.
• To listen, release the PTT key.
To end the Push to Talk call, press and hold the End key .
Receive a Push to Talk Call
1. Your BlackBerry Curve indicates an incoming PTT call using a tone and
displays the caller’s information on the screen.
2. If you have set your ringer to silent or vibrate, your device prompts
you to accept or reject the call before you hear the caller’s voice.
BlackBerry® Curve
™

Load and Play Music and Your Videos and Shop Online
Transfer Music and Videos to Your BlackBerry Curve
Media
In the Media application, you can play media files such as your videos,
ringtones, pictures, or MP3 songs that are stored on your BlackBerry
Curve. You might have some preloaded media files, including
background pictures and ring tones, in a Preloaded Media folder
on your BlackBerry Curve. Preloaded media files cannot be deleted,
renamed, or moved. For additional storage, add a media card (sold
separately) to your BlackBerry Curve.
Load MP3 and Video Files
You can listen to your music on the BlackBerry Curve. The built-in
media player provides the ultimate in control and flexibility to organize
your music and listen to it the way you want to.
1. Consider inserting a microSD card into the back of your BlackBerry
Curve to optimize memory available for music.
2. Connect your BlackBerry device to your computer using the USB
cable provided.
3. On your computer, open the BlackBerry® Desktop Manager.
4. Double-click Media Manager.
5. Two sections appear, one on the top showing your computer, and
one on the bottom showing your files on your BlackBerry®.
6. Drag files from your computer onto your BlackBerry device.
Note: You
must install the
BlackBerry®
Desktop Software
included on the
BlackBerry User
Tools CD that
came with your
BlackBerry device
to use Media
Manager. For more
information, see
the “BlackBerry
Desktop Software”
section located
later in this guide.
More Info
For more
information about
Media Manager
features, while in
the Media Manager
application, click
Help.
BlackBerry® Curve
™
27

Load and Play Music and Videos and Shop Online
Play MP3 Files
Listen to your favorite music on the BlackBerry Curve while on the road,
relaxing at home, or at the gym.
Steps?
4
28
Play MP3 files
1. On the Home screen, click Media.
2. In the Media application, click Music.
3. Click Media Card.
4. Perform one of the following actions:
• To play a single song, click the song.
• To play all songs on the media card,
press the Menu key . Click Play All.
BlackBerry® Curve
™

AT&T Mobile Music
AT&T Mobile Music
AT&T Mobile Music provides the ultimate, integrated, on-the-go music
experience. When you’re on the go, AT&T Mobile Music is designed to
connect you to music with a touch of a button*.
1. On the Home Screen, click AT&T Music .
Listen to your music with the integrated Music Player. Select your
•
music by Artist, Album, Genre, or Shuffle Songs.
Channel surf dozens of commercial free music stations with
•
Streaming Music.
Personalize your BlackBerry Curve with music ringtones and
•
Answer Tones™ at Shop Tones.
Instantly find out the artist’s name and the title of a song with
•
MusicID.
Visit one or more hot user communities by going to Community.
•
Purchase additional fun music applications via AT&T Mall by going
•
to Music Apps.
*Additional charges may apply for downloadable content. Your use of third party
products and services shall be governed by and subject to you agreeing to the terms of
separate software licenses, if any, for those products or services. Any third party products
or services that are provided with RIM’s products and services are provided “as is”. RIM
and/or AT&T make no representation, warranty or guarantee whatsoever in relation to
the third party products and services and assume no liability whatsoever in relation to
the third party products and services even if RIM and/or AT&T have been advised of the
possibility of such damage.
Note:
You must be
connected to the
mobile network to
use AT&T Mobile
Music.
BlackBerry® Curve
™
29

AT&T Mall
AT&T Mall
Personalize your phone with downloadable games, graphics and ring
tones from the hottest artists*.
On the Home Screen, click AT&T Mall .
•
Browse thousands of ring tones from the classics to today’s top
•
performers at Shop Tones.
Find games to turn your downtime into fun time at Shop Games.
•
Note:
You must be
connected to the
mobile network to
use AT&T Mall.
30
Personalize your BlackBerry device with unique art at Shop
•
Graphics.
Find an MMS greeting card that is perfect for the occasion at
•
Shop Multimedia.
Subscribe to useful applications and cool tools discovered at
•
Shop Applications.
*Additional charges may apply for downloadable content. Your use of third party
products and services shall be governed by and subject to you agreeing to the terms of
separate software licenses, if any, for those products or services. Any third party products
or services that are provided with RIM’s products and services are provided “as is”. RIM
and/or AT&T make no representation, warranty or guarantee whatsoever in relation to
the third party products and services and assume no liability whatsoever in relation to
the third party products and services even if RIM and/or AT&T have been advised of the
possibility of such damages or can anticipate such damages.
BlackBerry® Curve
™

TeleNav® GPS Navigator
TeleNav GPS Navigator
TeleNav GPS Navigator v5.1 for BlackBerry Curve
TeleNav GPS Navigator helps you get
around town by giving you audible
turn-by-turn directions and real-time
alerts designed to help you avoid
traffic incidents.
You can access 3D maps and
information on over 10 million
businesses to help you find nearby
restaurants, ATMs, hotels and
more—by category or by name—and
even help you compare gas prices.
Note: You must have a TeleNav subscription
to use the TeleNav service. If you did not
select TeleNav service when you purchased
your device, please call 1-800-331-0500 to have
TeleNav service activated on your BlackBerry
Curve. Additional charges may apply for
downloadable content. Your use of third party
products and services shall be governed by and subject to you agreeing to the terms
of separate licenses, if any, for those products or services. Any third party products or
services that are provided with RIM’s products and services are provided “as is”. RIM
and/or AT&T make no representation, warranty or guarantee whatsoever in relation to
the third party products and services and assume no liability in relation to the third party
products and services even if RIM and/or AT&T have beeb advised of the possibility of
such damages or can anticipate such damages. Maps and information not available for
all locations
Takes?
10 minutes
BlackBerry® Curve
™
31

Steps?
4
TeleNav GPS Navigator
Download TeleNav GPS Navigator
Download and Installation Instructions
1. On the Home screen, click the TeleNav GPS Navigator icon.
2. Once the Browser has launched, you will be presented with a release
waiver from RIM. Read the terms and conditions carefully. If you
agree with the terms, scroll to the bottom and press the I Agree
option.
3. Next, you will be passed to a product overview page for TeleNav
GPS Navigator on the BlackBerry Curve. Select the Download
option.
Note: Depending on the Theme you are using, the TeleNav GPS Navigator icon might be
in the Applications folder.
4. You will next come to the Download
Summary screen. Click the Download
button. A progress bar appears.
Optional: If you choose to cancel the download and
try again later, click the Cancel button. You will lose
any progress up to this point.
32
BlackBerry® Curve
™

Login Instructions
Login Instructions
1. You can start TeleNav GPS Navigator by clicking the icon
on the Home screen.
Note: Depending on the Theme you are using, the TeleNav GPS Navigator icon might be
in the Applications folder.
2. Once you have read through the
terms of use, click the Trackball or
press the Menu key for a list of
menu options. If you agree with the
terms of use, select the option for
Accept & Login.
3. To complete the login the login
process, you will be prompted to
enter your TeleNav GPS Navigator
Password. This password will be
sent to you via SMS. Once you have
entered your password, press the
trackball.
Note: Your BlackBerry device may prompt you for permission to use services such as GPS,
the data network or Phone Logs. Click Always Allow on these prompts if you wish to allow
TeleNav GPS Navigator to access these information sources and function.
Steps?
3
BlackBerry® Curve
™
33

Steps?
6
Note: You must be
outdoors for GPS
to work.
Steps?
1
TeleNav GPS Navigator
Generate A Route
Generate A Route
1. Click the Drive To option using
the trackball.
2. Using the trackball, click the
Address option and choose the
Type In Address Option.
3. Enter the address for your
desired destination and click
the Trackball.
4. TeleNav GPS Navigator will attempt
to validate the address and prompt
you to confirm the address.*
5. Once the address for your
destination is confirmed, click the
trackball to generate your route.
6. Congratulations! You have
successfully generated your route.
Exiting TeleNav GPS Navigator
1. To exit TeleNav GPS Navigator, press the Esc key from the
application main menu and then the trackball to confirm the
Exit selection.
*Maps and information may not be available for all locations
34
BlackBerry® Curve
™

Use Bluetooth® Services
Pair a Bluetooth Accessory
Pair a Bluetooth Accessory
1. On the Home screen,
®
.
.
click BlackBerry Setup
2. Click Set up Bluetooth
3. Click OK.
4. If required, type the passkey for
the Bluetooth enabled accessory
on your BlackBerry Curve.
5. Once the Bluetooth enabled
accessory is paired with the
BlackBerry Curve, you are
ready to use the accessory.
Note: You can simultaneously use more than one Bluetooth enabled accessory with your
BlackBerry Curve.
BlackBerry® Curve
™
Steps?
5
Takes?
1 minute
More Info
To learn more about
Bluetooth features,
while in Bluetooth,
press the Menu
key. Click Help.
35

Synchronize Your BlackBerry Curve With Your Computer
BlackBerry Desktop Software
BlackBerry Desktop Software
®
Desktop Software that was included on
Note:
Before installing
the BlackBerry®
Desktop Software,
you must agree to
the BlackBerry End
User/Software License
Agreement.
You can install the BlackBerry
the BlackBerry
®
User Tools CD with your BlackBerry devices on your
computer and connect your BlackBerry Curve to your computer to allow
you to perform any of the following actions:
• Synchronize organizer data such as contacts, calendar entries, tasks,
and memos between your BlackBerry Curve and your computer.
• Back up and restore BlackBerry Curve data.
• Transfer media files between your computer and your BlackBerry
Curve.
• Add applications to your BlackBerry Curve.
• Set up and manage email message forwarding or wireless calendar
synchronization if your BlackBerry® Enterprise Server administrator
has advised you to do so.
What You Need
• Intel® compatible 486 or higher computer that is compliant
with USB 1.1 or later
• Microsoft® Windows® 2000, or later
• Available USB port
• CD drive
36
BlackBerry® Curve
™

Setup Instructions
Setup instructions
1. Verify that your BlackBerry Curve is NOT connected to your
computer.
2. Insert the BlackBerry
computer.
3. Follow the instructions on the screen.
®
User Tools CD into the CD drive on your
Steps?
7
Takes?
5 - 10 minutes
BlackBerry® Curve
™
37

Synchronize Your BlackBerry Curve With Your Computer
Setup Instructions
4. Click BlackBerry Desktop Software to begin installing the
software.
5. Click Install BlackBerry Desktop Software.
6. Choose BlackBerry Internet Service to set up a personal email
account. Only choose BlackBerry
®
Enterprise Server if your company
uses this service.
38
BlackBerry® Curve
™

Setup Instructions
7. When the installation is complete, the BlackBerry® Desktop Software
should automatically open. If it does not, click Start > Programs >
BlackBerry > Desktop Manager from the taskbar.
Note: You should check the configuration of the BlackBerry Desktop Software so that
your computer can connect to your BlackBerry Curve. Click Options and then Connection
Settings and select a USB connection.
BlackBerry® Curve
™
39

Synchronize Data Between Your Device and Your Computer
BlackBerry Desktop Software
1. Connect the smaller end of the
USB cable to your BlackBerry
Curve and connect
the larger end of the USB
cable to the USB port on
your computer.
2. Click the Synchronize icon in the
BlackBerry® Desktop Manager
and set up your confi guration
More Info
To learn more
about synchronizing
data, backing up
or restoring data,
adding applications,
or other functions,
while in the
®
BlackBerry
Software, click Help.
Desktop
options.
Be sure to click on the
Confi guration tab to set your
confi guration settings.
3. When you have finished setting up
the configuration settings, click
Synchronize Now.
40
BlackBerry® Curve
™

Troubleshooting
I cannot connect to a wireless network
Try performing the following actions:
Verify that your SIM card is inserted correctly.
•
•
Verify that you have turned on the connection to the wireless network.
•
If you were traveling and you selected a network manually, your BlackBerry Curve should
remain connected to that network until you select your home network again.
I cannot associate my BlackBerry Curve with an email address
Try performing the following actions:
•
Log in to the email setup web site (att.com/blackberrystart) and add a supported email
address (up to 10) to your BlackBerry Curve using a browser on your computer. If you
have already created a user name and password, use this information to log in. If you
have not created a user name and password, click Create New Account and complete
the instructions on the screen.
•
Verify that the email account you wish to associate with your BlackBerry Curve is POP3
or IMAP account. If you still cannot add the email address, contact your wireless service
provider for more information on supported email accounts.
BlackBerry® Curve
™
41

I do not know which email setup option to choose in the Setup Wizard on
the BlackBerry Curve
• Select the I want to add or create an email address option if the other options do
not apply to you. This option is the most common option for individual users. If you
select this option, an email setup screen opens. You can create a new email address for
your BlackBerry Curve or associate your BlackBerry Curve with an existing supported
email address (up to 10).
• Select the
option if a BlackBerry® Enterprise Server system administrator has provided you with a
password that you can use to activate your BlackBerry Curve over the wireless network.
If you select this option, an Enterprise Activation screen appears. On this screen,
you can type your work email address and the password provided by your system
administrator to activate your BlackBerry Curve.
Select Skip email setup if any of the following situations apply:
A representative from the store where you purchased your BlackBerry Curve has
•
already helped you to set up your email address at att.com/blackberrystart.
You have already visited att.com/blackberrystart and have set up your
•
email account.
You have an existing email account and have access to a BlackBerry Enterprise Server,
•
but your BlackBerry Enterprise Server system administrator has not provided you
with a password that you can use to activate your BlackBerry Curve over the wireless
network. Contact your system administrator for more information about setting up
email for your BlackBerry Curve.
I want to use a work email account with a BlackBerry Enterprise Server
42
BlackBerry® Curve
™

I want to reset my BlackBerry Curve
Remove and reinsert the battery.
BlackBerry Internet Service messages are not being sent to my new
BlackBerry device
If you switch BlackBerry devices, you must update your BlackBerry® Internet Service
account to use the personal information number (PIN) and International Mobile Equipment
Identify (IMEI) for your new BlackBerry device. Open the BlackBerry Setup and select
Personal Email Setup email setup application. On the Login screen, type your user name
and password. Click Log In. Click Change Device. Type the PIN and IMEI for your new
BlackBerry Curve. Click Save.
Note: To find the PIN and IMEI for your new BlackBerry device, from the Home Screen click Settings, Options then Status.
I want to talk to a support representative
For support using live chat with a AT&T Technical Support Representative, go to
www.forums.wireless.att.com/ and click Register.
For more tips and tricks, see the shortcuts section in the BlackBerry Curve
User Guide.
To access the user guide:
On your BlackBerry device, on the Home screen, click Help.
In the BlackBerry Desktop Software, click Help. Click BlackBerry Device Help.
On the BlackBerry User Tools CD, click User Guide.
BlackBerry® Curve
™
43

Tips and Tricks
Keyboard
TO: DO:
Lock the keyboard
Unlock the keyboard Press the
Typing
TO: DO:
Insert a period
Capitalize a letter Hold the letter key or press the
Type alternate character on a key Press the
Insert @ and periods in an email fi eld Press the
Type a symbol
Type an accented letter Hold the letter key and roll the
Turn on number lock Press the
Turn on CAP lock Press the
Turn off number lock or CAP lock Press the
Keyboard Lock icon on the Home screen.
Click
Star (*) key
and then
Press the
is capitalized.
and then the letter key.
and then press the character key.
Press the Symbol key and then click a symbol.
highlight a character. Click the accented letter.
Send
Space key twice. The next letter
ALT key
Space key .
ALT key and the Left Shift key.
ALT key and the Right Shift key.
Shift key.
Shift key
Trackball to
44
44
BlackBerry® Curve
™

Navigating Screen
TO: DO:
Move up to top of screen Press T.
Unlock the keyboard Press
Move down screen Press
B.
Space key.
General Tip
TO: DO:
Reboot Remove the battery.
Attachments
TO: DO:
Search for text in an attachment Press F.
Phone
TO: DO:
Turn speaker phone on/off during a call Hold Speakerphone key.
Voice mail
TO: DO:
Check voice mail Press and hold the 1 key.
BlackBerry® Curve
™
4545

To connect to the wireless network successfully, the
BlackBerry Curve must be powered on, your wireless
service must be active, and you must be in a
coverage area.
a) Check that your BlackBerry Curve is turned on.
b) Your BlackBerry Curve should automatically connect
to the wireless network in your area. If you see “Off”
in the top right hand corner of your screen, the
wireless functionality is turned off and you need to
turn it on.
To turn the wireless network on or off from the
Home screen, use the trackball to scroll to the
Manage Connections icon and click the trackball to
select it. Select the Mobile Network check box.
When your BlackBerry Curve is not connected to the
wireless network you can continue to use features that
don’t require a connection such as typing and saving
draft email messages, managing tasks, or using the
calculator. You will see the error message Radio is Off if
you try to use any of the wireless features.
Tips and Tricks
FPO
46
46
BlackBerry® Curve
™

Accessories
You can buy accessories such as batteries, carrying solutions, headsets, and charging
solutions for your BlackBerry Curve. Visit your local AT&T store for more information.
CAUTION: Use only those accessories approved by Research In Motion (RIM). Using any accessories not approved
by RIM for use with this particular BlackBerry device model might invalidate any approval or warranty applicable to
the device, might result in the non-operation of hte device, and might be dangerous.
BlackBerry® Curve
™
4747

2007 AT&T Knowledge Ventures. All rights reserved. AT&T and the AT&T logo are trademarks of AT&T Knowledge
Ventures.
Research In Motion, the RIM logo, BlackBerry, the BlackBerry logo and SureType are registered with the U.S. Patent and
Trademark Offi ce and may be pending or registered in other countries - these and other marks of Research In Motion
Limited are used under license.
Bluetooth is a trademark of Bluetooth SIG. IBM, Lotus, Domino, and Lotus Notes trademarks of International Business
Machines Corporation. TeleNav® is a registered trademark and TeleNav GPS Navigator™ and TeleNav Track™ are
trademarks of TeleNav, Inc. Intel is a trademark of Intel Corporation. Microsoft, Outlook, and Windows are trademarks
of Microsoft Corporation. All other brands, product names, company names, trademarks, and service marks are the
properties of their respective owners.
The BlackBerry device and/or associated software are protected by copyright, international treaties, and various patents,
including one or more of the following U.S. patents: 6,278,442; 6,271,605; 6,219,694; 6,075,470; 6,073,318; D445,428;
D433,460; D416,256. Other patents are registered or pending in various countries around the world. Visit www.rim.
com/patents for a listing of RIM [as hereinafter defi ned] patents.
This document is provided as is and Research In Motion Limited and its affi liated companies (RIM) and/or AT&T
Knowledge Ventures (“AT&T”) assume no responsibility for any typographical, technical, or other inaccuracies in
this document. In order to protect RIM and/or AT&T proprietary and confi dential information and/or trade secrets,
this document may describe some aspects of RIM and/or AT&T technology in generalized terms. RIM and/or AT&T
reserves the right to periodically change information that is contained in this document; however, RIM and/or
AT&T makes no commitment to provide any such changes, updates, enhancements, or other additions to this
document to you in a timely manner or at all. RIM and/or AT&T MAKES NO REPRESENTATIONS, WARRANTIES,
CONDITIONS, OR COVENANTS, EITHER EXPRESS OR IMPLIED (INCLUDING WITHOUT LIMITATION, ANY EXPRESS
OR IMPLIED WARRANTIES OR CONDITIONS OF FITNESS FOR A PARTICULAR PURPOSE, NON-INFRINGEMENT,
MERCHANTABILITY, DURABILITY, TITLE, OR RELATED TO THE PERFORMANCE OR NON-PERFORMANCE OF ANY
SOFTWARE REFERENCED HEREIN OR PERFORMANCE OF ANY SERVICES REFERENCED HEREIN). IN CONNECTION
WITH YOUR USE OF THIS DOCUMENTATION, NEITHER RIM and/or AT&T NOR THEIR RESPECTIVE AFFILIATED
COMPANIES, DIRECTORS, OFFICERS, EMPLOYEES, OR CONSULTANTS SHALL BE LIABLE TO YOU FOR ANY
DAMAGES WHATSOEVER BE THEY DIRECT, ECONOMIC, COMMERCIAL, SPECIAL, CONSEQUENTIAL, INCIDENTAL,
EXEMPLARY, OR INDIRECT DAMAGES, EVEN IF RIM and/or AT&T HAVE BEEN ADVISED OF THE POSSIBILITY OF
SUCH DAMAGES, INCLUDING WITHOUT LIMITATION, LOSS OF BUSINESS REVENUE OR EARNINGS, LOST DATA,
DAMAGES CAUSED BY DELAYS, LOST PROFITS, OR A FAILURE TO REALIZE EXPECTED SAVINGS.
48
BlackBerry® Curve
™

This document might contain references to third-party sources of information, hardware or software, products or services
and/or third-party web sites (collectively the Third-Party Information). RIM does not control, and is not responsible for,
any Third-Party Information, including, without limitation the content, accuracy, copyright compliance, compatibility,
performance, trustworthiness, legality, decency, links, or any other aspect of Third-Party Information. The inclusion of
Third-Party Information in this document does not imply endorsement by RIM of the Third-Party Information or the
third-party in any way. Installation and use of Third-Party Information with RIM’s products and services may require one or
more patent, trademark, or copyright licenses in order to avoid infringement of the intellectual property rights of others.
Any dealings with Third-Party Information, including, without limitation, compliance with applicable licenses and terms
and conditions, are solely between you and the third-party. You are solely responsible for determining whether such
Third-Party licenses are required and are responsible for acquiring any such licenses relating to Third-Party Information.
To the extent that such intellectual property licenses may be required, RIM expressly recommends that you do not install
or use Third-Party Information until all such applicable licenses have been acquired by you or on your behalf. Your use
of Third-Party Information shall be governed by and subject to you agreeing to the terms of the Third-Party Information
licenses. Any Third-Party Information that is provided with RIM’s products and services is provided as is. RIM makes no
representation, warranty or guarantee whatsoever in relation to the Third-Party Information and RIM assumes no liability
whatsoever in relation to the Third-Party Information even if RIM has been advised of the possibility of such damages or
can anticipate such damages.
Research In Motion Limited
295 Phillip Street
Waterloo, ON N2L 3W8
Canada
Research in Motion UK Limited
200 Bath Road
Slough, Berkshire SL1 3XE
United Kingdom
Published in Canada
BlackBerry® Curve
™
AT&T Mobility, LLC
5565 Glenridge Connector
Atlanta, GA 30342
49

Wireless Connection Status Indicators
You can use the phone, send and receive email, PIN, SMS text, and MMS messages, and
use the browser with a high speed data connection.
You can use the phone, send and receive email, PIN, SMS text, and MMS messages, and
use the browser.
You can use the phone and send and receive SMS text messages.
You can only make emergency calls.
Your BlackBerry Curve’s radio is turned off.
You are not in a wireless coverage area.
Icons and Indicators
Battery Power Level Indicators
Full battery power
Low battery power
Battery charging
50
Push to Talk Indicators
Available
PTT Message
Do Not Disturb
Unavailable
BlackBerry® Curve
™

Home Screen Status Indicators
alarm set roaming
unopened message count missed call count
missed calendar reminder sending data
voice mail receiving data
®
Bluetooth
technology is turned on
Message List Status Indicators
unopened message MMS message
opened message sent message
message includes attachment message is sending
message is high priority message not sent
SMS message
Phone Call Status Indicators
missed call received call
placed call
paired with Bluetooth enabled
device
BlackBerry® Curve
™
51

BlackBerry Curve 8310 Key Functions
.VUF1MBZBOE
1BVTFLFZ
)FBETFUKBDL
64#QPSU
0QFOUIFNFOVJOBO
0QFOUIF1VTIUP5BML
3PMMUPNPWFBSPVOEB
1SFTTUIF"-5LFZBOE
.FOVLFZ
BQQMJDBUJPO
4FOELFZ
0QFOUIFQIPOF
$BMMBIJHIMJHIUFE
QIPOFOVNCFS
1VTIUP5BMLLFZ
BQQMJDBUJPO
5SBDLCBMM
TDSFFO$MJDLQSFTT
UPTFMFDUBOJUFN
"-5LFZ
5ZQFUIFBMUFSOBUF
DIBSBDUFSPOBLFZ
-FGU4IJGULFZ
$BQJUBMJ[FMFUUFST
UIJTLFZUPUVSOPO
/6.MPDL
7PMVNFLFZT
"EKVTUUIFWPMVNF
EVSJOHBDBMM
&TDBQFLFZ
.PWFCBDLBTDSFFO
$MPTFBNFOV
&OE1PXFSLFZ
&OEBDBMM
5VSOPGGUIFEFWJDF
3JHIU$POWFOJFODFLFZ
0QFOUIFDBNFSB
5BLFBQJDUVSF
#BDLTQBDF%FMFUFLFZ
4QFBLFSQIPOFLFZ
5VSOPOPGGUIF
TQFBLFSQIPOFEVSJOH
BDBMM
&OUFSLFZ
3JHIU4IJGULFZ
$BQJUBMJ[FMFUUFST
1SFTTUIF"MULFZBOEUIJT
LFZUPUVSOPO$"1MPDL
4ZNCPMLFZ
0QFOUIFTZNCPMMJTU

Applications*
Take some time to explore the applications that are available on your BlackBerry
Curve. Here are a few applications to get you started.
Click Setup Wizard to learn about typing, set
options to personalize your BlackBerry Curve,
and set up your email address.
Address Book to view your contact list or
Click
add a new contact.
Click
TeleNav to get directions, view maps,
and find nearby businesses.
BlackBerry Setup to access applications
Click
for setting up your BlackBerry Curve, including
Setup Wizard and Personal Email Setup.
Click Applications to access additional
applications, including TeleNav GPS
Navigator.
Click Personal Email Setup to set up one or
more supported email addresses or change
BlackBerry® Internet Service email options.
Click Browser to visit web pages, or view the
browser bookmarks list.
Click MEdia Net to access your favorite content
(weather, news, etc.) and download items like
ringtones and games. See the Quick Start
Guide for more details.
* Additional charges may apply for downloadable content. Your use of third party products and services shall be governed by
and subject to you agreeing to the terms of separate licenses, if any, for those products or services. Any third party products
or services that are provided with RIM’s products and services are provided “as is”. RIM and/or AT&T make no representation,
warranty or guarantee whatsoever in relation to the third party products and services and assume no liability whatsoever
in relation to the third party products and services even if RIM and/or AT&T have been advised of the possibility of such
damages or can anticipate such damages.
Click Phone to view a list of recent calls or make
a phone call.
Click
Calendar to view your calendar or add a
new appointment.
Click Push to Talk to instantly talk to family,
friends and co-workers.
Click
Media to play saved pictures, ring tones,
videos, or songs.
Click
Camera to take, send and save pictures.
Click AT&T Music to get the ultimate mobile
music experience.
Click AT&T Mall to visit a one-stop shop to
personalize and customize your BlackBerry Curve
with ringtones, games, applications, and much more.
Click
Settings to view the main list of BlackBerry
Curve options. You can also access additional
options from the menu in each application.
Click Help to view the user guide for your
BlackBerry Curve. The user guide provides
procedures to help you use your BlackBerry Curve.

Find More Information
• To view the User Guide on your BlackBerry Curve , click Help from the Home
Screen or when in an application, press the Menu key and click “Help”.
• To view the User Guide, Safety and Product Information booklet or
BlackBerry End User/Software License agreement and warranty for your
BlackBerry Curve, insert the BlackBerry® User Tools CD that came with your
BlackBerry device in the CD drive on your computer.
• To try a free online tutorial visit att.com/WirelessTutorials.
• To find information about your wireless network or your wireless service
plan visit att.com.
BlackBerry® Curve™ RBN41GW MAT-15803-001 PRINTSPEC-024 05-2007
 Loading...