


Earn BISSELL Rewards!
Register your product today!
See details on back page

 ®
®
USER'S GUIDE
61C5-G
2Thank You
3Safety Instructions
4Product View
5-7 Assembly
7-9 Operations
10-15 Maintenance and Care
16Troubleshooting
17Replacement Parts
18Accessories
19Warranty
20Product Registration
20 Consumer Care

Thanks for buying a BISSELL Total Floors® Vacuum
We’re glad you purchased a BISSELL Total Floors® vacuum. Everything we know about floor care went into the design and construction of this complete, high-tech home cleaning system.
Your BISSELL Total Floors® vacuum is well made, and we back it with a limited four-year warranty. We also stand behind it with a knowledgeable, dedicated Consumer Care department, so, should you ever have a problem, you’ll receive fast, considerate assistance.
My great-grandfather invented the floor sweeper in 1876. Today, BISSELL is a global leader in the design, manufacture, and service of high quality homecare products like your Total Floors® vacuum.
Thanks again, from all of us at BISSELL.
Mark J. Bissell
Chairman & CEO
2 w w w. b i s s e l l . c o m |
8 0 0 . 2 3 7 . 7 6 9 1 |

IMPORTANT SAFETY INSTRUCTIONS
When using an electrical appliance, basic precautions should be observed, including the following:
Read all instructions before using your upright VACUUM.
 WARNING:
To reduce the risk of fire, electric shock, or injury:
■Always connect to a polarized outlet (left slot is wider than right). Unplug from outlet when not in use and before conducting maintenance.
■Do not modify the polarized plug to fit a non-polarized outlet or extension cord.
■Do not leave vacuum cleaner unattended when it is plugged in.
■Unplug from outlet when not in use and before servicing.
■Unplug before attaching the TurboBrush Tool.
■Do not use outdoors or on wet surfaces.
■Do not allow children to operate vacuum cleaner or use as a toy.
■Close attention is necessary when used by or near children.
■Do not use for any purpose other than described in this user’s guide.
■Use only manufacturer’s recommended attachments.
■Do not use with damaged cord or plug.
■If appliance is not working as it should, has been dropped, damaged, left outdoors, or dropped into water, have it repaired at an authorized service center.
■Do not pull or carry by cord, use cord as a handle, close a door on cord, or pull cord around sharp edges or corners. Do not run appliance over cord. Keep cord away from heated surfaces.
■Do not unplug by pulling on cord. To unplug, grasp the plug, not the cord.
■Do not handle vacuum cleaner or plug with wet hands.
■Do not put any object into openings. Do not use with any opening blocked; keep openings free of dust, lint, hair, and anything that may reduce air flow.
■Keep hair, loose clothing, fingers, and all parts of body away from openings and moving parts.
■Turn off all controls before plugging or unplugging vacuum cleaner.
■Use extra care when cleaning stairs.
■Do not pick up flammable materials (lighter fluid, gasoline, kerosene, etc.) or use in the presence of explosive liquids or vapors.
■Do not pick up toxic material (chlorine bleach, ammonia, drain cleaner, etc.).
■Do not use vacuum cleaner in an enclosed space filled with vapors given off by oil base paint, paint thinner, some moth proofing substances, flammable dust, or other explosive or toxic vapors.
■Do not pick up hard or sharp objects such as glass, nails, screws, coins, etc.
■Do not pick up anything that is burning or smoking, such as cigarettes, matches, or hot ashes.
■Do not use without filters in place.
■Use only on dry, indoor surfaces.
■Keep appliance on a level surface.
■Do not carry the vacuum cleaner while it is running.
SAVE THESE INSTRUCTIONS.
This model is for household use only.
Commercial use of this unit voids the manufacturer’s warranty.
THIS APPLIANCE HAS A POLARIZED PLUG.
To reduce the risk of electric shock, this appliance has a polarized plug (one blade is wider than the other). This plug will fit in a polarized outlet only one way. If the plug does not fit fully in the outlet, reverse the plug. If it still does not fit, contact a qualified electrician to install a proper outlet. Do not change the plug in any way.
3
w w w. b i s s e l l . c o m |
8 0 0 . 2 3 7 . 7 6 9 1 |

Product view
Upper
Handle
Pet TurboEraser®
Tool
Power
Cord
Easy Empty™
Dirt Container
Pre-Motor
Filter
Height
Adjustment
Knob
Edge
Cleaning
Port
Pet Hair Lifter
Suction Power
Indicator
Carry
Handle
Power Switch
Stretch Hose 
Post-Motor
Filter*
Specialty
Tool**
Lock ’n
Seal™ Lever
Brush On/ |
Recline |
Off Pedal |
Pedal |
Cord Clip
Combination
Dusting
Brush/
Upholstery
Tool
Quick
Release®
Cord Wrap
Extension
Handle
Crevice
Tool
Hose
Wand Base
Foot
Hose
 WARNING:
Do not plug in your vacuum cleaner until you are familiar with all instructions and operating procedures.
4
*Select models include a Febreze® post-motor filter. For ordering information, turn to page 17.
**Select models may include Pet Hair Fabric Tool or Long Reach Dusting Tool
Febreze® and related trademarks are owned by The Procter & Gamble Company, Cincinnati, Ohio and used under license by BISSELL, Inc.
w w w. b i s s e l l . c o m |
8 0 0 . 2 3 7 . 7 6 9 1 |
Assembly
The only tool you’ll need to assemble your vacuum cleaner is a Phillips screwdriver.
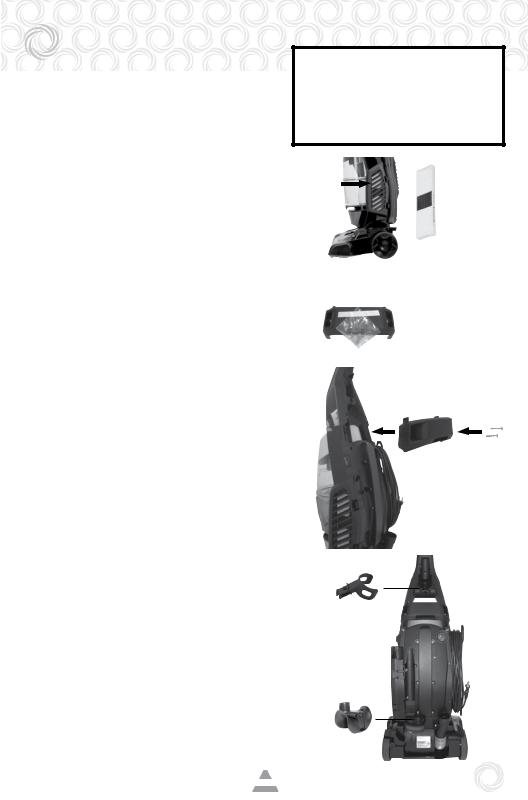
Locate and install filters
Important: Before using your vacuum, make sure that all filters (pre-motor and post-motor) are in place. Do not operate your vacuum without these filters. Your Total Floors vacuum comes preloaded with a post-motor foam filter. If you wish to use the post-motor Febreze® filter instead, locate the Febreze® filter in the vacuum carton and remove the filter from its packaging. Next, remove the post-motor foam filter from the filter door and insert the Febreze® filter in its place as is shown to the right (A). Do not use your vacuum without one of these filters in place. Do not use both filters together.
Attach handle to vacuum
1.Locate the carry handle. Remove the screw packet taped to the carry handle. There are three screws in this screw packet. Two screws are used to attach the upper handle and carrying handle to the vacuum base. One screw is used to attach the hose guide/tool caddy.
2.Stand the vacuum upright. From the back of the vacuum body, slide the base of the upper handle firmly into the grooves at the top of the vacuum body. Continue to push so that there are no gaps and the front of the handle is flush with the vacuum body.
3.With the upper handle firmly placed on the vacuum body, guide the carrying handle into place onto the back of the upper handle and insert two of the screws into the existing holes. (Reference the rear-facing product view on page 4 to see how the carry handle should look). Tighten screws securely with
a Phillips screwdriver to anchor the carry handle to the upper handle and the upper handle to the vacuum body.
Attach the vacuum hose & tools
1.Attach the 3 hose/tool storage pieces to the back of the unit.
a.Attach the tool storage clip to the back of the handle by snapping the piece into the unit as shown. Push piece straight in until it snaps into place.
b.Attach the hose guide clip to the left side
of the back of the vacuum. Insert tab at a 45 degree angle and turn clockwise so it snaps into place. 

 Warning:
Plastic film can be dangerous. To avoid danger or suffocation, keep away from babies
and children.
A.
1.
3.
a.
b. 

c.
5
w w w. b i s s e l l . c o m |
8 0 0 . 2 3 7 . 7 6 9 1 |
Assembly
Attach the vacuum hose & tools continued
c.The hose guide/tool caddy should be attached at the bottom of the back of the vacuum. Slide into place and insert screw into the existing hole. Tighten securely with a Phillips screwdriver.
2.Line up the tabs of the Twist n’ Snap hose with the corresponding notches and turn clockwise. Slide the end of the hose into the hose wand base. Hose wraps on back of unit as shown on page 4.
3.Place the Pet TurboEraser Tool into its holder from the front of the vacuum.
Power cord
To store the power cord, wrap cord around the upper and lower cord wrap on the side of the vacuum. To release the power cord, rotate the upper cord wrap down and gently pull off cord.
Power switch
The power switch is located just below the carrying handle on the side of the vacuum. Push the rocker switch “ON” (I) to vacuum, and “OFF” (O) when cleaning is complete.
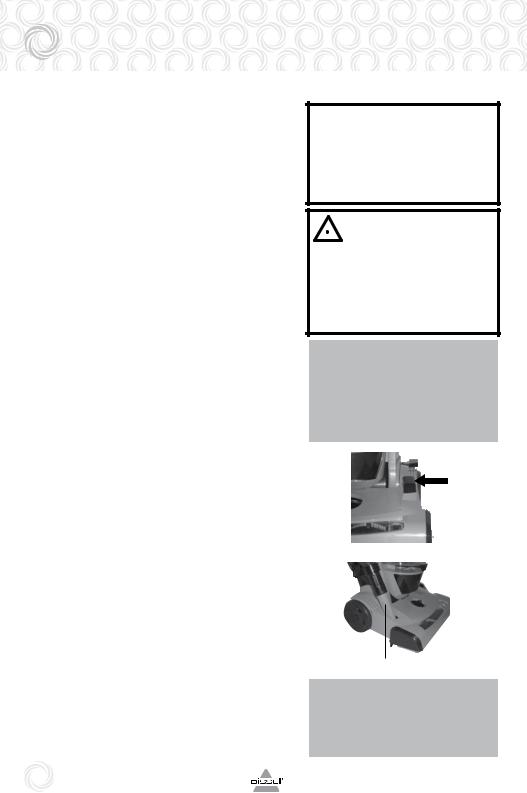
Brush Roll Power
The rotating brush ON/OFF pedal is located on the foot of the vacuum. You can use your foot to engage or disengage this pedal (A). When the brush roll pedal has been engaged, the brush will start rotating. The brush roll should be turned on for most carpeted floors. To turn the brush roll off, disengage the pedal by pressing on it with your foot. We recommend turning off the brush roll for bare floor cleaning to prevent scatter or for other delicate surfaces.
Edge Suction
To make edge cleaning more convenient, remove the hose from the hose wand base and attach the crevice tool. Insert the crevice tool into the port on the foot of the vacuum (B). Suction is now diverted to the front corner of the vacuum and you can clean along edges and into corners. It is recommended you turn off the brush roll when using this feature.
6 w w w. b i s s e l l . c o m
NOTICE:
The brush roll continues to rotate while using your vacuum for above floor cleaning. To prevent carpet damage, turn the brush roll off and do not lean on vacuum or tilt forward.
 CAUTION:
Before using your vacuum, make sure that the dirt container is in the locked position and that all filters (pre-motor and post-motor) are in place. Do not operate your vacuum without these filters.
Tip:
Your vacuum features a quickrelease cord wrap. To remove the power cord quickly and easily, rotate the upper cord wrap towards the floor, and slip the cord off.
A
(B)
Tip:
Do not use extension wand when using the Edge Suction Feature.
8 0 0 . 2 3 7 . 7 6 9 1
 Loading...