

CROSSWAVE® CORDLESS MAX
2596 SERIES
Go online for a comprehensive walkthrough
of your new purchase!
This guide features everything you need to get ready for first use,
including setting up, using and maintaining your machine, but join
us online for a comprehensive walkthrough. Our online support
includes tips and troubleshooting, videos, product registration,
parts and more. Go to support.BISSELL.com.

IMPORTANT SAFETY INSTRUCTIONS
READ ALL INSTRUCTIONS BEFORE USING YOUR APPLIANCE.
When using an electrical appliance, basic precautions should be observed, including the following:
TO REDUCE THE RISK OF FIRE, ELECTRIC
WARNING
SHOCK OR INJURY:
• Use indoors only.
• Do not allow to be used as a toy. Close attention is
necessary when used by or near children.
• Do not use for any purpose other than described
in this user guide. Use only manufacturer’s
recommended attachments.
• Do not charge with damaged cord or plug.
• Do not unplug by pulling on 3-in-1 Docking Station
cord. To unplug, grasp the charger, not the cord.
• Do not handle 3-in-1 Docking Station, charging plug
or appliance with wet hands.
• Do not put any object into openings. Do not use with
any opening blocked; keep openings free of dust,
lint, hair, and anything that may reduce air flow.
• Keep hair, loose clothing, fingers, and all parts of
body away from openings a nd moving parts of the
appliance and its accessories.
• Use extra care when cleaning on stairs.
• Do not use to pick up flam mable or combustible
materials (lighter fluid, gasoline, kerosene, etc.) or
use in areas where they may be present.
• Do not use appliance in an enclosed space filled with
vapors given off by oil- based paint, paint thinner,
some moth-proofing substances, flammable dust, or
other explosive or toxic vapors.
• Do not use to pick up toxic material (chlorine bleach,
ammonia , drain cleaner, etc.).
• Do not pick up anything that is burning or smoking,
such as cigarettes, matches or hot ashes.
• Do not pick up hard or sharp objects such as glass,
nails, screws, coins , etc.
• Use only BISSELL® cleaning products intend ed for use
with this appliance to prevent internal component
damage. See the Cleaning Formulas section of this
guide.
• Do not carry the ap pliance while in use.
• Do not immerse. Us e only on surfaces moistened by
the cleaning process.
• Plastic film can be dangerous. To avoid danger of
suffocation, keep away from babie s and children.
• Always connect to a proper electrical socket.
• Keep cord away from heated surfaces.
• Do not use without filters in place.
• Do not charge the unit outdoors.
• Do not incinerate the appliance even if it is severely
damaged. The batteries can explode in a fire.
• Use only with charger SIL, Model SSC-420085US.
• Recharge appliance only with th e charger specified
by the manufacturer. A charger that is suitable for
one type of battery pack may create a risk of injury
and fire when used with another battery pack.
• When battery pack is not in use, keep it away from
other metal objects, like paper clips, coins, keys,
nails, screws or other small metal objects, that can
make a connection from o ne terminal to another.
Shorting the battery terminals together may cause
burns or a fire.
• Do not immerse in water or liquid .
• Do not use a battery p ack or appliance that is
damaged or modified. Damaged or modified
batteries may exhibit unpredictable behavior
resulting in fire, explosion or risk of injury.
• Do not expose a battery pack or a ppliance to
fire or exces sive temperature. Exp osure to fire
or temperature above 130 °C / 265°F may cause
explosion.
• Follow all charging instructions and do not charge
the battery pack or appliance outside of the
temperature range 4-40°C / 40-104°F. Charging
improperly or at temperatures outside this range
may damage the batter y and increase the risk of fire.
• Prevent unintentional starting. Ensure the switch
is in the OFF-position b efore connecting to battery
pack, picking up or carrying the appliance. Carrying
the appliance with your finger on the switch or
energizing applian ce that have the switch on invites
accidents.
• Under abusive conditions, liquid may be ejected from
the battery; avoid contact. If contact accidentally
occurs, flush with water. If liquid contacts eyes,
additionally seek medical help. Liquid ejected from
the battery may cause irritation or burns.
• If appliance is not working as it sho uld, has been
dropped, damaged, left outdoors, or dropped into
water, return it to a service center.
• Have servicing per formed by a qualified repair
person using only identical replacement parts.
This will ensure that the s afety of the product is
maintained.
• Do not turn ON your appliance on until you are
familiar with all instructions and operating
procedures.
• Risk of injury from moving parts. Brush may start
unexpec tedly. Turn OFF before cleaning or servicing.
• If appliance is not working as it sho uld, has been
dropped, damaged, left outdoors, or dropped into
water, return it to a service center.
• Have servicing per formed by a qualified repair
person using only identical replacement parts.
This will ensure that the s afety of the product is
maintained.
• Unplug charger from electrical socket when not in
use, before cleaning, maintaining or servicing the
appliance.
• Liquid must not be directed towards equipment
containing electrical components.
• Use only the type and amount of liquids specified
under the o perations section of this guide.
• Use only on surface moistened by cleaning process.
• Do not pull or carry charger by cord, use cord as a
handle, close door on cord, or pull cord around sharp
edges or corners.
• Battery pack an d charger base output terminals are
not to be shor t-circuited.
• Do not modify or at tempt to repair the appliance
except as indicated in the instructions for use an d
care.
• The battery must be removed from the applia nce
before it is scrapped.
IMPORTANT
INFORMATION
• Keep appliance on a level surface.
• If your appliance has a motorized Brush Roll, do not
leave machine running in the same spot without the
handle fully upright.
• Do not store where freezing may occur.
• This product contains a wireless device. Refer to
website for regulatory information.
• The software included in this product contains op en
source sof tware. The open source licenses associate d
with this product may be obtained by visiting www.
BISSELL.com/opensource.
SAVE THESE
INSTRUCTIONS
This mod el is for househ old use only. Comme rcial use of this un it voids the
manufacturer’s warranty.
FCC/IC NOTICE: This equ ipment has bee n tested and found to c omply
with the li mits for a Class B di gital device, pu rsuant to part 15 o f the
FCC Rules. These limits are designed to provide reasonable protection
against harmful interference in a residential installation. This equipment gen erates, uses a nd can radiate rad io frequenc y energy and, if
not inst alled and used in a ccordance with t he instructio ns, may cause
harmfu l interference to r adio communic ations. However, th ere is no
guaran tee that interfe rence will not occu r in a particula r installation . If
this equi pment does ca use harmful inte rference to rad io or television
receptio n, which can be de termined by turn ing the equipm ent off and
on, the us er is encourage d to try to correct th e interferenc e by one or
more of the f ollowing measu res: (1) Reori ent or relocate th e receiving
antenna. (2) Increase the separation between the equipment and
receiver. ( 3) Connect th e equipment into a n outlet on a circui t different
from that to w hich the receiver i s connected. (4) Co nsult the deale r
or an expe rienced radio/ TV technici an for help. This d evice complies
with Par t 15 of FCC Rules and In dustry Cana da license-exe mpt RSS
standa rd(s). Operation is s ubject to the fol lowing two condit ions: (1)
this devic e may not cause har mful interfer ence, and (2) this d evice
must acce pt any interfere nce, including i nterference th at may cause
undesi red operation o f the device.
Le prése nt appareil est c onforme aux la pa rtie 15 des régle s de la FCC
et CNR d’I ndustrie Can ada applicab les aux appare ils radio exempt s de
licence. L’explo itation est au torisée aux deux c onditions suiv antes :
(1) l’ap pareil ne doit p as produire de bro uillage, et (2) l ’utilisateur d e
l’appa reil doit accepte r tout brouillag e radioélect rique subi, mê me si le
brouillage est susceptible d’en compromettre le fonctionnement.
Privac y of communicati ons may not be ensu red when using th is device.
WARNING: Ch anges or modi fications to this e quipment not e xpressly
approve d by the party res ponsible for com pliance could vo id the user’s
authority to operate the equipment.
CAUTION: Th e Digital Displ ay houses the tra nsmitter and m ust be kept
at a separ ation distanc e of at least 20 cm from a ll persons.
ATTENTION : L’écran à af fichage numér ique contient l ’émette ur. Gardezle à une dis tance d’un mini mum de 20 cm de toute pe rsonne.
Warranty
3-Year limited warranty, may vary by state. Visit support.BISSELL.com or call 1-844-383-2630
for complete warranty information.
2 BISSELL.com
We’re so happy you chose the CrossWave® Cordless Max. We put this
guide together to help you set up, use and maintain your cordless
hard surface cleaner. We’ve also included some tips we think will
come in handy when you first start using it, so let’s get started!
For a complete guide to your purchase, go to support.BISSELL.com.
Safety Instructions ......................................................... 2
Product View ..................................................................... 4
Connecting to the BISSELL Connect App.... 5
Assembly .............................................................................. 5
Cleaning Formulas .........................................................6
Charging the Battery....................................................6
Filling the Water Tank .................................................. 7
Cleaning Your Floors ....................................................8
Emptying the Dirty Water Tank ............................9
Using the 3-in-1 Docking Station ........................10
Storing Your Machine ................................................. 10
Disposing of the Batteries ........................................ 11
Troubleshooting ...............................................................11
BISSELL.com 3
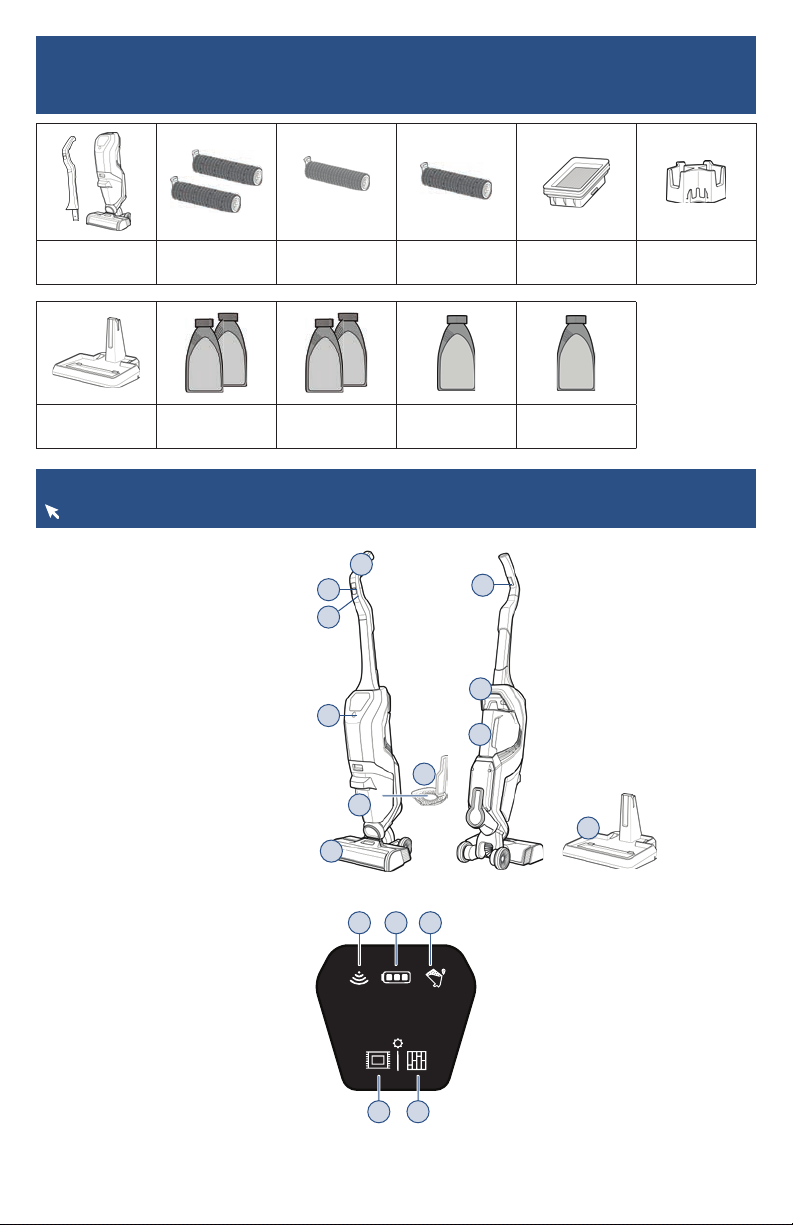
What’s in the Box?
Standard accessories may vary by model.To identify what should be included with your purchase,
please refer to the “Carton Contents” list located on the carton top flap.
Handle & Body (2) Multi-Surface
3-in-1 Docking
Station
Brush Rolls
(2) Hard Floor
Formula
Wood Floor
Brush Roll
(2) Multi-Surface
Formula
Pet Multi-Surface
Brush Roll
Wood Floor
Formula
Pet Multi-Surface
Formula
Product View
For additional support videos and information, visit support.BISSELL.com.
1
Product View
1. Upper Handle
2. Mode Button
3. Power Button
4. Clean Cycle Button
5. Dirty Water Tank
6. Strainer
7. Brush Roll Window
8. Solution Spray Trigger
9. Carry Handle
10. Clean Water Tank
11. 3-in-1 Docking Station
2
3
4
5
7
8
9
10
6
Filter Brush Roll
Dr ying Tray
11
Digital Display
1. Wi-Fi Connected
2. Battery Status
3. Dirty Water Tank Full
4. Area Rug Mode
5. Hard Floor Mode
4 BISSELL.com
1 2 3
54

Assembly
Go to support.BISSELL.com for assembly videos.
1. Insert handle into body
of machine until you hear a
“click”.
2. Slide the Brush Roll Drying
Tray into place on the side of
the 3-in-1 Docking Station.
Connecting to the BISSELL Connect App
For more help, visit support.BISSELL.com.
Downloading the BISSELL Connect App lets you track filter, brush roll and formula life, access usage
tips, cleaning history, how-to videos, and set up automatic reordering.
1. In the App or Google
Play Store search “BISSELL
Connect” and download.
2. Once downloaded, open the
app to sign in or create a new
login.
3. Make sure you are near
a Wi-Fi router and your
machine is charged or on
the 3-in-1 Docking Station
prior to pairing.
4. Select your product. 5. The QR code needed for
setup can be found behind the
Clean Water Tank.
6. Once you find and scan
the QR code, follow the
instructions in the app to pair.
BISSELL.com 5

Cleaning Formulas
You can set up automatic reordering for formulas through the BISSELL Connect App.
Keep plenty of CrossWave® formulas on hand so you can clean whenever it fits your
schedule.
Note: Always use CrossWave® formulas in your machine. Other formulas may harm the
machine and void the warranty. Do not use Hard Floor Formula on area rugs or carpet.
Multi-Surface Formula
Great for cleaning all
sealed floors and area
rugs.
Wood Floor Formula
Restores your wood
floors’ natural shine.
Area Rug Formula
Removes stuck-on and
embedded dirt from
area rugs.
Multi-Surface Pet with
Febreze Formula
Removes pet odors to
clean and refresh.
Hard Floor Formula
Removes tough sticky
messes, grime, odors &
allergens.
Charging the Battery
Download the BISSELL Connect App to watch helpful how-to videos.
Make sure machine is fully charged before first use. To check the battery status, remove the machine
from the dock and turn it ON by pressing the Power Button. You’ll know the battery is fully charged
when all three white status lights are illuminated.
1. Place your CrossWave®
Cordless Max onto the 3-in-1
Docking Station to charge.
2. Plug the adapter into
a suitable wall outlet. The
Battery Life Indicator will
3. For maximum run time,
charge the machine for 4
hours.
illuminate when charging.
WARNING To reduce the risk of fi re and electric shock due to internal component damage, use only BISSELL
cleaning formula intended for use with the hard fl oor device.
6 BISSELL.com

Filling the Clean Water Tank
Use the BISSELL Connect App to watch additional how-to videos.
1. The Clean Water Tank is
located on the back of the
machine. To remove, use the
finger groove at the top of the
tank to grab and pivot the tank
backwards.
4. The Clean Water Tank has a Large Area volume and a Small
Area volume. Pick one of the measuring volumes that best suits
the space that you would like to clean.
The Large Area fill lines are for areas up to 700 sq ft.
The Small Area fill lines are for areas under 350 sq ft.
Use warm (140°F/60°C max) tap water and add the appropriate
BISSELL formula. Tap water with hardness greater than 35 ppm
is recommended for use in machine to ensure the Dirty Water
Tank full detection sensor works properly.
2. Unscrew the cap from the
bottom of the Clean Water
Tank.
Large
Area
Small
Area
3. Choose the right BISSELL®
formula from the ‘Cleaning
Formulas’ section on page 6.
5. Screw the cap back on the
Clean Water Tank. On the
back of the machine, align the
bottom of the Clean Water
Tank with the grooves and
pivot the tank until it “clicks”
into place.
BISSELL.com 7

Cleaning Your Floors
Go to support.BISSELL.com for how-to videos and tips for cleaning stuck-on messes,
excessively dirty or muddy floors, and more!
Mode
Power
1. To clean hard floors, turn
machine ON by pressing the
Power Button. Press the Mode
Button to switch between
the Hard Floor and Area Rug
Modes.
Area Rug Mode dispenses
twice as much solution as
Hard Floor Mode. Before
cleaning area rugs, check the
manufacturer’s tag and test an
inconspicuous spot on the rug
for colorfastness. Don’t use on
silk or delicate rugs.
4. To clean, hold the Solution
Spray Trigger to apply solution
on forward and backward
passes.
2. Recline the machine to start
the Brush Roll spinning. Stand
the machine upright to stop
the Brush Roll spinning.
5. To dry floors faster, release
the trigger and make a second
pass without dispensing
solution.
3. Before each use, hold the
Solution Spray Trigger for 10
seconds to prime the system
with cleaning solution.
LED lights illuminate when
holding the trigger. Bubbles
will appear in the Brush Roll
window when the solution is
flowing.
6. Turn OFF the machine by
pressing the Power Button (
).
ATTENTION Do not overwet carpet. Be careful not to run over loose objects or edges of area rugs. Stalling the
brush may result in premature belt failure.
8 BISSELL.com

Emptying the Dirty Water Tank
Go to support.BISSELL.com for a full list of how-to videos.
When the Dirty Water Tank is full, your machine will turn OFF, beep and the Dirty Water Tank Full
icon will blink orange on the Digital Display.
1. To remove the Dirty Water
Tank, press the button on top
of the tank, grab the front
handle and pull the tank out.
4. Pour the dirty water into the
sink and rinse the Dirty Water
Tank.
2. Remove the top of the Dirty
Water Tank by grasping the
recessed areas on each side of
the filter and pulling up.
5. Remove the filter from the
top of the Dirty Water Tank by
pulling it up.
3. Separate the hair and
debris from the dirty water by
grasping the strainer tab and
pulling up. Throw the debris
into the trash.
6. Hand wash the filter and
screen with warm water and
mild detergent.
Rinse the bottom of the Dirty
Water Tank cover.
7. Leave the parts out to dry
before reassembling.
8. Once all parts are dry,
reassemble the filter and the
Dirty Water Tank cover.
9. Angle the Dirty Water tank
back into the body of the
machine. Insert the bottom of
the tank first, then pivot the
top toward the machine until it
“clicks” into place.
WARNING To reduce the risk of electrical shock, turn Power Button OFF before performing maintenance or
troubleshooting checks.
BISSELL.com 9

Using the 3-in-1 Docking Station
Open the BISSELL Connect App to watch a full walkthrough video on the dock.
Charging starts once the machine is placed onto the plugged-in dock. Charging stops once the Clean
Out Cycle runs, then resumes once the cycle completes.
1. Place the machine on the
3-in-1 Docking Station. Ensure
there is enough solution in the
Clean Water tank to run the
Clean Out Cycle. The level of
the solution should reach the
Clean Out Cycle line. If the
level of solution does not reach
the line, then fill with water to
that line.
4. Remove the machine from
the dock and wipe out the tray.
Do NOT rinse directly under
faucet. This keeps water out of
the charging plug.
2. Push the Clean Out Cycle
Button to start the 40-second
cycle. After the cycle is
complete, empty the Dirty
Water Tank. See page 9 for
detailed instructions.
5. Once the Brush Roll is dry,
place the end of the roll into
the right side of the foot of the
machine. Press the tab of the
Brush Roll down to lock into
place.
3. Remove the Brush Roll so
it can dry. Grab the front of
the Brush Roll window and
pull up to remove. Pull up on
the Brush Roll tab to remove.
Put the Brush Roll in the
drying tray. The Brush Roll and
window can be hand washed.
6. Replace the Brush Roll
Window by lining up the
window tabs with the edges
of the foot. Then, press the
window back into place until
you hear a “click”.
Storing Your Machine
Download the BISSELL Connect App for more useful tips on storing and maintaining
CrossWave Cordless Max.
Store CrossWave® Cordless Max in a protected, dry area. Since this product uses water, it must not
be stored where there is danger of freezing. Freezing will damage internal components and may void
the warranty.
WARNING To reduce the risk of fire, electric shock or injury, turn power OFF and disconnect plug from
electrical outlet before performing maintenance or troubleshooting on the dock.
NOTICE To reduce the risk of a leaking condition, do not store machine where freezing may occur. Damage to internal
components may result.
10 BISSELL.com

Disposing of the Battery
Go to support.BISSELL.com for resources on battery disposal.
Before disposing the battery, make sure:
• The machine is disconnected from the 3-in-1 Docking Station.
• The Clean and Dirty Water Tanks are empty or removed from the machine.
• A Phillips-head screwdriver, electrical tape and rubber handled wire cutters are available for
disassembly.
1. With a Phillips-head
screwdriver, remove the 4
screws on the back of the
machine. Lift off the back
cover.
2. Cut the yellow positive
(+) battery wire with wire
cutters. Wrap the end of the
cut wire with electrical tape.
Individually cut and wrap the
remaining battery wires.
3. Using a Phillips-head
screwdriver, remove the 4
screws located on the sides of
the battery pack and remove it
from the back cover.
Troubleshooting
For troubleshooting videos visit support.BISSELL.com.
This guide features everything you need to get ready for first use, including setting up, using and
maintaining your machine, but join us online for a comprehensive walkthrough. Our online support
includes tips and troubleshooting, videos, product registration, parts and more.
NOTICE Disconnecting the battery will destroy the appliance and invalidate the warranty.
WARNING This product contains lithium-ion rechargeable batteries. According to Federal
and State regulations, removal and proper disposal of lithium-ion batteries is required. For removal of the
batteries in your appliance, see instructions on this page. For specific disposal instructions of batteries, please
contact the RBRC (Rechargeable Battery Recycling Corporation) at 1-800-822-8837 or visit www.Call2Recycle.org.
BISSELL.com 11

We’re Waggin’ Our Tails!
Thanks to your purchase, BISSELL Pet Foundation® can help save
more pets. Go to www.BISSELL.com/savepets to learn more and
activate your product donation.
But wait, there’s more!
Join us online for a comprehensive walkthrough of
your new product, including troubleshooting, product
registration, parts and more.
Go to support.BISSELL.com or the BISSELL Connect App.
VIDEOSINFOREGISTER PAR TS SUPPORT
©2019 BISSE LL Inc. All right s reserved.
Printed in C hina. Part Nu mber 162-1922 08/ 19
Visit our website at: www.BISSELL.com
 Loading...