

Page 1
Biotechnology Explorer
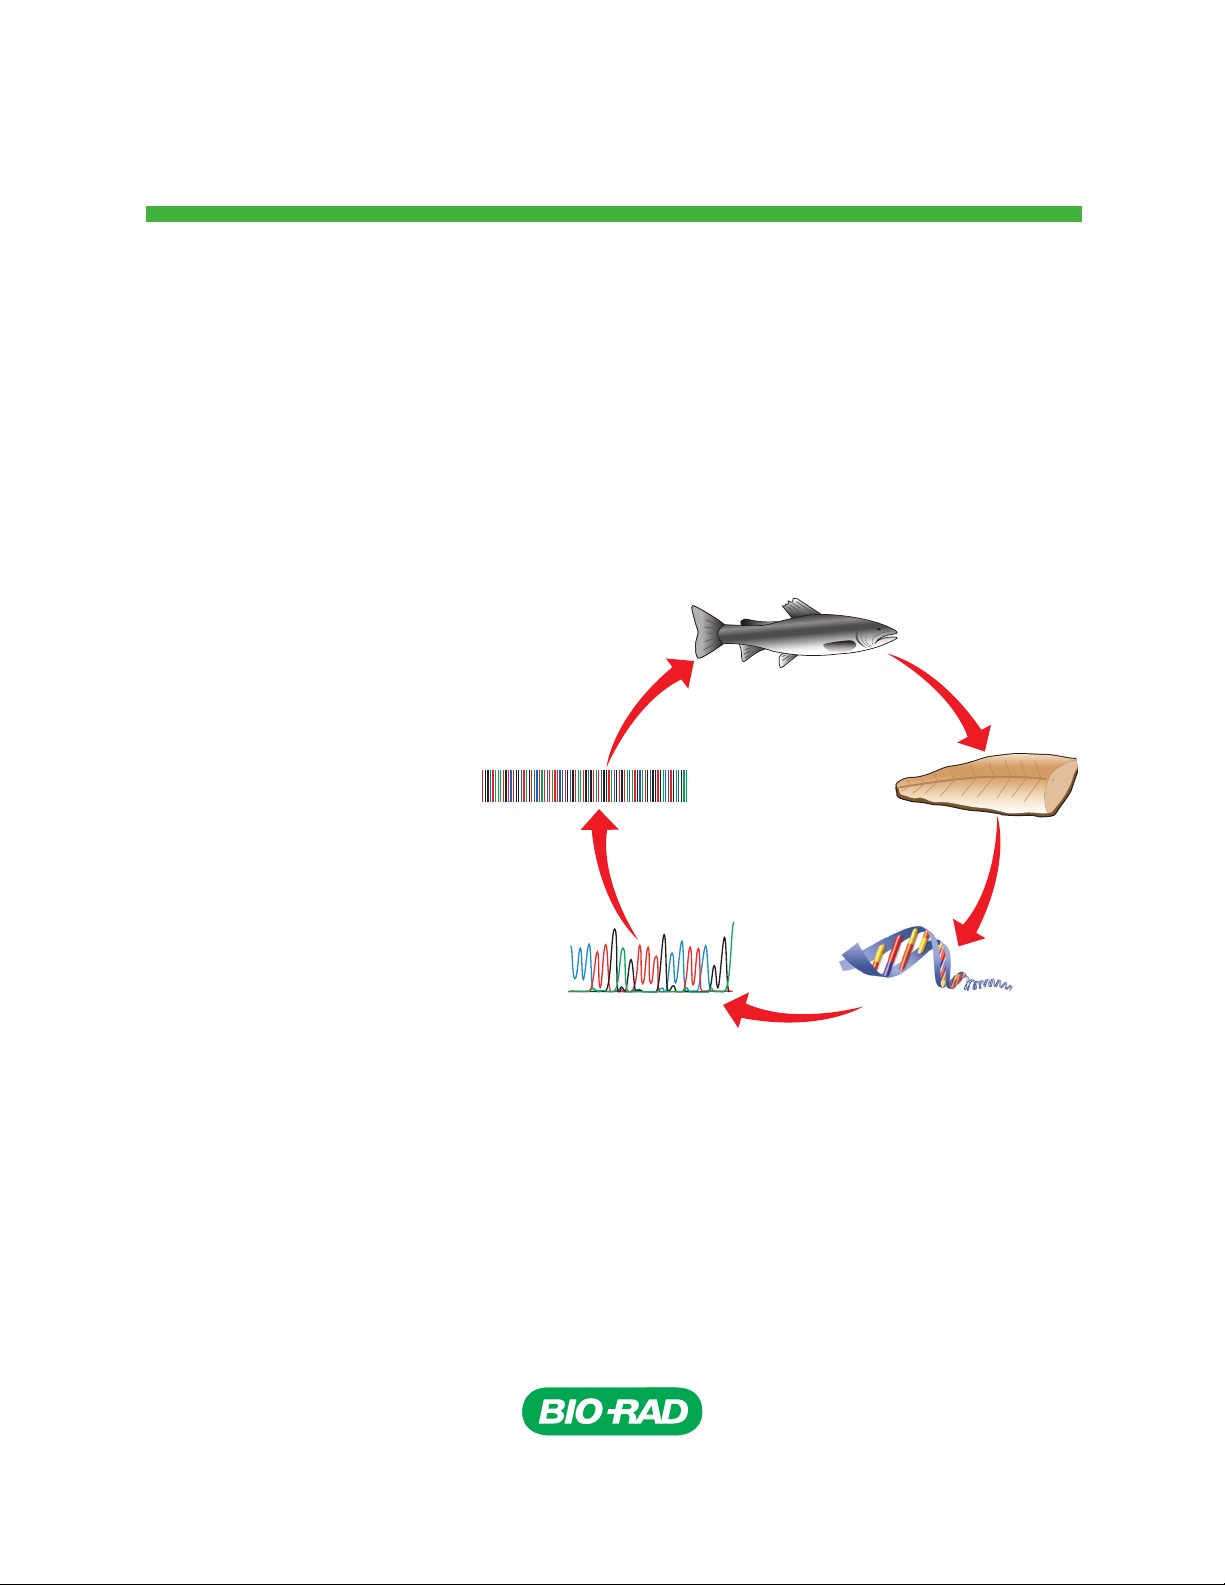
Fish DNA Barcoding Kit
Quick Guide
explorer.bio-rad.com
Catalog #166-5100EDU
Duplication of any part of this
document is permitted for
classroom use only.
™
Please visit explorer.bio-rad.com
to access our selection of language
translations for Biotechnology
Explorer kit curricula.
Page 2

Page 3
Quick Guide
Lesson 1: DNA Extraction
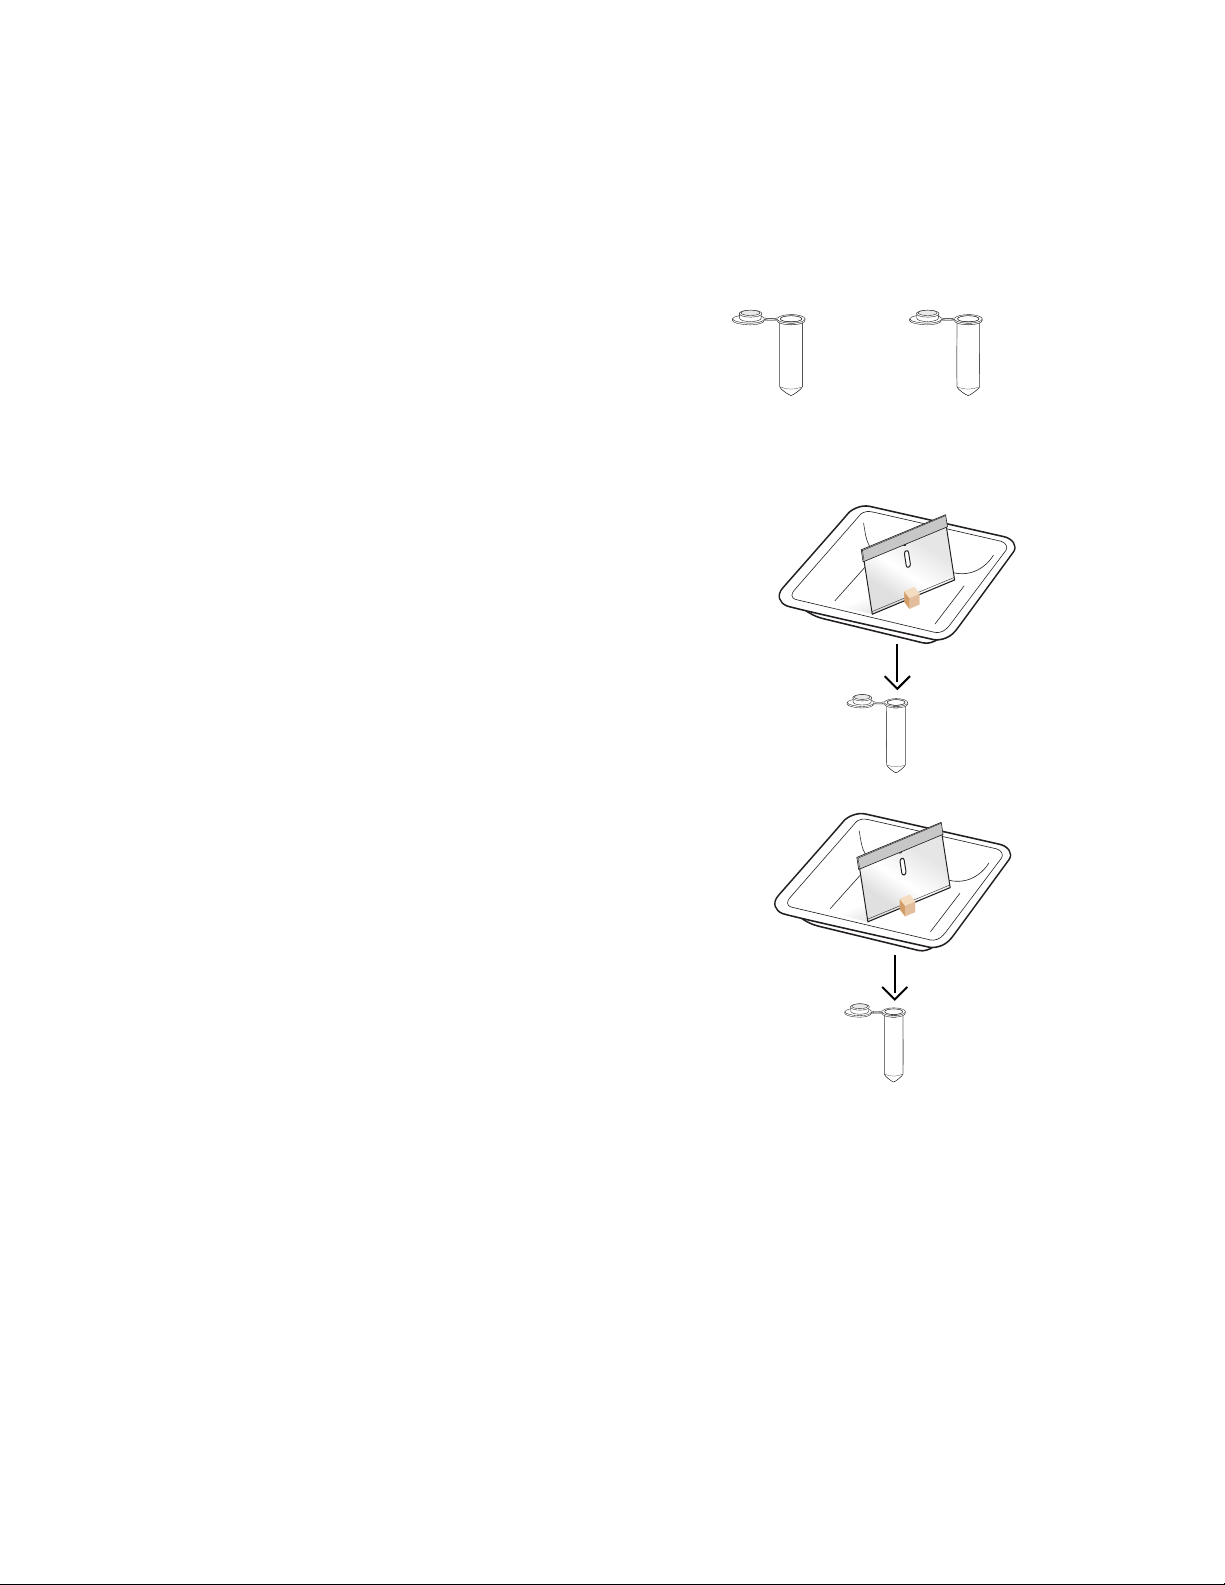
Preparing Fish Samples
1. Label one capped 2 ml microcentrifuge tube for
each of your fish samples (that is, “1” for fish
sample 1, “2” for fish sample 2, etc.). Also label
with your initials.
Fish 1__________________
Fish 2__________________
2. Cut a piece of fish muscle up to 100 mg in
mass, approximately the size of a pencil eraserhead, from your first fish sample. Place the piece
in a new weigh boat and slice it with a razor
blade or cutting implement until finely minced.
Transfer the sample into the appropriately
labeled microcentrifuge tube.
1
Initials Initials
1
2
3. Properly discard the razor blade or cutting
implement. If wearing gloves, change gloves
before handling the next piece of fish. If not,
wash hands thoroughly.
4. Using a new razor blade or cutting implement,
cut a piece of fish muscle up to 100 mg in mass,
approximately the size of a pencil eraser-head,
from your second fish sample. Place the piece
in a new weigh boat and slice it with a razor
blade until finely minced. Transfer the sample
into the appropriately labeled microcentrifuge
tube. Properly discard the razor blade or cutting
implement.
2
Fish DNA Barcoding Quick Guide 1
Page 4
Extracting DNA from fish samples
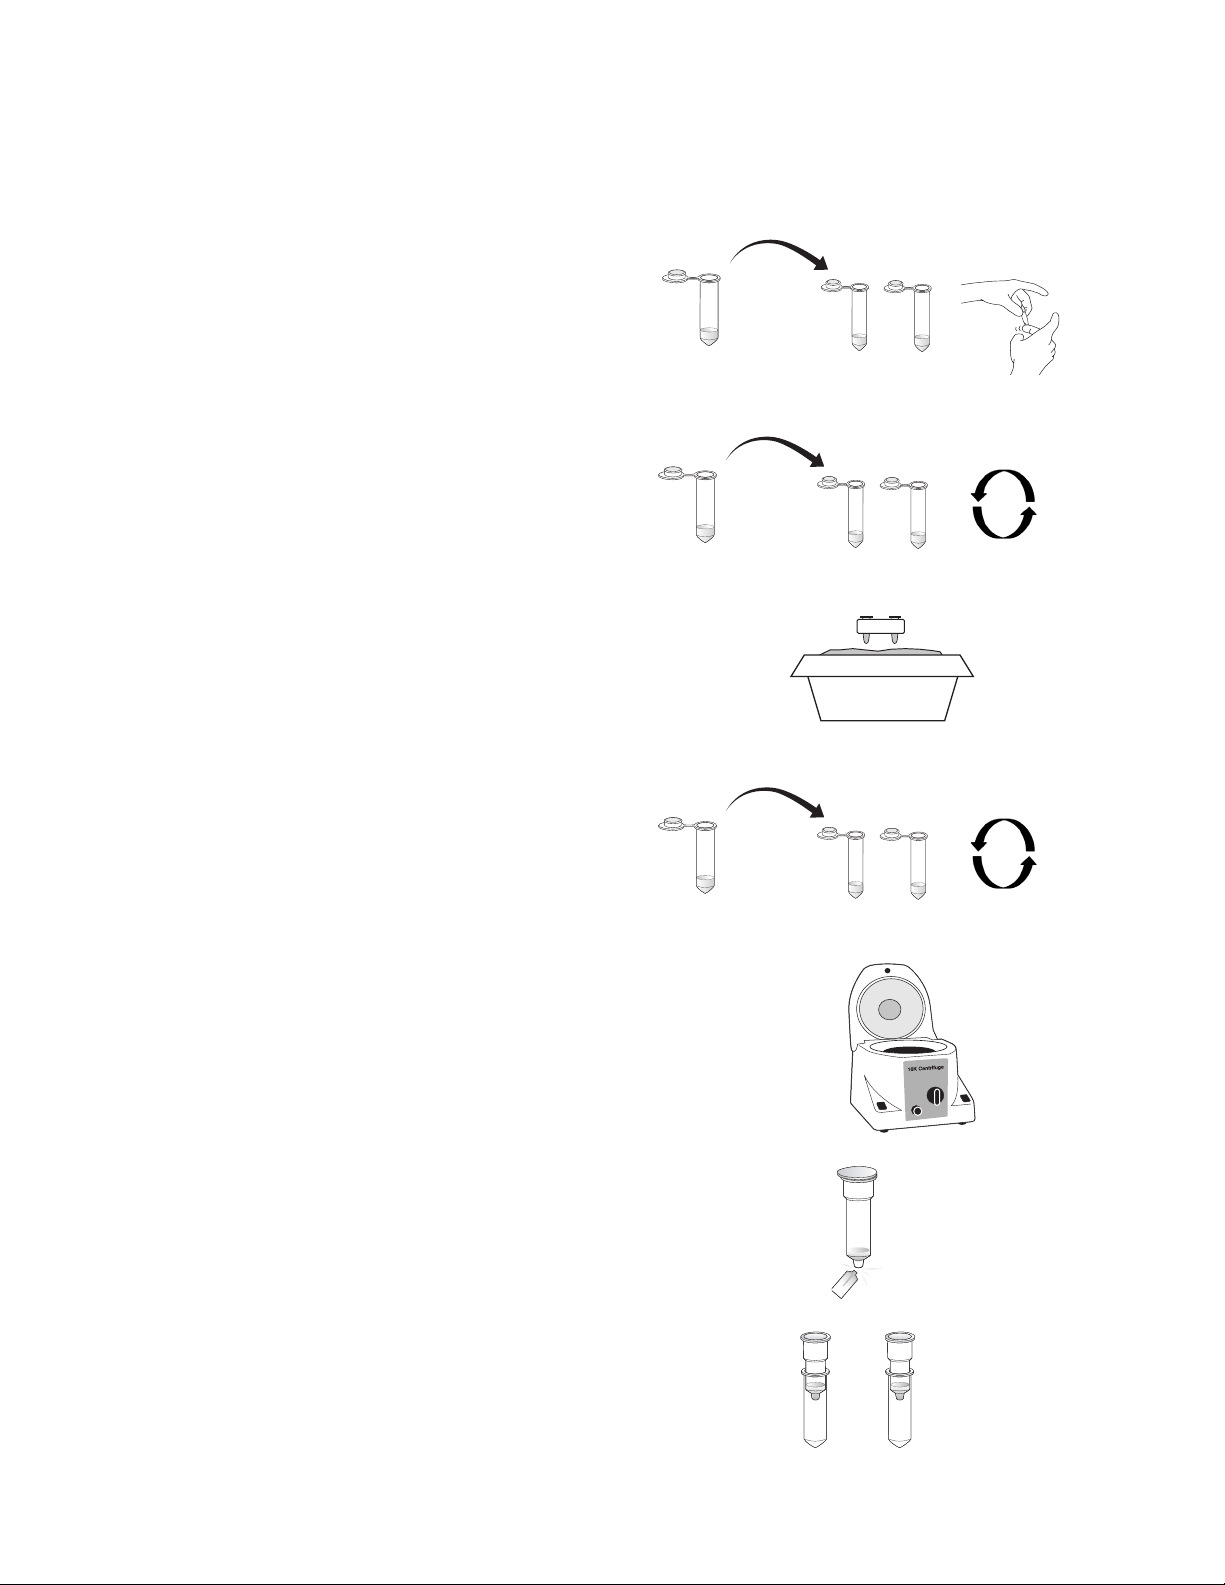
1. Add 200 µl of Resuspension to your two
microcentrifuge tubes containing minced fish
and flick the tubes several times to ensure
full submersion of the fish sample in the
resuspension solution.
2. Add 250 µl of Lysis to each tube and mix gently
by inverting tubes 10 times to mix contents. Do
not vortex! Vortexing may shear genomic DNA,
which can inhibit PCR amplification.
3. Incubate samples at 55°C for 10 min. The
samples do not need to be shaken during
incubation.
4. Add 250 µl of Neutralization to each
microcentrifuge tube and mix gently by inverting
tubes 10 times to mix contents (do not vortex). A
visible cloudy precipitate may form.
200 µl
Resuspension
250 µl
Lysis
250 µl
1
1
55°C Water bath
2
2
10 min
Flick
Invert
gently, 10x
5. Centrifuge the tubes for 5 min at top speed
(12,000–14,000 x g) in the microcentrifuge. A
compact pellet will form along the side of the
tube. The supernatant contains the DNA.
If there are a lot of particulates remaining in the
supernatant after centrifugation, centrifuge
the tubes for 5 additional min.
6. Snap (do not twist!) the bottoms off of the spin
columns and insert each column into a capless
2 ml microcentrifuge tube.
7. Label one spin column 1 for Fish 1 and a second
spin column 2 for Fish 2. Also label the columns
with your initials.
Neutralization
12,000–14,000 x g
5 min
1
1 2
2
Invert
gently, 10x
2 Fish DNA Barcoding Quick Guide
Page 5

8. Transfer the entire supernatant (500–550 µl)
of each fish sample from step 5 into the
appropriately labeled spin column. Try not to
get any of the particulates into the spin column
because they will clog the column and prevent
you from continuing.
9. Thoroughly mix the tube labeled Matrix by
vortexing or repeatedly shaking and inverting the
tube to make sure particulates are completely
resuspended before use.
Supernatant
1
1
200 µl
Supernatant
2
2
1
10. Add 200 µl of thoroughly resuspended Matrix to
the first column containing fish extract and pipet
up and down to mix.
11. Using a new pipet tip, add 200 µl of thoroughly
resuspended Matrix to the second column
containing fish extract and pipet up and down to
mix.
12. Centrifuge the columns for 30 sec at full speed.
Take care to spin the column for only
30 sec. Drying the matrix completely at
this point will result in loss of DNA.
13. Remove the spin column from the 2 ml
microcentrifuge tube, discard the flowthrough
at the bottom of the 2 ml tube, and replace the
spin column in the same tube. Add 500 µl of
Wash and wash the matrix by centrifugation for
30 sec.
1 2
Matrix
200 µl
2
Matrix
14,000 x g
30 sec
Take care to spin the column for only
30 sec. Drying the matrix completely at
this point will result in loss of DNA.
14. Repeat step 13 to wash samples again.
Wash
500 µl
1
2
14,000 x g
30 sec
Fish DNA Barcoding Quick Guide 3
Page 6

15. Remove the spin column from the 2 ml
microcentrifuge tube, discard the flowthrough
at the bottom of the 2 ml tube, and replace
the spin column in the same tube. Centrifuge
columns for a full 2 min to remove residual
traces of ethanol and dry out the matrix.
1 2
14,000 x g
2 min
16. Label two clean 2 ml capless microcentrifuge
tubes with your fish sample name and your
initials.
17. When your 2 min spin is completed, remove
the spin columns and discard the 2 ml
microcentrifuge wash tubes.
18. Place the spin column for each sample into a
new capless 2 ml microcentrifuge tube from
step 16.
19. Using a fresh pipet tip for each sample, add
100 µl of distilled water to each spin column,
being careful not to touch the resin. Elute the
DNA by centrifuging for 1 min at full speed.
20. Label two clean 2 ml microcentrifuge tubes (with
caps) Fish 1 and Fish 2 and your initials.
1
Initials Initials
1
1
1
Clean 2 ml tube,
labeled with “1”
and initials
100 µl
1
Dist.
Water
Initials
Initials
2
2
21. Transfer the eluted DNA into the appropriately
labeled 2 ml microcentrifuge tube with caps
and store the DNA at 4°C until you are ready to
proceed.
4 Fish DNA Barcoding Quick Guide
1
2
1 2
1
2
Page 7

Quick Guide
Lesson 2: PCR Amplification of DNA
1. Label four PCR tubes with your initials and the
sample name (1 for fish sample 1, 2 for fish
sample 2, (+) for the PCR positive control DNA,
(–) for the PCR negative control). Keep the tubes
on ice for the remaining steps.
2. Using a fresh aerosol filter pipet tip each time,
add 35 µl of CMM (COI master mix) reaction
mix to each PCR tube, capping each tube
immediately after the addition of liquid.
35 µl
2 (+)
(–)
1
3. Using a fresh aerosol filter pipet tip for each
tube, add 5 µl of the appropriate DNA sample
directly into the CMM liquid in each PCR tube
as indicated by the labels on the tubes, and
pipet up and down to mix. Recap each tube
immediately after adding DNA.
Tube Name Master Mix DNA
1 35 µl CMM, 5 µl fish sample 1
2 35 µl CMM, 5 µl fish sample 2
(+) 35 µl CMM, 5 µl (+) sample
(–) 35 µl CMM, 5 µl (–) sample
4. When instructed, place the PCR tubes in the
thermal cycler and run the program with the
following cycling conditions:
1. 94°C – 2 min
2. 94°C – 30 sec
3. 55°C – 2 min
4. 72°C – 1 min
CMM
5 µl
2 (+)
1
(–)
1
5. Repeat steps 2–4 35x
6. 72 °C – 10 min
7. 4°C – hold
Store tubes at 4°C after thermal cycling is
complete.
Fish DNA Barcoding Quick Guide 5
Page 8

Preparing PCR Samples for
Electrophoresis and Sequencing
1. Label four 2 ml microcentrifuge tubes with both
your initials and E. E stands for electrophoresis.
Now label one of these tubes Fish 1, one tube
Fish 2, one tube (+), and one tube (–).
1, E
Initials
2, E
Initials
(+), E
Initials
(–), E
Initials
2. Remove 5 µl from each PCR reaction and
deposit into the 2 ml microcentrifuge tube
corresponding to that sample.
3. Label three 2 ml microcentrifuge tubes with
both your initials and SEQ. SEQ stands for
sequencing. Now label one of these tubes
Fish 1, one tube Fish 2, and one tube (+). You
will not be sequencing your negative control
sample.
4. Remove 30 µl from each PCR reaction and
deposit into the 2 ml microcentrifuge tube
corresponding to that sample.
5. Store all samples at 4°C until you are ready to
proceed with electrophoresis and sequencing.
Product
1, SEQ
Initials
1, PCR
2, SEQ
1, PCR
Product
5 µl
Initials
30 µl
1, E
Initials
(+), SEQ
Initials
1, SEQ
Initials
6 Fish DNA Barcoding Quick Guide
Page 9

Quick Guide
Lesson 3: Gel Electrophoresis
1. Retrieve the 5 µl samples of PCR products (4
samples) from 4°C. To each one, add 5 µl of
sterile water. Use a new pipet tip each time.
2. Add 2 µl of UView™ 6x loading dye to each
sample, using a new pipet tip each time. Mix
samples well and pulse-spin.
3. Set up your gel electrophoresis apparatus as
instructed.
4. Load the agarose gel in the following lane order
and volumes, using a new pipet tip each time:
Lane Sample
1 – EMPTY
2 – EMPTY
3 – 20 µl PCR molecular weight ruler
4 – 12 µl (+) E
5 – 12 µl (–) E
6 – 12 µl 1 E
7 – 12 µl 2 E
8 – EMPTY
5 µl
sterile water
1, E 2, E (+), E (–), E
2 µl
6x loading dye
1, E 2, E (+), E (–), E
5. Ask your instructor whether the electrophoresis
buffer your electrophoresis units contain is 0.25x
TAE or 1x TAE.
If your buffer is 0.25 x TAE, run the gel at 200 V
for 20 min.
If your buffer is 1x TAE, run the gel at 100 V for
30 min.
6. Visualize the gel on a UV transilluminator or
imaging system. No gel staining is required
as the loading dye contains a fluorescent
compound that will allow visualization of DNA
with UV light.
Fish DNA Barcoding Quick Guide 7
Page 10

Quick Guide
Lesson 4: Sequencing
1. Parafilm your capped Fish 1 SEQ, Fish 2
SEQ, and (+) SEQ tubes thoroughly to prevent
leakage while shipping.
2. Record the sample names on your tubes
and make sure these match the names your
instructor is submitting to the sequencing facility.
This is the only way you can identify the correct
sequencing data file for each sample.
3. Give your samples to your instructor for
shipment to the sequencing facility.
Parafilm is a trademark of the American National Can Company
8 Fish DNA Barcoding Quick Guide
Page 11

Page 12

Life Science
Group
Sig 1212Bulletin 6410 Rev A US/EG 13-1028 0513
Bio-Rad
Laboratories, Inc.
Web site ww w.bio-rad.com USA 800 424 6723 Australia 61 2 9914 2800 Austria 01 877 89 01 Belgium 09 385 55 11 Brazil 5 5 11 5 044 5699
Canada 905 364 343 5 China 86 21 6169 8500 Cze ch Republic 420 241 430 5 32 Denmark 44 52 10 00 Finland 09 804 22 00
France 01 47 95 69 65 German y 089 31 884 0 Greece 30 210 9532 220 Hong Ko ng 852 2789 3300 Hungary 36 1 459 6100 India 91 124 4029300
Israel 03 963 6050 Italy 39 02 2160 91 Japan 03 6361 7000 Korea 82 2 3473 4460 Mexic o 52 555 488 7670 The Netherlands 0318 540666
New Zealand 64 9 415 2280 Nor way 23 38 41 30 Poland 48 22 331 99 99 Portugal 351 21 472 7700 Russia 7 495 721 14 04
Singapore 65 6415 3188 South Africa 27 861 246 723 Spain 34 91 590 52 00 Sweden 08 555 12700 Switzerland 026 674 55 05
Taiwan 886 2 2578 7189 Thailand 800 88 22 88 United Kingdom 020 8328 2000
 Loading...