


R250
SK
LINE
R250
sportkoncept
UNIDAD ELECTRÓNICA
ELECTONIC MONITOR
UNITÉ ÉLECTRONIQUE
ELEKTRONIKEINHEIT
UNIDADE ELECTRÓNICA
IMPIANTO ELETTRONICO
ELEKTRONISCHER MONITOR
SK
LINE
sportkoncept
Fig.1

SK
LINE
sportkoncept
Fig.2
Fig.3

SK
LINE
sportkoncept
4
ESPAÑOL
INDICACIONES GENERALES.-
Este aparato de ejercicio esta equipado con un generador de corriente eléctrica, que aprovecha la energía
desarrollada por usuario (realizando el ejercicio), para alimentar el monitor electrónico y el regulador de
frenada del mismo.
Esta pantalla de monitor es táctil, para lo cual el pulsar una tecla es, posicionando el dedo, en la
señalización de dicha tecla en la pantalla.
Este aparato de ejercicio incorpora también una serie de baterías que almacena la energía suficiente para
mantener el monitor electrónico operativo durante 60 segundos después de dejar de hacer el ejercicio.
En el caso de que la batería se agote por algún fallo de funcionamiento, esta se puede recargar mediante el
adaptador que se suministra con el aparato.
Para la puesta en marcha del monitor se tiene que realizar ejercicio sobre la máquina.
ATENCIÓN:
El adaptador debe conectarse en una toma apropiada. Asegúrese de que el voltaje de su
instalación es compatible al voltaje del adaptador que se suministra con la máquina.
El monitor electrónico está diseñado para ser utilizado de forma sencilla e intuitiva. Los textos que aparecen
en la pantalla inferior (B) guiarán al usuario durante la realización del ejercicio.
Sin embargo, recomendamos que el preparador físico lea atentamente esta sección con el fin de conocer a
fondo el monitor electrónico y mostrar al usuario su funcionamiento de forma efectiva.
IMPORTANTE:
PARA UN BUEN FUNCIONAMENTO Y DURACION DE LAS BATERIAS, SE
RECOMIENDA RECARGARLAS CON EL ADAPTADOR QUE SE SUMINISTRA AL RECIBIR LA
MÁQUINA
PERSONALIZACIÓN DEL MONITOR ELECTRÓNICO.-
Para entrar en el modo de personalización del monitor es necesario seguir los siguientes pasos: Estando el
monitor apagado, pulse a la vez la tecla RESET y la tecla O y sin soltar las teclas, comience el ejercicio.
1) CAMBIO DE Km. a Millas.-
Una vez encendido el monitor le aparecerá en la pantalla alfanumérica (B) Fig.1, la palabra “FACTORY
SETTINGS“, pulse la tecla ENTER y le aparecerá parpadeando UNITS, pulse la tecla ENTER y le
parpadeará METRIC, seleccione la medida de su velocidad con las teclas LEVEL▲ y LEVEL▼
(METRIC/Km. -- ENGLISH / Millas ) pulse la tecla ENTER y le volverá a parpadear la palabra “UNITS”, con
la tecla LEVEL▲, pase al punto (2 WHEELSIZE), del cuadro inferior adjunto.
Si desea salir del modo personalización pulse la tecla STOP y visualizará en el display Matriz de LEDs (A) el
programa manual.
2) CAMBIO DE DISTANCIA POR REVOLUCION.-
Estando la palabra ‘WHEELSIZE’ parpadeando, pulse la tecla ENTER y le parpadeara la cifra entre 0 y 80,
seleccione el valor 80 con las teclas LEVEL▲ y LEVEL▼ pulse la tecla ENTER y le volverá a parpadear la
palabra “WHEELSIZE”, con la tecla LEVEL▲, pase al punto (3 LANGUAGE), del cuadro inferior adjunto. Si
desea salir del modo personalización pulse la tecla STOP.
3) CAMBIO DE IDIOMA.-
Estando la palabra ‘LANGUAGE’ parpadeando, pulse la tecla ENTER y le parpadeara el idioma, seleccione
su idioma con las teclas LEVEL▲ y LEVEL▼ pulse la tecla ENTER y le volverá a parpadear la palabra
“LANGUAGE”, con la tecla LEVEL▲, pase al punto (4 Power), del cuadro inferior adjunto. Si desea salir del
modo personalización pulse la tecla STOP.

SK
LINE
sportkoncept
5
4) ALIMENTACION AUTOGENERADA Ó ELECTRICA.-
Estando la palabra Power parpadeando, pulse la tecla ENTER y le parpadeara la palabra ON o OFF, con
las teclas LEVEL▲ y LEVEL▼ seleccione la opción que se muestra parpadeante.
La opción ON es para mantener el monitor siempre encendido. Si ha elegido la opción ON es necesario
que la máquina esté enchufada con el adaptador a la red eléctrica una vez elegida la opción pulse la
tecla ENTER para confirmar y le volverá a parpadear la palabra Power, deje de hacer ejercicio.
Si desea apagar el monitor en esta opción mantenga pulsadas a la vez las teclas STOP, hasta que se oiga
un pitido , espere 45 segundos y pasa a la opción OFF.
La opción OFF al ser la maquina auto generada el monitor se pondrá en funcionamiento en el momento que
se empiece a hacer el ejercicio, una vez elegida la opción pulse la tecla ENTER y le parpadeara Power con
la tecla LEVEL▲ , pase al punto (5 SPR time) del cuadro inferior adjunto.
Una vez validada la opción (OFF) basta con dejar de hacer el ejercicio que ha mantenido al monitor
encendido y esperar los 45 segundos hasta que se apague. Si desea salir del modo personalización pulse la
tecla STOP.
5) TIEMPO DE RESISTENCIA EN PROGRAMA H.R.C.-
Estando la palabra SPR time parpadeando, pulse la tecla ENTER y le parpadeara la cifra entre 20 y 60
Segundos, con las teclas LEVEL▲ y LEVEL▼ seleccione la opción que se muestra parpadeante, una vez
elegida la opción pulse la tecla ENTER para confirmar y le parpadeara la palabra SPR time, con la tecla
LEVEL▲, pase al punto (6 Manual T), del cuadro inferior adjunto. Si desea salir del modo personalización
pulse la tecla STOP.
6) TIEMPO MAX. EJERCICIO.-
Estando la palabra Manual T. parpadeando, pulse la tecla ENTER y le parpadeará la cifra entre 0 y 60
Minutos, con las teclas LEVEL▲ y LEVEL▼ seleccione la opción que se muestra parpadeante, una vez
elegida la opción pulse la tecla ENTER para confirmar y le parpadeara la palabra Manual T, con la tecla
LEVEL▲, pase al punto (7 Text), del cuadro inferior adjunto. Si desea salir del modo personalización pulse
la tecla STOP.
7) CAMBIO DE SALUDO INICIAL.-
Estando la palabra Text parpadeando, pulse la tecla ENTER y le parpadeara la palabra ON o OFF, con las
teclas LEVEL▲ y LEVEL▼ se cambia la opción que se muestra parpadeante. Eligiendo la palabra ON le
permite cambiar el mensaje de saludo inicial del monitor.
Una vez elegida la opción ON pulse la tecla ENTER y visualizará en la pantalla alfanumérica (B) un cursor
parpadeante, con las teclas LEVEL▲ y LEVEL▼, seleccione letra a letra el mensaje de saludo inicial. Una
vez haya completado el mensaje pulse la tecla ENTER durante unos segundos y le parpadeara la palabra
Text, con la tecla LEVEL▲, pase al punto (8 Sounds) del cuadro inferior adjunto. Si desea salir del modo
personalización pulse la tecla STOP.
8) CAMBIO DE SONIDO.-
Estando la palabra Sounds parpadeando , pulse la tecla ENTER y le parpadeará la palabra ON o OFF, con
las teclas LEVEL▲ y LEVEL▼ se cambia la opción que se muestra parpadeante, una vez elegida la opción
pulse la tecla ENTER para confirmar y le parpadeara la palabra Sounds .
Pulse la tecla STOP para salir de los parámetros personalizables y visualizara en el display Matriz de LEDs
(A) el programa manual.
Comience el ejercicio y observe que los cambios de opciones han sido realizados.

SK
LINE
sportkoncept
6
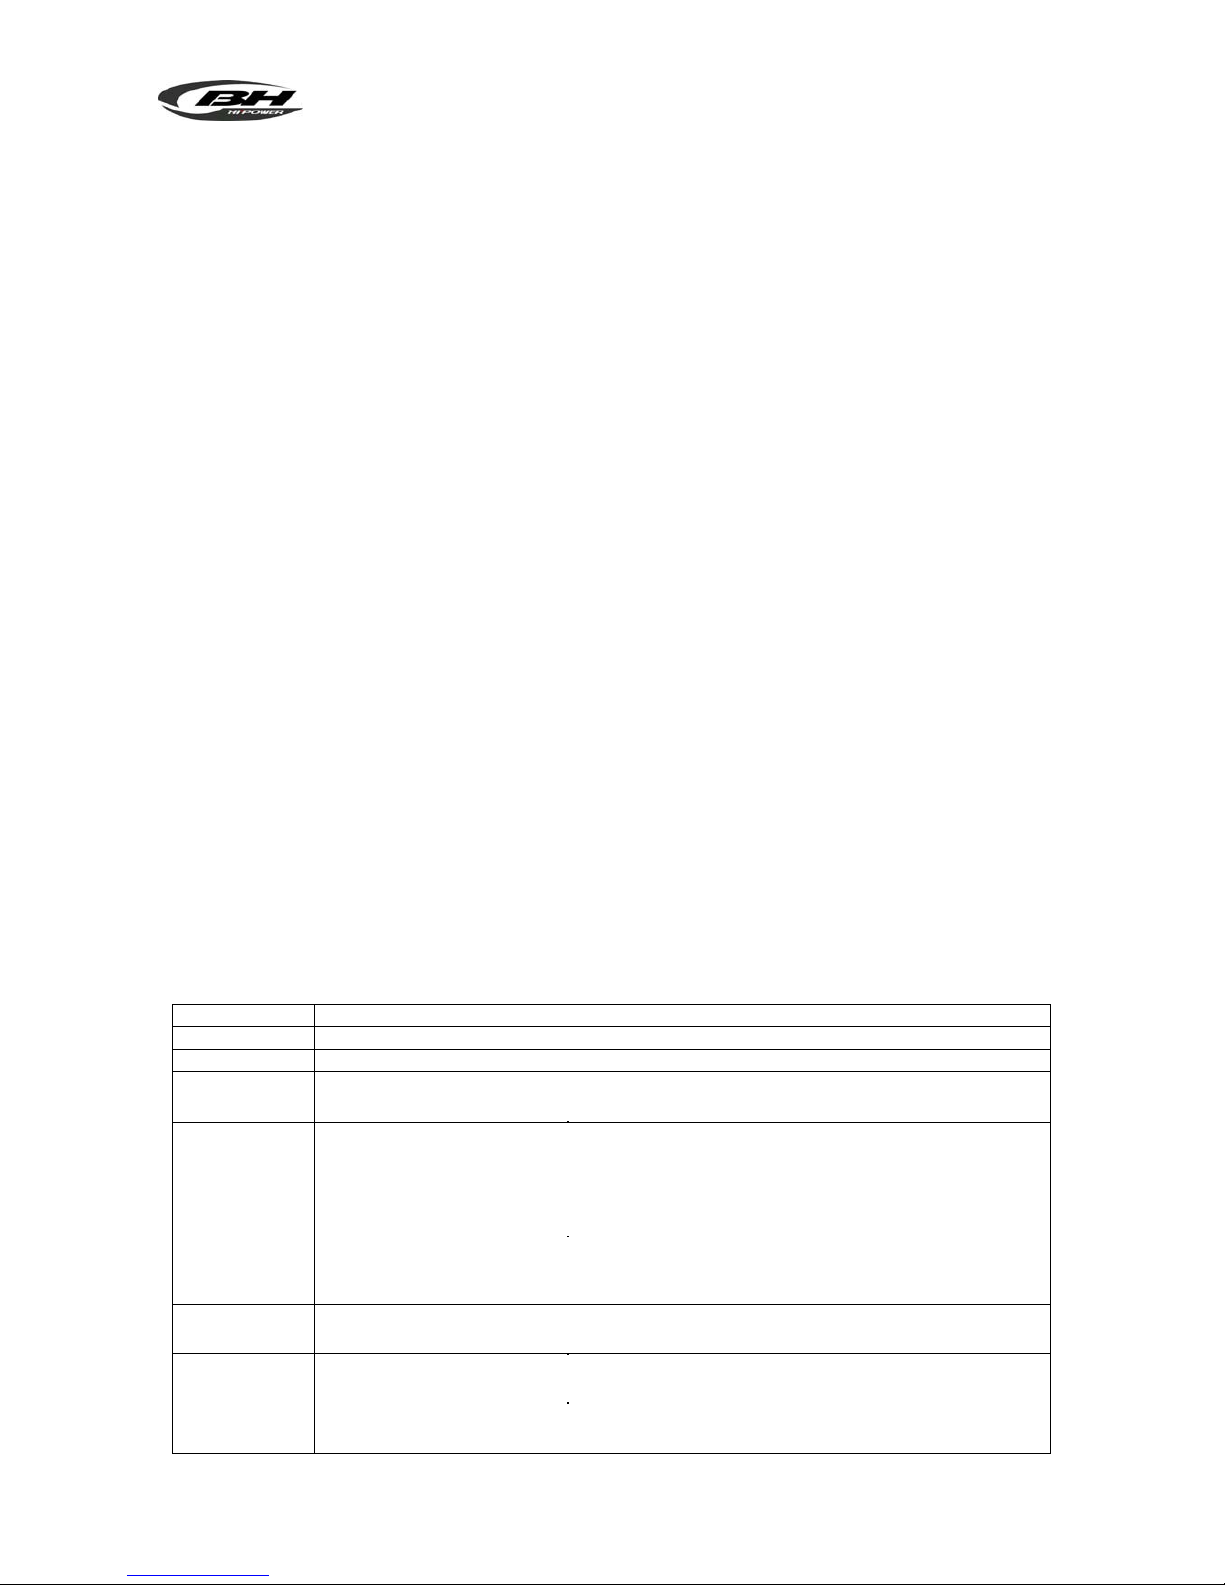
CUADRO DE LOS PARÁMETROS PERSONALIZABLES
Parámetro Descripción
1) Metric
Cambio de velocidad de Km. / h a Millas
2) Wheelsize
Cambio de relaccion rpm - distancia recorrida
3) Language
Define el idioma en el que el monitor electrónico muestra los mensajes.
Opciones: Español; Portugués; Ingles; Francés; Alemán; Holandés; Italiano
4) Power
Permite definir el modo de funcionamiento del aparato entre autogenerador o
conectado a la red. En caso de estar en modo ON es necesario que la máquina
esté enchufada a la red. Para apagar el monitor estando en modo ON basta con
mantener pulsada la tecla STOP durante 4 segundos.
Opciones:- OFF (Funcionamiento con baterías)
- ON (Funcionamiento enchufada a la red).
IMPORTANTE: La máquina debe de estar enchufada a la red eléctrica en
caso de elegir esta opción, de lo contrario se deteriorarán las baterías,
pudiendo quedar inservibles)
5) SPR time
Establece la cadencia de cálculo de la resistencia en el programa de pulso
constante.
Opciones: Valor en segundos (mínimo 20 y máximo 60)
6) Manual T
Establece un tiempo máximo para la duración del ejercicio.
Opciones:
0 (No se establece tiempo máximo)
Valor en minutos del tiempo máximo de duración del ejercicio (máximo 60)
7) Text
Opciones:
OFF (Se muestra el mensaje de saludo por defecto)
ON (Permite editar el mensaje de saludo)
Permite personalizar el mensaje de saludo, incluyendo, por ejemplo, el nombre
del gimnasio.
8) Sounds
Habilita o deshabilita los mensajes sonoros del monitor electrónico.
Opciones: - ON (Habilitado)
- OFF (Deshabilitado)
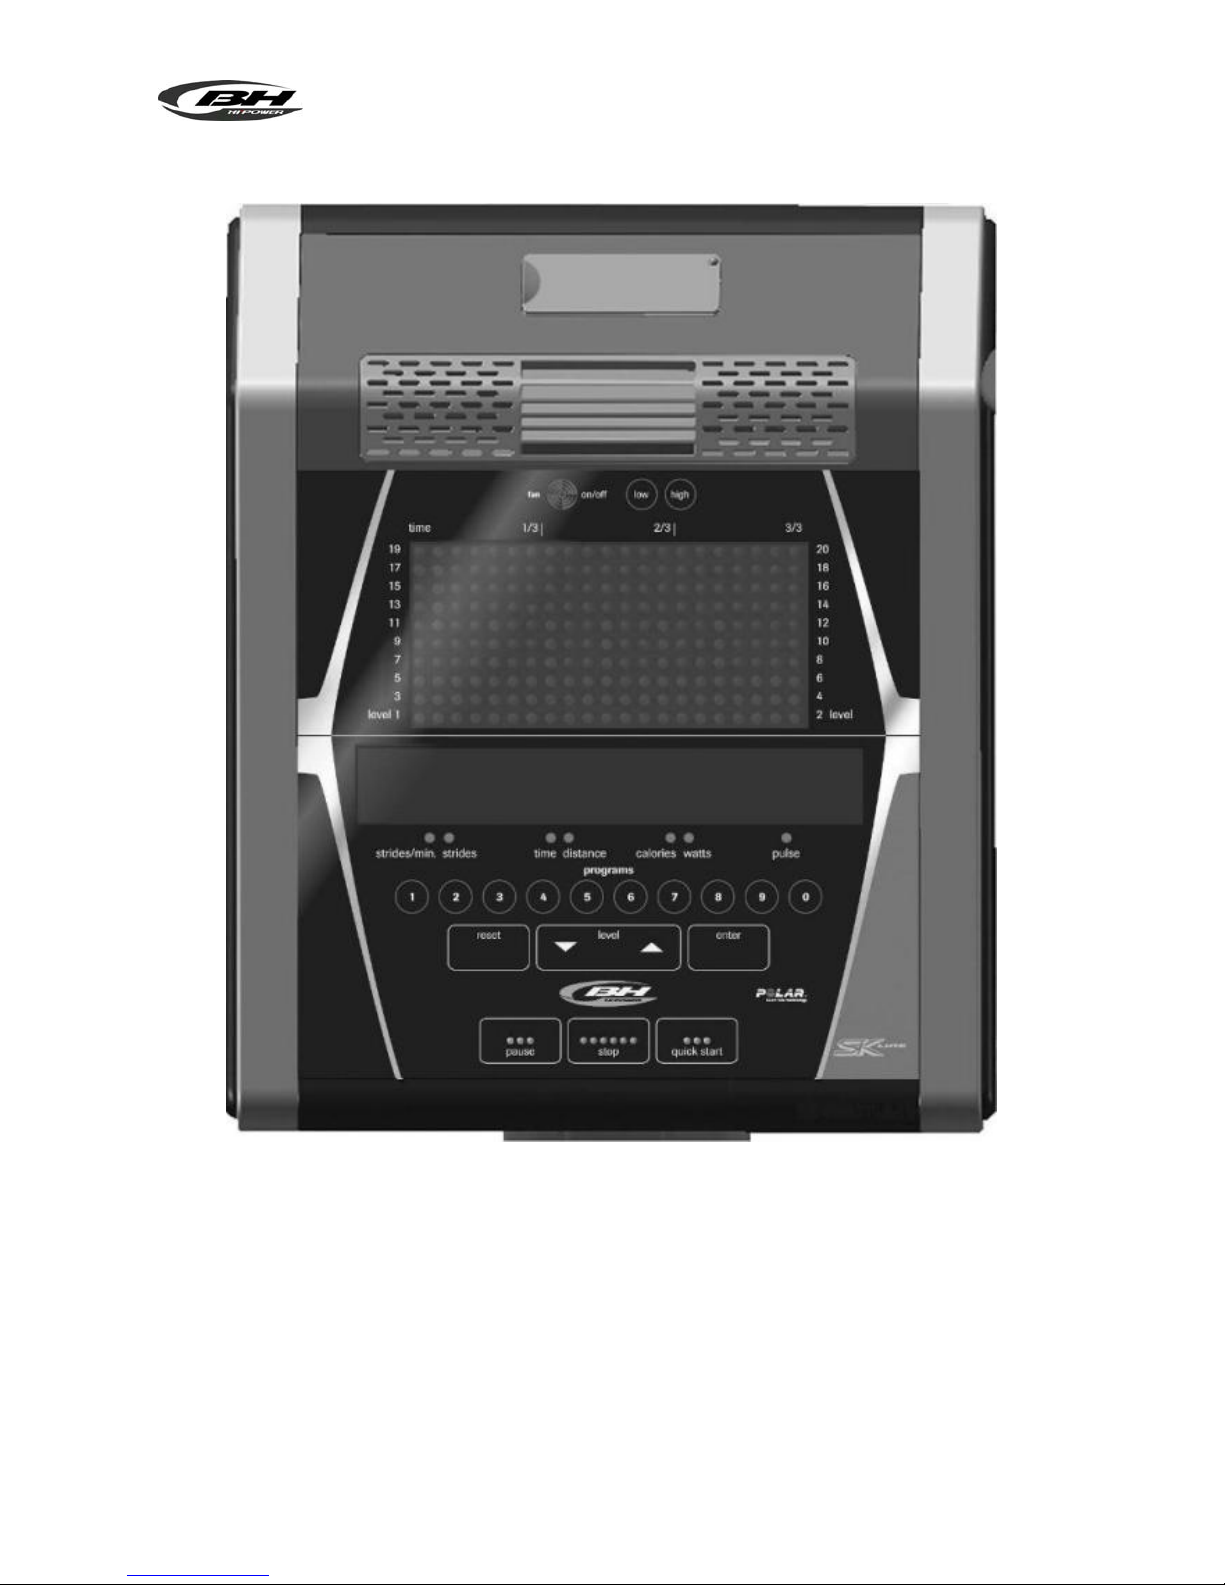
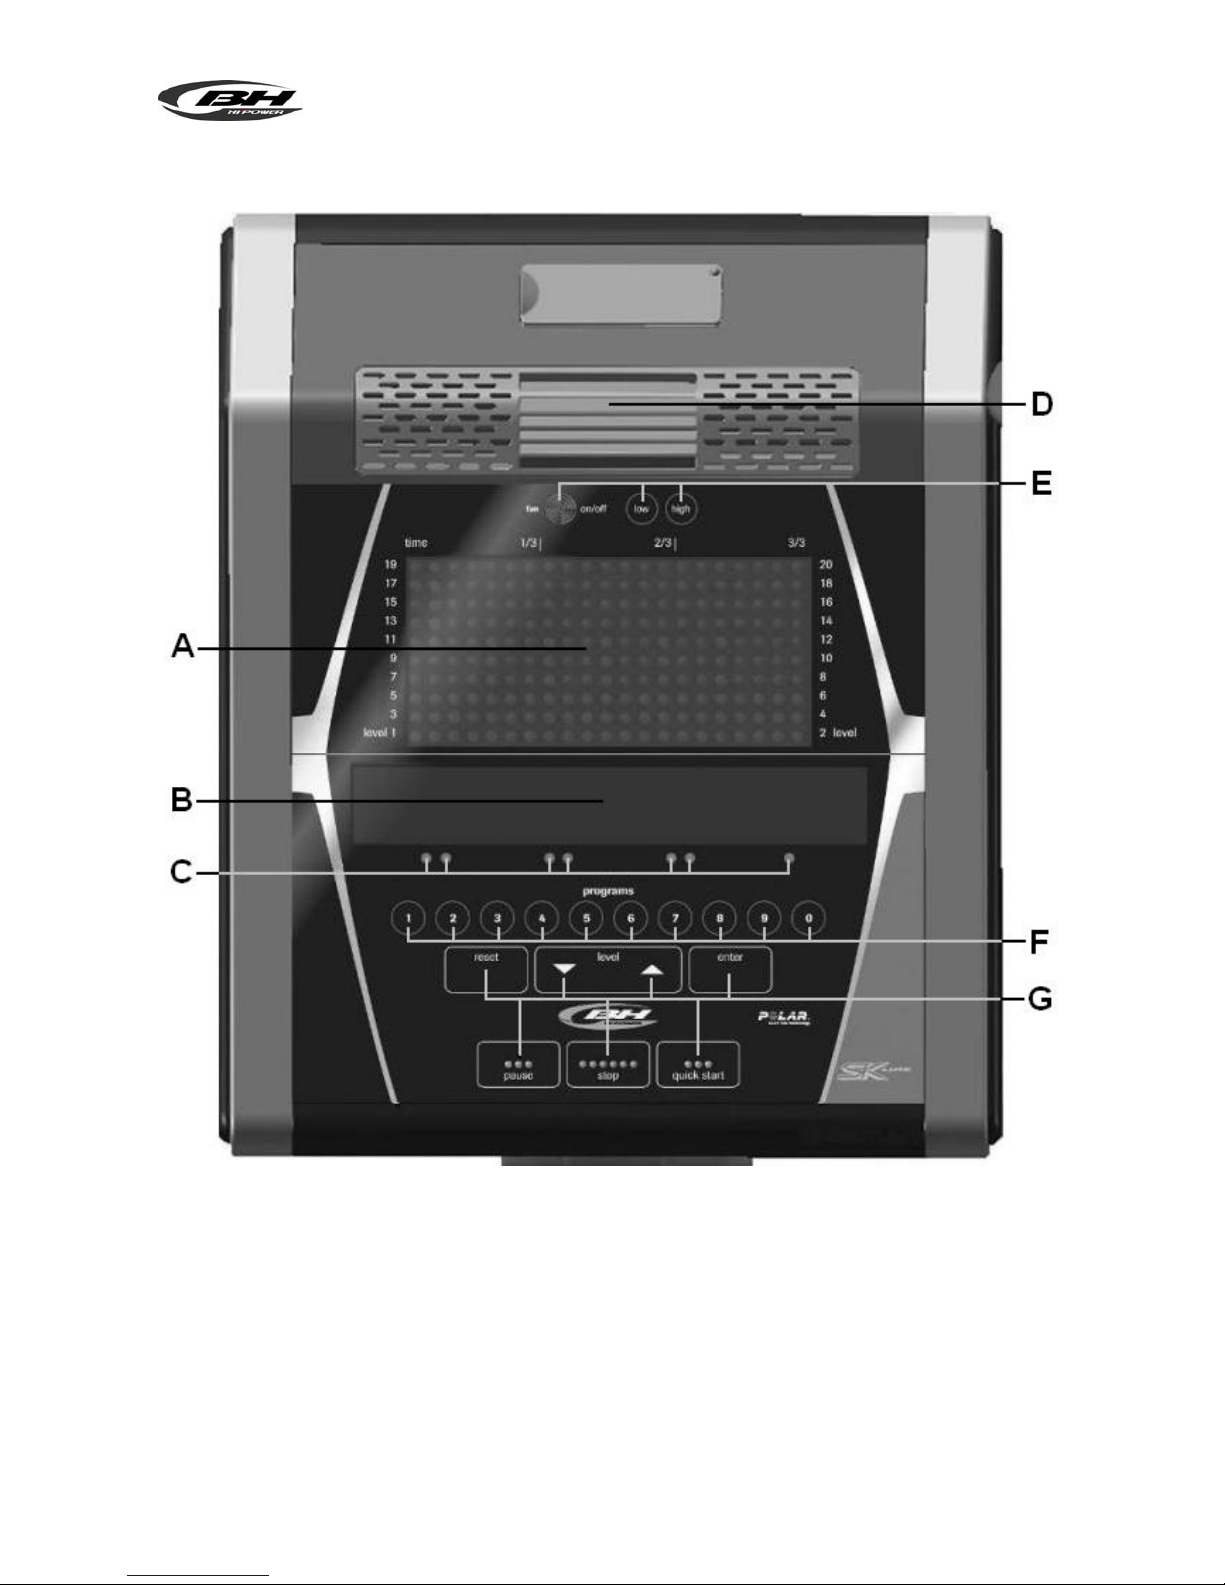
ELEMENTOS DEL MONITOR ELECTRÓNICO (Fig.1).-
El monitor electrónico se compone de dos zonas bien diferenciadas;
La zona superior Fig.2 (A – B – C) se encuentra la VISUALIZACIÓN.
La zona inferior Fig.3 (E – F – G) se encuentra el TECLADO.
VISUALIZACIÓN
.
Esta zona está compuesta por dos pantallas.
(A) Display Matriz de LEDs superior, donde se monitoriza el nivel de esfuerzo que se realiza del programa
seleccionado en cada momento.
(B) Display de Pantalla alfanumérica inferior, que guía al usuario durante la selección y realización del
ejercicio.
La pantalla superior (A) mostrara los diferentes perfiles preprogramados de esfuerzo (programas) que
podemos seleccionar y, durante el ejercicio, el nivel de esfuerzo que se realiza en cada momento.
La pantalla alfanumérica inferior (B) se encarga de guiar al usuario durante la selección del ejercicio a
realizar y de mostrar información sobre el ejercicio durante y después de su realización. Los indicadores
LED (C) situados debajo de la pantalla numérica proporcionan una lectura simultánea de STEPS/MIN
(pasos/min); TIME (tiempo); DISTANCE (distancia); CALORIES (calorías); WATTS (vatios); PULSE RATE
(ritmo cardíaco) e indican la información de los datos que se están realizando durante el ejercicio.
Los datos que se muestran en los LEDs (C) durante la realización del ejercicio son los siguientes:
STEPS/MIN - PASOS/MIN: Muestra el número de pasos por minuto.
TIME – TIEMPO: Durante el ejercicio se muestra el tiempo que ha trascurrido desde que comenzamos el
mismo, o, en caso de haber seleccionado un tiempo de ejercicio predefinido, el tiempo que resta para
acabar el ejercicio. El tiempo se muestra en minutos y segundos (mm:ss).

SK
LINE
sportkoncept
7
DISTANCE – DISTANCIA: Se muestra la distancia que hemos recorrido desde el inicio del ejercicio. La
distancia se calcula teniendo en cuenta el número de pasos y las unidades son los kilómetros y
hectómetros.
CALORIES – CALORIAS: Se muestra una estimación de las calorías que se han quemado hasta el
momento. La estimación se realiza tomando en cuenta la energía que se está realizando en cada momento
y los datos de peso y edad introducidos por el usuario.
WATT – VATIOS: Muestra la cantidad de energía que se está produciendo durante el ejercicio. Este cálculo
se basa en el nivel de ejercicio en el que está trabajando el usuario y la velocidad de pasos por minuto. La
información se muestra en Vatios.
PULSE – PULSO: Se muestra la frecuencia cardiaca del usuario, siempre que esta información sea
accesible mediante los sensores de mano (Hand – Grip)o la banda telemétrica de pecho, cuando se utilizan
los dos juntos ,se da prioridad a la banda telemétrica de pecho. Para más información acerca de la
frecuencia cardiaca, consultar la sección: Medida de pulso; banda de pecho y hand-grip.
TECLADO (Fig.3)
.
A continuación se enumera la función de cada tecla.
El monitor electrónico incluye un teclado de uso sencillo. Este teclado consta de las teclas de Fan/ventilador
(E), de teclas numéricas (F) y de las teclas función (G).
- Teclas Fan / Ventilador (E).- Off / On (Marcha y parada); Low (Velocidad Mínima); High (Velocidad
Máxima).
- Teclas numéricas (F) - (1- 0) se utilizan para introducir los datos que el monitor solicite.
- Teclas de función (G) - reset; level▼; level▲; enter; pause; stop; quick / start. Estas teclas se utilizan
para seleccionar el ejercicio a realizar, introducir los datos solicitados, controlar el nivel de resistencia del
ejercicio y finalizar el mismo.
-reset.-
Tecla de anulación. Se utiliza para borrar los datos que se introducen en el monitor a la hora de
seleccionar un programa.
-level▼.-
Tecla de disminución nivel de esfuerzo. Durante la realización del ejercicio esta tecla
disminuye en un punto el grado de resistencia de la máquina. Durante la selección de los perfiles
preprogramados se utiliza para mostrar en pantalla el perfil anterior al mostrado.
-level▲.-
Tecla de incremento nivel de esfuerzo. Durante la realización del ejercicio está tecla aumenta
en un punto el grado de resistencia de la máquina. Durante la selección de los perfiles preprogramados se
utiliza para mostrar en pantalla el perfil siguiente al mostrado
.
-enter.-
Tecla de selección y validación. Se utiliza durante la selección de un perfil preprogramado para
seleccionarlo, validar los datos que han de introducirse y comenzar el ejercicio. Durante la programación del
perfil de usuario se utiliza además para validar el nivel de esfuerzo correspondiente a cada minuto.
-pause.-
Tecla de pausa. Si se pulsa durante la realización del ejercicio, éste se interrumpe, deteniendo
el cronometro de duración de ejercicio. Para reanudar el cronometro de duración del ejercicio pulse la tecla
pause de nuevo o reanude el ejercicio. El tiempo limite de modo pausa es de 45 segundos, una vez
transcurrido este tiempo el ejercicio se dará por finalizado y se apaga el monitor.
Si, estando en modo pausa, se pulsa la tecla STOP en ejercicio se dará por finalizado.
-stop.-
Tecla de parada. Si se pulsa durante la realización del ejercicio, éste se da por finalizado y la
resistencia pasa a ser la resistencia mínima. Se muestra un resumen con los datos del ejercicio y se vuelve
a la pantalla de inicio.
En el modo Start/Ready, mantenga pulsada la tecla STOP durante 3 segundos, y la consola cambiará
automáticamente al estado de apagado con un sonido si la opción POWER bajo el modo de proyecto está
en encendido.
-quick / start.-
Tecla de inicio inmediato. Siempre que el LED de la tecla se encuentre parpadeando,
al pulsar esta tecla se comienza el ejercicio en modo manual.

SK
LINE
sportkoncept
8
PUESTA EN MARCHA.-
Para encender el monitor, es necesario comenzar el ejercicio a una cierta velocidad de pasos por minuto.
Tan pronto como el volante de inercia interna alcanza 45rpm, se enciende el monitor y permanece
encendido durante 60 segundos, de modo que pueda programarse.
También se puede enchufar el adaptador que se suministra con la maquina a una toma de corriente, si ha
optado poner en el cuadro de parámetros personalizables (paso 4 Power) en ON.
Una vez encendido el monitor le mostrara en el display de matriz de LEDs (A) Fig.2, el perfil y la letra “M” de
manual, y en display de pantalla alfanumérica inferior (B) le mostrara el saludo de bienvenida “BIENVENIDO
A HI POWER”.
Pulsando la tecla QUICK/START se pone en marcha el programa, en manual y pulsando las teclas level▼
o level▲, usted puede aumentar o disminuir la resistencia del ejercicio.
INSTRUCCIONES DE FUNCIONAMIENTO.-
PUESTA EN MARCHA VENTILADOR.-
Esta maquina dispone en el monitor de una salida de aire (D) Fig.1 que a través de un ventilador (FAN)
Fig.3, le proporciona dos velocidades de aire, una baja (LOW) y otra alta (HIGH), para la puesta en marcha
del ventilador estando realizando el ejercicio, pulse la tecla ON/OFF situada en el teclado Fig.3 y el
ventilador se pondrá en marcha, en el momento que el monitor se ponga en PAUSE el ventilador se
desconecta.
MODO SLEEP:
Si no se introduce una señal de RPM en un periodo de 45 segundos bajo el modo de espera, se activa este
modo. En este modo, no se muestra ninguna ventana, y deberá pisarse la placa de pie para introducir una
señal y reiniciar la ventana. Con el aparato encendido, no se puede acceder al modo Sleep.
Si se ha conectado un adaptador al bastidor, la consola no puede ponerse en el modo Sleep cuando la
opción POWER bajo el modo de proyecto se pone en Encendido. Sin adaptador, la consola se pondrá en el
modo Sleep, aunque esté en Encendido.
P0 MODO MANUAL.-
Una vez encendido el monitor le mostrara en el display de matriz de LEDs superior (A) Fig.2 el perfil y la
letra “M” de manual, y en display de pantalla alfanumérica inferior (B) Fig.2 le mostrara el saludo de
bienvenida “BIENVENIDO A HI POWER”.
Pulsando la tecla QUICK/START se pone en marcha el programa, en manual.
En el display de matriz de LEDs superior (A) Fig.2 le indicara parpadeando en el nivel que esta realizan-do
el ejercicio. Pulsando las teclas level▼ o level▲, usted puede aumentar o disminuir entre los diez niveles
de resistencia del ejercicio.
Cada 10 segundos la pantalla alfanumérica (B), Fig.2, cambia alternativamente entre las lecturas
visualizadas para: Los valores relacionados con: STM; DIST; WAT; PULSE y en la segunda secuencia:
STM; TIME; CAL; PULSE.
Pulsando la tecla STOP se interrumpe el programa y en el display de pantalla alfanumérica inferior (B) Fig.2,
le informara de la media de los valores TIEMPO DE EJERCICIO; DISTANCIA RECORRIDA; VELOCIDAD
MEDIA; CALORIAS CONSUMIDAS; que ha realizado durante el ejercicio, mostrándoselos dos veces cada
cinco segundos.
Si en el tiempo que trascurre la información de los valores medios, no se toca ninguna tecla, o no se hace
ejercicio y se pulsa la tecla STOP pasara al programa manual.
MODO PROGRAMAS
.
El monitor tiene: 1 programa de perfil MANUAL; 8 perfiles de PROGRAMA predefinidos; de 1 perfil de
usuario programable ( USER ) así como un TEST para varón, y TEST para mujer, y de 1 programa de ritmo
cardíaco constante ( H.R.C ).
Ver gráficos de los programas preprogramados en las paginas finales de este manual.

SK
LINE
sportkoncept
9
P1 - P8 PROGRAMAS DE GRÁFICOS.-
Estando el monitor encendido le mostrara el display de matriz de LEDs superior (A) Fig.2 el perfil y la letra
“M” de manual. Para visualizar lo diferentes perfiles preprogramados se utilizan las teclas LEVEL▲ y
LEVEL▼. Una vez se haya seleccionado un perfil en concreto pulse la tecla ENTER.
En el display de matriz de LEDs superior ( A ) le pedira la edad entre (10 y 99 años) seleccione su edad con
las teclas numéricas (F) Fig.3, pulse ENTER. A continuación le pedirá el peso entre (30 y 199Kg),
seleccione su peso con las teclas numéricas (F) Fig.3, pulse ENTER. A continuación le pedirá el tiempo de
duración del ejercicio entre (10 y 60 minutos), seleccione el tiempo con las teclas numéricas (F) Fig.3, pulse
ENTER y dará comienzo a su ejercicio.
Dentro de cada perfil preprogramado el usuario dispone de cuatro niveles de dificultad diferentes (L1 – L4),
para seleccionar cualquiera de ellos es suficiente con utilizar las teclas LEVEL▲ y LEVEL▼ durante la
realización del ejercicio.
Una vez haya terminado el programa que ha estado realizando el ejercicio el monitor le habrá calculado la
media de los valores en el cual ha realizado el ejercicio y se los mostrara el la pantalla alfanumerica inferior
(B) Fig.2.
Pulsando la tecla STOP se interrumpe el programa y en el display de pantalla alfanumérica inferior (B) Fig.2,
le informara de la media de los valores TIEMPO DE EJERCICIO; DISTANCIA RECORRIDA; VELOCIDAD
MEDIA; CALORIAS CONSUMIDAS; que ha realizado durante el ejercicio, mostrándoselos dos veces cada
cinco segundos .
Si en el tiempo que trascurre la información de los valores medios, no se toca ninguna tecla, no se hace
ejercicio y se pulsa la tecla STOP pasara al programa manual.
P9 PROGRAMA USUARIO (USER).
Estando el monitor encendido le mostrara el display de matriz de LEDs superior (A) Fig.2 el perfil y la letra
“M” de manual, para visualizar lo diferentes perfiles preprogramados se utilizan las teclas LEVEL▲ y
LEVEL▼. Una vez se haya seleccionado el programa 9 (USER), pulse la tecla ENTER.
En el display de matriz de LEDs (A) Fig.2 le pedirá la edad entre (10 y 99 años) seleccione su edad con las
teclas numéricas (F) Fig.3, (si se introduce el valor, fuera de los dos dígitos le mostrara el valor mas
cercano). Pulse ENTER.
A continuación le pedirá el peso entre (30 y 199 Kg), seleccione su peso con las teclas numéricas (F) Fig.3,
pulse ENTER. A continuación le pedirá el tiempo de duración del ejercicio entre (10 y 60 minutos),
seleccione el tiempo con las teclas numéricas (F) y pulse ENTER a continuación pulse la tecla RESET y
puede comenzar a diseñar el perfil de resistencia que usted desee en el display de matriz de LEDs (A).
El perfil a diseñar esta subdividido en 21 pasos, los tres primeros pasos son de calentamiento y solo llegan
al valor limitado de cuatro, para evitar posibles lesiones, el resto hasta 21 llegan al máximo. Para
seleccionar el primer paso, pulse RESET; las teclas LEVEL▲, LEVEL▼, a continuación pulse la tecla
ENTER, y así sucesivamente hasta completar el grafico del programa que usted desee.
Si se ha equivocado al grabar algún paso, pulse la tecla RESET y volverá al paso anterior.
A continuación pulse tecla ENTER y comience el ejercicio con el perfil que ha diseñado.
Una vez haya terminado el programa que ha estado realizando el ejercicio el monitor le habrá calculado la
media de los valores en el cual ha realizado el ejercicio y se los mostrara el la pantalla alfanumerica (B)
Fig.2.
Pulsando la tecla STOP se interrumpe el programa y en el display de pantalla alfanumérica inferior (B) Fig.2,
le informara de la media de los valores TIEMPO DE EJERCICIO; DISTANCIA RECORRIDA; CALORIAS
CONSUMIDAS; que ha realizado durante el ejercicio, mostrándoselos dos veces cada cinco segundos. Si
en el tiempo que trascurre la información de los valores medios no se toca ninguna tecla, no se hace
ejercicio o se pulsa la tecla STOP pasara al programa manual.
NOTA: Los tres primeros pasos del programa son de calentamiento con unos niveles de resistencia bajos,
de ese modo evitaremos cualquier tipo de lesiones.

SK
LINE
sportkoncept
10
P10 - P11 PROGRAMAS DE TEST VARON – MUJER.-
El objetivo del test es valorar la forma física del usuario. Para ello se ha de comenzar el ejercicio y mantener
la velocidad del volante de inercia interna entre 70 y 80 revoluciones por minuto (r.p.m.) durante 5 minutos.
La diferencia entre los programas de varón y mujer esta en los Watios, los valores del varón esta
seleccionado en 150 W. y en el programa de mujer en 100 W.
Estando el monitor encendido, el display de matriz de LEDs superior (A) Fig.2 le mostrará el perfil y la letra
“M” de manual. Para visualizar los diferentes perfiles preprogramados se utilizan las teclas LEVEL▲ y
LEVEL▼. Una vez se haya seleccionado el programa TEST Varón ó TEST Mujer, pulse la tecla ENTER. A
continuación, el display de Pantalla alfanumérica inferior (B) Fig.2 le pedirá la edad (entre 10 y 99 años).
Seleccione su edad con las teclas numéricas (F) Fig.3 y pulse ENTER.
El LED superior (A), Fig.2, mostrará un símbolo del corazón parpadeando. Coloque las manos en los
sensores de impulso (Hand-Grip) situados en el manillar o coloque la banda telemétrica en el pecho, si
dispone de una. Comience el TEST a una velocidad, con el volante de inercia girando entre 70 y 80 R.P.M.,
y continúe el ejercicio durante 5 minutos. Mientras la rueda se mantenga entre 70 y 80 R.P.M., el monitor
mostrará “OK”, sin embargo, si se sitúa por encima o por debajo de estas R.P.M, el monitor mostrará el
mensaje "R.P.M".
Al final del test de 5 minutos, se le adjudicará una puntuación entre 1 (muy baja) y 5 (excelente). También
puede aparecer una valoración de 0 que quiere decir que el test no ha sido realizado correctamente (No se
ha respetado la cadencia de pedaleo de 75 r.p.m. o no se ha utilizado la medición de ritmo cardiaco).
NOTA: Es obligatorio para hacer el test utilizar la medición del ritmo cardiaco, usando para ello los sensores
manuales (hand-grip) o la banda de pecho. Es conveniente hacer un pequeño calentamiento antes de
realizar el test. Esto evitará lesiones.
El máximo número de pulsaciones que una persona nunca debe sobrepasar se le denomina ritmo máximo y
éste disminuye con la edad. Una sencilla fórmula para calcular es restar a 220 la edad en años. El ejercicio,
para que sea correcto, debe mantenerse entre el 65% y el 85% del ritmo cardíaco máximo y se recomienda
no sobrepasar el 85%.
Cuando sus pulsaciones pasen del 85% del ritmo cardiaco máximo aparecerá un corazón parpadeando y un
pitido durante 2 segundos hasta que sus pulsaciones no bajen del 85 % de su ritmo cardiaco máximo.
Se recomienda trabajar por debajo del 85% del ritmo cardíaco máximo por razones de seguridad.
P12 PROGRAMA DE RITMO CARDIACO CONSTANTE ( H R C ).-
Es conveniente hacer un pequeño calentamiento antes de realizar el programa. Esto evitará posibles
lesiones.
Este programa permite hacer el ejercicio a un ritmo cardiaco (entre el 65 y el 85% del ritmo cardiaco
máximo) y la máquina le ajustará el nivel de resistencia para lograr que en todo momento el usuario
mantenga el ritmo cardiaco al nivel seleccionado. Es obligatorio utilizar la medición del ritmo cardiaco,
usando para ello la banda de pulso telemétrico de pecho, y no sobrepasar del 85% del ritmo cardiaco
máximo.
Estando el monitor encendido le mostrará el display de matriz de LEDs superior (A) Fig.2 el perfil y la letra
“M” de manual, para visualizar lo diferentes perfiles preprogramados se utilizan las teclas LEVEL▲ y
LEVEL▼. Una vez se haya seleccionado el programa HRC pulse la tecla ENTER.
Pulse ENTER para modificar el ritmo cardíaco objetivo y la ventana LED mostrará (INTRODUZCA
CONSIGNA DE PULSO <40-220>). Pulse las teclas numéricas y la ventana LED mostrará (PULSO= xxx) y
parpadearán los valores introducidos. Pulse las teclas numéricas para modificar e introducir un número de
tres dígitos (valores: 40 ~ 220). Si se introduce un número inadecuado, se mostrará el número mayor o
más pequeño. Introduzca un número adecuado y pulse ENTER para confirmar.
La resistencia es Nivel 1 y cambia a la línea siguiente cada minuto. Si la velocidad (RPM) no es suficiente,
la matriz de puntos mostrará (RPM) y se pasará al modo de pausa después de 15 segundos.

SK
LINE
sportkoncept
11
Comience el ejercicio a una velocidad, a la que el volante de inercia alcanza 70 a 80 R.P.M, coloque sus
manos sobre los sensores de pulso (hand-grip) situados en el manillar o en el caso de disponer de banda
medidora de pulso telemétrica colóquesela en el pecho, si en el caso de bajar el numero de R.P.M. le
mostrara en el display de matriz de LEDs superior (A) Fig.2 R.P.M, y si sobrepasa las revoluciones le
mostrara en el display R.P.M.
En los tres primeros minutos este programa tiene un esfuerzo programado para evitar cualquier tipo de
lesión. A partir del minuto tercero, el ordenador adecua automáticamente el esfuerzo para mantener el pulso
entorno al valor previamente programado.
REGULACION AUTOMATICA DE ESFUERZO.-
Al iniciarse el ejercicio, la máquina ajusta el nivel de resistencia al minimo, 50W, hasta que realiza la primera
medición de pulso.
Una vez detectado el pulso, el programa realiza una valoración del ritmo cardíaco cada X segundos (Estos
segundos son variables entre 20 y 60, dentro del programa SPR).
La regulación del esfuerzo según las pulsaciones se detalla en los pasos siguientes.
1.- RITMO CARDIACO OBJETIVO mayor que RITMO CARDIACO REAL:
Cuando la diferencia entre el RITMO CARDIACO OBJETIVO y el RITMO CARDIACO REAL es igual o
superior a 15 P.P.M, la REGULACIÓN AUTOMATICA DEL ESFUERZO se hará aumentando de 20 en 20
watios. Cuando esta diferencia sea inferior a 15 P.P.M, la regulación pasará a realizarse de 10 en 10 watios
hasta ajustar ambos ritmos cardiacos.
2.- RITMO CARDIACO REAL mayor que RITMO CARDIACO OBJETIVO:
- Cuando la diferencia entre el RITMO CARDIACO REAL y el RITMO CARDIACO OBJETIVO es igual o
superior a 15 P.P.M, la REGULACIÓN AUTOMATICA DEL ESFUERZO se hará disminuyendo de 20 en 20
watios. Cuando esta diferencia sea inferior a 15 P.P.M., la regulación pasará a realizarse de 10 en 10 watios
hasta ajustar ambos ritmos cardiacos.
- Cuando la diferencia entre el RITMO CARDIACO REAL y el RITMO CARDIACO OBJETIVO sea igual o
superior a 30 P.P.M, el display de la Pantalla alfanumérica inferior (B) le mostrara la frase DISMINUYA LA
INTENSIDAD DEL EJERCICIO, SU RITMO CARDIACO ES DEMASIADO ELEVADO y la regulación
automática de la maquina bajara el esfuerzo al mínimo (50W).
Si durante el ejercicio no se detecta el ritmo cardiaco se mostrara Cifra de ritmo cardiaco? y parpadeara,
si esta situación se mantiene durante 60 segundos, se pasa a modo manual.
NOTA: Al máximo número de pulsaciones que una persona nunca debe sobrepasar se le denomina ritmo
cardiaco máximo y éste disminuye con la edad. Una sencilla fórmula para calcular es restar a 220 la edad
en años. El ejercicio, para que sea correcto, debe mantenerse entre el 65% y el 85% del ritmo cardíaco
máximo y se recomienda no sobrepasar el 85%.
Se recomienda trabajar por debajo del 85% del ritmo cardíaco máximo por razones de seguridad. Si no se
usa un sistema de medición del ritmo cardiaco, en la pantalla se encenderá el símbolo del corazón y una
interrogante, si la máquina continua sin recibir información del ritmo cardiaco el programa se suspende y
será necesario realizar una nueva selección de programa.
SIGNIFICADO DE LOS SÍMBOLOS.-
En la pantalla pueden aparecer una serie de símbolos o de palabras con el siguiente significado:
Símbolo del corazón y una interrogante:
No se ha colocado la banda del pecho o no se la ha colocado adecuadamente.
Símbolo del corazón parpadeando: Este símbolo sólo aparecerá en los tests.
Al máximo número de pulsaciones que una persona nunca debe sobrepasar se le denomina ritmo máximo y
éste disminuye con la edad. Una sencilla fórmula para calcular es restar a 220 la edad en años. El ejercicio,
para que sea correcto, debe mantenerse entre el 65 y el 85% del ritmo cardíaco máximo y se recomienda
no sobrepasar el 85%.Cuando sus pulsaciones pasen del 85% del ritmo cardiaco máximo aparecerá un
corazón parpadeando y un pitido durante 2 segundos hasta que sus pulsaciones no bajen del 85% de su
ritmo cardiaco máximo. Se recomienda trabajar por debajo del 85% del ritmo cardíaco máximo por razones
de seguridad.

SK
LINE
sportkoncept
12
*0* :
Este símbolo aparece en los tests masculino y femenino y significa que usted ha realizado el test mal(es
decir usted no ha estado realizando el test a 75 r.p.m. o no se ha colocado la banda de pecho).
Símbolo de Llave fija:
Avería mecánica. Apagar la máquina y encenderla pasados 2 minutos. La máquina posee un sistema de
corrección de averías automático, no obstante, si el problema persiste, póngase en contacto con el servicio
técnico.
TEXTOS DE INFORMACIÓN MONITOR
1. “BIENVENIDO A HI POWER”
2. “PULSE LAS FLECHAS PARA SELECCIONAR PERFIL”
3. “PULSE QUICK/START PARA COMENZAR”
4. “PULSE ENTER PARA COMENZAR PERFIL”
5. “ERROR”
6. “CONSULTE SERVICIO TECNICO”
7. “INTRODUZCA SU EDAD <10-99>”
“INTRODUZCA SU PESO <30-199> KG”
8.
“INTRODUZCA SU PESO <70-440> LB”
9. “INTRODUZCA EL TIEMPO DE EJERCICIO <10-60> MINUTOS”
“INTRODUZCA CONSIGNA DE WATTIOS <25-400>”
10.
“WATTS=”
11. “EDAD=”
12. “INTRODUZCA CONSIGNA DE PULSO <40-220>”
13. “PULSO=”
14. “PULSE PAUSE PARA CONTINUAR EJERCICIO. PULSE STOP PARA TERMINAR”
15. “TIEMPO DE EJERCICIO=”
16. “DISTANCIA RECORRIDA=”
17. “VELOCIDAD MEDIA=”
18. “CALORIAS CONSUMIDAS=”
19. “PULSE ENTER PARA ACEPTAR EL PERFIL MEMORIZADO. PULSE RESET PARA MODIFICAR EL PERFIL.”
20.
“UTILICE LAS FLECHAS PARA SELECCIONAR LA INTENSIDAD PARA LA COLUMNA ACTIVA.
PULSE ENTER PARA PASAR A LA SIGUIENTE COLUMNA. PULSE RESET PARA VOLVER A MODO MANUAL.”
21. “DISMINUYA LA INTENSIDAD DEL EJERCICIO. SU RITMO CARDIACO ES DEMASIADO ELEVADO”
22. “EL RESULTADO DEL TEST ES=”
Para cualquier consulta, no dude en ponerse en contacto con el (S.A.T).Servicio de Asistencia Técnica,
llamando al teléfono de atención al cliente (ver página final del presente manual).
BH SE RESERVA EL DERECHO A MODIFICAR LAS ESPECIFICACIONES DE SUS PRODUCTOS SIN
PREVIO AVISO
.

SK
LINE
sportkoncept
13
ENGLISH
GENERAL INSTRUCTIONS.-
This exercise machine is equipped with a dynamo that makes use of the energy produced by the user (while
exercising) to power the electronic monitor and the brake controller.
This monitor screen is touch sensitive, so to press a key just place your finger on the said key displayed on
the screen.
This exercise machine also includes a set of batteries that store enough energy to keep the electronic
monitor operating for 60 seconds after the exercise has finished.
Should the battery run down because of an operational fault, it can be recharged by using the adapter that is
supplied with the exercise machine.
To switch the monitor on, start doing exercise with the machine.
ATTENTION: The adapter should be plugged into an appropriate socket. Make sure that the mains voltage
is compatible with the voltage for the adapter supplied with the machine.
The electronic monitor is designed to be easy and intuitive to use.The messages that appear on the bottom
screen (B) will guide the user throughout the whole exercise.
Nevertheless, we recommend that the gym instructor reads through this section carefully to become fully
familiar with the electronic monitor in order to show the user how to operate it correctly.
IMPORTANT: TO ENSURE THAT THE BATTERIES OPERATE CORRECTLY AND LAST LONGER IT IS
ADVISABLE TO RECHARGE THEM USING THE ADAPTER SUPPLIED WITH THE MACHINE.
PERSONALISING THE ELECTRONIC MONITOR.-
Follow the steps below to access the monitor’s personalisation mode: With the monitor switched off, press
and hold the RESET key and the O key at the same time, and then begin the exercise without releasing the
keys.
1) CHANGING FROM km to Mile.-
As soon as the monitor switches on, the words “FACTORY SETTINGS” will appear on the alphanumeric
screen (B), Fig.1. Press the ENTER key and the word UNITS will appear, press the ENTER key and the
word METRIC will flash, select the unit of speed by using the LEVEL▲ and LEVEL▼ keys (METRIC / Km. -ENGLISH / Miles) press the ENTER key and the word “UNITS” will start flashing again, using the LEVEL▲
key, pass on to the (2 WHEELSIZE) setting on the adjoining bottom screen.
If you wish to exit the personalisation mode, press the STOP key and the manual program will be displayed
on the LED array (A).
2) CHANGING DISTANCE PER REVOLUTION.-
With the word “WHEELSIZE” flashing, press the ENTER key and a figure between 0 to 80 will start flashing.
Select the value 80 using the LEVEL▲ y LEVEL▼ keys press the ENTER key and the word “WHEELSIZE”
will start flashing again, using the LEVEL▲ key, pass on to the (3 LANGUAGE) setting on the adjoining
bottom screen. If you wish to exit the personalisation mode press the STOP key.
3) CHANGING LANGUAGE.-
With the word “LANGUAGE" flashing, press the ENTER key and the current language will start flashing.
Select your language using the LEVEL▲ and LEVEL▼ keys and then press ENTER, the word
“LANGUAGE” will start flashing again, using the LEVEL▲ key , pass on to the (4 POWER) setting on the
adjoining bottom screen. If you wish to exit the personalisation mode press the STOP key.
4) SELF OR ELECTRICALLY POWERED.-
With the word “Power” flashing, press the ENTER key and the word ON or OFF will start flashing. Select the
option that is flashing by using the LEVEL▲ and LEVEL▼ keys.
The ON option is used to keep the monitor on at all times. If the ON option is selected it will be necessary
to ensure that the machine is plugged into the mains supply by means of the adapter. When you have
selected an option press the ENTER key to confirm and the word
"POWER" will start flashing again. Stop
exercising.
SK
LINE
sportkoncept
14
If you wish to switch the monitor off with this option, press and hold the STOP keys until you hear a beep.
Wait 45 seconds and the unit will switch over to the OFF option.
With the OFF option the machine is self powered, which means that the monitor will come on as soon as you
start exercising. Once you have selected this option press the ENTER key and the word “POWER” will start
flashing. Use the LEVEL▲ key to pass on to the (5 SPR time) setting on the adjoining bottom screen.
With the OFF option selected the monitor will switch itself off 45 seconds after you have finished exercising.
If you wish to exit the personalisation mode press the STOP key.
5) STEADY PULSE RATE TIME.-
With the word “SPR time" flashing, press the ENTER key and a figure between 20 and 60 seconds will start
flashing. Select the flashing value using the LEVEL▲ and LEVEL▼ keys and then press ENTER to confirm,
the word “SPR time” will start flashing again, using the LEVEL▲ key , pass on to the (6 MANUAL T) setting
on the adjoining bottom screen. If you wish to exit the personalisation mode press the STOP key.
6) MAX. EXERCISE TIME.-
With the word “MANUAL T" flashing, press the ENTER key and a figure between 0 and 60 minutes will start
flashing. Select the flashing value using the LEVEL▲ and LEVEL▼ keys and then press ENTER to confirm,
the word “MANUAL T” will start flashing again, using the LEVEL▲ key , pass on to the (7 TEXT) setting on
the adjoining bottom screen. If you wish to exit the personalisation mode press the STOP key.
7) CHANGING THE WELCOME MESSAGE.-
With the word “TEXT” flashing, press the ENTER key and the word ON or OFF will start flashing. Select the
option that is flashing by using the LEVEL▲ and LEVEL▼ keys choosing the ON option allows you to
change the monitor’s welcome message.
Once the ON option has been selected, press the ENTER key and a flashing cursor will appear on the
alphanumeric screen (B). Use the LEVEL▲ and LEVEL▼ keys to enter a welcome message letter by letter.
Once you have finished entering the message, press the ENTER key for a few seconds and the word
“TEXT” will start flashing. Use the LEVEL▲ key to pass on to the (8 SOUNDS) setting on the adjoining
bottom screen. If you wish to exit the personalisation mode press the STOP key.
8) CHANGING THE SOUND.-
With the word “SOUNDS" flashing, press the ENTER key and the word ON or OFF will start flashing. Select
the flashing value using the LEVEL▲ and LEVEL▼ keys and then press ENTER to confirm, the word
“SOUNDS” will start flashing again.
Press the STOP key to exit the personalisation mode and the manual program will be displayed on the LED
array (A).
Begin exercising and you will see that the changes have been made.
PERSONALISED SETTINGS PANEL
Setting Description
1) Metric
Change speed unit from km/h to mph
2) Wheelsize
Change rpm – distance travelled ratio
3) Language
Define the language in which messages are displayed on the monitor.
Options: Spanish, Portuguese, English, French, German, Dutch, Italian.
4) Power
Define the method of operating the machine, between self-powered or connected to
the mains supply. If the ON mode is selected, the machine has to be plugged into the
mains supply. To switch off the monitor in ON mode, hold the STOP key down for 4
seconds.
Options: - OFF (Battery operated)
- ON (Mains operated).
IMPORTANT: With the ON option the machine has to be plugged into the mains
supply otherwise the batteries will run down and may be rendered useless.
5) SPR time
Establishes the calculation rate for the steady pulse rate program.
Options: Value in seconds (minimum 20, maximum 60)
6) Manual T
Establishes a maximum time limit for the exercise.
Options: - 0 (No maximum time limit established)
- Exercise time limit values in minutes (maximum 60)

SK
LINE
sportkoncept
15
7) Text
Options: - OFF (The welcome message is displayed by default)
- ON (Allows the welcome message to be edited)
For personalising the welcome message, including, for example, the name of the
gymnasium.
8) Sounds
Enables or disables sound messages emitted by the monitor.
Options: - ON (Enabled)
- OFF (Disabled)
ELEMENTS OF THE ELECTRONIC MONITOR (Fig 1).-
The electronic monitor is made up of two distinct areas:
The top area, Fig.2 (A – B – C) for the DISPLAY
The bottom area, Fig.3 (E – F – G) for the KEYPAD
DISPLAY.-
This area comprises of two screens.
(A) The top LED array, which displays real-time exertion, levels being produced during the selected
program.
(B) Bottom alphanumeric screen, which guides the user selection options and exercise.
The top screen (A) displays the various pre-programmed exercise profiles (programs) that we can select
and, during exercise, current exertion levels.
The bottom alphanumeric screen (B) is used to guide the user when selecting the exercise to do, as well as
displaying information about the exercise both during and after the session. The LED indicators (C) located
below the alphanumeric screen give a simultaneous readout of SPEED/R.P.M; TIME/DISTANCE;
CALORIES/WATTS; PULSE RATE and indicate which information is being displayed throughout the
exercise.
The data that are displayed on the LEDs (C) during exercise are as follows:
-STEPS/MIN: SPEED: This shows an estimated value of the linear velocity at which a bicycle would be
travelling based on the user’s pedalling rate. The value is displayed in kilometres per hour (km/h)
-TIME: This shows the time that has elapsed since you started the exercise or, if a time limit has been
established, the amount of time left before the exercise finishes. The time is displayed in minutes and
seconds (mm:ss).
-DISTANCE: This shows the distance that you have travelled since beginning the exercise. The distance is
calculated by using the estimated linear velocity (SPEED) and the units displayed are kilometres and
hectometres
-CALORIES: This shows the estimated number of calories that have been burnt off up until now. This
calculation is based on the energy being produced and the weight and age values provided by the user.
-WATTS: This shows the amount of energy currently being produced during the exercise. This calculation is
based on the exertion level at which the user is working and the pedalling rate. The information is displayed
in Watts.
-PULSE: This shows the user’s heart rate, assuming that this information can be accessed through the
hand-grip sensors or the telemetric chest band. When both of these are used together, priority is given to the
telemetric chest band. For more information about heart rate refer to the section entitled: Pulse
measurement; chest band and hand-grip

SK
LINE
sportkoncept
16
KEYPAD.-
The function of each key is listed below. See Fig.3
.
The electronic monitor includes an easy-to-use keypad. This keypad consists of Fan keys (E), numeric keys
(F) and function keys (G).
- Fan keys (E) – Off / On; Low (minimum speed); High (maximum speed).
- Numeric keys (F) - (1- 0) are used to enter the data requested by the monitor.
- Function keys (G) – reset; level
; level
; enter; pause; stop; quick/start are used to select a particular
exercise, enter requested data, control exercise exertion levels and to finish the exercise.
-reset.-
Reset key. This is used to erase the data that have been entered into the monitor when selecting
a program.
-level▼.-
Key for decreasing exertion level. When pressed during exercise this key will decrease the
exertion level by one machine setting. During the selection of pre-programmed profiles, it is used to move on
to the next profile screen.
-level▲.-
Key for increasing exertion levels. When pressed during exercise this key will increase the
exertion level by one machine setting. During the selection of pre-programmed profiles, it is used to move
back to the previous profile screen.
-enter.-
Selection and validation key. This is used during pre-programmed profile selection to select a
profile, confirm data that have been entered and to start the exercise. It is also used during user profile
programming to confirm the exertion level settings for each minute.
-pause.-
Pause key. If this is pressed during a session, the exercise is interrupted and the exercise
chronometer is halted. To restart the exercise chronometer press the pause key again or continue
exercising. There is a 45 second time limit in pause mode, after which the exercise will be taken as finished
and the monitor will switch itself off.
If, in pause mode, the STOP key is pressed then the exercise will be taken as finished.
-stop.-
Stop key. If this is pressed during the session, the exercise will be taken as finished and exertion
settings will drop to minimum level. A summary of all the exercise data will be displayed and it will then return
to the start screen.
Hold the STOP key down for 3 seconds in Start/Ready mode, and the console will automatically change to
off status with a beep if the POWER option under project mode is on.
-quick/start.-
Quick start key. When this key is pressed, provided that the LED on the key is flashing,
exercise will begin in manual mode.
STARTING.-
In order to switch the monitor on it is necessary to pedal so that the crank spins at 45 r.p.m, as soon as it
reaches 45 r.p.m the monitor will come on and remain on for 60 seconds so that you can program it.
You can also plug the adapter that is supplied with the machine into a mains socket, assuming that you have
chosen the ON option in the personalised settings (step 4 POWER).
Once the monitor is on it will display the profile and the letter “M” for manual on the LED array (A) Fig.2, and
the “WELCOME TO HI POWER” welcome message on the bottom alphanumeric screen (B).
You can start the program in manual mode by pressing the QUICK/START key and by pressing the keys
level▲ or level▼ keys you can increase or decrease the exertion levels.
OPERATING INSTRUCTIONS.-
STARTING THE FAN.-
The monitor on this machine is fitted with an air vent (D), Fig.1, through which a FAN provides two air
speeds, LOW and HIGH. To switch the fan on while exercising press the ON/OFF key on the keypad, Fig.3,
and the fan will start. Whenever the monitor is switched to PAUSE the fan will switch off.
SLEEP MODE:
This mode is activated if no RPM signal is received within 45 seconds when in stand-by mode. No windows
are displayed while in this mode. You have to step on the footplate to produce a signal and reopen the
display window. Sleep mode cannot be accessed if the appliance is switched on.
If the adapter is connected to the machine then the console will not switch over to sleep mode when the
POWER option under project mode is switched on. With no adapter connected, the console will switch over
to sleep mode even when it is switched ON.

SK
LINE
sportkoncept
17
P0 MANUAL MODE.-
Once the monitor is on it will display the profile and the letter “M” for manual on the LED array (A) Fig.2, and
the “WELCOME TO HI POWER” welcome message on the bottom alphanumeric screen (B) Fig.2.
You can start the program in manual mode by pressing the QUICK / START key.
The flashing top LED array (A), Fig.2, will indicate the exertion level being produced during exercise. By
pressing the level▲ or level▼ keys you can increase or decrease the exertion levels between ten different
settings.
Every 10 seconds the alphanumeric screen (B), Fig.2, will switch between displayed readings for: Values
relating to: STM; DIST; WAT; PULSE and In the second sequence : STM; TIME; CAL; PULSE.
The program can be interrupted by pressing the STOP key and the bottom alphanumeric screen (B), Fig.2,
will display the average values for EXERCISE TIME; DISTANCE TRAVELLED; CALORIES CONSUMED
during the exercise. These values will be displayed twice every five seconds.
If, during the time it takes to display these average values, no keys are touched and no further exercise is
done and the STOP key is pressed then the machine will go back to the manual program.
PROGRAM MODE.-
The monitor has: 1 MANUAL profile program; 8 pre-programmed PROGRAM profiles; a user programmable
profile (USER) as well as a male TEST, female TEST, steady watt rate and steady pulse rate (H.R.C)
programs.
See pre-programmed program graphs at the end of this manual.
P1 - P8 GRAPHIC PROGRAMS.-
With the monitor switched on, the top LED array (A), Fig.2, will display the profile and the letter “M” for
manual. The LEVEL▲ and LEVEL▼ keys are used to display the various pre-programmed profiles. Once a
specific profile has been selected press the ENTER key.
The top LED array (A) will ask for an age value (between 10 and 99), select your age by using the number
keys (F), Fig.3, and press ENTER. It will now ask for your weight (between 30 and 199 kg), select your
weight by using the number keys (F), Fig.3, press ENTER. It will now ask for an exercise time limit (between
10 and 60 minutes), select the time by using the number keys (F), Fig.3, press ENTER and this will begin
your exercise session.
There are four different difficulty levels (L1 – L4) within each pre-programmed profile, to select any of these
just press the LEVEL▲ and LEVEL▼ keys during the exercise.
Once you have finished the exercise program, the monitor will calculate the average values at which you did
the exercise and display these on the bottom alphanumeric screen (B), Fig.2.
The program can be interrupted by pressing the STOP key and the bottom alphanumeric screen (B), Fig.2,
will display the average values for EXERCISE TIME; DISTANCE COVERED; AVERAGE SPEED;
CALORIES CONSUMED during the exercise. These values will be displayed twice every five seconds.
If, during the time it takes to display these average values, no keys are touched and no further exercise is
done and the STOP key is pressed then the machine will go back to the manual program.
P9 USER PROGRAM (USER).-
With the monitor switched on, the top LED array (A), Fig.2, will display the profile and the letter “M” for
manual. Use the LEVEL▲ and LEVEL▼ keys to display the various pre-programmed profiles. Once
program 9 (USER) has been selected, press the ENTER key.
The top LED array (A), Fig.2, will ask for an age value (between 10 and 99), select your age by using the
number keys (F), Fig.3, (If the value entered exceeds these limits it will display the closest acceptable value).
Press ENTER.
It will now ask for your weight (between 30 and 199kg), select your weight by using the number keys (F),
Fig.3, press ENTER. It will now ask for an exercise time limit (between 10 and 60 minutes), select the time
by using the number keys (F), and press ENTER. Now press the RESET key and you can begin to design a
personalised exercise profile on the LED array (A).
The profile to be designed is subdivided into 21 steps; the first three steps are for warm-up purposes and
only reach a limited value of four in order to prevent possible injuries, the rest of the 21 steps reach
maximum. To select the first step press RESET; the LEVEL▲, LEVEL▼ keys and then press the ENTER
key, and so on until you have completed the graph for your own personal program.

SK
LINE
sportkoncept
18
If you make a mistake when recording any step, press the RESET key and repeat the previous step.
Next press the ENTER key and begin exercising with your custom designed program. Once you have
finished the exercise program, the monitor will calculate the average values at which you did the exercise
and display these on the bottom alphanumeric screen (B), Fig.2.
The program can be interrupted by pressing the STOP key and the bottom alphanumeric screen (B), Fig.2,
will display the average values for EXERCISE TIME; DISTANCE COVERED; CALORIES CONSUMED
during the exercise. These values will be displayed twice every five seconds.
If, during the time it takes to display these average values, no keys are touched and no further exercise is
done and the STOP key is pressed then the machine will go back to the manual program.
NOTE: The first three steps of the program are for warm-up purposes with limited exertion levels to prevent
any possible injuries.
P10 – P11 MALE - FEMALE TEST PROGRAMS.-
The aim of this test is to assess the user’s level of fitness to do this you have to maintain a pedalling speed
of between 70 to 80 revolutions per minute (r.p.m) for 5 minutes. The difference between the Male and
Female programs is in the Watts. The value for the Male test is set at 150 W whereas the Female test is set
at 100 W.
With the monitor switched on, the top LED array (A), Fig.2, will display the profile and the letter “M” for
manual. The LEVEL▲ and LEVEL▼ keys are used to display the various pre-programmed profiles. Once
the Male TEST or Female TEST has been selected, press the ENTER key.
Next, the bottom alphanumeric screen (B), Fig.2, will ask for an age value (between 10 and 99), select your
age by using the number keys (F), Fig.3, press ENTER.
The top LED array (A), Fig.2, will display a flashing heart symbol. Place your hands on the pulse sensors
(handgrip) located on the handlebar or place the telemetric chest band on your chest, if you have one. Begin
the TEST at a pedalling rate of between 70 to 80 R.P.M, pedalling for 5 minutes. As long as you stay within
70 to 80 R.P.M limit the monitor will display “OK” however if you go above or drop below this R.P.M then the
monitor will display the "R.P.M" prompt.
At the end of the 5 minute test you will be awarded a score between 1 (very poor) and 5 (excellent). See
tables Fig.4 & 5. A 0 score may also appear, which means that the test was not done correctly (the 75r.p.m
pedalling rate was not maintained or heart rate measurement sensor was not used correctly).
NOTE: In order to do the test it is essential to use heart rate measurement, using either the hand-grip
sensors or the chest band. It is advisable to do a brief warm-up session before doing this test. This will
prevent possible injuries.
The maximum number of heartbeats that a person should not exceed is referred to as the maximum Herat
rate and this value drops with age. A simple formula to calculate this is to subtract your age, in years, from
the number 220. The maximum Herat rate should be kept between 65% and 85% for correct exercise, it is
not advisable to go above 85%.
Whenever your pulse rate exceeds 85% of the maximum heart rate value a flashing heart symbol will appear
and a 2 second beep will sound until your pulse rate drops below 85% of your maximum heart rate.
For safety reasons it is advisable to exercise at below 85% of the maximum heart rate.
P-12 CONSTANT HEART RATE PROGRAM (H R C).-
It is advisable to do a brief warm-up session before using this program. This will prevent possible injuries.
This program allows you to select a heart rate (between 65% and 85% of the maximum heart rate) and the
machine will automatically adjust exertion levels to ensure that the user maintains the selected heart rate
value. Use of heart rate measurement using telemetric chest band is obligatory and you must not exceed
85% of your maximum heart rate value.
With the monitor switched on, the top LED array (A), Fig.2, will display the profile and the letter “M” for
manual. Use the LEVEL▲ and LEVEL▼ keys to display the various pre-programmed profiles. Once the
HRC program has been selected, press the ENTER key.

SK
LINE
sportkoncept
19
Press the ENTER key to modify the target heart rate and the LED window will display “ENTER PULSE
SETTING <40-220>” Press the number keys and the LED window will show “PULSE = xxx” and the
specified value will flash. Press the number keys to modify and enter a three digit number (values: 40 ~
220). If the number is beyond these limits it will display a larger or smaller number. Enter a value within the
said limits and press ENTER to confirm.
The exertion level is 1 and moves to the next line every minute. If the speed (RPM) is too slow, the dot
matrix display will show “RPM” and switch to pause mode alter 15 seconds.
Begin the exercise at a pedalling rate of between 70 to 80 R.P.M., place your hands on the pulse sensors
(handgrip) located on the handlebar or place the telemetric chest band on your chest, if you have one.
Should you go above or drop below this R.P.M then the top LED array (A), Fig.2, will display the "R.P.M"
prompt.
This program uses a preset exertion level during the first three minutes in order to prevent any type of injury.
After the third minute, the computer will automatically adjust the exertion setting to keep the pulse rate at the
previously programmed value.
AUTOMATIC EXERTION SETTING.-
At the beginning of the exercise the machine sets the exertion level to minimum, i.e. 50W, until the first pulse
reading is taken.
Once the pulse rate is established the program calculates your heart rate every X seconds (this period can
be modified between 20 to 60 seconds within the SPR program).
The exertion setting based on pulse rate is explained in the following steps.
1.- TARGET HEART RATE greater than ACTUAL HEART RATE:
When the difference between the TARGET HEART RATE and the ACTUAL HEART RATE is equal to or
greater than 15r.p.m., the AUTOMATIC EXERTION CONTROL will start increasing in steps of 20 Watts.
When the difference is less than 15 r.p.m the setting will change in steps of 10 Watts until both heart rates
match.
2.- ACTUAL HEART RATE greater than TARGET HEART RATE:
When the difference between the ACTUAL HEART RATE and the TARGET HEART RATE is equal to or
greater than 15r.p.m., the AUTOMATIC EXERTION CONTROL will start decreasing in steps of 20 Watts.
When the difference is less than 15r.p.m the setting will change in steps of 10 Watts until both heart rates
match.
When the difference between the ACTUAL HEART RATE and the TARGET HEART RATE is equal to or
greater than 30r.p.m, the bottom alphanumeric screen (B) will display the message “REDUCE EXERTION
LEVEL, YOUR HEART RATE IS TOO HIGH” and the machine’s automatic control will drop the exertion
level to minimum (50 W).
If no heart rate is detected during the exercise, the message “Heart rate value?” will appear flashing, if this
situation continues for more than 60 seconds the machine will go back to manual mode.
NOTE: The maximum number of heartbeats that a person should not exceed is referred to as the maximum
heart rate and this value drops with age. A simple formula to calculate this value is to subtract your age, in
years, from 220. The maximum heart rate should be kept between 65% and 85% for correct exercise, it is
not advisable to go above 85%
For safety reasons it is advisable to exercise at below 85% of the maximum heart rate. If you do not use a
heart rate measuring system then the heart symbol and a question mark will appear on the screen, if the
machine continues not to receive any heart rate information then the program will be cancelled and you will
have to make a new program selection.

SK
LINE
sportkoncept
20
WHAT THE SYMBOLS MEAN.-
A series of symbols or words may appear on the screen, meaning the following:
Heart symbol and a question mark:
The chest band has not been fitted or is fitted incorrectly.
Flashing heart symbol: This symbol only appears in the tests.
The maximum number of heartbeats that a person should not exceed is referred to as the maximum heart
rate and this value drops with age. A simple formula to calculate this value is to deduct your age, in years,
from the number 220. The maximum heart rate should be kept between 65% and 85% for correct exercise, it
is not advisable to go above 85% whenever your pulse rate exceeds 85% of the maximum heart rate value a
flashing heart symbol will appear and a 2 second beep will sound until your pulse rate drops below 85% of
your maximum heart rate. For safety reasons it is advisable to exercise at below 85% of the maximum heart
rate.
*0*:
This symbol appears in the male and female tests, it means that you have not done the test correctly (i.e.
you have failed to maintain a speed of 75 r.p.m or you have not worn the chest band).
Spanner symbol:
Mechanical fault. Switch the machine off for 2 minutes and then switch it back on again. The machine hasan
automatic fault correction system, nevertheless if the problem persists get in touch with your technical
service centre.
Do not hesitate to get touch with the Technical Assistance Service if you have any queries by phoning customer
services (see last page in manual)
BH RESERVES THE RIGHT TO MODIFY THE SPECIFICATIONS OF ITS PRODUCTS WITHOUT PRIOR
NOTICE
1. “WELCOME TO HI POWER”
2. “PRESS THE ARROWS TO SELECT PROFILE”
3. “ PRESS QUICK/START TO BEGIN”
4. “ PRESS ENTER TO BEGIN PROFILE”
5. “ ERROR”
6. “ CONSULT TECHNICAL SERVICE”
7. “ INTRODUCE YOUR AGE <10-99>”
“ INTRODUCE YOUR WEIGHT <30-199> KG”
8.
“ INTRODUCE YOUR WEIGHT <70-440> LB”
9. “ INTRODUCE EXERCISE TIME <10-60> MINUTES”
“ INTRODUCE WATT SETTING <25-400>”
10.
“ WATTS=”
11. “ AGE=”
12. “ INTRODUCE PULSE RATE SETTING <40-220>”
13. “ PULSE RATE=”
14. “ PRESS PAUSE TO CONTINUE THE EXERCISE. PRESS STOP TO FINISH”
15. “ EXERCISE TIME=”
16. “ DISTANCE COVERED=”
17. “ AVERAGE SPEED=”
18. “ CALORIES BURNT=”
19. “ PRESS ENTER TO ACCEPT THE STORED PROFILE. PRESS RESET TO MODIFY THE PROFILE.”
20.
“ USE THE ARROWS TO SELECT THE EXERTION LEVELS FOR THE ACTIVE COLUMN. PRESS ENTER TO MOVE
TO THE NEXT COLUMN. PRESS RESET TO RETURN TO MANUAL MODE”
21. “ DECREASE EXERTION OF EXERCISE. YOUR HERAT RATE IS TOO HIGH”
22. “ THE RESULT OF THE TEST IS=”

SK
LINE
sportkoncept
21
FRANÇAIS
REMARQUES GÉNÉRALES.-
Cet appareil d’exercice est équipé d’un générateur de courant électrique qui utilise l’énergie produite par
l’utilisateur (pendant l’exercice) pour alimenter le moniteur électronique et le régulateur de freinage de celuici.
Cet écran de moniteur étant du type tactile, pour appuyer sur une touche il faudra placer le doigt sur l’icône
de cette touche située sur l’écran.
Cet appareil d’exercice comprend également une série de batterie qui stockent l’énergie requise pour
maintenir le moniteur électronique opérationnel pendant 60 secondes après la fin de l’exercice.
Si la batterie s’épuise à cause d’une défaillance de fonctionnement, il est possible de la recharger par
l’intermédiaire de l’adaptateur fourni avec l’appareil d’exercice.
Pour mettre en marche le moniteur, l’exercice doit être réaliser sur la machine.
ATTENTION: L’adaptateur doit être branché à une prise appropriée pour ce faire. Vérifier si la tension du
local concorde bien avec celle de l’adaptateur fourni avec la machine.
Le moniteur électronique a été conçu pour être utilisé d’une façon simple et intuitive. Les textes qui
s’afficheront sur l’écran inférieur (B) guideront l’utilisateur pendant la réalisation de l’exercice.
Cependant, nous recommandons au préparateur physique de lire très attentivement ce chapitre afin de
disposer de toutes les informations relatives au moniteur électronique et de montrer ensuite à l’utilisateur la
bonne façon de l’utiliser.
IMPORTANT
: POUR UN BON FONCTIONNEMENT ET UNE LONGUE DURÉE DES BATTERIES, IL
EST RECOMMANDÉ DE LES RECHARGER AVEC L’ADAPTATEUR FOURNI, DÈS RÉCEPTION DE LA
MACHINE.
PERSONNALISATION DU MONITEUR ÉLECTRONIQUE.-
Pour entrer dans le mode de personnalisation du moniteur, faire comme indiqué ci-après: Avec le moniteur
éteint, appuyez en même temps sur la touche RESET et sur la touche O et sans les lâcher, commencez
l’exercice.
1) PASSER DES km aux milles.-
Après allumage du moniteur, l’écran alphanumérique (B) Fig.1 affichera le mot “FACTORY SETTINGS“,
appuyez alors sur la touche ENTER et le mot UNITS clignotera, appuyez ensuite la touche ENTER et le mot
METRIC clignotera, sélectionnez la vitesse avec les touches LEVEL▲ et LEVEL▼ (METRIC/km. -ENGLISH/Milles) appuyez sur la touche ENTER et le mot “UNITS” clignotera à nouveau, avec la touche
LEVEL▲ L passez au point (2 WHEELSIZE) du tableau inférieur ci-joint.
Pour quitter le mode personnalisation, appuyez sur la touche STOP et le display général des LED (A)
affichera le programme manuel.
2) CHANGER DISTANCE PAR TOUR.-
Quand le mot ‘WHEELSIZE’ clignote, appuyez sur ENTER et un chiffre de 0 à 80 clignotera, sélectionnez la
valeur 80 avec les touches LEVEL▲ et LEVEL▼, appuyez sur ENTER et le mot “WHEELSIZE” clignotera à
nouveau, avec la touche LEVEL▲ passez au point (3 LANGUAGE) du tableau inférieur ci-joint. Pour quitter
le mode personnalisation, appuyez sur la touche STOP.
3) MODIFICATION DE LA LANGUE.-
Avec le mot ‘LANGUAGE’ qui clignote, appuyez sur la touche ENTER et la langue clignotera, sélectionnez la
langue de travail avec les touches LEVEL▲ et LEVEL▼, appuyez sur ENTER et le mot “LANGUAGE”
clignotera à nouveau, avec la touche LEVEL▲ passez au point (4 Power) du tableau inférieur ci-joint. Pour
quitter le mode personnalisation, appuyez sur la touche STOP.
 Loading...