


H946
Instrucciones de montaje y utilización Instructions for assembly and use Instructions de montage et utilisation Montage und Gebrauchsanleitung Instruções de montagem e utilização Istruzioni di montaggio e uso Montage-en gebruiksinstrukties

Fig.1
|
|
|
|
|
|
|
|
|
|
|
|
|
|
|
|
|
|
|
|
|
|
Fig.2 |
|
|
|
Fig.3 |
|
|
|
|
|
|
|
|
2
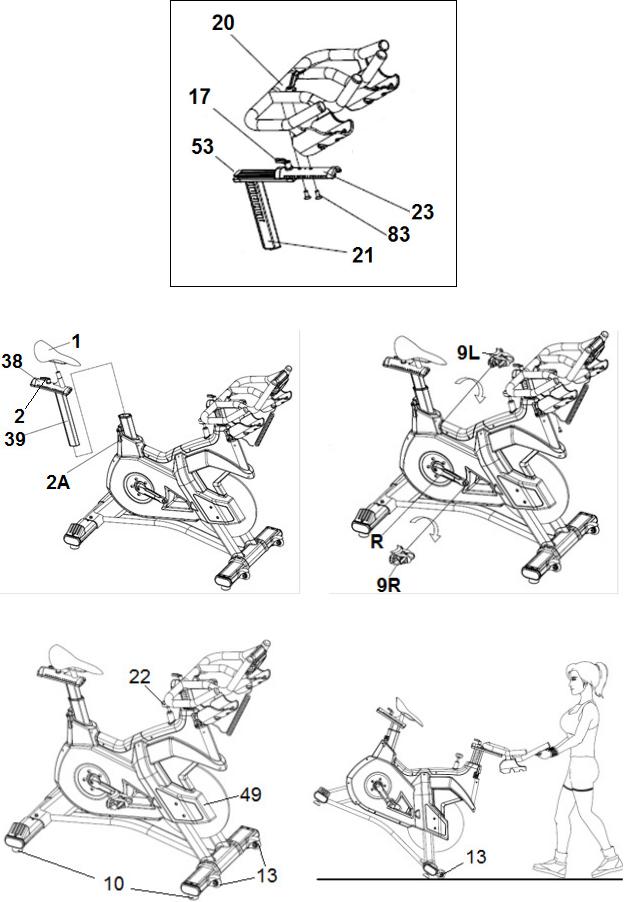
Fig.3A
Fig.4 |
|
Fig.5 |
|
|
|
Fig.6 |
|
Fig.7 |
|
|
|
|
|
|
3

Fig.8 |
|
Fig.9 |
|
|
|
Fig.10 |
Fig.11 |
Fig.12 |
Fig.13 |
Fig.14 |
Fig.15 |
4

Español
AVISO IMPORTANTE DE SEGURIDAD.-
PRECAUCIONES.
Esta bicicleta ha sido diseñada y construida de modo que proporcione la máxima seguridad. Sin embargo, deben aplicarse ciertas precauciones al utilizar aparatos de ejercicio.
Lea el manual en su totalidad antes de montar y utilizar la bicicleta. Este le da indicaciones importantes sobre el montaje, seguridad y uso de la máquina.
Asimismo, cumpla con las siguientes precauciones de seguridad:
1 Mantenga a los niños y animales domésticos, alejados de este aparato en todo momento. NO los deje desatendidos en la habitación en la que guarda la bicicleta.
2 Sólo puede utilizar el aparato una persona cada vez.
3 Si sufre mareos, nauseas, dolor en el pecho o cualquier otro síntoma durante la utilización de este aparato, PARE el ejercicio. ACUDA A UN MÉDICO INMEDIATAMENTE.
4 Utilice el aparato sobre una superficie sólida y a nivel. NO utilice la bicicleta cerca del agua o al aire libre.
5 Mantenga las manos alejadas de las partes en movimiento.
6 Utilice una indumentaria adecuada para la realización de ejercicio. No use prendas holgadas que podrían engancharse en la bicicleta. Utilice siempre calzado para correr o para aeróbic cuando utilice la máquina. Átese los cordones correctamente.
7 Utilice este aparato sólo para los fines descritos en este manual. NO utilice accesorios no recomendados por el fabricante.
8 No coloque objetos cortantes alrededor de la máquina.
9 Las personas discapacitadas no deberán utilizar la máquina sin la asistencia de una persona cualificada o un médico.
10 Antes de utilizar este aparato, realice un calentamiento con ejercicios de estiramiento.
11 No utilice la bicicleta si no funciona correctamente.
Precaución: Antes de comenzar a utilizar la bicicleta, consulte a su médico. Esta advertencia es especialmente importante para personas de edades superiores a 35 años o con problemas de salud.
Guarde estas instrucciones.
INDICACIONES GENERALES.-
1 Esta unidad ha sido diseñada para uso profesional. El peso de usuario no debe exceder de 150Kg.
2 Los padres y personas responsables de los niños deben de tener en cuenta la naturaleza curiosa de estos y que puede llevarles a situaciones y conductas que resulten peligrosas.
Esta unidad no ha de utilizarse en ningún caso como juguete.
3 Es responsabilidad del propietario asegurarse de que todos los usuarios de la máquina estén adecuadamente e informados sobre todas las precauciones necesarias a tomar.
INSTRUCCIONES DE MONTAJE.-
Para el montaje de esta unidad se recomienda la ayuda de otra persona.
ATENCIÓN: La sustitución de cualquier componente, diferente al suministrado por BH, lleva a la pérdida de garantía.
HERRAMIENTAS NECESARIAS.
Llave hexagonal (55) |
Loctite 242 |
(Suministrada) |
Cod 0190248 (*) |
2 llaves nº14 para |
BH rust inhibitor |
tuercas M8 (*) |
cod 0190236 (*) |
Llave dinamométrica |
Paños limpios. (*) |
cod 0190245 (*) |
|
Llave para tuerca M6 |
Spray lubricante |
(*) |
Multilube Wurth. |
|
cod 0190249 (*) |
Llave allen de 3mm. |
Jabón Nxt Meguiar´s |
(*) |
cod 0190244 (*) |
Destornillador de |
BH indoor cycling |
estrella (*) |
protector |
|
cod 0190237 (*) |
(*) No suministrado. Opcional.
Saque la unidad de la caja y compruebe que tiene todas las piezas Fig.1.
(A) Cuerpo principal; (20) Manillar; (21) Tubo manillar; (39) Tija de sillín; (38) Soporte horizontal sillín; (1) Sillín; (11) Caballete trasero con tacos regulables ; (14) Caballete delantero con ruedas; (9L) Pedal izquierdo; (9R) Pedal derecho; (8) Tornillo c/ Alomada M-10; (7) Arandela plana M-10;
(6) Tuerca ciega M-10; (15) Portabotellín; Llave hexagonal de dos bocas.
5
1.Coja el tubo caballete trasero (11) y posiciónelo en el caballete trasero de la máquina, como muestra la Fig.2, e introduzca los tornillos (8), coloque las arandelas planas (7), y las tuercas ciegas (6), apriete fuertemente.
2.Coja el tubo caballete delantero con ruedas (14) y teniendo en cuenta de posicionar los puntos rojos, y con las ruedas hacia delante, como muestra la Fig.2, introduzca los tornillos (8), coloque las arandelas planas (7), y las tuercas ciegas (6), y apriete fuertemente.
COLOCACIÓN DEL MANILLAR.-
Retire el tapón (53) y coloque el manillar (20) en la posición más próxima al pomo (G03) con los dos tornillos. Introduzca la pieza superior (23) en la inferior (21) y asegúrese que el pomo (G03) aprieta correctamente antes de volver a colocar el tapón (53). Fig.·3A.
Posicione el manillar (20) en el tubo de manillar (21), Fig.3, y apriete el pomo (17). A continuación, introduzca el tubo del manillar (21) por el agujero del tubo saliente del cuerpo principal (A) Fig.3, posiciónelo y apriete fuertemente el pomo (2) en sentido de las agujas del reloj. Conexione el terminal (114) del cable saliente del cuerpo principal (A), en la parte inferior del monitor (62) y fíjela con los dos tornillos. Coloque la cubierta delantera (109) en el cuerpo (A), el uso del tornillo (118) a fijo.
REGULACIÓN HORIZONTAL DEL MANILLAR.-
Posicione el manillar (20) a la distancia que le resulte cómoda para realizar el ejercicio. Apriete el pomo (17) fuertemente Fig.3.
REGULACIÓN VERTICAL DEL MANILLAR.-
Posicione el manillar (20) a la distancia cómoda de realizar el ejercicio sin salirse de las referencias de 0-6 y apriete el pomo (2) fuertemente Fig.3.
Manténgase dentro de las referencias 0-14 sin salirse de la marca “MIN INSERT”.
MONTAJE DEL SILLÍN.-
Introduzca la abrazadera del sillín (1) Fig.4, en el tubo horizontal de la tija (38) como muestra la Fig.4. Coloque el sillín en posición y apriete las tuercas de la abrazadera fuertemente.
Seguidamente introduzca el tubo horizontal de la tija (38) por el agujero del tubo de tija (39) Fig.4. Posiciónelo y apriete el pomo (2) Fig.4.
Introduzca la tija (39) por el tubo del cuerpo principal (A), posiciónelo y fije la tija del sillín en una posición cómoda sirviéndose del pomo de apriete (2A) Fig.4. Apriete en sentido de las agujas del reloj.
REGULACIÓN DE LA ALTURA SILLÍN.-
Afloje ligeramente el pomo de apriete (2A) de tija en el sentido contrario a las agujas del reloj Fig.4, hasta que el sillín quede regulado a la altura adecuada para realizar el ejercicio.
Apriete fuertemente el pomo (2A) en el sentido de las agujas del reloj. Manténgase dentro de las referencias 0-19 sin salirse de la marca “MIN INSERT”.
REGULACIÓN HORIZONTAL DEL SILLÍN.-
Afloje ligeramente el pomo de apriete (2) de tija en sentido contrario a las agujas del reloj Fig.4, y coloque el sillín a la distancia que le resulte cómoda para realizar el ejercicio. Apriete fuertemente el pomo (2) en el sentido de las agujas del reloj.
Manténgase dentro de las referencias 0-17 sin salirse de la marca “MIN INSERT”.
MONTAJE DE LOS PEDALES.-
Siga atentamente las instrucciones de montaje de los pedales, una colocación incorrecta podría dañar la rosca del pedal o de la biela.
La posición derecha e izquierda, se tomará teniendo como referencia al usuario montado en el sillín, en posición de hacer ejercicio.
El pedal derecho (9R), marcado con la letra (R), se enroscara en el sentido de giro de las agujas del reloj, en la biela derecha, marcada con la letra (R). Apriete fuertemente, Fig.5.
El pedal izquierdo (9L), marcado con la letra (L), se enroscará en el sentido contrario a las agujas del reloj, en la biela izquierda, marcada con la letra (L). Apriete fuertemente, Fig.5.
REGULACIÓN DE ESFUERZO.-
Para un control de esfuerzo regular de su ejercicio, este aparato dispone de un mando regulador de tensión (22), colocado en el tubo del cuerpo principal (A) Fig.6, que levantándolo en dirección de la flecha nos indica la escala de resistencia de la maquina en el monitor.
Para aumentar la resistencia del pedaleo levante usted el mando regulador de tensión (22), hasta conseguir que el esfuerzo que realiza en el ejercicio es el ideal para usted.
Para disminuir la resistencia del pedaleo, baje el mando regulador de tensión (22).
Importante:
Este mando regulador de tensión (22) dispone de un sistema de frenado de emergencia, que levantándolo al máximo en dirección de la flecha de la Fig.6, se produce una frenada más repentina para el volante
NIVELACIÓN.-
Una vez colocada la unidad en su lugar definitivo, para la realización del ejercicio, compruebe que el asentamiento en el suelo y su nivelación sean correctos. Esto se conseguirá roscando más o menos los pies regulables (10) como muestra la Fig.6.
6

MOVIMIENTO Y ALMACENADO.-
La unidad está equipada con ruedas (13) Fig.6, lo que hace más sencillo su desplazamiento.
Las ruedas que se encuentran en la parte delantera de su unidad, le facilitarán la maniobra de colocar su unidad en el emplazamiento escogido, levantando, ligeramente por la parte delantera y empujando, como muestra la Fig.7.
Guarde su máquina en un lugar seco con las menores variaciones de temperatura posible.
OPERACIONES ANTES DE COMENZAR.-
1.- Comprobar que todos los componentes están instalados adecuadamente:
Las tuercas de los caballetes tienen que estar apretadas con un par de apriete de 20Nm.
Los pedales han tenido que ser sellados con Loctite 242 y apretados con el par correspondiente (se debe aplicar un par de 46 Nm).
El sillín y el manillar debe estar ajustado adecuadamente al uso del usuario.
2.- Aplicar el BH rust inhibitor (110) en las superficies de contacto indicadas en los puntos de las figuras del 11 al 16.
Puntos de aplicación de BH rust inhibitor (110).
1.Casquilllos de las patas regulables de los caballetes delantero y trasero. Fig.10.
2.Superficies de las U de amarre de las ruedas de transporte. Fig.10.
3.Superficies de amarre de los caballetes delantero y trasero. Fig.11 y 12.
4.Contorno amarre caballetes al chasis. Fig.13.
5.Unión pedal con la biela. Fig.14.
6.Unión biela cuerpo central. Fig.14.
7.Superficies cromadas tija de manillar y superficie horizontal del amarre de tija manillar. Fig.15.
Modo de aplicación:
Agitar bien antes de usar.
Aplicar a una distancia de entre 20 y 30 cm de la superficie a tratar utilizando el tubo de extensión. Esperar dos minutos hasta que estabilize el producto. Extender con un paño cuidadosamente el producto, dejando una capa uniforme sobre la superficie a tratar y retirar el sobrante. Para accesos a zonas difíciles utilice un pincel para extender el producto. Dejar secar unas 3 horas.
Precauciones Manipulacion.
Evite toda fuente de ignición. (chispa o llama).
NO permita el material que entre en contacto con los ojos o la piel. Use un equipo apropiado de protección durante la manipulación. Mantenga el recipiente cerrado.Evitar vapores o las neblinas. Use sólo con ventilación adecuada. Lavado de las manos y la ropa contaminada a fondo después de la manipulación.
Almacenaje.
Mantener el producto en un área fresca y bien ventilada. Evitar todas las fuentes de ignición
(chispa o llama). Almacene entre el producto a una temperatura entre 4.4 ° C y 49 ° C. Guarde todos los materiales de un lugar seco y bien ventilado. Evite respirar los vapores.
3.- Aplicar el BH indoor cycling protector (111) con un paño limpio al equipo para dejarlo pulido.
Modo de aplicación: Se debe aplicar en seco por toda la bicicleta.
Rociar con el BH indoor cycling protector (111) sobre la superficie a tratar.
Seguidamente extender.con el paño limpio. Secar con el paño. No dejar que el producto se seque sólo.
Nota: En caso de sustitución de cualquier pieza o elemento se debe realizar, las operaciones descritas anteriormente. Utilice solamente repuestos originales BH.
MANTENIMIENTO PREVENTIVO DE LA MÁQUINA.-
En cada clase
1.El usuario debe comprobar que su aparato es seguro y apropiado para el ejercicio.
2.Con un paño o toalla, se debe retirar el sudor una vez terminada la sesión.
Semanalmente el primer mes
1. Revisar el par de apriete del pedal y biela con la llave dinamométrica. El par de apriete debe de ser de 46Nm.
Semanalmente
1. Inspeccionar minuciosamente cada aparato para asegurarse de que está en condiciones de funcionamiento seguro y correcto. Revisar los tornillos, tuercas y pernos, jaulas de pedales, manillar, silla,pomos correas de los pedales desgastados, etc
2.Limpiar con agua tibia y un paño suave las partes de la bicicleta que estén sucias
o que estén en continuo contacto con el sudor.
3.Si se necesita usar jabón utiliza utilice el jabón suave NXT de MEGUIAR’S, que no dañe el protector de la pintura. Aplicar en este caso seguidamente el BH indoor cycling protector, a la zona limpiada con un paño limpio y seco. Secar una vez aplicado.
Mensualmente.
1.Revisar el par de apriete del pedal y biela con la llave dinamométrica. El par de apriete debe de ser de 46Nm.
2.Revisión y ajuste de la correa.
Si la correa derrapa, será necesario tensar la correa:
Quite las tapas laterales (49) y afloje las tuercas un máximo de 2 vueltas Fig.6
Tense con una llave las tuercas pequeñas. Tenga cuidado que la tuerca gire el mismo número de vueltas en ambos lados de la máquina (generalmente son suficientes 2 vueltas), porque de otro modo el piñón puede quedar un poco oblicuo, dando lugar a un aumento de ruido y a la posibilidad de que se salga la correa.
7

Apriete nuevamente las tuercas y vuelva a colocar las tapas laterales (49).
Caso que la tensión de la máquina se haya modificado, ajuste nuevamente la frenada.
3.Encerar las áreas que están en contacto con el sudor.
No es necesario encerar la bicicleta por completo, pero sí es muy importante encerar las que estén en contacto con el sudor directamente, ya que son las más vulnerables al óxido.
Aplicar el BH indoor cycling protector con un paño limpio y seco. Secar una vez aplicado.
4.Los 3 pomos de apriete que dispone la unidad se deberán aflojar y rociar con el spray de engrase Wurth con el objeto de garantizar la movilidad de los mismos.
Anualmente
1.Limpiar con el jabón NXTde MEGUIAR’S, echando jabón en un cazo con agua.Agitar para generar espuma. Aplicar con una esponja húmeda y secar con un paño.
2.Se debe proteger con el BH rust inhibitor las zonas indicadas en las figuras del 11 al 16 siguiendo las mismas operaciones y dejar secar durante unas 3 horas.
3.Aplicar el el BH indoor cycling protector, a la zona limpiada con un paño limpio y seco. Secar una vez aplicado.
ATENCION: El no seguir las instrucciones de limpieza y mantenimiento puede llevar a la reducción de vida del aparato y a lesiones graves para el usuario. El no cumplir con dichas instrucciones conllevaría a la anulación de la garantía.
LA GARANTÍA NO CUBRE.-
Mantenimiento inadecuado.
Montaje inapropiado por parte del comprador. Incumplimiento de las instrucciones de montaje de acuerdo al manual suministrado.
Daños causados por las calas de las zapatillas. Los estiramientos deberán realizarse en un lugar adecuado para tal propósito, nunca en la propia máquina
Para cualquier consulta, no dude en ponerse en contacto con el (S.A.T).Servicio de Asistencia Técnica llamando al teléfono de atención al cliente (ver página final del presente manual).
BH SE RESERVA EL DERECHO A MODIFICAR LAS ESPECIFICACIONES DE SUS PRODUCTOS SIN PREVIO AVISO.
8

English
IMPORTANT SAFETY ADVICE.-
PRECAUTIONS.
This bicycle has been designed and constructed to provide maximum safety. Nevertheless, certain precautions should be taken when using exercise equipment.
Read the whole manual before assembling and using the bicycle. It provides you with important information about assembly, safety and use of the machine.
The following safety precautions should also be observed:
1 Keep children away from this equipment at all times. DO NOT leave them unsupervised in the room where this bicycle is kept.
2 It can only be used by one person at a time.
3 If you experience dizziness, nausea, chest pains or any other symptom while using this appliance STOP the exercise. SEEK MEDICAL ATTENTION IMMEDIATELY.
4 Use the appliance on a level, solid surface. DO NOT use the bicycle outdoors or close to water.
5 Keep your hands well away from any of the moving parts.
6 Wear clothing suitable for doing exercise. Do not use baggy clothing that might get caught up in the bicycle. Always wear running shoes or trainers when using the machine. Make sure all laces/cords are tied correctly.
7 This appliance must only be used for the purposes described in this manual. DO NOT use accessories that are not recommended by the manufacturer.
8 Do not place sharp objects near the machine.
9 Disabled people should not use the machine without the assistance of a qualified person or a doctor.
10 Do warm up stretching exercises before using the equipment.
11 Do not use the bicycle if it is not working correctly.
Caution: Consult your doctor before beginning to use the bicycle. This advice is especially important for those over 35 or suffering from health problems.
Keep these instructions safe for future use.
GENERAL INSTRUCTIONS.-
1 This unit has been designed for professional use. The weight of the user must not exceed 150 kg.
2 Parents and/or those responsible for children should always take their curious nature into account and how this can often lead to hazardous situations and behaviour resulting in accidents.
Under no circumstances should this appliance be used as a toy.
3 The owner is responsible for ensuring that anyone who uses the machine is duly informed about the necessary precautions.
ASSEMBLY INSTRUCTIONS.-
The assistance of a second person is recommended when assembling this unit.
WARNING: The replacement of any component with another not supplied by BH will void the warranty.
TOOLS NEEDED.-
Hex wrench (55) |
Loctite 242 |
(supplied) |
Cod 0190248 (*) |
2 No. 14 wrench for |
BH rust inhibitor |
M8 nuts (*) |
cod 0190236 (*) |
Torque wrench cod |
Clean cloths. (*) |
0190245 (*) |
|
Wrench for M6 nut (*) |
Multilube Wurth lubricant |
|
spray cod 0190249 (*) |
3 mm Allen key (*) |
Meguiar's Nxt soap |
Philips screwdriver (*) |
BH indoor cycling |
|
protector cod 0190237 (*) |
(*)Not supplied. Optional. |
|
Take the unit out of its box and make sure that all of the pieces are there (Fig. 1):
(A) Main body; (20) Handlebar; (21) Handlebar stem; (39) Saddle post; (38) Horizontal saddle tube;
(1) Saddle; (11) Rear stabiliser bar with adjustable feet; (14) Front stabiliser bar with wheels; (9L) Left pedal; (9R) Right pedal; (8) Slot head bolt M-10; (7) Flat washer M-10; (6) Cap nut M-10; (15) Bottle holder; Double ended spanner.
1.Position the machine’s rear stand on the rear stabilizer bar (11), as shown in Fig.2, insert the bolts (8), fit the flat washers (7) and cap nuts (6) and then tighten securely.
2.Position the front stabiliser bar with wheels (14), paying attention to the red dots and with the wheels facing forwards, as shown in Fig.2, insert the bolts (8), fit the flat washers (7) and cap nuts (6) and tighten securely.
FITTING THE HANDLEBAR.-
Remove the plug (53) and place the handlebar (20) in the position closest to the knob (G03) with two screws. Insert the upper part (23) at the bottom (21) and make sure the knob (G03) tightened properly before replacing the cap (53). Fig. 3A.
9
Position the handlebar (20) on the handlebar stem (21), Fig.3, tighten the knob (17) and then insert the handlebar stem (21) into the hole on the main body (A), Fig.3. Position it correctly and then tighten knob
(2) by turning it clockwise. Connect the terminal (114) of the cable sticking out of the main body to the console (62) and fix it with both screws.Fig.3. Attach the front cover (109) on the body (A), use screw (118) to fix.
ADJUSTING THE HANDLEBAR HORIZONTALLY.-
Position the handlebar (20) at a comfortable distance for doing exercise, now tighten knob (17) securely, Fig.3.
ADJUSTING THE HANDLEBAR VERTICALLY.-
Position the handlebar (20) at a comfortable distance for doing exercise, now tighten knob (2) securely, Fig.3.
Stay within the references 0-14 without going beyond the “MIN INSERT” mark.
ATTACHING THE SADDLE.-
Fit the saddle bracket (1), Fig.4, onto the horizontal saddle tube (38), as shown in Fig.4, fit the saddle into position and tighten the nuts on the bracket securely. Next insert the horizontal saddle tube (38) through the hole on the saddle post (39), Fig.4, position it correctly and tighten the knob (2), Fig.4.
Insert the saddle post (39) into the boss on the main body (A), position it correctly and tighten the saddle post by using the adjustment knob (2A), Fig.4, turning it clockwise.
ADJUSTING THE SADDLE HEIGHT.-
Loosen the saddle post adjustment knob (2A) slightly by turning it anticlockwise, Fig.4, move the saddle to a position comfortable for doing exercise and then tighten the adjustment knob (2A) securely by turning it clockwise.
Stay within the references 0-19 without going beyond the “MIN INSERT” mark.
HORIZONTAL ADJUSTMENT OF THE SADDLE.-
Loosen the knob (2) slightly by turning it anticlockwise, Fig.4, move the saddle to a position comfortable for doing exercise and then tighten the knob (2) securely by turning it clockwise.
Stay within the references 0-17 without going beyond the “MIN INSERT” mark.
FITTING THE PEDALS.-
The assembly instructions for the pedals must be followed to the letter, fitting these incorrectly could damage the screw thread on either the pedal or the crank.
Right and left refer to the position that the user adopts when sitting on the saddle to do the exercises.
The right-hand pedal (9R), marked with the letter (R), screws onto the right-hand crank, also marked with an (R), in a clockwise direction. Tighten securely, Fig.5.
The left-hand pedal (9L), marked with the letter (L), screws onto the left-hand crank, also marked with an
(L), in an anti-clockwise direction. Tighten securely, Fig.5.
EXERTION SETTINGS.-
For regular control of exercise settings, this appliance is equipped with a tensioning control (22), located on the stem of the main body (A) Fig.6 which, when lifted in the direction of the arrow, indicates the resistance settings of the appliance in the monitor.
To increase the pedalling resistance, lift the tensioning control (22) until the exertion level best suits your exercise requirements.
To decrease the pedalling resistance, lower the tensioning control (22).
Important: This tensioning control (22) has an emergency braking system which, when fully lifted in the direction of the arrow, as shown in Fig.6, causes a sudden braking force for the flywheel.
LEVELLING.-
Once the unit has been placed into its final position, make sure that it sits flat on the floor and that it is level. This can be achieved by screwing the adjustable feet (10) up or down, as shown in Fig.6.
MOVEMENT & STORAGE.-
The unit is equipped with wheels (13) Fig.6, to make it easier to move. The wheels located at the front of your unit make it easier to move it into a chosen position, by lifting the rear of the unit up slightly and pushing it, as shown in Fig.7. Store your unit in a dry place, preferably not subject to changes in temperature.
OPERATIONS BEFORE BEGINNING
1.- Check that all components are properly installed: The nuts of the stands must be tightened with a torque of 20 Nm.
The pedals must have been sealed with Loctite 242 and tightened with the appropriate torque (a 46 Nm torque must be applied).
The saddle and handlebars must be properly adjusted for the user.
2.- BH rust inhibitor (110) must be applied to the contact surfaces indicated in Figures 11 to 16.
Points of application for BH rust inhibitor(110):
1.Casing of the adjustable legs of the front and rear stands. Fig.10.
2.Transportation wheels U bracket surfaces. Fig.10.
3.Front and rear stand bracket surfaces. Fig.11 and 12.
4.Area where the stands are clamped to the frame. Fig.13.
5.Joint between the pedal and the crank. Fig.14.
6.Joint between the crank and the central frame. Fig.14.
7.Chromed handlebar post surfaces and horizontal surfaces where the handlebar post is locked. Fig.15.
10
Application:
Shake well before using.
Hold the can 20 to 30 cm away from the surface to be sprayed using the extension tube.
Wait two minutes until the product stabilises.
Carefully spread with a clean cloth, leaving a light and uniform coat over the surface, and wipe off any excess. For areas with difficult access use a brush to apply the product. Leave to dry for about 3 hours.
Handling Precautions
Avoid all ignition sources (spark or flame).
DO NOT allow the material to come in contact with eyes or skin. Wear appropriate protective equipment during handling. Keep the container closed. Avoid breathing vapours or mists. Use only with adequate ventilation. Wash hands and contaminated clothing thoroughly after handling.
Storage
Keep the product in a cool, well-ventilated area. Avoid all ignition sources (spark or flame). Store between 4.4ºC and 49ºC. Store all materials in a dry, well-ventilated area. Avoid breathing vapours.
3.- Apply the BH indoor cycling protector (111) with a clean cloth to polish the product.
Application: Application should be over the entire bike while this is dry.
Spray the BH indoor cycling protector (111) over the surface to be treated.
Then spread with a clean cloth. Wipe dry with the cloth. Do not let the product self-dry.
Note: In case any part or component needs to be replaced, follow the same operations described above. Use only original BH spare parts.
PREVENTIVE MAINTENANCE OF THE MACHINE
Every class
1.The user must check that the apparatus is safe and appropriate for exercise.
2.A cloth or towel should be used to remove sweat after the session has ended.
Weekly for the first month
1. Check the tightness of the pedal and crank with a torque wrench. The tightening torque must be 46 Nm.
Weekly
1.Thoroughly inspect each apparatus to make sure it is in safe and proper working order. Check screws, nuts and bolts, pedal cages, handlebar, saddle, knobs, worn pedal straps etc.
2.Use warm water and a cloth to clean the parts that are dirty or that are in continuous contact with sweat.
3.If you need to use soap, use the gentle MEGUIAR’S NXT soap, which will not damage the paint. In this case follow with the BH indoor cycling protector, cleaning the area with a clean, dry cloth. Wipe dry after.
Monthly
1.Check the tightness of the pedal and crank with a torque wrench. The tightening torque must be 46 Nm.
2.Check and adjust the belt.
If the belt slips it will be necessary to tighten it:
-Remove the side covers (49) and loosen the nuts a maximum of two turns, Fig 7.
-Tighten the small nuts with a spanner. Make sure that the nut rotates the same number of turns on both sides of the machine (generally 2 turns will be sufficient) otherwise the drive sprocket might become skewed, creating a lot more noise and making it possible for the belt to fall off.
-Tighten up the nuts again and put the side covers (49) back in place.
-Whenever the tension on the machine has been adjusted, readjust the brakes as well.
3.Wax those areas that are in contact with sweat. It is not necessary to wax the entire machine, but it is very important to wax those areas that are in direct contact with sweat, since these are more vulnerable to rust.
Apply the BH indoor cycling protector, cleaning the area with a clean, dry cloth. Wipe dry after.
4.The 3 tightening knobs should be loosened off and sprayed with Wurth lubricant to ensure that they remain operative.
Annually
1.Clean with MEGUIAR’S NXT, adding the soap to water in a bowl. Shake to create foam. Apply with a wet sponge and dry with a cloth.
2.The areas shown in Figures 11 to 16 should be protected with BH rust inhibitor following the same procedure and then left to dry for 3 hours.
3.Apply the BH indoor cycling protector to the cleaned area with a clean, dry cloth. Wipe dry after application.
WARNING: Failure to follow the cleaning and maintenance instructions could result in a reduced working life of the apparatus and serious personal injury to the user. Failure to follow these instructions will void the warranty.
NOT COVERED BY THE WARRANTY:
Improper maintenance.
Incorrect assembly by the purchaser.
Failure to follow the assembly instructions as stated in the manual provided.
Damage caused by the cleats of the shoes. Stretching exercises should be performed in a suitable place and never on the machine.
Do not hesitate to get touch with the Technical Assistance Service if you have any queries by phoning customer services (see last page in manual)
BH RESERVES THE RIGHT TO MODIFY THE SPECIFICATIONS OF ITS PRODUCTS WITHOUT PRIOR NOTICE.
11
 Loading...