


24” GLASS CERAMIC COOKTOP
30” GLASS CERAMIC COOKTOP
Use & Care Manual
Manuel d’utilisation et d’entretien
Manual de uso & Mantenimiento
Models: P24 CER NE, P30 CER NE


ENGLISH
Use & Care Manual
Table of Contents
WARNINGS FOR ELECTRIC INSTALLATION.......... 3
Safety Instructions............................................4
COOKTOP SAFETY................................................... 4
PERSONAL SAFETY.................................................5
Models and Part Identification.........................6
Element and Control Setting............................
SINGLE RADIANT ELEMENT....................................
DUAL RADIANT ELEMENT .......................................
ENERGY REGULATOR MODELS ...........................
Electric Cooktop Operation ...........................
BEFORE USING THE COOKTOP FOR THE FIRST
TIME .........................................................................
Cookware.........................................................
GENERAL.................................................................
COOKWARE CHARACTERISTICS .........................
OBSERVE THE FOLLOWING POINTS IN CANNING
..................................................................................
Cleaning the Cooktop.....................................1
Troubleshooting..............................................1
Assistance or Service.....................................1
Page
Installation Manual
ENGLISH
Pay attention to these symbols present in this
manual:
This is the safety alert symbol. This symbol
alerts you to potential hazards that can kill or
hurt you and others.
You can be killed or seriously injured if you
don't follow these instructions.
READ AND SAVE THESE INSTRUCTIONS.
WARNINGS FOR ELECTRIC
INSTALLATION
WARNING
WARNING
Installation and service must be performed by
a qualified installer or service agency.
The models may be powered at 240V
or 208V.
CAUTION
Always disconnect the electrical plug from the
wall receptacle before servicing this unit.
For personal safety, this appliance must be
properly grounded.
Do not under any circumstances cut or remove
the third (ground) prong from the power cord plug.
3

Installation Manual
Use & Care Manual
ENGLISH
ENGLISH
IMPORTANT
Please read all instructions before using this appliance.
COOKTOP SAFETY
WARNING
Proper Installation
Be sure your appliance is properly installed
and grounded by a qualified technician.
Never Use Your Appliance for Warming or
Heating the Room
Do Not Leave Children Alone
Children should not be left alone or
unattended in area where appliance is in use.
They should never be allowed to sit or stand
on any part of the appliance.
Wear Proper Apparel
Loose-fitting or hanging garments should
never be worn while using the appliance.
User Servicing
Do not repair or replace any part of the
appliance unless specifically recommended in
the manual. All other servicing should be
referred to a qualified technician.
Storage in or on Appliance
Flammable materials should not be stored in
an oven or near surface units.
Do Not Use Water on Grease Fires
Smother fire or flame or use dry chemical or
foam-type extinguisher.
Use Only Dry Potholders
Moist or damp potholders on hot surfaces may
result in burns from steam. Do not let
potholder touch hot heating elements. Do not
use a towel or other bulky cloth.
Use Proper Pan Size
This appliance is equipped with one or more
surface units of different size. Select utensils
having flat bottoms large enough to cover the
surface unit heating element. The use of
undersized utensils will expose a portion of
the heating element to direct contact and may
result in ignition of clothing. Proper
relationship of utensil to burner will also
improve efficiency.
Never Leave Surface Units Unattended at High
Heat Settings
Boil over causes smoking and greasy
spillovers that may ignite.
Make Sure Reflector Pans or Drip Bowls Are in
Place
Absence of these pans or bowls during
cooking may subject wiring or components
underneath to damage.
Safety Instructions
Protective Liners
Do not use aluminum foil to line surface unit
drip bowls or oven bottoms, except as
suggested in the manual. Improper installation
of these liners may result in a risk of electric
shock, or fire.
Glazed Cooking Utensils
Only certain types of glass, glass/ceramic,
ceramic, earthenware, or other glazed utensils
are suitable for range-top service without
breaking due to the sudden change in
temperature.
Utensil Handles Should Be Turned Inward and
Not Extend Over Adjacent Surface Units
To reduce the risk of burns, ignition of
flammable materials, and spillage due to
unintentional contact with the utensil, the
handle of a utensil should be positioned so
that it is turned inward, and does not extend
over adjacent surface units.
Do Not Soak Removable Heating Elements
Heating elements should never be immersed
in water.
Do Not Cook on Broken Cook-Top
If cook-top should break, cleaning solutions
and spillovers may penetrate the broken cooktop and create a risk of electric shock. Contact
a qualified technician immediately.
Clean Cook-Top With Caution
If a wet sponge or cloth is used to wipe spills on
a hot cooking area, be careful to avoid steam
burn. Some cleaners can produce noxious
fumes if applied to a hot surface.
4
4

Installation Manual
Use & Care Manual
ENGLISH
ENGLISH
PERSONAL SAFETY
To reduce the risk of injury to persons, in the
event of a grease fire, observe the following:
Grease is flammable and should be handled
carefully.
Do not use water on grease fires.
Never pick up a flaming pan. Smother sheet or
flat tray.
Flaming grease outside of utensil can be
extinguished with baking soda or, if available, a
multipurpose dry chemical or foam type
extinguisher.
Let fat cool before attempting to handle it.
Wipe up spill over immediately.
If you are "flaming" liquors or other spirits under
an exhaust, turn the fan off. The draft could
cause the flames to spread out of control.
Never leave the surface area unattended at
high heat setting. Boil over cause smoking and
greasy spill over, which may ignite.
CAUTION
Do not allow aluminum foil, plastic, paper or cloth to
come in contact with a hot Surface. Do not allow pans
to boil dry.
Be careful to prevent burns. If the flames do
not go out immediately, evacuate and call the
fire department.
Always have a working smoke detector near the
kitchen.
Leave the hood ventilator on when flambéing
food only if there is smoke without flames.
Use an extinguisher only if
You know you have a Class ABC extinguisher,
and you already know how to operate it.
The fire is small and contained in the area
where it started.
The fire department is being called.
You can fight the fire with your back to an exit.
Never use water on cooking fires.
In the event that personal clothing catches fire,
drop and roll immediately to extinguish
flames.
WARNING
WARNING
To reduce the risk of burn injuries during
cooktop use, observe the following:
Never use the cooktop to warm or heat a room.
Children or pets should not be left alone or
unattended in an area where appliances are in
use. They should never be allowed to sit or stand
on any part of the appliance.
CAUTION
Do not store items of interest to children in cabinets
above a range or on the backguard of a range;
children climbing on the range to reach items could be
seriously injured.
When using the cooktop
Do not touch surface units or areas near
units. Surface areas may become hot enough
to cause burns. Surface elements may be hot
even though they are dark in color. During and
after use, do not touch or let flammable
materials contact heating elements until they
have had time to cool.
When using the cooktop installed over oven
Do not touch heating elements or interior
surfaces of oven. Heating elements may be
hot even though they are dark in color. Interior
surfaces of an oven become hot enough to
cause burns. During and after use, do not
touch, or let clothing or other flammable
materials contact heating elements or interior
surfaces of oven until they have had sufficient
time to cool. Other surfaces of the appliance
may become hot enough to cause burns –
among these surfaces are (identification of
surfaces – for example, oven vent openings
and surfaces near these openings, oven
doors, and windows of oven doors).
To minimize the possibility of burns, ignition of
flammable materials and spillage, the handle
of a container should be turned toward the
center of the cooktop without extending over
any nearby surface units.
Use only certain types of glass, heatproof
glass ceramic, ceramic, earthenware, or other
glazed utensils that are suitable for cooktop
use
5
5

(Energy regulator) models
Models and Part Identication
Installation Manual
Use & Care Manual
ENGLISH
ENGLISH
3
4
4
3
2
2
1
1
5
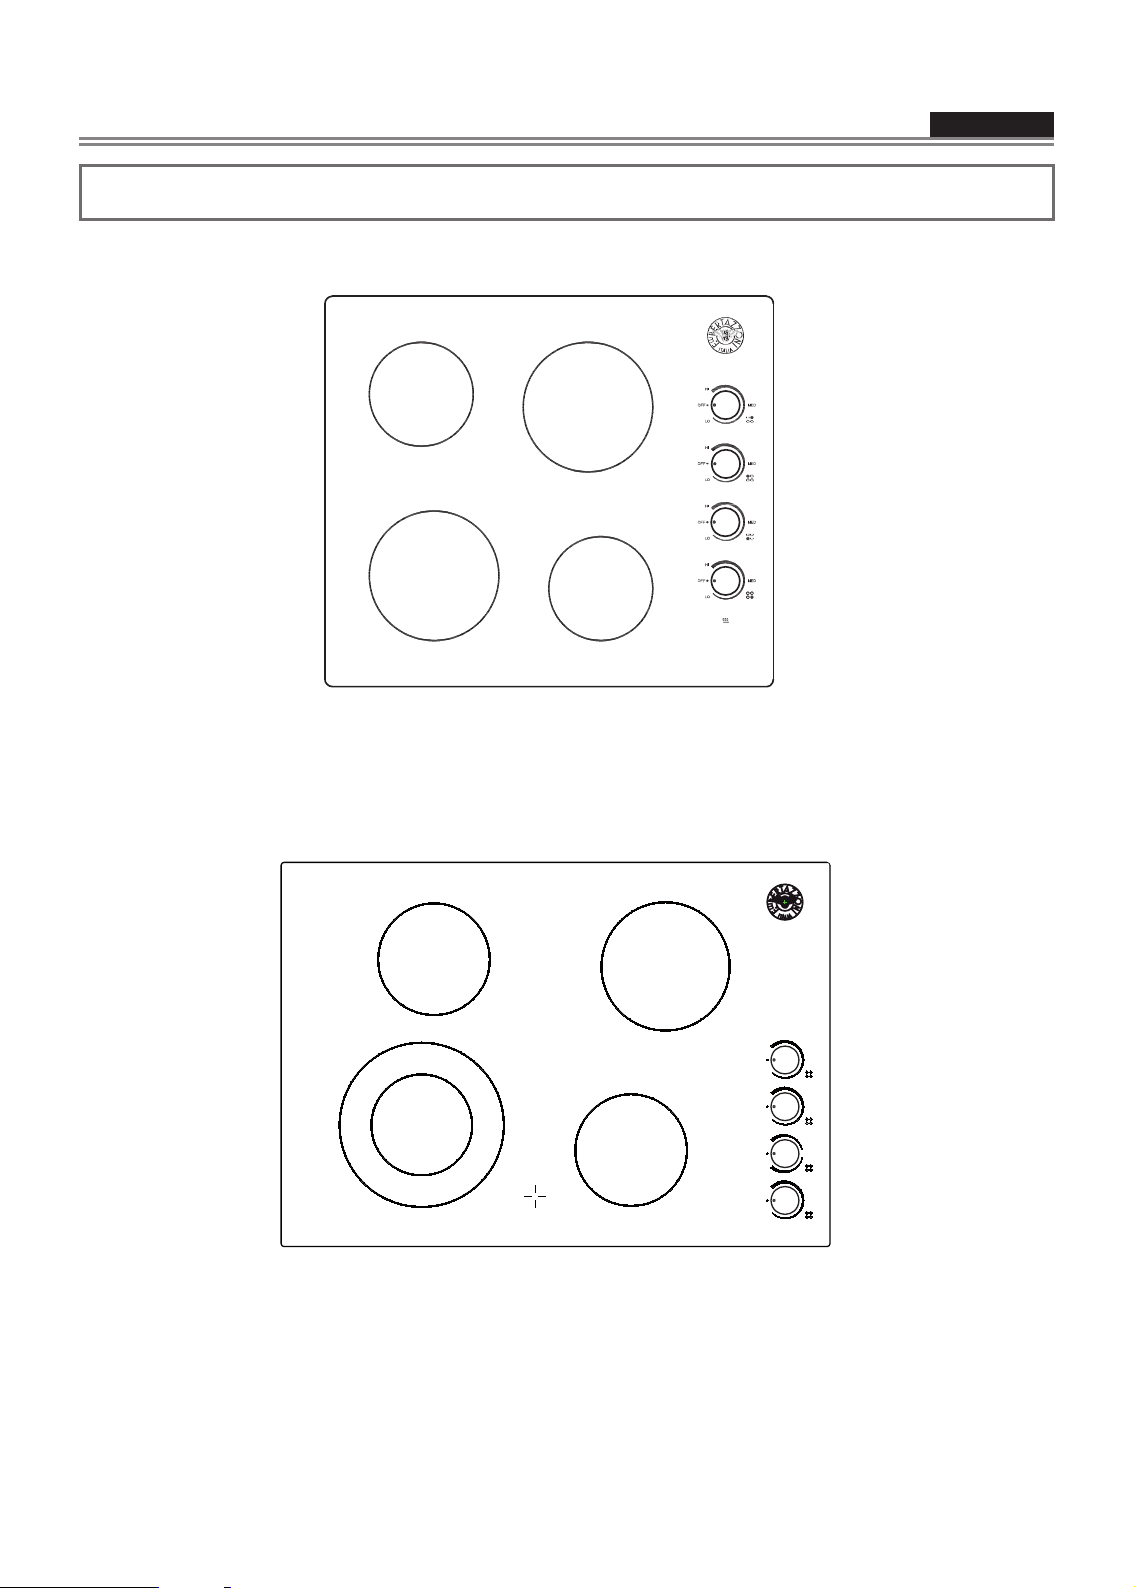
Position 1 - 1200W 5 1/2” single circuit element and control
Position 1- 1200W 5 1/2” single circuit element and
Position 2 - 1800W 7” single circuit element and control
control
Position 3 - 1200W 5 1/2” single circuit element and control
Position 2-
Position 4 - 1800W 7” single circuit element and control
Position 5 - “ON” and hot surface indicator lights
Position 3- 1200W 5 1/2” single circuit element and
control
Position 4- 1800W 7” single circuit element and control
Position 5- “ON” and hot surface indicator lights
1800W 7” single circuit element and control
3
2
5
Position 1 - 1200W 6” single circuit element and control
Position 2 - 1100W / 2500W 5”/9” dual circuit element and control
Position 3 - 1200W 6” single circuit element and control
Position 4 - 1800W 7” single circuit element and control
Position 5 - “ON” and hot surface indicator lights
6
6
1
4
HI
MED
OFF
LO
HI
OFF
LO
HI
OFF
HI
HI
OFF
LO
4
MED
3
MED
DUAL
LO
SINGLE
2
MED
MED
1

MED
Installation Manual
Use & Care Manual
ENGLISH
ENGLISH
Element and Control Setting
SINGLE RADIANT ELEMENT
This type of electric element uses a wire ribbon
located under the glass surface to provide the heat for
cooking. There Elements will cycle on and off by the
its own temperature limiters.
Temperature limiters
Each radiant heaters has its own sensor to protect the
glass cooking surface from extreme high
temperatures. The limiter will operate automatically by
cycling the element the cycles as defined by knob
setting (HI-LO)
DUAL RADIANT ELEMENT (if present)
TYPE OF FOOD
Melting butter, chocolate LO
Delicate sauce, rice,
simmering sauces with
butter and egg yolk
Cooking vegetables, fish
broths, eggs -fried or
scrambled-, finishing
HEAT SETTINGS
RADIANT ELEMENTS
Energy
regulator
LO to
Medium
Medium
cereals, pasta, milk,
The dual element consist of two radiant ribbon
elements within the same heating area. Either the
small (inner element) or both (inner and outer)
elements may be selected for use. There are an
infinite number of heat setting between the LO and HI
position. Fixed position are found at LO and HI to
define minimum and maximum heat setting.
To turn ON the inner element, push down on the
control knob and turn it counter clockwise following
the single line graphics.
To turn ON both inner and outer elements
together, push down on the control knob and turn
clockwise following the double graphics line.
Setting Recommended Use
All these settings are recommended without the
element being preheated, a range of heat settings are
listed because the actual setting depend on:
Type and quality of pan
Type, quantity and temperature of the food
Element used and cook’s preferences
HI
DUAL
OFF
HI
MED
LO
SINGLE
HI
pancakes, pudding,
simmering meats,
steaming vegetables,
pop corn, bacon, stewing
meet soup, sau-teed
vegetables, spaghetti
sauces
Braising meet, pan frying
meet, fish, eggs, stir frying,
Medium to
HI
quickly brown or sear
meats, hold rapid boil
Boiling water for
HI
vegetables, pasta
ENERGY REGULATOR MODELS
Control knobs (pos. 1 to 4)
The placement of each knob corresponds to the
placement of the heating element that it controls.
To turn on any element, PUSH DOWN on the knob
and TURN in either direction to desired heat setting.
Hot surface indicator light
Each element features a hot indicator light to show
when the cooking area is ON or hot. The signal light will
turn on automatically in the area marked with cross. The
light remains on until the cooking area has cooled to a
safe to touch temperature (approximately 150°F).
If a hot surface light is ON use caution when working
around the cooktop as the cooktop is still hot
.
OFF
LO
MED
7
7

Installation Manual
Use & Care Manual
ENGLISH
ENGLISH
Electric Cooktop Operation
BEFORE USING THE COOKTOP FOR
THE FIRST TIME
All products are wiped clean with solvents at the
factory to remove any visible signs of dirt, oil, and
grease which may have remained from the
manufacturing process.
If present, remove all packing and literature from
the cooktop surface.
Clean your glass top before the first time you use
it. A thorough cleaning with a glass top cleaner is
recommended. It only takes a minute and puts a
clean, shiny coating on the glass top before its
initial use.
There may be a slight odour during the first
several uses: this is normal and will disappear.
Optimum cooking result depends on the proper
cookware being selected and used.
The cooking surface will hold the heat and
remain hot over 20 minutes after the elements
have been turned off.
The glass ceramic cooking surface is a durable
material resistant to impact but not unbreakable if
a pan or other object is dropped on it.
Do not use aluminum foil directly on the glass; it
will melt and damage the glass surface.
Do nor allow pans to boil dry. This can damage
the pan, element and /or cooktop.
Never cook food directly on the glass.
Do not slide cookware across cooking surface it
may scratch the glass
Using cast iron cookware on the glass cooktop Is
not recommended. Cast iron retains heat and
may result in cooktop damage.
8
8

Installation Manual
Use & Care Manual
ENGLISH
ENGLISH
GENERAL
The choice of pan directly affects the cooking
performance (speed and uniformity) for best result
select pans with the following features.
Flat base
When a pan is hot, the base (pan bottom)should rest
evenly on the surface without wobbling (rocking).
Ideal cookware should have a flat bottom, straight
side, a well fitting lid and the material should be of
medium to heavy thickness.
Rough finishes may scratch the cooktop.
Match Pan Diameter to radiant element
The base of the pan should cover or match the
diameter of the element being used.
Cookware
COOKWARE CHARACTERISTICS
Cooking Utensil Guidelines
Aluminium: heats and cools quickly frying,
braising, roasting. May leave metal markings on
glass.
Cast Iron: heats and cools quickly Not
recommended. Retains excessive heat and may
damage cooktop.
Copper: tin heats and cools quickly gourmet.
cooking, lined wine sauces, egg dishes.
Enamel ware: response depends on base Not
recommended, metal Imperfections in enamel
may scratch cooktop.
Glass Ceramic: heats and cools slowly not
recommended. Heats too slowly. Imperfections in
enamel may scratch cooktop.
Stainless Steel: heats and cools at moderate
soups, sauces, rate vegetables, general cooking.
OBSERVE THE FOLLOWING POINTS IN
CANNING
Pots that extend beyond 1 of the surface unit's circle
are not recommended for most surface cooking.
However, when canning with water-bath or pressure
canner, larger-diameter pots may be used.
This is because boiling water temperatures (even
under pressure) are not harmful to the cooktop
surfaces surrounding the surface units.
However, do not use large diameter canners or
other large-diameter pots for frying or boiling
foods other than water.
Most syrup or sauce mixtures, and all types of frying,
cook at temperatures much higher than boiling water.
Such temperatures could eventually harm the glass
cooktop surfaces.
Be sure the canner fits over:
the center of the surface unit. If your cooktop or
its location does not allow the canner to be
centered on the surface unit, use smaller
diameter pots for good canning results.
Flat-bottomed canners must be used. Do not use
canners with flanged or rippled bottoms (often
found in enamelware) because they don't make
enough contact with the surface units and take a
long time to boil water.
9
9

Installation Manual
Use & Care Manual
ENGLISH
ENGLISH
When canning, use recipes and procedures from
reputable sources. Reliable recipes and
procedures are available from the manufacturer
of your canner; manufacturers of glass jars for
canning, such as Ball and Kerr brand; and the
United States Department of Agriculture
Extension Service.
Remember that canning is a process that
generates large amounts of steam. To avoid
burns from steam or heat, be careful when
canning.
CAUTION
Safe canning requires that harmful micro organisms
are destroyed and that the jars are sealed
completely. When canning foods in a water-bath
canner, a gentle but steady boil must be maintained
for the required time. When canning foods in a
pressure canner, the pressure must be maintained
for the required time.
After you have adjusted the controls, it is very
important to make sure the prescribed boil or
pressure levels are maintained for the required time.
Since you must make sure to process the canning
jars for the prescribed time, with no interruption in
processing time, do not can on any cooktop surface
unit if your canner is not flat.
Special pans
Special pans, such as griddles, roasters, pressure
cookers, woks, water (Use only a flat-bottom wok).
CAUTION
Food packaged in aluminum foil should not be placed
directly on the glass ceramic surface for cooking;
aluminum foil can melt and cause permanent
damage.
CAUTION
Plastic, paper, and cloth can melt or burn when in
contact with a hot surface. Do not let these items
come in contact with the hot glass.
10
10

Installation Manual
Use & Care Manual
ENGLISH
ENGLISH
Cleaning the Cooktop
CAUTION
Be sure electrical power is off and all surfaces are
cool before cleaning any part of the cooktop.
Apply a small amount of cooktop cleaning specific
ceramic crème on a daily basis. this provides a
protective film that makes it easy to remove water
spots or food spatters. The temperature of the cooking
surface reduces the protective qualities of this
cleaner.
It must be reapplied before each use. Use a clean
cloth and apply cooktop cleaning crème before each
use to remove dust or metal marks that can occur on
the counter level surface between uses.
CONTROL KNOBS
Pull up to remove the knob using the towel for
leverage. Wipe with hot, soapy cloth, rinse and dry.
Do not soak!
FRAME
(Stainless steel models)
Always wipe with the grain when cleaning. For
moderate/ heavy soil, use BonAmi
bleach).
Wipe using a damp sponge or cloth, rinse and dry.
®
or Soft Scrub® (no
DAILY CLEANING TECHNIQUES
Clean the surface when it is completely cool with the
following exception.
USE DAILY
Wipe off spatters with a clean, damp cloth; use white
vinegar if smudge remains; rinse.
Apply a small amount of the Cooktop Cleaning
Crème.
When dry, buff surface with a clean paper towel or
cloth.
CAUTION
Do not use any kind of cleaner on the glass while the
surface is hot; use only the razor blade scraper. The
resulting fumes can be hazardous to your health.
Heating the cleaner can chemically attack and
damage the surface.
RECOMMENDED CLEANERS
Cooktop Cleaning Crème:
Use only a small amount; apply to a clean paper towel
or cloth. Wipe on the surface and buff with a clean dry
towel.
BonAmi
Rinse and dry.
Soft Scrub
Rinse and dry.
White Vinegar:
Rinse and dry.
Razor blade scraper
Packaged with cooktop.
Note: The recommended cleaners indicate a type of
cleaner and do not constitute an endorsement.
®
:
®
(without bleach):
Remove these soils
immediately with the
razor blade scraper:
Dry Sugar
Sugar Syrup
Tomato Products
Milk
AVOID THESE CLEANERS
Glass cleaners which contain ammoniac or
chlorine bleach
These ingredients may permanently etch or stain the
cooktop.
Caustic Cleaners
Oven cleaners such as Easy Off
cooktop surface.
Abrasive Cleaners
Metal scouring pads and scrub sponges such as
Scotch Brite® can scratch and / or leave metal marks.
Soap-filled scouring pads such as SOS
the surface.
Powdery cleaners
Containing chlorine bleach can permanently stain the
cooktop.
Flammable cleaners
Such as lighter fluid or WD-40.
®
may etch the
®
can scratch
11
11

Installation Manual
Use & Care Manual
ENGLISH
ENGLISH
Problem Cause Possible Remedy
Nothing works
Heating elements do not heat
properly
Troubleshooting
Cooktop not connected to proper
electrical circuit.
Fuse is blown or circuit breaker is tripped.
No electricity to the cooktop.
Cooktop is connected to 120 volt power
supply.
Power supply connection is loose.
Improper cookware is being used.
Have electrician verify that the proper
rated cooktop voltage is being supplied
to the cooktop. Have electrician replace
fuse or reset circuit breaker.
Have electrician check your power
supply.
Have electrician connect cooktop to the
proper rate cooktop voltage.
Have electrician tighten the connections
at the junction box.
Select proper cookware as outlined in
the Cooktop Operation section of this
manual.
Heating element temperature limiters are
Heating elements cycle off
even when elements are
turned to their highest settings
Glass ceramic surface is seethrough or appears to be red
in color.
temporarily shutting off the elements due
to exceeding the maximum allowable
temperature.
Under direct or bright lighting, you will
sometimes be able to see through the
glass and into the chassis due to its
transparent quality. You may also notice a
red tint under these conditions
Assistance or Service
Before calling for assistance or service, please check
"Troubleshooting." It may save you the cost of a
service call.
If you still need help, follow the instructions below.
When calling, please know the purchase date and the
complete model and serial number of your appliance.
This information will help us to better respond to your
request.
This is a normal operating condition,
especially during rapid heat-up
operations. The element will cycle back
on automatically after it has cooled
sufficiently.
These are normal properties of black
ceramic glass panels.
Service Data Record
For authorized service or parts information see
paragraph "WARRANTY for Home
Appliances".
The location of the serial tag is below the cooktop
box. Now is a good time to write this information in
the space provided below. Keep your invoice for
warranty validation.
Model Number _____________________
Serial Number ______________________
Date of Installation or Occupancy ______________
12
12

Installation Manual
Use & Care Manual
ENGLISH
ENGLISH
Note
13
13

Installation Manual
Use & Care Manual
ENGLISH
ENGLISH
Note
14
14

Manuel d’utilisation et d’entretien
Manuel d’Installation
FRANÇAIS
FRANÇAIS
Table des matieres
Page
AVERTISSEMENTS POUR L’INSTALLATION
ELECTRIQUE...........................................................15
Précaution de Sécurité ...................................16
SECURITE DE LA TABLE DE CUISSON ................ 16
SECURITE PERSONNELLE.................................... 17
Modèles et Identification des Pièces ............18
ELEMENT ET REGLAGE DES COMMANDES
..........................................................................19
ELEMENT RAYONNANT SIMPLE...........................19
ELEMENT RAYONNANT DOUBLE .........................19
MODÈLES (régulateur d'énergie)........................... 19
Fonctionnement de la Table de Cuisson ......20
AVANT D’UTILISER LA TABLE DE CUISSON POUR
LA PREMIERE FOIS ................................................ 20
Batterie de Cuisine .........................................21
ACCESSOIRE DE CUISINE .................................... 21
CARACTÉRITIQUES DES ACCESSOIRES............21
OBSERVEZ LES POINTS SUIVANTS DE MISE EN
BOITE DE CONSERVE............................................ 21
Nettoyage de la Table de Cuisson.................23
PANNES...........................................................24
Assistance ou Service Après-Vente..............24
Veuillez prêter attention à ces symboles que vous
rencontrerez dans ce manuel:
Ce symbole signifie que la sécurité est en
danger. Il signale les risques potentiels qui
peuvent entraîner la mort ou des blessures à
l’opérateur ou aux autres.
Si vous ne suivez pas ces instructions à la
lettre, vous courez le risque de mourir ou
d’être sérieusement blessé.
BIEN LIRE CES INSTRUCTIONS ET LES
CONSERVER.
AVERTISSEMENT
AVERTISSEMENTS POUR
L’INSTALLATION ELECTRIQUE
AVERTISSEMENT
L’installation et l’entretien de l’appareil doivent
être exécutés par un installateur qualifié ou un
bureau technique.
Les modèles peuvent être actionnés
à 240V ou à 208V.
ATTENTION
Toujours débrancher la prise électrique de
l’appareil avant de commencer les opérations
d’entretien.
Pour des raisons de sécurité personnelle, cet
appareil doit être mis à la terre correctement.
Il ne faut en aucun cas couper ou enlever le
troisième fil (terre) du câble électrique.
15
15

Manuel d’utilisation et d’entretien
Manuel d’Installation
FRANÇAIS
FRANÇAIS
IMPORTANT
Veuillez lire les instructions avant toute utilisation.
SECURITE DE LA TABLE DE CUISSON
AVERTISSEMENT
Installation correcte
Assurez-vous que votre appareil est
correctement installé et mis à la masse par un
technicien qualifié.
N’utilisez jamais votre appareil pour réchauffer
ou chauffer la pièce
Ne laissez pas des enfants sans surveillance
Il ne faut pas laisser des enfants seuls ou
sans surveillance dans la pièce où l’appareil
est utilisé. Il ne faut jamais les laisser
s’asseoir ou s’appuyer sur l’appareil.
Portez des vêtements corrects
Il ne faut pas porter de vêtements larges ou
avec de grandes manches lorsque vous
utilisez l’appareil.
Utilisation du service après-vente
Ne réparez pas ou ne remplacez pas des
pièces de l’appareil à moins que le manuel ne
le recommande spécifiquement. Tous les
services après-vente doivent être effectués
par un technicien qualifié.
Entreposage dans ou sur l’appareil
Les matériaux inflammables ne doivent pas
être entreposés dans le four ou à côté.
N’utilisez pas d’eau ou sur les feux de friture
Sur un début de feu, utilisez des extincteurs à
poudre ou à mousse.
Utilisez uniquement des poignées sèches
Les poignées humides ou mouillées sur des
surfaces chaudes peuvent brûler en se
transformant e vapeur. Ne laissez pas les
poignées en contact avec des éléments
chauds. N’utilisez pas de serviettes ou
d’autres torchons volumineux.
Utilisez des casseroles dont la taille est
appropriée
L’appareil est équipé d’une ou plusieurs
surfaces de différentes tailles. Choisissez des
ustensiles dont le fond est plat et qui sont
assez larges pour couvrir la surface de
chauffage. L’utilisation d’ustensiles sousdimensionnés expose une partie de l’élément
de chauffage en contact direct et peut
enflammer des vêtements. Un bon rapport
entre l’ustensile et le brûleur améliorera
l’efficacité.
Précaution de Sécurité
Ne laissez jamais des surfaces de l’appareil
lorsque les réglages sont élevés
Les débordements peuvent provoquer des
fumées et les déversements graisseux
peuvent s’enflammer.
Vérifiez que les casseroles à réflexion ou les
cuvettes de propreté sont en place
L’absence des casseroles ou de ces cuvettes
pendant la cuisson peuvent endommager les
câbles ou les composants inférieurs.
Protections
N’utilisez pas de feuilles d’aluminium pour
protéger les cuvettes de propreté ou les
boutons, sauf comme le suggère le manuel.
Une installation incorrecte des ces protections
peut provoquer des risques d’électrochocs ou
d’incendie.
Les ustensiles de cuisson vitrifiés
Uniquement certains types de verre,
verre/céramique, céramique, la faïence, ou
d’autres ustensiles vitrifiés sont adaptés à la
table de cuisson sans se casser à cause du
changement soudain de température.
Les poignées des ustensiles doivent être
tournées vers l’intérieur et ne dépassées sur
une autre surface de chauffage
Pour réduire le risque de brûlures, l’allumage
de matériaux inflammables, et le déversement
dû à un contact accidentel avec l’ustensile, la
poignée de l’ustensile doit être positionnée
vers l’intérieur et ne pas dépassée au-dessus
des surfaces adjacentes.
Ne mouillez pas les éléments de chauffages
démontables
Les éléments de chauffage ne doivent jamais
être immergés dans l’eau.
Ne cuisinez pas sur une table de cuisson fêlée
Si la table de cuisson était fêlée, les
nettoyants et les déversements peuvent
pénétrer dans la fêlure de la table de cuisson
et provoquer un risqué d’électrochoc.
Contactez un technicien qualifié.
Nettoyez la table de cuisson avec attention
Si une éponge ou un chiffon humide est utilisé
pour essuyer les déversements sur une surface
chaude, évitez les brûlures de vapeur. Certains
nettoyants peuvent entraîner des fumées
nocives s’ils sont appliqués sur des surfaces
chaudes.
16
16

Manuel d’utilisation et d’entretien
Manuel d’Installation
FRANÇAIS
FRANÇAIS
SECURITE PERSONNELLE
Afin de réduire le risque de blessures à
personne au cas où la graisse de cuisson
prendrait feu, veuillez vous comporter de la
sorte:
La graisse est inflammable et il faut la manier
avec précaution.
N’utilisez pas d’eau sur les feux de friture.
Ne prenez jamais en main une casserole en
feu.
La graisse en feu peut être éteinte en dehors
de la casserole avec du bicarbonate de sodium,
ou si vous en avez, un extincteur polyvalent à
produit chimique sec ou à mousse.
Laissez la graisse refroidir avant d’essayer de
l’enlever.
Essuyez les éclaboussures immédiatement.
Si vous faites une flambée avec des liqueurs ou
d’autres alcools sous une hotte, coupez la
ventilation. Les flammes peuvent devenir hors
de contrôle à cause de l’aspiration.
Ne laissez jamais l’endroit sans surveillance
lorsque le réglage est sur une chaleur élevée.
Le débordement peut entraîner des fumées et
des éclaboussures qui peuvent prendre feu.
ATTENTION
Ne laissez jamais en contact avec la surface chaude
des feuilles d’aluminium, le plastique, le papier ou
chiffon. Ne laissez pas une casserole chauffée à sec.
Prévenir les brûlures. Si les flammes ne
s’étendent pas immédiatement, évacuez et
appelez immédiatement les pompiers
Ayez toujours un détecteur de fume près de la
cuisine.
Laissez le ventilateur de la hotte allume lorsque
vous flambez de la nourriture (seulement en
cas de fumée sans flammes).
Utilisez un extincteur uniquement si:
Vous savez que vous avez un extincteur Class
ABC, et que vous savez déjà vous en servir.
Le feu est petit et qu’il est contenu dans la zone
ou il a démarré.
Les pompiers sont prévenus.
Vous pouvez combattre le feu avec le dos près
d’une sortie.
N’utilisez jamais d’eau sur les incendies de
cuisine.
Si vos vêtements prennent feu, allongez -vous
et roulez-vous immédiatement pour éteindre
les flammes.
AVERTISSEMENT
Afin de réduire le risque de brûlures lorsque
vous utilisez la table de cuisson, observez ce
qui suit:
N’utilisez jamais la table de cuisson pour
chauffer ou réchauffer la pièce.
Les enfants et les animaux ne doivent pas être
laissés seuls ou sans surveillance dans la pièce
où l’appareil est utilisé. Il ne faut jamais les laisser
s’asseoir ou se mettre debout sur cet appareil.
ATTENTION
Ne pas conserver des objets qui pourraient intéresser
les enfants au-dessus ou à l’arrière de la table de
cuisson.
Lorsque vous utilisez la table de cuisson
Ne touchez jamais la surface en verre. La
surface peut devenir assez chaude pour
entraîner des brûlures. Les éléments en
surface peuvent être assez chauds pour
devenir sombres. Pendant et après utilisation,
ne touchez pas ou ne laissez pas de
matériaux inflammables en contact avec les
éléments de chauffage jusqu’à ce qu’ils
refroidissent
Lorsque vous utilisez la table de cuisson
Ne touchez pas d’éléments de chauffage ou
les surfaces intérieures du four. les éléments
de chauffage peuvent être assez chauds pour
devenir foncés. Les surfaces intérieures d’un
four peuvent devenir assez chaudes pour
provoquer des brûlures. Pendant l’utilisation et
après, ne touchez pas éléments chauffants, les
vêtements ou les matériaux inflammables ne
doivent pas être en contact avec ces surfaces
ou celles intérieures avant un certain temps de
refroidissement. D’autres surfaces de l’appareil
peuvent être assez chaudes pour provoquer
des brûlures– (identification des surfaces – par
exemple, ouvertures d’aération du four et
surfaces près de ces ouvertures, portes de four,
et fenêtres sur les portes de four).
Afin de réduire le risque de brûlures,
l’inflammation de matériaux inflammables et
les écoulements accidentels, la poignée du
contenant doit être tournée vers le centre de
la table de cuisson pour qu’elle ne dépasse
pas de la surface de l’unité.
Utilisez uniquement certains types de verre,
en vitrocéramique résistant à la chaleur, en
céramique, en faïence ou d’autres récipients
émaillés qui sont adaptés à la table de
cuisson.
AVERTISSEMENT
17
17

Modèles et Identication des Pièces
Modèles (régulateur d’énergie)
Manuel d’utilisation et d’entretien
Manuel d’Installation
FRANÇAIS
FRANÇAIS
3
4
4
3
2
2
1
1
5
Position 1 - 1200W 5 1/2” élément de circuit simple et commande
Position 1- 1200W 5 1/2” élément de circuit simple et
Position 2 - 1800W 7” élément de circuit simple et commande
commande
Position 3 - 1200W 5 1/2” élément de circuit simple et commande
Position 2-
Position 4 - 1800W 7” élément de circuit simple et commande
commande
Position 5 - témoin indicateur de surface chaude et “ON”
Position 3- 1200W 5 1/2” élément de circuit simple et
commande
Position 4- 1800W 7” élément de circuit simple et
commande
Position 5- témoin indicateur de surface chaude et “ON”
1800W 7” élément de circuit simple et
18
18
3
2
5
Position 1 - 1200W 6” élément de circuit simple et commande
Position 2 - 1100W / 2500W 5”/9” double circuit simple et commande
Position 3 - 1200W 6” élément de circuit simple et commande
Position 4 - 1800W 7” élément de circuit simple et commande
Position 5 - témoin indicateur de surface chaude et “ON”
1
4
HI
MED
OFF
LO
HI
MED
OFF
LO
MED
HI
DUAL
LO
OFF
SINGLE
HI
MED
HI
MED
OFF
LO
4
3
2
1

Manuel d’utilisation et d’entretien
MED
Manuel d’Installation
FRANÇAIS
FRANÇAIS
ELEMENT ET REGLAGE DES COMMANDES
ELEMENT RAYONNANT SIMPLE
Ce type d’élément électrique utilise un ruban de câble
situé sous la surface en verre pour fournir la chaleur
pour cuisiner. Ces éléments vont revenir par cycle
marche arrêt par leur propre limiteur de température.
Limiteurs de temperature
Chaque chauffage par rayonnement a son propre
capteur pour protéger la surface de verre de cuisson
des températures extrêmement élevées. Le limiteur
va fonctionner automatiquement par cycle comme
défini par le bouton de réglage (HI (vif) –LO (doux))
ELEMENT RAYONNANT DOUBLE (si existe)
L’élément double consiste à avoir deux rubans
rayonnants dans la même zone de chauffage. Le petit
élément (élément intérieur) comme les deux éléments
(intérieur et extérieur) peuvent être sélectionnés. Il
existe un nombre infini de réglage de chauffage entre
la position LO (DOUX) (doux) et HI (VIF) (vif). La
position fixée se trouvent entre LO (DOUX) et HI (VIF)
pour définir un réglage de chaleur minimum ou
maximum.
Pour allumer l’élément intérieur, poussez le bouton
de contrôle et tournez-le dans le sens des aiguilles
d’une montre en suivant la simple ligne des dessins.
Pour allumer les éléments intérieurs et extérieurs
ensemble, poussez le bouton de commande et
tournez dans les sens des aiguilles d’une montre en
suivant la double ligne des dessins.
Utilisation des réglages recommandes
Tous ces réglages sont recommandés sans
préchauffage de l’élément, la fourchette des réglages
de chauffage sont mentionnés parce que le réglage
actuel dépend de:
Type et qualité de casserole
Type, quantité et température de nourriture
Elément utilisé et préférences de cuisine
HI
OFF
HI
MED
DUAL
LO
SINGLE
REGLAGES DE
CHALEUR DES
TYPE DE NOURRITURE
Beurre fondu, chocolat LO (DOUX)
Sauce délicate, riz,
sauces mijotées sauces
avec beurre et jaune
d’œuf
Cuisson de légumes,
court bouillons de
poisson, omelettes ou
œufs brouillés -,
céréales, pâtes, lait,
crêpes, pudding, pots au
feu, légumes vapeur, pop
corn, bacon, soupe de
ragoût de viande,
légumes sautés, sauces
spaghetti
Bœufs braisés, viandes
frites, poisson, oeufs,
sautés à feu vif, viandes
rapidement revenues, eau
rapidement à ébullition
Eau bouillante pour
légumes, pâtes
MODÈLES (régulateur d'énrgie)
Bouton de commandes (pos. 1 à 4)
L’emplacement de chaque bouton correspond à
l’emplacement d’un élément de chauffage qu’il contrôle.
Pour allumer un élément, ENFONCEZ le bouton et
tournez dans la direction du chauffage désiré.
Témoin de chaleur résiduelle
Chaque élément a son témoin indicateur de chaleur pour
indiquer lorsque la zone de cuisson est chaude ou "ON".
Le témoin s’allume automatiquement dans la zone marquée
d’une croix. Le témoin reste allumé jusqu’à ce que la
zone de cuisson soit assez refroidie pour pouvoir être
touchée (environ 150°F). Si un témoin de chaleur
résiduel est allumé, faites attention lorsque vous
travaillez près de la table de cuisson tant qu’elle est
chaude.
ELEMENTS RADIANTS
Rég.
d’énergie
LO (DOUX)
to MEDIUM
(MOYEN)
MEDIUM
(MOYEN)
MEDIUM
(MOYEN)
to HI (VIF)
HI (VIF)
OFF
HI
LO
MED
19
19

Manuel d’utilisation et d’entretien
Manuel d’Installation
FRANÇAIS
FRANÇAIS
Fonctionnement de la Table de Cuisson
AVANT D’UTILISER LA TABLE DE
CUISSON POUR LA PREMIERE FOIS
Tous les produits sont essuyés avec des
solvants à l’usine pour enlever tous les signes
visibles de saleté, d’huile ou de graisse qui
peuvent être restés après la fabrication
Si vous en avez, enlevez tous les emballages et
les manuels de la surface de la table de cuisson
Nettoyez le verre avant de l’utiliser pour la
première fois. Un nettoyage soigné sur le verre
supérieur avec un nettoyant est recommandé.
Cela ne prend qu’une minute et le verre est
propre, brillant et enduit avant la première
utilisation.
Il peut se dégager une légère odeur pendant les
premières utilisations: c’est normal et l’odeur
disparaîtra.
Les meilleures cuissons dépendront de la
cuisson correcte sélectionnée.
La surface de cuisson va garder la chaleur et
rester chaude pendant plus de 20 minutes après
avoir éteint les éléments.
La surface de cuisson vitrocéramique est un
matériau durable résistant aux chocs mais
cassable si une casserole ou un autre objet
tombe dessus.
N’utilisez pas de feuille d’aluminium directement
sur le verre; il va fondre et endommager la
surface en verre.
Ne laissez pas les récipients vides chauffer. Cela
peut endommager le récipient, l’élément et /ou la
table de cuisson.
Ne cuisez jamais directement la nourriture sur le
verre.
Ne faites pas glisser des casseroles sur la
surface de cuisson, cela peut rayer le verre.
L’utilisation de récipient en fonte sur le verre de
la table de cuisson n’est pas recommandée. La
fonte retient la chaleur et elle peut endommager
la table de cuisson.
20
20

Manuel d’utilisation et d’entretien
Manuel d’Installation
FRANÇAIS
FRANÇAIS
Batterie de Cuisine
ACCESSOIRE DE CUISINE
Le choix du récipient a un effet direct sur les
performances de cuisson (rapidité et homogénéité)
pour de meilleurs résultats choisissez des récipients
avec les caractéristiques suivantes:
Fond plat
Lorsqu’une casserole est chaude, la base (fond de la
casserole) doit être posée uniformément sur la
surface sans osciller (basculer). La casserole idéale
doit avoir un fond plat, des bords rectilignes, un
couvercle bien tenu et le matériau doit être d’une
épaisseur moyenne à épaisse. Les finitions brutes
peuvent rayer la table de cuisson.
Adaptation du diamètre de la casserole à
l’élément rayonnant
Le fonde la casserole doit couvrir ou être adapté au
diamètre de l’élément utilisé
CARACTÉRITIQUES DES ACCESSOIRES
Guide des ustensiles de cuisine
L’aluminium chauffe et refroidit rapidement.
Le fer forgé chauffe et refroidit rapidement. Non
Le cuivre conserve la chaleur et refroidit
La finition émail, la réponse dépend de la base.
La vitrocéramique chauffe et refroidit lentement
L’acier inoxydable chauffe et refroidit
Frire, braiser, rôtir. Il peut laisser des marques
sur le verre.
recommandé. Il retient trop la chaleur et peut
endommager la table de cuisson.
rapidement. Cuisson gourmet, sauces au vin
liées, plat d’œufs.
Non recommandé, des imperfections métalliques
dans l’émail peuvent rayer la table de cuisson.
Non recommandé. Elle chauffe trop doucement.
Des imperfections en émail peuvent rayer la table
de cuisson.
modérément. Soupes, sauces, légumes crus,
cuisson générale.
OBSERVEZ LES POINTS SUIVANTS DE
MISE EN BOITE DE CONSERVE
Les casseroles qui dépassent plus de 1 cercle de la
surface ne sont pas recommandées pour la plupart
des cuissons. Cependant, lorsque vous faites des
conserves avec des bains-maries ou des conserves
sous pression, des casseroles de diamètre plus large
peuvent être utilisées. C’est parce que les
températures de l’eau bouillante (même sous
pression) ne sont pas dangereuses pour la surface
de la table de cuisson.
Cependant, n’utilisez pas de casseroles a large
diametre ou d’autres recipients pour frire ou faire
bouillir des aliments qui ne sont pas de l’eau.
La plupart des sirops ou d’autres sauces mixées— et
tout ce qui est frit— cuise à des températures bien
plus élevées que l’eau bouillante. Ces températures
peuvent donc chauffer le verre de la table de cuisson.
Vérifiez que le récipient soit bien sur le:
Centre de la surface. Si votre table de cuisson ou
son emplacement ne permet pas au récipient
d’être centré sur la surface, utilisez des récipients
plus petits pour un bon résultat.
Il faut utiliser des récipients à fond plat. N’utilisez
pas de récipient avec des fonds ondulés [souvent
dans les plats en émail) parce qu’ils ne sont pas
assez en contact avec la surface et donc l’eau
met longtemps à bouillir.
21
21

Manuel d’utilisation et d’entretien
Vous devez être sûr du temps nécessaire pour la
Lorsque vous faites des conserves, utilisez des
recettes et des procédés de sources sûres. Des
recettes fiables sont disponibles chez le fabricant
de conserves ou de bocaux comme la marque
Ball and Kerr; et au service d’extension du
département de l’agriculture des Etats-Unis.
Rappelez vous que la mise en boîte de
conserves entraîne beaucoup de vapeur. Pour
éviter les brûlures de la vapeur ou de la chaleur,
faites bien attention.
ATTENTION
Une mise en boîte de conserves sûre exige que les
micro-organismes nuisibles soient détruits et que le
bocal soit fermé de façon étanche. Lorsque vous
faites des conserves dans un bain-marie, une
ébullition douce mais maintenue doit être prolongée
pendant le temps exigé. Lors de la mise en boîte de
conserve dans une cocotte minute, la pression doit
être maintenue pendant le temps exigé.
Après avoir réglé les commandes, il est très
important de garder l’ébullition prescrite et les
niveaux de pression pendant le temps nécessaire.
mise en boîte de conserve et cela sans aucune
interruption, et surtout ne faites jamais de conserve
avec un récipient dont le fond est ondulé.
Poêles spéciales
Les poêles spéciales, comme les grils, les plats à
rôtir, les cocottes minutes, les woks, (N’utilisez que
les fonds plats).
ATTENTION
La nourriture emballée dans des feuilles d’aluminium
ne doit pas être placée directement sur le verre en
céramique de la surface de cuisson; les feuilles en
aluminium peuvent fondre et entraîner des
endommagements permanents.
ATTENTION
Le plastique, le papier, les tissus peuvent fondre ou
brûler lorsqu’ils sont en contact avec une surface
chaude. Ne laissez pas ces objets en contact avec le
verre chaud.
Manuel d’Installation
FRANÇAIS
FRANÇAIS
22
22

Manuel d’utilisation et d’entretien
Manuel d’Installation
FRANÇAIS
FRANÇAIS
Nettoyage de la Table de Cuisson
ATTENTION
Assurez-vous que l’alimentation électrique est
débranchée et que toutes les surfaces sont refroidies
avant de nettoyer la table de cuisson.
Appliquez une petite quantité du nettoyant crème
céramique spécifique pour table de cuisson tous les
jours. Cela lui apporte un film protecteur qui facilite le
nettoyage des éclaboussures d’eau et projections de
nourriture. La température de la surface de cuisson
réduit les qualités de protection de ce nettoyant.
Il faut la ré-appliquer avant chaque utilisation. Utilisez
un chiffon propre et appliquez la crème nettoyante de
table de cuisson avant chaque utilisation pour enlever
la saleté ou les traces métalliques que l’on peut voir
sur la surface entre les utilisations.
BOUTON DE COMMANDES
Tirez pour enlever le bouton en utilisant une serviette
pour faire levier. Essuyez avec un chiffon mouillé et
savonneux, rincez et séchez. Pas trop d’eau!
CADRE
(Modèles acier inoxydable)
Nettoyez toujours avec le grain. Pour les résidus
modérés/abondants, utilisez BonAmi
(pas de javel).
Essuyez en utilisant une éponge humide ou un
chiffon, rincez et séchez
®
ou Soft Scrub®
TECHNIQUES DE NETTOYAGE QUOTIDIEN
Nettoyez la surface lorsqu’elle est complètement
froide à l’exception de ce qui suit.
Enlevez
immédiatement avec
le racloir à lame de
rasoir ces résidus de
sucres séchés
sucre de sirop
produits à la
tomate
lait
Utilisation quotidienne
Essuyez les éclaboussures avec un chiffon propre et
humide.
Utilisez du vinaigre blanc s’il reste des salissures;
rincez.
Appliquez une petite quantité de crème nettoyante de
table de cuisson.
Lorsque c’est sec, polissez la surface avec un chiffon
ou du papier propre.
ATTENTION
N’utilisez aucun nettoyant sur le verre tant que la
surface est chaude; Utilisez uniquement le racloir à
lame de rasoir. Les fumées pourraient être nocives
pour votre santé. Un nettoyant chaud peut dégager
des fumées chimiques en endommage la surface.
NETTOYANTS RECOMMANDES
Crème nettoyant de table de cuisson:
Utilisez uniquement une petite quantité; appliquez sur
du papier ou chiffon propre. Essuyez et polissez la
surface avec une serviette propre et sèche.
BonAmi
Rincez et séchez.
Soft Scrub
Rincez et séchez.
Vinaigre blanc
Rincez et séchez.
Racloir à lame de rasoir
Emballé avec la table de cuisson.
Note: les nettoyants recommandés indiquent un type
de nettoyant et ils ne constituent pas une liste
exhaustive.
®
EVITEZ CES NETTOYANTS
Les nettoyants pour vitre qui contiennent de
l’ammoniaque ou de l’eau de Javel chlorée.
Ces ingrédients peuvent teindre ou attaquer la table
de cuisson.
Les nettoyants caustiques
comme les nettoyants pour four comme Easy Off
peuvent attaquer la table de cuisson.
Les éponges nettoyantes abrasives avec du
métal
Les éponges abrasives comme Scotch Brite
rayer et / ou laisser des traces de métal.
Les nettoyants à poudre contenant de l’eau de
Javel chlorée
Peuvent teindre de façon permanente la table de
cuisson.
Les nettoyants inflammables
Comme les essences à briquet ou WD-40.
®
(sans javel)
®
®
peuvent
23
23
Manuel d’utilisation et d’entretien
Manuel d’Installation
FRANÇAIS
FRANÇAIS
PANNES
Problème Cause Remèdes possibles
Rien ne fonctionne
Les éléments chauffants ne
chauffent pas correctement.
Les éléments de chauffage
s’arrêtent même s’ils sont réglés à
la positon de chauffage la plus
élevée
Le surface vitrocéramique est
transparente ou semble devenir
rouge.
La table de cuisson n’est pas
branchée correctement au circuit
électrique.
Le fusible ou le disjoncteur ont
sauté.
Il n’y a pas d’électricité dans la
table de cuisson.
La table de cuisson est branchée à
une alimentation de 120 volt.
L’alimentation est défectueuse.
La casserole utilisée est incorrecte.
Les limiteurs de chauffage arrêtent
temporairement les éléments car ils
dépassent la température
maximum.
Sous des lumières fortes ou
directes, vous pouvez parfois voir à
travers le verre et dans le châssis à
cause de sa qualité transparente.
Dans ces conditions, vous pouvez
voir également une teinte rouge.
Inspectez que la bonne tension
alimente la table de cuisson.
Remplacez le fusible ou réenclenchez le disjoncteur.
Inspectez l’alimentation électrique.
Raccordez votre table de cuisson au
voltage correct.
Serrez les connections à la boîte de
jonction.
Choisissez une casserole correcte
comme dans la section de
fonctionnement de la Table de
cuisson dans ce manuel.
C’est un fonctionnement normal,
spécialement pendant les chauffages
rapides. Les éléments vont
automatiquement se remettrent en
marche lorsqu’ils se seront
suffisamment refroidis.
Ces sont les propriétés normales des
panneaux en vitrocéramique noir.
Assistance ou Service Après-Vente
Avant d’appeler l’assistance ou le service aprèsvente, veuillez bien vérifier la section « Solution aux
problèmes ». Ceci peut vous faire économiser le coût
d’un appel à un centre de service. Si vous avez
cependant besoin d’aide, suivre les indications cidessous. Lorsque vous appelez, soyez prêt à indiquer
la date d’achat, le modèle complet ainsi que le
numéro de série de votre appareil. Ces informations
nous permettront de mieux répondre à vos questions.
24
24
Données de Service
Pour un centre de service autorisé ou de
l’information sur les pièces, voir le paragraphe
"GARANTIE pour l’électroménager".
L’emplacement du numéro de série sur le produit il est
situé sur la base de la table de cuisson. Notez cette
information dans l’espace prévu à cet effet cidessous. Gardez votre facture pour la validation de
votre garantie.
Numéro de modèle _________________
Numéro de série ___________________
Date d’installation ou Occupancy ________________

Notes
Manuel d’utilisation et d’entretien
Manuel d’Installation
FRANÇAIS
FRANÇAIS
25
25
Notes
Manuel d’utilisation et d’entretien
Manuel d’Installation
FRANÇAIS
FRANÇAIS
26
26
Manual de uso & Mantenimiento
Manual de Instalación
ESPAÑOL
ESPAÑOL
Tabela de Contenido
Pagina
ADVERTENCIAS PARA LA INSTALACIÓN
ELÉCTRICA..............................................................27
Instrucciones de Seguridad...........................28
SEGURIDAD DE LA PLACA DE COCCION............28
SEGURIDAD PERSONAL........................................29
Modelos e Identificación de Componentes ..30
Uso de los mandos .........................................31
ELEMENTO RADIANTE SENCILLO........................ 31
ELEMENTO RADIANTE DOBLE .............................31
MODELOS (regulador de energía)............................31
Uso de la placa de cocción ............................32
ANTES DE UTILIZAR LA PLACA POR PRIMERA
VEZ........................................................................... 32
Preste la debida atención a los siguientes
símbolos que encontrará en el manual:
Este es el símbolo de los avisos relacionados
con la seguridad: alerta sobre potenciales
peligros que pueden derivar en muerte o
daños a las personas.
Si no sigue estas instrucciones, puede correr
peligro de muerte o de resultar gravemente
herido.
LEA Y CONSERVE ESTAS INSTRUCCIONES
ADVERTENCIAS PARA LA INSTALACIÓN
ELÉCTRICA
ADVERTENCIA
ADVERTENCIA
Recipientes......................................................33
GENERAL................................................................. 33
CARACTERÍSTICAS DE LOS RECIPIENTES ........33
SIGA ESTOS CONSEJOS EN LA PREPARACIÓN
DE CONSERVAS ..................................................... 33
Limpieza de la Placa de Cocción...................35
Solución de Problemas ..................................36
Servicio de Asistencia Técnica .....................36
La instalación y el mantenimiento de este
electrodoméstico deben ser efectuados por un
instalador cualificado o una agencia técnica.
Los modelos de se pueden accionar
en 240V o 208V.
ATENCIÓN
Desenchufe siempre el aparato de la toma de
red de la pared antes de comenzar la revisión
o las operaciones de mantenimiento.
Estos dispositivos deben contar con una toma
de tierra para su seguridad.
No corte ni retire el tercer cable (el cable de tierra)
del cable del aparato, bajo ninguna circunstancia.
27
27

Manual de uso & Mantenimiento
Manual de Instalación
ESPAÑOL
ESPAÑOL
IMPORTANTE
Por favor, lea todas las instrucciones antes de utilizar este aparato.
SEGURIDAD DE LA PLACA DE COCCION
ADVERTENCIA
Instalación adecuada
El electrodoméstico debe ser instalado y
conectado a tierra por un electricista cualificado.
No utilice jamás el electrodoméstico para
calentar una habitación.
No deje a los niños solos
No deje a niños solos o sin supervisión en una
habitación en la que haya electrodomésticos en
funcionamiento. No permita que se suban o se
sienten en ninguna parte del electrodoméstico.
Lleve ropa adecuada
No lleve nunca ropa demasiado amplia o con
mangas o complementos que cuelguen mientras
use el electrodoméstico.
Mantenimiento
No repare ni sustituya ningún componente del
electrodoméstico si no se recomienda
explícitamente en este manual. Cualquier otra
operación debe ser efectuada por un técnico
cualificado.
Almacenamiento en el interior y encima del
electrodoméstico
No almacene materiales inflamables dentro de
un horno ni cerca de las unidades de superficie.
No utilice agua para sofocar los incendios
provocados por grasa
Sofoque las llamas con una tapa, bandeja o un
extintor de polvo químico o de espuma.
No utilice agarradores húmedos
Si los agarradores entran en contacto con una
superficie caliente, el vapor resultante podría
provocar quemaduras. Los agarradores no
deben entrar en contacto con elementos
térmicos calientes. No utilice toallas o trapos
gruesos o doblados.
Utilice sartenes del tamaño adecuado
El electrodoméstico está equipado con una o
más unidades de superficie de diferentes
dimensiones. Seleccione utensilios con bases
llanas y con tamaños que cubran la superficie
del fuego. Si utiliza sartenes o pucheros de
diámetro inferior al del fuego, dejará una parte
de este expuesto al contacto directo, lo que
podría provocar un incendio si entrara en
contacto con alguna prenda o paño. Si respeta
la proporción entre los utensilios y los fuegos
aumentará también la eficiencia del
funcionamiento del electrodoméstico.
Instrucciones de Seguridad
No deje el electrodoméstico desatendido si está
utilizando temperaturas elevadas
Las salpicaduras provocan humo y, si se
derrama grasa, puede prender fuego.
Asegúrese de que las placas reflectoras o
bandejas de goteo estén bien colocadas
Si estos elementos no están colocados durante
el uso del electrodoméstico, el cableado y los
componentes inferiores podrían resultar
dañados.
Cubiertas protectoras
No utilice papel de aluminio para cubrir la
superficie, las bandejas o la parte inferior del
electrodoméstico, excepto si lo hace siguiendo
las instrucciones de este manual. Una
colocación inadecuada de los elementos de
protección podría provocar peligro de descarga
eléctrica o de incendio.
Utensilios de cocina vitrificados
Utilice sartenes y ollas vidriadas (de cristal,
cerámica, cerámica vidriada, barro...). Estos
materiales no se rompen cuando son expuestos
a cambios repentinos de temperatura.
Gire los mangos de los utensilios hacia el
interior y no los sitúe sobre las unidades de
superficie adyacentes
Para reducir el riesgo de quemaduras o de
ignición de materiales inflamables o de
derramamientos provocados por un contacto no
intencionado con el utensilio, coloque los
mangos de los utensilios hacia dentro evitando
situarlos sobre las unidades de superficie
adyacentes.
No moje los elementos térmicos extraíbles
Los elementos térmicos no deben sumergirse en
agua.
No utilice la placa de cocción si tiene fisuras
Si la placa de cocción se rompiera, los
limpiadores y los derrames de alimentos podrían
filtrarse por las fisuras y provocar un riesgo de
descarga eléctrica. Si detecta alguna fisura,
póngase de inmediato en contacto con un
técnico cualificado.
Limpie la placa con cuidado
Si utiliza una esponja o un trapo mojados para
limpiar salpicaduras de la placa en caliente,
hágalo con cuidado: podría quemarse con el
vapor. Algunos productos de limpieza emanan
vapores tóxicos si se aplican a una superficie
caliente.
28
28

Manual de uso & Mantenimiento
Manual de Instalación
ESPAÑOL
ESPAÑOL
SEGURIDAD PERSONAL
Para reducir el riesgo de daños a las
personas, en caso de que el aceite con el que
cocina prenda fuego, siga los pasos
siguientes:
La grasa es un material inflamable y debe
manipularse con cuidado.
No utilice agua para sofocar los incendios
provocados por grasa.
No toque nunca una sartén en llamas.
Si prende fuego algo de grasa que se
encuentre fuera de la sartén, puede sofocarlo
con bicarbonato sódico o con un extintor de
polvo químico seco o de espuma.
No toque la grasa hasta que se haya enfriado.
Limpie cualquier derrame de inmediato.
Si va a flambear un alimento sobre la placa,
apague el extractor de la campana. La
corriente de aire podría extender y descontrolar
la llama.
No deje nunca la superficie desatendida si está
cocinando con temperaturas altas. Las
salpicaduras provocan humo y, si se derrama
grasa, puede prender y provocar un incendio.
ATENCIÓN
Evite que la placa entre en contacto con papel de
aluminio, plástico, papel o tela cuando esté caliente.
No coloque sartenes o recipientes vacíos sobre el
fuego encendido.
Si tiene cuidado, evitará quemaduras. Si las
llamas no se apagan inmediatamente, salga de
la habitación y llame a los bomberos.
Tenga siempre un detector de incendios que
funcione correctamente cerca de la cocina.
Deje siempre la campana extractora de humos
encendida cuando flambee alimentos
(solamemte en caso de humo sin llamas).
Utilice un extintor solo si
Dispone de un extintor ABC y sabe cómo
utilizarlo.
El fuego es pequeño y está limitado a la zona
en la que se inició.
Ya ha llamado a los bomberos.
Tiene una salida a su espalda mientras
combate el fuego.
No utilice jamás agua para extinguir fuegos en
la cocina.
Si su ropa prende fuego, tírese al suelo de
inmediato y gire sobre sí mismo para
extinguir las llamas.
ADVERTENCIA
Para reducir el riesgo de quemaduras en el
uso de la placa siga estos consejos:
No utilice jamás la placa de cocción para calentar
una habitación.
No deje a niños o mascotas solos en una
habitación en la que haya electrodomésticos en
funcionamiento. No permita que se sienten o
apoyen en ninguna parte del electrodoméstico.
ATENCIÓN
No almacene objetos que puedan llamar la atención
de los niños ni en los armarios que se encuentren
sobre el electrodoméstico ni en la parte posterior: los
niños podrían resultar gravemente heridos si
intentaran alcanzarlos.
Cuando utilice la placa de cocción
No toque la superficie de los fuegos ni la
zona de alrededor. La superficie puede emitir
calor suficiente para causar quemaduras. Los
elementos de la superficie pueden estar
calientes incluso cuando están de color
oscuro. No toque la superficie de la placa ni
permita que ningún material inflamable entre
en contacto con ella mientras esté caliente.
Cuando utilice la placa de cocción sobra el
horno
No toque los elementos térmicos o las
superficies interiores del horno. Los
elementos térmicos pueden estar calientes
aunque estén de color oscuro. Las superficies
interiores de un horno emiten y retienen calor
suficiente para provocar quemaduras. No
toque los elementos térmicos ni las
superficies interiores del horno, ni permita que
ningún material inflamabe o tejido entre en
contacto con ellos durante el uso del
electrodoméstico o mientras este esté
caliente. Hay otras superficies del
electrodoméstico que pueden calentarse lo
suficiente como para provocar quemaduras;
entre estas se encuentran, por ejemplo, las
aberturas de ventilación del horno y las
superficies de alrededor, las puertas del horno
y los cristales de las puertas del horno).
Para minimizar el riesgo de quemaduras,
salpicaduras y de incendio, mantenga el
mango de la sartén o recipiente que esté
utilizando en el centro de la placa de cocción,
pero no encima de un fuego.
Utilice únicamente recipientes adecuados
para la placa de cocción, como determinados
tipos de cristal, cerámica vidriada refractaria,
barro u otros recipientes vitrificados.
ADVERTENCIA
29
29
Modelos e Identicación de Componentes
Modelos (Regulador de energía)
Manual de uso & Mantenimiento
Manual de Instalación
ESPAÑOL
ESPAÑOL
3
2
4
1
5
Position 1 - Circuito sencillo de 1200W 5 1/2” y mando
Posición 1- Circuito sencillo de 1200W 5 1/2” y mando
Position 2 - Circuito sencillo de 1800W 7” y mando
Posición 2-
Position 3 - Circuito sencillo de 1200W 5 1/2” y mando
Posición 3- Circuito sencillo de 1200W 5 1/2” y mando
Position 4 - Circuito sencillo de 1800W 7” y mando
Posición 4- Circuito sencillo de 1800W 7” y mando
Position 5 - Indicadores de calor residual y “ON”
Posición 5- Indicadores de calor residual y “ON
Circuito sencillo de 1800W 7” y mando
3
4
4
3
2
1
30
30
2
1
5
Position 1 - Circuito sencillo de 1200W 6” y mando
Position 2 - Dual circuito sencillo de 1100W / 2500W
5”/9” y mando
Position 3 - Circuito sencillo de 1200W 6” y mando
Position 4 - Circuito sencillo de 1800W 7” y mando
Position 5 - Indicadores de calor residual y “ON
HI
MED
OFF
LO
HI
OFF
LO
HI
OFF
HI
HI
OFF
LO
4
MED
3
MED
DUAL
LO
SINGLE
2
MED
MED
1

Manual de uso & Mantenimiento
MED
Manual de Instalación
ESPAÑOL
ESPAÑOL
Uso de los mandos
ELEMENTO RADIANTE SENCILLO
Este tipo de elemento eléctrico utiliza un cable de
cinta situado bajo la superficie del cristal para
suministrar calor. Los elementos se encienden y
apagan en ciclos regulados por los limitadores de
temperatura.
Limitadores de temperatura
Cada elemento radiante tiene su propio sensor para
proteger la superficie de cristal de temperaturas
excesivas. El limitador funciona de forma automática
y se regula en función de la temperatura
seleccionada con el mando: de ALTA (HI) a BAJA
(LO).
ELEMENTO RADIANTE DOBLE (si presente)
El elemento doble contiene dos cables de cinta en la
misma área de cocción. Puede utilizarse el elemento
pequeño (el circuito interior) por separado o ambos
juntos. Entre la posición BAJA y ALTA hay un
número infinito de posiciones de calor. Las
posiciones fijas (BAJA y ALTA) definen la potencia
mínima y la máxima.
Para encender el circuito interior, pulse el mando y
gírelo en sentido contrario a las agujas del reloj
siguiendo las líneas sencillas.
Para encender el circuito interior y el exterior
simultáneamente, pulse el mando y gírelo en el
sentido de las agujas del reloj siguiendo las líneas
dobles.
Uso recomendado
Las siguientes recomendaciones (sin
precalentamiento del fuego) son una orientación,
porque la selección de temperatura varía en función
de:
El tipo y la calidad de la sartén
El tipo, cantidad y temperatura de los alimentos
El fuego utilizado y las preferencias del cocinero
HI
OFF
HI
MED
DUAL
LO
SINGLE
OFF
HI
MED
TEMPERATURA
ELEMENTO RADIANTE
TIPO DE ALIMENTO
Reg.
energía
Fundir mantequilla,
LO (Baja)
chocolate
Salsas delicadas, arroz,
cocción lenta de salsas
LO (Baja)
a Media
con mantequilla y yema
de huevo
Cocinar verduras, caldos
Media
de pescado, huevos
(fritos o revueltos),
terminar cereales, pasta,
leche, tortitas, arroz con
leche, cocer carne a
fuego lento, verduras al
vapor, palomitas, beicon,
caldos de carne, saltear
verduras, salsas
Estofar carne, freír carne,
pescado, huevos, freír con
Media a HI
(Alta)
poco aceite, dorar carne,
hervido rápido
Hervir agua para
HI (Alta)
verduras, pasta
MODELOS (regulador de energía)
Mandos (pos. 1 a 4)
La ubicación de cada mando corresponde a la del
elemento que activa. Para encender un elemento,
PULSE el mando correspondiente y GÍRELO en la
dirección indicada para la función deseada.
Indicador de calor residual
Cada fuego tiene un indicador luminoso asignado que
señala cuándo está caliente o "ON".
La luz se encenderá de forma automática en la zona
marcada con la cruz. La luz permanecerá encendida
hasta que el fuego se haya enfriado hasta una
temperatura segura.
Si la luz de calor residual está encendida, quiere decir
que el fuego sigue caliente, así que evite tocarlo.
LO
31
31

Manual de uso & Mantenimiento
Manual de Instalación
ESPAÑOL
ESPAÑOL
Uso de la placa de cocción
ANTES DE UTILIZAR LA PLACA POR
PRIMERA VEZ
Todos los productos se limpian en fábrica con
solventes que eliminan cualquier signo visible de
suciedad, aceite y grasa que haya podido fijarse
en la placa durante el proceso de producción.
Retire el embalaje de la placa y la
documentación que haya sobre ella.
Limpie la superficie de cristal antes de utilizarla
por vez primera. Se recomienda efectuar una
limpieza exhaustiva con un limpiador específico.
No le llevará más de un minuto y dejará una
película protectora limpia y brillante sobre el
cristal antes de su primer uso.
Las primeras veces que utilice la placa, podría
percibir un ligero olor: es perfectamente normal y
desaparecerá con el tiempo.
Para obtener buenos resultados en la cocina,
deberá elegir los recipientes adecuados.
La superficie de cocción conservará calor y
permanecerá caliente aproximadamente 20
minutos después de haber apagado los fuegos.
La superficie vitrocerámica de la placa es muy
duradera y resistente a los impactos, pero se
puede romper si algún objeto cae sobre ella.
No coloque papel de aluminio directamente
sobre el cristal; podría derretirse y dañar la
superficie de cristal.
No coloque sartenes o recipientes vacíos sobre
el fuego encendido. Podría dañar el recipiente, el
fuego o la placa de cocción.
No cocine alimentos directamente sobre el
cristal.
No deslice ningún recipiente sobre la superficie:
podría rayar el cristal
No es recomendable utilizar sartenes o
recipientes de hierro fundido en esta placa de
cocción. El hierro fundido retiene el calor y podría
provocar daños en la placa.
32
32

Manual de uso & Mantenimiento
Manual de Instalación
ESPAÑOL
ESPAÑOL
Recipientes
GENERAL
La elección del recipiente afecta directamente al
rendimiento de cocción (velocidad y uniformidad).
Para lograr los mejores resultados, seleccione
sartenes con las siguientes características:
Base plana
Cuando una sartén se calienta, la base
debería apoyarse uniformemente sobre
la superficie de cocción, sin bailar.
Los recipientes ideales para cocinar
son los que tienen una base plana, una tapa que
encaja perfectamente y están fabricados con un
material de espesor medio o alto.
Si tiene un acabado irregular, podría rayar la placa
de cocción
Ajuste el diámetro de la sartén al fuego
La base del recipiente utilizado debería encajar con
el diámetro del fuego utilizado o cubrirlo
CARACTERÍSTICAS DE LOS
RECIPIENTES
Guía de materiales
Aluminio: se calienta y enfría de forma rápida.
Sirve para freír, estofar y dorar. Puede dejar
marcas de metal en el cristal.
Hierro fundido: se calienta y enfría de forma
rápida. No es un material recomendable. Retiene
demasiado el calor y podría dañar la placa de
cocción.
Cobre, estaño: se calientan y enfrían de forma
rápida. Cocina gourmet, salsas con vino, platos a
base de huevo.
Recipientes esmaltados: el resultado depende
de su base. Pero no es un material
recomendable: las imperfecciones del metal y el
esmalte podrían dañar la placa.
Cerámica vidriada: se calienta y enfría muy
lentamente. No es un material recomendable.
Tarda demasiado en calentarse. Las
imperfecciones del acabado podrían rayar la
placa.
Acero inoxidable: se calienta y enfría con
velocidad moderada. Para sopas, salsas y cocina
en general.
SIGA ESTOS CONSEJOS EN LA
PREPARACIÓN DE CONSERVAS
Los recipientes que sobresalen del elemento no son
recomendables para la mayor parte de las
superficies de cocción. Sin embargo, cuando esté
preparando conservas al baño maría o con un
recipiente específico, puede utilizar diámetros
mayores. Esto es debido a que la temperatura de
ebullición del agua (incluso a presión) no es dañina
para la superficie de la placa que rodea el fuego.
pero no utilice ollas o recipientes de un diámetro
superior al del fuego para freír o hervir otros
alimentos.
La mayoría de los siropes y salsas (y el aceite para
freír) alcanzan temperaturas muy superiores a la del
agua en ebullición. Esas temperaturas podrían dañar
la superficie de la placa.
Coloque el recipiente que vaya a utilizar para
preparar conservas en el centro del fuego. Si la
placa o su ubicación no le permiten centrar bien
el recipiente, utilice uno más pequeño para
obtener buenos resultados.
33
33

Manual de uso & Mantenimiento
Manual de Instalación
ESPAÑOL
ESPAÑOL
Debe utilizar recipientes con la base plana. No
utilice recipientes con bases irregulares (cosa
habitual en los recipientes cerámicos), porque no
tienen un contacto total con la superficie de la
placa y el agua tardará mucho tiempo en hervir.
Cuando prepare conservas, utilice recetas de
fuentes de confianza. Puede obtener recetas e
instrucciones del fabricante del recipiente que
utilice para las conservas (como Ball and Kerr) y
del Departamento de Agricultura y de Servicios
para el Consumidor de los Estados Unidos.
Recuerde que el enlatado de conservas es un
proceso que genera grandes cantidades de
vapor.
Preste atención para evitar quemaduras.
ATENCIÓN
Safe canning requires that harmful micro organisms
En el proceso de enlatado de conservas es
necesario eliminar microorganismos nocivos y sellar
las conservas de forma segura. Cuando esté
preparando conservas debe mantener un hervor del
agua suave y constante durante un cierto período de
tiempo. Cuando utilice un recipiente específico a
presión, deberá mantener esa presión durante el
tiempo indicado.
Una vez haya seleccionado la potencia deseada, es
importante que se asegure de que el hervor del agua
o la presión se mantienen durante el tiempo indicado
en la receta.
Si el recipiente que utiliza para preparar las
conservas no tiene una base plana, no podrá estar
seguro de que ha llevado a cabo el procedimiento de
la forma correcta.
Sartenes especiales
Puede utilizar planchas, ollas a presión y woks
(siempre que tengan la base plana).
ATENCIÓN
No coloque alimentos envueltos en papel de aluminio
directamente sobre la placa de cocción: el papel de
aluminio podría derretirse y causar daños
permanentes en el cristal.
ATENCIÓN
El plástico, el papel y la tela pueden derretirse o
quemarse si entran en contacto con una superficie
caliente. No permita que esos materiales entren en
contacto con el cristal cuando esté caliente.
34
34
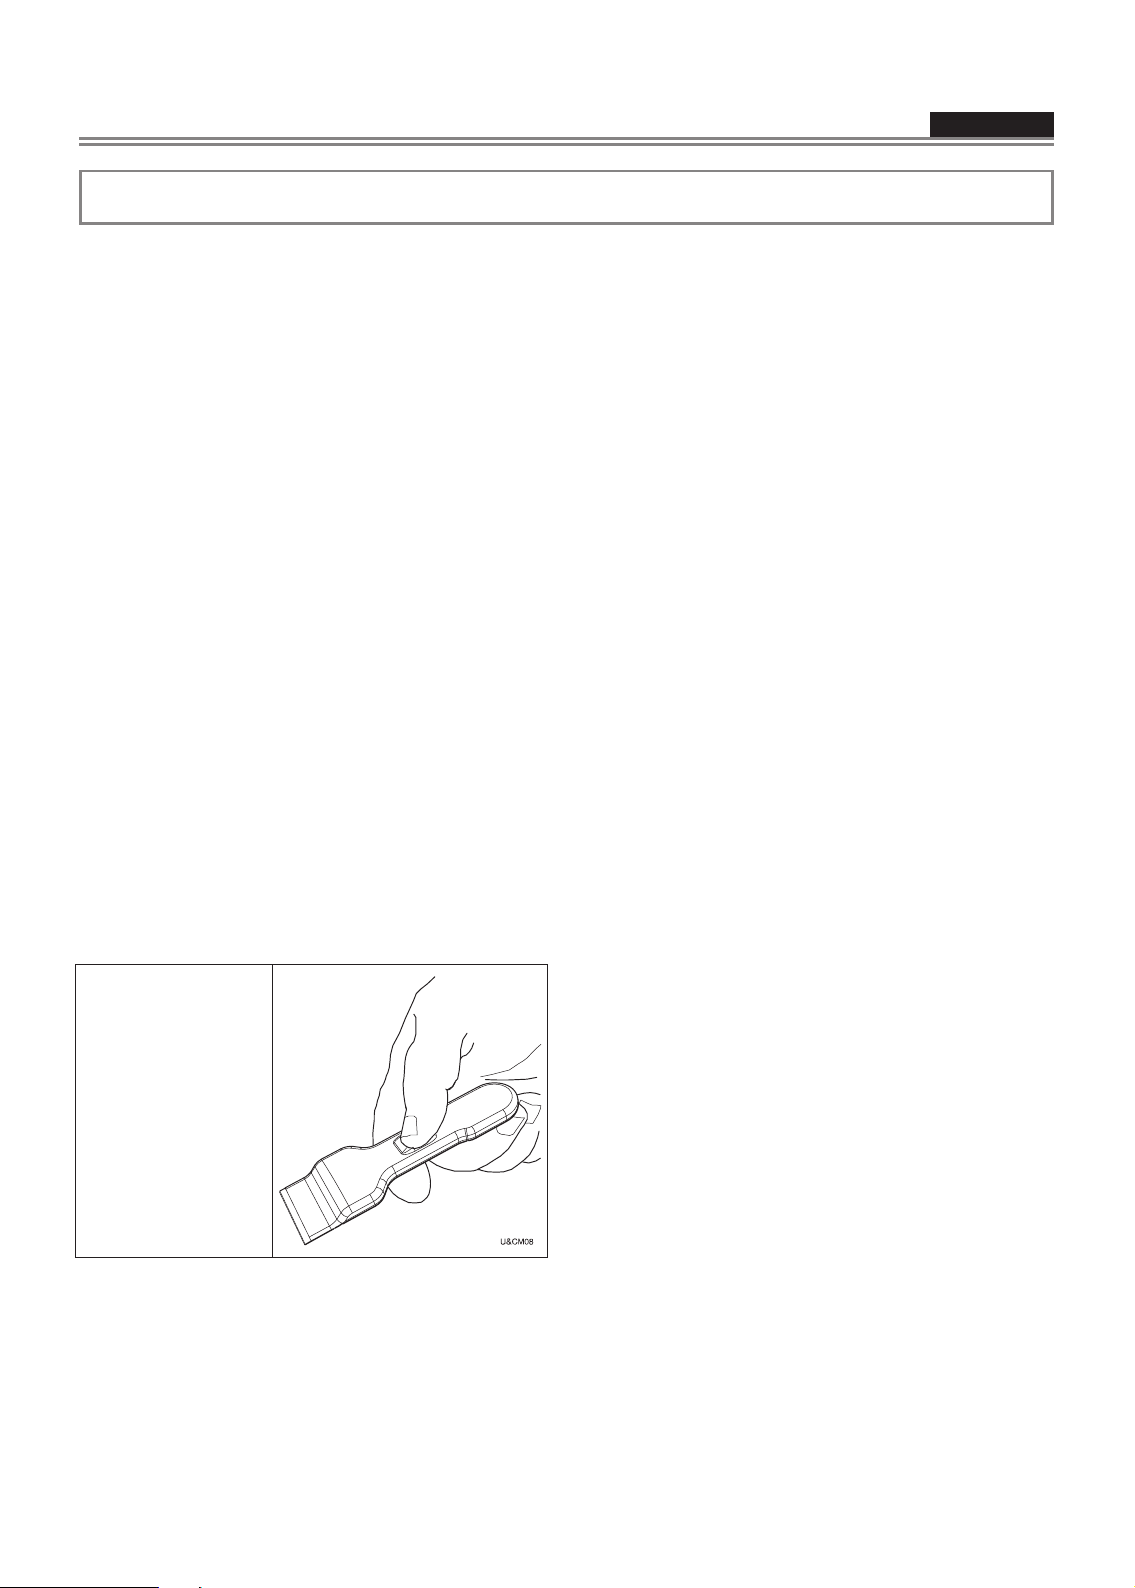
Manual de uso & Mantenimiento
Manual de Instalación
ESPAÑOL
ESPAÑOL
Limpieza de la Placa de Cocción
ATENCIÓN
Antes de limpiar la placa, asegúrese de que está
apagada y de que su superficie está fría.
Aplique a diario una pequeña cantidad de un producto
específico para la limpieza de vitrocerámicas. Así
creará una película protectora que facilitará la
limpieza de salpicaduras de agua o alimentos. Si la
superficie de la placa está caliente, el producto de
limpieza será menos efectivo.
Debe aplicarse antes de cada uso. Utilice un paño
limpio y aplique el producto para eliminar polvo o
marcas de metal que hayan podido aparecer en la
placa desde su último uso.
MANDOS
Utilice un trapo para tirar de los mandos y extraerlos
con facilidad. Límpielos con un trapo humedecido en
agua caliente y con jabón, aclárelos y séquelos.
¡No los sumerja en agua!
CONTORNO
(Modelos de acero inoxidable)
Límpielo siguiendo el veteado. Para una limpieza
intensiva, utilice BonAmi® o Soft Scrub® (nunca lejía).
Frote con una esponja o un paño húmedos y con
jabón. Aclare y seque.
TÉCNICAS DE LIMPIEZA DIARIA
Limpie la superficie en frío excepto en los casos
siguientes.
Limpieza diaria
Elimine las manchas con un paño limpio y húmedo.
Utilice vinagre blanco si quedan manchas.
Aclare y seque.
Aplique una pequeña cantidad de un producto de
limpieza específico. Cuando esté seco, saque brillo a
la superficie con un paño limpio,
ATENCIÓN
No utilice ningún tipo de detergente mientras la
superficie esté caliente: utilice únicamente el
rascador. Cuando los limpiadores se calientan,
pueden emitir vapores nocivos para su salud. Y
también pueden dañar la superficie de la placa.
PRODUCTOS DE LIMPIEZA
RECOMENDADOS
Crema limpiadora para placas
Utilice solo una pequeña cantidad. Aplíquela con un
paño o papel de cocina. Frote la superficie y sáquele
brillo con un paño seco.
BonAmi
Aclarar y secar.
Soft Scrub
Aclarar y secar.
White Vinegar
Aclarar y secar.
Rascador
Incluido en el embalaje.
Nota: Los productos recomendados son orientativos,
no se recogen en este manual por motivos
publicitarios.
®
®
(sin lejía)
Las salpicaduras de
azúcar, siropes,
productos a base de
tomate y leche deben
retirarse de
inmediato con el
rascador.
EVITE LOS SIGUIENTES PRODUCTOS
Limpiadores para cristal con amoníaco o
blanqueadores con cloro
Sus ingredientes pueden corroer o manchar la placa
de forma permanente.
Detergentes cáusticos
Limpiadores de horno pueden corroer la superficie de
la placa.
Detergentes abrasivos y estropajos
Detergentes abrasivos y estropajos como Scotch
®
pueden rayar la superficie o dejar marcas de
Brite
metal.
Detergentes en polvo con blanqueadores con
cloro
Pueden dejar manchas permanentes en la placa.
Detergentes inflamables
Como el líquido para encendedores o WD-40.
35
35

Manual de uso & Mantenimiento
Manual de Instalación
ESPAÑOL
ESPAÑOL
Solución de Problemas
Problema Causa Posible solución
La placa no funciona
Los fuegos no se calientan como
deberían.
Los elementos radiantes se
apagan incluso cuando están
configurados a la máxima
potencia.
La superficie vitrocerámica es
transparente o aparece de color
rojo.
La placa no está conectada a una red
eléctrica adecuada
El fusible o el diferencial han saltado.
La placa no está conectada a la red.
La placa está conectada a un voltaje
de 120 voltios
La conexión de alimentación está mal
ajustada.
No está utilizando recipientes
adecuados.
El limitador de temperatura del
elemento radiante apaga
temporalmente el elemento para
impedir que supere la temperatura
máxima.
Bajo una luz fuerte y directa se puede
ver a través del cristal. El color rojo
también es efecto de una luz fuerte.
Llame a un electricista para que
compruebe si la placa está conectada al
voltaje apropiado. Llame a un electricista
para que sustituya el fusible o el
diferencial.
Llame a un electricista para que analice
la red eléctrica.
Llame a un electricista para que conecte
la placa al voltaje adecuado.
Llame a un electricista para que ajuste
las conexiones de la caja de empalme
Utilice los recipientes adecuados
(encontrará indicaciones en este
manual).
Es normal, especialmente cuando el
elemento se calienta rápidamente. El
elemento volverá a encenderse cuando
se haya enfriado lo suficiente.
Son características normales de las
placas de vitrocerámica negras.
Servicio de Asistencia Técnica
Antes de ponerse en contacto con el servicio de
asistencia técnica, lea la sección “Solución de
problemas”. Puede que hacerlo le ahorre la llamada.
Si no encuentra la solución a su problema en esta
sección, siga las instrucciones que encontrará más
abajo. Cuando llame al servicio de asistencia, tenga
a mano los siguientes datos: fecha de compra,
referencia completa del modelo y número de serie de
su placa de cocción. Esa información nos ayudará a
atenderle.
36
36
Registro de datos para el servicio
Cómo obtener servicio Para información sobre
servicio autorizado o refacciones, ver el pàrrafo
"GARANTÍA para electrodomésticos".
A la base de la placa de cocción se puede ver la
etiqueta con el número de serie del producto. Ahora
es un buen momento para anotar esta información
en el espacio proporcionado abajo. Guarde su
factura para validar la garantía.
Número del Modelo _________________
Número de Serie ___________________
Fecha de instalación y ocupación
________________

Notas
Manual de uso & Mantenimiento
Manual de Instalación
ESPAÑOL
ESPAÑOL
37
37

Notas
Manual de uso & Mantenimiento
Manual de Instalación
ESPAÑOL
ESPAÑOL
38
38


09BN5281 - 11-11
 Loading...