


Table of contents
Important safety |
|
instructions ................... |
3 |
Introduction.................. |
7 |
Projector features..................................... |
7 |
Shipping contents ...................................... |
8 |
Projector exterior view........................... |
9 |
Controls and functions .......................... |
11 |
Positioning your |
|
projector ..................... |
15 |
Using the Quick Install........................... |
15 |
Obtaining a preferred projected |
|
image size.................................................. |
16 |
Mounting the projector ......................... |
20 |
Dimensions............................................... |
22 |
Connection ................. |
23 |
Connecting video source devices........ |
24 |
Connecting smart devices..................... |
24 |
Playing sound through the |
|
projector................................................... |
25 |
Operation ................... |
26 |
Starting up the projector ...................... |
26 |
Adjusting the projected image ............. |
27 |
Using the menus...................................... |
30 |
Securing the projector........................... |
31 |
Utilizing the password function ........... |
31 |
Switching input signal ............................. |
33 |
Magnifying and searching for details ... |
34 |
Selecting the aspect ratio ...................... |
35 |
Optimizing the image ............................. |
37 |
Setting the presentation timer............. |
41 |
Remote paging operations .................... |
42 |
Freezing the image .................................. |
42 |
Hiding the image ..................................... |
42 |
Locking control keys.............................. |
43 |
Operating in a high altitude |
|
environment............................................. |
43 |
Adjusting the sound ............................... |
44 |
Using the test pattern............................ |
45 |
Using the teaching templates............... |
45 |
Controlling the projector through a |
|
wired LAN environment....................... |
46 |
Installing PointWrite module on |
|
projector to use interaction |
|
function ..................................................... |
51 |
Shutting down the projector ............... |
52 |
Menu operation ...................................... |
53 |
Maintenance ............... |
66 |
Care of the projector............................ |
66 |
Light information .................................... |
67 |
Troubleshooting......... |
74 |
Specifications.............. |
75 |
Projector specifications......................... |
75 |
Timing chart............................................. |
76 |
Warranty and |
|
Copyright |
|
information................. |
82 |
Table of contents |
2 |
Important safety instructions
Your projector is designed and tested to meet the latest standards for safety of information technology equipment. However, to ensure safe use of this product, it is important that you follow the instructions mentioned in this manual and marked on the product.
Safety Instructions
1.Please read this manual before you operate your projector. Save it for future reference.
2.Do not look straight at the projector lens during operation.
The intense light beam may damage your eyes.
3.Refer servicing to qualified service personnel.
4.In some countries, the line voltage is NOT stable. This projector is designed to operate safely within a mains voltage between 100 to 240 volts AC, but could fail if power cuts or surges of ±10 volts occur. In areas where the mains voltage may fluctuate or cut out, it is recommended that you connect your projector through a power stabilizer, surge protector or uninterruptible power supply (UPS).
5.Do not block the projection lens with any objects when the projector is under operation as this could cause the objects to become heated and deformed or even cause a fire. To temporarily turn off the lamp, press ECO BLANK on the remote control.
3 Important safety instructions

Safety Instructions (Continued)
6.The lamp becomes extremely hot during operation. Allow the projector to cool for approximately 45 minutes prior to removing the lamp assembly for replacement.
7.Do not operate lamps beyond the rated lamp life. Excessive operation of lamps beyond the rated life could cause them to break on rare occasions.
8.Never replace the lamp assembly or any electronic components unless the projector is unplugged.
9.Do not place this product on an unstable cart, stand, or table. The product may fall, sustaining serious damage.
10.Do not attempt to disassemble this projector. There are dangerous high voltages inside which may cause death if you should come into contact with live parts. The only user serviceable part is the lamp which has its own removable cover.
Under no circumstances should you ever undo or remove any other covers. Refer servicing only to suitably qualified professional service personnel.
11.When the projector is under operation, you may sense some heated air and odor from its ventilation grill. It is a normal phenomenon and not a product defect.
Important safety instructions |
4 |

Safety Instructions (Continued)
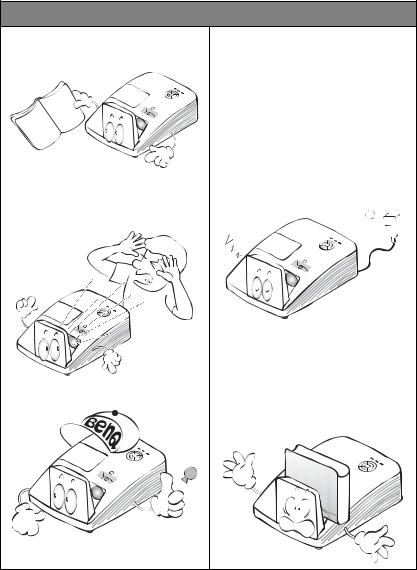
12.Do not place this projector in any of the following environments.
-Space that is poorly ventilated or confined. Allow at least 50 cm clearance from walls and free flow of air around the projector.
-Locations where temperatures may become excessively high, such as the inside of a car with all windows rolled up.
-Locations where excessive humidity, dust, or cigarette smoke may contaminate optical components, shortening the projector's life span and darkening the image.
-Locations near fire alarms
-Locations with an ambient temperature above 40°C / 104°F
-Locations where the altitudes are higher than 3000 m (10000 feet).
3000 m
(10000 feet)
0 m
(0 feet)
13.Do not block the ventilation holes.
-Do not place this projector on a blanket, bedding or any other soft surface.
-Do not cover this projector with a cloth or any other item.
-Do not place inflammables near the projector.
If the ventilation holes are seriously obstructed, overheating inside the projector may result in a fire.
14.Always place the projector on a level, horizontal surface during operation.
-Do not use if tilted at an angle of more than 10 degrees left to right, nor at
angle of more than 15 degrees front to back. Using the projector when it is not fully horizontal may cause a malfunction of, or damage to, the lamp.
5 Important safety instructions

Safety Instructions (Continued)
15.Do not stand the projector on end vertically. Doing so may cause the projector to fall over, causing injury or resulting in damage to the projector.
16.Do not step on the projector or place any objects upon it. Besides probable physical damage to the projector, doing so may result in accidents and possible injury.
17.Do not place liquids near or on the projector. Liquids spilled into the projector may cause it to fail. If the projector does become wet, disconnect it from the power supply's wall socket and call BenQ to have the projector serviced.
18.This product is capable of displaying inverted images for wall mount installation.
Use only BenQ's Wall Mount Kit for mounting the projector and ensure it is securely installed.
Wall mounting the projector
We want you to have a pleasant experience using your BenQ projector, so we need to bring this safety matter to your attention to prevent possible damage to person and property.
If you intend to mount your projector on the wall, we strongly recommend that you use a proper fitting BenQ projector wall mount kit and that you ensure it is securely and safely installed.
If you use a non-BenQ brand projector wall mount kit, there is a safety risk that the projector may fall from the wall due to an improper attachment through the use of the wrong gauge or length screws.
You can purchase a BenQ projector wall mount kit from the place you purchased your BenQ projector. BenQ recommends that you also purchase a separate Kensington lock compatible security cable and attach it securely to both the Kensington lock slot on the projector and the base of the wall mount bracket. This will perform the secondary role of restraining the projector should its attachment to the mounting bracket become loose.
Hg - Lamp contains mercury. Manage in
accordance with local disposal laws. See www.lamprecycle.org.
Important safety instructions |
6 |

Introduction
Projector features
The projector offers the following features
•SmartEco™ starts your dynamic power saving
The SmartEco™ technology offers a new way of operating the projector lamp system and saves lamp power up to 30% depending on the content brightness level.
•Interactive capability
Extend the interactive function with optional PointWrite module.
•Vertical 2% lens shift (No available in MH856UST+)
Optimize the installation flexibility.
•Corner fit
Correct each distorted corner to get a perfect rectangular image.
•Filter Free
Filter free design to lower maintenance and operating costs.
•Network Control
Integrated RJ45 connector for wired network control allowing management of projector status from a computer using a web browser.
Enable Network Standby mode <2W.
•Crestron RoomView®, and AMX supported
The projector supports Crestron eControl and RoomView and AMX allowing you to control and manage equipment from a remote computer via LAN connection.
•One-key auto-adjustment
Pressing AUTO on the keypad or remote control to show the best picture quality immediately.
•Built-in 10W x 2 speaker(s)
Built-in 10W x 2 speaker(s) providing stereo audio when an audio input is connected.
•Quick Cooling, Auto Power Off, Signal Power On, Direct Power On Quick Cooling function speeds up the cooling process when turning off the projector. Auto Power Off function allows the projector to turn off automatically if
no input signal is detected after a set period of time. Signal Power On function turns on your projector automatically once detecting the signal input and Direct Power On boots up the projector automatically when the power is connected.
•The apparent brightness of the projected image will vary depending on the ambient lighting
conditions, selected input signal contrast/brightness settings, and is directly proportional to projection distance.
•The lamp brightness will decline over time and may vary within the lamp manufacturers specifications. This is normal and expected behavior.
7 Introduction

Shipping contents
Carefully unpack and verify that you have all of the items shown below. If any of these items are missing, please contact your place of purchase.
Standard accessories
 The supplied accessories will be suitable for your region, and may differ from those illustrated.
|
|
|
|
|
|
|
|
|
|
|
|
|
|
|
|
|
|
|
|
|
|
|
|
|
|
|
|
|
|
|
|
|
|
|
|
|
|
|
|
|
|
|
|
|
|
|
|
|
|
|
|
|
|
|
|
|
|
|
|
|
|
|
|
|
|
|
|
|
|
|
|
|
|
|
|
|
|
|
|
|
|
|
|
|
|
|
|
|
|
|
|
|
|
|
|
|
|
|
|
|
|
|
|
|
|
|
|
|
|
|
|
|
|
|
|
|
|
|
|
|
|
|
|
|
|
|
|
|
|
|
|
|
|
|
|
|
|
|
|
|
|
|
|
|
|
|
|
|
|
|
|
|
|
|
|
|
|
|
|
|
|
|
|
|
|
|
|
|
|
|
|
|
|
|
|
|
|
|
|
|
|
|
|
|
|
|
|
|
|
|
|
|
|
|
|
|
|
|
|
|
|
|
|
|
|
|
|
|
|
|
|
|
|
|
|
|
|
|
|
|
|
|
|
|
|
|
|
|
|
|
|
|
|
|
|
|
|
|
|
|
|
|
|
|
|
|
|
|
|
|
|
|
|
|
|
|
|
|
|
|
|
|
|
|
|
|
|
|
|
|
|
|
|
|
|
|
|
|
|
|
|
|
|
|
|
|
|
|
|
|
|
|
|
|
|
|
|
|
|
|
|
|
|
|
|
|
|
|
|
|
|
|
|
|
|
|
|
|
|
|
|
|
|
|
|
|
|
|
|
|
|
|
|
|
|
|
|
|
|
|
|
|
|
|
|
|
|
|
|
|
|
|
|
|
|
|
|
|
|
|
|
|
|
|
|
|
|
|
|
|
|
|
|
|
|
|
|
|
|
|
|
|
|
|
|
|
|
|
|
|
|
|
|
|
|
|
|
|
|
|
|
|
|
|
|
|
|
|
|
|
|
|
|
|
|
|
|
|
|
|
|
|
|
|
|
|
|
|
|
|
|
|
|
|
|
|
|
|
|
|
|
Projector with wall mount plate |
Remote control with battery** |
|||||||||||
|
|
|
|
|
|
|
|
|
|
|
|
|
Power cord |
VGA cable |
Wall mount kit (WM04G4) & |
|
|
user manual |
Digital Pro Quick jector Start
Guide
Hex key (2.5mm)*** |
Quick start guide |
|
Warranty card* |
Installation chart for |
|
|
|
|
|
|
wallmount |
|
|
|
|
|
|
|
Optional accessories |
|
|
|
|
1. |
Spare lamp kit |
|
4. |
PointWrite kit (PW30U) |
|
2. |
3D glasses |
|
5. |
PointWrite Touch module (PT20) |
|
3.Wireless dongle: QCastMirror (QP20)
*The warranty card is only supplied in some specific regions. Please consult your dealer for detailed information.
**There is no Laser function of the remote for Japan region.
***Hex key not available in MH856UST+ model.
Introduction |
8 |

Projector exterior view
|
|
|
|
|
|
|
|
|
|
|
|
|
|
|
|
|
|
|
|
|
|
|
|
|
|
|
|
|
|
|
|
|
1. |
PointWrite dummy cover |
Front/upper side |
|
|
|
|
|
|
|
|
|
|
|
|
|
|
|
|
|
|
|
|
|
|
|
(Optional PointWrite kit) |
||||||||||
|
|
|
|
|
|
|
|
|
|
|
|
|
|
|
|
|
|
|
|
|
|
2. |
Mirror |
|||||||||||
|
|
|
|
|
|
|
1 |
|
|
|
|
|
|
|
|
|
|
|
|
|
|
|
|
4 |
|
|
|
|||||||
|
|
|
|
|
|
|
|
|
|
|
|
|
|
|
|
|
|
|
|
|
|
|
|
|
|
3. |
Lamp compartment cover |
|||||||
|
|
|
|
|
|
|
|
|
2 |
|
|
|
|
|
3 |
|
|
|
|
|
|
|
|
|
|
|||||||||
|
|
|
|
|
|
|
|
|
|
|
|
|
|
|
|
|
|
|
|
|
|
|
|
|
|
5 |
4. |
Focus ring |
||||||
|
|
|
|
|
|
|
|
|
|
|
|
|
|
|
|
|
|
|
|
|
|
|
|
|
|
|
|
|
|
|||||
|
|
|
|
|
|
|
|
|
|
|
|
|
|
|
|
|
|
|
|
|
|
|
|
|
|
|
|
|
|
|
|
|
5. |
External control panel |
|
|
|
|
|
|
|
|
|
|
|
|
|
|
|
|
|
|
|
|
|
|
|
|
|
|
|
|
|
|
|
|
|
|
(See "Projector" on page 11 for |
|
|
|
|
|
|
|
|
|
|
|
|
|
|
|
|
|
|
|
|
|
|
|
|
|
|
|
|
|
|
|
|
|
|
details.) |
|
|
|
|
|
|
|
|
|
|
|
|
|
|
|
|
|
|
|
|
|
|
|
|
|
|
|
|
|
|
|
|
|
6. |
Vent (cool air intake) |
|
|
|
|
|
|
|
|
|
|
|
|
|
|
|
|
|
|
|
|
|
|
|
|
|
|
|
|
|
|
|
|
|
7. |
Lens shift (No available in |
|
|
|
|
|
|
|
|
|
|
|
|
|
|
|
|
|
|
|
|
|
|
|
|
|
|
|
|
|
|
|
|
6 |
|
MH856UST+) |
|
|
|
|
|
|
|
|
|
|
|
|
|
|
|
|
|
|
|
|
|
|
|
|
|
|
|
|
|
|
|
||||
|
|
|
|
|
|
|
|
|
|
|
|
|
|
|
|
|
|
|
|
|
|
|
|
|
|
|
|
|
|
7 |
|
8. |
Projection lens |
|
10 |
|
|
|
|
|
|
|
|
|
|
|
|
|
|
|
|
|
|
|
|
|
|
|
|
8 |
|
|
9. |
Front adjuster foot |
|||||
|
|
|
|
|
|
|
|
|
|
|
|
|
|
|
|
|
|
|
|
|
|
|
|
|
|
|
|
|
||||||
|
|
|
|
|
|
|
|
|
|
|
|
|
|
|
|
|
|
|
|
|
|
|
|
|
|
|
|
|
||||||
|
|
|
|
|
|
|
|
|
|
|
|
|
|
|
|
|
|
|
|
|
9 |
|
|
|
|
|
|
|
10. |
Front IR remote sensor |
||||
|
|
|
|
|
|
|
|
|
|
|
|
|
|
|
|
|
|
|
|
|
|
|
|
|
|
|
|
|
|
|
||||
|
|
|
|
|
|
|
|
|
|
|
|
|
|
|
|
|
|
|
|
|
|
|
|
|
|
|
|
|
|
|
11. |
HDMI-1 input jack |
||
|
|
|
|
|
|
|
|
|
|
|
|
|
|
|
|
|
|
|
|
|
|
|
||||||||||||
|
|
|
|
|
|
|
|
|
|
|
|
|
|
|
|
|
|
|
|
|
|
|
|
|
|
|
|
|
|
|
|
|
||
Rear/lower side |
|
|
|
|
|
|
|
|
|
|
|
|
|
|
|
|
|
|
|
|
|
|
12. |
HDMI-2 input jack |
||||||||||
|
|
|
|
|
|
|
|
|
|
|
|
|
|
|
|
|
|
|
|
|
|
13. |
RGB signal output jack |
|||||||||||
|
|
|
|
|
|
|
|
|
|
|
|
|
|
|
|
|
|
|
|
|
|
|
|
|
|
|
|
|
|
|
|
|
||
11 12 |
13 |
|
14 151617 18 |
|
|
|
|
|
|
|
|
|
14. |
PC input jack |
||||||||||||||||||||
|
|
|
|
|
|
|
|
|
|
|
|
|
|
|
|
|
|
|
|
|
|
|
|
|
|
|
|
|
|
|
|
|
15. |
VIDEO input jack |
|
|
|
|
|
|
|
|
|
|
|
|
|
|
|
|
|
|
|
|
|
|
|
|
|
|
|
|
|
|
|
|
|
16. |
USB Type A port |
|
|
|
|
|
|
|
|
|
|
|
|
|
|
|
|
|
|
|
|
|
|
|
|
|
|
|
|
|
|
|
|
|
17. |
RJ45 LAN input jack |
|
|
|
|
|
|
|
|
|
|
|
|
|
|
|
|
|
|
|
|
|
|
|
|
|
|
|
|
|
|
|
|
|
18. |
PointWrite port (PointWrite kit is |
|
|
|
|
|
|
|
|
|
|
|
|
|
|
|
|
|
|
|
|
|
|
|
|
|
|
|
|
|
|
|
|
|
|
required) |
|
|
|
|
|
|
|
|
|
|
|
|
|
|
|
|
|
|
|
|
|
|
|
|
|
|
|
|
|
|
|
|
|
19. |
Front adjuster foot |
|
|
|
|
|
|
|
|
|
|
|
|
|
|
|
|
|
|
|
|
|
|
|
|
|
|
|
|
|
|
|
|
|
||
|
|
|
|
|
|
|
|
|
|
|
|
|
|
|
|
|
|
|
|
|
|
|
|
|
|
|
|
|
|
|
|
|
20. |
Kensington anti-theft lock slot |
|
|
|
|
|
|
|
|
|
|
|
|
|
|
|
|
|
|
|
|
|
|
|
|
|
|
|
|
|
|
|
|
|
21. |
USB Type B port (For service |
|
|
|
|
|
|
|
|
|
|
|
|
|
|
|
|
|
|
|
|
|
|
|
|
|
|
|
|
|
|
|
|
|
|
download) |
|
|
|
|
|
|
|
|
|
|
|
|
|
|
|
|
|
|
|
|
|
|
|
|
|
|
|
|
|
|
|
|
|
22. |
Audio (L/R) input jack |
|
|
|
|
|
|
|
|
|
|
|
|
|
|
|
|
|
|
|
|
|
|
|
|
|
|
|
|
|
|
|
|
|
23. |
RS-232 control port |
|
|
|
|
|
|
|
|
|
|
|
|
|
|
|
|
|
|
|
|
|
|
|
|
|
|
|
|
|
|
|
|
|
24. |
Rear adjuster foot |
|
|
|
|
|
|
|
|
|
|
|
|
|
|
|
|
|
|
|
|
|
|
|
|
|
|
|
|
|
|
|
|
|
||
|
|
|
|
|
|
|
|
|
|
|
|
|
|
|
|
|
|
|
|
|
|
|
|
|
|
|
|
|
|
|
|
|
25. |
Audio input jack |
27 |
|
|
2625 24 23 22 2120 |
|
|
19 |
|
|
|
26. |
Audio output jack |
|||||||||||||||||||||||
|
|
|
|
|
|
|
|
|
|
|
|
|
|
|
|
|
|
|
|
|
|
|
|
|
|
|
|
|
|
|
|
|
27. |
AC power cord inlet |
For setting the PointWrite kit on projector, Please find PointWrite manaual in the kit box you purchase.
9 Introduction

28. Wall mount plate
Bottom side
19 |
|
|
19 |
|
|
28
24
Introduction |
10 |
Controls and functions
Projector
1 |
|
|
2 |
8 |
|
3 |
9 |
|
4 |
|
|
5 |
10 |
|
6 |
11 |
|
12 |
||
|
||
7 |
13 |
|
|
14 |
1.FOCUS Ring
Used to adjust the projected image appearance. See "Fine-tuning the image size and clarity" on page 27 for details.
2.Lens Shift
Used Hex Key to adjust the lens shift function.
3.MENU/EXIT
Turns on the On-Screen Display (OSD) menu. Goes back to previous OSD menu, exits and saves menu settings. See "Using the menus" on page 30 for details.
4.Keystone/Arrow keys (  /▲ Up)
Manually corrects distorted images resulting from an angled projection.
5.SOURCE
Displays the source selection bar. See "Switching input signal" on page 33 for details.
6.◄ Left/ 
 Decrease volume level
Decreases volume. See "Adjusting the sound level" on page 44 for details.
7.POWER indicator light
Lights up or flashes when the projector is under operation. See "Indicators" on page 73 for details.
8.MODE/ENTER
Selects an available picture setup mode. See "Selecting a picture mode" on page 37 for details.
Enacts the selected On-Screen Display (OSD) menu item. See "Using the menus" on page 30 for details.
9.► Right/ 

 Increase volume level
Increases volume. See "Adjusting the sound level" on page 44 for details. When the On-Screen Display (OSD)
menu is activated, the #4, #6, #9, and #11 keys are used as directional arrows to select the desired menu items and to make adjustments. See "Using the menus" on page 30 for details.
10.AUTO
Automatically determines the best picture timings for the displayed image. See "Auto-adjusting the image" on page 27 for details.
11.Keystone/Arrow keys (  /▼ Down)
Manually corrects distorted images resulting from an angled projection.
12. POWER
POWER
Toggles the projector between standby mode and on.
See "Starting up the projector" on page 26 and "Shutting down the projector" on page 52 for details.
13.LAMP indicator light
Indicates the status of the lamp. Lights up or flashes when the lamp has developed a problem. See "Indicators" on page 73 for details.
14.TEMPerature indicator light
Lights up red if the projector's temperature becomes too high. See "Indicators" on page 73 for details.
11 Introduction

Remote Control
1
2
14
3
4 


 15
15
5 


 16
16


 17 6
17 6 


 18
18
7 

 3
3
8


 19 9
19 9 


 20
20
10 


 11
11 


 21
21
12 


 22
22
23
13
1.

 ON /
ON / 

 OFF
OFF
Toggles the projector between standby mode and on.
2.Source selection buttons (Computer 2, S-Video and Network are not available is this model)
Selects an input source for display.
3.Keystone/Arrow keys (  /▲ Up,
 /▼ Down)
Manually corrects distorted images resulting from an angled projection.
4.MENU/EXIT
Turns on the On-Screen Display (OSD) menu. Goes back to previous OSD menu, exits and saves menu settings.
5.◄ Left/ 

Decreases the projector volume.
6.ECO BLANK
Used to hide the screen picture.
7.LASER (Not available in Japan)
Emits visible laser pointer light for presentation purposes.
8.MHL control buttons
(Not available in this modle)
9.ZOOM+/ZOOM-
Magnifies or reduces the projected picture size.
10.ASPECT
Selects the display aspect ratio.
11.FREEZE
Freezes the projected image.
12.NETWORK SETTING
Displays the Network Settings OSD menu.
13.Numeric buttons
Enters numbers in network settings.
Numeric buttons 1, 2, 3, 4 cannot be pressed when asked to enter password.
14.NETWORK
Selects Network Display as the input signal source.
15.AUTO
Automatically determines the best picture timings for the displayed image.
16.► Right/ 


Increases the projector volume.
When the On-Screen Display (OSD) menu is activated, the #3, #5, and #16 keys are used as directional arrows to select the desired menu items and to make adjustments.
17.MODE/ENTER
Selects an available picture setup mode. Activates the selected On-Screen Display (OSD) menu item.
Introduction |
12 |
18.SOURCE
Displays the source selection bar.
19.PAGE +/PAGE -
Operate your display software program (on a connected PC) which responds to page up/down commands (like Microsoft PowerPoint).
20.MIC/VOL +/MIC/VOL -
The function is not available on this projector.
21.MUTE
Toggles projector audio between on and off.
22.SMART ECO
Switch the light mode between Eco/ Normal and SmartEco.
23.QUICK INSTALL
Displays the Quick Install OSD menu.
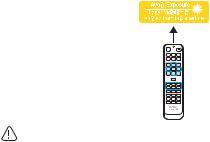
Operating the LASER pointer
The Laser Pointer is a
presentation aid for professionals. It emits a
beam of red light when you
press it.
The laser beam is visible. It is necessary to press and hold LASER for continuous output.
Do not look into the
laser light window or shine the laser light beam on yourself or others. See the warning messages on the back of the remote control prior to using it.
The laser pointer is not a toy. Parents should be mindful of the dangers of laser energy and keep this remote control out of the reach of children.
13 Introduction

Replacing the remote control battery
1.To open the battery cover, turn the remote control over to view its back, push on the finger grip on the cover and slide it up in the direction of the arrow as illustrated. The cover will slide off.
2.Remove any existing batteries (if necessary) and install two AAA batteries observing the battery polarities as indicated in the base of the battery compartment. Positive
(+) goes to positive and negative (-) goes to negative.
3.Refit the cover by aligning it with the base and sliding it back down into position. Stop when it clicks into place.
 • Avoid excessive heat and humidity.
•There may be battery damage if the battery is incorrectly replaced.
•Replace only with the same or equivalent type recommended by the battery manufacturer.
•Dispose of the used battery according to the battery manufacturer’s instructions.
•Never throw a battery into a fire. There may be danger of an explosion.
•If the battery is dead or if you will not be using the remote control for a long time, remove the battery to prevent damage to the remote control from possible battery leakage.
Remote control effective range
Infra-Red (IR) remote control sensor is located on the front of the projector. The remote control must be held at an angle within 30 degrees perpendicular to the projector's IR remote control sensor to function correctly. The distance between the remote control and the sensor should not exceed 8 meters (~ 26 feet).
Make sure that there are no obstacles between the remote control and the IR sensor on the projector that might obstruct the infra-red beam.
Approx.±30°
Introduction |
14 |

Positioning your projector
Using the Quick Install
The projector provides a hot key to set Projector Installation, Test Pattern, and Keystone quickly.
Press Quick Install on the remote control and press ▲/▼ to select:
•Projector Installation: See "Positioning your projector" on page 15.
•Test Pattern: See "Using the test pattern" on page 45.
•Keystone: See "Correcting 2D Keystone" on page 28.
1. Choosing a location
Your projector is designed to be installed in one of four possible installation locations:
Front Wall |
Rear Table |
|
Front Table |
Rear Wall |
|
|
|
|
|
|
|
|
|
|
|
|
|
|
|
|
|
|
|
|
2.Use the test pattern
3.Correct the image
2D Keystone correction
Corner fit correction
15 Positioning your projector

Digital shrink and shift
Set up your screen via Quick Install hotkey on remote, you can also go to the SYSTEM SETUP: Basic > Projector Installation menu after turning on the projector.
Your room layout or personal preference will dictate which installation location you select. Take into consideration the size and position of your screen, the location of a suitable power outlet, as well as the location and distance between the projector and the rest of your equipment.
Obtaining a preferred projected image size
1.Wall mount
2.Dimension (include projector and wall mount)
Positioning your projector |
16 |
Projection dimensions
Refer to "Dimensions" on page 22 for the center of lens dimensions of this projector before calculating the appropriate position.
To install the PointWrite Touch module, download the file “installation guide for PointWrite Touch module” from the BenQ website.
D
H 

 V
V
h
W
MW855UST+
The screen aspect ratio is 16:10 and the projected picture is 16:10.
WXGA
Screen |
Screen |
Screen |
Projection |
Offset (H) |
Scale |
Distance |
||||||
size |
distance |
between |
||||||||||
width (W) |
Height (h) |
parameter |
||||||||||
(Diagonal) |
|
|
|
|
(D) |
|
|
|
Wall plate |
|||
|
|
|
|
|
|
|
|
|
|
|
& |
|
|
|
|
|
|
|
|
|
|
|
|
||
inch |
mm |
inch |
mm |
inch |
mm |
inch |
mm |
inch |
mm |
mm |
projection |
|
screen (V) |
||||||||||||
|
|
|
|
|
|
|
|
|
|
|
||
|
|
|
|
|
|
|
|
|
|
|
|
|
80 |
2032 |
67 |
1723 |
42 |
1077 |
11.40 |
289.0 |
11.80 |
300.0 |
505 |
274.7 |
|
|
|
|
|
|
|
|
|
|
|
|
|
|
85 |
2159 |
71 |
1831 |
45 |
1144 |
12.90 |
326.9 |
12.40 |
314.3 |
540 |
289.0 |
|
|
|
|
|
|
|
|
|
|
|
|
|
|
87 |
2210 |
73 |
1874 |
46 |
1171 |
13.50 |
341.9 |
12.60 |
320.2 |
555 |
294.9 |
|
|
|
|
|
|
|
|
|
|
|
|
|
|
90 |
2286 |
76 |
1939 |
47 |
1212 |
14.40 |
364.7 |
13.00 |
328.9 |
580 |
303.6 |
|
|
|
|
|
|
|
|
|
|
|
|
|
|
92 |
2337 |
77 |
1982 |
48 |
1239 |
15.00 |
379.7 |
13.20 |
334.4 |
595 |
309.1 |
|
|
|
|
|
|
|
|
|
|
|
|
|
|
95 |
2413 |
80 |
2046 |
50 |
1279 |
15.80 |
402.1 |
13.50 |
343.0 |
615 |
317.7 |
|
|
|
|
|
|
|
|
|
|
|
|
|
|
97 |
2464 |
81 |
2089 |
51 |
1306 |
16.40 |
417.2 |
13.70 |
348.9 |
630 |
323.6 |
|
|
|
|
|
|
|
|
|
|
|
|
|
|
100 |
2540 |
85 |
2154 |
53 |
1346 |
17.30 |
439.9 |
14.00 |
356.9 |
655 |
331.6 |
|
|
|
|
|
|
|
|
|
|
|
|
|
|
17 Positioning your projector

MH856UST+
The screen aspect ratio is 16:9 and the projected picture is 16:9.
1080P
Screen |
Screen |
Screen |
Projection |
|
|
Scale |
Distance |
|||||
size |
distance |
Offset (H) |
between |
|||||||||
width (W) |
Height (h) |
parameter |
||||||||||
(Diagonal) |
(D) |
|
|
Wall plate |
||||||||
|
|
|
|
|
|
|
|
|
|
|
& |
|
|
|
|
|
|
|
|
|
|
|
|
||
inch |
mm |
inch |
mm |
inch |
mm |
inch |
mm |
inch |
mm |
mm |
projection |
|
screen (V) |
||||||||||||
|
|
|
|
|
|
|
|
|
|
|
||
|
|
|
|
|
|
|
|
|
|
|
|
|
89 |
2258 |
77.5 |
1968 |
43.6 |
1107 |
13.20 |
335.4 |
13.00 |
331.2 |
550 |
305.9 |
|
|
|
|
|
|
|
|
|
|
|
|
|
|
90 |
2286 |
78.4 |
1991 |
44.1 |
1120 |
13.50 |
343.0 |
13.20 |
334.5 |
560 |
309.2 |
|
|
|
|
|
|
|
|
|
|
|
|
|
|
95 |
2413 |
82.8 |
2103 |
46.6 |
1183 |
14.96 |
380.0 |
13.80 |
350.5 |
595 |
325.2 |
|
|
|
|
|
|
|
|
|
|
|
|
|
|
97 |
2464 |
84.5 |
2148 |
47.6 |
1208 |
15.55 |
395.0 |
14.00 |
356.7 |
610 |
331.4 |
|
|
|
|
|
|
|
|
|
|
|
|
|
|
100 |
2540 |
87.1 |
2213 |
49.0 |
1245 |
16.39 |
416.3 |
14.40 |
366.2 |
630 |
340.9 |
|
|
|
|
|
|
|
|
|
|
|
|
|
|
102 |
2594 |
89.1 |
2262 |
50.1 |
1272 |
17.03 |
432.5 |
14.70 |
373.3 |
645 |
348 |
|
|
|
|
|
|
|
|
|
|
|
|
|
|
There is 5% tolerance among these numbers due to optical component variations. BenQ recommends that if you intend to permanently install the projector, you should physically test the projection size and distance using the actual projector before you permanently install it, so as to make allowance for this projector's optical characteristics. This will help you determine the exact mounting position so that it best suits your installation location.
It is recommended to adjust focus 15 minutes after powering on due to the slight shifting of the lens from temperature changing.
Positioning your projector |
18 |
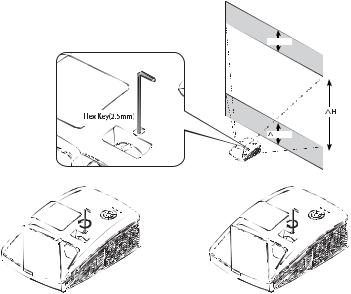
Limited lens shift specification (No available in MH856UST+)
 Hx±2%
Hx±2%
To shift up the projection image, twist the adjuster counter clockwisre.
To shift down the projection image, twist the adjuster clockwisre.
19 Positioning your projector

Mounting the projector
If you intend to mount your projector, we strongly recommend that you use a proper fitting BenQ projector mounting kit and that you ensure it is securely and safely installed.
If you use a non-BenQ brand projector mounting kit, there is a safety risk that the projector may fall down due to an improper attachment through the use of the wrong gauge or length screws.
Before mounting the projector
•Use BenQ Projector Wall Mounting Kit come with the package. Please refer to the User manual in the box of wall mount kit for installation details.
•BenQ recommends that you also purchase a separate Kensington lock compatible security cable and attach it securely to both the Kensington lock slot on the projector and the base of the mounting bracket. This will perform the secondary role of restraining the projector should its attachment to the mounting bracket become loose.
•Ask your dealer to install the projector for you. Installing the projector on your own may cause it to fall and result in injury.
•Take necessary procedures to prevent the projector from falling off such as during an earthquake.
•The warranty doesn’t cover any product damage caused by mounting the projector with a non-BenQ brand projector mounting kit.
•Consider the surrounding temperature where the projector is ceiling/wall mounted. If a heater is used, the temperature around the ceiling may be higher than expected.
•Read the user manual for the mounting kit about the range of torque. Tightening with torque exceeding the recommended range may cause damage to the projector and subsequently falling off.
•Make sure the power outlet is at an accessible height so that you can easily shut down the projector.
Install the projector on the projector wall mount
1.Slide the projector into the wall mount.
Positioning your projector |
20 |
2.Adjust the Vertical Tilt/Horizontal Roll/Horizontal Rotation to adjust screen alignment and image position.
A


 A
A
 B
B


Adjustment buttons
B
A


 B
B
Adjustment buttons |
A |
B |
Adjustment directions
A |
B |
|
|
|
|
Adjustment buttons |
A |
B |
|
Adjustment directions |
|
3.Adjust the Forward/Backward Slide to reduce/enlarge the image.
A
Adjustment directions
A
B
B
A B
21 Positioning your projector

Dimensions
287.5 mm (W) x 206.9 mm (H) x 373.3 mm (D)
|
|
|
|
|
|
|
|
|
373.3 |
|
|
|
|
|
||||
|
|
|
|
|
|
|
|
|
|
|
|
|
|
|
|
|
|
|
|
|
|
|
|
|
|
|
|
|
|
|
|
|
|
|
|
|
|
|
|
|
|
|
|
|
|
|
|
|
|
|
|
|
|
|
|
|
|
|
|
|
|
|
|
|
|
|
|
|
|
|
|
|
|
|
|
|
|
|
|
|
|
|
|
|
|
|
|
|
|
|
|
|
|
|
|
|
|
|
|
|
|
|
|
|
|
|
|
|
|
|
|
|
|
|
|
|
|
|
|
|
233.8 |
|
|
|
|
130.2 |
||||||
|
|
|
|
|
|
|
|
|||||||||||
|
|
|
|
|
|
|
206.9 |
|
|
|
|
|
|
|
|
|
||
|
|
|
287.5 |
|
|
Unit: mm |
||||||||||||
|
|
|
|
|
||||||||||||||
|
|
|
|
|
|
|||||||||||||
|
|
|
|
|
|
|||||||||||||
Wall Mount Installation
287.50
OPTICAL AXIS
247.01 135.51
43.25
149.25
206.25
255.25
141 |
Regulating Range |
0~30 |
|
137.0 |
55.0 |
55.0 |
3.0 |
12.5 |
195.0 |
170.0 |
7.0 |
|
Regulating Range
0~40
|
|
|
|
|
|
|
|
|
|
|
|
|
|
|
|
|
|
|
|
|
|
|
|
|
|
|
|
|
|
|
|
|
|
|
|
195.0 |
||
235.0 |
|
|
|
|||||||||
|
|
|
|
|
|
|
||||||
|
|
|
|
|
|
|
|
|
|
|
|
|
|
|
|
|
|
|
|
|
|
|
|
|
|
|
|
|
|
|
|
|
|
|
|
|
|
|
|
|
|
|
|
|
|
|
|
|
|
|
|
360~665
Positioning your projector |
22 |

Connection
When connecting a signal source to the projector, be sure to:
1.Turn all equipment off before making any connections.
2.Use the correct signal cables for each source.
3.Ensure the cables are firmly inserted.
In the connections shown below, some cables may not be included with the projector (see "Shipping contents" on page 8). They are commercially available from electronics stores.
Monitor |
A/V device |
Notebook or desktop computer |
|
|
|
|
|
|
|
|
|
Touch module
(VGA) or (DVI)
1 |
2 |
3 |
4 |
5 |
6 |
7 |
3 |
5 |
1 |
8 |
9 |
10
Smart devices
Speakers |
10 |
PointWrite kit |
|
||
|
|
|
|
11 |
|
5 |
|
|
|
|
|
|
|
|
|
|
|
|
|
|
|
|
|
|
|
|
|
|
|
|
|
|
|
|
|
|
|
|
|
|
|
|
|
|
|
|
|
|
|
|
|
|
|
|
|
|
|
|
|
|
|
|
|
|
|
|
|
|
|
|
|
|
|
|
|
|
|
|
|
|
|
|
|
|
|
|
|
|
|
|
|
|
|
|
|
|
|
|
|
|
|
|
|
|
|
|
|
|
|
|
|
|
|
|
|
|
|
|
|
|
|
|
|
|
|
|
|
|
|
|
|
|
1. |
VGA cable |
|
7. |
|
Audio L/R cable |
|||||||||||||||||||||||||
|
||||||||||||||||||||||||||||||
2. |
VGA to DVI-A cable |
|
8. |
|
USB cable |
|||||||||||||||||||||||||
3. |
HDMI cable |
|
9. |
|
USB cable (B to A type) |
|||||||||||||||||||||||||
4. |
Component Video to VGA (D-Sub) |
|
10. |
USB cable (A to micro B type): |
||||||||||||||||||||||||||
|
adapter cable |
|
|
|
Connect to PointWrite Touch |
|||||||||||||||||||||||||
5. |
Audio cable |
|
|
|
module or connect to the HDMI |
|||||||||||||||||||||||||
6. |
Video cable |
|
|
|
dongle for power supply |
|||||||||||||||||||||||||
|
|
|
|
|
|
|
|
|
|
11. |
HDMI dongle |
|||||||||||||||||||
|
|
|
|
|
|
|
|
|
|
|
|
(QCast Mirror, etc.) |
||||||||||||||||||
|
|
|
|
|
|
|
|
|
|
|
|
|
|
|
|
|
|
|
|
|
|
|
|
|
|
|
|
|
|
|
Many notebooks do not turn on their external video ports when connected to a projector. Usually a key combo like FN + F3 or CRT/LCD key turns the external display on/off. Locate a function key labeled CRT/LCD or a function key with a monitor symbol on the notebook. Press FN and the labeled function key simultaneously. Refer to your notebook's documentation to find your notebook's key combination.
23 Connection
Connecting video source devices
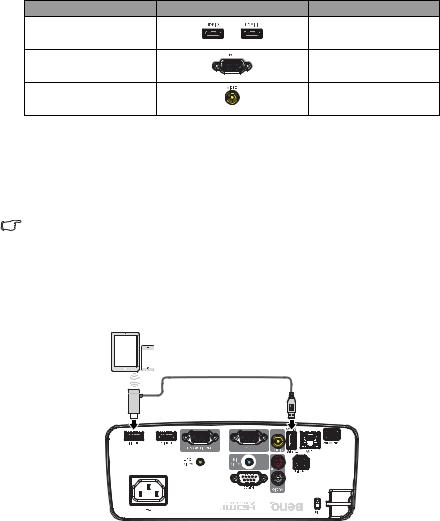
You need only connect the projector to a video source device using just one of the connecting methods, however each provides a different level of video quality. The method you choose will most likely depend upon the availability of matching terminals on both the projector and the video source device as described below:
Terminal name |
Terminal appearance |
Picture quality |
HDMI |
|
Best |
Component Video |
|
Better |
Video |
|
Normal |
Connecting audio
The projector has two built-in speaker which are designed to provide basic audio functionality accompanying data presentations for business purposes only. They are not designed for, nor intended for stereo audio reproduction use as might be expected in home theater or home cinema applications.
The built-in speaker will be muted when the AUDIO OUT jack is connected.
If the selected video image is not displayed after the projector is turned on and the correct video source has been selected, check that the video source device is turned on and operating correctly. Also check that the signal cables have been connected correctly.
Connecting smart devices
The projector can project the content directly from a smart device by using a wireless dongle.
HDMI wireless dongle (e.g. BenQ QCastMirror)
•Connect the dongle to HDMI 1 or HDMI 2 and USB TYPE-A ports on the projector and switch the input signal to HDMI 1 or HDMI 2.
Connection |
24 |

Playing sound through the projector
You can make use of the projector speaker in your presentations, and also connect separate amplified speakers to the AUDIO OUT socket of the projector.
If you have a separate sound system, you will most likely want to connect the audio output of your Video source device to that sound system, instead of to the audio projector.
Once connected, the audio can be controlled by the projector On-Screen Display (OSD) menus.
The table below describes the connection methods for different devices, and where the sound is from.
Device |
Computer/PC |
Component/Video |
HDMI |
|
|
|
|
Audio input port |
AUDIO IN (mini jack) |
AUDIO (L/R) |
HDMI |
|
|
|
|
The projector can play the |
AUDIO IN (mini jack) |
AUDIO (L/R) |
HDMI |
sound from... |
|
|
|
|
|
|
|
Audio output port |
AUDIO OUT |
AUDIO OUT |
AUDIO OUT |
The selected input signal determines which sound will be played by the projector speaker, and which sound will be output from the projector when AUDIO OUT is connected. If you select the COMPUTER/PC signal, the projector can play the sound received from AUDIO IN mini jack. If you select the COMPONENT/VIDEO signal, the projector can play the sound received from AUDIO (L/R).
25 Connection
 Loading...