


Beko RCNE520E31ZM, RCNE520E31ZX, RCNE520E31ZB, RCNE520E20M, RCNE520E20B User manual [EN,IT]
...RCNE520E31ZM |
RCNE520E20M |
RCNE520E20DS |
RCNE520E31ZX |
RCNE520E20B |
RCNE520E20FXP |
RCNE520E31ZB RCNE520E20DB |
|
|
EN IT |
|
|
Please read this manual before using the product!
Dear Customer,
We'd like you to make the best use of our product, which has been manufactured in modern facilities with care and meticulous quality controls.
Thus, we advice you to read the entire user manual before you use the product. In case the product changes hands, do not forget to hand the guide to its new owner along with the product.
This guide will help you use the product quickly and safely.
•Please read the user guide carefully before installing and operating the product.
•Always observe the applicable safety instructions.
•Keep the user guide within easy reach for future use.
•Please read any other documents provided with the product.
Keep in mind that this user guide may apply to several product models. The guide clearly indicates any variations of different models.
C Important information and useful tips.
A Risk of life and property.
B Risk of electric shock.
The product’s packaging is made of recyclable materials, in accordance with the National Environment Legislation.

1. Safety and environment instructions3
1.1. General safety . . . . . . . . . . . . . . . . . . . . . . 3 1.1.1 HC warning . . . . . . . . . . . . . . . . . . . . . . . 4 1.1.2 For models with water dispenser. . . . . . . . 4 1.2. Intended use . . . . . . . . . . . . . . . . . . . . . . . 5 1.3. Child safety . . . . . . . . . . . . . . . . . . . . . . . . 5
1.4. Compliance with WEEE Directive and Disposing of the Waste Product. . . . . . . . . . . . . . . . . 5
1.5. Compliance with RoHS Directive . . . . . . . . . 5 1.6. Package information . . . . . . . . . . . . . . . . . 5
2 |
Your Refrigerator |
6 |
|
|
|
3 |
Installation |
7 |
3.1. Right place for installation. . . . . . . . . . . . . . 7 3.2. Attaching the plastic wedges . . . . . . . . . . . 7 3.3. Adjusting the stands. . . . . . . . . . . . . . . . . . 7 3.4. Power connection . . . . . . . . . . . . . . . . . . . 8 3.5. Reversing the doors . . . . . . . . . . . . . . . . . . 9 3.6. Reversing the doors . . . . . . . . . . . . . . . . . 10
4 Preparation |
11 |
4.1. What to do for energy saving . . . . . . . . . . 11 4.2. First Use . . . . . . . . . . . . . . . . . . . . . . . . . 11
5 Using the product |
12 |
5.1. Temperature adjustment button . . . . . . . . 12 5.2. Rapid freezing . . . . . . . . . . . . . . . . . . . . . 12 5.3. Vacation function . . . . . . . . . . . . . . . . . . . 13 5.4. Indicator panel . . . . . . . . . . . . . . . . . . . . . 14 5.5. Indicator panel . . . . . . . . . . . . . . . . . . . . . 16 5.6. Ice bucket . . . . . . . . . . . . . . . . . . . . . . . . 18 5.7. Eggholder . . . . . . . . . . . . . . . . . . . . . . . . 18 5.8. Fan . . . . . . . . . . . . . . . . . . . . . . . . . . . . . 19 5.9. Vegetable bin . . . . . . . . . . . . . . . . . . . . . 19 5.10. Zero degree compartment. . . . . . . . . . . . 19 5.11. HerbBox/HerbFresh. . . . . . . . . . . . . . . . . 19 5.12. Moving door rack . . . . . . . . . . . . . . . . . . 20 5.13. Sliding storage box . . . . . . . . . . . . . . . . . 20 5.14. Moisture controlled vegetable bin . . . . . . 21 5.15. Automatic ice machine . . . . . . . . . . . . . . 21 5.16. Icematic and ice storage container . . . . . 22 5.17. Using the water dispenser . . . . . . . . . . . . 22 5.18. Filling the water dispenser's tank. . . . . . . 23 5.19. Cleaning the water tank . . . . . . . . . . . . 24 5.20. Drip tray . . . . . . . . . . . . . . . . . . . . . . . . . 25 5.21. Freezing fresh food . . . . . . . . . . . . . . . . . 26 5.22. Recommendations for storing frozen foods 26 5.23. Deep freezer details . . . . . . . . . . . . . . . . 27 5.24. Placing the food . . . . . . . . . . . . . . . . . . . 27 5.25. Door open alert. . . . . . . . . . . . . . . . . . . . 27 5.26. Changing the opening direction of the door27 5.27. Interior light . . . . . . . . . . . . . . . . . . . . . . 27
6 Maintenance and cleaning |
28 |
6.1. Avoiding bad odors. . . . . . . . . . . . . . . . . . 28 6.2. Protecting the plastic surfaces . . . . . . . . . 28 6.3. Door Glasses . . . . . . . . . . . . . . . . . . . . . 28
7. Troubleshooting |
29 |
|
|
|
2 /31 EN |
Refrigerator / User Guide |
|
|
|
|
|
|

|
1. |
|
Safety and environment instructions |
|
|||
This section provides the safety instructions |
1.1. General safety |
||||||
necessary to prevent the risk of injury and |
• |
This product should not be used by |
|||||
material damage. Failure to observe these |
|
persons with physical, sensory and mental |
|||||
instructions will invalidate all types of product |
|
disabilities, without sufficient knowledge |
|||||
warranty. |
|
|
|
and experience or by children. The device |
|||
Intended use |
|
can only be used by such persons under |
|||||
|
|
|
|
|
|
supervision and instruction of a person |
|
|
|
|
WARNING: |
|
|
||
|
|
|
|
|
responsible for their safety. Children should |
||
|
|
|
Keep ventilation openings, in |
|
|
||
|
|
|
|
|
not be allowed to play with this device. |
||
|
|
|
the appliance enclosure or in |
|
|
||
|
|
|
|
|
|
|
|
A the built-instructure, clear of |
|
• |
In case of malfunction, unplug the device. |
||||
|
|
|
obstruction. |
|
• |
After unplugging, wait at least 5 minutes |
|
|
|
|
WARNING: |
|
|
before plugging in again. |
|
|
|
|
Do not use mechanical |
|
• |
Unplug the product when not in use. |
|
|
|
|
devices or other means to |
|
• |
Do not touch the plug with wet hands! Do |
|
|
|
|
accelerate the defrosting |
|
|
not pull the cable to plug off, always hold |
|
A process, other than those |
|
|
the plug. |
||||
|
|
|
recommended by the |
|
• |
Do not plug in the refrigerator if the socket |
|
|
|
|
manufacturer. |
|
|||
|
|
|
|
|
is loose. |
||
|
|
|
WARNING: |
|
|
||
|
|
|
|
• |
Unplug the product during installation, |
||
A Do not damage the refrigerant |
|
||||||
|
|
maintenance, cleaning and repair. |
|||||
|
|
|
circuit. |
|
• |
If the product will not be used for a while, |
|
|
|
|
WARNING: |
|
|||
|
|
|
|
|
unplug the product and remove any food |
||
|
|
|
Do not use electrical |
|
|
||
|
|
|
|
|
inside. |
||
|
|
|
appliances inside the food |
|
|
||
|
|
|
|
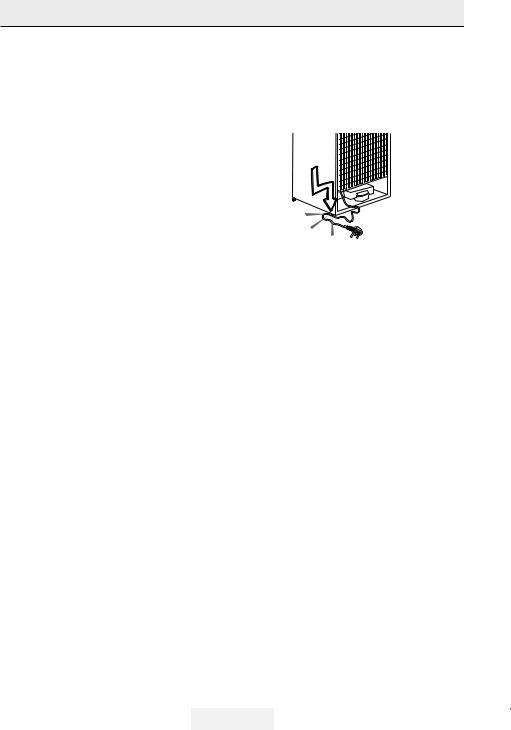
• |
Do not use the product when the |
||
|
|
|
storage compartments of the |
|
|||
A appliance, unless they are of |
|
|
compartment with circuit cards located |
||||
|
|
|
the type recommended by the |
|
|
on the upper back part of the product |
|
|
|
|
manufacturer. |
|
|
(electrical card box cover) (1) is open. |
|
1
This appliance is intended to be used in household and similar applications such as
–staff kitchen areas in shops, offices and other working environments;
–farm houses and by clients in hotels, motels and other residential type
environments; |
1 |
– bed and breakfast type environments; |
|
–catering and similar non-retail applications. 
•Do not use steam or steamed cleaning materials for cleaning the refrigerator and
|
melting the ice inside. Steam may contact |
|
Refrigerator / User Guide |
3/31EN |
|
|
|
|
|
|
|
Safety and environment instructions
|
the electrified areas and cause short |
• |
Do not step or lean on the door, |
||||||
|
circuit or electric shock! |
|
|
drawers and similar parts of the |
|||||
• Do not wash the product by spraying or |
|
|
refrigerator. This will cause the |
||||||
|
pouring water on it! Danger of electric |
|
|
product to fall down and cause |
|||||
|
shock! |
|
|
damage to the parts. |
|||||
• In case of malfunction, do not use the |
• Take care not to trap the power cable. |
||||||||
|
product, as it may cause electric shock. |
|
|
|
|
|
|
||
|
|
|
|
|
|
|
|||
|
Contact the authorised service before |
|
|
|
|
|
|
|
|
|
doing anything. |
|
|
|
|
|
|
|
|
• |
Plug the product into an earthed |
|
|
|
|
|
|
|
|
|
socket. Earthing must be done by a |
|
|
|
|
|
|
|
|
|
qualified electrician. |
|
|
|
|
|
|
|
|
• |
If the product has LED type lighting, |
|
|
|
|
|
|
|
|
|
|
|
|
|
|
|
|||
|
contact the authorised service for |
|
|
|
|
|
|
|
|
|
replacing or in case of any problem. |
1.1.1 HC warning |
|||||||
• Do not touch frozen food with wet |
If the product comprises a cooling |
||||||||
|
hands! It may adhere to your hands! |
system using R600a gas, take care to |
|||||||
• |
Do not place liquids in bottles and cansavoid damaging the cooling system and |
||||||||
|
into the freezer compartment. They mayits pipe while using and moving the |
||||||||
|
explode. |
product. This gas is flammable. If the |
|||||||
• Place liquids in upright position after |
cooling system is damaged, keep the |
||||||||
product away from sources of fire and |
|||||||||
|
tightly closing the lid. |
||||||||
|
ventilate the room immediately. |
||||||||
• |
Do not spray flammable substances |
||||||||
|
|
|
|
|
|
|
|||
|
near the product, as it may burn or |
|
C |
The label on the inner left side |
|
||||
|
explode. |
|
indicates the type of gas used in |
|
|||||
|
|
the product. |
|
||||||
• Do not keep flammable materials and |
|
|
|||||||
|
|
|
|
|
|
|
|||
|
products with flammable gas (sprays, |
1.1.2 For models with |
|||||||
|
etc.) in the refrigerator. |
water dispenser |
|||||||
• Do not place containers holding liquids |
• |
Pressure for cold water inlet shall |
|||||||
|
on top of the product. Splashing water |
|
|
be maximum 90 psi (6.2 bar). If |
|||||
|
on an electrified part may cause electric |
|
your water pressure exceeds 80 psi |
||||||
|
shock and risk of fire. |
|
|
(5.5 bar), use a pressure limiting |
|||||
• Exposing the product to rain, snow, |
|
|
valve in your mains system. If you |
||||||
|
sunlight and wind will cause electrical |
|
|
do not know how to check your |
|||||
|
danger. When relocating the product, do |
|
water pressure, ask for the help of a |
||||||
|
not pull by holding the door handle. The |
|
professional plumber. |
||||||
|
handle may come off. |
• |
If there is risk of water hammer effect |
||||||
• Take care to avoid trapping any part |
|
|
in your installation, always use a |
||||||
|
of your hands or body in any of the |
|
|
water hammer prevention equipment |
|||||
|
moving parts inside the product. |
|
|
in your installation. Consult |
|||||
4 /31 EN |
Refrigerator / User Guide |

Safety and environment instructions
Professional plumbers if you are not sure that there is no water hammer effect in your installation.
•Do not install on the hot water inlet. Take precautions against of the risk of freezing of the hoses. Water temperature operating interval shall
be 33°F (0.6°C) minimum and 100°F (38°C) maximum.
•Use drinking water only.
1.2. Intended use
•This product is designed for home use. It is not intended for commercial use.
•The product should be used to store food and beverages only.
•Do not keep sensitive products requiring controlled temperatures (vaccines, heat sensitive medication, medical supplies, etc.) in the refrigerator.
•The manufacturer assumes no responsibility for any damage due to misuse or mishandling.
•Original spare parts will be provided for 10 years, following the product purchasing date.
1.3. Child safety
•Keep packaging materials out of children’s reach.
•Do not allow the children to play with the product.
•If the product’s door comprises a lock, keep the key out of children’s reach.
1.4. Compliance with WEEE Directive and Disposing
of the Waste Product
This product complies with EU WEEE Directive (2012/19/EU). This product bears a classification symbol for waste electrical and electronic equipment (WEEE).
This product has been
manufactured with high quality parts and materials which can be reused and are suitable for
recycling. Do not dispose of the waste product with normal domestic and other wastes at the
end of its service life. Take it to the collection center for the recycling of electrical and electronic equipment. Please consult your local authorities to learn about these collection centers.
1.5. Compliance with RoHS Directive
•This product complies with EU WEEE Directive (2011/65/EU). It does not contain harmful and prohibited materials specified in the Directive.
1.6. Package information
Packaging materials of the product are manufactured from recyclable materials in accordance with our National Environment Regulations. Do not dispose of the packaging materials together with the domestic or other wastes. Take them to the packaging material collection points designated by the local authorities.
Refrigerator / User Guide |
5/31EN |
|
|
|
|

2 Your Refrigerator
|
|
|
*1 |
|
*15 |
|
*2 |
|
*14 |
|
*3 |
|
*5 |
|
*4 |
|
|
|
|
|
16 |
|
|
|
13 |
|
|
|
*12 |
|
*5 |
|
*11 |
|
*6 |
|
|
|
|
|
*9 |
|
|
|
*10 |
|
|
|
17 |
|
|
|
*8 |
|
|
|
7 |
7 |
|
|
|
|
|
1. |
Cooler compartment door shelf |
10. |
Ice cube tray & Ice bank |
2. |
Water dispenser filling tank |
11. |
Vegetable bin |
3. |
Egg section |
12. |
Zero degree compartment |
4. |
Water dispenser reservoir |
13. |
Interior light |
5. |
Bottle shelf |
14. |
Cooler compartment glass shelf |
6. |
Sliding storage box |
15. |
Temperature adjustment button |
7. |
Adjustable legs |
16. |
Cooler compartment |
8. |
Deep freezer compartment |
17. |
Freezer compartment |
9. |
Quick freeze compartment |
|
|
|
*optional: Pictures given in this manual are given as example figures and they may not be exactly |
||
|
the same as your product. If your product does not comprise the relevant parts, the information |
||
Cpertains to other models. |
|
|
|
|
6 /31 EN |
Refrigerator / User Guide |
|
|
|
|
|
|
3 Installation
3.1. Right place for installation
Contact the Authorized Service for the product's installation. To ready the product for installation, see the information in the user guide and make sure the electric and water utilities are as required. If not, call an electrician and plumber to arrange the utilities as necessary.
BWARNING: The manufacturer assumes no responsibility for any damage caused by the work carried out by unauthorized persons.
BWARNING: The product’s power cable must be unplugged during installation. Failure to do so may result in death or serious injuries!
AWARNING: If the door span is too narrow for the product to pass, remove the door and turn the product sideways; if this does not work, contact the authorized service.
•Place the product on a flat surface to avoid vibration.
•Place the product at least 30 cm away from the heater, stove and similar sources of heat and at least 5 cm away from electric ovens.
•Do not expose the product to direct sunlight or keep in damp environments.
•The product requires adequate air circulation to function efficiently.
•If the product will be placed in an alcove, remember to leave at least 5 cm distance between the product and the ceiling and the walls.
•Do not install the product in environments with temperatures below -5°C.
3.2. Attaching the plastic wedges
Use the plastic wedges in the provided with the product to provide sufficient space for air circulation between the product and the wall.
1.To attach the wedges, remove the screws on the product and use the screws provided with the wedges.
2.Attach 2 plastic wedges on the ventilation cover as shown in the figure.
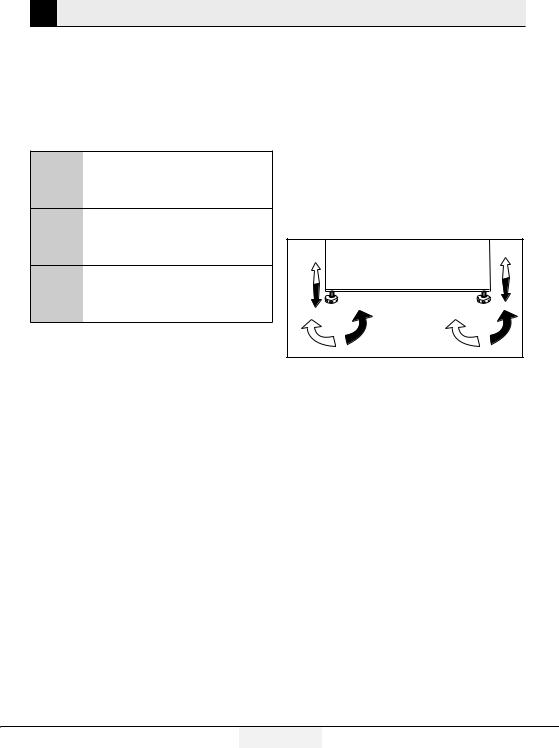
3.3. Adjusting the stands
If the product is not in balanced position, adjust the front adjustable stands by rotating right or left.
Refrigerator / User Guide |
7/31EN |
|
Installation
3.4. Power connection
AWARNING: Do not use extension or multi sockets in power connection.
BWARNING: Damaged power cable must be replaced by Authorized Service.
CWhen placing two coolers in adjacent position, leave at least 4 cm distance between the two units.
•Our firm will not assume responsibility for any damages due to usage without earthing and power connection in compliance with national regulations.
•The power cable plug must be easily accessible after installation.
•Connect the refrigerator to an earthed socket with 220-240V/50 Hz voltage. The plug must comprise a 10-16A fuse.
•Do not use multi-group plug with or without extension cable between the wall socket and the refrigerator.
Hot Surface Warning!
Side walls of your product is equipped with refrigerant pipes to improve the
Ccooling system. Refrigerant with high temperatures may flow through these areas, resulting in hot surfaces on the side walls. This is normal and does not need any servicing. Please pay attention while touching these areas.
|
8 /31EN |
Refrigerator / User Guide |
|
|
|
Installation
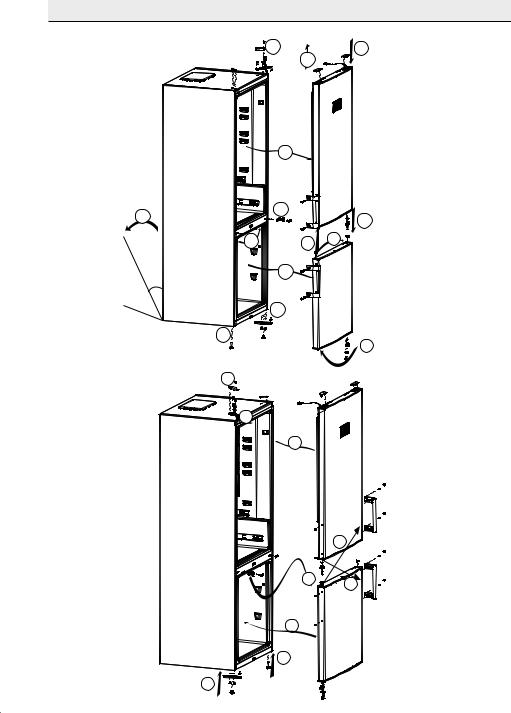
3.5. Reversing the doors
Proceed in numerical order . |
1 |
9 |
|
9 |
|
3 |
|
6 |
2 |
10 |
|
||
|
|
|
5 |
11 |
12 |
45 |
4 |
|
|
|
8
7
13
21

 16
16 
19
|
20 |
18 |
20 |
|
15
14
Refrigerator / User Guide |
9/31EN |
|
|
|
|
Installation
3.6. Reversing the doors
Proceed in numerical order . |
(8) |
|
(13) |
|
|
|
|
|
|
7 |
20 |
|
|
|
|
|
1 |
1 |
|
|
|
|
|
2 |
|
6 |
|
|
5 |
|
|
|
|
|
|
14 |
|
11 |
|
|
|
|
|
45° |
|
13 |
9 |
|
|
|
|
|
|
4 |
|
10 |
|
|
|
12 |
8 |
20 |
|
|
|
||
180° |
|
15 |
|
|
|
20 |
|
16
18
17
19
|
10 /31EN |
Refrigerator / User Guide |
|
|
|
4 Preparation
4.1. What to do for energy saving
AConnecting the product to electronic energy-saving systems is harmful, as it may damage the product.
•Do not keep the refrigerator doors open for long periods.
•Do not place hot food or beverages into the refrigerator.
•Do not overfill the refrigerator; blocking the internal air flow will reduce cooling capacity.
•In order to store the maximum amount of food into the cooler compartment of your refrigerator, you should take out the upper drawers and place it onto the glass rack.
The declared energy consumption of your refrigerator was determined by taking out the cooler, ice tray and upper drawers in a way that will enable maximum storage. Using the below drawer when storing is strongly recommended. Energy saving function should be activated for best energy consumption.
•You should not block the airflow by putting food in front of the cooler fan. A space of minimum 3cm must be left in front of the protective fan wire when placing food.
•Depending on the product’s features; defrosting frozen foods in the cooler compartment will ensure energy saving and preserve food quality.
•Food should be stored using the drawers in the cooler compartment in order to ensure energy saving and protect food in better conditions.
•Food packages should not be in direct contact with the heat sensor located in the cooler compartment. If they are in contact with the sensor, energy consumption of the appliance might increase.
•Make sure the foods are not in contact with the cooler compartment temperature sensor described below.
4.2. First Use
Before using your refrigerator, make sure the necessary preparations are made in line with the instructions in “Safety and environment instructions” and “Installation” sections.
•Keep the product running with no food inside for 6 and do not open the door, unless absolutely necessary.
CA sound will be heard when the compressor is engaged. It is normal to hear sound even when the compressor is inactive, due to the compressed liquids and gasses in the cooling system.
CFront edges of the product might heat up. This is normal. These areas are designed to warm up in order to prevent condensation.
CIn some models indicator panel turns off automatically 5 minutes after the door closes. It will be reactivated when the door is open or any button is pressed.
Refrigerator / User Guide |
11/31EN |
|
5 Using the product
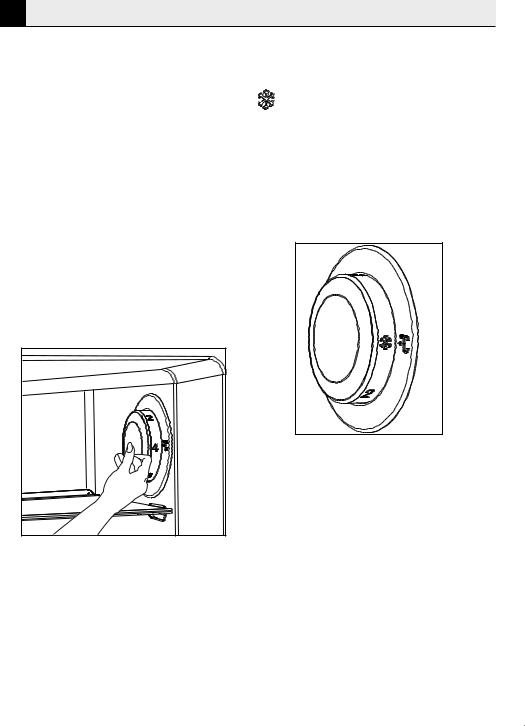
5.1. Temperature adjustment button
Internal temperature of your refrigerator varies depending on the following reasons:
•Seasonal temperatures,
•Opening the door frequently and leaving it open for long periods,
•Meals put into the refrigerator without being cooled to room temperature,
•Location of the refrigerator in the room (e.g. exposed to sunshine).
•Internal temperature varying due to these factors can be adjusted via the adjustment button.
Numbers around the adjustment button indicate temperature degrees as “°C”.
If the ambient temperature is 20°C, it is recommended to use the refrigerator temperature adjustment at 4°C. In other ambient temperatures this value can be customised.
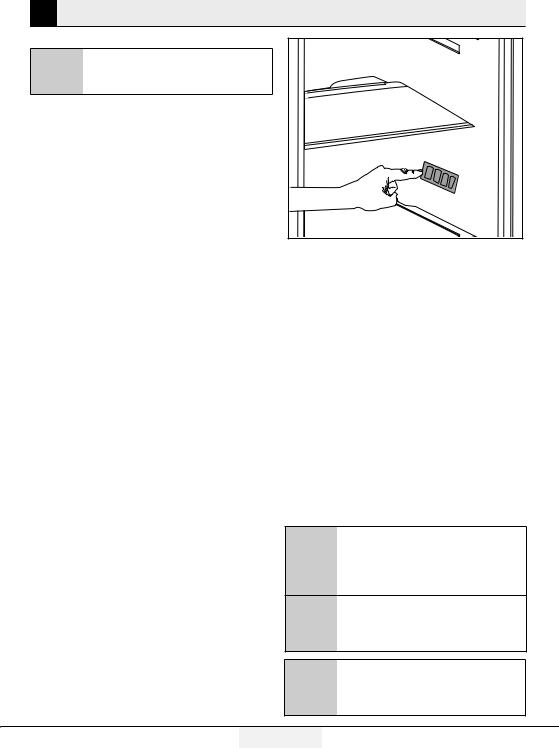
5.2. Rapid freezing
If you want to freeze large amounts of fresh food, switch the temperature adjustment button to
( ) position before putting the food into the quick freezing compartment.
It is recommended to keep the button at this position for 24 hours to freeze maximum amount of food indicated as the freezing capacity. Pay special attention not to mix food stolen as frozen and fresh food.
Remember to switch the temperature adjustment button back to its previous position.
|
12 /31 EN |
Refrigerator / User Guide |
|
|
|
|
|
|

Using the product
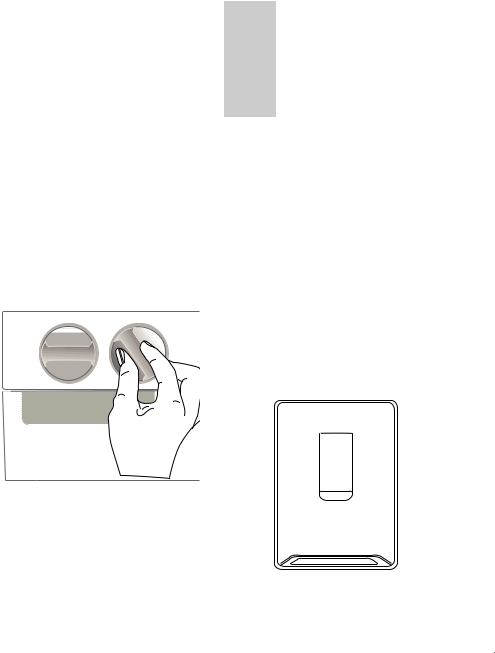
5.3. Vacation function
If doors of the product is not ( ) opened for at least 12 hours after adjusting the temperature setting button to the highest, vacation function is automatically activated.
Button setting must be changed to cancel the function.
It is not recommended to store food in the cooler compartment when vacation function is activated.
• After setting is completed, you can conceal the temperature setting button by pressing it inside.
Refrigerator / User Guide |
13/31 EN |
|
Using the product
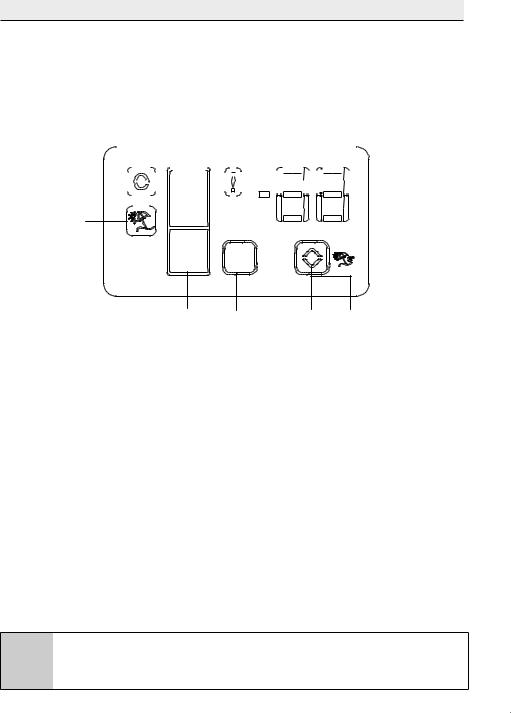
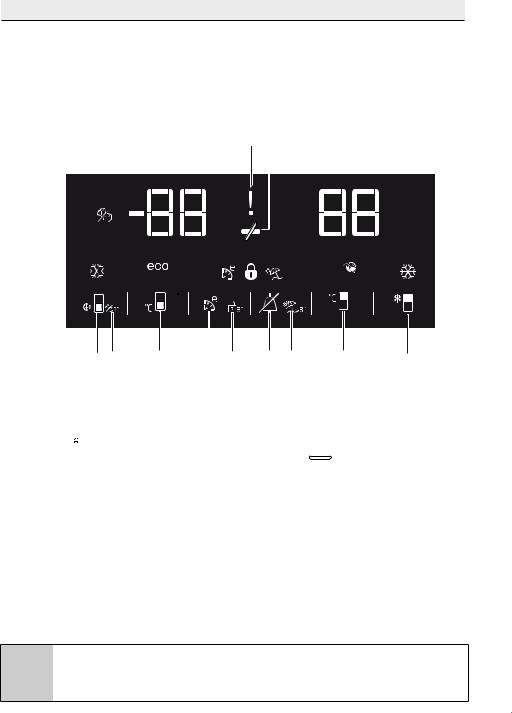
5.4. Indicator panel
Indicator panels may vary according to the product model.
Audio – visual functions on the indicator panel helps you in using your product.
8 |
|
|
|
|
1 |
|
2 |
|
|
3 |
|
|
|
|
|
|
||||||||||||||
|
|
|
|
|
|
|
|
|
|
|
|
|
|
|
|
|
|
|
|
|
|
|
|
|
|
|
|
|
|
|
|
|
|
|
|
|
|
|
|
|
|
|
|
|
|
|
|
|
|
|
|
|
|
|
|
|
|
|
|
|
|
|
|
|
|
|
|
|
|
|
|
|
|
|
|
|
|
|
|
|
|
|
|
|
|
|
|
|
|
|
|
|
|
|
|
|
|
|
|
|
|
|
|
|
|
|
|
|
|
|
|
|
|
|
|
|
|
|
|
|
|
|
|
|
|
|
|
|
|
|
|
|
|
|
|
|
|
|
|
|
|
|
|
|
|
|
|
|
|
|
|
|
|
|
9
7 |
6 |
5 |
4 |
1.Fridge Compartment Indicator
2.Error status indicator
3.Temperature indicator
4.Vacation function button
5.Temperature setting button
6.Compartment selection button
7.Freezer compartment indicator
8.Economy mode indicator
9.Vacation function indicator
*optional
C *Optional: The figures in this user guide are intended as drafts and may not perfectly match your product. If your product does not comprise the relevant parts, the information pertains to other models.
|
14 /31EN |
Refrigerator / User Guide |
|
|
|
|
|
|

Using the product
1. Fridge compartment indicator
Fridge compartment light is illuminated while the fridge compartment temperature is set.
2. Error status indicator
If your refrigerator does not perform enough cooling or in case of a sensor fault, this indicator is activated. When this indicator
is activated, “E” is displayed on the freezer compartment temperature indicator, and numbers such as “1,2,3...” are displayed on the fridge compartment temperature indicator. These numbers on the indicator inform service personnel about the error.
3.Temperature indicator
Indicates freezer, fridge compartment temperature.
4.Vacation function button
Press on Vacation Button for 3 seconds to activate this function. When the vacation function is activated, “- -” is displayed on the fridge compartment temperature indicator and no active cooling is performed on the fridge compartment. It is not suitable to keep the food in the fridge compartment when this function is activated. Other compartments
shall be continued to be cooled as per their set temperature.
To cancel this function press Vacation button again.
5. Temperature setting button
Changes the temperature of the relevant compartment between -24°C... -18°C and 8°C...1°C.
6.Compartment selection button
Selection button: Press compartment selection button to switch between fridge and freezer compartments.
7.Freezer compartment indicator
Fridge compartment light is illuminated while the freezer compartment temperature is set.
8.Economy mode indicator
Indicates that the refrigerator operates in energy saving mode. This display shall be activated if the freezer compartment temperature is set to -18°C.
9.Vacation function indicator
Indicates that vacation is activated.
Refrigerator / User Guide |
15/31 EN |
|
Using the product
5.5. Indicator panel
Indicator panel allows you to set the temperature and control the other functions related to the product without opening the door of the product. Just press the inscriptions on relevant buttons for function settings.
1 2
12
11 *10 |
9 |
8 |
7 |
6 |
5 |
4 |
3 |
1. Power failure/High temperature / error warning indicator
This indicator ( ) illuminates during power failure, high temperature failures and error warnings. During sustained power failures, the highest temperature that the freezer compartment reaches will flash on the digital display. After checking the food located in the freezer compartment
  ) press the alarm off button to clear the warning.
Please refer to "remedies advised for troubleshooting" section on your manual if you observe that this indicator is illuminated.
2. Energy saving function (display off):
If the product doors are kept closed for a long time energy saving function is automatically activated and energy saving symbol is illuminated. (  )
)
When energy saving function is activated, all symbols on the display other than energy saving symbol will turn off. When the Energy Saving function is activated, if any button is pressed or the door is opened, energy saving function will be canceled and the symbols on display will return to normal.
Energy saving function is activated during delivery from factory and cannot be canceled.
C *Optional: The figures in this user guide are intended as drafts and may not perfectly match your product. If your product does not comprise the relevant parts, the information pertains to other models.
|
16 /31EN |
Refrigerator / User Guide |
|
|
|
|
|
|
Using the product
3.Quick fridge function
The button has two functions. To activate or deactivate the quick cool function press it briefly. Quick Cool indicator will turn off and the product will return to its normal settings. ( )
)
CUse quick cooling function when you want to quickly cool the food placed in the fridge compartment. If you want to cool large amounts of fresh food,
activate this function before putting the food into the product.
CIf you do not cancel it, quick cooling will cancel itself automatically after 8 hours or when the fridge compartment reaches to the required temperature.
CIf you press the quick cooling button repeatedly with short intervals, the electronic circuit protection will be activated and the compressor will not start up immediately.
CThis function is not recalled when power restores after a power failure.
4. Fridge compartment temperature setting button
Press this button to set the temperature of the fridge compartment to 8, 7,6, 5,4,3, 2, 8...
respectively. Press this button to set the fridge compartment temperature to the desired value. (
 )
)
5.Vacation Function
In order to activate vacation function, press the this button ( 


 ) for 3 seconds, and the vacation mode indicator (
 ) will be activated. When the vacation function is activated,
“- -” is displayed on the fridge compartment temperature indicator and no active cooling is performed on the fridge compartment. It is not suitable to keep the food in the fridge compartment when this function is activated. Other compartments shall be continued to be cooled as per their set temperature.
To cancel this function press Vacation function button again.
6. Alarm off warning:
In case of power failure/high temperature alarm, after checking the food located in the freezer compartment press the alarm off button ( ) to clear the warning.
7. Key lock
Press key lock button ( 
 ) simultaneously for 3 seconds. Key lock symbol
( ) will light up and key lock mode will be activated. Buttons will not function if the Key lock mode is active. Press key lock button simultaneously for 3 seconds again. Key lock symbol will turn off and the key lock mode will be exited.
Press the key lock button if you want to prevent changing of the temperature setting of the refrigerator ( 
 ).
).
8. Eco fuzzy
Press and hold eco fuzzy button for 1 seconds to activate eco fuzzy function. Refrigerator will start operating in the most economic mode at least 6 hours later and the economic usage indicator will turn on when the function is
active ( 
 ). Press and hold eco fuzzy function button for 3 seconds to deactivate eco fuzzy function.
This indicator is illuminated after 6 hours when eco fuzzy is activated.
Refrigerator / User Guide |
17/31 EN |
|

Using the product
9. Freezer compartment temperature setting button
Press this button to set the temperature of the freezer compartment to -18,-19,-20,-21, -22, -23,-24, -18... respectively. Press this button to set the freezer compartment temperature to the desired value.( )
)
10. Icematic off indicator
Indicates whether the icematic is on or off. ( 
 )If On, then the icematic is not operating. To operate the icematic again press and hold the On-Off button for 3 seconds.
CWater flow from water tank will stop when this function is selected.
However, ice made previously can be taken from the icematic.
11. Quick freeze function button/ icematic on-off button
Press this button to activate or deactivate the quick freezing function. When you activate the function, the freezer compartment will be cooled to a temperature lower than the set value. ( )
)
To turn on and off the icematic press and hold it for 3 seconds.
CUse the quick freeze function when you want to quickly freeze the food placed in fridge compartment. If you want to freeze large amounts of fresh food, activate this function before putting the food into the product.
CIf you do not cancel it, Quick Freeze will cancel itself automatically after 4 hours or when the fridge compartment reaches to the required temperature.
CThis function is not recalled when power restores after a power failure.
12. Economic usage indicator
Indicates that the product is running in energyefficient mode. (
 )This indicator will be active if the Freezer Compartment temperature is set to -18 or the energy efficient cooling is being performed due to Eco-Extra function.
CEconomic usage indicator is turned off when quick cooling or quick freeze functions are selected.
5.6. Ice bucket
(Optional)
•Take the ice bucket from the freezer compartment.
•Fill the ice bucket with water.
•Place the ice bucket into the freezer compartment.
•The ice will be ready after approximately two hours. Take the ice bucket from
the freezer compartment and bend in sightly over the holder that you are going to serve. Ice will easily pour into
the serving holder.
5.7.Eggholder
You can put the eggholder on the door or body rack of your choice. If you decide to put it on the body rack, it is recommended to prefer the shelves below as they are colder.
ADo not put the eggholder into the freezer compartment.
|
18 /31EN |
Refrigerator / User Guide |
|
|
|
|
|
|

Using the product
5.8. Fan
Fan was designed to distribute circulate the cold air inside your refrigerator homogeneously. Operating time of the fan might vary depending the features of your product.
While in some products fan only operates with compressor, in others control system determines the operating time based on the need for cooling.
5.9. Vegetable bin
(Optional)
Product’s vegetable bin is designed to keep vegetables fresh by preserving humidity. For this purpose, the overall cold air circulation is intensified in the vegetable bin.
5.10.Zero degree compartment
(Optional)
Use this compartment to keep delicatessen at lower temperatures or meat products for immediate consumption.
Zero degree compartment is the coolest place where foods such as dairy products, meat, fish and chicken can be stored in ideal storage conditions. Vegetables and/or fruits should not be stored in this compartment.
5.11.HerbBox/HerbFresh
Remove the film container from HerbBox/ HerbFresh+
Take the film out of the bag and put it into the film container as shown in the image.
Seal the container again and replace it into HerbBox/HerbFresh+ unit.
HerbBox-HerbFresh+ sections are especially ideal for storage of various herbs that are supposed to be kept in delicate conditions. You can store your unbagged herbs (parsley, dill, etc.) in this section horizontally and keep them fresh for a much longer period.
The film shall be replaced in every six months.
Refrigerator / User Guide |
19/31 EN |
|
Using the product
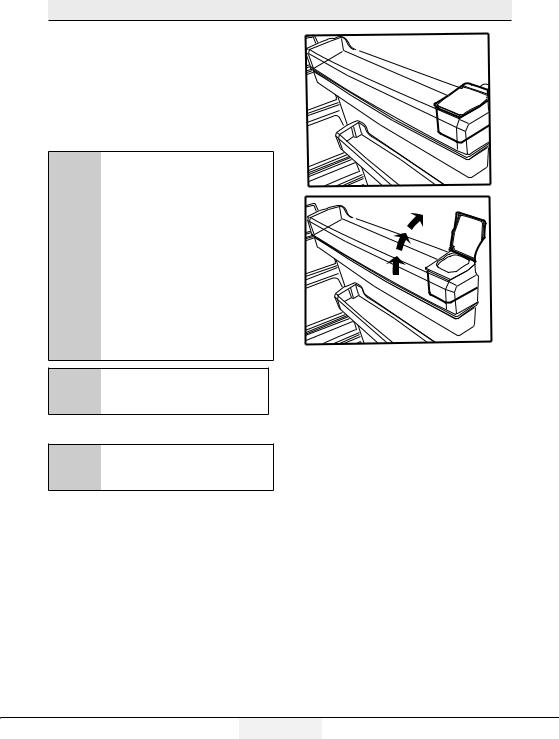
5.12.Moving door rack
(Optional)
Moving door rack can be fixed in 3 different positions.
In order to move the rack, push the buttons on the side evenly. Rack will be movable.
Move the rack up or down.
When the rack is in the position that you want, release the buttons. Rack will be fixed again in the position where you have released the buttons.
5.13.Sliding storage box
(Optional)
This accessory has been designed to increase the usage volume of the door racks.
Thanks to its ability to move sideways, it enables you to easily place long bottle, jar or boxes that you put in the bottle rack below.
|
20 /31EN |
Refrigerator / User Guide |
|
|
|
|
|
|
Using the product
5.14.Moisture controlled vegetable bin
(Optional)
With moisture control feature, moisture rates of vegetables and fruits are kept under control and ensures a longer freshness period for foods.
It is recommended to store leafed vegetables such as lettuce and spinach and similar vegetables prone to moisture loss not on their roots but in horizontal position into the vegetable bin as much as possible.
When placing the vegetables, place heavy and hard vegetables at the bottom and light and soft ones on the top, taking into account the specific weights of vegetables.
Do not leave vegetables in the vegetable bin in plastic bags. Leaving them in plastic bags causes vegetables to rot in a short time. In situations where contact with other vegetables is not preferred, use packaging materials such as paper that has a certain porosity in terms of hygiene.
Do not put fruits that have a high ethylene gas production such as pear, apricot, peach and particularly apple in the same vegetable bin with other vegetables and fruits. The ethylene gas coming out of these fruits might cause other vegetables and fruits to mature faster and rot in a shorter period of time.
5.15.Automatic ice machine
(Optional)
Automatic ice machine enables you to easily make ice in your refrigerator. In order to obtain ice from the ice machine, take out the water tank in the cooler compartment, fill it with water and fix it back.
First ice will be ready in about 2 hours in the ice machine drawer in the cooler compartment.
After placing the full water tank, you can obtain about 60-70 cubes of ice until it is fully empty.
If the water in the tank has waited for 2-3 weeks, it should be changed.
CIn products with automatic ice machine, you might hear a sound when pouring the ice. This sound is normal and is not a sign of failure.
Refrigerator / User Guide |
21/31 EN |
|
Using the product |
|
|
|
|
|
|
|
|
|||||||
|
5.16.Icematic and ice |
5.17.Using the water dispenser |
|||||||||||||
storage container |
*optional |
||||||||||||||
*optional |
|
|
|
|
|
|
|
|
|||||||
|
|
|
It is normal for the first few glasses |
||||||||||||
Using the Icematic |
|
|
|
||||||||||||
Cof water taken from the dispenser |
|||||||||||||||
Fill the Icematic with water and place it into its |
|||||||||||||||
seat. Your ice will be ready approximately in |
|
|
|
to be warm. |
|||||||||||
|
|
|
If the water dispenser is not used |
||||||||||||
two hours. Do not remove the Icematic from its |
|
|
|
||||||||||||
Cfor a long period of time, dispose |
|||||||||||||||
seating to take ice. |
|||||||||||||||
Turn the knobs on the ice reservoirs clockwise |
|
|
|
of first few glasses of water to |
|||||||||||
|
|
|
obtain fresh water. |
||||||||||||
by 90 degrees. |
|
|
|
|
|
|
|
|
|||||||
1. Push in the lever of the water dispenser with |
|||||||||||||||
Ice cubes in the reservoirs will fall down into |
|||||||||||||||
your glass. If you are using a soft plastic |
|||||||||||||||
the ice storage container below. |
|||||||||||||||
cup, pushing the lever with your hand will be |
|||||||||||||||
You may take out the ice storage container and |
|||||||||||||||
easier. |
|||||||||||||||
serve the ice cubes. |
2. After filling the cup up to the level you want, |
||||||||||||||
If you wish, you may keep the ice cubes in the |
release the lever. |
||||||||||||||
ice storage container. |
|
|
|
|
|
|
|
|
|||||||
C |
|
Please note, how much water |
|||||||||||||
Ice storage container |
|
flows from the dispenser depends |
|||||||||||||
Ice storage container is only intended for |
|
on how far you depress the lever. |
|||||||||||||
accumulating the ice cubes. Do not put water |
|
|
|
As the level of water in your cup |
|||||||||||
in it. Otherwise, it will break. |
|
|
|
/ glass rises, gently reduce the |
|||||||||||
|
|
|
|
|
|
|
|
|
|
amount of pressure on the lever to |
|||||
|
|
|
|
|
|
|
|
|
|
avoid overflow. If you slightly press |
|||||
|
|
|
|
|
|
|
|||||||||
|
|
|
|
|
|
|
|
|
|
the arm, the water will drip; this is |
|||||
|
|
|
|
|
|
|
|||||||||
|
|
|
|
|
|
|
|
|
|
quite normal and not a failure. |
|||||
|
|
|
|
|
|
|
|
|
|
||||||
|
|
|
|
|
|
|
|||||||||
|
|
|
|
|
|
|
|||||||||
|
|
|
|
|
|
|
|
|
|
|
|
|
|
|
|
|
|
|
|
|
|
|
|
|
|
|
|
|
|
|
|
|
|
|
|
|
|
|
|
|
|
|
|
|
|
|
|
|
|
|
|
|
|
|
|
|
|
|
|
|
|
|
|
|
|
|
|
|
|
|
|
|
|
|
|
|
|
|
|
|
|
|
|
|
|
|
|
|
|
|
|
|
|
|
|
|
|
|
|
|
|
|
|
|
|
|
|
|
|
|
|
|
|
|
|
|
|
|
|
|
|
|
|
|
|
|
|
|
|
|
|
|
|
|
|
|
|
|
|
|
|
|
|
|
|
|
|
|
|
|
|
|
|
|
|
|
|
|
|
|
|
|
|
|
|
|
|
|
|
|
|
|
|
|
|
|
|
|
|
|
|
|
|
|
|
|
|
|
|
|
|
|
|
|
|
|
|
|
|
|
|
|
|
|
|
|
|
|
|
|
|
|
|
|
|
|
|
|
|
|
|
|
|
|
|
|
|
|
|
|
|
|
|
|
|
|
|
|
|
|
|
|
|
|
|
|
|
|
|
|
|
|
|
|
|
|
|
|
|
|
|
|
|
|
|
|
|
|
|
|
|
|
|
|
|
|
|
|
|
|
|
|
|
|
|
|
|
|
|
|
|
|
|
|
|
|
|
|
|
|
|
|
|
|
|
|
|
|
|
|
|
|
|
|
|
|
|
|
|
|
22 /31EN |
Refrigerator / User Guide |
|
|
|
|
|
|
Using the product
5.18.Filling the water dispenser's tank
Water tank filling reservoir is located inside the door rack.
1.Open the cover of the tank.
2.Fill the tank with fresh drinking water.
3.Close the cover.
CDo not fill the water tank with any other liquid except for water such as fruit juices, carbonated beverages or alcoholic drinks which are not suitable to use
in the water dispenser. Water dispenser will be irreparably damaged if these kinds of liquids are used. Warranty does not cover such usages. Some chemical substances and additives contained in these kinds of drinks/liquids may damage the water tank.
CUse clean drinking water only.
CCapacity of the water tank is 3 litres; do not overfill.
Refrigerator / User Guide |
23/31 EN |
|
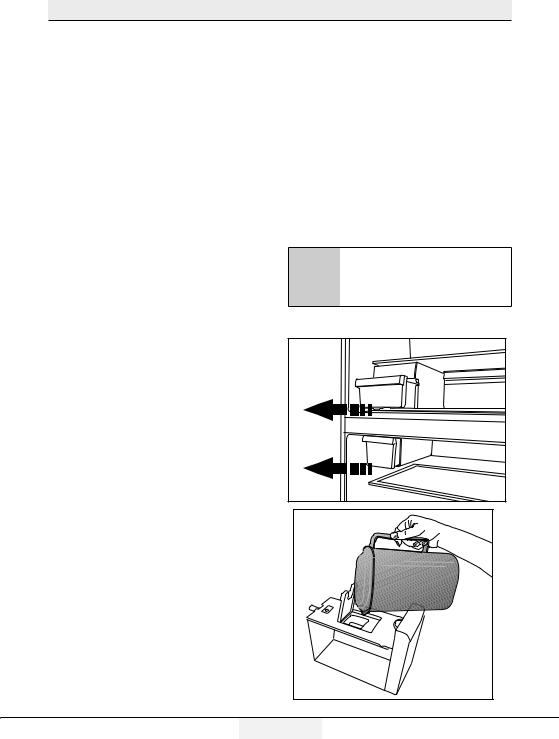
Using the product
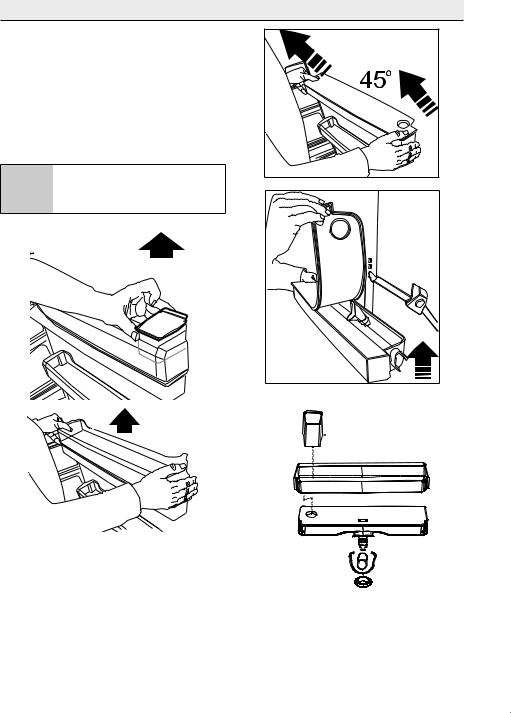
5.19. Cleaning the water tank
1.Remove the water filling reservoir inside the door rack.
2.Remove the door rack by holding from both sides.
3.Grab the water tank from both sides and remove it with an angle of 45°C.
4.Remove the cover of the water tank and clean the tank.
CComponents of the water tank and water dispenser should not be washed in dishwasher.
|
|
|
|
|
|
|
|
|
|
|
|
|
|
|
|
|
|
|
|
|
|
|
|
|
|
|
|
|
|
|
|
|
|
|
|
|
|
|
|
|
|
|
|
|
|
|
|
|
|
|
|
|
|
|
|
|
|
|
|
|
|
|
|
|
|
|
|
|
|
|
|
|
|
|
|
|
|
|
|
|
|
|
|
|
|
|
|
|
|
|
|
|
|
|
|
|
|
|
|
|
|
|
|
|
|
|
|
|
|
|
|
|
|
|
|
|
|
|
|
|
|
|
|
|
|
|
|
|
|
|
|
|
|
|
|
|
|
|
|
|
|
|
|
|
|
|
|
|
|
|
|
|
|
|
|
|
|
|
|
|
|
|
|
|
|
|
|
|
|
|
|
|
|
|
|
|
|
|
|
|
|
|
|
|
|
|
|
|
|
|
|
|
|
|
|
|
|
|
|
|
|
|
|
|
|
|
|
|
|
|
|
|
|
|
|
|
|
|
|
|
|
|
|
|
|
|
|
|
|
|
|
|
|
|
|
|
|
|
|
|
|
|
|
|
|
|
|
|
|
|
|
|
|
|
|
|
|
|
|
|
|
|
|
|
|
|
|
|
|
|
|
|
|
|
|
|
|
|
|
|
|
|
|
|
|
|
|
|
|
|
|
|
|
|
|
|
|
|
|
|
|
|
|
|
|
|
|
|
|
|
|
|
|
|
|
|
|
|
|
|
|
|
|
|
|
|
|
|
|
|
|
|
|
|
|
|
|
|
|
|
|
|
|
|
|
|
|
|
|
|
|
|
|
|
|
|
|
|
|
|
|
|
|
|
|
|
|
|
|
|
|
|
|
|
|
|
|
|
|
|
|
|
|
|
|
|
|
|
|
|
|
|
|
|
|
|
|
|
|
|
|
|
|
|
|
24 /31EN |
|
|
Refrigerator / User Guide |
||||||||||
|
|
|
|
|
|
|
|
|
|
|
|
|
|
|
|
|
|
|
|
|
|
|
|
|
|
|
|
|
|
|
|
|
|
|
|
|
|
|
|
|
|

Using the product
5.20.Drip tray
Water that dripped while using the water dispenser accumulates in the spillage tray.
Remove the plastic filter as shown in the figure.
With a clean and dry cloth, remove the water that has accumulated.
Refrigerator / User Guide |
25/31 EN |
|

Using the product
|
5.21.Freezing fresh food |
|
• Mark each food pack by writing the date on |
|
|||
|
• To preserve food quality, the food items |
the package before freezing. This will allow |
|||||
|
you to determine the freshness of each |
||||||
|
placed in the freezer compartment must be |
||||||
|
pack every time the freezer is opened. Keep |
||||||
|
frozen as quickly as possible, use the rapid |
||||||
|
the earlier food items in the front to ensure |
||||||
|
freezing for this. |
|
|||||
|
|
they are used first. |
|||||
|
• Freezing the food items when fresh will |
||||||
|
• Frozen food items must be used |
||||||
|
extend the storage time in the freezer |
||||||
|
immediately after defrosting and should not |
||||||
|
compartment. |
|
|||||
|
|
be frozen again. |
|||||
|
• Pack the food items in air-tight packs and |
||||||
|
• Do not free large quantities of food at once. |
||||||
|
seal tightly. |
|
|
||||
|
|
|
5.22.Recommendations for |
||||
|
• Make sure the food items are packed |
||||||
|
storing frozen foods |
||||||
|
before putting in the freezer. Use freezer |
||||||
|
The compartment must be set to at least |
||||||
|
holders, tinfoil and damp-proof paper, |
||||||
|
-18°C. |
||||||
|
plastic bag or similar packaging materials |
||||||
|
1. Place the food items in the freezer as |
||||||
|
instead of traditional packaging paper. |
quickly as possible to avoid defrosting. |
|||||
|
|
|
|
|
2. Before freezing, check the “Expiry Date” on |
||
|
C |
Ice in the freezing compartment thaws |
|||||
|
the package to make sure it is not expired. |
||||||
|
automatically. |
|
3. Make sure the food’s packaging is not |
||||
|
|
|
|
|
damaged. |
||
|
|
|
|
|
|||
|
|
|
|
|
|
||
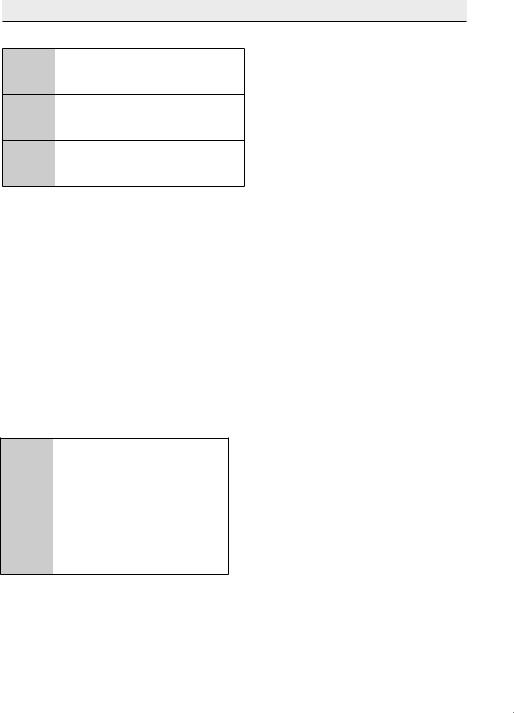
|
Freezer |
Cooler |
|
|
|
||
Compartment |
Compartment |
|
Details |
||||
|
Temperature |
Temperature |
|
||||
|
|
|
|
||||
|
Setting |
Setting |
|
|
|
||
-18°C |
4°C |
This is the default, recommended setting. |
|||||
-20,-22 or |
4°C |
These settings are recommended for ambient temperatures |
|||||
-24°C |
exceeding 30°C. |
||||||
|
|||||||
Quick Freeze |
4°C |
Use when you want to freeze your food in a short time. When the |
|||||
process ends, the product will regain its position. |
|||||||
|
|
|
|
||||
|
|
|
|
|
|||
-18°C or colder |
2°C |
Use these settings if you believe the cooler compartment is not cold |
|||||
enough due to ambient temperature or frequently opening the door. |
|||||||
|
|
|
|
||||
|
|
|
|
|
|
|
|
|
26 /31EN |
Refrigerator / User Guide |
|
|
|
|
|
|

Using the product
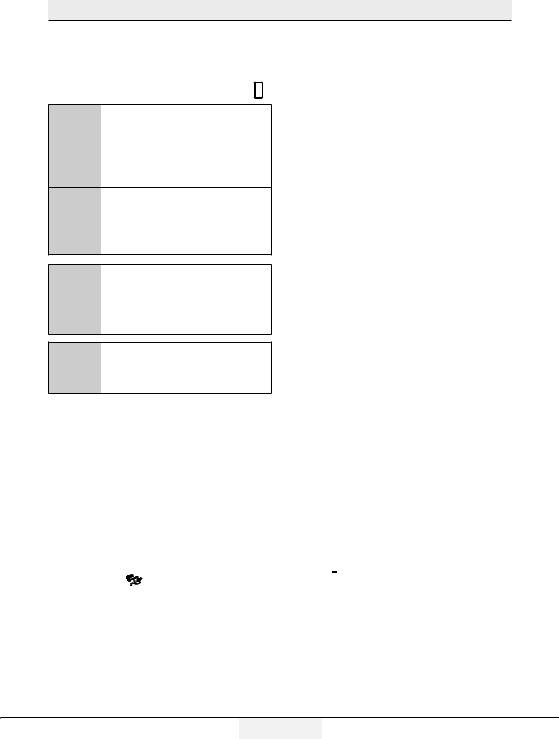
5.23.Deep freezer details
As per the IEC 62552 standards, the freezer must have the capacity to freeze 4,5 kg of food items at -18°C or lower temperatures in 24 hours for each 100 litres of freezer compartment volume.
Food items can only be preserved for extended periods at or below temperature of -18°C . You can keep the foods fresh for months (in deep freezer at or below temperatures of 18°C ).
The food items to be frozen must not contact the already-frozen food inside to avoid partial defrosting.
Boil the vegetables and filter the water to extend the frozen storage time. Place the food in air-tight packages after filtering and place in the freezer. Bananas, tomatoes, lettuce, celery, boiled eggs, potatoes and similar food items should not be frozen. In case this food rots, only nutritional values and eating qualities will be negatively affected. A rotting threatening human health is not in question.
5.24.Placing the food
Freezer |
Various frozen goods including |
|
compartment |
meat, fish, ice cream, |
|
shelves |
vegetables etc. |
|
Cooler |
Food items inside pots, capped |
|
compartment |
plate and capped cases, eggs |
|
shelves |
(in capped case) |
|
Cooler |
Small and packed food or |
|
compartment |
||
beverages |
||
door shelves |
||
|
||
Vegetable bin |
Fruits and vegetables |
|
Fresh food |
Delicatessen (breakfast food, |
|
meat products to be consumed |
||
compartment |
||
in short notice) |
||
|
5.25.Door open alert
(Optional)
An audible alert will be heard if the product's door remains open for at least 1 minute. The audible alert will stop when the door is closed or any button on the display (if available) is pressed.
Door open alert is indicated to the user both audibly and visually. Interior lighting will turn of if the warning continues for 10 min.
5.26.Changing the opening direction of the door
You can change the direction of opening of your refrigerator depending on the location where you use it. When you need this, consult the closest Authorized Service.
The explanation above is a general statement. You should check the warning tag located inside the product package about the changeability of direction of the door.
5.27.Interior light
Interior light uses a LED type lamp. Contact the authorized service for any problems with this lamp.
Lamp(s) used in this appliance cannot be used for house lighting. Intended use of this lamp is to help the user place food into the refrigerator / freezer safely and comfortably.
Refrigerator / User Guide |
27/31 EN |
|

6 Maintenance and cleaning
Service life of the product is increase if it is regularly cleaned
•Keep the food in closed containers. Microorganisms spreading out from uncovered containers can cause unpleasant odours.
BWARNING: First unplug the product before cleaning your refrigerator.
•Never use any sharp and abrasive tools, soap, household cleaners, detergent and wax polish for cleaning.
•Dissolve one teaspoon of carbonate in half liter of water. Soak a cloth with the solution and wrung it thoroughly. Wipe the interior of the appliance with this cloth and the dry thoroughly.
•Make sure that no water enters the lamp housing and other electrical items.
•Clean the door with a damp cloth. To remove door and body shelves, remove all of its contents. Remove door shelves by moving them upwards. After cleaning, slide them from top to bottom to install.
•Never use cleaning agents or water that contain chlorine to clean the outer surfaces and chromium coated parts of the product. Chlorine causes corrosion on such metal surfaces.
•Do not use sharp, abrasive tools, soap, household cleaning agents, detergents, kerosene, fuel oil, varnish etc. to prevent removal and deformation of the prints on the plastic part. Use lukewarm water and a soft cloth for cleaning and then wipe it dry.
6.1. Avoiding bad odors
Materials that may cause odor are not used in the production of our appliances. However, due to inappropriate food preserving conditions and not cleaning the inner surface of the appliance as required can bring forth the problem of odor.
Therefore, clean the refrigerator with carbonate dissolved in water every 15 days.
•Never keep the food that have expired best before dates and spoiled in the refrigerator.
6.2. Protecting the plastic surfaces
Clean with arm water immediately as the oil may cause damage on the surface when it is poured on plastic surfaces.
6.3. Door Glasses
Remove the protective foil on the glasses.
There is a coating on the surface of the glasses.This coating minimizes the stain build-up and helps to remove the possible stains and dirt easily.Glasses that are not protected with such a coating may be subject to persistent binding of air or water based organic
or inorganic dirt such as limescale, mineral salts, unburned hydrocarbons, metal oxides and silicones that can easily and quickly cause stains or material damage. Keeping the glass clean becomes too difficult despite the regular cleaning. Consequently, the appearance and the transparency of the glass deteriorates. Harsh and corrosive cleaning methods and compounds will intensify these defects and speed up the deterioration process.
Water-based cleaning products that are not alkaline and corrosive must be used for regular cleaning purposes.
Non-alkaline and non-corrosive materials must be used for cleaning so that the service life of this coating lasts for a long time.
These glasses are tempered to increase their durability against impacts and breaking.A safety film is also applied to their rear surfaces as an extra safety measure in order to prevent them from causing damage to their surrounding in case of a breakage.
*Alkali is a base that forms hydroxide ions (OH¯) when it is dissolved in water.
Li (Lithium), Na (Sodium), K (Potassium) Rb (Rubidium), Cs (Cesium) and artificial and radioactive Fr (Fan-sium) metals are called ALKALI METALS.
|
28 /31 EN |
Refrigerator / User Guide |
|
|
|
|
|
|

7. Troubleshooting
Check this list before contacting the service. Doing so will save you time and money. This list includes frequent complaints that are not related to faulty workmanship or materials. Certain features mentioned herein may not apply to your product.
The refrigerator is not working.
•The power plug is not fully settled. >>> Plug it in to settle completely into the socket.
•The fuse connected to the socket powering the product or the main fuse is blown. >>>
Check the fuses.
Condensation on the side wall of the cooler compartment (MULTI ZONE, COOL, CONTROL and FLEXI ZONE).
•The door is opened too frequently >>>
Take care not to open the product’s door too frequently.
•The environment is too humid. >>> Do not install the product in humid environments.
•Foods containing liquids are kept in unsealed holders. >>> Keep the foods containing liquids in sealed holders.
•The product’s door is left open. >>> Do not keep the product’s door open for long periods.
•The thermostat is set to too low temperature.
>>> Set the thermostat to appropriate temperature.
Compressor is not working.
•In case of sudden power failure or pulling the power plug off and putting back on, the gas pressure in the product’s cooling system is not balanced, which triggers the compressor thermic safeguard. The product will restart after approximately 6 minutes. If the product does not restart after this period, contact the service.
•Defrosting is active. >>> This is normal for a fully-automatic defrosting product. The defrosting is carried out periodically.
•The product is not plugged in. >>> Make sure the power cord is plugged in.
•The temperature setting is incorrect. >>>
Select the appropriate temperature setting.
•The power is out. >>> The product will continue to operate normally once the power is restored.
The refrigerator’s operating noise is increasing while in use.
•The product’s operating performance may vary depending on the ambient temperature variations. This is normal and not a malfunction.
The refrigerator runs too often or for too long.
•The new product may be larger than the previous one. Larger products will run for longer periods.
•The room temperature may be high. >>>
The product will normally run for long periods in higher room temperature.
•The product may have been recently plugged in or a new food item is placed inside. >>>
The product will take longer to reach the set temperature when recently plugged in or a new food item is placed inside. This is normal.
•Large quantities of hot food may have been recently placed into the product. >>> Do not place hot food into the product.
•The doors were opened frequently or kept open for long periods. >>> The warm air moving inside will cause the product to run longer. Do not open the doors too frequently.
•The freezer or cooler door may be ajar. >>>
Check that the doors are fully closed.
•The product may be set to temperature too low. >>> Set the temperature to a higher degree and wait for the product to reach the adjusted temperature.
•The cooler or freezer door washer may be dirty, worn out, broken or not properly settled. >>> Clean or replace the washer.
Damaged / torn door washer will cause the product to run for longer periods to preserve the current temperature.
Refrigerator / User Guide |
29/31EN |
|
 Loading...