

Page 1

Instructions Manual
Bedienungsanleitung
Manuel d’Instructions
Руководство по эксплуатации
Naudojimosi instrukcija
Gebruiksaanwijzing
Brugsvejledning
Εγχειρίδιο οδηγιών
Manual de Instruções
Instrukcja Obslugi
Libret de Instrucţiuni
Manual de instrucciones
Инструкции Ръководство
CTB 6407
CTB 9407
Page 2

INDEX
RECOMMENDATIONS AND SUGGESTIONS .............................................................................................................................................................................5
CHARACTERISTICS..............................................................................................................................................................................................................................6
INSTALLATION........................................................................................................................................................................................................................................ 7
USE..............................................................................................................................................................................................................................................................9
MAINTENANCE.................................................................................................................................................................................................................................... 10
EN
INHALTSVERZEICHNIS
EMPFEHLUNGEN UND HINWEISE.............................................................................................................................................................................................. 11
CHARAKTERISTIKEN........................................................................................................................................................................................................................ 12
MONTAGE ............................................................................................................................................................................................................................................. 13
BEDIENUNG.......................................................................................................................................................................................................................................... 15
WARTUNG............................................................................................................................................................................................................................................. 16
SOMMAIRE
CONSEILS ET SUGGESTIONS...................................................................................................................................................................................................... 17
CARACTERISTIQUES ....................................................................................................................................................................................................................... 18
INSTALLATION..................................................................................................................................................................................................................................... 19
UTILISATION ......................................................................................................................................................................................................................................... 21
ENTRETIEN ...........................................................................................................................................................................................................................................22
УКАЗАТЕЛЬ
СОВЕТЫ И РЕКОМЕНДАЦИИ...................................................................................................................................................................................................... 23
ХАРАКТЕРИСТИКИ........................................................................................................................................................................................................................... 24
УСТАНОВКА......................................................................................................................................................................................................................................... 25
ЭКСПЛУАТАЦИЯ................................................................................................................................................................................................................................ 27
УХОД........................................................................................................................................................................................................................................................ 28
TURINYS
PATARIMAI IR NUORODOS............................................................................................................................................................................................................ 29
PRIETAISO APRAŠYMAS ................................................................................................................................................................................................................30
MONTAVIMAS ...................................................................................................................................................................................................................................... 31
NAUDOJIMAS..................................................................................................................... ..................................................................................................................33
VALYMAS IR PRIEŽIŪRA.................................................................................................................................................................................................................. 34
DE
FR
RU
LT
INHOUDSOPGAVE
ADVIEZEN EN SUGGESTIES ......................................................................................................................................................................................................... 35
EIGENSCHAPPEN.............................................................................................................................................................................................................................. 36
INSTALLATIE......................................................................................................................................................................................................................................... 37
GEBRUIK................................................................................................................................................................................................................................................ 39
ONDERHOUD....................................................................................................................................................................................................................................... 40
NL
2
2
Page 3

INDHOLD
RÅD OG ANVISNINGER ................................................................................................................................................................................................................... 41
APPARATBESKRIVELSE................................................................................................................................................................................................................. 42
INSTALLATION..................................................................................................................................................................................................................................... 43
BRUG....................................................................................................................................................................................................................................................... 45
VEDLIGEHOLDELSE ......................................................................................................................................................................................................................... 46
DK
ΠΕΡΙΕΧΟΜΕΝΑ
ΣΥΜΒΟΥΛΕΣ ΚΑΙ ΣΥΣΤΑΣΕΙΣ......................................................................................................................................................................................................... 47
ΧΑΡΑΚΤΗΡΙΣΤΙΚΑ............................................................................................................................................................................................................................... 48
ΕΓΚΑΤΑΣΤΑΣΗ..................................................................................................................................................................................................................................... 49
ΧΡΗΣΗ..................................................................................................................................................................................................................................................... 51
ΣΥΝΤΗΡΗΣΗ......................................................................................................................................................................................................................................... 52
ÍNDICE
CONSELHOS E SUGESTÕES ....................................................................................................................................................................................................... 53
CARACTERÍSTICAS........................................................................................................................................................................................................................... 54
INSTALAÇÃO ........................................................................................................................................................................................................................................55
UTILIZAÇÃO .......................................................................................................................................................................................................................................... 57
MANUTENÇÃO .................................................................................................................................................................................................................................... 58
SPIS TREŚCI
UWAGI I SUGESTIE............................................................................................................................................................................................................................ 59
WŁAŚCIWOŚCI TECHNICZNE....................................................................................................................................................................................................... 60
INSTALACJA ......................................................................................................................................................................................................................................... 61
UŻYTKOWANIE ................................................................................................................................................................................................................................... 63
KONSERWACJA.................................................................................................................................................................................................................................. 64
CUPRINS
RECOMANDĂRI ŞI SUGESTII......................................................................................................................................................................................................... 65
CARACTERISTICI................................................................................................................................................................................................................................ 66
INSTALAREA......................................................................................................................................................................................................................................... 67
UTILIZARE.............................................................................................................................................................................................................................................. 69
ÎNTREŢINERE....................................................................................................................................................................................................................................... 70
GR
PT
PL
RO
INDICE
CONSEJOS Y SUGERENCIAS ...................................................................................................................................................................................................... 71
CARACTERÍSTICAS........................................................................................................................................................................................................................... 72
INSTALACIÓN....................................................................................................................................................................................................................................... 73
USO ..........................................................................................................................................................................................................................................................75
MANTENIMIENTO............................................................................................................................................................................................................................... 76
ИНДЕКС
СЪВЕТИ И ТРИКОВЕ....................................................................................................................................................................................................................... 77
ХАРАКТЕРИСТИКИ........................................................................................................................................................................................................................... 78
ИНСТАЛАЦИЯ..................................................................................................................................................................................................................................... 79
УПОТРЕБА............................................................................................................................................................................................................................................ 81
ПОДДРЪЖКА....................................................................................................................................................................................................................................... 82
ES
BG
3
3
Page 4
2°
RECOMMENDATIONS AND SUGGESTIONS
The Instructions for Use apply to several versions of this appliance. Accordingly, you may find
descriptions of individual features that do not apply to you r specific appliance.
INSTALLATION
• The manufacturer will not be held liable for any damages resulting from incorrect or improper
installation.
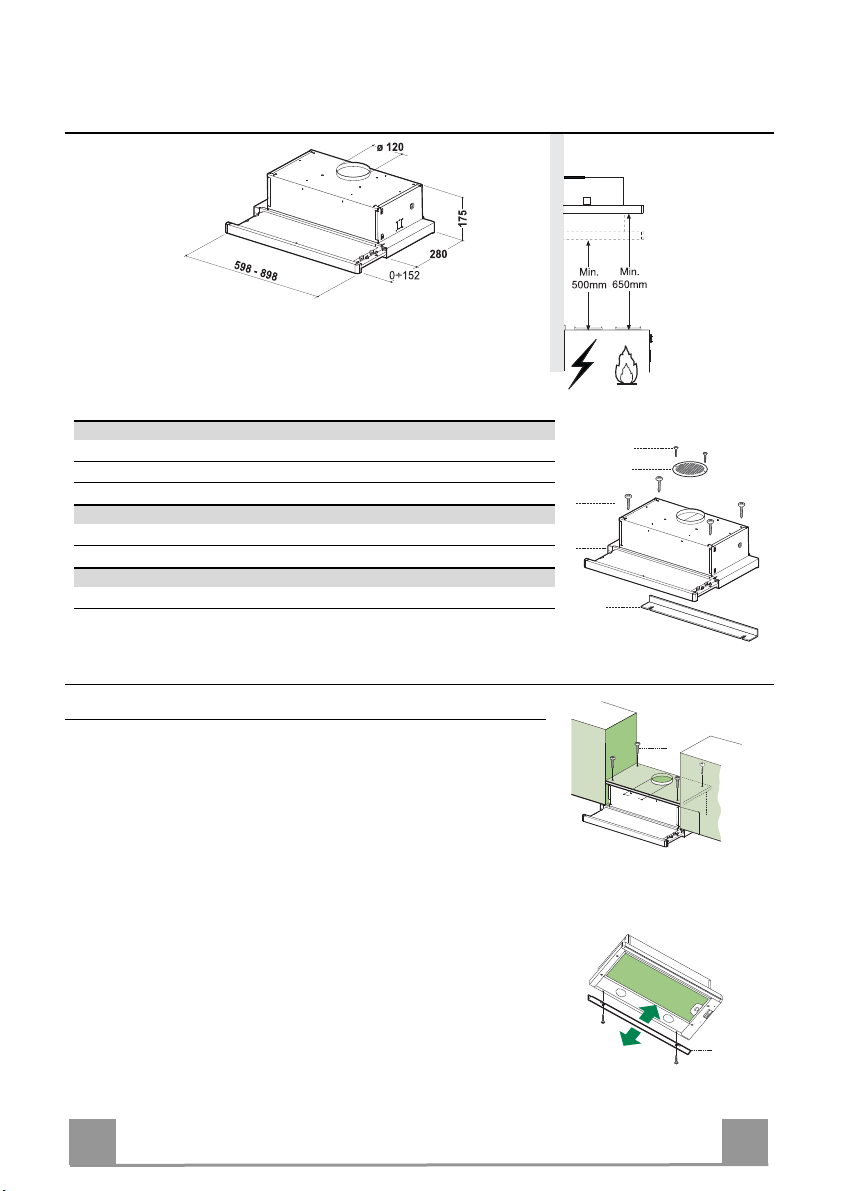
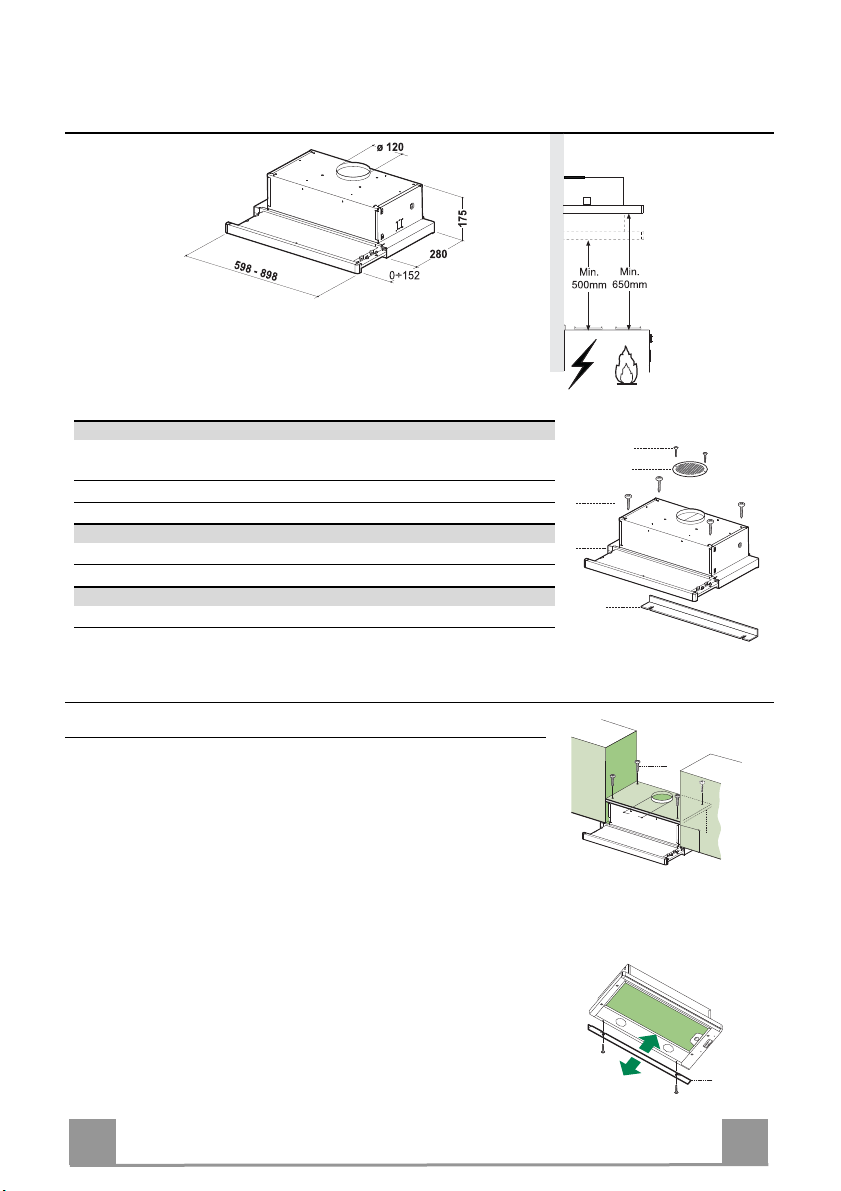
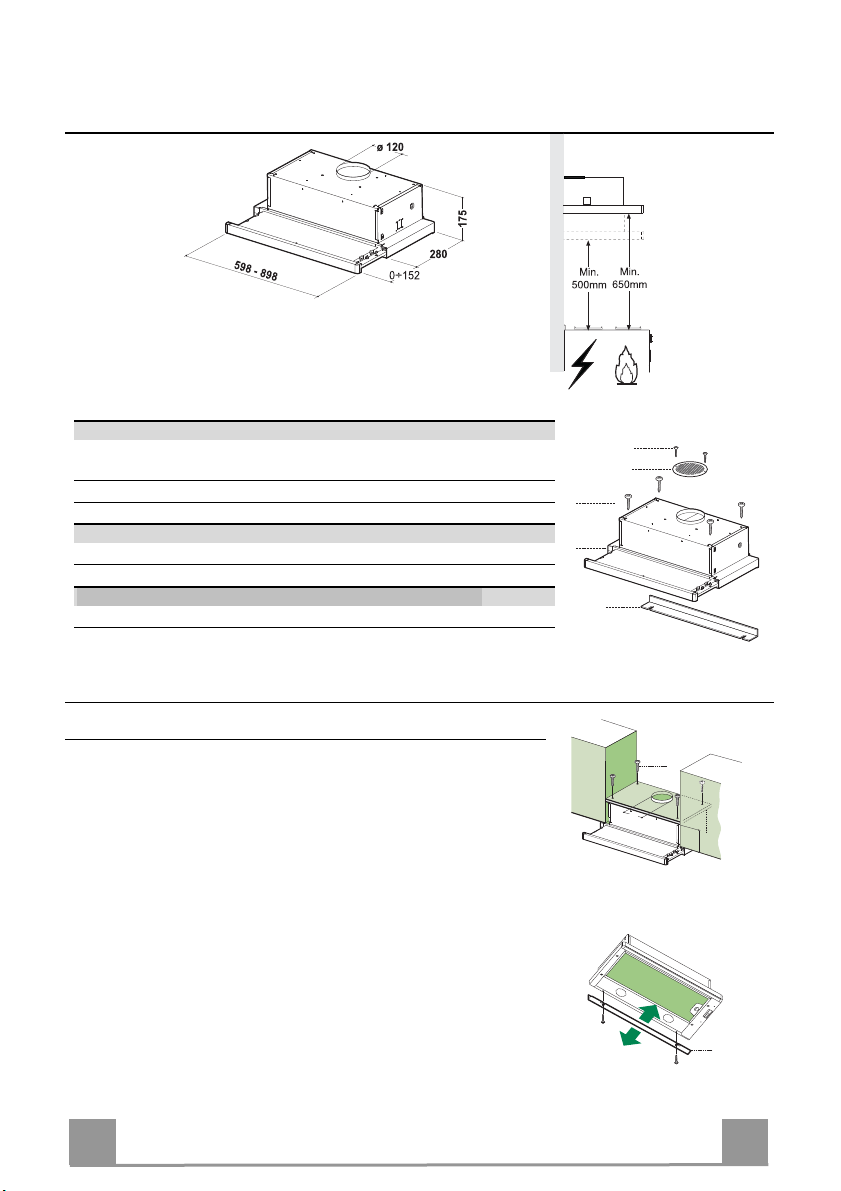
• The minimum safety distance between the cooker top and the extractor hood is 650 mm (some
models can be installed at a lower height, please refer to the paragraphs on working dimensions
and installation).
• Check that the mains voltage corresponds to that indicated on the rating plate fixed to the inside of
the hood.
• For Class I appliances, check that the domestic po wer supply guarantees adequate earthing.
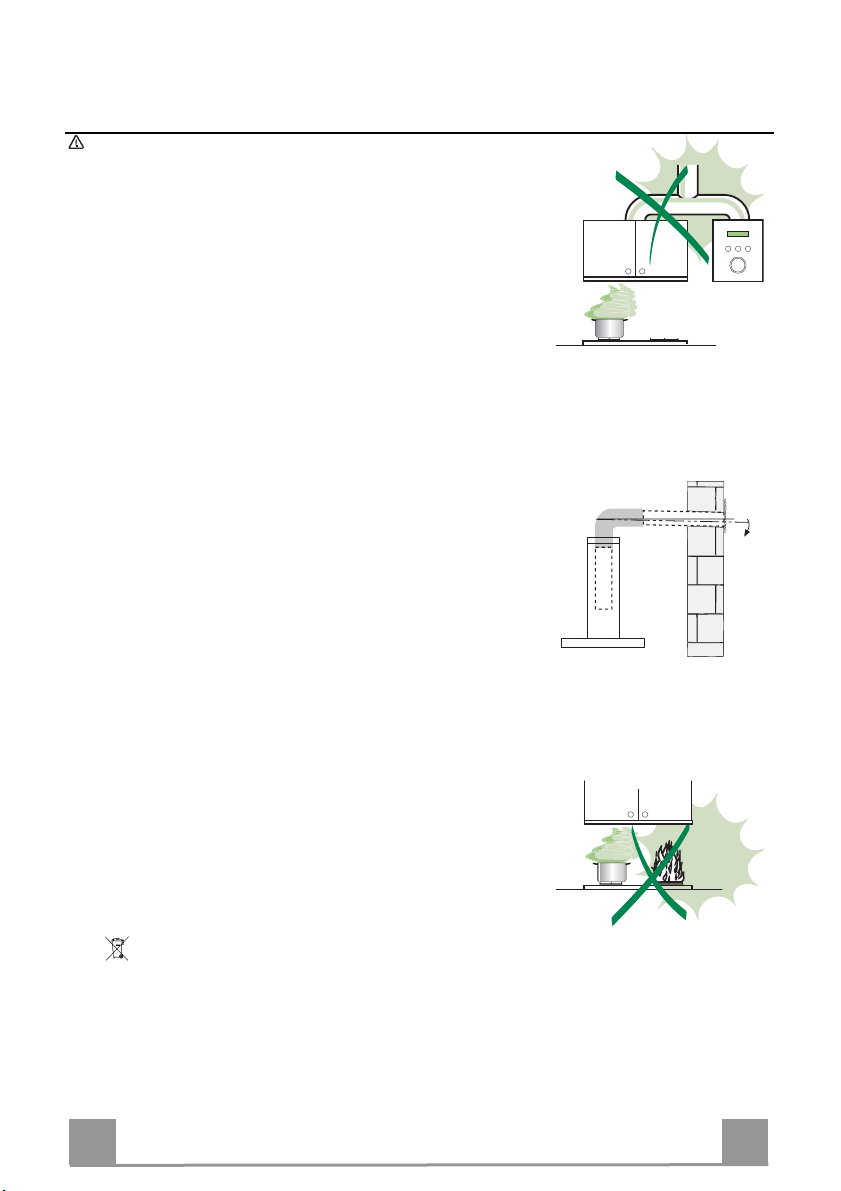
Connect the extractor to the exhaust flue through a pipe of minimum diameter 120 mm. The route
of the flue must be as short as possible.
• Do not connect the extractor hood to exhaust ducts carrying combustion fumes (boilers, fireplaces,
etc.).
• If the extractor is used in conjunction with non-electrical appliances (e.g. gas burning appliances), a
sufficient degree of aeration must be guaranteed in the room in order to prevent the backflow of
exhaust gas. The kitchen must have an opening communicating directly with the open air in order
to guarantee the entry of clean air. When the cooker hood is used in conjunction with appliances
supplied with energy other than electric, the negative pressure in the room must not exceed 0,04
mbar to prevent fumes being drawn back into the room b y the cooker hood.
• In the event of damage to the power cable, it must be replaced by the manufacturer or by the
technical service department, in order to prevent an y risks.
• If the instructions for installation for the gas hob specify a greater distance specified above, this has
to be taken into account. Regulations concerning the discharge of air have to be fulfilled.
USE
• The extractor hood has been designed ex clusively for domestic use to eliminate kitchen smells.
• Never use the hood for purposes other than for wh ich it has been designed.
• Never leave high naked flames under the hood wh en it is in operation.
• Adjust the flame intensity to direct it onto the bottom of the pan only, making sure that it does not
engulf the sides.
• Deep fat fryers must be continuously monitor ed during use: overheated oil can burst into flames.
• Do not flambè under the range hood; risk of fire
• This appliance is not intended for use by persons (including children) with reduced physical, sensory or mental capabilities, or lack of experience and knowledge, unless they have been given supervision or instruction concerning use of the appli ance by a person responsible for their safety.
• Children should be supervised to ensure that they d o not play with the appliance.
• “ CAUTION: Accessible parts may become hot when use d with cooking appliances.”.
MAINTENANCE
• Switch off or unplug the appliance from the mains supply before carrying out any maintenance
work.
• Clean and/or replace the Filters after the specified ti me period (Fire hazard).
• Clean the hood using a damp cloth and a neutral liq uid detergent.
The symbol on the product or on its packaging indicates that thi s product may not be treated as household waste. Instead it shall be handed over to the
applicable collection point for the recy cling of electrical and electronic equipment . By ensuring this product is disposed of corre ctly, you will help prevent potential neg ative
consequences for the environment and h uman health, which could otherwise be cau sed by inappropriate waste handling of this product. For more detailed information
about recycling of this product, p lease contact your local city o ffice, your household waste disp osal service or the shop where you purchased the product
.
EN
4
4
Page 5

12e
8
1
12a
20
12a
135
125125
20
CHARACTERISTICS
Components
Ref. Q.ty Product Components
1 1 Hood Body, complete with: Controls, Light, Blower, Filters
8 1 Directional Air Outlet grille
20 1 Closing element
Ref. Q.ty Installation Components
12a 4 Screws 4,2 x 44,4
12e 2 Screws 2,9 x 9,5
Q.ty Documentation
1 Instruction Manual
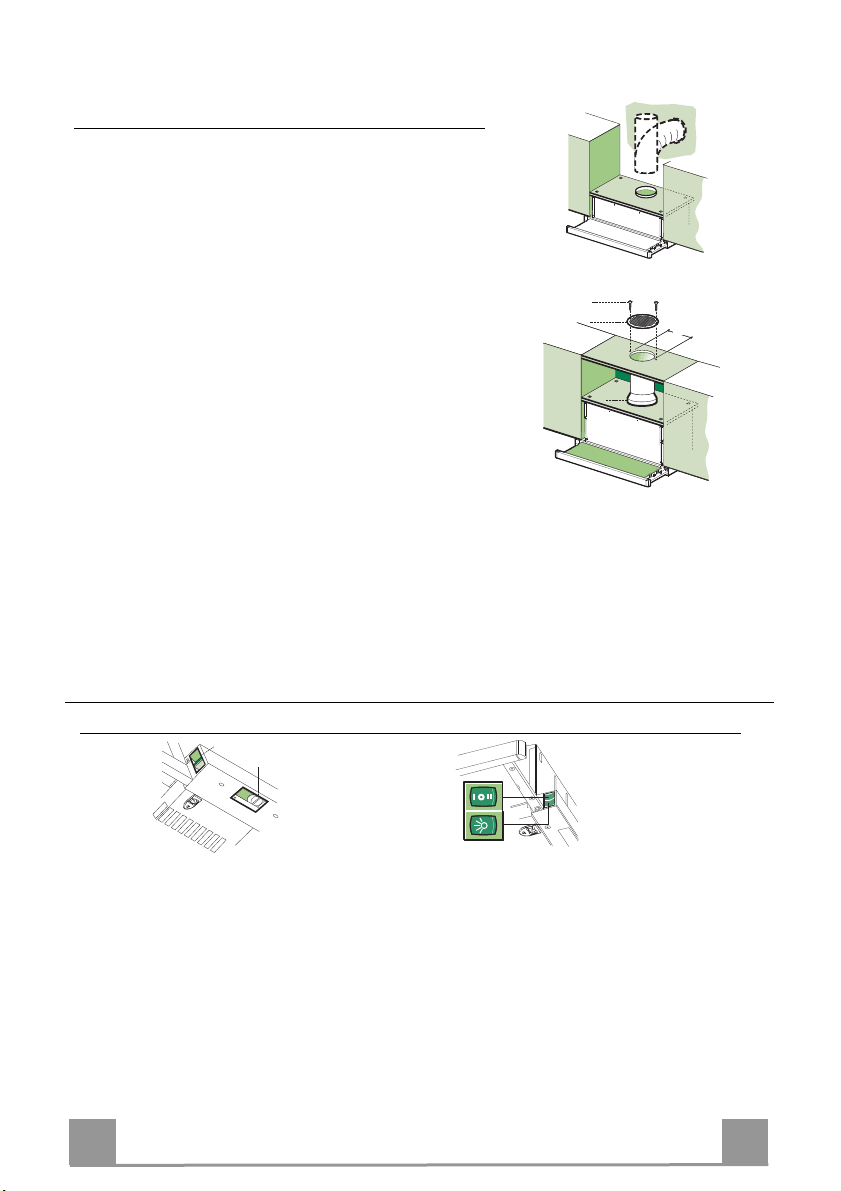
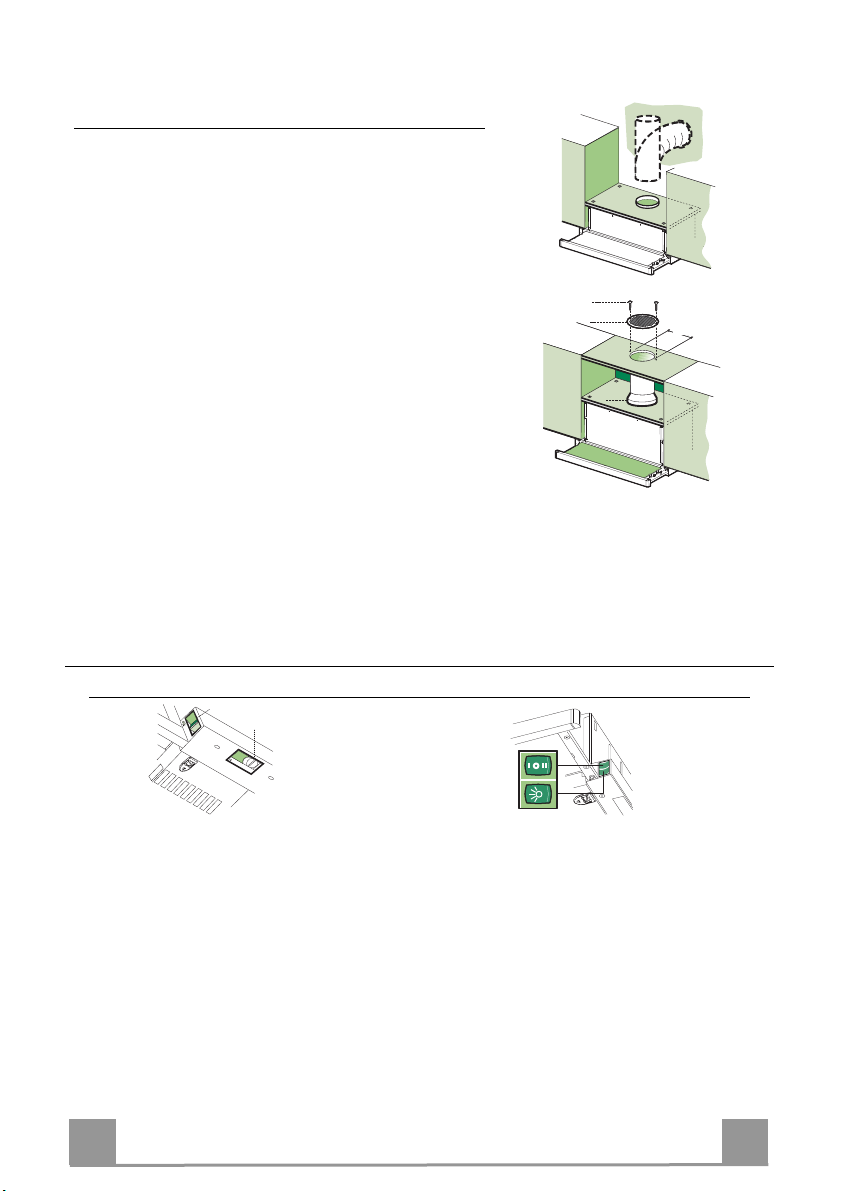
INSTALLATION
Drilling the Support surface and Fitting the Hood
SCREW FITTING
• The hood support surface must be 135 mm above the bottom
surface of the wall units.
• Drill the support with a ø 4,5 mm drill bit, using the drilling
template provided.
• Cut a hole ø 125 mm in size on the support surface, using the
drilling template provided.
• Fix using the 4 screws 12a (4,2 x 44,4) provided.
CLOSING ELEMENT
• The space between the edge of the hood and the rear wall can
be closed by applying the element 20 provided, using the
screws supplied for this purpose.
EN
5
5
Page 6
ø 120
Connections
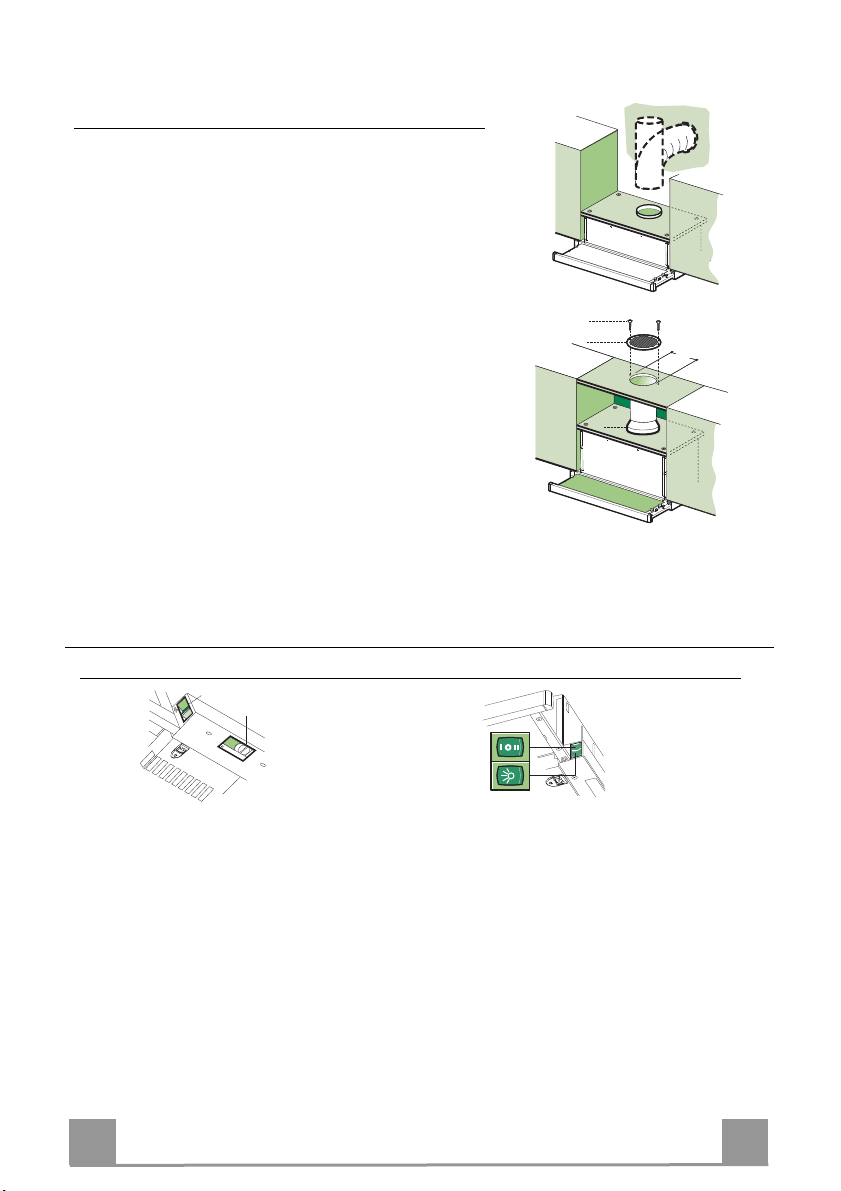
DUCTED VERSION AIR EXHAUST SYSTEM
When installing the ducted version, connect the hood to the
chimney using either a flexible or rigid pipe ø120 mm, the
choice of which is left to the installer.
• Fix the pipe in position using sufficient pipe clamps (not supplied).
• Remove any activated charcoal filters.
RECIRCULATION VERSION AIR OUTLET
• Cut a hole ø 125 mm in any shelf that may be positioned over
the hood.
• Connect the flange to the outlet on the shelf over the hood
using a flexible or rigid pipe ø120 mm.
• Fix the pipe in position using sufficient pipe clamps (not supplied).
• Fix the directional grille 8 on the recirculation air outlet using
the 2 screws 12e (2,9 x 9,5) provided.
• Ensure that the activated charcoal filters have been inserted.
12e
8
8
125
125
9
9
ELECTRICAL CONNECTION
• Connect the hood to the mains through a two-pole switch having a contact gap of at least 3 mm.
• When opening the sliding carriage for the first time after installing the hood, pull it out briskly until it clicks.
USE
Control panel
L
0
M - V
1
0
1
2
3
M-V
L
L Light Switches the lighting system on and
off.
M Motor Switches the extractor motor on and
off.
V Speed Sets the operating speed of the extrac-
tor:
1. Low speed, used for a continuous and
silent air change in the presence of light
cooking vapour.
2. Medium speed, suitable for most operating conditions given the optimum treated air
flow/noise level ratio.
3. Maximum speed, used for eliminating the
highest cooking vapour emission, including
long periods.
EN
L Light Switches the lighting system on and
off.
M Motor Switches the extractor motor on and
off.
V Speed Sets the operating speed of the extrac-
tor:
1. Low speed, used for a continuous and
silent air change in the presence of light
cooking vapour.
2. Medium speed, suitable for most operating conditions given the optimum treated air
flow/noise level ratio.
6
6
Page 7
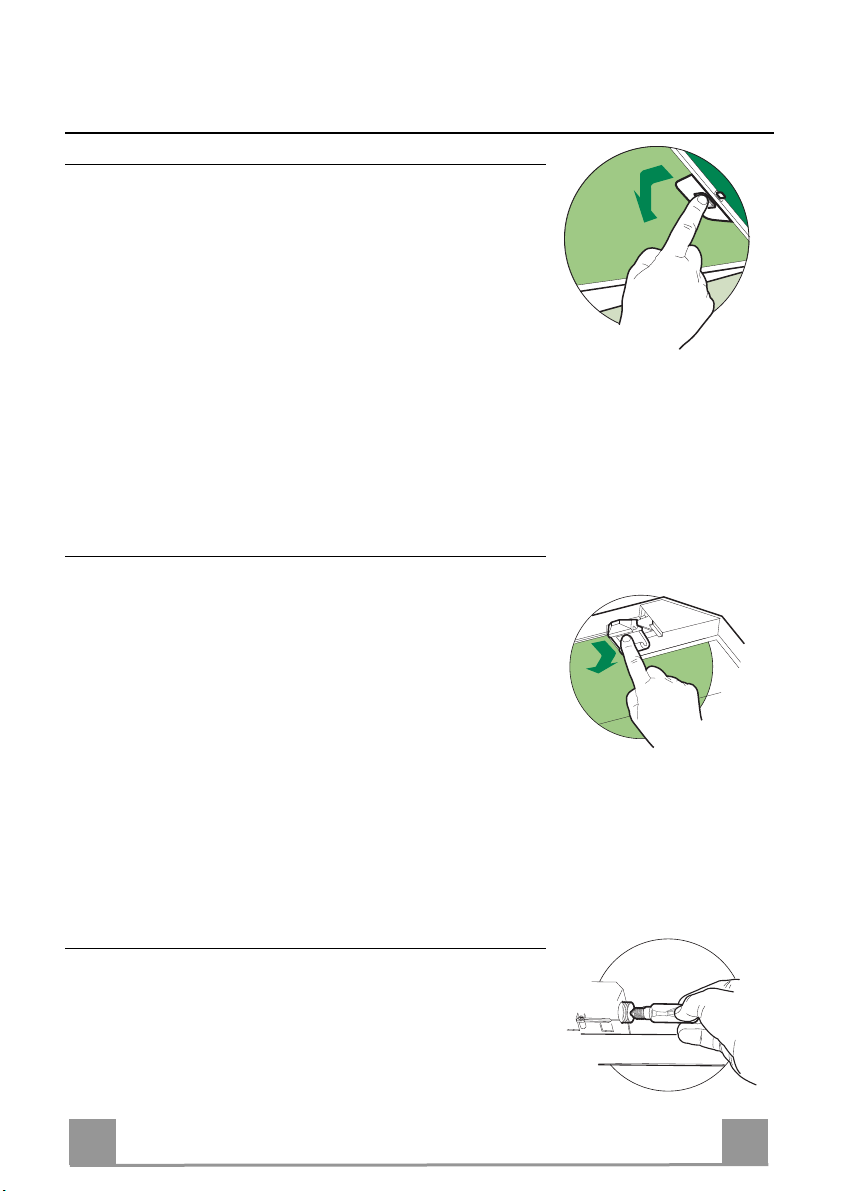
MAINTENANCE
Grease filters
CLEANING METAL CASSETTE GREASE FILTERS
• The filters must be cleaned every 2 months, or more frequently
in case of particularly heavy use of the hood. Filters can be
washed in a dishwasher.
• Pull out the sliding suction panel.
• Remove the filters one by one, after having disconnected the
relative fastening elements.
• Wash the filters, taking care not to bend them. Let them get dry
before refitting them. (The colour of the filter surface may
change throughout the time but this has no influence to the filter efficiency).
• When refitting the filters, make sure that the handle is visible
on the outside.
• Close the sliding suction panel.
Charcoal filter (Recycling version)
REPLACING CHARCOAL FILTERS
Warning: Turn the lights off and wait until the lamps cool down
before you change the odour filter.
• These filters are not washable and cannot be regenerated, and
must be replaced approximately every four months or more
frequently by particularly heavy use.
• Pull out the sliding suction panel.
• Remove the grease filters.
• Remove the saturated carbon filter by releasing the fixing
hooks
• Fit the new filter by hooking it into its seating.
• Replace the grease filters.
• Close the sliding suction panel.
Lighting
LIGHT REPLACEMENT
28W-40W light.
• Remove the metal grease filters.
• Unscrew the bulbs and replace them with new ones having the
same characteristics.
• Replace the metal grease filters.
EN
7
7
Page 8

2°
EMPFEHLUNGEN UND HINWEISE
Diese Gebrauchsanleitung gilt für mehrere Geräte-Ausführungen. Es ist möglich, dass einzelne Ausstattungs-
merkmale beschrieben sind, die nicht auf Ihr Gerät zutreffen.
MONTAGE
• Der Hersteller haftet nicht für Schäden, die auf eine fehlerhafte oder unsachgemäße Montage zurückzuführen
sind.
• Der minimale Sicherheitsabstand zwischen Kochmulde und Haube muss 650 mm betragen (einige Modelle
können an einer geringeren Höhe installiert werden, beziehen Sie sich dazu auf den Absatz Raumbedarf und
Installation).
• Prüfen, ob die Netzspannung mit dem Wert auf dem im Haubeninneren angebrachten Schild übereinstimmt.
• Bei Geräten der Klasse I ist sicherzustellen, dass die elektrische Anlage des Wohnhauses über eine vorschriftsmäßige Erdung verfügt.
• Das Anschlussrohr der Haube zur Luftaustrittsöffnung muss einen Durchmesser von 120 mm oder darüber
aufweisen. Der Rohrverlauf muss so kurz wie möglich sein.
• Die Haube darf an keine Entlüftungsschächte angeschlossen werden, in die Verbrennungsgase (Heizkessel,
Kamine usw.) geleitet werden.
• Werden im Raum außer der Dunstabzugshaube andere, nicht elektrisch betriebene (z.B. gasbetriebene)
Geräte verwendet, muss für eine ausreichende Belüftung gesorgt werden. Sollte die Küche diesbezüglich nicht
entsprechen, ist an einer Aussenwand eine Öffnung anzubringen, die Frischluftzufuhr gewährleistet. Der
Gebrauch ist dann sachgemäß und sicher, wenn der max. Unterdruck des Raums nicht mehr als 0,04 mbar
beträgt.
• Ein schadhaftes Kabel muss vom Hersteller oder vom technischen Kundendienst ausgewechselt werden,
damit jedes Risiko vermieden wird.
• Wenn die Anweisungen für die Installation für die Gaskochgeräts einen größeren Abstand oben angegeben,
muss dies berücksichtigt werden. Vorschriften über die Entlastung der Luft müssen erfüllt sein.
BEDIENUNG
• Die Dunstabzugshaube ist ausschließlich zum Einsatz im privaten Haushalt und zur Beseitigung von Küchengerüchen vorgesehen.
• Unsachgemäßer Einsatz der Haube ist zu unterlassen.
• Große Flammen bei eingeschalteter Haube niemals unbedeckt lassen.
• Die Intensivität der Flamme ist so zu regulieren, dass sie den Topfboden nicht überragt.
• Frittiergeräte müssen während des Gebrauchs stets beaufsichtigt werden: überhitztes Öl kann sich entzünden.
• Keine flambierten Speisen unter der Abzugshaube zubereiten: Brandgefahr.
• Dieses Gerät darf nicht von Personen, auch Kindern, mit verminderten psychischen, sensorischen und geistigern Fähigkeiten, oder von Personen ohne Erfahrung und Kenntnisse benutzt werden, sofern sie nicht von für
ihre Sicherheit verantwortlichen Personen beaufsichtigt und beim Gebrauch des Geräts angeleitet werden.
• Kinder dürfen sich nicht unbeaufsichtigt in der Nähe des Geräts aufhalten und auf keinen Fall mit dem Gerät
spielen.
• “ACHTUNG: Die zugänglichen Teile können sehr heiß werden, wenn sie mit Kochgeräten eingesetzt werden.”.
WARTUNG
• Bevor Wartungsarbeiten durchgeführt werden, muss die Stromzufuhr zur Haube unterbrochen werden, indem
der Stecker gezogen oder der Hauptschalter abgeschaltet wird.
• Bei der Filterwartung müssen die vom Hersteller empfohlenen Zeiträume zum Austauschen der Filter genauestens eingehalten werden (Brandgefahr).
• Zur Reinigung der Haubenflächen Wir empfehlen ein feuchtes Tuch und ein mildes Flüssigreinigungsmittel.
Das Symbol auf dem Produkt oder seiner Verpackung weist darauf hin, dass dieses Produkt nicht als
normaler Haushaltsabfall zu behandeln ist, sondern an einem Sammelpunkt für das Recycling von elektrischen und elektronischen Geräten abgegeben werden muss. Durch Ihren Beitrag zum korrekten Entsorgen
dieses Produkts schützen Sie die Umwelt und die Gesundheit Ihrer Mitmenschen. Umwelt und Gesundheit
werden durch falsches Entsorgen gefährdet. Weitere Informationen über das Recycling dieses Produkts
erhalten Sie von Ihrem Rathaus, Ihrer Müllabfuhr oder dem Geschäft, in dem Sie das Produkt gekauft haben.
DE
8
8
Page 9
12e
8
1
12a
20
12a
135
125125
20
CHARAKTERISTIKEN
Komponenten
Pos. St. Produktkomponenten
1 1 Haubenkörper mit Schaltern, Beleuchtung, Gebläsegruppe, Filter
8 1 Luftleitgitter Luftaustritt
20 1 Abdeckprofil
Pos. St. Montagekomponenten
12a 4 Schrauben 4,2 x 44,4
12e 2 Schrauben 2,9 x 9,5
St. Dokumentation
1 Bedienungsanleitung
MONTAGE
Bohren der Trägerplatte und Montage der Dunstabzugshaube
MONTAGE MIT SCHRAUBEN
• Die Hauben-Trägerplatte muss 135 mm oberhalb der Oberschrank-Unterfläche positioniert werden.
• Mit Hilfe des beiliegenden Bohrplanes Löcher ø 4,5 mm in die
Trägerplatte bohren.
• Mit Hilfe des beiliegenden Bohrplanes ein Loch ø 125 mm in
die Trägerplatte bohren.
• Mit 4 der mitgelieferten Schrauben 12a (4,2 x 44,4) fixieren.
ABDECKPROFIL
• Der Bereich zwischen Haubenkante und Rückwand kann mit
Hilfe des mitgelieferten Abdeckprofils 20 und der für diesen
Zweck vorgesehenen Schrauben geschlossen werden.
DE
9
9
Page 10
ø 120
Anschlüsse
ANSCHLUSS IN ABLUFTVERSION
Bei Abluftbetrieb kann die Haube vom Installateur wahlweise
mittels Rohr oder Schlauch (ø120 mm) an die Außenrohrleitung
angeschlossen werden.
• Das Rohr mit geeigneten Rohrschellen fixieren. Das hierzu
erforderliche Material wird nicht mitgeliefert.
125
125
• Eventuell vorhandene Aktivkohlefilter entnehmen.
ANSCHLUSS IN UMLUFTVERSION
• In das eventuell über der Haube vorhandene Bord ein Loch ø
12e
8
8
125 mm bohren.
• Den Flansch beim Luftaustritt am Bord oberhalb der Haube
mittels Rohr oder Schlauch ø120 mm anschließen.
9
9
• Das Rohr mit geeigneten Rohrschellen fixieren. Das hierzu
erforderliche Material wird nicht mitgeliefert.
• Das Luftleitgitter 8 mit Hilfe von 2 der mitgelieferten Schrau-
ben 12e (2,9 x 9,5) beim Austritt der rückzuführenden Luft fixieren.
• Sicherstellen, dass der Aktivkohle-Geruchsfilter vorhanden ist.
ELEKTROANSCHLUSS
• Bei Anschluss der Haube an das Stromnetz muss ein zweipoliger Schalter mit einem Öffnungsweg von mindestens 3 mm
zwischengeschaltet werden.
• Nach Montage der Haube muss beim ersten Mal der Auszug energisch geöffnet werden, bis bei Erreichen des Endanschlages ein Klicken zu hören ist.
BEDIENUNG
L
0
L Beleucht. Schaltet die Beleuchtung ein und aus.
M Motor Schaltet den Gebläsemotor ein und aus.
V Geschw. bestimmt die Gebläsegechwindigkeit und
steuert folgende Geschwindigkeitsstufen:
1. geringste Gebläsestufe, diese Stufe ist für einen
ständigen und besonders leisen Luftaustausch bei
geringer Kochdunstentwicklung geeignet.
2. mittlere Gebläsestufe, eignet sich aufgrund des
guten Verhältnisses zwischen Fördervolumen und
Geräuschentwicklung für die meisten Anwendungssituationen.
3. höchste Gebläsestufe, eignet sich für starke Kochdunstentwicklung, auch über längere zeithin.
DE
M - V
1
0
1
2
3
Bedienfeld
M-V
L
L Beleucht. Schaltet die Beleuchtung ein und aus.
M Motor Schaltet den Gebläsemotor ein und aus.
V Geschw. bestimmt die Gebläsegechwindigkeit und
steuert folgende Geschwindigkeitsstufen:
1. geringste Gebläsestufe, diese Stufe ist für einen
ständigen und besonders leisen Luftaustausch bei
geringer Kochdunstentwicklung geeignet.
2. mittlere Gebläsestufe, eignet sich aufgrund des
guten Verhältnisses zwischen Fördervolumen und
Geräuschentwicklung für die meisten Anwendungssituationen.
1
10
Page 11

WARTUNG
Fettfilter
• Die Filter können im Geschirrspüler gereinigt werden und
müssen nach spätestens zwei Monaten Betriebszeit oder, bei
besonders intensiver Nutzung, häufiger gereinigt werden.
• Den Wrasenleitschirm herausziehen.
• Die Verriegelung des Fettfilters zuerst nach hinten, dann nach
unten herausnehmen.
• Die Filter im Geschirrspüler bei stärkstem Reinigungsprogramm und höchster Temperatur, mindestens 65°C, reinigen
und vor dem Wiedereinsetzen trocknen lassen, dabei nicht knicken. (Eine eventuelle Verfärbung der Filteroberfläche, zu der
es im Laufe der Zeit kommen kann, beeinträchtigt die Funktion
des Filters keinesfalls.)
• Die Filter wieder einsetzen, dabei darauf achten, dass die Verriegelung sichtbar ist.
• Den Wrasenleitschirm wieder einschieben.
Achtung: Die Beleuchtung ausschalten und warten, bis die Lampe abgekühlt ist, bevor der Geruchsfilter ausgewechselt wird.
• Die Filter lassen sich nicht reinigen oder regenerieren und
müssen spätestens nach vier Monaten Betriebszeit oder, bei besonders intensiver Nutzung, häufiger ersetzt werden.
• Den Wrasenleitschirm herausziehen.
• Die Fettfilter entnehmen
• Die entsprechenden Haken lösen und den gesättigten Aktivkohlefilter entnehmen.
• Die Metallfettfilter wieder montieren.
• Die Fettfilter wieder einsetzen.
• Den Wrasenleitschirm wieder einschieben.
REINIGUNG DER METALLFETTFILTER
Aktivkohlefilter (Umluftbetrieb)
FILTERWECHSEL
Beleuchtung
AUSWECHSELN DER LAMPEN
Lampen 28W-40W
• Die Metallfettfilter entfernen.
• Die Lampen ausschrauben und durch gleichwertige ersetzen.
• Die Metallfettfilter wieder montieren.
DE
1
11
Page 12

2°
CONSEILS ET SUGGESTIONS
La présente notice d'emploi vaut pour plusieurs versions de l'appareil. Elle peut contenir des descriptions d'ac-
cessoires ne figurant pas dans votre appareil.
INSTALLATION
• Le fabricant décline toute responsabilité en cas de dommage dû à une installation non correcte ou non
conforme aux règles de l’art.
• La distance minimale de sécurité entre le plan de cuisson et la hotte doit être de 650 mm au moins (certains
modèles peuvent être installés à une hauteur inférieure : se reporter aux paragraphes « Encombrement » et
« Installation »).
• Vérifier que la tension du secteur correspond à la valeur qui figure sur la plaquette apposée à l’intérieur de la
hotte.
• Pour les Appareils appartenant à la Ière Classe, veiller à ce que la mise à la terre de l’installation électrique
domestique ait été effectuée conformément aux normes en vigueur.
• Connecter la hotte à la sortie d’air aspiré à l’aide d’une tuyauterie d’un diamètre égal ou supérieur à 120 mm. Le
parcours de la tuyauterie doit être le plus court possible.
• Ne pas connecter la hotte à des conduites d’évacuation de fumées issues d’une combustion tel que (Chaudière, cheminée, etc…).
• Si vous utilisez des appareils qui ne fonctionnent pas à l’électricité dans la pièce ou est installée la hotte (par
exemple: des appareils fonctionnant au gaz), vous devez prévoir une aération suffisante du milieu. Si la cuisine
en est dépourvue, pratiquez une ouverture qui communique avec l’extérieur pour garantir l’infiltration de l’air pur.
Pour un emploi correct et sans risque, la dépression maximum dans la pièce ne doit pas dépasser 0,04 mbar.
• En cas d’endommagement du cordon d’alimentation, faites-le remplacer par le constructeur ou par le service
après-vente, afin de prévenir tout risque.
• Si les instructions de montage pour la plaque de cuisson au gaz spécifient une plus grande distance indiquée cidessus, cela doit être pris en compte. Règlement concernant l'évacuation d'air doivent être remplies..
UTILISATION
• La hotte a été conçue exclusivement pour l’usage domestique, dans le but d’éliminer les odeurs de la cuisine.
• Ne jamais utiliser abusivement la hotte.
• Ne pas laisser les flammes libres à forte intensité quand la hotte est en service.
• Toujours régler les flammes de manière à éviter toute sortie latérale de ces dernières par rapport au fond des
marmites.
• Contrôler les friteuses lors de l’utilisation car l’huile surchauffée pourrait s’enflammer.
• Ne pas préparer d’aliments flambés sous la hotte de cuisine : risque d’incendie
• Cet appareil ne doit pas être utilisé par des personnes (y compris les enfants) ayant des capacités psychiques,
sensorielles ou mentales réduites, ni par des personnes n’ayant pas l’expérience et la connaissance de ce type
d’appareils, à moins d'être sous le contrôle et la formation de personnes responsables de leur sécurité.
• Les enfants doivent être surveillés pour s'assurer qu'ils ne jouent pas avec l'appareil.
• « ATTENTION : Les parties accessibles peuvent devenir très chaudes si utilisées avec des appareils de cuis-
son. »
ENTRETIEN
• Avant de procéder à toute opération d’entretien, débrancher la hotte en retirant la fiche ou en actionnant
l’interrupteur général.
• Effectuer un entretien scrupuleux et en temps dû des Filtres, à la cadence conseillée (Risque d’incendie).
• Pour le nettoyage des surfaces de la hotte, il suffit d’utiliser un chiffon humide et détersif liquide neutre.
Le symbole sur le produit ou son emballage indique que ce produit ne peut être traité comme déchet
ménager. Il doit plutôt être remis au point de ramassage concerné, se chargeant du recyclage du matériel
électrique et électronique. En vous assurant que ce produit est éliminé correctement, vous favorisez la prévention des conséquences négatives pour l’environnement et la santé humaine qui, sinon, seraient le résultat
d’un traitement inapproprié des déchets de ce produit. Pour obtenir plus de détails sur le recyclage de ce
produit, veuillez prendre contact avec le bureau municipal de votre région, votre service d’élimination des
déchets ménagers ou le magasin où vous avez acheté le produit.
FR
1
12
Page 13
12e
8
1
12a
20
12a
135
125125
20
CARACTERISTIQUES
Composants
Réf. Q.té Composants de Produit
1 1 Corps Hotte équipé de:Commandes, Lumière, Groupe Ventilateur,
Filtres
8 1 Grille orientée Sortie de l ’Air
20 1 Profil fermeture
Réf. Q.té Composants pour l ’installation
12a 4 Vis 4,2 x 44,4
12e 2 Vis 2,9 x 9,5
Q.té Documentation
1 Manuel d’instructions
INSTALLATION
Perçage du Plan de support et Montage de la Hotte
MONTAGE AU MOYEN DE VIS
• Le Plan de support de la Hotte doit être monté plus en haut de
135 mm. par rapport au Plan inférieur des Armoires murales.
• Percer un trou de ø 4,5 mm. sur le support, en utilisant le Gabarit de perçage fourni avec l’appareil.
• Percer un trou de ø 125 mm. sur le Plan de support, en utilisant
le Gabarit de perçage fourni avec l’appareil.
• Fixer à l’aide des 4 Vis 12a (4,2 x 44,4) fournies avec
l’appareil.
• Il est possible de boucher l’espace entre le rebord de la Hotte et
la Paroi du fond, en appliquant le Profil 20 fourni avec
l’appareil, à l’aide des Vis déjà prévus à cet effet.
FR
PROFIL DE FERMETURE
1
13
Page 14
ø 120
Branchements
SORTIE AIR VERSION EVACUATION
En cas d’installation en version évacuation, brancher la hotte à la
tuyauterie de sortie via un tube rigide ou flexible de ø 120 mm, au
choix de l’installateur.
• Fixer le tube par des colliers appropriés. Le matériau nécessaire
n’est pas fourni.
• Retirer les éventuels filtres anti-odeur au charbon actif.
SORTIE AIR VERSION RECYCLAGE
• Percer un trou de ø 125 mm. sur l’éventuelle Tablette qui se
12e
8
8
125
125
trouve au-dessus de la Hotte.
• Connecter la Flasque au trou de sortie sur la Tablette qui se
trouve au-dessus de la Hotte, au moyen d’un tuyau rigide ou
9
9
flexible de ø120 mm.
• Fixer le tube par des colliers appropriés. Le matériau nécessaire
n’est pas fourni.
• Fixer la Grille orientée 8 sur la sortie de l’air recyclé à l’aide de 2
Vis 12e (2,9 x 9,5) fournies avec l’appareil.
• S’assurer de la présence des filtres anti-odeur au charbon actif.
BRANCHEMENT ELECTRIQUE
• Brancher la hotte sur le secteur en interposant un interrupteur bipolaire avec ouverture des contacts d’au moins 3 mm.
• Après avoir installé la hotte, il est indispensable pour la première fois d’ouvrir le chariot coulissant de façon énergique, jusqu’à
ce que l’on entende le déclic de fin de course.
UTILISATION
L
0
M - V
1
0
1
2
3
Tableau de commande
M-V
L
L Lumières Allume et éteint l’éclairage.
M Moteur Allume et éteint le moteur aspiration.
V Vitesses Détermine les vitesses d’exploitation ainsi
subdivisées:
1. Vitesse minimale, pour un rechange d’air perma-
nent particulièrement silencieux en cas de faibles vapeurs de cuisson.
2. Vitesse moyenne pour la plupart des conditions
d’utilisation, étant donné le rapport optimal entre débit d’air traité et niveau sonore.
3. Vitesse maximum, pour faire face aux émissions
maximum de vapeur de cuisson, même pendant des
temps prolongés.
FR
L Lumières Allume et éteint l’éclairage.
M Moteur Allume et éteint le moteur aspiration.
V Vitesses Détermine les vitesses d’exploitation ainsi
subdivisées:
1. Vitesse minimale, pour un rechange d’air permanent particulièrement silencieux en cas de faibles vapeurs de cuisson.
2. Vitesse moyenne pour la plupart des conditions
d’utilisation, étant donné le rapport optimal entre débit d’air traité et niveau sonore.
1
14
Page 15

ENTRETIEN
Filtres anti-graisse
NETTOYAGE DES FILTRES ANTI-GRAISSE MÉTALLIQUES AUTOPOR-
• Les filtres peuvent être également lavés au lave-vaisselle; il
faut les laver tous les 2 mois d’emploi environ, ou bien plus
souvent, en cas d’emploi particulièrement intense.
• Sortir le tiroir aspirant.
• Retirer un Filtre à la fois, en intervenant sur les crochets spécialement prévus.
• Laver les Filtres en évitant de les plier, puis laisser sécher
avant de les remonter(L’éventuel changement de couleur de la
surface du filtre, qui pourrait survenir au cours du temps, ne
porte absolument pas préjudice à l’efficacité de celui-ci.).
• Remonter les filtres, en faisant attention à ce que la poignée
soit orientée vers la partie visible externe.
• Fermer le tiroir aspirant.
Filtres anti-odeur (Version Recyclage)
Attention: Éteindre les lumières et attendre le refroidissement
des ampoules avant de procéder au remplacement du filtre antiodeur.
• Les filtres ne peuvent pas être lavés ni régénérés; il faut les
remplacer tous les 3-4 mois d’emploi environ ou bien plus
souvent, en cas d’emploi particulièrement intense.
• Sortir le chariot aspirant.
• Retirer les Filtres Anti-graisse.
• Retirer le Filtre anti-odeur au Charbon actif saturé, en intervenant sur les crochets spécialement prévus.
• Mettre le nouveau Filtre en l’accrochant bien en place.
• Remonter les Filtres anti-graisse.
• Refermer le chariot aspirant.
TEURS
REMPLACEMENT
Eclairage
REMPLACEMENT LAMPES
Lampes de 28W-40W
• Retirer les filtres anti-graisse métalliques.
• Dévisser les lampes et les remplacer par de nouvelles avec les
mêmes caractéristiques.
• Remonter les filtres anti-graisse métalliques.
FR
1
15
Page 16

2°
СОВЕТЫ И РЕКОМЕНДАЦИИ
Настоящее руководство по эксплуатации составлено для разных моделей прибора. Возможно, вы встре-
тите в нем описание отдельных комплектующих, не относящихся к модели Вашего прибора.
УСТАНОВКА
• Производитель отклоняет всякую ответственность за повреждения, вызванные неправильной и несоответствующей правилам установкой.
• Минимальное безопасное расстояние между плитой и вытяжкой должно быть 650 мм (некоторые модели
могут быть установлены на меньшей высоте, см. разделы, посвященные габаритным размерам и установке прибора).
• Проверить соответствие напряжения сети указанному на табличке, закрепленной
• Для приборов класса I проверить, чтобы электрическая проводка в доме обеспечивала правильное заземление.
• Соединить вытяжку с дымоходом трубкой диаметром, равным или больше 120 мм. Длина трубки должна
быть как можно меньше.
• Не соединять вытяжку с выпускными трубами дымов от процессов горения (котлы, камины и проч.).
• В случае если
(например, газовые приборы), необходимо должным образом проветривать помещение. Если на кухне
нет окна, сделать отверстие наружу из помещения, чтобы через него поступал свежий воздух. Для правильного и безопасного использования прибора максимальное разрежение в помещении не должно пре
вышать 0,04 бара.
• В случае повреждения кабеля питания он должен быть заменен изготовителем или службой технического
содействия во избежание возникновения опасных ситуаций.
• Если в инструкциях по установке газовой плиты сказано, что рас-стояние до вытяжки должно быть больше
указанного выше, сле-дует придерживаться предписанных размеров. Соблюдайте пра-вила отведения
отработанного
в помещении используются как вытяжка, так и приборы, не работающие на электроэнергии
воздуха.
ЭКСПЛУАТАЦИЯ
• Вытяжка спроектирована исключительно для бытового применения для уничтожения запахов от готовки.
• Никогда не допускать несоответствующего пользования вытяжкой.
• Не оставлять открытое и сильное пламя под находящейся в работе вытяжкой.
• Обязательно регулировать пламя, чтобы оно не выходило за дно кастрюль.
• Следить за работой фритюрниц: сильно нагретое масло может воспламениться.
готовьте блюда фламбе под кухонной вытяжкой; опасность возникновения пожара.
• Не
• Запрещается пользоваться прибором людям (и детям) с ограниченными психическими, сенсорными и
умственными способностями, а также лицам, не обладающим опытом и необходимыми знаниями, без
контроля и предварительного обучения пользованием прибора со стороны ответственных за их безопасность лиц.
• Дети должны находиться
• ВНИМАНИЕ! Детали, доступные для контакта, могут сильно нагреваться в случае пользования вытяжкой
одновременно с приборами для приготовления пищи.
под надзором взрослых и не играть с прибором.
УХОД
• Прежде чем приступать к любой операции по уходу, отсоединить вытяжку от сети, вынув электрическую
вилку или выключив главный выключатель.
• Производить тщательный и своевременный уход за фильтрами в рекомендуемые интервалы времени
(Опасность пожара).
• Для уборки поверхностей вытяжки пользоваться влажной тряпкой и жидким нейтральным мылом.
внутри вытяжки.
-
Символ на изделии или на его упаковке указывает, что оно не подлежит утилизации в качестве бытовых отходов. Вместо этого
его следует сдать в соответствующий пункт приемки электронного и электрооборудования для последующей утилизации. Соблюдая
правила утилизации изделия, Вы поможете предотвратить причинение окружающей среде и здоровью людей потенциального
ущерба, который возможен, в противном случае, вследствие неподобающего обращения с подобными отходами. За более подробной информацией об утилизации этого изделия просьба обращаться к местным властям, в службу по вывозу и утилизации отходов
или в магазин, в котором Вы приобрели изделие.
RU
1
16
Page 17
12e
8
1
12a
20
12a
135
125125
20
ХАРАКТЕРИСТИКИ
Части
Об. Кол. Части изделия
1 1 Корпус вытяжки в комплекте с устройствами управления, ос-
8 1 Регулируемая решетка выпуска воздуха
20 1 Затворный профиль
Об. Кол. Установочные элементы
12a 4 Винты 4,2 x 44,4
12e 2 Винты 2,9 x 9,5
Кол. Документы
1 Руководство по
вещением, вентилятором, фильтрами
УСТАНОВКА
Сверление опорной плиты и установка вытяжки
КРЕПЛЕНИЕ ВИНТАМИ
• Опорная плита вытяжки должна выступать на 135 мм меньше
по сравнению с нижним уровнем полок.
• Просверлить ø 4,5 мм опору, используя входящий в комплект
шаблон сверления.
• Сделать в опорной плите отверстие ø 125 мм, используя входящий в комплект шаблон сверления.
• Закрепить входящими в комплект 4 винтами 12a (4,2 x 44,4).
ЗАТВОРНЫЙ ПРОФИЛЬ
• Пространство между краем вытяжки и задней стеной может
быть закрыто прилагаемым в комплекте профилем 20 и соответствующими винтами.
RU
1
17
Page 18

ø 120
Соединения
ВЫПУСК ВОЗДУХА ИЗ ВСАСЫВАЮЩЕЙ ВЫТЯЖКИ
Для установки всасывающей вытяжки соединить ее с выпускной
трубой жесткой или гибкой трубкой диаметром 120 мм, тип которой может выбрать монтажник.
• Закрепить трубку соответствующими трубными зажимами. Необходимый крепежный материал не входит в комплект.
• Вынуть фильтры от запахов на активном угле
ВЫХОД ВОЗДУХА ИЗ ФИЛЬТРУЮЩЕЙ ВЫТЯЖКИ
• Сделать в полке над вытяжкой отверстие ø 125мм.
• Соединить фланец с выпускным отверстием полки над вытяжкой
жесткой или гибкой трубой ø 120 мм.
• Закрепить трубу соответствующими зажимами. Необходимый для
этого материал не входит в комплект поставки.
• Закрепить решетку 8 на выпускном отверстии 2 винтами 12e (2,9 x
9,5) (прилагаются).
• Проверить наличие в вытяжке фильтров от
угле.
ЭЛЕКТРИЧЕСКОЕ ПОДКЛЮЧЕНИЕ
• Подключить вытяжку к сети питания через двухполюсный выключатель с минимальным разведением контактов в 3 мм.
• После установки вытяжки необходимо в первый раз энергично открыть выдвижную тележку, чтобы услышать щелчок оста-
нова.
запахов на активном
12e
8
8
9
125
125
9
ЭКСПЛУАТАЦИЯ
Пульт управления
L
0
M - V
1
0
1
2
3
M-V
L
L Освещение Включает и выключает осветительное
оборудование
M Мотор Включает и выключает мотор всасывания
V Скорость Регулирует рабочую скорость:
1. Минимальная скорость - пригодна для непрерывной смены воздуха при наличии малого количества пара от готовки; отличается бесшумностью
работы.
2. Средняя скорость - пригодна для наибольшей
части условий эксплуатации благодаря отличному
соотношению двух показателей:
пропускная спо-
собность обработанного воздуха и уровень шума.
3. Максимальная скорость - пригодна для обработки наибольших испарений от готовки даже в
течение длительного времени.
RU
L Освещение Включает и выключает осветительное
оборудование
M Мотор Включает и выключает мотор всасывания
V Скорость Регулирует рабочую скорость:
1. Минимальная скорость - пригодна для непрерывной смены воздуха при
наличии малого количества пара от готовки; отличается бесшумностью
работы.
2. Средняя скорость - пригодна для наибольшей
части условий эксплуатации благодаря отличному
соотношению двух показателей: пропускная способность обработанного воздуха и уровень шума.
1
18
Page 19

УХОД
Противожировые фильтры
ОЧИСТКА ПРОТИВОЖИРОВЫХ МЕТАЛЛИЧЕСКИХ САМОНЕСУЩИХ
ФИЛЬТРОВ
• Фильтры можно мыть в посудомоечной машине. Их следует мыть примерно раз в 2 месяца работы или чаще в
случае особенно интенсивного использования.
• Вынуть всасывающую каретку.
• Вынуть фильтры по одному, отсоединив специальные защелки.
• Осторожно помыть фильтры, чтобы они не согнулись, и
перед установкой дать им просохнуть. (Появляющееся со
временем изменение цвета поверхности фильтра совершенно не влияет на качество его работы.)
• Поставить фильтры на место так, чтобы ручка находилась
с видной наружной стороны.
• Закрыть всасывающую каретку.
Фильтры против запахов (фильтрующая вытяжка)
ЗАМЕНА
Внимание: выключите свет и подождите, пока не остынут
лампочки, прежде чем приступать к замене фильтра против
запахов.
• Эти фильтры нельзя мыть и восстанавливать. Их следует заменять приблизительно каждые 4 месяца работы или чаще в
случае особенно интенсивного использования.
• Вынуть всасывающую каретку.
• Вынуть противожировые фильтры.
• Вынуть фильтр против запахов на активном угле, отсоединив
специальные защелки.
• Установить новый фильтр в положении и закрепить его защелками.
• Поставить на место противожировые фильтры.
• Закрыть всасывающую каретку.
Освещение
ЗАМЕНА ЛАМПОЧЕК
2 лампы 28-40 Вт
• Вынуть металлические противожировые фильтры.
• Отвинтить лампочки и заменить их на новые с такими же
характеристиками.
• Установить металлические противожировые фильтры.
RU
1
19
Page 20

2°
PATARIMAI IR NUORODOS
Naudojimo instrukcijos taikomos kelioms šio prietaiso versijoms. Taigi galite rasti aprašytas tokias
savybes, kurios nebūdingos konkrečiam jūsų prietaisui.
MONTAVIMAS
• Gamintojas nebus atsakingas už jokią žalą, atsiradusią netaisyklingai arba netinkamai sumonta-
vus prietaisą.
• Mažiausiasis saugus atstumas tarp viryklės viršaus ir rinktuvo gaubto yra 650 mm (kai kurie modeliai gali būti montuojami žemiau, žr. paragrafus apie atstumus ir montavimą).
• Patikrinkite, ar tinklo įtampa atitinka įtampą, nurodytą ant techninių duomenų lentelės, esančios
gaubto viduje.
• Patikrinkite, ar I klasės prietaisai yra tinkamai įžeminti .
Rinktuvą prijunkite prie ventiliacijos kanalo, naudokite ne mažesnio kaip 120 mm skersmens
vamzdį. Atstumas nuo garų rinktuvo iki ventiliacijos kanalo turėtų būti kuo trumpesnis.
• Garų rinktuvo nejunkite prie dūmtakių, per kuriuos šalinami degimo metu susidarę dūmai (boilerių,
židinių ir t. t.).
• Jei trauktuvas yra naudojamas kartu su neelektriniais prietaisais (pvz., dujų degimo įrenginiais),
patalpoje turi būti pakankamai geras vėdinimas, kad būtų išvengta išmetamųjų dujų atgalinio srau-
to. Tarp virtuvės ir lauko turi būti tiesioginė orlaidė, kad į patalpą patektų gryno oro. Kai gartraukis
yra naudojamas su įrenginiais, kuriems reikalinga kitokia energijos rūšis (ne elektra), neigiamas
slėgis patalpoje neturi viršyti 0,04 mbar – taip bus užtikrinta, kad gartraukis nestumtų garų į patal-
pą.
• Jei pažeidžiamas elektros kabelis, jį turi pakeisti gamintojas arba techninės priežiūros skyrius, kad
būtų išvengta bet kokių pavojų.
• Jei dujinės viryklės montavimo instrukcijose nurodyta, kad atstumas turi būti didesnis, negu nuro-
dyta anksčiau, į tai turi būti atsižvelgta. Rei-kia laikytis visų ventiliavimo angoms keliamų reikalavimų.
NAUDOJIMAS
• Garų rinktuvas buvo sukurtas naudoti tik namuose virtuvės kvapams šalinti.
• Rinktuvo niekada nenaudokite kitiems tikslams, kurie nen umatyti instrukcijoje.
• Garų rinktuvui veikiant, po juo niekada nepalikite didelės atviros ugnies.
• Sureguliuokite liepsnos intensyvumą taip, kad liepsna būtų nukreipta į keptuvės apačią, ji negali
apimti šonų.
• Naudodami gilią keptuvę, turite būti atidūs, nes perkaitęs aliejus gali užsiliepsnoti.
• Po trauktuvu neruoškite patiekalų, kuriuos reikia užpilti spiritiniu gėrimu ir padegti, nes kyla gaisro
pavojus.
• Šis prietaisas neskirtas naudoti asmenims (įskaitant vaikus), kurių fiziniai, jutiminiai ar protiniai
gebėjimai yra sutrikę, taip pat asmenims, nemokantiems ir nežinantiems, kaip elgtis su prietaisu,
išskyrus atvejus, kai tokius asmeni s prižiūri arba moko už jų saugumą atsakingas žmogus.
• Vaikus reikia prižiūrėti, kad jie su prietaisu nežaistų.
• „ATSARGIAI! Jei viryklės naudojamos, rankomis pa liečiamos dalys gali būti karštos.“
PRIEŽIŪRA
• Prieš atlikdami bet kokius priežiūros darbus, prietaisą išjunkite arba ištraukite kištuką iš elektros
tinklo.
• Po nurodyto laiko išvalykite ir (arba) pakeiskite filtrus (dėl gaisro pavojaus).
• Rinktuvą valykite drėgnu skudurėliu, naudodami neutralų skystą ploviklį.
Ant gaminio arba jo pakuotės esantis simbolis nurodo, kad šis prietaisas nepriskiriamas prie įprastų
buities atliekų. Prietaisas turi būti perduotas į reikiamą surinkimo punktą, užsiimantį elektros ir elektroninės
įrangos perdirbimu. Tinkamai sunaikindami šį gaminį, aplinką ir žmogaus sveikatą apsaugosite nuo galimų
neigiamų pasekmių, kurių gali atsirasti dėl netinkamo šio gaminio utilizavimo. Norėdami gauti daugiau infor-
macijos apie šio gaminio utilizavimą, kreipkitės į miesto institucijas, savo buitinių atliekų tvarkymo tarnybą arba
parduotuvę, kurioje prietaisą nusipirkote.
LT
2
20
Page 21

12e
8
1
12a
20
12a
135
125125
20
PRIETAISO APRAŠYMAS
SUDEDAMOSIOS DALYS
Nr. Kiekis priepaiso datalès
1 1 Gaubtuvo dalis su jungikliais, apšvietimu, traukos anga, filtru
8 1 Oro išėjimo prijungiamosios dalies grotelės
20 1 Baigiamasis elementas
Nr. Kiekis Montavamo dalys
12a 4 Varžtai 4,2 x 44,4
12e 2 Varžtai 2,9 x 9,5
Kiekis Dokumentas
1 Libretto Istruzioni
MONTAVIMAS
Pragręžkite tvirtinimo paviršių ir įstatykite garų surinktuvą
ANGŲ PRAGRĘŽIMAS
• Tarp uždengiamojo tvirtinimo paviršiaus ir prietaiso apačios
turi būti 135 mm atstumas šoninės spintelės atžvilgiu.
• Pragręžkite tvirtinimo paviršių Ø 4.5 mm skersmens grąžto
antgaliu, naudodami gręžimo šabloną (pav.).
• Išpjaukite ant tvirtinimo paviršiaus Ø 125 mm skersmens skylę
(naudokite gręžimo šabloną).
• Tvirtinkite 4 varžtus 12a (4,2x44,4).
• Erdvę tarp gartraukio ir galinės sienos dalies galite uždengti
speciale apdailos detale (20), priveržiant detalę su tam skirtais
varžtais.
LT
APDAILOS DETALĖ
2
21
Page 22

ø 120
Pajungimas
PAJUNGIMAS VENTILIACIJOS - ORO IŠTRAUKIMO REŽIMU
Garų surinktuvo gaubtas montuotojo nuožiūra gali būti jungiamas prie
išorinio vamzdyno (ventiliacijos angos) tvirtu arba lanksčiu vamzdžiu (Ø
120 mm).
• Tvirtasis arba lankstusis vamzdis jungiamas dviem vamzdiniais gnybtais (nėra komplektacijoje).
• Prietaisą pajungiant ventiliacijos - oro ištraukimo režimu reikia pašalinti gaubto viduje esančius aktyviosios anglies filtrus.
PAJUNGIMAS RECIRKULIACIJOS REŽIMU
(REIKALINGAS AKTYVIOSIOS ANGLIES FILTRAS)
• Išpjaukite 125 mm Ø skylę virš garų surinktuvo, viršutinėje plokštės
12e
8
8
125
125
dalyje. (žr. pav.)
• Pritvirtinkite garų surinktuvo tiesų arba lankstų, 120 mm Ø ištraukia-
9
mąjį vamzdį prie viršutinės plokštės dalies. Montavimo darbus turi at-
9
likti kvalifikuotas meistras.
• Vamzdį užtvirtinkite specialiais vamzdiniais gnybtais (nėra komplek-
tacijoje).
• Groteles (8) tvirtinkite 2 varžtais 12e (2,9 x 9,5) prie oro recirkuliacijos
išėjimo angos.
• Užtikrinkite, kad pajungiant prietaisą recirkuliacijos režimu būtų įdėtas
aktyviosios anglies filtras.
• Garų surinktuvą prie elektros tinklo prijunkite per dvipolį jungiklį, tarp kurio atvirų kontaktų susidaro 3 mm tarpelis.
• Pirmą kartą (po montavimo) atidarant prietaiso ištraukiamąją apatinę dalį, ją traukite iki pat galo, kol pasigirs spragtelėji-
mas.
ELEKTROS PRIJUNGIMAS
NAUDOJIMAS
Valdymo skydelis
L
0
M - V
1
0
1
2
3
M-V
L
L Apšvietimas Įjungia ir išjungia apšvietimą.
M Variklis Įjungia ir išjungia gartraukį.
V Greitis Nustato gartraukio darbinį greitį.
1.Mažas greitis: naudojamas nuolatiniam ir tyliam
oro ventiliavimui, kai yra nedaug garų.
2.Vidutinis greitis: tinkamas daugumai darbo
sąlygų, užtikrina tinkamą ventiliuojamo oro srauto
/ triukšmo santykį.
3.Maksimalus greitis: naudojamas garams, susi-
kaupusiems per ilgesnį laiko tarpą, šalinti.
LT
L Apšvietimas Įjungia ir išjungia apšvietimą.
M Variklis Įjungia ir išjungia gartraukį.
V Greitis Nustato gartraukio darbinį greitį.
1.Mažas greitis: naudojamas nuolatiniam ir ty-
liam oro ventiliavimui, kai yra nedaug garų.
2.Vidutinis greitis: tinkamas daugumai darbo
sąlygų, užtikrina tinkamą ventiliuojamo oro srauto
/ triukšmo santykį.
2
22
Page 23

VALYMAS IR PRIEŽIŪRA
Riebalų filtrai
METALINĖS KASETĖS RIEBALŲ FILTRŲ VALYMAS
• Filtrai turi būti valomi kas 2 mėnesius arba dažniau, jei gartraukis naudojamas labai dažnai. Filtrai gali būti plaunami indų
plautuvėje.
• Ištraukite stumdomą traukos skydelį.
• Atjungę tvirtinimo elementus, filtrus vieną po kito išimkite.
• Išplaukite filtrus, stenkitės jų nesulankstyti. Prieš dėdami atgal,
palaukite, kol jie išdžius. (Kartais filtro spalva gali keistis, tačiau ji neturi įtakos filtro darbui).
• Dėdami filtrus pasirūpinkite, kad išorėje būtų matoma rankenė-
lė.
• Uždarykite stumdomą traukos skydelį.
Anglies pluošto filtras (perdirbamas filtras)
ANGLIES PLUOŠTO FILTRŲ KEITIMAS
Įspėjimas! Prieš pakeisdami kvapų filtrą, išjunkite lemputes ir
palaukite, kol jos atvės.
• Šių filtrų negalima plauti ir atnaujinti, jie turi būti keičiami kas
keturis mėnesius arba dažniau, jei gartraukis labai dažnai naudojamas.
• Ištraukite stumdomą traukos skydelį.
• Išimkite riebalų filtrus.
• Išimkite panaudotą anglies pluošto filtrą atleisdami fiksuojamuosius kabliukus.
• Įdėti naują filtrą pritaisant jį savo buvusioje vietoje.
• Pakeiskite riebalų filtrus.
• Uždarykite stumdomą traukos skydelį.
Apšvietimas
APŠVIETIMUI NAUDOJAMA
28W-40W lemputė
• Nuimkite metalinį filtrą atidarant groteles.
• Išsukite blogą lemputę ir tuo pačiu keliu įsukite naują.
• Pakeiskite metalinį filtrą ar uždarykite jį laikančias groteles.
LT
2
23
Page 24

2°
ADVIEZEN EN SUGGESTIES
Deze gebruiksaanwijzing geldt voor verschillende uitvoeringen van het apparaat. Het is
mogelijk dat er een aantal kenmerken worden beschreven die niet van toepassing zijn op
uw apparaat.
INSTALLATIE
• De fabrikant aanvaardt geen enkele aansprakelijkheid voor schade die voortkomt uit onjuiste of niet overeenkomstig de regels der kunst uitgevoerde installaties.
• De minimale veiligheidsafstand tussen de kookplaat en de wasemkap bedraagt 650 mm
(sommige modellen kunnen lager worden geïnstalleerd, raadpleeg de paragrafen afmetingen en installatie).
• Controleer of de netspanning correspondeert met de spanning die aangegeven is op het
plaatje aan de binnenkant van de wasemkap.
• Voor apparaten van klasse I dient u zich ervan te verzekeren dat het elektriciteitsnet in uw
huis over een goede aarding beschikt.
• Verbind de wasemkap met de luchtuitlaat door middel van een leiding met een diameter
van 120 mm of groter. De leiding moet een zo kort mogelijke route afleggen.
• Sluit de wasemkap niet aan op afvoerpijpen van rook die geproduceerd is door verbranding (verwarmingsketels, open haarden etc.).
• Als er in het vertrek zowel de wasemkap als apparaten die niet op elektriciteit werken
(bijvoorbeeld gasapparaten) worden gebruikt, moet ervoor worden gezorgd dat het vertrek
voldoende geventileerd wordt. Indien de keuken geen gat in de buitenmuur heeft om de
aanvoer van schone lucht te garanderen, dient dit gemaakt te worden. Een juist gebruik
zonder gevaren wordt verkregen wanneer de maximale onderdruk in het vertrek niet hoger
is dan 0,04 mbar.
• Om elk risico te voorkomen moet een beschadigde voedingskabel door de fabrikant of
door de technische servicedienst worden vervangen.
• Als de instructies voor installaties voor de gaskooktoestel een grotere afstand boven aangegeven, moet rekening worden gehouden. Alle voorschriften betreffende de afvoer van
lucht moeten in acht worden genomen.
GEBRUIK
• De wasemkap is uitsluitend ontworpen voor huishoudelijk gebruik, voor het elimineren van
kookgeuren. Gebruik de kap nooit op oneigenlijke wijze.
• Laat geen hoog brandende branders onbedekt onder de wasemkap
terwijl deze in werking is.
• Regel de vlammen altijd zo dat ze niet langs de pannen omhoogkomen.
• Controleer frituurpannen tijdens het gebruik: de oververhitte olie zou vlam kunnen vatten.
• Er mag niet onder de afzuigkap geflambeerd worden; brandgevaar
• Dit apparaat mag niet worden gebruikt door personen (inclusief kinderen) met beperkte
psychische, sensorische en geestelijke vermogens, of door personen zonder ervaring en
kennis, tenzij ze onder toezicht staan of worden geïnstrueerd over het gebruik van het apparaat door personen die verantwoordelijk zijn voor hun veiligheid.
• Kinderen moeten worden gecontroleerd om er zeker van te zijn dat ze niet met het apparaat spelen.
• LET OP: de toegankelijke onderdelen kunnen erg warm worden als ze met kookap paraten worden gebruikt.”
ONDERHOUD
• Alvorens onderhoudswerkzaamheden uit te voeren, moet de wasemkap uitgeschakeld
worden door de stekker uit het stopcontact te halen of de hoofdschakelaar om te zetten.
• Voer het onderhoud van de filters altijd tijdig en nauwgezet uit,volgens de aanbevolen
intervallen (Brandgevaar).
• Om de oppervlakken van de kap schoon te maken is het voldoende een vochtige doek en
een neutraal reinigingsmiddel te gebruiken.
Het symbool op het product of op de verpakking wijst erop dat dit product niet als huishoudafval
mag worden behandeld. Het moet echter naar een plaats worden gebracht waar elektrische en
elektronische apparatuur wordt gerecycled. Als u ervoor zorgt dat dit product op de correcte manier
wordt verwijderd, voorkomt u mogelijk voor mens en milieu negatieve gevolgen die zich zouden kunnen
voordoen in geval van verkeerde afvalbehandeling. Voor meer details in verband met het recyclen van
dit product, neemt u het best contact op met de gemeentelijke instanties, het bedrijf of de dienst belast
met de verwijdering van huishoudafval of de winkel waar u het product hebt gekocht.
NL
2
24
Page 25

12e
8
1
12a
20
12a
135
125125
20
EIGENSCHAPPEN
Onderdelen
Ref. Productonderdelen
1 1 Wasemkap compleet met:Bedieningen,
Licht, Ventilatorgroep, Filters
8 1 Richtingrooster luchtuitlaat
20 1 Sluitprofiel
Ref. Installatieonderdelen
12a 4 Schroeven 4,2 x 44,4
12e 2 Schroeven 2,9 x 9,5
Documentatie
1 Gebruiksaanwijzing
INSTALLATIE
Boren van gaten in draagvlak en montage kap
MONTAGE MET SCHROEVEN
• Het draagvlak van de kap moet 135 mm hoger zijn dan het ondervlak
van de hangkastjes.
• Boor een gat van ø 4,5 mm in de drager met behulp van de bijgeleverde
boormal.
• Boor een gat van ø 125 mm in het draagvlak met behulp van de bijgeleverde boormal.
• Bevestig met de 4 bijgeleverde schroeven 12a (4,2 x 44,4).
• De ruimte tussen de rand van de kap en de achterwand kan worden afgesloten met behulp van het bijgeleverde profiel 20 met de voor dit doel
reeds aanwezige schroeven.
NL
SLUITPROFIEL
2
25
Page 26

ø 120
Aansluitingen
LUCHTUITLAAT AFZUIGVERSIE
Bij installatie in afzuigversie, moet u de wasemkap met de uitlaatleiding
verbinden door middel van een starre of buigzame leiding van ø 120 mm,
naar keuze van de installateur.
• Zet de leiding vast met geschikt leidingklemmen. Het benodigde materiaal wordt niet bij de wasemkap geleverd.
• Verwijder de eventuele geurfilters met actieve koolstof.
LUCHTUITLAAT FILTERVERSIE
• Boor een gat van ø 125 mm in de eventuele plank boven de kap.
• Verbind de flens met de uitlaatopening op de plank boven de kap met
behulp van een starre of flexibele leiding van ø120 mm.
• Zet de leiding vast met geschikte leidingklemmen. Het benodigde
materiaal wordt niet bij de wasemkap geleverd.
• Bevestig het richtingsrooster 8 op de uitlaat van de gerecirculeerde
lucht met 2 van de bijgeleverde schroeven 12e (2,9 x 9,5).
• Verzeker u ervan dat het geurfilter met actieve koolstof geïnstalleerd is.
ELEKTRISCHE AANSLUITINGETTRICA
• Sluit de wasemkap aan op de netspanning met een tweepolige schakelaar ertussen met een opening tussen de contacten
van tenminste 3 mm.
• Nadat u de kap geïnstalleerd heeft, moet u het uitschuifbare gedeelte de eerste keer met kracht naar buiten trekken tot het
niet verder kan en u een klik hoort.
12e
8
8
125
125
9
9
GEBRUIK
L
0
M - V
1
0
1
2
3
Bedieningspaneel
M-V
L
L Lichten Hiermee schakelt u de erlichting aan en uit.
M Motor Hiermee schakelt u de afzuigmotor aan en
uit.
V Snelheid Instelling van de werkingssnelheid:
1. Minimumsnelheid, geschikt voor een continue en
zeer stille luchtverversing, als er weinig kookdampen zijn.
2. Gemiddelde snelheid, geschikt voor de meeste
gebruiksomstandigheden, gezien de uitstekende
verhouding tussen de hoeveelheid behandelde lucht
en het geluidsniveau.
3. Maximumsnelheid, geschikt om de grootste
kookdampen tegen te gaan, ook voor langere tijd.
NL
L Lichten Hiermee schakelt u de erlichting aan en uit.
M Motor Hiermee schakelt u de afzuigmotor aan en
uit.
V Snelheid Instelling van de werkingssnelheid:
1. Minimumsnelheid, geschikt voor een continue en
zeer stille luchtverversing, als er weinig kookdampen zijn.
2. Gemiddelde snelheid, geschikt voor de meeste
gebruiksomstandigheden, gezien de uitstekende
verhouding tussen de hoeveelheid behandelde lucht
en het geluidsniveau.
2
26
Page 27

ONDERHOUD
Vetfilters
REINIGING VAN DE METALEN ZELFDRAGENDE VETFILTERS
• Deze filters moeten minstens om de 2 maanden of, bij een bijzonder intensief gebruik vaker, gereinigd worden. Ze kunnen
ook in de vaatwasmachine afgewassen worden.
• Trek de rolletjes met de zuiggroep naar voren.
• Verwijder de filters één voor één door aan de hiervoor bestemde
hendeltjes te trekken.
• Was de filters zonder ze te vouwen en laat ze drogen alvorens ze
weer terug te plaatsen. (Een eventuele kleursverandering van het
oppervlak van de filters, die na verloop van tijd kan optreden,
heeft absoluut geen invloed op de goede werking ervan.)
• Plaats de vetfilters terug, maar let erop dat de handgreep goed
zichtbaar blijft.
• Sluit opnieuw de zuiggroep.
Geurfilter (Filterversie)
VERVANGING
Let op: schakel de lichten uit en wacht tot de lampen zijn afgekoeld, voordat u het geurfilter vervangt.
• Deze filter kan niet gewassen of geregenereerd worden en moet
ongeveer om de 4 maanden vervangen worden. Indien U de wasemkap zeer intensief gebruikt, moet U de filter zelfs vaker vervangen.
• Trek de rolletjes met de zuiggroep naar voren.
• Verwijder de vetfilters.
• Verwijder de verzadigde geurfilter met actieve koolstof door aan
de hiervoor bestemde hendeltjes te trekken.
• Monteer het nieuwe filter door het op zijn plaats vast te drukken.
• Plaats opnieuw de vetfilters.
• Sluit opnieuw de zuiggroep.
Verlichting
VERVANGING VAN DE LAMPEN
Gloeilampen van 28W-40W
• Verwijder de metalen vetfilters.
• Schroef de lampen los en vervang ze door nieuwe lampen met
dezelfde eigenschappen.
• Plaats de metalen vetfilters terug.
NL
2
27
Page 28

2°
RÅD OG ANVISNINGER
Denne brugervejledning gælder for flere versioner af apparatet.
Der fremstilles muligvis enkelte dele af tilbehøret, der ikke vedrører jeres apparat.
INSTALLATION
• Producenten k an ikke holdes ansvarlig for eventuelle skader, der skyldes ukorrekt eller forkert installation.
• Den mindst tilladelige sikkerhedsafstand mellem komfurets top og emhættens underside er 650 mm
(nogle modeller kan installeres lavere, jævnfør afsnittene vedrørende ydre mål og installation).
• Kontrollér, at lysnetspændingen er den samme som den spænding, der er angivet mærkepladen, der
sidder på inde i emhætten.
• For Klasse I apparat er skal det også kontrolleres, at elforsyningen er forsynet me d jord.
• Emhætten kobles til aftrækskanalen ved hjælp af et rør med en min.-diameter på 120 mm. Afstanden fra
emhætten til kanalen skal være så ko rt som mulig.
• Emhætten må ikke t ilsluttes en kanal, der fører forbrændingsgasser ud i det f ri (oliefyr, brændeovne etc.).
• Hvis emhætten skal anvendes i forbindelse med ikke-elektriske apparater (f.eks. gaskomfur, gaskogeblus), skal det sikres, at luf ttilgangen til rummet er tilstrækkelig, så aftræksga sserne ikke slår tilbage. Køkkenet skal have en åbning, der har direkte forbindelse til det fri, så der er sikret en tilstrækkelig mængde ren
luft. Der opnås en korrekt, risikofri anvendelse, når det maksimale undertryk i rummet ikke overstiger 0,04
mBar.
• Hvis forsyningskablet er defekt, skal det erstattes af fabrikanten eller af det tekniske servicecenter for at
forebygge enhver risiko.
• Hvis der i gaskogepladens installationsvejledning er angivet en større afstand end den ovenstående, skal
der tages højde for dette. Overh old alle lovbestemmelser vedrørende luftudledni ng.
ANVENDELSE
• Emhætten er ude lukkende beregnet til at fjerne em og lugte i køkken er i private husholdninger.
• Emhætten må kun a nvendes til det formål, hvortil den er konstrueret.
• Der må ikke forek omme høj åben ild under emhætten, mens den anvendes.
• Justér brænderen, så fl ammerne er rettet direkte mod bunden af panden/gryden – de må ikke nå ud over
kanten af bunden.
• Frituregryder skal under brug holdes under konstant opsyn: kogende varm olie kan sprøjte ind i flammerne.
• Emhætten må ikk e anvendes af børn og personer, som ikke ved, hvordan den betjenes.
• Apparatet er ikke beregnet til at skulle anvendes af mindre børn eller svækkede personer uden opsyn.
• Undlad at fl ambere retter under emhætten; der opstår ellers brandfare.
• Dette apparat må ikke anvendes af personer (derunder børn) med nedsatte psykiske, sensoriske eller
sindsmæssige evner, eller personer uden erfaring eller tilstrækkeligt kendskab, med mindre de overvåges
eller oplæres i brug af apparatet af personer, der er ansvarlige for deres sikkerhed.
• Børn skal overvåges f or at undgå, at de leger med apparatet.
• ”GIV AGT: De t ilgængelige dele kan blive meget varme, hvis de an vendes med kogeapparater.”
VEDLIGEHOLDELSE
• Inden apparatet skal vedligeholdes eller rengøres, skal der slukkes for det eller stikket skal tages ud af
stikkontakten.
• Rengør og/eller udskift filtrene iht. det angivne tidinterval (Brandbare).
• Rengør emhætt en ved hjælp af en fugtig klud og et neutralt f lydende rengøringsmiddel.
Symbolet på produktet eller på pakken angiver, at dette produkt ikke må behandles som husholdningsaffald. Det skal i stedet overgives til en affaldsstation for behandling af elektrisk og elektronisk udstyr. Ved at
sørge for at dette produkt bliver bortskaffet på den rette måde, hjælper du med til at forebygge eventuelle
negative påvirkninger af miljøet og af personers helbred, der ellers kunne forårsages af forkert bortskaffelse af
dette produkt. Kontakt det lokale kommunekontor, affaldsselskab eller den forretning, hvor produkt er købt, for
yderligere oplysninger om genanvendelse af dette produkt.
DK
2
28
Page 29

12e
8
1
12a
20
12a
135
125125
20
APPARATBESKRIVELSE
Komponenter
Ref. Antal Produktkomponenter
1 1 Emhætte, komplet med Styring, lys, blæser, filtre
8 1 Retningsbestemt luftudtagsrist
20 1 Lukkeelement
Ref. Antal Installationskomponenter
12a 4 Skruer 4,2 x 44,4
12e 2 Skruer 2,9 x 9,5
Antal Dokumentation
1 Brugsanvisning
INSTALLATION
Således bores der i den bærende konstruktionsflade og således anbringes
emhætten
TILPASNING MED SKRUER
• Emhættens støtteflade skal være 135 mm over vægelementernes underflade.
• Bor støttefladen med et ø 4,5 mm borehoved fra den medleverede borekasse.
• Skær et ø 125 mm stor hul på støttefladen ved at bruge den medleverede
borekasse.
• Fastgør ved brug af de 4 skruer 12a (4,2 x 44,4), der er leveret med.
• Afstanden mellem emhættens kant og den bageste væg kan lukkes ved at
bruge element 20, der er medleveret, og bruge skruerne der er beregnet til
det.
DK
LUKKEELEMENT
2
29
Page 30

ø 120
Tilslutninger
AFSKÆRMET UDGAVE LUFTAFTRÆKSYSTEM
Når den afskærmede version installeres, skal emhætten tilsluttes
skorstenen ved hjælp af enten et flex- eller et stift rør ø 120 mm.
Det beslutter installatøren
• Fastgør røret på plads ved hjælp af tilstrækkeligt med rørholdere (ikke medleveret).
• Fjern alle aktive kulfiltre.
RECIRKULATIONS VERSION LUFTAFTRÆK
• Skær et hul ø 125 mm i vægelementet over emhætten.
12e
8
8
• Tilslut emhættens afgang til den øverste del af vægelementet
ved at bruge et fast eller et flexrør, ø 120 mm, hvilket installatøren beslutter.
9
• Fastgør kanalen ved brug af tilstrækkelig mange rørholdere
9
(følger ikke med).
• Faxtgør retningsgitteret 8 på recirkulationsluftaftrækket ved
hjælp af de 2 skruer 12e (2,9 x 9,5), der følger med.
• Sørg for at de aktive kulfiltre er blevet sat ind.
ELEKTRISK TILSLUTNING
• Tilslut emhætten til strømmen via en topolet kontakt med en kontaktafstand på mindst 3 mm.
• Når skydeslæden åbnes for første gang, efter emhætten er installeret, skal den trækkes hurtigt ud, indtil den
klikker.
125
125
BRUG
L
0
M - V
1
0
1
2
3
L Lys Tænder og slukker for belysningen.
M Motor Tænder og slukker for ekstraktorens motor
V Hastighed Sætter ekstraktorens driftshastighed:
1. Lav hastighed, bruges til at give en konstant og lydløs
luftudskiftning, hvis der er lette madlavningsdampe.
2. Middelhastighed, passende til de fleste driftbetingelser, forudsat et optimalt forhold mellem behandlet
luft/støjniveau.
3. Højeste hastighed, bruges til at fjerne de madlavningsdampe, der udsendes på højeste varme, inklusive lange perioder.
DK
Betjeningspanel
M-V
L
L Lys Tænder og slukker for belysningen.
M Motor Tænder og slukker for ekstraktorens motor
V Speed Sætter ekstraktorens driftshastighed:
1. Lav hastighed, bruges til at give en konstant og
lydløs luftudskiftning, hvis der er lette madlavningsdampe.
2. Højeste hastighed, bruges til at fjerne de madlavningsdampe, der udsendes på højeste varme, inklusive lange perioder.
3
30
Page 31

VEDLIGEHOLDELSE
Fedtfiltre
RENGØRING AF SELVBÆRENDE FEDTFILTRE AF METAL
• Filtrene kan vaskes i opvaskemaskine og skal rengøres ca. hver
anden måned ved normalt brug eller oftere, hvis emhætten bruges meget.
• Træk udsugningsgruppen ud.
• Fjern filtrene ét af gangen ved at trykke på de specielle holdere.
• Vask filtrene uden at bøje dem og lad dem tørre helt, inden de
monteres igen. (Hvis filtrets overflade skulle skifte farve i tidens løb, har dette ingen indflydelse på filtrets effektivitet.)
• Når filtrene monteres igen, skal man sørge for, at håndtaget
vender den synlige del udad.
• Luk udsugningsgruppen til igen.
Lugtabsorberende filtre (Recirkulation gennem filter)
UDSKIFTNING
Advarsel: Sluk lyset. Udskift det aktive kulfilter, når pærerne er
afkølet.
• Disse filtre kan ikke vaskes og bruges igen, men skal udskiftes
ca. hver 4. måned eller oftere ved særligt intens brug.
• Træk udsugningsgruppen ud.
• Fjern fedtfiltrene.
• Tag de opbrugte lugtabsorberende kulfiltre ud ved at trykke på
de specielle holdere.
• Fastgør det nye filter ved at hægte ind på plads
• Monter fedtfiltrene igen.
• Luk udsugningsgruppen til igen.
Lys
UDSKIFTNING AF LYS
28W-40W glødelys.
• Tag fedtfiltrene af metal ud
• Skru pærerne af og erstat dem med nye med de samme egenskaber.
• Sæt metalfedtfiltrene på plads igen.
DK
3
31
Page 32

2°
ΣΥΜΒΟΥΛΕΣ ΚΑΙ ΣΥΣΤΑΣΕΙΣ
Το παρόν εγχειρίδιο οδηγιών χρήσης αναφέρεται σε πολλά μοντέλα της συσκευής. Είναι δυνατό να
περιγράφονται διάφορα εξαρτήματα του εξοπλισμού, που δεν αφορούν τη συσκευή σας.
ΕΓΚΑΤΑΣΤΑΣΗ
• Ο κατασκευαστής δεν φέρει καμία ευθύνη για βλάβες που οφείλονται σε λανθασμένη εγκατάσταση
ή στη μη τήρηση των κανόνων της τεχνικής.
• Η ελάχιστη απόσταση ασφαλείας μεταξύ της επιφάνειας των εστιών και του απορροφητήρα πρέπει
να είναι 650 mm (ορισμένα μοντέλα μπορούν να εγκατασταθούν σε μικρότερο ύψος, ανατρέξτε στις
παραγράφους με τις διαστάσεις
• Βεβαιωθείτε ότι η τάση του δικτύου αντιστοιχεί στην τιμή που αναγράφεται στην πινακίδα στο εσωτερικό του απορροφητήρα.
• Για συσκευές κλάσης I βεβαιωθείτε ότι η οικιακή ηλεκτρική εγκατάσταση εξασφαλίζει σωστή γείωση.
• Συνδέστε τον απορροφητήρα στον αγωγό απαγωγής χρησιμοποιώντας σωλήνα με διάμετρο ίση ή
μεγαλύτερη από
• Μη συνδέετε το σωλήνα σε αγωγούς απαγωγής καπναερίων που παράγονται από καύση (λέβητες,
τζάκια κλπ.).
• Σε περίπτωση που στο δωμάτιο εκτός από τον απορροφητήρα χρησιμοποιούνται και συσκευές
που δεν καταναλώνουν ηλεκτρική ενέργεια (π.χ. συσκευές καύσης αερίου), θα
προβλέπεται επαρκής αερισμός του χώρου. Εάν η κουζίνα δεν διαθέτει ανοίγματα,
δημιουργήστε ένα άνοιγμα που να επικοινωνεί με το εξωτερικό για να εξασφαλίζεται η είσοδος
καθαρού αέρα. Μια κατάλληλη και χωρίς κινδύνους χρήση επιτυγχάνεται όταν η μέγιστη
υποπίεση του δωματίου δεν υπερβαίνει τα 0,04 mBar.
• Σε περίπτωση ζημιάς του ηλεκτρικού
κατασκευαστή ή από το σέρβις, ώστε να προληφθεί κάθε κίνδυνος.
• Αν οι οδηγίες εγκατάστασης της συσκευής μαγειρέματος με υγραέριο υποδεικνύουν ότι απαιτείται απόσταση μεγαλύτερη από εκείνη που αναφέρεται παραπάνω, είναι απαραίτητο να τις λάβετε υπόψη. Πρέπει να τηρείτε όλους τους κανονισμούς
120 mm. Η διαδρομή του σωλήνα πρέπει να είναι όσο το δυνατόν συντομότερη.
ΧΡΗΣΗ
• Ο απορροφητήρας έχει μελετηθεί αποκλειστικά για οικιακή χρήση και για την απαγωγή των οσμών
της κουζίνας.
• Μη χρησιμοποιείτε ποτέ για άλλες χρήσεις τον απορροφητήρα.
• Μην αφήνετε ελεύθερες φλόγες μεγάλης έντασης κάτω από τον απορροφητήρα όταν λειτουργεί.
• Ρυθμίζετε πάντα τις φλόγες έτσι ώστε να μην προεξέχουν πολύ από τον πάτο
• Ελέγχετε τις φριτέζες όταν χρησιμοποιούνται: το καυτό λάδι μπορεί να πάρει φωτιά.
• Μην μαγειρεύετε φαγητά φλαμπέ κάτω από τον απορροφητήρα της κουζίνας. Υπάρχει κίνδυνος
πυρκαγιάς.
• Αυτή η συσκευή δεν πρέπει να χρησιμοποιείται από άτομα (συμπεριλαμβανομένων των παιδιών)
με μειωμένες ψυχικές ή διανοητικές ικανότητες, ή από άτομα χωρίς
χονται ή εκπαιδεύονται στη χρήση της συσκευής από άτομα που ευθύνονται για την ασφάλειά τους.
• Τα παιδιά πρέπει να επιβλέπονται ώστε να εξασφαλιστεί ότι δεν παίζουν με τη συσκευή.
• "ΠΡΟΣΟΧΗ: Τα προσβάσιμα μέρη μπορεί να έχουν υψηλή θερμοκρασία αν χρησιμοποιούνται με
συσκευές μαγειρέματος."
ΣΥΝΤΗΡΗΣΗ
• Πριν από οποιαδήποτε επέμβαση συντήρησης, αποσυνδέστε τον απορροφητήρα βγάζοντας το φις
από την πρίζα ή γυρνώντας το γενικό διακόπτη.
• Η συντήρηση των φίλτρων πρέπει να εκτελείται σχολαστικά και έγκαιρα στα ενδεδειγμένα χρονικά
διαστήματα (Κίνδυνος πυρκαγιάς).
• Για τον καθαρισμό των επιφανειών του απορροφητήρα αρκεί να χρησιμοποιήσετε ένα υγρό πανί
ουδέτερο υγρό απορρυπαντικό.
και
Το σύµβολο στο προϊόν ή επάνω στη συσκευασία του υποδεικνύει ότι δεν πρέπει να µ εταχειρίζεστε το προϊόν αυτό
ως οικιακό απόρριµµα . Αντιθέτως θα πρέπει να παραδίδεται στο κατάλληλο σηµείο συλλογής για την ανακύκλωση
ηλεκτρικού και ηλεκτρονικού εξοπλισµού. Εξασφαλίζοντας ότι το προϊόν αυτό διατίθεται σωστά, συµβάλλετε στην αποτροπή ενδεχόµενων αρνητικών συνεπειών για το περιβάλλον και την ανθρώπινη υγεία, οι οποίες θα µπορούσαν διαφορετικά
να προκληθούν από ακατάλληλο χειρισµό απόρριψης του προϊόντος αυτού. Για λεπτοµερέστερες πληροφορίες σχετικά µε
την ανακύκλωση του προϊόντος αυτού, επικοινωνήστε µε το δηµαρχείο της περιοχής σας, την τοπική σας υπηρεσία αποκοµιδής οικιακών απορριµµάτων ή µε το κατάστηµα όπου αγοράσατε το προϊόν.
και τις οδηγίες τοποθέτησης).
πρέπει να
καλωδίου, αυτό πρέπει να αντικατασταθεί από τον
αναφορικά με την εκκένωση του αέρα.
των σκευών.
πείρα και γνώση, εκτός εάν ελέγ-
Page 33

12e
8
1
12a
20
12a
135
125125
20
ΧΑΡΑΚΤΗΡΙΣΤΙΚΑ
Εξαρτήματα
Αναφ.Ποσοτ. Εξαρτήματα Προϊόντος
1 1 Σώμα Απορροφητήρα συμπληρώνεται από τον Πίνακα Ελέγχου, το
8 1 Γρίλια Οδήγησης Αέρα Εξόδου
20 1 Στοιχείο κλεισίματος
Αναφ.Ποσοτ. Εξαρτήματα Προϊόντος
12a 4 Βίδες 4,2 x 44,4
12e 2 Βίδες 2,9 x 9,5
Ποσοτ. Τεκμηρίωση
1 Gebruiksaanwijzing
Φωτισμό, τον Ανεμιστήρα, τα Φίλτρα
ΕΓΚΑΤΑΣΤΑΣΗ
Τρυπώντας την επιφάνεια Στήριξης και Στερεώνοντας τον Απορροφητήρα
ΤΟΠΟΘΕΤΗΣΗ ΒΙΔΩΝ
• Η επιφάνεια στήριξης του απορροφητήρα πρέπει να βρίσκεται 135
χιλιοστά πάνω από την κάτω επιφάνεια των μονάδων τοίχου.
• Τρυπήστε την στήριξη με ένα τρυπάνι ø 4,5 χιλιοστών,
χρησιμοποιώντας τον οδηγό που παρέχεται.
• Κόψτε μία τρύπα μεγέθους ø 125 χιλιοστών στην επιφάνεια στήριξης, χρησιμοποιώντας τον οδηγό τρυπήματος
που παρέχεται.
• Στερεώστε χρησιμοποιώντας τις 4 βίδες 12a (4,2 x 44,4)
παρέχονται.
ΣΤΟΙΧΕΙΟ ΚΛΕΙΣΙΜΑΤΟΣ
• Ο χώρος μεταξύ της άκρης του απορροφητήρα και του πίσω τοίχου
μπορεί να καλυφθεί εφαρμόζοντας το στοιχείο 20 που παρέχεται.
GR
που
3
33
Page 34

ø 120
Συνδέσεις
ΕΞΟΔΟΣ ΑΕΡΑ ΜΟΝΤΕΛΟΥ ΑΠΑΓΩΓΗΣ
Για την εγκατάσταση του μοντέλου απαγωγής, συνδέστε τον απορροφητήρα στο σωλήνα εξόδου με έναν άκαμπτο ή εύκαμπτο σωλήνα o120
mm, η επιλογή του οποίου επαφίεται στον εγκαταστάτη.
• Στερεώστε το σωλήνα με κατάλληλα κολάρα. Τα αναγκαίο υλικό δεν
διατίθεται με τον εξοπλισμό.
• Αφαιρέστε τυχόν φίλτρο ενεργού άνθρακα.
ΕΞΟΔΟΣ ΑΕΡΑ ΕΚΔΟΣΗΣ ΕΠΑΝΑΚΥΚΛΟΦΟΡΙΑΣ ΑΕΡΑ
• Κόψτε μία τρύπα ø 125 χιλιοστών στη μονάδα του τοίχου πάνω από
τον απορροφητήρα.
• Συνδέστε την έξοδο του σώματος απορροφητήρα στο πάνω μέρος της
μονάδας τοίχου χρησιμοποιώντας ένα σταθερό ή εύκαμπτο σωλήνα ø
120 χιλιοστών, επιλεγόμενος από τον εγκαταστάτη.
• Στερεώστε το σωλήνα στη θέση του χρησιμοποιώντας σφιγκτήρα
σωλήνων (δεν παρέχεται).
• Στερεώστε τις
χρησιμοποιώντας τις 2 βίδες 12e (2,9 x 9,5) που παρέχονται.
• Σιγουρευτείτε ότι φίλτρα ενεργού άνθρακα έχουν τοποθετηθεί.
γρίλιες οδηγούς 8 στην έξοδο επανακυκλο φορίας αέρα
12e
8
8
9
125
125
9
ΗΛΕΚΤΡΙΚΗ ΣΥΝΔΕΣΗ
• Συνδέστε τον απορροφητήρα στην κεντρική παροχή τροφοδοσίας διαμέσου ενός διπολικού διακόπτη που έχει ένα κενό επαφών τουλάχιστον 3
χιλιοστών.
• Κατά το άνοιγμα της συρόμενης θήκης για πρώτη φορά μετά την τοποθέτηση του απορροφητήρα, τραβήξτε την έξω απότομα μέχρι να κάνει
«κλικ».
ΧΡΗΣΗ
L
0
M - V
1
0
1
2
3
L Φωτισμός Ανάβει και σβήνει το φωτισμό.
M Μοτέρ Ενεργοποιεί και απενεργοποιεί το μοτέρ.
V Ταχύτητα Ρυθμίζει την ταχύτητα λειτουργίας του
απορροφητήρα.
1. Χαμηλή ταχύτητα, χρησιμοποιείται για συνεχής και
ήσυχη εναλλαγή αέρα όταν υπάρχουν ελαφρές οσμές
μαγειρέματος.
2. Μέση ταχύτητα, κατάλληλη για όπως περισσότερες
καταστάσεις λειτουργίας και δίνει την βέλτιστη
αναλογία ροής αέρα/στάθμη θορύβου.
3. Μέγιστη ταχύτητα, χρησιμοποιείται για να απομακρύνει
έντονες οσμές μαγειρέματος, συμπεριλαμβανομένου
μεγάλων χρονικών διαστημάτων.
GR
Πίνακας ελέγχου
M-V
L
L Φωτισμός Ανάβει και σβήνει το φωτισμό.
M Μοτέρ Ενεργοποιεί και απενεργοποιεί το μοτέρ.
V Ταχύτητα Ρυθμίζει την ταχύτητα λειτουργίας του
απορροφητήρα.
1. Χαμηλή ταχύτητα, χρησιμοποιείται για συνεχής και
ήσυχη εναλλαγή αέρα όταν υπάρχουν ελαφρές οσμές
μαγειρέματος.
2. Μέση ταχύτητα, κατάλληλη για όπως περισσότερες
καταστάσεις λειτουργίας και δίνει την βέλτιστη
αναλογία ροής αέρα/στάθμη θορύβου.
3
34
Page 35

ΣΥΝΤΗΡΗΣΗ
Φίλτρα για λίπη
ΚΑΘΑΡΙΣΜΟΣ ΑΥΤΟΦΕΡΟΜΕΝΩΝ ΜΕΤΑΛΛΙΚΩΝ ΦΙΛΤΡΩΝ ΓΙΑ ΛΙΠΗ
• Μπορούν να πλυθούν στο πλυντήριο πιάτων και απαιτούν καθαρισμό
κάθε 2 μήνες χρήσης ή συχνότερα σε περίπτωση ιδιαίτερα συχνής χρήσης.
• Βγάλτε το συρόμενο τμήμα αναρρόφησης.
• Αφαιρείτε τα φίλτρα ένα τη φορά, επεμβαίνοντας στους ειδικούς γά-
ντζους.
• Πλύνετε τα φίλτρα χωρίς να τα στραβώσετε
σουν πριν τα τοποθετήσετε στη θέση τους. (Η ενδεχόμενη αλλαγή χρώματος της επιφάνειας του φίλτρου με την πάροδο του χρόνου, δεν επηρεάζει με κανένα τρόπο την απόδοσή τους.)
• Τοποθετήστε τα έτσι ώστε η λαβή να παραμείνει προς το εξωτερικό μέρος.
• Κλείστε
το συρόμενο τμήμα αναρρόφησης.
Φίλτρα ενεργού άνθρακα (Μοντέλο ανακύκλωσης)
ΑΝΤΙΚΑΤΑΣΤΑΣΗ
Προσοχή: Σβήστε τα φώτα και περιμένετε μέχρι να κρυώσουν οι
λαμπτήρες πριν αντικαταστήσετε το φίλτρο ενεργού άνθρακα.
• Δεν μπορούν να πλυθούν και να αναγεννηθούν και πρέπει να
αντικαθίστανται περίπου κάθε 4 μήνες χρήσης ή συχνότερα σε
περίπτωση ιδιαίτερα συχνής χρήσης.
• Βγάλτε το συρόμενο τμήμα αναρρόφησης.
• Βγάλτε τα φίλτρα
• Βγάλτε το κορεσμένο φίλτρο ενεργού άνθρακα αφού το ελευθερώσετε από τα στηρίγματα.
• Τοποθετήστε το νέο φίλτρο ενεργού άνθρακα στη θέση του.
• Τοποθετήστε τα φίλτρα για λίπη.
• Κλείστε το συρόμενο τμήμα αναρρόφησης.
ενεργού άνθρακα.
και αφήστε τα να στεγνώ-
Φωτισμός
ΑΝΤΙΚΑΤΑΣΤΑΣΗ ΛΑΜΠΤΗΡΩΝ
Λαμπτήρες των 28W-40W.
• Βγάλτε τα μεταλλικά φίλτρα για λίπη.
• Ξεβιδώστε τους λαμπτήρες και αντικαταστήστε τους με νέους
ίδιων χαρακτηριστικών.
• Τοποθετήστε τα μεταλλικά φίλτρα για λίπη.
GR
3
35
Page 36

CONSELHOS E SUGESTÕES
2°
Estas instruções de serviço aplicam-se a vá rios modelos de aparelhos.
É por isso, possível que se encontrem descritas várias características de equipamento que não
dizem respeito ao seu aparelho.
INSTALAÇÃO
• O fabricante declina toda e qualquer responsabilidade pelos danos decorrentes de uma instalação não correcta ou feita não em conformidade com a s normas da boa técnica.
• A distância mínima de segurança entre a placa de cozedura e o exaustor deve ser de 650 mm
(alguns modelos podem ser instalados a uma altura inferior, números referem-se a pegada e instalação).
• Verifique se a tensão da rede coincide com a indicada na placa de características aplicada no
interior do exaustor.
• Para os aparelhos de Classe Ia, certifique-se de que a instalação doméstica garanta uma descarga correcta à terra.
• Ligue o exaustor à saída do ar aspirado utilizando um tubo de diâmetro igual ou superior a 120
mm. O percurso do tubo deve ser o mais breve po ssível.
• Não ligue o exaustor a tubos de descarga de fumaça produzida porcombustão (caldeiras, lareiras, etc...).
• Caso no mesmo local sejam utilizados quer o exaustor, quer aparelhos não accionados pela
corrente eléctrica (por exemplo, aparelhos alimentados a gás), será preciso providenciar uma
ventilação suficiente do aposento. Se a cozinha não possuir uma abertura que comunique com o
exterior, providencie a sua realização para garantir a entrada de ar limpo. Para um emprego
apropriado e sem riscos é necessário que a depressão máxima do local não ultrapase 0,04
mBar.
• No caso de danos no cabo de alimentação, é necessário mandá-lo substituir ao fabricante ou ao
serviço de assistência técnica, a fim de prevenir q uaisquer riscos.
• Se as instruções de instalação do dispositivo de cozedura gás sugerem a necessidade de uma
distância maior do que o indicado acima, é necessário ter em conta. É necessário respeitar todas
as normas referentes às descargas de ar.
USO
• O exaustor foi projectado para ser utilizado exclusivamente em ambientes domésticos, sendo a
sua finalidade a de reduzir os odores de cozedura. Não utili ze o aparelho de maneira imprópria.
• As chamas de forte intensidade não devem ficar descobertas enquanto o exaustor estiver a
funcionar.
• Regule sempre as chamas de maneira que não sobressaiam do fundo das panelas.
• Mantenha as frigideiras sob controlo durante o uso: o óleo excessivamente aquecido pode inflamar-se.
• No prepare alimentos flamejados sob o exaustor. Per igo de incêndio!
• Este aparelho não deve ser utilizado p or pessoas (incluindo crianças) diminuídas psíquica, sensorial ou mentalmente nem por indivíduos sem experiência e conhecimento, salvo se vigiados ou
instruídos para utilização do aparelho por pessoas responsáveis pela respectiva segurança.
• As crianças devem ser vigiada s no sentido de assegurar que não brinquem com o aparelho.
• “ATENÇÃO! As partes acessíveis podem aquecer muito, se forem utilizadas com aparelhos de
cozedura”.
MANUTENÇÃO
• Antes de efectuar qualquer operação de manutenção, desligue o exaustor tirando a ficha da
tomada de corrente ou desligando o interruptor ger al.
• Faça uma manutenção atenta e rápida dos filtros, respeitando os intervalos aconselhados (risco
de incêndio).
• Para limpar as superfícies do exaustor, é suficiente utilizar um pano húmido e detergente líquido
neutro.
O símbolo no produto ou na embalagem indica que este produto não pode ser tratado como lixo doméstico. Em vez disso,
deve ser entregue ao centro de recolha selectiva para a reciclagem de equipamento eléctrico e electrónico. Ao garantir uma eliminação adequada deste produto, irá ajudar a evitar eventuais consequências negativas para o meio ambiente e para a saúde pública,
que, de outra forma, poderiam ser provocadas por um tratamento incorrecto do produto. Para obter informações mais pormenorizadas sobre a reciclagem deste produto, contacte os serviços municipalizados locais, o centro de recolha selectiva da sua área de
residência ou o estabelecimento onde adquiriu o produto.
PT
36
Page 37

CARACTERÍSTICAS
12e
8
1
12a
20
12a
135
125125
20
Componentes
Ref. Qtd Componentes do produto
1 1 Corpo do exaustor equipado com: Comandos iluminação, grupo do
8 1 Grade direccionada de saída do ar
20 1 Perfil de fecho
Ref. Qtd Componentes de instalação
12a 4 Parafusos 4,2 x 44,4
12e 2 Parafusos 2,9 x 9,5
Qtd Documentação
ventilador e filtros
1 Manual de Instruções
INSTALAÇÃO
Perfuração do plano de suporte e montagem do exaustor
MONTAGEM COM PARAFUSOS
• O plano de suporte do exaustor deve ficar numa posição 135 mm mais
alta relativamente ao plano inferior dos móveis suspensos.
• Perfure o suporte com furos de ø 4,5 mm utilizando o gabarito de perfuração fornecido com o aparelho.
• Faça um furo de ø 125 mm no plano de suporte utilizando o gabarito
de perfuração fornecido com o aparelho.
• Fixe com os 4 parafusos 12a (4,2 x 44,4) fornecidos com o aparelho.
•
O espaço entre a borda do exaustor e a parede de fundo pode
ser fechado aplicando o perfil 20 fornecido com o aparelho utilizando os parafusos já preparados para esta finalidade.
PT
PERFIL DE FECHO
37
Page 38

Ligações
ø 120
p
SAÍDA DO AR PARA A VERSÃO ASPIRANTE
Para a instalação na Versão Aspirante, ligue o exaustor
ao tubo de saída utilizando um tubo rígido ou flexível
de ø120 mm; esta escolha deve ser feita pelo instalador.
• Fixe o tubo com braçadeiras de aperto adequadas. O material
necessário não é fornecido com o aparelho.
• Tire os filtros anti-odor de carvão activo, se presentes.
SAÍDA DO AR PARA A VERSÃO FILTRANTE
• Faça um furo de ø 125 mm na prateleira presente acima do
exaustor.
• Ligue a saída do corpo do exaustor com a parte superior do
móvel suspenso utilizando um tubo rígido ou flexível de ø120
mm; esta escolha deve ser feita pelo instalador.
• Fixe a grade direccionada 8 na saída do ar reciclado com 2
parafusos 12e (2,9 x 9,5) fornecidos com o aparelho.
• Certifique-se da presença dos filtros anti-odor de carvão activo.
12e
8
8
125
125
9
9
• Ligue o exaustor à rede de alimentação eléctrica intercalando um interruptor bipolar com abertura mínima
LIGAÇÃO ELÉCTRICA
entre os contactos de 3 mm.
• Tendo instalado o exaustor, para a primeira vez é necessário abrir o carro deslizante com força até perceber
o encaixe do fim de curso.
UTILIZAÇÃO
Quadro de comandos
L
M - V
0
1
0
1
2
3
L Luzes Liga e desliga a Iluminação
M Motor Liga e desliga o motor de exaustão
V Velocidade Determina a velocidade de funci-
onamento:
1. Velocidade mínima, indicada para uma troca
contínua do ar muito silenciosa, se os vapores
de cozedura forem poucos.
2. Velocidade média, indicada para a maior parte
das condições de uso vista a excelente relação
entre o débito do ar tratado e o nível de ruído.
3. Velocidade máxima, indicada para enfrentar
as máximas emissões de vapores de cozedura,
mesmo durante
eríodos prolongados.
L Luzes Liga e desliga a Iluminação
M Motor Liga e desliga o motor de exaustão
V Velocidade Determina a velocidade de funci-
onamento:
1. Velocidade mínima, indicada para uma troca
contínua do ar muito silenciosa, se os vapores
de cozedura forem poucos.
2. Velocidade média, indicada para a maior
parte das condições de uso vista a excelente
relação entre o débito do ar tratado e o nível
de ruído.
M-V
L
PT
38
Page 39

MANUTENÇÃO
Filtros antigordura
LIMPEZA DOS FILTROS METÁLICOS ANTIGORDURA AUTOPORTANTES
• Também podem ser lavados na máquina de lavar louça. Precisam de ser lavados cerca de 2 em 2 meses de utilização ou com
maior frequência em caso de uso muito intenso do aparelho.
• Puxe o carro aspirante para fora.
• Tire os filtros, um de cada vez, manobrando os engates próprios.
• Lave os filtros, evitando dobrá-los, e deixe-os secar antes de os
reinstalar. (A eventual alteração de cor da superfície do filtro
que, com o tempo, se poderá verificar, não prejudica de modo
nenhum a sua eficácia.)
• Reinstale-os, lembrando-se de manter a pega virada para o lado
exterior visível.
• Feche o carro aspirante.
Filtros anti-odores (Versão filtrante)
SUBSTITUIÇÃO
Atenção! Apague as luzes e aguarde que as lâmpadas arrefeçam,
antes de proceder à substituição do filtro anti-odores.
• Não podem ser lavados nem são regeneráveis. Têm de ser
substituídos de 4 em 4 meses de utilização, aproximadamente, ou
com maior frequência em caso de uso muito intenso do aparelho.
• Puxe o carro aspirante para fora.
• Tire os filtros antigordura.
• Remova o filtro anti-odores de carvão activo saturado,
manobrando os respectivos engates.
Instale o novo filtro encaixando-o no respectivo lugar.
• Monte de novo os filtros antigordura.
• Feche de novo o carro aspirante.
Iluminação
SUBSTITUIÇÃO DAS LÂMPADAS
Lâmpadas de 28W-40W
• Tire os filtros metálicos antigordura ou abra a grade portafiltros.
• Desatarraxe as lâmpadas e substitua-as por novas de características iguais.
• Reinstale os filtros metálicos antigordura ou feche a grade porta-filtros.
PT
39
Page 40

UWAGI I SUGESTIE
o
ż
2°
Niniejsza instrukcja obsługi została przygotowana dla różnych wersji urządzenia. M
niektóre ilustracje nie odzwierciedlają dokładnie waszego urządzenia.
MONTAŻ
• Producent nie ponosi żadnej odpowiedzialności za szkody powstałe w wyniku niewłaściwego i
niezgodnego z zasadami techniki montażu.
• Minimalna odległość bezpieczeństwa pomiędzy płytą kuchenną a okapem musi wynosić 650 mm
(niektóre modele mogą być instalowane na niższej wysokości, patrz paragrafy dotyczące usta-
wienia oraz instalacji).
• Sprawdź, czy napięcie w sieci elektrycznej odpowiada danym umieszczonym na tabliczce znamionowej wewnątrz okapu.
• W przypadku urządzeń klasy Ia należy się upewnić, czy domowa instalacja elektryczna gwarantu-
je prawidłowe uziemienie.
• Podłącz okap do wlotu otworu wyciągowego za pomocą rury o średnicy równej lub większej niż
120 mm. Trasa rury powinna być możliwie najkrótsza.
• Nie podłączaj okapu do przewodó w odprowadzających spaliny (z kotłów, kominków, itp.).
• Jeżeli w pomieszczeniu używane są zarówno okap, jak i urządzenia niezasilane energią elek-
tryczną (na przykład urządzenia na gaz), należy zapewnić odpowiednią wentylację pomieszcze-
nia. Jeżeli w kuchni nie ma wywietrzników zapewniających dopływ świeżego powietrza, należy je
wykonać. Bezpieczne użytkowanie okapu jest wówczas, gdy maksymalne podciśnienie w pomieszczeniu nie przekracza 0,04 mbar.
• Jeżeli kabel zasilający zostanie uszkodzony, powinien zostać wymieniony przez producenta lub
wykwalifikowanych pracowników serwisu.
• Jeśli instrukcja instalacji urządzenia do gotowania wskazuje na potrzebę zastosowane większej
odległości, niż podana powyżej, należy to wziąć pod uwagę. Należy przestrzegać wszystkich
norm dotyczących od-prowadzania powietrza.
UŻYTKOWANIE
• Okap został zaprojektowany wyłącznie do użytku domowego, do neutralizacji zapachów kuchennych.
• Nie wolno używać okapu do innych celów.
• Nie pozostawiaj wolnego ognia o dużej intensywności pod załączonym okapem.
• Reguluj zawsze płomienie tak, aby nie wydostawały się one po bokach garnków.
• Nie zostawiaj patelni bez nadzoru podczas ic h użytkowania : przegrzany olej mo że się zapalić.
• Niniejsze urządzenie nie może być używane przez osoby (w tym dzieci) niepełnosprawnie fizycz-
nie lub umysłowo oraz przez bez doświadczenia lub wiedzy na temat jego działania, operatorzy
powinni zostać poinstruowani i skontrolowani we kwestii obsługi urządzenia przez osoby odpo-
wiedzialne za jego bezpieczeństwo.
• Dzieci powinny być nadzorowane, aby upewnić się że nie bawią się urządzeniem.
• „UWAGA: Części zewnętrzne mogą stać się bardzo gorące, jeżeli używane są razem z urządze-
niami przeznaczonymi do gotowania.”
KONSERWACJA
• Przed przystąpieniem do dowolnej czynności konserwacyjnej należy wyłączyć okap z sieci elektrycznej, wyciagając wtyczkę lub wyłączając wyłącznik gówny.
• Wykonuj skrupulatną i częstą konserwację filtra zgodnie z podanym opisem(Niebezpieczeństwo
pożaru).
• Powierzchnie okapu wystarcz y czyścić wilgotną szmatką i neutralnym płynem do mycia.
Symbol na produkcie lub na opakowaniu oznacza, że produktu tego nie można traktować jak zwykłych odpadów, ale należy go zawieźć do punktu zajmującego się likwidacją urządzeń elektrycznych i
elektronicznych. Likwidując produkt w sposób właściwy, przyczyniasz się do zapobiegania ewentualnym
ujemnym wpływom na środowisko i na zdrowie ludzi, które mogłyby powstać w wyniku niewłaściwej jego
likwidacji. Szczegółowe informacje na temat recyclingu tego produktu uzyskasz w urzędzie miasta/gminy, lokalnych instytucjach zajmujących się likwidacja odpadów lub w sklepie, w którym kupileś
produkt.
liwe jest, że
PL
40
Page 41

WŁAŚCIWOŚCI TECHNICZNE
12e
8
1
12a
20
12a
135
125125
20
Części składowe
Odn. Il. Elementy urządzenia
1 1 Korpus okapu wraz z: przyciskami sterowania, oświetleniem, ze-
8 1 Kratka kierunkowa Wyjście powietrza
20 1 Profil zamknięcia
Odn. Il. Elementy montażowe
12a 4 Śruby 4,2 x 44,4
12e 2 Śruby 2,9 x 9,5
Il. Dokumentacja
1 Instrukcja
społem wentylatora, filtrami.
INSTALACJA
Wiercenie i montaż okapu
MONTAŻ NA ŚRUBACH
• Powierzchnia montażu okapu powinna znajdować się o 135
wyżej od pozostałych mebli.
• Przy pomocy znajdującego się w zestawie wzornika, wywiercić otwory ø 4,5 mm.
• Przy pomocy znajdującego się w zestawie wzornika, wykonać
w powierzchni montażowej otwór ø 125 mm.
• Przykręcić przy pomocy 4 śrub 12a (4,2 x 44,4) znajdujących
się w zestawie.
PROFIL ZAMKNIĘCIA
• Miej
sce pomiędzy brzegiem okapu a ścianą można zasłonić
przy pomocy znajdującego się w zestawie profilu 20 oraz śrub
do tego przeznaczonych.
PL
41
Page 42

Podłączenia
ø 120
8
9
125
8
9
125
12e
WYLOT POWIETRZA WERSJA Z WYCIĄGIEM
Aby zainstalować okap w wersji z wyciągiem, należy go pod-
łączyć do rury wylotowej za pomocą sztywnej lub giętkiej rury
ø 120 mm, wyboru rury dokonuje monter.
• Zamocuj rurę odpowiednimi opaskami. Konieczne materiały nie znajdują się w zestawie.
• Wyjmij ewentualne węglowe filtry zapachowe.
PRACA W TRYBIE RECYRKULACJI
• Jeżeli ponad okapem znajduje się półka należy wyciąć w
niej otwór ø 125 mm.
• Połączyć okap z wylotem powietrza zamocowanym w półce
za pomocą giętkiej lub sztywnej rury ø 120 mm.
• Zamocować rurę za pomocą odpowiednich klamer zaciskowych do rur (nie znajdują się w zestawie).
• Zamocować kratkę wentylacyjną 8 na wylocie powietrza w
półce przy użyciu 2 wkrętów 12e (2,9 x 12,7 w zestawie).
• Upewnić się czy zamontowano filtry węglowe.
PODŁĄCZENIE ELEKTRYCZNE
• Przyłącz okap do sieci zasilania, montując wyłącznik dwubiegunowy o otwarciu styków przynajmniej 3 mm.
• Po zainstalowaniu okopu, za pierwszym razem konieczne jest energiczne otwarcie wózka przesuwnego, aż do usłyszenia
trzaśnięcia oznaczającego koniec ruchu.
UŻYTKOWANIE
L
M - V
0
1
0
1
2
3
Tablica sterownicza
M-V
L
L Oświetlenie Włączanie i wyłączanie oświetlenia.
M Silnik Włączanie i wyłączanie silnika zasysania.
V Prędkość Regulacja prędkości:
1.Prędkość minimalna, przystosowana do ciągłej i
cichej wymiany powietrza, dla małej ilości zapachów.
2.Prędkość średnia, przystosowana do większości
warunków użytkowania, optymalna pod względem
przepływu powietrza oraz powstającego hałasu.
3.Prędkość maksymalna, przystosowana do dużej
L Oświetlenie Włączanie i wyłączanie oświetlenia.
M Silnik Włączanie i wyłączanie silnika zasysania.
V Prędk
ość Regulacja prędk
ości:
1.Prędkość minimalna, przystosowana do ciągłej i
cichej wymiany powietrza, dla małej ilości zapachów.
2. Prędkość średnia, przystosowana do większości
warunków użytkowania, optymalna pod względem
przepływu powietrza oraz powstającego hałasu.
emisji zapachów powstających podczas gotowania,
także przez dłuższy czas.
PL
42
Page 43

KONSERWACJA
Filtry tłuszczowe
CZYSZCZENIE KASETOWYCH METALOWYCH FILTRÓW TŁUSZCZOWYCH
• Filtry należy czyścić co 2 miesiące użytkowania, bądź częściej w przypadku intensywnego używania. Możliwe jest czyszczenie ich w zmywarce.
• Wysunąć szufladę okapu.
• Filtry należy zdejmować po kolei, po odbezpieczeniu ich elementów
mocujących.
• Unikać zaginania filtrów podczas mycia. Przed ponownym montażem
wewnątrz okapu, upewnić się, czy są całkowicie suche. (Kolor filtrów
może zmieniać się wskutek mycia, nie wpływa to jednak na ich efektywność)
• Wkładając filtry z powrotem do okapu należy zwrócić uwagę, aby zostały poprawnie zamontowane uchwytem do zewnątrz.
• Wsunąć szufladę okapu.
Filtr węglowy (tryb recyrkulacji)
WYMIANA FILTRA WĘGLOWEGO
Uwaga: Przed przystąpieniem do wymiany filtra anty-
zapachowego, zgasić oświetlenie i odczekać aż żarówki ostygną.
• Tego filtra nie można myć ani regenerować. Należy go wy-
mieniać mniej więcej co 4 miesiące użytkowania lub częściej
w przypadku intensywnego używania.
• Wysunąć szufladę filtra.
• Wyjąć metalowe filtry tłuszczowe.
• Wyjąć nasycony filtr węglowy po zwolnieniu blokad.
• Zamontować nowy filtr.
• Zamontować ponownie metalowe filtry tłuszczowe.
• Wsunąć szufladę filtra.
Oświetlenie
WYMIANA ŻARÓWEK
Żarówki 28W-40W
• Wyjąć metalowe filtry tłuszczowe.
• Wykręcić uszkodzoną żarówkę i wymienić na nową o takich
samych parametrach.
• Zamontować ponownie metalowe filtry tłuszczowe.
PL
43
Page 44

RECOMANDĂRI ŞI SUGESTII
2°
Acest manual cu instrucţiuni pentru utilizare este prevăzut pentru mai multe modele de ' aparat. Este
posibil să fie descrise unele particul arităţi din dotare, care nu privesc aparatul dumneavoastră.
INSTALARE
• Producătorul nu se face responsabil pentru orice avarii produse în urma unei instalări incorecte.
• Respectaţi distanţa de siguranţă de 650 mm între plită şi hotă (unele dintre modele pot fi instalate la o
înălţime inferioară, a se vedea capitolele referitoare la dimensiuni şi instalare).
• Verificaţi dacă voltajul de alimentare corespunde cu cel indicat pe plăcuţa cu date tehnice din interiorul
hotei.
• Pentru aparatele din clasa I, verificaţi dacă sursa de alimentare este prevăzută cu împământare.
• Conectaţi la hotă un furtun de evacuare cu diametrul de minim 120 mm. Acesta trebuie să fie cât mai
scurtă cu putinţă.
• Nu conectaţi hota de evacuare la o conductă ce evacuează gaze de combustie ( de la bolier, cămin,
etc.).
• În cazul în care în cameră se utilizează atât hota, cât şi aparate care nu sunt acţionate de energie
electrică (de exemplu, aparate cu gaz), trebuie să existe o ventilaţie suficientă a mediului. Dacă nu exis-
tă, în bucătărie trebuie realizată o deschidere care comunică cu exteriorul, pentru a asigura intrarea ae-
rului curat. Folosirea corectă şi fără riscuri se obţine atunci când depresiunea maximă în cameră nu
depăşeşte 0,04 mbar.
• Dacă este deteriorat, cablul de alimentare trebuie înlocuit de fabricant sau de serviciul de asistenţă
tehnică, pentru a evit a orice risc.
• Dacă instrucţiunile de instalare a maşinii de gătit pe gaz indică faptul că este necesară o distanţă mai
mare decât cea de mai sus, vă rugăm să le respectaţi. Trebuie să se respecte toate normele privind
evacuarea aerului.
UTILIZARE
• Hota de evacuare a fost realizată numai pentru uz casnic, pentru a elimina mirosurile neplăcute din
bucătărie. Nu utilizaţi hota în alte scopuri decât cel pentru care a fost creată.
• Nu lăsaţi focul deschis nesupravegheat sub hotă atunci când aceasta funcţionează.
• Reglaţi intensitatea flăcării pentru a o direcţiona doar sub recipient.
• Recipientele cu grăsime trebuie să fie supravegheate în continuu: uleiul supraîncins poate lua foc.
• Acest aparat nu trebuie să fie utilizat de către persoane (inclusiv copii) cu capacităţi psihice, senzoriale
sau mentale reduse, sau de către persoane fără experienţe şi cunoştinţe, dacă nu au fost controlaţi
sau instruiţi pentru utilizarea aparatului de către persoanele care răspund pentru siguran ţa lor.
• Copii trebuie să fie supravegheaţi pentru a fii siguri că nu se joacă cu aparatul.
• „ATENŢIE: Părţile accesibile se pot încinge dacă sunt folosite cu aparate de gătit”.
ÎNTREŢINERE
• Opriţi funcţionarea hotei şi scoateţi ştecherul cablului de alimentare înainte de a realiza procedurile de
întreţinere.
• Curăţaţi şi / sau înlocuiţi filtrele după perioada de timp specificată (Risc de incendiu).
• Curăţaţi hota cu ajutorul unui material textil umed şi detergent lichid neutru.
Simbolul pe produs sau pe ambalajul sau semnifica faptul ca acest produs, in cazul in care nu-l mai utilizaţi, nu
trebuie tratat ca un gunoi menajer. El trebuie transferat la centrele de colectare pentru reciclarea echipamentului
electric si electronic. Asigurân du-va ca acest produs este reciclat in mod corect, ajut aţi la prevenirea unor eventuale
consecinţe negative asupra mediului si sanatatii umane, consecinţe care ar putea avea loc in cazul nereciclării
acestui produs. Pentru detalii referitoare la reciclarea acestui produs, contactaţi autorităţile locale sau magazinul de
unde l-aţi cumpărat.
RO
44
Page 45

CARACTERISTICI
12e
8
1
12a
20
12a
135
125125
20
Părţi componente
Nr. ref.Cant. Părţile componente
1 1 Corpul hotei, prevăzut cu: Butoane de control, lumini, ventilator,
8 1 Grilă de evacuare a aerului direcţională
20 1 Element de închidere
Nr. ref.Cant. Elementele pentru instalare
12a 4 Şuruburi 4,2 x 44,4
12e 2 Şuruburi 2,9 x 9,5
Cant. Documentaţie
filtre
1 Manual de utilizare
INSTALAREA
Găurirea suprafeţei suport şi fixarea hotei
PRINDEREA CU ŞURUBURI
• Suprafaţa suport a hotei trebuie să se afle la 135 mm deasupra suprafeţei de jos a
unităţii de pe perete.
•
Găuriţi suportul cu un şpiral cu diametru de 4,5 mm, utilizând tiparul furnizat.
• Tăiaţi un orificiu cu diametru de 125 mm pe suprafaţa suport, cu ajutorul tiparu-
lui furnizat.
• Fixaţi cu ajutorul celor patru şuruburi furnizate 12a (4,2 x 44,4).
ELEMENT DE ÎNC
• Spaţiul dintre marginea hotei şi peretele din spate poate fi închis prin aplicarea
elementului 20 furnizat, cu ajutorul şuruburilor special furnizate în acest scop.
RO
HIDERE
45
Page 46

Conectări
MODUL DE EVACUARE
Atunci când instalaţi hota în modul de evacuare, conectaţi-o la
cămin utilizând o conductă flexibilă cu diametru de 120 mm,
alegerea este a instalatorului.
• Fixaţi conducta cu utilizând suficiente cleme (nu sunt furnizate).
• Îndepărtaţi orice filtru cu carbon.
ø 120
MODUL DE RECIRCULARE
• Tăiaţi un orificiu cu diametrul de 125 mm în perete deasu-
12e
8
8
125
125
pra hotei.
• Conectaţi orificiul de evacuare la partea de sus a unităţi de
9
pe perete cu ajutorul unei conducte rigide sau flexibile cu
9
diametru de 120 mm, care va fi selectată de instalator.
• Fixaţi conducta utilizând suficiente cleme (nu sunt furnizate).
• Fixaţi grila direcţională 8 pe or
ificiul de evacuar
e pentru
recircularea aerului cu ajutorul celor 2 şuruburi 12e furniza-
te (2,9 x 9,5).
• Asiguraţi-vă de faptul că filtrele cu carbon sunt instalate.
CONEXIUNI ELECTRICE
• Conectaţi hota la sursa de alimentare prin intermediul unui comutator cu doi poli ce are o distanţă între contacte de cel
puţin 3 mm.
• Atunci când deschideţi culisaţi hota în afară pentru prima dată după instalare, trageţi până se aude un click.
UTILIZARE
Panoul de control
L
0
L Lumină Porneşte şi opreşte sistemul de iluminare.
M Motor Porneşte şi opreşte motorul.
V Viteză Setează viteza de evacuare:
1.
Viteză mică, utilizată pentru o schimbare lentă şi conti-
nuă a aerului în prezenţa unei cantităţi reduse de
abur.
2. Viteză medie, potrivită pentru majoritatea condiţiilor de
utilizare, oferind un raport optim de aer / zgomot.
3. Viteza maximă, utilizată pentru eliminarea vaporilor
produşi în timpul preparării îndelungate a alimente-
lor.
M - V
1
0
1
2
3
M-V
L
L Lumină Porneşte şi opreşte sistemul de iluminare.
M Motor Porneşte şi opreşte motorul.
V Viteză Setează viteza de evacuare:
1. Viteză mică, utilizată pentru o schimbare lentă şi conti-
nuă
a aerului în prezenţa unei cantităţi reduse de
abur.
2. Viteza maximă, utilizată pentru eliminarea vaporilor
produşi în timpul preparării îndelungate a alimente-
lor.
RO
46
Page 47

ÎNTREŢINERE
Filtrele de grăsime
CURĂŢIREA CASETEI METALICE A FILTRELOR DE GRĂSIME
• Filtrele trebuie curăţate o dată la 2 luni, sau mai frecvent în cazul
folosirii mai intense a hotei. Filtrele se pot spăla în maşina de spă-
lat vase.
• Scoateţi panoul de aspirare glisant.
• Scoateţi filtrele unul câte unul, după deconectarea elementelor de
fixare respective.
• Spalaţi filtrele, având grijă să nu le îndoiţi. Lăsaţi-le să se usuce
înainte de a le pune la loc. (Culoar
timp dar aceasta nu influenţează eficienţa filtrului).
• Când puneţi la loc filtrele, asiguraţi-vă că mânerul este vizibil în
exterior.
• Închideţi panoul de aspirare glisant.
Filtrul de cărbune (versiunea reciclare)
ÎNLOCUIREA FILTRELOR DE CĂRBUNE
Atenţie: Stingeţi luminile şi aşteptaţi răcirea lămpilor înainte de a
înlocui filtrul anti-miros.
• Aceste filtre nu se pot spală şi nu pot fi regenerate, deci trebuie
să fie înlocuite o dată la 4 luni sau mai frecvent în cazul unei
utilizări foarte frecvente.
• Trageţi de panoul de aspiratie glisant.
• Scoateţi filtrele de grăsime.
• Scoateţi filtrul de cărbune saturat eliberând cârligele de fixare.
• Montaţi filtrul nou prinzându-l în locaşul său.
• Înlocuiţi filtrele de grăsime.
• Închideţi panoul de aspiraţie glisant.
ea filtrului se poate schimba în
Iluminare
ÎNLOCUIREA BECULUI
Becuri de 28W-40W.
• Scoateţi filtrele de gră
a filtrului.
• Deşur
ubaţi becul şi înlocuiţi-l cu unul cu acelaşi caracteristici.
• Puneţi la loc filtrele de grăsi
nere al filtrului.
sime metalice sau deschideţi grilajul de susţinere
me metalice sau închideţi grilajul de susţi-
RO
47
Page 48

CONSEJOS Y SUGERENCIAS
2°
Las presentes instrucciones de servicio son válidas para diferentes modelos de aparato; por ello
puede ser posible que se describan detalles y características de equipamiento que no concuerden íntegramente con las de su apa rato concreto.
INSTALACIÓN
• El fabricante declina cualquier responsabilidad debida a los daños provocados por una instalación
incorrecta o no conforme con las reglas.
• La distancia mínima de seguridad entre la encimera y la campana debe ser de 650mm (algunos
modelos pueden ser instalados a una altura por debajo, se refieren al párrafo huella y la instalación).
• Comprobar que la tensión de red corresponda a la indicada en la placa situada en el interior de la
campana.
• Para los aparatos Clase I asegurarse de que la instalación eléctrica doméstica posea una toma de
tierra eficaz.
• Conectar la campana a la salida del aire de aspiración mediante un tubo de 120mm de diámetro
como mínimo. El recorrido del tubo debe ser lo más corto posible.
• No conectar la campana a tubos de descarga de humos producidos por combustión (calderas, chimeneas, etc.).
• En el caso que en la cocina se utilice de manera silmultánea la campana y otros aparatos no eléctricos (por ejemplo aparatos de gas), debe existir un sistema de ventilación suficiente para todo el ambiente. Si la cocina no posee un orificio que comunique con el exterior, hay que realizarlo para garantizar el recambio del aire. Un uso propio y sin riesgos se obtiene cuando la depresión máxima del local
no supera los 0,04 mBar.
• En el caso se dañe el cable de alimentación, éste debe ser sustituido por el constructor o por el servicio de asistencia técnica, para prevenir cualquier riesgo.
• Si las instrucciones de instalación del dispositivo de cocción de gas sugieren la necesidad de una
distancia mayor que la indicada anteriormente, es necesario tenerlas en cuenta. Es necesario respetar todas las normativas relativas al conducto de descarga del aire.
USO
• La campana ha sido concebida exclusivamente para un uso doméstico, para eliminar los olores de la
cocina. No utilizarla de maner a inadecuada.
• No dejar llamas libres de fuerte intensidad mientras la campana esté funcionando.
• Regular siempre las llamas de manera que éstas no sobresalgan lateralmente con respecto al fondo
de las ollas.
• Controlar las freídoras durante su uso: el aceite muy caliente se puede inflamar.
• No flambear bajo la campana extractora.
• Este aparato no tiene que ser utilizado por personas (niños incluídos) con capacidades psíquicas,
sensoriales o mentales reducidas, o bien por personas sin experiencia y conocimientos en la materia,
a menos que no lo hagan bajo el control, o instruídos, por personas responsables de su seguridad.
• Controlar que los niños no jueguen con el aparato.
• “ATENCIÓN: Las partes accesibles pueden calentarse mucho si utilizadas con aparatos de cocción.”
MANTENIMIENTO
• Antes de efectuar cualquier operación de mantenimiento, desenchufar la campana de la red eléctrica
o apagar el interruptor gener al.
• Efectuar un mantenimiento escrupuloso e inmediato de los filtros, según los intervalos de tiempo
aconsejados (riesgo de incendio).
• Para limpiar las superficies de la campana es suficiente utilizar un trapo mojado y detergente líquido
neutro.
El símbolo en el producto o en su embalaje indica que este producto no se puede tratar como
desperdicios normales del hogar. Este producto se debe entregar al punto de recolección de equipos
eléctricos y electrónicos para reciclaje. Al asegurarse de que este producto se deseche correctamente,
usted ayudará a evitar posibles consecuencias negativas para el ambiente y la salud pública, lo cual
podría ocurrir si este producto no se manipula de forma adecuada. Para obtener información más detallada sobre el reciclaje de este producto, póngase en contacto con la administración de su ciudad, con
su servicio de desechos del hogar o con la tienda donde compró el producto.
ES
48
Page 49

CARACTERÍSTICAS
12e
8
1
12a
20
12a
135
125125
20
Componentes
Ref. Cant. Componentes del producto
1 1 Cuerpo campana dotado con:mandos,luz,grupo de ventila-
8 1 Rejilla de dirección de salida del aire
20 1 Perfil de cierre
Ref. Cant. Componentes de instalación
12a 4 Tornillos 4,2 x 44
12e 2 Tornillos 2,9 x 12,7
Cant. Documentación
ción,filtros.
1 Manual de instrucciones
INSTALACIÓN
Taladrado de la superficie de soporte y montaje de la campana
MONTAJE CON TORNILLOS
• La superficie de soporte de la campana debe encontrarse 135
mm por encima de la superficie inferior del mueble colgante.
• Taladrar ø 4,5 mm el soporte utilizando la plantilla de perforación suministrada en dotación.
• Hacer un orificio ø 125 mm en la superficie de soporte, usando
la plantilla de perforación suministrada en dotación.
• Fijar con los 4 tornillos 12a (4,2 x 44,4) en dotación.
• El espacio entre
ES
puede cerrar aplicando el perfil 20 en dotación con los tornillos
ya predispuestos para este objeto.
PERFIL DE CIERRE
el borde de la campana y la pared de fondo se
49
Page 50

Conexiones
ø 120
SALIDA DEL AIRE VERSIÓN ASPIRANTE
Para la instalación de la versión aspirante, conectar la campana al tubo de
salida mediante un tubo rígido o flexible de ø120 mm, a discreción del
instalador.
• Fijar el tubo con abrazaderas adecuadas. Este material no se proporciona en dotación.
• Quitar los filtros antiolor al carbón activo.
SALIDA DEL AIRE VERSIÓN FILTRANTE
• Realizar un orificio de ø 125 mm en la repisa de encima de la campa-
12e
8
8
125
125
na.
• Conectar la salida del cuerpo de la campana con la parte superior del
9
mueble colgante mediante un tubo rígido o flexible de ø120 mm, a dis-
9
creción del instalador.
• Fijar el tubo con abrazaderas adecuadas. Este material no se proporciona en dotación.
• Fijar la rejilla de dirección 8 en la salida del aire reciclado mediante los
2 tornillos 12e (2,9 x 12,7) en dotación.
• Controlar que estén presentes los Filtros Antiolor al Carbón activo.
CONEXIÓN ELÉCTRICA
• Conectar la campana a la red de alimentación eléctrica instalando un interruptor bipolar con apertura de los contactos de 3
mm como mínimo.
• Tras instalar la campana, la primera vez hay que abrir el carro desplazable enérgicamente hasta que se oiga el clic del final
de carrera.
USO
L
0
M - V
1
0
1
2
3
L Luces Enciende y apaga la instalación de ilumi-
nación.
M Motor Enciende y apaga el motor de aspiración
V Velocidad Determina las velocidades de ejercicio:
1. Velocidad mínima, indicada para un recambio de
aire continuo muy silencioso, en presencia de pocos vapores de cocción.
2. Velocidad media, indicada para la mayor parte de
las condiciones de uso, gracias a la óptima relación
entre caudal de aire tratado y nivel de ruido.
3. Velocidad máxima, indicada para hacer frente a
grandes cantidades de vapor de cocción, incluso
para tiempos prolongados.
Panel de mandos
M-V
L
L Luces Enciende y apaga la instalación de ilumi-
nación.
M Motor Enciende y apaga el motor de aspiración
V Velocidad Determina las velocidades de ejercicio:
1. Velocidad mínima, indicada para un recambio de
aire continuo muy silencioso, en presencia de pocos vapores de cocción.
2. Velocidad media, indicada para la mayor parte de
las condiciones de uso, gracias a la óptima relación
entre caudal de aire tratado y nivel de ruido.
ES
50
Page 51

MANTENIMIENTO
Filtros antigrasa
LIMPIEZA DE LOS FILTROS ANTIGRASA METÁLICOS
• Se pueden lavar en el lavavajillas y requieren un lavado cada 2
meses aproximadamente o más a menudo si su uso es muy intenso.
• Abrir el carro aspirante.
• Quitar los filtros uno por vez, operando en los enganches correspondientes.
• Lavar los filtros evitando que se doblen y dejarlos secar antes
de volverlos a montar (si la superficie de los filtros cambia de
color, no influye en el correcto funcionamiento y eficacia de
los filtros).
• Montar los filtros prestando atención en mantener la manija
hacia la parte visible exterior.
• Cerrar el carro aspirante.
Filtro antiolor (Versión filtrante)
SUSTITUCIÓN
Atención : Apagar las luces y esperar el enfriamiento de las lámparas antes de efectuar la sustitución del filtro antiolor.
• No se puede lavar ni regenerar, se debe cambiar cada 4 meses
aproximadamente. La señal de alarma se produce solo cuando
el motor de aspiración está funcionando.
• Abrir el carro aspirante.
• Quitar los filtros antigrasa metálicos.
• Quitar el filtro antiolor de carbón activo saturado, de la manera
indicada.
• Montar el nuevo filtro enganchándolo en su asiento.
• Montar nuevamente los filtros antigrasa.
• Cerrar el carro aspirante.
Iluminación
SUSTITUCIÓN DE LAS LÁMPARAS
Lámparas de 28W-40W
• Quitar los filtros antigrasa metálicos, o abrir la rejilla portafiltros.
• Destornillar las lámparas y sustituirlas con nuevas que tengan
las mismas características.
• Montar nuevamente los filtros antigrasa metálicos, o cerrar la
rejilla portafiltros.
ES
51
Page 52

СЪВЕТИ И ТРИКОВЕ
2°
Упътването за ползване се отнася за няколко варианта на този уред. Съответно, можете да намерите
описания на отделни функции, които не се отнасят за вашия специфичен уред.
МОНТАЖ
• Производителят няма да бъде считан за отговорен във връзка с каквито и да е щети, произтичащи от
неправилен или неподходящ монтаж.
• Минималното разстояние между горната част на печката и аспиратора е 650 mm (някои модели могат
да бъдат монтирани на по-малка височина, моля вижте параграфите за работните размери и
монтажа).
• Проверете да
закрепена от вътрешната страна на аспиратора.
• При уредите от Клас I проверете дали електрозахранването в дома гарантира съответно заземяване.
Свържете аспиратора към комина чрез тръба с минимален диаметър 120 mm. Осигурете колкото е
възможно по-малка дължина на тръбата.
• Не свързвайте аспиратора към ком
(бойлери, камини и т.н.).
• Ако аспираторът се използва съвместно с неелектрически уреди (например газови уреди), е необхо-
димо да осигурите достатъчна въздушна циркулация в помещението, за да предотвратите връщането на изпусканите газове. Кухнята трябва да има не
тъпване на свеж въздух. Когато аспираторът се използва заедно с уреди, захранвани с енергия, раз-
лична от електричество, отрицателното налягане в стаята не трябва да надвишава 0,04 mbar, за предотвратяване връщането на дим в стаята през аспиратора.
• В случай на повреда в захранващия кабе
отдела за техническо обслужване, с цел предотвратяване на каквито и да е рискове.
• Ако указанията за монтаж на газовата печка посочват, че е нужно разстояние, по-голямо от
посоченото по-горе, трябва да се вземе предвид това разстояние. Всички норми за про
трябва да б
УПОТРЕБА
• Аспираторът е създаден изключително за домакински нужди за премахване на кухненските миризми.
• Никога не го използвайте за други цели, освен по предназначение.
• При работа на аспиратора под него никога не трябва да има висок пламък.
• Регулирайте интензивността на пламъка, за да го насочите само към долната страна на домакинския
съ
• Наблюдавайте непрекъснато фритюрниците по време на употреба: прегрятото олио може да избухне
в пламъци.
• Не правете фламбе под аспиратора поради риск от пожар.
• Уредът не е предназначен за използване от лица (включително деца) с намалени физически, сетивни
или ум
или инструктирани от отговорно за тяхната безопасност лице.
• Децата трябва да бъдат наблюдавани, за да сте сигурни, че не си играят с уреда.
• “ ВН
ПОДДРЪЖКА
• Изключвайте уреда или изваждайте щепсела от уреда, преди да извършите дейности по неговата
поддръжка.
• Почиствайте и/или сменяйте филтрите след указания срок (Опасност от пожар).
• Почиствайте аспиратора с влажна кърпа и неутрален течен препарат.
ли за
хранващото напрежение съответства на посоченото на табелката с данни,
ин
и, през които се осъществява изпускане на дим от горене
посредствен изла
л, той тр
ябва да бъде заменен от производителя или от
ъдат спазени.
д и се уверете се,
ИМАНИЕ: Достъпните части могат да се нагорещят при използване с уреди за готвене.”
че пламъкът не обхваща страните му.
ствени способности, или на ко
ито липсват опит и познания, освен ако не бъдат наблюдавани
з навън, за да се гарантира пос-
ветрение
.
Символът върху продукта или неговата опаковка показва, че той не трябва да се изхвърля с домакинските отпадъци.
Вместо това той трябва да бъде върнат в съответен пункт за рециклиране на електрическо и електронно оборудване. Осигурявайки правилното изхвърляне на този продукт, вие спомагате за предотвратяване на възможните отрицателни въздействия
върху околната среда и човешкото здраве, които биха възникнали в резултат на неправилната обработка на изхвърления
продукт. За по-подробна информация относно рециклирането на този продукт се обърнете към местните градски органи,
фирмата за събиране на домакински отпадъци или магазина, от който сте го закупили..
BL
52
Page 53

ХАРАКТЕРИСТИКИ
12e
8
1
12a
20
12a
135
125125
20
Компоненти
Номер Колич. Компоненти на изделието
1 1 Корпус на аспиратора, вкл.: Командни бутони, Осветление,
8 1 Насочваща решетка за изпускания въздух
20 1 Затварящ елемент
Номер Колич. Компоненти за монтаж
12а 4 винта 4,2 х 44,4
12е 2 винта 2,9 х 9,5
Колич. Документация
1 Ръководство
Изпускателен отвор, Филтри
ИНСТАЛАЦИЯ
Пробиване на поддържащата стойка и монтаж на аспиратора
МОНТАЖ С ВИНТОВЕ
• Стойката на аспиратора трябва да е на 135 mm над плоскостта на
дъното на стенния уред.
• Разпробийте стойката с бургия ø 4,5 mm, като използвате
доставения шаблон за пробиване.
• Изрежете отвор ø 125 mm в повърхността на стойката, като използвате доставения шаблон за пробиване.
• Фиксирайте я с доставените 4 винта 12a (4,2 x 44,4).
ЗАКРИВАЩ ЕЛЕМЕНТ
• Пространств
бъде закрито с доставения елемент 20 , като се използват
доставените за целта винтове.
BL
ото между ръба на аспиратора и стената отзад може да
53
Page 54

Свързване
ø 120
ВАРИАНТ НА ИЗПУСКАТЕЛНА СИСТЕМА С ВЪЗДУХОВОД
При инсталирането на варианта с въздуховод, свържете аспиратора
към комина като използвате гъвкава или твърда тръба ø 120 мм изборът зависи от монтажника.
• Укрепете тръбата с достатъчен брой скоби (не влизат в
комплекта).
• Свалете филтрите с активен въглен.
ВАРИАНТ С ИЗХОД ЗА РЕЦИРКУЛАЦИЯ
• Изрежете отвор ø125 mm в рафта, ако има такъв над аспиратора.
• Съединете фланеца към изхода в рафта над аспиратора, като
12e
8
8
125
125
използвате твърда или гъвкава тръба ø120 mm.
• Укрепете тръбата с достатъчен брой скоби (не влизат в комплек-
та).
9
9
• Скачете насочващата решетка 8 върху отвора за рециркулация с
доставените 2 винта 12е (2,9 x 9,5) .
• Уверете се, че филт
рите с акти
вен въглен са поставени.
СВЪРЗВАНЕ С ЕЛЕКТРИЧЕСКАТА ИНСТАЛАЦИЯ
• Свържете аспиратора към захранването с двуполюсен щепсел с разстояние между контактните щифтове поне 3 mm.
• Когато отваряте плъзгащата се шейна за пръв път след монтажа на аспиратора, издърпайте я енергично, докато щракне.
УПОТРЕБА
Панел за управление
L
M - V
0
1
0
1
2
3
M-V
L
L Осветление Включва и изключва осветителната
система
М Мотор Включва и изключва мотора на
екстрактора.
V Скорост Задава работната скорост на
екстрактора.
1. Ниска скорост, използва се за непрекъснат и
безшумен обмен на въздух в присъствието на
леки изпарения при готвене.
2. Средна скорост, подходяща за повечето
работни условия при оптимално съотношение
третиран възд
3. Ма
ксимална скорост, използвана за
ух/шум.
елиминиране на големи емисии от готварски
пари, включително за дълги периоди.
BL
L Осветление Включва и изключва осветителната
система
М Мотор Включва и изключва мотора на
екстрактора.
V Скорост Задава работната скорост на
екстрактора:
1. Ниска скорост, използва се за непрекъснат и
безшумен обмен на възд
ух в п
рисъствието на
леки изпарения при готвене.
2. Средна скорост, подходяща за повечето
работни условия при оптимално съотношение
третиран въздух/шум.
54
Page 55

ПОДДРЪЖКА
Филтри за мазнини
ПОЧИСТВАНЕ НА МЕТАЛНИ КАСЕТЪЧНИ ФИЛТРИ ЗА МАЗНИНИ
• Филтрите трябва да се чистят на всеки 2 месеца или по-често при
особено интензивно използване на аспиратора. Филтрите може
да се почистват в съдомиялна машина.
• Изтеглете плъзгащия се смукателен панел.
• Извадете филтрите един по един, след като сте разкачили съответните фиксиращи елементи.
• Измийте филтрите, като внимавате да не ги огъвате. Оставете ги
да изсъхнат, преди да ги поставите отново. (Цветът на филтъра
може да се промени с времето, но това не влияе върху ефективността му).
• При поставянето на филтрите се уверете, че дръжката се показва
от външната страна.
• Затворете плъзгащия се сму
Въгленов филтър (рециклиращ вариант)
СМЯНА НА ВЪГЛЕНОВИТЕ ФИЛТРИ
Предупреждение: Изключете осветлението и изчакайте
лампите да изстинат, преди да смените външния филтър.
• Тези филтри не се мият и не може да се регенерират и
трябва да се сменяват през четири месеца или по-често,
ако се използват особено интензивно.
• Изтеглете плъзгащия се смукателен панел.
• Свалете филтрите за мазнини.
• Извадет
фиксиращите куки
• Поставете новия филтър, като го закачите в гнездото.
• Сменете филтрите за мазнини.
• Затворете плъзгащия се смукателен панел.
е замърсения въгленов филтър, като разкачите
кателен панел.
Осветление
СМЯНА НА КРУШКИ
28W-40W крушка.
• Свалете металните филтри за мазнини.
• Отвинтете крушките и ги сменете с нови със същите
параметри.
• Поставете металните филтри за мазнини.
BL
55
Page 56

Условия и срок хранения, срок службы .
Условия хранения в закрытых помещениях при температуре воздуха от -40 до +50ºС . Срок хранения 12 месяцев .
Срок службы – 10 лет Изделие изготовлено в соответствии с Директивами 2006/95/ЕС, 2004/108/ЕС
Изготовитель: «Arcelik A.S.» Юридический адрес: Караач Джаддеси № 2-6 34445 Сютлюдже Стамбул
(Турция (Karaağaç Caddesi No:2-6 Sütlüce, 34445, Turkey)
Уполномоченное изготовителем лицо: ООО «BEKO», РФ, 601021,
Владимирская обл., Киржачский р-н Муниципальное образование сельское поселение Першинское, дер. Федоровское, ул.
Сельская, д. 49 Бесплатная линия сервисного обслуживания и информационной поддержки по установке и эксплуатации
(только для звонков по России) 8-800-200-23-56
Дата производства включена в серийный номер продукта, указанный на этикетке, расположенной на продукте .
а именно: первые две цифры серийного номера обозначают год производства, а последние две – месяц Например,
«10-100001-05» обозначает, что продукт произведен в мае 2010 года
436003312_12 - 150218
www.beko.com
 Loading...