

Page 1
Manual for changing/controlling audio settings of specific research lab’s at the DCC. TSG.dec.2017.
PC Line OUT-R
PC Line OUT-L
PC Line IN-R
PC Line IN-L
Phones Exp-R
Phones Exp-L
Behringer Input-3
Behringer Input-4
MIC IN Subject-1
MIC IN Subject-2
Behringer AUX-1
Behringer AUX-2
Behringer Control-L
Behringer Control-R
Phones Sub-1-L
Phones Sub-1-R
Behringer AUX-5
Behringer AUX-6
Behringer Input-1
Behringer Input-2
Phones Sub-2-L
Phones Sub-2-R
Behringer Main-L
Behringer Main-R
Behringer AUX-3
Behringer AUX-4
Speakers Cabin-L
Speakers Cabin-R
PC
Behringer
Behringer-1-setup TSG
Extra UTP Card in PC connection
IP: 192.168.1.101
Behringer set as DHCP server
IP: 192.168.1.1
Radboud University Nijmegen. FSW/TSG june 2017
USB 2.0 to USB PC connection
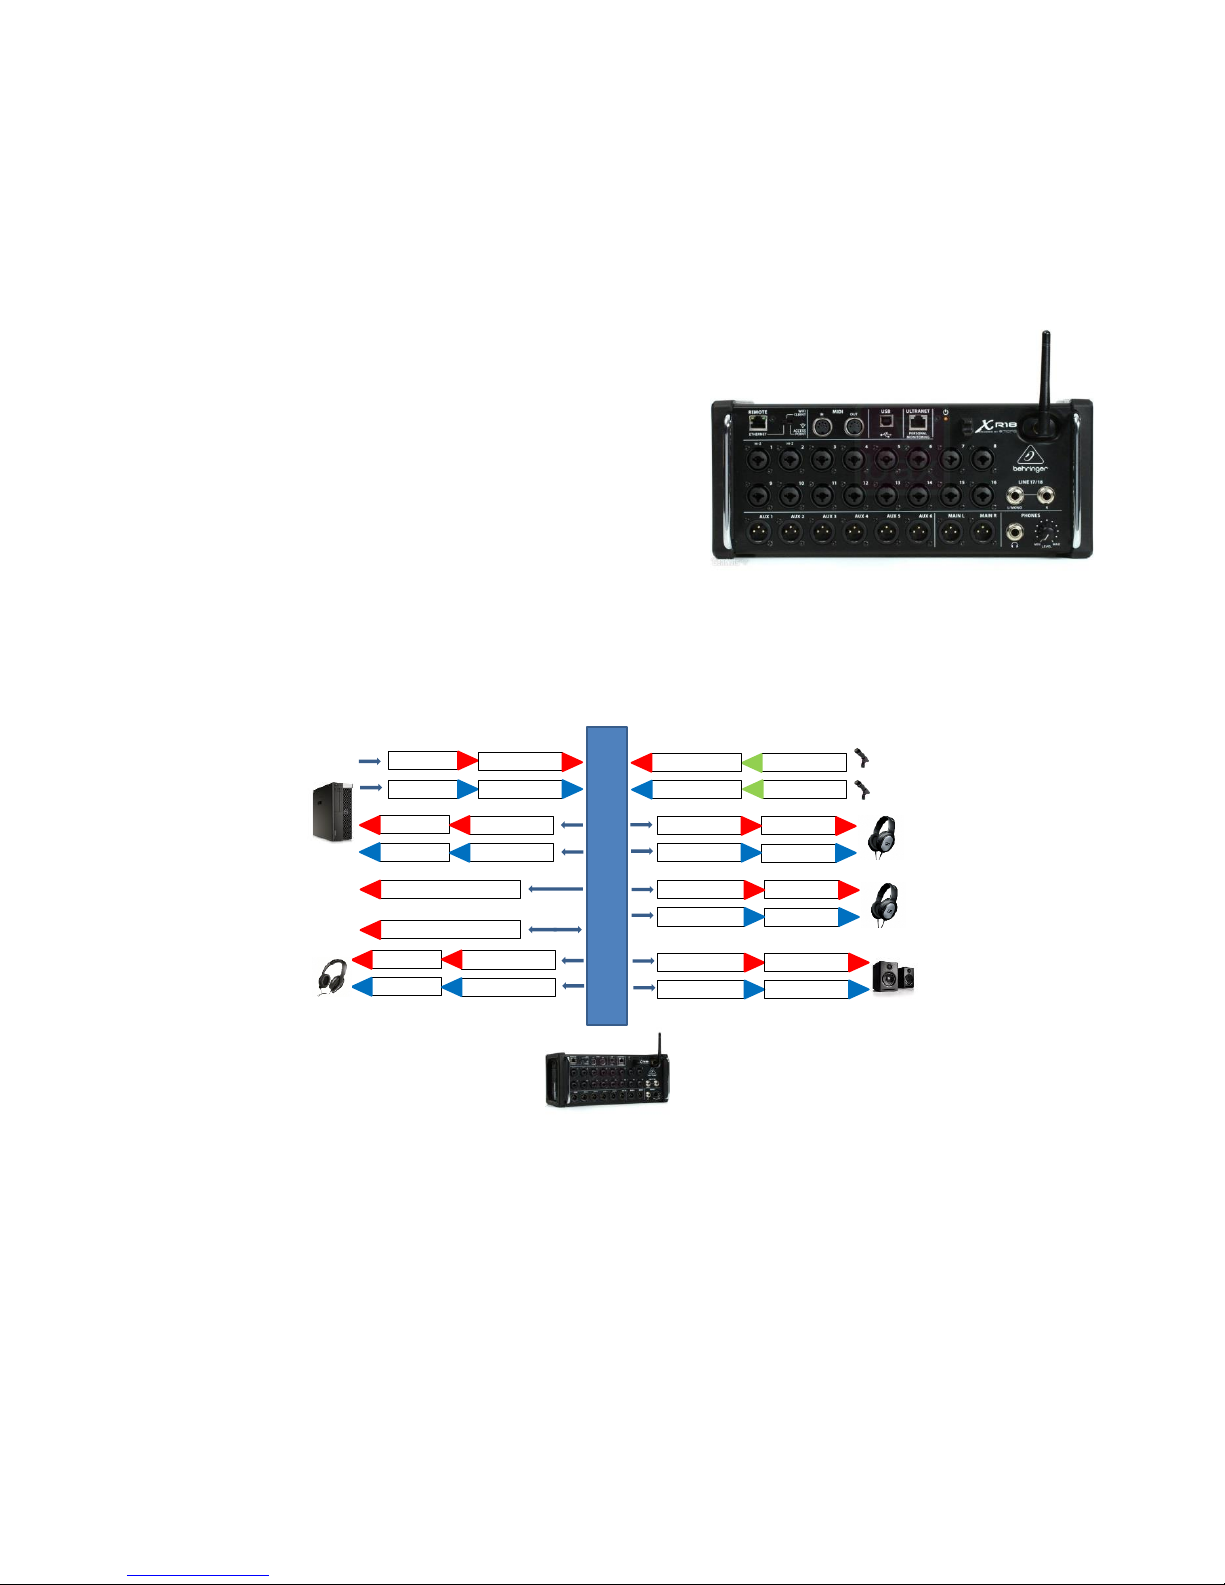
Set up audio recording labs.
The sound recording and EEG labs have been equipped with a setup that enables to present audio
stimuli, to record audio responses, to make stimulus recordings and to monitor the quality of the stimuli
and responses.
The mixer that is used for this is the Behringer Xair18.
This is a professional mixer with 18 analog mono inputs,
10 analog mono outputs, Midi in and out, USB connection
for audio-in-out and control, Ethernet for control and
additional features.
The Behringer is controlled by a program built by the TSG called ‘Beer’. Beer enables researchers to set
and store settings for specific experiments. These specific settings have to be loaded at the start of each
new measurement session ensuring that these stay identical throughout all experiment sessions.
Control of the Behringer via ‘Beer’.
-How to use Beer.
The ‘Beer’ program expects the default TSG settings and the devices to be switched on. The ‘Beer’
program is based on Python and will run on our FSW/DCC/BSI research labcomputer
(Start\All_Programs\Behringer).
The available input devices are:
Subject1-microphone. (mono)
Subject2-microphone. (mono)
PC output audio line-out. (stereo)
1
Page 2
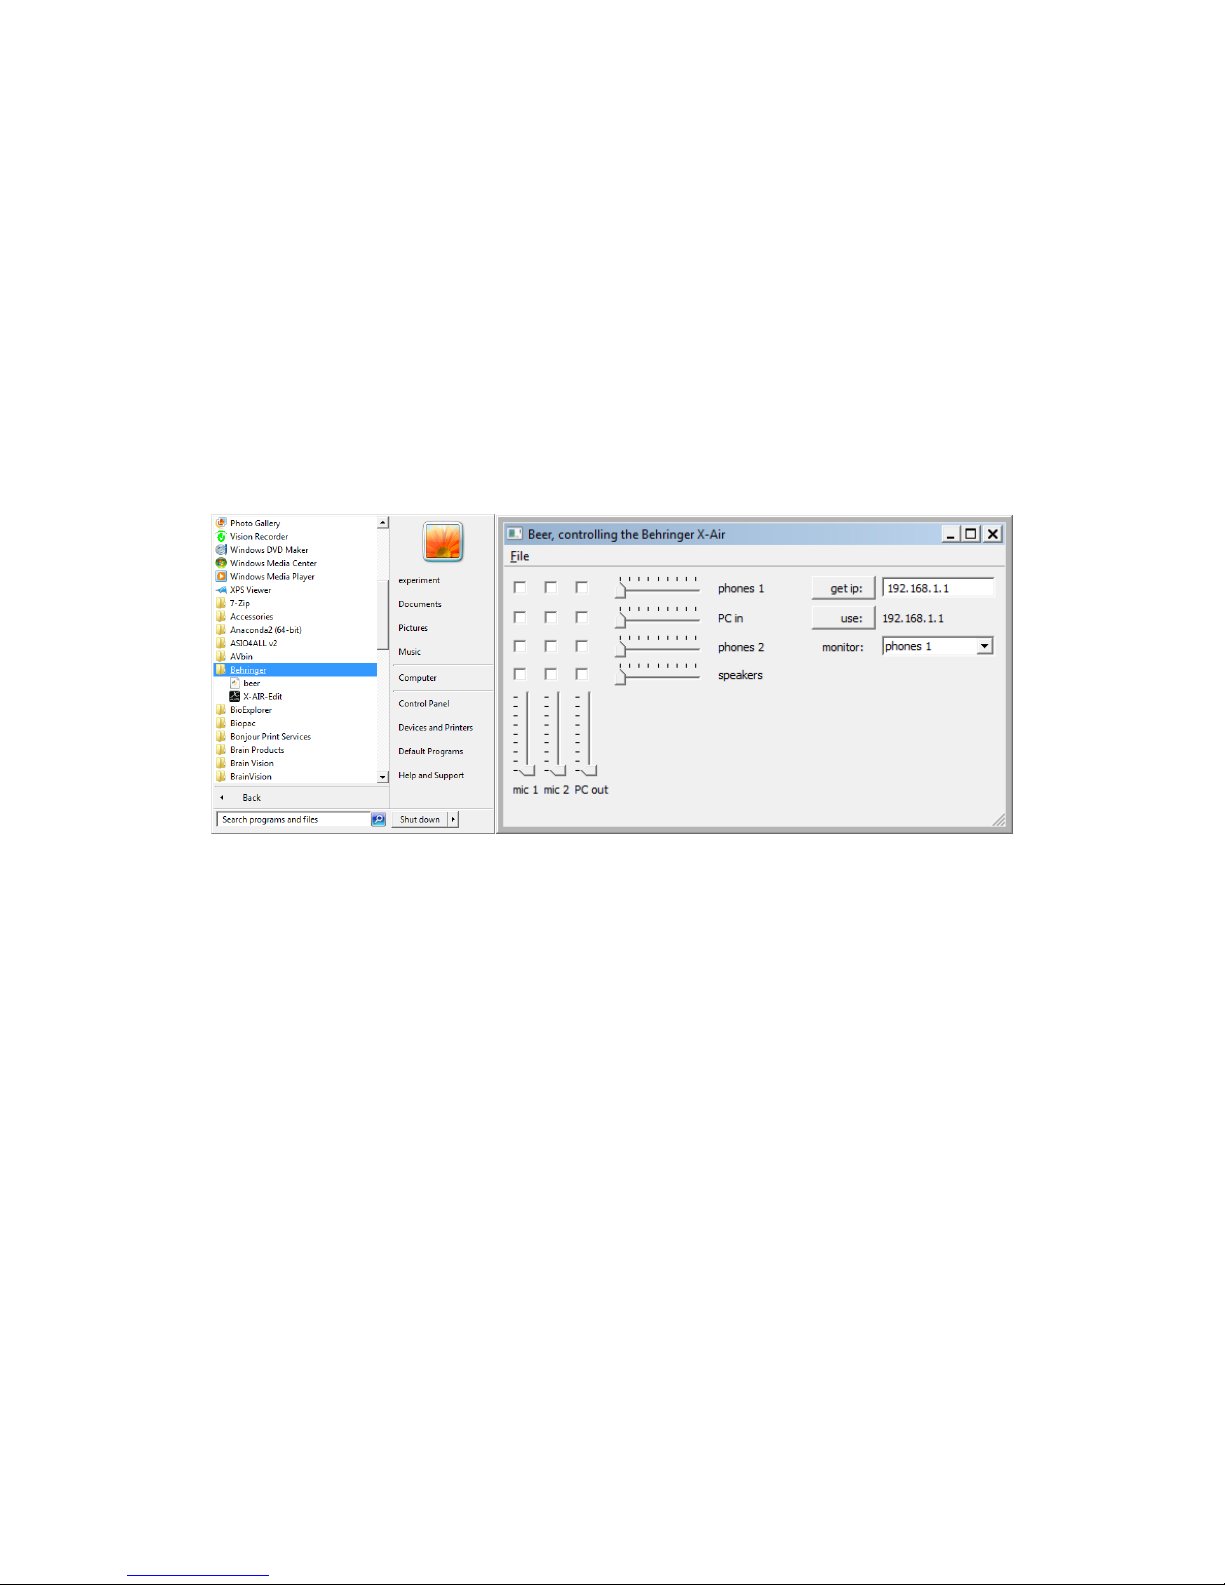
The available outputs devices are:
Subject1-headphones. (stereo)
PC input audio Line-in. (stereo)
Subject2-headphones. (stereo)
Speakers. (stereo)
Monitor-headphones. (stereo)
Make sure that the needed devices are connected and switched on. By default the Behringer and the
Speakers are activated already or they are activated when the lab-computer is turned on. Some
microphones should be turned on separately.
Start the program.
First the ‘Beer’ program automatically looks for the Behringer mixer to make a connection (see.get ip:
192.168.1.1). After the connection has been set up the program initializes (resets!) the Behringer
(see.use:192.168.1.1) automatically.
By default all input and output volumes are set at their lowest levels and no selections from input to
output are made. (everything is ‘off’)
Create the settings for your experiment:
At the bottom left you see the available inputs with their corresponding volume setting above this.
The input options are:
-‘mic1’, Subject1-microphone. (mono) To detect and record speech responses. VU-meter shown.
-‘mic2’, Subject2-microphone. (mono) To detect and record speech responses. VU-meter shown.
-‘PC out’, PC output audio line-out. (stereo) To present stimuli or feedback audio. VU-meter shown.
The left top has selectable squares to connect the input below to a specific output on the right.
The destinations here are connected to the noted devices with their individual volume control.
2
Page 3

The output options are:
-‘phones 1’, Subject1-headphones. (stereo) To present stimuli or feedback audio.
-‘PC in’, PC input audio Line-in. (stereo) To detect and record speech responses and/or present stimuli or
feedback audio and enable voice-time-response trigger measurements.
-‘phones 2’, Subject2-headphones. (stereo) To present stimuli or feedback audio.
-‘speakers’. Audio desk or wall mounted speakers. (stereo) To present stimuli or feedback audio.
As an extra feature there is a ‘Controller monitor’ output at the right labelled ‘monitor’.
This enables the controller to hook up an extra headphone directly to the Behringer device (front of the
device at the right bottom) with a 6,35mm stereo Jack connector.
Next to the Jack-socket there is a volume control that controls the
volume of this output directly.
(this does not influence your other volumes and settings).
In the application you can determine which output you want to monitor from the pull-down menu.
The monitor options are ‘phones 1’, ‘PC in’, ‘phones 2’, ‘speakers’.
Make your choices:
In this example the ‘mic 1’ is used at maximum volume sensitivity. The output of this device goes to
‘phones 1’. Because the volume control of ‘phones 1’ is at its lowest level no sound will be available on
the headphones 1. Also the input device (‘mic 1’) goes to ‘phones 2’, here the sound level has been
raised to 62 and audio will be played.
Input device ‘mic 2’ is not used and it’s volume is at its minimum.
3
Page 4

The input ‘PC out’ has been set at level 42 and will play audio stimuli. The signal is linked to ‘PC in’ at a
volume level of 58. This feeds the signal back to the computer for time trigger detection or recording.
Also the input (‘PC in’) is connected to the ‘speaker’ output. The volume being at 50 will play the sound
over the wall mounted speakers.
IMPORTANT NOTE!!:
Save your settings by pressing in the top-menu the option ‘File’!
Then select ‘save file’ and select the location within your experiment folder in
E:/data/userfiles/*yourfolder*. Additionally, make a backup of this file on a drive that is backed up
automatically (DRDR, workgroup files). The default extension for these files is *.scn .
At the start of each measurement session load your own settings file by selecting ‘open file’ in the
menu.
We STRONGLY recommend to check the settings. Are they correct and do all devices work properly?
( broken equipment, switches on microphones might be off, batteries might be empty).
4
Page 5

Audio Set Up Lab.
PC Line OUT-R
PC Line OUT-L
PC Line IN-R
PC Line IN-L
Phones Exp-R
Phones Exp-L
Behringer Input-3
Behringer Input-4
MIC IN Subject-1
MIC IN Subject-2
Behringer AUX-1
Behringer AUX-2
Behringer Control-L
Behringer Control-R
Phones Sub-1-L
Phones Sub-1-R
Behringer AUX-5
Behringer AUX-6
Behringer Input-1
Behringer Input-2
Phones Sub-2-L
Phones Sub-2-R
Behringer Main-L
Behringer Main-R
Behringer AUX-3
Behringer AUX-4
Speakers Cabin-L
Speakers Cabin-R
PC
Behringer
Behringer-1-setup TSG
Extra UTP Card in PC connection
IP: 192.168.1.101
Behringer set as DHCP server
IP: 192.168.1.1
Radboud University Nijmegen. FSW/TSG june 2017
USB 2.0 to USB PC connection
Below you find the basic initial audio setup with all possible features.
You can see that some of the mono inputs and outputs are combined into stereo inputs and outputs.
The initial setup in the research-labs will make use of the audio connections of the lab-computer and the
Behringer. The computer settings of the audio card make use of the Line-Output for presenting stimuli
and the Line-Input is set for audio responses and recordings.
In exceptional circumstances additional setting or features of the Behringer are needed. You can use the
Xair-mixer for this. Contact the TSG if this is the case.
5
Page 6

With kind regards, TSG
6
 Loading...