


 Loading...
Operation Guide
Betjeningsvejledning
Bruksanvisning

Contents
Safety instructions
Information regarding general road safety
Overview of controls
General operation
Menu basics
Fast access function Main menu
Status display Options menu
How to use the menus Data entry menus
Anti-theft device
Entering unit code numbers
What to do if an incorrect code number has been entered
Removing/Inserting the control panel
Removal
Insertion
Inserting/Removing the cover
Inserting the cover Removing the cover
Switching the unit on/off
Switching on Switching off
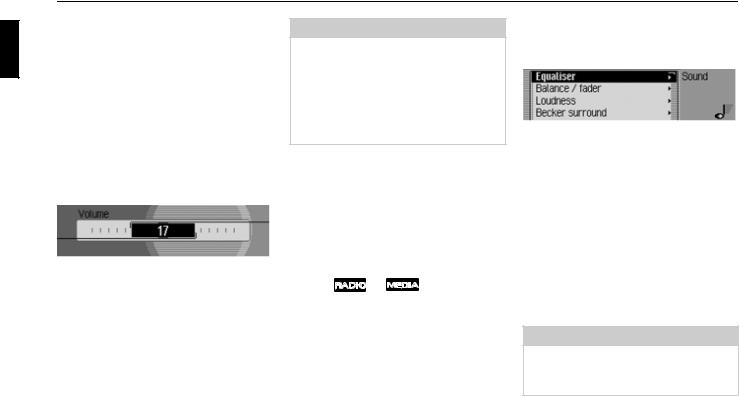
Setting the volume
Sound settings
Calling up the sound settings
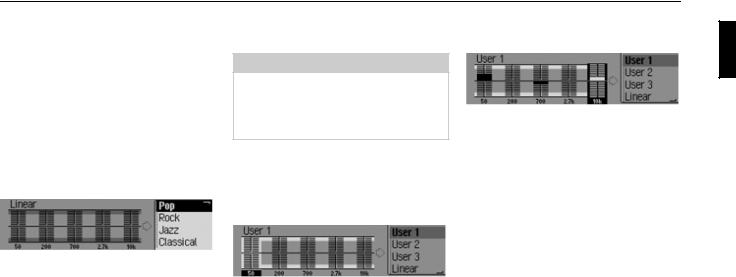
8Setting the equalizer
Defining the equalizer setting
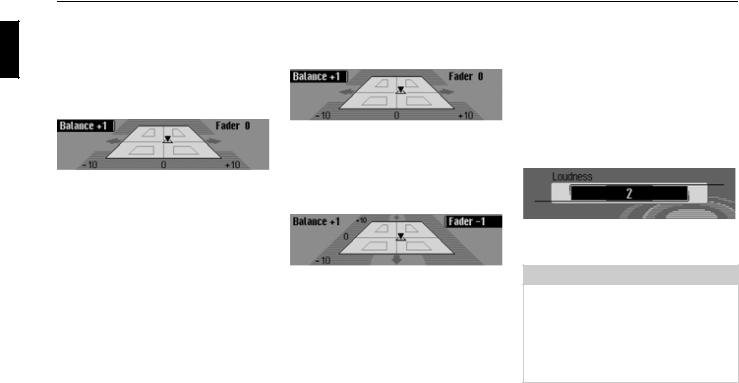
9Setting balance and fader
10Balance setting Fader setting
11Switching Loudness on/off and
11 |
adjusting |
|
11 |
||
Becker Surround |
||
|
11Subwoofer
12Crossover
12 Compression
12Reset settings
13Mute
14
14 |
Navigation mode |
|
What is navigation? |
||
|
14 |
Navigation data |
|
Inserting memory card |
15 |
Removing memory card |
15 |
Selecting navigation |
16 |
Calling up the Navigation |
16 |
main menu |
16 |
Entering a destination |
16 |
Selecting a country |
17 |
Entering a destination town |
17 |
Selecting destination via postcode |
17Entering the destination road
18Entering the destination town centre
18Entering house number for
18destination road
Selecting junction for destination road
19 |
Entering destination |
|
|
19 |
via geo-coordinates |
33 |
|
20 |
Setting the route options |
34 |
|
20 |
Saving/Deleting route options |
35 |
|
20 |
Saving a destination |
36 |
|
|
Navigation fast access |
36 |
|
20 |
Navigating from fast access |
36 |
|
21 |
Navigation to POI in local area |
37 |
|
21 |
Protecting an entry |
37 |
|
21 |
Deleting an entry |
37 |
|
22 |
Deleting a list |
38 |
|
22 |
Saving an entry in the address book |
38 |
|
22 |
Creating a new entry |
38 |
|
24 |
Adding data to entries |
39 |
|
Selecting a destination from the |
|
||
24 |
|
||
address book |
40 |
||
24 |
|||
Point of interest |
40 |
||
25 |
|||
Local |
41 |
||
26 |
|||
In country |
42 |
||
26 |
|||
Local area of destination |
43 |
||
|
|||
27 |
In place |
43 |
|
Information about points of interest |
44 |
||
28 |
|||
External points of interest |
45 |
||
28 |
|||
Beckerclub |
46 |
||
29 |
|||
Loading/updating @-destinations |
46 |
||
30 |
|||
Navigating to @-destination |
47 |
||
31 |
|||
Functions in the @-destination list |
47 |
||
32 |
|||
During route guidance |
47 |
||
|
|||
32 |
Navigation status screen |
48 |
|
Example navigation displays |
48 |
||
33 |
|||
Traffic lane recommendations |
50 |
||
|
2

Contents
Options menu |
50 |
Radio mode |
|
Cancelling route guidance |
51 |
Switching on radio mode |
|
Traffic announcements |
52 |
Calling up the Radio main menu |
|
Route list |
52 |
Selecting a waveband |
|
Stopover |
52 |
FM mode |
|
Blocking a route |
54 |
Possible settings for FM stations |
|
Modifying route options |
54 |
||
Station list |
|||
Switching navigation |
|
||
|
Scan function |
||
announcements on/off |
55 |
||
Manual station tuning |
|||
Information during route guidance |
55 |
||
Filter function |
|||
Displaying destination information |
55 |
Switching the filter function on/off |
|
Displaying/Storing position |
56 |
Filtering stations |
|
Displaying traffic announcements |
56 |
Filtering stations |
|
Displaying/Changing route settings |
57 |
Cancel filtering |
|
Information during non-active |
|
Programme type |
|
route guidance |
57 |
Switching the programme |
|
Displaying/Storing a position |
57 |
type function on/off |
|
Displaying TMC messages |
57 |
Selecting the programme type |
|
Dynamic route guidance |
|
Regionalisation |
|
with TMC |
57 |
Radio text |
|
What is dynamic route guidance? |
57 |
Voice entries |
|
Dynamic route guidance |
58 |
Reception optimisation |
|
Displaying traffic information |
59 |
Bandwidth control |
|
Settings |
60 |
Traffic programme |
|
Traffic announcements |
60 |
Switching a traffic programme on/off |
|
Announcing the time of arrival |
61 |
Selecting a TP station |
|
Displaying speed limits |
61 |
Automatic |
|
ETA setting |
62 |
Manual TP station selection |
|
Measuring unit |
63 |
TP volume |
|
|
|
Cancelling traffic announcements |
64 |
AM mode |
75 |
|
|
|||
64 |
Possible settings for AM stations |
75 |
|
64 |
Scan search |
76 |
|
65 |
Scan function |
76 |
|
66 |
Station memory |
77 |
|
|
|||
66 |
Calling up the station memory |
77 |
|
66 |
Storing stations |
77 |
|
67 |
Different waveband set |
77 |
|
68 |
Station already in memory |
78 |
|
68 |
Moving stations |
78 |
|
68 |
Deleting stations |
79 |
|
69 |
Naming stations |
79 |
|
69 |
Creating/Deleting voice entries |
80 |
|
69 |
Create |
80 |
|
70 |
Deleting |
80 |
|
|
Reading out voice entries |
80 |
|
70 |
Media mode |
81 |
|
70 |
Activating media mode |
81 |
|
71 |
|
||
Media fast access functions |
81 |
|
|
71 |
|
||
Media status display |
82 |
|
|
72 |
|
||
Track jump/Track skip |
83 |
|
|
72 |
|
||
Fast forward/rewind |
83 |
|
|
73 |
|
||
Play mode |
83 |
|
|
73 |
|
||
Calling up the Play Mode menu |
83 |
|
|
74 |
Track mix (random play function) |
84 |
|
74 |
Scan |
84 |
|
74 |
Repeat track |
85 |
|
74 |
CD mix |
85 |
|
75 |
Repeat CD |
85 |
|
75 |
Directory mix |
85 |
|
|
Repeating a directory |
86 |
|
3

Contents
|
Calling up the Media main menu |
86 |
External units/AUX mode |
95 |
Accepting/ rejecting a call |
113 |
|
||||||
|
Switching detailed track display |
|
Telephone mode |
96 |
Accepting a call |
113 |
|
on/off |
86 |
Rejecting a call |
113 |
||
|
Inserting the SIM card |
97 |
||||
|
CD mode |
87 |
Ending a call |
114 |
||
|
Entering PIN |
98 |
||||
|
Notes on compact discs (CD) |
87 |
Holding |
114 |
||
|
Calling up the telephone |
98 |
||||
|
Inserting/Ejecting CDs |
87 |
Toggling |
115 |
||
|
Calling up the Telephone |
|
||||
|
Notes on CD-R and CD-RWs |
88 |
|
Conference call |
115 |
|
|
main menu |
99 |
||||
|
Notes on copy-protected CDs |
88 |
Creating a conference |
115 |
||
|
Temperature protection circuit |
88 |
Dialling number |
100 |
Adding parties |
116 |
|
MP3 mode |
88 |
Number is busy |
100 |
Private call |
116 |
|
General notes on MP3 |
88 |
Dialling a number from the |
|
Ending call with individual parties |
117 |
|
Creating an MP3 storage medium |
89 |
address book |
101 |
Ending a conference call |
117 |
|
MP3 CD mode |
90 |
Call lists |
102 |
Options menu |
117 |
|
MP3 memory cards/ |
|
Calling a number from the list |
103 |
Ending call |
118 |
|
Micro-drive mode |
90 |
Retrieving information about |
|
Ending all calls |
118 |
|
Inserting a micro-drive/ |
|
the entry |
103 |
Holding |
118 |
|
CF memory card |
90 |
Deleting a call list |
103 |
Activating |
118 |
|
Removing a micro-drive/ |
|
Emergency call |
103 |
Dialling |
118 |
|
CF memory card |
91 |
Settings |
104 |
Conference |
119 |
|
Inserting SD/MMC memory card |
91 |
Call divert |
105 |
Disconnecting |
119 |
|
|
91 |
Call settings |
107 |
Sound sel. |
119 |
|
Removing SD/MMC memory card |
92 |
Selecting a network |
109 |
Private |
120 |
|
Playback sequence for MP3 |
|
Ring tone |
110 |
Telephone fast access functions |
120 |
|
storage media |
92 |
PIN Settings |
110 |
Direct calling |
121 |
|
Playlists |
93 |
Automatic call answering |
111 |
Protecting an entry |
121 |
|
Creating playlists |
93 |
Dialogue with call |
111 |
Deleting an entry |
121 |
|
Audio playback via an |
|
Switching the telephone off |
112 |
Deleting a list |
122 |
|
optional Apple™ iPod |
94 |
Telephone calls |
112 |
Saving a number in the address book |
122 |
|
CD changer mode |
94 |
Status display |
112 |
Creating a new entry |
122 |
|
|
|
Adding data to entries |
123 |
||
|
Operational readiness of CD changer |
94 |
|
|
||
|
|
|
Saving number to SIM card |
124 |
||
|
Loading/Ejecting the CD magazine |
95 |
|
|
||
|
|
|
|
|
4

Contents
Mail messages |
125 |
Internet (WAP) function |
New incoming SMS display |
125 Establishing a WAP connection |
|
Calling up SMS fast access |
|
Operation in WAP pages |
function |
126 |
Text input |
Reading SMS |
126 |
Terminating WAP connection |
Options for SMS read aloud |
127 |
Favourites |
Replying |
127 |
Pages visited |
Returning call |
127 |
Entering URL for WAP page |
Deleting |
127 |
Terminating WAP connection |
Storing number in address book |
127 |
Opening WAP fast access |
Saving number to SIM card |
128 |
function |
Editing |
128 |
Opening WAP address directly |
Deleting all SMS |
128 |
Saving entry to the Favourites |
Opening SMS main menu |
128 |
Saving an entry in the address book |
Composing SMS |
129 |
Protecting an entry |
Saved SMS |
131 |
Deleting an entry |
Sending |
132 |
Deleting a list |
Deleting |
132 |
Changing Beckerclub address |
Editing |
132 |
WAP main menu |
Deleting all SMS |
132 |
Opening WAP main menu |
Sent SMS |
133 |
Favourites |
Displaying free memory space |
133 |
Opening list of favourites |
Mail settings |
134 |
Loading favourites |
Opening Mail settings |
134 |
Editing favourites |
Announcing new SMS |
134 |
Entering a URL |
SMS centre number |
135 |
Access profiles |
|
|
Loading access profile |
|
|
Creating access profile |
|
|
Changing/deleting an access profile |
Settings
URL beginning
136 |
URL ending |
152 |
|
|
|||
136 |
BeckerClub |
152 |
|
137 |
Accessing the BeckerClub on |
|
|
138 |
the Cascade |
153 |
|
138 |
Address book |
154 |
|
|
|||
138 |
Calling up the address book |
154 |
|
139 |
|
||
Calling up the Address Book |
|
|
|
139 |
|
|
|
main menu |
154 |
|
|
140 |
|
||
Creating an entry |
155 |
|
|
|
|
||
140 |
Creating an entry which supports |
|
|
navigation |
156 |
|
|
141 |
|
||
Find entry |
158 |
|
|
141 |
|
||
Setting the search criterion |
159 |
|
|
142 |
|
||
Editing entries |
159 |
|
|
143 |
|
||
Modifying an entry |
160 |
|
|
143 |
|
||
Deleting an entry |
161 |
|
|
143 |
|
||
Creating/Deleting voice entries |
161 |
|
|
144 |
|
||
Create |
161 |
|
|
144 |
|
||
Delete |
161 |
|
|
144 |
|
||
Reading out voice entries |
161 |
|
|
145 |
|
||
Exporting address book/data |
162 |
|
|
145 |
|
||
Exporting entry |
163 |
|
|
145 |
|
||
146 |
Importing an address book entry |
163 |
|
147 |
Saving address book entry to |
|
|
147 |
SIM card |
165 |
|
147 |
Importing SIM card entries |
165 |
|
148 |
Deleting address book/data |
|
|
151 |
entirely |
166 |
|
151 |
|
||
|
|
|
|
152 |
|
|
|
5

Contents
Navigating to an address book entry
Calling an address book entry/sending SMS Voice entries
Fast access functions
Protecting an entry Deleting an entry Deleting a list
Settings
Calling up general settings Bluetooth
Opening the device list
Always allow connection Name device
Deleting a device from the list Deleting all devices from the list
Connecting and disconnecting devices
Connecting devices (Cascade) Connecting a device (external device) Disconnecting devices
Calling up Bluetooth settings
Activating/ deactivating Bluetooth Searching for Bluetooth devices Making devices visible to others Device name
Voice mode
Calling up voice mode settings
Setting the system language
166Displaying voice settings
167Volume for voice output
168Automatic dialogue
Voice entries
Voice output
169
Extended PTT
Repeating a voice announcement
170 |
System settings |
|
170 |
||
Calling up the system settings |
170Audio
171GAL (speed dependent volume)
172Setting microphone sensitivity
172Settings for left-hand/
172right-hand drive vehicles
173Volume for acoustic signals
173 |
Displaying the volume |
Digital level |
|
173 |
Supporting the parking aid |
175 |
Display |
Display brightness |
|
177 |
Display colour |
178 |
Day/ night design |
178 |
External device |
179 |
Reset function |
179 |
Data backup |
180 |
Backing up data |
|
Loading data |
180 |
Direction of rotation of the |
|
|
180 |
rotary control/push button |
192 |
|
181 |
Clock |
192 |
|
181 |
Software update |
193 |
|
182 |
Voice mode |
194 |
|
182 |
|||
What is voice mode? |
194 |
||
183 |
|||
Symbols |
194 |
||
183 |
|||
General information about the |
|
||
184 |
|
||
voice control system |
195 |
||
184 |
|||
Activating the voice control system |
195 |
||
184 |
|||
Ending voice dialogue prematurely |
196 |
||
185 |
|||
Voice entries |
196 |
||
186 |
|||
Settings |
197 |
||
186 |
|||
Examples for a voice dialogue |
197 |
||
186 |
|||
Example operation in radio mode |
198 |
||
|
|||
186 |
Example for entering a |
|
|
navigation destination |
199 |
||
187 |
|||
Example for entering a telephone |
|
||
187 |
|
||
number |
201 |
||
187 |
|||
General commands |
201 |
||
188 |
|||
Help function (online help) |
202 |
||
188 |
|||
Aborting voice dialogue |
202 |
||
188 |
|||
Navigation in lists |
202 |
||
188 |
|||
Calling up the status display |
202 |
||
189 |
|||
|
|
189Commands for status displays,
190fast access functions and main
190 |
menus |
203 |
|
Commands for radio mode |
204 |
||
191 |
|||
191 |
Commands for the radio status |
|
|
|
display |
204 |
6

Contents
Commands for radio fast access mode
Commands in the Edit Station menu
Commands for the Radio main menu
Commands in the Waveband menu Commands in the Programme Type menu
Commands in the Filter menu Commands in the TP menu Commands in the Voice Entries menu
Commands in the Reception Optimisation menu
Commands for media mode
Commands for the media status display
Commands for media fast access Commands for the Media main menu Commands for the media
Play Mode menu
Navigation commands
Correction option for incorrect destination entry
Commands for the navigation status display
Commands for navigation fast access
Commands in the Fast Access/ Edit Destinations menu
|
Commands for the Navigation main |
|
Commands in the Fast Access/ |
|
|
|
|
|
|
||
206 |
menu |
221 |
Edit Entries menu |
235 |
|
|
Commands for the Destination menu |
222 |
Commands in the Edit menu |
235 |
|
207 |
Commands for the POI menu |
223 |
Commands in the Edit Data menu |
235 |
|
|
Commands for the Route |
|
Commands in the menu for selecting |
|
|
|
|
|
|
||
208 |
Options menu |
223 |
a Bluetooth device for export |
235 |
|
209 |
Commands for the Stopover menu |
224 |
Commands when an entry is open |
236 |
|
|
Prompt: Is the new destination a |
|
Commands for the |
|
|
210 |
main destination or a stopover? |
225 |
Address Book main menu |
237 |
|
210 |
Commands for telephone, |
|
Commands in the Voice |
|
|
211 |
mail and WAP mode |
225 |
Entries menu |
238 |
|
|
Commands for the PIN input menu |
225 |
Commands in the Search |
|
|
211 |
Commands for telephone fast |
|
Criterion menu |
238 |
|
212 |
access mode |
226 |
Technical terminology |
239 |
|
Commands in the Fast Access/ |
|
Technical data |
252 |
|
|
212 |
Edit Telephone Numbers menu |
227 |
|
||
NOTICE |
253 |
|
|||
213 |
Commands for the Telephone |
|
|
||
main menu |
228 |
Correct disposal of this product |
|
|
|
215 |
Commands in the input menu for |
|
|
|
|
|
(waste for electrical and electronic |
|
|
||
216 |
telephone numbers |
228 |
|
|
|
equipment) |
254 |
|
|||
|
Commands in the Call Lists menu |
229 |
|
||
217 |
|
|
|
||
Commands in the call lists |
229 |
|
|
|
|
218 |
Commands in the Telephone |
|
|
|
|
|
Settings menu |
230 |
|
|
|
218 |
Commands for the Mail main menu |
231 |
|
|
|
|
Commands for a dialogue in the |
|
|
|
|
218 |
event of an incoming call |
232 |
|
|
|
|
Commands for a dialogue for an |
|
|
|
|
219 |
incoming SMS |
232 |
|
|
|
|
Commands for the address book |
232 |
|
|
|
221 |
Commands for address book fast |
|
|
|
|
|
access |
232 |
|
|
|
7

GSafety instructions
Operation of the unit is permitted only if traffic conditions are suitable and you are absolutely sure that you, your passengers or other motorists are not endangered, obstructed or inconvenienced.
In all cases, all applicable road traffic regulations must be obeyed. Destinations may only be entered when the vehicle is stationary.
The country-specific regulations apply for telephone operations.
The navigation system is only an aid. Errors may occur in individual data items/entries. At all times, the driver must decide whether or not to heed the information provided. We do not accept liability for erroneous data provided by the navigation system.
Due to continual changes in traffic routing or deviations in the data, it may occur that imprecise or erroneous information is given. Therefore, actual road signs and traffic regulations must always be observed. In particular, the navigation system cannot be used as an orientation aid at times of poor visibility.
The unit may only be used for its intended purpose. The volume of the radio, navigation system and telephone should be adjusted so that external noise is still audible.
Do not activate the telephone near petrol stations, fuel depots, chemical plants or blasting areas.
In the case of a malfunction (i.e. smoke or other noticeable odours) the unit is to be turned off immediately.
For safety reasons, the unit must only be opened by a trained technician. Please refer to your dealer for repair.
8

Information regarding general road safety
This car radio device is intended and approved for installation and operation in passenger cars, commercial vehicles and buses (vehicle classes M, N and O) whose electric system has a rated voltage of 12V.
Installation and maintenance should only be carried out by specialists. Faulty installation or maintenance can result in the malfunctioning of the motor vehicle’s electronic systems. The vehicle manufacturer’s safety instructions must be observed.
The vehicle’s electronics (e.g. speedometer signal) must only be worked on by an authorised service garage. We assume no liability for any impairment of the vehicle’s electronics.
This device is only intended for installation in the area provided for this purpose by the vehicle manufacturer.
The method of attachment used must ensure that the device will remain properly attached, should the vehicle be involved in a crash.
The power supply must be properly fused.
Using mobile phones without an external antenna in the proximity of the radio unit may cause interference.
Familiarise yourself with the device and how it works before embarking on your journey. Whilst on the move, only operate the device in appropriate traffic conditions. The volume of the device should be set at a level that enables external noises (e.g. police sirens) to be easily heard.
9

Overview of controls
|
1 |
2 |
3 |
4 |
5 |
6 |
7 |
8 |
9 |
|||||||||
|
|
|
|
|
|
|
|
|
|
|
|
|
|
|
|
|
|
|
|
|
|
|
|
|
|
|
|
|
|
|
|
|
|
|
|
|
|
|
|
|
|
|
|
|
|
|
|
|
|
|
|
|
|
|
|
|
15 |
10 |
14 |
13 |
12 |
11 |
1 Information button  2 On / off switch
3 Select radio 
4 Select CD/CDC/memory card  5 Select navigation
6 Select telephone 
7 Select address book  8 CD eject button
9 Status button 
10Right-hand rotary control/push button  Press = Confirm
Turn = Scroll through lists and menus
11Back button 
12Release slide for removable control panel
13Display
14Arrow keys  and
and  Change radio station and audio track
15Left-hand rotary control/push button  Press = Activate voice dialogue
Turn = Set volume
10
General operation
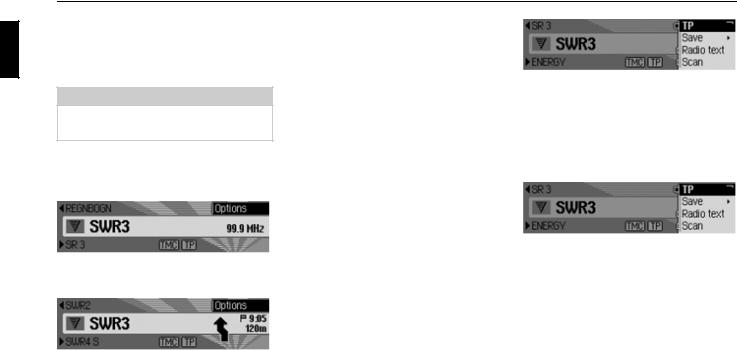
Menu basics
Note:
If an entry in the list is abbreviated because it is too long (three dots appear at the end of the text), you can display the entry in full briefly by pressing and holding down the  button.
Fast access function
The fast access function provides fast access to the major functions in the various operating modes. In most cases, you may then make selections from lists (radio stations, navigation destinations, etc.). Select the first entry in the list to go to the Operating Mode main menu.
Note:
If no selections are made for a short period of time when the fast access function is displayed, the display will automatically switch to the status display for the active operating mode.
The fast access function for the radio is shown here by way of example.
Press the various operating elements to access:
• The radio fast access function
• The media fast access function (CD, CD changer and memory card)
• The navigation fast access function
• the telephone fast access func-
tion (if Bluetooth is activated and a telephone is connected or SIM-Access or the internal phone is switched on).
• The address book fast access function
Main menu
The main menu for each operating mode provides access to the various functions and possible settings for that mode.
The Radio main menu is shown here by way of example.
The main menu for the various operating modes can be called up in two different ways:
•Activate the fast access function (press
 ,
,  ,
,  ,
,  or
or
 ).
).
ΞTurn the rotary control/push button 
 to select the first entry in the fast access list.
ΞPress the rotary control/push button  .
.
or
ΞPress the button for which you have called up the fast access function again
( ,
,  ,
,  ,
,  or
or
 ).
).
11
General operation
Status display
All the information you need about the current operating mode appears on the status screen.
Note:
The address book does not have a status display.
If navigation is also active in addition to the current radio or media operating mode, a combined display may appear.
The radio status display is shown here by way of example.
The radio status display with active navigation route guidance is shown here.
The status display can always be accessed by pressing  .
.
If route guidance is active, you can toggle between the combined display and the status display by pressing  repeatedly.
Options menu
You can call up the Options menu in the status display.
ΞPress the rotary control/push button  .
.
The Options menu appears.
You can access the major functions for the active operating mode directly in the Options menu. Some of the possible settings and functions in the Options menu can also be set/activated via the main menu.
The Options menu for the radio function is shown here by way of example.
How to use the menus
The commands are the same for all menus.
The Options menu for the radio function is shown here by way of example.
Turn the rotary control/push button  to scroll through the menus.
Once you have made an entry in a menu, the next menu will appear or you can select the entry (by turning the rotary control/push button  ) to activate/ deactivate a function.
12

General operation
If the menu entry is concealing another menu, a small triangle will appear after the menu entry.
 or
or  in front of a menu entry indicates that a function can be activated or deactivated. The
  symbol stands for off and the
  symbol for on.
Note:
You can always press  to go back one step in the menu hierarchy.
Data entry menus
If data can be entered, special data entry menus appear.
The data entry menu for the surname in an address book entry appears in the example.
ΞTurn the rotary control/push button  and then press the rotary control/push
button to select each letter one after the other.
Note:
Select the  symbol to delete the last character in the entry.
If, when selecting the symbol  , the rotary control/push button
  is pressed for longer than 2 seconds, the complete entry is deleted.
You can change the character set for the available characters by selecting various symbols.
• Switch to lowercase
• Switch to uppercase
• Switch to numbers
• Switch to special characters
• Switch to lowercase international
• Switch to uppercase international
Note:
After the first character has been entered, the Cascade automatically switches to the input of lower case letters.
Accept entry:
Ξ In the data entry menu, select the
 symbol.
or
ΞPress the rotary control/push button  and hold it down for at least 2 seconds.
13
General operation
Anti-theft device
Your Cascade features two anti-theft devices:
•Protection by means of a five-digit unit code number
•Protection by means of a removable control panel
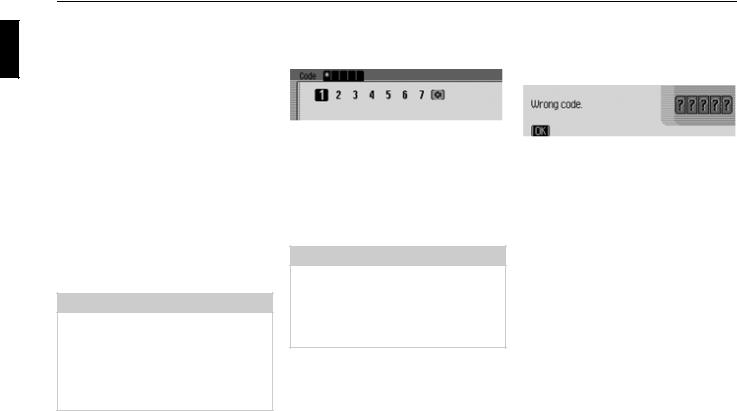
Entering unit code numbers
If the Cascade is disconnected from the electrical supply source, the anti-theft device prevents it against unauthorised use once it has been reconnected.
You need the five-digit code number printed on the CODE CARD to start up the Cascade.
Note:
It is important to store the CODE CARD in a safe place outside of the vehicle. This will prevent unauthorised use. The window stickers provided can be attached to the windscreen/windows inside your vehicle.
Shortly after the unit has been switched on by pressing  , the data entry menu for the code number will appear.
ΞTurn the rotary control/push button  to select the first digit of the code
number.
ΞPress the rotary control/push button  .
.
ΞEnter the remaining digits of the code number in the same way.
Note:
If you enter an incorrect number:
Ξ Press the back button  to delete the last number entered.
or
Ξ Select the  symbol.
Once you have entered all 5 digits of the code number correctly, the Cascade will come on automatically and you can use all functions.
What to do if an incorrect code number has been entered
The following message appears if an incorrect code number is entered.
ΞPress the rotary control/push button  .
.
The data entry menu for the code number appears again.
ΞEnter the correct code number as described above.
14
General operation
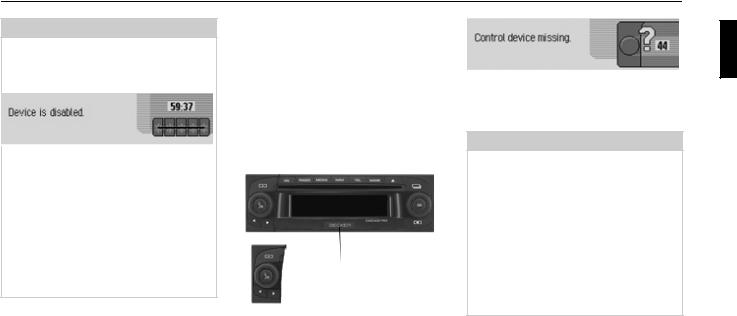
Note:
Entering an incorrect code number three times will disable the unit for approx. 1 hour.
The time remaining until another attempt can be made to enter the code number is displayed.
Ξ Leave the ignition switched on. Switching the ignition off resets the waiting time of one hour to zero.
Once the waiting time has elapsed, the data entry menu for the code number appears again.
Removing/Inserting the control panel
Part of the control panel can be removed to provide additional effective protection against theft.
The Cascade cannot be switched on without this removable control panel.
Removal
A
ΞPush the release slide for the control panel (A) to the right.
The control panel is released.
ΞRemove the control panel from the mount.
If the Cascade is still switched on when the control panel is removed, it is switched to mute and disabled.
If the control panel is reinserted within 90 seconds, the Cascade will automatically switch itself back on.
Notes:
•Please insert the control panel into the accompanying protective cover after removal.
Do not touch the metal contacts on the control panel or on the Cascade.
•If you move your vehicle once the control panel has been removed, once you insert the control panel, it will take some time for the navigation system to ascertain your position.
15

General operation
Insertion
ΞTake the control panel out of its protective cover.
ΞInsert the left-hand side of the control panel.
ΞPush the control panel into place. The Cascade is now ready for operation and can be switched on, or it will switch itself on automatically.
Inserting/Removing the cover
The scope of supply of the Cascade includes a red plastic insert. This plastic insert can be snapped into the gap which appears once the control panel has been removed.
As well as serving as a protective cover for any CF card/micro-drive, the red colour of the plastic insert clearly indicates that the control panel has been removed.
Inserting the cover
ΞRemove the control panel as described in “Removing/Inserting the control panel” on page 15.
ΞInsert the plastic insert into the gap with the hole at the top and the smooth side facing outwards.
ΞPush the lower section of the plastic insert into the gap until it snaps into
place.
The cover has now been inserted.
ΞReinsert the control panel as described in “Removing/Inserting the control panel” on page 15.
Removing the cover
ΞRemove the control panel as described in “Removing/Inserting the control panel” on page 15.
ΞInsert your finger into the hole in the plastic insert.
ΞCarefully push the plastic insert downwards.
ΞPull the plastic insert forwards.
The cover has now been removed.
ΞReinsert the control panel as described in “Removing/Inserting the control panel” on page 15.
16
General operation
Switching the unit on/off
Switching on
ΞPress  .
.
or
ΞIf the Cascade was switched off via the ignition, the Cascade will switch back on once the ignition has been switched on.
ΞConfirm the warning which appears
by pressing the rotary control/push button  .
.
Notes:
•Unless the warning message is confirmed, the Cascade will remain disabled.
•Once it has been switched on, the Cascade will play back the last source selected (radio or media). Any mute or pause function activated will be cancelled.
•If fewer than approx. 2 hours have elapsed since the unit was last switched off, active route guidance will be restarted.
•If the volume was set to a very loud value before the unit was last switched off, it will be reset to setting 26 when the unit is switched back on.
Switching off
Ξ Press  .
.
If the ignition is switched on, the Cascade is switched to standby mode. The display goes dark and the Cascade sound is switched off.
or
Ξ Switch off the vehicle ignition.
The shutdown display appears for approx. 5 seconds.
During this period of approx. 5 seconds, shutdown can be aborted by pressing one of the buttons on the Cascade or by switching the ignition back on.
The Cascade then switches itself back on and plays back the last source selected (radio or media).
17
General operation
Setting the volume
There are 50 volume settings. The volume setting applies to all radio and audio sources.
You can specify whether changes in volume should be displayed in graphics format or not in “Displaying the volume” on page 187.
ΞTurn the rotary control/push button  clockwise/counter clockwise.
Note:
Subsequent sections of the operation guide describe how to set the volume for:
•Traffic announcements (page Page 75)
•Navigation announcements and other voice messages (Page 182)
•Acoustic signals (Page 187)
Sound settings
You can configure the sound of your Cascade to meet your requirements in the sound settings. The settings are also valid for all radio/audio sources.
Ξ The volume increases or decreases. |
Calling up the sound settings |
||
|
Ξ Press |
or |
until the sound |
settings appear.
or
Ξ Select 6RXQG in the radio or Audio main menu (Radio main menu Page 64/Audio main menu Page 86).
ΞTurn the rotary control/push button  to select one of the following options:
(TXDOLVHU, %DODQFH IDGHU, /RXGQHVV, %HFNHU VXUURXQG, 6XEZRRIHU, &URVVRYHU, &RPSUHVVLRQ and 5HVHW VHWWLQJV
ΞConfirm your selection by pressing the rotary control/push button  .
.
Note:
Press one of the buttons  ,
,  ,
,  ,
,  or
or  in order to quit
the sound settings.
18
General operation
Setting the equalizer
You can switch the acoustic pattern on 5 frequency bands with the equalizer setting.
4 equalizer presets are also available for selection. An additional option also allows you to make another 3 equalizer settings.
or
ΞSelect (TXDOLVHU in the sound settings.
ΞNext, turn the rotary control/push
button  to select one of the four
equalizer presets (5RFN 3RS, -D]] 0XVLF
and &ODVVLFDO) or one of the three userdefined equalizer settings (8VHU - 8VHU
or /LQHDU).
ΞTurn the rotary control/push button  to apply the required equalizer setting.
Note:
The equalizer presets (5RFN 3RS, -D]] 0XVLF and &ODVVLFDO) cannot be modified. Select /LQHDU to set the equalizer settings to an average value.
Defining the equalizer setting
ΞSelect 8VHU , 8VHU or 8VHU .
ΞPress and hold down the rotary control/ push button  .
.
The cursor jumps to the first frequency band.
ΞTurn the rotary control/push button  to select the frequency band to be
changed.
ΞConfirm your selection by pressing the rotary control/push button  .
.
ΞTurn the rotary control/push button  to select the required setting for the
selected frequency band.
ΞConfirm the setting by pressing the rotary control/push button  .
.
You may now change other settings. Once you have made the required settings:
ΞPress and hold down the rotary control/ push button  .
.
or
ΞTurn the rotary control/push button  to select the arrow next to the
frequency bands and press the rotary control/push button  .
.
You may now make other equalizer settings or select one of the presets.
19
General operation
Setting balance and fader
You can shift the tone centre in the vehicle using the balance and fader setting.
ΞSelect %DODQFH IDGHU in the sound settings.
An image of the vehicle interior in the direction of travel appears on the display. The small triangle indicates the current position of the tone centre.
The Balance setting is active.
ΞTurn the rotary control/push button 
to select %DODQFH or )DGHU.
Balance setting
ΞTurn the rotary control/push button  clockwise/counter clockwise.
The tone centre moves to the right/left.
Fader setting
ΞTurn the rotary control/push button  clockwise/counter clockwise.
The tone centre moves forwards/backwards.
Switching Loudness on/off and adjusting
Loudness provides a tone-compensated increase of the low frequencies, independently of the volume. The setting options enable you to adapt the Loudness function to your vehicle.
ΞSelect /RXGQHVV in the sound settings.
ΞTurn the rotary control/ push button  to select the required value.
Note:
Selecting “ ” sets an increase for higher bass frequencies, “ ” for medium bass frequencies and “ ” for low bass frequencies.
Select RII to deactivate the Loudness function.
20
General operation
Becker Surround
You can use this function to activate virtual surround sound and select the vehicle size to optimise the surround sound function.
Note:
The Becker Surround function is not available for medium wave or short wave.
ΞSelect %HFNHU VXUURXQG in the sound settings.
ΞSelect %HFNHU VXUURXQG and press the
rotary control/push button  to switch virtual surround sound on (
  ) or off (
  ).
).
ΞSelect /DUJH YHKLFOH or 0HGLXP VL]HG YHKL
FOH (on =  ).
).
Note:
Only one of the vehicle types in the list can be active (  ).
).
Subwoofer
You can set the volume level of the subwoofer output/ deactivate the subwoofer output.
ΞSelect 6XEZRRIHU in the sound settings.
ΞTurn the rotary control/push button  to select the required value.
Note:
A setting of "+10" indicates an increase in the volume of the subwoofer.
Select RII to deactivate the subwoofer output.
In addition, 6XEZRRIHU is deactivated with the crossover setting.
Crossover
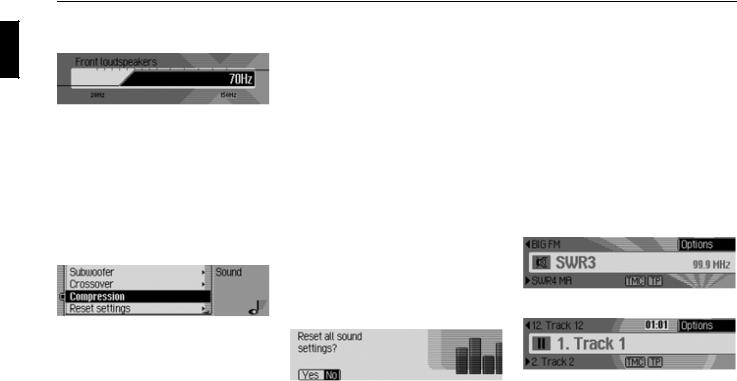
Use this function to set the threshold frequencies for the front loudspeakers, the rear loudspeakers and the subwoofer.
ΞSelect &URVVRYHU in the sound settings.
ΞYou may now select )URQW ORXGVSHDNHUV,
5HDU ORXGVSHDNHUV or 6XEZRRIHU.
• )URQW ORXGVSHDNHUV and 5HDU ORXGVSHDNHUV
You can set the lower threshold frequency of the front and rear loudspeakers to a value of between RII, 20 and 150 Hz.
• 6XEZRRIHU
You can set the upper threshold frequency of the subwoofer to a value of between 50 and 150 Hz.
21
General operation
In this example you can see the settings for the front loudspeakers.
ΞTurn the rotary control/push button  to select the required value.
Compression
This function enables you to switch the reduction of the dynamic range of the audio signal on/off.
ΞSelect &RPSUHVVLRQ in the sound settings.
ΞPress the rotary control/ push button
 to switch the function on (
 ) or off (
 ).
).
Reset settings
You can reset all sound settings to the default settings.
The following settings are reset to the relevant default value:
• (TXDOLVHU: All default settings are reset to the initial value. The user-defined setting is reset to zero.
•%DODQFH IDGHU to centre setting
•/RXGQHVV to off
•%HFNHU VXUURXQG to off
•6XEZRRIHU to RII.
•&URVVRYHU front and rear loudspeakers
to RII, subwoofer to 100 Hz.
• &RPSUHVVLRQ to RII.
ΞSelect 5HVHW VHWWLQJV in the sound settings.
ΞSelect <HV to reset the sound settings or 1R to continue without making any changes.
Select <HV to reset the sound settings.
Mute
You can switch your Cascade to mute, i.e. switch off the sound from the current radio/media source.
However, navigation announcements, traffic announcements (if TP has been activated) and other voice announcements on the Cascade continue to be transmitted unaffected.
Ξ Press the rotary control/push button  and hold it down for at least
2 seconds.
Example of muted radio mode.
Example of muted media mode.
22

General operation
You can deactivate the mute function as follows:
•Press the rotary control/push button
again  and hold it down for at least 2 seconds.
•Change the volume by turning the rotary control/push button  .
.
•Press  or
or  .
.
•Select another station or track.
•Switch the Cascade off and back on again.
23

Navigation mode
What is navigation?
The term “navigation” (lat. navigare = to travel by sea) is generally understood to mean the location of a vehicle, the determination of the direction and distance from the desired destination and the required route. As navigation aids, stars, prominent landmarks, compass and satellites are used.
With Cascade, location is determined with the GPS receiver (GPS = Global Positioning System). The direction and distance from the destination are determined using a digital road map, a navigation computer and sensors. A speedometer signal and a reverse signal are additionally used to calculate the route. For safety reasons, navigation is predominantly in spoken form supported by a direction indicator on the display.
GSafety instructions
•Road traffic regulations always take priority. The navigation system is only an aid. Errors may occur in individual data items/entries. At all times, the driver must decide whether or not to heed the information provided.
We do not accept liability for erroneous data provided by the navigation system.
•Observation of traffic signs and local traffic regulations must always take priority.
•Traffic guidance is restricted to passenger vehicles only. Special driving recommendations and regulations for other vehicles (e.g. commercial vehicles) are not included.
•Destinations may only be entered when the vehicle is stationary.
Navigation data
The Cascade is supplied with a CF memory card. This memory card contains a digitised road map.
Note:
The navigation function of the Cascade only functions with an original memory card supplied by Harman/Becker.
The supplied memory card must not be formatted under any circumstances.
The memory card with the navigation data is copy-protected. If you change the data on the card in any way, the Cascade will no longer accept this memory card.
Motorways, federal and regional roads, as well as district roads are stored in the digitised street map. Larger cities and communities are comprehensively covered. For smaller towns and communities, the regional and unclassified roads or access roads and the town centres are included.
One-way streets, pedestrian zones, turn bans and other traffic regulations are taken into account as far as possible.
There may be discrepancies between the data on the memory card and the actual lo-
24

Navigation mode
cal situation, due to permanent changes to road systems and their traffic regulations.
Note:
For Norway, Sweden, Finland, Denmark, Spain and Italy, non-verified data has been used to achieve a high depth of digitisation; i.e. with this data, the navigation system cannot refer to information such as motorway, trunk road, 30 zone, one-way street or other traffic regulations, as this is not recorded.
All roads can be used, but optimum route guidance cannot be guaranteed.
Inserting memory card
The slot for memory cards containing navigation data is located underneath the removable control panel on the Cascade or underneath the cover.
ΞRemove the control panel as described in “Removing/Inserting the control panel” on page 15.
ΞRemove the cover as described in “Inserting/Removing the cover” on page 16.
ΞTake the memory card containing the navigation data out of its protective sleeve.
ΞInsert the memory card into the visible slot on the right-hand side.
Notes:
The memory card can only be inserted in one direction. The reverse of the memory card points to the left.
ΞPush the memory card carefully into the slot.
This pushes the eject button located above and to the left of the slot outwards.
ΞReinsert the cover as described in “Inserting/Removing the cover” on page 16.
ΞReinsert the control panel as described in “Removing/Inserting the control panel” on page 15.
The memory card containing the navigation data is now ready for operation and the system is able to access the navigation data.
25
Navigation mode
Removing memory card
ΞRemove the control panel as described in “Removing/Inserting the control panel” on page 15.
ΞRemove the cover as described in “Inserting/Removing the cover” on page 16.
ΞPress the eject button located to the top left of the slot.
ΞThe memory card is pushed forwards out of the slot.
ΞPull the memory card out of the slot.
ΞPut the memory card containing the navigation data back into its protective sleeve.
ΞReinsert the cover as described in “Inserting/Removing the cover” on page 16.
•Reinsert the control panel as described in “Removing/Inserting the control panel” on page 15.
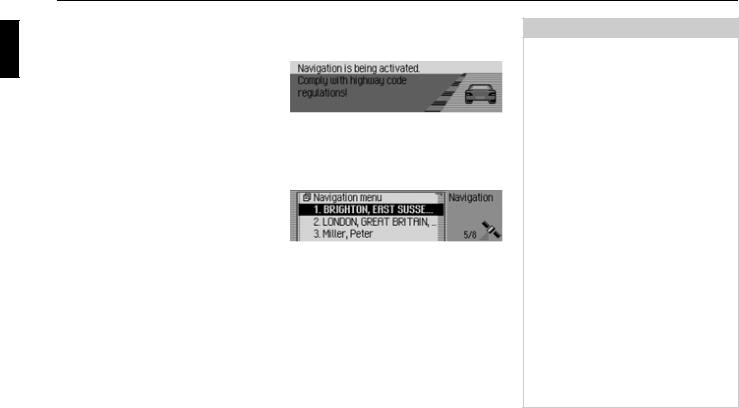
Selecting navigation
Ξ Press  .
.
Navigation is activated. The display only appears if navigation has not been activated since the last time the Cascade was switched on or if it is not yet ready.
The Fast Access menu then appears. The number of satellites received appears on the right-hand side of the display (in the example, 5 of the maximum of 8 receivable satellites are being received).
In fast access mode, you can select and navigate to the last destinations entered/ the destinations you have stored in fast access mode.
For more information, see “Navigation fast access” on page 36.
Note:
The memory card containing the navigation data must be loaded when starting navigation mode for the first time.
If calibration of the navigation system has not yet been completed, the system will prompt you to take a drive for calibration (see Installation Guide).
The memory card containing the navigation data must be inserted to start the calculation of a route. If it is not inserted, you will be prompted to insert it. During the route calculation, the  symbol appears on the right-hand side of the display. Once the calculation has been completed, the
  symbol disappears, the memory card can then be removed and replaced, if desired, by a memory card containing audio data.
When entering destinations, driving off should be delayed until the  symbol has disappeared. For distant destinations, you may be prompted to re-insert the memory card at a later time.
26
Navigation mode
Calling up the Navigation main menu
ΞPress  twice.
or
ΞPress  .
.
The Fast Access menu appears. Ξ Select the 1DYLJDWLRQ PHQX entry.
The Navigation menu appears.
ΞTurn the rotary control/push button  to select one of the following options:
(QWHU DGGUHVV, 'HVW IURP DGG ERRN, 6SHFLDO'HVW, 3RLQW RI ,QWHUHVW H[WHUQDO , %HFNHUFOXE or
6HWWLQJ
ΞConfirm your selection by pressing the rotary control/push button  .
.
The required function is called up.
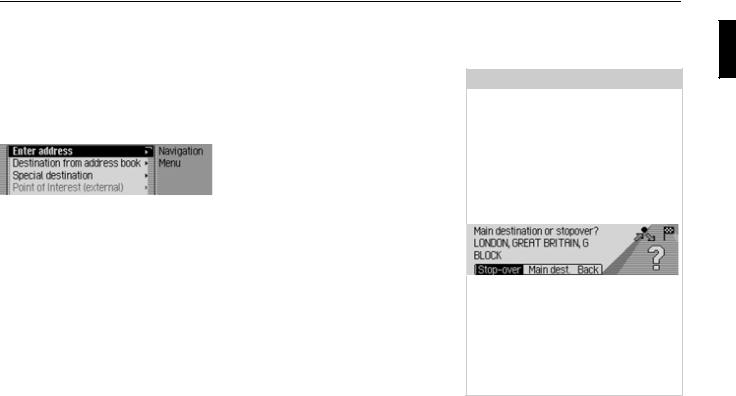
• (QWHU DGGUHVV
Accesses the data entry menu for the destination. See “Entering a destination” on page 28.
• 'HVW IURP DGG ERRN
You can select a destination from the address book. See “Selecting a destination from the address book” on page 40.
• 6SHFLDO'HVW
Access the POI selection menu. POIs include petrol stations, airports or hospitals, for example. See “Point of interest” on page 40.
• %HFNHUFOXE
The destinations on the Beckerclub homepage can be called up. See “Beckerclub” on page 46.
• 3RLQW RI ,QWHUHVW H[WHUQDO
Takes you to the menu for selecting an external point of interest. In other words, you can select special points of interest on a special storage medium. This menu item can only be selected if, for example, a CD with external points of interest has been inserted. See “External points of interest” on page 45.
• 6HWWLQJ
Accesses the Navigation Settings menu. See “Settings” on page 60.
Note:
If route guidance is already active, you can start to enter another destination by
selecting (QWHU DGGUHVV, 'HVW IURP DGG ERRN and 6SHFLDO'HVW.
Once the destination has been selected, the Cascade will prompt you to confirm if the new destination is to be used as the main destination or a stopover.
ΞTurn the rotary control/push button
 to select 6WRS RYHU or 0DLQ GHVW .
ΞConfirm your selection by pressing the rotary control/push button  .
.
Depending on the selection, the new destination is now used as a stopover or the new main destination.
27
Navigation mode
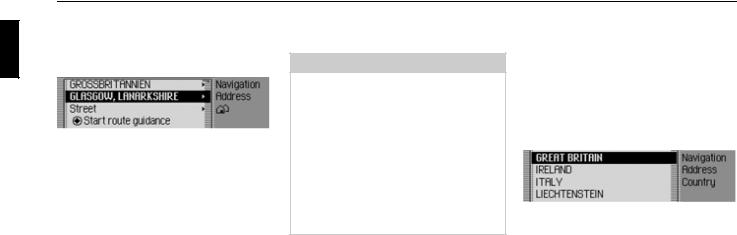
Entering a destination
ΞIn the Navigation main menu, select
the (QWHU DGGUHVV entry.
The Enter Destination menu appears. The last country selected and the last town selected appear first.
ΞTurn the rotary control/push button  to select one of the following options:
*5($7 %5,7$,1 (country as example), */$6*2: (town as example),
6WUHHW, 6WDUW URXWH JXLGDQFH, 3RVWDO FRGH (postcode), +RXVH QXPEHU, ,QWHUVHFWLRQ,
&HQWUH, *HR FR RUGLQDWHV,
5RXWH VKRUW/5RXWH IDVW or 5RXWH G\QDPLF
and
6DYH GHVWLQDWLRQ
ΞConfirm your selection by pressing the rotary control/push button  .
.
The corresponding menu appears or the required action is initiated.
Note:
Some entries in the Enter Destination menu cannot be selected directly. For example, a house number cannot be entered unless the name of a road has been entered first. These non-selectable entries are greyed out in the display and cannot be selected.
The entry will also be greyed out if no house numbers are available for a specific road.
Selecting a country
If your destination is located in a different country (*5($7 %5,7$,1 in the example display) you must first select the required country.
ΞIn the Enter Destination menu, select the country (*5($7 %5,7$,1 in the example).
ΞTurn the rotary control/push button  to select your destination country.
ΞConfirm your selection by pressing the rotary control/push button  .
.
28

Navigation mode
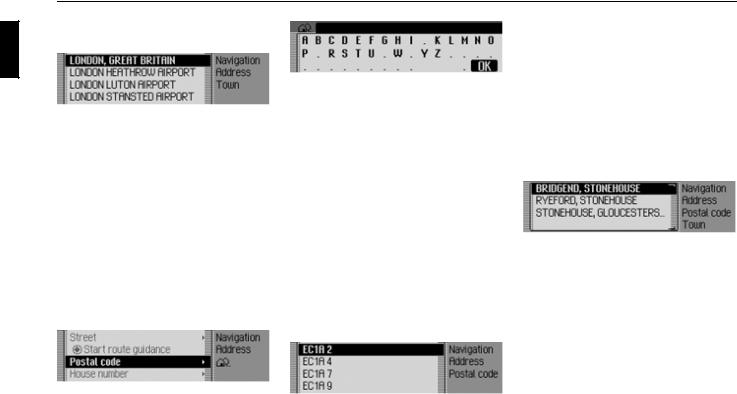
Entering a destination town
ΞIn the Enter Destination menu, select the town (*/$6*2: in the example).
Note:
If your destination is in the same town as that displayed, you can continue directly with entering the road/centre.
ΞConfirm your selection by pressing the rotary control/push button  .
.
The data entry menu for the town appears.
ΞTurn the rotary control/push button
 and then press the rotary control/ push button to select each letter one
after the other.
Note:
Select the  symbol to delete the last character in the entry.
The last letter entered is highlighted. To help, the name of the location closest to the previous entry appears. The Cascade offers only the possible remaining letters for selection. If no other entries are available, the Cascade completes the town name automatically.
Accept entry:
ΞIn the data entry menu, select the  symbol.
or
ΞPress the rotary control/push button  and hold it down for at least 2 seconds.
If the complete town name has already been entered or completed automatically, the unit will either switch automatically to either the town distinguishing list or you can continue directly with entering the road/centre.
If an incomplete town entry has been confirmed, the town selection list appears.
ΞTurn the rotary control/push button  and then press the rotary control/push
button to select the required town.
If the entry made is unambiguous, you can continue directly with entering the road/centre.
29
Navigation mode
The town distinguishing list appears if the selection is ambiguous.
ΞTurn the rotary control/push button  and then press the rotary control/push
button to select the required town.
You can now continue with entering the road/centre.
Selecting destination via postcode
You can also select a destination via its postcode.
Ξ In the Enter Destination menu, select
3RVWDO FRGH.
ΞConfirm your selection by pressing the rotary control/push button  .
.
The data entry menu for the postcode appears.
ΞTurn the rotary control/push button
 and then press the rotary control/ push button to select the numbers and
letters one after the other.
Accept entry:
ΞIn the data entry menu, select the  symbol.
or
ΞPress the rotary control/push button  and hold it down for at least 2 seconds.
If you have entered an incomplete postcode, the postcode selection list appears.
ΞTurn the rotary control/push button
 and then press the rotary control/ push button to select the required post-
code.
The display then shows either the destination corresponding to the postcode in the Enter Destination menu or, if the postcode is shared among several towns, a list containing these towns.
ΞTurn the rotary control/push button  and then press the rotary control/push
button to select the required town.
You can now continue with entering the road/centre.
30
Loading...