


IMPORTANT SAFETY INSTRUCTIONS
When using this machine, basic safety precautions should always be taken, including the following: Read all instructions before using.
DANGER - To reduce the risk of electric shock:
1.The machine should never be left unattended while plugged in. Always unplug the machine from the electrical outlet immediately after using and before cleaning.
WARNING - To reduce the risk of burns, fire, electric shock, or injury to persons:
1.Do not allow this machine to be used as a toy. Close attention is necessary when the machine is used by or near children.
2.Use this machine only for its intended use as described in this manual. Use only accessories recommended by the manufacturer as contained in this manual.
3.Never operate this machine if it has a damaged cord or plug, if it is not working properly, if it has been dropped or damaged, or dropped into water. Return the machine to the nearest authorized retailer or service center for examination, repair, electrical or mechanical adjustment.
4.Never operate the machine with any air openings blocked. Keep ventilation openings of the machine and foot control free from the accumulation of lint, dust, and loose cloth.
5.Never drop or insert any object into any opening.
6.Do not use outdoors.
7.Do not operate where aerosol (spray) products are being used or where oxygen is being administered.
8.To disconnect, turn the main switch to the symbol “ ” position which represents off, then remove plug from outlet.
9.Do not unplug by pulling on cord. To unplug, grasp the plug, not the cord.
10.Keep fingers away from all moving parts. Special care is required around the machine needle.
11.Always use the proper needle plate. The wrong plate can cause the needle to break.
12.Do not use bent needles.
13.Do not pull or push fabric while stitching. It may deflect the needle causing it to break.
14.Switch the machine to the symbol “  ” position when making any adjustments in the needle area, such as threading needle, changing needle, threading bobbin, or changing presser foot, and the like.
15.Always unplug the machine from the electrical outlet when removing covers, lubricating, or when making any other user servicing adjustments mentioned in the instruction manual.
16.This sewing machine is not intended for use by young children or infirm persons without supervision.
17.Young children should be supervised to ensure that they do not play with this machine.
18.If the LED light unit (light-emitting diode) is damaged, it must be replaced by authorized dealer.
19.Hold the foot controller plug when rewinding into cord reel. Do not allow the plug to whip when rewinding.
SAVE THESE INSTRUCTIONS
This machine is intended for household use.
1

FOR USERS IN THE UK, EIRE, MALTA
AND CYPRUS ONLY
If this machine is fitted with a three-pin non-rewireable BS plug, then please read the following.
IMPORTANT
If the available socket outlet is not suitable for the plug supplied with this equipment, it should be cut off and an appropriate three-pin plug fitted. With alternative plugs, an approved fuse must be fitted in the plug.
NOTE
The plug severed from the main lead must be destroyed, as a plug with bared flexible cords is hazardous if engaged in a live socket outlet. In the event that the plug fuse must be replaced, use a fuse approved by ASTA to BS 1362,
i.e., carrying the  mark, rated as marked on the plug.
Always replace the fuse cover; never use plugs with the fuse cover omitted.
WARNING
DO NOT CONNECT EITHER WIRE TO THE EARTH TERMINAL, WHICH IS MARKED WITH THE LETTER ‘E’, BY
THE EARTH SYMBOL ( ) OR COLOURED GREEN OR GREEN AND YELLOW.
The wires in this main lead are coloured in accordance with the following code:
Blue |
Neutral |
Brown Live
As the colours of the wiring in the main lead of this appliance may not correspond with the coloured markings identifying the terminals in your plug, proceed as follows.
The wire that is coloured blue must be connected to the terminal that is marked with the letter ‘N’ or coloured black or blue.
The wire that is coloured brown must be connected to the terminal that is marked with the letter ‘L’ or coloured red or brown.
2

Federal Communications Commission (FCC)
Declaration of Conformity (For USA Only)
Responsible Party: Tacony Corporation
1760 Gilsinn Lane,
Fenton, Missouri 63026
declares that the product
Product Name: |
Baby Lock Sewing Machine |
Model Number: |
BLL2 |
Complies with Part 15 of the FCC Rules. Operation is subject to the following two conditions: (1) this device may not cause harmful interference, and (2) this device must accept any interference received, including interference that may cause undesired operation.
This equipment has been tested and found to comply with the limits for a Class B digital device, pursuant to Part 15 of the FCC Rules. These limits are designed to provide reasonable protection against harmful interference in a residential installation. This equipment generates, uses, and can radiate radio frequency energy and, if not installed and used in accordance with the instructions, may cause harmful interference to radio communications. However, there is no guarantee that interference will not occur in a particular installation. If this equipment does cause harmful interference to radio or television reception, which can be determined by turning the equipment off and on, the user is encouraged to try to correct the interference by one or more of the following measures:
•Reorient or relocate the receiving antenna
•Increase the separation between the equipment and receiver.
•Connect the equipment into an outlet on a circuit different from that to which the receiver is connected.
•Consult the retailer or an experienced radio/TV technician for help.
•The included interface cable should be used in order to ensure compliance with the limits for a Class B digital device.
•Changes or modifications not expressly approved by Tacony Corporation could void the user's authority to operate the equipment.
3

CONGRATULATIONS ON CHOOSING OUR
MACHINE
Your machine is the most advanced computerized household embroidery and sewing machine. To fully enjoy all the features incorporated, we suggest that you study the manual.
PLEASE READ BEFORE USING THIS MACHINE
For safe operation
1.Be sure to keep your eye on the needle while sewing. Do not touch the handwheel, thread take-up lever, needle, or other moving parts.
2.Remember to turn off the power switch and unplug the cord when:
•Operation is completed
•A power failure occurs during use
•Maintaining the machine
•Leaving the machine unattended.
3.Do not store anything on the foot controller.
4.Plug the machine directly into the wall. Do not use extension cords.
For a longer service life
1.When storing this machine, avoid direct sunlight and high humidity locations. Do not use or store the machine near a space heater, iron, halogen lamp, or other hot objects.
2.Use only neutral soaps or detergents to clean the case. Benzene, thinner, and scouring powders can damage the case and machine, and should never be used.
3.Do not drop or hit the machine.
4.Always consult the operation manual when replacing or installing any assemblies, the presser feet, needle, or other parts to assure correct installation.
For repair or adjustment
In the event a malfunction occurs or adjustment is required, first follow the troubleshooting table in the back of the operation manual to inspect and adjust the machine yourself. If the problem persists, please consult your local authorized Baby Lock retailer.
For additional product information and updates, visit our web site at www.babylock.com
The contents of this manual and specifications of this product are subject to change without notice.
4
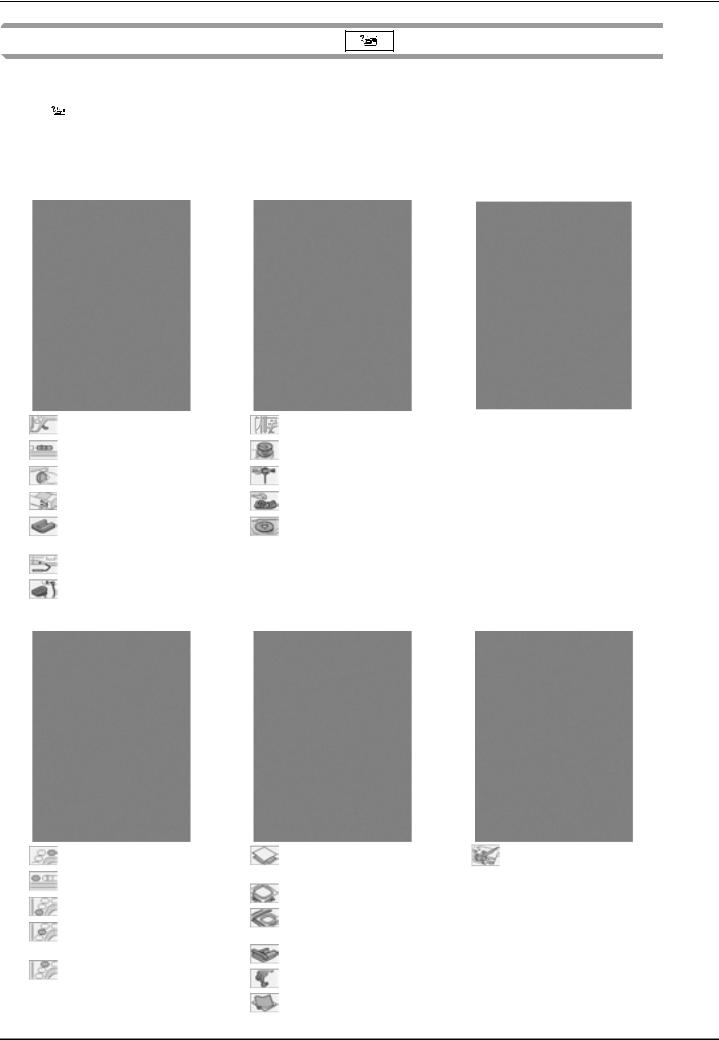
HOW TO USE THIS MANUAL
Chapters 1 and 2 describe to the first-time user the initial operations for using this machine and the basic sewing operations.
To sew utility stitches
Continue with chapter 3 to learn how to select a stitch and sew using the various stitches.
Chapter 1 |
Chapter 2 |
Chapter 3 |
|||
|
|
|
|
|
|
|
|
|
|
|
|
To sew characters and patterns
Continue with chapter 4 to learn basic operations, from selecting patterns to sewing, in addition to operations such as combining and editing patterns to rotate or resize them, and storing combined patterns.
Chapter 1 |
Chapter 2 |
Chapter 4 |
|||
|
|
|
|
|
|
|
|
|
|
|
|
|
|
|
|
|
|
To embroider
Continue with chapter 5 to learn basic embroidering operations, from selecting patterns to sewing, as well as operations such as editing patterns to rotate or resize them and utilizing more useful functions or techniques. In chapter 6, you can learn how to edit more advanced embroidery patterns and combine patterns.
Chapter 1 |
Chapter 2 |
Chapter 5 |
Chapter 6 |
||||
|
|
|
|
|
|
|
|
|
|
|
|
|
|
|
|
•Parts related to operations described in the procedures are highlighted in gold.
Perform the operations while comparing the screens in the procedures with those that appear on the machine.
•If, while using the machine, you have questions about an operation or you would like to know more about a specific function, refer to the index (P.207) and the table of contents to find the section of the manual to refer to.
5

CONTENTS
CONTENTS
NAMES OF MACHINE PARTS AND THEIR |
|
FUNCTIONS .................................................. |
9 |
Machine ..................................................................... |
9 |
Needle and Presser Foot Section ............................... |
10 |
Embroidery Unit ....................................................... |
10 |
Operation Buttons .................................................... |
11 |
Included Accessories ................................................ |
11 |
Options .................................................................... |
14 |
Chapter 1 Getting Ready |
15 |
TURNING THE MACHINE ON/OFF............. |
16 |
LCD SCREEN................................................ |
17 |
Using the Machine Setting Mode Key ...................... |
20 |
Using the Machine Operation Mode Key ................. |
22 |
Using the Pattern Explanation Key ........................... |
23 |
LOWER/UPPER THREADING....................... |
24 |
Winding the Bobbin ................................................. |
24 |
Setting the Bobbin .................................................... |
27 |
Pulling Up the Bobbin Thread .................................. |
28 |
Upper Threading ...................................................... |
29 |
Using the Twin Needle ............................................. |
32 |
CHANGING THE PRESSER FOOT................ |
34 |
Removing the Presser Foot ........................................ |
34 |
Attaching the Presser Foot......................................... |
34 |
CHANGING THE NEEDLE ........................... |
35 |
Chapter 2 Sewing Basics |
39 |
SEWING....................................................... |
40 |
Sewing a Stitch ......................................................... |
40 |
Sewing Reinforcement Stitches ................................. |
42 |
Sewing Curves .......................................................... |
42 |
Changing Sewing Direction ...................................... |
42 |
Sewing Heavyweight Fabric...................................... |
43 |
Sewing Lightweight Fabric ........................................ |
43 |
Top Stitching............................................................. |
74 |
Smocking .................................................................. |
74 |
Fagoting .................................................................... |
75 |
Tape or Elastic Attaching........................................... |
76 |
Heirloom Stitching .................................................... |
77 |
Buttonhole Stitches ................................................... |
79 |
Bar Tacks .................................................................. |
84 |
Button Sewing........................................................... |
86 |
Eyelets ...................................................................... |
87 |
Multi-Directional Sewing |
|
(Straight Stitch and Zigzag Stitch) .............................. |
88 |
Zipper Insertion ........................................................ |
89 |
Chapter 4 Character/Decorative Stitches 93
SELECTING STITCH PATTERNS ................... |
94 |
Selecting Decorative Stitch Patterns/ |
|
7 mm Decorative Stitch Patterns/ |
|
Satin Stitch Patterns/ |
|
7 mm Satin Stitch Patterns/Cross Stitch Patterns/ |
|
Utility Decorative Stitch Patterns............................... |
95 |
Alphabet Patterns ...................................................... |
95 |
SEWING STITCH PATTERNS ....................... |
97 |
Sewing Attractive Finishes......................................... |
97 |
Basic Sewing............................................................. |
97 |
Adjusting Patterns ..................................................... |
98 |
EDITING STITCH PATTERNS ..................... |
100 |
Changing the Pattern Size ....................................... |
101 |
Changing the Pattern Length |
|
(7 mm Satin Stitch Patterns Only) ............................ |
101 |
Creating a Vertical Mirror Image ............................. |
101 |
Creating a Horizontal Mirror Image ........................ |
101 |
Selecting a Single/Repeating Pattern........................ |
102 |
Changing the Thread Density |
|
(Satin Stitch Patterns Only) ...................................... |
102 |
Checking the Image ................................................ |
103 |
ADJUSTING STITCH SETTINGS ................... |
44 |
Adjusting the Stitch Width ........................................ |
44 |
Adjusting the Stitch Length ....................................... |
44 |
Adjusting the Thread Tension ................................... |
45 |
USEFUL FUNCTIONS .................................. |
46 |
Automatic Reinforcement Stitching ........................... |
46 |
Automatic Thread Cutting ......................................... |
46 |
Locking the Screen ................................................... |
47 |
Chapter 3 Utility Stitches |
49 |
SELECTING A UTILITY STITCH .................... |
50 |
Selecting a Stitch Pattern........................................... |
51 |
Saving Stitch Settings ................................................ |
52 |
Using the Sewing Type Selection Key ...................... |
53 |
SEWING THE STITCHES .............................. |
54 |
Straight Stitches ........................................................ |
54 |
Darts Seams .............................................................. |
58 |
Gathering ................................................................. |
58 |
Flat Fell Seams .......................................................... |
59 |
Pintucks .................................................................... |
60 |
Zigzag Stitches.......................................................... |
61 |
Elastic Zigzag Stitches ............................................... |
62 |
Overcasting .............................................................. |
63 |
Quilting .................................................................... |
67 |
Blind Hem Stitches ................................................... |
71 |
Appliqués ................................................................. |
72 |
Shell Tuck Stitching .................................................. |
73 |
Scalloping................................................................. |
73 |
COMBINING STITCH PATTERNS .............. |
104 |
Before Combining Patterns...................................... |
104 |
Combining Patterns From Different Categories ........ |
104 |
Combining Stitch Patterns of Different Sizes............ |
106 |
Combining Stitch Patterns of Different Orientations....... |
106 |
Combining Stitch Patterns of Different Lengths........ |
107 |
Creating Step Patterns |
|
(7 mm Satin Stitch Patterns Only) ............................ |
108 |
USING THE MEMORY FUNCTION ........... |
110 |
Stitch Data Precautions ........................................... |
110 |
Saving Stitch Patterns in the Machine’s Memory ..... |
112 |
Saving Stitch Patterns to USB Media |
|
(Commercially Available)........................................ |
113 |
Saving Stitch Patterns to the Computer .................... |
114 |
Retrieving Stitch Patterns from the Machine’s |
|
Memory .................................................................. |
115 |
Retrieving stitch pattern from USB Media................ |
116 |
Retrieving Stitch Patterns from the Computer .......... |
117 |
6

CONTENTS
Chapter 5 Embroidery |
119 Chapter 6 Embroidery Edit |
165 |
BEFORE EMBROIDERING ......................... |
120 |
Attaching Embroidery Foot “U” ............................... |
121 |
Attaching the Embroidery Unit ................................ |
122 |
SELECTING EMBROIDERY PATTERNS ...... |
124 |
Embroidery Patterns/Floral Patterns/ |
|
Baby Lock Exclusive Embroidery Designs ................ |
125 |
Alphabet Patterns .................................................... |
125 |
Frame Patterns......................................................... |
126 |
Embroidery Cards .................................................... |
127 |
Selecting Patterns from the Machine's Memory/ |
|
USB Media/Computer.............................................. |
127 |
VIEWING THE SEWING SCREEN .............. |
128 |
PREPARING THE FABRIC .......................... |
129 |
Attaching Stabilizer to Fabric................................... |
129 |
Hooping Fabric in the Embroidery Frame ................ |
130 |
Embroidering Small Fabrics and Fabric Edges .......... |
132 |
ATTACHING THE EMBROIDERY FRAME .. |
133 |
EDITING THE PATTERN ............................ |
134 |
Changing the Embroidery Frame Display................. |
134 |
Changing the Pattern Position.................................. |
135 |
Rotating the Pattern ................................................. |
135 |
Changing the Pattern Size........................................ |
136 |
Creating a Horizontal Mirror Image ......................... |
137 |
Changing the Stitching Density |
|
(Alphabet and Frame Patterns Only) ........................ |
138 |
Changing the Color of Single Characters.................. |
138 |
CHECKING THE PATTERN ........................ |
139 |
Checking the Embroidering Position ........................ |
139 |
Previewing the Pattern............................................. |
140 |
SEWING AN EMBROIDERING PATTERN .. |
141 |
Sewing Attractive Finishes ....................................... |
141 |
Sewing Embroidery Patterns .................................... |
142 |
Embroidering Appliqué Patterns .............................. |
143 |
ADJUSTMENTS DURING THE |
|
EMBROIDERY PROCESS............................ |
145 |
If the Bobbin Runs Out of Thread ................................. |
145 |
If the Thread Breaks During Sewing .............................. |
146 |
Restarting from the Beginning.................................. |
147 |
Automatically Resuming Embroidery |
|
When the Power Goes Off....................................... |
147 |
Manually Resuming Embroidery After |
|
Turning Off the Power ............................................. |
148 |
Adjusting the Thread Tension .................................. |
149 |
Automatic Thread Cutting (End Color Trim) ............. |
150 |
Changing the Embroidering Speed........................... |
151 |
Changing the Thread Color Display......................... |
151 |
AVAILABLE EDITING FUNCTIONS ............ |
166 |
|
|
................SELECTING PATTERNS TO EDIT |
167 |
|
|
Selecting Embroidery Patterns/ |
|
|
|
Floral Patterns/Frame Patterns/ |
|
|
|
Baby Lock Exclusive Embroidery Designs ................ |
167 |
1 |
|
Alphabet Patterns .................................................... |
168 |
|
|
EDITING PATTERNS................................... |
170 |
|
|
Moving the Pattern .................................................. |
171 |
|
|
Rotating the Pattern ................................................. |
171 |
|
|
Changing the Size of the Pattern .............................. |
172 |
|
|
Deleting the Pattern ................................................. |
173 |
2 |
|
Changing the Configuration of Character Patterns.... |
173 |
|
|
Changing the Character Spacing .............................. |
174 |
|
|
..Changing the Color of Each Character in a Pattern |
174 |
|
|
Changing the Thread Color...................................... |
174 |
|
|
Creating a Custom Thread Table.............................. |
176 |
|
|
....Choosing a Color from the Custom Thread Table |
177 |
3 |
|
After Editing............................................................. |
178 |
|
|
COMBINING PATTERNS............................ |
179 |
|
|
.......................................Editing Combined Patterns |
179 |
|
|
Sewing Combined Patterns ...................................... |
182 |
|
|
USING THE MEMORY FUNCTION ............ |
182 |
|
|
Chapter 7 Appendix |
183 |
4 |
|
CARE AND MAINTENANCE....................... |
184 |
|
|
....................................................Cleaning the LCD |
184 |
|
|
Cleaning the Machine Casing .................................. |
184 |
|
|
...................................................Cleaning the Race |
184 |
|
|
Cleaning the Bobbin Case ....................................... |
185 |
5 |
|
ADJUSTING THE SCREEN .......................... |
186 |
|
|
Screen Visibility Is Low............................................ |
186 |
|
|
Touch Panel Is Malfunctioning ................................ |
186 |
|
|
TROUBLESHOOTING ................................ |
188 |
|
|
ERROR MESSAGES ..................................... |
191 |
|
|
6 |
|
||
SPECIFICATIONS........................................ |
197 |
|
|
UPGRADING YOUR MACHINE’S |
|
|
|
SOFTWARE |
198 |
|
|
|
|
||
.....................Upgrade Procedure Using USB Media |
198 |
|
|
Upgrade Procedure Using Computer ....................... |
199 |
|
|
STITCH SETTING CHART........................... |
201 |
7 |
|
INDEX ........................................................ |
207 |
|
|
USING THE MEMORY FUNCTION ........... |
153 |
Embroidery Data Precautions .................................. |
153 |
Saving Embroidery Patterns in |
|
the Machine’s Memory............................................ |
155 |
Saving Embroidery Patterns to USB Media |
|
(Commercially Available) ........................................ |
156 |
Saving Embroidery Patterns to the Computer ........... |
157 |
Retrieving Embroidery Patterns from |
|
the Machine’s Memory............................................ |
158 |
Retrieving Embroidery Patterns from |
|
USB Media (Commercially Available)...................... |
159 |
Retrieving Embroidery Patterns from the Computer.. 160 |
|
EMBROIDERY APPLICATIONS .................. |
162 |
Using a Frame Pattern to Make an Appliqué (1)....... |
162 |
Using a Frame Pattern to Make an Appliqué (2)....... |
163 |
7

8
NAMES OF MACHINE PARTS AND THEIR FUNCTIONS
NAMES OF MACHINE PARTS AND THEIR FUNCTIONS
Machine
■ Front View
aTop cover
Open the top cover to thread the machine and wind the bobbin.
b Thread guide plate
Pass the thread around the thread guide plate when threading the upper thread.
cThread take-up lever check window
Look through the window to check the position of the take-up lever.
dNeedle threader lever
Use the needle threader lever when threading the needle automatically.
eThread cutter
Pass the threads through the thread cutter to cut them.
fFlat bed attachment with accessory compartment
Store presser feet and bobbins in the accessory compartment of the flat bed attachment. Remove the flat bed attachment when sewing cylindrical pieces such as sleeve cuffs.
gOperation buttons (5 buttons) and sewing speed controller
Use these buttons to perform various operations, such as starting sewing and raising or lowering the needle.
Slide the sewing speed controller to adjust the sewing speed while using utility stitches.
hKnee lifter slot
Insert the knee lifter into the slot.
iKnee lifter
Use the knee lifter to raise and lower the presser foot.
jLCD (liquid crystal display)
Stitch settings can be viewed and edited, and operations for using the machine can be displayed, and error messages appear in the LCD.
kSpool pin
Place a spool of thread on the spool pin.
lSpool cap
Use the spool cap to hold the spool in place.
mBobbin winder
Use the bobbin winder when winding the bobbin.
nSupplemental spool pin
Use this spool pin to wind the bobbin thread while sewing or to sew with the twin needle.
oThread guide
Pass the thread through this thread guide when winding the bobbin thread.
pBobbin winding pretension disk and guide
Pass the thread through the pretension disk and guide when winding the bobbin thread.
■ Right-side/Rear View
aHandle
When transporting the machine, carry it by this handle.
bHandwheel
Turn the handwheel toward you to sew one stitch or to raise or lower the needle.
cEmbroidery card slot
Insert the embroidery cards (sold separately) into the embroidery card slot.
dUSB port connector for media
In order to send patterns from/to USB media, plug the USB media into the USB port connector.
eUSB port connector for computer
In order to import/export patterns between a computer and the machine, plug the USB cable into the USB port connector.
fTouch pen holder
Use the touch pen holder to hold the touch pen when it is not being used.
gFoot controller jack
Insert the plug on the end of the foot controller cord into the foot controller jack.
hFoot controller with retractable cord
Press the foot controller to control the speed of the machine.
iJack connector
Insert the power cord into the connector jack.
jMain power switch
Use the main power switch to turn the machine ON and OFF.
kAir vent
Do not cover the air vent while the sewing machine is being used.
lFeed dog position switch
Use the feed dog position switch to lower the feed dogs.
mPresser foot lever
Raise and lower the presser foot lever to raise and lower the presser foot.
9
NAMES OF MACHINE PARTS AND THEIR FUNCTIONS
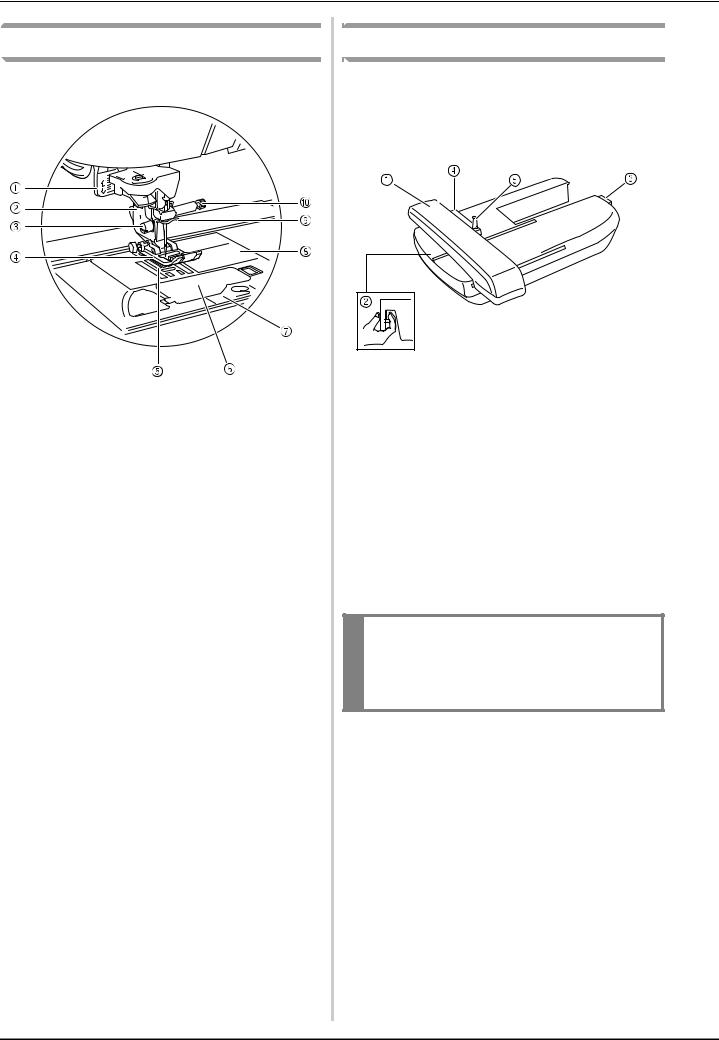
Needle and Presser Foot Section
aButtonhole lever
Lower the buttonhole lever when sewing buttonholes and bar tacks.
bPresser foot holder
The presser foot is attached to the presser foot holder.
cPresser foot holder screw
Use the presser foot holder screw to hold the presser foot holder in place.
dPresser foot
The presser foot consistently applies pressure to the fabric as it is sewn. Attach the appropriate presser foot for the selected stitch.
eFeed dogs
The feed dogs feed the fabric in the sewing direction.
fBobbin cover
Open the bobbin cover to insert the bobbin.
gNeedle plate cover
Remove the needle plate cover to clean the bobbin case and race.
hNeedle plate
The needle plate is marked with guides to help sew straight seams.
iNeedle bar thread guide
Pass the upper thread through the needle bar thread guide.
jNeedle clamp screw
Use the needle clamp screw to hold the needle in place.
Embroidery Unit
aCarriage
The carriage moves the embroidery frame automatically when embroidering.
bRelease button (located under the embroidery unit)
Press the release button to remove the embroidery unit.
cEmbroidery unit connector
Insert the embroidery unit connector into the connection port to attach the embroidery unit.
dEmbroidery frame holder
Attach the embroidery frame to the embroidery frame holder to hold the frame in place.
eFrame-securing lever
Press down the frame-securing lever to secure the embroidery frame.
 CAUTION
•After the embroidery frame is set in the frame holder, be sure the frame-securing lever is correctly lowered.
10
NAMES OF MACHINE PARTS AND THEIR FUNCTIONS
Operation Buttons
a“Start/Stop” button

When this button is pressed, the machine sews a few stitches at a low speed, then begins sewing at the speed set by the sewing speed controller. Press this button again to stop sewing. This button lights up in a different color depending on the machine’s operating condition.
Green: |
The machine is ready to sew or is sewing. |
Red: |
The machine cannot sew. |
b“Reverse/Reinforcement Stitch” button 
This button is used to sew reinforcement stitches at the beginning and end of stitching. When this button is pressed, the machine sews 3 to 5 stitches in the same spot, then stops automatically. For straight and zigzag stitch patterns that take reverse stitches, the machine sews reverse stitches (stitches sewn in the opposite direction) at low speed only while the “Reverse/Reinforcement Stitch” button is held down.
c“Needle Position” button 
Use this button to change the sewing direction or for detailed sewing in small areas. Press this button to raise or lower the needle position. Press this button twice to sew a single stitch.
d“Thread Cutter” button 
Press this button after sewing to automatically trim the excess thread.
e“Presser Foot Lifter” button 
Press this button to lower the presser foot and apply pressure to the fabric. Press this button again to raise the presser foot.
fSewing speed controller 
Slide the sewing speed controller to the left or right to adjust the sewing speed. Slide the controller to the left to sew at lower speeds. Slide the controller to the right to sew at higher speeds. Beginners should sew at a lower speed until they become familiar with the machine.
 CAUTION
•Do not press the “Thread Cutter” button after the threads have already been cut. Otherwise, the needle may break, the threads may become tangled, or damage to the machine may occur.
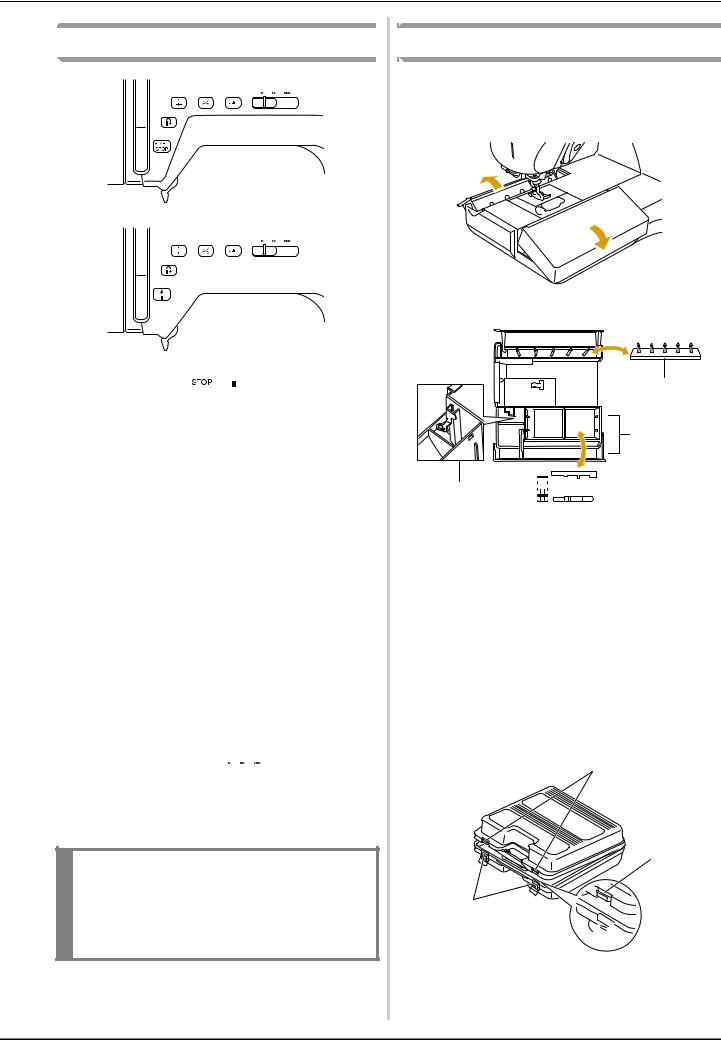
Included Accessories
The accessories are stored in the flat bed attachment. Open the flat bed attachment as shown below.
b
c
a d
d
a Embroidery foot “U” storage space
bBobbin stand
(Place the bobbins on the pins to store them.)
c Storage space
dPresser foot storage tray
(Store presser feet marked A, G, I, J, M, N, and R.)
Included accessories 33,34,35 are contained in the embroidery unit carrying case. To open the embroidery unit carrying case, raise the lock and unlock the latch out of the position. To hook the latches and securely close the case, position the latch on the case and lower the lock till it snaps.
b
b
a
a

a Latches b Locks
11

NAMES OF MACHINE PARTS AND THEIR FUNCTIONS
1 |
2 |
|
3 |
4 |
5 |
6 |
7 |
8 |
9* |
10 |
11* |
12* |
13 |
14 |
15 |
16 |
17 |
18 |
|
|
|
19 |
20 |
|
|
|
75/11 2 needles |
|
|
|
|
|
|
|
90/14 2 needles |
|
|
|
|
|
|
|
90/14 2 needles: Ball point needle |
|
|
|
|
|
|
|
|
(gold colored) |
|
|
|
21 |
22 |
23 |
24 |
25 |
26 |
27 |
28 |
29 |
30 |
31 |
32 |
33 |
34 |
35 |
36 |
37 |
38 |
39 |
40 |
41 |
42 |
43 |
44 |
45 |
46 |
47 |
|
48 |
49 |
50* |
51* |
52* |
53* |
54 |
55 |
56 |
|
|
|
12
NAMES OF MACHINE PARTS AND THEIR FUNCTIONS
No. |
Part Name |
Part Code |
|
|
|
|
|
1 |
Embroidery foot “U” |
XD0313-051 |
|
|
|
|
|
2 |
Buttonhole foot “A” |
X57789-151 |
|
|
|
|
|
3 |
Overcasting foot “G” |
XC3098-051 |
|
|
|
|
|
4 |
Monogramming foot “N” |
X53840-351 |
|
|
|
|
|
5 |
Zipper foot “I” |
X59370-051 |
|
|
|
|
|
6 |
Zigzag foot “J” (on machine) |
XC3021-051 |
|
|
|
|
|
7 |
Blind stitch foot “R” |
X56409-051 |
|
|
|
|
|
8 |
Button fitting foot “M” |
130489-001 |
|
|
|
|
|
9 |
Cording foot (3 cord guide)* |
XA6871-001 |
|
|
|
|
|
10 |
Walking foot |
X59816-104 |
|
|
|
|
|
11 |
Blind stitch foot (with guide)* |
XA0059-001 |
|
|
|
|
|
12 |
Narrow hemmer foot* |
184600-001 |
|
|
|
|
|
13 |
Free-motion quilting foot |
XA4322-001 |
|
|
|
|
|
14 |
Straight stitch foot |
XD0826-051 |
|
|
|
|
|
15 |
Straight stitch needle plate |
XC8362-051 |
|
|
|
|
|
16 |
Seam ripper |
X54243-051 |
|
|
|
|
|
17 |
Bobbin × 10 |
X52800-150 |
|
|
|
|
|
18 |
Needle set |
X58358-051 |
|
|
|
|
|
19 |
Twin Needle |
X59296-151 |
|
|
|
|
|
20 |
Scissors |
XC1807-121 |
|
|
|
|
|
21 |
Chalk pen |
184944-001 |
|
|
|
|
|
22 |
Cleaning brush |
X59476-051 |
|
|
|
|
|
23 |
Eyelet punch |
135793-001 |
|
|
|
|
|
24 |
Screwdriver (large) |
XC8349-021 |
|
|
|
|
|
25 |
Screwdriver (small) |
X55468-021 |
|
|
|
|
|
26 |
Spool cap (small) |
130013-154 |
|
|
|
|
|
27 |
Spool cap (medium) × 2 |
X55260-153 |
|
|
|
|
|
28 |
Spool cap (large) |
130012-054 |
|
|
|
|
|
29 |
Vertical spool pin |
XC8619-051 |
|
|
|
|
|
30 |
Spool felt |
X57045-051 |
|
|
|
|
|
31 |
Disc-shaped screwdriver |
XC1074-051 |
|
|
|
|
|
32 |
Spool net |
XA5523-050 |
|
|
|
|
|
|
Embroidery frame set (medium) |
EF74: Frame |
|
33 |
10 cm (H) × 10 cm (W) |
||
EF78: Embroidery sheet |
|||
|
(4 inches (H) × 4 inches (W)) |
||
|
|
||
|
|
|
|
|
Embroidery frame set (large) |
EF75: Frame |
|
34 |
18 cm (H) × 13 cm (W) |
||
EF79: Embroidery sheet |
|||
|
(7 inches (H) × 5 inches (W)) |
||
|
|
||
|
|
|
|
|
Embroidery frame set (extra |
|
|
35 |
large) 26 cm (H) × 16 cm (W) |
EF81: Frame |
|
(10-1/4 inches (H) × 6-1/4 inches |
EF86: Embroidery sheet |
||
|
(W)) |
|
|
|
|
|
|
36 |
Foot controller |
XC8028-051 |
|
|
|
|
|
37 |
Embroidery needle plate cover |
XA9939-051 |
|
|
|
|
|
38 |
Touch pen (stylus) |
XA9940-051 |
|
|
|
|
|
39 |
Knee lifter |
XA6941-052 |
|
|
|
|
|
40 |
USB cable |
XD0745-051 |
|
|
|
|
|
41 |
Alternate bobbin case |
XC8167-451 |
|
(no color on the screw) |
|||
|
|
|
|
42 |
Embroidery bobbin thread |
BBT-W |
|
|
|
|
|
43 |
Stabilizer material |
X81176-001 |
|
|
|
|
|
44 |
Instruction and Reference Guide |
XE6350-001 |
|
|
|
|
|
45 |
Quick Reference Guide |
XE6351-001 |
|
|
|
|
|
46 |
Instruction and Reference Guide |
XE6352-001 |
|
Addendum |
|||
47 |
Hard case |
XC9640-152 |
|
|
|
|
|
48 |
Bobbin center pin (for pre-wound |
XD0835-051 |
|
bobbin) |
|||
|
|
|
|
49 |
Embroidery unit carrying case |
BLG-EUC |
|
|
|
|
|
50 |
Free motion quilting foot “C”* |
XE0765-101 |
|
|
|
|
No. |
Part Name |
Part Code |
|
|
|
51 |
Free motion open toe quilting |
XE0767-001 |
foot “O”* |
||
52 |
Free motion echo quilting foot |
XE0766-001 |
“E”* |
||
53 |
Bobbin cover (with mark) |
XE0715-001 |
(on machine)* |
||
54 |
Bobbin cover |
XD1645-021 |
|
|
|
|
Bobbin case |
|
55 |
(green marking on the screw) |
XC3153-251 |
|
(on machine) |
|
|
|
|
56 |
Power cord |
XC6052-051 |
|
|
|
*See Instruction and Reference Guide Addendum for detailed instruction.
Memo
(For U.S.A. only)
Foot controller: Model S
This foot controller can be used with this machine model BLL2.
Memo
•Always use accessories recommended for this machine.
•The screw for the presser foot holder is available through your authorized retailer (part code: XA4813-051).
•See the additional accessories guide.
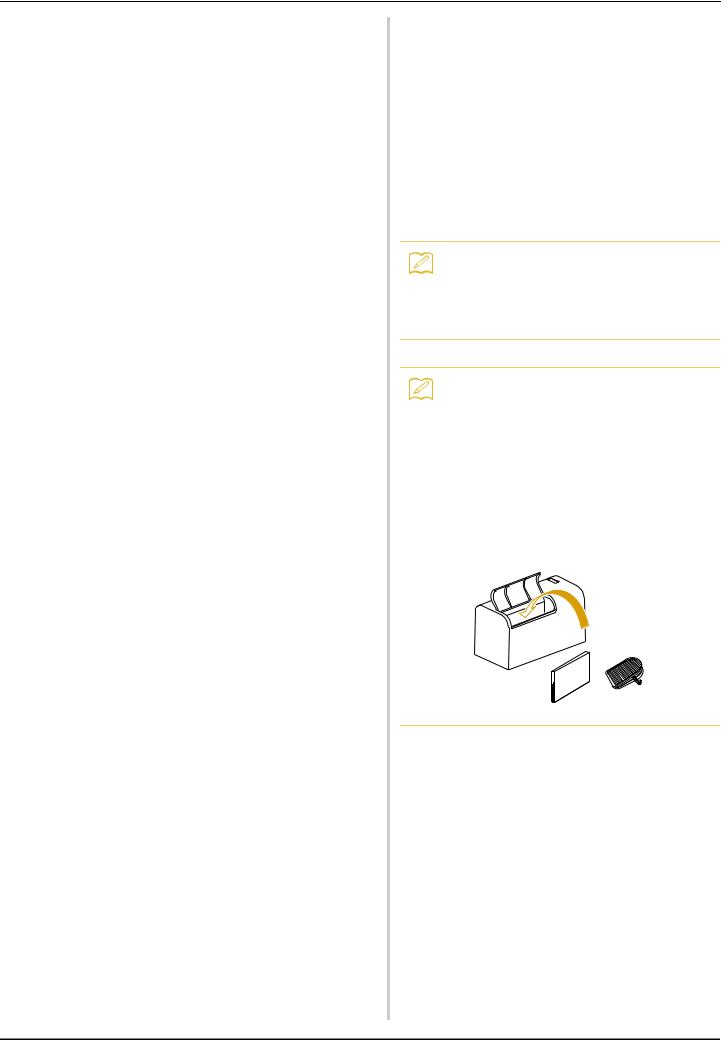
•This operation manual and the foot controller can be stored in the machine’s hard case.
13

NAMES OF MACHINE PARTS AND THEIR FUNCTIONS
Options
1 |
2 |
3 |
4 |
5 |
6 |
7 |
8 |
9 |
No. |
Part Name |
Part Code |
|
|
|
|
|
1 |
Side cutter foot |
XC3923-001 |
|
|
|
|
|
2 |
Embroidery bobbin thread (White) |
BBT-W |
|
|
|
||
Embroidery bobbin thread (Black) |
BBT-B |
||
|
|||
|
|
|
|
3 |
Seam guide |
BLG-SG |
|
|
|
|
|
|
Embroidery frame set (small) |
EF73: Frame |
|
4 |
2 cm (H) 6 cm (W) |
||
EF77: Embroidery sheet |
|||
|
(1 inch (H) 2-1/2 inches (W)) |
||
|
|
||
|
|
|
|
5 |
Cord guide bobbin cover |
XC8449-051 |
|
(with single hole) |
|
||
|
|
||
|
|
|
|
6 |
Table and free motion grip |
BLG-ET |
|
|
|
|
|
7 |
Spool stand |
BLG-TS |
|
|
|
|
|
8 |
Embroidery card |
|
|
|
|
|
|
9 |
Circular attachment |
BLCSA |
|
|
|
|
|
|
|
|
Memo
•All specifications are correct at the time of printing.
•Please be aware that some specifications may change without notice.
14

1Chapter 1
Getting Ready
TURNING THE MACHINE ON/OFF.................................................... |
16 |
LCD SCREEN........................................................................................ |
17 |
■ Display Precautions......................................................................................................... |
17 |
■ Key Functions .................................................................................................................. |
18 |
Using the Machine Setting Mode Key...................................................................... |
20 |
Using the Machine Operation Mode Key ................................................................ |
22 |
■ Contents of Each Category .............................................................................................. |
22 |
Using the Pattern Explanation Key .......................................................................... |
23 |
LOWER/UPPER THREADING .............................................................. |
24 |
Winding the Bobbin ................................................................................................ |
24 |
■ Using the Supplemental Spool Pin................................................................................... |
24 |
■ Winding the Bobbin Using the Spool Pin......................................................................... |
26 |
Setting the Bobbin ................................................................................................... |
27 |
Pulling Up the Bobbin Thread ................................................................................. |
28 |
Upper Threading ..................................................................................................... |
29 |
Using the Twin Needle ............................................................................................ |
32 |
CHANGING THE PRESSER FOOT ....................................................... |
34 |
Removing the Presser Foot ...................................................................................... |
34 |
Attaching the Presser Foot ...................................................................................... |
34 |
CHANGING THE NEEDLE ................................................................... |
35 |
■ Checking the Needle ....................................................................................................... |
35 |
■ About the Needle ............................................................................................................ |
37 |
■ Fabric/Thread/Needle Combinations .............................................................................. |
37 |
TURNING THE MACHINE ON/OFF
TURNING THE MACHINE ON/OFF
 WARNING
•Use only regular household electricity as the power source. Using other power sources may result in fire, electric shock, or damage to the machine.
•Turn the main power to OFF and remove the plug in the following circumstances: When you are away from the machine
After using the machine
When the power fails during use
When the machine does not operate correctly due to a bad connection or a disconnection During electrical storms
 CAUTION
•Do not use extension cords or multi-plug adapters with many other appliances plugged in to them. Fire or electric shock may result.
•Do not touch the plug with wet hands. Electric shock may result.
•When unplugging the machine, always turn the main power to OFF first. Always grasp the plug to remove it from the outlet. Pulling on the cord may damage the cord, or lead to fire or electric shock.
•Do not allow the power cord to be cut, damaged, modified, forcefully bent, pulled, twisted, or bundled. Do not place heavy objects on the cord. Do not subject the cord to heat. These things may damage the cord, or cause fire or electric shock. If the cord or plug is damaged, take the machine to your authorized retailer for repairs before continuing use.
•Unplug the power cord if the machine is not to be used for a long period of time. Otherwise, a fire may result.
•When leaving the machine unattended, either the main switch of the machine should be turned to OFF or the plug must be removed from the socket-outlet.
•When servicing the machine or when removing covers, either the machine or the electrical set must be unplugged.
•For U.S.A. only
This appliance has a polarized plug (one blade wider than the other). To reduce the risk of electrical shock, this plug is intended to fit in a polarized outlet only one way.
If the plug does not fit fully in the outlet, reverse the plug. If it still does not fit, contact a qualified electrician to install the proper outlet. Do not modify the plug in any way.
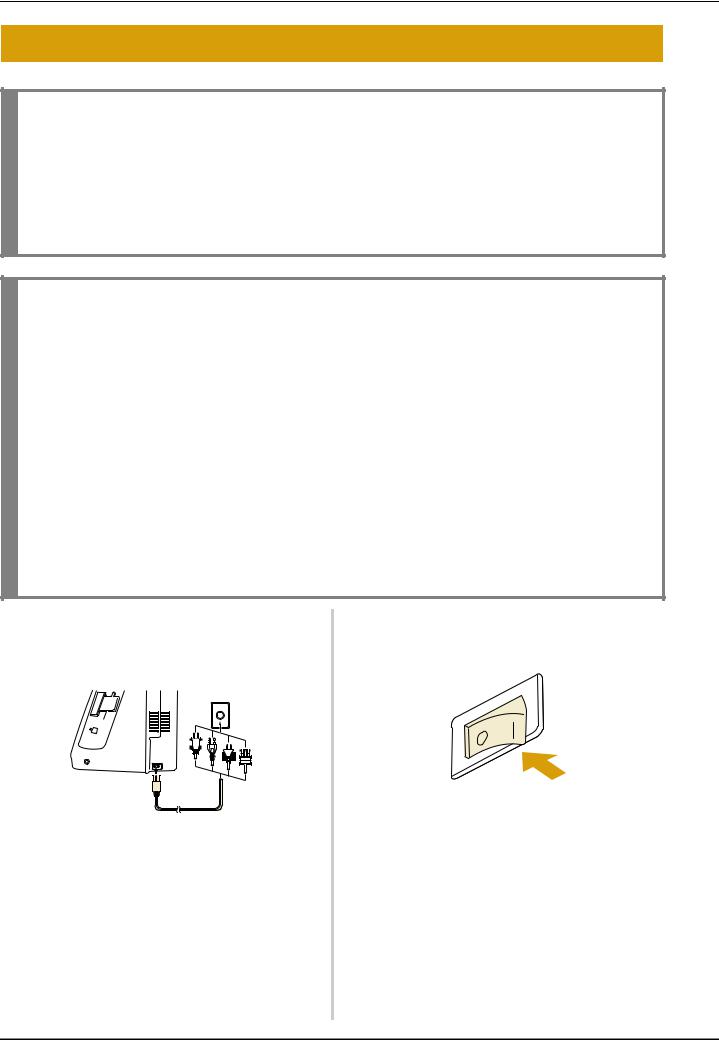
aInsert the power cord into the power cord jack connector, then insert the plug into a wall outlet.
 a
a
b
a Main power switch b Power cord
bTurn the main power switch to “I” to turn ON the machine.
b
a
a OFF b ON
cTurn the main power switch to “O” to turn OFF the machine.
16

LCD SCREEN
LCD SCREEN
■Display Precautions
•Only touch the display with your finger or the touch pen included with the machine. Do not use a mechanical pencil, screwdriver or any other hard or sharp objects. In addition, do not press the display with extreme pressure, otherwise damage to the display may result.
•All or part of the display may sometimes become darker or lighter due to fluctuations in the surrounding temperature or other changes in the environment. This is not a sign of a malfunction. If the display is difficult to read, adjust its brightness (see page 21).
•The display may be dark immediately after the machine is turned on. This is a normal characteristic of the backlight and is not a sign of a malfunction. After approximately 10 minutes, the display should reach its normal level of brightness.
•If you are not directly facing the display, the colors may be distorted or the screen may be difficult to read. This is a normal characteristic of the display and is not a malfunction. Be sure to sit in front of the display while using it.
When the machine is turned on, the opening screen appears. The machine can be set so that the opening screen is not displayed (see page 21).
Lightly press the display with your finger. Depending on the setting either, "1-01 Straight stitch (Left)" or "1-03 Straight stitch (Middle)" is automatically selected (see page 20).
Memo
It may take some time until the opening screen appears. This is not a sign of a malfunction.
|
|
|
|
|
|
|
|
|
a Shows whether the machine is set for a single needle |
|
|
|
|
|
|
|
|
|
|
||
|
|
|
|
|
|
|
|
|
or twin needle, and the needle position when the |
|
|
|
|
|
|
|
|||||
|
|
|
|
|
|
|||||
|
|
|
|
|
|
|
|
|
machine is stopped. The desired needle position can |
|
|
|
|
|
|
|
|
|
|
be set (see page 20). |
|
a |
|
|
|
|
|
|
|
For a single needle |
|
|
b |
|
|
|
|
|
|
|
|
||
|
|
|
|
|
|
|
|
|||
|
|
|
|
|
|
|
|
|||
|
|
|
|
|
|
|
||||
c |
|
|
|
|
|
Single needle/down |
Single needle/up |
|||
|
|
|
|
|||||||
|
|
|
|
|
||||||
|
|
|
|
|
|
|
|
|
||
d |
|
|
|
|
|
|
position |
position |
||
|
|
|
|
|
||||||
|
|
|
|
|
|
|
|
|
For a twin needle |
|
e
Twin needle/down |
Twin needle/up |
position |
position |
b Presser foot code
Attach the indicated presser foot before sewing. c Shows the number for the selected stitch (only for
utility stitches).
d Shows a preview of the selected stitch.
e Shows the current page number and the total number of pages available.
1
Ready Getting
17
LCD SCREEN
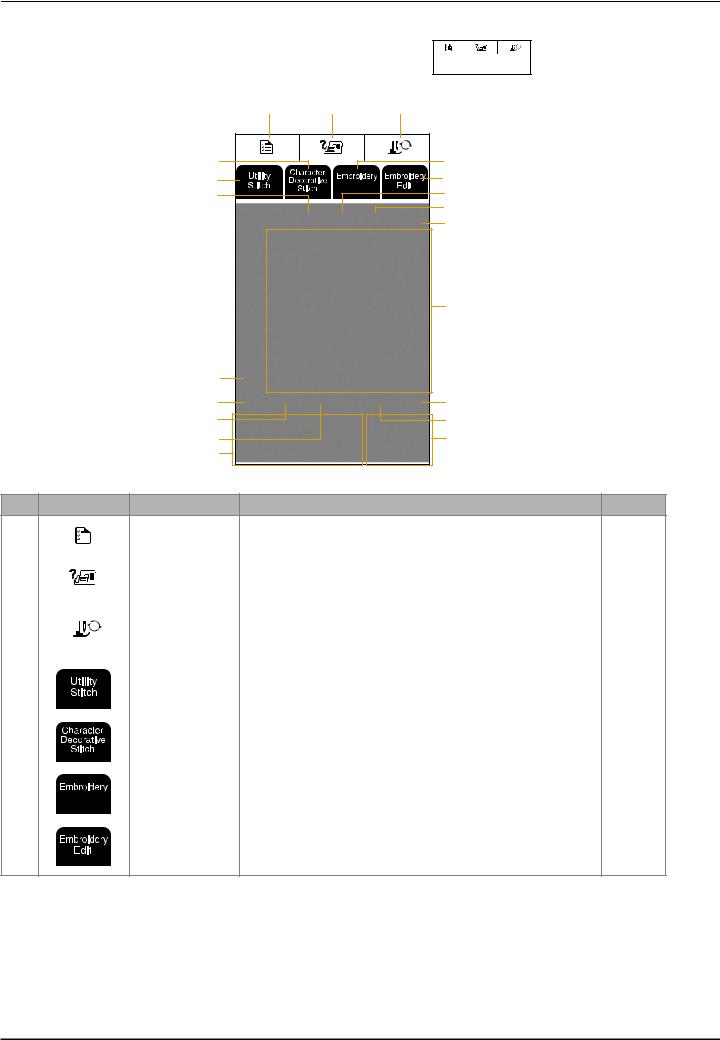
■ Key Functions
With your finger or the touch pen, press a key at the top of the display ( 


 ) to change the screen that is displayed.
|
|
1 |
2 |
3 |
|
|
|
5 |
|
|
6 |
|
|
4 |
|
|
7 |
|
|
h |
|
|
i |
|
|
|
|
|
j |
|
|
|
|
|
k |
|
|
|
|
|
l |
|
|
m |
|
|
|
|
|
n |
|
|
r |
|
|
o |
|
|
q |
|
|
p |
|
|
t |
|
|
s |
|
|
|
Operation panel |
|
|
|
|
|
No. |
Key |
Name |
|
Function |
Page |
1 |
|
|
|
Machine setting mode |
Press this key to change the needle stop position, turn the buzzer on/off, adjust |
20 |
|
|
|
||||
|
|
|
|
key |
the pattern or screen, and change other machine settings. |
|
|
|
|
|
|
||
|
|
|
|
|
|
|
|
|
|
|
|
|
|
2 |
|
|
|
Machine operation |
Press this key to see descriptions for upper threading, winding the bobbin, |
22 |
|
|
|
||||
|
|
|
|
mode key |
changing the presser foot, and other operations for using the machine. |
|
|
|
|
|
|
|
|
|
|
|
|
|
|
|
3 |
|
|
|
Presser foot/Needle |
Press this key when changing the needle or presser foot. Pressing this key locks |
34,35 |
|
|
|
|
exchange key |
all keys and operation buttons so that parts can safely be changed. Press this key |
|
|
|
|
|
|
again to unlock the keys and buttons. |
|
|
|
|
|
|
When operations are displayed, the screen for the presser foot/needle |
|
|
|
|
|
|
|
|
|
|
|
|
|
replacement mode is not displayed. |
|
|
|
|
|
|
|
|
4 |
|
|
|
Utility stitch key |
Press this key to select a straight stitch, zigzag stitch, buttonhole, blind hem |
50 |
|
|
|
|
|
stitch, or other stitch (utility stitch) commonly used in garment sewing. |
|
|
|
|
|
|
|
|
5 |
|
|
|
Character/Decorative |
Press this key to select character or decorative stitch patterns. |
94 |
|
|
|
|
stitch key |
|
|
|
|
|
|
|
|
|
6 |
|
|
|
Embroidery key |
Press this key to sew embroidery. |
124 |
|
|
|
|
|
|
|
7 |
|
|
|
Embroidery edit key |
Press this key to combine embroidery patterns. By editing embroidery patterns, |
167 |
|
|
|
|
|
you can create original emblems and name tags. |
|
18
LCD SCREEN
Screen
No. |
Key |
Name |
|
|
Function |
|
|
Page |
|
|
|
|
|
|
|||||
h |
|
Screen lock key |
Press this key to lock the screen. When the screen is locked, the various settings, |
47 |
|||||
|
|
|
such as the stitch width and stitch length, are locked and cannot be changed. |
|
|||||
|
|
|
Press this key again to unlock the settings. |
|
|
|
|
||
|
|
|
|
|
|||||
i |
|
Image key |
Press this key to display an enlarged image of the selected stitch pattern. |
51 |
|||||
|
|
|
|
|
|||||
j |
|
Sewing type selection |
Press this key when you need help selecting the appropriate stitch pattern for the |
53 |
|||||
|
|
key |
sewing application and when you need instructions on how to sew the selected |
|
|||||
|
|
|
stitch pattern. This key is very helpful for beginners. |
|
|
|
|||
|
|
|
|
|
|||||
k |
|
Pattern explanation key |
Press this key to see how the selected stitch pattern can be used. |
23 |
|||||
|
|
|
|
|
|||||
l |
|
Stitch selection display |
Press the key for the stitch pattern that you want to sew. Press one of the |
50 |
|||||
|
|
|
|
keys to change the pattern selection screen. |
|
||||
|
|
|
|
|
|||||
m |
|
Automatic |
Press this key to select the automatic reinforcement stitching (reverse stitching) |
46 |
|||||
|
|
reinforcement stitch key |
setting. If you select this setting before sewing, the machine will automatically |
|
|||||
|
|
|
sew reinforcement stitches at the beginning and end of stitching (depending on |
|
|||||
|
|
|
the selected stitch pattern, reverse stitches may be sewn). Press this key again to |
|
|||||
|
|
|
cancel the setting. |
|
|
|
|
|
|
|
|
|
|
|
|
||||
n |
|
Automatic thread |
Press this key to select the automatic thread cutting setting. |
|
46 |
||||
|
|
cutting key |
If you select this setting before sewing, the machine will automatically sew |
|
|||||
|
|
|
reinforcement stitches (or reverse stitches, depending on the selected stitch) and |
|
|||||
|
|
|
trim the threads when the “Reverse/Reinforcement Stitch” button is pressed. |
|
|||||
|
|
|
Press this key again to cancel the setting. |
|
|
|
|
||
|
|
|
|
|
|||||
o |
|
Mirror image key |
Press this key to create a mirror image of the selected stitch pattern. |
51 |
|||||
|
|
|
• If this key appears as |
, it cannot be used. |
|
|
|
||
|
|
|
|
|
|||||
p |
|
Needle mode selection |
Before sewing with the twin needle, press this key to select the setting for twin |
32 |
|||||
|
|
key (single/twin) |
needle sewing. Each time this key is pressed, the setting switches between that |
|
|||||
|
|
|
for single needle sewing and twin needle sewing. |
|
|
|
|||
|
|
|
• If this key appears as |
, it cannot be used. |
|
|
|
||
|
|
|
|
|
|||||
q |
|
Reset key |
Press this key to return the selected stitch pattern’s saved settings to the original |
52 |
|||||
|
|
|
settings. |
|
|
|
|
|
|
|
|
|
|
|
|||||
r |
|
Manual memory key |
Change the stitch pattern settings (zigzag width and stitch length, thread tension, |
52 |
|||||
|
|
|
automatic thread cutting or automatic reinforcement stitching, etc.), then save |
|
|||||
|
|
|
them by pressing this key. |
|
|
|
|
|
|
|
|
|
|
|
|||||
s |
|
Stitch width and stitch |
Shows the stitch width (zigzag width) and the stitch length settings of the |
44 |
|||||
|
|
length keys |
currently selected stitch pattern. Press |
or |
to adjust the stitch width |
|
|||
|
|
|
|
||||||
|
|
|
and stitch length settings. |
|
|
|
|
|
|
|
|
|
• If |
appears, the setting cannot be adjusted. |
|
|
|||
|
|
|
|
|
|||||
t |
|
Thread tension keys |
Shows the thread tension setting of the currently selected stitch pattern. The |
45 |
|||||
|
|
|
thread tension is usually set automatically. Press |
or |
to adjust the |
|
|||
|
|
|
thread tension setting. |
|
|
|
|
|
|
|
|
|
|
|
|
|
|
|
|
1
Ready Getting
19
LCD SCREEN
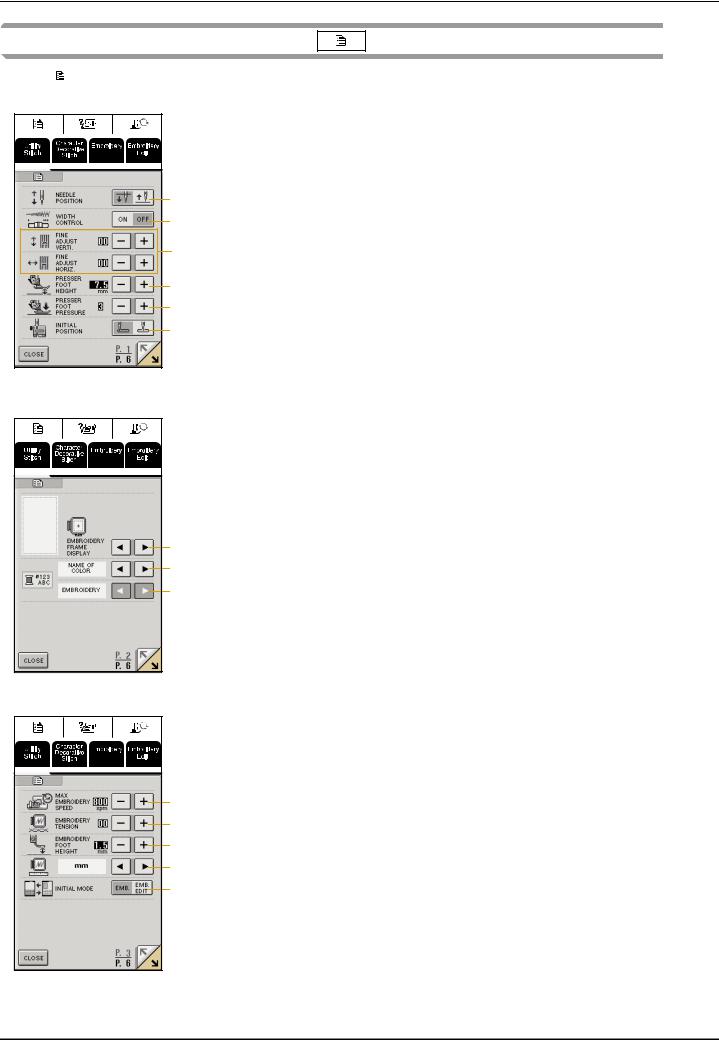
Using the Machine Setting Mode Key
Press |
|
to change the needle stop position, turn the buzzer on/off, adjust the pattern or screen, and change |
other basic machine settings.
a b
c
d e f
* Press  to display the next page.
a b c
* Press  to display the next page.
a b c d e
aSelect whether the needle stops in the raised or lowered position when the machine is stopped.
bSelect whether to use the sewing speed controller or to adjust the zigzag width (see page 69).
cMake adjustments to the character and decorative stitch patterns (see page 99).
dAdjust the presser foot height (select the height of the presser foot when the presser foot is raised) (see page 43).
eAdjust the presser foot pressure between 1 (weak) and 4 (strong).
* The higher the number, the greater the pressure will be. Set the pressure to 3 for normal sewing.
fSelect whether “1-01 Straight stitch (Left)” or “1-03 Straight stitch (Middle)” is the utility stitch that is automatically displayed when utility stitch is selected.
aSelect from among 10 embroidery frame displays (see page 134).
bSelect whether the thread color name, thread color number or sewing time appears for the thread color display in the embroidery screen (see page 151).
cSelect the thread brand available when selecting a thread color number in the thread color display of the Embroidery screen. (see page 151).
aAdjust the maximum embroidering speed (see page 151).
bAdjust the thread tension for embroidering (see page 149).
cAdjust the height of embroidery foot “U” (see page 129).
dSelect the units (mm/inch) for displaying distances and the sizes of embroidery patterns.
eSelect the initial screen (Embroidery/Embroidery Edit) when the embroidery unit is installed.
* Press  to display the next page.
20
LCD SCREEN
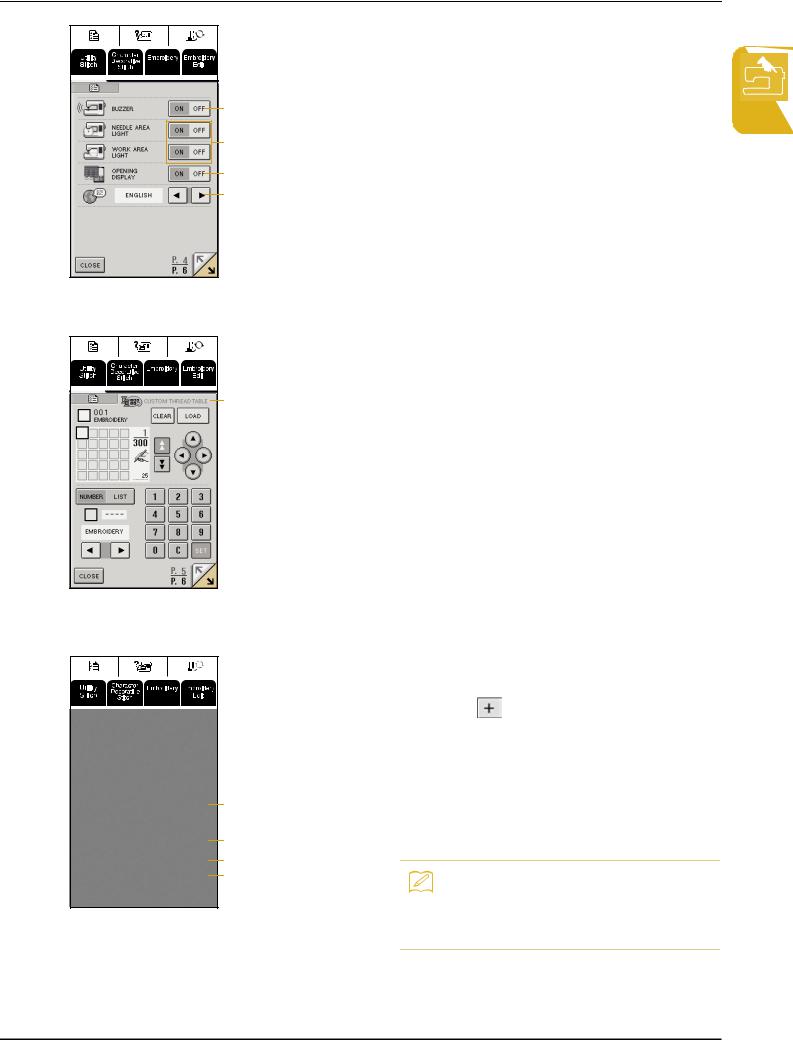
a Turn on/off the buzzer (see page 196).
b Turn on/off the needle area and work area lights. c Select whether or not the opening screen appears
when the machine is turned on.
d Select one of the three display languages:
[English], [French], [Spanish]
a
b
c d
* Press  to display the next page.
a Customize the thread color numbers (see page 176).
a
1
Ready Getting
* Press  to display the next page.
a
b
c d
aAdjust the brightness of the LCD.
* Press  to make the screen lighter.
* Press |
to make the screen darker. |
bDisplay the service count of embroidery stitches. The service count is a reminder to take your machine in for regular servicing. (Contact your authorized retailer for details.)
cShows the product identification number for this machine.
dShows the version of the software installed on this machine.
Memo
The latest version of software is installed in your machine. Check with your local authorized Baby Lock retailer or at www.babylock.com for notification of available updates (see page 198).
21
LCD SCREEN
Using the Machine Operation Mode Key
Basic machine operations and other information based on the contents of this Operation Manual are stored in this machine.
Press |
|
to open the screen shown below. Six categories are displayed at the top of the screen. Press a key to |
|||
see more information about that category. |
|
|
|||
■ Contents of Each Category |
|
|
|||
|
|
|
|
|
|
Names of Machine Parts and Their Functions |
|
Sewing Basics |
Troubleshooting |
||
|
|
|
|
|
|
|
Presser foot lever |
|
Upper threading |
|
|
|
Sewing speed controller |
|
Bobbin winding |
|
|
|
Handwheel |
|
Changing the needle |
|
|
|
Feed dog position switch |
|
Changing the presser foot |
|
|
|
Flat bed attachment with |
|
Setting the bobbin |
|
|
|
accessory compartment |
|
|
|
|
|
Knee lifter |
|
|
|
|
|
Foot controller |
|
|
|
|
|
|
|
|
|
|
|
|
Main Buttons |
|
Basic Embroidering Operations |
Maintenance |
|
|
|
|
|
|
|
“Thread Cutter” button |
|
Attaching iron-on stabilizers |
Cleaning the race and bobbin |
|
|
“Presser Foot Lifter” button |
|
(backing) to the fabric |
case |
|
|
|
|
|
||
|
|
|
|
Inserting the fabric |
|
|
“Start/Stop” button |
|
|
|
|
|
|
|
|
Attaching & removing the |
|
|
“Reverse/Reinforcement Stitch” |
|
embroidery frame |
|
|
|
|
|
|
|
|
|
button |
|
Attaching the embroidery unit |
|
|
|
|
|
|
|
|
|
“Needle Position” button |
|
Attaching embroidery foot “U” |
|
|
|
|
|
|
|
|
|
|
|
|
Correct stabilizer to use |
|
|
|
|
|
|
|
22
LCD SCREEN
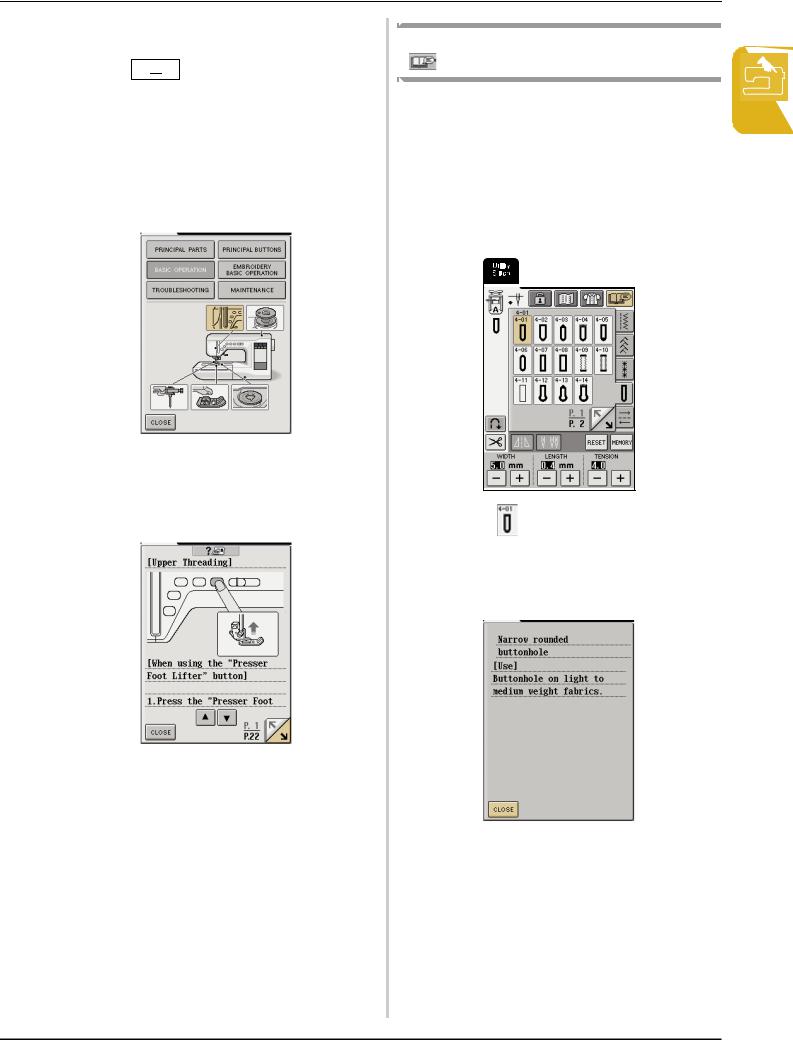
Example: Displaying information about upper threading
a Press 
 .
.
bPress  .
.
A list of basic operations appears in the lower half of the screen.
c Press  (upper threading).
The instructions for threading the machine appear.
d Press  to view the next page.
*Press  or
or  to view additional information for that page.
eWhen you are finished with the instructions, press  .
.
Using the Pattern Explanation Key
To learn more about the uses for a stitch pattern, select the stitch, and then press  to see a description of the selected stitch.
Example: Displaying information on the use for  .
.
a Select  , and then press
  .
.
Uses for |
appear. |
bWhen you are finished with the instructions, press  .
.
1
Ready Getting
23
LOWER/UPPER THREADING
LOWER/UPPER THREADING
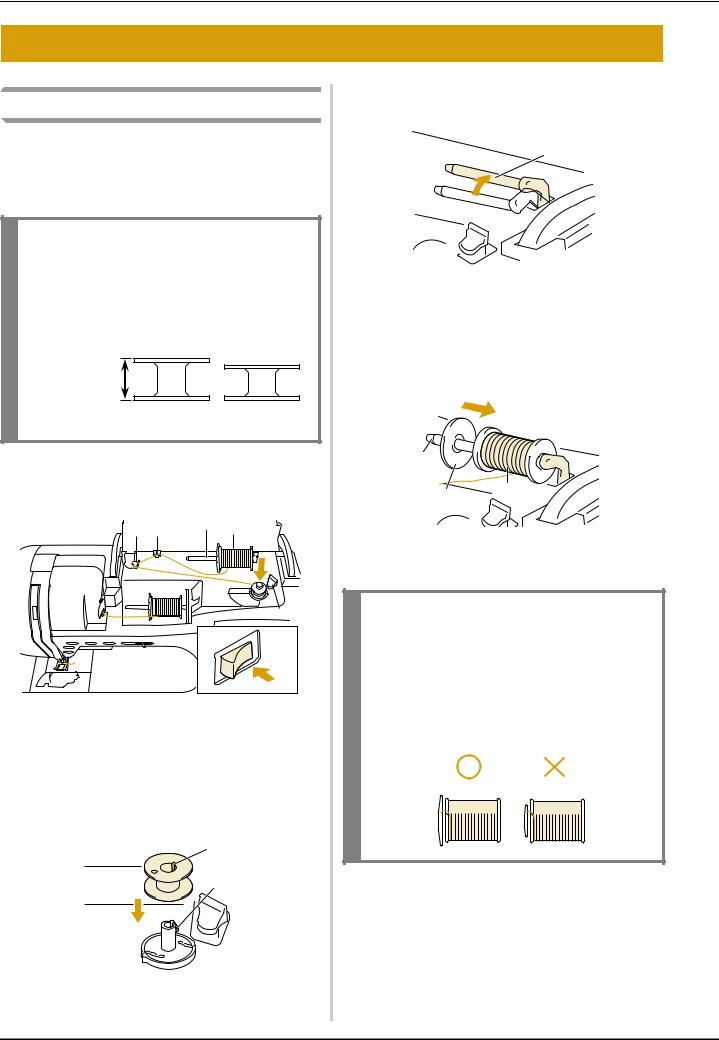
Winding the Bobbin
This section describes how to wind thread onto a bobbin. With this machine, you can use the supplemental spool pin to wind the bobbin while sewing using the main spool pin.
 CAUTION
•The included bobbin was designed specifically for this sewing machine. If bobbins from other models are used, the machine will not operate correctly. Use only the included bobbin or bobbins of the same type (part code: X52800-150).
Actual size
11.5 mm (approx. 7/16 inch)
This model |
Other models |
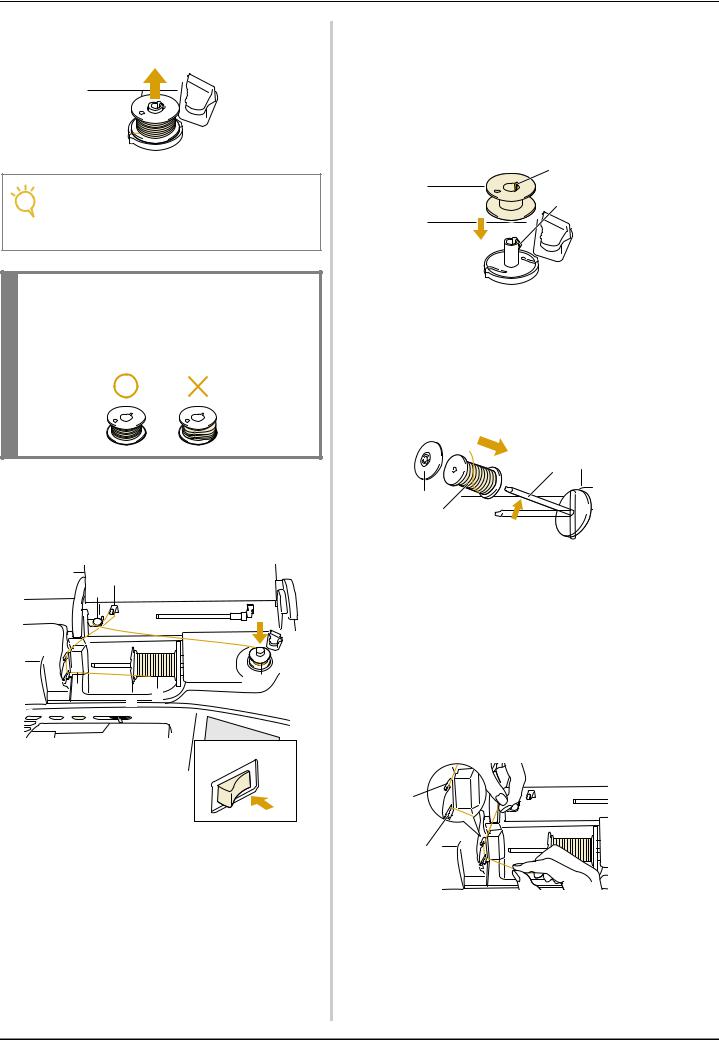
■ Using the Supplemental Spool Pin
While sewing embroidery, the bobbin can conveniently be wound.
6 |
5 |
a 3, 4 |
|
|
2 |
|
|
7, 8 |
|
|
9,10 |
|
|
l |
|
|
o |
|
|
1 |
a Supplemental spool pin
a Turncover.on the machine, and then open the top
bAlign the groove in the bobbin with the spring on the bobbin winder shaft, and then set the bobbin on the shaft.
cSet the supplemental spool pin in the “up” position.
a
a Supplemental spool pin
dPlace the spool of thread on the supplemental spool pin so that the thread unwinds from the front. Then, slide the spool cap as far as possible onto the supplemental spool pin to secure the thread spool.
a
b c
a Supplemental spool pin b Spool cap
c Thread spool
 CAUTION
•If the thread spool and/or spool cap are set incorrectly, the thread may tangle on the spool pin and cause the needle to break.
•Use the spool cap (large, medium, or small) that is closest in size to the thread spool. If a spool cap smaller than the thread spool is used, the thread may become caught in the slit on the end of the spool.
a
b
a Groove in bobbin
b Spring on bobbin winder shaft
24
LOWER/UPPER THREADING
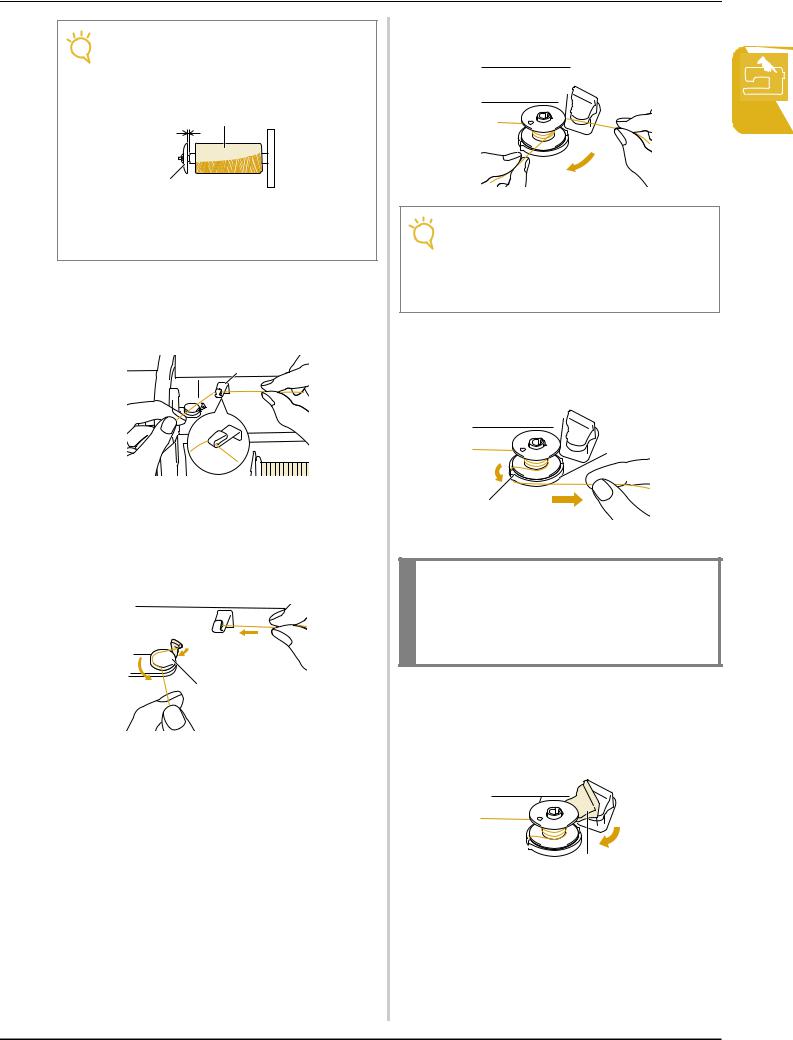
Note
When using cross-wound thread on a thin spool, use the small spool cap, and leave a small gap between the cap and the thread spool.
a b
c 
a Gap
b Cross-wound thread c Spool cap (small)
eWhile holding the thread from the spool in your right hand, hold the end of the thread with your left hand, and then pass the thread through the thread guide.
a
a Thread guide
fPass the thread under the pin on the bobbin winding pretension disk and guide, and then pass it around the pretension disk.
* Make sure that the thread passes under the pretension disk.
a

b
a Pin
b Pretension disk
gWind the thread clockwise around the bobbin four or five times.
2
3 |
1 |
|
Note
•Make sure that the thread between the spool and the bobbin is pulled tight.
•Be sure to wind the thread clockwise around the bobbin, otherwise the thread will become wrapped around the bobbin winder shaft.
hPass the end of the thread through the guide slit in the bobbin winder seat, and then pull the thread to the right to cut it with the cutter.
b
a
a Guide slit
b Bobbin winder seat
 CAUTION
•Be sure to follow the process described. If the thread is not cut with the cutter, and the bobbin is wound, when the thread runs low, it may tangle around the bobbin.
iSlide the bobbin holder to the left until it snaps into place.
* When the bobbin holder is set to the left, it works as a switch to make the bobbin wind automatically.
a
aBobbin holder (switch)
The bobbin stops spinning automatically when it is full, and the bobbin holder returns to its original position.
1
Ready Getting
25
LOWER/UPPER THREADING
j Cut the thread, and then remove the bobbin.
Note
When removing the bobbin, pull up only on the bobbin. Do not pull on the bobbin winder seat, otherwise it may become loose, resulting in damage to the machine.
 CAUTION
•Winding the bobbin thread improperly may cause the thread tension to loosen, breaking the needle and possibly resulting in injury.
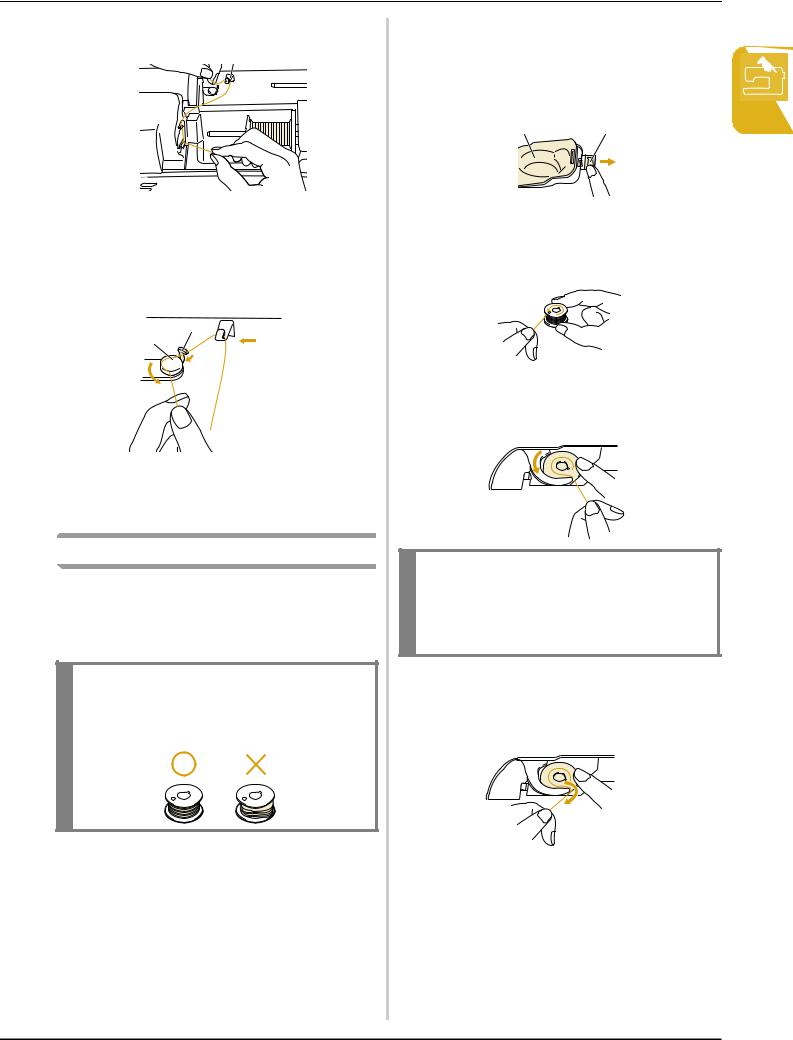
■ Winding the Bobbin Using the Spool Pin
The main spool pin cannot be used to wind the bobbin while sewing. For details, see “Using the Supplemental Spool Pin” on page 24.
2 |
|
7 |
|
|
|
8 |
|
|
|
|
3 |
|
6 |
|
9 |
|
5 |
4 |
|
|
|
||
|
|
|
l o
1
a Turn on the machine. b Open the top cover.
cAlign the groove in the bobbin with the spring on the bobbin winder shaft, and then slide the bobbin onto the shaft.
a
b
a Groove in bobbin
b Spring on bobbin winder shaft
dPivot the spool pin so that it angles upward, and then place the spool of thread on the spool pin.
* Make sure that the thread unwinds from the front.
c
a
b
a Spool cap b Thread spool c Spool pin
eSlide the spool cap as far as possible onto the spool pin, and then return the spool pin to its original position.
fWhile holding the thread from the spool with both hands, pull the thread through the lower notch in the thread guide plate, then through the upper notch.
b

a
a Lower notch in the thread guide plate b Upper notch in the thread guide plate
26
LOWER/UPPER THREADING
g Pass the thread through the thread guide.
a
a Thread guide
hPass the thread under the pin on the bobbin winding pretension disk and guide, and then pass it around the pretension disk.
* Make sure that the thread passes under the pretension disk.
a
b
a Pin
bPretension disk
i Follow steps g through j on page 25.
Setting the Bobbin
This section describes how to set a bobbin wound with thread into the machine. You can begin sewing without pulling up the bobbin thread. If you wish to pull up the bobbin thread, for example, when sewing gathers, follow the procedure described in the next section.
 CAUTION
•Use a bobbin thread that has been correctly wound. Otherwise, the needle may break or the thread tension will be incorrect.
aPress the “Presser Foot Lifter” button to raise the presser foot.
bSlide the bobbin cover latch to the right, and then remove the bobbin cover.
a |
b |
1 |
|
||
|
|
Getting |
a Bobbin cover |
|
Ready |
|
|
|
b Latch |
|
|
cHold the bobbin with your right hand and hold the end of the thread with your left hand.
dInsert the wound bobbin into the bobbin case so that the thread unwinds in the direction of the arrow.
 CAUTION
•Be sure to hold down the bobbin with your finger and unwind the bobbin thread correctly. Otherwise, the thread may break or the thread tension will be incorrect.
eLightly hold down the bobbin with your right hand, and then, while slightly pulling the thread with your left hand, guide it through the groove.
27

LOWER/UPPER THREADING
fAfter guiding the thread completely through the groove, pull it toward you to cut it with the cutter.
a

a Cutter
gAttach the bobbin cover by inserting the tab in the lower-left corner of the bobbin cover, then lightly press down on the right side of the cover until it snaps into place.
a
a Tab
Pulling Up the Bobbin Thread
There may be some sewing applications where you may want to pull up the bobbin thread, for example, when making gathers or with free-motion quilting. Follow the procedure described below to pull up the bobbin thread.
Memo
Thread the upper thread before pulling up the bobbin thread. For details, see “Upper Threading” on page 29.
aFollow steps a through d from the previous section to insert the bobbin into the bobbin case.
bGuide the bobbin thread through the groove, following the arrow in the illustration.
Note
•Do not cut the thread with the cutter.
•Do not attach the bobbin cover.
cWhile lightly holding the upper thread, press the “Needle Position” button twice to lower, then raise the needle.
dGently pull the upper thread to pull up the bobbin thread.
A loop of the bobbin thread comes out from the hole in the needle plate.
ePull out about 100 mm (approx. 3-4 inches) of the bobbin thread, and then pass it under the presser foot toward the rear of the machine, making it even with the upper thread.
a b
a Upper thread b Bobbin thread
f Attach the bobbin cover.
28
 Loading...