


Congratulations on Choosing Baby Lock Eclipse dx
C O N G R A T U L A T I O N S
T A B L E
O F
C O N T E N T S
Table of Contents
/Rolled Hem
Front Cover Seam Guide ................................................. |
19 |
Table of Contents (Cont.)
Threading Lightweight Thread
Threading Medium Weight Thread
T A B L E
O F
C O N T E N T S
O
V
E
R
V
I
E
W
How Your Serger Operates

Overview of the Eclipse
O
V
E
R
V
I
E
W
A |
|
|
Accessories |
||
C |
||
|
||
|
||
C |
|
|
E |
|
|
S |
|
|
S |
|
|
O |
|
|
R |
|
I |
|
DVD (U.S.A. only) |
|
|
|
E |
|
S |
|

Needles
Thread
Optional Accessories
There are optional snap-on specialty feet available for the Eclipse. The optional accessories are available at your Baby Lock retailer.
Beading Foot |
R0-B5002-01A-C-E |
(BLE-BF) |
Blindhem Foot |
R0-B5002S02A-E |
(BLE-BLHFS) |
Clear Foot |
R0-B5002K01A-E |
(BLE-CLF) |
Cording / Piping Foot (3mm) |
R0-B5002-02A-C-E |
(BLE-CF3) |
Cording / Piping Foot (5mm) |
R0-B5002-03A-C-E |
(BLE-CF5) |
Elastic Applicator Foot |
R0-B5002S01A-E |
(BLE-EF) |
Flat Sole Foot |
R0-B5001K02B-C-E |
(BLE-FSF) |
Lace Applicator Foot |
R0-B5002S05A-E |
(BLE-LF) |
Ruffling Foot |
R0-B5002S03A-E |
(BLE-RF) |
Bulb Remover Tool |
R0-B7525-01A |
(262011) |
Size 90 Top Stitch Needle |
|
(T-90B) |
A C C E S S O R I E S

S |
|
|
Setting Up Your Serger |
||
E |
||
|
||
|
R |
After removing the packing materials from the box, gently lift your Baby Lock serger by gasping |
|||
G |
the handle provided on the top of the machine. Place the machine on a serger sewing table or |
|||
any level surface that provides ample work area to the left of the machine. Place the foot control |
||||
E |
||||
in a pedal stay, if desired, and place if under the sewing table. |
||||
R |
Plug the power cord into the machine first, then into a wall outlet. The power switch is located |
|||
toward the back on the right side of the machine. Always make sure the power is OFF when the |
||||
|
||||
|
machine is not in use (fig.A). |
|||
S |
Available foot control for U.S.A.: Model YC-482, or YC-420W |
|||
E |
||||
This appliance has a polarized plug (one blade wider than the other). To reduce the risk of |
||||
T |
electric shock, this plug is intended to fit in a polarized outlet only one way. If the plug does |
|||
|
not fit fully in the outlet, reverse the plug. If it still does not fit, contact a qualified electrician to |
|||
U |
install the proper outlet. Do not modify the plug in any way. |
|||
The sewing speed of the machine is determined by the amount of pressure applied to the foot |
||||
P |
||||
control. When not in use, do not place anything on the foot control, or the machine could start |
||||
|
||||
|
inadvertently and the foot control or motor could burn out (fig.A). |
|||
|
Raise the telescopic thread guide to its highest position of 14". Rotate the shaft to the left and |
|||
|
right until each section "clicks" into a locked position (fig.B). The front cover may be opened |
|||
|
simply by placing your fingers behind the tab at the right side and pulling toward you (fig.C). |
|||
|
To open the cutting blade cover, place your thumb against the tab, and slide the cover to the |
|||
|
right. A slight pull forward will allow the cover to swing down, providing access to the loopers, |
|||
|
blades, and thread guides (fig.D). |
|||
|
|
|
|
|
|
|
|
|
|
Threading Preparation
(fig.A).
(fig.B).
B.
(fig.C).
nylon, rayon or silk threads (fig.D). Once it’s on the spool, fold
(fig.E).
C.
S E R G E R
S E T
U P
D. |
E. |
|

S E R G E R
S E T
U P
Threading Your Eclipse
Locked Position for Threading
(fig.A)
Lower Looper
1.With the presser foot up and machine lock button in the locked position (fig.A), set the looper threader selector lever to "L" for lower looper threading (fig.B).
2.Place the thread cone or spool on the far right front spool pin. Slip the thread into the telescopic antenna thread guide "1" directly above the spool, snap into the thread guide "2" at the top of the machine, through the slot on the front of the machine. (fig.C, page 11)
3.Pull 18 inches (45cm) of thread through guide "3". Insert the end of the thread into the threading port "L" about 1 inch (2.5cm). Use tweezers if necessary, to insert the thread end more easily.
4.Depress the looper threading lever (fig.D, page 11). If the thread does not go through the lower looper eye with one push, depress the threading lever again until it does.
5.Clip the thread 4 inches (10cm) from the lower looper eye and leave it hanging loose.
6.Move the lock button release lever to the right.
10

Upper Looper
1.With the presser foot up and machine lock button in the locked position (fig.A, page 10), set the looper threader selector lever to "U" for upper looper threading. (fig.B, page 10)
2.Place the thread cone or spool on the second spool pin from the right back. Slip the thread into the telescopic antenna thread guide "A" directly above the spool, snap into the thread guide "B" at the top of the front of the machine, through the slot on the front cover. (fig.C, below)
3.Pull 18 inches (45cm) of thread through guide "C". Insert the end of the thread into the threading port "U", about 1 inch (2.5cm). Use tweezers, if necessary, to insert the thread end more easily. (fig.D below)
4.Depress the looper threader lever (fig.D below). If the thread does not go through the upper looper eye with one push, depress the looper threader lever again until it does, and leave thread hanging loose.
5.Move the lock button release lever to the right, to unlock the machine.
S E R G E R
S E T
U P
11

S |
|
|
Right Needle |
||
E |
||
|
||
|
||
R |
|
G |
|
|
|
|
|
(fig.B page 13). |
|||
E |
|
|
|
|
R |
2. Place the thread on the second from left spindle on the thread stand (fig.A). Thread needle |
|
||
thread guides and , through the groove on the face plate and through guides , , |
|
|||
|
|
|||
S |
and . Pull a 6 inch length of thread through guide . |
|
||
|
|
|
|
|
E |
|
|
||
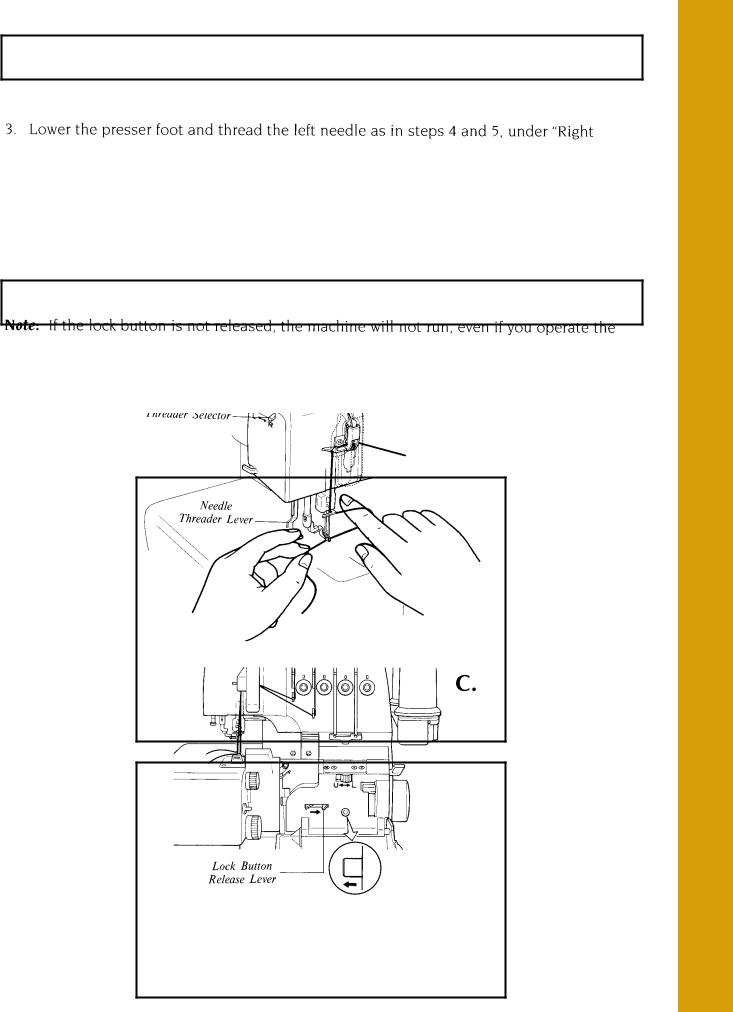
4. Hold the thread between your left thumb and middle finger (fig.B page 13). With your |
||||
T |
right index finger, hold the thread horizontally in front and just below the needle eye. |
|
||
|
With the left index finger, push the needle threader lever down to insert the hook into the |
|
||
U |
needle eye. Slip the thread into the threader hook guides in front of the needle. Carefully |
|
||
release the needle threader lever and remover your right index finger, allowing the thread |
|
|||
P |
|
|||
to be pulled through the needle eye. |
|
|||
|
|
|
|
|
12
Left Needle
2. Place the thread on the far-left spindle on the thread stand (fig.A page 12). Thread needle thread guides and , through the groove the groove on the face plate and through guides , , , and . Pull a 6 " length of thread from guide .
Unlocked Position for Serging
After threading is complete, move the lock button release lever to the right until it stops. You will hear the lock release as the lock button pops out automatically (fig.C). Close the front cover.
S E R G E R
S E T
U P
13
 Loading...