


BLES8

"IMPORTANT SAFETY INSTRUCTIONS"
When using overlock machine, basic safety precautions should always be followed,
including the following.
Read all instructions before using this overlock machine.
DANGER- To reduce the risk of electric shock.
1. The overlock machine should never be left unattended when plugged in. Always unplug this overlock
machine from the electrical outlet immediately after using and before cleaning.
WARNING- To reduce the risk of burns, fire, electric shock, or injury to persons.
1. Do not allow to be used as a toy. Close attention is necessary when the sewing machine is used by
or near children.
2. Use this overlock machine only for its intended use as described in this manual. Use only attachments
recommended by the manufacturer as contained in this manual.
3. Never operate this overlock machine if it has a damaged cord or plug, if it is not working properly, if it
has been dropped or damaged, or dropped into water. Return the overlock machine to the nearest
authorized dealer or service center for examination, repair, electrical or mechanical adjustment.
4. Never operate the overlock machine with any air openings blocked. Keep ventilation openings of the
overlock machine and foot controller free from the accumulation of lint, dust, and loose cloth.
5. Never drop or insert any object into any opening.
6. Do not use outdoors.
7. Do not operate where aerosol (spray) products are being used or where oxygen is being administered.
8. To disconnect, turn the main switch to the symbol "O" position which represents off, then remove plug
from outlet.
9. Do not unplug by pulling on cord. To unplug, grasp the plug, not the cord.
10. Keep fingers away from all moving parts. Special care is required around the overlock machine
needle.
11. Always use the proper needle plate. The wrong needle plate can cause the needle to break.
12. Do not use bent needles.
13. Do not pull or push fabric while stitching. It may deflect the needle(s) causing it to break.
14. Switch the overlock machine to the symbol "O" position when making any adjustments in the needle
area, such as threading needle, changing needle, threading looper, or changing presser foot, and the
like.
15. Always unplug the overlock machine from the electrical outlet when removing covers, lubricating, or
when making any of the user servicing adjustments mentioned in the instruction manual.
16. Keep fingers away from moving parts, especially the area near the blades.
17. Please note that on disposal, this product must be safely recycled in accordance
with relevant National legislation relating to electrical / electronic products. If in
doubt please contact your retailer for guidance.
18. The appliance is not intended for use by young children or infirm persons without
supervision.
19. This appliance is not intended for use by persons (including children) with reduced
physical, sensory or mental capabilities, or lack of experience and knowledge, unless they
have been given supervision or instruction concerning use of the appliance by a person
responsible for their safety.
20. - Moving Parts- To reduce risk of injury, switch off before servicing.
CLOSE COVER BEFORE OPERATING MACHINE
21. Do not allow the power cable and controller cable to be scarred, damaged, modified, excessively bent,
pulled, twisted, or bundled. If heavy objects are placed on the power cable or it it is subjected to heat,
it may be damaged, possibly causing fire or electrical shock.
"SAVE THESE INSTRUCTIONS"
"This overlock machine is intended for household use."

Welcome to the Baby Lock Ovation
Your Baby Lock Ovation provides chain stitching, cover stitching, and overlocking. The Baby Lock
Ovation has an exclusive "Thread Delivery System" that eliminates confusing tension adjustments.
The Ovation enables you to accomplish a perfect stitch with any type of thread on any type of
fabric. You no longer need to guess at the correct tension adjustments.
The Ovation is equipped with an exclusive Push to Thread "Electronic Extraordin Air Threading
System".
It is no longer necessary to select the threading position. All looper threads may be threaded at the
same time or individually.
Your Baby Lock Ovation is a high-quality, dependable machine. It gives you the ability to seam,
overcast and trim all in one operation. Fabrics and threads you previously avoided are now a joy to
sew because the Baby Lock Ovation handles all varieties with equal ease. With the Baby Lock
Ovation your creative options are endless and your time spent serging is more fulfilling and rewarding. With the "Extraordin Air Threading System", even threading the Ovation is a breeze.
With proper care and maintenance, your Baby Lock Ovation promises years of high-quality, dependable performance and sewing pleasure. Keep this instruction manual as a step-by-step guide to
become familiar with your Baby Lock Ovation and expand your sewing horizons.
For additional product information and updates, visit our website at www. babylock. com.
Happy Sewing!
1

T
A
B
L
E
O
F
C
O
N
T
E
N
T
S
2
Table of Contents
OVERVIEW................................................................................................................ 4
How Your Machine Operates............................................................................ 4
Overview of the Ovation ................................................................................... 5
Accessories ...................................................................................................... 6
Needles............................................................................................................. 7
Thread .............................................................................................................. 7
Optional Accessories........................................................................................ 7
Setting Up Your Ovation ................................................................................ 8/9
Cutting Blade Locking Dial ............................................................................. 10
Upper Looper Positioning Knob...................................................................... 10
Cutting Blade Cover and Sewing Table .......................................................... 10
Thread Cutter.................................................................................................. 11
Presser Foot Pressure Adjustment ................................................................. 11
Snap-on Presser Foot..................................................................................... 11
Stitch Length / Rolled Hem............................................................................. 12
Stitch Width..................................................................................................... 12
Differential Feed ............................................................................................. 13
Overlock Thread Delivery System .................................................................. 14
Stitch Selector Lever....................................................................................... 14
Wave/Overlock Selector Lever ....................................................................... 14
Side Cover...................................................................................................... 14
Chain/Cover Stitch Tension Dials.................................................................... 15
Chain/Cover Stitch Needle Tension Dial ......................................................... 15
Chain/Cover Stitch Looper Tension Dial ......................................................... 15
2-Thread Subsidiary Looper ........................................................................... 16
Upper and Lower Looper Thread Fine-Tuning Knob...................................... 16
Sewing Speed Controller................................................................................ 17
Knee Lifter ...................................................................................................... 17
THREADING............................................................................................................ 18
Threading Preparation.................................................................................... 18
Threading Your Ovation.................................................................................. 19
Locked Position for Threading........................................................................ 19
Thread Stand and Thread Port Reference Chart............................................ 19
Lower Looper.................................................................................................. 20
Upper Looper.................................................................................................. 20
Chain Looper .................................................................................................. 21
Chain/Cover Needles...................................................................................... 22
Left Chain/Cover Needle - C-1 ......................................................... 22
Center Chain/Cover Needle - C-2 .................................................... 22
Right Chain/Cover Needle - C-3....................................................... 22
Overlock Needles ........................................................................................... 23
Left Overlock Needle - O-1............................................................... 23
Right Overlock Needle - O-2............................................................. 23
How to Use the Needle Threader ................................................................... 24
Cutting Blade Cover Seam Guide .................................................................. 24
Start to Sew .................................................................................................... 25
To Chain-Off of the Fabric............................................................................... 25
Clearing the Stitch Width Fingers ................................................................... 26
Re-threading Loopers..................................................................................... 26
OVERLOCK STITCHES - Express Stitches.......................................................... 27
4-Thread Overedging ..................................................................................... 27
Overlock Seam ............................................................................................... 27
4-Thread Overlock.......................................................................................... 28
3-Thread Overlock - Wide............................................................................... 29
3-Thread Overlock - Narrow ........................................................................... 30
3-Thread Overlock - Narrow Hem................................................................... 31
Rolled Edging ................................................................................................. 32
3-Thread Rolled Edge .................................................................................... 32
Seaming Sheers ............................................................................................. 33
Lettuce Edge .................................................................................................. 33
Belt Loops and Button Loops.......................................................................... 33
Returning to Standard Serging ....................................................................... 33
3-Thread Flatlock - Narrow............................................................................. 34
2-Thread Overlock.......................................................................................... 35

Table of Contents (Cont.)
Converting from 3-Thread to 2-Thread Overlock............................................ 35
2-Thread Flatlock - Wide ................................................................................ 36
2-Thread Flatlock - Narrow............................................................................. 37
Blanket Stitch - Decorative Stitch.................................................................... 38
Ladder Stitch - Decorative Stitch .................................................................... 39
Wave Stitch..................................................................................................... 40
Converting from Normal Serging to Wave...................................................... 40
3-Thread Wave Stitch ..................................................................................... 41
3-Thread Rolled Wave Stitch .......................................................................... 42
3-Thread Reversed Wave Stitch..................................................................... 43
CHAIN/COVER STITCH - Express Stitches.......................................................... 44
Chain Stitching........................................................................................... 44/45
Chain Stitch - Tension Adjustment ................................................... 45
Cover Stitch - Right Narrow - 3mm........................................................... 46/47
Cover Stitch Tension Adjustment ...................................................... 47
Cover Stitch - Left Narrow - 3mm .............................................................. 48/49
Cover Stitch Tension Adjustment ...................................................... 49
Cover Stitch - Wide - 6mm......................................................................... 50/51
Cover Stitch Tension Adjustment ...................................................... 51
Triple Cover Stitch - 6mm .......................................................................... 52/53
Triple Cover Stitch Tension Adjustment ............................................ 53
COMBINATION STITCH - Expressive Stitches .................................................... 54
4-Thread Safety Stitch............................................................................... 54/55
5-Thread Safety Stitch............................................................................... 56/57
7-Thread Wave Stitch ................................................................................ 58/59
7-Thread Reversed Wave Stitch................................................................ 60/61
8-Thread Stitch .......................................................................................... 62/63
Expressive Stitches: Chain/Cover Stitches Combined with Overlock Stitches
Expressive Combinations .......................................................................... 64/65
TECHNIQUES ......................................................................................................... 66
Turning Corners - Chain Stitch ....................................................................... 66
Turning Corners - Cover Stitch ....................................................................... 66
Turning Outside Corners - Overlock............................................................... 67
Turning Inside Corners - Overlock.................................................................. 67
Flat Hemming - Cover Stitch........................................................................... 68
Hemming in the Round - Cover Stitch ............................................................ 68
Blind Hemming - Overlock.............................................................................. 69
Tapes Slots ..................................................................................................... 70
Inserting Tapes - Overlock.............................................................................. 70
Inserting Tapes - Cover Stitch......................................................................... 70
Flatlock "Decorative" - Overlock ..................................................................... 71
Securing Ends - Overlock.......................................................................... 72/73
Securing Chain and Cover Stitching............................................................... 74
Notes .............................................................................................................. 75
SPECIALTY THREADS........................................................................................... 76
Using Specialty Threads ................................................................................. 76
Lightweight Threads .............................................................................. 76
Medium weight Threads ........................................................................ 76
Heavy weight Threads........................................................................... 76
Bypassing the Threading Port ........................................................................ 77
Looper Threading Tool.................................................................................... 78
Thread Cradle for Loopers ............................................................................. 79
Specialty Thread Guide Chart.................................................................... 80/81
MAINTENANCE ...................................................................................................... 82
Troubleshooting......................................................................................... 82/83
Replacing Needles ......................................................................................... 84
Replacing Cutting Blades ............................................................................... 85
Replacing LED Lighting .................................................................................. 85
Cleaning.......................................................................................................... 86
TECHNICAL DATA.................................................................................................. 87
Technical data................................................................................................. 87
STITCH SELECTION CHART................................................................................. 88
Chart for Stitch Selection Setting for Chain/Cover and Combination Stitches
....64
.. 88/89
T
A
B
L
E
O
F
C
O
N
T
E
N
T
S
3
O
V
E
R
How Your Machine Operates
Sometimes called an overlock machine or overlocker, the serger is different from any conventional
sewing machine you have used. Awareness of its simple operation will enable you to become more
proficient in its use. Please read all instructions before using your new machine.
V
I
E
W
A serger is kind of a knitting process that loops two, three or four threads together to create a stitch.
Your Baby Lock Ovation operates with one or two needles in the overlock position and one or two
loopers to form an overlock stitch. Use one, two or three chain/cover stitch needles and one looper
for a chain or cover stitch. Uniquely independent of each other, you can use any of the overlock or
chain/cover stitch selections separately or in combination.
When fabric is placed in front of the presser foot, it reaches the feed dogs first. The feed dogs move
the fabric along as the cutting blades trim the fabric edge, creating a clean edge to be finished.
Or disengage your blade and insert the sewing table to sew a chain stitch in the center of your
fabric.
The overlock stitch is supported by one or more parallel "stitch finger(s)" that keep the fabric flat.
To form an overlock stitch, the threads become "locked" "over" the edge of the fabric encasing the
raw edge with thread to prevent fabric raveling. When forming a chain stitch, the chain needle thread
catches the chain looper to form a straight stitch on the top of your fabric and thread chain loops on
the underside. Use 2 or 3 cover stitch needles and the chain looper to form a double or triple row of
straight stitching on the top and a weave of thread on the underside of your fabric.
After setting up your machine for the first time, take a few moments to learn how it sews. Before your
machine is threaded, turn the handwheel slowly toward you several times and watch the operation
of the various parts.
4

Overview of the Ovation
C‑1
C‑2
C‑3
O‑1
O‑2
UL
33
21
31
29
27
25
23
32
30
28
26
24
22
20
34
35
8
11
15
7
9
14
16
18
19
17
41
1
2
3
4
5
6
42
40
39
38
37
36
12
13
10
O
1. Carrying handle
2. Chain/cover stitch needle tension dial
3. Presser foot pressure adjusting dial
4. Thread cutter
5. Quilting guide fixing screw
6. Presser foot release lever
7. Needle clamp
8. Needle height viewing area
9. Needle clamp screws
10. Snap-on presser foot
11. Needle plate
12. Upper blade
13. Stitch width adjusting dial
14. Side cover
15. Cutting blade locking dial
16. Stitch length/rolled hem adjusting dial
17. Cutting blade cover
18. Needle drop drawer
19. Front cover
20. Knee lifter slot
21. Threading lever
22. Bypassing thread guide
23. Differential feed adjusting lever
24. Handwheel
25. Foot control jack
26. Power cord receptacle
27. Power switch
28. Push to thread button
29. Chain looper threading port
30. Lower looper threading port
31. Upper looper threading port
32. Accessory compartment & thread stand
33. Stitch selector lever
34. Extension thread stand
35. Telescopic antennae and thread guides
36. Chain/cover stitch looper tension dial
37. Wave/Overlock Selector Lever
38. Upper & Lower looper thread
fine-tuning knob
39. Presser foot thread release lever*
40. Upper looper positioning knob
41. Sewing speed controller
42. Subsidiary looper
V
E
R
V
I
E
W
* Raising the presser foot releases all threads.
5

O
1
5
11
12
13
20
22
21
10
6
7
8
9
14
15
16
18
19
17
2
3
4
V
E
R
V
Accessories
Your Baby Lock Ovation serger has a built-in accessory compartment. To open, grasp the backside
of the compartment located under the lower and chain looper spool pins and slide toward the right
to reveal the tray holding some of the accessories listed below.
Others may be found in the machine packing materials.
I
E
W
Accessory Number included Located in
1. Instruction manual 1 Packing box
2. Quick reference threading guide 1 Packing box
3. Power cord 1 Packing box
4. Foot control 1 Packing box
5. Sewing table for chain/cover stitching 1 Packing box
6. Guide fixing screws for sewing table 2 With sewing table
7. Package of assorted sized needles 1 Accessory compartment
Organ ELx705CF
8. Lint brush/needle insert tool 1 Accessory compartment
9. Needle threader 1 Accessory compartment
10. Allen screwdriver 1 Accessory compartment
11. Tweezers 1 Accessory compartment
12. Upper cutting blade for replacement 1 Accessory compartment
13. Screwdriver 1 Accessory packet
14. Looper threading tool 1 Accessory packet
15. Thread nets 8 Accessory packet
16. Spool caps with sponge 8 Accessory packet
17. Spool caps 8 Accessory packet
18. Machine cover 1 Packing box
19. Mounting bolt with washer 1 Accessory packet
20. Spool pin disks (large) 2 Accessory packet
21. Cone holders 8 On machine
22. Knee lifter 1 Packing box
6

Needles
Your Baby Lock Ovation serger is set up to use either Organ or Schmetz ELx705CF needles size
90/14. This is suitable for most medium and heavyweight fabrics. For lightweight fabrics use size
80/12, ELx705CF needles. The ELx705CF needle is a semi-ballpoint design and is suitable for knits
and wovens.
Thread
O
V
E
R
V
I
All types of thread may be used on your Baby Lock, but 100% polyester long fiber thread,
crosswound on a cone, consistently provides the best stitch performance. Because the threads must
pass through several thread guides at high speeds, they must be of uniform thickness and high
strength while producing a minimum amount of lint.
Good quality cotton or cotton covered polyester threads sew well, though they produce more lint,
creating the need to clean the machine more frequently. They work well for overedging and seaming, but they may be too weak or too fuzzy for the rolled edge. Poor grades of thread can result in
frequent fraying, breaking and unbalanced stitches.
Threads of other fiber contents and weights may be used, depending on their strength and thickness.
Testing will help you determine the stitch quality and how easily the threads can pass through the
thread guides, thread slots, needles and loopers.
Important Note: For maximum performance of the Baby Lock Ovation, it is recommended to use
"100% polyester long fiber thread". This thread also performs best when used with many decorative
threads for sewing specialty decorative techniques.
Optional Accessories
OVERLOCK OPTIONAL ACCESSORIES
Beading Foot B5002-04A-C (BLE8-BF)
Blindhem Foot B5002S06A (BLE8-BLHF)
Elastic Applicator Foot B5002S09A (BLE8-EF)
Lace Applicator Foot B5002S08A (BLE8-LF)
Piping/Cording Foot 5mm B5002-05A-C (BLE8-CF)
Ruffling Foot B5002S07A (BLE8-RF)
Clear Foot B5002S14A (BLE8-CLF)
Curving Foot M0-36034 (BLE8-CVF)
E
W
CHAIN/COVER STITCH OPTIONAL ACCESSORIES
Belt Loop Binder 3/4" B0421S12A (BLE8-S12)
Belt Loop Binder 1-1/2" B0421S11A (BLE8-S11)
Cover Chain Foot B5002S10B (BLE8-CCF)
Double Fold Bias Binder 28mm B0421S03A (BLE8-S3)
Double Fold Bias Binder 36mm B0421S02A (BLE8-S2)
Fabric Guide M0-70A09 (BLES8-FG)
Pintuck Foot w/2 Guides B5002-06A-C (BLE8-PTF)
Plain Hemmer 1/4" B0421S07A (BLE8-S7)
Plain Hemmer 1/2" B0421S06A (BLE8-S6)
Single Downturn Feller 1/4" B0421S10A (BLE8-S10)
Single Downturn Feller 5/8" B0421S08A (BLE8-S8)
Single Downturn Feller 1" B0421S09A (BLE8-S9)
Single Fold Bias Binder 28mm B0421S04A (BLE8-S4)
Single Fold Bias Binder 40mm B0421S05A (BLE8-S5)
OTHER OPTIONAL ACCESSORIES
Top Stitch Needle Size 90 (T-90B)
Trim bin 900N (BLTBIN)
Quilt Guide (BLES8-QG)
7
O
I
Main Switch
I I
OO
O
V
E
R
V
I
E
Setting Up Your Ovation
1. Remove machine from box
After removing the packing materials from the
box, gently lift your Baby Lock serger by grasping
the handle provided on the top of the machine.
Place the machine on a serger sewing table or
any sturdy level surface that provides ample work
area to the left. Place the foot control in a pedal
stay, if desired, and place it under the sewing
table.
W
A
B
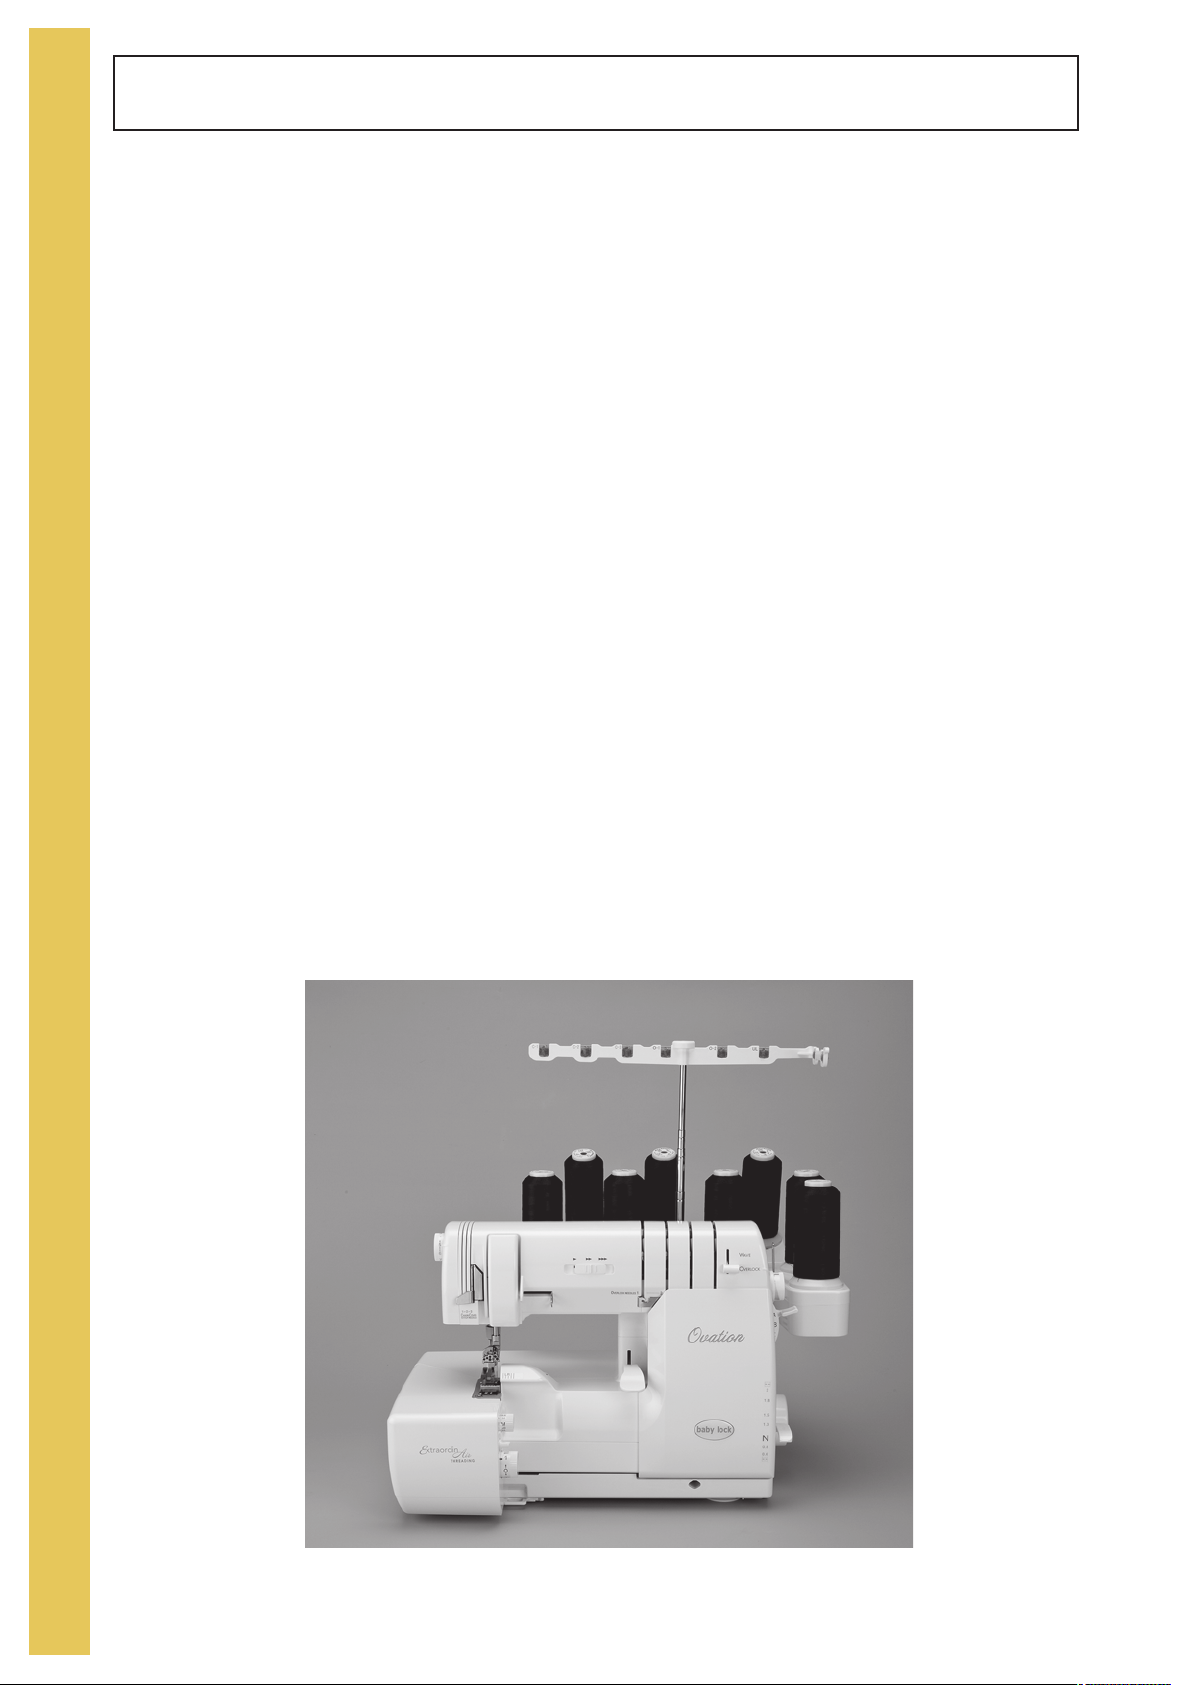
2. Plug in the machine
Before connecting the power supply, make sure
the voltage and frequency shown on the machine
conforms to your electrical power.
With the overlock machine turned off, insert the
foot control jack and the power cord plug into
their appointed connectors. (fig. A) Then plug
the power cord into an electrical wall outlet.
Always make sure the power is off when the
machine is not in use. (fig. A) Available foot
control: Model YC-485EC or 4C-333C.
3. Polarized plug
This appliance has a polarized plug (one blade
wider than the other). To reduce the risk of electric shock, this plug is intended to fit in a polarized
outlet only one way. (fig. B) If the plug does not fit
fully in the outlet, reverse the plug. If it still does
not fit, contact a qualified electrician to install the
proper outlet. Do not modify the plug in any way.
8
C
D
E
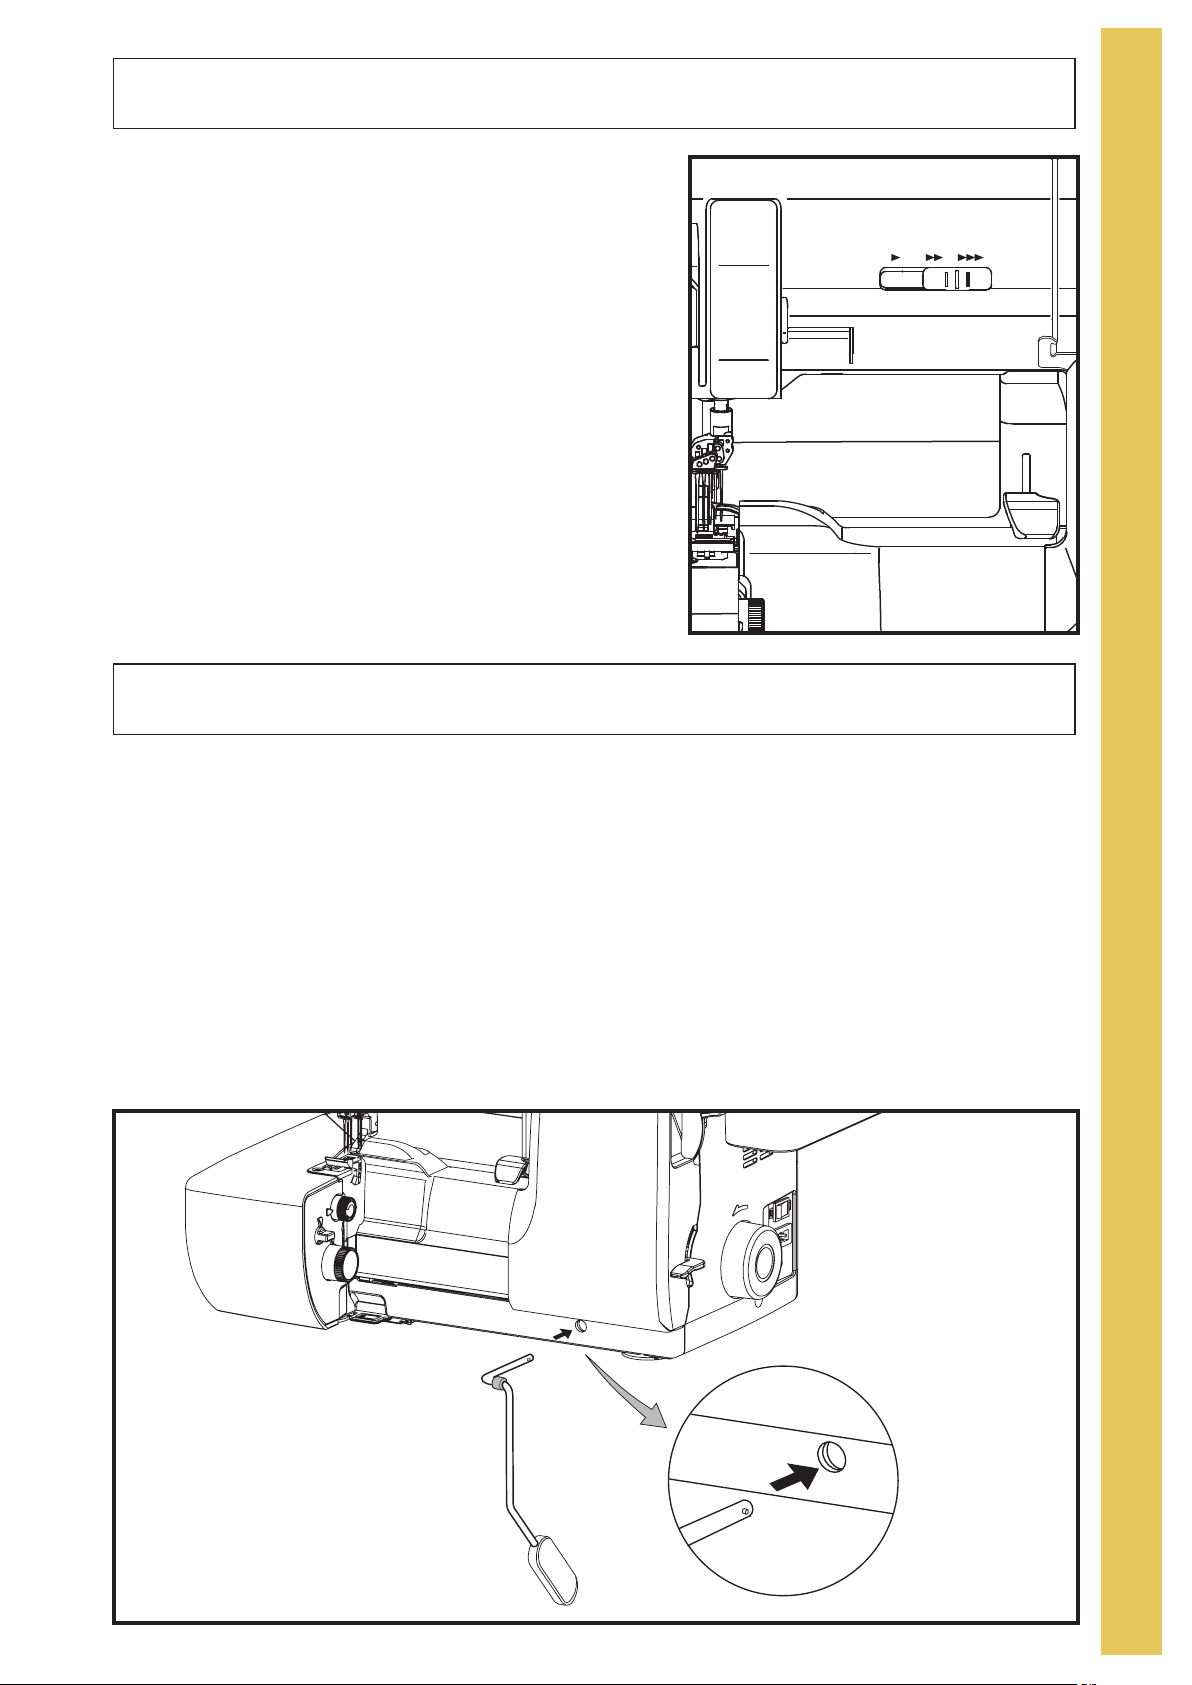
4. Foot controller
The sewing speed of the machine is determined
by the amount of pressure applied to the foot
controller. When not in use, do not place anything
on the foot controller, or the machine could start
inadvertently and the controller or motor could
burn out.
Lay the foot control cord along the inside of the
channel located on the bottom right side of the
overlock machine. (fig. C)
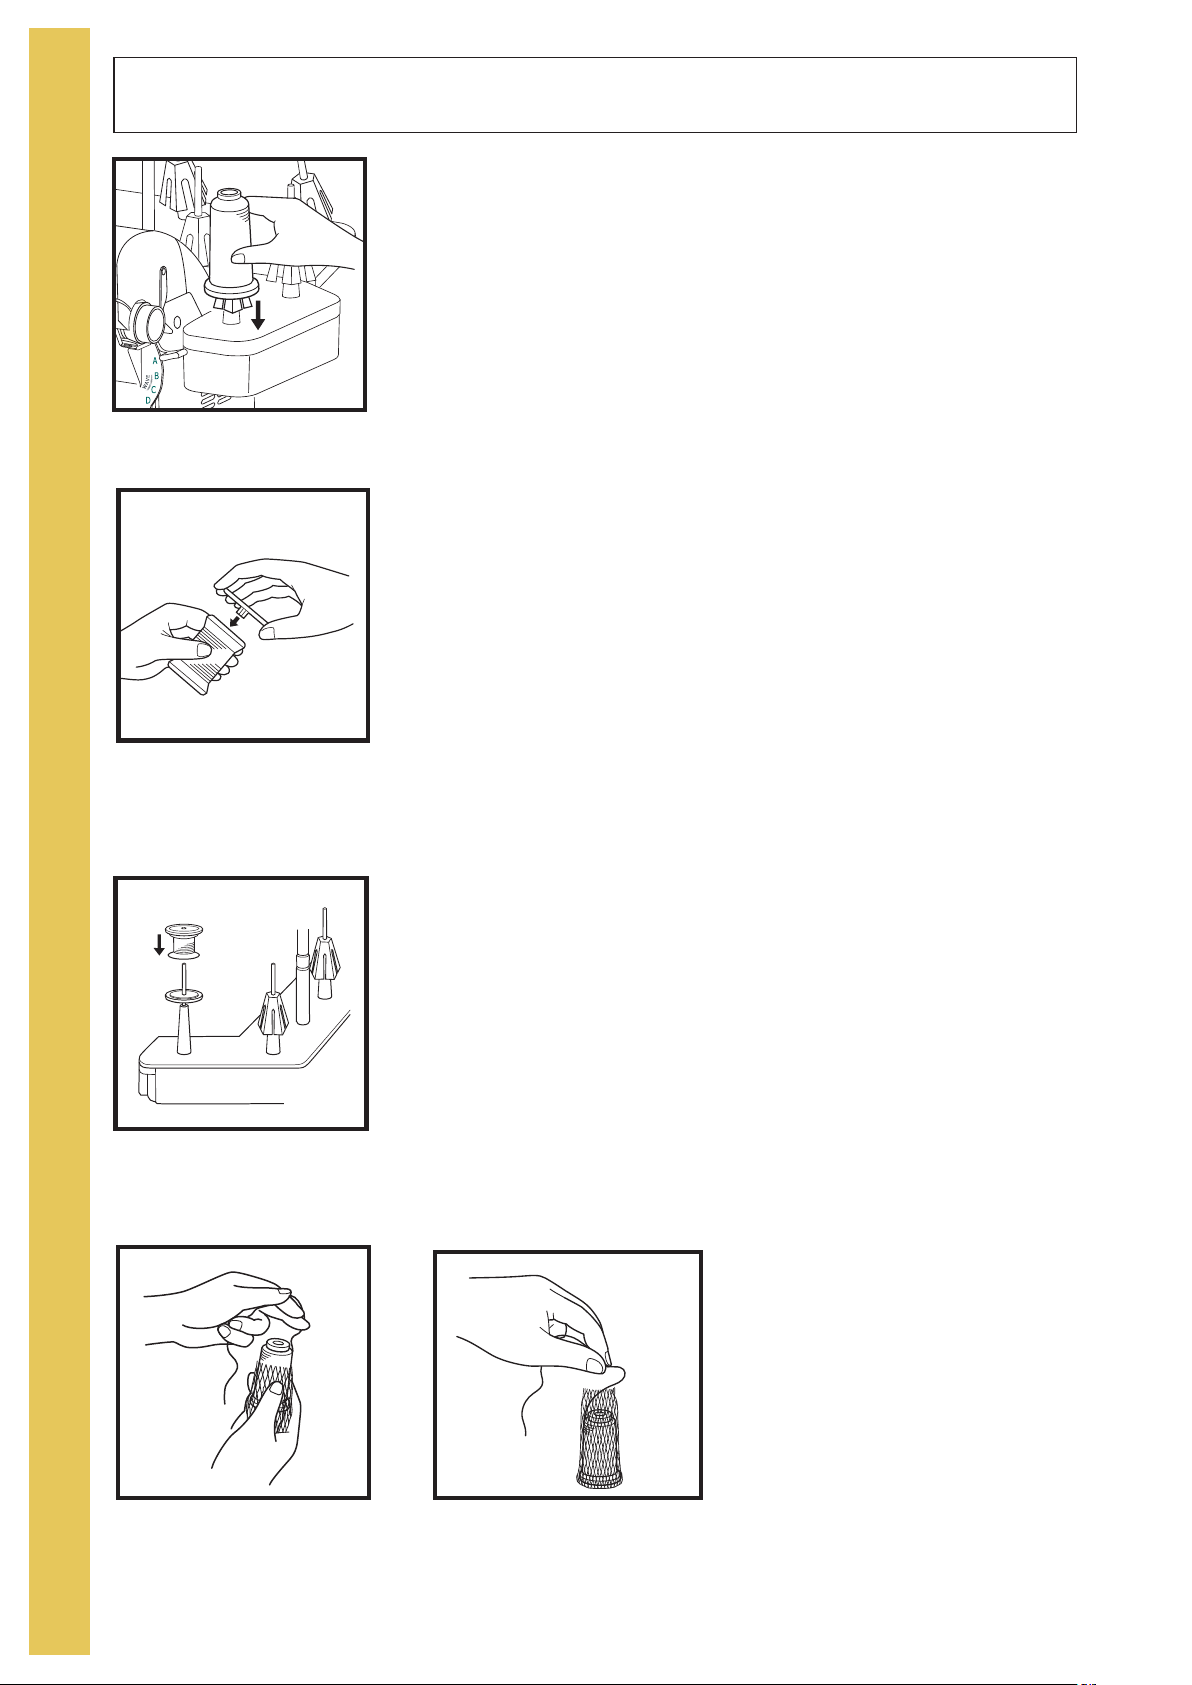
5. Extension thread stand
To insert the extension thread stand:
Place the pegs into the slots on the back of the
main thread stand.
Push the extension thread stand into the main
thread stand until it snaps into place. (fig. D)
To remove:
Using both hands squeeze together the upper
section of the stand support braces that are
located just underneath the stand while gently
raising it up and out to release from the main
thread stand.

Setting Up Your Ovation (Cont.)
C-2
C-1
C-3
O-1
O-2
UL
LL
C-2
C-1
C-3
O-1
O-2
UL
LL
CL
CL
6. Position the telescopic thread guide.
Raise the telescopic thread guide to its highest position. Rotate the shaft to the left and right until
each section "clicks" into a locked position. (fig. F)
O
V
E
R
7. Opening front cover
The front cover may be opened simply by placing your fingers behind the cover at the upper right
side and gently pull toward you. (fig. G)
8. Opening Cutting blade cover
To open the cutting blade cover, place your thumb against the tab, and slide the cover to the right.
A slight pull toward you will allow the cover to swing down, providing access to the loopers,
blades, and thread guides. (fig. H)
Note: The front cover has to be opened before opening the cuttting blade cover.
Your machine is pre-set to sew an overlock with a chain stitch. The upper blade is engaged to cut
the fabric while sewing. Of course, you may select to engage or disengage the cutting blade. You
can change the blade cover to the sewing table and lock the upper looper down when sewing only
the chain stitch.
V
I
E
W
G
F
H
9

O
O
80 2
507
50 2
70 7
,/#+
V
E
R
V
Cutting Blade Locking Dial
To lock cutting blade down:
Turn the dial clockwise 180 degrees until you see "LOCK" on the
top.
The cutting blade will stay below the needle plate for non-cutting
techniques. (fig. A)
A
I
E
W
To re-engage cutting blade:
Turn the cutting blade locking dial half of a turn counter-clockwise.
The blade will start moving automatically when you start sewing.
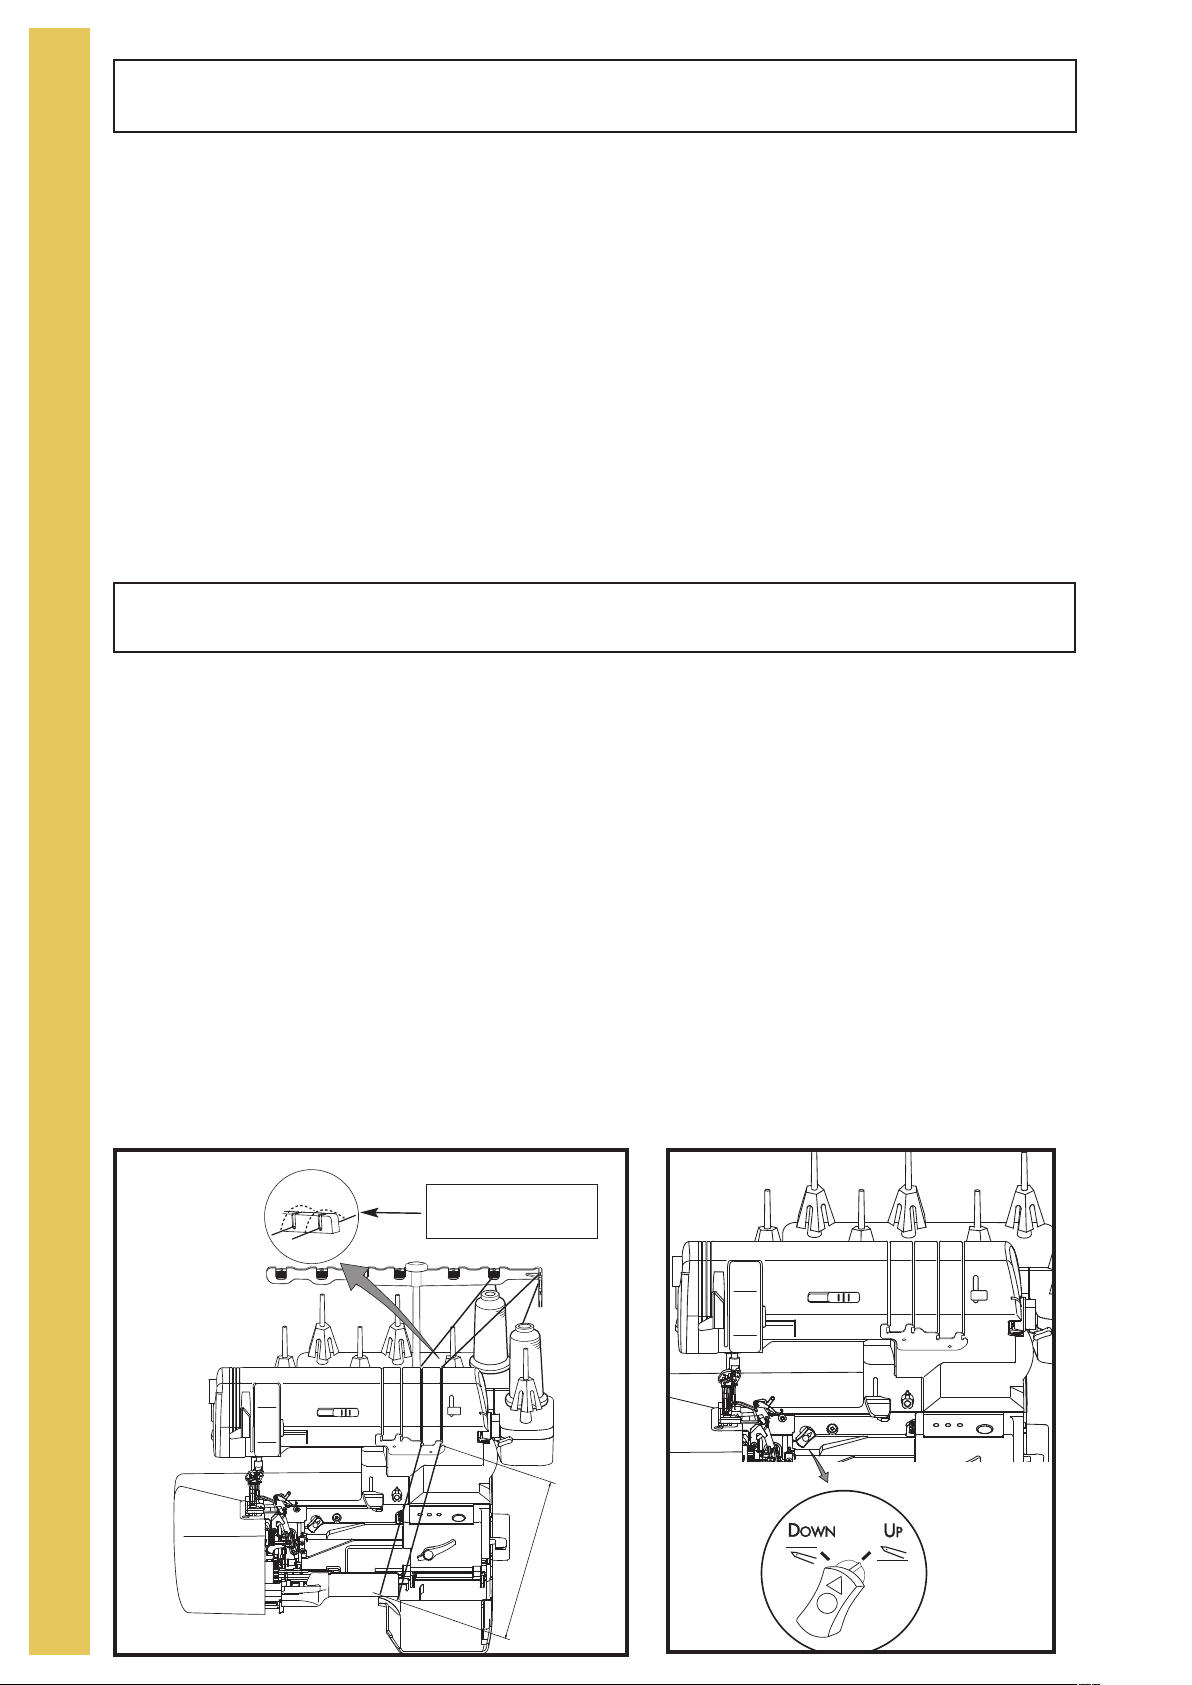
Upper Looper Positioning Knob
When you change from overlocking to chain/cover stitching, you
should also disengage the upper looper by changing the upper
looper positioning knob to the "DOWN" position before you close the
sewing table door.
B
C
a) Turn the handwheel until upper looper is at its lowest position.
b) Change the upper looper positioning knob to the "DOWN"
position. (fig. B)
c) Close the sewing table door and then the front cover. (fig. C)
Note: Make sure the upper looper positioning knob is in the "UP"
position prior to locking the machine to thread the upper looper.
Cutting Blade Cover and Sewing Table
To use the sewing table for chain/cover stitching you will need to
change the cutting blade cover as follows:
a) Open front cover and cutting blade cover. (page 9, fig. G & H)
b) Depress the center snap and gently pull toward you to unsnap
blade cover (fig. D) and then snap sewing table into place. (fig.
E)
c) Disengage the upper looper by turning the upper looper
positioning knob to "Down". (fig. B)
d) Move the stitch width adjusting dial to the 3.0 setting.
e) To close the sewing table door raise to the up position and slide
to the left placing the tab of the table under the needle plate. (fig.
E)
f) Close the front cover.
Note: Even though you are not using your cutting blade with the
sewing table, the adjusting dial needs to be moved to its lowest
setting for the table to fit against the needle plate.
E
D
10

Thread Cutter
There is a thread cutter located on the left side of your Ovation.
At the end of a seam, sew off the fabric edge and continue sewing to
create a 5-6 inch (12.5-15cm) thread chain.
Bring the chain of thread up and from the back to front through the
thread cutter.
O
V
E
R
V
I
Presser Foot Pressure Adjustment
The presser foot pressure has been preset at the factory and rarely
needs adjustment. You may find it necessary, however, to decrease
the pressure for thick fabrics or increase pressure for thin fabrics to
feed more smoothly under the foot. Turn the adjusting dial on left side
of the machine.
To increase pressure, turn the pressure adjusting dial counterclockwise.
To decrease pressure, turn the dial clockwise.
Snap-On Presser Foot
The Ovation has the convenience of a snap-on presser foot
system.
To Release:
1. Raise the presser foot thread release lever to highest
position.
2. Lock the cutting blade down.
3. Raise the needles to their highest position.
4. Push the presser foot release lever located at the back of the
presser foot holder.
5. Slide presser foot slightly toward you and carefully turn the
back section of foot clockwise 90 degrees.
6. Slide the presser foot to the rear to remove.
E
W
To Replace:
Presser Foot
Release Lever
The presser foot that comes with the Ovation has three separate tape slots located on the front
section of the foot. Insert the tape or ribbon through the appropriate slot and then under the sole of
the foot. (see page 70 for detailed instructions)
The raised markings on the toe of the foot are seam line guides. They indicate the needle positions
to help guide your fabric for accurate seaming.
1. Raise the presser foot thread release lever.
2. Lock the cutting blade down.
3. Raise the needles to the highest position.
4. Slide the foot from the left to right.
5. Align the bar of the foot with the groove in the holder.
6. Lower the presser foot thread release lever to snap into
place.
11
O
0
0
V
E
R
V
I
E
W
Stitch Length/Rolled Hem
The stitch length / rolled hem adjusting dial is conveniently located just
to the left of the cutting blade cover, near the base plate. (fig. A) The
dial shows two stitch-length ranges, from 0.75, for the shortest stitch,
to 4 for the longest. As the dial indicates, one range is for standard
sewing and one is for rolled edging or narrow seaming.
A
B
Simply turn the dial aligning the desired setting with the indicator mark
on the machine. A stitch length of 3mm, or about 10 stitches per inch
is ideal for seaming and overedging most fabrics. For overedging or
seaming very lightweight fabrics, you may prefer a shorter stitch
length. When sewing heavier fabrics, you may choose to lengthen the
stitch. (fig. B)
.
Note: 0.75mm is located between the 0 and 1 on both standard &
rolled hem settings.
Stitch Width
A
The stitch width adjusting dial is located above the stitch length dial. (fig.
A) The stitch width displays two sets of numbers, indicating two width
ranges, for overlock stitches. The larger size numbers on the dial, 5.5
through 7.5mm, denote the stitch width when the 0-1 (left) needle is in
use. The smaller size numbers, 3.0 through 5.0mm, apply when only
the 0-2 (right) needle is in use for forming a 3-thread stitch. The "M"
setting (3.5) is for the rolled edge.
Adjusting the stitch width moves the upper cutting blade. It also moves
the stitch fingers further apart or closer together for complete fabric
support with any stitch width.
The stitch width is infinitely variable between either end of the range.
Simply turn the dial aligning the desired setting with the indicator mark
on the machine. Use a wider stitch on loosely woven fabrics. You may
prefer a narrower stitch width on knits, tightly woven, or sheer fabrics.
(fig. B)
12
B
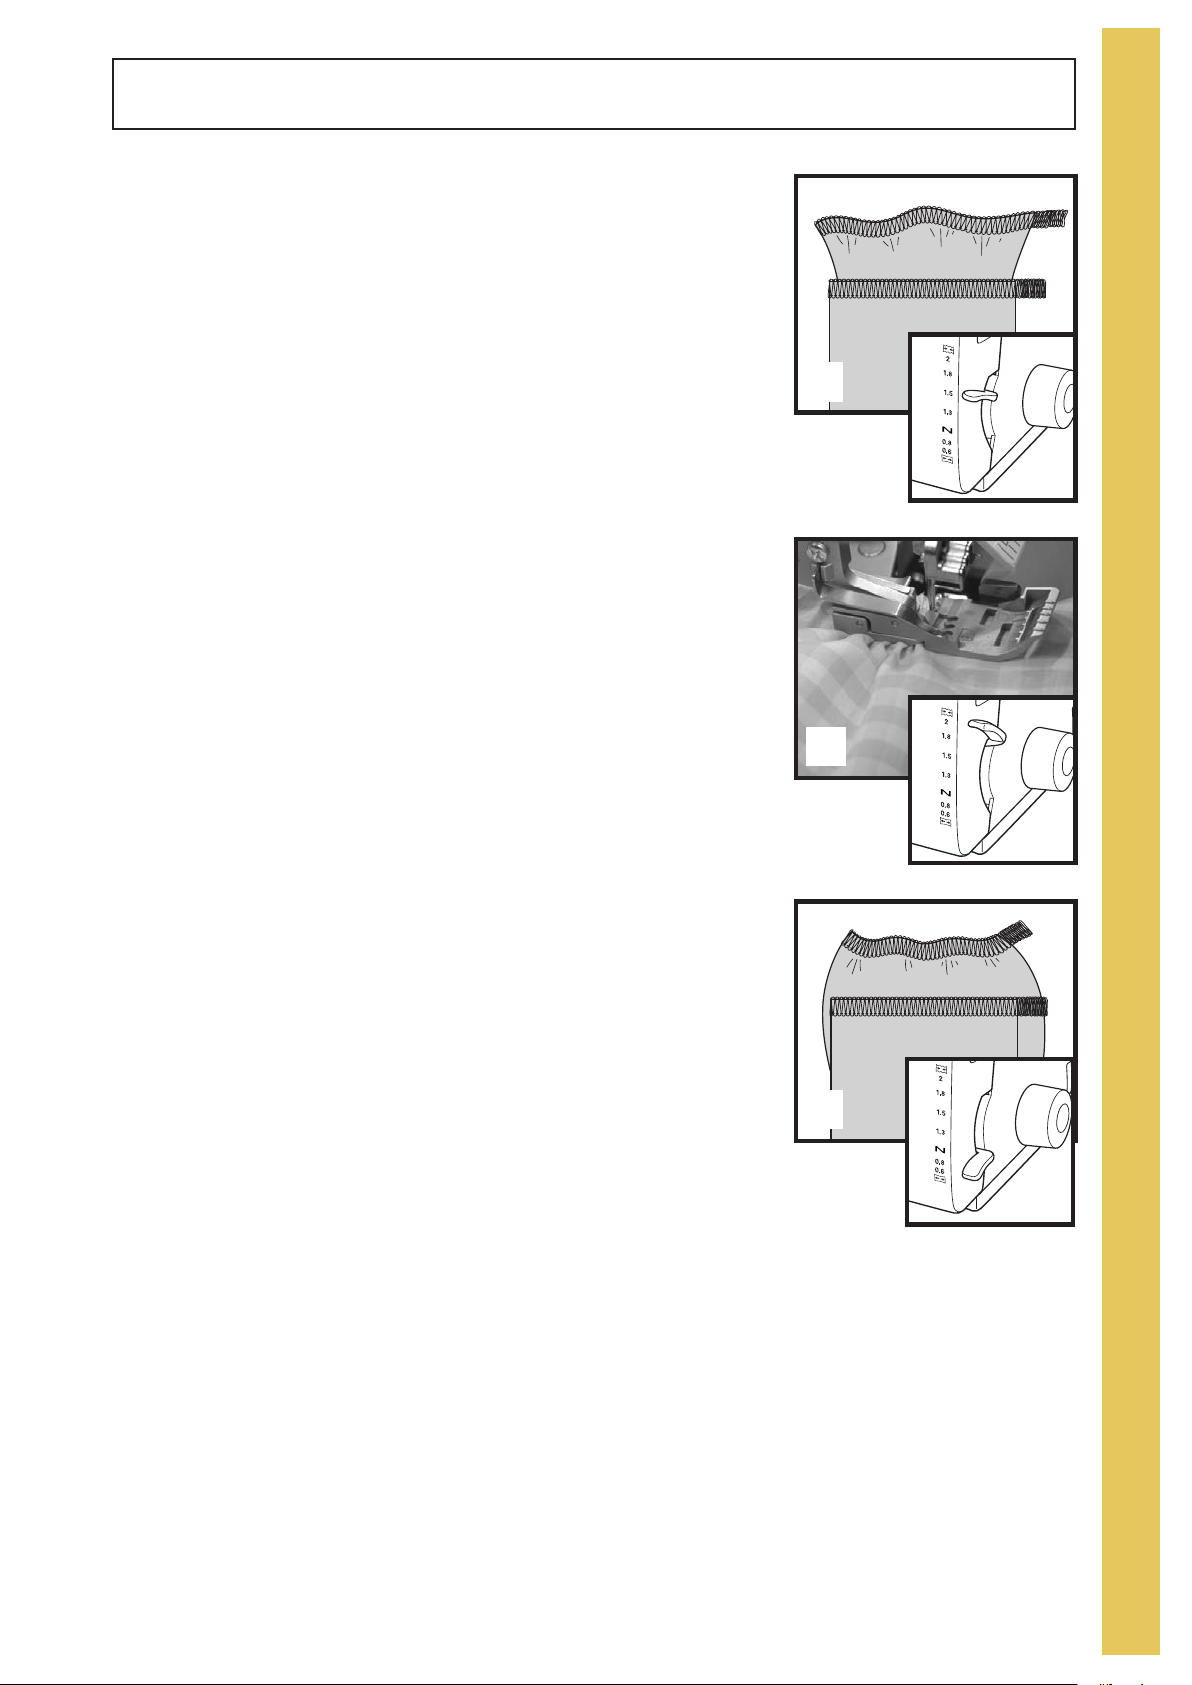
Differential Feed
Your Baby Lock serger is equipped with differential feed.The set of
feed dogs work independently in order to ensure smooth sewing on
all fabrics.
O
V
E
R
When the differential feed adjusting lever, located at the machine's
right front edge, is set on "N" for normal feeding, the feed dogs
move the same distance. This is the setting to use for most fabrics
and applications.
When the dial is set above "N" (fig.B), the front feed dog will feed
more fabrics than the back. This is because the front feed dog
moves at a greater distance than the back feed dog. As a result,
the fabric becomes compressed or eased, as the diagram on the
front cover indicates. This can eliminate wavy seams in stretchy
fabrics or those cut on the bias grain. (fig.A)
At the maximum setting of 2 (fig. C), the differential feed can
gather a lightweight fabric to nearly double fullness. (fig. D)
The front feed dog is actually feeding in twice as much fabric as the
back feed dog is feeding out. To maximize the gathering effects,
use the longest stitch length setting. Fabric weight will affect the
gathering. Test stitch for desired results.
When the differential feed lever is set below "N" (fig. F), the front feed
dog moves less distance than the back feed dog. This adjustment
stretches the fabric slightly as it is sewn. The lower settings prevent
puckers on lightweight fabric (fig. E), add more stretch to swim wear,
active wear, and can be used to create a lettuce edge. (see page 33)
A
V
I
E
W
B
D
C
E
F
13
O
V
E
R
V
I
E
Overlock Thread Delivery System
The Baby Lock Ovation revolutionizes the way a serger works with its exclusive overlock Thread
Delivery System. You no longer have to manually adjust the tension settings for the type of overlock
stitch you are sewing. Select the type of overlock stitch you wish to serge, the Ovation will
automatically feed the correct amount of thread through the needles, the loopers and thread guides
to form a perfect stitch every time.
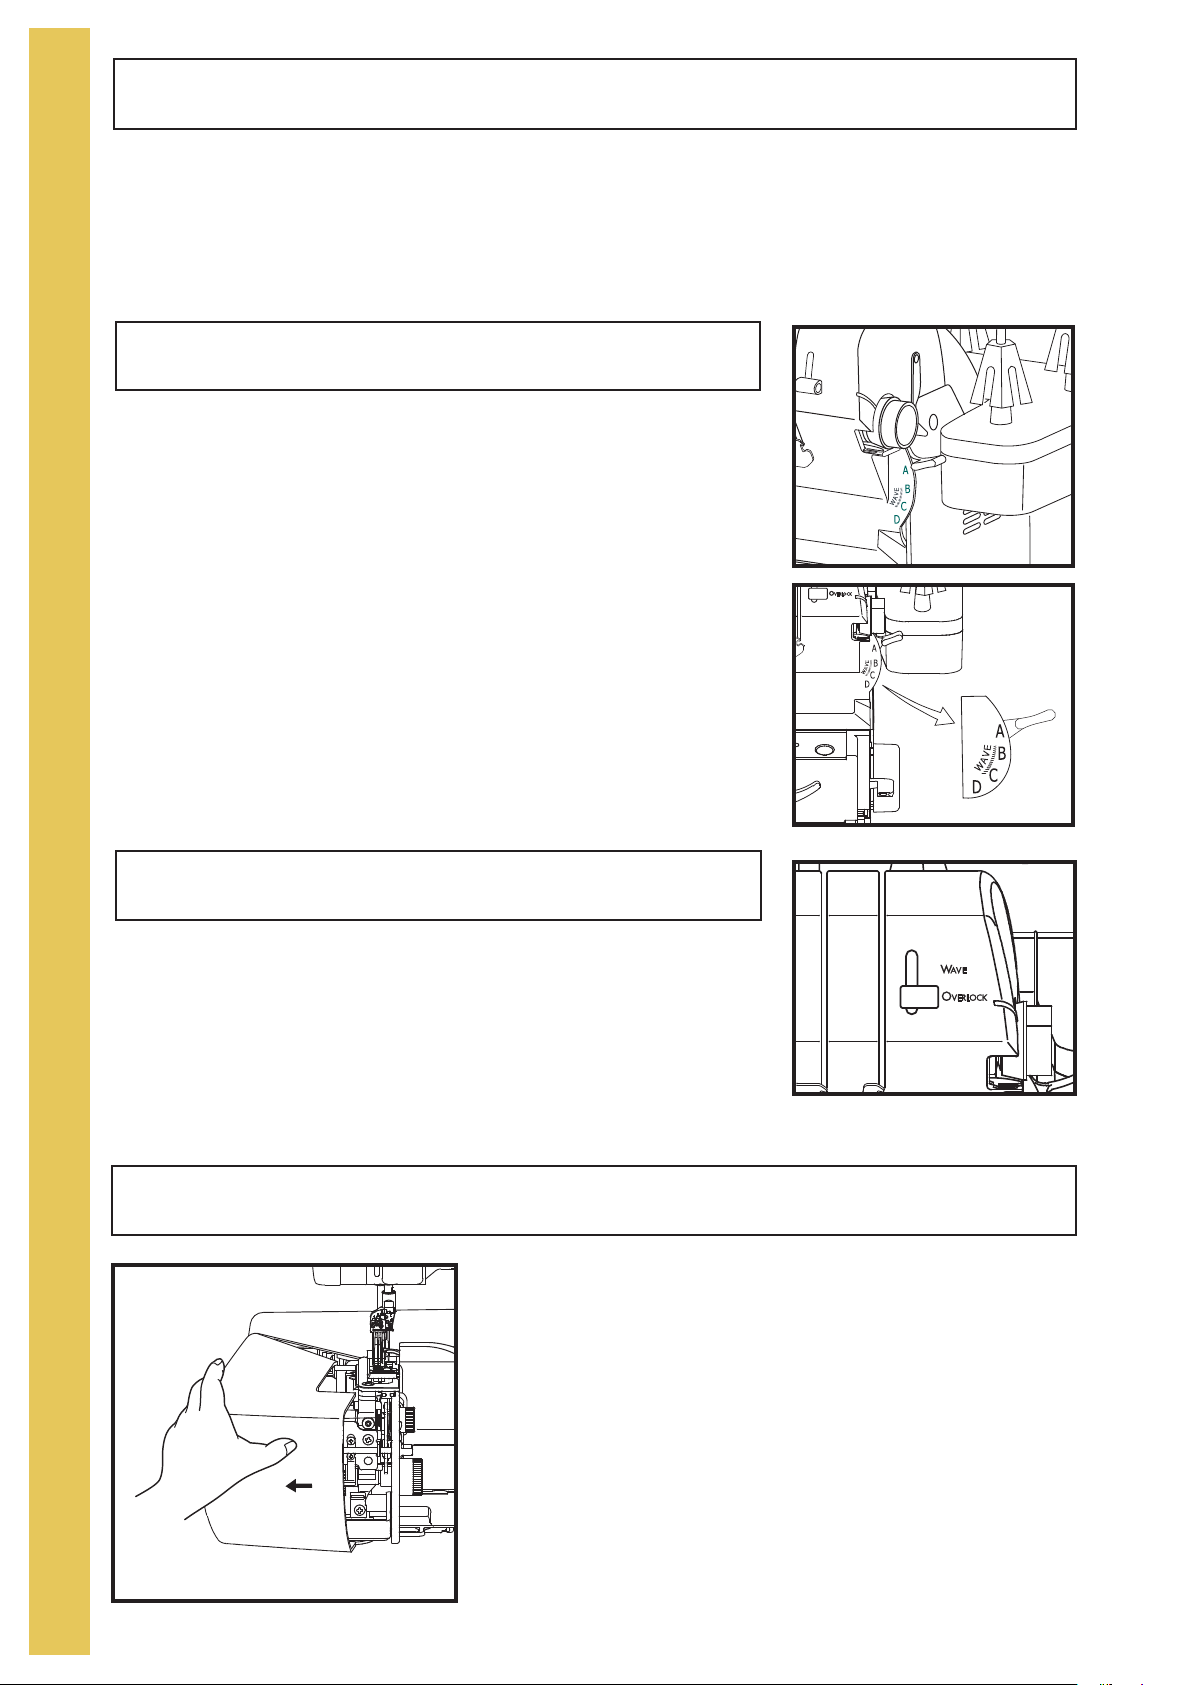
Stitch Selector Lever
W
The stitch selector lever, which controls the overlock thread
delivery system for overlock stitching, is located on the right side of
the machine. Select appropriate setting: A, B, C, or D.
A - for overlock stitches using the left needle (O-1) and the looper
threads balanced.
B - for overlock stitches using the right needle (O-2) and the
looper threads balanced.
C - for narrow stitches with a short length and the looper threads
balanced.
D - for stitches that require a tight lower looper.
For best results, use setting B or C for WAVE stitching.
See chart on last two pages for stitch selection settings.
Wave/Overlock Selector Lever
The Wave/Overlock Selector lever shows "OVERLOCK" and
"WAVE". Select "OVERLOCK" for overlock stitching. Select
"WAVE" for wave stitching
14
Side Cover
Open side door on the left for easy access
to the chain looper thread tray.
Close door before sewing.
Chain/Cover Stitch Tension Dials
C‑1
C‑2
C‑3
O‑1
O‑2
UL
5
1
9
2
0
6
7
4
3
C
O
V
E
R
C
H
A
I
N
S
T
I
T
C
H
S
T
I
T
C
H
The tension system of the chain and cover stitches are completely separate from the system being
used on the overlock stitches. Unlike the thread delivery system of the overlock stitches, the
tensions of the chain / cover stitch needles and chain looper are adjusted by dials located on the
outer sides of your Ovation.
O
V
E
R
V
Chain/Cover Stitch Needle Tension Dial
The chain/cover stitch needle tension dial is located on the left upper side of the machine. One
tension dial controls all 3 of the chain/cover stitch needle selections. Normally set at "5", the dial can
be turned from 0 - 9 to increase or decrease the tension on the chain/cover stitch needle threads.
Increase the tension by turning the dial to a larger number.
Decrease the tension by turning the dial to a smaller number.
Align the number with the indicator mark on the front of the machine near the dial.
Chain/Cover Stitch Looper Tension Dial
The chain/cover stitch looper tension dial is divided into 2 sections - Chain Stitch and Cover Stitch.
The dial is located on the right upper side of the machine. Align the selected tension setting with the
indicator mark on the front right of the machine.
The Chain Stitch section of the looper tension dial has a tighter looper tension for sewing chain
stitch. Select from the row of stripes on the dial for chain stitching. The wider the stripe the
tighter the chain looper tension.
I
E
W
The Cover Stitch section of the looper tension dial has a looser tension for sewing wide,
narrow or triple cover stitches. Select the solid line on the dial for cover stitch tension settings.
The closer the dial is moved to the wide horizontal mark indicates looser tension for cover
stitching.
15
O
V
E
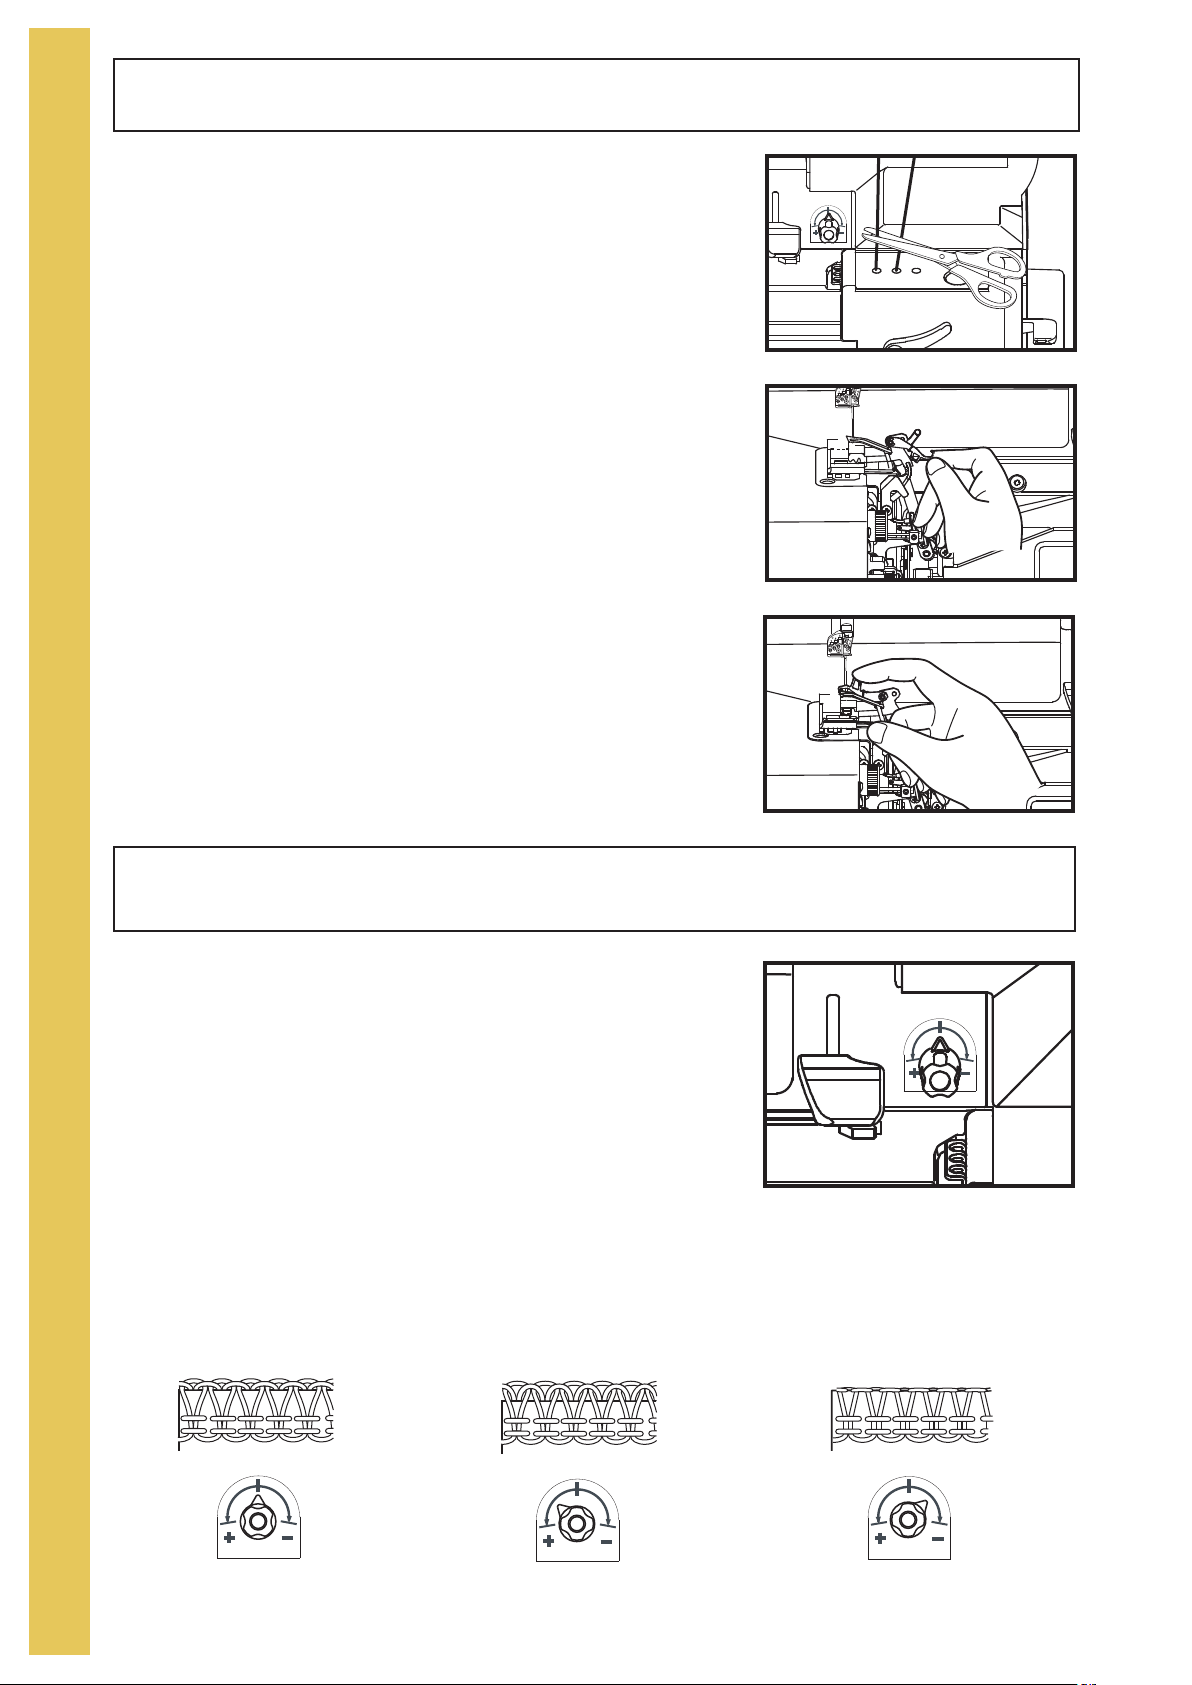
2-Thread Subsidiary Looper
Either needle thread may be engaged for 2-thread overlock
sewing.
A
R
V
I
E
W
1. Open the front cover and the blade cover, cut the upper
looper thread just above the threading port. (fig. A) Raise
the presser foot and pull out the clipped thread from under
the foot.
Remove the upper looper thread from the machine.
2. Rotate the handwheel to bring the upper looper to its
highest position.
3. Rotate the subsidiary looper up and to the left (fig. B), insert
the end into the upper looper eye. (fig. C)
4. Close the blade cover and the front cover.
B
C
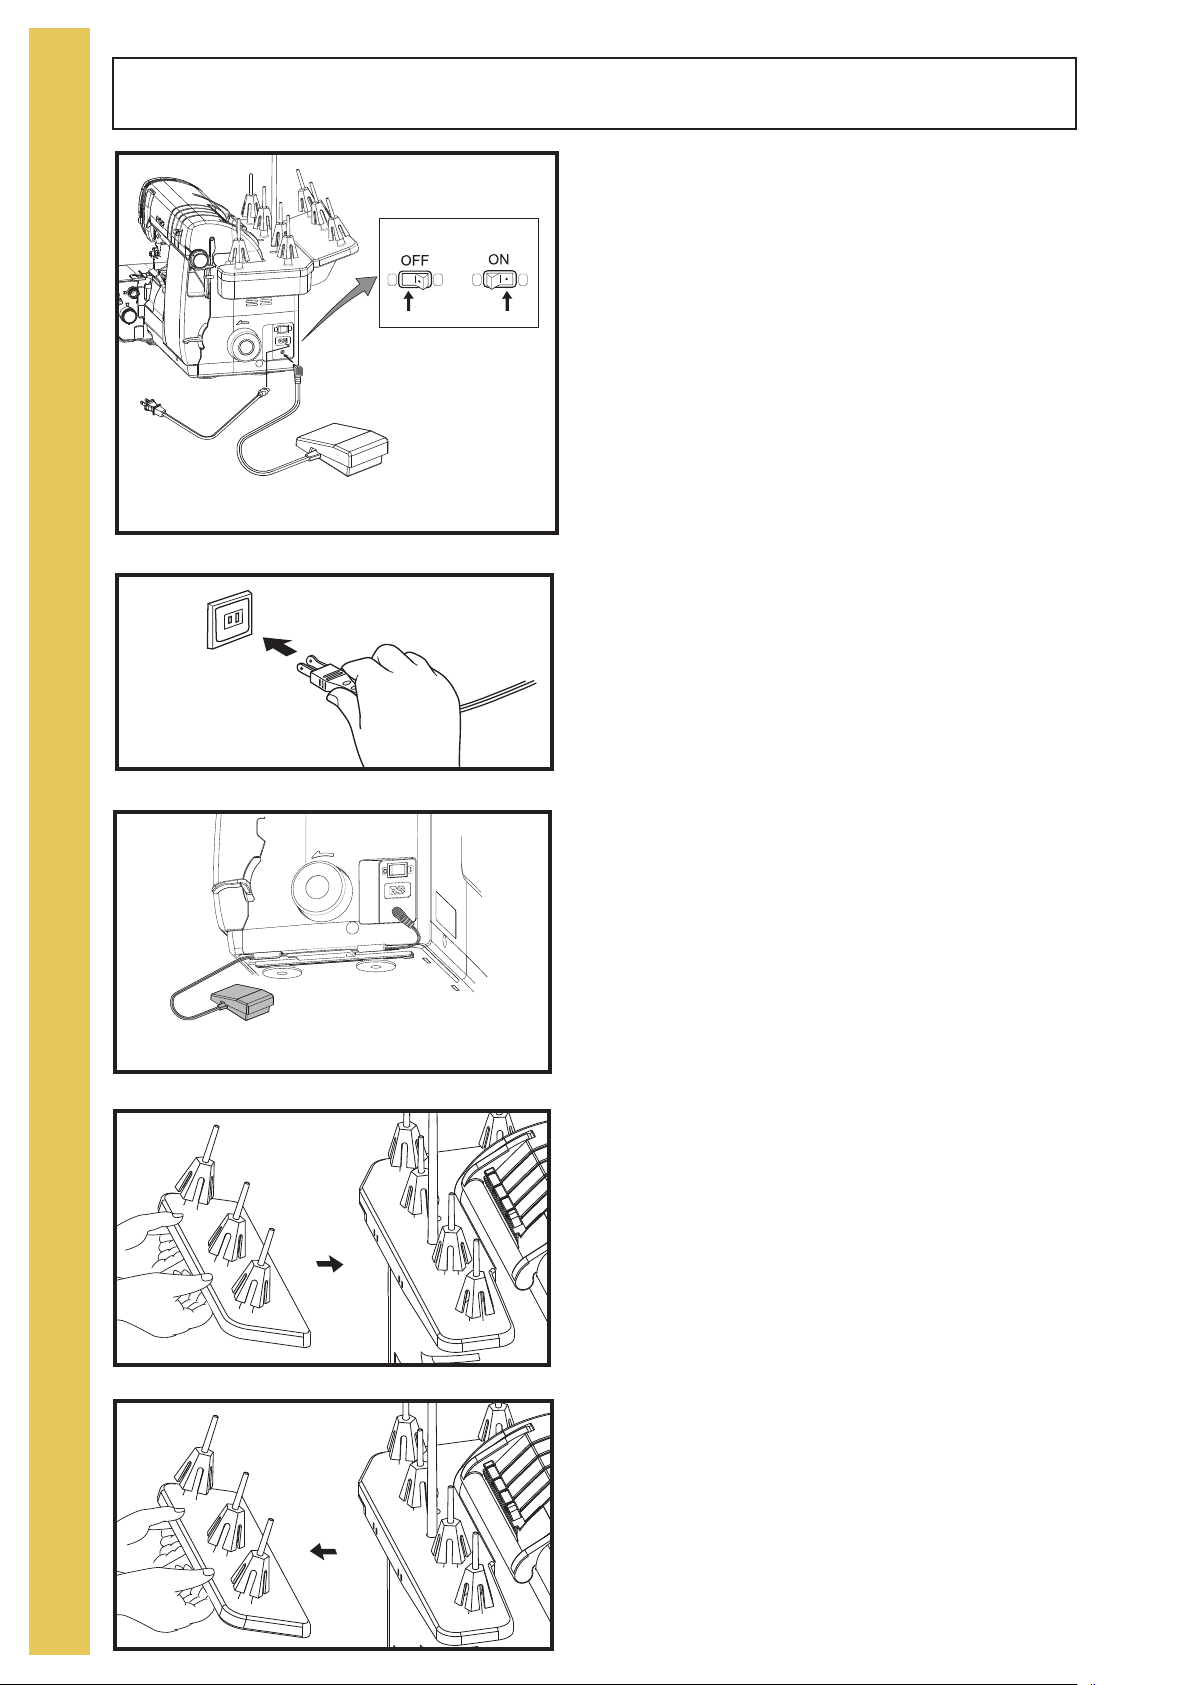
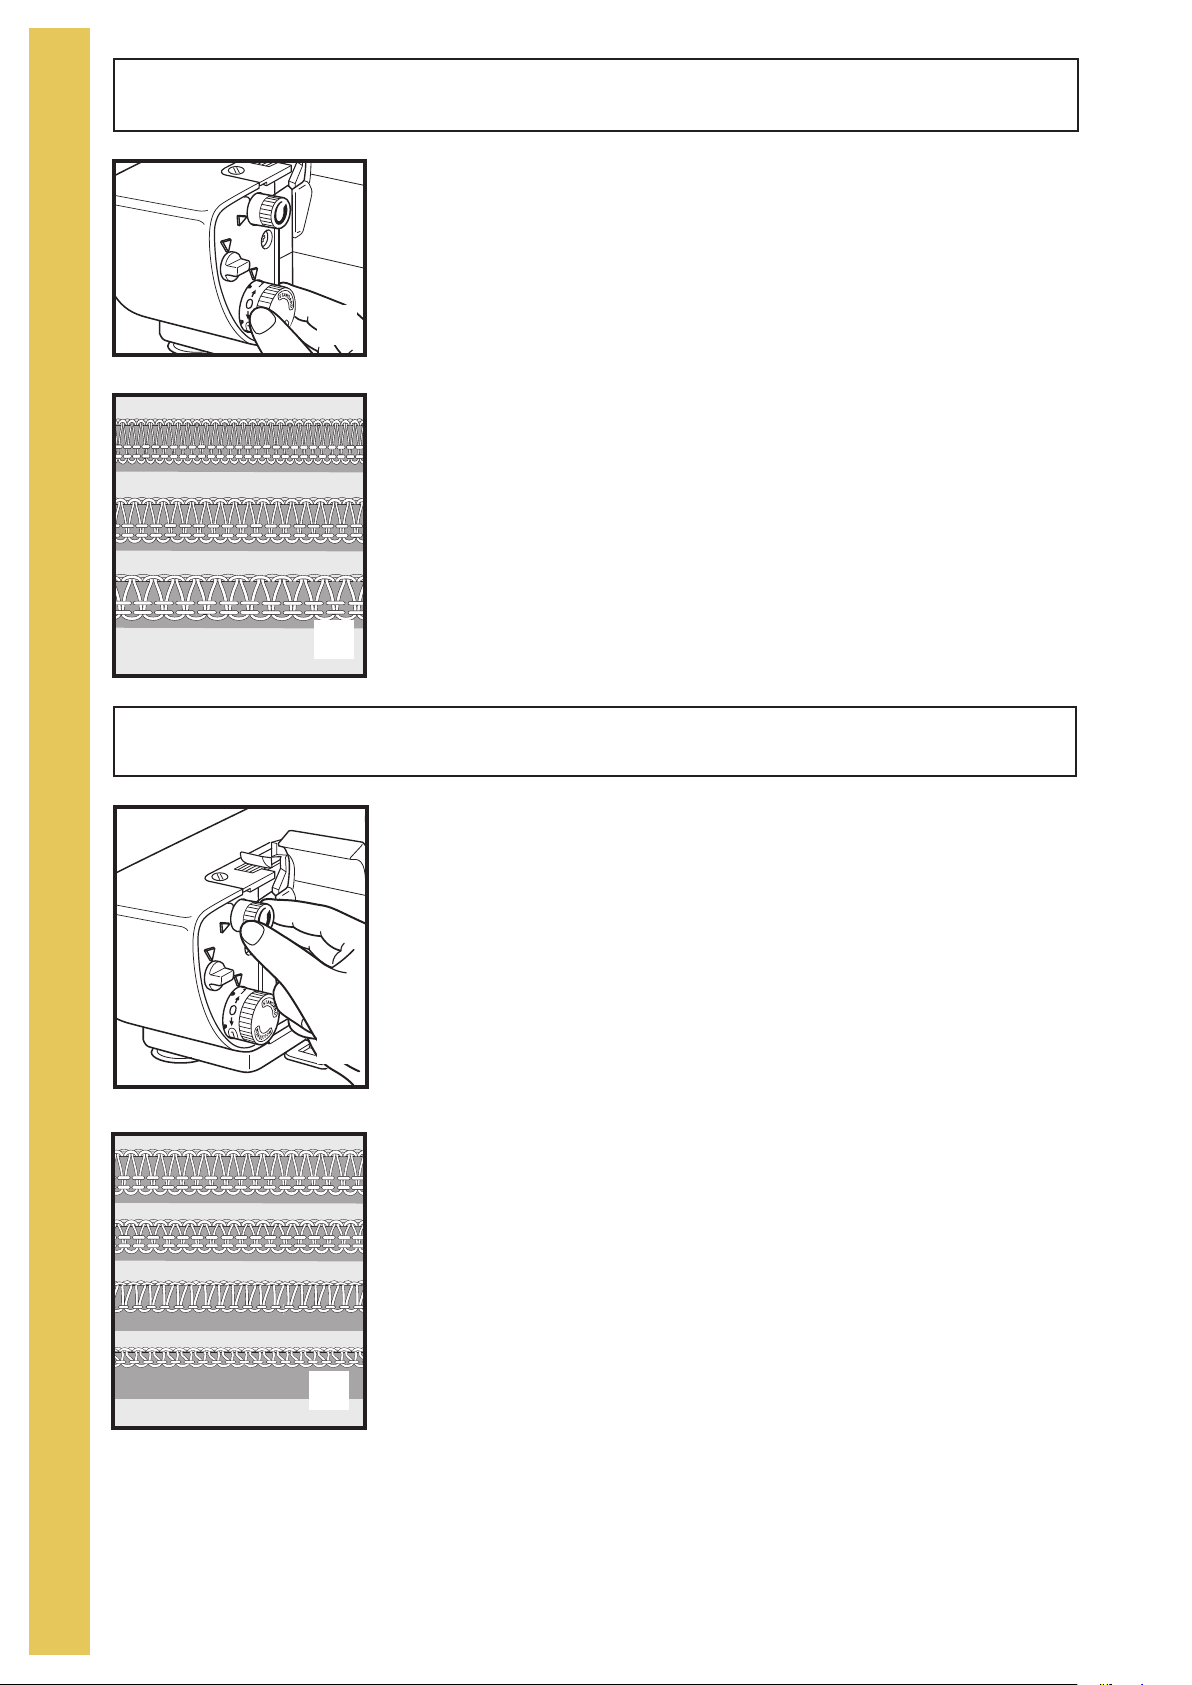
Upper and Lower Looper Thread Fine-Tuning Knob
No adjustments are needed when sewing with most fabrics and
threads on your Baby Lock Ovation, but certain threads or
fabrics may require minor fine-tuning of the looper delivery
system to perfect your stitches. Increase or decrease the
delivery of the looper threads with the upper and lower looper
thread fine-tuning knob. With your finger tips, turn the finetuning knob counterclockwise to tighten the looper threads
equally. Turn the knob clockwise to loosen the looper threads
equally.
Ideal Stitch
Upper and lower
looper threads are
too loose.
Upper and lower
looper threads are
too tight.
16
Standard Position
Tighten the tension(+)
Loosen the tension (-)
Sewing Speed Controller
Your Baby Lock Ovation is equipped with a sewing
speed controller.
The machine will sew faster with the foot control fully
depressed when the controller is moved to the right and
will sew slower when the controller is moved to the left.
O
V
E
R
V
I
E
W
Knee Lifter
Your Baby Lock Ovation comes equipped with a knee lifter.
Using your knee, the presser foot can easily be raised and lowered; leaving both hands free to
manipulate the fabric.
Align the tabs on the knee lifter with the notches in the jack, and then insert the knee lifter by
pushing it toward the machine until it clicks into place. The black "Knee lifter front cover protector"
should be positioned as shown in the below illustration.
To remove the knee lifter place left hand on the front cover to secure and with right hand pull knee
lifter straight out.
17
T
H
R
E
A
D
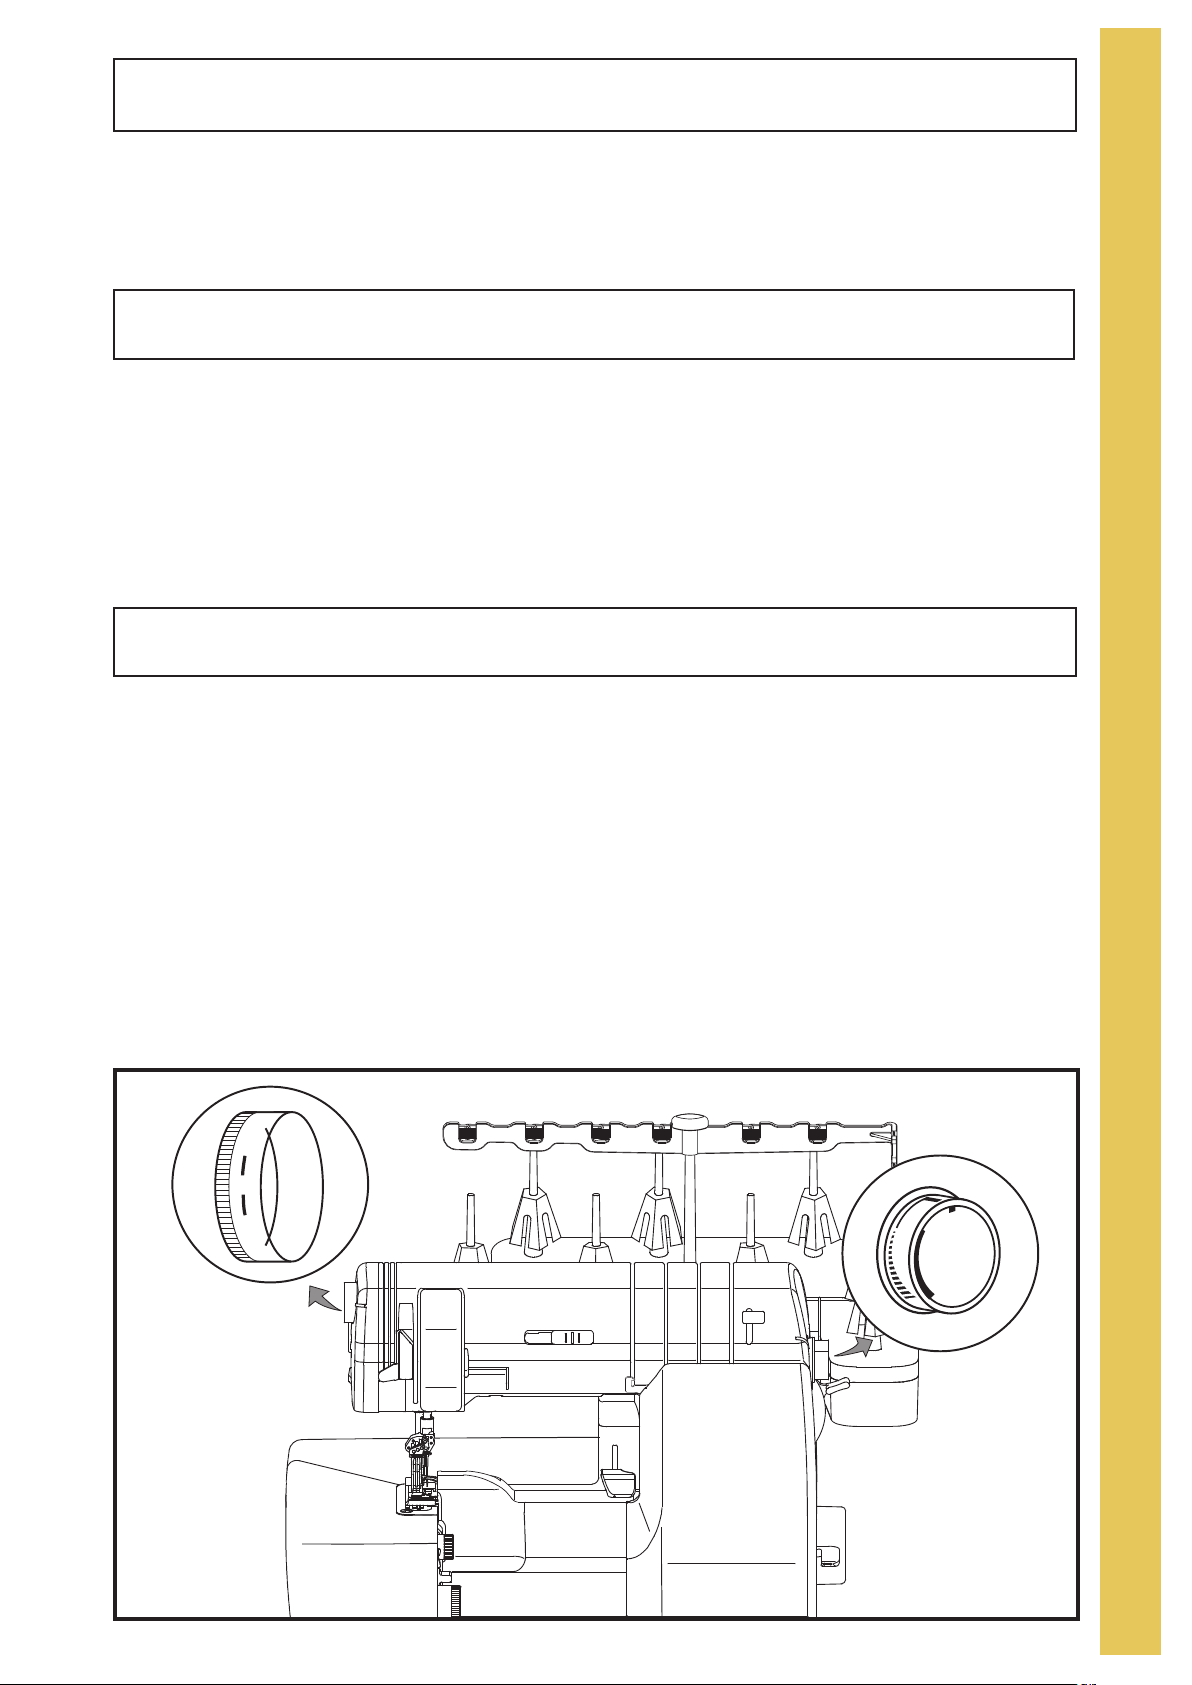
Threading Preparation
When using threads on cones or king spools place the cone or spool
securely over the cone holders furnished on your machine. To avoid
bending the thread stand, you may need to place one hand under the
stand while positioning the cone. The cone holders prevent the cone
or spool from spinning, enabling the thread to feed evenly. (fig.A)
I
N
G
A
Large spools with Cone Holders.
Because threads for the serger feed from the top, standard spool
threads can snag on the rough edges of many of these spools. That's
why spool caps are furnished with your serger to provide a smooth
surface that enables the thread to flow freely. With the spool notch
side down, insert a spool cap into the top of the spool. (fig.B)
B
Standard sewing thread with
spool cap.
When using standard spool threads on your serger, replace the cone
holders with the spool caps with sponge furnished with your machine.
These caps hold smaller spools securely and help the thread to flow
properly. With the spool cap with sponge in place, put the capped
spool on the spindle. (fig.C)
18
Standard sewing thread with
spool cap with sponge and
spool cap.
Thread net on thread.
C
D
Thread nets may be placed over threads that tend to slip off the
bottom of the spool during sewing. Most threads do not require their
use, but nets often are necessary with nylon, rayon or silk threads
(fig.D). Once it's on the spool, fold the net back on itself. Pull thread
from the top of spool to enable the
thread to feed evenly. (fig.E)
E
Pulling thread through thread net.

Threading Your Ovation
C‑1
C‑2
C‑3
O‑1
O‑2
UL
Your Baby Lock Ovation is equipped with an exclusive "Electrionic Extraordin Air Threading System"
for fast, easy threading of the upper, lower, and chain loopers.
One touch of the "Push to Thread" button will automatically thread the loopers. It is no longer
necessary to use tweezers for threading the loopers. If a looper thread breaks or runs out, just
re-thread it. There is no need to follow a specific threading sequence.
T
H
R
E
A
D
Threading Position for Threading,
Thread Stand and Thread Port Reference Chart
1. Open the front cover.
2. Raise the presser foot to release all threads.
3. Set the threading lever from serging position to threading position. (fig.A)
4. Rotate the machine handwheel slowly toward you until the tubes move to the connecting
position. (fig. B)
Note: The Ovation must be in the locked threading position when threading the loopers unless
otherwise indicated.
I
N
G
A
B
The antennae thread guides, base of thread stands and threading ports are color coded for your
convenience.
All gold color labels relate to threading for chain and cover stitches.
All green color labels relate to threading for overlock stitches.
C-1 C-3
CHAIN
NEEDLE
C-2
CHAIN
NEEDLE
1
2
CHAIN
NEEDLE
O-1
OVERLOCK
NEEDLE
1
3
O-2
OVERLOCK
NEEDLE
2
UL
UPPER
LOOPER
LOWER
LOOPER
CHAIN
LOOPER
LL
CL
C
19
T
C‑1
C‑2
C‑3
O‑1
O‑2
UL
22(56cm)
UL
LL
H
R
E
A
D
I
N
G
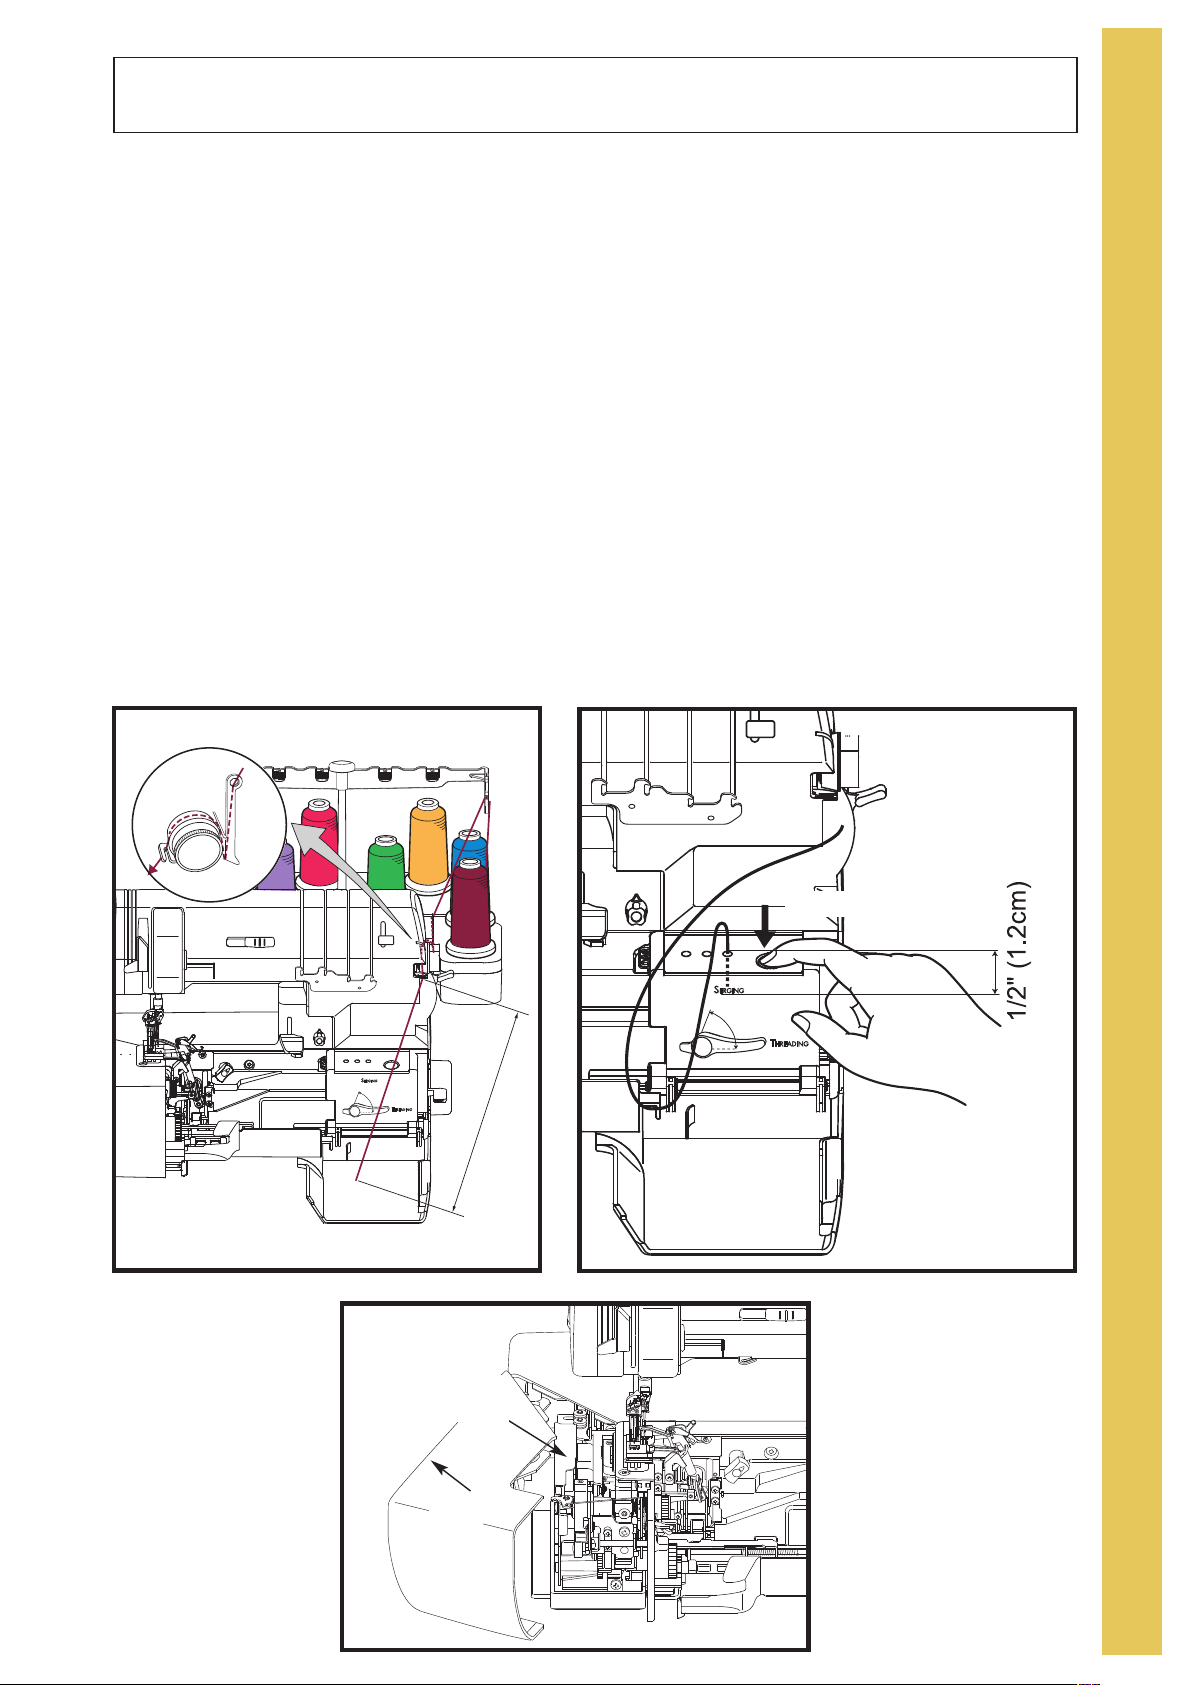
Lower Looper
1. Raise the presser foot and move the threading lever to the threading position. (see page 19, fig.
A)
2. Place the thread cone or spool on the "LOWER LOOPER" spool pin on the thread stand. Glide
the lower looper thread through the telescopic antennae thread guide "LL" directly above the
thread spool. (see page 19, fig. C) Snap the thread into the pretension thread guide on the top
of the machine and through the slot above the front cover. (fig. A)
3. Pull 22 inches (56cm) of thread through guide and slot. Insert the end of the thread into the
threading port "L" about 1/2 inch (1.2cm). Use tweezers, if necessary, to insert the thread end
more easily.(see page 21, fig. E for example of port threading)
4. Press the "Push to Thread" button. (see page 21, fig. E for example of port threading) If the
thread does not go through the eye of the lower looper with one push, push the threading button
again until it does.
5. Clip the thread 4 inches (10cm) from the eye of the lower looper and leave it hanging loose inside
the machine.
6. Once machine is completely threaded for chosen serging application set the threading lever to
serging position.
Upper Looper
1. Set the upper looper positioning knob to "UP" position. (fig. B)
2. Raise the presser foot and move the threading lever to the threading position. (see page 19, fig.
A)
3. Place the thread on the "UPPER LOOPER" spool pin on the thread stand. Glide the upper
looper thread through the telescopic antennae thread guide "UL" directly above the thread spool.
(see page 19, fig. C) Snap the thread into the pretension thread guide on the top of the machine
and through the slot above the front cover. (fig. A)
4. Pull 22 inches (56cm) of thread through guide and slot. Insert the end of the thread into the
threading port "U", about 1/2 inch (1.2cm). Use tweezers, if necessary, to insert the thread end
more easily. (see page 21, fig. E for example of port threading)
5. Press the "Push to Thread" button. (see page 21, fig. E) If the thread does not go through the
eye of the upper looper with one push, push the threading button again until it does, then pull
thread toward rear of machine and place under presser foot.
6. Once machine is completely threaded for chosen serging application set the threading lever to
serging position.
Note: Make sure that the upper looper positioning knob is always set in the "UP" position
whenever you are threading the "eye" of the upper looper. (fig. B)
Pretension
Thread Guides
20
A
B
Chain Looper
C‑1
C‑2
C‑3
O‑1
O‑2
UL
22(56cm)
1. With the presser foot in the raised position, open the front cover and move the threading lever
into the threading position. (see page 19, fig. A)
2. Set the stitch selector lever to "D" position for easy threading of the chain looper tension dial.
3. Place the thread cone or spool on the "Chain Looper" spool pin. Glide the chain looper thread
through the telescopic antennae thread guide "CL" directly above the thread spool. (see page 19,
fig. C)
4. Insert the thread through the guide above the chain looper tension dial from right to left. Bring
the thread to the back and under the thread guide, then up and over the tension dial. (fig. D inset)
5. Slip thread into guide on front of dial, then down to the chain looper threading port.
6. Pull 22 inches (56cm) of thread and insert 1/2 inch (1.2cm) of thread into the chain looper threading port. Use tweezers if necessary, to insert the thread end. (fig. E)
7. Press the "Push to Thread" button. (fig. E) If the thread does not go through the eye of the chain
looper with one push, push the threading button again until it does.
8. Open side cover to the left for easy access to the chain looper thread in tray. ( fig. F)
9. Trim excess thread to 4 inches (10cm) from the eye of chain looper and lay thread back inside
the tray.
10. Close side cover.
11. Once machine is completely threaded for chosen serging application set the threading lever to
serging position.
T
H
R
E
A
D
I
N
G
D
Push to Thread Button
E
F
Chain Looper
Thread Tray
Side
Cover
21
T
C2
C3
C1
C‑1
C‑2
C‑3
O‑1
O‑2
UL
H
R
E
A
D
I
N
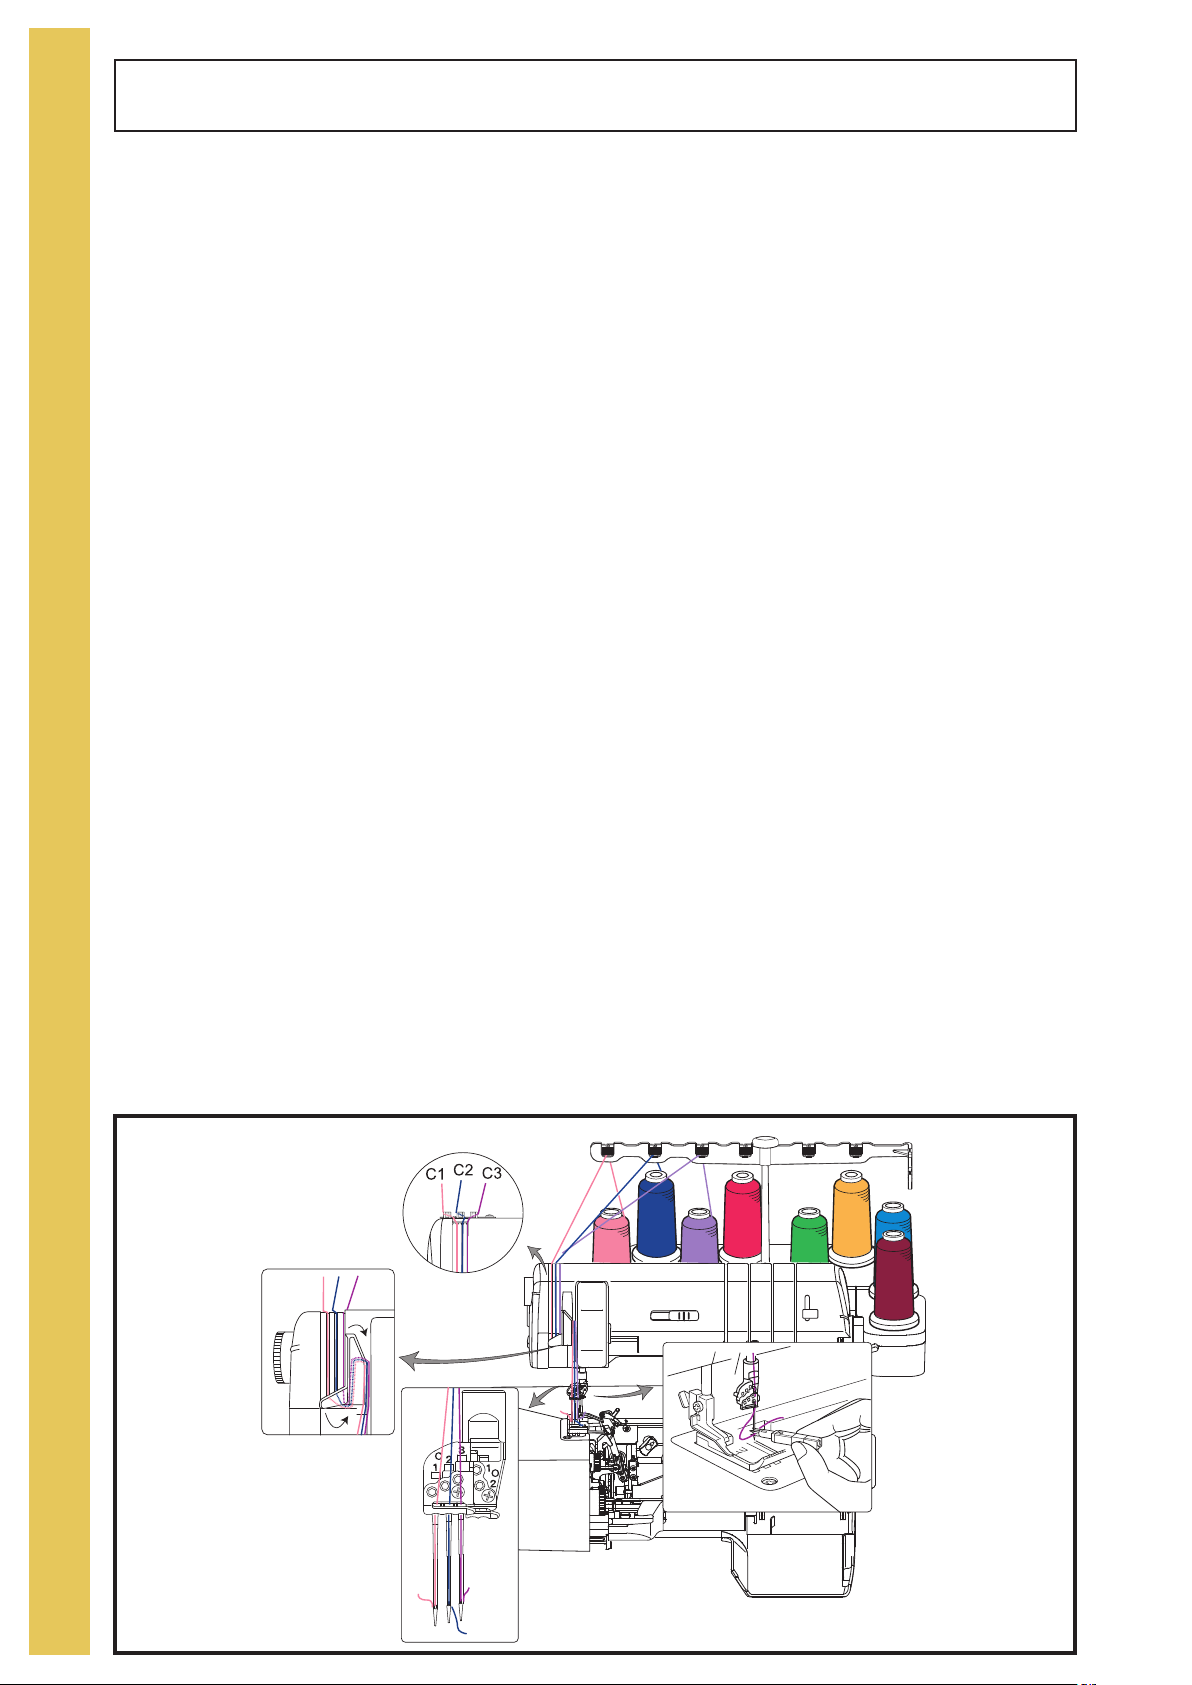
Chain / Cover Needles
Left Chain/Cover Needle C-1
1. Raise presser foot, place the thread on the "Chain Needle 1" spool pin. Glide the thread through
the telescopic antennae thread guide "C-1" directly above the thread spool.
See drawings below for reference.
2. Bring thread down from the telescopic antennae thread guide and going from left to right place
into the far left chain/cover needle thread guide "C1"; inserting the thread into slot until it clicks
into place. This seats the thread into the tension. Bring the thread behind the front thread guide,
up, over and down the right side of the thread take up lever.
3. Insert "C-1" thread into the thread guide on needle clamp just above the needle. See drawings
below for reference.
4. With the needle threader or tweezers in the accessory compartment, thread needle in "C1"
position.
G
Center Chain/Cover Needle C-2
1. Raise presser foot, place the thread on the "Chain Needle 2" spool pin. Glide the thread through
the telescopic antennae thread guide "C-2" directly above the thread spool.
See drawings below for reference.
2. Bring thread down from the telescopic antennae thread guide and going from right to left place
into the center chain/cover needle thread guide "C2"; inserting the thread into slot until it clicks
into place. This seats the thread into the tension. Bring the thread behind the front thread guide,
up, over and down the right side of the thread take up lever.
3. Insert "C-2" thread into the thread guide on needle clamp just above the needle. See drawings
below for reference.
4. With the needle threader or tweezers in the accessory compartment, thread needle in "C2"
position.
Right Chain/Cover Needle C-3
1. Raise presser foot, place the thread on the "Chain Needle 3" spool pin. Glide the thread through
the telescopic antennae thread guide "C-3" directly above the thread spool.
See drawings below for reference.
2. Bring thread down from the telescopic antennae thread guide and going from right to left place
into the far right chain/cover needle thread guide "C3"; inserting the thread into slot until it clicks
into place. This seats the thread into the tension. Bring the thread behind the front thread guide,
up, over and down the right side of the thread take up lever.
3. Insert "C-3" thread into the thread guide on needle clamp just above the needle. See drawings
below for reference.
4. With the needle threader or tweezers in the accessory compartment, thread needle in "C3"
position.
22
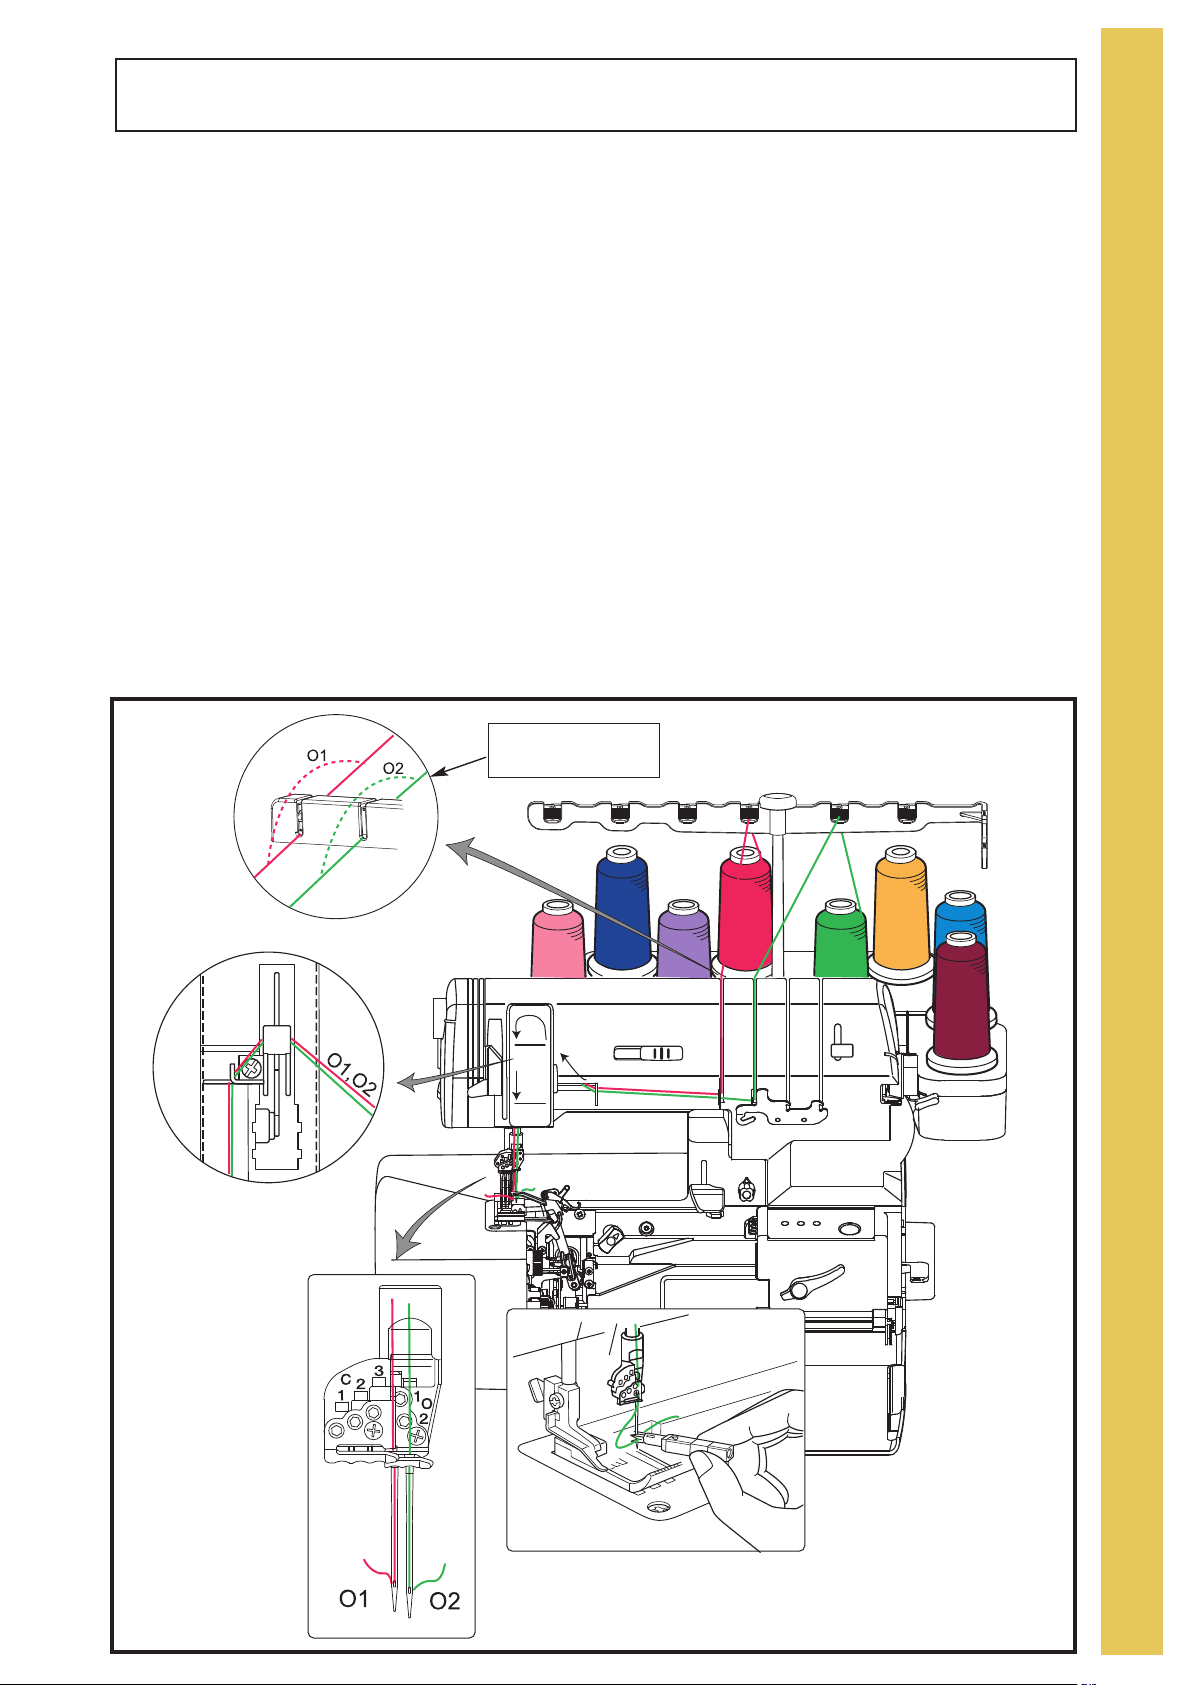
Overlock Needles
C‑1
C‑2
C‑3
O‑1
O‑2
UL
Left Overlock Needle O-1
1. Place the thread cone or spool on the "OVERLOCK NEEDLE 1" spool pin. (see page 19, fig. C)
Glide the thread through the telescopic antennae thread guide "O-1" directly above the thread
spool. Snap the thread into the pretension thread guide on top of machine and down the
"overlock needle 1" thread path and in the guide just below the faceplate. Pull an 8 inch (20.5cm)
length of thread through the guide. Follow the arrows as shown in below illustration. Thread the
overlock thread guide above the needle.
2. Using the needle threader or tweezers, thread needle in the O-1 position.
T
H
R
E
A
D
Right Overlock Needle O-2
1. Place the thread cone or spool on the "OVERLOCK NEEDLE 2" spool pin. (see page 19, fig. C)
Glide the thread through the telescopic antennae thread guide "O-2" directly above the thread
spool. Snap the thread into the pretension thread guide on top of machine and down the "overlock
needle 2" thread path and in the guide just below the faceplate. Pull an 8 inch (20.5cm) length of
thread through the guide. Follow the arrows as shown in below illustration. Thread the overlock
thread guide above the needle.
2. Using the needle threader or tweezers, thread the needle in the O-2 position.
Note: Make sure that each needle is in the overlock needle position; right needle is O-2 and left
needle is O-1 as shown in below illustration..
Pretension
Thread Guides
I
N
G
23
T
5/8 inch
5/8 inch
H
R
E
A
D
I
N
G
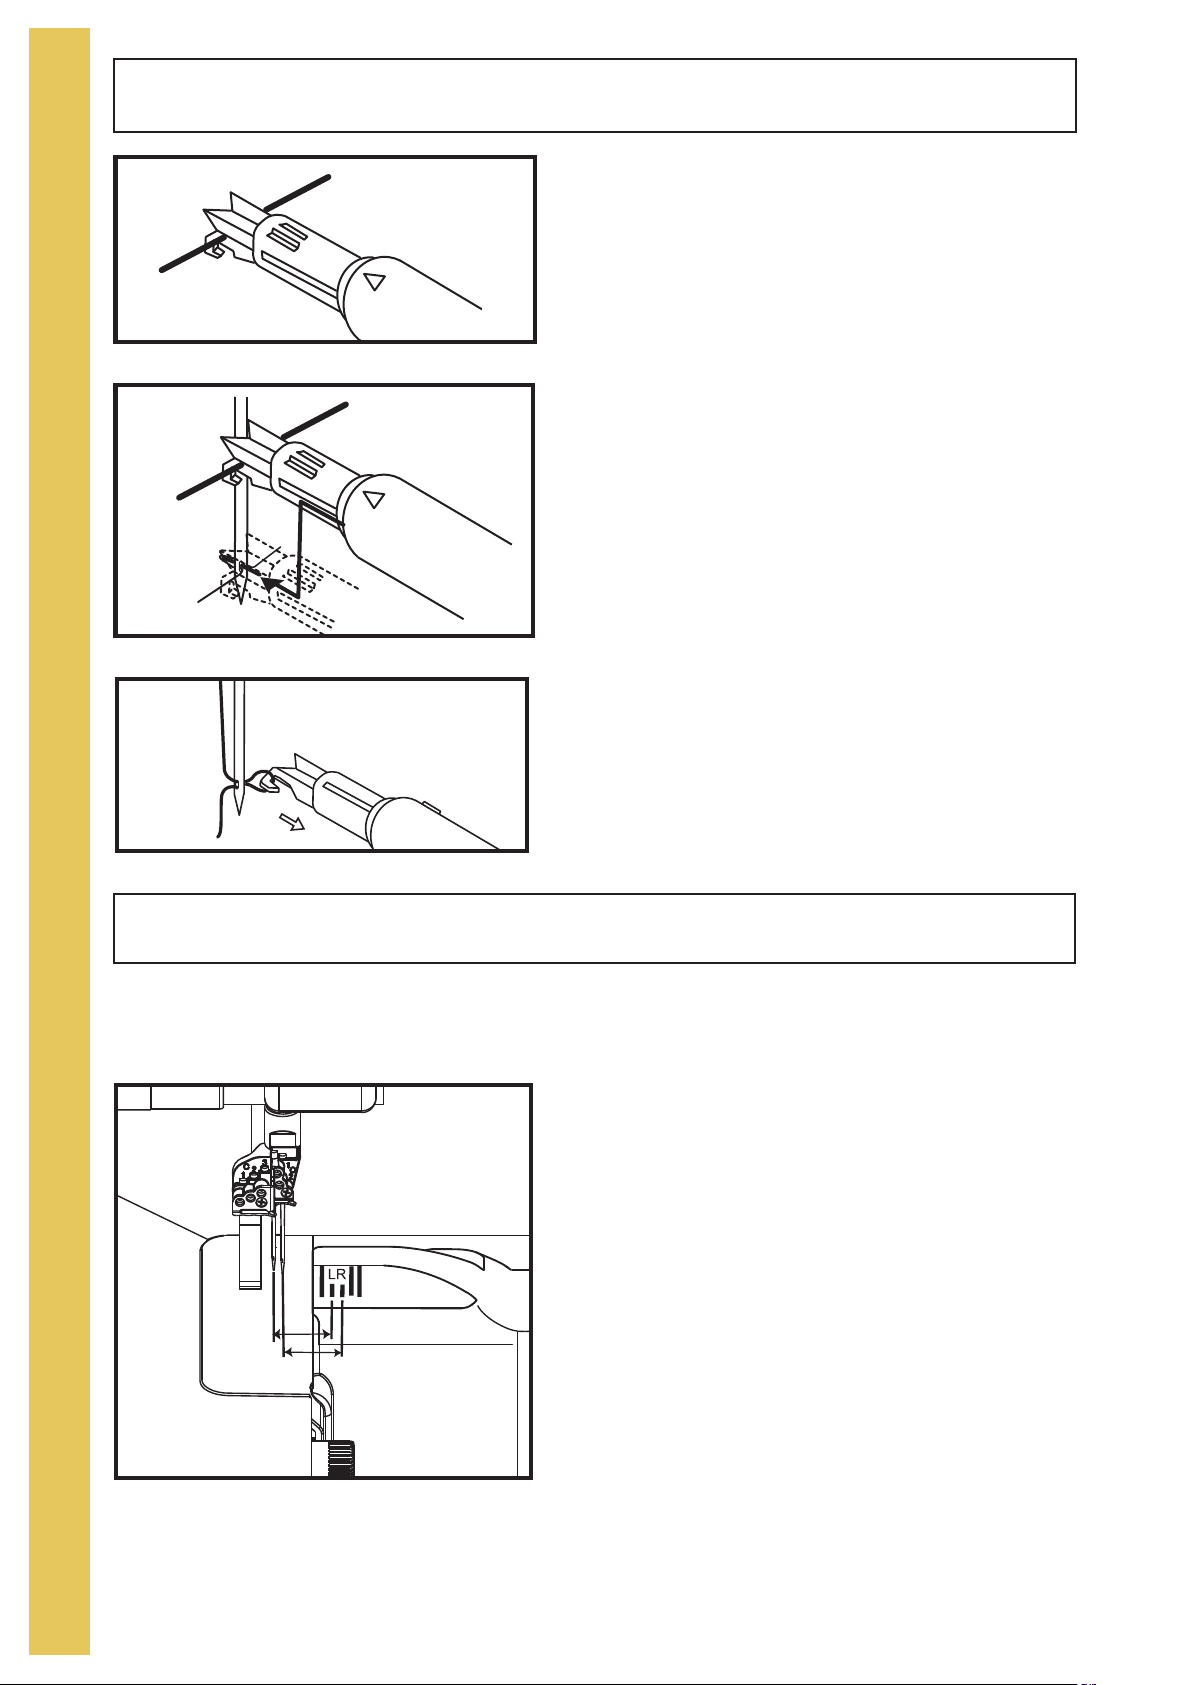
How To Use The Needle Threader
1. Hold the needle threader with the arrow mark on
top. Place the thread in the groove of the needle
threader. (fig. A)
2. Push the needle threader against the needle
shaft above the eye of the needle and then slide
A
B
down the groove of the needle to the eye. Gently
push on the needle threader until the thread is
inserted through the eye of the needle and then
slowly remove while leaving the thread loop
through eye. (fig. B)
3. Using the hook located at the grooved end of the
needle threader or the tweezers pull the loop of
thread from the back of the needle, place under
the foot and to the back left. (fig. C)
C
Cutting Blade Cover Seam Guide
Use the marks on your serger's cutting blade cover to align the fabric the desired seam width.
Set the width dial at the "M" setting for accurate seam allowances.
1. The chain stitch (C-3) combined with the 3-thread
overlock is the most common 5-thread combination.
The mark closest to the needles indicates 5/8
inch (16mm) from the cutting edge to the C-3
chain needle.
2. When using the left overlock needles (O-1) for
either a 3 or 4-thread overlock seam, the second
mark from the needles indicates 5/8 inch (16mm)
from the cutting edge to the O-1 overlock needle.
3. Use the right overlock needle (O-2) for 3-thread
overlock seam and the third mark from the
needles indicates 5/8 inch (16mm) from the
cutting edge to the O-2 overlock needle.
4. Other marks on the front cover are for any
Note: Be sure to set the width dial at the "M" setting for accurate seam allowances.
custom seam allowance.
24

Start To Sew
When properly threaded, the loose threads should initially interlock on fabric when sewn. This is
most important when sewing the chain or cover stitches.
T
H
R
C
A
B
1. Cut all threads to 4 inch (10cm) in length.
2. Place fabric under the presser foot directly below the needles.
(fig. A)
3. Lower the presser foot.
4. Turn the handwheel toward you to form 2 or 3 stitches.
5. Start to sew slowly.
6. After the first few stitches, stop and cut excess threads and
continue sewing seam. (fig. B)
7. Start the next seam at the toe of the presser foot. (fig. C)
8. You only need to raise and lower the presser foot when
working with thick fabrics or when precise positioning is
required.
Note: Be careful not to push or pull the fabric. The Ovation will
feed it evenly without help.
E
A
D
I
N
G
To Chain-Off of the Fabric
Your Ovation will sew a chain off the edge of the fabric. For best results, we recommend to follow
the instructions below.
Overlock stitches-
1. At the end of the seam, gently pull the fabric and thread to the back to chain-off. (fig. A)
2. When the desired length is reached, cut the thread chain with the thread cutter located on the left side
cover. (fig. B)
3. Start the seam by placing the fabric under the front of the foot. (fig. C)
Chain/Cover stitches-
1. At the end of the seam, change the stitch length to 4 and chain needle tension set at a range from
2 to 0.
2. Let the thread flow from the back of the foot 2-4 inches without pulling.
3. Start the seam by placing the fabric under the front of the foot.
A
B
C
25
T
H
R
E
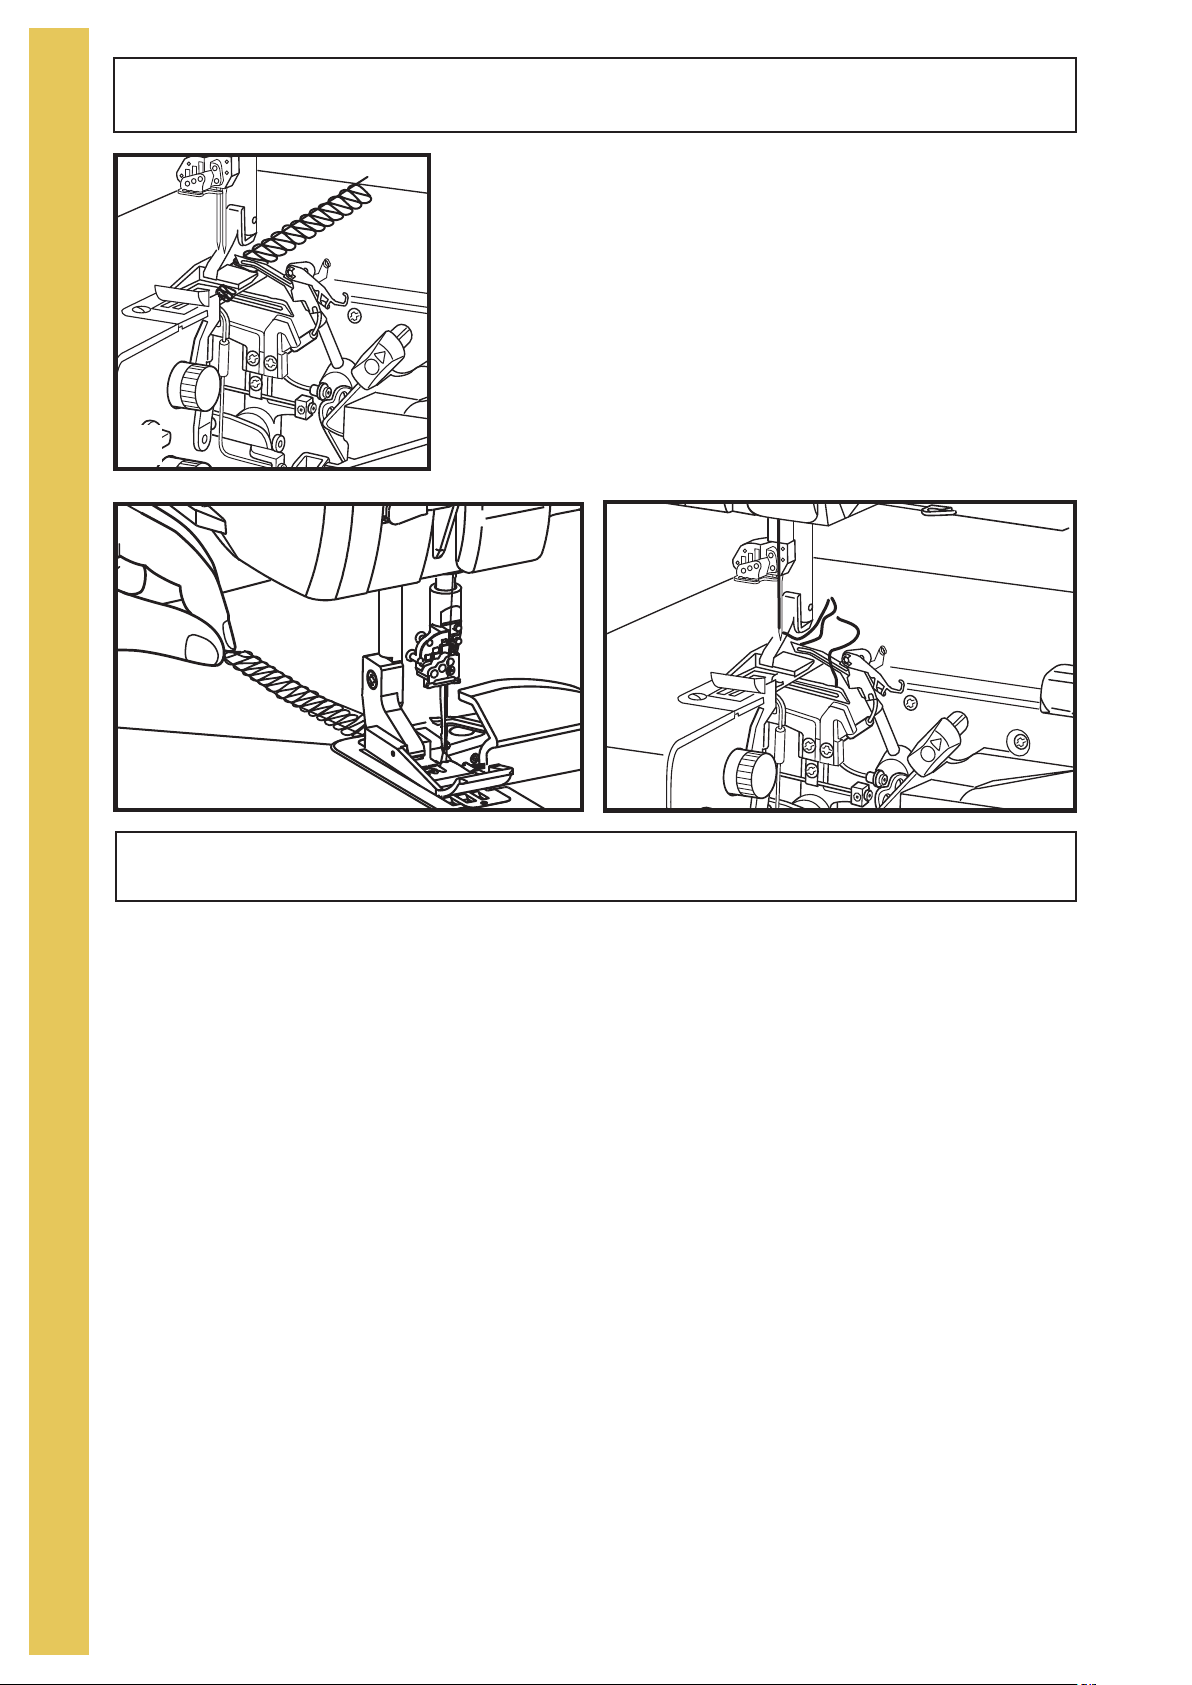
Clearing the Stitch Width Fingers
As you sew, you will discover that maneuvering the fabric is
different from conventional sewing because the threads form
around the stitch fingers. (fig. A)
A
D
I
N
G
A
B
To clear the stitch fingers, simply raise the presser foot, which
releases all threads. Raise the needle(s). Then pull the
threads gently from behind the foot. (fig. B) The stitches are
now released from the fingers. (fig. C)
C
Re-threading Loopers
If a thread breaks, raise the presser foot and pull the broken thread out from under the foot. Open
the front cover and engage the threading lever. (see page 19) Re-thread the machine above the
threading port, leaving a 22 inch (56cm) thread tail. Thread the looper as usual then engage the
threading lever to the serging position. (see pages 20/21) Close the front cover and sew a test
sample.
Note: When re-threading your Baby Lock Ovation using the "Extraordin Air Threading" feature,
make sure that the previous thread that was in the looper (tube) is completely removed. This will
eliminate any chance of the previous thread obstructing the flow of the air when re-threading the
machine.
26
 Loading...