


420HD
Table of contents
 Loading...
AudioCodes Series of High Definition IP Phones
HD VoIP
Administrator’s Manual
400HD Series IP Phones
®
for Microsoft
Skype™ for Business
Version 2.0.13B


Administrator's Manual Contents
Table of Contents
1 Introduction ....................................................................................................... 15
2 Automatic Mass Provisioning of IP Phones using DHCP .............................. 17
2.1 Preparing the Microsoft Skype for Business Environment for IP Phones ..... 19
2.1.1 Making Sure DHCP Server Options are Correctly Configured ................................ 20
2.1.1.1 DHCP Option 43 .......................................................................................20
2.1.1.2 VLAN Discovery via DHCP Option 43 ......................................................21
2.1.1.3 DHCP Option 120 .....................................................................................21
2.1.1.4 DHCP Option 42 .......................................................................................21
2.1.1.5 DHCP Scope Option ................................................................................21
2.1.2 Making Sure the DHCP Server is Correctly Configured for Auto Provisioning ....... 29
2.2 Creating a Configuration File for Auto Provisioning ........................................ 30
2.2.1 Saving a Single Phone’s Default Configuration as a .cfg File ................................. 30
2.2.2 Configuring the Phone According to Requirements ................................................ 31
2.2.3 Save the Phone’s Newly Configured Settings as a .cfg File ................................... 31
2.2.4 Creating a Delta Configuration .cfg File ................................................................... 31
2.2.5 Loading the Delta .cfg File to Another Phone, Signing In, Testing .......................... 31
2.2.5.1 Loading the Delta .cfg File to Another Phone ..........................................31
2.2.5.2 Signing In to the Phone ............................................................................32
2.2.5.3 Testing the Phone ....................................................................................33
2.2.5.4 Changing the Order of the Sign-In Method ..............................................33
2.2.5.5 Allowing Users to Display Phone # or Ext # in LCD .................................33
2.3 Copying the Configuration File to the Provisioning Server ............................. 33
2.4 Triggering Automatic Provisioning .................................................................... 33
2.5 Troubleshooting Automatic Provisioning ......................................................... 34
2.5.1 Using the Phone LCD .............................................................................................. 34
2.5.2 Using the Web Interface .......................................................................................... 36
3 Manual Configuration of a Single IP Phone .................................................... 37
3.1 Configuring Network Connections ..................................................................... 37
3.1.1 Configuring LAN Connection Type .......................................................................... 37
3.1.2 Configuring LAN Port / PC Port ............................................................................... 41
3.1.3 Configuring VLAN Settings ...................................................................................... 42
3.2 Configuring Personal Settings ........................................................................... 44
3.2.1 Configuring Language ............................................................................................. 44
3.2.2 Configuring a Personal Directory ............................................................................. 45
3.2.3 Configuring Function Keys as Speed Dials ............................................................. 47
3.2.3.1 Configuring Speed Dials using the Web Interface ...................................47
3.2.3.2 Configuring Speed Dials using the Configuration File .............................48
3.2.3.3 Saving Configured Speed Dials in a cfg File ............................................48
3.2.3.4 Loading the cfg File to Other Phones .......................................................49
3.2.3.5 Deleting a Speed Dial ...............................................................................49
3.2.3.6 Configuring Function Keys for Paging ......................................................49
3.2.4 Programming Line Keys .......................................................................................... 52
3.2.4.1 Programming Line Keys using the Web Interface ....................................52
3.2.4.2 Programming Line Keys using the Configuration File ..............................54
3.2.4.3 Saving Programmed Line Keys in a cfg File ............................................54
3.2.4.4 Loading the cfg File to Other Phones .......................................................54
3.2.4.5 Configuring Programmable Keys for Paging ............................................55
3.2.4.6 Configuring Programmable Key #6 as a VocaNOM Speed Dial ..............56
3.2.4.7 Configuring a VocaNOM Speed Dial on the 420HD Phones ...................57
3.2.5 Configuring Tones ................................................................................................... 58
3.2.5.1 Configuring CPT Regional Settings .........................................................58
3.2.5.2 Uploading Ring Tones ..............................................................................60
3.3 Configuring VoIP Settings ................................................................................... 62
Version 2.0.13B 3 400HD Series for Skype for Business

400HD Series for Skype for Business
3.3.1 Defining an Outbound Proxy ................................................................................... 62
3.3.2 Configuring Dialing .................................................................................................. 64
3.3.2.1 Configuring Automatic Dialing ..................................................................64
3.3.2.2 Configuring Default Audio Device ............................................................65
3.3.3 Disabling the Phone Microphone ............................................................................. 66
3.3.4 Disabling the Blind Transfer Softkey ....................................................................... 67
3.3.5 Enabling Electronic Hook Switch ............................................................................. 68
3.3.6 Disabling Audial Call Waiting Indication .................................................................. 69
3.3.7 Configuring Disconnect if Handset On-Hooked after Putting Call on Hold ............. 70
3.3.8 Configuring Media Streaming .................................................................................. 71
3.3.8.1 Configuring Quality of Service ..................................................................71
3.3.8.2 Configuring Codecs ..................................................................................72
3.3.8.3 Configuring Real Time Protocol (RTP) Port Range .................................73
3.3.8.4 Configuring RTCP Extended Report ........................................................74
3.3.9 Enabling Paging ....................................................................................................... 75
3.3.10 Enabling Barge-in .................................................................................................... 76
3.3.11 Configuring a Dedicated Voicemail Server .............................................................. 78
3.3.12 Securing Voicemail Access by PIN Code Authentication ........................................ 79
3.4 Configuring Security ............................................................................................ 80
3.4.1 Using the Encryption Tool........................................................................................ 80
3.4.1.1 Encrypting Configuration Files .................................................................80
3.4.2 Encrypting Passwords in Configuration File ............................................................ 80
3.4.3 Managing Security Certificates ................................................................................ 82
3.4.3.1 Loading the Root CA Certificate to the Phone .........................................82
3.4.3.2 Loading the Client Certificate to the Phone..............................................83
3.4.3.3 Generating a Certificate Signing Request ................................................84
3.4.4 Configuring 802.1X Authentication .......................................................................... 85
3.4.4.1 Using the Phone LCD ...............................................................................85
3.4.4.2 EAP MD5 Mode ........................................................................................85
3.4.4.3 EAP TLS Mode .........................................................................................86
3.4.5 Using the Web Interface / Configuration File ........................................................... 86
3.4.5.1 EAP MD5 Mode ........................................................................................86
3.4.5.2 EAP TLS Mode .........................................................................................87
3.4.6 Configuring HTTPS .................................................................................................. 88
3.5 Configuring Advanced Applications .................................................................. 89
3.5.1 Dynamic URL Provisioning ...................................................................................... 89
3.5.1.1 DHCP Option 160 .....................................................................................91
3.5.1.2 DHCP Options 66 and 67 .........................................................................93
3.5.2 Configuring Date and Time ...................................................................................... 94
3.5.2.1 Configuring Daylight Saving Time ............................................................94
3.5.2.2 Configuring NTP Server ...........................................................................97
3.5.2.3 Configuring NTP Server via DHCP ..........................................................99
3.5.3 Configuring Contacts (LDAP) ................................................................................100
3.5.4 Configuring T9 .......................................................................................................103
4 Configuring Microsoft Skype for Business Features ................................... 105
4.1 Park Call .............................................................................................................. 105
4.2 Music on Hold (MoH) ......................................................................................... 105
4.3 Configuring Timeout for 'Inactive' Status to change to 'Away' ..................... 106
4.4 Group Call Pickup (GCP) ................................................................................... 106
4.5 Location .............................................................................................................. 107
4.6 Configuring Skype for Business Server for SRTP / TLS ................................ 107
4.7 Better Together over Ethernet .......................................................................... 108
4.7.1 Installing the BToE PC Application ........................................................................108
4.7.2 Making Sure BToE is Correctly Installed ...............................................................116
4.7.3 Configuring the BToE TCP Port ............................................................................116
4.7.4 Pairing the BToE PC Application with the IP Phone .............................................117
Administrator's Manual 4 Document #: LTRT-09940

Administrator's Manual Contents
4.7.4.1 Generating a Pair Code......................................................................... 118
4.7.4.2 Connecting the IP Phone with the BToE PC Application ...................... 119
4.7.5 Connecting the Skype for Business Client with the IP Phone ...............................122
4.7.6 Making Sure IP Phone/ Skype for Business Client are Paired ..............................122
4.7.6.1 Making Sure the Skype for Business Client is Paired ........................... 122
4.7.6.2 Making Sure the IP Phone is Paired ..................................................... 123
4.7.7 Pairing Across Different Subnets ...........................................................................124
4.7.8 Troubleshooting .....................................................................................................124
4.8 Boss Admin (Shared Line Appearance) ........................................................... 125
4.8.1 Viewing Admin Lines on Boss's Phone .................................................................128
4.8.2 Viewing Boss's Line on Admin's Phone .................................................................128
4.9 Configuring Phones to Operate in an OVR Deployment ................................ 128
4.10 Disabling Local 3-Way Conferencing Capability ............................................. 129
4.11 Disabling User Sign-Out on Common Area Phones ....................................... 129
4.12 Blocking All Phone Users from Signing Out ................................................... 129
4.13 Signing in / out with the Web Interface ............................................................ 130
5 Maintenance .................................................................................................... 133
5.1 Upgrading Phone Firmware .............................................................................. 133
5.2 Administration .................................................................................................... 134
5.2.1 Managing Users .....................................................................................................134
5.2.2 Restoring Defaults .................................................................................................135
5.2.3 Restarting the Phone .............................................................................................135
5.3 Enabling Remote Management ......................................................................... 136
5.3.1 Enabling Telnet Access .........................................................................................136
6 Status and Performance ................................................................................. 137
6.1 Viewing Network Status .................................................................................... 137
6.1.1 Viewing LAN Status ...............................................................................................137
6.1.2 Viewing Port Mode Status .....................................................................................137
6.1.3 Viewing 802.1X Status ...........................................................................................137
6.2 Viewing VoIP Status ........................................................................................... 138
6.2.1 Viewing Phone Status ............................................................................................138
6.2.2 Viewing Line Status ...............................................................................................138
6.2.3 Viewing Call Information ........................................................................................139
6.3 Viewing Call History ........................................................................................... 139
6.4 Viewing Phone Model / Firmware Version ....................................................... 140
6.4.1 Viewing from the Web Interface ............................................................................140
6.4.2 Viewing from the Phone's LCD ..............................................................................140
6.4.3 Viewing Release Information .................................................................................141
7 Diagnostics ...................................................................................................... 143
7.1 Logging ............................................................................................................... 143
7.1.1 Analyzing and Debugging Traffic using Syslog .....................................................143
7.1.2 Analyzing and Debugging Traffic using 'Lightweight Syslog' ................................144
7.2 Monitoring: Pinging & Traceroute
.................................................................... 145
7.3 Enabling Recording to Debug Voice ................................................................ 146
7.4 Creating a Crash Dump File .............................................................................. 148
7.5 Enabling Tracing ................................................................................................ 149
7.6 Configuring Port Mirroring ................................................................................ 150
7.7 Configuring Core Dump .................................................................................... 150
7.7.1 Downloading Core Dump.......................................................................................151
7.7.2 Downloading Core Dump Archive .........................................................................151
8 Troubleshooting .............................................................................................. 153
Version 2.0.13B 5 400HD Series for Skype for Business

400HD Series for Skype for Business
8.1 Unable to Sign in to Skype for Business using Username/Password .......... 153
8.2 Unable to Authenticate User using PIN ........................................................... 153
8.3 IP Phone Fails Registration Process ................................................................ 153
8.4 How to Verify CA Certificate is Trusted / Authorized by IP Phone ................ 154
8.5 Invalid Time Server ............................................................................................ 154
8.6 Invalid Time Offset ............................................................................................. 154
8.7 General Corrective Actions ............................................................................... 155
8.7.1 Restoring Phone Defaults ......................................................................................155
8.7.1.1 Restoring Factory Defaults from the Phone LCD .................................. 155
8.7.1.2 Restoring Factory Defaults from the Web Interface .............................. 156
8.7.2 Loading the Configuration File Manually ...............................................................156
8.7.3 Recovering Firmware .............................................................................................157
8.7.4 Restarting the Phone .............................................................................................157
8.7.4.1 Restarting the Phone from the LCD ...................................................... 157
8.7.4.2 Restarting the Phone from the Web Interface ....................................... 158
A Alternative Automatic Provisioning Methods ............................................... 159
A.1 Static DNS Record Method ................................................................................ 159
A.2 SIP SUBSCRIBE and NOTIFY Methods ............................................................ 161
A.3 AudioCodes' HTTPS Redirect Server ............................................................... 163
B Specifications .................................................................................................. 165
B.1 420HD IP Phone .................................................................................................. 165
B.2 430HD and 440HD IP Phones ............................................................................ 168
B.3 SIP Support (RFC, Headers) .............................................................................. 171
B.3.1 SIP Compliance Tables .........................................................................................172
Administrator's Manual 6 Document #: LTRT-09940

Administrator's Manual Contents
List of Figures
Figure 2-1: Setting up Automatic Provisioning ....................................................................................... 18
Figure 2-2: DHCP Server Options .......................................................................................................... 20
Figure 2-3: DHCP Options Assigned to IPv4 Addresses ....................................................................... 22
Figure 2-4: Defining User Classes ......................................................................................................... 22
Figure 2-5: DHCP User Classes ............................................................................................................ 22
Figure 2-6: New Class ............................................................................................................................ 23
Figure 2-7: Packet Bytes Window .......................................................................................................... 23
Figure 2-8: DHCP User Classes ............................................................................................................ 24
Figure 2-9: Set Predefined Options ........................................................................................................ 24
Figure 2-10: Predefined Options and Values ......................................................................................... 25
Figure 2-11: Option Type – Add AudioCodes 160 Option ...................................................................... 25
Figure 2-12: Predefined Options and Values – Add IP Phone Management Server Location .............. 26
Figure 2-13: 'Scope Leased' Folder - Configure Options ....................................................................... 26
Figure 2-14: Configure Options 1 ........................................................................................................... 27
Figure 2-15: Configure Options 2 ........................................................................................................... 27
Figure 2-16: Server Options ................................................................................................................... 28
Figure 2-17: Three Scope Options Created ........................................................................................... 28
Figure 2-18: Web Interface - Configuration File ..................................................................................... 30
Figure 2-19: Web Interface – Loading a New Configuration File ........................................................... 32
Figure 3-1: Web Interface - Network Settings – Static IP ....................................................................... 38
Figure 3-2: Web Interface - Network Settings - Automatic IP (DHCP) ................................................... 39
Figure 3-3: Web Interface – LAN Port Mode / PC Port Mode ................................................................ 41
Figure 3-4: Web Interface - VLAN Settings ............................................................................................ 42
Figure 3-5: Language ............................................................................................................................. 44
Figure 3-6: Web Interface – Personal Directory ..................................................................................... 45
Figure 3-7: Web Interface – Directory – Add Contact ............................................................................ 45
Figure 3-8: Web Interface - Function Keys ............................................................................................. 47
Figure 3-9: Web Interface - Function Keys - Paging .............................................................................. 49
Figure 3-10: Web Interface - Function Keys – Paging Parameters........................................................ 50
Figure 3-11: Web Interface - Function Keys - Paging ............................................................................ 50
Figure 3-12: Web Interface - Function Keys – Paging Parameters........................................................ 51
Figure 3-13: Web Interface – Programmable Keys ................................................................................ 52
Figure 3-14: Web Interface – Programmable Line Keys ........................................................................ 52
Figure 3-15: Web Interface – Programmable Line Keys – Speed Dial .................................................. 53
Figure 3-16: Web Interface – Programmable Line Keys – Key Event ................................................... 53
Figure 3-17: Web Interface – Programmable Line Keys – Selecting a Key Event ................................. 53
Figure 3-18: Web Interface - Programmable Keys ................................................................................. 55
Figure 3-19: Web Interface - Programmable Keys – Line Key 2............................................................ 55
Figure 3-20: Web Interface - Programmable Keys – Line Settings ........................................................ 55
Figure 3-21: Web Interface - Programmable Keys ................................................................................. 56
Figure 3-22: Web Interface - Programmable Keys - VocaNOM ............................................................. 56
Figure 3-23: Web Interface – Services - VocaNOM – 420HD Phones .................................................. 57
Figure 3-24: Web Interface - Tones - Regional Settings ........................................................................ 58
Figure 3-25: Web Interface - Upload Ringing Tone ............................................................................... 60
Figure 3-26: Web Interface – Signaling Protocol – Use Hosting Outbound Proxy ................................. 62
Figure 3-27: Web Interface - Dialing - Automatic Dialing ....................................................................... 64
Figure 3-28: Web Interface - Dialing - Default Audio Device ................................................................. 65
Figure 3-29: Web Interface - VoIP- Services – General Parameters ..................................................... 68
Figure 3-30: Web Interface - Voice over IP – Services – Generate Tone .............................................. 69
Figure 3-31: Web Interface – Media Streaming - Quality of Service Parameters .................................. 71
Figure 3-32: Web Interface – Media Streaming - Codecs ...................................................................... 72
Figure 3-33: Web Interface – Media Streaming - RTP Port Range ....................................................... 73
Figure 3-34: Web Interface – Media Streaming - RTCP-XR .................................................................. 74
Figure 3-35: Web Interface – Services - Paging .................................................................................... 75
Figure 3-36: Web Interface – Services – Enabling Paging .................................................................... 75
Figure 3-37: Web Interface – Services - Paging .................................................................................... 76
Figure 3-38: Web Interface – Services – Paging Enabled – Barge-in ................................................... 77
Version 2.0.13B 7 400HD Series for Skype for Business

400HD Series for Skype for Business
Figure 3-39: Web Interface – Services - MWI ........................................................................................ 78
Figure 3-40: Web Interface – Dedicated Voicemail Server .................................................................... 78
Figure 3-41: Web Interface – Root CA Certificate .................................................................................. 82
Figure 3-42: Web Interface – Client Certificate ...................................................................................... 83
Figure 3-43: Web Interface – Certificate Signing Request ..................................................................... 84
Figure 3-44: Web Interface - 802.1X Settings - EAP MD5 ..................................................................... 86
Figure 3-45: Web Interface - 802.1X Settings – EAP-TLS ..................................................................... 87
Figure 3-46: Web Interface - Automatic Provisioning – Dynamic URL .................................................. 89
Figure 3-47: Web Interface - Automatic Provisioning - DHCP Option 160 ............................................ 92
Figure 3-48: Web Interface – Automatic Provisioning - DHCP Options 66/67 ....................................... 93
Figure 3-49: Web Interface - Date and Time .......................................................................................... 94
Figure 3-50: Web Interface – Daylight Saving Time .............................................................................. 94
Figure 3-51: Web Interface - NTP & Time Settings ................................................................................ 97
Figure 3-52: Web Interface - NTP and Time Settings ............................................................................ 99
Figure 3-53: Web Interface – Contact Search Method .........................................................................100
Figure 3-54: Web Interface – T9 Mode ................................................................................................103
Figure 4-1: Skype for Business Server - Edit Trunk Configuration - Global .........................................107
Figure 4-2: InstallShield Wizard – Preparing to Install .........................................................................109
Figure 4-3: Welcome to the InstallShield Wizard .................................................................................109
Figure 4-4: License Agreement ............................................................................................................110
Figure 4-5: License Agreement ............................................................................................................110
Figure 4-6: Destination Folder ..............................................................................................................111
Figure 4-7: Change Current Destination Folder ...................................................................................111
Figure 4-8: Ready to Install ..................................................................................................................112
Figure 4-9: Installing AudioCodes Better2Gether ................................................................................113
Figure 4-10: InstallShielf Wizard Completed ........................................................................................113
Figure 4-11: AudioCodes Icon in Taskbar ............................................................................................114
Figure 4-12: Control Panel>Programs>AudioCodes Better2Gether ....................................................114
Figure 4-13: Computer Management > Services and Applications ......................................................115
Figure 4-14: Device Manager > AudioCodes B2GoE USB Driver .......................................................115
Figure 4-15: Popup Menu .....................................................................................................................116
Figure 4-16: About AC BToE ................................................................................................................116
Figure 4-17: TCP Port ..........................................................................................................................117
Figure 4-18: AC BToE TCP Port ..........................................................................................................117
Figure 4-19: Popup Menu .....................................................................................................................119
Figure 4-20: Phone Pairing...................................................................................................................119
Figure 4-21: AC BToE Failed Indication ...............................................................................................119
Figure 4-22: AC BToE is Connected Indication....................................................................................120
Figure 4-23: Popup Menu: 'Disconnect' Enabled, 'Phone Pairing' Disabled ........................................120
Figure 4-24: BToE Disconnected .........................................................................................................120
Figure 4-25: Popup Menu: BToE Disconnected ...................................................................................120
Figure 4-26: Start > Programs > AudioCodes > BToE Controller ........................................................121
Figure 4-27: Sign-in Request Prompt ...................................................................................................122
Figure 4-28: Web Interface - Configuration File ...................................................................................124
Figure 4-29: Skype for Business Client – Call Forwarding Settings ....................................................125
Figure 4-30: Skype for Business Client - Edit my delegate members ..................................................126
Figure 4-31: Skype for Business Client – Call Forwarding – Add Delegates .......................................126
Figure 4-32: Skype for Business Client – Call Forwarding – Added Delegate - Receive Calls ...........127
Figure 4-33: Skype for Business Client – Call Forwarding – Simultaneously ring - My Delegates ......127
Figure 4-34: Sign-in – Content Blocked Page ......................................................................................130
Figure 4-35: Sign-in – Windows Security Prompt ................................................................................130
Figure 4-36: Windows Security Prompt ................................................................................................131
Figure 4-37: Sign-in with PIN Code ......................................................................................................131
Figure 4-38: Sign-in with Username & Password ................................................................................131
Figure 5-1: Manual Firmware Upgrade ................................................................................................133
Figure 5-2: Web Interface – Users .......................................................................................................134
Figure 5-3: Web Interface - Telnet .......................................................................................................136
Figure 6-1: Web Interface - LAN Information .......................................................................................137
Figure 6-2: Web Interface - Port Mode Status ......................................................................................137
Administrator's Manual 8 Document #: LTRT-09940

Administrator's Manual Contents
Figure 6-3: Web Interface - 802.1X Status ...........................................................................................137
Figure 6-4: Web Interface - Phone Status ............................................................................................138
Figure 6-5: Web Interface - Line Status ...............................................................................................138
Figure 6-6: Web Interface - Call Information ........................................................................................139
Figure 6-7: Web Interface - Call History ...............................................................................................139
Figure 6-8: Web Interface - System Information ..................................................................................140
Figure 6-9: Web Interface - System Information - Release Information ...............................................141
Figure 7-1: Web Interface - System Logging ........................................................................................143
Figure 7-2: Web Interface - Monitoring .................................................................................................145
Figure 7-3: Web Interface - Recording .................................................................................................146
Figure 7-4: Web Interface - Crash Dump .............................................................................................148
Figure 7-5: Configuring Tracing ............................................................................................................149
Figure 7-6: Web Interface - Port Mirroring ............................................................................................150
Figure 7-7: Web Interface – Core Dump ..............................................................................................150
Figure 8-1: Web Interface - Restore Defaults .......................................................................................156
Figure 8-2: Confirm Restore to Factory Defaults..................................................................................156
Figure 8-3: Web Interface - Configuration File .....................................................................................156
Figure 8-4: Web Interface - Load New Configuration File ....................................................................157
Figure 8-5: Web Interface - Restart System .........................................................................................158
Figure 8-6: Confirmation Box ...............................................................................................................158
Figure A-1: Web Interface - Static DNS Record ...................................................................................159
Figure A-2: HTTPS Redirect Server Directing Phones to Provisioning Server ....................................164
Version 2.0.13B 9 400HD Series for Skype for Business

400HD Series for Skype for Business
List of Tables
Table 2-1: DHCP Option 43 Configuration Reference ........................................................................... 20
Table 2-2: DHCP Option 43, Sub-Option 010, Configuration Reference ............................................... 21
Table 2-3: DHCP Option 120 Configuration Reference ......................................................................... 21
Table 2-4: DHCP Option 120 Configuration Reference ......................................................................... 21
Table 2-5: DHCP User Class Entry for Each AudioCodes Phone Model Deployed .............................. 24
Table 2-6: Troubleshooting Deployment Problems ................................................................................ 34
Table 2-7: Web Interface – Status & Diagnostics - Tracing ................................................................... 36
Table 3-1: Network Settings – Static IP .................................................................................................. 39
Table 3-2: Network Settings - Automatic IP (DHCP) .............................................................................. 40
Table 3-3: Port Settings .......................................................................................................................... 41
Table 3-4: VLAN Parameters Description .............................................................................................. 42
Table 3-5: Language Display Parameters .............................................................................................. 44
Table 3-6: Speed Dial Parameter ........................................................................................................... 48
Table 3-7: Programmable Line Keys Parameters .................................................................................. 54
Table 3-8: VocaNOM Parameter ............................................................................................................ 57
Table 3-9: VocaNOM SIP URI Parameter .............................................................................................. 57
Table 3-10: Regional Parameters .......................................................................................................... 58
Table 3-11: Ring Tone File URI in the Configuration File ...................................................................... 61
Table 3-12: Ring Tones Parameter in the Configuration File ................................................................. 61
Table 3-13: Proxy and Registrar Parameters ......................................................................................... 63
Table 3-14: Automatic Dialing Parameters ............................................................................................. 64
Table 3-15: Default Audio Device Parameter ......................................................................................... 65
Table 3-16: Disable Microphone Parameter ........................................................................................... 66
Table 3-17: Blind Transfer Softkey Parameter ....................................................................................... 67
Table 3-18: EHS Parameter ................................................................................................................... 68
Table 3-19: Call Waiting Audial Indication Parameter ............................................................................ 69
Table 3-20: Disconnect if Handset On-Hooked after Call Put on Hold .................................................. 70
Table 3-21: QoS Parameters ................................................................................................................. 71
Table 3-22: Codec Parameters .............................................................................................................. 72
Table 3-23: Media Streaming - RTP Port Range ................................................................................... 73
Table 3-24: RTCP_XR Parameter .......................................................................................................... 74
Table 3-25: Paging Parameters ............................................................................................................. 76
Table 3-26: Paging – Allow Barge In ...................................................................................................... 77
Table 3-27: Dedicated Voicemail Server - Parameters .......................................................................... 78
Table 3-28: Securing Voicemail Access by PIN Code Authentication Parameter ................................. 79
Table 3-29: Root CA Certificate Parameters .......................................................................................... 83
Table 3-30: Client Certificate Parameters .............................................................................................. 84
Table 3-31: EAP MD5 Parameters ......................................................................................................... 86
Table 3-32: EAP TLS Parameters .......................................................................................................... 87
Table 3-33: Configuring Automatic Provisioning Performed by DHCP .................................................. 89
Table 3-34: Daylight Saving Time Parameters....................................................................................... 95
Table 3-35: NTP Server Parameters ...................................................................................................... 98
Table 3-36: NTP Server and GMT Parameters ....................................................................................100
Table 3-37: LDAP Parameters .............................................................................................................101
Table 3-38: T9 Parameter ....................................................................................................................103
Table 4-1: Removing Local 3-Way Conferencing Capability from Users - Parameter .........................129
Table 4-2: Disabling Sign-Out on Common Area Phones - Parameter ...............................................129
Table 4-3: Blocking All Users from Signing out - Parameter ................................................................129
Table 5-1: Administrator account - Username and Password ..............................................................135
Table 5-2: User account - Username and Password ...........................................................................135
Table 5-3: Telnet Parameters ...............................................................................................................136
Table 7-1: Syslog Parameters ..............................................................................................................143
Table 7-2: Packet Recording Parameters ............................................................................................146
Table 7-3: Crash Dump Parameters ....................................................................................................148
Table 7-4: Port Mirroring Parameters ...................................................................................................150
Table 7-5: Core Dump Parameter ........................................................................................................151
Table A-1: Static DNS Record Parameters ..........................................................................................160
Table B-1: 420HD IP Phone Specifications ..........................................................................................165
Administrator's Manual 10 Document #: LTRT-09940

Administrator's Manual Contents
Table B-2: 430HD and 440HD IP Phone Specifications ......................................................................168
Table B-3: Supported IETF RFCs ........................................................................................................171
Table B-4: Supported SIP Methods ......................................................................................................172
Table B-5: Supported SIP Headers ......................................................................................................173
Version 2.0.13B 11 400HD Series for Skype for Business

400HD Series for Skype for Business
Notice
This manual shows administrators how to set up and configure AudioCodes' 400HD Series IP
Phones for Microsoft Skype for Business in the enterprise network environment.
Information contained in this document is believed to be accurate and reliable at the time of
printing. However, due to ongoing product improvements and revisions, AudioCodes cannot
guarantee accuracy of printed material after the Date Published nor can it accept
responsibility for errors or omissions. Updates to this document and other documents can be
viewed by registered customers at http://www.audiocodes.com/downloads.
© Copyright 2016 AudioCodes Ltd. All rights reserved.
This document is subject to change without notice.
Date Published: Feb-02-2016
Trademarks
AudioCodes, AC, HD VoIP, HD VoIP Sounds Better, IPmedia, Mediant, MediaPack, What’s
Inside Matters, OSN, SmartTAP, VMAS, VoIPerfect, VoIPerfectHD, Your Gateway To
VoIP, 3GX, VocaNOM and CloudBond 365 are trademarks or registered trademarks of
AudioCodes Limited All other products or trademarks are property of their respective
owners. Product specifications are subject to change without notice.
WEEE EU Directive
Pursuant to the WEEE EU Directive, electronic and electrical waste must not be disposed
of with unsorted waste. Please contact your local recycling authority for disposal of this
product.
Customer Support
Customer technical support and services are provided by AudioCodes or by an authorized
AudioCodes Service Partner. For more information on how to buy technical support for
AudioCodes products and for contact information, please visit our Web site at
www.audiocodes.com/support.
Abbreviations and Terminology
Each abbreviation, unless widely used, is spelled out in full when first used.
Documentation Feedback
AudioCodes continually strives to produce high quality documentation. If you have any
comments (suggestions or errors) regarding this document, please fill out the
Documentation Feedback form on our Web site at http://www.audiocodes.com/downloads.
Your valuable feedback is highly appreciated.
Administrator's Manual 12 Document #: LTRT-09940

Administrator's Manual Notices
Related Documentation
Document Name
420HD IP Phone User’s Manual
430HD and 440HD IP Phone User’s Manual
420HD IP Phone Quick Guide
430HD IP Phone Quick Guide
440HD IP Phone Quick Guide
IP Phone Management Server Administrator's Manual
EMS and SEM Server IOM Manual
EMS User's Manual
One Voice Resiliency Configuration Note
Regulatory Information
Compliancy and Regulatory Information can be viewed at:
http://www.audiocodes.com/library.
Note: Throughout this document, where features can be configured using the Web
interface or configuration file, the Web parameter is displayed in the regular font above
its corresponding configuration file parameter, which is enclosed in square brackets in
bold font type.
Version 2.0.13B 13 400HD Series for Skype for Business

400HD Series for Skype for Business
This page is intentionally left blank.
Administrator's Manual 14 Document #: LTRT-09940

Administrator's Manual 1. Introduction
1 Introduction
This Administrator's Manual is intended for administrators responsible for provisioning
AudioCodes' 400HD Series of IP Phones deployed with Microsoft Skype for Business in an
enterprise network.
Note: Microsoft rebranded Lync as Skype for Business so whenever the term
Skype for Business appears in this document, it applies also to Microsoft Lync.
AudioCodes IP phones are based on AudioCodes' proprietary High Definition (HD) voice
technology, providing clarity and a rich audio experience in Voice-over-IP (VoIP) calls.
The phones are fully-featured telephones that provide voice communication over an IP
network, allowing you to place and receive phone calls, put calls on hold, transfer calls, etc.
The phones offer different automatic provisioning options.
This manual shows how to automatically provision a mass deployment of AudioCodes IP
phones using DHCP.
Version 2.0.13B 15 400HD Series for Skype for Business

400HD Series for Skype for Business
This page is intentionally left blank.
Administrator's Manual 16 Document #: LTRT-09940

Administrator's Manual 2. Automatic Mass Provisioning of IP Phones using DHCP
2 Automatic Mass Provisioning of IP
Phones using DHCP
This section shows how to automatically provision a mass deployment of AudioCodes IP
phones in a Microsoft Skype for Business environment.
Note: Instead of using DHCP as the automatic provisioning method, you can
alternatively use Static DNS Record or SIP SUBSCRIBE and NOTIFY messages (see
Appendix A).
As DHCP clients, AudioCodes IP phones can be automatically provisioned with the
following files:
Configuration file (.cfg)
Firmware file (.img)
These files can be placed on any of these three provisioning server types:
HTTP/S server
TFTP server
FTP server
Figure 2-1 summarizes the steps required for setting up mass provisioning of IP phones in
the Microsoft Skype for Business environment.
These steps are described in detail in the following sections.
Note: Automatic mass provisioning of IP phones using the DHCP provisioning method
can alternatively be performed from the AudioCodes EMS Provisioning Server in the IP
Phones Management Server. For detailed information, see the IP Phone Management
Server Administrator's Manual.
Version 2.0.13B 17 400HD Series for Skype for Business

400HD Series for Skype for Business
Prepare the Microsoft Skype for Business environment for
IP phones, e.g., configure the DHCP server with DHCP
Option 160 to point to the provisioning server’s URL
Without signing in, save a single phone’s default
configuration as a .cfg file, using the Web interface
1
2
3
Configure this single phone to perform according to your
specific performance requirements in the enterprise
4
Save the phone’s newly configured settings as a .cfg file
5
Create a configuration .cfg file containing only the delta
between the default .cfg and the newly configured
enterprise-specific .cfg file
6
7
Place the delta .cfg file on the provisioning server
Load this delta .cfg file to another phone. Sign in.
Test performance to see if it matches requirements.
Connect all IP phones to the network and power up.
Phones are automatically provisioned
8
Figure 2-1: Setting up Automatic Provisioning
Administrator's Manual 18 Document #: LTRT-09940

Administrator's Manual 2. Automatic Mass Provisioning of IP Phones using DHCP
2.1 Preparing the Microsoft Skype for Business Environment for IP Phones
Before plugging in and playing the IP phones in an enterprise's Microsoft Skype for
Business environment, make sure that the environment is ready for them.
To prepare it for IP phones, you must set up:
1. Front End Skype for Business Server
2. Domain Controller, including:
a. Active Directory, LDAP service
b. DNS service
c. DHCP service
d. NTP service (optional)
3. Unified Messaging Server (optional)
4. Mediant
5. SBA Server (optional)
For details, refer to Microsoft's website at:
http://technet.microsoft.com/en-us/library/gg425854%28v=ocs.14%29.aspx
™
Gateway
Version 2.0.13B 19 400HD Series for Skype for Business
400HD Series for Skype for Business
2.1.1 Making Sure DHCP Server Options are Correctly Configured
This section shows how to ensure that your enterprise's DHCP server options are correctly
configured and that the network environment is ready for deployment of IP phones.
For detailed Microsoft instructions on setting up DHCP for the IP phone, see:
http://technet.microsoft.com/en-us/library/gg398369(v=ocs.14).aspx
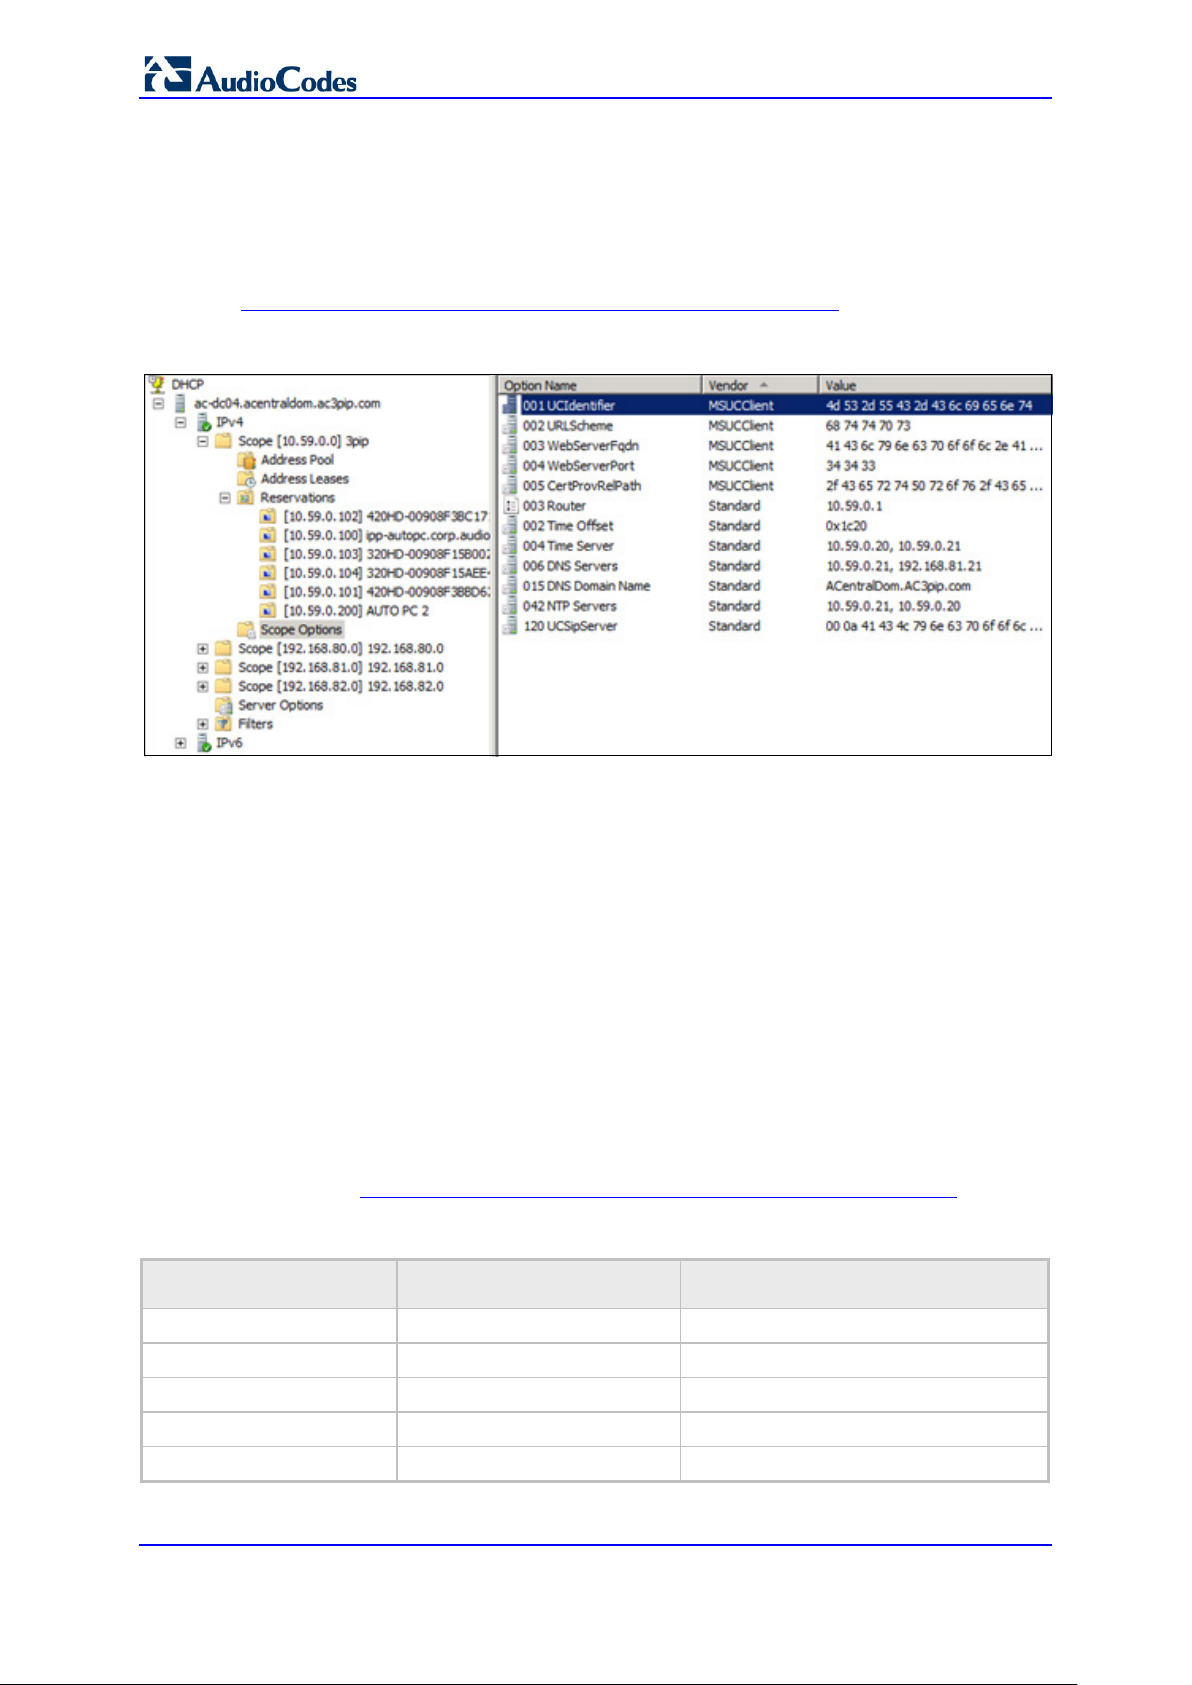
Figure 2-2: DHCP Server Options
Make sure that
DHCP Option 43 (comprising 001-005 in the figure above) is correctly configured
(see Section 2.1.1.1 on page 20 below)
DHCP Option 120 is correctly configured (see Section 2.1.1.3 on page 21 below)
DHCP Option 42 is correctly configured (see Section 2.1.1.4 on page 21 below)
Correct configuration of these three is critically important. The other DHCP options shown
in the figure above are also important but are less susceptible to inaccuracies than these.
2.1.1.1 DHCP Option 43
Option 43 comprises the five sub-options 001-005 shown in the figure above and in the
table below. These point the phone to the location of the Certificate Provisioning service on
the Skype for Business server. Use the table as a reference to make sure that each suboption is correctly configured. Sub-option 010 is shown in the next section (VLAN
Discovery via DHCP).
Refer also to http://technet.microsoft.com/en-us/library/gg398088(v=ocs.14).aspx
Table 2-1: DHCP Option 43 Configuration Reference
Sub-Option Number Sub-Option Name ASCII Value (example)
001 UCIdentifier MS-UC-Client
002 URLScheme https
003 WebServerFQDN lyncserver.domain.com
004 WebServerPort 443
005 CertProvRelPath /CertProv/CertProvisioningService.svc
Administrator's Manual 20 Document #: LTRT-09940

Administrator's Manual 2. Automatic Mass Provisioning of IP Phones using DHCP
2.1.1.2 VLAN Discovery via DHCP Option 43
Option 43 comprises the five sub-options 001-005 shown in the previous section, as well
as sub-option 010, shown in the table below. Sub-option 010 is used to specify a voice
VLAN. It is not mandatory.
Refer also to http://technet.microsoft.com/en-us/library/gg398088(v=ocs.14).aspx
Table 2-2: DHCP Option 43, Sub-Option 010, Configuration Reference
Sub-Option Number Sub-Option Name ASCII Value (example)
010 VoiceVLAN Valid values: 1-4094
2.1.1.3 DHCP Option 120
Option 120, which includes the Skype for Business Server’s fully qualified domain name
(FQDN) as shown in the table below, is required for the certification authority (CA) pool
Registrar.
Use the table as reference to make sure Option 120 is correctly configured.
Table 2-3: DHCP Option 120 Configuration Reference
Option Number Option Name ASCII Value (example)
120 UCSipServer lyncserver.domain.com
2.1.1.4 DHCP Option 42
Option 42 specifies the servers that provide NTP /SNTP for the network. Make sure that
NTP server IP addresses are correct, as shown in the table below.
Table 2-4: DHCP Option 120 Configuration Reference
Option Number Option Name String (example)
42 NTP Servers 10.59.0.20, 10.59.0.21
2.1.1.5 DHCP Scope Option
Use a DHCP Scope Option if vendor phones other than those of AudioCodes are deployed
in the same enterprise as AudioCodes' phones and a DHCP Option cohabitation issue
consequently occurs.
This section shows how to configure provisioning of AudioCodes phones using a DHCP
Scope Option when other vendor phones in the enterprise point to the same DHCP server
and use one of the standard DHCP Options described in the previous sections.
To configure provisioning of AudioCodes phones using a DHCP Scope
Option:
1. Determine the DHCP server hosting the phones.
2. Determine if DHCP Options are assigned to IPv4 or IPv6 addresses.
Note:
• The examples below show DHCP server acrtplab-ad.audiocodes.local
• The examples below show IPv4 addresses
Version 2.0.13B 21 400HD Series for Skype for Business

400HD Series for Skype for Business
Figure 2-3: DHCP Options Assigned to IPv4 Addresses
3. Define a separate User Class for each AudioCodes phone model deployed (420HD,
430HD and 440HD phone models): Right-click the IPv4 server icon and from the
popup menu, select Define User Classes…
Figure 2-4: Defining User Classes
The DHCP User Classes screen opens.
Figure 2-5: DHCP User Classes
4. Click the Add… button.
Administrator's Manual 22 Document #: LTRT-09940

Administrator's Manual 2. Automatic Mass Provisioning of IP Phones using DHCP
Figure 2-6: New Class
5. In the New Class screen, enter Display name and Description as shown in the figure
above, and then in the ASCII field, enter the User Class Phone Type (see the Packet
Bytes window in Wireshark below for an example of the 420HD phone, and see the
table below for the other AudioCodes phone models) to be sent from the phone during
DHCP Discover via Option 77 (supported by DHCP Server 2008). Do this for each
AudioCodes phone model so that a User Class entry for each model deployed will
exist when completed.
Figure 2-7: Packet Bytes Window
6. Make sure one DHCP User Class entry exists for each AudioCodes phone model
deployed in the enterprise.
Version 2.0.13B 23 400HD Series for Skype for Business
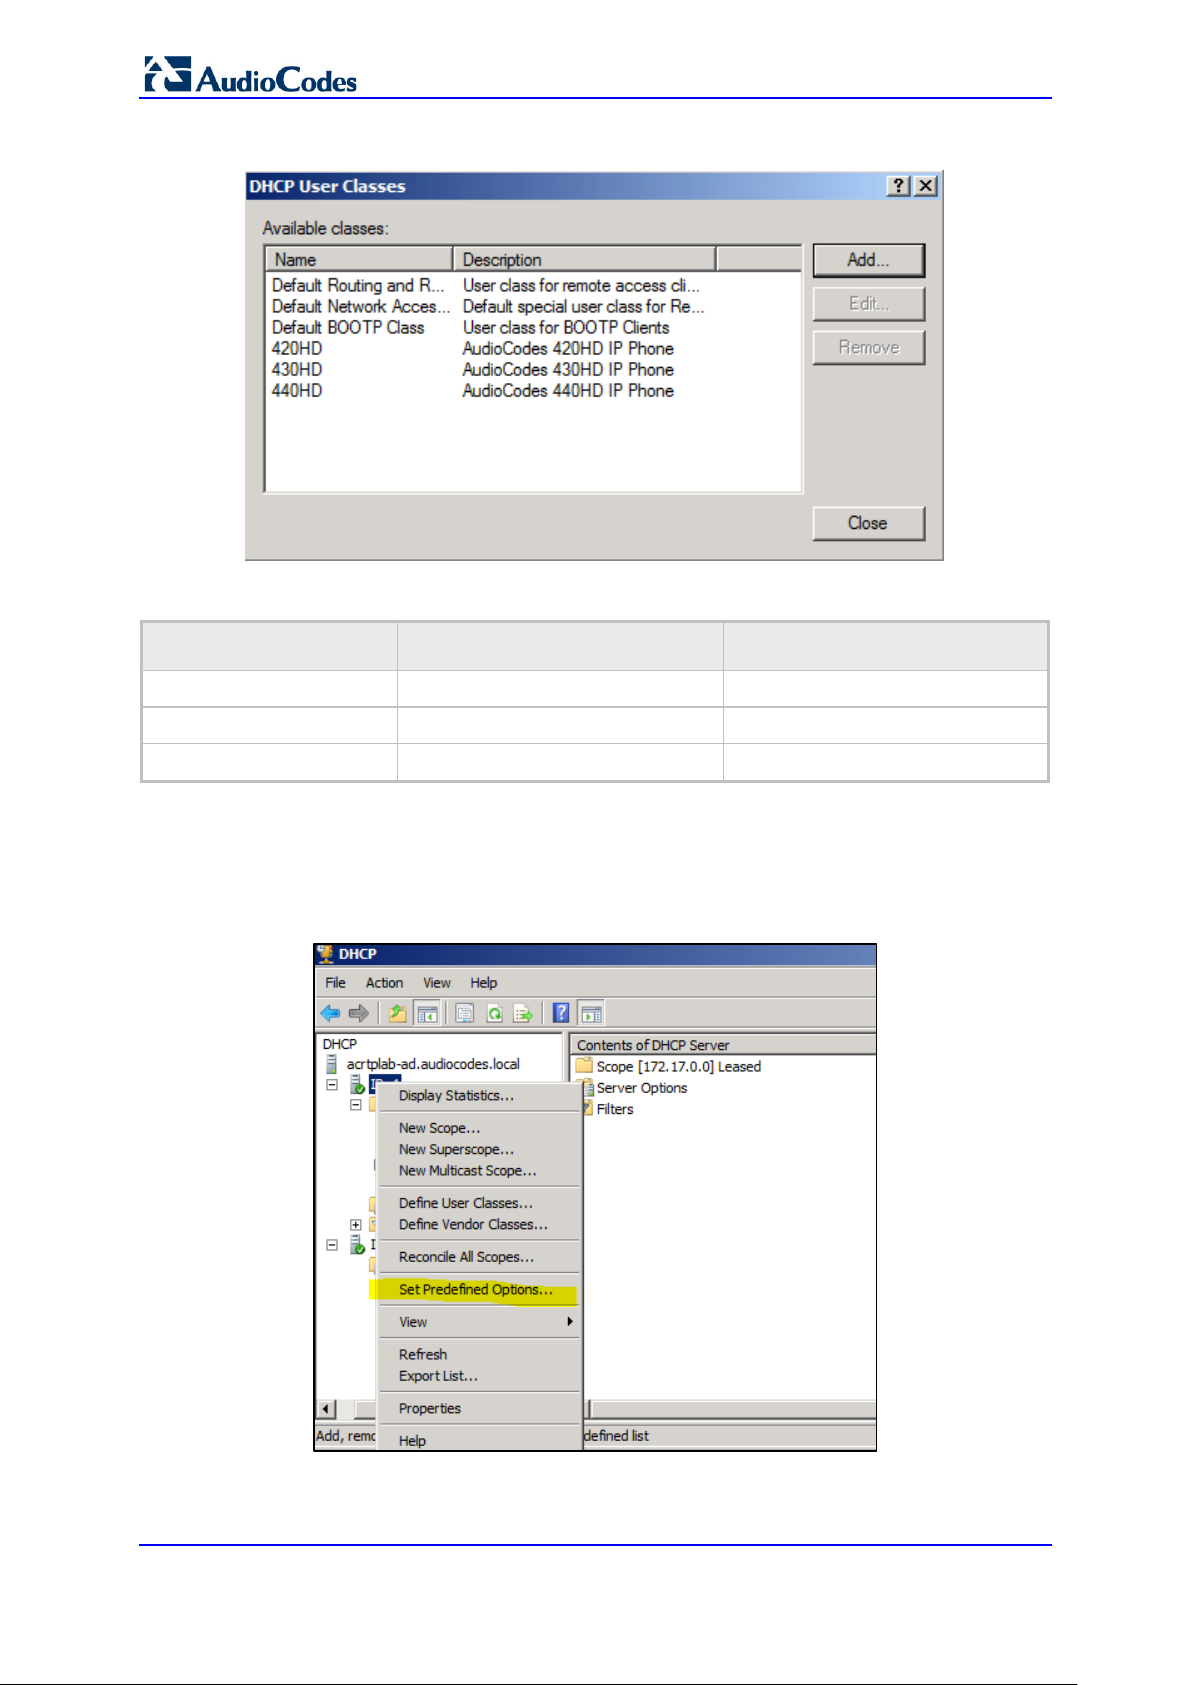
400HD Series for Skype for Business
Figure 2-8: DHCP User Classes
Table 2-5: DHCP User Class Entry for Each AudioCodes Phone Model Deployed
Display Name Description ASCII
420HD AudioCodes 420HD IP Phone 420HD
430HD AudioCodes 430HD IP Phone 430HD
440HD AudioCodes 440HD IP Phone 440HD
7. Configure Scope Option 160. This is not a standard Scope Option, so it needs to be
created. To create it on the server, select the IP version (IPv4) and select Set
Predefined Options…
Figure 2-9: Set Predefined Options
Administrator's Manual 24 Document #: LTRT-09940
Administrator's Manual 2. Automatic Mass Provisioning of IP Phones using DHCP
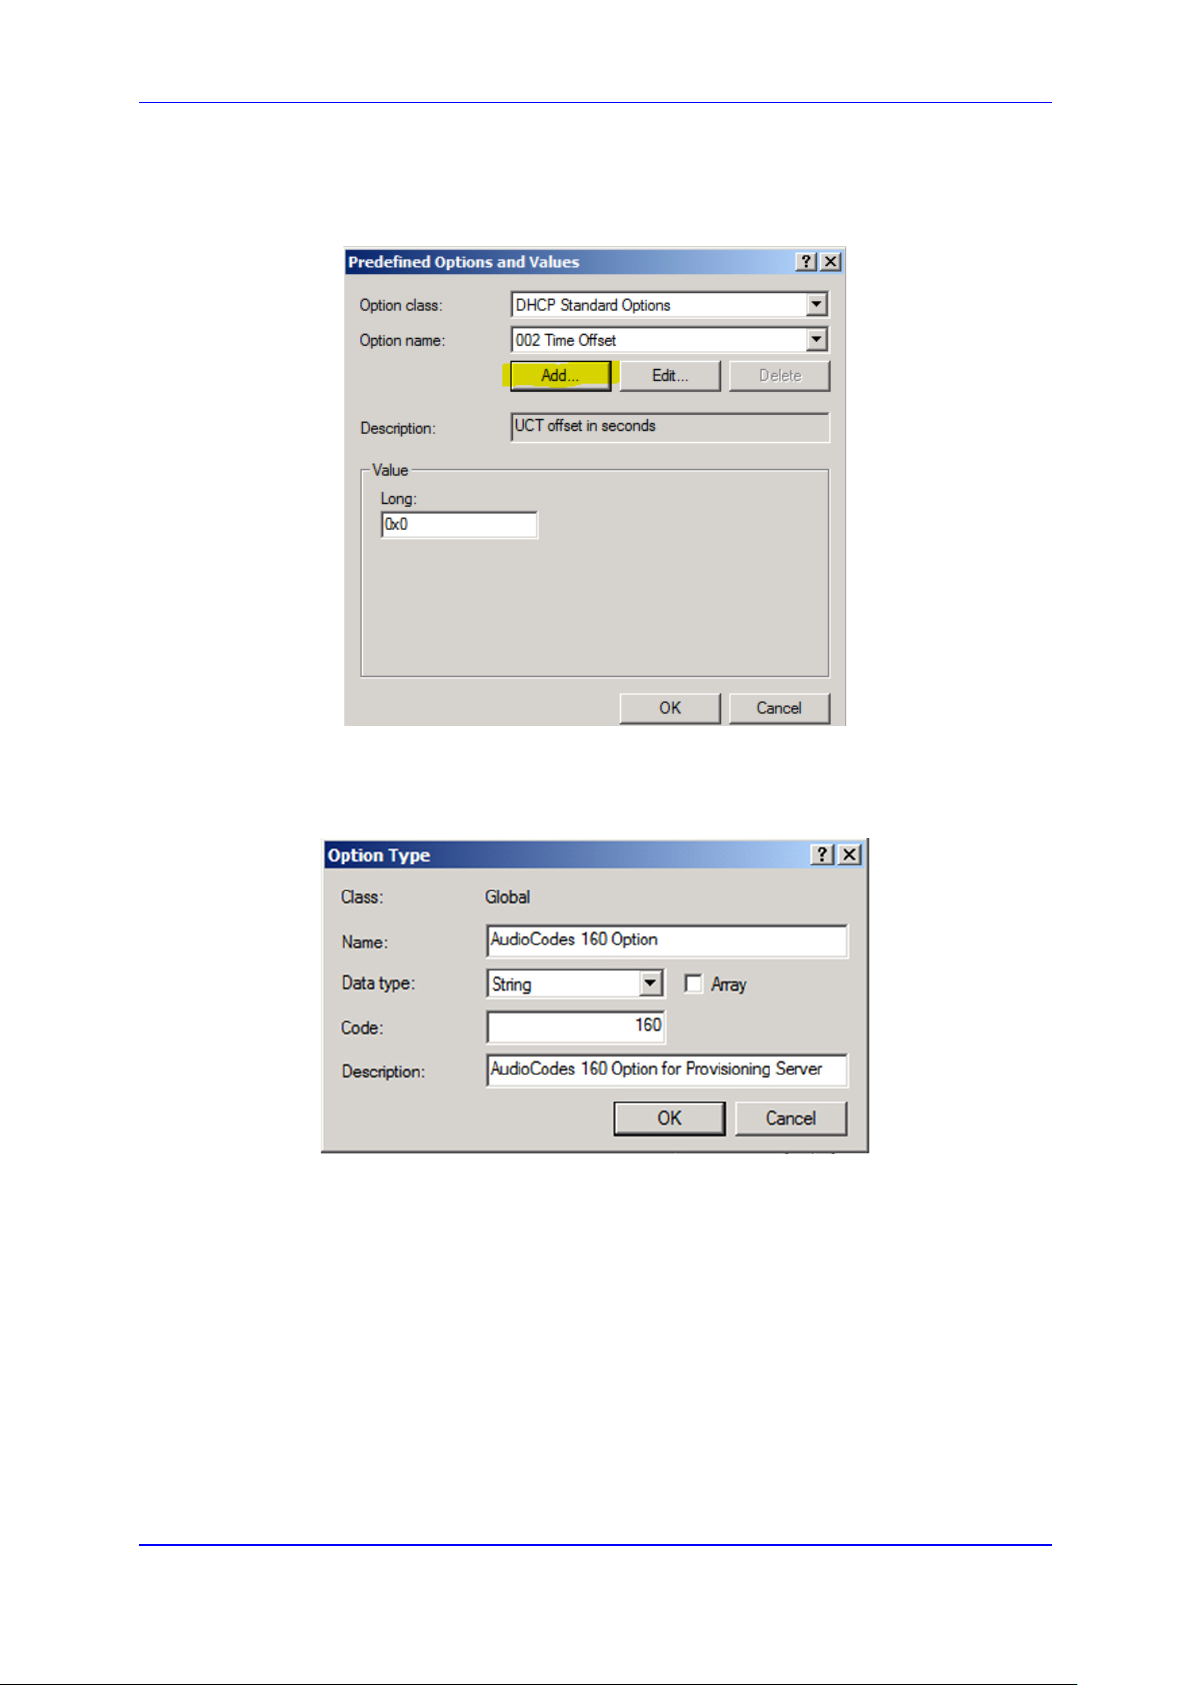
8. From the 'Option class' dropdown, select DHCP Standard Options, and then click the
Add… button.
Figure 2-10: Predefined Options and Values
9. Add the AudioCodes 160 Option as shown below, and then click OK.
Figure 2-11: Option Type – Add AudioCodes 160 Option
10. Add the IP Phone Management Server location using HTTP. In the figure below, it's
http://<EMS IP address>/firmwarefiles;ipp/dhcpoption160.cfg. See the IP Phone
Management Server Administrator’s Manual for detailed information.
Version 2.0.13B 25 400HD Series for Skype for Business

400HD Series for Skype for Business
Figure 2-12: Predefined Options and Values – Add IP Phone Management Server Location
Note: Ensure you defined http://<EMS IP address>/firmwarefiles;ipp/dhcpoption160.cfg
for DHCP Option 160 in the enterprise's DHCP server.
11. Decide if the DHCP Scope Option needs to be assigned to phones in a specific VLAN
(Scope), or to the entire server (acrtplab-ad.audiocodes.local) for IPv4 addresses.
VLAN Scope
12. Assign to a specific VLAN (Scope of IP addresses such as the Scope below
172.17.0.0, or to multiple Scopes, to be performed separately on each Scope).
a. If selecting a VLAN, expand the 'Scope Leased' folder, select 'Scope Options',
and then select Configure Options from the popup menu.
Figure 2-13: 'Scope Leased' Folder - Configure Options
Administrator's Manual 26 Document #: LTRT-09940
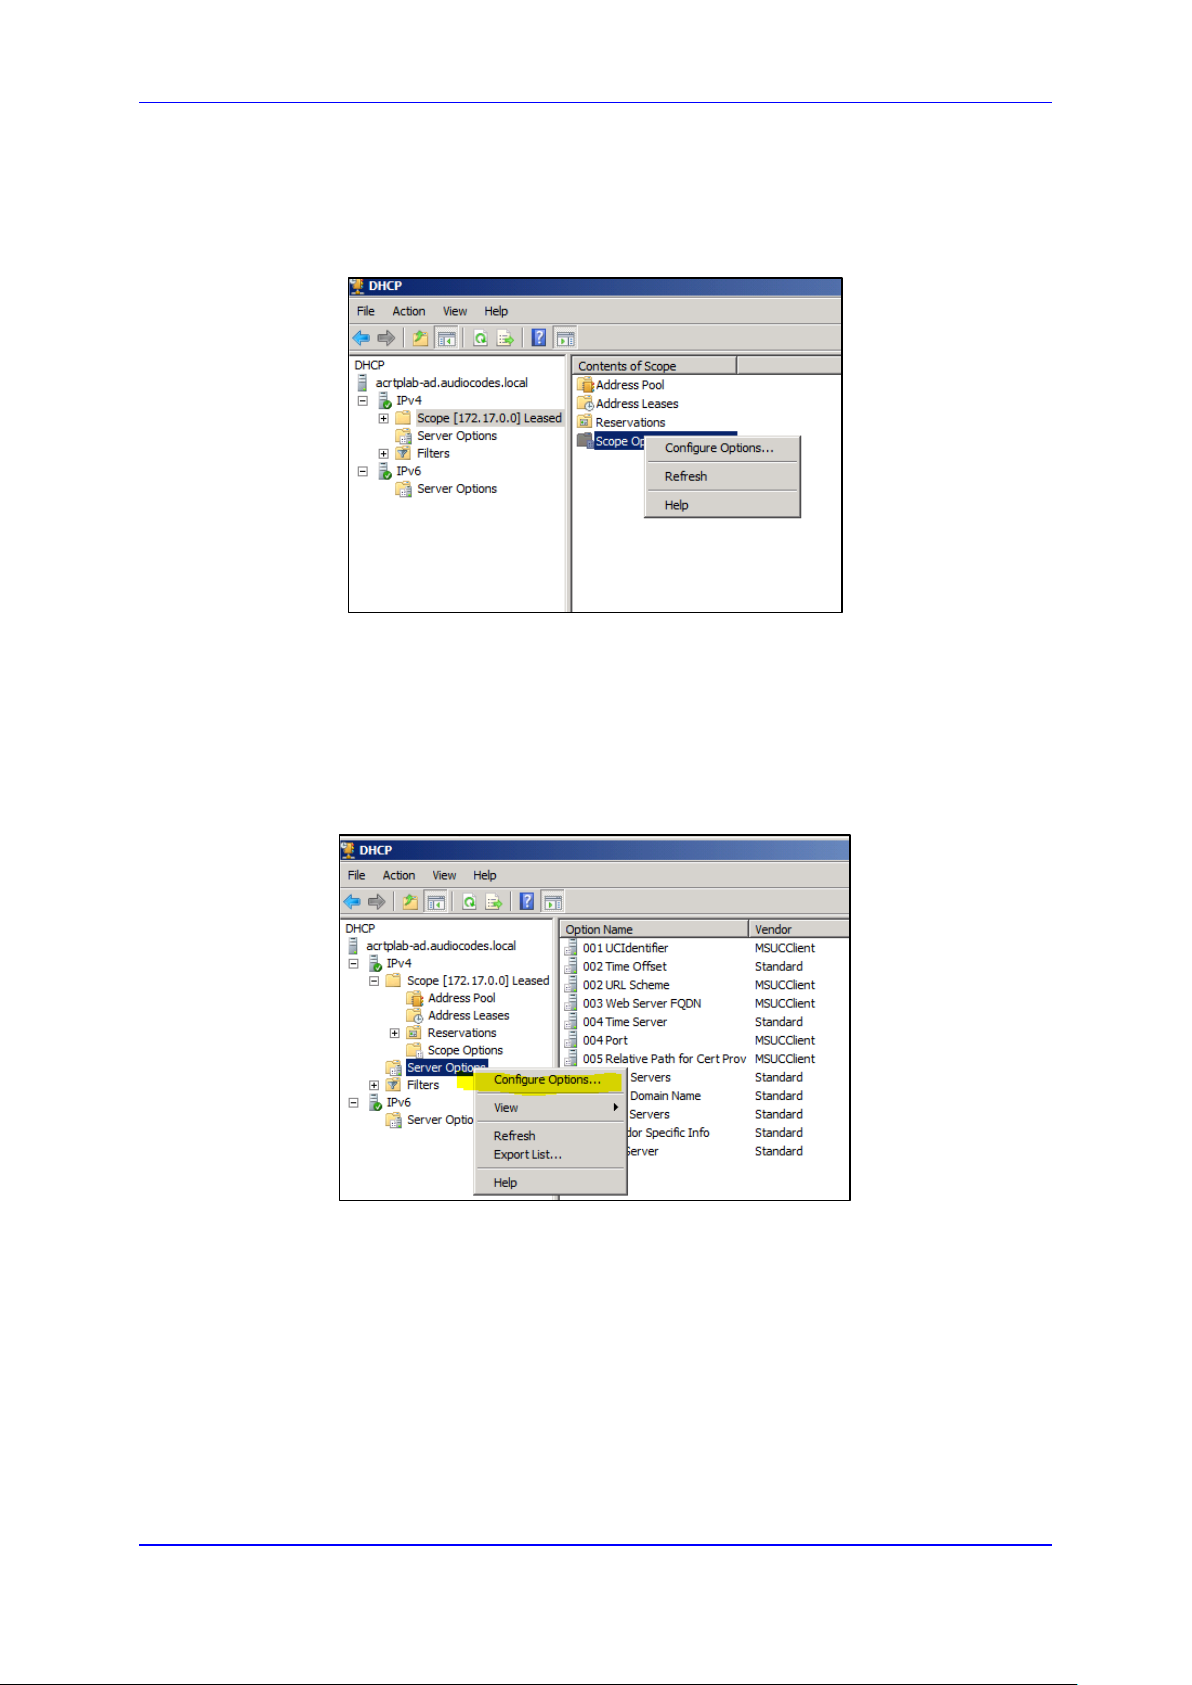
Administrator's Manual 2. Automatic Mass Provisioning of IP Phones using DHCP
-OR-
b. Select the collapsed folder 'Scope Leased' and in the main screen, right-click
'Scope Options' and select Configure Options…
Figure 2-14: Configure Options 1
-OR Server Option
13. If assigning to the entire server (acrtplab-ad.audiocodes.local), select the 'Server
Options' folder under server IPv4, right-click 'Server Options' and select Configure
Options...
Figure 2-15: Configure Options 2
14. In the Server Options page (or Scope Options page) that opens, select the Advanced
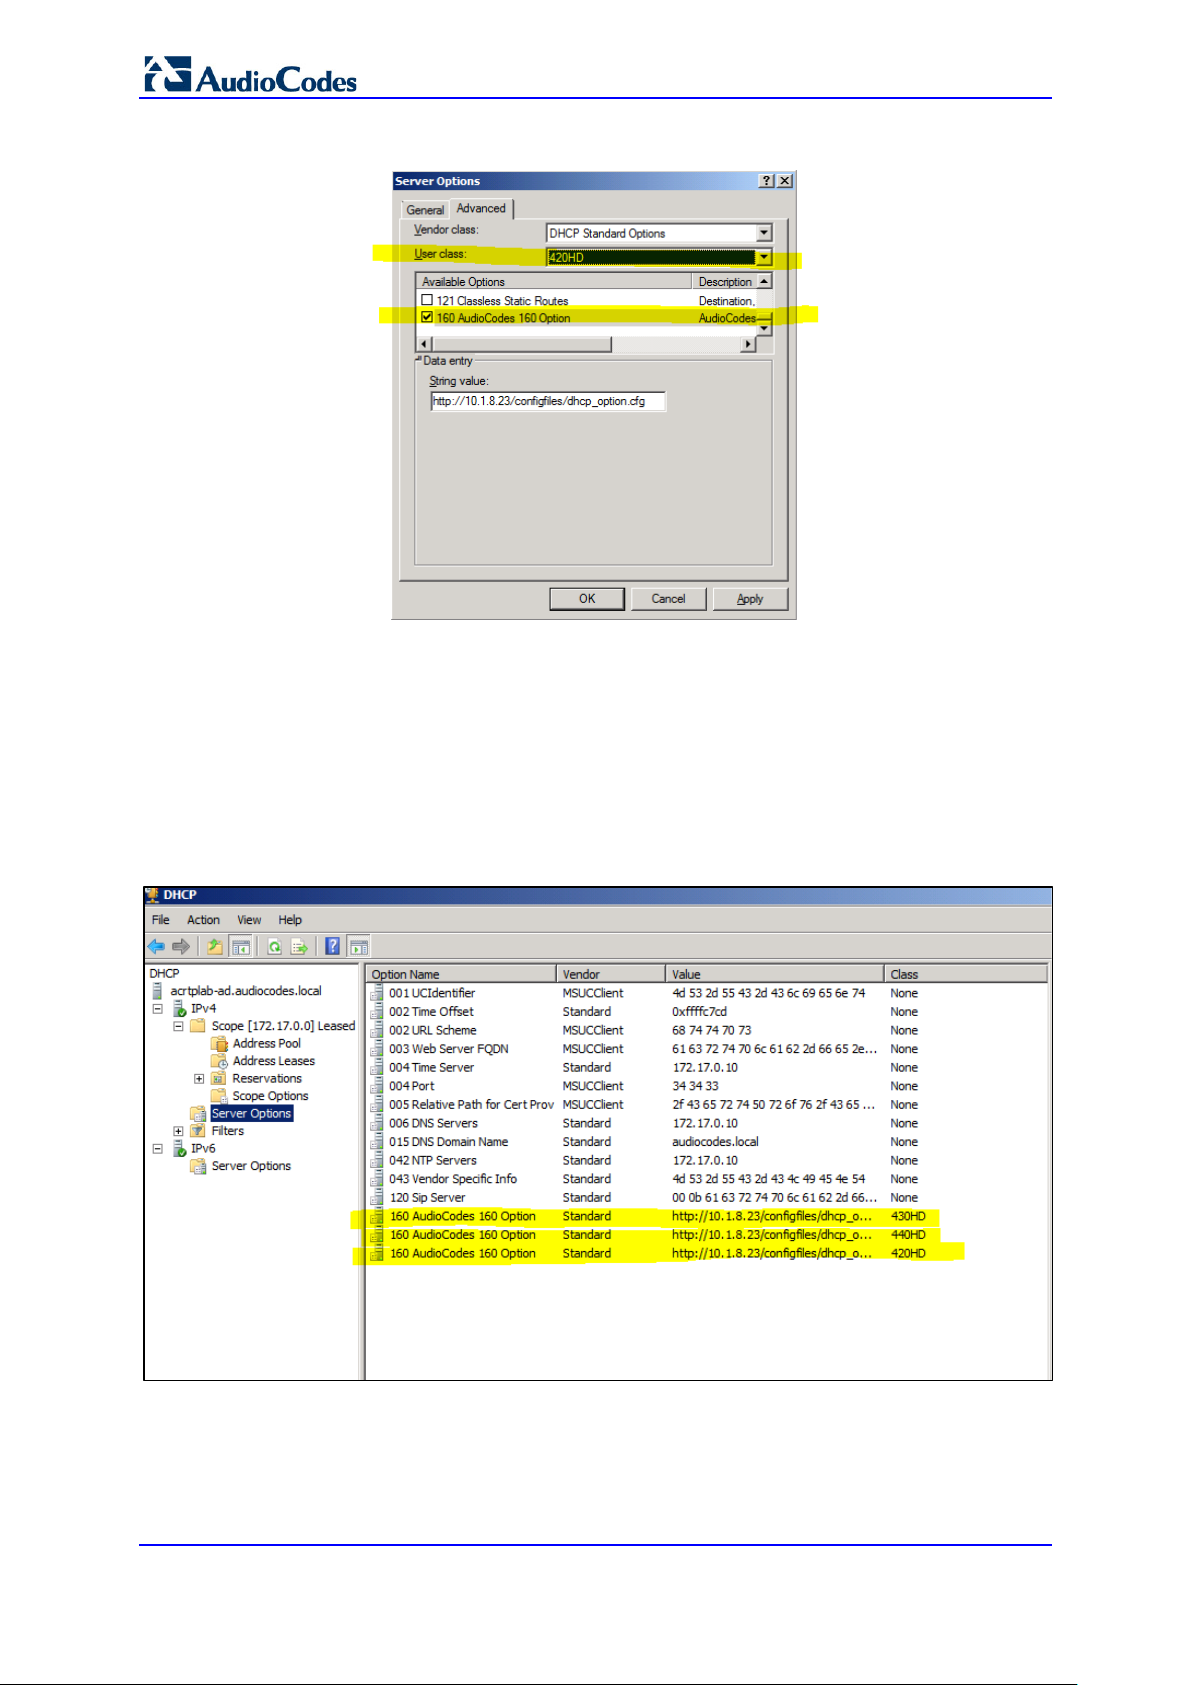
tab, ensure that DHCP Standard Options remains selected, and select 420HD User
Class for the first phone model to be defined. Scroll through the Available Options (all
are cleared) and select only 160 AudioCodes 160 Option.
The figure below shows the Server Options page. The Scope Options page is
identical. Note that the String value you defined for Scope Option 160 is automatically
populated, so it's unnecessary to change it. Note also that if additional DHCP Options
are required (such as DNS or time server) that are different from the Servers Options
for the rest of the Scopes on the server, they can also be selected, but this is typically
not needed.
Version 2.0.13B 27 400HD Series for Skype for Business
400HD Series for Skype for Business
Figure 2-16: Server Options
15. Click Apply and then follow the same procedure to add the 430HD and 440HD user
classes. After adding them, click the OK button.
You have successfully created three separate Scope Options that will only allow
AudioCodes phones to connect to the IP Phone Manager when they boot up and will
not allow other vendor phones from receiving AudioCodes' IP Phone Management
Server as their configuration server.
Figure 2-17: Three Scope Options Created
Administrator's Manual 28 Document #: LTRT-09940

Administrator's Manual 2. Automatic Mass Provisioning of IP Phones using DHCP
2.1.2 Making Sure the DHCP Server is Correctly Configured for Auto Provisioning
After creating a .cfg configuration file (see Section 2.2), place it - and the software file (img)
and other files such as tone files - on a provisioning server from where the IP phones can
download and install it.
To get the URLs to this provisioning server, the IP phones use DHCP. The provisioning
server can be HTTP/S, TFTP or FTP server.
The phone features automatic update capability to update the configuration and the
software. Checks for newer configuration files and software versions are routinely
automatically performed. Manual checks can also be performed.
To make sure the feature functions correctly:
1. Verify that the provisioning server is running and that the configuration and firmware
files are located in the correct location on it.
2. Connect the phone to the IP network and then to power.
3. On the DHCP server, configure DHCP Option 160 with the URL to the provisioning
server where the configuration and firmware files are located.
By default, the IP phone uses Option 160 which has highest priority.
If absent, the IP phone uses Options 66/67 for TFTP.
The following syntax is available for DHCP option 160:
• <protocol>://<server IP address or host name>/<firmware file
name>;<configuration file name>
• <protocol>://<server IP address or host name>
• <protocol>://<server IP address or host name>/<firmware file name>
• <protocol>://<server IP address or host name>/;<configuration file name>
Where <protocol> can be "ftp", "tftp", "http" or "https"
4. During DHCP negotiation, the phone requests DHCP options 66/67/160 to receive
provisioning information. The DHCP server responds with Option 160 providing the
provisioning URL, or Options 66 and 67 providing the TFTP IP address and firmware
file name respectively.
5. The phone then checks whether new firmware is available by checking the firmware
file header. If the version is different from the one currently running on it, the phone
downloads the complete image and burns it to its flash memory.
6. If new firmware is unavailable, the phone checks whether a new configuration file is
available on the server. If available, the phone downloads it and updates the phone’s
configuration after verifying that the configuration file is related to the phone model.
When a configuration update is needed, the phone might reboot.
Note:
• Only img (firmware) and cfg (configuration) files can be used.
• In the DHCP Discover message, the phone publishes its model name in Option
fields 60 and 77 (e.g., 420HD). To provide different provisioning information to
different models, set up a policy in the DHCP server according to phone model
name.
• If the phone is powered off during provisioning, it becomes unusable; perform a
recovery process (see Section 5 on page 133).
Version 2.0.13B 29 400HD Series for Skype for Business

400HD Series for Skype for Business
2.2 Creating a Configuration File for Auto Provisioning
Most phones deployed in an enterprise typically require identical configuration settings.
Best practice for creating a configuration file for auto provisioning is to:
1. Without signing in, use the Web interface to save a single phone’s default
configuration (factory settings) as a .cfg file.
2. Configure that single phone to perform according to your specific performance
requirements in the enterprise.
3. Save the phone’s newly configured settings as a .cfg file.
4. Create a configuration .cfg file containing only the delta between the default .cfg and
the newly configured enterprise-specific .cfg file.
5. Load this delta .cfg file to another phone, sign in, and test that phone’s performance to
see if it matches requirements.
6. Use this delta configuration .cfg file to automatically provision all IP phones through
DHCP.
2.2.1 Saving a Single Phone’s Default Configuration as a .cfg File
To save a single phone’s default configuration as a .cfg file:
1. Get the phone's IP address (MENU key > Status > Network Status > IP Address)
and point your Web browser to it; the phone's Web interface login page opens.
2. Enter the login credentials (default user name is admin; get Windows credentials from
IT); the Home page of the Web interface is displayed.
3. Open the Configuration File page (Management tab > Manual Update menu >
Configuration File).
Figure 2-18: Web Interface - Configuration File
4. Click the Save Current Configuration File button and save the .cfg file in a folder on
your PC.
Administrator's Manual 30 Document #: LTRT-09940
Loading...