


 Loading...
AudioCodes 400HD Series of High Definition IP Phones
|
|
|
|
|
|
|
HD VoIP |
405HD IP Phone |
|
|
|
User’s Manual
405HD IP Phone for Microsoft® Skype™ for Business
Version 3.0.1

User's Manual Contents
Table of Contents
1 Introducing the 405HD IP Phone................................................................................ |
9 |
|||
|
1.1 |
About AudioCodes' Series of High Definition IP Phones ................................................... |
9 |
|
|
1.2 |
Cutting Edge Voice Quality & HD VoIP ............................................................................. |
9 |
|
2 Setting up the Phone................................................................................................. |
11 |
|||
|
2.1 |
Unpacking........................................................................................................................ |
11 |
|
|
2.2 |
Device Description........................................................................................................... |
11 |
|
|
|
2.2.1 |
Front View .......................................................................................................................... |
11 |
|
|
2.2.2 |
Rear View .......................................................................................................................... |
13 |
|
2.3 |
Cabling............................................................................................................................. |
14 |
|
|
2.4 |
Mounting the Phone......................................................................................................... |
15 |
|
|
|
2.4.1 Mounting the Phone on a Desktop .................................................................................... |
15 |
|
|
|
2.4.2 Mounting on a Wall ............................................................................................................ |
15 |
|
|
|
|
2.4.2.1 Routing the Handset Cable ................................................................................ |
15 |
3 |
Getting Started........................................................................................................... |
17 |
||
|
3.1 |
Getting Acquainted with the Phone Screen ..................................................................... |
17 |
|
|
3.2 |
Softkeys ........................................................................................................................... |
18 |
|
|
3.3 |
Navigating the Phone Menu ............................................................................................ |
19 |
|
|
3.4 |
Displayed Messages........................................................................................................ |
20 |
|
4 |
Signing In |
................................................................................................................... |
21 |
|
|
4.1 |
Signing in with PIN Code ................................................................................................. |
21 |
|
|
4.2 |
Signing .......................................................................in with User Name and Password |
22 |
|
|
4.3 |
Signing .....................................................................in with the Cloud PBX Web Option |
22 |
|
|
4.4 |
Switching ...................................................................from Letters to Numbers/Symbols |
23 |
|
|
4.5 |
Signing ......................................................................................................................Out |
24 |
|
|
|
4.5.1 ..............................Signing out when the 'Sign out' Softkey is Removed from the Screen |
25 |
|
5 Unlocking .......................................................................................a Locked Phone |
29 |
|||
6 |
Customizing .............................................................................................the Phone |
31 |
||
|
6.1 |
Changing ......................................................................................the Screen Language |
31 |
|
|
6.2 |
Selecting ........................................................................................................Ring Tone |
32 |
|
|
6.3 |
Enabling .......................................................................................................Call Waiting |
33 |
|
|
6.4 |
Managing ..........................................................................Simultaneous Incoming Calls |
33 |
|
|
|
6.4.1 .................................................................................................Configuring Busy on Busy |
34 |
|
|
6.5 |
Defining .................................................................................................Call Forwarding |
35 |
|
|
6.6 |
Setting .....................................................................................................Date and Time |
36 |
|
|
6.7 |
Changing ..................................................................................Screen's Contrast Level |
38 |
|
|
6.8 |
Defining ...............................................................................Screen's Backlight Timeout |
39 |
|
|
6.9 |
Selecting .......................................................................................an Answering Device |
40 |
|
|
6.10 |
Defining .............................................................................................................Location |
40 |
|
|
6.11 |
Defining ............................................................................................an Outbound Proxy |
41 |
|
|
6.12 |
Adjusting .............................................................................................................Volume |
42 |
|
|
|
6.12.1 ...................................................................................................... |
Adjusting Ring Volume |
42 |
|
|
6.12.2 .................................................................................................... |
Adjusting Tones Volume |
42 |
Version 3.0.1 |
3 405HD IP Phone for Microsoft Skype for Business |

|
|
|
405HD IP Phone for Microsoft Skype for Business |
|
|
|
6.12.3 |
Adjusting Handset Volume ................................................................................................ |
43 |
|
|
6.12.4 |
Adjusting Speaker Volume ................................................................................................ |
43 |
|
|
6.12.5 |
Adjusting Headset Volume ................................................................................................ |
43 |
|
6.13 |
Managing Phone Directories ........................................................................................... |
44 |
|
|
|
6.13.1 |
Accessing Directories ........................................................................................................ |
44 |
|
|
6.13.2 |
Adding a Contact to the Personal Directory ...................................................................... |
45 |
|
|
6.13.3 |
Editing Contact Information in the Personal Directory....................................................... |
46 |
|
|
6.13.4 |
Deleting a Contact from the Personal Directory ................................................................ |
47 |
|
|
6.13.5 |
Adding a Person to Favorites after a Call with them is Logged......................................... |
48 |
|
|
6.13.6 |
Removing a Person from Favorites ................................................................................... |
48 |
|
|
6.13.7 |
Searching for a Contact in a Directory............................................................................... |
49 |
|
6.14 |
Searching for a Contact in the Corporate Directory using T9 .......................................... |
50 |
|
|
|
6.14.1 |
Changing from T9 to A/a/1................................................................................................. |
50 |
|
6.15 |
Defining a Speed Dial ...................................................................................................... |
51 |
|
|
|
6.15.1 |
Defining a Phone Key as a Speed Dial.............................................................................. |
51 |
|
|
6.15.2 |
Configuring Pause Dialing for a Speed Dial to an Ext. behind an IVR .............................. |
52 |
|
|
6.15.3 |
Using a VocaNOM Speed Dial .......................................................................................... |
52 |
|
|
6.15.4 |
Editing a Speed Dial .......................................................................................................... |
52 |
|
|
6.15.5 |
Deleting Speed Dials ......................................................................................................... |
52 |
|
6.16 |
Defining Phone Keys as Paging Dials ............................................................................. |
53 |
|
|
6.17 |
Changing your Presence Status ...................................................................................... |
54 |
|
|
6.18 |
Viewing Microsoft Exchange Calendar in the Phone Screen .......................................... |
55 |
|
|
6.19 |
Receiving Meeting Reminders......................................................................................... |
56 |
|
7 |
Performing Basic Operations................................................................................... |
57 |
||
|
7.1 |
Using Audio Devices........................................................................................................ |
57 |
|
|
7.2 |
Making Calls .................................................................................................................... |
57 |
|
|
|
7.2.1 |
Dialing ................................................................................................................................ |
58 |
|
|
7.2.2 |
Redialing ............................................................................................................................ |
59 |
|
|
7.2.3 |
Dialing a Missed Call ......................................................................................................... |
60 |
|
7.3 |
Answering Calls ............................................................................................................... |
60 |
|
|
7.4 |
Rejecting Incoming Calls ................................................................................................. |
61 |
|
|
7.5 |
Silencing Incoming Calls.................................................................................................. |
61 |
|
|
7.6 |
Making a New Call Even Though a Call is Coming in ..................................................... |
61 |
|
|
7.7 |
Ending an Established Call.............................................................................................. |
62 |
|
|
7.8 |
Viewing Missed, Received and Dialed Calls.................................................................... |
62 |
|
8 |
Performing Advanced Operations ........................................................................... |
65 |
||
|
8.1 |
Answering Waiting Calls .................................................................................................. |
65 |
|
|
8.2 |
Placing a Call On Hold..................................................................................................... |
66 |
|
|
8.3 |
Handling Multiple Incoming Calls..................................................................................... |
66 |
|
|
8.4 |
Calling a Contact from 'Favorites' .................................................................................... |
67 |
|
|
8.5 |
Using a Speed Dial to Place a Call.................................................................................. |
67 |
|
|
8.6 |
Transferring Calls ............................................................................................................ |
68 |
|
|
|
8.6.1 |
Performing a Blind Transfer............................................................................................... |
68 |
|
|
8.6.2 |
Performing a Consultative Transfer ................................................................................... |
68 |
|
|
8.6.3 |
Performing a Semi-Consultative Transfer.......................................................................... |
69 |
|
|
8.6.4 |
Merging Calls ..................................................................................................................... |
70 |
|
8.7 |
Parking a Call .................................................................................................................. |
71 |
|
|
8.8 |
Configuring Group Call Pickup (GCP) ............................................................................. |
71 |
|
User's Manual |
4 |
Document #: LTRT-12044 |

User's Manual Contents
8.9 |
Initiating a Multi-Party Skype for Business Remote Conference ..................................... |
71 |
|
8.10 |
Muting Calls ..................................................................................................................... |
74 |
|
8.11 |
Paging |
.............................................................................................................................. |
75 |
|
8.11.1 Performing Outgoing Paging Calls .................................................................................... |
75 |
|
|
8.11.2 ......................................................................................Receiving Incoming Paging Calls |
75 |
|
8.12 |
Setting ........................................................................up Better Together over Ethernet |
77 |
|
|
8.12.1 ....................................................................................Installing the BToE PC Application |
77 |
|
|
8.12.2 ...........................................................................Making Sure BToE is Correctly Installed |
85 |
|
|
8.12.3 .........................................................................................Configuring the BToE TCP Port |
85 |
|
|
8.12.4 ........................................................................................Enabling BToE for Online Users |
86 |
|
|
8.12.5 ...........................Automatically Pairing the BToE PC/Laptop Application with the Phone |
86 |
|
|
8.12.6 ..................................Manually Pairing the BToE PC/Laptop Application with the Phone |
87 |
|
|
...................................................................... |
8.12.6.1 Manually Generating a Pair Code |
87 |
|
........................ |
8.12.6.2 Manually Connecting the Phone with the BToE PC Application |
88 |
|
................................ |
8.12.6.3 Connecting the Skype for Windows Client with the Phone |
91 |
|
8.12.7 ..............................................Making Sure Phone/ Skype for Windows Client are Paired |
91 |
|
|
.............................................. |
8.12.7.1 Making Sure Skype for Windows Client is Paired |
91 |
|
....................................................................... |
8.12.7.2 Making Sure the Phone is Paired |
92 |
8.13 |
Using BToE .....................................................................................................Functions |
93 |
|
|
8.13.1 ........................................................................................................................... |
Signing In |
93 |
|
8.13.2 ..............................................................................................Making a Call (Click-to-Dial) |
94 |
|
|
8.13.3 .................................................Establishing a Unified Communications Call Conference |
94 |
|
|
8.13.4 ................................................................................................................ |
Answering a Call |
96 |
|
8.13.5 ............................................................................................................. |
Transferring a Call |
97 |
8.14 |
Switching ......................................................................................Primary Audio Device |
98 |
|
8.15 |
Routing ................................................................Voice from a Video Call to the Phone |
99 |
|
8.16 |
Viewing ....................................................................and Playing Voicemail Messages |
100 |
|
|
8.16.1 ..............................................................Sending an Incoming Call Directly to Voicemail |
100 |
|
9 Troubleshooting ...................................................................................................... |
101 |
||
9.1 Uploading ............................................Logs to Microsoft Server for Support Purposes |
101 |
||
Version 3.0.1 |
5 405HD IP Phone for Microsoft Skype for Business |

405HD IP Phone for Microsoft Skype for Business |
|
List of Figures |
|
Figure 2-1: Front View ...................................................................................................................................... |
12 |
Figure 2-2: Rear View....................................................................................................................................... |
13 |
Figure 2-3: Desktop Mounting .......................................................................................................................... |
15 |
Figure 2-4: Wall Mounting ................................................................................................................................ |
15 |
Figure 3-1: Phone Screen in Idle State ............................................................................................................ |
17 |
Figure 3-2: Phone Menu................................................................................................................................... |
19 |
Figure 4-1: Entering Letters of the Alphabet .................................................................................................... |
23 |
Figure 4-2: Entering a Symbol (e.g., a dot) ...................................................................................................... |
24 |
Figure 4-3: Reverting to Letters (e.g., abc) ...................................................................................................... |
24 |
Figure 4-4: Login............................................................................................................................................... |
25 |
Figure 4-5: Web Interface – Home Page.......................................................................................................... |
25 |
Figure 4-6: Sign-in – Content Blocked.............................................................................................................. |
26 |
Figure 4-7: Sign-in – Windows Security Prompt............................................................................................... |
26 |
Figure 4-8: Windows Security Prompt .............................................................................................................. |
27 |
Figure 4-9: Sign-out.......................................................................................................................................... |
27 |
Figure 8-1: InstallShield Wizard – Preparing to Install ..................................................................................... |
78 |
Figure 8-2: Welcome to the InstallShield Wizard ............................................................................................. |
78 |
Figure 8-3: License Agreement ........................................................................................................................ |
79 |
Figure 8-4: License Agreement ........................................................................................................................ |
79 |
Figure 8-5: Destination Folder .......................................................................................................................... |
80 |
Figure 8-6: Change Current Destination Folder ............................................................................................... |
80 |
Figure 8-7: Ready to Install .............................................................................................................................. |
81 |
Figure 8-8: Installing AudioCodes Better2Gether............................................................................................. |
81 |
Figure 8-9: InstallShield Wizard Completed ..................................................................................................... |
82 |
Figure 8-10: AudioCodes Icon in Taskbar........................................................................................................ |
82 |
Figure 8-11: Control Panel>Programs>AudioCodes Better2Gether ................................................................ |
83 |
Figure 8-12: Computer Management > Services and Applications.................................................................. |
83 |
Figure 8-13: Device Manager > AudioCodes B2GoE USB Driver ................................................................... |
84 |
Figure 8-14: Popup Menu................................................................................................................................. |
85 |
Figure 8-15: About AC BToE............................................................................................................................ |
85 |
Figure 8-16: TCP Port....................................................................................................................................... |
85 |
Figure 8-17: AC BToE TCP Port ...................................................................................................................... |
86 |
Figure 8-18: Popup Menu................................................................................................................................. |
88 |
Figure 8-19: Phone Pairing............................................................................................................................... |
88 |
Figure 8-20: AC BToE Failed Indication........................................................................................................... |
88 |
Figure 8-21: AC BToE is Connected Indication................................................................................................ |
88 |
Figure 8-22: Popup Menu: 'Disconnect' Enabled, 'Phone Pairing' Disabled .................................................... |
89 |
Figure 8-23: BToE Disconnected ..................................................................................................................... |
89 |
Figure 8-24: Popup Menu: BToE Disconnected............................................................................................... |
89 |
Figure 8-25: Start > Programs > AudioCodes > BToE Controller .................................................................... |
90 |
Figure 8-26: Skype for Windows Sign-in Request Prompt............................................................................... |
91 |
Figure 8-27: Primary Device: Phone ................................................................................................................ |
98 |
Figure 8-28: Primary Device: Speaker ............................................................................................................. |
98 |
Figure 8-29: Primary Device: Headset ............................................................................................................. |
98 |
List of Tables |
|
Table 2-1: Font View Description ..................................................................................................................... |
12 |
Table 2-2: Rear View Description..................................................................................................................... |
14 |
Table 2-3: Cabling ............................................................................................................................................ |
14 |
Table 3-1: Phone Screen in Idle State.............................................................................................................. |
17 |
Table 3-2: Softkeys........................................................................................................................................... |
18 |
Table 3-3: Messages Displayed in the Phone Screen Indicating Processes In Progress ............................... |
20 |
Table 4-1: Symbol Options ............................................................................................................................... |
23 |
Table 6-1: Time Zones...................................................................................................................................... |
37 |
Table 6-2: Presence Statuses .......................................................................................................................... |
54 |
Table 9-1: Troubleshooting............................................................................................................................. |
101 |
User's Manual |
6 |
Document #: LTRT-12044 |

User's Manual |
Notices |
Notice
Information contained in this document is believed to be accurate and reliable at the time of printing. However, due to ongoing product improvements and revisions, AudioCodes cannot guarantee accuracy of printed material after the Date Published nor can it accept responsibility for errors or omissions. Updates to this document and other documents can be viewed by registered customers at http://www.audiocodes.com/downloads.
© Copyright 2017 AudioCodes Ltd. All rights reserved.
This document is subject to change without notice. Date Published: Aug-14-2017
Trademarks
AudioCodes Ltd. All rights reserved. AudioCodes, AC, HD VoIP, HD VoIP Sounds Better, IPmedia, Mediant, MediaPack, What’s Inside Matters, OSN, SmartTAP, VMAS, VoIPerfect, VoIPerfectHD, Your Gateway To VoIP, 3GX, VocaNom, AudioCodes One Voice and CloudBond are trademarks or registered trademarks of AudioCodes Limited All other products or trademarks are property of their respective owners. Product specifications are subject to change without notice.
WEEE EU Directive
Pursuant to the WEEE EU Directive, electronic and electrical waste must not be disposed of with unsorted waste. Please contact your local recycling authority for disposal of this product.
Customer Support
Customer technical support and services are provided by AudioCodes or by an authorized AudioCodes Service Partner. For more information on how to buy technical support for AudioCodes products and for contact information, please visit our Web site at www.audiocodes.com/support.
Abbreviations and Terminology
Each abbreviation, unless widely used, is spelled out in full when first used.
Documentation Feedback
AudioCodes continually strives to produce high quality documentation. If you have any comments (suggestions or errors) regarding this document, please fill out the Documentation Feedback form on our Web site at http://www.audiocodes.com/downloads. Your valuable feedback is highly appreciated.
Version 3.0.1 |
7 405HD IP Phone for Microsoft Skype for Business |
405HD IP Phone for Microsoft Skype for Business
Related Documentation
Document Name
400HD Series IP Phone for Microsoft Skype for Business Release Notes
400HD Series IP Phone for Microsoft Skype for Business Administrator’s Manual
420HD IP Phone for Microsoft Skype for Business Quick Guide
400HD Series IP Phones for Skype for Windows Hosting Partner (LHPv2) Environment Configuration Note
User's Manual |
8 |
Document #: LTRT-12044 |
User's Manual |
1. Introducing the 405HD IP Phone |
1 Introducing the 405HD IP Phone
The 405HD SIP IP Phone is a low-cost, entry-level IP phone designed to offer the essential everyday features that the modern business environment demands.
Features include:
Skype for Business compatibility
Graphical, backlit multi-lingual LCD (132 X 64)
GbE network interface
Four programmable soft keys
AudioCodes Auto-provisioning
Robust security mechanisms
Power over Ethernet (PoE)
Multiple language support
Integration with voice quality monitoring
Full duplex speakerphone and headset connectivity (analog headsets through RJ-9 port and USB headsets through USB port)
Read this User’s Manual carefully to learn how to operate the product and take advantage of its rich feature set.
1.1About AudioCodes' Series of High Definition IP Phones
AudioCodes Series of High Definition IP Phones offers a new dimension of voice call quality and clarity for the IP Telephony market. This new series of IP Phones further expands AudioCodes’ VoIP product offering for the service providers’ hosted services, Enterprise IP telephony and Enterprise contact centers markets. As a natural addition to the AudioCodes Mobile Clients, Media Gateway, Media Server & Multi-Service Business Gateway products, the AudioCodes Series of High Definition IP Phones enable Systems Integrators and end-customers to build end- to-end solutions that rely on AudioCodes’ technological advantage and proven track record in providing state-of-the-art products. The AudioCodes Series of High Definition IP Phones meet a growing demand for High Definition VoIP solutions in end-user phones and terminals, improving the productivity and efficiency of business communications with new quality standards set by the High Definition voice technology.
1.2Cutting Edge Voice Quality & HD VoIP
Based on AudioCodes’ advanced, robust and field-proven VoIPerfectHD™ software, AudioCodes’ IP Phones are designed to utilize the most popular wideband coders. The phones feature enhanced proprietary capabilities such as packet loss concealment, high quality wideband acoustic echo canceler, and low-delay adaptive jitter buffers to enrich the HDVoIP experience.
Version 3.0.1 |
9 405HD IP Phone for Microsoft Skype for Business |

405HD IP Phone for Microsoft Skype for Business
This page is intentionally left blank.
User's Manual |
10 |
Document #: LTRT-12044 |
User's Manual |
2. Setting up the Phone |
2 Setting up the Phone
2.1Unpacking
When unpacking, ensure that the following items are present and undamaged:
405HD IP Phone / Stand |
Handset / Cord |
Cat 5e Ethernet Cable |
AC Power Adapter (Optional) |
If anything appears to be missing or broken, contact the distributor from whom you purchased the phone for assistance.
2.2Device Description
Use the graphics below to identify and familiarize yourself with the device's hardware functions.
2.2.1Front View
The front view of the phone is shown in Figure 2-1 and described in Table 2-1.
Version 3.0.1 |
11 405HD IP Phone for Microsoft Skype for Business |

405HD IP Phone for Microsoft Skype for Business
Figure 2-1: Front View
1
2
3
4
 5
5
6
7
8
9  10 11
10 11
 12
12
13
14
|
|
15 |
|
|
Table 2-1: Font View Description |
|
|
|
Item # |
Label/Name |
Description |
|
|
|
1 |
Screen |
LCD (Liquid Crystal Display) - interactive screen displaying calling |
|
|
information, enabling you to set up phone features. |
2 |
Ring LED |
Flashing green light indicates an incoming call. |
3 |
Softkeys |
See Section 3.2 on page 18 for details on the four softkeys and the |
|
|
available functions they offer. |
4 |
MENU |
Accesses menus (1) Call Log (2) Calendar (3) Speed Dial (4) Settings |
|
|
(5) Device Status (6) Administration (7) Favorites (8) Log upload. |
5 |
Navigation |
Press the upper rim to scroll up menus/items in the screen. Press its |
|
Control / OK |
lower rim to scroll down. Press its left or right rim to move the cursor left |
|
|
or right (when editing a contact number for example). Press the OK |
|
|
button to select a menu/item/option. |
6 |
USB port |
[On the side of the phone] Allows USB headset connectivity |
7 |
VOICE MAIL |
Retrieves voice mail messages. |
User's Manual |
12 |
Document #: LTRT-12044 |
User's Manual |
2. Setting up the Phone |
|||
|
|
|
|
|
|
Item # |
Label/Name |
Description |
|
|
|
|
|
|
8 |
CONTACTS |
Press to directly access the 'Favorites' directory. Other directories can be |
||
|
|
|
accessed from the 'Favorites' directory. |
|
9 |
REDIAL |
Accesses recently dialed numbers; one can be selected to redial. |
||
10 |
HOLD |
Places an active call on hold. |
||
11 |
HEADSET |
Activates a call using an external headset. |
||
12 |
SPEAKER |
Activates the speaker, allowing a hands-free conversation. |
||
13 |
MUTE |
Mutes a call. |
||
|
|
▲ |
Increases or decreases the volume of the handset, headset, speaker, ring |
|
14 |
VOL |
|||
VOL |
tone and call progress tones. |
|||
|
|
|||
|
|
▼ |
|
|
15Alphanumerical Keys for entering numbers, letters and symbols (e.g., colons).
Keypad
2.2.2Rear View
The rear view of the phone is shown in the figure below and described in the table below.
Figure 2-2: Rear View
Version 3.0.1 |
13 405HD IP Phone for Microsoft Skype for Business |
|
405HD IP Phone for Microsoft Skype for Business |
|
Table 2-2: Rear View Description |
|
|
Label |
Description |
|
|
DC |
12V DC power jack that connects to the AC power adapter. |
|
|
PC |
RJ-45 port for connecting the phone to a PC (10/100/1000 Mbps downlink). |
|
|
Internet |
RJ-45 port to connect to the Ethernet LAN cable for the LAN connection (uplink - |
|
10/100/1000 Mbps). If you're using Power over Ethernet (PoE), power to the |
|
phone is supplied from the Ethernet cable (draws power from either a spare line or |
|
signal line). |
|
|
|
Headset jack, i.e., RJ-9 port that connects to an external headset. |
|
|
|
Handset jack, i.e., RJ-9 port, to connect the handset. |
|
|
2.3Cabling
This section shows how to cable your phone.
Table 2-3: Cabling
Step |
Description |
|
|
1Connect the handset cord's shorter straight end to the handset. Connect the longer, straight end to the  jack on the phone.
2Connect the RJ-45 Internet port to your LAN network (LAN port or LAN switch/router), using a CAT 5 / 5e Ethernet cable.
3Connect the RJ-45 PC port to a computer, using a CAT 5 / 5e straight-through Ethernet cable.
4Connect the connector tip of the power adapter to the phone’s power socket (labelled DC 12V). Connect the two-prong adapter directly to the electrical wall outlet.
5Connect the RJ-9 headset  jack to a headset (optional)
Note: If the LAN to which the phone is connected supports Power over Ethernet (PoE), no AC adapter is required; the phone receives power from the Ethernet network.
Prior to connecting power, refer to the Compliancy and Regulatory Information at www.audiocodes.com/library.
User's Manual |
14 |
Document #: LTRT-12044 |
User's Manual |
2. Setting up the Phone |
2.4Mounting the Phone
The phone can be mounted on a:
Desk (see Section 2.4.1 below)
Wall (see Section 2.4.2 below)
See also https://www.youtube.com/watch?v=oGe9STB9lFE to assemble the base stand.
2.4.1Mounting the Phone on a Desktop
This section shows how to place the phone on a desk or flat surface.
To mount the phone on a desk or flat surface:
Slide the short edges of the L-shaped stand (the prongs) into the phone's two rear slots (see A below). Slide the prongs in until they lock.
Figure 2-3: Desktop Mounting
A A
BB
2.4.2Mounting on a Wall
To mount the phone on a wall:
1.Hook the phone's two rear notches (see B below) onto wall mounting screws.
2.Pull out the handset's cradle clip, which is by default in desktop mounting position, invert it, and then push it back in.
Figure 2-4: Wall Mounting
B B
This is the wall mounting position.
2.4.2.1Routing the Handset Cable
The phone features a groove for routing the handset cable.
Version 3.0.1 |
15 405HD IP Phone for Microsoft Skype for Business |

405HD IP Phone for Microsoft Skype for Business
This page is intentionally left blank.
User's Manual |
16 |
Document #: LTRT-12044 |
User's Manual |
3. Getting Started |
3 Getting Started
This section gets you started with the phone. The phone features a screen, providing an intuitive, menu-driven user interface for configuring the device and viewing call information.
Before using the screen, you must sign in (see Section 4 on page 21).
3.1Getting Acquainted with the Phone Screen
This section gets you acquainted with the phone screen.
The figure below shows the screen in idle state.
Figure 3-1: Phone Screen in Idle State
1 |
|
|
|
|
|
|
|||
|
|
|
|
|
2 |
|
|
|
4 |
|
|
|
||
|
|
|
|
|
3 |
|
|
|
|
|
|
|
|
|
|
|
|
|
|
Reference:
Table 3-1: Phone Screen in Idle State
Reference |
Description |
|
|
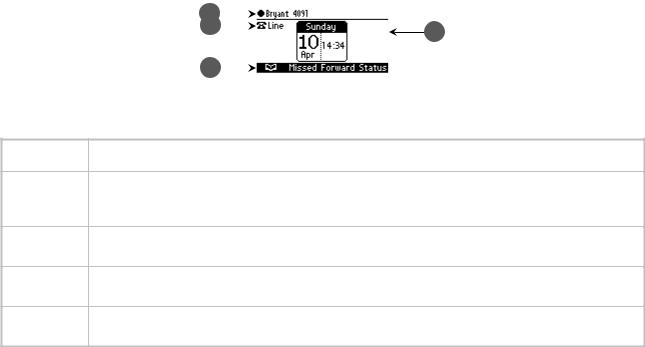
1Displayed name configured by your system administrator; see the Administrator's Manual. Adjacent to the name is the Presence status (Available, Busy, Do not disturb, Away, or Be right back). See Section 6.17 on page 54 for details.
2Extension Line configured by your system administrator. See the Administrator's Manual for details.
3Softkeys; to activate, press the key on the device, below the screen, corresponding to the softkey. See Table 3-2 for softkey descriptions.
4Day, Date and Time, automatically retrieved from the Network Time Protocol (NTP) server, enabled by your system administrator.
Version 3.0.1 |
17 405HD IP Phone for Microsoft Skype for Business |
405HD IP Phone for Microsoft Skype for Business
3.2Softkeys
The table below shows the softkeys displayed in the phone screen. To use a softkey, press the hard key located directly below it on the device.
Table 3-2: Softkeys
Softkey |
Description |
|
|
Missed |
Displays missed calls. |
Forward |
Automatically forwards calls. |
Status |
Displayed in idle state. Lets you set presence status: Available, Busy, Do not disturb, Away, |
|
Be right back |
Sign in |
Sign in is displayed if you haven't signed in yet (in the idle screen). |
/Sign out |
Sign out is displayed if you press the Status softkey after signing in. |
|
Displayed after lifting the handset. Opens the 'Favorites' defined in the Skype for Business |
|
client. |
|
Displayed after lifting the handset (for example). Displays the Call Log. |
|
|
Select |
Identical to the hard OK key on the phone. Either can be used. Selects a menu or option. |
BToE |
Displayed after pressing the MENU hard key. Generates a code for manually pairing the |
|
phone with Skype for Business client, for unified communications. |
A/a/1 |
Enables switching between input modes: abc, ABC, Abc, 123, or T9. |
Save |
Saves settings. |
Cancel |
Cancels the currently initiated call or configuration. |
Dial |
Displayed after a number is keyed, a directory contact is selected, or a logged call is selected. |
Clear |
Displayed after entering a digit of a phone number (for example). Deletes from right to left. |
|
Displayed after a number is dialed and answered on the other side, and after you answer a |
|
call. Displays the Call Menu. |
Conf |
Displayed (1) after a number is dialed and the call is answered on the other side and (2) after |
|
you answer a call. Pressing it displays the ADD PARTICIPANT screen. |
BXfer |
Displayed (1) after a number is dialed and the call is answered on the other side and (2) after |
|
a call is answered. Lets you transfer the call in a blind transfer. |
URL |
Displayed after lifting the handset (for example). Enables calling a URL. |
Detail |
Displayed after selecting a call log (for example). If selected, the details of a logged call are |
|
displayed (Time, Date, etc.). |
+Fav |
Displayed in the Call Details screen. Allows adding the person to the Favorites screen. |
End |
Displayed after pressing the Dial softkey (for example). Ends the call. |
Back |
Displayed after pressing the MENU key (for example). Returns to the previous screen. |
Start |
Displayed after pressing Forward > Forward to a number (for example). |
Edit |
Displayed after you select a contact to be edited (for example). |
Delete |
Displayed after pressing the MENU key on the phone and then selecting Call Log (for |
|
example). |
Silent |
Displayed when the phone rings, alerting to an incoming call. Lets you silence the ring. |
Reject |
Displayed when the phone rings, alerting to an incoming call. Lets you reject the call. |
Accept |
Displayed when the phone rings, alerting to an incoming call. Lets you accept the call. |
User's Manual |
18 |
Document #: LTRT-12044 |
User's Manual |
3. Getting Started |
3.3Navigating the Phone Menu
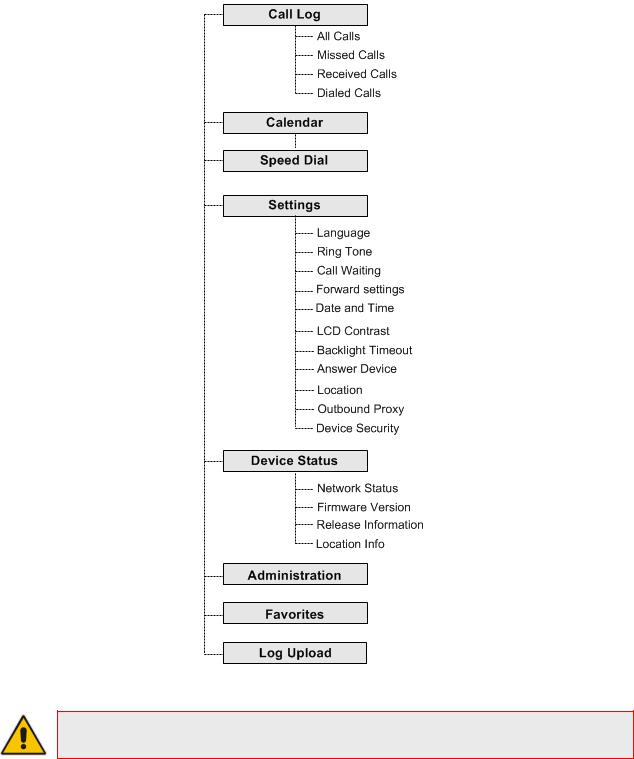
The MENU key on the phone lets you access information and configure settings shown in the figure below. Press it to view call logs, view meetings scheduled in the calendar for that day (integrated with Skype for Business client), configure speed dials, customize phone settings, determine device status, perform administration, access 'Favorites' and other phone directories, and perform log upload to Microsoft server.
Figure 3-2: Phone Menu
Note: Administration is intended for system administrators only. It is password protected. See the Administrator’s Manual for details.
Version 3.0.1 |
19 405HD IP Phone for Microsoft Skype for Business |

405HD IP Phone for Microsoft Skype for Business
To access the phone's menu:
Press the MENU key located on the device.
|
To navigate to menu items: |
|
After opening the menu, press the navigation control's lower rim -OR- press the menu item's |
|
number, e.g., press 3 to navigate to Speed Dial. |
|
To select a menu or menu item: |
Press the Select softkey or press the navigation control's OK button.
To cancel and move to a previous menu level:
Press the Back softkey.
3.4Displayed Messages
Messages displayed in the phone screen, indicating processes in progress, include:
Table 3-3: Messages Displayed in the Phone Screen Indicating Processes In Progress
Message |
Description |
|
|
Initializing |
Initializing |
|
|
Discovering LLDP |
Discovering VLAN using Link Layer Discovery Protocol (LLDP) |
|
|
Discovering CDP |
Discovering VLAN using Cisco Discovery Protocol (CDP) ) |
|
|
Acquiring IP |
Acquiring an IP address from a DHCP server |
|
|
Initializing Network |
Initializing the network |
|
|
Signing in |
Signing in to the Skype for Windows server |
|
|
Signing in...Contacting time server |
Get the time from the NTP server |
|
|
Discovering Lync server |
Auto discovering the Skype for Windows server on the network |
|
|
Registering |
Registering to a SIP proxy server (after booting up the phone) |
|
|
Downloading Firmware File |
Downloading a firmware file |
|
|
Upgrading Firmware |
Upgrading the phone’s firmware |
|
|
Signing out |
Signing out of the Skype for Windows server |
|
|
User's Manual |
20 |
Document #: LTRT-12044 |
User's Manual |
4. Signing In |
4 Signing In
This section shows you how to sign in to the phone.
To sign in to the phone:
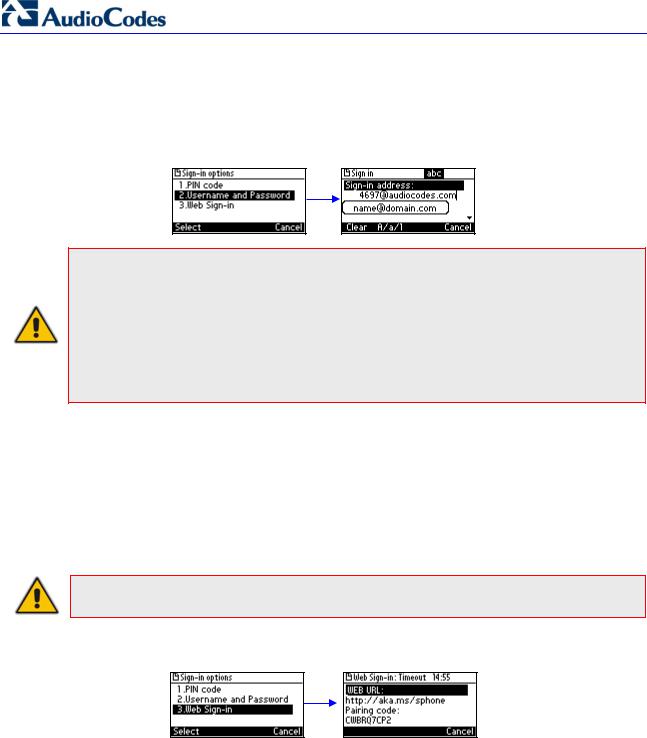
In the idle screen, press the Sign in softkey; the sign-in options are displayed:
PIN code - see Section 4.1
User name and Password - see Section 4.2
Web Sign-in - see Section 4.3
Note:
•After signing out, the next time you sign in the phone will present the option that was used to sign in before signing out.
•If a user signs out and another signs in, the phone presents empty Speed Dials and empty Call Logs to the newly signed-in user. The Speed Dials and Call Logs of the signed-out user are not saved on the phone.
4.1Signing in with PIN Code
This section shows how to sign in with the PIN code and phone number. The PIN code is provided by your network administrator.
To sign in with the PIN code:
1.In the 'Sign-in options' screen shown above, select the PIN Code option.
2.Enter your phone number.
3.Navigate down and enter your PIN code (obtainable from the network administrator). To switch from numbers to alphabetical letters and symbols, see Section 4.4.
4.Navigate down with the lower rim of the navigation control button, and then enter your PIN code. You can get it from your administrator. To switch from numbers to alphabetical letters and symbols, see the next section.
5.Press the Sign-in softkey; the phone is signed in and the idle screen is displayed.
Version 3.0.1 |
21 405HD IP Phone for Microsoft Skype for Business |
405HD IP Phone for Microsoft Skype for Business
4.2Signing in with User Name and Password
This section shows how to sign in with User Name and Password.
To sign in with User Name and Password:
1.In the 'Sign-in options' screen, select User name and Password.
Note: Signing in with a username that is a NetBIOS Domain Name, i.e., domain\username, or with the PIN Code, are disallowed for Skype for Business online sign-in. They are only allowed for on-premises sign-in. Online sign-in must be in the following format:
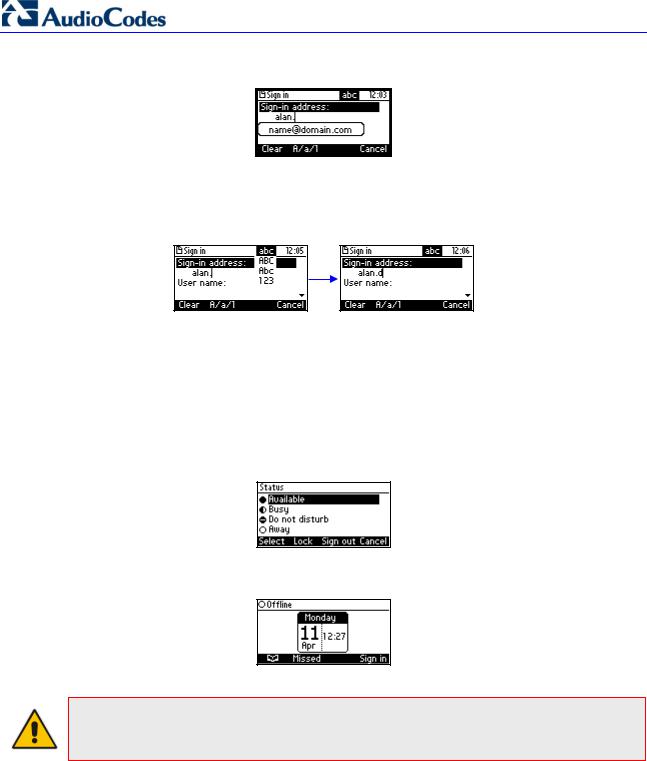
•Sign-in address, i.e., SIP URI. To switch from letters of the alphabet to symbols such as @, - and period, see Section 4.4.
•User name, in UPN (User Principal Name) format, i.e., the way the user's name appears in their e-mail address listed in the Active Directory: username@domain.com
•User’s network IT password (the same password you use to access your PC)
2.Press the Sign in softkey; after signing in successfully, the New Device Lock Code screen opens (see under Section 5 for more information).
4.3Signing in with the Cloud PBX Web Option
This section shows how to sign in with the Cloud PBX Web option, a.k.a. Device Pairing. Signing in with this option enables connectivity to Microsoft's Cloud PBX, Microsoft's cloud-hosted version of enterprise voice.
Note: Applies only to Microsoft Cloud PBX users using the 405HD phone.
The option exempts users from having to laboriously key in their user name and password using the phone keypad. If the option is selected, a URL and a Pairing Code are displayed:
Users must then point their browser to the URL and enter the Pairing Code in the Microsoft web page. Sign-in to Microsoft's Cloud PBX is then performed.
User's Manual |
22 |
Document #: LTRT-12044 |

User's Manual |
4. Signing In |
4.4Switching from Letters to Numbers/Symbols
You can use the keypad to enter letters of the alphabet, numbers or symbols, and to switch from one to the other.
To enter letters of the alphabet/numbers:
1.Press the A/a/1 softkey repeatedly or the # key on the keypad repeatedly to navigate to:
•abc = lower case letters -OR-
•ABC = upper-case letters -OR-
•Abc = first-letter upper case, the rest lower case -OR-
•123 = numbers
Figure 4-1: Entering Letters of the Alphabet
2.Select abc; the selection is displayed (see the figure above). Press the MNO key (for example) on the keypad; m is entered. Press the GHI key three successive times (pressing it once produces g, twice produces h); i is entered (see the figure above). Enter k and e.
To enter a symbol (e.g., dot or @ or hyphen):
1.If you're not in lower case alphabetical mode, press the A/a/1 softkey and navigate to abc (mandatory). You can also access the mode menu by pressing the # key on the keypad – press the # key successively to navigate in the menu.
2.Press the 1 key on the keypad; a dot is entered. Immediately press the 1 key again; a backslash is entered. Pressing successively produces the symbol options shown in the table.
Table 4-1: Symbol Options
Symbol Explanation
. Dot
\Backslash
@At
;Semi-colon
:Colon
#Pound
$ Dollar
%Percentage
^Caret
&Ampersand
! Exclamation mark
?Question mark
+Plus
-Hyphen
_ Underscore
~Approximates
Symbol Explanation
* Star sign
=Equal sign
| |
Separator |
|
|
( |
Open parenthesis |
|
|
) |
Close parenthesis |
|
|
{ |
Open parenthesis |
}Close parenthesis
[ |
Open square parenthesis |
|
|
] |
Close square parenthesis |
|
|
" |
Double quotation marks |
|
|
' |
Single quotation mark |
|
|
> |
Greater than |
<Less than
,Comma
/Forward slash
Version 3.0.1 |
23 405HD IP Phone for Microsoft Skype for Business |
405HD IP Phone for Microsoft Skype for Business
Figure 4-2: Entering a Symbol (e.g., a dot)
To revert to letters (e.g., abc):
Press the A/a/1 softkey (or the # key on the keypad) and navigate to abc mode.
Figure 4-3: Reverting to Letters (e.g., abc)
4.5Signing Out
This section shows you how to sign out.
To sign out:
1.In the idle screen, press the Status softkey.
2.In the Status screen press the Sign out softkey.
You're now signed out. You're returned to the idle screen displaying the Sign in softkey.
Note: If a user signs out and another signs in, the phone presents empty Speed Dials and empty Call Logs to the newly signed in user. The Speed Dials and Call Logs of the signed out user are not saved on the phone.
User's Manual |
24 |
Document #: LTRT-12044 |

User's Manual |
4. Signing In |
4.5.1Signing out when the 'Sign out' Softkey is Removed from the Screen
Located in lobbies, cafeterias, employee lounges, meeting rooms, and other gathering places, Common Area phones typically do not display a Sign out softkey in the screen, in line with IT management's decision to remove the capability from users. Users can sign out, if necessary, using the Web interface.
To sign out using the Web interface:
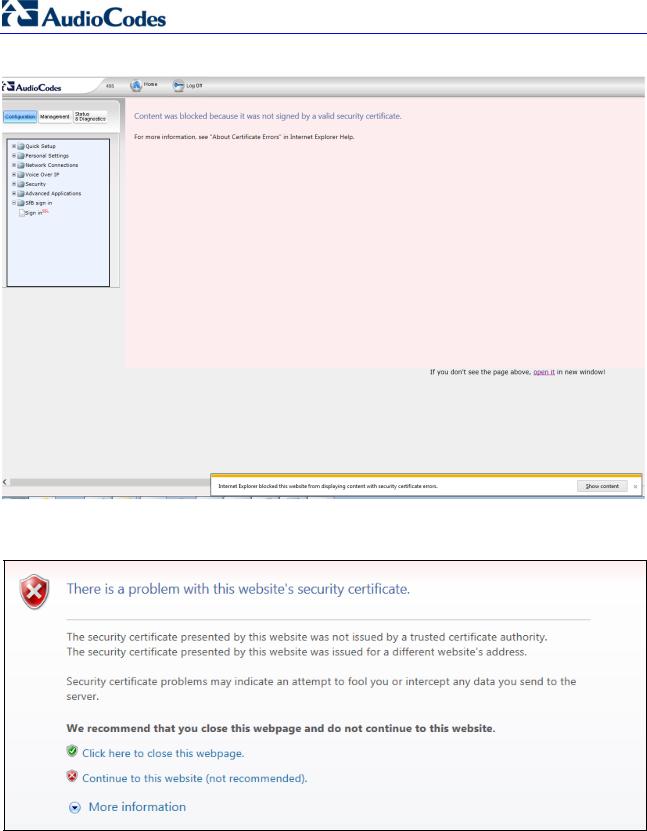
3.Obtain the Common Area phone's IP address (MENU key > Status > Network Status > IP Address) and point your Web browser to it; the phone's Web interface login page opens.
Figure 4-4: Login
4.Enter the login credentials (default user name is admin and default password is 1234); the Home page of the Web interface is displayed.
Figure 4-5: Web Interface – Home Page
5.In the Web interface, open the Sign-In page (Configuration tab > SfB sign in > Sign in).
Version 3.0.1 |
25 405HD IP Phone for Microsoft Skype for Business |
405HD IP Phone for Microsoft Skype for Business
Figure 4-6: Sign-in – Content Blocked
6.Click the open it link and then click Show content.
Figure 4-7: Sign-in – Windows Security Prompt
7.Click the Continue to this website (not recommended) link.
User's Manual |
26 |
Document #: LTRT-12044 |
User's Manual |
4. Signing In |
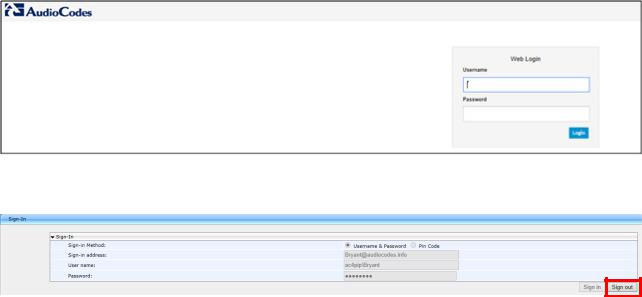
Figure 4-8: Windows Security Prompt
8.In the Windows Security prompt, enter the username and password and then click OK.
Figure 4-9: Sign-out
9.Click the Sign out button.
Version 3.0.1 |
27 405HD IP Phone for Microsoft Skype for Business |

405HD IP Phone for Microsoft Skype for Business
This page is intentionally left blank.
User's Manual |
28 |
Document #: LTRT-12044 |

User's Manual |
5. Unlocking a Locked Phone |
5 Unlocking a Locked Phone
Note: For the automatic locking feature to be available to users, the administrator must first enable it in the Skype for Business server and Web interface. See the Administrator's Manual for details.
The phone supports the capability to automatically lock after a configured period of time. The feature secures phones against unwanted (mis)use. If left untouched for 10 minutes (default), the phone automatically locks and is inaccessible to anyone who doesn't know its lock number. After a phone locks:
Incoming calls are allowed, but outgoing calls need the lock number.
Without the lock number, users cannot access the Call Log, Calendar and Corporate Directory, but they can call preconfigured emergency numbers.
When signing in for the first time, the user is prompted for a device lock PIN (personal identification number). After entering a number, e.g., 123456, confirming it, and saving it, the phone goes into idle state, and after 10 minutes it is automatically locked.
To manually change the lock code:
1.Press the MENU key, select Settings and then scroll down to select Device Security.
2.In the Device Security screen that opens, select Change Lock PIN, enter the old number, click OK, then when prompted for the new number, enter it and confirm.
To locally unlock a phone:
1.In the idle screen, press the Unlock softkey.
2.In the Enter Lock Code screen, enter the number and press the OK softkey; the phone unlocks.
To manually lock a phone at any time you choose:
[When the phone is in idle mode] Press the Status softkey and then press the Lock softkey that is displayed; the phone locks and an Unlock softkey is displayed in the idle screen.
Version 3.0.1 |
29 405HD IP Phone for Microsoft Skype for Business |

405HD IP Phone for Microsoft Skype for Business
This page is intentionally left blank.
User's Manual |
30 |
Document #: LTRT-12044 |
Loading...