


074208
Reference guide
for professionals
and the user
to be kept by the user
for future reference
atlantic-comfort.com
code 074208
Document N° 1846-4
03/07/2017
Navilink A59
Intelligent Room
Temperature Controller
EN
ES
Reference guide "1846- EN"
Navilink A59 Intelligent Room Temperature Controller
- 2 -
1 Description of the equipment
1.1 General characteristics
Frequency: 868 MHz. Radiofrequency output: 5 mW maximum.
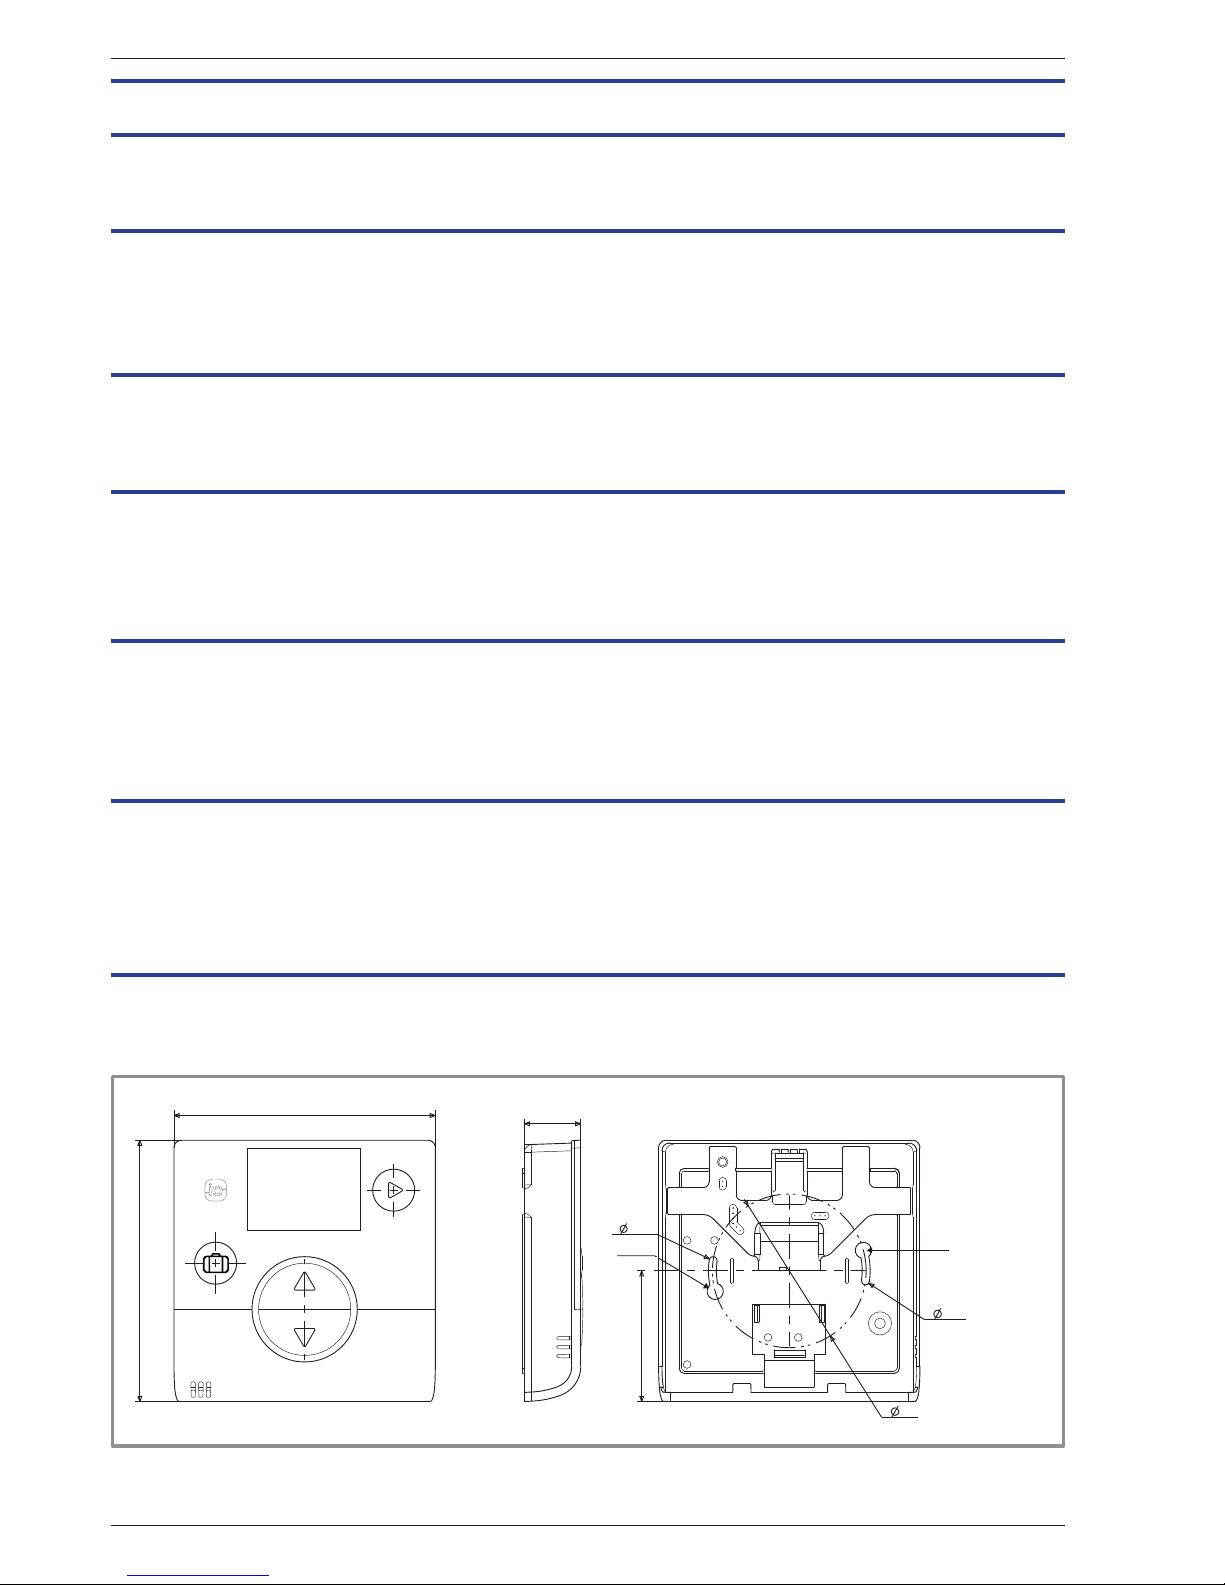
gure 1 - Dimensions in mm
102
102
22
(51)
Trou de
fixation vis
(
)3.1
( )60
( )3.1
Trou de fixation
vis
Contents
Description of the equipment . . . . . . . . . . . . . . . . . . . . . . . . . . 2
General characteristics . . . . . . . . . . . . . . . .2 Display Description . . . . . . . . . . . . . . . . . .3
Assembly and connections . . . . . . . . . . . . . . . . . . . . . . . . . . . 4
Installation . . . . . . . . . . . . . . . . . . . . . . . 4
Opening the sensor . . . . . . . . . . . . . . . . . . 4
Using the sensor with batteries . . . . . . . . . . . . 4
Using the sensor with mains power . . . . . . . . . . 5
Attaching to a wall . . . . . . . . . . . . . . . . . . . 5
WiFi connection . . . . . . . . . . . . . . . . . . . . . . . . . . . . . . . . .7
Room sensor pairing basics . . . . . . . . . . . . . . 7
Pairing a sensor with a HP / Boiler . . . . . . . . . .8
Pairing a 2nd sensor . . . . . . . . . . . . . . . . . 10
Installer Menu . . . . . . . . . . . . . . . . . . . . . . . . . . . . . . . . . 12
Calibration . . . . . . . . . . . . . . . . . . . . . . 13
Pairing a sensor . . . . . . . . . . . . . . . . . . . 14
Resetting . . . . . . . . . . . . . . . . . . . . . . 15
Sending an io-homecontrol® key . . . . . . . . . . 16
Receiving an io-homecontrol® key . . . . . . . . . 17
Version. . . . . . . . . . . . . . . . . . . . . . . . 18
How to Use . . . . . . . . . . . . . . . . . . . . . . . . . . . . . . . . . . . 20
screw hole
Mounting
Mounting
screw hole
Adjusting the setpoint via the Advanced Menu:
Manual mode . . . . . . . . . . . . . . . . . . . . 20
Adjusting the setpoint via the Simplied Menu:
Direct setpoint . . . . . . . . . . . . . . . . . . . . 20
Holiday mode . . . . . . . . . . . . . . . . . . . . 21
Error List . . . . . . . . . . . . . . . . . . . . . . . . . . . . . . . . . . . . 22
Reference guide "1846- EN" - 3 -
Navilink A59 Intelligent Room Temperature Controller
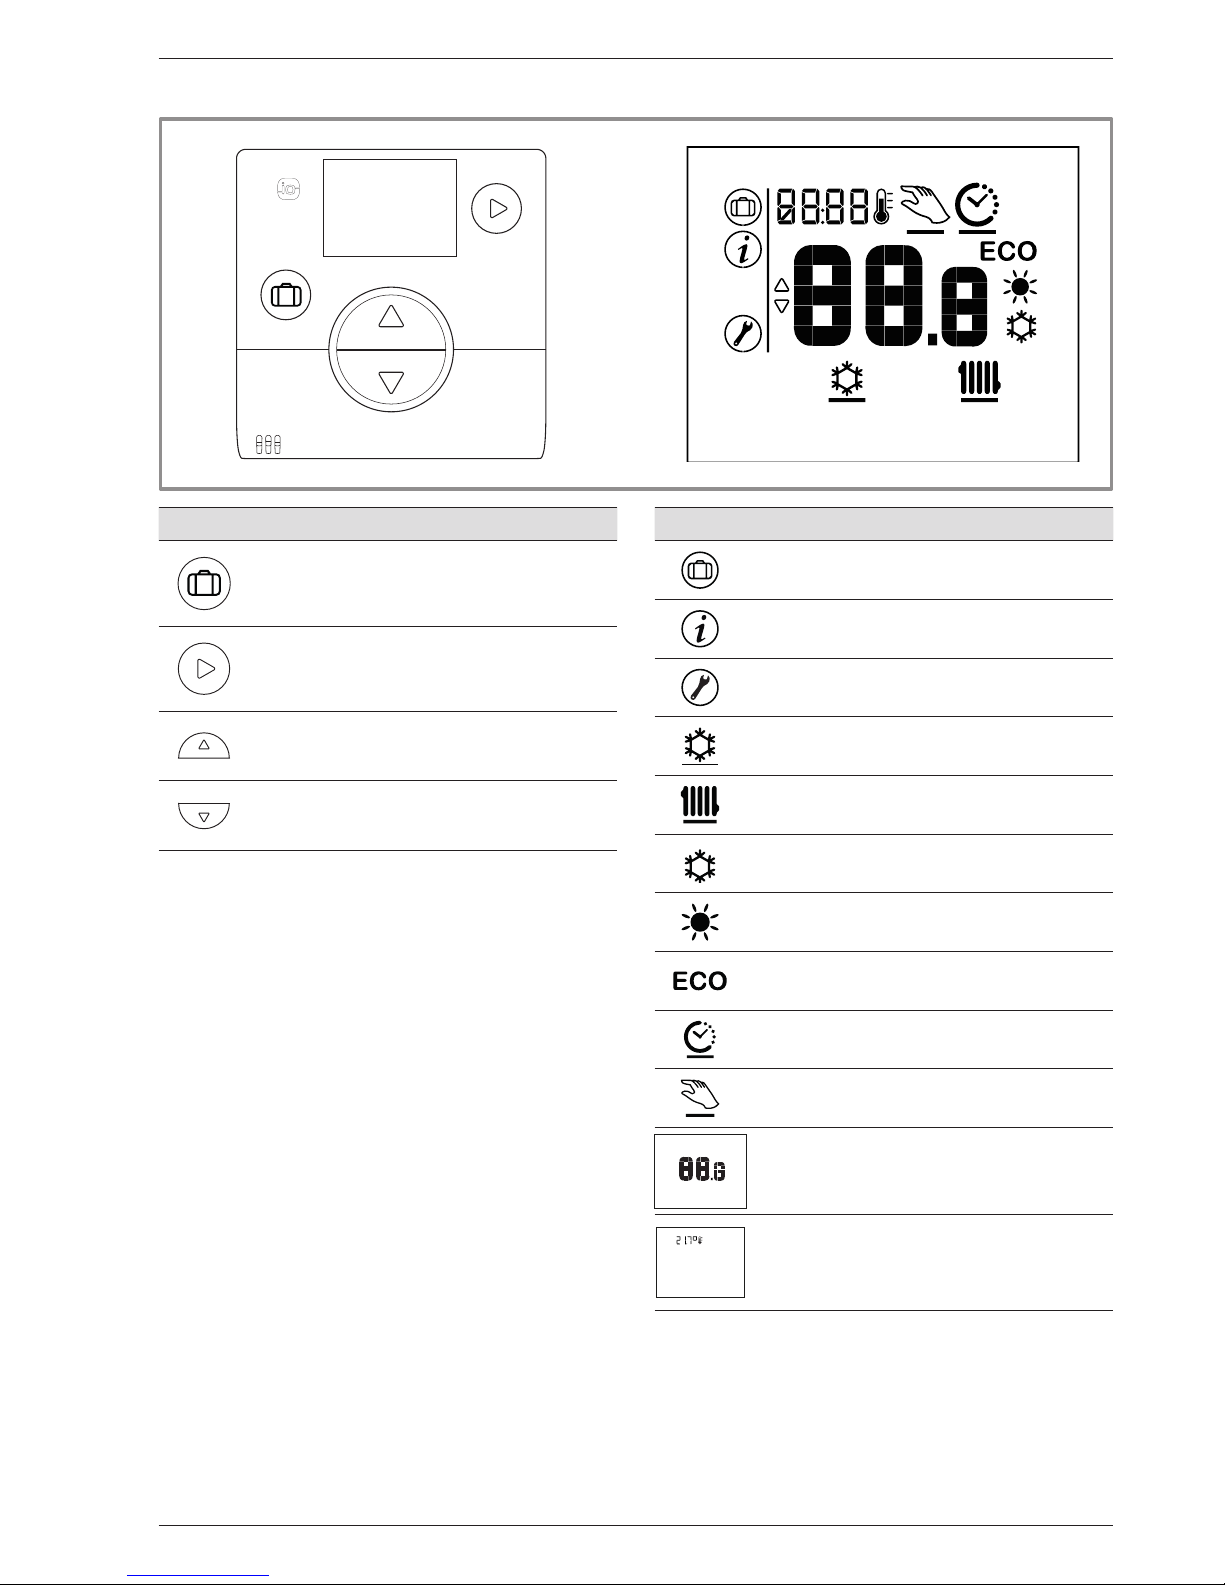
Features
• Holiday mode
• Navigation
• Changing mode
(OFF, Heating, Cooling)
• Increase the setpoint
• Go to next screen
• Reduce the setpoint
• Back to previous screen
1.2 Display Description
Symbols Denitions
• Holiday mode activated
• Information
• Installer menu
• Cooling mode*
• Heating mode
• Comfort mode Cooling activated*
• Comfort mode Heating activated
• ECO mode Heating/Cooling activated
• Timer programming mode
• Manual mode
• Setpoint value
• Screensaver / Ambient temperature
* If installation allows
Reference guide "1846- EN"
Navilink A59 Intelligent Room Temperature Controller
- 4 -
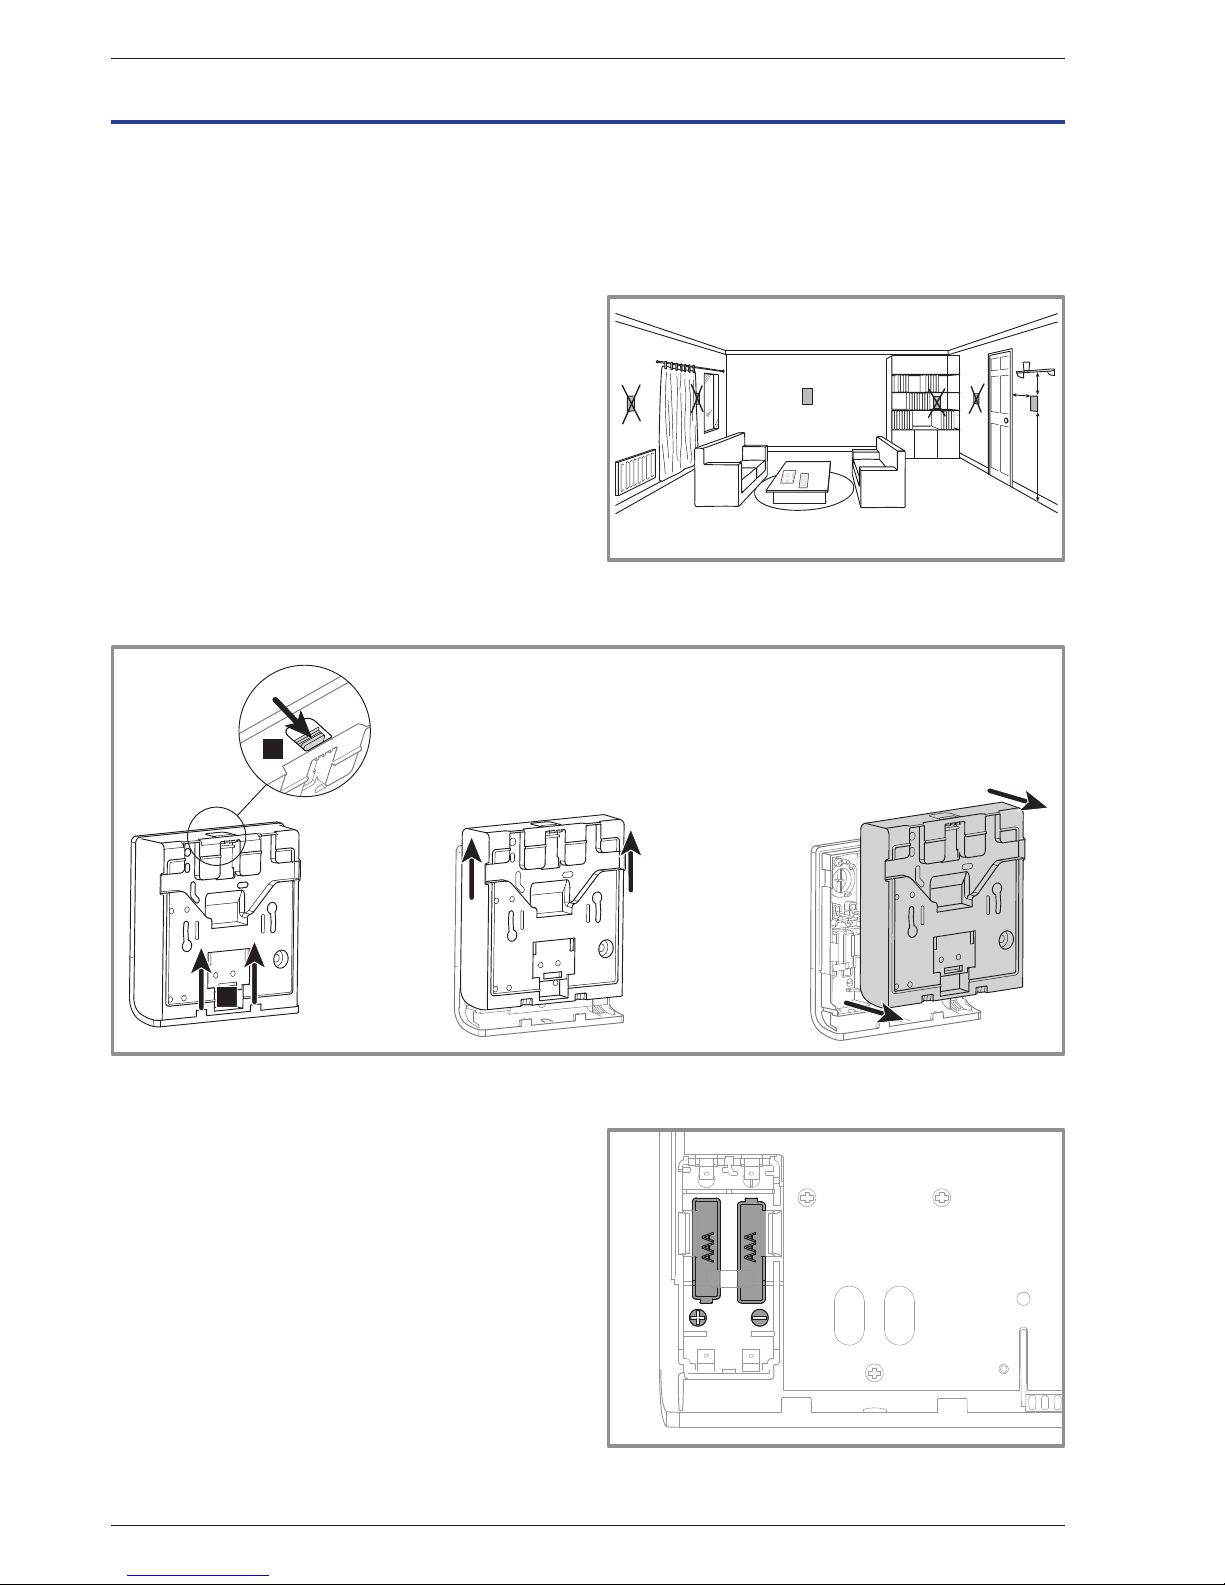
2.1 Installation
The sensor must be installed in the living room area
on an unobstructed wall. It must be installed so as to
be easily accessible. Choose a location with the fewest
possible obstacles to good transmission. Comply with
the following points:
• Avoid proximity to electrical cables, strong magnetic
elds or devices such as computers, televisions or
microwave ovens, etc.
• Avoid any zones of interference caused by large
metallic objects or buildings containing ne metallic
mesh or reinforcing (e.g. glass or special concrete).
• The distance between the transmitter and the receiver
must not exceed 30 m or 2 storeys.
• Do not install the appliance inside a metal casing
(e.g. heat pump).
2.2 Opening the sensor
2 Assembly and connections
Clément TAVERNIER
Notices Atlantic
B : 20 cm miniA : 10 cm C : 150 cm
C
B
A
• Avoid direct sources of heat (chimney, television,
cooking surfaces, sun) and draughty areas (ventilation,
door, etc.).
gure 2 - Opening the sensor
A
B
2.3 Using the sensor with batteries
2 AAA LR03 batteries (supplied).
Maintain polarity.
" Do not connect the wires.
gure 3 - Battery-operated sensor
min.
Reference guide "1846- EN" - 5 -
Navilink A59 Intelligent Room Temperature Controller
2.4 Using the sensor with mains power
Power rating 12-24V DC.
Type of cable to be used: 0.5 to 1.5 mm
2
rigid or 0.5 to 0.75 mm2 exible with rigid end.
" Do not use batteries.
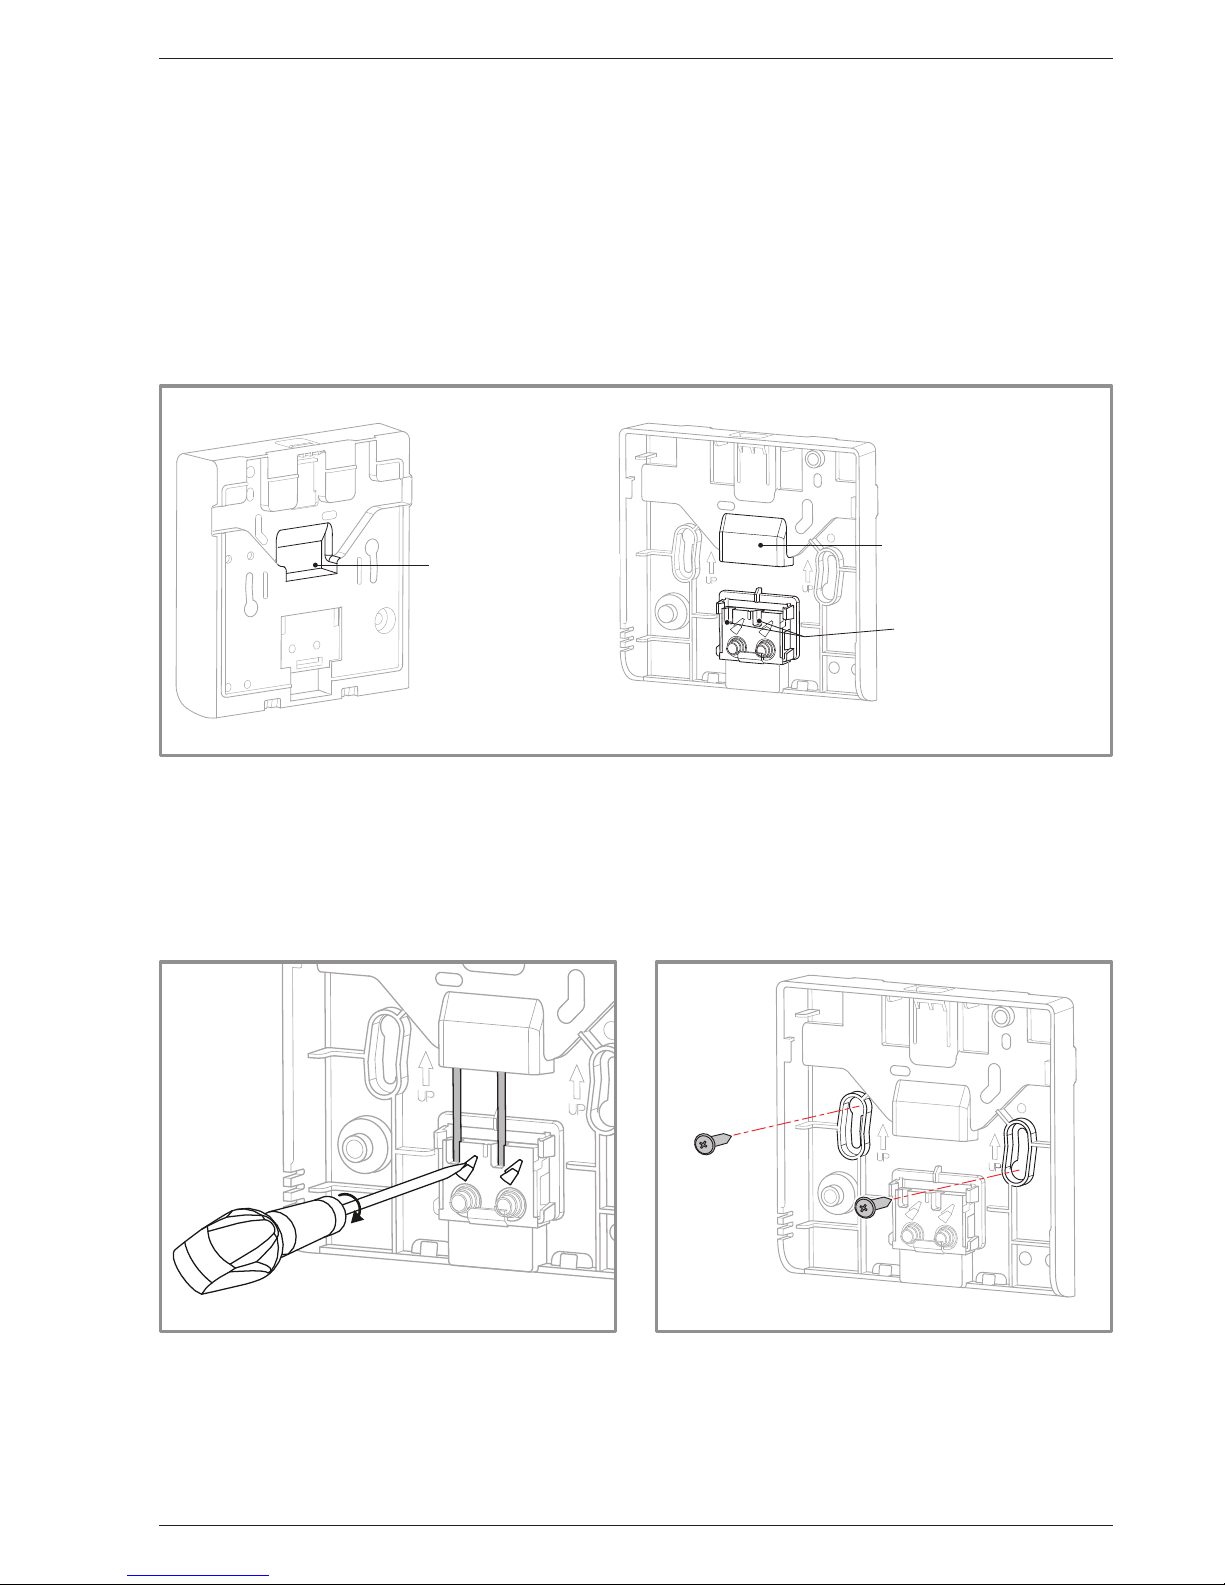
2.4.1 Cable connection
1. Bare the end of the wires to around 10 mm.
2. Insert the cable ends into the connection terminals ("Push-in" connectors).
gure 4 - Cable connection
Passage des fils
Bornes de connexion
Passage des fils
gure 5 - Cable disconnection gure 6 - Attaching to a wall
2.4.2 Cable disconnection
Use a at-blade screwdriver.
Rotate the small metal plate while pulling on the cable.
2.5 Attaching to a wall
Attach the sensor's rear plate using the screws
(not supplied).
Connection terminals
Cable route
Cable route

Reference guide "1846- EN"
Navilink A59 Intelligent Room Temperature Controller
- 6 -
Reference guide "1846- EN" - 7 -
Navilink A59 Intelligent Room Temperature Controller
3 WiFi connection
3.1 Room sensor pairing basics
• HP / Boiler --> 1 room sensor
Pair the sensor with the HP / Boiler.
ALFEA
NAIA / NAEMA
• HP / Boiler --> 2 room sensors
Pair the 1st sensor with the HP / Boiler.
ALFEA
NAIA / NAEMA
Pair the 2nd sensor with the 1st sensor.
U0601155-A
ALFEA
NAIA / NAEMA
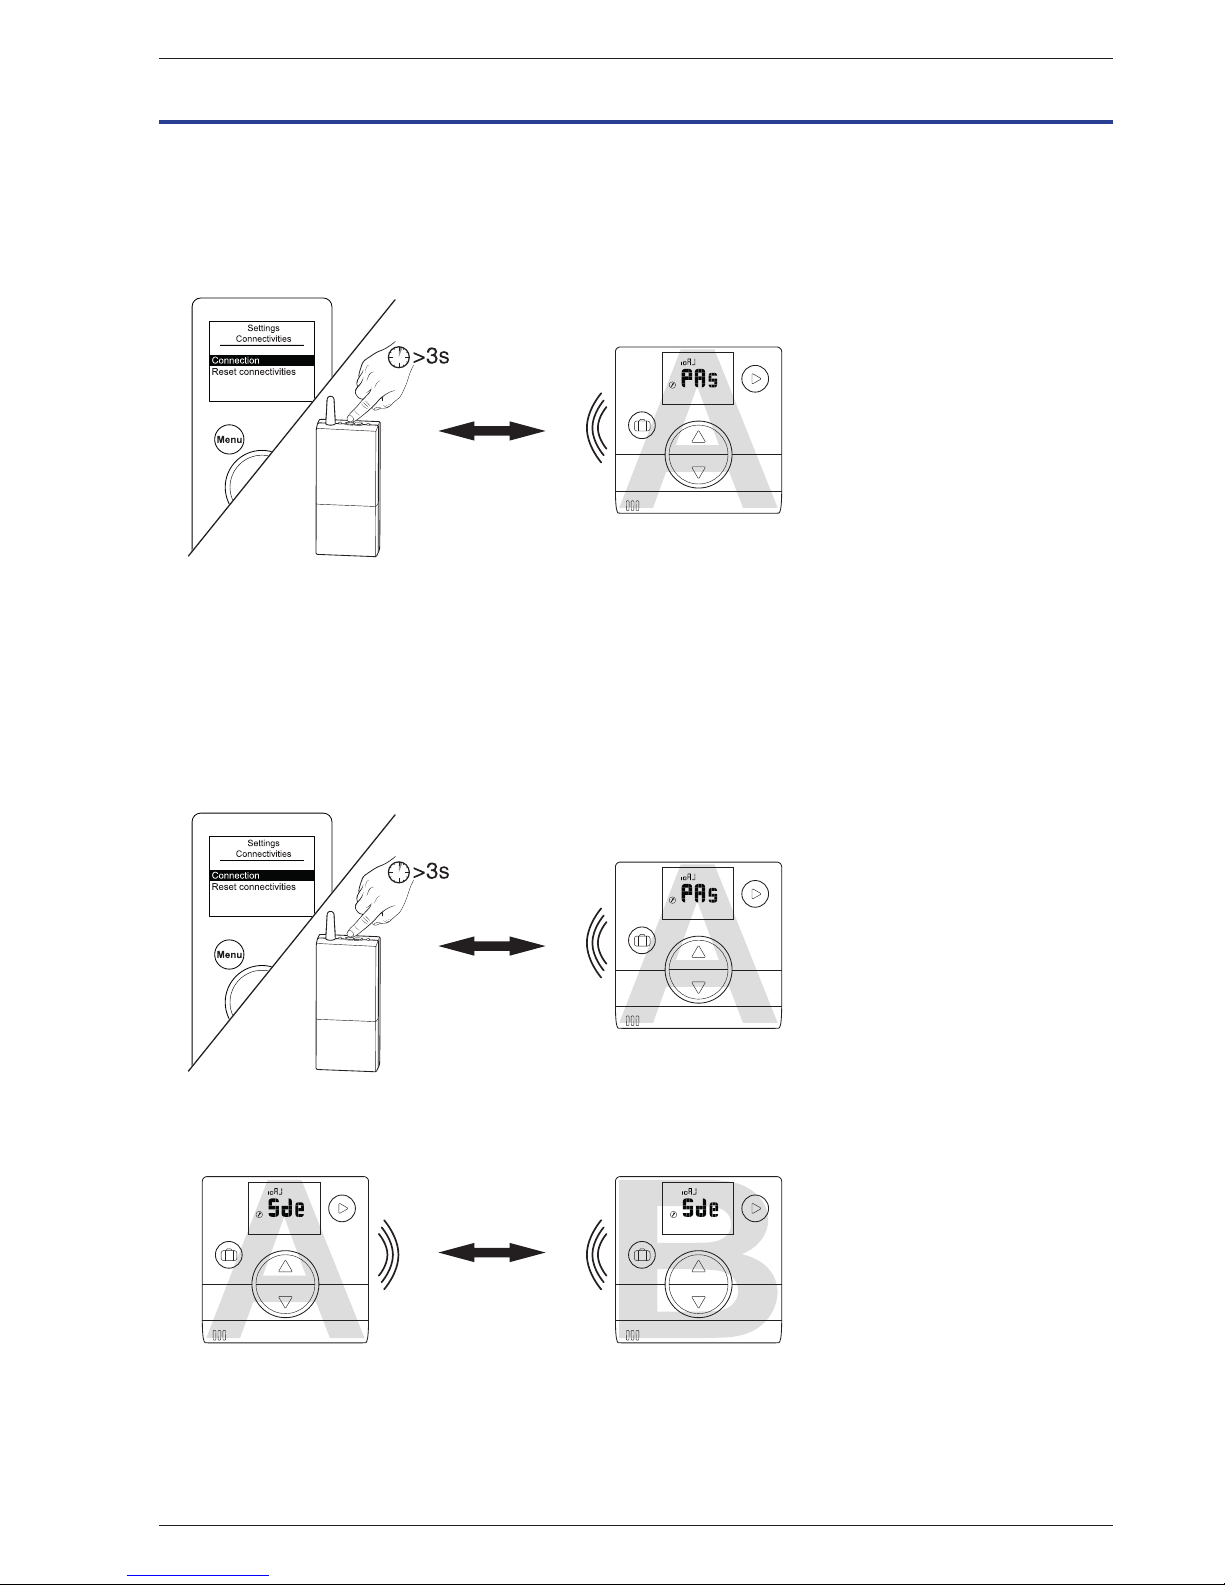
" To pair two devices (HP / Boiler - Sensor or Sensor - Sensor), both devices must be in pairing mode.
Reference guide "1846- EN"
Navilink A59 Intelligent Room Temperature Controller
- 8 -
A
A
A
A
A
A
A
A
A
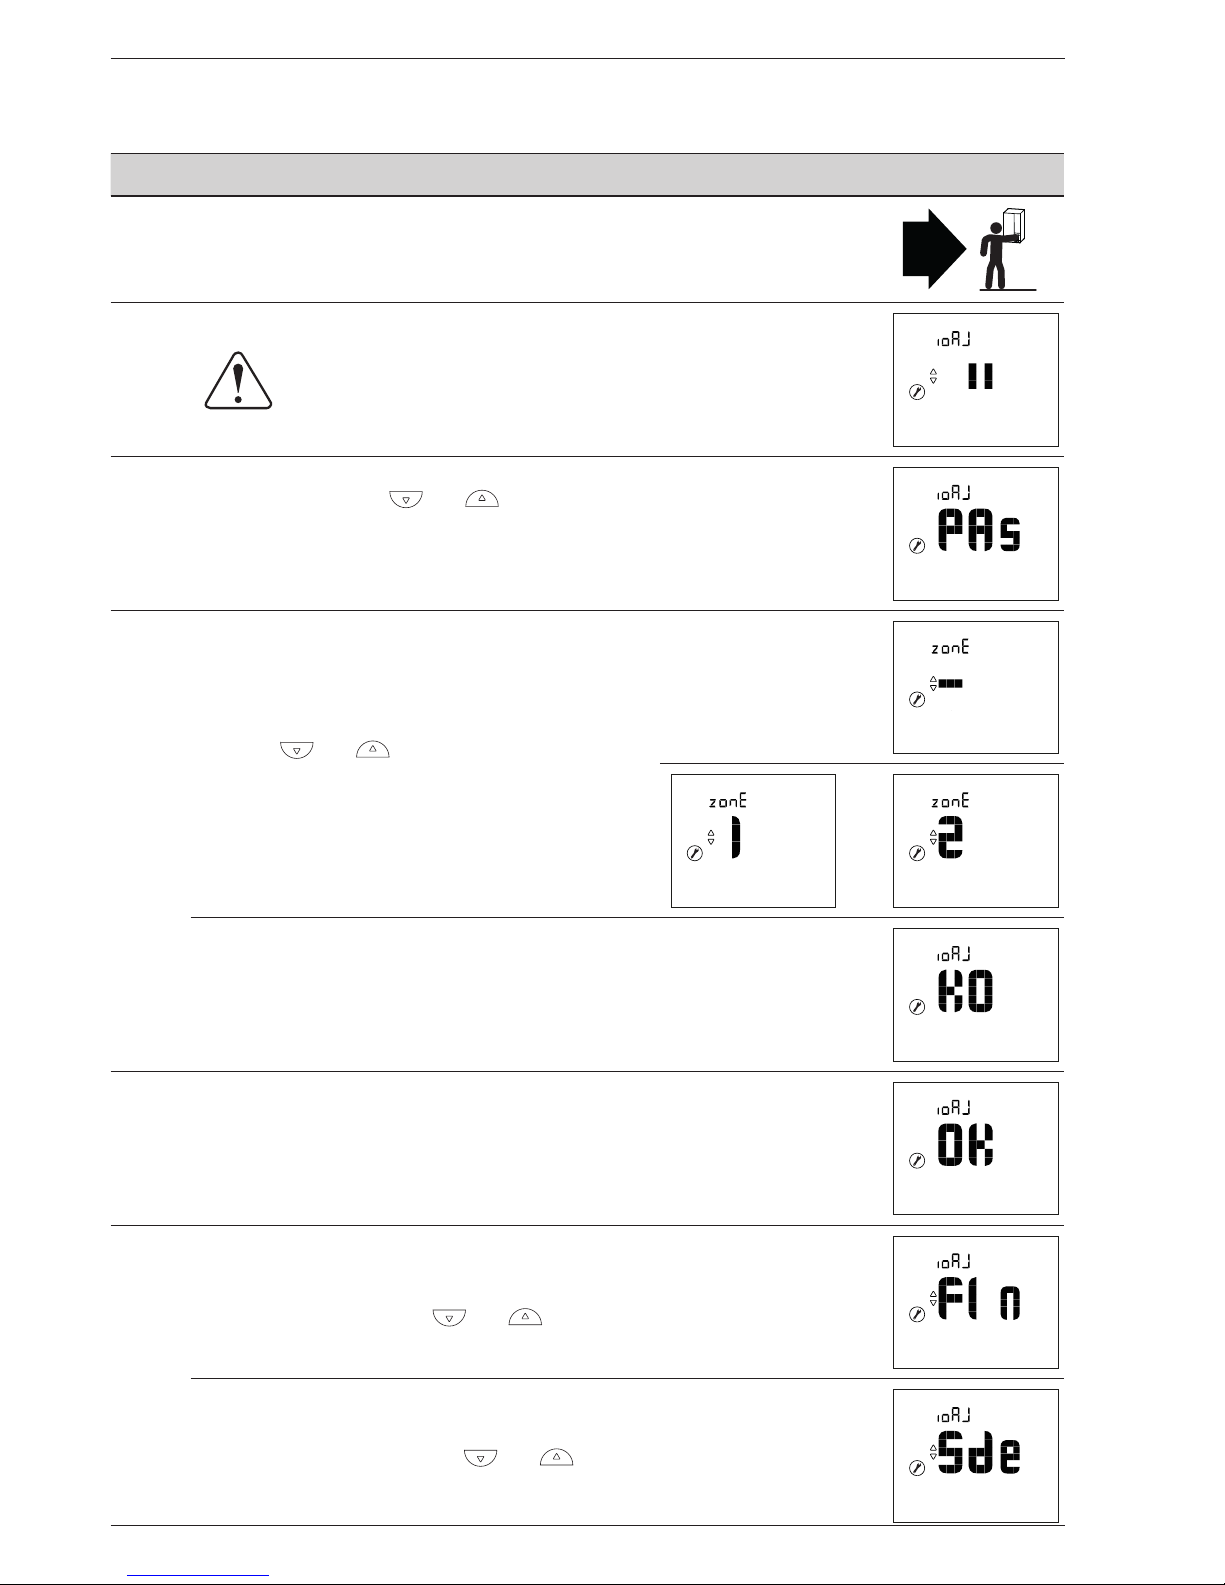
3.2 Pairing a sensor with a HP / Boiler
3.2.1 Pairing a 1st sensor with a HP / Boiler
Action Description Display
1
On the boiler or heat pump, start the pairing procedure.
Please refer to the instructions supplied with the product.
2
Default display when sensor is rst commissioned.
3
Select "PAs" using the and buttons.
Wait 5 seconds.
"PAs" ashes. The sensor waits for pairing for 10 minutes.
4
Select the sensor's zone number
using the and buttons.
Wait 5 seconds.
or
Pairing failed.
Restart the procedure from step 2.
5 Pairing was successful.
6
If only one sensor is to be paired
Select "FIn" (end) using the and buttons.
If a 2nd sensor is to be paired
Select "Sde" (sensor) using the and buttons.
"Sde" ashes. The sensor waits for pairing for 10 minutes.
 Loading...