

Page 1
Seite 1
Page 9
Page 16
Blz. 24
Sidan 31
Brennholzspalter
Bedienungsanleitung – Sicherheitshinweise – Ersatzteile
Log splitter
Operating Manual – Safety instructions – Spare parts
Fendeur de bois à brûler
Instructions d’utilisation – Consignes de sécurité – Pièces de rechange
Brandhoutsplijter
Bedieningshandleidning – Veiligheidsinstructies – Reserveonderdelen
Vedklyv
Bruksanvisning – Säkerhetsanvisningar – Reservdelar
Side 38
Str. 45
Stronie 52
Trækløvnings
Brugsanvisning – Sikkerhedshenvisninger – Reservdeler
Štípač palivového dřeva
Návod k použití – Bezpečnostní pokyny – Náhradní díly
Łuparka do trewna
Instrukcja obsługi – Wskazówki bezpieczeństwa – Części zamienne
ASP 4
Page 2
Sie dürfen die Maschine nicht in Betrieb
nehmen, bevor Sie diese Bedienungsanleitung gelesen, alle angegebenen Hinweise
beachtet und das Gerät wie beschrieben
montiert haben.
Anleitung für künftige Verwendungen aufbewahren.
IInnhhaallt
t
Symbole Gerät / Bedienungsanleitung 1
Lieferumfang 1
Bestimmungsgemäße Verwendung 1
Restrisiken 2
Sicheres Arbeiten 2
Inbetriebnahme 3
Arbeiten mit dem Brennholzspalter 3
Wartung und Pflege 5
Mögliche Störungen 7
Technische Daten 8
Garantie 8
Konformitätserklärung 60
Ersatzteile 61
Kundendienstanschriften 65
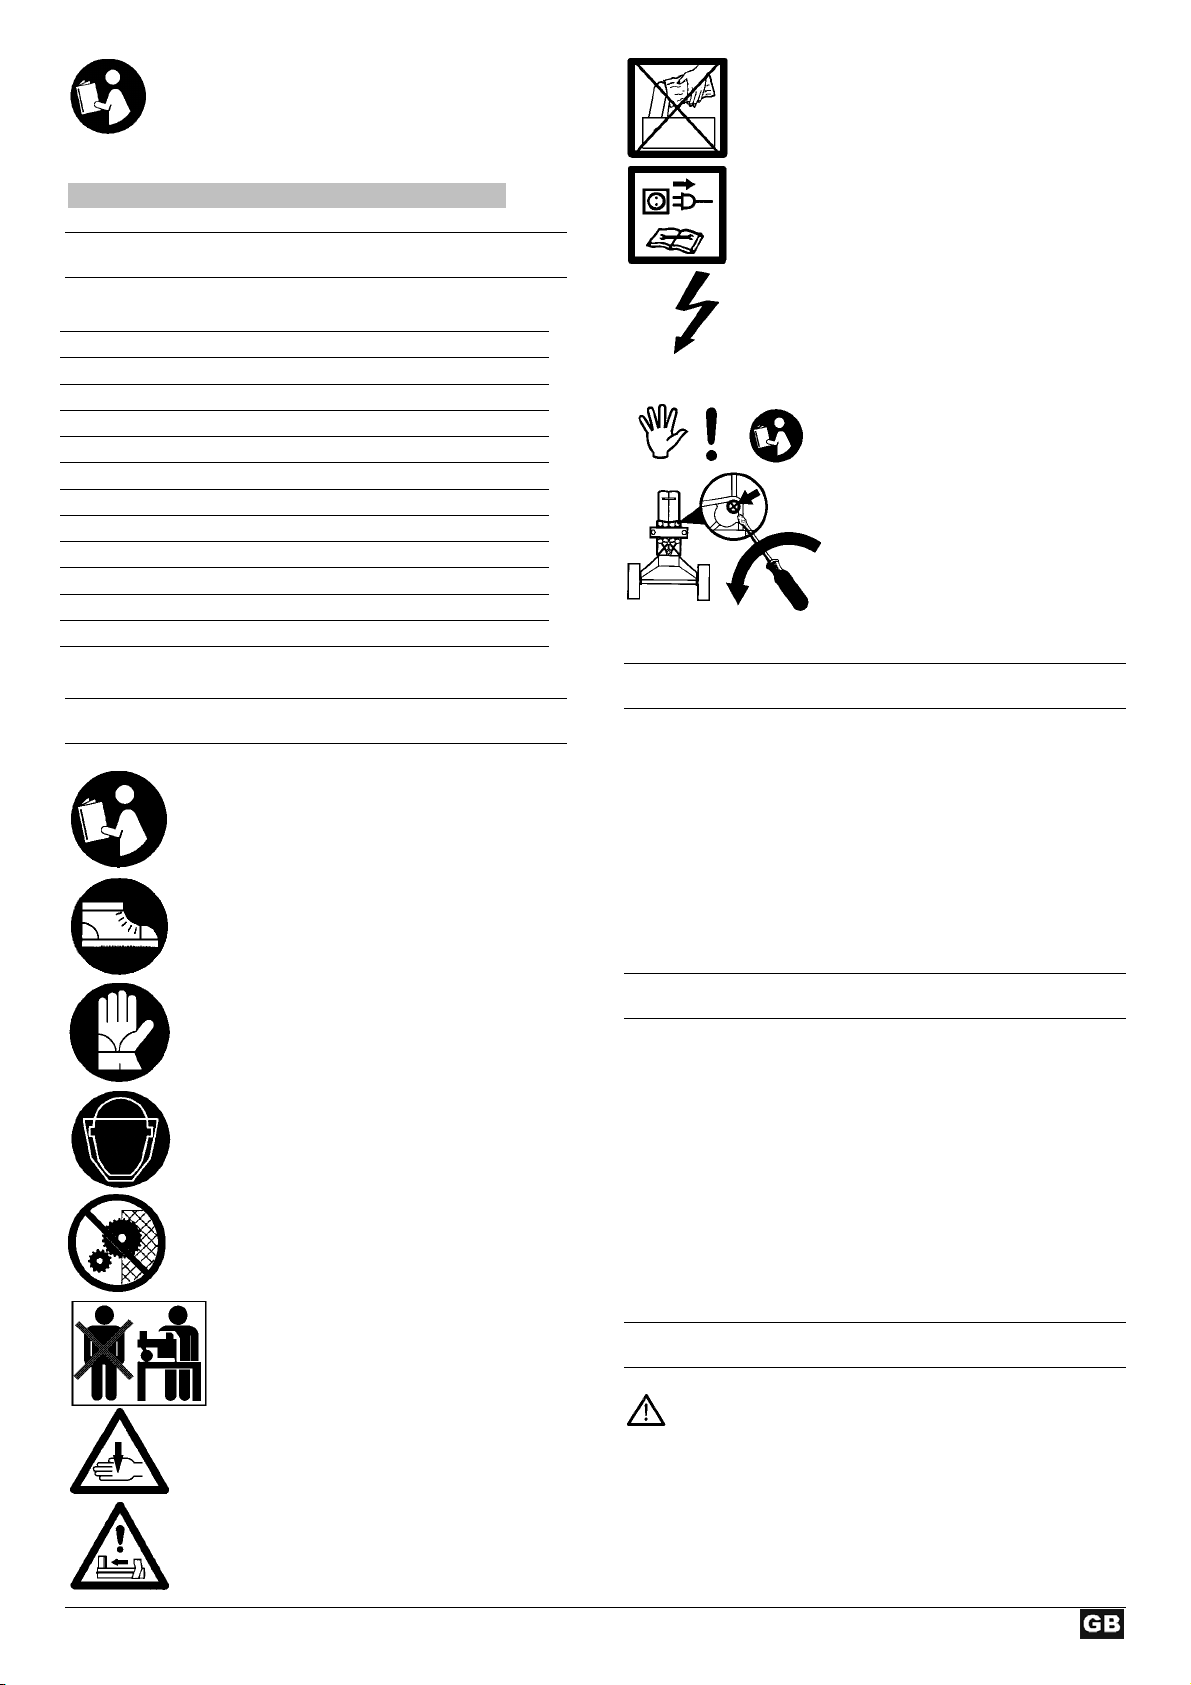
SSyymmbboollee GGeerräät
t
230 V – 240 V
Vor Inbetriebnahme die Bedienungsanleitung und Sicherheitshinweise lesen
und beachten.
L
Beim Arbeiten Sicherheitsschuhe tragen,
um den Fuß vor fallenden Stämmen zu
schützen.
Beim Arbeiten Schutzhandschuhe tragen,
um die Hände vor Spänen und Splittern zu
schützen.
SSyymmbboollee BBeeddiieennuunnggssaannlleeiittuunng
Drohende Gefahr oder gefährliche Situation. Das
Nichtbeachten dieser Hinweise kann Verletzungen
zur Folge haben oder zu Sachbeschädigung führen.
Wichtige Hinweise zum sachgerechten Umgang.
Das Nichtbeachten dieser Hinweise kann zu
Störungen führen.
Benutzerhinweise. Diese Hinweise helfen Ihnen,
alle Funktionen optimal zu nutzen.
Montage, Bedienung und Wartung. Hier wird Ihnen
genau erklärt, was Sie tun müssen.
Beim Arbeiten Schutzbrille oder Schutzvisier tragen, um die Augen vor Spänen
und Splittern zu schützen.
Es ist verboten, Schutz- und
Sicherheitseinrichtungen zu entfernen
oder zu verändern.
Nur der Bediener darf im Arbeitskreis der
Maschine stehen. Unbeteiligte Personen
sowie Haus- und Nutztiere aus dem
Gefahrenbereich (Mindestabstand 5 m)
fern-halten.
Schnitt- und Quetschgefahr; niemals
gefährliche Bereiche berühren, wenn sich
der Spaltkeil bewegt.
Überprüfen Sie nach dem Auspacken den Inhalt des
Kartons auf
! Vollständigkeit
! evtl. Transportschäden
Teilen Sie Beanstandungen umgehend dem Händler,
Zulieferer bzw. Hersteller mit. Spätere Reklamationen werden
nicht anerkannt.
BBeessttiimmmmuunnggssggeemmääßßee VVeerrwweenndduunngg
Der Brennholzspalter ist nur zum Spalten von Holz
einsetzbar.
Nur gerade abgeschnittenes Holz ist für den
Brennholzspalter geeignet.
1
Achtung!
Immer auf die Bewegung des Stammschiebers achten.
Achtung!
Niemals einen Stamm der im Keil feststeckt mit der Hand entfernen.
Achtung!
Vor Reparatur-, Wartungs- und
Reinigungsarbeiten Motor abstellen und
Netzstecker ziehen.
Achtung!
Die auf dem Typenschild angegebene
Spannung einhalten.
Stop!
Bedienungsanleitung beachten.
Entlüftungsschraube lösen
Entlüften Seite 5
LLiieeffeerruummffaanngg
g
Page 3

Metallteile (Nägel, Draht etc.) sind aus dem zu spaltenen
Holz unbedingt zu entfernen.
Jeder darüber hinausgehende Gebrauch gilt als nicht
bestimmungsgemäß. Für daraus resultierende Schäden
haftet der Hersteller nicht – das Risiko dafür trägt
ausschließlich der Benutzer.
RReessttrriissiikkeenn
Auch bei bestimmungsgemäßer Verwendung können
trotz Einhaltung aller einschlägigen Sicherheitsbestimmungen
aufgrund der durch den Verwendungszweck bestimmten
Konstruktion noch Restrisiken bestehen.
Restrisiken können minimiert werden, wenn die
„Sicherheitshinweise“ und die „Bestimmungsgemäße
Verwendung“, sowie die Bedienungsanleitung insgesamt
beachtet werden.
Rücksichtsnahme und Vorsicht verringern das Risiko von
Personenverletzungen und Beschädigungen.
Ignorierte oder übersehene Sicherheitsvorkehrungen
können zu Verletzungen beim Bediener oder zu
Beschädigungen von Eigentum führen.
Gefährdung durch Strom, bei Verwendung nicht
ordnungsgemäßer Elektro-Anschlußleitungen.
Berührung spannungsführender Teile bei geöffneten
elektrischen Bauteilen.
Des weiteren können trotz aller getroffener Vorkehrungen
nicht offensichtliche Restrisiken bestehen.
SSiicchheerreess AArrbbeeiitteenn
Lesen und beachten Sie vor Inbetriebnahme dieses
Erzeugnisses die folgenden Hinweise und die im
jeweiligen Land gültigen Sicherheitsbestimmungen, um
sich selbst und andere vor möglichen Verletzungen zu
schützen.
Geben Sie die Sicherheitshinweise an alle Personen
L
weiter, die mit der Maschine arbeiten.
Bewahren Sie diese Sicherheitshinweise gut auf.
L
Machen Sie sich vor Gebrauch mit Hilfe der Bedien-
ungsanleitung mit der Maschine vertraut.
Benützen Sie die Maschine nicht für Zwecke, für die sie
nicht bestimmt ist (siehe „Bestimmungsgemäße
Verwendung“ und „Arbeiten mit dem Brennholzspalter“).
Sorgen Sie für sicheren Stand und halten Sie jederzeit
das Gleichgewicht.
Nehmen Sie eine Arbeitsstellung ein, die sich hinter dem
Schieber im Bereich der Bedienungsgriffe befindet.
Niemals im Bereich des Spaltkeils stehen.
Niemals auf der Maschine stehen.
Seien Sie aufmerksam. Achten Sie darauf, was Sie tun.
Gehen Sie mit Vernunft an die Arbeit. Verwenden Sie das
Gerät nicht:
− wenn Sie müde sind.
− unter Einfluss von Drogen, Alkohol oder
Medikamenten stehen, die Ihr Urteilungsvermögen
beeinflussen können.
Tragen Sie beim Arbeiten
− Schutzbrille oder Schutzvisier
− Arbeitshandschuhe
− Gehörschutz
− Sicherheitsschuhe mit Stahlkappe
Tragen Sie geeignete Arbeitskleidung:
− keine weite Kleidung oder Schmuck (sie können von
beweglichen Teilen erfasst werden)
Der Bedienende ist im Arbeitsbereich der Maschine
gegenüber Dritten verantwortlich.
Kinder und Jugendliche unter 18 Jahren dürfen die
Maschine nicht bedienen.
Kinder von der Maschine fernhalten.
Setzten Sie die Maschine niemals ein, während
unbeteiligte Personen in der Nähe sind.
Lassen Sie die Maschine nie unbeaufsichtigt.
Halten Sie Ihren Arbeitsbereich in Ordnung! Unordnung
kann Unfälle zur Folge haben.
Überlasten Sie die Maschine nicht! Sie arbeiten besser
und sicherer im angegebenen Leistungsbereich.
Betreiben Sie die Maschine nur mit kompletten und
korrekt angebrachten Schutzeinrichtungen und ändern
Sie an der Maschine nichts, was die Sicherheit
beeinträchtigen könnte.
Die Maschine bzw. Teile der Maschine nicht verändern.
Die Maschine nicht mit Wasser abspritzen.
(Gefahrenquelle elektrischer Strom).
Maschine nicht im Regen stehen lassen oder bei Regen
arbeiten.
Nur an einem trockenen Ort außerhalb der Reichweite
von Kindern aufbewahren.
Schalten Sie die Maschine ab und ziehen Sie den
Netzstecker aus der Steckdose bei:
Reparaturarbeiten
−
Wartungs- und Reinigungsarbeiten
−
Beseitigung von Störungen
−
Transport
−
Verlassen (auch bei kurzzeitigen Unterbrechungen)
−
Überprüfen Sie die Maschine auf eventuelle
Beschädigungen:
Vor weiterem Gebrauch des Gerätes müssen
−
Schutzvorrichtungen sorgfältig auf ihre einwandfreie
und bestimmungsgemäße Funktion untersucht
werden.
Überprüfen Sie, ob Teile beschädigt oder defekt sind.
−
Sämtliche Teile müssen richtig montiert sein und alle
Bedingungen erfüllen, um einwandfreien Betrieb
sicherzustellen.
Beschädigte Schutzvorrichtungen und Teile
−
müssen sachgemäß durch eine anerkannte
Fachwerkstatt repariert oder ausgewechselt werden,
soweit nichts anderes in der Gebrausanweisung
angegeben ist.
Beschädigte oder unleserliche Sicherheitsaufkleber
−
sind zu ersetzen.
2
Page 4

Elektrische Sicherheit
Ausführung der Anschlussleitung nach IEC 60245 (H 07
RN-F) mit einem Aderquerschnitt von mindestens
⇒ 2,5 mm² bei einer Kabellänge bis max. 10 m
Niemals Anschlussleitungen über 10 m verwenden.
Längere Anschlussleitungen erzeugen einen
Spannungsabfall. Der Motor erreicht nicht mehr seine
maximale Leistung, die Funktion der Maschine wird
reduziert.
Beim Verlegen der Anschlussleitungen darauf achten,
dass sie nicht gequetscht, geknickt und die
Steckverbindung nicht naß wird.
Verwenden Sie das Kabel nicht für Zwecke, für die es
nicht bestimmt ist. Schützen Sie das Kabel vor Hitze, Öl
und scharfen Kanten. Verwenden Sie das Kabel nicht,
um den Stecker aus der Steckdose zu ziehen.
Kontrollieren Sie Verlängerungskabel regelmäßig und
ersetzen Sie sie, wenn sie beschädigt sind.
Verwenden Sie keine defekten Anschlussleitungen.
Verwenden Sie im Freien nur dafür zugelassene und
entsprechend gekennzeichnete Verlängerungskabel.
Keine provisorischen Elektroanschlüsse einsetzen.
Schutzeinrichtungen niemals überbrücken oder außer
Betrieb setzen.
Der Elektroanschluß bzw. Reparaturen an
elektrischen Teilen der Maschine hat durch eine
konzessionierte Elektrofachkraft oder eine unserer
Kundendienststellen zu erfolgen. Örtliche Vorschriften
insbesondere hinsichtlich der Schutzmaßnahmen sind
zu beachten.
Reparaturen an anderen Teilen der Maschine haben
durch den Hersteller bzw. einer seiner
Kundendienststellen zu erfolgen.
Nur Originalersatz-, Zubehörteile verwenden. Durch den
Gebrauch anderer Ersatzteile und anderen Zubehörs
können Unfälle für den Benutzer entstehen. Für hieraus
resultierende Schäden haftet der Hersteller nicht.
IInnbbeettrriieebbnnaahhmmee
Vergewissern Sie sich, dass die Maschine komplett und
vorschriftsmäßig montiert ist.
Überprüfen Sie vor jedem Gebrauch:
die Anschlussleitungen auf defekte Stellen (Risse,
−
Schnitte o. dgl.)
verwenden Sie keine defekten Leitungen
die Maschine auf eventuelle Beschädigungen
−
(s. Sicheres Arbeiten)
ob alle Schrauben fest angezogen sind
−
die Hydraulik auf Leckstellen
−
Netzanschluß
L
Vergleichen Sie die auf dem Gerätetypenschild
angegebene Spannung mit der Netzspannung und
schließen Sie das Gerät an die entsprechende und
vorschriftsmäßige Steckdose an.
Verwenden Sie Verlängerungskabel mit ausreichendem
Querschnitt.
Schließen Sie die Maschine über einen Fi-Schutzschalter
(Fehlerstrom-Schutzschalter) 30 mA an.
Absicherung:
L
Hydraulik
L
Niemals die Maschine betreiben, wenn eine Gefahr durch
Hydraulikflüssigkeit besteht.
Stellen Sie sicher, dass die Maschine und der
Arbeitsbereich sauber und frei von Ölflecken sind.
Rutsch- und Feuergefahr!
Überprüfen Sie regelmäßig, ob genügend Hydrauliköl im
Behälter ist (siehe Wartung und Pflege)
Inhalt: 2,6 Liter
AArrbbeeiitteenn mmiitt ddeemm BBrreennnnhhoollzzssppaalltteerr
zusätzliche SICHERHEITSHINWEISE
Der Holzspalter darf nur von einer einzelnen Person
bedient werden.
Nur Personen über 18 Jahre, die die Bedienungsanleitung
gelesen und verstanden haben, dürfen die Maschine
bedienen.
Tragen Sie Ihre Schutzausrüstungen (Schutzbrille/-visier,
Handschuhe, Sicherheitsschuhe), um sich vor möglichen
Verletzungen zu schützen.
Niemals Stämme spalten, die Nägel, Draht oder andere
Gegenstände enthalten.
Bereits gespaltenes Holz und Holzspäne erzeugen einen
gefährlichen Arbeitsbereich. Es besteht die Gefahr des
Stolperns, Ausrutschens oder Hinfallens. Halten Sie den
Arbeitsbereich immer aufgeräumt.
Niemals bei eingeschalteter Maschine die Hände auf sich
bewegende Teile der Maschine legen. Halten Sie
Sicherheitsabstand von Holzstamm, Schieber und
Spaltkeil, um Ihre Hände vor Verletzungen zu schützen.
Spalten Sie nur Holz, dass der max. zu verarbeitenden
Länge von 370 mm entspricht.
16 A
Aufstellen
Um eine bequeme Arbeitshaltung einzunehmen, stellen Sie
den Brennholzspalter auf eine 60 – 75 cm hohe Arbeitsfläche.
Blockieren Sie die Räder mit Keilen, um ein Rollen während
des Betriebes zu vermeiden.
Achten Sie darauf, dass der Arbeitsbereich folgende
Bedingungen erfüllt:
− rutschfest
− eben
− frei von Stolpergefahren
− ausreichende Lichtverhältnisse
Die Maschine nicht in der Nähe von Erdgas, Benzinrinnen
oder anderen leicht brennbaren Materialien betreiben.
3
Page 5
Was kann ich spalten?
lösen
festziehen
Größe der zu spaltenden Stämme
Holzlänge: max. 370 mm
Holzdurchmesser: 50 – 250 mm
Der Holzdurchmesser ist ein empfohlender Richtwert, weil:
− dünnes Holz kann schwer zu spalten sein, wenn es
Astlöcher enthält oder die Fasern zu stark sind.
− dickeres Holz als ∅ 250 mm kann gespalten werden,
wenn die Fasern glatt und locker sind.
Spalten Sie keine grünen Stämme. Trockene, gelagerte
Stämme spalten sich viel leichter und verursachen nicht so oft
ein Festfressen wie grünes (nasses) Holz.
Bedienung
Zweihandbetrieb
1. Drücken Sie den EIN-/AUS-Schalter am Elektromotor.
Warten Sie ein paar Sekunden, damit der Motor seine
Enddrehzahl erreicht und der Druck in der
Hydraulikpumpe aufgebaut wird – Abb. 1.
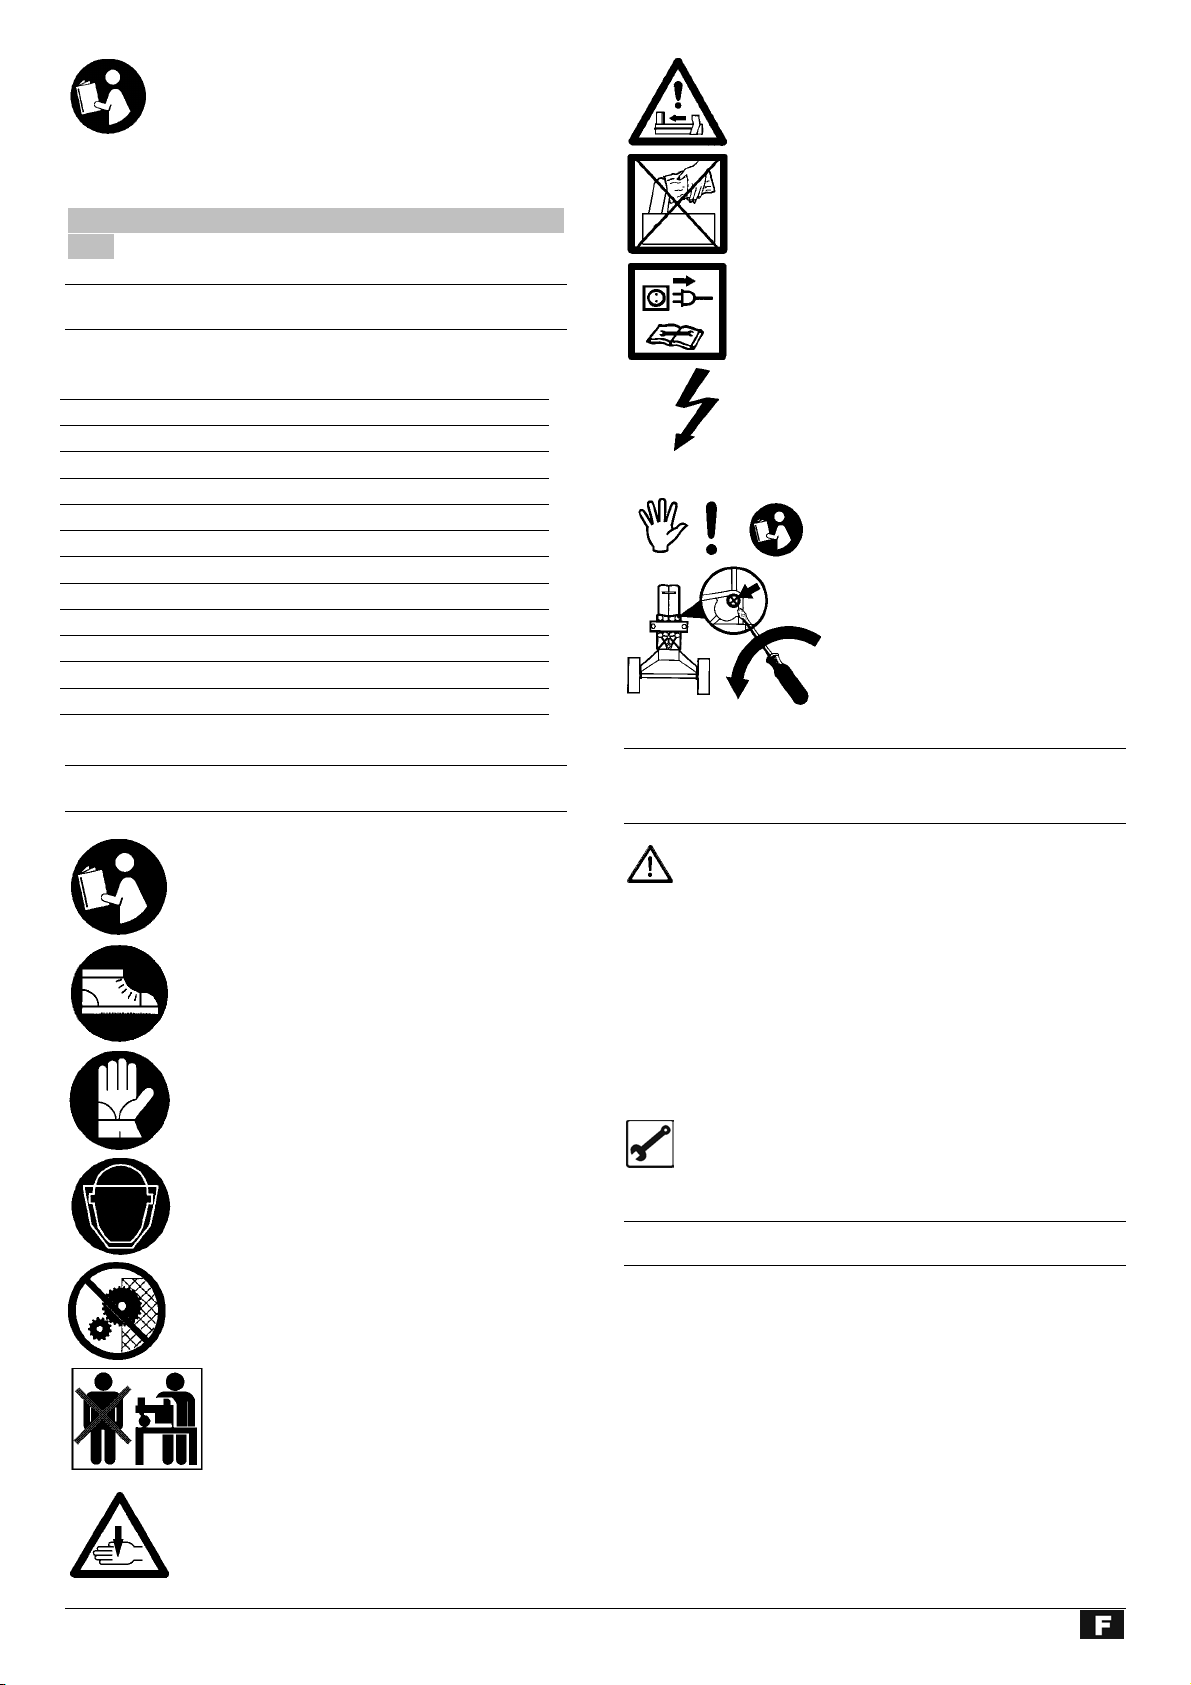
2. Drücken Sie beide Bedienungsgriffe gleichzeitig nach
unten – Abb. 2.
Der Stammschieber drückt den Stamm gegen den
Spaltkeil. Der Stamm wird gespalten.
3. Lassen Sie die Bedienungsgriffe los, der Stammschieber
fährt in seine Ausgangsposition zurück – Abb. 3.
Abb. 1
Abb. 2
EIN-/AUSSchalter
Abb. 3
Besondere Hinweise zum Spalten:
Vorbereitungen:
Bereiten Sie das zu spaltene Holz auf die maximal zu
verarbeitenden Abmessungen (370 mm lang, ∅ 50 – 250
mm) vor und achten Sie darauf, dass das Holz gerade
geschnitten ist.
Legen Sie sich das Holz am Holzspalter so zurecht, dass
keine Gefahr für Sie besteht (Stolpergefahr).
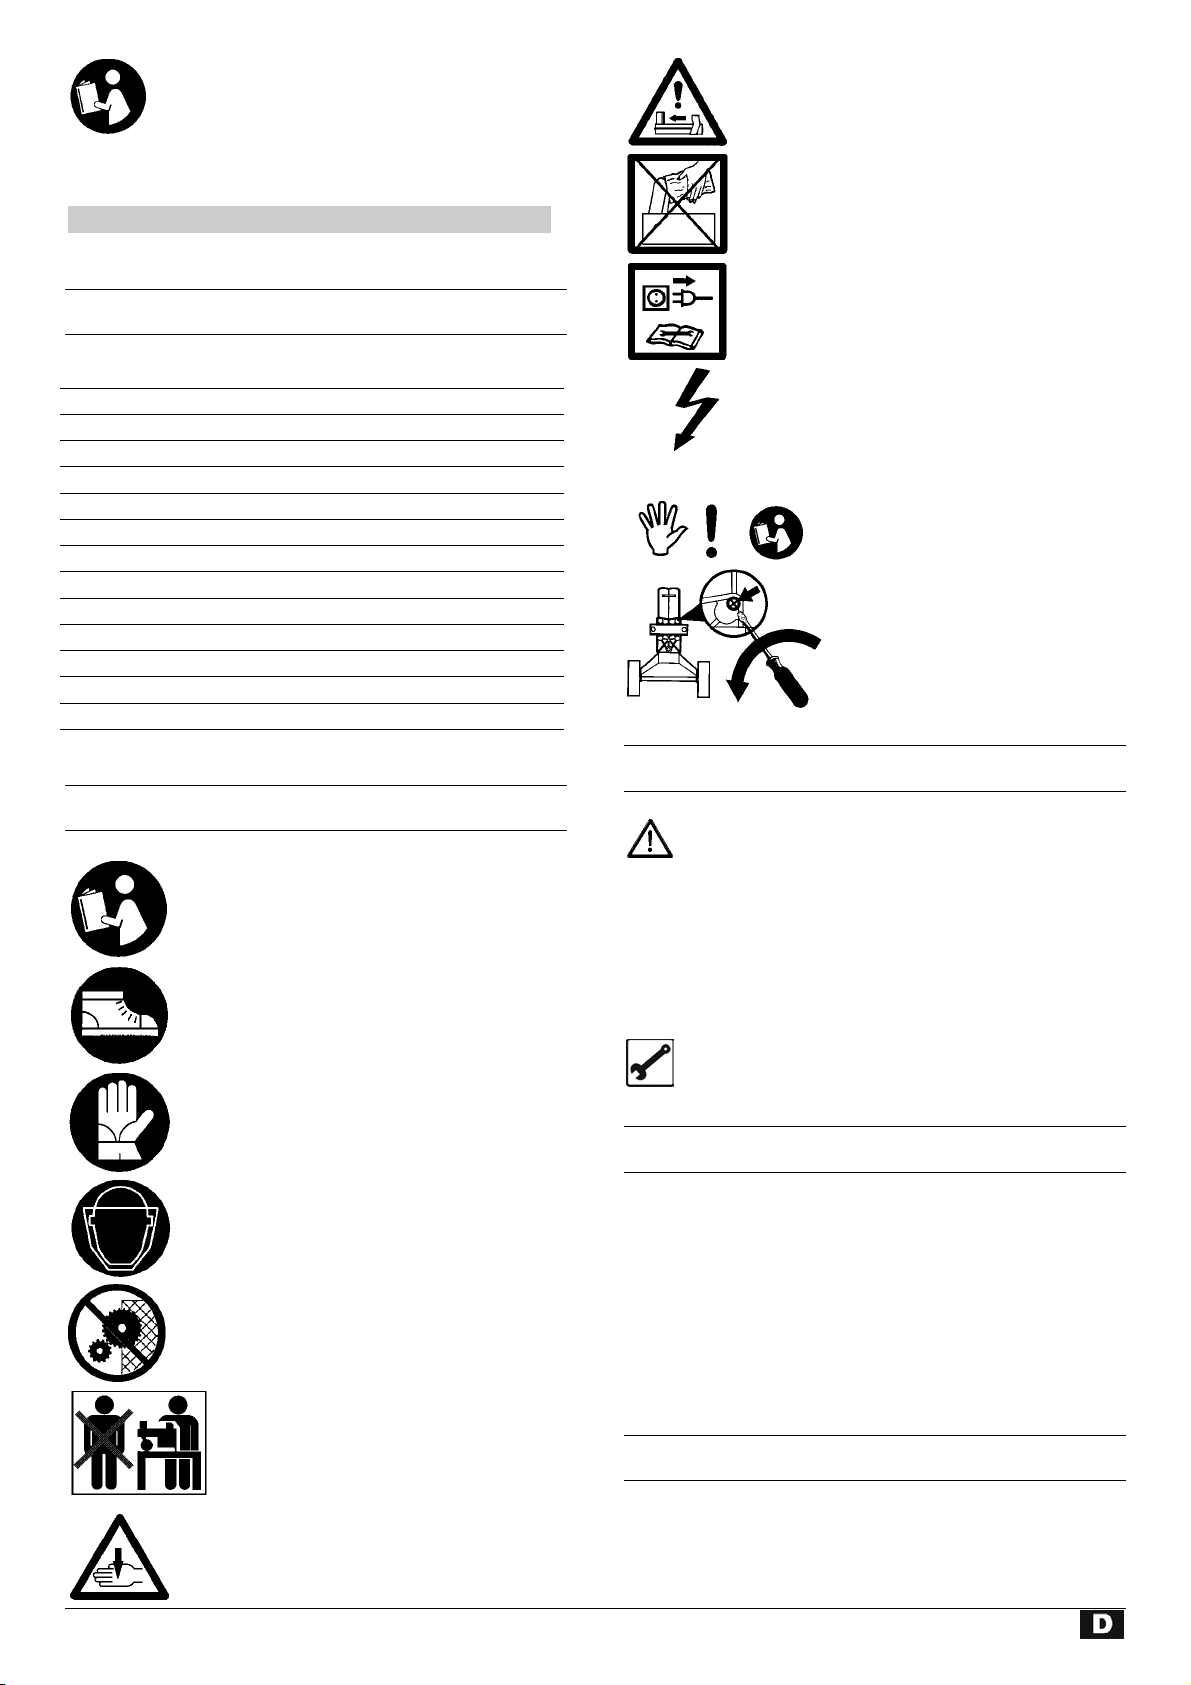
Entlüften
Lösen Sie die Entlüftungsschraube um 3 – 4 Umdrehungen.
Abb. 4.
Ziehen Sie die Schraube erst wieder an, wenn Sie mit dem
Holzspalten fertig sind.
Entlüftungsschraube
Abb. 4
Holz spalten:
Legen Sie die Stämme immer länglich und flach auf den
Hauptrahmen des Spalters. Der Stamm muss von den
Stammführungsblechen umschlossen sein. Abb. 5
Abb. 5
4
Page 6
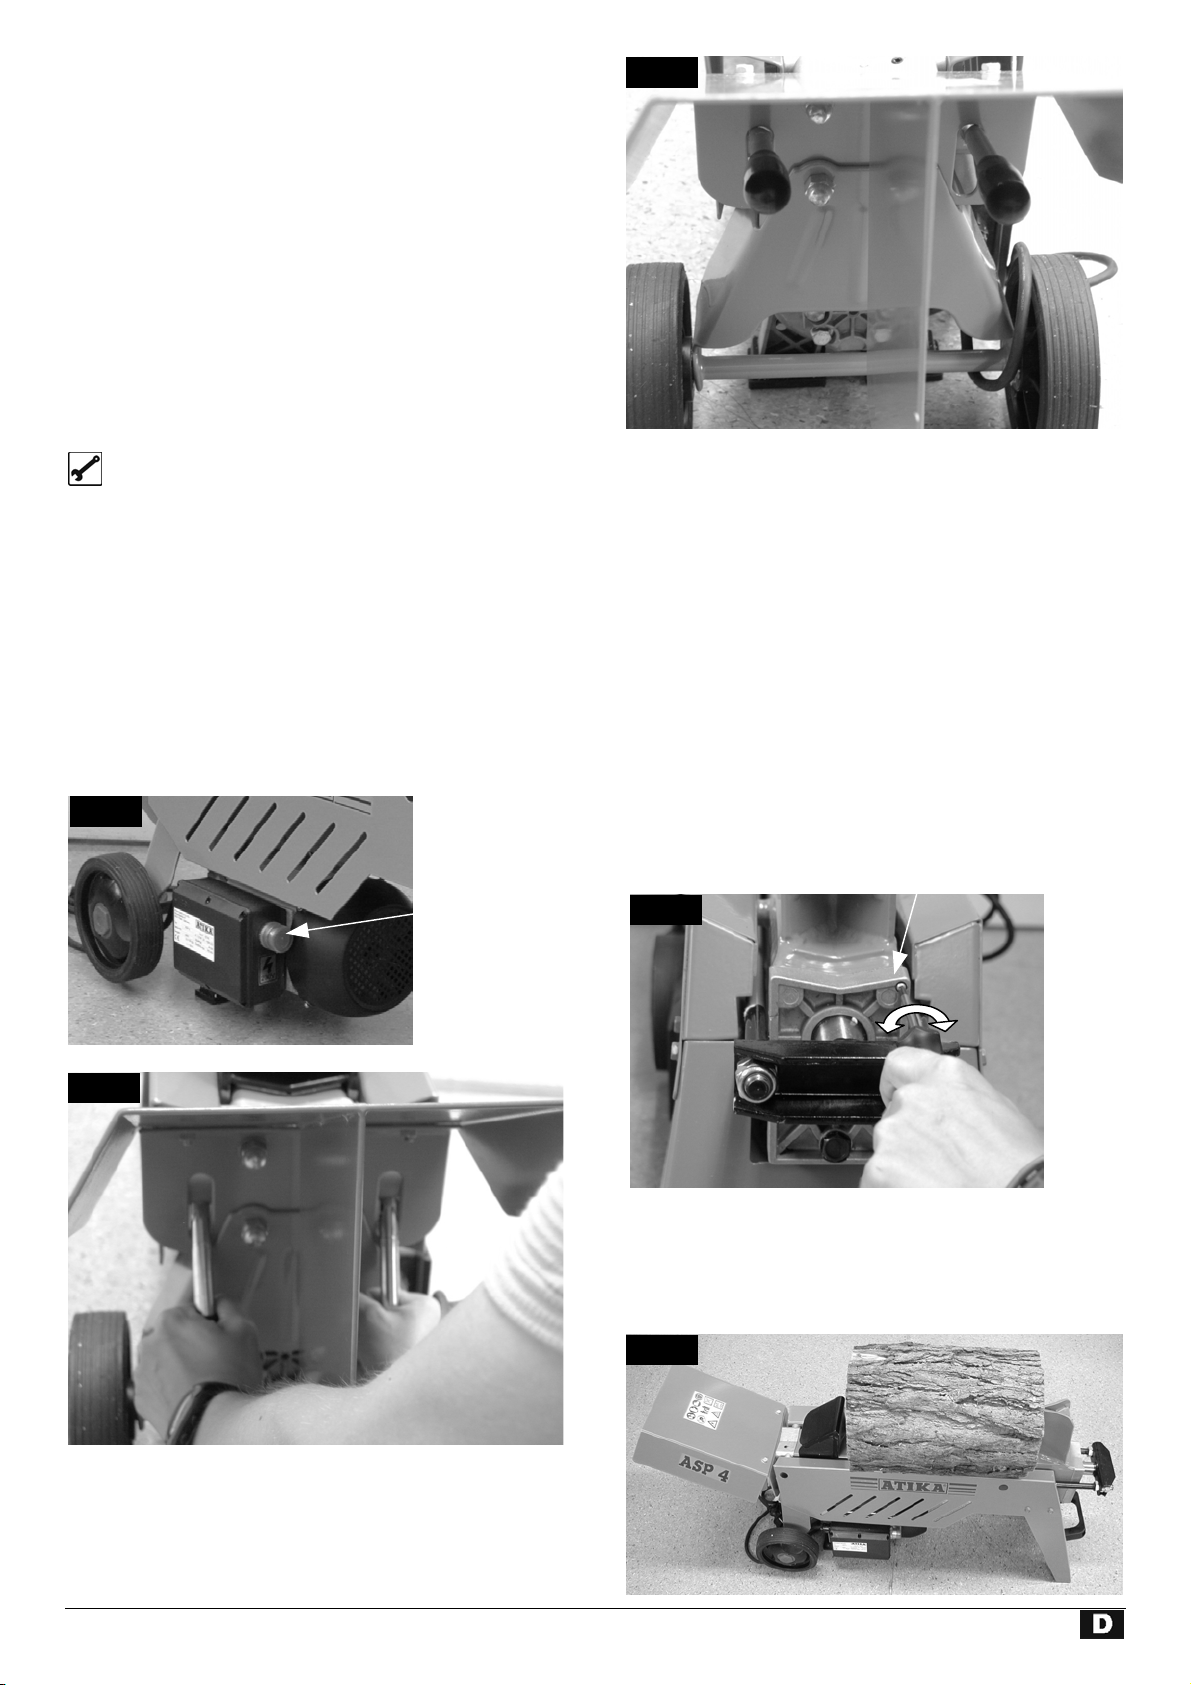
Den Stamm niemals schräg auf den Hauptrahmen legen.
Abb. 6
Abb. 7
A
Abb. 6
Immer darauf achten, dass der Spaltkeil und der
Stammschieber die Stammenden senkrecht erfassen
kann.
Niemals zwei Stämme in einem Arbeitsgang spalten.
Niemals Holz während des Arbeitvorganges nachlegen
oder ersetzen.
L Niemals durch Aufrechterhalten des Schubs über
mehrere Sekunden ein Spalten des Stammes erzwingen.
Dies kann zu Beschädigungen an der Maschine führen.
Positionieren Sie den Stamm erneut auf dem Hauptrahmen
und wiederholen Sie den Spaltvorgang oder legen Sie den
Stamm zur Seite.
Wie wird ein festgeklemmter Stamm gelöst?
1. Beide Bedienungselemente loslassen, damit der Stammschieber zurückfahren kann.
2. Legen Sie einen dreieckigen Holzkeil unter den Stamm,
Stammschieber ausfahren damit dieser den Keil unter
den festgeklemmten Stamm drückt.
3. Löst sich der Stamm nicht, den Vorgang mit immer
größeren Keilen wiederholen.
Beim Lösen niemals auf den festgeklemmten Stamm
hämmern oder die Hände nahe am Stamm halten.
Bitten Sie keine zweite Person um Unterstützung.
Versuchen Sie nicht den Stamm durch Schlagen mit
einem Werkzeug herauszubekommen, denn es kann zum
Bruch des Motorblocks kommen.
Arbeitsende:
Bevor Sie an der Maschine den EIN-/AUS-Schalter am
Elektromotor betätigen ist zu beachten, dass der
Stammschieber in seine Ausgangspostion zurückgefahren
ist.
Ziehen Sie dann den Netzstecker.
Schrauben Sie die Entlüftungsschraube wieder fest.
Abb. 4
Wartungs- und Plege-Hinweise beachten.
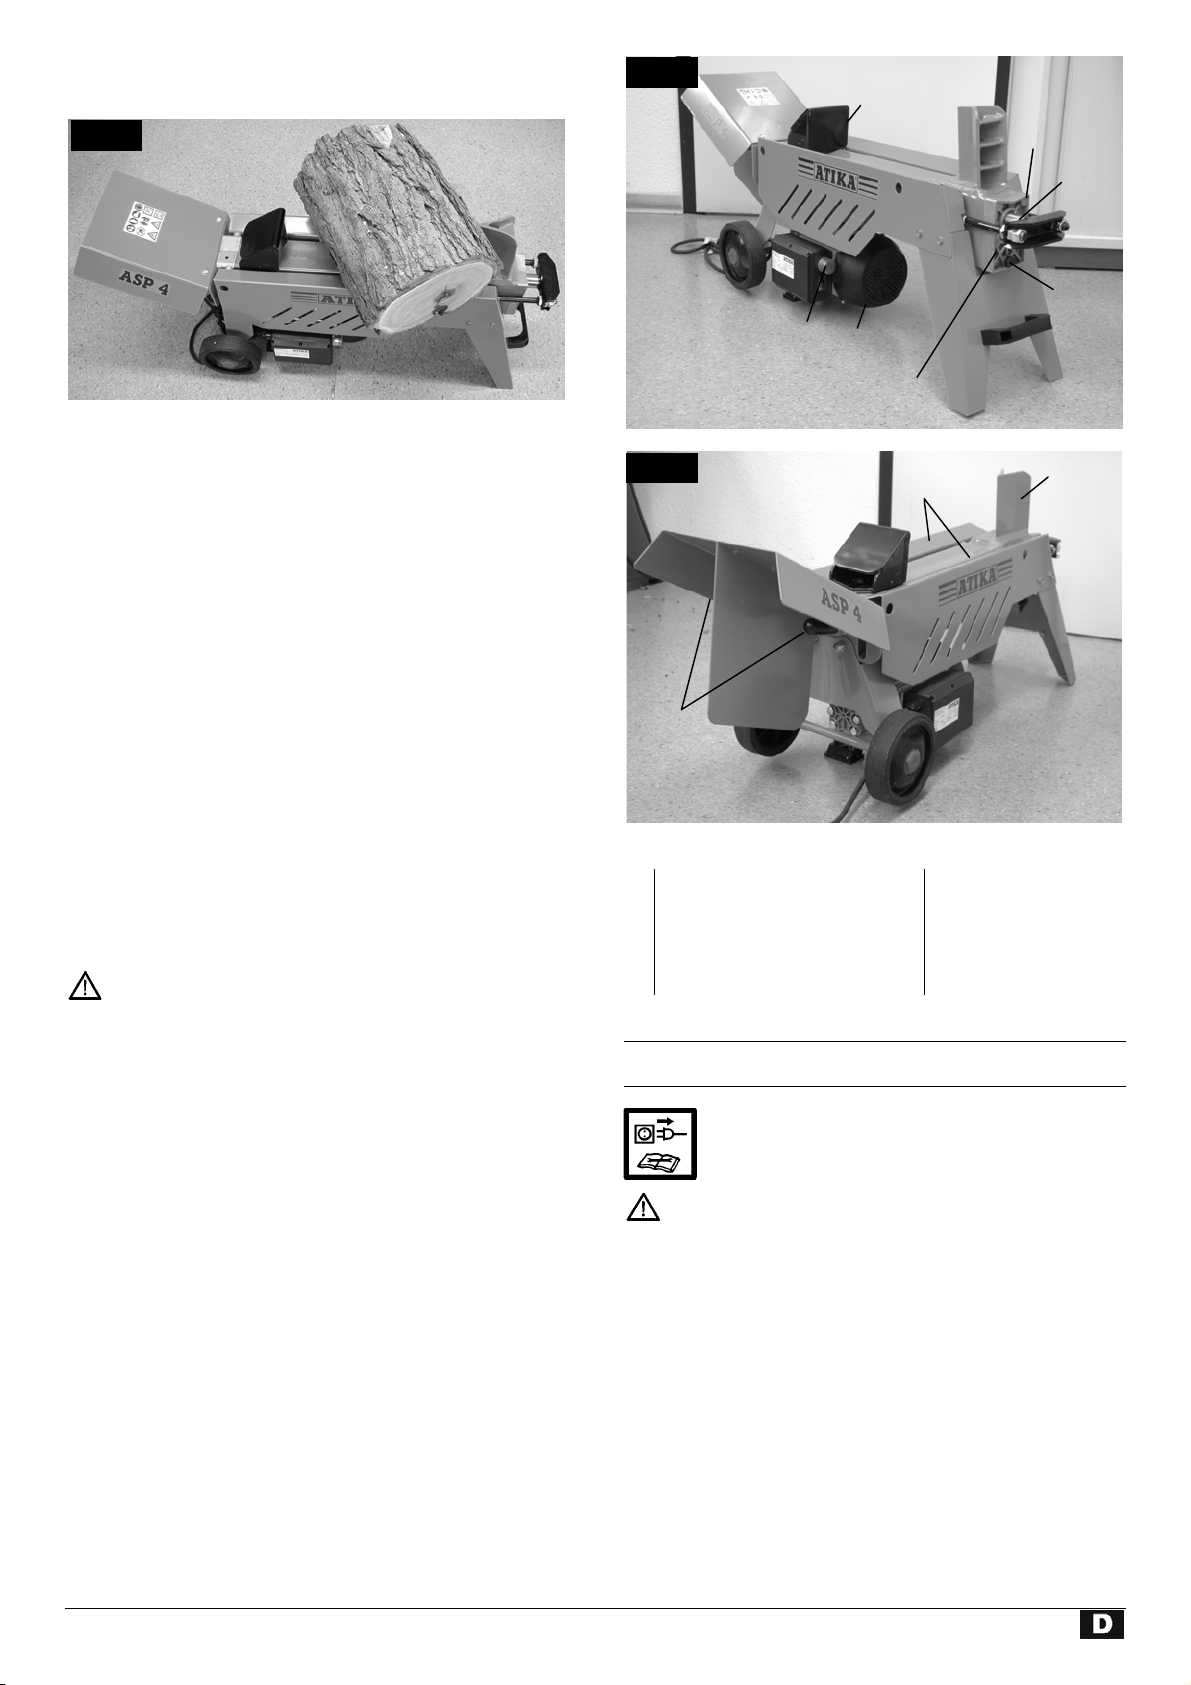
B
C
D
G
F
E
Abb. 8
I
H
J
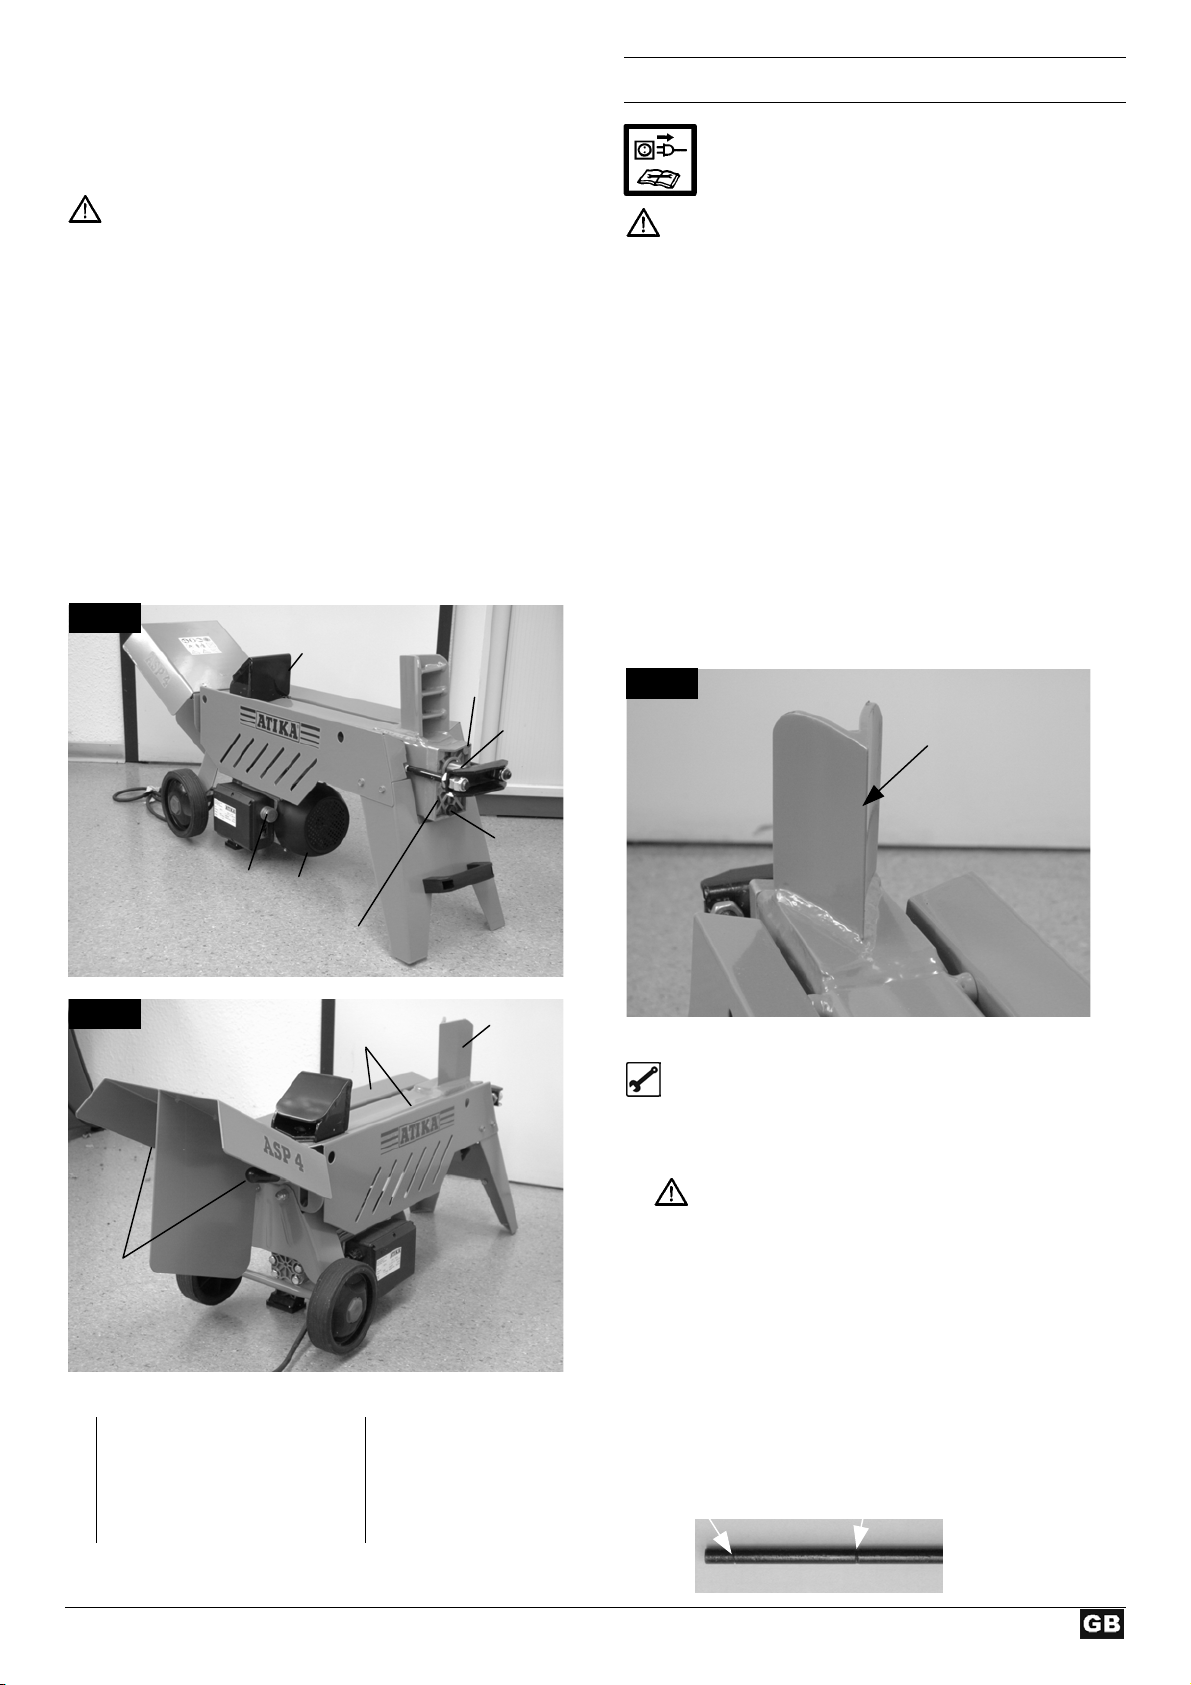
A Stammschieber F Elektromotor
B Entlüftungsschraube G EIN-/AUS-Schalter
C Kolbenstange H Spaltkeil
D Ölmessstab I Stammführungbleche
E Zylinderdeckel J Bedienungsgriffe
WWaarrttuunngg uunndd PPfflleeggee
Vor Wartungs- und Reinigungsarbeiten Netzstecker ziehen.
Schutzhandschuhe tragen, um Verletzungen an den
Händen zu vermeiden.
L Beachten Sie folgendes, um die Funktionsfähigkeit des
Brennholzspalters zu erhalten:
Reinigen Sie die Maschine nach Arbeitsende
gründlich.
Entfernen Sie Harzrückstände.
Ölen Sie die Kolbenstange (Abb. 7) regelmäßig mit
einem umweltfreundlichen Sprühöl ein.
Ölstand prüfen bzw. Öl auswechseln
5
Page 7
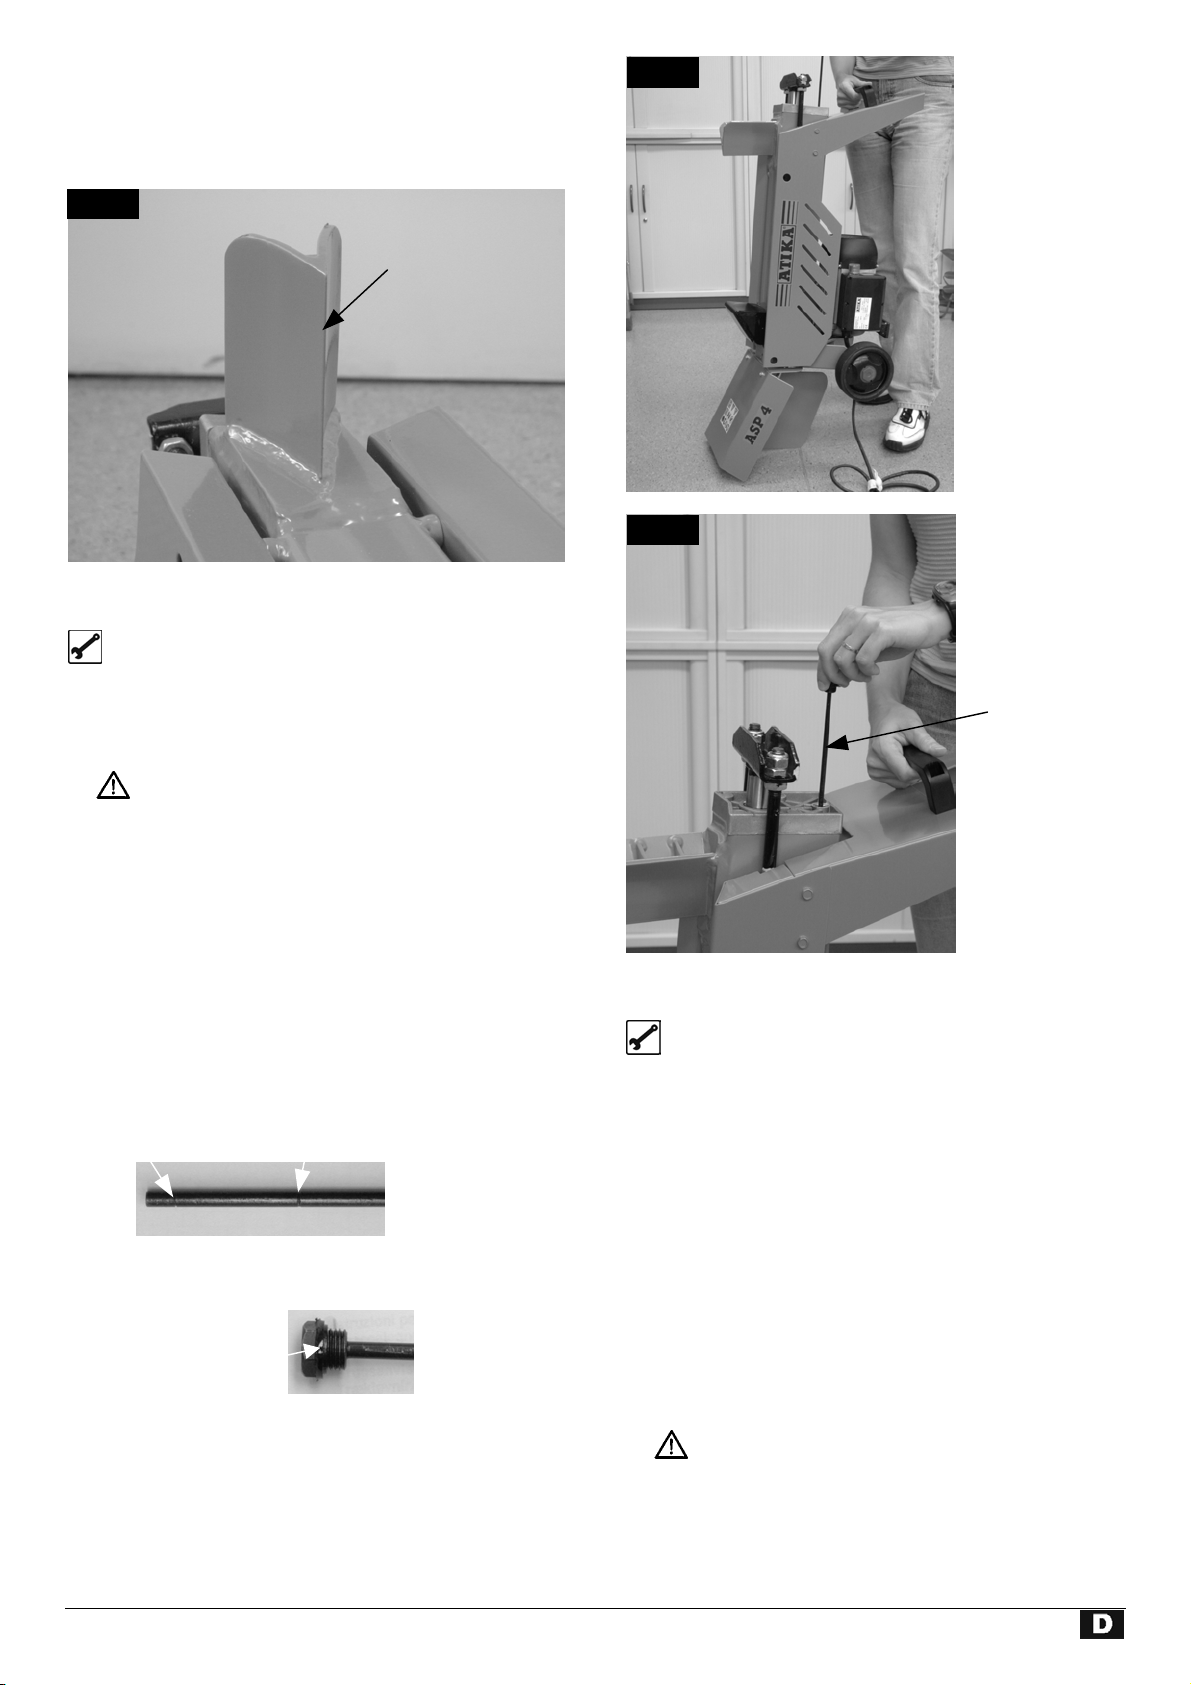
Spaltkeil schärfen
Nach langer Bedriebsdauer oder bei verminderter
Spaltleistung, den Spaltkeil mit einer feinen Feile schärfen
(Grate entfernen). Abb. 9
Abb. 9
Kante schärfen
Abb. 10
Wie überprüfe ich den Ölstand?
1. Der Stammschieber muss in seine Ausgangsposition
zurückgefahren sein.
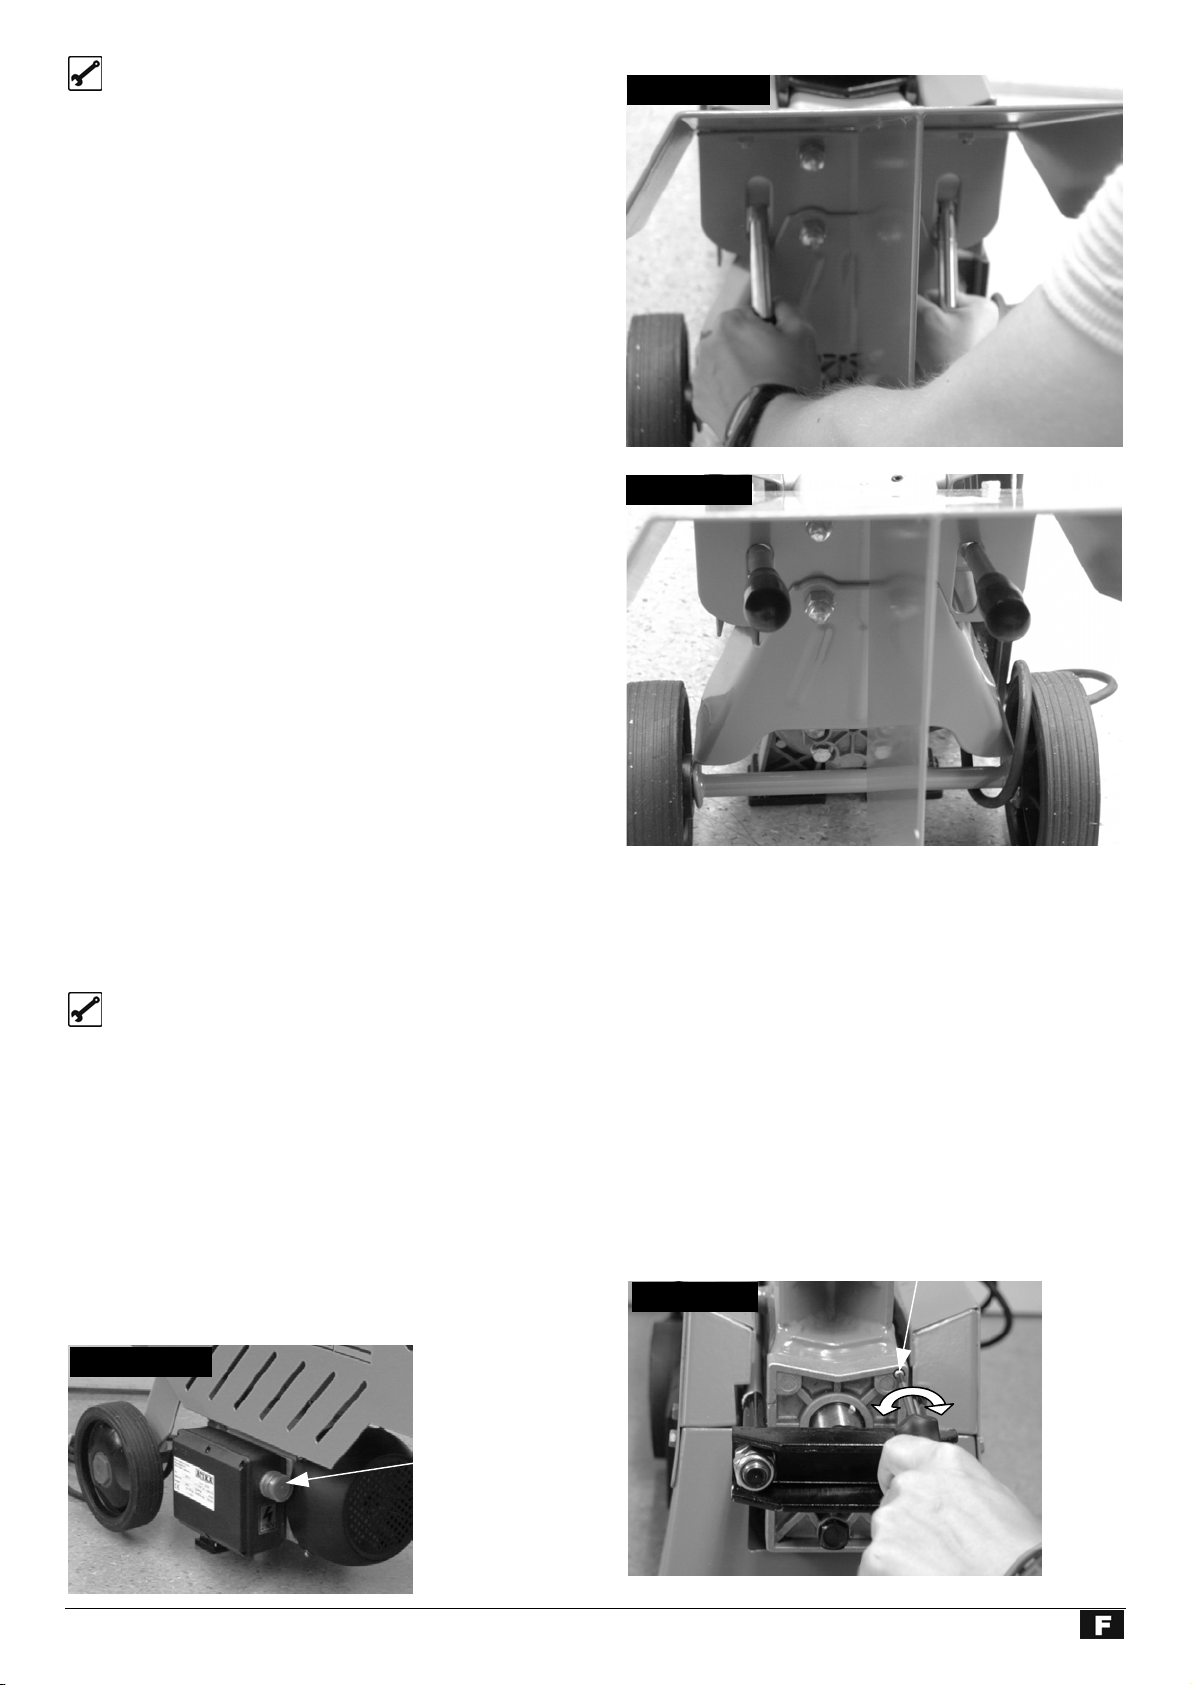
2. Kippen Sie den Holzspalter so, dass die Füllöffnung nach
oben zeigt. Abb 10
Zum Aufrichten und Festhalten des Holzspalters
ist eine zweite Person erforderlich.
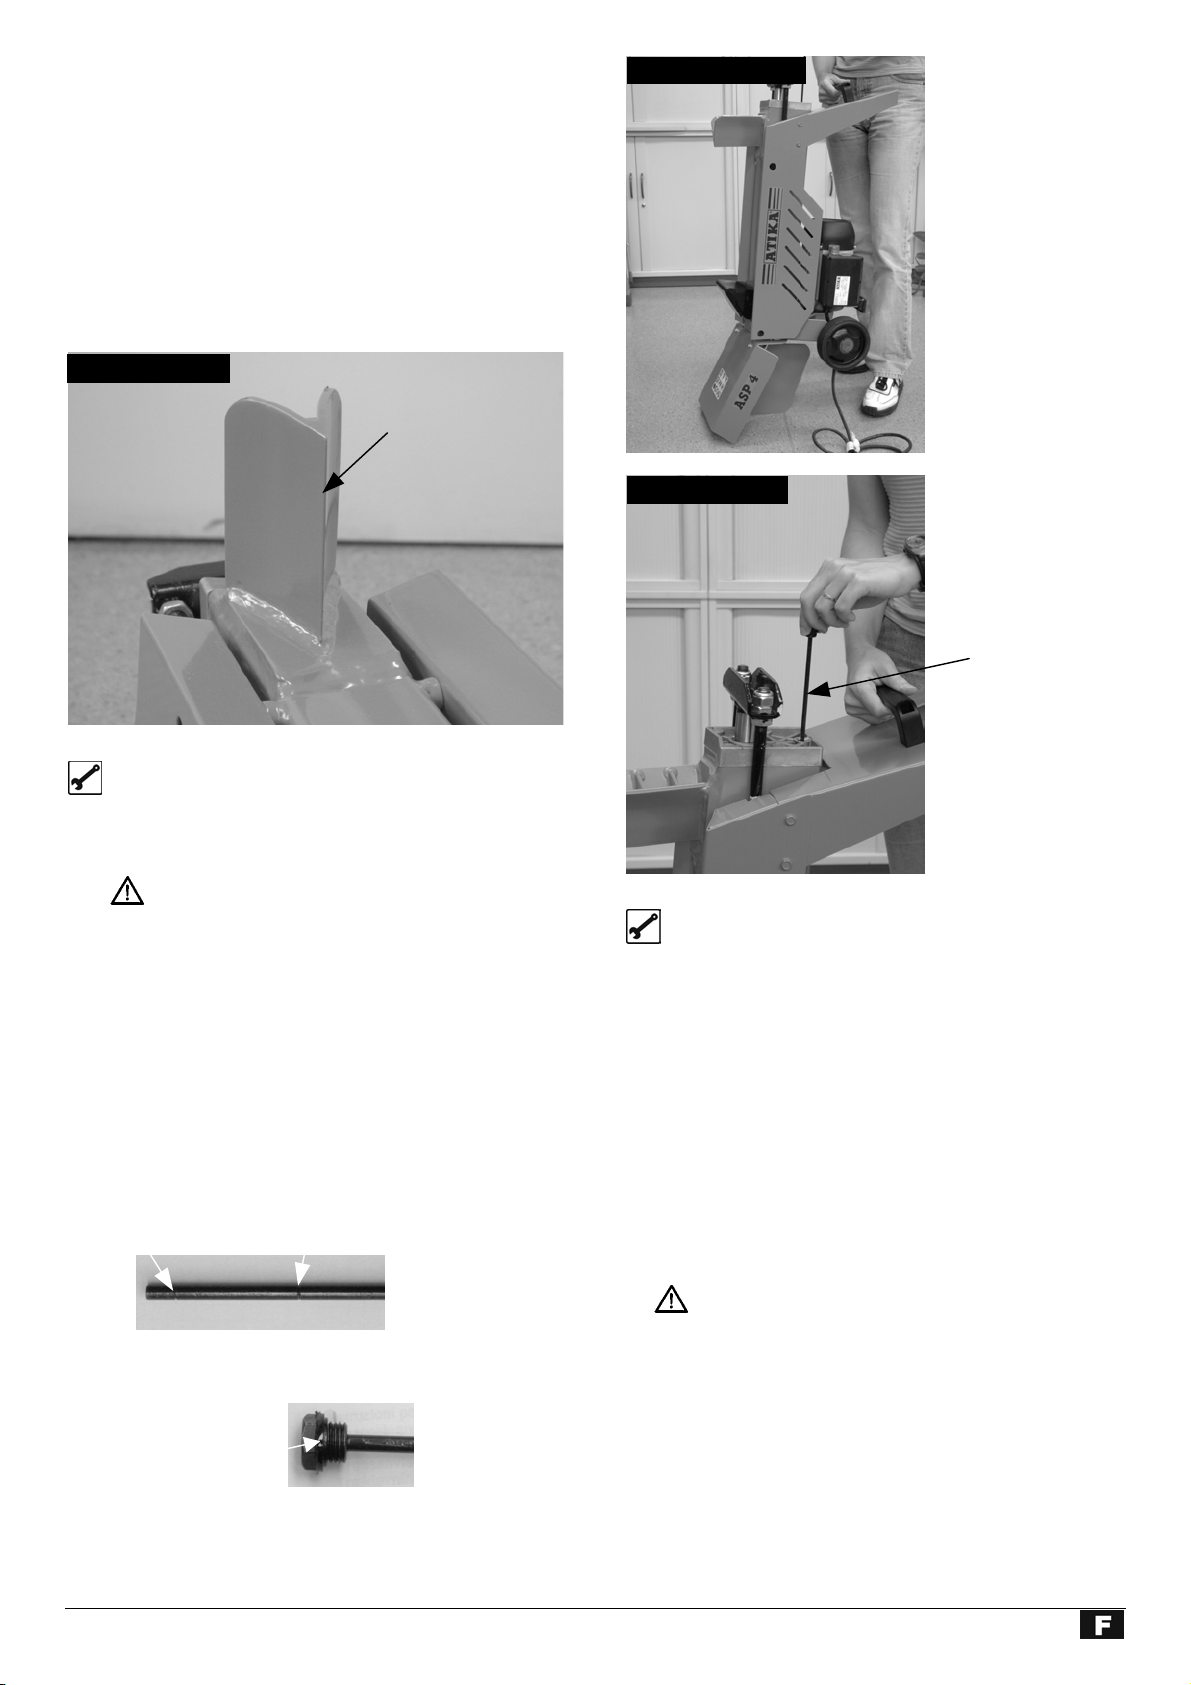
3. Schrauben Sie den Ölmessstab heraus – Abb. 11. Achten
Sie beim herausnehmen auf die Öldichtung.
4. Säubern Sie den Ölmessstab und die Öldichtung.
5. Stecken Sie den Messstab bis zum Anschlag wieder in die
Öffnung.
6. Ziehen Sie den Ölmessstab wieder heraus.
Liegt der Ölpegel zwischen den beiden Markierungen,
ist genug Öl im Behälter.
Liegt der Ölpegel unterhalb der unteren Markierung
muss Öl mit Hilfe eines sauberen Trichters nachgefüllt
werden.
untere Markierung obere Markierung
8. Überprüfen Sie die Öldichtung. Diese muss bei
Beschädigungen ausgetauscht werden.
Öldichtung
9. Schrauben Sie den Ölmessstab wieder fest.
Achtung! Um Beschädigungen an der Öldichtung und im
Gewinde des Zylinderdeckels zu vermeiden, die Schraube
nicht zu fest anziehen.
Abb. 11
Ölmessstab
Wann wechsel ich das Öl aus?
Erster Ölwechsel nach 50 Betriebsstunden, dann alle 250
Betriebsstunden oder 1x jährlich.
Auswechseln:
1. Der Stammschieber muss in seine Ausgangsposition
zurückgefahren sein.
2. Stellen Sie einen Behälter, der mindestens 4 Liter Öl
aufnehmen kann, unter den Holzspalter.
3. Schrauben Sie den Ölmessstab heraus. Achten Sie beim
Herausnehmen auf die Öldichtung.
4. Kippen Sie dann die Maschine, um das Öl in den Behälter
zu entleeren.
5. Kippen Sie dann den Holzspalter so, dass die
Einfüllöffnung nach oben zeigt – Abb. 10.
Zum Aufrichten und Festhalten des Holzspalters ist
eine zweite Person erforderlich.
6. Füllen Sie das neue Hydrauliköl (2,6 Liter) mit Hilfe eines
sauberen Trichters ein.
7. Säubern Sie den Ölmessstab und die Öldichtung.
6
Page 8

8. Überprüfen Sie die Öldichtung. Diese muss bei Beschädigungen ausgetauscht werden.
9. Schrauben Sie den Ölmessstab wieder fest.
Achtung! Um Beschädigungen an der Öldichtung und im Gewinde des Zylinderdeckels zu vermeiden, die Schraube nicht zu fest
anziehen.
Entsorgen Sie das Altöl ordnungsgemäß (Altölsammelstelle vor Ort). Es ist verboten das Altöl in den Boden
abzulassen oder mit Abfall zu vermischen.
Hydrauliköl
L
Für den Hydraulikzylinder empfehlen wir die folgenden Hydrauliköle:
Shell Tellus T 22
Aral Vitam Gf 22
BP Energol HLP 22
Mobil DTE 11
oder gleichwertiges
Keine anderen Ölsorten verwenden. Der Gebrauch von anderen Ölsorten beeinflusst die Funktion des Hydraulikzylinders.
MMöögglliicchhee SSttöörruunnggeenn
Problem mögliche Ursache Beseitigung
Stamm wird nicht gespalten
(zu wenig Spaltleistung)
Stammschieber fährt schwankend oder mit
starken Vibrationen aus
Stammschieber fährt nicht aus
Motor läuft nicht an
Öl-Leck am Ölmessstab
⇒ Stamm ist nicht richtig positioniert
⇒ Stamm überschreitet die zulässigen
Abmessungen oder das Holz ist für die
Leistung der Maschine zu hart
⇒ Spaltkeil spaltet nicht
⇒ Öl-Leck
⇒ Hydraulikdruck zu niedrig
⇒ falsche Anschlussleitung (länger als 10
m oder zu kleiner Aderquerschnitt)
⇒ Luft im Kreislauf ⇒ Entlüftungsschraube öffnen
⇒ Hydraulikpumpe defekt ⇒ Zur Problembehebung wenden Sie
⇒ Netzspannung fehlt
⇒ Anschlusskabel defekt
⇒ Elektromotor defekt
⇒ Öldichtung am Ölmessstab undicht ⇒ Öldichtung auswechseln
⇒ positionieren Sie den Stamm erneut
⇒ Stamm auf zulässige Abmessungen
schneiden
⇒ Spaltkeil schärfen, auf Grat oder
Kerben prüfen
⇒ Legen Sie ein Stück Karton unter den
Holzspalter, um das Leck zu finden.
Zur Problembehebung wenden Sie
sich an den Hersteller oder an von ihm
benannte Firma.
⇒ Ölstand überprüfen; wenn nötig Öl
nachfüllen.
Problem ist nicht zu beheben, bitte
wenden Sie sich an den Hersteller oder
an von ihm benannte Firma.
⇒ richtige Anschlussleitung verwenden
⇒ Ölstand überprüfen; wenn nötig Öl
nachfüllen.
Problem ist nicht zu beheben, bitte
wenden Sie sich an den Hersteller oder
an von ihm benannte Firma.
sich an den Hersteller oder an von ihm
benannte Firma.
⇒ Absicherung überprüfen (16 A)
⇒ Anschlusskabel austauschen bzw. von
einem Elektrofachmann überprüfen
lassen
⇒ Zur Problembehebung wenden Sie
sich an den Hersteller oder an von ihm
benannte Firma.
7
Page 9

TTeecchhnniisscchhee DDaatteenn
Spaltkraft 40 kN (4 t)
Holzlänge 370 mm
Holzdurchmesser 50 – 250 mm
Spalthub 300 mm
Durchmesser Kolbenstange 30 mm
Hydrauliköl (max.) 2,6 Liter
Elektromotorleistung (Aufnahmeleistung) P1 = 1500 W ( S1-100 % )
Anschluss 230 V ~ 50 Hz
Drehzahl 2850 min -1
Abmessungen Länge 1115 x Breite 320 x Höhe 470 mm
Gewicht 45 kg
GGaarraannttiiee
• Wir übernehmen 2 Jahre Garantie ab Lieferung des Gerätes vom Lager des Händlers, und zwar für Mängel, die durch Materialbzw. Fabrikationsfehler aufgetreten sind.
• Für Schäden, die durch unsachgemäße Behandlung oder unzureichende Verpackung beim Rücktransport der Geräte bzw.
Nichtbeachtung der Bedienungsanleitung entstehen, sind Garantieansprüche ausgeschlossen.
• Fehlerhafte Teile sind unserem Werk porto- bzw. frachtfrei einzuschicken. Die Entscheidung auf kostenlose Ersatzteillieferung
obliegt uns.
• Die Garantie erstreckt sich nicht auf den normalen Verschleiß von Spaltkeil, Hydrauliköl, Führungen, Dichtungen und
Laufrädern.
• Anfallende Garantiearbeiten werden von uns ausgeführt. Es bedarf unserer ausdrücklichen Genehmigung, die Behebung des
Schadens von einer anderen Firma vornehmen zu lassen.
• Nur bei Verwendung von Original-Ersatzteilen leisten wir Garantie.
• Änderungen, die dem technischen Fortschritt dienen, behalten wir uns vor.
8
Page 10
Do not operate machine before having read
the operating instructions, understood all
the notes and assembly the machine as
described here.
Keep the instructions in a safe place for future use.
CCoonntteennttss
Symbols machine / operating manual 9
Extent of delivery 9
Proper use 9
Residual risks 9
Safe working 10
Start-up 11
Working with the log splitter 11
Maintenance and care 13
Guarantee 14
Possible problems 15
Technical data 15
Declaration of Conformity 60
Spare parts 61
SSyymmbboollss mmaacchhiinnee
Read the operating and safety instructions
thoroughly before commissioning the
machine.
Wear safety shoes when working with the
machine to protect the feet from falling
logs.
Wear safety gloves when working with the
machine to protect the hands from chips
and splinters.
Wear safety goggles when working with
the machine to protect the eyes from chips
and splinters.
Do not remove or modify any protection or
safety devices.
Nobody else should be in the working area
of the machine other than the operator.
Keep other persons or animals out of the
danger area (minimum distance 5 m).
Danger of being cut or trapped; never
touch any dangerous parts when the
splitting wedge is in motion.
230 V – 240 V
! That it is complete
! Check for possible transport damage
Report any damage or missing items to your dealer, supplier
or the manufacturer immediately. Complaints made at a later
date will not be acknowledged.
The log splitter must only be used for splitting logs.
Only straight-cut logs are suitable for use with the log
splitter.
Metal parts (nails, wire etc.) must be removed from logs
before splitting.
Every other form of use is considered improper use. The
manufacturer accepts no liability for any damages
resulting from improper use, and any risk is in this case
borne solely by the user.
the relevant safety regulations are complied with due to the
design determined by the intended purpose.
After unpacking, check the contents of the box
Even if used properly, residual risks can exist even if
Caution!
Never remove a log jammed against the
wedge by hand.
Caution!
Before starting any repair, maintenance or
cleaning work, always switch off the motor
and remove the plug from the socket.
Caution!
Ensure that the voltage of the power
supply matches that shown on the type
designation plate.
Stop!
Follow the operating instructions.
Open the bleed screw
Bleeding Page 12
EExxtteenntt ooff ddeelliivveerryy
PPrrooppeerr uussee
RReessiidduuaall rriisskkss
Caution!
Always note when the log ram is in
motion.
Residual risks can be minimised if the “Safety information”
and the “Intended usage” as well as the whole of the
operating instructions are observed.
9
Page 11
Observing these instructions, and taking proper care, will
reduce the risk of personal injury or damage to the
equipment.
Failure to observe the safety precautions can lead to injury
to the operator or damage to property.
Risk from electricity, by using non-standard electrical
connections.
Touching live parts of opened electrical components.
In addition, in spite of all the precautionary measures taken,
non-obvious residual risks can still exist.
SSaaffee wwoorrkkiinngg
Before commissioning this product, read and keep to
the following advice. Also observe the preventive
regulations of your professional association and the safety
provisions applicable in the respective country, in order to
protect yourself and others from possible injury.
Pass the safety instructions on to all persons who work
L
with the machine.
Keep these safety instructions in a safe place.
L
Make yourself familiar with the equipment before using it,
by reading and understanding the operating instructions.
Do not use the machine for unsuitable purposes (see
“Normal intended use” and “Working with the log splitter”).
Ensure that you have stand in a secure standing
position and maintain your balance at all times.
You should take up a working position behind the ram in
the area of the operating handles. Never stand in the area
of the splitting wedge.
Never stand on top of the machine.
Pay attention at all times. Take care with what you are
doing, and approach the work sensibly. Do not use the
machine:
− when you are tired.
− under the influence of drugs, alcohol or medications
that may impair your powers of judgement.
When working with the machine, always wear
− protective goggles or face mask
− safety gloves
− hearing protection
− safety shoes with steel toe-caps
Wear suitable work clothing:
− do not wear any loose-fitting clothing or jewellery,
since these may be caught or trapped by moving parts
Within his area of work the operator is responsible for
third parties.
The machine may not be operated by children or young
people under the age of 18.
Keep children away form machine.
Never operate the machine if other persons are in the
immediate vicinity.
Never leave the saw unattended.
Keep your workplace in an orderly condition!
Untidiness can result in accidents.
Do not overload the machine! You work better and safer in
the given performance range.
Only operate the machine with complete and correctly
attached safety equipment and do not alter anything on
the machine that could impair the safety.
Faulty or damaged parts in the device must be replaced
immediately.
Do not spray machine with water
(this is hazardous due to live components).
Do not leave the machine standing in the rain or use
when raining.
Store the unused machine in a dry locked place away
from the reach of children.
Switch the machine off and remove the mains plug from
the socket when
− carrying out repair works
− carrying out servicing and repair works,
removal of faults
− Transporting
− leaving unattended (even during short interruptions)
Check the machine for possible damage
Before continuing to use the machine, the protective
−
devices must be inspected to ensure that they work
perfectly and with their intended function
Check whether the parts are damaged. All parts must
−
be correctly installed and fulfil all conditions to ensure
perfect operation of the saw
Damaged guards and parts must be properly repaired
−
or exchanged by a recognized, specialist workshop;
insofar as nothing else is stated in the instructions for
use.
Damaged or illegible safety warning labels should be
−
replaced immediately.
Electrical safety
Electrical connections must conform to IEC 60245 (H 07
RN-F) with a cable cross-section of at least
⇒ 2.5 mm² for a maximum cable length of up to 10 m
Never use the machine with a power supply cable of over
10 m in length. Longer power supply cables will cause a
drop in voltage. The motor will not be able to provide its
maximum performance and the operation of the machine
will be impaired.
When laying the connecting attachments, be sure that
they do get crushed or bent, and that the plug-and-socket
connection does not get wet.
Do not use the cable for purposes for which it is not
meant. Protect the cable against heat, oil and sharp
edges. Do not use the cable to pull the plug from the
socket.
Regularly check the extension cables and replace them if
they are damaged.
Do not use any defective connection cables.
When working outdoors, only use extension cables
especially approved and appropriately labelled for
outdoor use.
Do not set up any provisional electrical connections.
Never bypass protective devices or deactivate them.
10
Page 12

The electrical connection or repairs to electrical parts
of the machine must be carried out by a certified
electrician or one of our customer service points. Local
regulations – especially regarding protective measures –
must be observed.
Repairs to other parts of the machine must be carried
out by the manufacturer or one of his customer service
points.
Use only original spare parts, accessories and special
accessory parts. Accidents can arise for the user
through the use of other spare parts. The
manufacturer is not liable for any damage or injury
resulting from such action.
SSttaarrtt--uupp
Check that the machine is completely and correctly
assembled.
Before using the shredder, make sure each time that
there are no faulty connections (tears, cuts, etc.)
−
there are no damage at the machine
−
all screws are tight
−
check the hydraulic system for any possible leaks
−
Mains connection
L
Compare the voltage given on the machine model plate
e.g. 230 V with the mains voltage and connect the
machine to the relevant and properly earthed plug.
Only use connection cables with sufficient diameters.
Connect the machine via a 30 mA fault current safety
switch.
Fuse protection: 16 A
L
Hydraulics
L
Never operate the machine in the event of any possible
danger from hydraulic fluid.
Ensure that the machine and working area are clean and
free of oil.
Danger of slippage or fire!
Check the hydraulic reservoir regularly to ensure that it
contains enough hydraulic oil (see “Care and
maintenance”)
Capacity: 2.6 litres
WWoorrkkiinngg wwiitthh tthhee lloogg sspplliitttteerr
additional SAFETY INSTRUCTIONS
The log splitter may only be operated by a single person.
The machine may only be operated by persons over the
age of 18 years, and who have read and understood these
operating instructions.
Wear protective equipment (safety goggles/mask, gloves,
safety shoes) to protect yourself from possible injury.
Never try to split logs containing nails, wire or other similar
objects.
Already split wood and wood chips create a dangerous
working area. The operator may stumble, slip or fall.
Always keep the working area neat and tidy.
Never place the hands on or near any moving parts of the
machine when it is switched on. Maintain a safe distance
from the log, the ram
and the wedge in order to protect your hands from injury.
The machine should only be used for splitting logs with a
maximum length of 370 mm.
Positioning
Position the log splitter on a work surface at a height of about
60 – 75 cm, this will create an comfortable working position.
Place chocks under the wheels to prevent the machine rolling
during operation.
Ensure that the working area meets the following conditions:
− no danger of slipping
− level
− free of obstacles
− sufficiently well lit
Do not operate the machine in the direct vicinity of gas or
petrol pipes or containers, or any other easily inflammable
materials.
What type of logs can I split?
Size of logs
Length: max. 370 mm
Diameter: 50 – 250 mm
The log diameter is a recommended guideline figure,
because:
− thin logs can be difficult to split if they contain knots or if
the fibres are too strong.
− logs with a diameter of over 250 mm can be split if the
fibres are smooth and open.
Do not try to split green logs. Dry logs are much easier to
split, and do not cause jams as often as green (damp) wood.
Operation
Two-hand operation
1. Press the ON/OFF switch on the electric motor. Wait a few
moments until the motor has reached its operating
revolutions and the required pressure has been built up in
the hydraulic pump – Fig. 1.
2. Press both operating handles down simultaneously –
Fig. 2.
The log ram pushes the log against the splitting
wedge, and the log will be split.
3. Release the operating handles. The log ram will now
return to its original starting position – Fig. 3.
11
Page 13
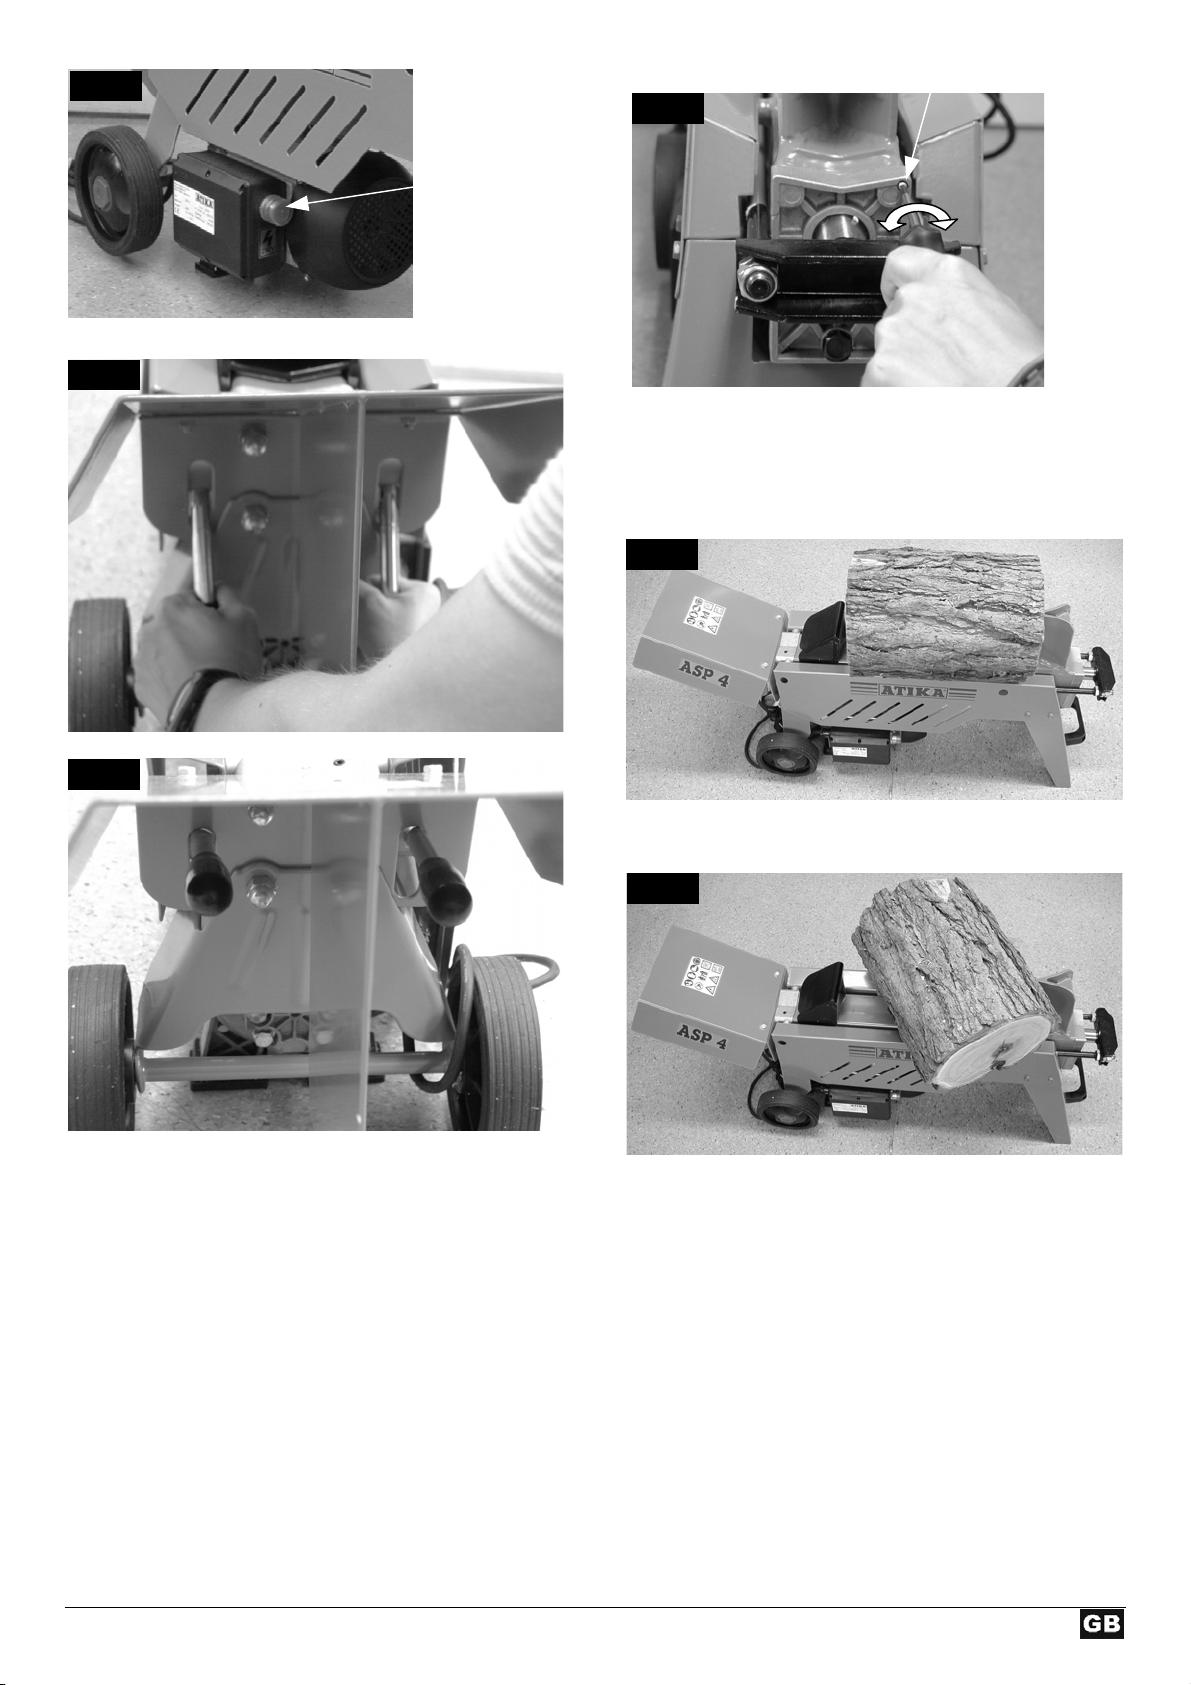
Fig. 1
open
Fig. 2
ON/OFF
switch
Bleed screw
Fig. 4
tighten
Splitting logs:
Always place the logs lengthwise and flat on the main
frame of the log splitter. The log must be enclosed by the
log guide plates. Fig. 5
Fig. 5
Fig. 3
Special instructions for splitting logs:
Preparations:
The logs to be split should be cut to the maximum dimensions
(370 mm long, ∅ 50 – 250 mm). Ensure also that the logs are
cut straight and square.
Place the log properly on the log splitter, so as not to cause
any risk of stumbling or falling to the operator.
Bleeding
Open the bleed screw 3 – 4 complete turns – Fig. 4.
Close the bleed screw again when you are finished splitting
logs.
Never place the log on the frame at an angle. Fig. 6
Fig. 6
Always ensure that the splitting wedge and the log ram
contact the ends of the log at right-angles.
Never try to split two logs at once.
Never try to remove or replace the log during the splitting
process.
L Never try to force the splitting of the log by maintaining
the pressure for several seconds. This can lead to damage to
the machine.
Reposition the log on the main frame and repeat the splitting
process, or put the log to one side.
How to release a jammed log?
1. Release both operating handles so that the log ram can
return to its starting position.
12
Page 14
2. Place a triangular wooden chock under the log, then move
the log ram forward so that it pushes the chock under the
jammed log.
3. If the log is not released, keep repeating this procedure,
using larger chocks, until the log is released.
Never use a hammer to release a jammed log, and keep
your hands away from the log.
Do not enlist the aid of a second person - this is a one-man
job.
Do not try to release the log by using a hammer, since this
may break the motor block.
Finishing work:
Before switching off the machine at the ON/OFF switch on
the electric motor, ensure that the log ram has been
allowed to return to its starting position.
Then remove the plug from the power socket.
Close the bleed screw. Fig. 4
Follow the care and maintenance instructions.
Fig. 7
A
B
CCaarree aanndd mmaaiinntteennaannccee
Remove the plug from the power socket before
starting any maintenance or cleaning work.
Wear protective gloves in order to avoid injury to the
hands.
L Observe the following in order to keep the log splitter in
good working order:
Clean the machine thoroughly after you have
finished using it.
Remove any resin remains on the machine.
Oil the piston rod (Fig. 7) regularly with an
environmentally friendly spray oil.
Check the oil level and change the oil as necessary.
Sharpening the splitting wedge
After extended periods of use, or if the splitting performance
is reduced, sharpen the splitting wedge with a file (and
remove any burrs). Fig. 9
Fig. 9
C
D
G
F
E
Fig. 8
I
H
J
A Log ram F Electric motor
B Bleed screw G ON/OFF switch
C Piston rod H Splitting wedge
D Dipstick I Log guide plates
E Cylinder cover J Operating handles
Sharpen wedge
How do I check the oil level?
1. The log ram must be in its starting position.
2. Stand the log splitter on end, with the filler opening at the
top. Fig 10
A second person will be required to up-end and
hold the log splitter.
3. Unscrew the dipstick – Fig. 11. Do not drop or lose the oil
seal when removing the dipstick.
4. Clean the dipstick and the oil seal.
5. Replace the dipstick fully into the oil reservoir.
6. Now remove the dipstick again, and read off the oil level.
If the oil level is between the two marking on the
dipstick, there is sufficient oil in the reservoir.
If the oil level is below the lower marking, more oil
should be added with the aid of a clean funnel.
lower marking upper marking
13
Page 15

7. Check the oil seal and replace it if it is damaged in any
way.
Oil seal
8. Replace the dipstick and screw it firmly into place.
Caution! Do not tighten the screw too tightly, since this
may damage the oil seal or the thread in the cylinder
cover.
Fig. 10
4. Now tip the machine to empty the oil into the container.
5. Stand the log splitter on end, with the filler opening at the
top. Fig 10.
A second person will be required to up-end and
hold the log splitter.
6. Pour in the new hydraulic oil (2.6 litres) using a clean
funnel.
7. Clean the dipstick and the oil seal.
8. Check the oil seal and replace it if it is damaged in any
way.
9. Replace the dipstick and screw it firmly into place.
Caution! Do not tighten the screw too tightly, since this
may damage the oil seal or the thread in the cylinder
cover.
Dispose of the old oil properly (local oil disposal
point). The old oil must not be poured into the
ground or drainage system, or mixed with other
waste.
Hydraulic oil
L
We recommend the following hydraulic oils for the hydraulic
cylinder:
Fig. 11
Dipstick
When should I change the oil?
The first oil change should be carried out after 50
operating hours, and then every 250 operating hours or
1x per year.
Changing the oil:
1. The log ram must be in its starting position.
2. Place a container under the log splitter to catch the old oil.
The container should have a capacity of at least 4 litres.
3. Unscrew the dipstick. Do not drop or lose the oil seal
when removing the dipstick.
Shell Tellus T 22
Aral Vitam Gf 22
BP Energol HLP 22
Mobil DTE 11
or equivalent
Do not use any other types of oil. The use of any other
type of oil will adversely affect the operation of the
hydraulic cylinder.
GGuuaarraanntteeee
• The machine is guaranteed for a period of 2 years from
the date of purchase/delivery against faults due to material
or manufacturing errors.
• The guarantee is rendered invalid in the event of any
damage caused due to improper use or handling,
improper packaging when returning the machine or failure
to observe the operating instructions.
• Faulty parts must be returned to our works carriage-paid.
The decision on free replacement of faulty parts will be
made at our discretion.
• The guarantee does not cover normal wear and tear to the
splitting wedge, hydraulic oil, guide plates, seals or
wheels.
• Any guarantee work will be carried out by the
manufacturer. Our express approval must be obtained
before having any such work carried out by another
company.
• The guarantee only remains valid provided that original
replacement parts are used.
• We reserve the right to make technical changes in the
course of technical progress.
14
Page 16

PPoossssiibbllee pprroobblleemmss
Problem possible cause remedy
Logs are not being split properly
(insufficient splitting performance)
Log ram travels out jerkily or under heavy
vibration
Log ram will not move out
Motor will not start
Oil leak at the dipstick
⇒ The log is not positioned correctly
⇒ The log exceeds the maximum
dimensions or the wood is too hard for
the performance of the machine
⇒ The splitting wedge is not working
properly
⇒ Oil leak
⇒ Hydraulic pressure too low
⇒ Incorrect connecting lead (longer than
10 m or too small cable cross-section)
⇒ Air in the circuit ⇒ Open the bleed screw
⇒ Hydraulic pump defective ⇒ To correct the problem, refer to the
⇒ No electrical power
⇒ Connection cable defective
⇒ Electric motor defective
⇒ Oil seal at the dipstick not sealing ⇒ Replace the oil seal.
⇒ Reposition the log correctly
⇒ Cut the log to the required dimensions
⇒ Sharpen the splitting wedge, and check
for any burrs or notches
⇒ Place a sheet of cardboard under the
log splitter in order to locate the leak.
To correct the problem, refer to the
manufacturer or other approved
service centre.
⇒ Check the oil level and add more oil if
necessary.
If the problem cannot be rectified, refer
to the manufacturer or other approved
service centre.
⇒ Use the correct connecting lead
⇒ Check the oil level and add more oil if
necessary.
If the problem cannot be rectified, refer
to the manufacturer or other approved
service centre.
manufacturer or other approved
service centre.
⇒ Check the fuse (16 A).
⇒ Replace the connection cable or have
it checked by an electrician.
⇒ To correct the problem, refer to the
manufacturer or other approved
service centre.
TTeecchhnniiccaall ddaattaa
Splitting force 40 kN (4 t)
Log length 370 mm
Log diameter 50 – 250 mm
Stroke 300 mm
Piston rod diameter 30 mm
Hydraulic oil (max.) 2.6 litres
Electric motor performance (power consumption) P1 = 1500 W ( S1-100 % )
Power supply 230 V ~ 50 Hz
Revolutions 2850 rpm
Dimensions Length 1115 x Width 320 x Height 470 mm
Weight 45 kg
15
Page 17
Vous ne devez pas mettre la machine en
route avant d’avoir lu attentivement ce
mode d’emploi, d’avoir observé toutes les
informations indiquées et d’avoir monté la
machine comme décrit.
Conserver ces notice d’utilisation pour tout utilisateur
futur.
TTaabbllee ddeess mmaattiièèrreess
Symboles utilisés sur cet appareil / Instructions
de service
Fourniture 16
Utilisation dans les règles de l’art 17
Risques résiduels 17
Consignes de sécurité 17
Mise en service 18
Travaux avec fendeur de bois à brûler 18
Maintenance et entretien 20
Pannes 22
Caractéristiques techniques 23
Garantie 23
Déclaration de conformité 60
Pièces de rechange 61
16
230 V – 240 V
Attention !
Toujours observer le mouvement du
pousse-tronc.
Attention !
Ne jamais retirer à la main les troncs
coincés dans le coin.
Attention !
Avant de réaliser les travaux de réparation, de maintenance et d’entretien, arrêter
le moteur et retirer la fiche secteur.
Attention !
Respecter la tension indiquée sur la
plaque signalétique.
Stop!
Respecter les instructions
d’utilisation. Dévisser la vis
d’évacuation d’air.
Purge (cf. page 19)
SSyymmbboolleess uuttiilliissééss ddaannss cceess nnoottiicceess
SSyymmbboolleess uuttiilliissééss ssuurr cceess aappppaarreeiillss
Avant la mise en service, lire et respecter
les instructions de service ainsi que les
consignes de sécurité.
Durant les travaux, porter des chaussures
de sécurité afin de protéger les pieds
contre une chute accidentelle des troncs.
Durant les travaux, porter des gants de
protection afin de protéger les mains
contre les copeaux et les éclats.
Durant les travaux, porter des lunettes ou
une visière de protection afin de protéger
les yeux contre les copeaux et les éclats.
Il est interdit de démonter ou de modifier
les dispositions de protection et de
sécurité.
Seul l’utilisateur doit se tenir dans la zone
de travail de la machine. Les autres
personnes, tout comme les animaux
domestiques et de rente, doivent
respecter une distance minimale (5 m).
Risque de coupure et d’écrasement ; ne
jamais s’approcher des zones
dangereuses tant que le coin à refendre
est en mouvement.
Danger imminent ou situation dangereuse.
L’inobservation de ces indications génère des
risques de blessures ou d’endommagements
matériels.
L
Indications importantes pour un emploi conforme
à l’usage prévu. L’inobservation de ces indications
peut provoquer des défauts de fonctionnement.
Indications pour l’usager. Ces indications sont
d’une aide précieuse pour un emploi optimal des
différentes fonctions.
Montage, exploitation et maintenance. Ce symbole
attire votre attention sur ce que vous devez faire.
dd’’uuttiilliissaattiioonn
FFoouurrnniittuurree
Après le déballage de la machine, vérifiez le contenu
du carton quant à
!l’intégralité des pièces
!la présence éventuelle de dommages dus au transport.
Informez immédiatement le revendeur, le transporteur et / ou
le fabricant en cas de réclamation. Sachez que les
réclamations ultérieures ne sont plus acceptées.
16
Page 18

UUttiilliissaattiioonn ddaannss lleess rrèègglleess ddee ll’’aarrtt
Le fendeur de bois à brûler convient uniquement pour
fendre le bois.
Seul le bois découpé convient pour le fendeur de bois à
brûler.
Les pièces métalliques (clous, fil, etc.) doivent
impérativement être retirées du bois à fendre.
Toute utilisation autre est non conforme. Le constructeur
décline toute responsabilité pour les dommages en
résultat – le risque incombe alors exclusivement à
l’utilisateur.
RRiissqquueess rrééssiidduueellss
Même un emploi conforme à l’usage prévu et le respect
des consignes de sécurité applicables en la matière ne
sauraient exclure tous les risques résiduels générés par la
construction et l’emploi de la machine, notamment.
Les risques résiduels sont minimisés en respectant les
« consignes de sécurité » et un « emploi conforme à l’usage
prévu » comme toutes les indications des présentes
instructions de service.
La prise de conscience et la prudence réduisent les risques
de blessures et d’endommagements.
Les mesures de sécurité ignorées ou omises peuvent
occasionner des blessures ou des endommagements.
Dangers d’électrocution en cas d’utilisation de câbles de
raccordement non conformes.
Contact avec des pièces sous tension de composants
électriques ouverts.
Il se pourrait donc que des risques résiduels non apparents
persistent bien que toutes les mesures de protection aient été
prises.
CCoonnssiiggnneess ddee ssééccuurriittéé
Avant toute mise en service de ce produit, lire et
respecter les indications suivantes et les règlements de
prévention d’accident de l’association préventive des
accidents du travail, particulièrement les règlements de
sécurité en vigueur dans les pays respectifs afin d’éviter
tout risque d’accident possible.
Remettez les consignes de sécurité à toute personne
L
devant de travailler avec la machine.
Conservez ces consignes de sécurité avec soin.
L
Avant l‘utilisation, familiarisez-vous avec l‘appareil à l‘aide
des instructions de service.
Ne pas utiliser l’appareil à des fins non appropriées (voir
« Utilisation dans les règles de l’art » et « Travaux avec le
feudeur de bois à brûler » ).
Prenez correctement appui sur vos jambes et veillez à
votre équilibre à tout moment.
Durant les travaux, positionnez-vous derrière le poussoir
à proximité des leviers de commande. Ne vous tenez
jamais à proximité du coin à refendre.
Ne vous tenez jamais sur la machine.
Soyez attentif. Soyez conscient de ce que vous faites.
Faites preuve de prudence lors du travail. N’utilisez
jamais l’appareil :
− lorsque vous êtes fatigué.
− Sous l’influence de drogues, de l’alcool ou de
médicaments pouvant influencer votre jugement.
Lors des travaux, portez
− des lunettes ou une visière de protection
− des gants de travail
− un protège-oreilles
− des chaussures de sécurité munies de chapeaux
d’acier.
Portez des vêtements de travail appropriés :
− pas de vêtements amples ni bijoux (ils pourraient être
happés par les pièces mobiles)
L’utilisateur est responsable de la machine à l’égard de
tiers dans la zone de travail.
Il est interdit aux enfants et aux adolescents de moins
de 18 ans d’utiliser la machine.
Il convient de s’assurer que des enfants ne soient jamais
à proximité de l’appareil.
Ne mettez jamais l’appareil en marche lorsque des
personnes étrangères se trouvent à proximité.
Ne laissez jamais l’a sans surveillance.
Veillez à maintenir la zone de travail en ordre ! Le
désordre peut être la cause d’accidents.
Ne surchargez pas la machine ! Elle travaille mieux et
avec une sécurité accrue dans la plage indiquée.
Veillez au montage complet et correct des équipements
de sécurité pendant l’exploitation et ne modifiez rien sur
la machine qui risquerait d’influencer sa sécurité.
Ne pas modifier l'appareil ou des parties ou pièces de
l'appareil.
L’appareil ne doit être arrosé d’eau (source de risque car
présence de courant électrique).
Ne pas travailler avec l'appareil lorsqu'il pleut.
Conservez les outillages non utilisés dans un endroit
sec et verrouillé et hors de portée de main des enfants.
Débranchez la machine et retirez la fiche de la prise au
secteur en cas de
travaux de réparation
−
travaux de maintenance et de nettoyage
−
l’élimination de perturbations
−
transport
−
et si vous quittez (même s’il ne s’agit que d’une brève
−
interruption du travail)
Vérifiez la machine afin de découvrir tout
endommagement éventuel.
Contrôlez le fonctionnement impeccable et conforme à
−
l’usage prévu des équipements de sécurité avec soin
avant de poursuivre l’utilisation de la machine.
Vérifiez le fonctionnement correct des pièces mobiles
−
et assurez-vous qu’elles ne sont ni coincées ni
partiellement endommagées. Toutes les pièces sont à
monter correctement et toutes les conditions requises
sont à remplir afin de garantir une exploitation
impeccable de l’appareill.
17
Page 19

Les dispositifs de sécurité et les pièces
−
endommagés doivent être réparés ou remplacés
convenablement dans un atelier spécialisé reconnu, à
moins que d’autres informations ne soient
mentionnées dans le mode d’emploi.
Les autocollants de sécurité endommagés ou
−
illisibles doivent être remplacés.
Sécurité électrique
Réalisation de la ligne d’alimentation conformément à
IEC 60245 (H 07 RN-F) avec une section de conducteur
minimale de 2,5 mm² avec une longueur maximale de
10 m.
Ne jamais employer de lignes d’alimentation de plus de 10
m de long. Les lignes d’alimentation plus longues
occasionnent une chute de tension. Le moteur n’atteint
plus sa puissance, le fonctionnement de la machine est
restreint.
Lors de la pose de la ligne de raccordement, veiller à ce
qu'elle ne soit ni coincée, ni compressée, ni pliée et à ce
que le connecteur ne soit pas soumis à l'humidité ou
tombe dans un liquide quelconque.
N’employez pas le câble à des fins pour lesquelles il
pas prévu. Protégez le câble contre la chaleur, l’huile et
les arêtes vives. Ne tirez pas sur le câble pour retirer la
fiche de la prise au secteur.
Vérifiez le câble de rallonge à intervalles réguliers et
remplacez-le dès que vous constatez un
endommagement.
Ne vous servez jamais de lignes de raccordement
défectueuses.
Servez-vous exclusivement de câbles de rallonge
spéciaux et homologués pour l’extérieur le cas échéant.
Ne vous servez jamais de raccordements électriques
provisoires.
Ne pontez jamais les équipements de sécurité et ne les
mettez jamais hors service.
Tout raccordement électrique, voire des réparations sur
des parties électriques de la machine doivent être
effectuées par des personnes compétentes ou remises
à l’un de nos services après-vente. Les règlements
locaux, particulière-ment en ce qui concerne les
mesures de protection sont à respecter.
Toutes réparations des différentes pièces de la machine
sont à effectuer par le fabricant, ou l’un de ses services
après-vente.
N’utiliser que des pièces détachées d’origine ou des
pièces d’accessoires spéciales. L’utilisation d’autres
pièces détachées et d’autres accessoires pourraient
entraîner un risque d’accident pour l’utilisateur, le
fabricant dégageant toute responsabilité pour tout
dommage encouru.
MMiissee eenn sseerrvviiccee
Assurez-vous que l'appareil est intégralement monté et
conformément aux réglementations.
Avant toute utilisation, veuillez vérifier
n’est
que les lignes de raccordement ne présentent pas de
−
défectuosités (fissures, sou pures ou semblables).
l‘appareil quant aux éventuels endommagements
−
que toutes les vis sont serrées à fond
−
l’absence de fuites sur le système hydraulique.
−
Branchement au secteur
L
Comparez la tension de votre secteur, p. ex. 230 V, avec
la tension indiquée sur la plaque signalétique de la
machine et raccordez la machine à une prise mise à la
terre appropriée et conforme aux prescriptions.
Utilisez un câble de rallonge de section sufficante.
Raccordez la machine au moyen d’un commutateur de
sécurité (interrupteur m de protection contre les courants
de court-circuit) 30 mA.
Fuse: 16 A
L
L
Système hydraulique
Ne jamais exploiter la machine lorsque le liquide
hydraulique présente un risque.
Assurez-vous que la machine et la zone de travail sont
propres et exemptes de tâches d’huiles.
Risque de glissement et d’incendie !
Contrôlez régulièrement si le réservoir contient
suffisamment d’huile hydraulique (cf. entretien et
maintenance)
Contenance : 2,6 litres
L
TTrraavvaaiilllleerr aavveecc llee ffeennddeeuurr ddee bbooiiss
L
àà bbrrûûlleerr
CONSIGNES DE SECURITE complémentaires
Le fendeur de bois à brûler doit uniquement être utilisé par
une seule personne à la fois.
Seules les personnes de plus de 18 ans ayant lu et
compris les instructions de service peuvent utiliser la
machine.
Portez votre équipement de protection personnelle
(lunettes/visière de protection, gants, chaussures de
protection) afin de vous protéger contre d’éventuelles
blessures.
Ne jamais fendre de troncs contenant des clous, du fil ou
d’autres objets.
Le bois fendu et les copeaux de bois rendent la zone de
travail dangereuse. Risque de trébuchement, glissement
et de chute. Veillez à ce que la zone de travail reste
ordonnée.
Ne jamais placer les mains sur les pièces mobiles de la
machine lorsque que cette dernière est en marche. Veillez
à respecter une distance de sécurité avec le tronc, le
poussoir et le coin à refendre afin de protéger vos mains
contre les blessures.
Fendez uniquement le bois dont la longue maximale à ne
dépasse pas 370 mm.
18
Page 20
dévisser
Installation
Installez le fendeur de bois à brûler sur un plan de travail de
60 à 75 cm de haut; cela vous oblige à travailler
confortablement.
Bloquez les roues au moyen de cales afin d’éviter tout
déplacement durant l’exploitation.
Veillez à ce que la zone de travail remplisse les conditions
suivantes :
− antidérapante
− plane
− exempte de risques de trébuchement
− éclairage suffisant.
Il est interdit d’exploiter la machine à proximité de gaz naturel,
de conduits d’essence ou d’autres matériaux très
inflammables.
Que puis-je fendre?
Dimensions des troncs à fendre
Longueur : 370 mm maxi
Diamètre : 50 à 250 mm
Le diamètre est la valeur recommandée fournie à titre indicatif
car :
− le bois de faible épaisseur se laisse difficilement fendre
car il contient des trous provenant de nœuds ou les fibres
sont trop épaisses.
− le bois d’épaisseur supérieure à ∅ 250 mm peut être
fendu lorsque les fibre sont lisses et lâches.
Ne fendez pas de troncs verts. Les troncs secs entreposés se
fendent beaucoup plus facilement et n’occasionnent pas de
grippage aussi souvent que le bois vert (mouillé).
Utilisation
Exploitation à deux mains
1. Appuyez sur le commutateur MARCHE/ARRET du moteur
électrique. Attendez quelques secondes jusqu’à ce que le
moteur atteigne sa vitesse finale et que la pression soit
générée dans la pompe hydraulique (illustration 1).
2. Abaissez simultanément les deux leviers de commande
(illustration 2).
Le pousse-troncs pousse le tronc contre le coin à
refendre. Le tronc est fendu.
3. Relâchez les leviers de commande, le pousse-troncs
revient en position initiale (illustration 3).
Illustration 1
Commutateur
MARCHE /
ARRET
Illustration 2
Illustration 3
Instructions particulières pour la fente :
Conditionnement :
Conditionnez le bois à fendre aux dimensions maximales
(370 mm de long, ∅ 50 à 250 mm) et veillez à ce que le bois
soit découpé en ligne droite.
Positionnez le bois sur le fendeur de manière à ne pas vous
mettre en danger (risque de trébuchement).
Purge
Dévissez la vis d’évacuation d’air de 3 à 4 tours (illustration
4).
Resserrez seulement la vis après avoir achevé la fente du
bois.
Serrer à fond la
Illustration 4
vis d’évacuation d’air
19
Page 21

Fente du bois:
Positionnez toujours les troncs dans le sens de la
longueur et à plat sur le châssis principal du fendeur. Le
tronc doit être entouré par les guides-troncs (illustration 5).
Illustration 5
Ne jamais positionner le tronc en biais sur le châssis
porteur (illustration 6).
Illustration 6
Retirez ensuite la fiche secteur.
Resserrez à fond la vis d’évacuation d’air (illustration 4).
Observer les instructions d’entretien et de maintenance.
Illustration 7
A
B
C
D
G
F
E
Illustration 8
I
H
Toujours veillez à ce que le coin à refendre et le pousse-
tronc saisissent verticalement les extrémités du tronc.
Ne jamais fendre deux troncs d’un coup.
Ne jamais rajouter ou remplacer le bois durant la
procédure.
L Ne jamais forcer la fente du tronc en maintenant la
poussée durant plusieurs secondes. Cela pourrait
endommager la machine.
Repositionnez le tronc sur le châssis principal puis répéter la
procédure de fente ou mettez le tronc de côté.
Comment libérer un tronc coincé ?
1. Relâchez les deux leviers de commande afin que le
pousse-tronc puisse retourner en position initiale.
2. Insérez une cale triangulaire en bois sous le tronc,
déployez le pousse-tronc de manière à ce qu’il pousse la
cale sous le tronc coincé.
3. Si le tronc ne se libère pas, répéter la procédure avec des
cales toujours plus grandes.
Lors de la libération, ne jamais frapper avec un marteau
sur le tronc ou placez les mains à proximité du tronc.
Ne demandez pas d’aide à une seconde personne.
N’essayez pas de libérer le tronc en frappant à l’aide d’un
outil. Cela pourrait occasionner une rupture du bloc-moteur.
Achèvement du travail :
Avant d’actionner le commutateur MARCHE/ARRET sur la
machine, veiller à ce que le pousse-tronc soit retourné en
position initiale.
J
A Pousse-tronc F Moteur électrique
B Vis d’évacuation d’air G Commutateur
MARCHE/ARRET
C Tige de piston H Coin à refendre
D Jauge d’huile I Guides-tronc en tôle
E Culasse de cylindre J Leviers de commande
EEnnttrreettiieenn eett mmaaiinntteennaannccee
Avant d’effectuer des travaux d’entretien et de
maintenance, retirer la fiche secteur.
Porter des gants de protection afin d’éviter de se blesser
les mains.
L Observer les points suivants afin de ne pas entraver le
bon fonctionnement du fendeur de bois à brûler :
Nettoyez soigneusement la machine après chaque
utilisation.
Eliminez les résidus de résine.
20
Page 22
Lubrifiez régulièrement la tige du piston (illustration
7) à l’aide d’huile pulvérisée respectant les impératifs
écologiques.
Contrôlez le niveau d’huile, respectivement
remplacez l’huile.
Affûtage du coin à refendre
Après une utilisation prolongée ou lorsque l’aptitude au
dédoublement est réduit, affûter le coin à refendre à l’aide
d’une lime fine (éliminer les ébarbures) (illustration 9).
Illustration 9
Affûtage des
arêtes
Illustration 10
Illustration 11
Jauge d’huile
Comment contrôler le niveau d’huile ?
1. Le pousse-tronc doit se trouver en position initiale.
2. Basculez le coin à refendre de manière à ce que l’orifice
de remplissage pointe vers le haut (illustration 10).
Faire appel à une seconde personne pour
positionner et tenir le coin à refendre.
3. Dévissez la jauge d’huile (illustration 11). Ne perdez pas
le joint d’étanchéité lorsque vous retirez la jauge.
4. Nettoyez la jauge d’huile et le joint d’étanchéité.
5. Enfoncez la jauge jusqu’à la butée dans l’orifice.
6. Retirez à nouveau la jauge de l’orifice.
Lorsque le niveau d’huile est compris entre les deux
repères, le réservoir contient suffisamment d’huile.
Lorsque le niveau d’huile se situe au-dessous du
repère inférieur, il faut rajouter de l’huile à l’aide d’un
entonnoir propre.
Repère inférieur Repère supérieur
7. Contrôlez le joint d’étanchéité. Le remplacer en cas de
détérioration.
Joint
d’étanchéité
8. Revissez à fond la jauge d’huile.
Attention ! Afin d’éviter d’endommager le joint d’étanchéité
et le filet de la culasse du cylindre, la vis ne doit pas être
serrée à fond.
Quand faut-il faire une vidange ?
Première vidange après 50 heures de service puis toutes
les 250 heures ou une fois par an.
Vidange :
1. Le pousse-tronc doit se trouver en position initiale.
2. Placez un récipient pouvant contenir 4 litres d’huile sous
le fendeur de bois.
3. Dévissez complètement la jauge d’huile. N’oubliez pas le
joint d’étanchéité lors du retrait.
4. Basculez ensuite la machine afin de vider l’huile contenue
dans le réservoir.
5. Basculez ensuite le coin à refendre de manière à ce que
l’orifice de remplissage pointe vers le haut (illustration 10).
Faire appel à une seconde personne pour positionner
et tenir le coin à refendre.
6. Versez l’huile hydraulique de rechange (2,6 litres) à l’aide
d’un entonnoir propre.
7. Nettoyez la jauge d’huile et le joint d’étanchéité.
8. Contrôlez le joint d’étanchéité. Le remplacer en cas de
détérioration.
9. Revissez à fond la jauge d’huile.
Attention ! Afin d’éviter d’endommager le joint d’étanchéité
et le filet de la culasse du cylindre, la vis ne doit pas être
serrée à fond.
21
Page 23

Eliminez l’huile usée conformément à la réglementation en vigueur (point de collecte d’huile usée sur place). Il
est interdit de vidanger les huiles usées dans le sol ou de les mélanger aux déchets.
Huile hydraulique
L
Pour le cylindre hydraulique, nous recommandons les huiles hydrauliques suivantes :
Shell Tellus T 22
Aral Vitam Gf 22
BP Energol HLP 22
Mobil DTE 11
ou des huiles équivalentes
Ne pas employer d’autres sortes d’huiles. L’emploi d’autres sortes d’huiles se répercute sur le fonctionnement du cylindre
hydraulique.
PPaannnneess ppoossssiibblleess
Problème Source Remède
Le tronc n’est pas fendu
(puissance insuffisante).
Le pousse-tronc est instable ou soumis à
de fortes vibrations
Le pousse-tronc ne se déplace pas
Le moteur ne fonctionne pas
Fuite d’huile sur la jauge d’huile
⇒ Positionnement incorrect du tronc
⇒ Le tronc dépasse les dimensions
maximales autorisées ou le bois est
trop dur pour la puissance de la
machine
⇒ Le coin à refendre ne fend pas
⇒ Fuite d’huile
⇒ Pression hydraulique trop basse
⇒ Ligne d’alimentation incorrecte (plus de
10 m de long ou section trop faible)
⇒ Le circuit contient de l’air ⇒ Ouvrir la vis d’évacuation d’air
⇒ Pompe hydraulique défectueuse ⇒ S’adresser au constructeur ou à une
⇒ Absence de courant
⇒ Câble d’alimentation défectueux
⇒ Moteur électrique défectueux
⇒ Joint d’étanchéité de la jauge d’huile
n’est pas étanche
⇒ Repositionner le tronc
⇒ Couper le tronc aux dimensions
maximales autorisées
⇒ Affûter le coin à refendre, contrôler
l’absence d’ébarbures et d’encoches
⇒ Placer un morceau de carton sous le
fendeur pour localiser la fuite. Pour y
remédier, s’adresser au constructeur
ou à une autre entreprise.
⇒ Contrôler le niveau d’huile ; le cas
échéant, en rajouter.
Problème insoluble. Prière de
s’adresser au constructeur ou à une
autre entreprise afin d’y remédier.
⇒ Employer une ligne appropriée
⇒ Contrôler le niveau d’huile ; le cas
échéant, en rajouter.
Problème insoluble. Prière de
s’adresser au constructeur ou à une
autre entreprise afin d’y remédier.
autre entreprise afin de remédier au
problème.
⇒ Contrôler la protection par fusible (16
A)
⇒ Remplacer le câble d’alimentation ou le
faire contrôler par un électricien
⇒ S’adresser au constructeur ou à une
autre entreprise afin de remédier au
problème.
⇒ Remplacer le joint d’étanchéité
22
Page 24

CCaarraaccttéérriissttiiqquueess tteecchhnniiqquueess
Force de dédoublement 40 kN (4 t)
Longueur maximale du bois 370 mm
Diamètre du bois 50 à 250 mm
Course de dédoublement 300 mm
Diamètre de la tige du piston 30 mm
Huile hydraulique (maxi) 2,6 litres
Puissance du moteur électrique (puissance absorbée) P1 = 1500 W ( S1-100 % )
Alimentation électrique 230 V ~ 50 Hz
Régime 2850 min -1
Dimensions (longueur x largeur x hauteur) 1 115 x 320 x 470 mm
Poids 45 kg
CCoonnddiittiioonnss ddee GGaarraannttiiee
• Nos appareils sont garantis 2 ans, à partir de la livraison de l’appareil du stock du revendeur, pour des défauts que si seraient
présentés à cause de défectuosités des matériaux ou de fabrication.
• La garantie ne couvre pas les dommages dus à un maniement incorrect ou au non-respect du mode d’emploi, même pendant
le délai de garantie.
• Les pièces défectueuses devront être expédiées à notre usine frais de port ou de fret payés et nous nous réservons le droit de
décider s’il y a lieu d’accepter une livraison gratuite de pièces de rechange.
• La garantie ne s’étend pas à l’usure normale du coin à refendre, de l’huile hydraulique, des guides, des joints d’étanchéité et
des roues de roulement.
• Les travaux de garantie seront exécutés par nos soins. Une Réparation par une autre entreprise ne pourra être exécutée
qu’après nous avoir demandé notre autorisation expresse.
• L’appareil n’est sous garantie qu’à condition d’utiliser des pièces de rechange d’origine.
• Sous réserve de modifications sans le sens d’un progrès technique.
23
Page 25

U mag het apparaat niet in bedrijf nemen,
voordat U deze bedieningsaanwijzing heeft
gelezen, alle instruties hebt gevolgd en het
apparaat volgens de beschrijving heeft
gemonteerd.
Bewaar deze bedieningsaanwijzing voor alle toekomstige
toepassingen.
IInnhhoouudd
Symbolen apparaat / bedieningsaanwijzing 24
Lever hoeveelheid 24
Reglementaire toepassing 24
Restrisico’s 24
Veilig werken 25
Ingebruikname 26
Werken met de brandhoutsplijter 26
Onderhoud en verzorging 28
Storingen 30
Technische gegevens 30
Garantie 29
Conformiteitsverklaring 60
Reserveonderdelen 61
SSyymmbboolleenn aappppaarraaaatt
Voor de inbedrijfstelling de bedieningshandleiding en de veiligheidsinstructies
lezen en in acht nemen.
Bij het werken veiligheidsschoenen
dragen, om de voet tegen vallende
stammen te beveiligen.
Bij het werken veiligheidshandschoenen
dragen, om de handen tegen spanen en
splinters te beveiligen.
230 V – 240 V
pakking op:
! Aanwezigheid van alle onderdelen
! Eventuele transportschade
In het geval van onvolkomenheden dit direct aan uw
leverancier melden. Latere reclamaties worden niet in
behandeling genomen.
Bij het werken een veiligheidsbril of een
veiligheidsvizier dragen, om de ogen
tegen spanen en splinters te beveiligen.
Het is verboden beschermings- of
veiligheidsinrichtingen te verwijderen of te
wijzigen.
Alleen de bediener mag in de werkcirkel
van de machine staan. Niet betrokken
personen, alsook huisdieren en vee uit de
gevarenzone (minimum afstand 5 m)
verwijderd houden.
Snijd- en kneuzinggevaar; nooit
gevaarlijke bereiken aanraken, wanneer
de splijtwig beweegt.
De brandhoutsplijter is alleen bruikbaar voor het splijten
van hout.
Alleen pas gezaagd hout is geschikt voor de
brandhoutsplijter.
Metalen delen (nagels, draad enz.) dienen absoluut uit het
te splijten hout te worden verwijderd.
Elk verder leidend gebruik geldt als niet conform de
voorschriften. Voor daaruit resulterende schade is de
fabrikant niet aansprakelijk – het risico daarvoor wordt
alleen door de gebruiker gedragen.
Ook bij het gebruik volgens de voorschriften zijn er op grond
van de constructie voor de toepassing van deze machine nog
een aantal restricties.
Controleer na het uitpakken de inhoud van de ver-
RReegglleemmeennttaaiirree ttooeeppaassssiinngg
Attentie!
Steeds op de beweging van de stamschuif
letten.
Attentie!
Nooit een stam die in de wig vast is
geklemd met de hand verwijderen.
Attentie!
Voor reparatie-, onderhouds-, en
reinigingswerkzaamheden de motor
uitschakelen en de netstekker uit de
contactdoos halen.
Attentie!
De op het typeplaatje aangegeven
spanning aanhouden.
Stop!
Bedieningshandleiding in acht
nemen. Ontluchtingsschroef losmaken
Ontluchten pagina 27
LLeevveerr hhooeevveeeellhheeiidd
RReessttrriissiiccoo’’ss
24
Page 26

De restricties kunnen geminimaliseerd worden wanneer de
veiligheids-, gebruiks-, gezondheids- en onderhoudsvoorschriften nauwkeurig in acht genomen worden.
Consideratie en voorzichtigheid verminderen het risico van
personenletsels en beschadigingen.
Geïgnoreerde of over het hoofd geziene
veiligheidsmaatregelen kunnen leiden tot letsels voor de
bediener of tot beschadiging van eigendom.
Gevaar door stroom door het niet juist aansluiten van de
aansluitdraden.
Het aanraken van onder spanning staande delen bij een
geopende elektrische delen.
Verder kunnen er ondanks alle genomen maatregelen niet
zichtbare restricties bestaan.
VVeeiilliigg wweerrkkeenn
Lees en volg de onderstaande aanwijzingen, de
voorschriften te voorkoming van ongevallen en de
algemene veiligheidsvoorschriften op, om u zelf en
anderen tegen verwondingen te beschermen.
Geef de veiligheidsvoorschriften aan alle personen,
L
die met deze machine werken, door.
Bewaar deze veiligheidsvoorschriften goed.
L
Maak u voor gebruik met het apparaat vertrouwd, met
behulp van de bedieningshandleiding.
Gebruik de machine alleen waar hij voor gemaakt is (zie
het betreffende hoofdstuk en “Werken met de
brandhoutsplijter”).
Zorg voor een stabiele en uitgebalanceerde houding.
Neem een werkpositie in, die zich achter de schuif in het
bereik van de bedieningshendels ligt. Ga nooit in het
bereik van de splijtwig staan.
Ga nooit op de machine staan.
Wees oplettend. Let er op, wat u doet. Werk verstandig.
Gebruik het toestel niet:
− wanneer u vermoeid bent.
− onder invloed van drugs, alcohol of medicijnen staat,
die uw oordelingsvermogen kunnen beïnvloeden.
Draag tijdens het werken
− veiligheidsbril of veiligheidsvizier
− veiligheidshandschoenen
− gehoorsbeschermers
− veiligheidsschoenen met stalen tippen
Draag geschikte werkkleding:
− geen wijde kleding of sieraden (zij kunnen door
beweeglijke delen worden gegrepen)
De bedienende persoon is binnen het arbeitsbereik van
de machine verantwoordelijk ten opzichte van derden.
Kinderen en jongeren van minder dan 18 jaren mogen
de machine niet bedienen.
Kinderen dienen uit de buurt van het apparaat te worden
geweerd.
Zet het toestel nooit aan, terwijl niet betrokken personen
in de buurt zijn.
Laat de machine niet zonder toezicht achter.
Zorg dat uw werkomgeving op orde is. Rommel kan
ongevallen veroorzaken.
Overbelast de machine niet. U werkt beter en zeker met
de juiste belasting van de machine.
Werk alleen met alle veiligheidsvoorzieningen op de
juiste wijze aangebracht. Verander niets aan de machine
wat de veiligheid in gevaar kan brengen.
Apparaat resp. onderdelen van het apparaat niet
veranderen.
Het apparaat mag niet met water worden afgespoten
(bron van gevaar voor elektrische stroom).
Machine niet in de regen laten staan. Niet in de regen
met die machine werken.
Als u de machine niet gebruikt moet u hem op een
droge plaats, buiten het bereik van kinderen opslaan.
Schakel de machine uit en neem de steker uit het
stopcontact bij:
Reparatiewerkzaamheden
−
Onderhouds- en reinigings-
−
werkzaamheden
Transport van de machine
−
Het verlaten van de machine (ook voor een korte tijd).
−
Onderzoek de machine op eventuele beschadigingen.
Voor het verdere gebruik van de machine moeten alle
−
veiligheidsvoorzieningen gecontroleerd worden op
de juiste montage en het goed functioneren.
Controleer of delen van de machine beschadigd
−
resp. defect zijn. Alle delen moeten juist gemonteerd
zijn en goed functioneren om de machine correct te
laten werken.
Beschadigde bescherminrichtingen en delen moeten,
−
indien noodzakelijk, door een erkende
reparatiewerkplaats gerepareerd of verwisseld worden.
Met uitzondering indien in de gebruiks-aanwijzing
anders aangegeven.
Beschadigde of onleesbare veiligheidsstickers
−
dienen te worden vervangen.
Elektrische veiligheid
Uitvoering van de aansluitleiding volgens de IEC 60245
(H 07 RN-F) norm met een aderdiameter van minimum
⇒ 2,5 mm² bij een kabellengte tot max. 10 m.
Gebruik nooit aansluitleidingen die langer dan 10 m zijn.
Langere aansluitleidingen veroorzaken een daling van de
spanning. De motor bereikt zijn maximum vermogen niet
meer, de functie van de machine wordt gereduceerd.
Bij het leggen van de aansluitleiding erop letten dat deze
niet gekneusd of geknikt wordt en dat de
stekerverbinding niet nat wordt.
Gebruik de kabel niet voor doeleinden warvoor hij niet
geschikt is. Bescherm de kabel tegen hitte, olie of
scherpe randen. De steker niet met de kabel uit het
stopcontact trekken.
Controleer de verleng kabel regelmatig op bescha-
digingen en vervang hem als hij beschadigd is.
Gebruik geen defecte kabels.
Gebruik alleen toegestane en gemerkte verleng-kabels.
25
Page 27

Maak geen geknutselde elektrische aansluitingen.
Veiligheidsvoorzieningen nooit overbruggen of buiten-
werking stellen.
Elektrische aansluitingen of reparaties mogen alleen
door een erkend bedrijf of een erkende
reparatiewerkplaats uitgevoerd worden. De plaatselijke
voorschriften moeten opgevolgd worden.
Reparaties aan andere delen van de machine mogen
alleen door de fabrikant of een door hem erkende
werkplaats uitgevoerd worden.
Alleen de originele toebehoren en onderdelen
gebruiken. Bij het gebruik van niet originele
onderdelen kunnen risico’s voor de gebruiker ontstaan.
De fabrikant kan niet aansprakelijk gesteld worden voor
ongevallen hierdoor ontstaan
IInnggeebbrruuiikknnaammee
Overtuigt u zich er van, dat het apparaat compleet en
volgens voorschrift is gemonteerd.
Controleer voor ieder gebruik
Aansluitleidingen op defecte plaatsen (scheuren,
−
sneden o. d.)
de machine op enventuele beschadigingen
−
of alle schroeven goed zijn vastgedraaid
−
het hydraulisch systeem op lekkages
−
Aansluiting op het net
L
Vergelijk de netspanning met de spanning (bijv. 230 V) die
op het type plaatje is aangegeven. Sluit de machine
volgens de voorschriften en op een geaard stopcontact
aan.
Gebruik verleng kabel met voldoende diameter
Sluit de machine aan via een Fi-veiligheidsschakelaar
(differentiaaluitschakelaar) met 30 mA.
L
L
Gebruik de machine nooit, wanneer een gevaar door
Zorg ervoor dat de machine en de werkplek zuiver zijn en
Controleer regelmatig, of voldoende hydraulische olie in
De houtsplijter mag slechts door één enkele persoon
Beveiliging: 16 A
Hydraulisch systeem
hydraulische vloeistof bestaat.
er geen olievlekken aanwezig zijn.
Gevaar voor uitglijden en brand!
het reservoir is (zie onderhoud en verzorging)
Inhoud: 2,6 liter
L
WWeerrkkeenn mmeett ddee bbrraannddhhoouuttsspplliijjtteerr
L
aanvullende VEILIGHEIDSINSTRUCTIES
worden bediend.
.
Alleen personen van meer dan 18 jaren, die de
bedieningshandleiding hebben gelezen en begrepen
mogen de machine bedienen.
Draag uw beschermuitrustingen (veiligheidsbril/-vizier,
handschoenen, veiligheidsschoenen), om u tegen
mogelijke letsels te beschermen.
Splijt nooit stammen, die nagels, draad of andere
voorwerpen bevatten.
Reeds gespleten hout en houtspaanders veroorzaken een
gevaarlijk werkterrein. Er bestaat gevaar voor struikelen,
uitglijden of vallen. Houd uw werkplek steeds opgeruimd.
Leg bij ingeschakelde machine nooit uw handen op
bewegende delen van de machine. Bewaar een
veiligheidsafstand van de houtstam, de schuif en de
splijtwig, om uw handen tegen letsels te beschermen.
Splijt alleen hout, dat aan de max. te verwerken lengte
van 370 mm voldoet.
Opstellen
Voor een aangename werkpositie, plaats de brandhoutsplijter
op een 60 – 75 cm hoog werkblad.
Blokkeer de wielen met keilen, om een rollen tijdens het
werken te vermijden.
Let er op, dat de werkplek de volgende voorwaarden vervult:
− slipbestendig
− vlak
− geen struikelgevaren
− voldoende lichtomstandigheden
Gebruik de machine niet in de buurt van aardgas,
benzinegoten of andere licht ontvlambare materialen.
Wat kan ik splijten?
Maten van de te splijten stammen
Lengte van het hout: max. 370 mm
Diameter van het hout: 50 – 250 mm
De diameter van het hout is een aanbevolen richtwaarde,
omdat:
− dun hout kan moeilijk te splijten zijn, wanneer het
knoestgaten bevat of de vezels te sterk zijn.
− dikker hout met meer dan ∅ 250 mm kan worden
gespleten, wanneer de vezels glad en los zijn.
Splijt geen groene stammen. Droge, opgeslagen stammen
kunnen veel beter worden gespleten en veroorzaken niet zo
vaak een vast vreten dan groen (nat) hout.
Bediening
Tweehandige werking
1. Druk op de IN-/UIT-schakelaar op de elektromotor. Wacht
een paar seconden, zodat de motor zijn eindtoerental
bereikt en de druk in de hydraulische pomp wordt
opgebouwd – afb. 1.
26
Page 28

2. Druk beide bedieningshendels gelijktijdig naar onder –
afb. 2.
De stamschuif drukt de stam tegen de splijtwig. De
stam wordt gespleten.
3. Laat de bedieningshendels los, de stamschuif beweegt
terug naar de uitgangspositie – afb. 3.
Afb. 1
IN-/UITschakelaar
Afb. 2
Ontluchten
Schroef de ontluchtingsschroef 3 – 4 omwentelingen los –
afb. 4.
Schroef de schroef eerst weer vast, wanneer u het
houtsplijten heeft beëindigd.
Ontluchtingsschroef
Afb. 4
losschroeven
vastschroeven
Hout splijten:
Leg de stammen steeds in de lengte en vlak op het
hoofdframe van de splijter. De stam dient door de
stamleiplaten te worden omsloten. Afb. 5.
Afb. 5
Afb. 3
Bijzondere instructies voor het splijten:
Voorbereidingen:
Bereid het te splijten hout voor op de maximum te verwerken
afmetingen (370 mm lang, ∅ 50 – 250 mm) en let er op, dat
het hout recht is gezaagd.
Legen het hout zodanig klaar aan de houtsplijter, dat er geen
gevaar voor u bestaat (struikelgevaar).
Leg de stam nooit schuin op het hoofdframe. Afb. 6
Afb. 6
Let er steeds op, dat de splijtwig en de stamschuif de
uiteinden van de stam verticaal kunnen grijpen.
Splijt nooit twee stammen in één werkcyclus.
Nooit hout tijdens het werkproces bijleggen of vervangen.
L Nooit door het in stand houden van de druk gedurende
meerdere seconden een splijten van een stam proberen te
dwingen. Dit kan leiden tot beschadigingen aan de machine.
Positioneer de stam opnieuw op het hoofdframe en herhaal
het splijtproces of leg de stam opzij.
27
Page 29

Hoe wordt een vastgeklemde stam losgemaakt?
1. Laat beide bedieningselementen los, zodat de stamschuif
terug kan bewegen.
2. Leg een driehoekige houten spie onder de stam, schuif de
stamschuif uit zodat deze de spie onder de vastgeklemde
stam drukt.
3. Wanneer de stam niet loskomt, herhaalt u het proces met
een grotere spie.
Bij het losmaken nooit op de vastgeklemde stam
hameren of de handen aan de stam houden.
Vraag geen tweede persoon om hulp.
Probeer de stam niet vrij te krijgen door er met gereedschap
op te slaan, dit kan leiden tot een breuk van het motorblok.
Einde van het werk:
Voor u op de IN-/UIT-schakelaar van de elektromotor op
de machine drukt, dient u er op te letten, dat de
stamschuif terug naar de uitgangspositie is bewogen.
Haal dan de netstekker uit de contactdoos.
Schroef de ontluchtingsschroef weer vast. Afb. 4.
Onderhouds- en verzorgingsinstructies in acht nemen.
Afb. 7
A
OOnnddeerrhhoouudd eenn vveerrzzoorrggiinngg
Voor onderhouds- en reinigingswerkzaamheden
de netstekker uit de contactdoos halen.
Draag veiligheidshandschoenen om letsels aan de
handen te vermijden.
L Neem het onderstaande in acht om de functionaliteit van
de brandhoutsplijter te behouden:
Reinig de machine grondig na het beëindigen van
het werk.
Verwijder harsresten.
Olie de zuigerstang (afb. 7) regelmatig in met een
milieuvriendelijke sproeibare olie.
Oliepeil controleren c.q. olie wisselen.
Splijtwig scherpen
Na lange bedrijfsduur of bij verminderd splijtvermogen, de
splijtwig scherpen met een fijne vijl (bramen verwijderen). Afb.
9.
Afb. 9
B
C
D
G
F
E
Afb. 8
I
H
J
A Stamschuif F Elektromotor
B Ontluchtingsschroef G IN-/UIT-schakelaar
C Zuigerstang H Splijtwig
D Oliepeilstaaf I Stamleiplaten
E Cilinderdeksel J Bedieningshendels
kant scherpen
Hoe controleer ik het oliepeil?
1. De stamschuif dient in de uitgangspositie terug bewogen
te zijn.
2. Kantel de houtsplijter zo, dat de vulopening naar boven
wijst. Afb. 10.
Voor het kantelen en vasthouden van de
houtsplijter is een tweede persoon noodzakelijk.
3. Schroef de oliepeilstaaf uit – afb. 11. Let bij het uitnemen
op de oliedichting.
4. Reinig de oliepeilstaaf en de oliedichting.
5. Steek de peilstaaf weer tot aan de aanslag in de opening.
6. Trek de oliepeilstaaf er weer uit.
Wanneer het oliepeil tussen beide merkstrepen ligt is
er voldoende olie in het reservoir.
Wanneer het oliepeil onder de onderste merkstreep
ligt, dient met behulp van een zuivere trechter olie te
worden bijgevuld.
onderste merkstreep bovenste merkstreep
28
Page 30

7. Controleer de oliedichting. Deze dient bij beschadigingen
te worden vervangen.
Oliedichting
8. Schroef de oliepeilstaaf weer vast.
Attentie! Om beschadigingen aan de oliedichting en de
schroefdraad van het cilinderdeksel te vermijden, de
schroefniet te vast schroeven.
Afb. 10
4. Kantel dan de machine om de olie in de recipiënt te
ledigen.
5. Kantel dan de houtsplijter zo, dat de vulopening naar
boven wijst – afb. 10.
Voor het kantelen en vasthouden van de houtsplijter
is een tweede persoon noodzakelijk.
6. Vul de nieuwe hydraulische olie (2,6 liter) met behulp van
een zuivere trechter in de machine.
7. Reinig de oliepeilstaaf en de oliedichting.
8. Controleer de oliedichting. Deze dient bij beschadigingen
te worden vervangen.
9. Schroef de oliepeilstaaf weer vast.
Attentie! Om beschadigingen aan de oliedichting en de
schroefdraad van het cilinderdeksel te vermijden, de
schroef niet te vast schroeven.
Verwijder de oude olie volgens de voorschriften
(verzamelpunt voor oude olie in uw buurt). Het is
verboden, de oude olie in de grond af te laten of met
afval te mengen.
Hydraulische olie
L
Voor de hydraulische cilinder bevelen wij de volgende
hydraulische oliesoorten aan:
Afb. 11
Wanneer hoef ik de olie te wisselen?
Oliepeilstaaf
Eerste oliewisseling na 50 bedrijfsuren, daarna alle 250
bedrijfsuren of 1 x jaarlijks.
Olie wisselen:
1. De stamschuif dient in de uitgangspositie terug bewogen
te zijn.
2. Plaats een recipiënt, die minimum 4 liter olie kan opnemen
onder de houtsplijter.
3. Schroef de oliepeilstaaf uit. Let bij het uitnemen op de
oliedichting.
Shell Tellus T 22
Aral Vitam Gf 22
BP Energol HLP 22
Mobil DTE 11
of gelijkwaardige olie
Gebruik geen andere oliesoorten. Het gebruik van andere
oliesoorten beïnvloedt de functie van de hydraulische
cilinder.
GGaarraannttiieevvoooorrwwaaaarrddeenn
• Wij aanvaarden 2 jaare garantie vanaf leverung van het
apparaat vanuit het magazijn van de handelaar en voor
gebreken die zijn opgetreden door materiaal- resp.
Fabricagefouten.
• Voor schade die ontstaat door onvakkundige behandeling of
onvoldoende verpakking bij het terugzenden van de
apparaten c.q. het niet-inachtnemen van de
bedienigshandleiding, uijn aanspraken op garantie ook
tijdens de garantieperiode uitgesloten.
• Gebrekkige onderdelen dienen vrijn van porto- resp.
Vrachtkosten an onze fabriek te worden opgestuurd. De
beslissing i. v. m. een gratis levering van vervangende
onderdelen ligt bij ons.
• De garantie geldt niet voor de normale slijtage van splijtwig,
hydraulische olie, geleidingen, dichtingen en loopwielen.
• Noodzakelijke garantieewerkzaamheden worden door ons
uitgevoerd. Het verhelpen van de schade door een andere
firma dient uitgedrukklijk door ons te worden goedgekeurd.
• Alleen indien orginele reserveonderdelen worden gebruikt,
bieden wij garantie.
• Wijzingen die de technische vooruitgang dienen., houden
wij bij ons.
29
Page 31

MMooggeelliijjkkee ssttoorriinnggeenn
Probleem Mogelijke oorzaak Oplossing
Stam wordt niet gespleten
(te weinig splijtvermogen)
Stamschuif schuift slingerend of met
hevige trillingen uit
Stamschuif schuift niet uit
Motor loopt niet aan
Olielek aan de oliepeilstaaf
⇒ Stam is niet correct gepositioneerd
⇒ Stam overschrijdt de toegelaten
afmetingen of het hout is te hard voor
het vermogen van de machine
⇒ Splijtwig splijt niet
⇒ Olielek
⇒ Hydraulische druk te laag
⇒ Verkeerde aansluitleiding (langer dan
10 m of te kleine aderdiameter)
⇒ Lucht in de kringloop ⇒ Ontluchtingsschroef openen
⇒ Hydraulische pomp defect ⇒ Om het probleem op te lossen neemt u
⇒ Netspanning ontbreekt
⇒ Aansluitkabel defect
⇒ Elektromotor defect
⇒ Oliedichting aan de peilstaaf ondicht ⇒ Oliedichting uitwisselen
⇒ Positioneer de stam opnieuw
⇒ Stam op de toegelaten afmetingen
zagen
⇒ Splijtwig scherpen, op bramen en
inkervingen controleren
⇒ Leg een stuk karton onder de
houtsplijter om het lek te vinden. Om
het probleem op te lossen neemt u
contact op met de fabrikant of een door
hem genoemde firma.
⇒ Oliepeil controleren; indien
noodzakelijk olie bijvullen.
Probleem kan niet worden opgelost,
gelieve contact op te nemen met de
fabrikant of een door hem genoemde
firma.
⇒ Correcte aansluitleiding gebruiken
⇒ Oliepeil controleren; indien
noodzakelijk olie bijvullen.
Probleem kan niet worden opgelost,
gelieve contact op te nemen met de
fabrikant of door hem genoemde firma.
contact op met de fabrikant of een door
hem genoemde firma.
⇒ Zekering controleren (16 A)
⇒ Aansluitkabel vervangen c.q. door een
elektricien laten controleren
⇒ Om het probleem op te lossen neemt u
contact op met de fabrikant of een door
hem genoemde firma.
TTeecchhnniisscchhee ggeeggeevveennss
Splijtkracht 40 kN (4 t)
Lengte van het hout 370 mm
Diabeter van het hout 50 – 250 mm
Splijtlengte 300 mm
Diameter zuigerstang 30 mm
Hydraulische olie (max.) 2,6 liter
Vermogen van de elektromotor (opnamevermogen) P1 = 1500 W ( S1-100 % )
Aansluiting 230 V ~ 50 Hz
Toerental 2850 min -1
Afmetingen lengte 1115 x breedte 320 x hoogte 470 mm
Gewicht 45 kg
30
Page 32

Det är inte tillåtet att ta maskinen i drift om
man inte noga har läst igenom bruksanvisningen, följt alla anvisningar och har
monterat maskinen enligt monteringsanvisningarna.
Förvara bruksanvisningen väl.
IInnnneehhåållll
Symboler på maskinen/bruksanvisning 31
Leveransomfattning 31
Föreskriven användning 31
Faror och risker 32
Säker användning 32
Idrifttagande 33
Att arbeta med vedklyven 33
Underhåll och skötsel 35
Garantie 36
Möjliga störningar 37
Teknisk data 37
Reservdelar 60
Konformitetsförklaring 61
SSyymmbboollss mmaacchhiinnee
Läs igenom och beakta manualen och
säkerhetsanvisningarna innan apparaten
tas i bruk.
Använd skyddsskor under arbetet så att
fötterna inte skadas av nedfallande
vedträn.
Använd skyddshandskar under arbetet för
att skydda händerna mot spån och flisor.
Använd skyddsglasögon eller visir under
arbetet för att skydda ögonen mot spån
och flisor.
230 V – 240 V
SSyymmbboolleerr II bbrruukkssaannvviissnniinnggeenn
En fara hotar eller farlig situation. Om denna
symbol resp. hänvisning inte beaktas finns risk för att
personer kan skada sig eller maskinen resp. andra
föremål kan ta skada.
L
Viktiga anvisningar för den rätta användningen.
Om denna symbol resp. hänvisning inte beaktas
finns för maskin- eller funktionsstörningar.
Användningstips. Här får du information och tips
om hur du använder maskinen på optimalt sätt.
Montering, hantering och underhåll. Här förklaras
allt i detalj som du måste göra.
Det är förbjudet att avlägsna eller
modifiera skydds- och säkerhetsanordningar.
Endast operatören får vistas i maskinens
arbetsområde. Se till att inga andra
personer, husdjur o.s.v. finns i riskområdet
(minimiavstånd 5 m).
Risk för skär- och klämskador; vidrör
aldrig farliga områden när kniven rör sig.
Kontrollera innehållet i kartongen dvs.
om leveransen är komplett
om leveransen ev. har tagit skada
Informera din återförsäljare, leverantören resp. tillverkaren
omgående om någon del fattas eller har tagit skada. Senare
reklamationer kan inte accepteras.
FFöörreesskkrriivveenn aannvväännddnniinngg
Vedklyven får användas enbart till klyvning av ved.
Använd endast rakt avsågade stockar i klyven.
OBS!
Kontrollera alltid påskjutarens rörelse.
OBS!
Använd aldrig händerna för att ta bort en
stock som har fastnat i kniven.
OBS!
Stäng av motorn och dra ur kontakten vid
reparations-, underhålls- och rengöringsarbete.
OBS!
Observera den spänning som anges på
typskylten.
Stopp!
Beakta manualen. Lossa luftskruven
Avluftning sid. 34
LLeevveerraannssoommffaattttnniinngg
31
Page 33

Metalldelar (spik, tråd etc.) måste ovillkorligen tas bort ur
den ved som skall klyvas.
All annan användning än ovannämnd är otillåten. För
skador som förorsakas av otillåten användning bär
tillverkaren inget ansvar – användaren ensam har
ansvaret i ett sådant fall.
FFaarroorr oocchh rriisskkeerr
Även om man använder maskinen på föreskrivet sätt
och beaktar alla säkerhetsanvisningar finns alltid en viss risk
att skada sig på grund av maskinens speciella konstruktion.
Risken att skada sig kan man i första hand reducera genom
att i detalj följa alla anvisningar i avsnittent „Föreskriven
användning“ och „Säkerhetsanvisningar“, Därutöver bör man
vara extra försiktig vad det gäller följande risker:
Hänsyn och försiktighet minskar riskerna för person- och
sakskador.
Om säkerhetsåtgärderna ignoreras kan person- eller
sakskador uppstå.
Risk att skada sig genom ström om man använder
bristfälliga elektriska anslutningsledningar.
Risk att skadas sig om man vidrör spänningsförande delar
om elektriska komponenter har öppnats.
Dessutom kann det alltid finnas en viss risk att skada sig även
om denna risk inte är direkt uppenbar.
SSääkkeerr aannvväännddnniinngg
Läs noga igenom och beakta anvisningarna nedan
samt alla tillämpliga nationella säkerhetsbestämmelser
innan du börjar använda maskinen för att skydda både
dig själv och andra för möjliga faror.
Överlämna säkerhetsanvisningarna till alla personer
L
som använder maskinen.
Förvara säkerhetsanvisningarna väl så att de alltid
L
finns till hands.
Informera dig med hjälp av bruksanvisningen om
maskinen och dess funktioner.
Använd maskinen aldrig för andra ändamål än den är
avsedd för (se avsnitten „Föreskriven användning“ och
„Att arbeta med vedklyven“).
Se till att du står stadigt så att du har god balans.
Ha en sådan arbetsställning att Du befinner Dig bakom
påskjutaren invid manöverhandtagen. Stå aldrig i närheten
av kniven.
Stå aldrig ovanpå maskinen.
Var uppmärksam. Tänk på vad Du gör. Använd Ditt
sunda förnuft. Använd inte apparaten:
− om Du är trött.
− om Du är påverkad av droger, alkohol eller mediciner
vilka kan påverka omdömet.
Använd
− skyddsglasögon eller -visir
− arbetshandskar
− hörselskydd
− säkerhetsskor med stålhätta
Använd lämpliga arbetskläder:
− inga vida kläder, eller smycken (kan fasta i de rörliga
delarna)
Den som använder maskinen ansvarar för att inga andra
personer kan ta skada av den.
Barn och ungdomar under 18 år får inte använda
maskinen.
Håll barn på avstånd från maskinen.
Använd alldrig maskinen när obehöriga personer
uppehåller sig i närheten.
Låt maskinen aldrig vara utan uppsikt.
Se alltid till att det är rent och städat kring maskinen!
Oordning kan leda till olycksfall.
Överbelasta inte maskinen! Håll dig alltid till den angivna
effekten.
Använd maskinen endast im alla skyddsanordningar är
monterade enligt anvisningarna och förändra ingenting på
maskinen som skulle kunna påverka säkerheten.
Förändra ingenting på maskinen.
Rengör maskinen aldrig med en vattenstråle (riskfaktor:
elektrisk ström).
Låt maskinen aldrig stå ute i regn och använd den inte
när det regnar.
Förvara maskinen endast på en torr plats och där barn
inte kann komma åt den.
Stäng av maskinen och dra ur nätkontakten i samband
med:
reparationer
−
underhåll och rengöring
−
att du åtgärdar en störning
−
transport
−
att du lämnar maskinen (även vid korta arbetsavbrott)
−
Kontrollera regelbundet om maskinen eventuellt kan vara
skadat:
Varje gång innan du börjar använda maskinen igen
−
måste du kontrollera att skyddsanordningarna
fungerar felfritt.
Kontrollera om delar har tagit skada eller om det är
−
defekta. Alla delar måste vara korrekt monterade och
uppfylla alla krav som ställs på dem.
Skyddsanordningar som har tagit skada resp. som
−
inte fungerar felfritt måste repereras eller bytas ut på
en auktoriserad fackverkstad såvida det inte står något
annat i bruksanvisningen.
Skadade eller oläsliga etiketter med
−
säkerhetsanvisningar måste ersättas.
Elektrisk säkerhet
Utförande av anslutningsledningen enligt IEC 60245 (H
07 RN-F) med ett ledartvärsnitt på minst
⇒ 2,5 mm² vid en kabellängd på upp till max. 10 m
Använd aldrig anslutningsledningar längre än 10 m. De
kan förorsaka spänningsfall. Motorn kan inte nå full effekt
och maskinens prestanda reduceras.
32
Page 34

När man drar anslutningsledningen är det viktigt att se
till att ledningen inte kläms ellr böjs för mycket och att
insticksförbindelsen inte kan bli fuktig.
Använd kabel aldrig för ändamål som de inte är avsedda
för. Skydda kablar för kraftig värme, olja och vassa
kanter. Drag aldrig i själva kabeln för att dra ut en
stickkontakt ur ett eluttag.
Om du använder en skarvkabel är det viktigt att
regelbundet kontrollera den att den inte har tagit skada.
Skadade kablar ska alltid bytas ut omgående.
Använd aldrig defekt anslutningsledningar.
Använd endast skarvkablar som är godkända och märkta
för utomhusbruk.
Använd inga provisoriska elanslutningar.
Skyddsanordningar får aldrig överkopplas eller tas ur
drift.
Elanslutningar resp. reparationer på maskinens
elektriska komponenter får endast iordningställas resp.
genomföras av auktoriserad elfackman eller på en av
våra service-verkstäder. De lokala föreskrifterna, i
synnerhet vad det gäller skyddsåtgärder, ska alltid
beaktas.
Reparationer på övriga delar på maskinen får endast
genomföras av tillverkaren eller på en av våra serviceverkstäder.
Använd endast original-reservdelar och original tillbehör.
Om andra delar än originaldelar används kan detta
leda till olycksfall. För skador som följd av att andra delar
än originaldelar har använts ansvarar tillverkaren inte.
IIddrriiffttttaaggaannddee
Kontrollera att maskinen är komplett monterad och att
alla anvisningar har beaktats i samband med
monteringen.
Kontrollera följande inför varje gång som du använder
maskinen:
Om anslutningsledningar är skadade (sprickor, snitt
−
eller dylikt).
Använd inga defekta ledningar
Om själva maskinen eventuellt kan vara skadad (se
−
avsnittet „Säker användning“)
Om alla skruvar är ordentligt åtdragna.
−
hydrauliken (läckage)
−
Nätanslutning
L
Kontrollera att spänningen som står på maskinens typskylt
stämmer överens med nätspänningen och anslut
maskinen till ett föreskrivet el-uttag.
Använd endast skarvledningar med tillräckligt stort
tvärsnitt.
Anslut maskinen med en Fi-skyddsbrytare
(felströmsskyddsbrytare) 30 mA.
Säkringar: 16 A
L
33
Hydraulik
L
Använd aldrig maskinen om risker uppstår p.g.a.
hydraulikvätska.
Kontrollera att maskinen och arbetsområdet är rena och
inte uppvisar några oljefläckar.
Risk för halka och brand!
Kontrollera med jämna mellanrum att det finns tillräckligt
med hydraulolja i tanken (se Underhåll och skötsel)
Innehåll: 2,6 liter
AAtttt aarrbbeettaa mmeedd vveeddkkllyyvveenn
LL
Kompletterande SÄKERHETSANVISNINGAR
Vedklyven får användas av endast en person.
Maskinen får användas endast av personenr över 18 års
ålder vilka har läst och förstått manualen.
Använd skyddsutrustning (skyddsglasögon/-visir,
handskar, skyddsskor), som skydd mot ev. skador.
Klyv aldrig stockar som innehåller spik, tråd eller andra
föremål.
Kluven ved och spån utgör i sig en fara – man kan
snubbla, slinta eller falla omkull på veden – håll därför
ordning i området runt klyven.
Lägg aldrig händerna på rörliga maskindelar när maskinen
är igång. Beakta säkerhetsavståndet till stock, påskjutare
och kniv så att inte händerna skadas.
Klyv endast stockar som inte är längre än max.längden
370 mm.
Placering
För en bekväm arbetsställningen, ställ klyven på en 60 – 75
cm hög arbetsyta.
Blockera hjulen med kilar för att undvika rullning under
arbetet.
Kontrollera att arbetsytan uppfyller följande krav:
− Halksäker
− Jämn
− Ingen risk att någon snubblar
− Tillräckligt god belysning
Använd inte maskinen i närheten av naturgas, bensinrännor
eller annat lätt brännbart material.
Vad kan jag klyva?
Storlek på stockarna
Längd på stocken: max. 370 mm
Diameter på stocken: 50 – 250 mm
Diametern är ett rekommenderat riktvärde eftersom:
− Tunnare stockar kan vara svåra att klyva om de innehåller
kvisthål eller om fibrerna är för starka.
− Tjockare trä än ∅ 250 mm kan klyvas om fibrerna är
glatta och mjuka.
Page 35

Klyv inga gröna stockar. Torra, lagrade stockar går mycket
lossa
enklare att klyva och fastnar inte lika lätt som gröna (våta)
stockar.
Handhavande
Tvåhandsfattning
1. Tryck på PÅ-/AV-knappen på elmotorn. Vänta ett
ögonblick tills att motorn har kommit upp i slutvarvtalet och
trycket i hydraulikpumpen har genererats – bild 1.
2. Tryck bägge manöverhandtagen nedåt samtidigt – bild 2.
Påskjutaren skjuter stocken mot kniven, och stocken
klyvs.
3. Släpp handtagen. Påskjutaren går tillbaka till utgångsläget
– bild 3.
bild 1
bild 2
TILL-/FRÅNhandtag
Att tänka på:
Förberedelser:
Förbered stockarna så att de ligger inom max.dimensinerna
(370 mm längd, ∅ 50 – 250 mm). Se till att veden är rakt
kapad.
Lägg stocken i klyven så att risken för personskador
minimeras (risk för snubbling).
Avluftning
Lossa på luftskruven 3 – 4 varv – bild 4.
Dra åt skruven igen när klyvningen är avslutad.
Luftskruv
bild 4
dra åt
Vedklyvning:
Lägg stocken i längsriktningen och plant på huvudramen
till klyven. Stocken måste befinna sig i styrplåtarna. Bild 5
bild 3
bild 5
Lägg aldrig stocken snett på huvudramen. Bild 6
bild 6
Se alltid till att eggen och påskjutaren kan gripa tag i
34
stockändarna lodrättt.
Klyv aldrig två stockar i ett och samma moment.
Lägg aldrig på extrastockar eller byt ut stockar under
pågående klyvning.
Page 36

L Försök aldrig framtvinga klyvning genom att hålla kvar
påskjutningen i flera sekunder. Detta kan förorsaka skada på
maskinen.
Placera stocken på nytt i huvudramen och upprepa
klyvningen, eller ta en annan stock.
Hur lossar jag en fastklämd stock?
1. Släpp bägge handtagen så att påskjutaren kan åka
tillbaka.
2. Lägg en trekantig träkil under stocken. Kör ut påskjutaren
så att den trycker in kilen under den fastklämda stocken.
3. Om inte stocken lossnar, måste man använda större kilar.
Hamra aldrig på den fastklämda stocken när den lossnar
och håll aldrig händerna nära stocken.
Be inte om hjälp.
Försök inte att få loss stocken med hjälp av verktyg –
motorblocket kan ta skada.
När arbetet är klart:
Innan Du trycker på elmotorns PÅ/AV-knapp måste Du se
till att påskjutaren är tillbakakörd till utgångsläget.
Dra ur nätkontakten.
Skruva tillbaka luftskruven. Bild 4
Beakta varningarna och skötselanvisningarna.
bild 7
A
UUnnddeerrhhåållll oocchh sskkööttsseell
Dra ur nätkontakten före underhåll och skötsel.
Använd skyddshandskar för att undvika skador på
händerna.
L Beakta följande för att få en lång livstid på maskinen:
Rengör maskinen ordentligt efter avslutat arbete.
Ta bort kådrester.
Olja in kolvstången (bild 7) med jämna mellanrum.
Använd en miljövänlig sprayolja.
Kontrollera oljenivån resp. byt ut oljan
Skärpning av kniven
När maskinen har använts en längre tid, eller om klyveffekten
har minskat, kan man vässa kniven med en fin fil (ta bort
grader). Bild 9
bild 9
skärpa kanten
B
C
D
G
F
E
bild 8
I
H
J
A Påskjutare F Elmotor
B Luftskruv G PÅ-/AV-knapp
C Kolvstång H Kniv
D Oljesticka I Ledare
E Cylinderkåpa J Manöverhandtag
35
Hur kontrolleras oljenivån?
1. Påskjutaren måste stå i utgångsläget.
2. Tippa klyven så att påfyllningsöppningen pekar uppåt.
Bild 10
Be om hjälp för att hålla upp och fast klyven.
3. Skruva ur oljemätstickan – bild 11. Akta oljetätningen.
4. Rengör oljemätstickan och oljetätningen.
5. Sätt tillbaka stickan i öppningen så långt in det går.
6. Dra ut oljestickan igen.
Om oljenivån ligger mellan de båda markeringarna,
finns det tillräckligt med olja i behållen.
Om oljenivån ligger nedanför den nedre markeringen,
måste man fylla på olja. Använd en ren tratt.
nedre markering övre markering
Page 37

7. Kontrollera oljetätningen. Om den är skadad måste den
bytas ut.
Oljesticka
8. Skruva tillbaka oljemätstickan.
OBS! För att inte oljetätningen och gängorna i
cylinderkåpan skall skadas, får skruven inte dras åt för
hårt.
bild 10
bild 11
När skall oljan bytas?
Första oljebyte efter 50 arbetstimmar, därefter var 250:e
arbetstimme eller 1x varje år.
oljemätstickan
Utbyte:
1. Påskjutaren måste stå i utgångsläget.
2. Ställ ett kärl, som rymmer minst 4 liter olja, under klyven.
3. Skruva ur oljemätstickan. Akta oljetätningen.
4. Tippa sedan maskinen så att oljan rinner ut i kärlet.
5. Tippa maskinen så att oljepåfyllningsöppningen pekar
uppåt – bild 10.
Be om hjälp för att hålla upp och fast klyven.
6. Fyll på ny hydraulikolja (2,6 liter) med hjälp av en ren tratt.
7. Rengör oljemätstickan och oljetätningen.
8. Kontrollera oljetätningen. Om den är skadad måste den
bytas ut.
9. Skruva tillbaka oljemätstickan.
OBS! För att inte oljetätningen och gängorna i
cylinderkåpan skall skadas, får skruven inte dras åt för
hårt.
Ta hand om den gamla oljan på föreskrivet sätt
(avfallsanläggning). Det är inte tillåtet att hälla ut
oljan i marken eller att blanda ut den i annat avfall.
Hydraulolja
L
Vi rekommenderar följande hydrauloljor för hydraulikcylindern:
Shell Tellus T 22
Aral Vitam Gf 22
BP Energol HLP 22
Mobil DTE 11
eller likvärdig
Använd inga andra oljesorter. Används andra oljesorter,
påverkas hydraulcylinderns funktion.
GGaarraannttiieevviillllkkoorr
• Vi står för två års garanti från och med leverans av
maskinen från affärens lager och detta innefattar brister
om uppstått på grund av material- eller tillverkningsfel.
• För skador till följd av en ofackmannamässig hantering
eller bristfällig förpackning i samband med apparatens
återtransport resp. till följd av att bruksanvisningen inte har
beaktats, frånsäger vi oss allt ansvar och kunden förlorar
sina garantianspråk. Detta gäller även för garantitiden.
• Felaktiga delar skall porto- fraktfritt skickas till vår fabrik.
Beslutet att kostnadsfritt leverera reservdel åligger oss.
• Garantin gäller inte normal förslitning på kniv, hydraulolja,
styrningar, tätningar och löphjul.
• Förekommande garantiarbeten utförs av oss eller av ett av
oss rekommenderat serviceställe. Vårt uttryckliga
medgivande krävs för att låta utföra garantireparation
genom annan firma.
• Garantin är endast tillämplig vid användning av originalreservdelar.
• Vi förbehåller oss ändringar som gagnar den tekniska
utvecklingen.
36
Page 38

PPrroobblleemmllöössnniinnggssgguuiiddee
Problem Möjlig orsak Åtgärd
Stocken klyvs inte
(för låg klyvkraft)
Påskjutaren svajar eller skakar kraftigt när
den körs ut
Påskjutaren åker inte ut
Motorn startar inte
Oljeläckage vid oljemätstickan
⇒ Stocken ligger fel
⇒ Stocken är längre/större än tillåtet, eller
trät är för hårt
⇒ Kniven klyver inte
⇒ Oljeläckage
⇒ För lågt hydrauliktryck
⇒ fel anslutningsledning (längre än 10 m
eller för litet ledartvärsnitt)
⇒ Luft i kretsloppet ⇒ Öppna luftskruven
⇒ Defekt hydraulikpump ⇒ Kontakta tillverkaren eller av denne
⇒ Ingen nätspänning
⇒ Defekt anslutningskabel
⇒ Elektromotor defekt
⇒ Otät oljetätning vid oljestickan ⇒ Byt ut oljetätningen
⇒ Lägg i stocken rätt
⇒ Kapa stocken till rätt mått
⇒ Vässa kniven (ta bort grader eller jack)
⇒ Lägg en bit kartong under klyven för att
se var läckan finns. Kontakta
tillverkaren eller av denne angivet
företag.
⇒ Kontrollera oljenivån. Fyll ev. på olja.
Om problemet inte löses: Kontakta
tillverkaren eller av denne angivet
företag.
⇒ Använd rätt anslutningsledning
⇒ Kontrollera oljenivån. Fyll ev. på olja.
Om problemet inte löses: Kontakta
tillverkaren eller av denne angivet
företag.
angivet företag.
⇒ Kontrollera säkringen (16 A)
⇒ Byt ut anslutningskabeln, eller låt
elektriker kontrollera den
⇒ Kontakta tillverkaren eller av denne
angivet företag.
TTeekknniisskkaa ddaattaa
Klyvningskraft 40 kN (4 t)
Vedlängd 370 mm
Stockdiameter 50 – 250 mm
Klyvlängd 300 mm
Diameter kolvstång 30 mm
Hydraulolja (max.) 2,6 liter
Elmotoreffekt (effektbehov) P1 = 1500 W ( S1-100 % )
Anslutning 230 V ~ 50 Hz
Varvtal 2850 min -1
Dimensioner Längd 1115 x bredd 320 x höjd 470 mm
Vikt 45 kg
37
Page 39

Anvend ikke apparatet, før De har læst betjeningsvejledningen, iagttaget de angivne
henvisnin-ger og monteret apparatet som
beskrevet.
Bør opbevares til senere anvendelse.
IInnddhhoolld
Symboler på apparatet / i betjeningsvejledningen 38
Leveringsomfang 38
Formålsbestemt anvendelse 38
Uberegnelige risici 39
Sikkert arbejde 39
Igangsætning 40
Arbejde med brændekløveren 40
Vedligeholdelse og pleje 42
Garanti 43
Mulige fejl 44
Tekniske data 44
Overensstemmelseserklæring 60
Reservdeler 61
d
SSyymmbboolleerr ppåå aappppaarraatteet
Før igangsætningen skal brugsanvisningen og sikkerhedsforskrifterne læses
igennem og overholdes.
230 V – 240 V
t
L
Bær sikkerhedssko under arbejdet for at
beskytte fødderne mod faldende
brændestykker.
Bær beskyttelseshandsker under arbejdet
for at beskytte hænderne mod spån og
splinter.
Bær beskyttelsesbriller eller ansigtsskærm
under arbejdet for at beskytte øjnene mod
spån og splinter.
Det er forbudt at fjerne eller ændre
beskyttelses- og sikkerhedsanordninger.
Kun brugeren må opholde sig i maskinens
arbejdsområde. Uvedkommende personer
samt hus- og nyttedyr skal holdes borte fra
farezonen (minimumsafstand 5 m).
Fare for snitsår og indeklemning; berør
aldrig farlige områder, når kløvekilen
bevæger sig.
Bemærk!
Hold altid øje med stammeskubberens
bevægelse.
! fuldstændighed
! evt. transportskader
Reklamationer skal omgående meddeles forhandleren,
leverandøren eller producenten. Senere reklamationer
anerkendes ikke.
Brændekløveren må kun anvendes til kløvning af træ.
Kun lige afskåret træ egner sig til brændekløveren.
Metaldele (søm, tråd osv.) skal under alle
omstændigheder fjernes fra træet, som skal kløves.
Ethvert derudover gående brug gælder som ukorrekt
anvendelse. For heraf resulterende skader overtager
producenten intet ansvar - risikoen overtages ene og
alene af brugeren.
38
SSyymmbboolleerr ii bbrruuggssaannvviissnniinngg
Truende fare eller farlig situation. Ignorering af
disse henvisninger kan medføre kvæstelser eller
materielle skader.
Vigtige henvisninger til saglig korrekt håndtering.
Ignorering af disse henvisninger kan medføre
forstyrrelser.
Brugerhenvisninger. Disse henvisninger hjælper
Dem med at anvende alle funktioner optimalt.
Montering, betjening og vedligeholdelse. Her
forklares nøjagtigt, hvad De skal gøre.
Efter udpakning skal kartonens indhold kontrolleres med
hensyn til
FFoorrmmåållssbbeesstteemmtt aannvveennddeellssee
Bemærk!
Fjern aldrig manuelt en stamme, som
sidder fast i kilen.
Bemærk!
Før reparations-, vedligeholdelses- og
rengøringsarbejde skal motoren afbrydes
og netstikket trækkes ud.
Bemærk!
Overhold spændingen, der er angivet på
typeskiltet.
Stop!
Følg brugsanvisningen. Løsning
af udluftningsskruen
Udluftning side 41
LLeevveerriinnggssoommffaanngg
Page 40

UUbbeerreeggnneelliiggee rriissiiccii
Også ved formålsbestemt anvendelse kan der endnu
bestå uberegnelige risici på trods af overholdelse af alle
gældende sikkerhedsbestemmelser på grund af
konstruktionen til anvendelsesformålet.
Uberegnelige risici kan minimeres, når både
"Sikkerhedshenvisninger" og "Formålsbestemt anvendelse
samt driftsvejledningen iagttages.
Hensyntagen og forsigtighed reducerer risikoen for personog materielle skader.
Ignorering eller tilsidesættelse af sikkerhedsfor-
anstaltninger kan resultere i tilskadekomst af bruger eller
beskadigelse af materielle ting.
Fare på grund af strøm ved anvendelse af ukorrekte
eltilslutningskabler.
Berøring af spændingsførende dele ved åbnede elektriske
komponenter.
Derudover kan der på trods af alle trufne forholdsregler bestå
ikke tydelige uberegnelige risici.
SSiikkkkeerrtt aarrbbeejjddee
Læs og iagttag før igangsætning af dette produkt
følgende henvisninger og Deres fagsammenslutnings
forskrifter om ulykkesforebyggelse hhv. de gyldige
sikkerhedsbestemmelser i det pågældende land for at
beskytte Dem selv og andre mod eventuelle skader.
Giv sikkerhedshenvisningerne videre til alle personer,
L
der arbejder med apparatet.
Opbevar disse sikkerhedshenvisninger på et sikkert
L
sted.
Gør Dem kendt med apparatet før brug ved hjælp af
betjeningsvejledningen.
Anvend apparatet ikke til formål, som det ikke er beregnet
til (se "Formålsbestemt anvendelse" og "Arbejde med
brændekløveren").
Sørg for en stabil kropsstilling og hold hele tiden
balancen.
Indtag en arbejdsstilling, som er bag skubberen i
betjeningshåndtagenes område. Stå aldrig i kløvekilens
område.
Stå aldrig på maskinen.
Vær forsigtig. Vær opmærksom på arbejdet. Påbegynd
arbejdet varsomt. Anvend maskinen ikke:
− når du er træt.
− under påvirkning af narkotika, alkohol eller lægemidler,
som kan have indflydelse på din dømmekraft.
Bær underarbejdet
− beskyttelsesbriller eller ansigtsskærm
− arbejdshandsker
− høreværn
− sikkerhedssko med stålkapper
Anvend egnet arbejdstøj:
− intet løstsiddende tøj eller smykker (de kan gribes af
bevægelige dele)
Brugeren er ansvarlig over for tredjemænd i apparatets
arbejdsområde.
Børn og unge under 18 år må ikke betjene maskinen.
Børn må ikke komme i nærheden af apparatet.
Anvend aldrig apparatet, mens uimplicerede personer er i
nærheden.
Apparat må aldrig være uden opsyn.
Hold arbejdsområdet i orden! Uorden kan resultere i
ulykker.
Overbelast ikke apparatet! De arbejder bedre og mere
sikkert i det angivne effektområde.
Apparatet må kun anvendes med komplette og korrekt
anbragte sikkerhedsindretninger og der må ikke ændres
noget på apparatet, som kan påvirke sikkerheden.
Apparatets værktøj eller dele må ikke ændres.
Spul ikke apparatet med vand (farekilde elektrisk strøm).
Apparatet må ikke stå ude i regn og der må ikke
arbejdes i regnvejr.
Opbevar det kun på et tørt sted uden for børns
rækkevidde.
Sluk for apparatet og træk netstikket ud af stikkontakten
ved:
Reparationsarbejde
−
Vedligeholdelses- og rengøringsarbejde
−
Afhjælpning af fejl
−
Transport
−
Når apparatet forlades (også ved kortvarige
−
afbrydelser)
Kontrol af apparatet for eventuelle beskadigelser:
Før yderligere brug af apparatet skal
−
sikkerhedsindretningerne omhyggeligt kontrolleres
med hensyn til deres upåklagelige og tiltænkte
funktion.
Kontroller, om dele er beskadigede eller defekte.
−
Samtlige dele skal være rigtigt monterede og alle
betingelser være opfyldt for at sikre upåklagelig drift.
Beskadigede sikkerhedsindretninger og dele skal
−
repareres eller udskiftes fagligt korrekt af et autoriseret
værksted så vidt ikke angivet på anden måde i
brugsanvisningen.
Beskadigede eller ikke læsbare sikkerhedsmærkater
−
skal erstattes.
Elektrisk sikkerhed
Udførelse af tilslutningsledningen iht. IEC 60245 (H 07
RN-F) med et tværsnit af korerne på mindst
⇒ 2,5 mm² ved en kabellængde til max. 10 m
Anvend aldrig tilslutningsledninger over 10 m. Længere
tilslutningsledninger forårsager spændingsfald. Motoren
opnår ikke mere sin maksimale effekt, maskinfunktionen
reduceres.
Ved trækning af tilslutningskablerne skal De være
opmærksom på, at disse ikke klemmes inde, bøjes, og at
stikforbindelsen ikke bliver våd.
Anvend ikke kablet til formål, som det ikke er beregnet til.
Beskyt kablet mod varme, olie og skarpe kanter.
Anvend kablet ikke til at trække stikket ud af stikkontakten.
39
Page 41

Kontroller forlængerledningen regelmæssigt og udskift i
tilfælde af beskadigelser.
Anvend ingen defekte tilslutningskabler.
Anvend udendørs kun de hertil tilladte og tilsvarende
markerede forlængerledninger.
Anvend ingen provisoriske eltilslutninger.
Sikkerhedsindretninger må aldrig forbikobles eller
sættes ud af drift.
Den elektriske tilslutning hhv. reparationer på
apparatets elektriske dele må kun udføres af en
autoriseret elektriker eller en af vore serviceafdelinger.
Lokale forskrifter især i henseende til
beskyttelsesforanstaltninger skal iagttages.
Reparationer på apparatets andre dele skal lades
udføre af producenten hhv. en af hans
serviceafdelinger.
Anvend kun originalreserve-, tilbehørs- og ekstra
tilbehørsdele. Gennem anvendelse af andre
reservedele og andet tilbehør kan der opstå ulykker for
brugeren. For heraf resulterende skader overtager
producenten intet ansvar.
IIggaannggssæættnniinngg
Kontroller, at apparatet er monteret komplet og efter
reglementerne.
Kontroller før hver brug:
Tilslutningskablerne med hensyn til defekte områder
−
(revner, snit o.l.)
Anvend ingen defekte kabler.
Eventuelle beskadigelser (se "Sikkert arbejde")
−
Om alle skruer er strammede.
−
hydraulikken for lækager
−
Nettilslutning
L
Sammenlign på apparatets mærkeplade den angivne
spænding med netspændingen og tilslut apparatet til en
tilsvarende og korrekte stikkontakt.
Anvend forlængerledninger med tilstrækkeligt tværsnit.
Tilslut maskinen via et Fi-relæ (fejlstrømsrelæ) på 30 mA.
Sikring: 16 A
L
Hydraulik
L
Anvend aldrig maskinen, når der består fare på grund af
hydraulikvæske.
Kontroller, at maskinen og arbejdsområdet er rent og frit
for oliepøle.
Glide- og brandfare!
Kontroller regelmæssigt, om der er nok hydraulikolie i
beholderen (se Vedligeholdelse og pleje)
Indhold: 2,6 liter
L
AArrbbeejjddee mmeedd bbrræænnddeekklløøvveerreenn
L
Ekstra SIKKERHEDSHENVISNINGER
Brændekløveren må kun betjenes af én person.
Kun personer over 18 år, som har læst og forstået
brugsanvisningen, må betjene maskinen.
Anvend beskyttelsesudstyret (beskyttelsesbriller/
ansigtsskærm, handsker, sikkerhedssko) for at beskytte
dig mod mulige kvæstelser.
Kløv aldrig stammer, som indeholder søm, metaltråde
eller andre genstande.
Træ og træspåner, der allerede er blevet kløvet, udgør et
farligt arbejdsområde. Der er fare for at snuble, glide eller
falde. Arbejdsområdet skal altid være ryddet op.
Læg aldrig hænderne på maskinens bevægelige dele, når
den er i gang. Overhold en sikkerhedsafstand til
træstamme, skubber og kløvekile for at beskytte
hænderne mod kvæstelser.
Kløv kun træ, som svarer til maksimummet af længden på
370 mm, der må forarbejdes.
Opstilling
For en bekvem arbejdsstilling, stil brændekløveren på en
60 - 75 cm høj arbejdsflade.
Hjulene skal blokeres med kiler for at undgå, at maskinen
ruller væk under brug.
Kontroller, at arbejdsområdet opfylder følgende betingelser:
− skridsikkert
− plant
− fri for farer med hensyn til at snuble
− tilstrækkeligt lys
Anvend ikke maskinen i nærheden af biogas, benzinrender
eller andre let brændbare materialer.
Hvad kan jeg kløve?
Stammernes størrelse, der må kløves
Trælængde: max. 370 mm
Trædiameter: 50 – 250 mm
Trædiameteren er en anbefalet referenceværdi, fordi:
− tyndt træ kan være vanskeligt at kløve, hvis det har
knasthuller eller fibrene er for stærke.
− tykkere træ end ∅ 250 mm kan kløves, når fibrene er
glatte og løse.
Forarbejd ingen grønne træstammer. Det er meget nemmere
at kløve tørre, oplagrede træstammer. Disse hænger ikke så
tit fast i maskinen som grønt (vådt) træ.
40
Page 42

Betjening
Tohåndsbetjening
1. Tryk på ON/OFF-kontakten på elmotoren. Vent et par
sekunder, indtil motoren har nået sin sluthastighed og
trykket i hydraulikpumpen er oprettet - ill. 1.
2. Tryk samtidigt begge betjeningshåndtag nedad - ill. 2.
Stammeskubberen presser stammen mod kløvekilen.
Stammen kløves.
3. Slip betjeningshåndtagene; stammeskubberen kører
tilbage til sin udgangsposition - ill. 3.
Ill. 1
Ill. 2
ON/OFFkontakt
Anbring træet således ved brændekløveren, at du ikke
kommer i fare (fare for at snuble).
Udluftning
Løsn udluftningsskruen 3 - 4 omdrejninger - ill. 4.
Stram først igen skruen, når arbejdet er afsluttet.
Udluftningsskrue
Ill. 4
løsning
stramning
Kløvning af træ:
Læg altid stammerne på langs og fladt på kløverens
hovedramme. Stammen skal omsluttes af styrepladerne ill. 5.
Ill. 3
Ill. 5
Læg aldrig stammen på skrå på hovedrammen - ill. 6.
Ill. 6
Særlige henvisninger til kløvning:
Forberedelser:
Forbered træet, der skal kløves, til de maksimale størrelser
(370 mm lang, ∅ 50 – 250 mm), som må forarbejdes, og
kontroller, at træet er skåret lige.
Kontroller altid, at kløvekilen og stammeskubberen kan
holde stammeenderne lodret.
Kløv aldrig to stammer i én arbejdsgang.
Læg ikke mere træ på og udskift ikke træ under
arbejdsprocessen.
L Fremtving aldrig kløvning af en stamme ved at
opretholde fremføringen i flere sekunder. Dette kan medføre
skader på maskinen.
Anbring stammen igen på hovedrammen og gentag
kløvningen eller læg stammen til side.
41
Page 43

Hvordan løsnes en fastsiddende stamme?
1. Slip begge betjeningshåndtag for at stammeskubberen
kan køre tilbage.
2. Læg en trekantet trækile under stammen, kør
stammeskubberen frem for at den kan presse kilen ind
under den fastsiddende stamme.
3. Gentag denne proces med større kiler, hvis stammen ikke
løsner sig.
Under løsningen må der aldrig bankes på den
fastsiddende stamme og hænder må heller ikke komme i
nærheden af den.
Spørg ikke en ekstra person om hjælp.
Forsøg ikke at løsne stammen gennem slag med et værktøj,
da motorblokken i så fald kan ødelægges.
Arbejdsslut:
Før du betjener ON/OFF-kontakten på elmotoren,
kontroller, at stammeskubberen er kørt tilbage til sin
udgangsposition.
Træk derefter netstikket ud.
Skru udluftningsskruen fast igen - ill. 4.
Følg vedligeholdelses- og plejehenvisningerne.
Ill. 7
A
B
VVeeddlliiggeehhoollddeellssee oogg pplleejjee
Træk netstikket ud før vedligeholdelses- og
rengøringsarbejde.
Bær sikkerhedshandsker for at undgå skader på
hænderne.
L Iagttag følgende for at opretholde brændekløverens
funktionsdygtighed:
Rengør maskinen grundigt efter afslutning af arbejdet.
Fjern harpiksrester.
Smør stempelstangen (ill. 7) regelmæssigt med en
miljøvenlig sprayolie.
Kontroller oliestanden resp. udskift olien.
Skærpning af kløvekile
Skærp kløvekilen med en fin fil efter længere driftstid eller ved
reduceret kløveydelse (fjernelse af grater) iIl. 9.
Ill. 9
skærpning af
kant
C
D
G
F
E
Ill. 8
I
H
J
A Stammeskubber F Elmotor
B Udluftningsskrue G ON/OFF-kontakt
C Stempelstang H Kløvekile
D Oliemålepind I Styreplader
E Topstykke J Betjeningshåndtag
Hvordan kontrolleres oliestanden?
1. Stammeskubberen skal være kørt tilbage til
udgangspositionen.
2. Kip brændekløveren således, at påfyldningsåbningen er
opad iIl. 10.
Til oprejsning og fastholdelse af brændekløveren
er en ekstra person nødvendig.
3. Skru oliemålepinden ud - ill. 11. Vær opmærksom på
olietætningen under udtagningen.
4. Rengør oliemålepinden og olietætningen.
5. Før målepinden igen ind i åbningen til stoppet.
6. Træk oliemålepinden ud igen.
Når oliestanden er mellem de to markeringer, er der
42
nok olie i beholderen.
Hvis oliestanden er under den nederste markering
skal der efterfyldes olie ved hjælp af en ren tragt.
nederste markering øverste markering
Page 44

7. Kontroller olietætningen. Udskift den i tilfælde af
beskadigelser.
Olietætning
8. Skru oliemålepinden fast igen.
Bemærk! Stram ikke skruen for fast for at undgå
beskadigelser på olietætningen og i topstykkets gevind.
Ill. 10
Ill. 11
5. Kip derefter brændekløveren således, at
påfyldningsåbningen er opad - ill. 10.
Til oprejsning og fastholdelse af brændekløveren er
en ekstra person nødvendig.
6. Påfyld ny hydraulikolie (2,6 liter) ved hjælp af en ren tragt.
7. Rengør oliemålepinden og olietætningen.
8. Kontroller olietætningen. Udskift den i tilfælde af
beskadigelser.
9. Skru oliemålepinden fast igen.
Bemærk! Stram ikke skruen for fast for at undgå
beskadigelser på olietætningen og i topstykkets gevind.
Bortskaf spildolien efter forskrifterne (lokal
modtagestation for spildolie). Det er forbudt at lede
spildolie ned i jorden eller at blande den med normal
affald.
Hydraulikolie
L
Til hydraulikcylinderen anbefaler vi følgende hydraulikolier:
Shell Tellus T 22
Aral Vitam Gf 22
BP Energol HLP 22
Mobil DTE 11
eller olie af samme kvalitet.
Anvend ingen andre oliesorter. Brug af andre oliesorter
har indflydelse på hydraulikcylinderens funktion.
Oliemålepind
Hvornår skal olien udskiftes?
Første olieskift efter 50 driftstimer, derefter alle 250
driftstimer eller 1x om året.
Udskiftning:
1. Stammeskubberen skal være kørt tilbage til
udgangspositionen.
2. Stil en beholder, som kan rumme mindst 4 liter olie, under
brændekløveren.
3. Skru oliemålepinden ud. Vær opmærksom på
olietætningen under udtagningen.
4. Kip derefter maskinen for at hælde olien ned i beholderen.
GGaarraannttii
• Vi yder to års garanti på kværnen fra og med
leveringsdagen med hensyn til materiale- eller
fabrikationsfejl.
• Der kan i garantiperioden ikke gøres garantikrav
gældende for skader, der måtte være opstået pga.
usagkyndig behandling, utilstrækkelig indpakning i
forbindelse med transport eller tilsidesættelse af
betjeningsvejledningen.
• Komponenter med fejl skal sendes til producenten, som
også afgør, hvad der skal udføres gratis. Garantien
omfatter arbejds- og materialeudgifter i forbindelse med
udbedringen af den eventuelle fejl.
• Garantien dækker ikke normal slitage af kløvekile,
hydraulikolie, føringer, tætninger og løbehjul.
• Alle garantireparationer udføres af producenten, undtagen
hvis vi udtrykkeligt giver et andet værksted besked på at
udføre dem.
• Garantien gælder kun, når der er benyttet originale
reservedele.
• Vi forbeholder os ret til tekniske ændringer.
43
Page 45

MMuulliiggee ffeejjll
Problem Mulig årsag Afhjælpning
Stammen kløves ikke
(for lav kløveydelse)
Stammeskubberen kører usikkert eller
med stærke vibrationer
Stammeskubberen kører ikke ud
Motoren starter ikke
Olielækage på oliemålepinden
⇒ Stammen er ikke placeret korrekt
⇒ Stammen overskrider de tilladte
størrelser eller træet er for hårdt for
maskinen
⇒ Kløvekile kløver ikke
⇒ Olielækage
⇒ Hydrauliktryk for lavt
⇒ Forkert tilslutningsledning (længere
end 10 m eller for småt koretværsnit)
⇒ Luft i kredsløbet ⇒ Udluftningsskruen åbnes.
⇒ Hydraulikpumpe defekt ⇒ Kontakt producenten eller et
⇒ Netspænding mangler
⇒ Tilslutningskabel er defekt
⇒ Elmotor er defekt
⇒ Olietætning utæt ved oliemålepinden ⇒ Udskift olietætningen.
⇒ Anbring stammen på ny
⇒ Afkort stammen til de tilladte
størrelser
⇒ Skærp kløvekilen, og kontroller den
for grater og kærve
Læg et stykke karton under
⇒
brændekløveren for at finde lækagen.
Kontakt producenten eller et
autoriseret firma til afhjælpning af
problemet.
⇒ Kontroller oliestanden; efterfyld om
nødvendigt olie.
Hvis problemet ikke kan afhjælpes,
kontakt producenten eller et
autoriseret firma.
⇒ Anvend den rigtige tilslutningsledning.
⇒ Kontroller oliestanden; efterfyld om
nødvendigt olie.
Hvis problemet ikke kan afhjælpes,
kontakt producenten eller et
autoriseret firma.
autoriseret firma til afhjælpning af
problemet.
⇒ Kontroller sikringen (16 A).
⇒ Udskift tilslutningskablet eller lad det
efterse af en elektriker.
⇒ Kontakt producenten eller et
autoriseret firma til afhjælpning af
problemet.
TTeekknniisskkee ddaattaa
Kløvetryk 40 kN (4 t)
Trælængde 370 mm
Trædiameter 50 – 250 mm
Kløvelængde 300 mm
Stempelstangens diameter 30 mm
Hydraulikolie (max.) 2,6 liter
Elmotoreffekt (optaget effekt) P1 = 1500 W ( S1-100 % )
Tilslutning 230 V ~ 50 Hz
Omdrejningstal 2850 min -1
Dimensioner længde 1115 x bredde 320 x højde 470 mm
Vægt 45 kg
44
Page 46

Stroj nesmíte obsluhovat bez dokonalého
prostudování tohoto návodu,respektování
všech daných pokynů a jeho řádného
smontování.
Návod uschovejte pro případné další použití.
OObbssaah
Grafické symboly stroje a návodu 45
Obsah dodávky 45
Působnost stroje 45
Zbytková rizika 46
Bezpečná práce 46
Uvedení do provozu 47
Práce s palivovým dřevem 47
Údržba a péče 49
Záruka 50
Možné poruchy 51
Technická data 51
Prohlášení o shodě 60
Náhradní díly 61
SSyymmbboollyy nnaa ppřřííssttrroojji
Před uvedením stroje do chodu přečíst
tento návod a všechna bezpečnostní
upozornění v něm uvedena. Striktně dbát
všech pokynů.
Během práce používat bezpečnostní
obuv. Ochrana nohou před padajícími
špalky.
Používejte ochranné rukavice.
Při práci použít ochranné brýle nebo vizír.
Ochrana očí před odštěpky či třískami.
Je zakázáno namontované ochranné
prvky odmontovat nebo měnit.
Při práci obsluhuje stroj pouze jedna
osoba. Jiné osoby, domácí či užitková
zvířata se nesmějí v pracovní okruhu
stroje pohybovat (pobývat). Minimální
vzdálenost je 5 m.
Jestliže se pohyblivé části stroje pohybují
je zakázáno dotýkat se pohyblivých částí
stroje.
h
230 V – 240 V
i
GGrraaffiicckkéé ssyymmbboollyy vv nnáávvoodduu
Hrozící nebezpečí nebo nebezpečná situace. Při
nedbání těchto pokynů může dojít ke zraněním nebo
k věcným škodám.
Důležité informace správného zacházení se
L
! úplnost dodávky
! event. škody způsobené transportem
Jestliže zjistíte závady, sdělte tyto neprodleně svému prodejci
nebo přímo výrobci. Pozdější reklamace nebudou uznány.
Štípač palivového dřeva je určen výhradně a pouze pro
Štípačem lze štěpit pouze špalky, které jsou rovně (kolmo)
Obsahují-li špalky kovové předměty (hřebíky, dráty apod.)
45
strojem. Při nedbání těchto pokynů může dojít
k poruchám či poškození stroje.
Pokyny pro uživatele. Tyto informace Vám
pomohou všechny funkce stroje optimálně využít.
Montáž, obsluha a údržba. Zde je přesně
vysvětleno co je třeba udělat.
Po rozbalení dodávky z kartonu překontrolujte:
tuto činnost.
nařezány.
je nutné tyto před štípáním odstranit.
POZOR!
Vždy sledujte pohyb posunovače špalku.
POZOR!
Špalek, který se zaklíní na štěpicím klínu,
nikdy neodstraňovat rukou.
POZOR!
Před opravou, údržbou nebo čištěním
vždy motor vypněte a stroj odpojte od sítě
vytažením vidlice ze zásuvky.
POZOR!
Stroj připojte na el. napětí, které odpovídá
napětí na typovém štítku stroje.
STOP!
Prostudujte návod k použití.
Odvzdušňovací šroub uvolnit.
Odvzdušnění str. 48
OObbssaahh ddooddáávvkkyy
PPůůssoobbnnoosstt ssttrroojjee
Page 47

Každé jiné další užití stroje je kvalifikováno jako
nespadající do okruhu působnosti a při event. škodách se
výrobce vzdává veškeré odpovědnosti. Veškerá rizika
nese obsluha stroje.
ZZbbyyttkkoovváá rriizziikkaa
I přes správné užití stroje a při dodržení všech
předepsaných bezpečnostních pokynů je nutno vzhledem ke
konstrukci stroje a způsobu jeho užití, počítat s jistými
tzv.zbytkovými riziky.
Tato zbytková rizika lze minimalizovat pouze jestliže
bezpečnostní pokyny, návod k obsluze a okruh působnosti
stroje dokonale prostudujete a respektujete.
Při vlastní práci ohleduplnost a opatrnost zmenšují rizika
zranění nebo jiných škod.
Ignorování nebo jen přehlédnutí bezpečnostních pokynů a
opatření mohou mít za následek zranění obsluhy či jiných
osob nebo majetkových škod.
Ohrožení el. proudem, při použití nevhodných kabelů
nebo nevhodného připojení k el. síti.
Dotýkání se el. částí pod proudem při odkrytých el. prvků
stroje.
Dále se mohou objevit jistá skrytá rizika i přes veškerá zde
uvedená upozornění.
BBeezzppeeččnnáá pprrááccee
Před uvedením do provozu čtěte a dbejte všech
pokynů zde uvedených jakož i ve Vaší zemi platných
předpisů pro provoz podobných strojůjen tak chráníte
sebe a ostatní před možnými zraněními.
Veškeré bezpečnostní pokyny předejte všem osobám,
L
které se strojem pracují.
Návod spolu s bezpečnostními pokyny uschovejte.
L
Před uvedení do provozu se řádně se strojem seznamte
prostřednictvím návodu.
Neužívejte stroj k jiným účelům než je zde popsáno.
Užívejte bezpečné pracovní místo.
Pracovní místo zaujměte vždy za posunovačem špalků
v okruhu ovládacích prvků stroje. Nikdy se nestavte do
blízkosti štípacího klínu.
Nikdy nestoupejte na stroj.
Při práci buďte pozorný a soustředěný. Pracujte
s rozvahou. Stroj nepoužívejte:
− jste-li unavený
− jste-li pod vlivem alkoholu, drog či léčiv, která snižují
koncentraci a reakci.
Při práci noste ochranné brýle nebo vizír, ochranu uší,
pracovní rukavice, pracovní boty s ocelovou špičkou.
Pracovní oděv bez volných částí a pracujte bez ozdob,
která by mohly být zachyceny pohyblivými částmi stroje.
Obsluhující je při práci zodpovědný vůči dalším osobám.
Děti a mladiství pod 18 let nesmějí stroj obsluhovat.
Nepouštějte děti do pracovního okruhu stroje.
Nikdy nespouštějte stroj nachází-li se v jeho blízkosti další
osoba.
Nenechávejte stroj bez dozoru.
Udržujte pracoviště v pořádku.Nepořádek může být
příčinou úrazu.
Nepřetěžujte stroj. Výsledky práce jsou nejlepší pracujete-
li s udanými výkonnostními hodnotami.
Stroj provozujte pouze s řádně namontovanými
ochrannými prvky a neměňte na stroji nic co by mohlo
ovlivnit bezpečnost práce.
Stroj neuzpůsobujte a jeho části neměňte.
Stroj nestříkejte vodou (nebezpečí úrazu el. proudem).
Stroj nenechávejte na dešti a stejně tak při dešti
nepracujte.
Stroj uschovejte v suchém místě a ne v dosahu dětí.
Stroj vypněte a odpojte od sítě při
− opravách
− údržbě a čištění
− odstraňování poruch
− transportu
− opuštění stroje (i krátkodobě)
Kontrolujte stroj z hlediska event.poškození:
− před každým započetím práce musí ochranné prvky
být pečlivě prověřeny z hlediska jejich bezvadné
funkce.
− přezkoušejte zda všechny části stroje nejsou
poškozeny nebo defektní. Veškeré části stroje musí
být správně namontovány a splňovat všechny.
Podmínky pro bezchybný a bezpečný provoz.
− poškozené bezpečnostní prvky nebo jiné části musí
být prostřednictvím odborné firmy opraveny nebo
vyměněny (není-li uvedeno v návodu jinak).
− poškozené či nečitelné bezpečnostní samolepky na
stroji je třeba vyměnit.
Elektrická bezpečnost
Provedení přípojného kabelu podle IEC 60245 (H 07 RN-
F) s příčným průměrem od nejméně 2,5 qmm při délce
kabelu max. do 10 m.
Nikdy nepoužívejte kabel delší než 10 m. Delší kabely
mohou způsobit výpadek proudu. Motor nedosáhne svého
maximálního výkonu, funkce stroje je redukována.
Při pokládání přípojného kabelu dbejte na to, aby nebyl
překroucen nebo skřípnut a aby přípojná spojení (vidlice,
zásuvka) nebylo vlhké.
Nepoužívejte kabel, který není pro připojení určen.
Chraňte kabel před horkem, olejem a ostrými hranami. Při
vytažení vidlice ze zásuvky netahejte za kabel.
Prodlužovací kabel pravidelně kontrolujte a je-li poškozen
ihned jej vyměňte.
Nepoužívejte žádné defektní přípojné kabely.
Ve venkovním prostředí použijte pouze kabel, který je pro
práci pod širým nebem schválen.
Nikdy nepoužívejte provizorní připojení el. proudu ke
stroji.
Ochranné el. prvky nikdy nepřemosťujte nebo nevyřazujte
z provozu.
46
Page 48

El.připojení resp. oprava el.částí stroje musí svěřena
koncesované elektrofimě nebo našemu obchodnímu
oddělení. Dbejte na splnění místních bezpečnostních
předpisů a opatřeních.
Opravy ostatních částí stroje provádí buď výrobce nebo
jím pověřená firma.
Při výměně částí stroje použijte pouze originální díly.
Použitích jiných náhradních dílů může přinést úrazy či
poškození majetku. V těchto případech se výrobce
vzdává veškeré zodpovědnosti.
UUvveeddeenníí ddoo pprroovvoozzuu
Ujistěte se, že stroj je kompletně smontován dle předpisů.
Před uvedením do provozu zkontrolujte:
− přípojný kabel na poškození či defekt (takové kabely
nelze použít).
− poškození přístroje (viz bezpečná práce)
− že všechny šrouby jsou řádně dotaženy.
− hydrauliku na průsak oleje
Připojení k síti
L
Porovnejte napětí uvedené na typovém štítku stroje
s napětím ve Vaší síti. Stroj připojte na odpovídající napětí
do řádné předpisové zásuvky.
Použijte kabel s dostatečným průřezem.
Připojení stroje proveďte přes Fi-ochranný jistič 30 mA.
Jištění:16 A
L
Hydraulika
L
Stroj nikdy nespouštět hrozí-li nebezpečí prostřednictvím
hydraulické kapaliny.
Ujistěte se, že stroj a pracovní místo je čisté bez olejových
skvrn.
Nebezpečí uklouznutí a nebezpečí ohně.
Pravidelně kontrolujte množství hydraulického oleje
v nádrži (viz kapitola o údržbě a péči).
Obsah nádrže: 2,6 l
LL
Štípač obsluhuje pouze 1 osoba.
Štípač mohou obsluhovat pouze osoby starší 18 let, které
Při práci vždy noste ochranné brýle, ochranu uší, pracovní
Nikdy neštípejte špalky, ketré obsahují cizorodé předměty
Rozštípané špalky představují nebezpečný pracovní
PPrrááccee ssee ššttííppaaččeemm ppaalliivvoovvééhhoo
byly dokonale seznámeny s návodem a se všemi
bezpečnostními pokyny.
obuv, rukavice a řádný pracovní oblek.
(kov).
prostor. Nebezpečí klopýtnutí, uklouznutí nebo pádu.
Udržujte pracoviště vždy uklizené.
ddřřeevvaa
Při zapnutém stroji nepřibližujte ruce k pohyblivým částem
stroje. Dodržujte bezpečnou vzdálenost od špalku,
posunovače a štípacího klínu.
Štípejte pouze špalky, které mají max. délku 370 mm.
Umístění stroje
Abyste mohli pracovat pohodlně, postavte stroj na pracovní
plochu vysolou ca. 60 – 75 cm.
Zablokujte kolečka klíny pro znemožnění posunu během
práce.
Dbejte na to,aby pracoviště splňovalo následující podmínky:
− protiskluzná podlaha
− rovná podlaha
− eliminace možnosti klopýtnutí
− dostatek světla
Stroj neprovozujte v blízkosti zemního plynu, benzinových
výparů nebo dalších těkavých látek, které jsou vznětlivé.
Co mohu štípat?
Velikost štípaného dřeva (špalku).
Délka: max. 370 mm
Průměr: 50 – 250 mm
Průměr špalku je doporučen protože:
− tenké dřevo je obtížné štípat jestliže má více suků nebo
jestliže dřevná vlákna jsou příliš silná.
− silnější dřevo (více než 250 mm) lze štípat jestliže je bez
suků a dřevná vlákna jsou hladká a rovně vedena.
Neštípejte zelené špalky (čerstvé). Suché uskladněné dřevo
rozštípnete snadněji a nebudete mít problémy s častým
„zakousnutím“ dřeva jako u vlhkého špalku.
Obsluha
Práce obouruč
1. Zapněte stroj vypínačem. Vyčkejte několik sekund než
motor dosáhne svých oráček a než se hydraulika
natlakuje. Obr. 1
2. Stlačte obě ovládací madla současně dolů. Obr. 2
Posunovač špalku tlačí špalek proti štípacímu klínu.
Špalek bude rozštípnut.
3. Uvolněte ovládací madla a posunovač špalku se vrátí zpět
do výchozí polohy. Obr. 3
Obr. 1
Vypínač
47
Page 49

Obr. 2
uvolnit
Obr. 3
Śtípání dřeva:
Śpalek vložte do stroje vždy podélně na posunovač.
Špalek musí být posunovačem „obejmut“. Obr. 5
Obr. 5
Špalek nikdy nevkládejte do stroje napříč. Obr. 6
Obr. 6
Zvláštní pokyny pro štípání
Příprava:
Připravte ke štípání špalky, které odpovídají předem
uvedeným rozměrům (délka max. 370 mm, průměr od 50 do
250 mm) a dbejte aby špalky byly rovně (kolmo) nařezány.
Špalek vkládejte do štípače tak, aby pro Vás nevzniklo žádné
nebezpečí.
Odvzdušnění
Uvolněte odvzdušňovací šroub ca o 3-4 otáčky. Obr. 4
Po skončení práce opět šroub utáhněte.
Obr. 4
Odvzdušňovací šroub
Vždy dbejte na to, aby špalek byl vložen do stroje podélně
a rovně aby štěp byl po vláknech dřeva.
Nikdy nezkoušejte štípat 2 ks dřeva v jednom pracovním
kroku.
Nikdy špalek v průběhu pracovního kroku neměňte
(neopravovat jeho polohu, nebo jej nahrazovat jiným).
L Nikdy špalek,který zřejmě nelze rozštípnout,nezkoušejte
donutit ke štěpu tím, že budete po dobu více sekund „tlačit“
na ovládací madla. To může vést k poškození motoru.
V takovém případě se pokuste opravit polohu špalku na
posunovači dřeva a opakujte celý postup znovu. V případě,
že špalek je vskutku nepodajný, odložte jej.
Jak uvolnit zaklínovaný špalek ve stroji.
1. Obě ovládací madla uvolnit a tím vrátit posunovač dřeva
zpět do výchozí polohy.
2. Pod zaklíněný špalek vložte trojstranný dřevěný klín.
Vyjeďte znovu posunovačem dřeva tak,aby tento tlačil na
klín.
3. Jestliže se špalek neuvolní, opakujte stejný postup
s větším dřevěným klínem.
Při uvolňování zaklíněného špalku nepoužívejte násilí
(tlučení) a své ruce držte v bezpe čné vzdálenosti. Nežádejte
další osobu o pomoc. Použijete-li násilí (kladivo atp.) může
dojít k prasknutí motorového bloku.
48
Page 50

Ukončení práce
Dříve než stroj vypnete,zkontrolujte,že posunovač dřeva je
opět zpět ve své výchozí poloze.
Odpojte od sítě vytažením vidlice ze zásuvky.
Utáhněte opět odvzdušňovací šroub. Obr. 4
Učiňte kroky pospané v kapitole Údržba a péče.
Obr. 7
A
B
C
D
Ostření štípacího klínu
Po dlouhotrvající práci nebo při sníženém výkonu je třeba
štípací klín naostřit. To proveďte jemným pilníkem. Obr. 9
Abb. 9
G
F
E
Obr. 8
I
H
J
A posunovač dřeva F elektromotor
B odvzdušňovací šroub G vypínač
C pístní tyč H štípací klín
D měrka oleje I vodicí plech dřeva
E cylindrický kryt J ovládací madla
ÚÚddrržžbbaa aa ppééččee oo ssttrroojj
Před těmito pracemi vždy odpojit stroj od sítě
(vytažením vidlice ze zásuvky).
Při těchto pracech vždy noste ochranné rukavice.
L Dbejte na dodržení následných kroků-aby funkce stroje
byla zachována.
Po skončení práce stroj řádně vyčistěte.
Odstraňte veškeré zbytky praskyřice.
Pístní tyč naolejujte sprejovým olejem.
Prověřte množství oleje resp. olej vyměňte.
Jak zkontrolovat stav oleje?
1. Posunovač špalku musí zpět ve výchozí poloze.
2. Otočte stroj tak,aby otvor pro olej byl nahoře (Obr.10).
Při tomto kroku je třeba druhé osoby.
3. Vyšroubujte olejovou měrku. Obr. 11. Pozor na těsnění.
4. Očistěte měrku a těsnění.
5. Ćistou měrku vsuňte opět do otvoru až na doraz.
6. Měrku opět vyjmete
leží-li hladina oleje mezi oběma označeními, je oleje
ve stroji dostatek.
je-li hladina oleje pod dolní ryskou, je třeba olej
doplnit. Použijte čistý trychtýř.
Dolní ryska Horní ryska
7. Zkontrolujte těsnění. Nesmí být poškozené. Při poškození
vyměnit.
ol. těsnění
8. Zašroubujte měrku opět zpět.
Pozor! Šroub utahujte s citem. Příliš pevné utažení může
poškodit těsnění.
49
Page 51

Obr. 10
Hydraulický olej
L
Pro stroj doporučujeme následující oleje:
Shell Tellus T22
Aral Vitam Gf 22
BP Enrgol HLP 22
Mobil DT 11
nebo srovnatelné
Jiné oleje nepoužívat. Použití jiného oleje negativně
ovlivňuje funkci hydraulického cylindru.
Obr. 11
Měrka oleje
Kdy je nutné olej vyměnit?
První olej je třeba vyměnit po 50 pracovních hodinách,
potom každých 250 pracovních hodin nebo min. 1x
ročně.
Výměna oleje:
1. Posunovač špalku ve výchozí poloze.
2. Nádobu (nejméně 4 l obsah) postavte pod stroj.
3. Vyšroubujte měrku oleje(pozor na těsnění).
4. Nakloňte stroj tak,aby olej vytekl do nádoby.
5. Postavte stroj tak,aby otvor měrky byl nahoře. Obr. 10.
Pomoc druhé osoby nutná.
6. Pomocí čistého trychtýře vlijte nový hydraulicky olej (2,6 l).
7. Očistěte měrku a těsnění.
8. Přezkoušejte těsnost. Je-li těsnění poškozeno musí být
vyměněno.
9. Zašroubujte měrku zpět. Pozor! Abyste nepoškodili
těsnění či cylindrický kryt, utahujte s citem.
Starého oleje se zbavte dle zákona (sběrné místo).
Je zakázáno starý olej vylívat do půdy či smíchat
s odpadem.
ZZáárruukkaa
1. Poskytujeme záruční dobu 2 roky od data prodeje výrobku
konečnému uživateli. V průběhu celé záruční doby ručíme
za zachování technických parametrů výrobku, za
správnou funkci všech částí a za jakost použitých
materiálů. Pokud se na přístroji během záruční doby
vyskytne zřejmá vada materiálu, konstrukce nebo výroby,
bude bezplatně odstraněna.
2. Záruční nároky zanikají, pokud k poškození došlo při
přepravě nebo v důsledku nesprávného použití,
nerespektování návodu k obsluze, neodborné opravy
nebo pokud bylo způsobeno vyšší mocí. Záruka se
nevztahuje na běžné opotřebení štípacího klínu, hydr.
oleje, posunovacích a vodicích částí, těsnění a koleček.
3. Záruční opravy provádí výrobce nebo jím pověřený
zástupce. Bližší informace jsou uvedeny v Záručním listě.
4. Záruka platí jen při používání originálních náhradních dílů.
5. Změny sloužící technickému pokroku jsou vyhrazeny.
6. Všechny součásti z umělé hmoty jsou označeny pro
tříděnou recyklaci. Další likvidaci obalu a stroje po
ukončení životnosti provádějte v souladu s platnými
předpisy.
50
Page 52

MMoožžnnéé ppoorruucchhyy
Závada možná příčina Odstranění
Špalek není rozštípnut (slabý výkon)
Posunovač špalku vyjíždí ne rovně a s
vibracemi
Posunovač špalku nevyjíždí
Motor nefunguje
Průsak oleje na měrce
⇒ špatná poloha špalku
⇒ špalek překračuje rozměry
⇒ štíp. klín nerozštěpuje
⇒ průsak oleje
⇒ malý tlak oleje
⇒ použití kabelu přes 10 m nebo kabelu
s malým prům
⇒ vzduch v systému ⇒ uvolnit odvzdušnění
⇒ závada v hydr. systému ⇒ odb. firma
⇒ závada v el. připojení
⇒ závada příp. kabelu
⇒ defektní motor
⇒ špatné těsnění ⇒ výměna těsnění
⇒ znovu vložit do stroje
⇒ použít dopor. rozměr
⇒ klín naostřit
⇒ vložte pod stroj papír. Zjistíte-li průsak,
obraťte Se na odbornou firmu.
⇒ kontrola stavu oleje. Jestliže po
doplnění ne dojde ke zlepšení, obraťe
se na odbornou firmu.
⇒ použít předepsaný kabel
⇒ kontrola oleje
⇒ nejde-li závada takto odstranit, obraťe
se na odb. firmu.
⇒ kontrola jištění 16 A
⇒ výměna kabelu
⇒ odb. firma
TTeecchhnniicckkáá ddaattaa
Síla na klínu 40 kN (4 t)
Délka špalku 370 mm
Průměr špalku 50 – 250 mm
Posun na klín 300 mm
Průměr pístní tyče 30 mm
Hydraulický olej(max.) 2,6 Liter
Výkon motoru P1 = 1500 W ( S1-100 % )
Připojení 230 V ~ 50 Hz
Otáčky 2850 min -1
Rozměry Länge 1115 x Breite 320 x Höhe 470 mm
Váha 45 kg
51
Page 53

Zanim nie przeczytają Państwo niniejszej
Instrukcji obsługi, nie przyjmą do
wiadomości i przestrzegania zawartych w
niej wskazówek oraz nie zmontują
urządzenia w opisany poniżej sposób, nie
Niniejszą instrukcję należy przechować dla późniejszego
wykorzystania.
Symbole urządzenie/instrukcja obsługi 52
Zakres dostawy 52
Stosowanie zgodne z przeznaczeniem 53
Pozostałe elementy ryzyka 53
Bezpieczna praca 53
Włączenie urządzenia 54
Prace wykonywane łuparką do drewna opałowego 54
Obsługa i konserwacja 57
Gwarancja 58
Ewentualne zakłócenia 59
Dane techniczne 59
Deklaracja zgodności 60
Części zamienne 61
wolno uruchomić urządzenia.
SSppiiss ttrreeśścci
SSyymmbboollee nnaa uurrzząąddzzeenniiu
Przed uruchomieniem należy przeczytać
instrukcję obsługi oraz wskazówki
dotyczące bezpieczeństwa i następnie się
do nich stosować.
W celu ochrony stóp przed uderzeniami
przez spadające pnie należy podczas
prowadzenia robót nosić obuwie
ochronne.
W celu chrony dłoni przed skaleczeniami
przez wióry i drzazgi należy stosować
rękawice ochronne.
i
u
W celu ochrony oczu przed skaleczeniami
przez wióry i drzazgi należy stosować
okulary ochronne lub maskę chroniącą
twarz.
Zabrania się demontowania lub
stosowania jakichkolwiek zmian w
zakresie urządzeń ochronnych i
zabezpieczających.
Na stanowisku pracy maszyny może się
znajdować tylko obsługujący. Ze strefy, w
której występuje zagrożenie należy
usunąć osoby postronne oraz zwierzęta
domowe i robocze (minimalna odległość
5 m).
Niebezpieczeństwo odniesienia ran
ciętych i zgnieceń; nie należy nigdy
dotykać niebezpiecznych miejsc podczas
ruchu klina rozszczepiającego.
230 V – 240 V
SSyymmbboollee ww IInnssttrruukkccjjii oobbssłłuuggi
Zagrażające niebezpieczeństwo lub
niebezpieczna sytuacja. Nieprzestrzeganie
niniejszych wskazówek może prowadzić w
następstwie do odniesienia obrażeń lub wystąpienia
szkód rzeczowych.
L
! kompletność dostawy
! ew. szkody transportowe
Należy odwrotnie poinformować dystrybutora, dostawcę bądź
producenta o zastrzeżeniach. Późniejsze reklamacje nie
zostaną uwzględnione.
Ważne wskazówki dotyczące prawidłowej
obsługi. Nieprzestrzeganie niniejszych wskazówek
może prowadzić w następstwie do zakłóceń w pracy
urządzenia.
Wskazówki dla użytkownika. Wskazówki te
pomagają w optymalnym wykorzystaniu wszystkich
funkcji urządzenia.
Montaż, obsługa i konserwacja. Tutaj następuje
dokładne objaśnienie czynności, które należy
wykonać.
Po rozpakowaniu kartonów należy sprawdzić
Uwaga!
Należy stale obserwować ruch
popychacza wyrzynka.
Uwaga!
Nie należy nigdy uwalniać wyrzynka
zaciśniętego na klinie rozszczepiającym
samymi rękoma..
Uwaga!
Przed rozpoczęciem wykonywania
czynności związanycdh z naprawą,
obsługą i czyszczeniem urządzenia należy
wyłączyć silnik i wyjąć wtyczkę z gniazda
sieciowego.
Uwaga!
Należy zabezpieczyć napięcie o wartości
podanej na tabliczce znamionowej
urządzenia.
Stop!
Stosować się do wskazówek
zamieszczonych w instrukcji
obsługi. Poluzować śrubę
odpowietrzającą .
Odpowietrzanie strona 56
ZZaakkrreess ddoossttaawwyy
i
52
Page 54

SSttoossoowwaanniiee zzggooddnnee zz pprrzzeezznnaacczzeenniieemm
Łuparkę do drewna opałowego należy stosować wyłącznie
do rozszczepiania drewna.
Do obróbki w łuparce nadaje się wyłącznie prosto
przycięte drewno.
Z drewna, które ma być rozszczepiane należy
bezwzględnie usunąć przedmioty metalowe (gwoździe,
drut itp.).
Każdy inny sposób użycia urządzenia, wykraczający poza
opisany powyżej jest uważany za sprzeczny z
przeznaczeniem. Za szkody wynikające z takiego
użytkowania producent nie ponosi odpowiedzialności skutki ryzyka ponosi wyłącznie użytkownik.
PPoozzoossttaałłee eelleemmeennttyy rryyzzyykkaa
Także przy posługiwaniu się urządzeniem w sposób
zgodny z wszystkimi obowiązującymi przepisami dotyczącymi
bezpieczeństwa mogą, w związku z jego przeznaczeniem i
konstrukcją, pozostać jeszcze pewne elementy ryzyka.
Te pozostałe elementy ryzyka można ograniczyć poprzez
kompleksowe stosowanie się do „wskazówek dotyczących
bezpieczeństwa“ oraz łącznie z nimi, „stosowania urządzenia
zgodnie z przeznaczeniem“.
Praca wykonywana w przemyślany sposób i z zachowaniem
należytej ostrożności zmniejsza ryzyko odniesienia obrażeń
przez inne osoby oraz ryzyko spowodowania szkód.
Ignorowanie lub lekceważenie przedsięwzięć służących
bezpieczeństwu pracy może prowadzić do odniesienia
obrażeń przez obsługującego oraz uszkodzenia rzeczy.
Zagrożenie porażeniem prądem przy stosowaniu
nieprawidłowych przewodów zasilania energią
elektryczną.
Dotknięcie elementów przewodzących prąd przy
otwartych podzespołach elektrycznych.
Ponadto, pomimo wszystkich zastosowanych przedsięwzięć
zapobiegawczych mogą wystąpić elementy utajonego ryzyka.
BBeezzppiieecczznnaa pprraaccaa
W celu ochrony siebie samego i innych przed
ewentualnymi obrażeniami, przed włączeniem
niniejszego produktu należy przeczytać i stosować się do
następujących wskazówek i przepisów o zapobieganiu
wypadkom, opracowanych przez Wasze zrzeszenia
branżowe lub do obowiązujących lokalnie w danym kraju
regulacji dotyczących bezpieczeństwa.
Należy przekazać niniejsze wskazówki dotyczące
L
bezpieczeństwa wszystkim innym osobom, które
użytkują maszynę.
Niniejsze wskazówki dotyczące bezpieczeństwa
L
należy starannie przechowywać.
Przy pomocy niniejszej instrukcji należy zapoznać się z
urządzeniem przed rozpoczęciem użytkowania.
Nie należy stosować urządzenia do celów, do których nie
jest ono przeznaczone (użytkowanie zgodnie
przeznaczeniem i prace wykonywane łuparką do drewna
opałowego).
Należy wybrać pewne stanowisko pracy i stale
utrzymywać równowagę.
Podczas pracy należy stać za popychaczem, w
obszarze, w którym znajdują się uchwyty manipulacyjne.
Nie należy nigdy znajdować się w obszarze klina
rozszczepiającego.
Nigdy nie stawać na maszynie.
Pracować z zachowaniem uwagi. Należy koncentrować
uwagę na wykonywanej czynności. Pracę należy
wykonywać w rozsądny sposób. Nie należy pracować
urządzeniem:
− jeżeli odczuwa się zmęczenie,
− pod wpływem narkotyków, alkoholu czy
medykamentów osłabiających zdolność reagowania
Podczas pracy należy nosić:
− okulary ochronne lub maskę zabezpieczającą twarz
− rękawice robocze
− osłonę narządu słuchu
− obuwie ochronne z noskami okutymi blachą
Należy nosić odpowiednią odzież roboczą:
− nie nosić odzieży czy ozdób, (które mogłyby się
wplątać w części maszyny znajdujące się w ruchu)
Obsługujący maszynę odpowiada w miejscu
użytkowania maszyny w stosunku do osób trzecich.
Dzieci oraz młodzież poniżej lat 18 nie mogą obsługiwać
maszyny.
Dzieci muszą pozostawać z dala od urządzenia.
Nie należy pozostawiać urządzenia bez dozoru.
Nigdy nie używaj urządzenia, gdy w pobliżu są osoby nie
biorące udziału w pracy.
Na stanowisku pracy należy utrzymywać porządek!
Następstwem nieporządku może być zaistnienie
wypadków.
Nie należy przeciążać urządzenia! Praca w podanym
zakresie wykorzystania mocy jest łatwiejsza i
bezpieczniejsza.
Użytkować urządzenie tylko z kompletnymi i prawidłowo
zamontowanymi urządzeniami ochronnymi i nie
dokonywać przy maszynie żadnych zmian, które mogą
mieć wpływ na zmniejszenie bezpieczeństwa.
Nie eksploatować urządzenia bez leja wpustowego.
Nie spryskiwać urządzenia wodą (zagrożenie porażeniem
prądem elektrycznym).
Nie pozostawiać urządzenia oraz nie pracować w czasie
opadów deszczu.
Przechowywać urządzenie w suchym miejscu i
uniemożliwić dostęp dzieciom.
ochronne.
Do wykonywania następujących robót należy wyłączyć
maszynę i wyjąć wtyczkę z gniazda zasilania
sieciowego:
− Naprawy
Czynności obsługowo-konserwacyjne
−
53
Page 55

Usuwanie zakłóceń
−
Transport
−
Pozostawienie urządzenia (także na
−
krótki okres czasu)
Sprawdzić maszynę, czy nie wykazuje ona ewentualnych
uszkodzeń:
Przed dalszym użytkowaniem urządzenia należy
−
starannie sprawdzić czy urządzenia ochronne zostały
w prawidłowy sposób zamontowane i czy spełniają
swoją funkcję.
Proszę sprawdzić czy podzespoły nie są uszkodzone
−
lub niesprawne. Żeby uzyskać pełną sprawność
eksploatacyjną wszystkie podzespoły muszą być
prawidłowo zamontowane i spełniać wszystkie
wymagania.
Jeżeli niniejsza instrukcja nie stanowi inaczej,
−
wszystkie uszkodzone urządzenia ochronne muszą
zostać fachowo naprawione lub wymienione przez
autoryzowany warsztat.
Uszkodzone lub nieczytelne etykiety bezpieczeństwa
−
należy wymienić na nowe.
Bezpieczeństwo urządzeń elektrycznych
Wykonanie z przewodem zasilania energią elektryczną
odpowiadającym IEC 60245 (H 07 RN-F) z przekrojem żył
minimum 2,5 mm², przy długości przewodu do maks.
10 m
Nie należy nigdy stosować przewodów zasilania o
długości powyżej 10 m. Dłuższe przewody zasilające
powodują spadek napięcia. Silnik nie osiąga swojej
maksymalnej mocy i w konsekwencji zredukowaniu ulega
sprawność funkcjonalna maszyn.
Przy wykładaniu przewodu zasilania sieciowego należy
zwrócić uwagę na to, żeby nie został zgnieciony ani
złamany oraz, żeby wtyk nie uległ zawilgoceniu.
Nie należy stosować przewodu zasilającego do celów,
do których nie jest on przewidziany. Należy chronić
przewód zasilania przed wysokimi temperaturami,
olejem i ostrymi krawędziami. Nie wyciągać wtyku z
gniazda zasilania sieciowego ciągnąc za przewód.
Regularnie sprawdzać stan techniczny przewodu
przedłużacza i jeżeli jest uszkodzony, to należy go
wymienić. Nie należy posługiwać się uszkodzonymi
przewodami zasilającymi.
Podczas pracy na otwartej przestrzeni należy stosować
tylko dozwolone do tego i odpowiednio oznakowane
przedłużenia przewodów zasilających.
Nie należy posługiwać się prowizorycznymi
przyłączami elektrycznymi.
Nie należy nigdy stosować obejść urządzeń
zabezpieczających ani ich wyłączać.
Wykonanie przyłącza elektrycznego lub naprawy
podzespołów elektrycznych maszyny mogą być
wykonywane wyłącznie przez koncesjonowanego
elektrotechnika lub jedną z naszych stacji obsługi
klienta. Należy przy tym stosować się do lokalnych
przepisów dotyczących bezpieczeństwa.
Naprawy innych podzespołów maszyny wykonuje
producent lub jedna z jego stacji obsługi klienta.
Należy stosować wyłącznie oryginalne części zamienne
oraz elementy wyposażenia standardowego i
specjalnego. Wskutek stosowania innych części
zamiennych oraz elementów wyposażenia użytkownik
może ulec wypadkowi. Za szkody wynikłe wskutek
powyższego producent nie przyjmuje na siebie
odpowiedzialności.
WWłłąącczzeenniiee uurrzząąddzzeenniiaa
Proszę się upewnić, czy urządzenie jest kompletne oraz
czy jest prawidłowo zmontowane.
Przed każdym użyciem należy sprawdzić:
czy przewody zasilania energią nie wykazują
−
uszkodzeń (pęknięć, przecięć itp.),
Nie należy posługiwać się uszkodzonymi
przewodami.
czy nie występują inne uszkodzenia (patrz –
−
Bezpieczne wykonywanie pracy),
czy wszystkie śruby zostały prawidłowo dokręcone.
−
szczelność układu hydraulicznego
−
Przyłącze sieciowe
L
Należy porównać wartość napięcia znamionowego
podaną na tabliczce urządzenia z wartością napięcia
sieciowego i podłączyć urządzenie do przepisowej
wtyczki.
Stosować przedłużenia przewodów zasilania
sieciowego o wystarczającym przekroju.
Maszynę należy podłączyć poprzez wyłącznik ochronny Fi
(wyłącznik ochronny różnicowy) 30 mA .
L
L
Nigdy nie eksploatować maszyny, jeżeli zagraża
Stwierdzić, czy maszyna i jej otoczenie są czyste oraz
Należy regularnie sprawdzać, czy w zbiorniku znajduje się
PRACY
Łuparka do drewna może być obsługiwana wyłącznie
Zabezpieczenie: 16 A
Układ hydrauliczny
niebezpieczeństwo ze strony cieczy hydraulicznej.
wolne od plam oleju.
Niebezpieczeństwo poślizgnięcia oraz zapłonu!
wystarczająca ilość oleju hydraulicznego (patrz rozdział
„Obsługa techniczna i konserwacja”)
zawartość: 2,6 Liter
L
PPrraaccaa
L
dodatkowe WSKAZÒWKI DOT. BEZPIECZEŃSTWA
przez jedną osobę.
łłuuppaarrkkąą ddoo ddrreewwnnaa
o
ooppaałłoowweeggo
54
Page 56

Maszynę mogą obsługiwać wyłącznie osoby w wieku
powyżej 18 lat, które przeczytały i zrozumiały instrukcję
obsługi.
W celu ochrony przed możliwymi onrażeniami należy
stosować wyposażenie ochronne (okulary / maska
ochronna, rękawice, obuwie ochronne).
Nigdy nie rozszczepiać wyrzynków, w których znajdują się
gwoździe, drut czy inne przedmioty.
Rozszczepione drewno i wióry stwarzają na stanowisku
pracy nowe zagrożenia. Występuje zagrożenie potknięcia,
poślizgnięcia lub upadku. Stanowisko pracy powinno być
stale uporządkowane.
Przy włączonej maszynie nie należy nigdy opierać dłoni
na jej ruchomych podzespołach. W celu ochrony rąk przed
obrażeniami należy zachować odpowiedni odstęp od
wyrzynka, popychacza i klina rozszczepiającego.
Rozszczepiać można wyłącznie drewno, którego
maksymalna długość nie przekracza 370 mm.
Lokalizacja urządzenia
Łuparkę do drewna opałowego należy ustawić na powierzchni
roboczej o wysokości 60 - 75 cm, żeby wykonywanć pracę w
wygodnej pozycji.
W celu uniemożliwienia maszynie toczenia się podczas pracy
należy zablokować koła klinem.
Należy zwrócić uwagę, żeby stanowisko pracy spełniało
następujące wymagania:
− nie stwarzało zagrożenia poślizgnięciem
− było równe
− nie stwarzało zagrożenia potknięciem
− posiadało wyszarczające oświetlenie
Nie należy eksploatować maszyny w pobliżu gazu ziemnego,
benzyny oraz innych materiałów łatwopalnych.
Co można rozszczepiać?
Obsługa
Obsługa urządzenia dwoma rękami
1. Wcisnąć przycisk przełącznika ZAŁ / WYŁ usytuowanego
na silniku elektrycznym. Odczekać kilka sekund, aż silnik
uzyska maksymalne obroty a w pompie zostanie
wytworzone prawidłowe ciśnienie – rys. 1.
2. Jednocześnie wcisnąć obydwa uchwyty manipulacyjne w
kierunku do dołu – rys. 2.
Popychacz dociska wyrzynek do klina
rozszczepiającego. Następuje rozszczepienie wyrzynka.
3. Zwolnić obydwa uchwyty manipulacyjne, popychacz
powraca do swojej pozycji wyjściowej – rys. 3.
s. 2
rys. 1
rys. 2
przełącznik
ZAŁ / WYŁ
Wielkość wyrzynków przeznaczonych do
rozszczepiania
długość wyrzynka: maks. 370 mm
średnica wyrzynka: 50 – 250 mm
Średnica wyrzynka jest zalecaną wartością odnośną,
ponieważ:
− drewno o mniejszej średnicy może być trudniejsze do
rozszczepiania ze względu zawarte w nim sęki i grube
włókna
− drewno o średnicy więszej niż ∅ 250 mm może być
rozszczepiane gdy włókna są gładkie i niespójne
Nie należy rozszczepiać zielonych wyrzynków. Wyschnięte i
wysezonowane wyrzynki można łatwiej rozszczepiać i nie
powodują tylu zacięć materiału w maszynie jak drewno
zielone (wilgotne).
rys. 3
55
Page 57

Szczególne wskazówki dotyczące
rozszczepiania:.
Przygotowania:
Drewno, które ma być rozszczepiane należy przygotować
nadając mu maksymalne wymiary umożliwiające obróbkę
(370 mm długości, ∅ 50 – 250 mm). Należy przede
wszystkim zwrócić uwagę na to, żeby drewno było równo
pocięte.
Położyć drewno przy łuparce tak, żeby nie stanowiło dla
nikogo zagrożenia (niebezpieczeństwo potknięcia).
Odpowietrzanie
Wykręcić śrubę odpowietrzającą o 3 - 4 obrotów – rys. 4.
Dokręcić śrubę ponownie dopiero wtedy gdy zostanie
zakończone rozszczepianie.
Śruba odpowietrzająca
rys. 4
wykręcanie
dokręcanie
Rozszczepianie drewna:
Wyrzynki należy układać zawsze podłużnie i płasko na
ramie zasadniczej łuparki. Wyrzynek musi być zawsze
objęty przez prowadniki blaszane - rys. 5
rys. 5
Zawsze zwracać uwagę na to, żeby klin rozszczepiający i
popychacz mogły naciskać na końcówki wyrzynka w
pozycji pionowej.
Nigdy nie rozszczepiać dwóch wyrzynków jednocześnie.
Nie należy nigdy podczas fazy pracy urządzenia dokładać
lub zamieniać drewna.
L Nigdy nie kontynuować posuwu przez dłuższy czas (kilka
sekund) w celu wymuszenia rozszczepienia wyrzynka. Może
to doprowadzić do uszkodzenia maszyny.
Ponownie ułożyć wyrzynek na prowadniku i powtórzyć
rozszczepianie lub zdjąć go i odłożyć go na stronę.
W jaki sposób miżna uwolnić wyrzynek zaciśnięty w
maszynie?
1. Zwolnić obydwa elementy manipulacyjne tak, żeby
popychacz wyrzynka mógł się wycofać.
2. Podłożyć pod wyrzynkiem trójkątny klin drewniany,
następnie uruchomić popychacz tak, żeby naciskał on na
klin znajdujący się pod zaciśniętym wyrzynkiem.
3. Jeżeli wyrzynka nie będzie można uwolnić, to należy
powtórzyć tę czynność stosując coraz większe kliny.
Podczas luzowania nie uderzać w zaciśnięty wyrzynek
młotkiem lub trzymać rąk w jego pobliżu.
Nie należy także prosić innej osoby o pomoc.
Nie należy także próbować uwolnić wyrzynka poprzez
uderzanie jakimkolwiek innym narzędziem, gdyż może to
doprowadzić do pęknięcia bloku silnika.
Zakończenie pracy:
Zanim zostanie naciśnięty przycisk przełącznika ZAŁ/WYŁ
znajdujący się na silniku elektrycznym maszyny należy
zwrócić uwagę na to, żeby popychacz wyrzynka wycofał
się do pozycji wyjściowej.
Następnie należy wyjąć wtyczkę z gniazda sieciowego.
Ponownie mocno wkręcić śrubę odpowietrznika rys. 4
Przestrzegać przepisów dotyczących obsługi technicznej i
konserwacji.
rys. 7
A
Nie należy nigdy układać wyrzynka na prowadniku w
pozycji ukośnej rys. 6
rys. 6
B
C
D
G
F
E
56
Page 58

rys. 8
I
H
J
A Popychacz wyrzznka F Silnik elektryczny
B Śruba odpowietrznika G Przełącznik ZAŁ/WYŁ
C Tłoczysko H Klin rozszczepiający
D Pręt pomiaru stanu oleju I Blaszane prowadniki
wyrzynka
E Pokrywa cylindra J Rękojeści manipulacyjne
W jaki sposób sprawdzam stan oleju?
1. Popychacz wyrzynka należy wycofać do pozycji
wyjściowej.
2. Przechylić rozszczepiacz tak, żeby otwór wlewu oleju był
skierowany do góry. rys 10
Do przytrzymania rozszczepiacza w powyższej
pozycji niezbędna jest pomoc drugiej osoby.
3. Wykręcić pręt pomiaru stanu oleju – rys. 11. Należy przy
tym zwrócić uwagę na uszczelkę olejową.
4. Oczyścić pręt pomiaru stanu oleju i uszczelkę olejową.
5. Ponownie włożyć aż do oporu pręt pomiaru stanu oleju do
otworu.
6. Ponownie wyjąć pręt pomiaru stanu z otworu.
jeżeli poziom oleju znajduje się pomiędzy dwoma
oznaczeniami krańcowymi, to w zbiorniku znajduje się
wystarczająca ilość oleju.
jeżeli poziom oleju znaduje się poniżej dolnego
oznaczenia krańcowego, należy uzupełnić olej
stosując do tego czysty lejek.
dolne oznaczenie górne oznaczenie
OObbssłłuuggaa tteecchhnniicczznnaa ii kkoonnsseerrwwaaccjjaa
Przed rozpoczęciem czynności obsługi technicznej
i konserwacji należy wyjąć z gniazda wtyczkę
ochronne.
przewodu zasilania sieciowego.
W celu uniknięcia obrażeń rąk należy nosić rękawice
L W celu zachowania sprawności funkcjonalnej łuparki do
drewna opałowego należy zwrócić uwagę na
następujące zagadnienia:
Po zakończeniu pracy należy dokładnie oczyścić
maszynę.
Usunąć pozostałości żywicy.
Regularnie oliwić tłoczysko (rys. 7) stosując do tego
olej w spraju nie obciążający środowiska
naturalnego.
Badać stan oleju lub wymienić olej.
Ostrzenie klina rozszczepiającego
Po dłuższym okresie eksploatacji bądź przy wyraźnym
spadku skuteczności rozszczepiania należy naostrzyć
drobnym pilnikiem klin rozszczepiający (usunąć grat). rys. 9
rys. 9
ostrzenie
krawędzi tnącej
7. Sprawdzić stan techniczny uszczelki olejowej. W
przypadku uszkodzeń uszczelka musi zostać wymieniona.
Pręt pomiaru stanu oleju
8. Ponownie wkręcić i dokręcić pręt pomiaru stanu oleju.
Uwaga! W celu uniknięcia uszkodzeń uszczelki olejowej
oraz gwintu pokrywy cylindra, nie należy zbyt mocno
dokręcać śruby
rys. 10
57
Page 59

rys. 11
pręt pomiaru
stanu oleju
Olej hydrauliczny
L
Zaleca się stosowanie do siłownika następujących gatunków
oleju hydraulicznego:
Shell Tellus T 22
Aral Vitam Gf 22
BP Energol HLP 22
Mobil DTE 11
lub o równorzędnych właściwościach
Nie stosować żadnych innych gatunków oleju.
Stosowanie innych gatunków oleju wywiera wpływ na
sprawność funkcjonalną siłownika hydraulicznego.
Wkiedy należy wymienić olej?
Pierwszą wymianę oleju należy wykonać po upływie 50
godzin eksploatacyjnych, następnie po upływie każdych
kolejnych 250 godzin eksploatacyjnych lub 1 x w roku.
Wymiana:
1. Popychacz wyrzynka musi powrócić do pozycji
wyjściowej.
2. Ustawić pod klinem rozszczepiającym zbiornik, który
będzie mógł pomieścić minimum 4 litry oleju,.
3. Wykręcić pręt pomiaru stanu oleju. Przy wyjmowaniu pręta
należy zwrócić uwagę na uszczelkę olejową.
4. Następnie przechylić maszynę w celu wylania oleju do
zbiornika.
5. Teraz przechylić rozszczepiacz do drewna w taki sposób,
żeby otwór wlewu oleju był zwrócony do góry - rys. 10.
Do przytrzymania rozszczepiacza w powyższej
pozycji niezbędna jest pomoc drugiej osoby.
7. Stosując czysty lejek, wlać do maszyny świeży olej
hydrauliczny (2,6 Liter).
8. Oczyścić pręt pomiaru stanu oleju i uszczelkę olejową.
9. Sprawdzić stan techniczny uszczelki olejowej. W
przypadku uszkodzeń uszczelka musi zostać
wymieniona..
9. Ponownie wkręcić i dokręcić pręt pomiaru stanu oleju.
Uwaga! W celu uniknięcia uszkodzeń uszczelki olejowej
oraz gwintu pokrywy cylindra, nie należy zbyt mocno
dokręcać śruby
Przepracowany olej należy zagospodarować zgodnie
z obowiązującymi przepisami (lokalna składnica
przepracowanego oleju). Zabrania się spuszczania
przepracowanego oleju do podłoża lub mieszania go
z innymi odpadkami.
GGwwaarraannccjjaa
• Przez pierwsze 2 lata, począwszy od dostawy urządzenia
z magazynów dystrybutora, udzielamy gwarancji z tytułu
wad wynikających z zastosowanych materiałów i błędów
jakie wystąpiły przy produkcji urządzenia.
• Roszczenia gwarancyjne z tytułu szkód jakie powstaną
wskutek nieprawidłowego obchodzenia się z urządzeniem
oraz nieprawidłowego opakowania go podczas transportu
zwrotnego są wykluczone.
• Wadliwe podzespoły należy odesłać nieodpłatnie do
naszego zakładu. Decyzja o nieodpłatnej dostawie części
zamiennych pozostaje w naszej gestii. Rozstrzygnięcie o
bezpłatnej dostawie części zamiennych pozostaje w
naszej gestii.
• Udzielona gwarancja nie obejmuje normalnego zużycia
eksploatacyjnego klina rozszczepiającego, oleju
hydraulicznego, prowadników, uszczelek oraz kół
jezdnych.
• Roboty związane z roszczeniem gwarancyjnym zostaną
wykonane przez nas. Udzielenie zlecenia na naprawę
innej firmie wymaga udzielenia przez nas jednoznacznej
zgody.
• Gwarancja zostaje przez nas udzielona pod warunkiem,
stosowane były oryginalne części zamienne.
• Zastrzegamy sobie prawo do zmian technicznych
służących dalszemu rozwojowi technicznemu urządzenia.
58
Page 60

EEwweennttuuaallnnee zzaakkłłóócceenniiaa
rodzaj zakłócenia ewentualna przyczyna usuwanie
Wyrzynek nie zostaje
rozszczepiony
(zbyt mała siła rozszczepiania)
Popychacz wyrzynka wysuwa się
skokami lub z intensywną wibracją
Popychacz wyrzynka nie wysuwa
się.
Silnik urządzenia nie podejmuje
pracy
Wyciek oleju poprzez pręt
pomiaru stanu.
⇒ Wyrzynek znajduje się w niewłaściwej pozycji.
⇒ Wymiary wyrzynka wykraczają poza dozwolone
lub drewno jest zbyt twarde jak na możliwości
maszyny.
⇒ Klin rozszczepiający nie rozszczepia.
⇒ Wyciek oleju.
⇒ Zbyt niskie ciśnienie w układzie hydraulicznym.
⇒ Niewłaściwy przewód przyłącza zasilania
energią elektryczną (dłuższy niż 10 m lub o
zbyt małym przekroju żył).
⇒ Powietrze w układzie. ⇒ Otworzyć śrubę odpowietrzającą.
⇒ Niesprawna pompa hydrauliczna ⇒ W celu usunięcia zakłócenia należy
⇒ Brak napięcia sieciowego
⇒ Uszkodzony przewód zasilania sieciowego
⇒ Niesprawny silnik elektryczny.
⇒ Niesprawna uszczelka olejowa pręta pomiaru
stanu.
⇒ Ponownie umieścić wyrzynek w
urządzeniu.
⇒ Skorygować wymiary wyrzynka do
dozwolonych.
⇒ naostrzyć klin rozszczepiający,
sprawdzić czy nie występuje grat lub
wyszczerbienia
⇒ W celu umiejscowienia wycieku należy
podłożyć pod łuparką kawałek kartonu.
W sprawie usunięcia wycieku należy
nawiązać kontakt z producentem lub
wskazaną przez niego firmą.
⇒ Sprawdzić poziom oleju i jeżeli
zachodzi potrzeba, uzupełnić. Jeżeli
zakłócenia nie ustąpiło, to należy
nawiązać kontakt z producentem lub
wskazaną przez niego firmą.
⇒ Zastosować prawidłowy przewód
przyłącza zasilania energią elektryczną
⇒ Sprawdzić stan oleju i jeżeli zachodzi
potrzeba, uzupełnić.
Jeżeli zakłócenia nie ustąpiło, to należy
nawiązać kontakt z producentem lub
wskazaną przez niego firmą.
nawiązać kontakt z producentem lub
wskazaną przez niego firmą.
⇒ Sprawdzić zabezpieczenie (16 A)
⇒ Wymienić przewód zasilania
sieciowego, lub zlecić jego
sprawdzenie elektrykowi
⇒ W celu usunięcia zakłócenia należy
nawiązać kontakt z producentem lub
wskazaną przez niego firmą.
⇒ Wymienić uszczelkę olejową.
DDaannee tteecchhnniicczznnee
Siła rozszczepiania 40 kN (4 t)
Długość wyrzynków drewnianych 370 mm
Średnica wyrzynków drewnianych 50 – 250 mm
Długość skoku rozszczepiania 300 mm
Średnica tłoczyska 30 mm
Olej hydrauliczny (maks.) 2,6 Liter
Moc silnika elektrycznego (pobór mocy) P1 = 1500 W ( S1-100 % )
Przyłącze 230 V ~ 50 Hz
Liczba obrotów 2850 min -1
Wymiary długość 1115 x szerokość 320 x wysokość 470 mm
Ciężar 45 kg
59
Page 61

EG-Konformitätserklärung
EC Declaration of Conformity
Déclaration de conformité de la CE
EG-Verklaring van overeenstemming
EG-konformitetsintyg
EF-overensstemmelseserklæring
Prohlášení o shodě
ATIKA GmbH & Co. KG, Schinkelstraße 97, D-59227 Ahlen
EG-Deklaracja zgodności
erklären in alleiniger Verantwortung, dass das Produkt Brennholzspalter ASP 4
podle směrnice EU č. 98/37 EG
entsprechend der Richtlinie 98/37 EG
according to Directive 98/37 EC
conformément à la disposition 98/37 CE
overeenkomstig de richtlijn van de raad 98/37 EG
enligt EG-norm 98/37/EG
i henhold til EF-direktiv 98/37/EF
stosownie do Wytycznych 98/37 EG
auf die sich diese Erklärung bezieht, den einschlägigen grundlegenden Sicherheits- und Gesundheitsanforderungen der Richtlinien
98/37/EG, sowie den Anforderungen der anderen einschlägigen Richtlinien
declare under our sole responsibility, that the product Log spliter ASP 4
to which this declaration relates corresponds to the relevant basic safety and health requirements of the Directive 98/37/EC, and to
the requirements for the other relevant Directives:
déclarons en responsabilité propre, que le produit Fendeur de bois à brûler ASP 4
auquel se rapporte la présente déclaration, correspondes aux exigences de sécurité et de santé fondamentales des dispositions
98/37/CE, ainsi qu’aux exigences des autres dispositions en la matière
verklaren, iutsluitende verantwoordelijkheid, dat het produkt Brandhoutsplijter ASP 4
waarop deze verklaring betrekking heeft, voldoet aan de desbetreffende veiligheids- en gezonheidseisen van de richtlijn 98/37/EG,
alsmede aan de eisen van de andere desbetreffende richlijnen
intygar med ensamansvar att nedanstående produkt, Vedklyv ASP 4
för vilket detta intyg gäller, uppfyller, grundläggande säkerhets- och hälsoskyddsfäreskrifter enligt EG-norm 98/37/EG, samt uppfyller
kraven enligt övriga gällnade EG-normer
erklærer på eget ansvar, at produkt, Trækløvnings ASP 4
som er omfattet af denne erklæring, overholder de relevante grundlæggende sikkerheds- og sundhedskrav i EF-direktiv 98/37/EF
samt kravene i andre EF-direktiver, der kan finde anvendelse.
prohlašuje se vší odpovědností, že výrobek Štípač palivového dřeva ASP 4
na který se vztahuje toto prohlášení, odpovídá příslušným základním bezpečnostním a zdravotním podmínkám směrnice 98/37 EG,
jakož i podmínkám dalších příslušných směrnic
oświadcza, przyjmując na siebie wyłączną odpowiedzialność, że następujący produkt, Łuparka do trewna ASP 4
którego to oświadczenie dotyczy, odpowiada Wytycznym 98/37/EG określającym wymagania w zakresie bezpieczeństwa i
zdrowotności, a także wymaganiom wszystkich innych Wytycznych znajdujących zastosowanie w powyższym zakresie.
89/336/EWG, 73/23/EWG
entsprechen. Zur sachgerechten Umsetzung der in den EG-Richtlinien genannten Sicherheits- und Gesundheitsanforderungen
wurden folgende Normen und technische Spezifikationen herangezogen:
For the relevant implementation of the safety health requirements mentioned in the Directives, the following standards and technical
spezifications have been respected:
Pour la mise en pratique correcte des revendications de sécurité et de santé nommées dans les dispositions CEE les normes et
spécifications techniques suivant ont été appliquées:
Voor de desbetreffende tenuitvoerlegging van de in de Richtlijnen genoemde veiligheids- en gezondheidseisen is rekening gehouden
met de volgende normen en technische specificaties:
Föfjande mormer och tekniska specifikationer har legat till grund för ett fackmässigt inörande av de i EG-normen angivna säkerhetsoch hälsoskyddsföreskrifterna
Til gennemførelse af de i EF-direktivet nævnte sikkerheds- og sundhedskrav er følgende standarder og tekniske specifikationer
anvendt:
Pro technicky správné uplatnění bezpečnostních a zdravotních podmínek dle směrnic EU byly použity následující normy a technické
specifikace:
W celu prawidłowej realizacji wymagań stawianych przez Wytyczne EG w zakresie bezpieczeństwa i zdrowotności oparto siş na
następujących normach i specyfikacjach technicznych:
DIN EN 574:1997-02, DIN EN 609-1:1999-05, DIN EN 60204:1998-11
Ahlen, 24.07.2003 A. Pollmeier, Geschäftsführung
60
Page 62

-- EErrssaattzztteeiillee -- SSppaarree ppaarrttss -- PPiièècceess ddee rreecchhaannggee -- RReesseerrvveeoonnddeerrddeelleenn --
-- RReesseerrvvddeellaarr -- RReesseerrvveeddeelleerr -- NNááhhrraaddnníí ddííllyy -- CCzzęęśśccii zzaammiieennnnee --
Entnehmen Sie die Ersatzteile der
Ersatzteillist oder Zeichnung.
Ersatzteile bestellen:
Bezugsquelle ist der Hersteller oder
−
Händler
erforderliche Angaben bei der
−
Bestellung:
• Farbe des Gerätes (nur bei
Gehäuseteilen)
• Ersatzteil - Nr.
• Bezeichung des Ersatzteils
• gewünschte Stückzahl
• Bezeichnung des Brennholzspalters
Beispiel: orange, 360464, Tragegriff, 1,
ASP 4
The spare parts are shown in the spare
parts list or relevant drawing.
Ordering spare parts:
Spare parts must be obtained from the
−
manufacturer or dealer
Information required when ordering:
−
• Colour of the machine (for housing
components only)
• Spare part no.
• Description/designation of the part
• Quantity required
• Model no. of the log splitter
Example: orange, 360464, carrying handle,
1, ASP 4
Les références des pièces de rechange
sont indiquées dans la nomenclature des
pièces de rechange ou sur les
illustrations.
Commande de pièces de rechange :
Le fournisseur est le constructeur ou un
−
revendeur
Références indispensables lors de la
−
commande :
• Coloris de l’appareil (uniquement
pour les éléments du boîtier)
• N° de la pièce de rechange
• Désignation la de pièce de rechange
• Quantité requise
• Désignation du fendeur de bois à
brûler
Exemple: orange, 360464, poignée de
De reserveonderdelen staan vermeld in
de reserveonderdelenlijst of de tekening.
Reserveonderdelen bestellen:
Bron van aankoop is de fabrikant of
−
handelaar
Noodzakelijke gegevens bij de
−
bestelling:
• Kleur van het toestel (alleen bij
behuizingdelen)
• Reserveonderdeel - nummer
• Benaming van het reserveonderdeel
• Gewenst aantal
• Benaming van de brandhoutsplijter
Se reservdelslistan eller ritning.
Att beställa reservdelar:
Inköpskälla: tillverkaren eller
−
återförsäljaren
Data som behövs vid beställning:
−
• Färg på maskinen (gäller endast
kåpans delar)
• Reservdelsnummer
• Beteckning på reservdelen
• Önskat antal
• Beteckning på klyven
Exempel: orange, 360464, bärhandtag, 1,
ASP 4
manutention, 1, ASP 4
Reservedelene fremgår af reservedelslisten eller tegningen.
Bestilling af reservedele:
Leverandør er producenten eller
−
forhandleren
Nødvendige oplysninger ved bestillingen:
−
• Maskinfarve (kun ved kabinetsdele)
• Reservedelsnr.
• Reservedelens betegnelse
• Ønsket styktal
• Brændekløverens betegnelse
Eksempel: orange, 360464, bærehåndtag,
1, ASP 4
Voorbeeld: oranje, 360464, draaggreep, 1,
ASP 4
Náhradní díly vyberte podle seznamu a
označení.
Objednávka náhradních dílů
− díly získáte buď u výrobce nebo u
Vašeho dodavatele.
− Objednávka:
• barva stroje(u dílů krytu stroje)
• číslo náhr.dílu
• název náhr.dílu
• potřebný počet
• značka štípače
Příklad: oranžová, 360464, ovládací
madlo, 1, ASP 4
Części zamienne znajdują się w listach
części zamiennych lub na rysunkach.
Zamawianie części zamiennych:
części zamienne dostarcza producent
−
lub dystrybutor
do niezbędnych informacji należą przy
−
składaniu zamówienia:
• kolor urządzenia (tylko przy
częściach korpusu maszyny)
• nr części zamiennej
• nazwa części zamiennej
• żądana ilość
• oznaczenie łuparki do drewna
opałowego
przykład: pomarańczowy, 360464, uchwyt
nośny, 1, ASP 4
61
Page 63

Pos.-Nr. Ersatzteil-Nr.
Spare part no.
N° de pièce de
rechange
Reserveonderdeel
- nummer
001 391052 Sechskantmutter Hexagonal nut Ecrou hexagonal Zeskante moer DIN 985 – M 14 – 8 – VZ
002 391053 Flachmutter Flat nut Ecrou plat Vlakke moer DIN 439 – B M 14 – 04 – VZ
003 360450 Kolbenstange Piston rod Tige du piston Zuigerstang
004 360451 Feder Spring Ressort Veer 668 mm
005 360452 O-Ring Öldichtung O-ring oil seal Joint torique d’étanchéité O-ring oliedichting
006 360453 Kolbenring Piston ring Segment de piston Zuigerring
007 360454 O-Ring Öldichtung O-ring oil seal Joint torique d’étanchéité O-ring oliedichting
008 360455 Kolbendruckplatte Piston pressure plate Plaque de pression du piston Zuigerdrukplaat
009 360456 Zylinderrohr Cylinder pipe Tube du cylindre Cilinderbuis
010 360457 Ölmessstab Dipstick Jauge d’huile Oliepeilstaaf
011 360458 O-Ring Öldichtung O-ring oil seal Joint torique d’étanchéité O-ring oliedichting
012 360459 Teflon Dichtungsring Teflon seal Anneau d’étanchéité en Téflon Teflon dichtingsring
013 360460 O-Ring Öldichtung O-ring oil seal Joint torique d’étanchéité O-ring oliedichting
014 360461 Entlüftungsschraube Bleed screw Vis d’évacuation d’air Ontluchtingsschroef M 3 x 10
015 360462 Zylinderdeckel – hinten Cylinder cover - rear Culasse arrière du cylindre Cilinderdeksel achteraan
016 360463 Zugsteg Drawbar Etançon de traction Trekbout
017 390201 Linsenschraube mit
018 391643 Scheibe DIN 125 – 6,4 – VZ
019 360464 Tragegriff Carrying handle Poignée de manutention Draaggreep
020 360465 Stützfuss Supporting foot Pied d’appui Steunpoot
021 391020 Sechskantmutter Hexagonal nut Ecrou hexagonal Zeskante moer DIN 937 – M 6 – 8.8 – VZ
022 390058 Sechskantschraube Hexagonal bolt Boulon hexagonal Zeskante bout DIN 933 – M 6 x 12 – 8.8 – VZ
023 360467 Gummifuss für Motor – rechts Rubber foot for motor -
024 360468 Gummifuss für Motor – links Rubber foot for motor - left Pied en caoutchouc pour le
025 360469 Schalter Switch Commutateur Schakelaar
026 391040 Sechskantmutter Hexagonal nut Ecrou hexagonal Zeskante moer DIN 934 – M 8 – 8.8 – VZ
027 391660 Zahnscheibe Retaining washer Rondelle d’arrêt Borgplaatje DIN 6797 – A 8,4 – FSt
028 360470 Kondensator Capacitor Condensateur Condensator 30 µF
029 360471 Gummidichtung
030 360472 Kondensatorgehäuseab031 390202 Schraube Screw Vis Schroef ST 3,5 x 13
032 360473 Anschlussleitung (Netzkabel
033 390021 Sechskantschraube Hexagonal bolt Boulon hexagonal Zeskante bout DIN 933 – M 8 x 30 – 8.8 – VZ
034 391914 Federring Spring washer Rondelle élastique bombée Veerring DIN 128 – A 8 – FSt
035 391644 Scheibe Washer Rondelle Schijf DIN 125 – A 8,4 – VZ
036 360474 O-Ring Öldichtung O-ring oil seal Joint torique d’étanchéité O-ring oliedichting
037 360475 Ölpumpendeckel Oil pump cover Couvercle de la pompe à huile Oliepompdeksel
038 360476 Motor Motor Moteur Motor
039 360477 Motor inkl. Schalter, Konden-
040 390203 Zylinderschraube mit
041 360478 Stammführungsblech – rechts
042 360479 Stammführungsblech – links
043 360480 Hauptrahmen mit Spaltkeil Main frame with splitting
044 360481 Kunststoffplatte Plastic plate Plaque à plastique Kunststof plaat
045 360482 Baugruppe Stammschieber Log ram assembly Bloc du pousse-tronc Bouwgroep stamschuif
046 360483 O-Ring Öldichtung O-ring oil seal Joint torique d’étanchéité O-ring oliedichting
047 360484 Zylinderdeckel – vorn Cylinder cover - front Culasse avant du cylindre Cilinderdeksel vooraan
048 360485 Feder Spring Ressort Veer
049 360496 Befestigungsschraube Retaining screw Vis de fixation Bevestigingsschroef M 8 x 10
050 360486 Griffsockel – rechts Handle mounting Socle de poignée Greepsokkel
051 360487 Griffsockel – links Handle mounting Socle de poignée Greepsokkel
052 360488 Verbindungsteil Connector Adaptateur Verbindingsstuk
053 360489 Bedienungsgriff Operating handle Levier de commande Bedieningshendel
054 360490 Kunststoffkappe Plastic handle Levier plastique Plastichendel
055 391011 Sechskantmutter Hexagonal nut Ecrou hexagonal Zeskante moer DIN 934 – M 10 – 8 – VZ
056 391670 Scheibe Washer Rondelle Schijf DIN 125 – A 10,5 – VZ
057 360491 Schutzhaube Protective cover Capot de protection Schutkap
058 360492 Abdeckung Radachse Axle cover Couvercle de l’essieu Afdekking wielas
059 392024 Sicherungsring Retaining ring Circlip Borgring DIN 471 – 15 x 1
060 360493 Rad Wheel Roue Wiel
061 360494 Konsole Console Console Console
062 391130 Hutmutter Cap nut Ecrou borgne Hoedmoer DIN 986 – M 10 – 8
063 360497 Dichtung Seal Joint Dichting
064 390030 Sechskantschraube Hexagonal bolt Boulon hexagonal Zeskante bout DIN 931 – M 8 x 55 – 8.8 – VZ
065 360495 Distanzplatte Distance plate Plaque de distance Afstandplaate
066 360496 Sicherheitsaufkleber Safety warning label Autocollants de sécurité Veiligheidssticker
Bezeichnung Description Désignation Benaming
Kreuzschlitz
(Staubschutz)
deckung
mit Stecker)
sator und Netzkabel
Innensechskant
Cross-head screw Vis cruciforme Kruiskopschroef DIN 7985 – M 6 x 20 – 8.8 – VZ
right
Rubber seal (dust
protection)
Condenser housing cover Couvercle du boîtier du
Connection cable (power
supply cable with plug)
Motor incl. switch, capacitor and power supply cable
Cylindric screw Vis Schroef DIN 912 – M 8 x 10 – 8.8 – VZ
wedge
Pied en caoutchouc pour le
moteur (droite)
moteur (gauche)
Joint en caoutchouc (protection
contre la poussière)
condensateur
Ligne d’alimentation (câble
d’alimentation avec fiche secteur)
Moteur, commutateur, condensateur et câble d’alimentiation
compris
Châssis principal avec coin à
refendre
Rubberen voet motor - rechts
Rubberen voet motor - links
Rubberen dichting (stofkap)
Condensatorbehuizingaf-
dekking
Aansluitleiding (netsnoer met
stekker)
Motor incl. schakelaar,
condensator en netsnoer
Hoofdframe met splijtwig
∅
25 x 3,55 mm
∅
43,5 x 3,5 mm
∅
10,6 x 1,8 mm
∅
30 mm
∅
30 x 2,65 mm
∅
10 x 2,65 mm
∅
50 x 3,1
62
Page 64

Pos.-Nr. Reservdelsnr.
Reservedelsnr.
číslo náhr.dílu
Nr części
zamiennej
001 391052 Sexkantmutter Sekskantmøtrik plochá matice nakrętka sześciokątna DIN 985 – M 14 – 8 – VZ
002 391053 Flat mutter Flad møtrik šestihranná matice nakrętka płaska DIN 439 – B M 14 – 04 – VZ
003 360450 Kolvstång Stempelstang pístní tyč tłoczysko
004 360451 Fjäder Fjeder pero sprężyna 668 mm
005 360452 O-ring (oljetätning) O-ring olietætning prstenec ol.těsnění okrągła uszczelka olejowa
006 360453 Kolvring Stempelring pístní prstenec pierścień tłokowy
007 360454 O-ring (oljetätning) O-ring olietætning prstenec ol.těsnění okrągła uszczelka olejowa
008 360455 Kolvtryckplatta Stempeltrykplade pístní t laková dest ička płyta dociskowa tłoka
009 360456 Cylinderrör Cylinderrør cylindrická trubka rura cylindra
010 360457 Oljemätsticka Oliemålepind měrka oleje pręt pomiaru stanu oleju
011 360458 O-ring (oljetätning) O-ring olietætning prstenec ol.těsnění okrągła uszczelka olejowa
012 360459 Teflon tätningsring Teflon tætningsring teflon.prstenec těsnění teflonowy pierścień uszczelniający
013 360460 O-ring (oljetätning) O-ring olietætning prstenec ol.těsnění okrągła uszczelka olejowa
014 360461 Luftskruv Udluftningsskrue odvzdušňovací šroub śruba odpowietrzająca M 3 x 10
015 360462 Cylinderkåpa – bakre Topstykke - bagved zadní cylindrický kryt pokrywa cylindra - tył
016 360463 Dragplatta Træklegeme kobylka posunu mostek
017 390201 Korsspårskruv Stjerneskrue křížový šroub śruba z nacięciem krzyżowym DIN 7985 – M 6 x 20 – 8.8 – VZ
018 391643 Skiva Skive podložka podkładka DIN 125 – 6,4 – VZ
019 360464 Bärhandtag Bærehåndtag nosič uchwyt nośny
020 360465 Stödfot Støttefod opěrná noha wspornik
021 391020 Mutter Møtrik matka nakrętka DIN 937 – M 6 – 8.8 – VZ
022 390058 Skruv Skrue šroub śruba DIN 933 – M 6 x 12 – 8.8 – VZ
023 360467 Gummifot för motor – höger Gummifod til motor - højre gum.noha motoru pravá wspornik gumowy silnika - prawy
024 360468 Gummifot för motor – vänster Gummifod til motor - venstre gum.noha motoru levá wspornik gumowy silnika - lewy
025 360469 Brytare Kontakt vypínač przełącznik
026 391040 Mutter Møtrik matka nakrętka DIN 934 – M 8 – 8.8 – VZ
027 391660 Låsbricka Låseskive pojistná podložka nakrętka zabezpieczająca DIN 6797 – A 8,4 – FSt
028 360470 Kondensator Kondensator kondensator kondensator 30 µF
029 360471 Gummitätning (dammskydd) Gummipakning
030 360472 Kondensatorkåpa Kondensatorkapsel kryt kondensátoru pokrywa korpusu kondensatora
031 390202 Skruv Skrue šroub śruba ST 3,5 x 13
032 360473 Anslutningsledning (kabel
033 390021 Skruv Skrue šroub śruba DIN 933 – M 8 x 30 – 8.8 – VZ
034 391914 Fjäderring Fjederring perový prstenec podkładka sprężynująca DIN 128 – A 8 – FSt
035 391644 Skiva Skive podložka podkładka DIN 125 – A 8,4 – VZ
036 360474 O-ring (oljetätning) O-ring olietætning prstenec ol.těsnění okrągła uszczelka olejowa
037 360475 Oljepumplock Oliepumpedæksel kryt ol.pumpy pokrywa pompy olejowej
038 360476 Motor Motor motor silnik
039 360477 Motor inkl. brytare och
040 390203 Skruv Skrue šroub śruba DIN 912 – M 8 x 10 – 8.8 – VZ
041 360478 Ledare – höger Styreplader - højre vodicí plech dřeva –
042 360479 Ledare – vänster Styreplader - venstre vodicí plech dřeva – levá Blaszane prowadniki wyrzynka –
043 360480 Huvudram med kniv Hovedramme med kløvekile nosný rám se štípacím
044 360481 Plasthylsplatta Plastplade objímka z um.hmoty płyta z tworzywa sztucznego
045 360482 Komponentgrupp påskjutare Modul stammeskubber posunovač špalku podzespół popychacza pni
046 360483 O-ring (oljetätning) O-ring olietætning prstenec ol.těsnění okrągła uszczelka olejowa
047 360484 Cylinderkåpa – främre Topstykke - foran cylindrický kryt přední pokrywa cylindra - przód
048 360485 Fjäder Fjeder pero sprężyna
049 360496 Fastsättningsskruv Sikringsskrue upevňovací šroub śruba mocująca M 8 x 10
050 360486 Handtagssockel Gribesokkel podstavec madla cokół uchwytu
051 360487 Handtagssockel Gribesokkel podstavec madla cokół uchwytu
052 360488 Förbindningsdel Samleled spojovací část element łączący
053 360489 Manöverhandtag Betjeningshåndtag ovládací madlo rękojeść manipulacyjna
054 360490 Kunststoffkappe Kunststoffkappe Kunststoffkappe Kunststoffkappe
055 391011 Mutter Møtrik matice nakrętka DIN 934 – M 10 – 8 – VZ
056 391670 Skiva Skive podložka podkładka DIN 125 – A 10,5 – VZ
057 360491 Skyddskåpa Beskyttelsesskærm kryt pokrywa ochronna
058 360492 Kåpa hjulaxel Afdækning hjulaksel kryt osy kolečka pokrywa osi kół
059 392024 Låsring Låsering pojistný prstenec pierścień zabezpieczający DIN 471 – 15 x 1
060 360493 Hjul Hjul kolečko koło
061 360494 Konsol Konsol konsola konsola
062 391130 Hattmutter Hættemøtrik klobouková matice nakrętka kołpakowa DIN 986 – M 10 – 8
063 360497 Tätning Tætning těsnění
064 390030 Skruv Skrue šroub śruba DIN 931 – M 8 x 55 – 8.8 – VZ
065 360495 Platta Plade destička płyta
066 360496 Etikett med
Beteckning Betegnelse Popis
gumová prachovka uszczelka gumowa (oslona
el.přípoj(síť.kabel
s vidlicí)
motor včetně vypínače a
kondensátoru
pravá
klínem
pyłoszczelna)
przyłącze sieciowe (przewód
przyłącza sieciowego z wtyczką)
silnik z przełącznikiem i
kondensatorem
Blaszane prowadniki wyrzynka –
prawy
lewy
rama zasadnicza z klinem
rozszczepiającym
med kontakt)
kondensator
säkerhetsanvisnigar
(støvbeskyttelse)
Tilslutningsledning (netkabel
med stik)
Motor inkl. kontakt og
kondensator
Sikkerhedsmærker Sicherheitsaufkleber etykiety bezpieczeństwa
∅
25 x 3,55 mm
∅
43,5 x 3,5 mm
∅
10,6 x 1,8 mm
∅
30 mm
∅
30 x 2,65 mm
∅
10 x 2,65 mm
∅
50 x 3,1
63
Page 65

64
Page 66

VVeerrzzeeiicchhnniiss ddeerr KKuunnddeennddiieennssttsstteelllleenn iinn DDeeuuttsscchhllaanndd
PLZ Ort Firma Straße Telefon Telefax
01108 Weixdorf/Dresden G & K Köhler Königsbrücker Landstr. 261 0351-8805031 0351-8805031
01109 Dresden Wiener Verleih + Service Karl-Liebknecht-Str. 31 0351-8809424 0351-8809424
01468 Boxdorf Aehlig, Günther Hauptstraße 10 0351-4609061 0351-4609179
01968 Senftenberg Joachim König Karl-Ziehm-Str. 13 03573-796571 03573-796571
01833 Dürrröhrsdorf Josef Landl Alte Hauptstr. 46 035026-91438 035026-91429
02730 Ebersbach Liebscher, W. Neusalzaer Str. 10 03586-5925 03586-5925
02763 Zittau-Eichgraben Rumpf & Schuppe Hirschfelder Ring 10 03583-77510 03583-775113
02826 Görlitz Power GmbH Paul-Mühsam-Str. 1 03581-87121
02828 Görlitz Rumpf & Schuppe Heilige-Grab-Str. 26 03581-314939 03581-306807
02829 Kunnersdorf Technischer Handel Wolfram Nieskyer Str. 12 035825-5178 035825-5179
02906 Jänkendorf Power GmbH Schulstr. 2 03588-201924 03588-201924
03044 Cottbus-Sielow Fritzsch, Jürgen Peter-Rosegger-Str. 24 0355-870389 0355-870439
03046 Cottbus Sola – Technik Lieberoser Str. 3 0355-22181 0355-3830392
03149 Forst/Lausitz Schulz, Andreas Gubener Str. 44a 03562-6301 03562-6301
03149 Forst Werkzeug-Treiber Skurumer Str. 22 03562-983716 03562-668135
04349 Leipzig Pätz, Lothar Gmundener Weg 11 0341-9213109 0341-9213109
04448 Wiederitzsch Mario Franzke Fritz-Reuter-Str. 6 0341-5214168 0341-5214169
04509 Priester Rühl, Siegfried Dorfstraße 21 034295-72176
04552 Zedtlitz Koitzsch, Manfred OT Raupenhain 1 03433-852812
04600 Altenburg Werkzeugfachhandel Altenburg H.-Schlegelstr. 2 03447-311277 03447-311277
04758 Oschatz Fala Handels GmbH Leipziger Str. 25 03435-920324 03435-926143
04758 Oschatz Andreas Ritter Blumenberg 43 03435-927754 03435-927764
04838 Doberschütz Endress GmbH An der Mühle 3 034244-5330
04916 Werchau Gert Haase Nr. 37 035362-358 035362-358
06118 Halle Melzer Elektrogeräte GmbH Hans-Dittmar-Str. 3 a 0345-529660 0345-529663
06179 Schochwitz Baumann, Wilh. Am Bahnhof 7 034609-3300 034609-33024
06295 Eisleben Jürgen Meinicke GmbH Heizhausstr. 6 03475-717966 03475-717966
06333 Hettstedt Bode Service Center Gerbstedter Str. 03476-202325 03476-202326
06484 Westerhausen Elektro Fessel Str. d. Friedens 267 03946-6346 03946-6346
06796 Brehna Schlemmer Gartenger.-service Neue Str. 10 034954-48879 034954-48879
06803 Greppin Kremer & Wünsch GbR Wolfener Str. 68 03493-20107 03493-20107
06917 Jessen Schubert, Walter Unterberge 134 03537-214501 03537-214501
07552 Gera Haushalt- u. Service GmbH Adam-Opel-Str. 1 0365-4356111 0365-4356110
07749 Jena Töpfer Löbstedter Str. 50 03641-826213 03641-420675
07751 Zöllnitz Herold, Axel Zöllnitz Nr. 35 03641-334274 03641-334274
07987 Kahmer Müller, Stefan Ortsstr. 65 03661-433289 03661-433289
08134 Langenbach Junghänel + Partner Werkstr. 037603-4044 037603-4045
08289 Wildbach bbb GmbH Schneeberger Str. 1 03772-360318 03772-360315
09232 Hartmannsdorf Bautechnik Chemnitz Leipziger Str. 1 03722-92544 03722-92545
09366 Stollberg/Erzgeb. Gebr. Weidauer Bachgasse 1 037296-6167 037296-6167
09456 Annaberg-Buchh. Baupunkt Kraatz Gewerbering 37 03733-56020 03733-560220
09599 Freiberg Paul, Martin Obergasse 19 03731-23617 037321-23627
10365 Berlin ME-ST-RE GmbH Josef-Orlopp Str. 92-106 030-5578308 030-5578309
12435 Berlin Uhlemann, Adolf Kiefholzstr. 399 030-5348502 030-5348403
12459 Berlin Ha & Be Baumaschinen An der Wuhlheide 239 030-53790299 030-53790297
12557 Berlin Otto, Klaus Grünauer Str. 43 – 47 030-6540107 030-6540107
13409 Berlin Negt Motorgeräteservice Papierstr. 13 030-4923668 030-4911771
12623 Berlin Plume, Heiko Bergedorfer Str. 207 030-5676695 030-5676695
12681 Berlin Oslislok, Peter Beilsteiner Str. 66 030-5406443 030-5433038
13127 Berlin Haba Baumaschinen Marienstr. 12 030-4769050 030-47690515
65
Page 67

13595 Berlin Dransch Elektroanlagen GmbH Jordanstr. 5 030-3612900 030-3613081
14478 Potsdam Bausetra Handelshof 10 0331-88780 0331-8878155
14482 Potsdam Choyna, Uwe Kleine Str. 9 0331-7405491 0331-7405492
14513 Teltow-Seehof Choyna, Uwe Bruno-H. Bürgel-Str. 22 03328-41020 03328-41020
14532 Stahnsdorf Choyna, Uwe Lindenstr. 8 03329-62238 03329-41020
14913 Jüterbog Saal, Dirk Turmstr. 14 03372-431436 03372-431436
14913 Jüterbog Kleinwechter, Bodo Teichstr. 20 03372-432831
14913 Kloster-Zinna Detlef Dimde GmbH Berliner Str. 38 03372-41660 03372-416615
14913 Ließen Jeserig, Dieter Dorfstr. 6 033745/50273 033745/50273
15374 Müncheberg Tesch, Harald Marienfeld 3 033432-89464 033432-89464
15518 Beerfelde Pfinow, Manfred Am Anger 19 033637-202 033637-202
15569 Woltersdorf WEA GmbH Fasanenstr. 65/66 03362-58840 3362588429
15910 Wittmannsdorf Werner Scherbatzki Dorfstr.47 035476-297 035476-3820
15926 Luckau Agro-Service Luckau Zaackoer Weg 15 03544-50110 03544-2540
16303 Schwedt/O. Martin Runge Baumaschinen Passower Chaussee Str. 1 03332-465661 03332-413677
16306 Casekow Auto Meier Gartenstr. 34 033331-65005 033331-64151
16321 Bernau E. Deutschmann Schönower Chaussee 124 03338-2295 03338-755978
16348 Klosterfelde Pumpen-Wegener Güterbahnhofstr. 2 033396-448 033396-448
16515 Oranienburg Gartentechnik Eden Ostweg 240 03301-3088 03301-535253
16547 Birkenwerder Spezi-Baumaschinen Havelstr. 85 03303-502915 03303-502915
16816 Neuruppin Kleine, Siegfried Schlosserei Buskower Weg 16 03391-5590 03391-5590
17034 Neubrandenburg CiS GmbH Adolf-Kolping-Str. 14/12 0395-429121 0395-4291430
17121 Düvier Motorger. & Werkzeuge Hoppe Dorfstr. 84 039998-12053 039998-31962
17192 Waren (Müritz) Elektro Kocik Papenbergstr. 1 03991-663460 03991-663461
17321 Löcknitz Elektromaschinen e. G. Straße d. Republik 14 b 039754-20331 039754-20688
17367 Eggesin Hardy Damske Hinzenkamp 4
18211 Börgerende Lothar Mergenthal Seestr. 47 038203-81175 038203-81213
18356 Barth Papenhagen, Peter Barthestr. 37 038231-81710 038231-81710
19075 Holthusen Hartmann Baumaschinen Dorfstr. 1 03865-8210 03865-82124
19089 Crivitz Winterfeldt, Egon Freiheitsallee 2 03863-222337 03863-222337
19348 Perleberg Elektro Zippel Schwarzer Weg 34 03876-786891 03876-786891
19370 Parchim IST Industrie Technik Juri-Gargarin Ring 11 03871-624831 03871-624820
21039 Escheburg J. Pena Service Stubbenberg 6 04152-79295 04152-70821
23795 Bad Segeberg Dieter Griem Motorrengeräte Lindhofstr. 7 04551-83394 04551-81503
24145 Kiel-Wellsee M. Bergner Technik Lise-Meitner-Str. 3 0431-719230 0431-7192333
24214 Gettorf Fachhaus Dillenburg Starkenbrook 1 04346-9444 04346-8029
24963 Tarp Brummer Wanderuper Str. 26 04638-898811 04638-898812
25548 Kellinghusen Timo Laackmann Quarnstedter Str. 14 04822-6244 04822-5346
25693 St. Michaelisdonn Ernst Neumann Kampstr. 2 04853-80136 04853-80137
25876 Ramstedt Bruhn Gartentechnik Schulstraße 11 04884-707 04884-1223
26789 Leer Johann Feldmann Am Emsdeich 5 0491-928680 0491-9286868
27578 Bremerhaven Wassenaar GmbH Fritz-Erler-Str. 10 0471-68720 0471-68721
27637 Nordholz Antetoma Garten-Service Rottland 21 A 0 47 41-27 69 04741-180256
28219 Bremen Biermann & Thoneick Waller Heerstr. 183 0421-394411 0421-3967574
31073 Delligsen Meyerhof Göttingerstr. 4 05187-1390 05187-4682
31073 Delligsen Andreas Baumert Schleiestr. 5 05187-941620
32584 Löhne Gartentechnik Dustmann Knickstr. 10 05228-1077 05228-1076
33014 Bad Driburg Schröbler Service Center Hans-Sachs-Str. 12 05253-2506 05253-7340
33098 Paderborn Gebro-Autoelektrik Breslauer Str. 27 05251-78058 05251-78059
35444 Biebertal-Bieber Wolfgang Bender Hauptstr. 21 06409-1393 06409-9123
35581 Wetzlar Edwin Boos Lindenstr. 40 06441-76735 06441-76735
37293 Herleshausen Bastian´s Maschinen-Markt Brandenburgstraße 2 05654-6437 05654-1452
37318 Uder Zimmermann, Dietmar Pfützenrasen 6 036083-2187 036083-42976
38122 Braunschweig Elektro Klawun Thiedestr. 23 0531-871111 0531-875350
66
Page 68

38173 Evessen Flammann, Bernd Am Wendelberge 5 05333-8218 05333-8219
38364 Schöningen TPS Alversdorfer Weg 1 05352-59665 05352-50642
38419 Wolfsburg Claus Schaefer Fallersl./Bölschestr. 8 05362-2295 05362-2295
38518 Gifhorn Kutzner Schillerplatz 6 05371-98850 05371-988530
38553 Wasbüttel Horst Eckert Pommernring 21 05374-9861 05374-9862
38667 Bad-Harzburg Borchardt-Motorgeräte Landstr. 41 a 05322-80938 05322-81580
38822 Schachdorf-Ströb. Lippa, Dieter Schlosserei Haupstr. 2 a 039427-637 039427-637
39112 Magdeburg Reinhardt Katte Schöninger Str. 6 0391-600996
39114 Magdeburg Ewald Henze Simonstr. 11 0391-857652
39124 Magdeburg Hümmer Siedlerweg 8 0391-2523503 0391-2545932
39249 Barby Bernhard Thieme Breite Tor 31 039298-3521 039298-3521
39340 Haldensleben Peter Bär Neuhaldensleberstr. 91 03904-44043 03904-44040
39446 Löderburg Lehrmann Fachhandel Neustaßfurter Str. 1 039265-51314
39576 Stendal Schirmer, Ernst Dahlener Str. 11 03931-212043 03931-212043
40627 Düsseldorf Wabbel, Adolf Reichenbacher Weg 80 0211-276108
44149 Dortmund Kraftwerkzeug Betriebsge.mbH Beratgerstraße 28 0231-170833 0231-170120
44229 Dortmund Pöhl Gartentechnik Kirchhörder Str. 240 0231-731102 0231-736484
45881 Gelsenkirchen Hackner, Josef Wilhelminenstr. 124 0209-493300 0209-496238
46535 Dinslaken Albrecht, Uwe Elektrotechnik Thyssenstr. 179 02064-433630 02064-433636
46147 Oberhausen P.T.W. Metall Köstersfeld 20 0208-627525 0208-627526
48653 Coesfeld Frenzel Elektromotoren Lübbesmeyerweg 5 02541-82586
49324 Melle Borgards H.-U. GmbH Plettenberger Str. 50 05422-94970 05422-949792
49716 Meppen Dollner + Silbernagel Kuhstr. 10 05931-93230 05931-932325
50733 Köln Elektro Schmitz Niehler Kirchweg 124 0221-9762294 0221-9762295
51069 Köln Ulrich Meissner Paul-Henri-Spaak-Str. 6 0221-9689788 0221-9689789
51647 Gummersbach Rainer Hardt Großenbernberger Str. 52 02261-53563 02261-56937
51647 Gummersbach Wolfgang Müller Piener Weg 8 02763-247 02763-840922
55129 Mainz Peter Süße Rheinhessenstr. 15 06131-504455 06131-509952
55234 Wendelsheim Gartengeräte Verkauf & Service Bahnhofstr. / Güterhalle 06734-6924 06734-6924
57223 Kreuztal Fahrzeugtechnik Albrecht Marburger Str. 369 02732-4100 02732-4100
59909 Bestwig-Velmede Jürgen Hegener Bundesstraße 110-111 02904-3095-96 02904-1407
64572 Büttelborn Moser Motorgeräte Kurt Schumacher Ring 11 06152-2467 06152-83648
65205 Wiesbaden STIHL-Dienst Hans GmbH Kreuzberger Ring 9 0611-719349 0611-702521
66440 Blieskastel P. Oberheim Bliesgaustr. 46 – 48 06842-536275 06842-537814
66892 Bruchmühlbach Oskar Simon St. Wendelerstr. 125 a 06372-8071 06372-8073
67433 Neustadt Elektro Broux Merowingerstr. 4 06321-12895 06321-16906
67468 Frankenstein Stöckel-Service Am Galgental 45 06329-493 06329-8142
68309 Mannheim Geräte Vierling Schwalbenstr. 11 0621-735202 0621-735202
71720 Oberstenfeld Schilpp Landtechnik Eisenbahnstr. 3/1 07062-4159 07062-4175
72116 Mössingen-Belsen Speidel Geisshäuserstr. 12 07473-6676 07473-24676
72622 Nürtingen Lepper GmbH Seilerstraße 12 07022-34446 07022-34617
72636 Frickenhausen Zaiser, Karl-Heinz Kirchstr. 4 07025-3814 07025-3714
74706 Osterburken Albrecht, Günter Friedhofstr. 4 06291-8187 06291-9824
79282 Ballrechten Georg Löffler Weinstr. 7 07634-8345 07634-6602
81379 München Heinisch Hofmannstr. 21 089-788883 089-74849040
84130 Dingolfing Finsterwald Bahnhofstr. 49 08731-73583 08731-72344
85053 Ingolstadt Leonhard Pöhmerer Kothauerstraße 86 0841-61949 0841-9611969
86529 Schrobenhausen Sander, Walter Pfarrgasse 8 08252-1364 08252-4273
87435 Kempten Elektro Klaus Lindauer Str. 25 0831-23514 0831-18928
87471 Durach-Weidach Mitschke Reinigungstech. Sulzberger Str. 11 0831-62181 0831-62177
88255 Baindt-Schachen Edwin Bentele Schachener Str. 108/1 07502-3528 07502-3538
89264 Oberhausen Josef, Konrad Bgm.-Streitle-Str. 19 07309-5865 07309-7452
90556 Cadolzburg Stechhöfer & Bauer Vogtsreichenbach 23 0831-62177 09103-1651
91126 Rednitzhembach IMA Ringstraße 102 09122-9865-0 09122-9865-25
67
Page 69

92364 Deining Götz Technik Lange Str. 17 09497-94000 09497-6334
92431 Neunburg v. W. Müller, Martin Aschenbrenner Str. 1 09672-1732 09672-1078
94419 Reisbach Wenk Eisenwaren Marktplatz 36 08734-213 08734-1562
94474 Vilshofen Poisl Kloster-Mondsee-Str. 16 08541-3091 08541-3092
95030 Hof Bambach Autoelektrik Kulmbacher Str. 54 09281-6966 09281-62770
95100 Selb-Erkersreuth Fenzl, Kurt Reuthweg 20-22 09287-1620 09287-78112
95448 Bayreuth Schindler Motorgeräte Bernecker Str. 13 0921-22321 0921-22321
96515 Sonneberg IMC Neustadter Str. 93 03675-750911 03675-750914
96524 Neuhaus Harald Faltinath Sonneberger Str. 55 b 036764-72358 036764-70022
97332 Volkach Heinrich Baur Mainstr. 7 09381-9552 09381-3722
97447 Gerolzhofen Leo Müller Frankenwinheimer Str. 17 09382-255
97456 Holzhausen Leo Müller Kaltenhof 15 09725-7070 09725-70750
97762 Hammelburg Leo Müller Am Weiten Weg 19 09732-91900
98617 Meiningen Bernd Koch Mittelstraße 4a 03693-820235 03693-477588
98708 Gehren Klaus Dornhardt Königseer Str. 1 036783-81322 036783-81305
99092 Erfurt HIB Alacher Chaussee 20 0361-220800 0361-2208022
99095 Erfurt Mehlhorn GmbH Julius-König-Str. 14 0361-712177 0361-5621017
99099 Erfurt Opel, Bernd Am Steinbiel 13 0361-4210340 0361-4210132
99765 Uthleben Elektro Telemann Mönchstraße 10 036333-60380 036333-61790
99819 Förtha/Eisenach Bernd Morgenweck Friedhofsweg 2 036925-61301 036925-61301
99826 Mihla Elektro Sülzner GmbH Münsterstr. 24 036924-42420 036924-42420
99867 Gotha Meyer Rep.-Gesellschaft Langensalzaer Str. 22-24 03621-45820 03621-458213
99869 Warza Grünes Warenhaus Am Bahnhof Bufleben 03621-51815 03621-51819
99947 Merxleben Reinhard Gasse GmbH Kirchhellinger Str. 10B 03603-811795 03603-811702
99974 Mühlhausen Voigt, Eberhard Brunnenstr. 121 03601-812049 03601-424955
68
Page 70

ATIKA GmbH & Co. KG
Schinkelstraße 97, D-59227 Ahlen • Postfach 21 64, D-59209 Ahlen
Telefon +49 (0) 23 82 / 8 92-0 • Telefax +49 (0) 23 82 / 8 18 12
E-mail: info@atika.de • Internet: www.atika.de
 Loading...