

Page 1
WL-520GU/GC
R
®
Plataus diapazono belaidės šeimos maršrutizatorius
Vartotojo vadovas
LI3188 pirmas leidimas 2008 Liepos
Page 2

Gamintojo kontaktiniai duomenys
ASUSTeK COMPUTER INC. (Azija ir Ramusis vandenynas)
Bendrovės adresas 15 Li-Te Road, Beitou, Taipei 11259
Bendrasis tel. +886-2-2894-3447
Tinklapio adresas www.asus.com.tw
Bendrasis faks. +886-2-2894-7798
Bendrasis el. paštas info@asus.com.tw
ASUS COMPUTER INTERNATIONAL (Amerika)
Bendrovės adresas 800 Corporate Way, Fremont, CA 94538, JAV
Bendrasis faks. +1-510-608-4555
Tinklapio adresas usa.asus.com
Techninis aptarnavimas
Bendrasis aptarnavimas +1-502-995-0883
Aptarnavimas (faks.) +1-502-933-8713
Priežiūra internetu: http://vip.asus.com/eservice/techserv.aspx
ASUS COMPUTER GmbH (Vokietija ir Austrija)
Bendrovės adresas Harkort Str. 25, D-40880 Ratingen, Vokietija
Bendrasis tel. +49-2102-95990-3447
Tinklapio adresas www.asuscom.de
Bendrasis faks. +49-2102-959911
Susisiekimas internetu: www.asuscom.de/sales
Techninis aptarnavimas
Detalės +49-2102-95990
Aptarnavimas internetu: www.asuscom.de/support
Nešiojamieji kompiuteriai +49-2102-959910
Aptarnavimas (faks.) +49-2102-959911
Page 3

R
Turinys
Plataus diapazono belaidės šeimos maršrutizatoriaus WL-520GU/GC vartotojo vadovas
Specikacijų santrauka
................................................................................2
1. Pakuotės turinys ..................................................................................
2. ADSL modemo ir belaidžio maršrutizatoriaus sujungimas ..............3
1) Laidinis ryšys .....................................................................................3
2) Būsenos indikatoriai ...........................................................................4
3) Montavimas ant sienos ...................................................................... 4
3. Kaip pradėti ...........................................................................................5
1) Laidinis ryšys ........................................................................................5
2) Belaidis ryšys .....................................................................................5
3) IP adreso suteikimas laidiniam arba belaidžiam ryšiui ......................5
4) Belaidžio maršrutizatoriaus kongūravimas ......................................6
5) Greitasis nustatymas .........................................................................7
4. Belaid
žio maršrutizatoriaus funkcijos .............................................12
1) Tinkamiausio veikimo režimo parinkimas .......................................12
2) Belaidžio tinklo duomenų šifravimo nustatymas .............................. 13
3) Virtualaus serverio vietiniame tinkle sukūrimas .............................. 14
4) Virtualios DMZ vietiniame tinkle sukūrimas .....................................15
5) DDNS nustatymas ...........................................................................15
6) Pralaidumo valdymo nustatymas .....................................................19
5. Taikymai ..............................................................................................
22
1) Bendras naudojimasis USB spausdintuvu ......................................22
6. ASUS pagalbin
ės programos nustatymas .......................................... 25
1) Pagalbinės programos diegimas WL-520GU/GC ............................ 25
2) „EZSetup“ .......................................................................................26
čių šalinimas ................................................................................28
7. Trik
8. Priedas ................................................................................................
30
3
WL-520GU/GC kongūravimas su „Vista“ OS
.....................................36
1
Page 4
Plataus diapazono belaidės šeimos maršrutizatoriaus WL-520GU/GC vartotojo vadovas
R
Specikacijų santrauka
Ti n klo s tand artas
Veiki mo d ažni s
Duo m enų perd avim o
spa r t a
Veiki mo k anal a i
Pri e v ada i
Ant e n a
„EZ S etup “ my gtuk as
Mai t inim o ša ltin is*
Sau g a
Pri e igos kon trol ė
Užk a rda
Pas l augo s ko kybė
Ti n klo v aldy mas
Tempe ratūr a
Drė g numa s
IEEE 802.11b, IEEE 802.11g, IEEE 802.3, IEEE802.3x, IEEE 802.3u,
IEEE 802.1x, IEEE 802.11i, IPv4, IPv6, CSMA/CA, CSMA/CD, ICMP
2.4G ~ 2.5GHz
802,11g: 6, 9, 12, 18, 24, 36, 48, 54 Mbps
802.11b: 1, 2, 5,5, 11 Mbps
Š. Amerikoje – 11, Japonijoje – 14, Europoje (ETSI) – 13
Plačiojo tinklo (WAN) x 1, vietinio tinklo (LAN) x 4 RJ45 10/100
BaseT kabeliui, 1 x USB 2.0 spausdintuvo dalijimuisi
(tik WL-520GU)
Palaiko įvairias antenas, 1 x atvirkščiai prisukama SMA antenos
jungtis
Automatiškai kongūruoja SSID ir WEP arba WPA
Nuolatinė srovė: +5 V, iki 2 A stiprio srovė
Nuolatinė srovė: +9 V iki 1 A stiprio srovė
64 bitų WEP, 128 bitų WEP, WPA-Personal, WPA2-Personal, WPAAuto-Personal (TKIP. AES. TKIP+AES), WPA-Enterprise, WPA2Enterprise, WPA-Auto-Enterprise (TKIP. AES. TKIP+AES), RADIUS
su 802.1x
Prieigos kontrolė MAC lygmenyje, įeinančių / išeinančių IP ltras
Tinklo adresus transliuojanti (NAT) užkarda, paketų būklę tikrinanti
(SPI) užkarda, plačiojo tinklo Ping kontrolė
Dažnių juostos plotis pagal poreikį (BoD
) (tik WL-520GU),
„Wi-“
daugialypė terpė (VMM)
Palaiko UPnP, DHCP serverį, DNS Proxy, NTP klientą, DDNS,
prievado atvėrimą, virtualų serverį, virtualią DMZ (angl. demilitarised
zone – demilitarizuota zona), VPN Pass-Through
Eksploatacijos: 0-40°C Saugojimo: -30-50°C
Eksploatacijos: 50-90% Saugojimo: 20-90%
*Naudokite tik pakuotėje pridedamą adapterį.
2
Page 5
Plataus diapazono belaidės šeimos maršrutizatoriaus WL-520GU/GC vartotojo vadovas
R
1
Modemas
Telefoninio ryšio lizdas
Elektros tinklo lizdas
Telefonas
Maitinimas
2
Elektros tinklo lizdas
Vietinis tinklas
3
Modemas
Telefoninio ryšio lizdas
Vietinis tinklas
Maitinimas
Telefonas
Maitinimas
ASUS belaidis maršrutizatorius
Platusis tinklas
Maitinimas
ASUS belaidis marérutizatorius
Elektros tinklo lizdas
1. Pakuotės turinys
• Belaidis maršrutizatorius WL-520GU/GC x 1
• Maitinimo adapteris x 1
• Pagalbinis kompaktinis diskas x 1
• RJ45 kabelis x 1
• Išorinė antena x 1
• Greitojo paleidimo instrukcija x 1
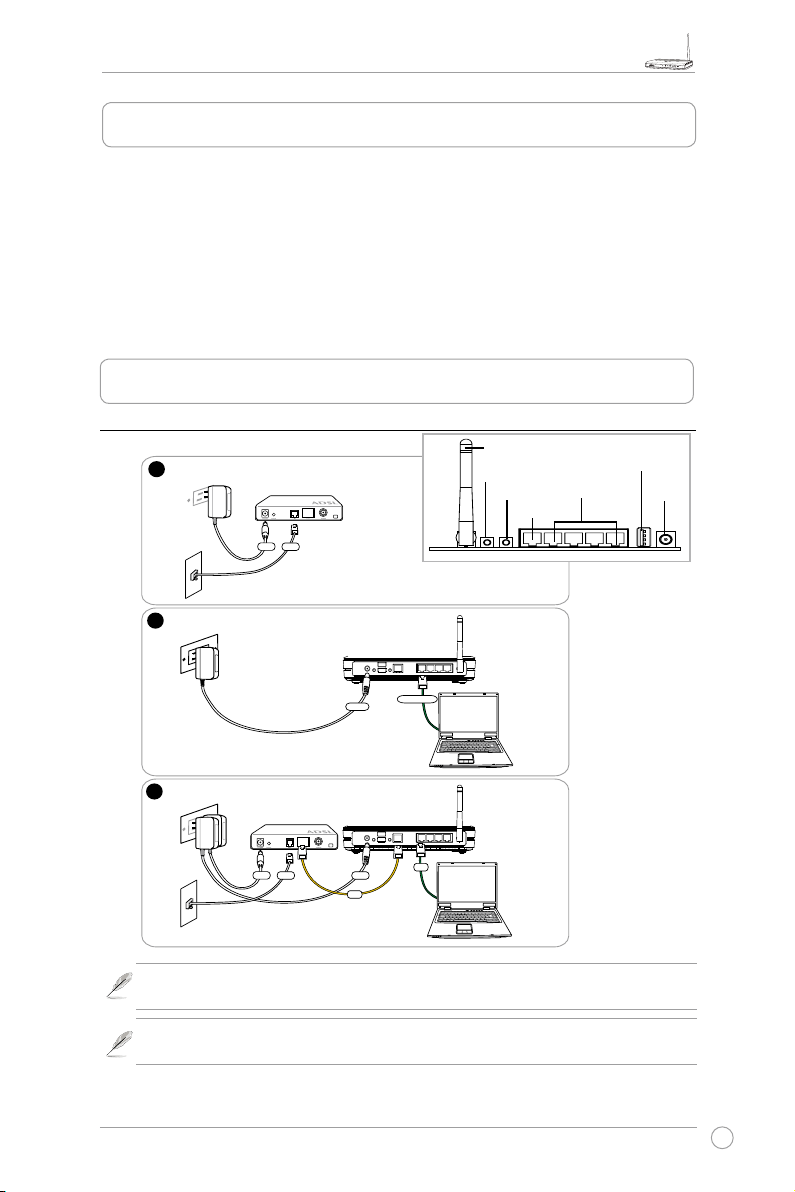
2. ADSL modemo ir belaidžio maršrutizatoriaus sujungimas
1) Laidinis ryšys
Antena
„EZSetup“
Grįžtis
Platusis tinklas
Vietinis tinklas
Nugarėlė
USB
Maitinimas
Pastaba: Naudokite tik pakuotėje pridedamą adapterį. Naudodami kitus adapterius
galite sugadinti įrenginį.
Pastaba: Aukščiau esančiose iliustracijose įrenginys vaizduojamas tik informaciniais
tikslais. Tikro produkto ieškokite pakuotėje.
3
Page 6
Plataus diapazono belaidės šeimos maršrutizatoriaus WL-520GU/GC vartotojo vadovas
R
WL-520GU
125M High Speed
AIR WAN LAN1 LAN2 LAN3 LAN4
R
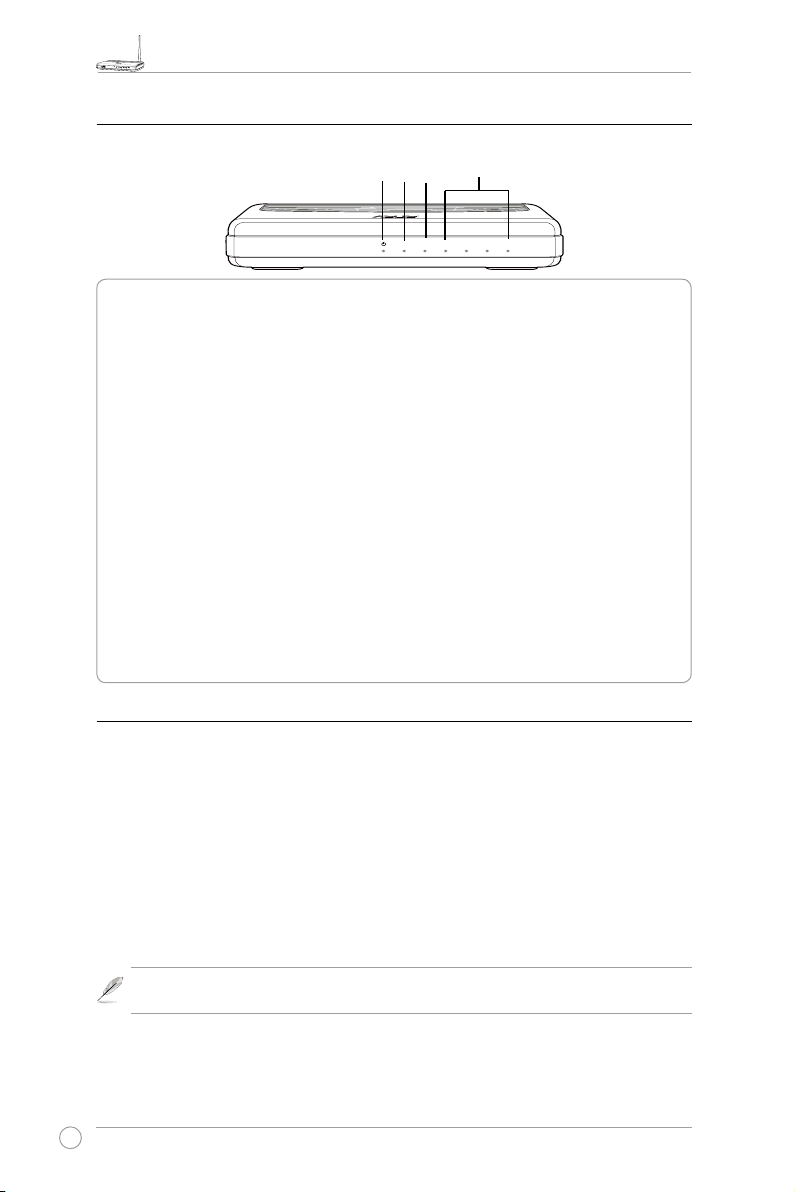
2) Būsenos indikatoriai
Maitinimas
Belaidis
tinklas
Platusis
tinklas
Vietinis
tinklas
Maitinimas
Nešviečia Maitinimo nėra
Šviečia Sistema paruošta
Lėtai mirksi Mikroprograminės įrangos atnaujinimas nepavyko / atkūrimo režimas
Greitai mirksi Paleista programa „EZsetup“ / atkūrimo režimas
Belaidis tinklas
Nešviečia Maitinimo nėra
Šviečia Belaidė sistema paruošta / Radijo signalo nėra
Mirksi Persiunčiami arba gaunami duomenys belaidžiu tinklu
Platusis tinklas
Nešviečia Nėra maitinimo arba zinio ryšio
Šviečia Yra zinis ryšys su „Ethernet“ tinklu
Mirksi Persiunčiami arba gaunami duomenys „Ethernet“ kabeliu
Vietinis tinklas
Nešviečia Nėra maitinimo arba zinio ryšio
Šviečia Yra zinis ryšys su „Ethernet“ tinklu
Mirksi Persiunčiami arba gaunami duomenys „Ethernet“ kabeliu
3) Montavimas ant sienos
ASUS belaidis maršrutizatorius WL-520GU/GC turi būti laikomas ant pakilaus plokščio
paviršiaus, pavyzdžiui, ant spintelės arba lentynos. Jį taip pat galima pritaikyti montavimui ant
sienos arba lubų.
Montuodami ASUS belaidį maršrutizatorių ant sienos, sekite šiuos žingsnius:
1. Apatinėje pusėje suraskite du montavimo kablius.
2. Ant plokščio paviršiaus padarykite dvi skyles.
3. Į jas sukite varžtelius, kol liks kyšoti 0,6 cm.
4. Užksuokite ASUS belaidžio maršrutizatoriaus kablius ant varžtelių.
Pastaba: Jei neįmanoma užksuoti ASUS belaidžio maršrutizatoriaus ant varžtelių
arba jei jis kabo per laisvai, koreguokite varžtelių įsukimo gylį
4
Page 7
Plataus diapazono belaidės šeimos maršrutizatoriaus WL-520GU/GC vartotojo vadovas
R
3. Kaip pradėti
Tinkamai sukongūruotas ASUS belaidis maršrutizatorius WL-520GU/GC gali būti tinkamas įvairiose
situacijose. Numatytuosius belaidžio maršrutizatoriaus nustatymus gali tekti pakeisti, kad jie atitiktų
Jūsų individualius poreikius. Todėl prieš pradėdami naudoti ASUS belaidį maršrutizatorių patikrinkite
pagrindinius nustatymus, kad įsitikintumėte, ar visi jie tinka Jūsų aplinkai.
Belaidžio ryšio kongūravimui ASUS pateikia pagalbinę programą „EZSetup“. Jeigu belaidžio tinklo
kongūravimui norite naudoti „EZSetup“, daugiau informacijos ieškokite 6-ame skyriuje
Pastaba: Pradiniam kongūravimui rekomenduojame naudoti laidinį ryšį, kad išvengtumėte
galimų nustatymo problemų dėl belaidžio ryšio nestabilumo.
1) Laidinis ryšys
Prie ASUS belaidžio maršrutizatoriaus WL-520GU/GC pakuotėje pridedamas „Ethernet“ kabelis.
Kadangi ASUS belaidis maršrutizatorius turi integruotą kabelio vertimo funkciją, laidiniam ryšiui
galite naudoti tiesų arba verstą kabelį. Vieną kabelio galą prijunkite prie maršrutizatoriaus nugarėlėje
esančio vietinio tinklo prievado, o kitą prie kompiuterio „Ethernet“ prievado.
2) Belaidis ryšys
Belaidžiam ryšiui užmegzti, Jums reikės su IEEE 802.11b/g suderinamos belaidžio vietinio tinklo
plokštės. Vadovaukitės belaidžio adapterio vartotojo vadovo aprašoma belaidžio ryšio užmezgimo
procedūra. Pagal nutylėjimą, ASUS belaidžio maršrutizatoriaus tinklo tarnybos identikatorius (SSID) yra
„default“ (mažosiomis raidėmis), šifravimas išjungtas, naudojama atvira autentikavimo sistema.
3) IP adreso suteikimas laidiniam arba belaidžiam ryšiui
Kad prisijungtumėte prie belaidžio maršrutizatoriaus WL-520GU/GC, turite laidiniuose ir belaidžiuose
klientuose nustatyti teisingus TCP/IP parametrus. Klientų adresus nustatykite tame pačiame WL-520GU/
GC potinklyje.
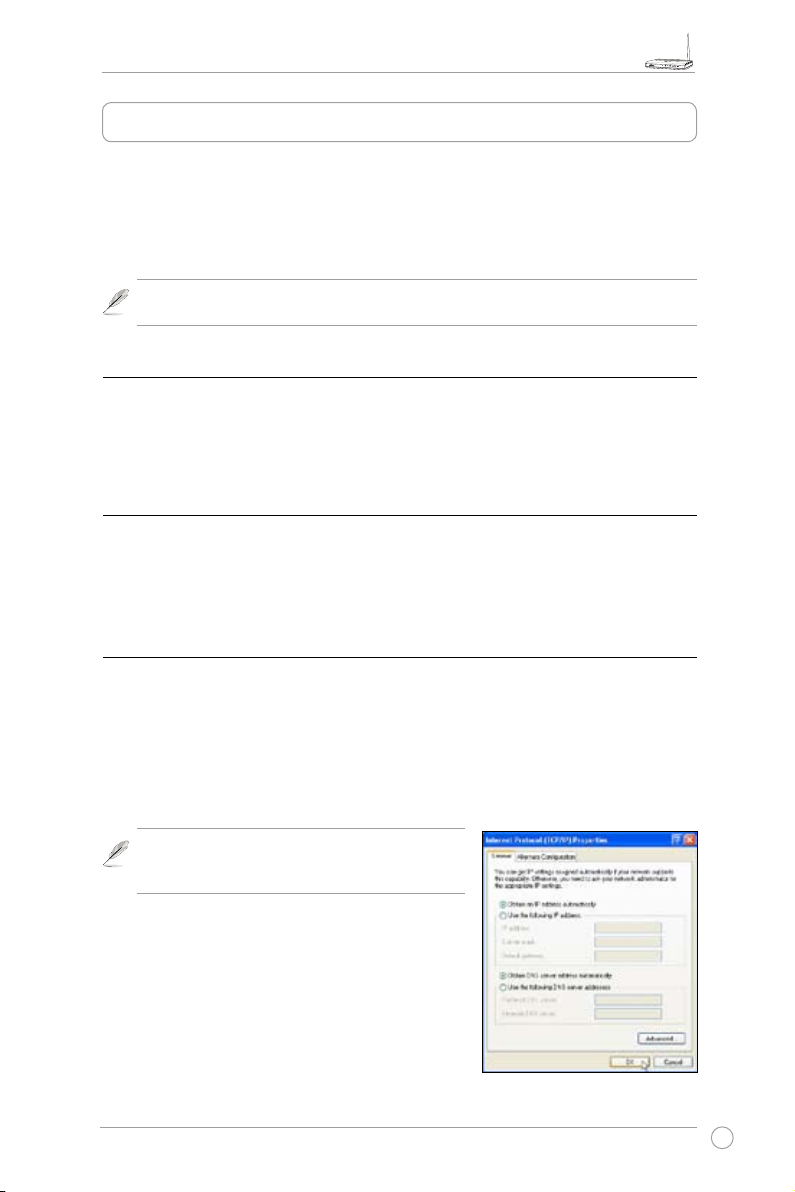
Automatinis IP adreso gavimas
ASUS belaidis maršrutizatorius turi integruotą DHCP serverio funkciją, todėl kompiuteriui galite
leisti IP adresą gauti automatiškai iš ASUS belaidžio maršrutizatoriaus.
Pastaba: Prieš perkraudami kompiuterį, ĮJUNKITE
belaidį maršrutizatorių ir įsitikinkite, kad jis
paruoštas naudojimui
IP adreso suteikimas rankiniu būdu
Kad galėtumėte suteikti IP adresą rankiniu būdu, Jums reikia
žinoti numatytuosius ASUS belaidžio maršrutizatoriaus
nustatymus.
• IP adresas 192.168.1.1
• Potinklio šablonas: 255.255.255.0
5
Page 8
Plataus diapazono belaidės šeimos maršrutizatoriaus WL-520GU/GC vartotojo vadovas
R
2
3
1
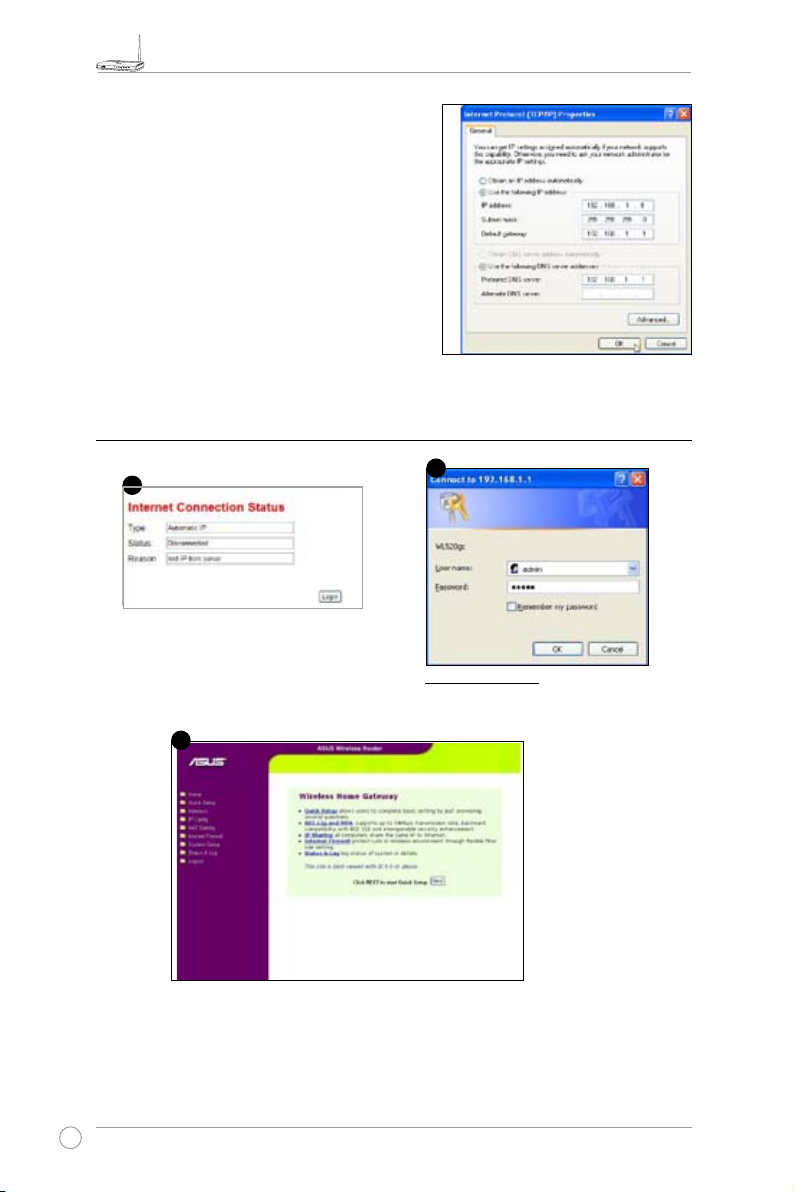
Kad galėtumėte sukurti ryšį naudodami rankiniu
būdu suteiktą IP adresą, kompiuterio ir belaidžio
maršrutizatoriaus adresai turi būti tame pačiame
potinklyje.
• IP adresas: 192.168.1.xxx (xxx gali būti bet
koks skaičius tarp 2 ir 254. Įsitikinkite, kad šis IP
adresas nėra naudojamas kito įrenginio)
• Potinklio šablonas: 255.255.255.0 (toks pats kaip
ir WL-520GU/GC)
• Šliuzas: 192.168.1.1 (WL-520GU/ GC IP adresas)
• DNS: 192.168.1.1 (WL-520GU/GC), arba
priskirkite žinomą tinklo DNS serverį.
4) Belaidžio maršrutizatoriaus kongūravimas
Interneto naršyklėje įveskite šį
adresą: http://192.168.1.1
Pagal nutylėjimą
User name (Vartotojo vardas): admin
Password (Slaptažodis): admin
Prisijungę matysite ASUS belaidžio maršrutizatoriaus pagrindinį puslapį.
Pagrindiniame puslapyje pateikiamos greitos nuorodos padės sukongūruoti pagrindines
belaidžio maršrutizatoriaus funkcijas.
6
Page 9
Plataus diapazono belaidės šeimos maršrutizatoriaus WL-520GU/GC vartotojo vadovas
R
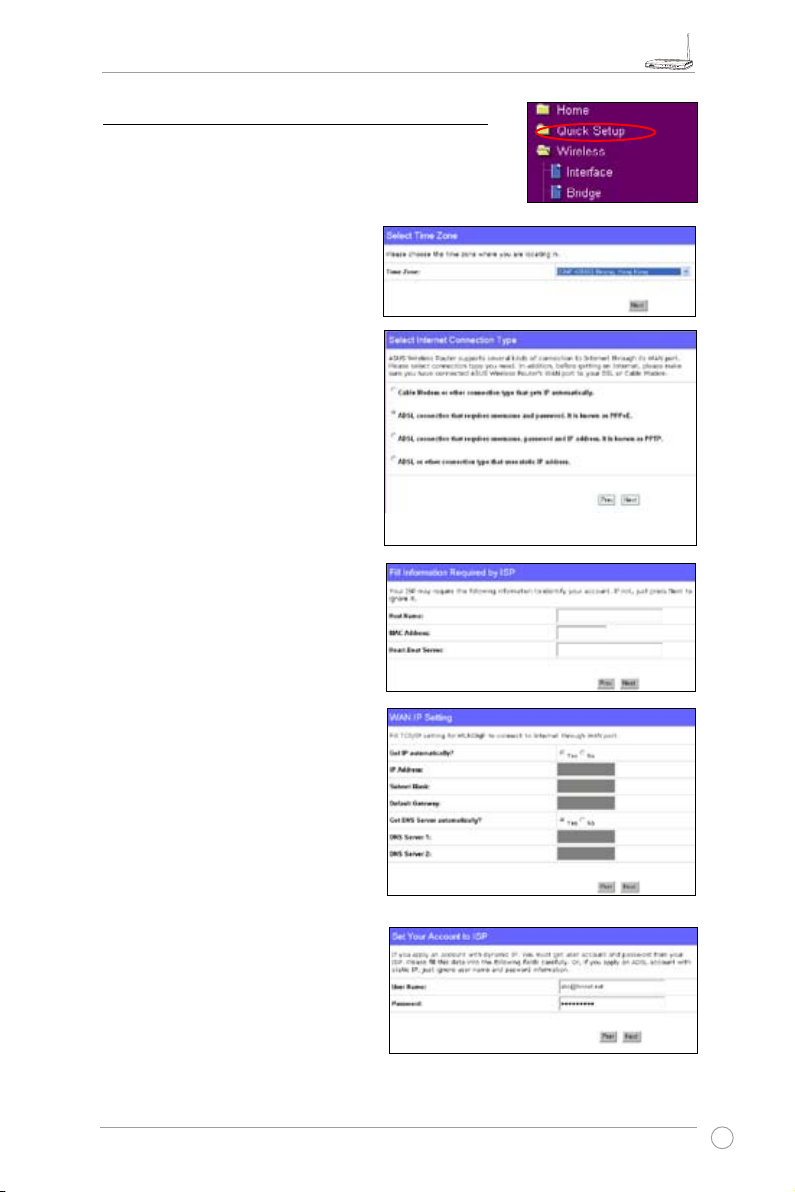
5) Greitasis nustatymas
Jei norite pradėti greitąjį nustatymą, spustelėję Next (Toliau)
atverkite puslapį „Greitasis nustatymas“. Nustatydami ASUS
belaidį maršrutizatorių, sekite šias instrukcijas.
1. Pasirinkite savo laiko juostą ir
spustelėkite Next (Toliau).
2. ASUS belaidis maršrutizatorius
palaiko penkis IPT paslaugų tipus:
kabelinį internetą, PPPoE, PPTP,
statinį plačiojo tinklo IP ir „Telstra
BigPond“ (jį palaiko tik WL520GU). Pasirinkite savo ryšio tipą
ir spustelėję Next (Toliau) tęskite.
Kabelinio interneto arba
dinaminio IP vartotojams
Jeigu naudojatės IPT teikiama kabelinio
interneto paslauga, pasirinkite Cable
Modem or other connection that gets
IP automatically (Kabelinis modemas
arba kitas automatiškai IP gaunantis
ryšys). Jeigu IPT Jums suteikia serverio
pavadinimą, MAC adresą ir būsenos
stebėsenos serverio adresą, įveskite šią
informaciją nustatymų puslapyje, jeigu
ne, praleiskite šį žingsnį spustelėję Next
(Toliau).
PPPoE vartotojams
Jeigu naudojatės PPPoE paslauga,
pasirinkite ADSL connection that
requires username and password
(ADSL ryšys, reikalaujantis vartotojo
vardo ir slaptažodžio). Jums reikės
įvesti IPT suteiktą vartotojo vardą ir
slaptažodį. Spustelėkite Next (Toliau)
ir tęskite.
7
Page 10
Plataus diapazono belaidės šeimos maršrutizatoriaus WL-520GU/GC vartotojo vadovas
R
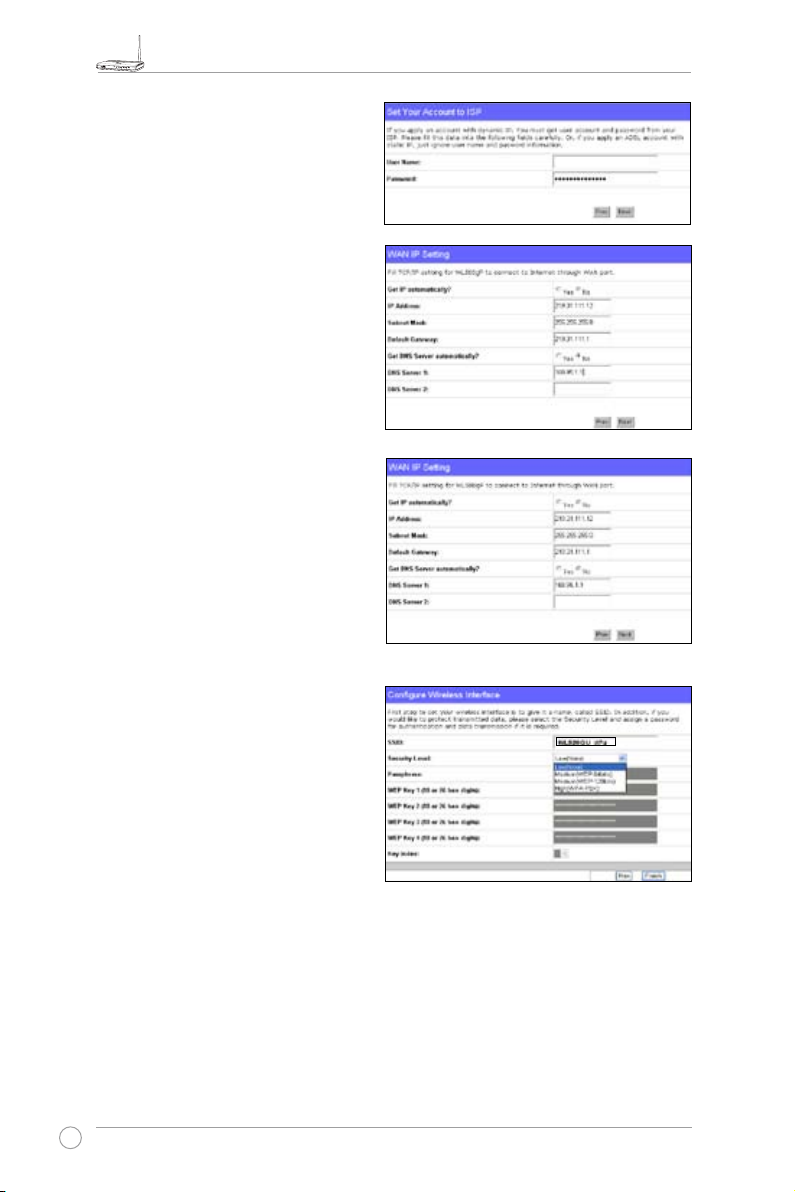
PPTP vartotojams
Jeigu naudojatės PPTP paslauga,
pasirinkite ADSL connection that requires
username, password and IP address
(ADSL ryšys, reikalaujantis vartotojo
vardo, slaptažodžio ir IP adreso). Į
laukelius įveskite IPT suteiktą vartotojo
vardą, slaptažodį ir IP adresą. Spustelėkite
Next (Toliau) ir tęskite.
Statinio IP vartotojams
Jeigu naudojate ADSL ar kito tipo ryšį,
kuriam reikia statinio IP adreso, pasirinkite
ADSL or other connection type that uses
static IP address (ADSL ar kito tipo ryšys,
naudojantis statinį IP adresą). Įveskite
IPT suteiktą adresą, potinklio šabloną ir
numatytąjį šliuzą. Galite nurodyti DNS serverį
arba gauti DNS informaciją automatiškai.
herk036@adsl-comfort
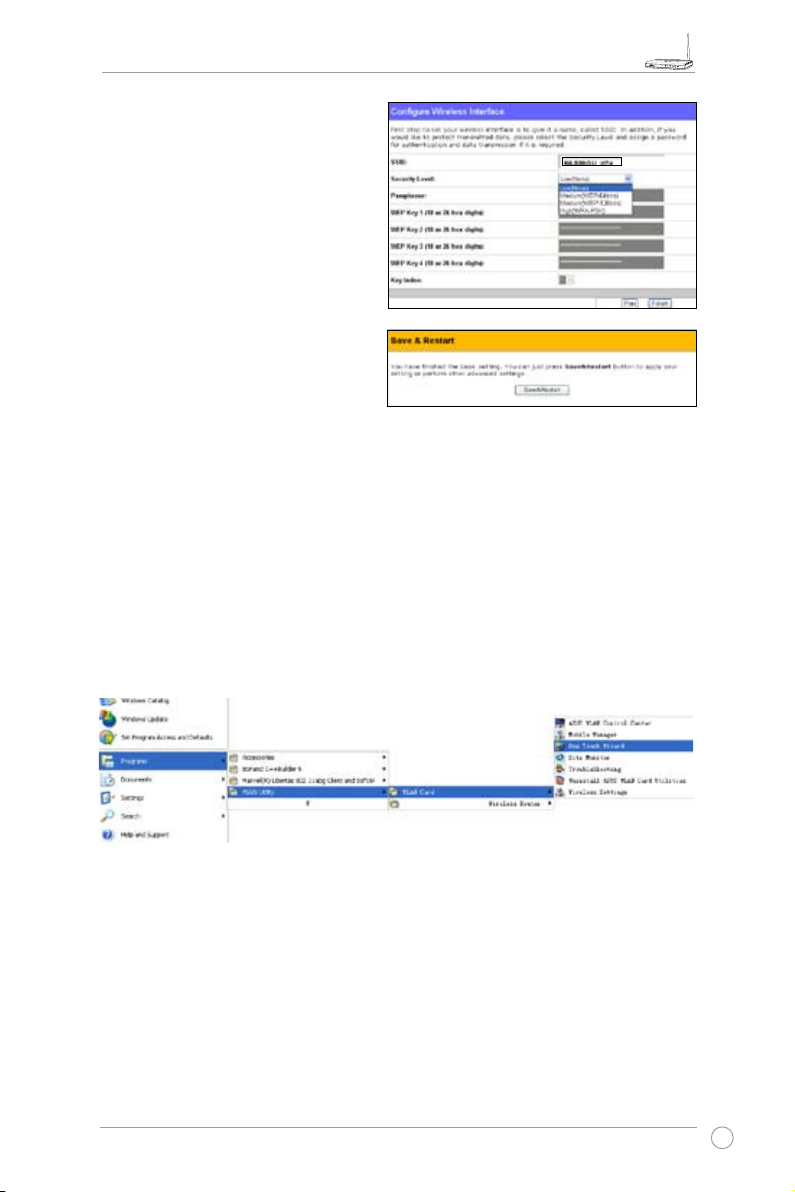
3. Baigę ryšio tipo nustatymą, sukurkite
belaidžio ryšio sąsają. Belaidžiam
maršrutizatoriui parinkite SSID
(angl. Service Set Identier) – prie
belaidžiame vietiniame tinkle siunčiamų
paketų prisegamą unikalų skiriamąjį
ženklą. Įrenginiui bandant susisiekti
su maršrutizatoriumi belaidžiu vietiniu
tinklu, šis skiriamasis ženklas emuliuoja
slaptažodį.
Jei norite apsaugoti siunčiamus duomenis, aktyvuokite šifravimo metodus pasirinkę Saugumo
lygmenį Security Level.
Medium (Vidutinis): Prisijungti prie belaidžio maršrutizatoriaus ir persiųsti duomenis
naudodami 64 arba 128 bitų WEP rakto šifravimą gali tik vartotojai su tokiais pačiais WEP
rakto nustatymais. Nustatymus kongūruokite kaip „Open System“ / WEP, o ne „Shared Key“
/ WEP.
High (Aukštas): Prisijungti prie belaidžio maršrutizatoriaus ir persiųsti duomenis naudodami
TKIP šifravimą gali tik vartotojai, turintys tokius pačius WPA iš anksto padalintų raktų
nustatymus.
8
Page 11
Plataus diapazono belaidės šeimos maršrutizatoriaus WL-520GU/GC vartotojo vadovas
R
4. WEP raktų laukelius įveskite keturis WEP
raktų rinkinius (64 bitų WEP raktui reikia
10 šešioliktainių skaitmenų, 128 bitų – 26
šešioliktainių skaitmenų). Taip pat galite
leisti sistemai sugeneruoti WEP raktus
įvesdami slaptą frazę. Pasižymėkite
slaptą frazę ir WEP raktus užrašų
knygelėje, tada spustelėkite Finish
(Baigti).
Pavyzdžiui, jei pasirinksime 64 bitų
WEP šifravimo metodą ir kaip slaptą
frazę įvesime 11111, WEP raktai bus
sugeneruoti automatiškai.
5. Maršrutizatoriui perkrauti ir naujiems
nustatymams aktyvuoti spustelėkite
Save&Restart (Įrašyti ir perkrauti).
6. Prijunkite belaidį maršrutizatorių belaidžiu būdu.
Norėdami prisijungti prie belaidžio maršrutizatoriaus iš belaidžio kliento, ryšiui užmegzti
galite naudoti „Windows® Wireless Zero Conguration“ paslaugų programą. Jeigu savo
kompiuteryje naudojatės ASUS belaidžio tinklo plokšte, belaidžiam ryšiui užmegzti galite
pasinaudoti „One Touch Wizard“ pagalbine programa, pridedama belaidžio vietinio tinklo
plokštės pagalbiniame kompaktiniame diske.
ASUS belaidžio vietinio tinklo plokštės kongūravimas su „One Touch Wizard“
Jeigu į kompiuterį esate įdiegę ASUS belaidę plokštę kartu su jos pagalbinėmis programomis ir
tvarkyklėmis, spragtelėję Start -> Programes -> ASUS Utility-> WLAN Card -> One Touch
Wizard (Pradėti -> Programos -> ASUS pagalbinė programa-> Belaidžio vietinio tinklo plokštė-
> One Touch Wizard) paleiskite „One Touch Wizard“ pagalbinę programą.
9
Page 12
Plataus diapazono belaidės šeimos maršrutizatoriaus WL-520GU/GC vartotojo vadovas
R
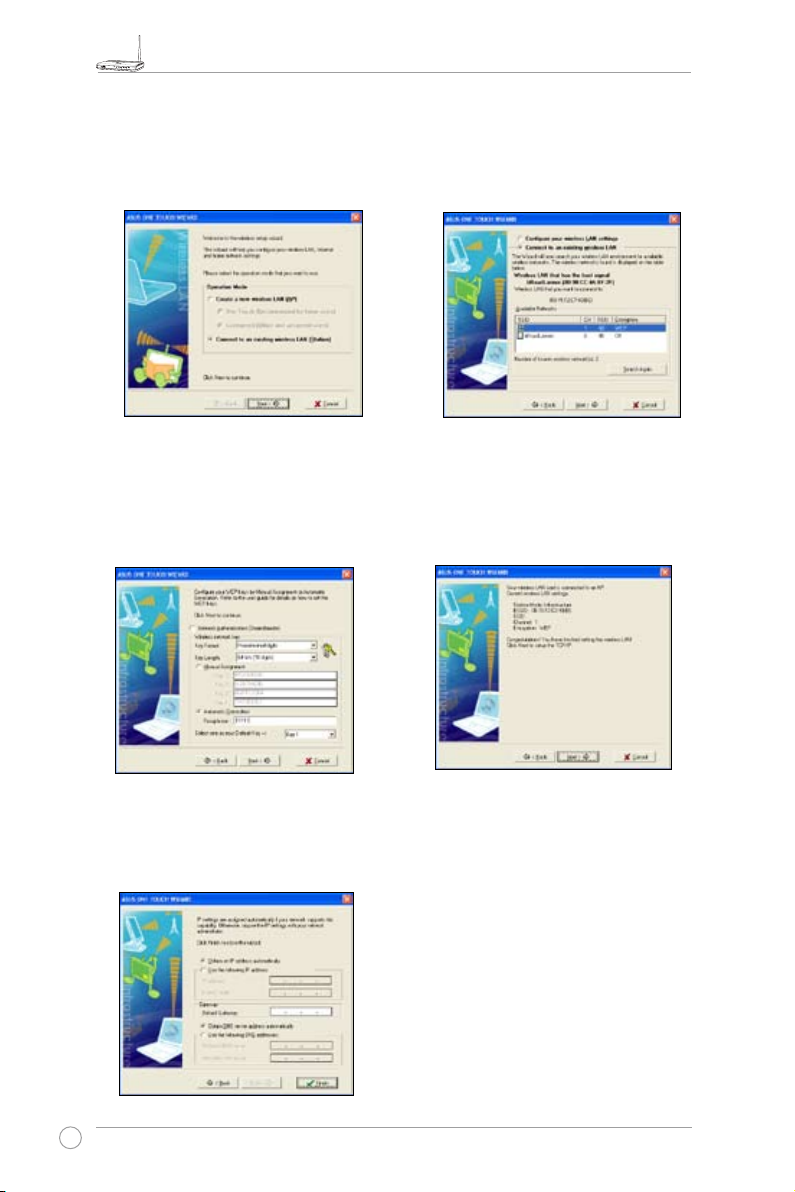
1) Pasirinkite Connect to an existing
wireless LAN (Station) (Prisijungti
prie esamo vietinio tinklo Stotelės)
žymimąją akutę ir spragtelėję Next
(Toliau) tęskite.
3) Nustatykite tokį patį belaidės vietinio
tinklo plokštės autentikavimą ir šifravimą
kaip ir WL-520GU/GC. Ankstesniuose
žingsniuose Key Length (Rakto ilgis)
buvo 64 bits (64 bitai), Passphrase
(slapta frazė) – 11111. Spustelėję Next
(Toliau) tęskite.
2) „One Touch Wizard“ ieško ir Available
Networks (Pasiekiamų tinklų) sąraše
pateikia pasiekiamus prieigos taškus.
Pasirinkite WL-520GU/GC ir spragtelėję
Next (Toliau) tęskite.
WL 520GU
WL 520GU
4) Belaidės plokštės susisiejimas su WL520GU/GC trunka keletą sekundžių.
Spustelėkite Next (Toliau) ir belaidžio
vietinio tinklo plokštei nustatykite TCP/IP.
WL 520GU
5) Atsižvelgdami į tinklo sąlygas,
nustatykite belaidžio vietinio tinklo
plokštės IP adresą. Baigę nustatymą,
spustelėkite Finish (Baigti) ir išeikite iš
„One Touch Wizard“.
10
Page 13
Plataus diapazono belaidės šeimos maršrutizatoriaus WL-520GU/GC vartotojo vadovas
R
Belaidžio vietinio tinklo plokštės kongūravimas su „Windows® WZC“ paslaugų
programa
Jeigu naudojate ne ASUS belaidžio tinklo plokštę, belaidžio ryšio užmezgimui galite naudoti
„Windows® Wireless Zero Conguration“ (WZC) paslaugų programą.
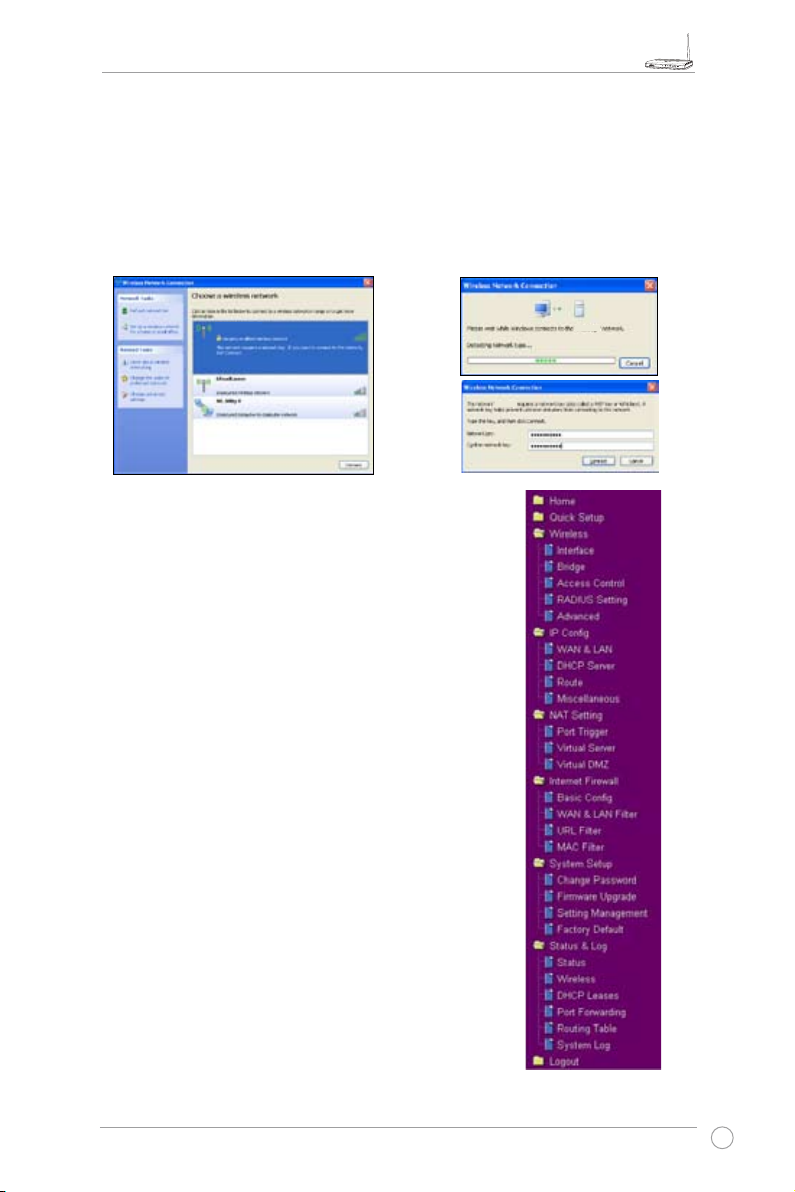
1) Užduočių juostoje dukart spustelėję belaidžio
2) Įveskite 10 skaitmenų raktą, kurį esate
tinklo piktogramą matysite pasiekiamus
tinklus. Pasirinkite savo belaidį maršrutizatorių
ir spustelėkite Connect (Jungtis).
WL 520GU
7. Sudėtingesnių parametrų kongūravimas
Jei norite peržiūrėti arba pakeisti kitus
belaidžio maršrutizatoriaus nustatymus,
įeikite į WL-520GU/GC kongūravimo puslapį
internete. Spustelėjus meniu punktus atsivers
submeniu; nustatydami maršrutizatorių sekite
instrukcijas. Vedant kursorių per kiekvieną
punktą, pasirodys patarimai.
nustatę belaidžiam maršrutizatoriui, ir
spustelėkite Connect (Jungtis). Ryšys
bus užmegztas per keletą sekundžių.
‘WL 520GU’
‘WL 520GU’
11
Page 14
Plataus diapazono belaidės šeimos maršrutizatoriaus WL-520GU/GC vartotojo vadovas
R
4. Belaidžio maršrutizatoriaus funkcijos
Šiame skyriuje pateikiami kai kurių dažnai naudojamų maršrutizatoriaus funkcijų
nustatymo pavyzdžiai. Šias funkcijas galite nustatyti
interneto naršyklės pagalba.
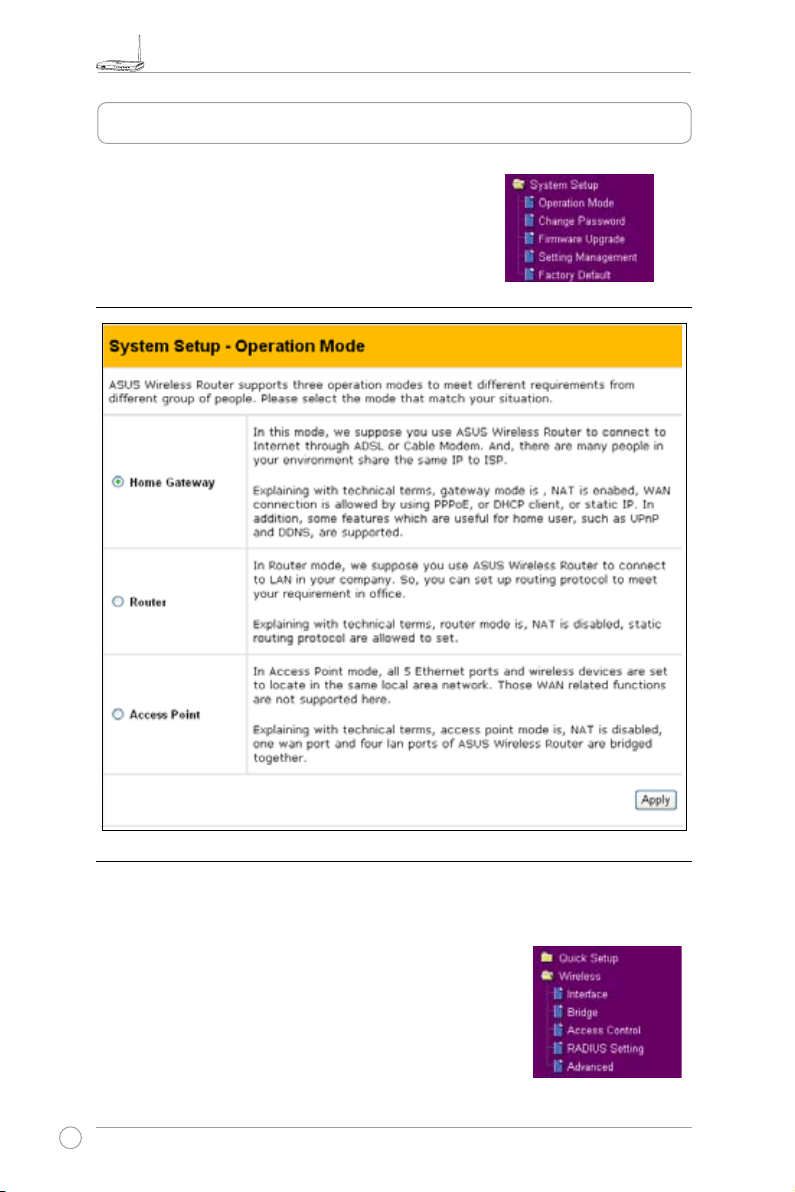
1) Tinkamiausio veikimo režimo parinkimas
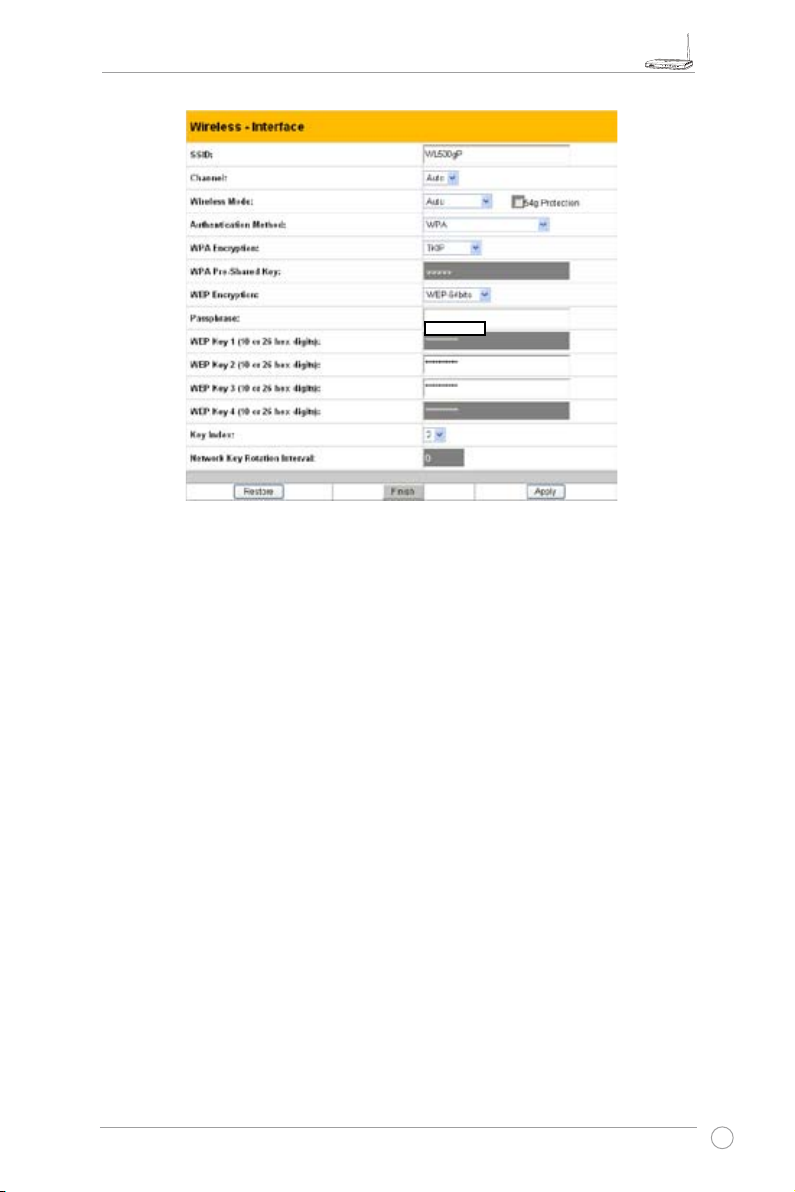
1) Belaidžio tinklo duomenų šifravimo nustatymas
WL-520GU/GC turi rinkinį šifravimo ir autentikavimo metodų, galinčių patenkinti
skirtingus namų, mažo arba namų biuro bei įmonių vartotojų poreikius. Prieš
nustatydami WL-520GU/GC šifravimą ir autentikavimą, kreipkitės į tinklo
administratorių patarimo.
Spragtelėkite Wireless (Belaidis tinklas) -> Interface
(Sauga), kad atsivertų kongūravimo puslapis.
12
Page 15
Plataus diapazono belaidės šeimos maršrutizatoriaus WL-520GU/GC vartotojo vadovas
R
Šifravimas
WL-520GU/GC palaiko šiuos šifravimo režimus: 64 bitų WEP, 128 bitų WEP,
WPA-Personal, WPA2-Personal, WPA-Auto-Personal (TKIP. AES. TKIP+AES),
WPA-Enterprise, WPA2-Enterprise, WPA-Auto-Enterprise (TKIP. AES.
TKIP+AES), RADIUS su 802.1x
WEP yra laidiniam ekvivalentus privatumas (angl. Wired Equivalent Privacy);
duomenų siunčiamų belaidžiu tinklu šifravimui jis naudoja 64 arba 128 bitų
statinius raktus. Norėdami nustatyti WEP raktus, laukelyje WEP Encryption
(WEP šifravimas) pasirinkite WEP-64bits (64 bitų WEP) arba WEP-128bits
(128bitų WEP) raktą. Taip pat galite leisti sistemai sugeneruoti WEP raktus įvedę
Passphrase (Slaptą frazę).
TKIP yra laikinojo rakto vientisumo protokolas (angl. Temporal Key Integrity
Protocol). TKIP dinamiškai generuoja unikalius raktus, šifruojančius kiekvieną
belaidžio ryšio sesijos duomenų paketą.
AES yra pažangus šifravimo standartas (angl. Advanced Encryption
Standard). Šis sprendimas suteikia patikimesnę apsaugą ir padidina belaidės
šifruotės sudėtingumą.
TKIP+AES naudojamas, kai belaidžiame tinkle yra ir WPA, ir WPA2 klientų.
WPA-Personal apsaugo nuo nesankcionuotos prieigos naudojantis nustatymo
slaptažodžiu.
WPA-enterprise per serverį tikrina tinklo vartotojus.
13
Page 16

Plataus diapazono belaidės šeimos maršrutizatoriaus WL-520GU/GC vartotojo vadovas
R
Autentikavimas
Tarp WL-520GU/GC palaikomų autentikavimo metodų yra: Atviras, padalinto rakto, WPAPersonal, WPA2-Personal, WPA-Auto-Personal (TKIP. AES. TKIP+AES), WPA-Enterprise,
WPA2-Enterprise, WPA-Auto-Enterprise (TKIP. AES. TKIP+AES) ir Radius su 802.1x.
Open (Atviras): Ši pasirinktis panaikina belaidžio tinklo autentikavimo teikiamą
apsaugą.
Shared Key (Padalintas raktas): Šis režimas naudoja tuo metu autentikavimui
naudojamus WEP raktus.
WPA-Enterprise, WPA2-Enterprise, WPA-Personal, WPA2-Personal, WPA-AutoPersonal: WPA yra belaidžio tinklo apsaugota prieiga (angl. WiFi-Protected Access). WPA
suteikia du saugos režimus: WPA įmonės tinklui ir WPA-PSK namų ir mažo biuro arba
namų biuro vartotojams. Įmonės tinkle WPA autentikavimui naudoja esamą RADIUS
serverį, o namų ir mažo biuro arba namų biuro vartotojų identikavimui jis suteikia iš
anksto padalintą raktą (PSK). Iš anksto padalintą raktą sudaro nuo 8 iki 64 ženklų.
Radius with 802.1x (Radius su 802.1x): Kaip ir WPA, šis sprendimas taip pat
autentikavimui naudoja RADIUS serverį. Skiriasi tik šifravimo metodai: WPA taiko TKIP
arba AES šifravimo metodus, tuo tarpu Radius su 802.1 X šifravimo paslaugos neteikia.
Nustatę autentikavimą bei šifravimą, spustelėkite Finish (Baigti) – taip išsaugosite
nustatymus ir perkrausite belaidį maršrutizatorių.
3) Virtualaus serverio vietiniame tinkle sukūrimas
Virtualus serveris yra tinklo adreso transliavimo (angl. Network Address Translation –
NAT) funkcija, kuri praleisdama tik tam tikros tarnybos paketus,
pavyzdžiui, HTTP, vietinio tinklo kompiuterį paverčia serveriu.
1. NAT sukūrimo aplanke spragtelėkite Virtual Server (Virtualus
serveris), kad atvertumėte NAT kongūravimo puslapį.
2. Norėdami įjungti virtualų
serverį, pasirinkite Taip.
Pavyzdžiui, jei pagrindinis
kompiuteris192.168.1.100 yra FTP
serveris skirtas interneto vartotojų
prieigai, reiškia, visi paketai iš
interneto, kurių paskirties prievadas
yra 21, turi būti nukreipiami į
pagrindinį kompiuterį. Gerai
žinomos programos (Well-known
Application) laukelyje pasirinkite
FTP. Prievadų sritis (Port range)
yra 21, vietinio kompiuterio IP (Local
IP) – pagrindinio kompiuterio IP,
vietinis prievadas (Local Port) – 21,
protokolas (Protocol) – TCP.
3. Spustelėkite Finish (Baigti).
4. Belaidžiam maršrutizatoriui
perkrauti ir nustatymams aktyvuoti
spustelėkite Save&Restart (Įrašyti
ir perkrauti).
14
Page 17

Plataus diapazono belaidės šeimos maršrutizatoriaus WL-520GU/GC vartotojo vadovas
R
4) Virtualios DMZ vietiniame tinkle sukūrimas
Jeigu vidinį pagrindinį kompiuterį norite padaryti matomu internete, o visas jo teikiamas
paslaugas prieinamas išoriniams vartotojams, įgalinkite DMZ funkciją atidaryti visus
pagrindinio kompiuterio prievadus. Ši funkcija naudinga, kai pagrindinis kompiuteris atlieka
keletą vaidmenų, pavyzdžiui, veikia kaip HTTP ir FTP serveris. Tačiau tada Jūsų tinklas
taps mažiau saugus.
Pastaba: Kai įjungta virtuali DMZ, belaidžiai / laidiniai WL520GU/GC klientai nebus apsaugoti.
1. NAT nustatymo (NAT Setting) meniu spustelėkite
Virtual DMZ (Virtuali DMZ).
2. Įveskite pagrindinio
kompiuterio IP adresą
ir spustelėkite Finish
(Baigti).
3. Belaidžiam maršrutizatoriui
perkrauti ir nustatymams
aktyvuoti spustelėkite
Save&Restart (Įrašyti ir
perkrauti)
5) DDNS nustatymas
DNS įgalina statinį IP naudojantį pagrindinį kompiuterį sietis su domeno vardu;
dinaminio IP vartotojai taip pat gali susisieti su domeno vardu per dinaminę DNS
(DDNS). DDNS reikalauja užsiregistruoti ir susiskurti paskyrą DDNS paslaugos
tiekėjo internetinėje svetainėje. Kai Jums paskiriamas naujas IP adresas, DDNS
serveris atnaujina IP adreso informaciją. Todėl interneto vartotojai visada gali
pasiekti Jūsų tinklą.
1. IP kongūravimo (IP Cong) aplanke spragtelėkite
Miscellaneous (Įvairūs).
2. Norėdami įjungti DDNS
paslaugą, pasirinkite Yes
(Taip). Jeigu neturite DDNS
paskyros, spustelėkite
Free Trial (Nemokamas
bandymas) ir užregistruokite
bandomąją paskyrą.
15
Page 18

Plataus diapazono belaidės šeimos maršrutizatoriaus WL-520GU/GC vartotojo vadovas
R
3. Spustelėję nuorodą
„Nemokamas bandymas“,
būsite nukreipti į pagrindinį
puslapį www.DynDNS.org,
kur galėsite užsiregistruoti
ir kreiptis dėl DDNS
paslaugos.
Perskaitykite taisykles ir
pažymėkite “I have read...“
(„Perskaičiau...“).
4. Įveskite savo vartotojo
vardą, el. pašto adresą,
tada spustelėkite Sukurti
paskyrą
5. Pasirodys žinutė,
pranešanti apie paskyros
sukūrimą. Į Jūsų pašto
dėžutę nusiunčiamas
elektroninis laiškas.
Atverkite dėžutę ir
peržvelkite paštą.
6. Savo elektroninio pašto
dėžutėje rasite laišką su
aktyvavimo duomenimis.
Spustelėkite nuorodą.
7. Nuoroda Jus nukreips
į registracijos puslapį.
Spustelėkite login
(jungtis).
8. Įveskite vartotojo vardą
ir slaptažodį, tada
spragtelėkite login
(jungtis).
16
Page 19

Plataus diapazono belaidės šeimos maršrutizatoriaus WL-520GU/GC vartotojo vadovas
R
9. Prisijungę matysite šią
sveikinimo žinutę.
10. Pasirinkite skirtuką
Services (Paslaugos).
11. Spragtelėkite
Add
Dynamic DNS Host
(Pridėti dinaminį DNS
pagrindinį kompiuterį).
12. Įveskite pagrindinio
kompiuterio vardą ir
spustelėkite Add Host
(Pridėti pagrindinį
kompiuterį).
13. Šią žinutę matysite, kai
bus sėkmingai sukurtas
pagrindinio kompiuterio
vardas.
17
Page 20

Plataus diapazono belaidės šeimos maršrutizatoriaus WL-520GU/GC vartotojo vadovas
R
14. Į belaidžio
maršrutizatoriaus DDNS
nustatymo laukelius
įveskite paskyros
informaciją.
15. Spustelėkite Finish
(Baigti).
16. Belaidžiam maršrutizatoriui
perkrauti ir nustatymams
aktyvuoti spustelėkite
Save&Restart (Įrašyti ir
perkrauti).
17. Patikrinkite ar veikia DDNS.
Spustelėkite meniu Start (Pradėti) ir
pasirinkite Run... (Vykdyti...). Įveskite
cmd ir spragtelėkite OK (Gerai), kad
atsivertų CLI konsolė.
18. Įveskite ping account.
dyndns.org. Jeigu matote
atsakymą panašų į rodomą
paveikslėlyje dešinėje,
reiškia, DDNS veikia
tinkamai.
18
Page 21

Plataus diapazono belaidės šeimos maršrutizatoriaus WL-520GU/GC vartotojo vadovas
R
6) Pralaidumo valdymo nustatymas (tik WL-520GU)
Pralaidumo valdymas suteikia tinklo srautą kontroliuojantį mechanizmą.
Pralaidumo valdymo parengimas:
1. Pralaidumo valdymo aplanke spragtelėkite puslapį Basic Cong (Pagrindiniai
nustatymai). Šiame puslapyje yra keturi mygtukai; tarp jų: Gaming Blaster
(Žaidimų stiprintuvas), Internet Application (Interneto programa), ir VOIP/Video
Streaming (IP telefonija / vaizdo transliavimas). Šiame puslapyje kiekvienam
elementui spragtelėjimu galite suteikti aukštesnį prioritetą. Spragtelėjus kiekvieną
mygtuką, ant jo esančios raidės pageltonuoja (žr. žemiau esančias iliustracijas), o
už jo esanti žalia juosta pailgėja rodydama, kad šio elemento pralaidumas prioritetų
sąraše yra pirmas. Norėdami pabaigt kongūravimą, spustelėkite Finish (Baigti) ir
Apply (Taikyti). Šios iliustracijos rodo skirtingus pralaidumo prioritetų nustatymus:
Gaming Blaster (Žaidimų stiprintuvas)
WL 520GU
19
Page 22

Plataus diapazono belaidės šeimos maršrutizatoriaus WL-520GU/GC vartotojo vadovas
R
Internet Application (Interneto programa)
VOIP/Video Streaming (IP telefonija / vaizdo transliavimas)
WL 520GU
20
Page 23

Plataus diapazono belaidės šeimos maršrutizatoriaus WL-520GU/GC vartotojo vadovas
R
2. Taip pat galite kongūruoti pralaidumą rankiniu būdu paspaudę "User Specify Services"
(„Vartotojo nurodytos paslaugos“). Įveskite IP adress (IP adresą), destination port
(paskirties prievadą) ir išskleidžiamajame sąraše pasirinkite priority status (prioriteto
lygmenį).
21
Page 24

Plataus diapazono belaidės šeimos maršrutizatoriaus WL-520GU/GC vartotojo vadovas
R
5. Taikymai
ASUS belaidis maršrutizatorius WL-520GU turi vieną USB2.0 prievadą bendram
spausdintuvo naudojimui.
1) Bendras naudojimasis USB spausdintuvu (tik WL-520GU/GC)
Jei su kitais vietinio tinklo vartotojais norite bendrai naudotis spausdintuvu, galite
prijungti su USB suderinamą spausdintuvą prie WL-520GU USB2.0 prievado.
Sekite žemiau esančias instrukcijas parengdami kompiuterius naudotis WL-520GU
spausdintuvo serverio funkcija.
USB spausdintuvo diegimas
esančio USB2.0 prievado. Norėdami patikrinti, ar spausdintuvas
tinkamai įdiegtas ir prijungtas prie belaidžio maršrutizatoriaus,
spustelėkite Status & Log (Būsena ir žurnalas) -> Status
(Būsena). Jeigu Printer Model (Spausdintuvo modelis)
nurodytas teisingai ir Printer Status (Spausdintuvo būsena) yra
On-Line (Įjungtas), šiuo spausdintuvu galite bendrai naudotis
vietiniame tinkle.
Pastaba: Jei norite sužinoti
suderinamų spausdintuvų
gamintojus ir modelius,
apsilankykite ASUS
internetinėje svetainėje.
Spausdintuvo kliento su „Windows XP“ nustatymas
Klientams diegdami tinklo spausdintuvą, sekite žemiau esančias instrukcijas.
1. Spragtelėję Start (Pradėti) ->
Printers and Faxes (Spausdintuvai
ir faksai) -> Add a printer
(Pridėti spausdintuvą) paleiskite
spausdintuvo pridėjimo vedlį.
22
2. Pasirinkite Local printer attached to
this computer (Prie šio kompiuterio
prijungtas vietinis spausdintuvas) ir
spustelėkite Next (Toliau).
Page 25

Plataus diapazono belaidės šeimos maršrutizatoriaus WL-520GU/GC vartotojo vadovas
R
3. Pasirinkite Create a new port
(Sukurti naują prievadą) prievado
tipą parinkite Standard TCP/IP Port
(Standartinis TCP / IP prievadas),
tada spustelėkite Next (Toliau).
5. Laukelyje Printer Name of IP
Address (Spausdintuvo vardas ar
IP adresas) įveskite WL-520GU IP
adresą ir spustelėkite Next (Toliau).
4. Spustelėję
Next (Toliau) nustatykite
TCP / IP prievadą, kuriuo pasieksite
tinklo spausdintuvą.
6. Pažymėkite
Custom (Pasirinktinis)
ir spustelėkite Settings (Nustatymo)
parametrai.
7. Laukelyje
Protocol (Protokolas)
pasirinkite LPR, o laukelyje Queue
Name (Eilės pavadinimas) įveskite
8. Spustelėję
standartinio TCP / IP prievado
nustatymą.
Next (Toliau) baikite
LPRServer. Spustelėkite Next (Toliau)
ir tęskite.
23
Page 26

Plataus diapazono belaidės šeimos maršrutizatoriaus WL-520GU/GC vartotojo vadovas
R
9. Paspaudę Finish (Baigti) pabaigsite
nustatymus ir grįšite į spausdintuvo
pridėjimo vedlį.
11. Spustelėję Next (Toliau), paliksite
numatytąjį spausdintuvo vardą.
13. Įdiegimas baigtas. Spustelėję Finish
(Baigti) išeisite iš spausdintuvo pridėjimo
vedlio.
10. Iš pardavėjų / modelių sąrašo įdiekite
spausdintuvo tvarkyklę. Jeigu Jūsų
spausdintuvo sąraše nėra, spustelėję
Have Disk (Iš disko) tvarkyklės
buvimo vietą nurodykite rankiniu būdu.
12. Pasirinkite
Yes (Taip), jei norite
atspausdinti bandomąjį puslapį.
Spustelėjus Next (Toliau) bus
atspausdintas puslapis.
Pastaba: Jeigu kompiuteryje jau esate įdiegę spausdintuvą, dešiniu pelės klavišu
spragtelėkite spausdintuvo piktogramą ir pasirinkę skirtuką Property (Ypatybė) ->
Port (Prievadas) pridėkite standartinį TCP / IP prievadą. Spustelėkite Add Port
(Pridėti prievadą), tada pasirinkite Standard TCP/IP Port (Standartinis TCP / IP
prievadas) ir spragtelėkite mygtuką New Port (Naujas prievadas). Vadovaukitės
5-8 žingsniuose pateikiamomis nustatymo instrukcijomis.
Pastaba: Jeigu naudojate „Windows® 98“ arba ME, kuris nepalaiko standartinio TCP
/ IP prievado, naudokitės WL-520GU palaikomu nuotoliniu prievadu.
24
Page 27

Plataus diapazono belaidės šeimos maršrutizatoriaus WL-520GU/GC vartotojo vadovas
R
6. ASUS pagalbinės programos nustatymas
1) Pagalbinės programos diegimas WL-520GU/GC
1. Norėdami paleisti diegimo programą,
spustelėkite Install ASUS Wireless
Router Utilities (Įdiegti ASUS
belaidžio maršrutizatoriaus pagalbines
programas).
3. Norėdami įdiegti pagalbinę programą
nurodytoje vietoje, spustelėkite Next
(Toliau).
5. Spustelėję
Finish (Baigti) išeisite iš
diegimo programos.
2. Spustelėkite Next (Toliau).
4. Pasirinkite programų aplanką ir
spustelėkite Next (Toliau).
25
Page 28

Plataus diapazono belaidės šeimos maršrutizatoriaus WL-520GU/GC vartotojo vadovas
R
1
2
3
2) „EZSetup“.
Bevielio vietinio tinklo nustatymą baigsite dviem lengvais žingsniais. Pirmiausia iš meniu
Pradėti (Start) paleiskite programą „EZSetup“, tada tris sekundes spauskite galiniame
prietaiso dangtelyje esantį „EZSetup“ mygtuką.
Spauskite „EZSetup“ ne mažiau kaip tris
sekundes, tada atleiskite.
1) Jeigu nustatymo mygtuką paspausite nepaleidę „EZSetup“ vedlio pagalbinės
programos, mirksės maitinimo indikatorius, interneto ryšys bus trumpam sustabdytas,
bet vėliau atsistatys ir vėl veiks kaip įprasta.
2) Naudojantis „EZSetup“ programa rekomenduojame naudoti ASUS belaidį
adapterį, pavyzdžiui, WL-106gM, WL-100gE arba WL-169gE.
Pagalbinėje programoje spragtelėkite
EZSetup mygtuką.
Pastaba: „EZSetup“ vedlio
pagalba vienu metu galima
kongūruoti tik vieną belaidį klientą.
Jei „EZSetup“ režime belaidis
klientas-kompiuteris neaptinka
belaidžio maršrutizatoriaus,
sumažinkite atstumą tarp kliento ir
maršrutizatoriaus.
Bel a idžia i nustat y mai, į s kaita n t tinkl o vardą i r tinkl o r aktus , sugen e ruojam i
automatiškai. Šiuos nustatymus galite keisti rankiniu būdu.
Pastaba: jei belaidis maršrutizatorius jau anksčiau buvo sukongūruotas ir jeigu norite palikti
tuos pačius nustatymus, pasirinkite Preserve original wireless router settings (Išsaugoti
originalius belaidžio maršrutizatoriaus nustatymus). Spustelėję Next (Toliau) tęskite.
26
Page 29

Plataus diapazono belaidės šeimos maršrutizatoriaus WL-520GU/GC vartotojo vadovas
R
4
5
Jeigu jums reikia nustatyti belaidžio maršrutizatoriaus IPT parametrus, pasirinkite Congure
ISP settings (Kongūruoti IPT parametrus,) spustelėkite Next (Toliau) ir sekdami instrukcijas
baikite nustatymą.
Nustatymas baigtas, paspauskite mygtuką
Print/Save Wireless LAN Settings
(Spausdinti / Išsaugoti belaidžio vietinio
tinklo nustatymus), kad ateityje galėtumėte
juos peržiūrėti. Spustelėję Finish (Baigti)
išeisite iš „EZSetup“ pagalbinės programos.
7. Trikčių šalinimas
Neįmanoma maršrutizatoriaus kongūravimui paleisti interneto
naršyklės
1. Atverkite interneto naršyklę ir
atidarykite dialogo langą „Interneto
pasirinktys“ ("Internet Options")
2. Spragtelėkite ant „Naikinti slapukus“
("Delete Cookies") ir „Naikinti failus“
("Delete Files").
27
Page 30

Plataus diapazono belaidės šeimos maršrutizatoriaus WL-520GU/GC vartotojo vadovas
R
3. Spustelėkite
4. Spragtelėkite
5. Pasirinkite telefono ryšį, tada spustelėkite mygtuką
6. Išvalykite žymimuosius langelius
serverį, kad jie liktų nepažymėti.
7. Norėdami užverti interneto pasirinkčių dialogo langą, spustelėkite
Valyti aplanką Retrospektyva.
Taip, tada pasirinkite skirtuką Ryšiai.
Nustatymai.
Automatiškai atrasti parametrus ir Naudoti Proxy
Gerai.
Neįmanoma užmegzti belaidžio ryšio
Už veikimo diapazono ribų:
• Padėkit belaidį maršrutizatorių arčiau belaidžio kliento.
• Pabandykite pakeisti veikimo kanalų nustatymus.
Autentikavimas:
• Junkitės prie maršrutizatoriaus laidiniu ryšiu.
• Patikrinkite belaidžio tinklo saugos nustatymus.
• Mechaniškai perkraukite belaidį maršrutizatorių spausdami nugarėlėje esantį atstatymo
mygtuką ilgiau nei 5 sekundes.
Neįmanoma aptikti maršrutizatoriaus:
• Mechaniškai perkraukite belaidį maršrutizatorių spausdami nugarėlėje esantį atstatymo
mygtuką ilgiau nei 5 sekundes.
• Patikrinkite belaidžio adapterio nustatymus, pavyzdžiui, SSID arba šifravimo nustatymus.
Neįmanoma prisijungti prie interneto per belaidžio vietinio tinklo
adapterį
• Padėkit belaidį maršrutizatorių arčiau belaidžio kliento.
• Patikrinkite ar belaidis adapteris prijungtas prie reikiamo prieigos taško.
• Patikrinkite ar naudojamas belaidis kanalas atitinka esamus kanalus Jūsų šalyje /
teritorijoje.
• Patikrinkite šifravimo nustatymus.
• Patikrinkite ar tinkamai prijungtas ADSL ar kabelis
• Bandykite dar kartą, naudodami kitą „Ethernet“ kabelį.
28
Page 31

Plataus diapazono belaidės šeimos maršrutizatoriaus WL-520GU/GC vartotojo vadovas
R
Internetas nepasiekiamas
• Patikrinkite ADSL modemo ir belaidžio maršrutizatoriaus švieseles
• Patikrinkite ar šviečia belaidžio maršrutizatoriaus plačiojo tinklo šviestukas. Jeigu
šviestukas nešviečia, pakeiskite kabelį ir bandykite dar kartą.
Kai šviečia (ne mirksi) ADSL modemo švieselė „Ryšys“, tai reiškia, kad
prisijungti prie interneto įmanoma.
• Perkraukite kompiuterį.
• Remkitės belaidžio maršrutizatoriaus greitojo nustatymo instrukcija ir perkonfigūruokite
nustatymus.
• Patikrinkite, šviečia ar nešviečia maršrutizatoriaus plačiojo tinklo šviestukas.
• Patikrinkite belaidžio tinklo šifravimo nustatymus.
• Patikrinkite ar kompiuteris gali gauti IP adresą, ar ne (laidiniu bei belaidžiu tinklu).
• Įsitikinkite, kad Jūsų interneto naršyklė yra sukonfigūruota naudotis vietiniu tinklu, o ne
proxy serveriu.
Jeigu ADSL „Ryšio“ švieselė nuolat mirksi arba visai nešviečia, prisijungti
prie interneto neįmanoma – maršrutizatorius negali užmegzti ryšio su ADSL
tinklu.
• Įsitinkite, kad visi kabeliai tinkamai prijungti.
• Atjunkite maitinimo laidą nuo ADSL arba kabelinio modemo, palaukite kelias minutes,
tada vėl prijunkite laidą.
• Jeigu ADSL švieselė toliau mirksi arba nešviečia, susisiekite su savo ADSL paslaugos
tiekėju.
Pamirštas tinklo vardas arba šifravimo raktai
• Pabandykite iš naujo užmegzti laidinį ryšį ir nustatyti belaidžio tinklo šifravimą.
• Mechaniškai perkraukite belaidį maršrutizatorių spausdami nugarėlėje esantį atstatymo
mygtuką ilgiau nei 5 sekundes.
Kaip atstatyti numatytuosius parametrus
Žemiau pateikiamos gamyklinių nustatymų vertės. Jeigu spausite ASUS belaidžio
maršrutizatoriaus nugarėlėje esantį atstatymo mygtuką ilgiau nei 5 sekundes arba spustelėsite
mygtuką „Atstatyti“ gamyklinių nustatymų puslapyje, sistemos parametrų skiltyje, šie
gamykliniai nustatymai perrašys ankstesniuosius belaidžio maršrutizatoriaus nustatymus.
Vartotojo vardas: admin Potinklio šablonas: 255.255.255.0
Slaptažodis: admin DNS Serveris 1: 192.168.1.1
Įgalinti DHCP: Taip DNS Serveris 2: (Tuščia)
IP adresas: 192.168.1.1 SSID: numatytasis
Domeno vardas: (Tuščia)
29
Page 32

Plataus diapazono belaidės šeimos maršrutizatoriaus WL-520GU/GC vartotojo vadovas
R
8. Priedas
FCC Warning Statement
This device complies with Part 15 of the FCC Rules. Operation is subject to the following two
conditions:
(1) This device may not cause harmful interference.
(2) This device must accept any interference received, including interference that
may cause undesired operation.
This equipment has been tested and found to comply with the limits for a class B
digital device, pursuant to part 15 of the FCC Rules. These limits are designed
to provide reasonable protection against harmful interference in a residential
installation.
This equipment generates, uses and can radiate radio frequency energy and, if
not installed and used in accordance with the instructions, may cause harmful
interference to radio communications. However, there is no guarantee that
interference will not occur in a particular installation. If this equipment does
cause harmful interference to radio or television reception, which can be determined
by turning the equipment off and on, the user is encouraged to try to correct the
interference by one or more of the following measures:
- Reorient or relocate the receiving antenna.
- Increase the separation between the equipment and receiver.
- Connect the equipment into an outlet on a circuit different from that to which the receiver
is connected.
- Consult the dealer or an experienced radio/TV technician for help.
CAUTION:
Any changes or modications not expressly approved by the party responsible for
compliance could void the user’s authority to operate the equipment.
Prohibition of Co-location
This device and its antenna(s) must not be co-located or operating in conjunction with
any other antenna or transmitter
Safety Information
To maintain compliance with FCC’s RF exposure guidelines, this equipment should
be installed and operated with minimum distance 20cm between the radiator and your
body. Use on the supplied antenna.
Declaration of Conformity for R&TTE directive 1999/5/EC
Essential requirements – Article 3
30
Page 33

Plataus diapazono belaidės šeimos maršrutizatoriaus WL-520GU/GC vartotojo vadovas
R
Protection requirements for health and safety – Article 3.1a
Testing for electric safety according to EN 60950-1 has been conducted. These are
considered relevant and sufcient.
Protection requirements for electromagnetic compatibility – Article 3.1b
Testing for electromagnetic compatibility according to EN 301 489-1 and EN 301 489-17 has
been conducted. These are considered relevant and sufcient.
Effective use of the radio spectrum – Article 3.2
Testing for radio test suites according to EN 300 328- 2 has been conducted. These are
considered relevant and sufcient.
CE Mark Warning
This is a Class B product, in a domestic environment, this product may cause radio
interference, in which case the user may be required to take adequate measures.
GNU general public license
Licensing information
This product includes copyrighted third-party software licensed under the terms of the GNU
General Public License. Please see The GNU General Public License for the exact terms
and conditions of this license. We include a copy of the GPL with every CD shipped with our
product. All future rmware updates will also be accompanied with their respective source
code. Please visit our web site for updated information. Note that we do not offer direct
support for the distribution.
GNU GENERAL PUBLIC LICENSE
Version 2, June 1991
Copyright (C) 1989, 1991 Free Software Foundation, Inc.
59 Temple Place, Suite 330, Boston, MA 02111-1307 USA
Everyone is permitted to copy and distribute verbatim copies of this license document, but
changing it is not allowed.
Preamble
The licenses for most software are designed to take away your freedom to share and change
it. By contrast, the GNU General Public License is intended to guarantee your freedom to
share and change free software--to make sure the software is free for all its users. This
General Public License applies to most of the Free Software Foundation’s software and to
any other program whose authors commit to using it. (Some other Free Software Foundation
software is covered by the GNU Library General Public License instead.) You can apply it to
your programs, too.
When we speak of free software, we are referring to freedom, not price. Our General Public
Licenses are designed to make sure that you have the freedom to distribute copies of free
software (and charge for this service if you wish), that you receive source code or can get it
if you want it, that you can change the software or use pieces of it in new free programs; and
that you know you can do these things.
31
Page 34

Plataus diapazono belaidės šeimos maršrutizatoriaus WL-520GU/GC vartotojo vadovas
R
To protect your rights, we need to make restrictions that forbid anyone to deny you
these rights or to ask you to surrender the rights. These restrictions translate to certain
responsibilities for you if you distribute copies of the software, or if you modify it.
For example, if you distribute copies of such a program, whether gratis or for a fee, you must
give the recipients all the rights that you have. You must make sure that they, too, receive or
can get the source code. And you must show them these terms so they know their rights.
We protect your rights with two steps: (1) copyright the software, and (2) offer you this license
which gives you legal permission to copy, distribute and/or modify the software.
Also, for each author’s protection and ours, we want to make certain that everyone understands
that there is no warranty for this free software. If the software is modied by someone else and
passed on, we want its recipients to know that what they have is not the original, so that any
problems introduced by others will not reect on the original authors’ reputations.
Finally, any free program is threatened constantly by software patents. We wish to avoid the
danger that redistributors of a free program will individually obtain patent licenses, in effect
making the program proprietary. To prevent this, we have made it clear that any patent must
be licensed for everyone’s free use or not licensed at all.
The precise terms and conditions for copying, distribution and modication follow.
Terms & conditions for copying, distribution, & modication
0. This License applies to any program or other work which contains a notice placed by
the copyright holder saying it may be distributed under the terms of this General Public
License. The “Program”, below, refers to any such program or work, and a “work based
on the Program” means either the Program or any derivative work under copyright
law: that is to say, a work containing the Program or a portion of it, either verbatim or
with modications and/or translated into another language. (Hereinafter, translation is
included without limitation in the term “modication”.) Each licensee is addressed as
“you”.
Activities other than copying, distribution and modication are not covered by this License;
they are outside its scope. The act of running the Program is not restricted, and the
output from the Program is covered only if its contents constitute a work based on the
Program (independent of having been made by running the Program). Whether that is
true depends on what the Program does.
1. You may copy and distribute verbatim copies of the Program’s source code as you
receive it, in any medium, provided that you conspicuously and appropriately publish on
each copy an appropriate copyright notice and disclaimer of warranty; keep intact all the
notices that refer to this License and to the absence of any warranty; and give any other
recipients of the Program a copy of this License along with the Program.
You may charge a fee for the physical act of transferring a copy, and you may at your
option offer warranty protection in exchange for a fee.
2. You may modify your copy or copies of the Program or any portion of it, thus forming a
work based on the Program, and copy and distribute such modications or work under the
terms of Section 1 above, provided that you also meet all of these conditions:
a) You must cause the modied les to carry prominent notices stating that
you changed the les and the date of any change.
32
Page 35

Plataus diapazono belaidės šeimos maršrutizatoriaus WL-520GU/GC vartotojo vadovas
R
b) You must cause any work that you distribute or publish, that in whole or in part contains
or is derived from the Program or any part thereof, to be licensed as a whole at no charge
to all third parties under the terms of this License.
c) If the modied program normally reads commands interactively when run, you
must cause it, when started running for such interactive use in the most ordinary
way, to print or display an announcement including an appropriate copyright
notice and a notice that there is no warranty (or else, saying that you provide a
warranty) and that users may redistribute the program under these conditions, and
telling the user how to view a copy of this License. (Exception: if the Program
itself is interactive but does not normally print such an announcement, your work
based on the Program is not required to print an announcement.)
These requirements apply to the modied work as a whole. If identiable
sections of that work are not derived from the Program, and can be reasonably
considered independent and separate works in themselves, then this License, and
its terms, do not apply to those sections when you distribute them as separate
works. But when you distribute the same sections as part of a whole which is a
work based on the Program, the distribution of the whole must be on the terms
of this License, whose permissions for other licensees extend to the entire
whole, and thus to each and every part regardless of who wrote it.
Thus, it is not the intent of this section to claim rights or contest your
rights to work written entirely by you; rather, the intent is to exercise the
right to control the distribution of derivative or collective works based on
the Program.
In addition, mere aggregation of another work not based on the Program with
the Program (or with a work based on the Program) on a volume of a storage
or distribution medium does not bring the other work under the scope of this
License.
3. You may copy and distribute the Program (or a work based on it, under Section 2) in
object code or executable form under the terms of Sections 1 and 2 above provided that
you also do one of the following:
a) Accompany it with the complete corresponding machine-readable source code,
which must be distributed under the terms of Sections 1 and 2 above on a medium
customarily used for software interchange; or,
b) Accompany it with a written offer, valid for at least three years, to give
any third party, for a charge no more than your cost of physically performing
source distribution, a complete machine-readable copy of the corresponding
source code, to be distributed under the terms of Sections 1 and 2 above on a
medium customarily used for software interchange; or,
c) Accompany it with the information you received as to the offer to distribute
corresponding source code. (This alternative is allowed only for noncommercial
distribution and only if you received the program in object code or executable
form with such an offer, in accord with Subsection b above.)
33
Page 36

Plataus diapazono belaidės šeimos maršrutizatoriaus WL-520GU/GC vartotojo vadovas
R
The source code for a work means the preferred form of the work for making
modications to it. For an executable work, complete source code means all the source
code for all modules it contains, plus any associated interface denition les, plus the
scripts used to control compilation and installation of the executable. However, as a
special exception, the source code distributed need not include anything that is normally
distributed (in either source or binary form) with the major components (compiler, kernel,
and so on) of the operating system on which the executable runs, unless that component
itself accompanies the executable.
If distribution of executable or object code is made by offering access to copy
from a designated place, then offering equivalent access to copy the source
code from the same place counts as distribution of the source code, even though
third parties are not compelled to copy the source along with the object code.
4. You may not copy, modify, sublicense, or distribute the Program except as expressly
provided under this License. Any attempt otherwise to copy, modify, sublicense or
distribute the Program is void, and will automatically terminate your rights under this
License. However, parties who have received copies, or rights, from you under this License
will not have their licenses terminated so long as such parties remain in full compliance.
5. You are not required to accept this License, since you have not signed it. However,
nothing else grants you permission to modify or distribute the Program or its derivative
works. These actions are prohibited by law if you do not accept this License. Therefore,
by modifying or distributing the Program (or any work based on the Program), you
indicate your acceptance of this License to do so, and all its terms and conditions for
copying, distributing or modifying the Program or works based on it.
6. Each time you redistribute the Program (or any work based on the Program), the
recipient automatically receives a license from the original licensor to copy, distribute
or modify the Program subject to these terms and conditions. You may not impose any
further restrictions on the recipients’ exercise of the rights granted herein. You are not
responsible for enforcing compliance by third parties to this License.
7. If, as a consequence of a court judgment or allegation of patent infringement or for any
other reason (not limited to patent issues), conditions are imposed on you (whether by
court order, agreement or otherwise) that contradict the conditions of this License, they
do not excuse you from the conditions of this License. If you cannot distribute so as
to satisfy simultaneously your obligations under this License and any other pertinent
obligations, then as a consequence you may not distribute the Program at all. For
example, if a patent license would not permit royalty-free redistribution of the Program
by all those who receive copies directly or indirectly through you, then the only way you
could satisfy both it and this License would be to refrain entirely from distribution of the
Program.
If any portion of this section is held invalid or unenforceable under any particular
circumstance, the balance of the section is intended to apply and the section as a whole
is intended to apply in other circumstances.
It is not the purpose of this section to induce you to infringe any patents or other property
right claims or to contest validity of any such claims; this section has the sole purpose
of protecting the integrity of the free software distribution system, which is implemented
by public license practices. Many people have made generous contributions to the wide
range of software distributed through that system in reliance on consistent application
of that system; it is up to the author/donor to decide if he or she is willing to distribute
software through any other system and a licensee cannot impose that choice.
34
Page 37

Plataus diapazono belaidės šeimos maršrutizatoriaus WL-520GU/GC vartotojo vadovas
R
This section is intended to make thoroughly clear what is believed to be a consequence of
the rest of this License.
8. If the distribution and/or use of the Program is restricted in certain countries either by
patents or by copyrighted interfaces, the original copyright holder who places the Program
under this License may add an explicit geographical distribution limitation excluding those
countries, so that distribution is permitted only in or among countries not thus excluded.
In such case, this License incorporates the limitation as if written in the body of this
License.
9. The Free Software Foundation may publish revised and/or new versions of the General
Public License from time to time. Such new versions will be similar in spirit to the present
version, but may differ in detail to address new problems or concerns.
Each version is given a distinguishing version number. If the Program species a
version number of this License which applies to it and “any later version”, you have the
option of following the terms and conditions either of that version or of any later version
published by the Free Software Foundation. If the Program does not specify a version
number of this License, you may choose any version ever published by the Free Software
Foundation.
10. If you wish to incorporate parts of the Program into other free programs whose
distribution conditions are different, write to the author to ask for permission. For software
which is copyrighted by the Free Software Foundation, write to the Free Software
Foundation; we sometimes make exceptions for this. Our decision will be guided by
the two goals of preserving the free status of all derivatives of our free software and of
promoting the sharing and reuse of software generally.
NO WARRANTY
11. BECAUSE THE PROGRAM IS LICENSED FREE OF CHARGE, THERE IS NO
WARRANTY FOR THE PROGRAM, TO THE EXTENT PERMITTED BY APPLICABLE
LAW. EXCEPT WHEN OTHERWISE STATED IN WRITING THE COPYRIGHT
HOLDERS AND/OR OTHER PARTIES PROVIDE THE PROGRAM “AS IS” WITHOUT
WARRANTY OF ANY KIND, EITHER EXPRESSED OR IMPLIED, INCLUDING, BUT
NOT LIMITED TO, THE IMPLIED WARRANTIES OF MERCHANTABILITY AND
FITNESS FOR A PARTICULAR PURPOSE. THE ENTIRE RISK AS TO THE QUALITY
AND PERFORMANCE OF THE PROGRAM IS WITH YOU. SHOULD THE PROGRAM
PROVE DEFECTIVE, YOU ASSUME THE COST OF ALL NECESSARY SERVICING,
REPAIR OR CORRECTION.
12. IN NO EVENT UNLESS REQUIRED BY APPLICABLE LAW OR AGREED TO IN
WRITING WILL ANY COPYRIGHT HOLDER, OR ANY OTHER PARTY WHO MAY
MODIFY AND/OR REDISTRIBUTE THE PROGRAM AS PERMITTED ABOVE,
BE LIABLE TO YOU FOR DAMAGES, INCLUDING ANY GENERAL, SPECIAL,
INCIDENTAL OR CONSEQUENTIAL DAMAGES ARISING OUT OF THE USE OR
INABILITY TO USE THE PROGRAM (INCLUDING BUT NOT LIMITED TO LOSS OF
DATA OR DATA BEING RENDERED INACCURATE OR LOSSES SUSTAINED BY
YOU OR THIRD PARTIES OR A FAILURE OF THE PROGRAM TO OPERATE WITH
ANY OTHER PROGRAMS), EVEN IF SUCH HOLDER OR OTHER PARTY HAS BEEN
ADVISED OF THE POSSIBILITY OF SUCH DAMAGES.
END OF TERMS AND CONDITIONS
35
Page 38

Plataus diapazono belaidės šeimos maršrutizatoriaus WL-520GU/GC vartotojo vadovas
R
WL-520GU/GC kongūravimas su „Vista“ OS
Iš anksto ASUS WL-520GU/GC įdiegta „Windows Simple Cong“ funkcija įgalina
sukongūruoti įrenginį „Windows Vista“ „WCN Net“ proceso pagalba.
Pastaba: „Windows Vista“ „WCN Net“ procesas gali aptikti įrenginį tik tada, kai jis nėra
sukongūruotas ir turi gamyklinius nustatymus. Jeigu įrenginys yra sukongūruotas,
turėsite jį parengti naudodamiesi „WEB“ arba „Ezsetup“. Arba galite paspausti atstatymo mygtuką ir tada pradėti nustatymą su „WCN-NET“.
Pastaba: WL-520GC nepalaiko „WCN“ nustatymo, bet vis tiek gerai veikia su „Vista“ turinčiu
kompiuteriu naudodama „WEB cong“ arba „EZSetup“.
1) Įrenginio kongūravimas
Kongūruodami įrenginį „Windows Vista“ „WCN-Net“ proceso pagalba, sekite žemiau
aprašytus žingsnius:
1. Prijunkite įrenginį prie kompiuterio ir įjunkite maitinimą.
2. „Vista“ darbalaukyje spustelėkite
Start (Pradėti) > Network (Tinklas) Atsiras tinklo
langas (kaip parodyta žemiau).
3. Dukart spragtelėkite ASUS Wireless Router (ASUS belaidį maršrutizatorių).
36
Page 39

Plataus diapazono belaidės šeimos maršrutizatoriaus WL-520GU/GC vartotojo vadovas
R
Atsiras langas, prašantis įvesti įrenginio PIN kodą. PIN įrašytas ant
įrenginio priklijuotame lipduke.
4. PIN laukelyje įveskite kodą, tada spustelėkite
Next (Toliau).
4. Suteikite tinklui vardą ir įveskite laukelyje Network name (Tinklo vardas), tada
spustelėkite Next (Toliau).
37
Page 40

Plataus diapazono belaidės šeimos maršrutizatoriaus WL-520GU/GC vartotojo vadovas
R
Slapta frazė sukuriama tinklo WPA saugai.
5. Šiame lange spustelėkite
Next (Toliau).
Jeigu norite sukurti kitą slaptą frazę, spustelėkite create a different passphrase for
me (sukurti man kitą slaptą frazę). Jeigu norite naudoti kitą saugos metodą, ne
WPA-Personal, spragtelėkite Show advanced network security options (Rodyti
sudėtingesnes tinklo saugos pasirinktis).
Kitos slaptos frazės ir saugos metodų langai pavaizduoti žemiau.
38
Page 41

Plataus diapazono belaidės šeimos maršrutizatoriaus WL-520GU/GC vartotojo vadovas
R
Sukurti kitą slaptą frazę
Keturi saugos metodai
39
Page 42

Plataus diapazono belaidės šeimos maršrutizatoriaus WL-520GU/GC vartotojo vadovas
R
6. Baigę kongūraciją, aukščiau pavaizduotuose languose spustelėkite Next (Toliau).
Atsiras langas, pranešantis apie baigtą kongūraciją, kaip parodyta žemiau. Spustelėję
Close (Užverti) pabaigsite procesą ir išeisite iš programos.
2) Tinklo bendrinimo centro nustatymas
Kurdami bendrinimo centrą, leidžiantį tinklo vartotojams bendrai naudotis
spausdintuvu, failais ir laikmenomis.
1. Prijunkite įrenginį prie kompiuterio ir įjunkite maitinimą.
2. Naršymo juostoje spragtelėkite
centras) Pasirodys Network and Sharing Center (Tinklo ir bendrinimo centro) langas.
40
Network and Sharing Center (Tinklas ir bendrinimo
Page 43

Plataus diapazono belaidės šeimos maršrutizatoriaus WL-520GU/GC vartotojo vadovas
R
3. Spustelėkite Set up a wireless router or network (Parengti belaidį maršrutizatorių
arba tinklą).
41
Page 44

Plataus diapazono belaidės šeimos maršrutizatoriaus WL-520GU/GC vartotojo vadovas
R
3. Pasirinkite Set up a wireless router or access point (Parengti belaidį maršrutizatorių
arba prieigos tašką), tada spustelėkite Next (Toliau).
4. Spustelėkite Next (Toliau).
42
Page 45

Plataus diapazono belaidės šeimos maršrutizatoriaus WL-520GU/GC vartotojo vadovas
R
5. Pasirodžiusiame lange, laukelyje Network name (Tinklo vardas) įveskite tinklo vardą,
tada spustelėkite Next (Toliau). Slapta frazė sukuriama WPA saugai.
6. Spustelėkite Next (Toliau). Jeigu norite naudoti kitus saugos metodus, ne WPA-Personal,
spragtelėkite Show advanced network security options (Rodyti sudėtingesnes tinklo
saugos pasirinktis).
43
Page 46

Plataus diapazono belaidės šeimos maršrutizatoriaus WL-520GU/GC vartotojo vadovas
R
7. Pasirinkite saugos metodą, tada spustelėkite Next (Toliau).
8. Atsiras langas, prašantis įvesti įrenginio PIN kodą. Įveskite PIN, kuris įrašytas ant
įrenginio priklijuotame lipduke, tada spustelėkite Next (Toliau).
44
Page 47

Plataus diapazono belaidės šeimos maršrutizatoriaus WL-520GU/GC vartotojo vadovas
R
9. Pasirinkite failų ir spausdintuvo bendro naudojimosi metodą, tada spustelėkite Next
(Toliau).
Pasirodys langas, pranešantis, kad parengimas baigtas; pavyzdys pateikiamas žemiau.
45
Page 48

Plataus diapazono belaidės šeimos maršrutizatoriaus WL-520GU/GC vartotojo vadovas
R
10. Aukščiau pavaizduotame lange galite pasirinkti View settings (Peržiūrėti nustatymus)
arba Save settings to a USB ash drive (Įrašyti nustatymus į USB atmintinę).
Atitinkami langai pavaizduoti žemiau.
Nustatymų peržiūros langas
Nustatymų įrašymo į USB atmintinę langas
46
Page 49

Plataus diapazono belaidės šeimos maršrutizatoriaus WL-520GU/GC vartotojo vadovas
R
11. Kai pasirodo langas Save settings to a USB ash drive screen (Įrašyti nustatymus
į USB atmintinę), prie kompiuterio prijunkite USB atmintinę, tada pasirinkite laikmeną
Save settings to (laukelyje Įrašyti nustatymus į) ir spustelėkite Next (Toliau).
Nustatymai pradedami rašyti į USB laikmeną.
Kai įrašymo procesas bus baigtas, pasirodys langas mokantis prie tinklo prijungti
kompiuterį ar kitus įrenginius. Prijungdami kompiuterius ir įrenginius prie tinklo, sekite
instrukcijas.
47
 Loading...