

Page 1
WL-500W SuperSpeed N
Wireless multi-function router
WL-500W
¤
Wireless Multi-Function Router
User Manual
E3336 /July 2007
Page 2

Manufacturer Contact Information
ASUSTeK COMPUTER INC. (Asia-Pacic)
Company address: 15 Li-Te Road, Beitou, Taipei 11259
General (tel): +886-2-2894-3447 Web site address: www.asus.com.tw
General (fax): +886-2-2894-7798 General email: info@asus.com.tw
ASUS COMPUTER INTERNATIONAL (America)
Company address: 44370 Nobel Drive, Fremont, CA 94538, USA
General (fax): +1-510-608-4555 Web site address: usa.asus.com
Technical support
General support: +1-502-995-0883 Support (fax): +1-502-933-8713
Online support: http://vip.asus.com/eservice/techserv.aspx
ASUS COMPUTER GmbH (Germany & Austria)
Company address: Harkort Str. 25, D-40880 Ratingen, Germany
General (tel): +49-2102-95990 Web site address: www.asus.com.de
General (fax): +49-2102-959911 Online contact: www.asus.com.de/sales
Technical support
Components: +49-2102-95990 Online support: www.asus.com.de/support
Notebook: +49-2102-959910 Support (fax): +49-2102-959911
Page 3

WL-500W Wireless Router User Manual
Table of contents
1. Package contents .................................................................................3
2. Connecting ADSL modem and wireless router ................................. 3
1) Cable connection ...............................................................................3
2) Status indicators ................................................................................ 4
3) Wall mount option ..............................................................................4
3. Getting started ......................................................................................5
1) Wired connection ...............................................................................5
2) Wireless Connection ..........................................................................5
3) Setting IP address for wired or wireless client ...................................5
5) Quick setup .......................................................................................7
4. Wireless router features ....................................................................12
1) Choosing an appropriate operation mode .......................................12
2) Setting up wireless encryption ........................................................13
3) Setting up virtual server in your LAN ............................................... 14
4) Setting up virtual DMZ in your LAN .................................................15
5) Setting up DDNS .............................................................................15
6) Setting up Bandwidth Management .................................................19
5. Application features ...........................................................................22
1) Sharing USB storage .......................................................................22
2) Setting up FTP site .......................................................................... 24
3) Download Master .............................................................................25
4) Web camera ....................................................................................26
5) Sharing USB printer .........................................................................29
6. Setting up using ASUS utility ................................................................ 32
1) Utility Installation for WL-500W ........................................................32
2) EZSetup ........................................................................................... 33
1
Page 4

WL-500W Wireless Router User Manual
7. Congure WL-500W under Vista OS ..................................................... 35
1) Conguring the device .....................................................................35
2) Setting up the network sharing center ............................................. 40
8. Troubleshooting ................................................................................. 47
9. Appendix ............................................................................................. 49
2
Page 5
WL-500W Wireless Router User Manual
1
3
2
Modem
Wall telephone outlet
Wall power outlet
Phone
Power
Wall power outlet
LAN
Power
ASUS Wireless Router
Modem
Wall telephone outlet
Wall power outlet
LAN
Power
Phone
Power
ASUS Wireless Router
WAN
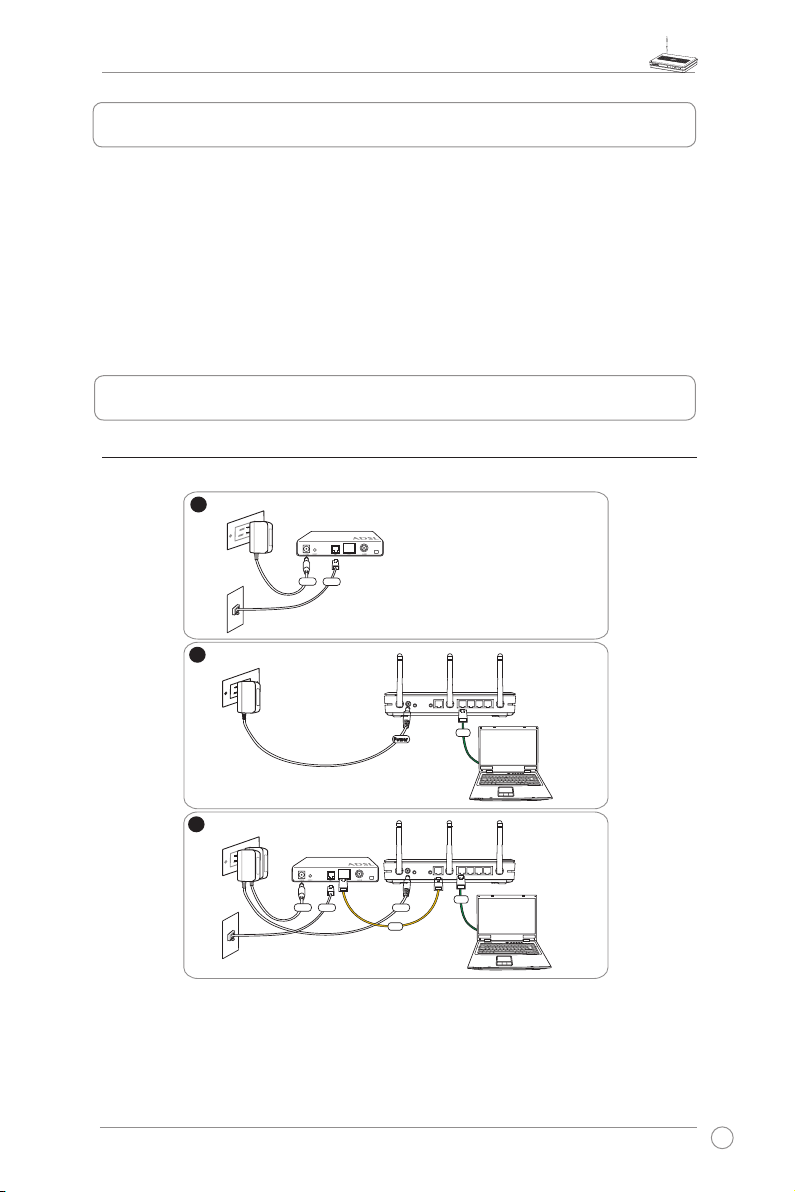
1. Package contents
• WL-500W wireless router x 1
• Power adapter x 1
• Utility CD x 1
• RJ45 cable x 1
• Quick Start Guide x 1
2. Connecting ADSL modem and wireless router
1) Cable connection
3
Page 6

WL-500W Wireless Router User Manual
Wireless multi-function router
WL-500W
2) Status indicators
PWR
AIR WANLAN
PWR (Power)
Off No power
On System ready
Flashing-slow Firmware upgrade failed
Flashing-quick EZsetup processing
AIR (Wireless Network)
Off No power
On Wireless system ready
Flashing Transmitting or receiving data (wireless)
WAN (Wide Area Network)
Off No power or no physical connection
On Has physical connection to an Ethernet network
Flashing Transmitting or receiving data (through Ethernet cable)
LAN 1-4 (Local Area Network)
Off No power or no physical connection
On Has physical connection to an Ethernet network
Flashing Transmitting or receiving data (through Ethernet cable)
3) Wall mount option
The ASUS WL-500W Wireless Router is designed to
sit on a raised at surface like a le cabinet or book
shelf. The unit may also be converted for mounting to
a wall or ceiling.
Fo llo w t hes e s tep s t o m oun t t he AS US Wir ele ss
Router to a wall:
1. Look on the underside for the two mounting hooks.
2. Mark two upper holes in a at surface.
3. Tighten two screws until only 1/4'' is showing.
4. Latch the hooks of the ASUS Wireless Router onto the screws.
Re-adjust the screws if you cannot latch the ASUS Wireless Router onto the
Note:
screws or if it is too loose.
4
Page 7
WL-500W Wireless Router User Manual
3. Getting started
The ASU S WL-500W Wireless Router can meet variou s working scenarios with proper
conguration. The default settings of the wireless router may need change so as to meet your
individual needs. Therefore, before using the ASUS Wireless Router, check the basic settings to
make sure they all work in your environment.
ASUS provides a utility named EZSetup for fast wireless conguration. If you would like to use
EZSetup for your wireless network conguration, refer to chapter 6 for details.
Wired connection for initial conguration is recommended to avoid possible
Note:
setup problems due to wireless uncertainty.
1) Wired connectionired connection
The WL-500W Wireless Router is supplied with an Ethernet cable in the package. The wireless
router has an integrated auto-crossover function. Thus, you can either use straight-through or
crossover cable for wired connection. Plug one end of the cable to the LAN port on the rear
panel of the router and the other end to the Ethernet port on your PC.
2) Wireless Connection
For establishing wireless connection, you need an IEEE 802.11b/g compatible WLAN card. ReferRefer
to your wireless adapter user manual for wireless connection procedures. By default, the
SSID of ASUS Wireless Router is “default” (in lower case), encryption is disabled and open
system authentication is used.
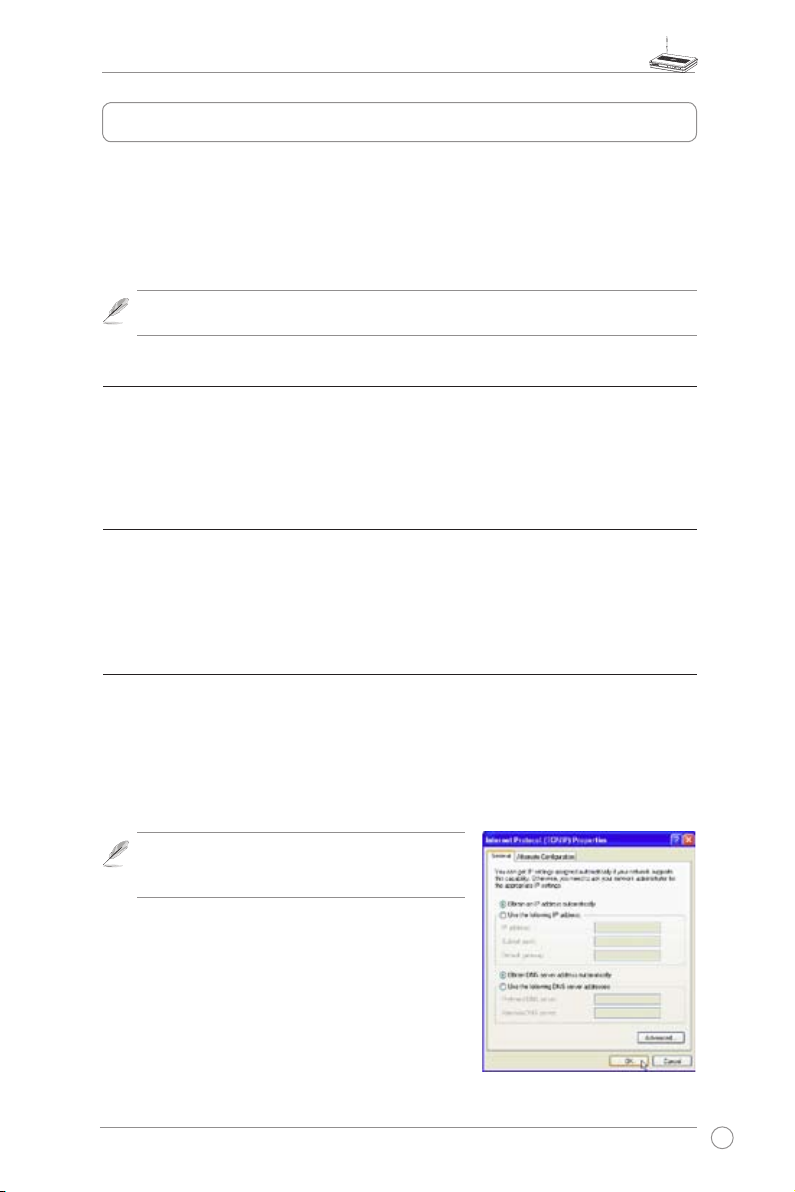
3) Setting IP address for wired or wireless client
To access the WL-500W Wireless Router, you must have correct TCP/IP settings on your wired or
wireless clients. Set the IP addresses of the clients within the same subnet of WL-500W.
Getting an IP address automatically
The WL-500W Wireless Router integrates DHCP server functions, thus, your PC gets an IP
address automatically.
Before rebooting your PC, switch ON the
Note:
wireless router and make sure the router is in ready
state.
Setting up the IP address manually
To manually set the IP address, you need to know the
default settings of the wireless router:
• IP address 192.168.1.1
• Subnet Mask 255.255.255.0
5
Page 8
WL-500W Wireless Router User Manual
2
1
3
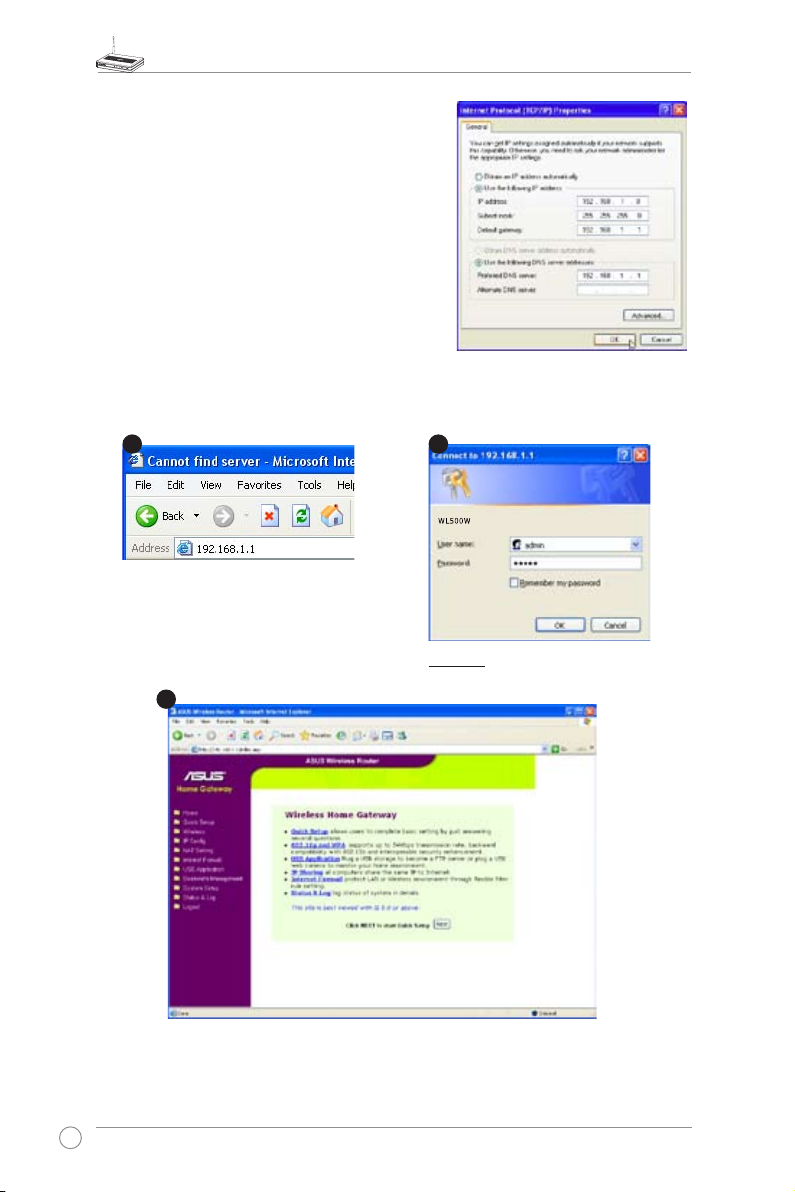
To set up the connection with a manually assigned
IP address, the address of your PC and the wireless
router must be within the same subnet:
• IP address: 192.168.1.xxx (xxx can be any number
between 2 and 254. Make sure the IP address is
not used by other device)
• Subnet Mask: 255.255.255.0 (same as WL-500GU/
GC)
• Gateway: 192.168.1.1 (IP address of WL-500GU/
GC)
• DNS: 192.168.1.1 (WL-500GU/GC), or assign a
known DNS server in your network.
4) Conguring the wireless router
Follow the steps below to enter the Web conguration interface of WL-500W.
Enter the following address in your
web browser: http://192.168.1.1
Defaults
User name:
After logging in, you can see the ASUS Wireless Router home page.
The homepage displays quick links to congure the main features of the wireless router.
6
admin
Password:
admin
Page 9
WL-500W Wireless Router User Manual
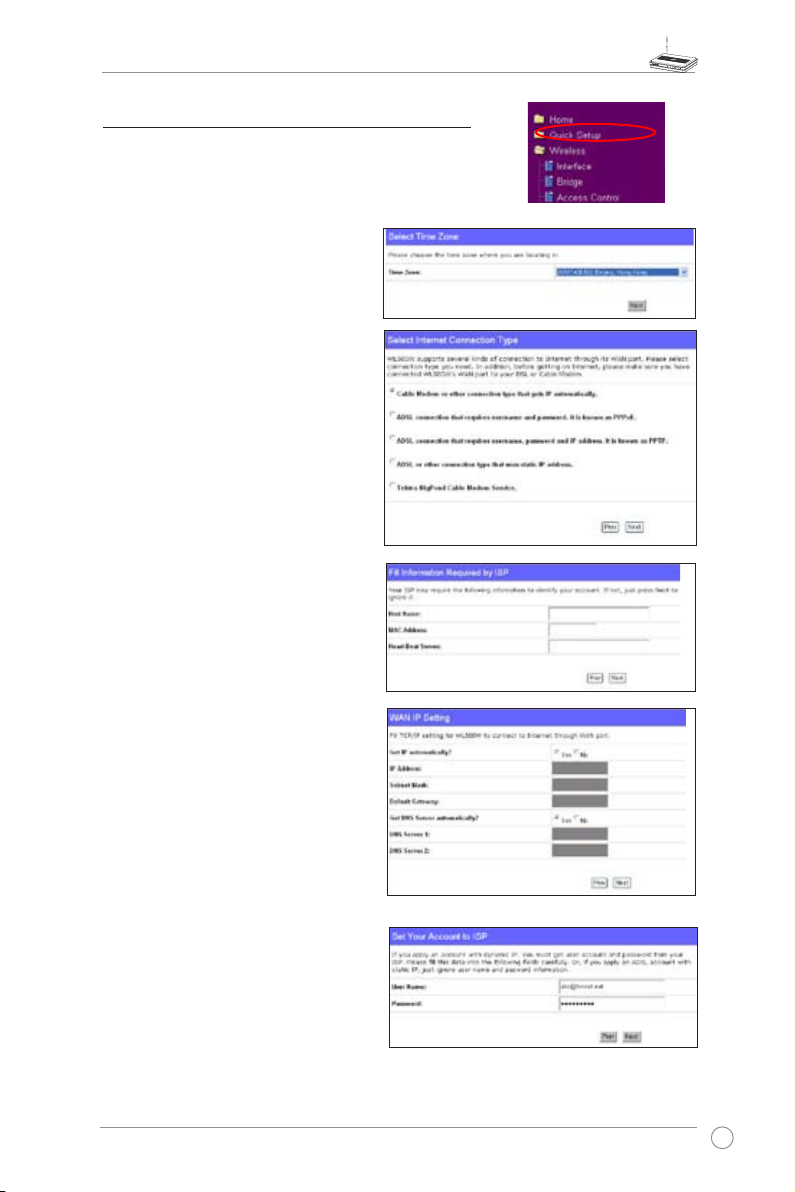
5) Quick setup
To start quick setup, click
page. Follow the instructions to setup the ASUS Wireless
Router.
1. Sel ect you r t ime zon e a nd c lic k
.
Next
2. ASU S wir e less rout e r s u ppo r ts
five types of ISP services: cable,
PPPoE, PP T P, st a t i c WA N IP,
and Telstra BigPond. Select your
connection type and click
continue.
Cable or dynamic IP user
If you are using services provided by
cable ISP, select
connection that gets IP automatically
If y o u r IS P pr ovides y o u wi t h th e
hostname, the MAC address, and the
heart beat serv er address, fill t hese
information into the boxes on the setting
page; if not, click
Cable Modem or other
to skip this step.
Next
to enter the “Quick Setup”
Next
to
Next
.
PPPoE user
If you use PPPoE service, select
connection that requires username
and password.
You need to input the username and
password provided by your ISP. Click
to continue.
Next
It is known as PPPoE.
ADSL
7
Page 10
WL-500W Wireless Router User Manual
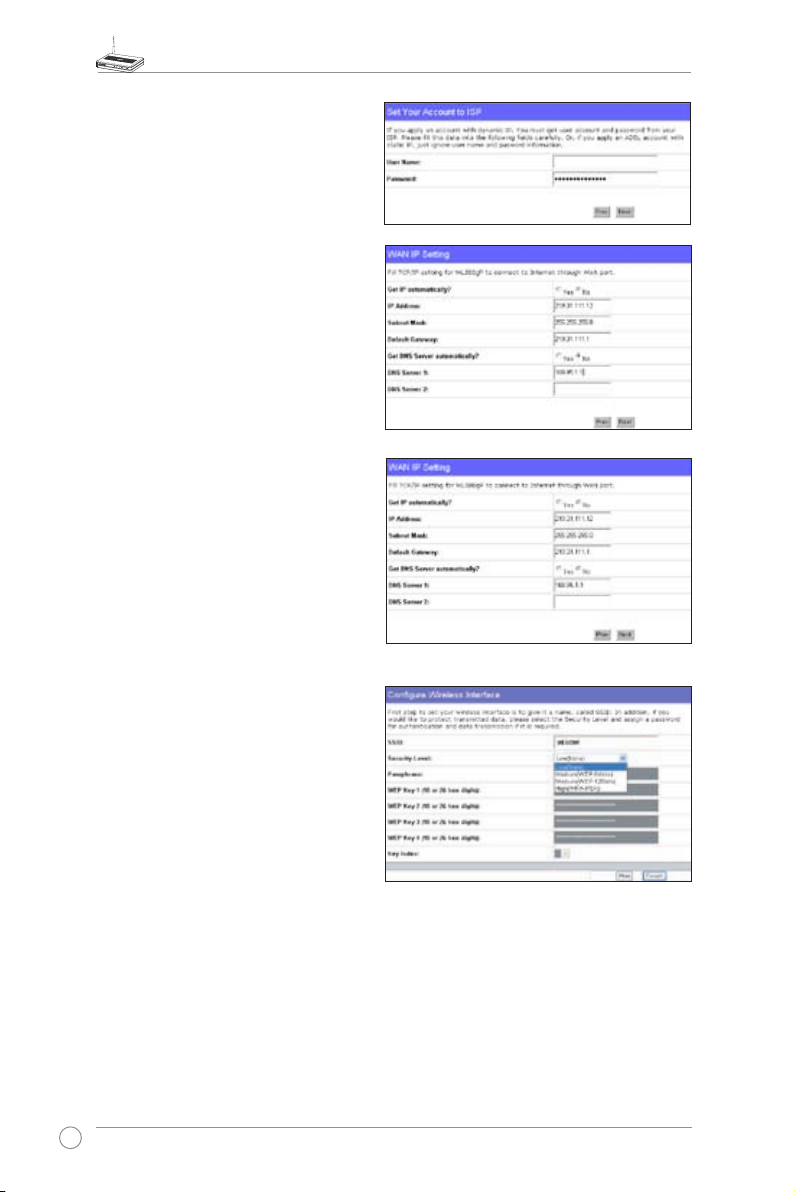
PPTP user
If you are using PPTP services, select
conn ec tion that r equires u sername,
pa sswor d a nd IP ad dress .
username, the password and the IP address
provided by your ISP into the fields. Click
to continue.
Next
ADSL
Fi ll in the
Static IP user
If you are using ADSL or other connection
type that uses static IP address, select
or other connection type that uses static
IP address
. Input the IP address, the subnet
mask, and the default gateway provided by
your ISP. You can specify DNS servers, or
get DNS information automatically.
ADSL
herk036@adsl-comfort
3. After the con nection type se tt ing is
com p lete, you a r e to s e t up you r
wi re less inter fa ce. S pecif y to yo ur
wireless router an SSID (Service Set
Identifier), which is a unique identifier
attached to packets sent over WLAN.
This identifier emulates a password
when a device attempts to communicate
with your wireless router via WLAN.
If you want to protect transmitted data, select a
Medium:
Only users with the same WEP key settings can connect to your wireless router
Security Level
and transmit data using 64bits or 128bits WEP key encryption.
Only users with the same WPA pre-shared key settings can connect to your wireless
High:
router and transmit data using TKIP encryption.
8
to enable encryption methods.
Page 11
WL-500W Wireless Router User Manual
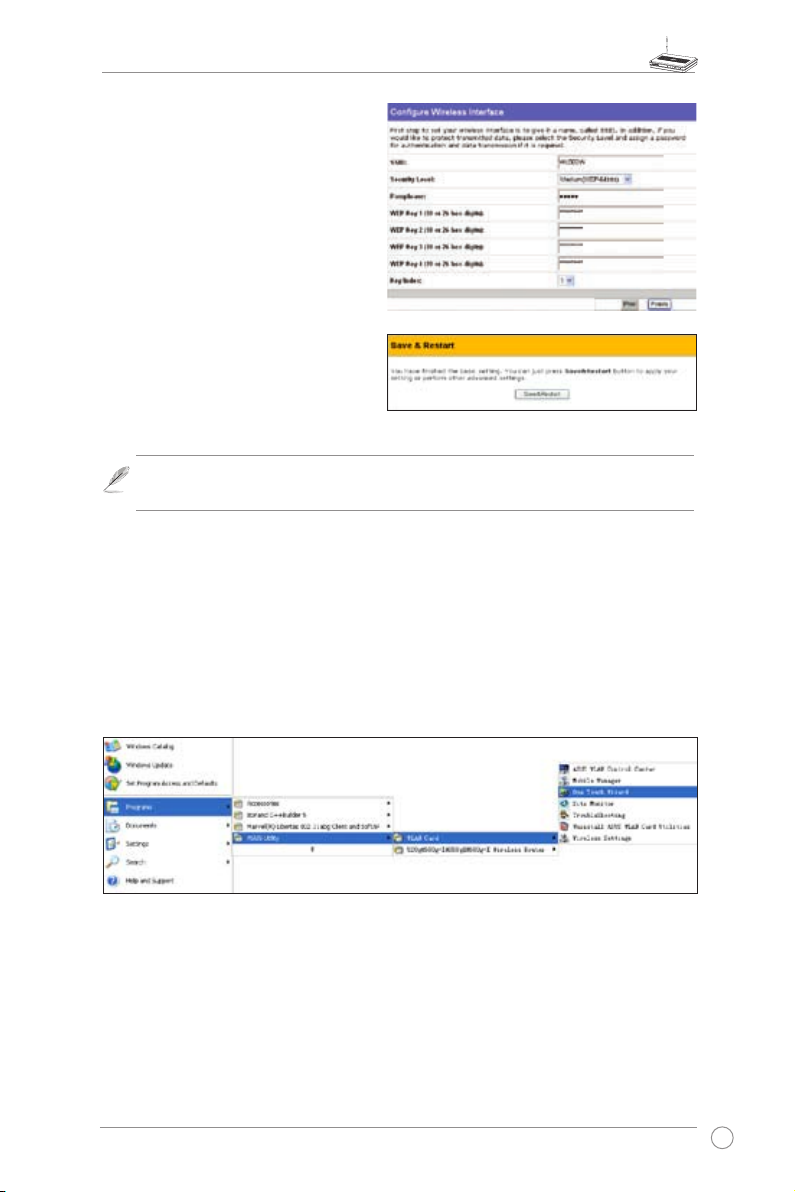
4. Input four sets of WEP keys in the WEP
Key fields (1 0 hexadecimal digits for
WE P 64b its , 26 hex ade cimal dig its
for WEP 128bits). You can also let the
system generate the keys by inputting
a Passphrase. Record the PassphraseRecord the Passphrase
and the WEP keys in your notebook, then
click
Finish
.
For example, if we select WEP 64bitsFor example, if we select WEP 64bits
encryptio n mode and inpu t 11111 as
the Passphr ase, th e WEP Key s are
generated automatically.
5. Cli c k
Sa v e &Res t art
t o rest a rt t h e
wireless router and activate the new
settings.
We recommend using WL-100W wireless adapters to connect WL-500W so
Note:
as to achieve high speed data transmission.
6. To connect the wireless router from a wireless client, you can use Windows® Wireless
Zero Conguration service to set up the connection. If you use ASUS Wireless Card on
your computer, you can use the One Touch Wizard utility supplied in WLAN Card support
CD for wireless connection.
Conguring ASUS WLAN Card with One Touch Wizard
If you have installed ASUS wireless card together with its utilities and drives on your PC, click
Start -> All Programs -> ASUS Utility-> WLAN Card -> One Touch Wizard
to launch the One
Touch Wizard utility.
9
Page 12
WL-500W Wireless Router User Manual
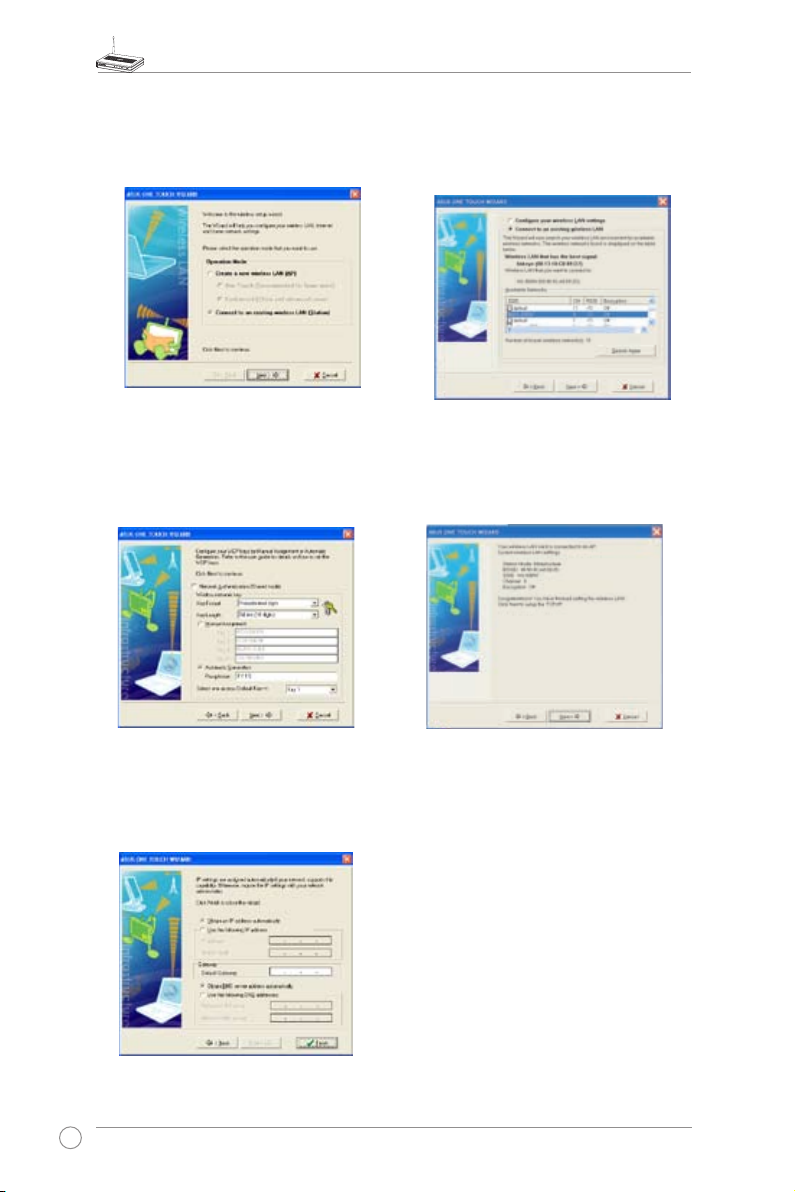
1) Select
Connect to an existing wireless
LA N (St ati on )
to continue.
Next
rad io but ton a nd cli ck
3) Set the authentication and encryption of
your WLAN card the same with those at
WL-500W. In the previous steps the
is
Length
Click
64 bits, Passphrase
to continue.
Next
Key
is 11111
2) One Touch Wizard searches and displays
the a v ailab l e A P s in the
Ne tw ork s
press
list. Se lect WL-50 0W an d
to continue.
Next
Av a ilabl e
4) It takes several seconds for the wireless
card to associate with WL-500W. Press
to setup TCP/IP for your WLAN Card.
Next
5) Setup the IP address of the WLAN Card
according to your ne tw or k con di ti on .
After the setup is complete, click
to exit the One Touch Wizard.
10
Finish
Page 13
WL-500W Wireless Router User Manual
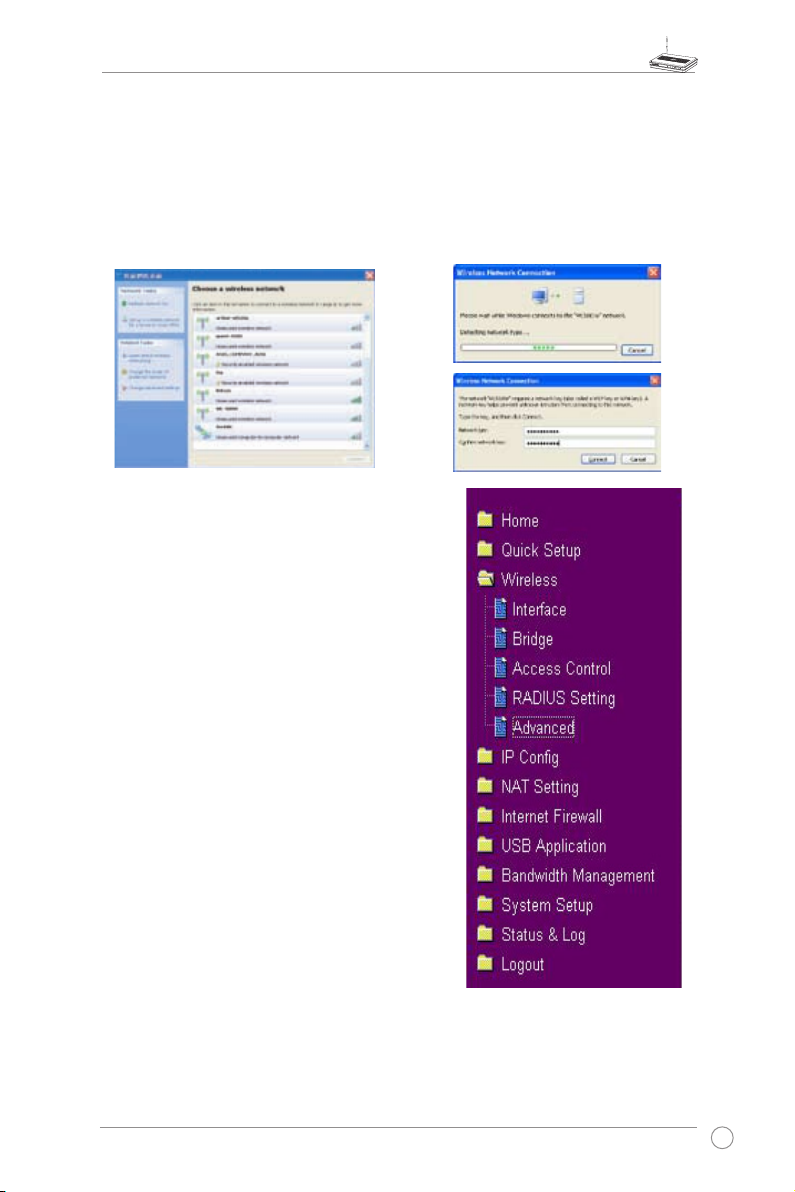
Conguring WLAN card with Windows® WZC service
If you use non-ASUS wireless card, you can set up the wireless connection with Windows®
Wireless Zero Conguration (WZC) service.
1) Double-click the wireless network icon on
the task bar to view available networks.
Select y our wireles s ro uter and cl ic k
.
Connect
2) Input the 10-digit keys you have set on
the wireless router and click
Connect
The c o n n e c t i o n is co m p l ete within
several seconds.
7. Conguring advanced features
To view and adjust other settings of the wireless router,
enter the Web conguration page of WL-500W. Click
on items on the menu to open a submenu and follow
the instructions to setup the router. Tips show up when
you move your cursor over each item.
.
11
Page 14
WL-500W Wireless Router User Manual
4. Wireless router features
This chapter provides setup examples of some frequently used router features. You
can set up these features via your Web browser.
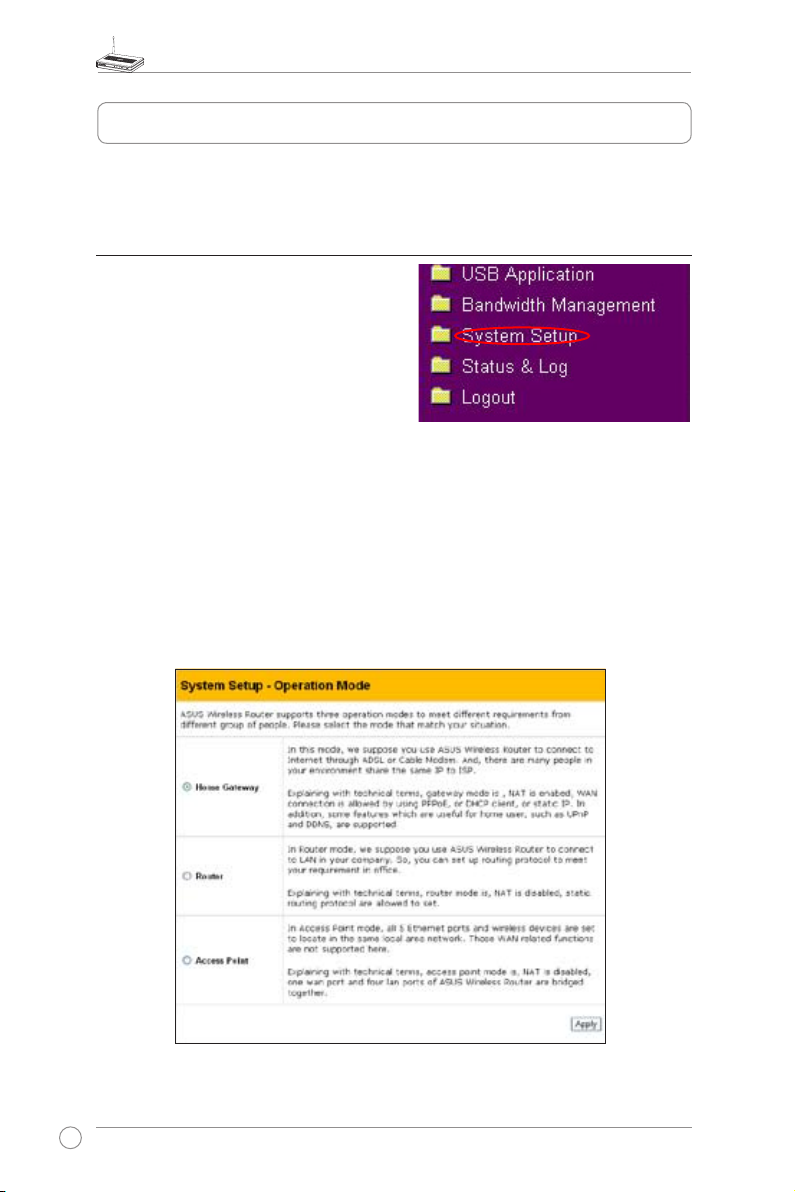
1) Choosing an appropriate operation mode
ASUS WL-500W Wireless Router supports
three operation modes: home gateway,
router, and access point. Click
Setup -> Operation mode
conguration page.
System
to open the
Home gateway
SOHO users who want to connect to
their ISPs for Internet services. In this operation mode, NAT, WAN connection,
Internet rewall functions are supported.
mode is for ofce use where multiple routers and switches co-exist.
Router
You can set up routing policies in this mode; however, NAT function is disabled.
Access point
this mode, all Ethernet ports on WL-500W (4 LAN ports and 1 WAN port) are
recognized as LAN ports. WAN connection, NAT, and Internet rewall functions
are disabled in access point mode.
Select a proper mode which complies to your network scenario and press
mode is for home or
mode works when you setup WL-500W as a wireless bridge. In
Apply
12
Page 15
WL-500W Wireless Router User Manual
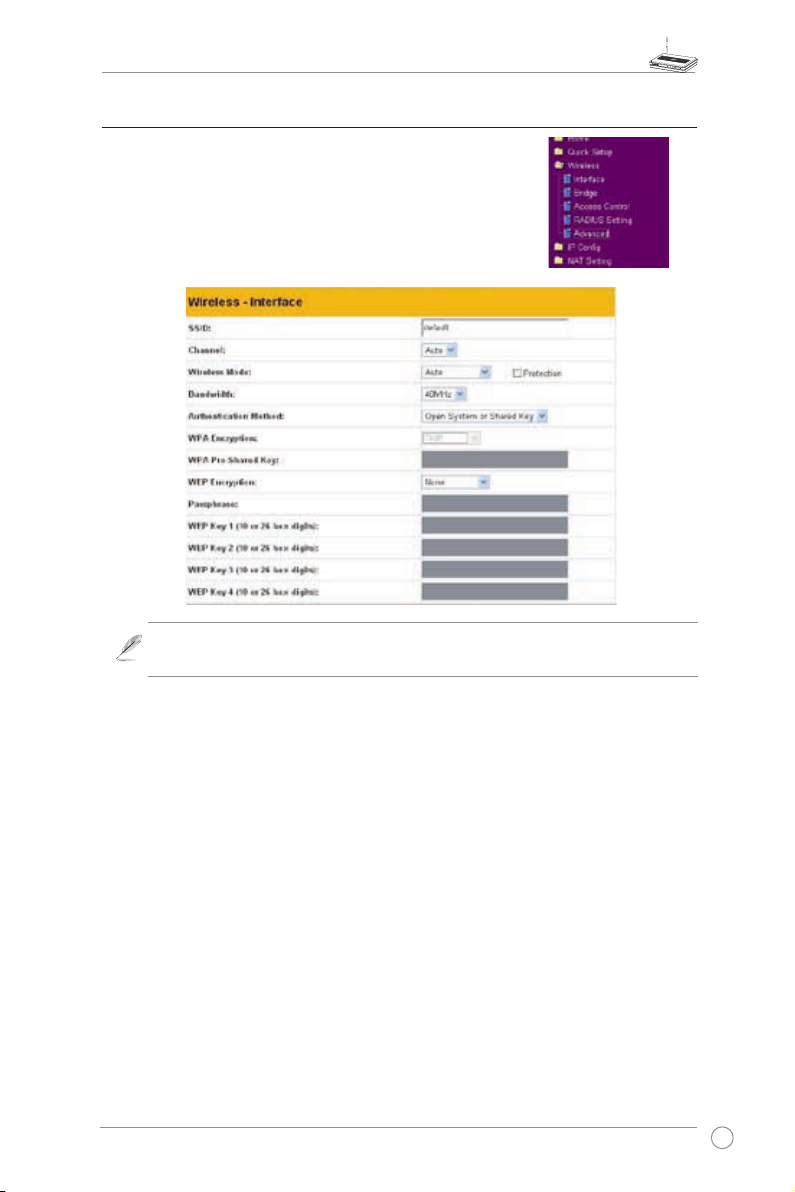
2) Setting up wireless encryption
WL-500W provides a set of encryption and authentication
methods to meet the different demands of home, SOHO,
and enterprise users. B e fore setting u p encryption
and authentication for WL-500W, contact your network
administrator for advice.
Click
Wireless -> Interface
Note: For 802.11n performance, select 40MHz bandwidth. Channel option will
depend on the bandwidth that you select.
to open the conguration page.
Encryption
The encryption modes supported by WL-500W are: WEP (64bits), WEP (128bits),
TKIP, AES, and TKIP+AES.
stands for Wired Equivalent Privacy, it uses 64bits or 128bits static keys
WEP
to encrypt the data for wireless transmission. To setup WEP keys, set
Encryption
WEP Keys
to
WEP-64bits
(10 hexadecimal digits for 64-bit key or 26 hexadecimal digits
or
WEP-128bits
, then manually type in four sets
WEP
for 128-bit key). You can also let the system generate the keys by entering a
Passphrase
TKIP
.
stands for Temporal Key Integrity Protocol. TKIP dynamically generates
unique keys to encrypt every data packet in a wireless session.
stands for Advanced Encryption Standard. This solution offers stronger
AES
protection and increases the complexity of wireless encryption.
TKIP+AES
is used when both WPA and WPA2 clients co-exist in the wireless
network.
13
Page 16
WL-500W Wireless Router User Manual
Authentication
The authentication methods supported by WL-500W include: Open, shared key,
WPA-PSK, WPA, and Radius with 80.211x.
This option disables authentication protection for wireless network. Under
Open:
Open mode, any IEEE802.11b/g client can connect to your wireless network.
Shared:
WPA/WPA2 and WPA-PSK/WPA2-PSK:
This mode uses the WEP keys currently in use for authentication.
WPA stands for WiFi-Protected
Access. WPA provides two security modes: WPA for enterprise network, and
WPA-PSK for home and SOHO users. For enterprise network, WPA uses the
already existing RADIUS server for authentication; for home and SOHO user,
it provides Pre-Shared Key (PSK) for user identication. The Pre-Shared Key
consists of 8 to 64 characters.
Radius with 802.1X:
Similar with WPA, this solution also uses RADIUS server
for authentication. The difference lays on the encryption methods: WPA adopts
TKIP or AES encryption methods, while Radius with 802.1X does not provide
encryption.
When authentication and encryption are set, click
to save the settings and
Finish
restart the wireless router.
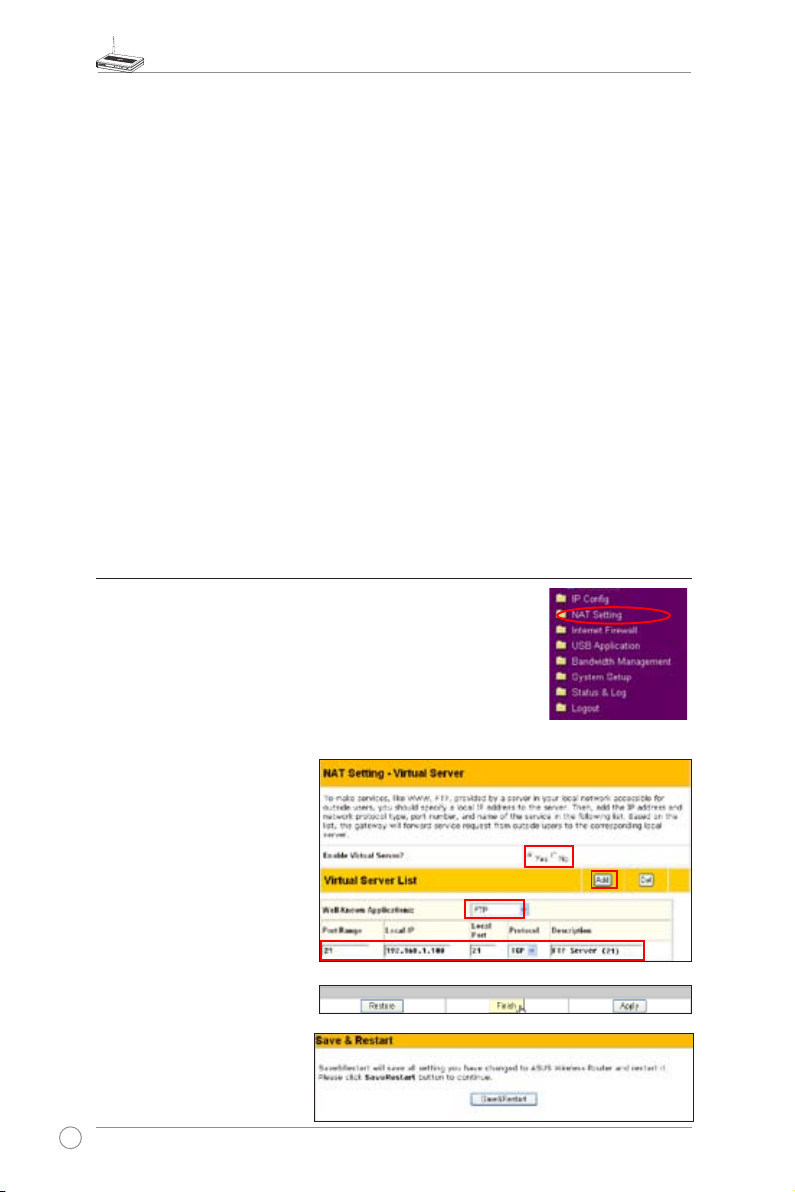
3) Setting up virtual server in your LAN
Virtual server is a Network Address Translation (NAT) function
which turns a computer within a LAN into a server by allowing
data packets of certain service, such as HTTP, from Internet.
1. Cli ck
Vi rtu al S erv er
conguration page.
in N AT Sett ing fol d er to open the NAT
2. Select
3. Click
4. Cli c k
14
Yes
se r v e r. Fo r ex a m p le , if
hos t 192.168.1.100 is the
FT P s erv er tha t t h e u ser
wi l l acce s s , it m eans all
packets from Internet with
destination port as 21 are to
be directed to the host. Set
Well-known Application to
FTP. Port range to 21, Local
IP to the host IP, Local Port
to 21, Protocol to TCP.
Finish
Sa v e & R e star t
restart the wireless router
and activate the settings.
to enable virtual
.
t o
Page 17
WL-500W Wireless Router User Manual
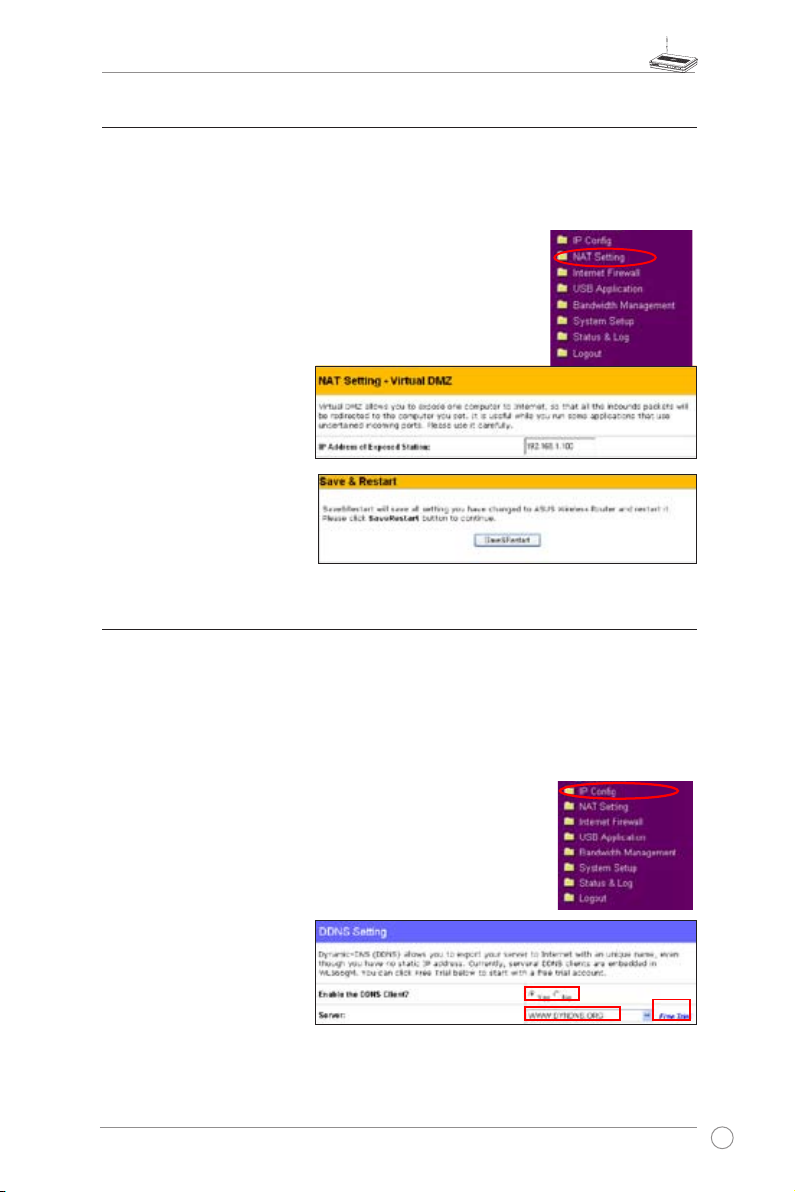
4) Setting up virtual DMZ in your LAN
To expose an internal host to the Internet and make all services provided by this
host available to outside users, enable Virtual DMZ function to open all ports of
the host. This function is useful when the host plays multiple roles such as HTTP
server and FTP server. However, in doing this, your network becomes less secure.
1. Click
Virtual DMZ
2. Enter the IP address of the
host and click
3. Click
Save & Restart
restart the wireless router
and activate the settings.
in the NAT Setting menu.
.
Finish
to
5) Setting up DDNS
DNS enables host who uses static IP address to associate with a domain name;
for dynamic IP users, they can also associate with a domain name via dynamic
DNS (DDNS). DDNS requires registering and account-creating at DDNS service
providers' website. The DDNS server updates your IP address information once
you are assigned to a new IP address. Thus, the Internet user can always access
your network.
1. Click
Miscellaneous
from IP Cong folder.
2. Se le ct
DD NS ser vic e. If you do
not have a DDNS account,
click
for a trial account.
to en ab le th e
Yes
Free Trial
to register
15
Page 18

WL-500W Wireless Router User Manual
3. Aft er c lic k ing Free Trial,
you ar e d i r e c t ed to the
homepage of www.DynDNS.
org, where you can register
and apply for DDNS service.
Read the policy and select
"
I have read...
".
4. E n t e r y o ur u s e r na m e ,
e-mail address, password,
then click
Create Account
5. A m e s s a g e p r o m p t s
out in f o r m i n g that yo u r
account has been created.
An E-mail is se nt to your
mailbox. Open your mailbox
and read the mail.
.
6. You can nd the activation
lett er in your E-mai l box .
Click the hyperlink.
7. The lin k di rect s y ou t o a
login page. Click
8. En te r t he user name and
password then click
16
login
Login
.
.
Page 19

9. A fter loggi ng in , you can
see this welcome message.
WL-500W Wireless Router User Manual
10. Select
11. Click
Add Dynamic DNS
.
Host
Services
tab.
12. Enter the host name then
click
Add Host
.
13. You can see this message
whe n y o ur hos t n a me is
successfully created.
17
Page 20

WL-500W Wireless Router User Manual
14. Fill the account information
into the DDNS setting elds
of your wireless router.
15. Click
16. C lic k
.
Finish
Sa v e & Rest art
to
restart the wireless router
and activate the settings.
17. Verify whether DDNS is working. Click
menu and select
Start
Run.
Type
cmd
and click OK to open the CLI console.
18. T y p e
p i n g a c c o u n t .
dy ndn s .or g
(yo ur D DNS
domain name). If you can
se e t he reply like wha t i s
shown in the right picture,
DDNS is working correctly.
18
Page 21

WL-500W Wireless Router User Manual
6) Setting up Bandwidth Management
Bandwidth Management provides a mechanism that controls the traffic of you
network. To set up bandwidth management:
1. Click
Basic Config
four buttons including
VOIP/Video Streaming
After you click each item, the letters on the button turns yellow (see gures below) and
the green bar behind it automatically grows longer, indicating its bandwith status is the
rst priority. Click
shows different bandwith priority settings:
Gaming Blaster
page in Bandwidth Management folder. In this page you can see
Gaming Blaster, Internet Application, 500W FTP Server
. In this page, you can click each item to set its priority higher.
Finish
and
to complete the conguration. The following gures
Apply
, and
Internet Application
19
Page 22

WL-500W Wireless Router User Manual
500W FTP Server
After you applying the 500W FTP Server settings, a screen appears asking you to
do further conguration:
20
Page 23

VOIP/Video Streaming
WL-500W Wireless Router User Manual
2. You can also congure the bandwith manually by clicking "
the
IP adress, destination port
and choose the
priority status from
User Specify Services
the drop-down list.
". Input
21
Page 24

WL-500W Wireless Router User Manual
5. Application features
ASUS WL-500W Wireless Router provides two USB2.0 ports for connecting the
USB storage, the USB camera, and the USB printer. Thus, you can monitor the
working environment, share data and printer with both wired and wireless users in
your network. Furthermore, WL-500W provides a download utility -- the Download
Master -- to facilit ate and share the download les.
Warning:
the disk in
Note:
are disabled, it would take more than 20 seconds for WL-500W to reboot.
1) Sharing USB storage
To use this feature, you need to plug a USB hard disk to the USB2.0 port on the rear
panel of WL-500W. Make sure the hard disk is formatted and partitioned properly.
Note:
you want to use les of above 2GB, you must format the disk to EXT2 le system.
Creating user account
To share the data in the USB storage, you need to create
user accounts rst.
1. Click
menu to open the conguration page.
Before unplugging the USB storage disk from WL-500W, you must eject
Status & Log -> External USB Disk
Before applying change and rebooting WL-500W, make sure all USB applications
FAT32 has a 2GB le size limitation and do not support les above that size. If
USB Application -> User List
in the left side
page to prevent data corruption.
2. I n p u t
3. To del e t e a n a c c ou n t ,
4. Click
U s e r N a m e
Password
C l i ck
account to the list.
se lec t t he accou nt fro m
the list and click
change s and restart t he
wireless router.
for the accounts.
to ad d th e
A d d
to apply th e
App ly
Del
a n d
.
Creating share folder and access right
You can create a new share folder or share an existing folder
in your hard disk.
1. Click
USB Application -> Share Nodes
side menu to open the conguration page.
22
in the left
Page 25

WL-500W Wireless Router User Manual
2. Cl ick
to add a share
Add
folder.
3. Select the folder you want to share
from Folder Manager and click Ok.
To create a share folder, input the
folde r name in
and press
Add
Add Folder
.
fi eld
4. Dene the access right for
the share folder by appoint
. Cli c k
and
Ad d
Acce ss
to a dd
User Name
Ri ght
the access right rule. When
fin i s hed, c l i ck
App l y
t o
save the conguration.
5. Set Network Neighbourhood
Mod e to
sha r e d nod e list
Group to
App l y rules i n
, W o rk
WORKGROUP
to
enable all computers within
WORK GR OUP t o acc es s
WL-500W USB storage.
6. Click
7. Cli c k
.
Finish
Sa v e & Rest art
restart the wireless router
and activate the settings.
8. Ope n
My Netw ork Plac e
from a computer connected
to W L - 5 0 0 W. C l i c k
wo r k g r oup comp u ter s
yo u c an see WL- 500 W i n
the
Workgroup
category. All
les on the USB storage are
ready for sharing.
t o
view
,
23
Page 26

WL-500W Wireless Router User Manual
2) Setting up FTP site
WL-500W can also serve as an FTP site. You can make your FTP site accessible to
all users, or set up an access policy to restrict anonymous login. To use this feature,
you need to plug a USB storage disk to the USB2.0 port on the rear panel of WL500W. Make sure the hard disk is formatted and partitioned properly.
1. To allow anonymous login: Set
Network Neighborhood Mode
to
Share all partitions in disk
FT P M ode to
parti t i o n
lo g i n di r e c t or y is th e ro o t
directory of rst partition.
To allow account login only: Set
Netwo rk Neighborhood Mode
to
Apply rules in shared node
, FTP Mode to
list
match ed shared node
in the Share Node List to
Add
specify the access directory and
access right of FTP account.
Lo gin to f irs t
. T h e a n o n y mous
Login to rst
,
. Click
2. The
Max i m u m Logi n Us e r
fi el d s pecif ies the m aximu m
number of concurrent u se rs .
The default value is 6.
3. Cli c k
4. Ty p e
24
Fin i sh
settings and reboot. This process
may take several minutes.
ftp : / / 1 92.16 8 . 1 .1
the address box of your Web
br o w ser a nd p r e ss E n ter t o
login the FTP site.
t o acti v a te t h e
i n t o
Page 27

WL-500W Wireless Router User Manual
3) Download Master
The Download Master helps to manage the download tasks without turning your
computer on. To use this function, you need to: 1) mount a USB storage to WL-500W
Wireless Router; and 2) install ASUS Utilities from the support CD. Refer to chapter 6
for utility installation procedures.
1. Click
Basic Cong
2. Set
En a ble Down load Mast er
to
. If you want to share the
Yes
do wnlo ade d f ile wit h y o ur LAN
users, set
to
Share
save a n d r e s t a r t th e wi r e l e s s
router.
3. Open Download Master from Start
-> Al l Pro grams -> ASUS Ut ility
->WL -500W W irele ss Ro ut er ->
Do wnl oad M ast er. Cli ck
Co nnect
500W.
4.
HTTP download (1)
Right click the download link
on the Web page and click
Dow n l o a d using A SUS
Dow n l o a d
step 5 appears to indicate
download progress.
to as soc ia te with WL-
page in USB Application folder.
Enable Download
. Click
Yes
. A w i ndow i n
Finish
and
Fi le ->
HTTP download (2)
Ri g ht cli c k t he d own l oad
link on the Web page and
click
Properties.
download
Copy the
Address (URL)
.
25
Page 28

WL-500W Wireless Router User Manual
If you sel e ct
ASUS Download
th e d own l oad tas k i s a dde d to
the
Transfer
indicate the progress of download
tasks.
If you copy the download address,
click
Paste the address into
File From
Op t ions
button to start.
5. FTP download
Cl i c k
Download Master and select
in the
site address, Port number, User
Name, Password. Click Download
to start.
6. BT download
S a ve t h e BT se e d o n y o u r
computer. Click
the Download Master and select
i n th e Op tions f i e l d. Click
BT
Browse
Click
Do wnl oad usi ng
, you c an see
list. The blue bars
button in the utility.
Assign
box, select
, a nd c l ick
Tr a n sf e r
eld. Input the FTP
Options
Transfer
to locate the seed fi le.
Download
to start.
Getting
HTTP
Do w nloa d
b ut t o n o f th e
button of
from
FTP
7. Click
download le. Open the
folder to view or copy the nished
files to your local hard disk. The
unfini s h e d ta s k s ar e ke p t in
InComplete
butt on to view the
Folde r
folder.
Complete
4) Web camera
The ASUS Wireless Router implements several applications for a USB
Web camera, enabling you to capture images and send them over the
Internet. For this function, you need to plug a USB camera onto WL500W and enable ActiveX for your Web browser.
Web camera
1. Click
Web Camera
2.
Enable Web Ca me ra
Selecting LAN and WAN enableds Web Camera for both LAN users and WAN users
through rewall.
26
page in USB Application folder.
- S el ec ti ng LAN O nl y enables Web Camera fo r LAN user s.
Page 29

WL-500W Wireless Router User Manual
Web Camera Mode
- Select the
appropriate camera mode from
the drop down list. ActiveX Only
enables user to execute ActiveX
c l ie nt s on an W i nd ow s® IE
platform and get the best image
quality. A c t i v e X a n d R e f r e s h
enables user to get a basic image
on b oth IE and other browsers.
Refresh Only provides to all users
still images which are refreshed in
a specied interval.
Web Camera Driver
- When you plug a supported Web Camera into the USB2.0 port in
the wireless router, the appropriate driver is selected automatically. Refer to the USB Web
Camera support list on ASUS Website (www.asus.com) for supported Web Camera models.
Image Size
- Select the image size from the drop down list. 320 x 240 provides a larger
image while 160 x 120 provides faster transmission. Click Preview to see the effect.
Sense Level
Refresh Time in Seconds
- This eld indicates the sensitivity at which image movement is detected.
- This eld indicates the time interval in seconds in which the
system reloads images. The range of values is 1~65535.
HTTP Port
- This eld indicates the port that HTTP server listens on to communicate. For
example, by default, you can connect to your web camera by using http://192.168.1.1:7776
without password checking. (The password checking eld is unchecked.)
ActiveX Port
- This eld indicates the port that server listens on to communicate with
ActiveX clients.
Enabling ActiveX for your IE
If you use Internet Explorer®, you need to enable ActiveX or
the Web Camera cannot function properly. For clients using
Netscape or other browsers, ignore this part.
1. Open Internet Explorer 5.0 or above on your computer,
click
Tools -> Internet Options
3. Select
Level
Security
button.
tab and click
.
Custom
4. Enable the activeX controls and plug-ins.
By default, these items are disabled.
27
Page 30

WL-500W Wireless Router User Manual
5. By default, these three items are enabled.
Enable them if changed.
6. Click
to change the security settings.
Yes
Enable Web Camera to WAN users
With proper setting to DDNS, you can monitor your working environment from
anywhere on Internet, even if dynamic WAN IP address is used. If any motion is
detected by the camera, WL-500W captures the images and send them to your
appointed E-mail box. Refer to page 15-17 for DDNS setup procedures.
1.
Enable Security Mode?
Yes to enable security function on
the data and time you set below.
Date to Enable Security Mode
This fiel d d ef ines th e d at e tha t
Security Mode is enabled.
Time to Enable Security Mode
This eld denes the time interval
that Security Mode is enabled.
- Input the E-mail address you wish WL-500W send the image to.
Send to
Email Server
leave this eld blank, WL-500W uses the mail server of your E-mail address in
Subject
Attach Image File?
- This eld indicates the E-mail server you use for exchanging E-mail. If you
- This eld is for the subject of E-mail.
-Select
-
-
Send to
- This eld allows you to attach the captured image in the E-mail.
eld.
Remote monitors
This function allows you to monitor up to 6 Web Cameras in your LAN. You can enter
the IP addresses of other ASUS Wireless Routers which have Web Camera attached.
When enabling "LAN and WAN" remote control in the Wireless Router, packets
Note:
from Internet with destination ports 8081 to 8086 will be forwarded to WL-500W
in Remote Control fields. To make sure packets from WL-500W are routed back
to Internet, you need to set a static route entry for WL-500W. The IP address and
gateway address are same as the address of WL-500W.
28
Page 31

WL-500W Wireless Router User Manual
Remot e Si t e 1 -6
st a nds for the IP addr ess and
port nu m b e r of Re m o t e S i t e .
Th e va lu e of th i s fi e l d i s [I P
Address]:[Connection Port].
- C lick Preview to see
Previ ew
the view of all the Web Camera
sites you set in Remote Site.
- T h i s field
5) Sharing USB printer
You can connect a compatible USB printer to the USB2.0 port of WL-500W to
share the printer with your LAN users. Follow the procedures below to setup your
computers to utilize the printer server function of WL-500W.
Installing USB printer
Plug your USB printer to the USB2.0 port on WL-500W rear
panel. To verify whether your printer is properly installed and
to WL-500W Wireless router, click
Printer Model
share this printer within your LAN.
is correct and
Visit ASUS Website for
Note:
compatible printer vendor and
models.
Printer Status
Status & Log -> Status
is
On-Line
. If
, you can
Setting up printer client under Windows XP
Follow the steps below to install network printer on your clients.
1. Run Add Printer Wizard from
Printers and Faxes -> Add a printer
Start ->
.
2. Select
computer
Local printer attached to this
and click
Next
.
29
Page 32

WL-500W Wireless Router User Manual
3. Select
of port to
click
Create a new port
Standard TCP/IP Port
.
Next
and set Type
, then
5. Input the IP address of WL-500W in
the
Printer Name of IP Address
and click
7. S e t
LPRServer
Next
to continue.
Next
P r o t oc ol
in
.
to
Queue Name
L P R
eld
an d ty p e
eld. Click
4. Clic k
to se tu p TCP/IP po rt for
Next
accessing the network printer.
6. Select
8. Press
and click
Custom
to finish standard TCP/IP
Next
port setting.
Settings.
30
Page 33

WL-500W Wireless Router User Manual
9. Press
to complete the settings
Finish
and return to Add Printer Wizard.
11. Click
to accept the default name
Next
for the printer.
13. T he inst alla tio n is c omp l ete . Cl i ck
to quit the Add Printer Wizard.
Finish
10. Install printer driver from the vendormodel list. If your printer is not in the
list, click
Have Disk
to manually assign
the location of driver.
12. Select
Next
to print a test page. Click
Yes
to print.
If you have already installed the printer locally on your computer, right click the
Note:
printer icon and select
then select
Port
Standard TCP/IP Port
Property -> Port
tab to add a standard TCP/IP port. Click
and click
New Port
button. Refer to step 5-8
for setting procedures.
If you use Windows® 98 or ME which does not support Standard TCP/IP port,
Note:
you need to use Remote Port which is supported by WL-500W.
Add
31
Page 34

WL-500W Wireless Router User Manual
6. Setting up using ASUS utility
1) Utility Installation for WL-500W
1. Click
Utilities
program.
Ins tall ASUS Wireless Router
to run the setup installat ion
2. Click
to continue.
Next
3. Cl ic k
designated location.
5. Press Finish to quit the installation program.
to install the util it y in th e
Next
4. Select a program folder and click
6. Open the
EZSetup Wizard
.
Next
.
32
Page 35

WL-500W Wireless Router User Manual
1
3
2) EZSetup
Wireless LAN setup will complete in two easy steps. First open the EZSetup utility
form Start menu, then push the EZSetup button on the rear panel for 3 seconds.
Push
3 sec. and release.
EZSetup
over
1) If the setup button is pushed without running the EZsetup wizard utility, the PWR
indicator will ash and Internet connections will pause for a short period but will then
return to normal operation without change.
2) To use EZSetup, we recommend using an ASUS wireless adapter such as WL-100W,
WL-100gE, and WL-169gE.
Click the
Note:
button in the utility.
EZSetup
Use EZSetup Wizard with one
wireless client at a time. If the wireless
client computer cannot discover the
wi r ele s s r o uter whil e in EZSe tup
mode, please shorten the distance
between the client and the router.
Wireless settings, including network name and network keys, are generated automatically.
You can modify these settings manually. Note if your wireless router is congured before,
select
Preserve original wireless router settings
continue.
to use the current value. Click
Next
to
33
Page 36

WL-500W Wireless Router User Manual
4
5
If you need to configure the ISP settings for your wireless router, select
, click
settings
Setup is complete, press
LAN Settings
Click Finish to exit the EZSetup utility.
and follow the instructions to complete the settings.
Next
bu tton for future r eference.
Print/Save Wireless
Configure ISP
34
Page 37

WL-500W Wireless Router User Manual
7. Congure WL-500W under Vista OS
The Windows Simple Cong function, which is preinstalled in the ASUS WL-500W,
enables the device to be congured via WCN Net process of Windows Vista.
Note: The WCN Net process of Windows Vista can only discover the device
when it is not congured and is in the default settings state. If the device is
congured, you have to set up the device by WEB or EZsetup. You can also
push the Reset button and then begin WCN-NET setup.
1) Conguring the device
Follow the steps below to congure the device using WCN-Net process of Windows
Vista:
1. Connect the device to your PC and power on it.
2. Click
Start > Network
3. Double-click
from the Vista desktop. The Network screen appears.
ASUS Wireless Router
.
35
Page 38

WL-500W Wireless Router User Manual
4. A screen prompts you to enter the PIN, which is located on the sticker posted on the
device. Enter the PIN in the
box, then click
PIN
Next
.
5. Give the network a name and type it in the
36
Network name
box, then click
Next
.
Page 39

WL-500W Wireless Router User Manual
6. A Passphrase is generated for WPA security for the network. Click
If you want to create a different passphrase, click
. If you want to use security method other than WPA-Personal, click
for me
advanced network security options
The screens for
Create a different passphrase
.
create a different passphrase
and
Security methods
Next
in the next page.
from this screen.
Show
are shown
37
Page 40

WL-500W Wireless Router User Manual
Create a different passphrase
Four security methods
38
Page 41

WL-500W Wireless Router User Manual
7. Click
from the above screens after the conguration is completed. The complete
Next
conguration screen appears as shown below. Click
to nish the process and exit.
Close
39
Page 42

WL-500W Wireless Router User Manual
2) Setting up the network sharing center
Follow the steps below to set up a sharing center to allow the network users to
share printer, le and media.
1. Connect the device to your PC and power it on.
2. Click
Center
Network and Sharing Center
screen appears.
in the navigation bar. The
Network and Sharing
40
Page 43

WL-500W Wireless Router User Manual
3. Click
Set up a wireless router or network
4. Choose
Set up a wireless router or access point
.
, then click
Next
.
41
Page 44

WL-500W Wireless Router User Manual
5. Click
Next
.
6. In the screen that appears, type a network name in the
. A passphrase is generated for the WPA security.
Next
Network name
box, then click
42
Page 45

WL-500W Wireless Router User Manual
7. Click
. If you want to use security methods other than WPA-Personal, click
Next
advanced network security options
8. Choose a security method and click
Next.
.
Show
43
Page 46

WL-500W Wireless Router User Manual
9. A screen prompts you to enter the PIN for the device. Enter the PIN, which is located on
the sticker posted on the device, then click
Next
.
10. Choose a le and printer sharing option and click
44
Next.
Page 47

WL-500W Wireless Router User Manual
A screen appears showing that the set up is complete as shown below.
11. From the above screen you can choose to
ash drive
. The respective screens are shown below.
View settings screen
View settings
or,
Save settings to a USB
45
Page 48

WL-500W Wireless Router User Manual
Save settings to a USB ash drive screen
12. When
Save settings to a USB ash drive screen
your computer, then select the drive from the
appears, plug a USB ash drive into
Save settings to
box and click
Next
. The
settings starts to be saved into the USB drive.
After the saving process is completed, a screen appears to instruct you to add computer
or other devices into the network. Follow the instructions to add computers and devices
into your network.
46
Page 49

WL-500W Wireless Router User Manual
8. Troubleshooting
Cannot access to web browser for router conguration
1 . Op e n a we b br o ws e r an d op en
"Internet Options" dialog box.
2. Click on "Delete Cookies" and "Delete
Files".
Cannot Establish Connection via Wireless
Out of Range:
• Put the router closer to the wireless client.
• Try to change the channel setting.
Authentication:
• Use wired connection to connect to router.
• Check the wireless security setting.
• Do the hard reset on the wireless router by pressing the Reset button on the rear panel
for more than 5 seconds.
Couldn't nd the router:
• Do the hard reset on the wireless router by pressing the Reset button on the rear panel for
more than 5 seconds.
• Check the setting in the wireless adapter such as SSID and encryption setting.
Cannot get access to the Internet via wireless LAN adapter
• Move the router closer to the wireless client.
• Check whether the wireless adapter is connected to the correct AP.
• Check whether the wireless channel in use conforms to the channels available in your
country/ area.
• Check encryption setting.
• Check whether the ADSL or Cable connection is correct.
• Retry using another Ethernet cable.
47
Page 50

WL-500W Wireless Router User Manual
Internet is not accessible
• Check the lights on ADSL modem and the Wireless Router.
• Check whether the "WAN" LED on the Wireless Router is ON. If the LED is not ON,
change the cable and try again.
When ADSL Modem "Link" light is ON (not blinking), this means Internet
Access is Possible.
• Restart your computer.
• Refer to the Quick Setup Guide of the wireless router and reconfigure the settings.
• Check whether the WAN LED on the router is ON or not.
• Check wireless encryption settings.
• Check whether the computer can get the IP address or not (via both wired network and
wireless network).
• Make sure your Web browser is configured to use the local LAN, and is not configured to
use a proxy server.
If the ADSL "LINK" light blinks continuously or stays off, Internet access is
not possible - the Router is unable to establish a connection with the ADSL
network.
• Make sure your cables are all correctly connected .
• Disconnect the power cord from the ADSL or Cable modem, wait a few minutes, then
reconnect the cord.
• If the ADSL light continues to blink or stays OFF, contact your ADSL service provider.
Network name or encryption keys are forgotten
• Try to setup the wired connection for setup the wireless encryption again.
• Do the hard reset on the wireless router by pressing the Reset button on the rear panel for
more than 5 seconds.
How to reset to defaults
The following are factory default values. If you push the Restore button on the back of the
ASUS Wireless Router for over 5 seconds, or click the “Restore” button on the “Factory Default”
page under “ Advanced Setup”, the following default settings overwrite the old settings on your
wireless router.
User Name: admin Subnet Mask: 255.255.255.0
Password: admin DNS Server 1: 192.168.1.1
Enable DHCP: Yes (if plug in Wan cable) DNS Server 2: (Blank)
IP address: 192.168.1.1 SSID: default
Domain Name: (Blank)
48
Page 51

WL-500W Wireless Router User Manual
9. Appendix
FCC Warning Statement
This device complies with Part 15 of the FCC Rules. Operation is subject to the following two
conditions:
(1) this device may not cause harmful interference, and
(2) this device must accept any interference received, including interference that may cause
undesired operation.
This equipment has been tested and found to comply with the limits for a class B digital
device, pursuant to part 15 of the FCC Rules. These limits are designed to provide reasonable
protection against harmful interference in a residential installation.
This equipment generates, uses and can radiate radio frequency energy and, if not installed
and used in accordance with the instructions, may cause harmful interference to radio
communications. However, there is no guarantee that interference will not occur in a particular
installation. If this equipment does cause harmful interference to radio or television reception,
which can be determined by turning the equipment off and on, the user is encouraged to try to
correct the interference by one or more of the following measures:
- Reorient or relocate the receiving antenna.
- Increase the separation between the equipment and receiver.
- Connect the equipment into an outlet on a circuit different from that to which the receiver
is connected.
- Consult the dealer or an experienced radio/TV technician for help.
CAUTION:
Any changes or modications not expressly approved by the party responsible for compliance
could void the user’s authority to operate the equipment.
Prohibition of Co-location
This device and its antenna(s) must not be co-located or operating in conjunction with any other
antenna or transmitter.
Safety Information
To maintain compliance with FCC’s RF exposure guidelines, this equipment should be
installed and operated with minimum distance 20cm between the radiator and your body. Use
on the supplied antenna.
Declaration of Conformity for R&TTE directive 1999/5/EC
Essential requirements – Article 3
Protection requirements for health and safety – Article 3.1a
49
Page 52

WL-500W Wireless Router User Manual
Testing for electr ic safety according to EN 60950-1 has been conducted. These a re
considered relevant and sufcient.
Protection requirements for electromagnetic compatibility – Article 3.1b
Testing for electromagnetic compatibility according to EN 301 489-1 and EN 301 489-17 has
been conducted. These are considered relevant and sufcient.
Effective use of the radio spectrum – Article 3.2
Testing for radio test suites according to EN 300 328- 2 has been conducted. These are
considered relevant and sufcient.
CE Mark Warning
This is a Class B product , in a d om estic e nv ir on me nt, t hi s product may c au se radio
interference, in which case the user may be required to take adequate measures.
GNU general public license
Licensing information
This product includes copyrighted third-party software licensed under the terms of the GNU
General Public License. Please see The GNU General Public License for the exact terms
and conditions of this license. We include a copy of the GPL with every CD shipped with our
product. All future rmware updates will also be accompanied with their respective source
code. Please visit our web site for updated information. Note that we do not offer direct
support for the distribution.
GNU GENERAL PUBLIC LICENSE
Version 2, June 1991
Copyright (C) 1989, 1991 Free Software Foundation, Inc.
59 Temple Place, Suite 330, Boston, MA 02111-1307 USA
Everyone is permitted to copy and distribute verbatim copies of this license document, but
changing it is not allowed.
Preamble
The licenses for most software are designed to take away your freedom to share and change
it. By contrast, the GNU General Public License is intended to guarantee your freedom to
share and change free software--to make sure the software is free for all its users. This
General Public License applies to most of the Free Software Foundation’s software and to
any other program whose authors commit to using it. (Some other Free Software Foundation
software is covered by the GNU Library General Public License instead.) You can apply it to
your programs, too.
When we speak of free software, we are referring to freedom, not price. Our General Public
Licenses are designed to make sure that you have the freedom to distribute copies of free
software (and charge for this service if you wish), that you receive source code or can get it
if you want it, that you can change the software or use pieces of it in new free programs; and
that you know you can do these things.
50
Page 53

WL-500W Wireless Router User Manual
To protect your right s, we need to make restricti on s t ha t f orbid anyo ne to deny you
these rights or to ask you to surrender the rights. These restrictions translate to certain
responsibilities for you if you distribute copies of the software, or if you modify it.
For example, if you distribute copies of such a program, whether gratis or for a fee, you must
give the recipients all the rights that you have. You must make sure that they, too, receive or
can get the source code. And you must show them these terms so they know their rights.
We protect your rights with two steps: (1) copyright the software, and (2) offer you this license
which gives you legal permission to copy, distribute and/or modify the software.
Also, for each author’s protection and ours, we want to make certain that everyone understands
that there is no warranty for this free software. If the software is modied by someone else and
passed on, we want its recipients to know that what they have is not the original, so that any
problems introduced by others will not reect on the original authors’ reputations.
Finally, any free program is threatened constantly by software patents. We wish to avoid the
danger that redistributors of a free program will individually obtain patent licenses, in effect
making the program proprietary. To prevent this, we have made it clear that any patent must
be licensed for everyone’s free use or not licensed at all.
The precise terms and conditions for copying, distribution and modication follow.
Terms & conditions for copying, distribution, & modication
0. This License applies to any program or other work which contains a notice placed by
the copyright holder saying it may be distributed under the terms of this General Public
License. The “Program”, below, refers to any such program or work, and a “work based
on the Program” means either the Program or any derivative work under copyright law:
that is to say, a work containing the Program or a portion of it, either verbatim or with
modications and/or translated into another language. (Hereinafter, translation is included
without limitation in the term “modication”.) Each licensee is addressed as “you”.
Activities other than copying, distribution and modication are not covered by this License;
they are outside its scope. The act of running the Program is not restricted, and the
output from the Program is covered only if its contents constitute a work based on the
Program (independent of having been made by running the Program). Whether that is
true depends on what the Program does.
1. You may copy and distribute verbatim copies of the Program’s source code as you receive
it, in any medium, provided that you conspicuously and appropriately publish on each
copy an appropriate copyright notice and disclaimer of warranty; keep intact all the
notices that refer to this License and to the absence of any warranty; and give any other
recipients of the Program a copy of this License along with the Program.
You may charge a fee for the physical act of transferring a copy, and you may at your
option offer warranty protection in exchange for a fee.
2. You may modify your copy or copies of the Program or any portion of it, thus forming a
work based on the Program, and copy and distribute such modications or work under the
terms of Section 1 above, provided that you also meet all of these conditions:
a) You must cause the modied les to carry prominent notices stating that you changed
the les and the date of any change.
51
Page 54

WL-500W Wireless Router User Manual
b) You must cause any work that you distribute or publish, that in whole or in part contains
or is derived from the Program or any part thereof, to be licensed as a whole at no charge
to all third parties under the terms of this License.
c) If the modified program normally reads commands interactively when run, you must
cause it, when started running for such interactive use in the most ordinary way, to print or
display an announcement including an appropriate copyright notice and a notice that there
is no warranty (or else, saying that you provide a warranty) and that users may redistribute
the program under these conditions, and telling the user how to view a copy of this
License. (Exception: if the Program itself is interactive but does not normally print such an
announcement, your work based on the Program is not required to print an announcement.)
These requirements apply to the modied work as a whole. If identiable sections of that
work are not derived from the Program, and can be reasonably considered independent
and separate works in themselves, then this License, and its terms, do not apply to those
sections when you distribute them as separate works. But when you distribute the same
sections as part of a whole which is a work based on the Program, the distribution of the
whole must be on the terms of this License, whose permissions for other licensees extend
to the entire whole, and thus to each and every part regardless of who wrote it.
Thus, it is not the intent of this section to claim rights or contest your rights to work written
entirely by you; rather, the intent is to exercise the right to control the distribution of
derivative or collective works based on the Program.
In addition, mere aggregation of another work not based on the Program with the Program
(or with a work based on the Program) on a volume of a storage or distribution medium
does not bring the other work under the scope of this License.
3. You may copy and distribute the Program (or a work based on it, under Section 2) in object
code or executable form under the terms of Sections 1 and 2 above provided that you
also do one of the following:
a) Accompany it with the complete corresponding machine-readable source code, which
must be distributed under the terms of Sections 1 and 2 above on a medium customarily
used for software interchange; or,
b) Accompany it with a written offer, valid for at least three years, to give any third party,
for a charge no more than your cost of physically performing source distribution, a
complete machine-readable copy of the corresponding source code, to be distributed
under the terms of Sections 1 and 2 above on a medium customarily used for software
interchange; or,
c) A c com p any it w ith the info r mat i on y ou r ece i ved as t o the offe r to dist ribu te
corresponding source code. (This a lt er na tive is allowed o nl y f or noncommercial
distribution and only if you received the program in object code or executable form with
such an offer, in accord with Subsection b above.)
The source code for a work means the preferred form of the work for making modications
to it. For an executable work, complete source code means all the source code for all
modules it contains, plus any associated interface denition les, plus the scripts used to
control compilation and installation of the executable. However, as a special exception,
the source code distributed need not include anything that is normally distributed (in either
source or binary form) with the major components (compiler, kernel, and so on) of the
operating system on which the executable runs, unless that component itself accompanies
the executable.
52
Page 55

WL-500W Wireless Router User Manual
If distribution of executable or object code is made by offering access to copy from a
designated place, then offering equivalent access to copy the source code from the
same place counts as distribution of the source code, even though third parties are not
compelled to copy the source along with the object code.
4. You may not copy, modify, sublicense, or distribute the Program except as expressly provided
under this License. Any attempt otherwise to copy, modify, sublicense or distribute the
Program is void, and will automatically terminate your rights under this License. However,
parties who have received copies, or rights, from you under this License will not have their
licenses terminated so long as such parties remain in full compliance.
5. You are not required to accept this License, since you have not signed it. However,
nothing else grants you permission to modify or distribute the Program or its derivative
works. These actions are prohibited by law if you do not accept this License. Therefore,
by modifying or distributing the Program (or any work based on the Program), you indicate
your acceptance of this License to do so, and all its terms and conditions for copying,
distributing or modifying the Program or works based on it.
6. Each time you redistribute the Program (or any work based on the Program), the recipient
automatically receives a license from the original licensor to copy, distribute or modify
the Program subject to these terms and conditions. You may not impose any further
restrictions on the recipients’ exercise of the rights granted herein. You are not responsible
for enforcing compliance by third parties to this License.
7. If, as a consequence of a court judgment or allegation of patent infringement or for any
other reason (not limited to patent issues), conditions are imposed on you (whether by
court order, agreement or otherwise) that contradict the conditions of this License, they do
not excuse you from the conditions of this License. If you cannot distribute so as to satisfy
simultaneously your obligations under this License and any other pertinent obligations,
then as a consequence you may not distribute the Program at all. For example, if a
patent license would not permit royalty-free redistribution of the Program by all those who
receive copies directly or indirectly through you, then the only way you could satisfy both it
and this License would be to refrain entirely from distribution of the Program.
If a ny port ion of th is section is he ld invalid or unenforceable unde r any particu lar
circumstance, the balance of the section is intended to apply and the section as a whole
is intended to apply in other circumstances.
It is not the purpose of this section to induce you to infringe any patents or other property
right claims or to contest validity of any such claims; this section has the sole purpose
of protecting the integrity of the free software distribution system, which is implemented
by public license practices. Many people have made generous contributions to the wide
range of software distributed through that system in reliance on consistent application
of that system; it is up to the author/donor to decide if he or she is willing to distribute
software through any other system and a licensee cannot impose that choice.
This section is intended to make thoroughly clear what is believed to be a consequence of
the rest of this License.
8. If the distribution and/or use of the Program is restricted in certain countries either by
patents or by copyrighted interfaces, the original copyright holder who places the Program
under this License may add an explicit geographical distribution limitation excluding those
countries, so that distribution is permitted only in or among countries not thus excluded.
In such case, this License incorporates the limitation as if written in the body of this
License.
53
Page 56

WL-500W Wireless Router User Manual
9. The Free Software Foundation may publish revised and/or new versions of the General
Public License from time to time. Such new versions will be similar in spirit to the present
version, but may differ in detail to address new problems or concerns.
Each version is given a distinguishing version number. If the Program specifies a
version number of this License which applies to it and “any later version”, you have the
option of following the terms and conditions either of that version or of any later version
published by the Free Software Foundation. If the Program does not specify a version
number of this License, you may choose any version ever published by the Free Software
Foundation.
10. If you wish to incorporate parts of the Program into other free programs whose distribution
conditions are different, write to the author to ask for permission. For software which is
copyrighted by the Free Software Foundation, write to the Free Software Foundation;
we sometimes make exceptions for this. Our decision will be guided by the two goals
of preserving the free status of all derivatives of our free software and of promoting the
sharing and reuse of software generally.
NO WARRANTY
11.B E CAUS E TH E PROGR A M I S LICEN S ED F R EE O F CHAR G E, T HER E IS NO
WARRANTY FOR THE PROGRAM, TO THE EXTENT PERMITTED BY APPLICABLE
LA W. EX C EPT WHEN OTHER WISE STATED I N WRI T ING THE C OPYR I GHT
HOLDERS AND/OR OTHER PARTIES PROVIDE THE PROGRAM “AS IS” WITHOUT
WARRA NTY OF AN Y K I ND, EITH ER E XPRE SSE D OR I MPL IED, INCL UDI N G,
BUT NOT LIMITED TO, THE IMPLIED WARRANTIES OF MERCHANTABILITY AND
FITNESS FOR A PARTICULAR PURPOSE. THE ENTIRE RISK AS TO THE QUALITY
AND PERFORMANCE OF THE PROGRAM IS WITH YOU. SHOULD THE PROGRAM
PROVE DEFECTIVE, YOU ASSUME THE COST OF ALL NECESSARY SERVICING,
REPAIR OR CORRECTION.
12 .IN NO EVE NT UN LES S R EQU IRE D B Y AP PLI CAB LE LAW O R AG REE D TO IN
WRITING WILL AN Y COPY RIGHT HO LDER, OR ANY O THER PARTY WH O MAY
MODIFY AND/OR REDISTRIBUTE THE PROGRAM A S PERMITTED ABOVE, BE
LIABLE TO YOU FOR DAMAGES, INCLUDING ANY GENERAL, SPECIAL, INCIDENTAL
OR CONSEQUENTIAL DAMAGES ARISING OUT OF THE USE OR INABILITY TO USE
THE PROGRAM (INCLUDING BUT NOT LIMITED TO LOSS OF DATA OR DATA BEING
RENDERED INACCURATE OR LOSSES SUSTAINED BY YOU OR THIRD PARTIES OR
A FAILURE OF THE PROGRAM TO OPERATE WITH ANY OTHER PROGRAMS), EVEN
IF SUCH HOLDER OR OTHER PARTY HAS BEEN ADVISED OF THE POSSIBILITY OF
SUCH DAMAGES.
END OF TERMS AND CONDITIONS
DGT warning
經型式認證合格之低功率射頻電機,非經許可,公司、商號或使用者均不得擅自變
更頻率、加大功率或變更原設計之特性及功能。
低功率射頻電機之使用不得影響飛航安全及干擾合法通信;經發現有干擾現象時,
應立即停用,並改善至無干擾時方得繼續使用。
前項合法通信,指依電信法規定作業之無線電通信。
低功率射頻電機須忍受合法通信或工業、科學及醫療用電波輻射性電機設備之干擾。
54
 Loading...