

Page 1
WL-500W SuperSpeed N
®
Wireless multi-function router
WL-500W
Wireless Multi-Function Router
Quick Start Guide
QE2654/ June 2006
Page 2

Manufacturer Contact Information
ASUSTeK COMPUTER INC. (Asia-Pacic)
Company address: 15 Li-Te Road, Beitou, Taipei 11259
General (tel): +886-2-2894-3447 Web site address: www.asus.com.tw
General (fax): +886-2-2894-7798 General email: info@asus.com.tw
ASUS COMPUTER INTERNATIONAL (America)
Company address: 44370 Nobel Drive, Fremont, CA 94538, USA
General (fax): +1-510-608-4555 Web site address: usa.asus.com
Technical support
General support: +1-502-995-0883 Support (fax): +1-502-933-8713
Online support: http://vip.asus.com/eservice/techserv.aspx
ASUS COMPUTER GmbH (Germany & Austria)
Company address: Harkort Str. 25, D-40880 Ratingen, Germany
General (tel): +49-2102-95990 Web site address: www.asus.com.de
General (fax): +49-2102-959911 Online contact: www.asus.com.de/sales
Technical support
Components: +49-2102-95990 Online support: www.asus.com.de/support
Notebook: +49-2102-959910 Support (fax): +49-2102-959911
Page 3

WL-500W Wireless Router Quick Start Guide
Table of contents
1. Package contents .................................................................................2
2. Connecting ADSL modem and wireless router ................................. 2
1) Cable connection ...............................................................................2
2) Status indicators ................................................................................ 3
3) Wall mount option ..............................................................................3
3. Getting started ......................................................................................4
1) Wired connection ...............................................................................4
2) Wireless Connection ..........................................................................4
3) Setting the IP address for wired or wireless client .............................4
4) Conguring the wireless router ..........................................................5
5) Quick setup .......................................................................................6
4. Application features ........................................................................... 11
1) Sharing USB storage ....................................................................... 11
2) Setting up FTP site .......................................................................... 13
3) Download Master .............................................................................14
4) Sharing USB printer .........................................................................16
1
Page 4
WL-500W Wireless Router Quick Start Guide
1
3
2
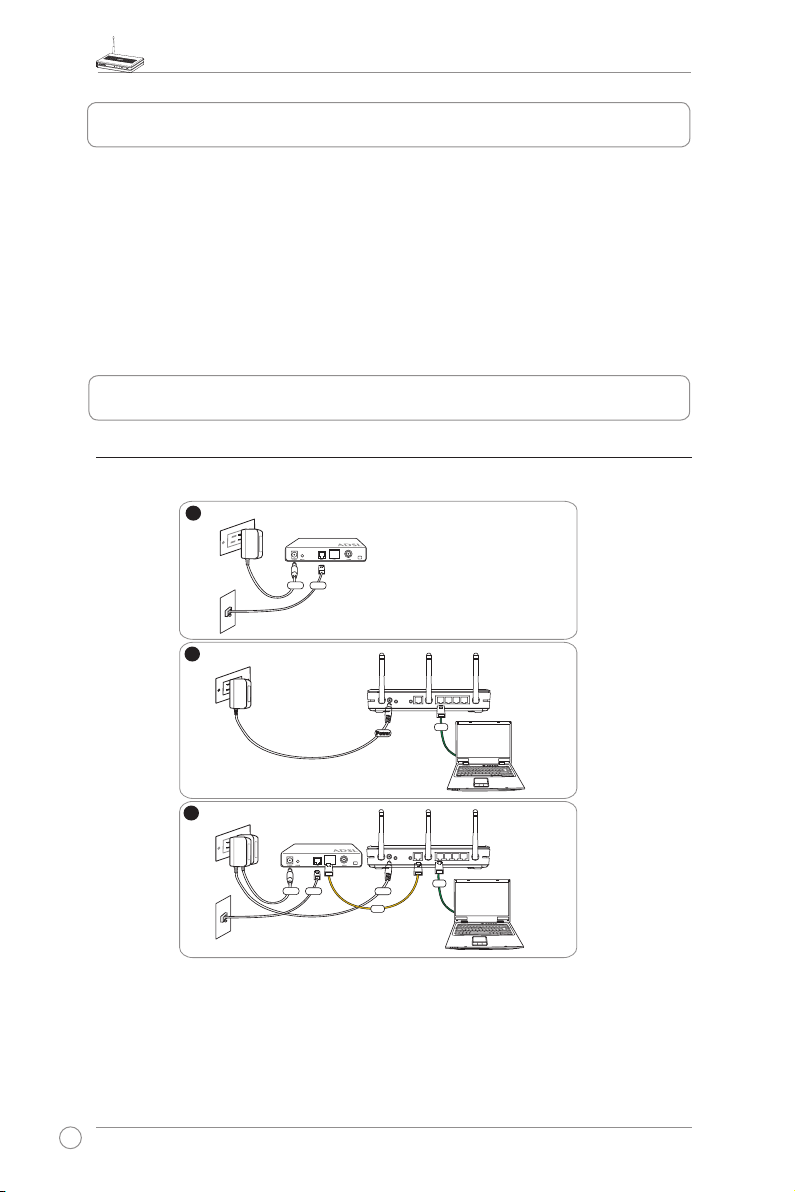
Modem
Wall telephone outlet
Wall power outlet
Phone
Power
Wall power outlet
LAN
Power
ASUS Wireless Router
Modem
Wall telephone outlet
Wall power outlet
LAN
Power
Phone
Power
ASUS Wireless Router
WAN
1. Package contents
• WL-500W wireless router x 1
• Power adapter x 1
• Utility CD x 1
• RJ45 cable x 1
• Quick Start Guide x 1
2. Connecting ADSL modem and wireless router
1) Cable connection
2
Page 5
WL-500W Wireless Router Quick Start Guide
Wireless multi-function router
WL-500W
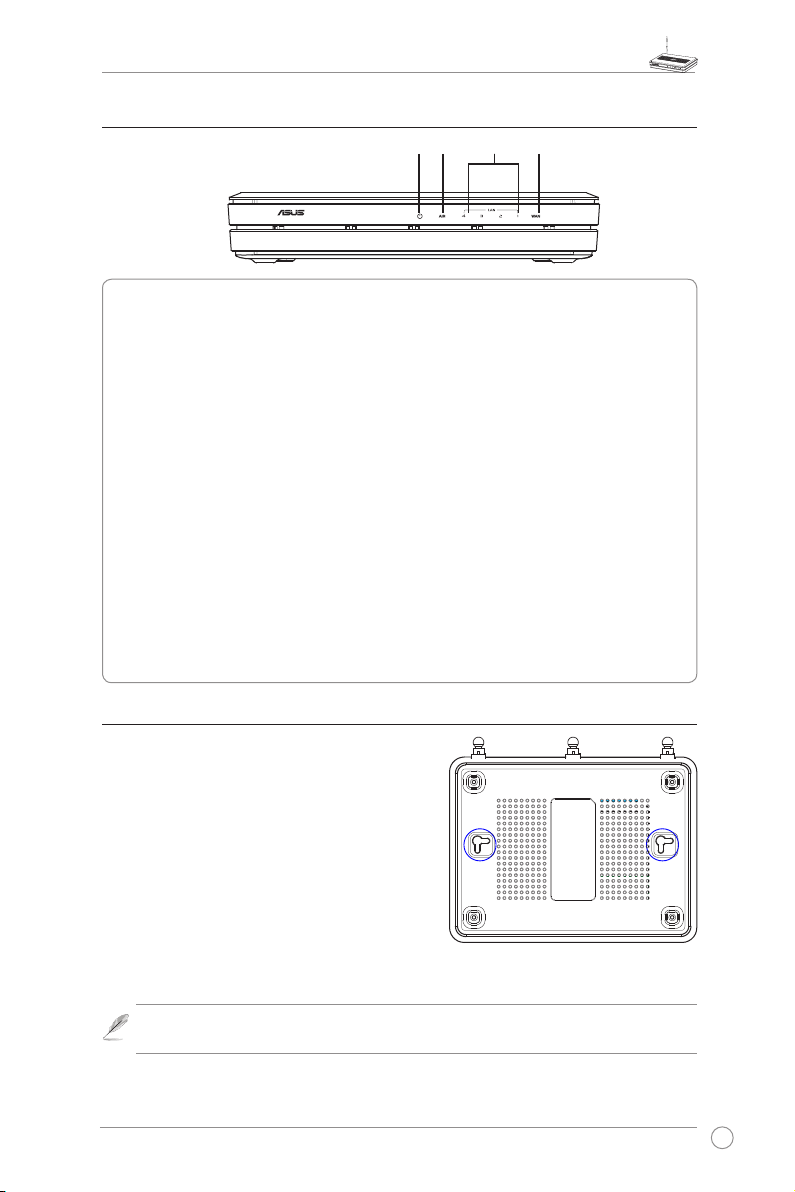
2) Status indicators
PWR
AIR WANLAN
PWR (Power)
Off No power
On System ready
Flashing-slow Firmware upgrade failed
Flashing-quick EZsetup processing
AIR (Wireless Network)
Off No power
On Wireless system ready
Flashing Transmitting or receiving data (wireless)
WAN (Wide Area Network)
Off No power or no physical connection
On Has physical connection to an Ethernet network
Flashing Transmitting or receiving data (through Ethernet cable)
LAN 1-4 (Local Area Network)
Off No power or no physical connection
On Has physical connection to an Ethernet network
Flashing Transmitting or receiving data (through Ethernet cable)
3) Wall mount option
Out of the box, ASUS WL-500W Wireless Router
is designed to sit on a raised flat surface like a
file cabinet or book shelf. The unit may also be
converted for mounting to a wall or ceiling.
Follow these steps to mount the ASUS Wireless
Router to a wall:
1. Look on the un dersi de for the two mounti ng
hooks.
2. Mark two upper holes in a at surface.
3. Tighten two screws until only 1/4'' is showing.
4. Latch the hooks of the ASUS Wireless Router onto the screws.
Re-adjust the screws if you cannot latch the ASUS Wireless Router onto the
Note:
screws or if it is too loose.
3
Page 6
WL-500W Wireless Router Quick Start Guide
3. Getting started
The ASUS WL-500W Wireless Router can meet various working scenarios with proper
conguration. The default settings of the wireless router may change to meet your individual needs.
Thus, before using the wireless router, check the basic settings to make sure they all work in your
environment.
ASUS provides a utility named EZSetup for fast wireless conguration. If you would like to use
EZSetup for your router conguration, refer to chapter 6 of user manual in support CD.
Wired connection for initial conguration is recommended to avoid possible
Note:
setup problems due to wireless uncertainty.
1) Wired connectionired connection
The WL-500W Wireless Router is supplied with an Ethernet cable in the package. The wireless
router has an integrated auto-crossover function. Thus, you can either use a straight-through or
a crossover cable for wired connection. Plug one end of the cable to the LAN port on the rear
panel of the router and the other end to the Ethernet port on your PC.
2) Wireless Connection
For establishing wireless connection, you need an IEEE 802.11b/g compatible WLAN card.
Refer to your wireless adapter user manual for wireless connection procedures. By default,
the SSID of the wireless router is “default” (in lower case), encryption is disabled and open
system authentication is used.
3) Setting IP address for wired or wireless client
To access the WL-500W Wireless Router, you must have the correct TCP/IP settings on your
wired or wireless clients. Set the IP addresses of the clients within the same subnet of WL-500W.
Getting an IP address automatically
The WL-500W Wireless Router integrates DHCP server functions, thus, your PC gets an IP
address automatically.
Before rebooting your PC, switch ON the
Note:
wireless router and make sure the router is ready.
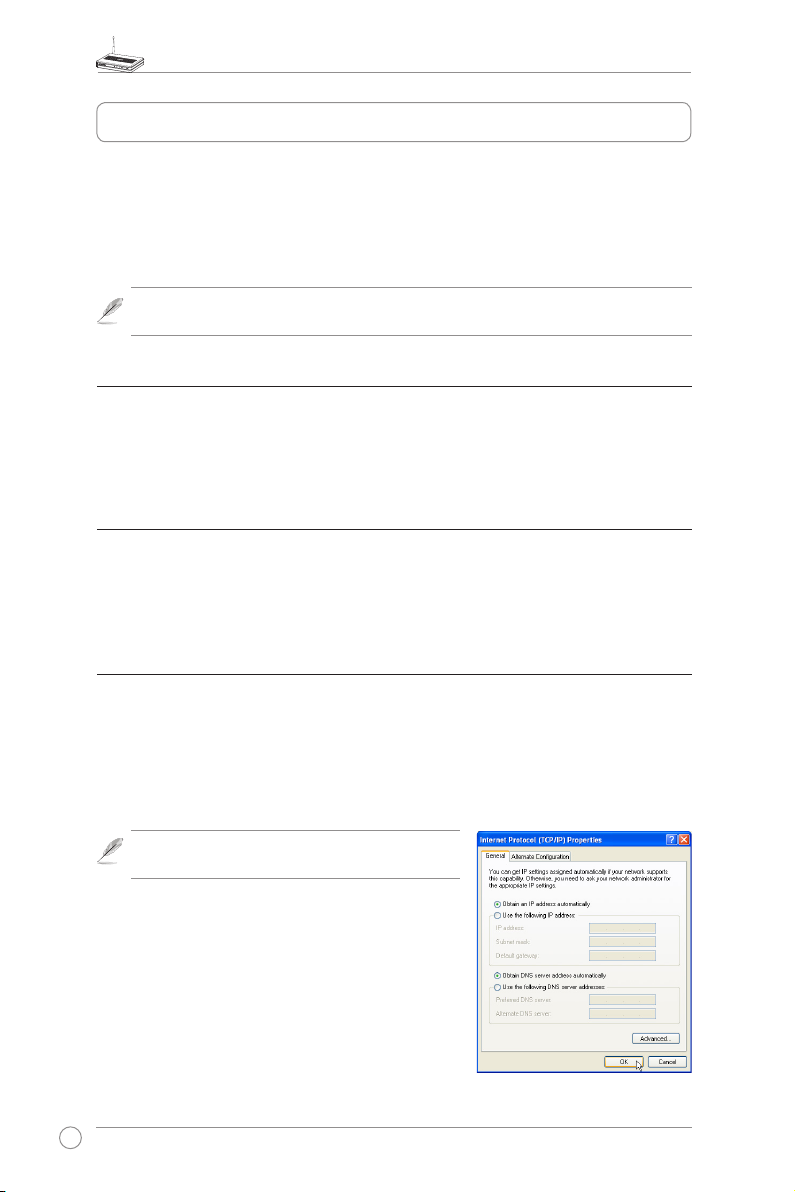
Setting up the IP address manually
To manually set the IP address, you need to know the
default settings of the wireless router:
• IP address 192.168.1.1
• Subnet Mask 255.255.255.0
4
Page 7

WL-500W Wireless Router Quick Start Guide
2
1
3
To set up the connection with a manually assigned
IP address, the address of your PC and the wireless
router must be within the same subnet:
• IP addre s s: 1 9 2.16 8 .1.x x x (xx x can b e any
number between 2 and 254. Make sure the IP
address is not used by other device)
• Su b net Mas k : 2 55.2 55. 2 55. 0 (s ame as W L-
500W)
• Gateway: 192.168.1.1 (IP address of WL-500W)
• DNS: 192.168.1.1 (WL-500W), or assign a known
DNS server in your network.
4) Conguring the wireless router
Follow the steps below to enter the Web conguration interface of WL-500W.
Enter the following address in your
web browser: http://192.168.1.1
Defaults
User name:
After logging in, you can see the ASUS Wireless Router home page.
The homepage displays quick links to congure the main features of the wireless
router.
admin
Password:
admin
5
Page 8

WL-500W Wireless Router Quick Start Guide
5) Quick setup
To start quick setup, click
page. Follow the instructions to setup the ASUS Wireless
Router.
1. Sel ect you r t ime zon e a nd c lic k
.
Next
2. ASU S wir e less rout e r s u ppo r ts
five types of ISP services: cable,
PPPoE, PP T P, st a t i c WA N IP,
and Telstra BigPond. Select your
connection type and click
continue.
Cable or dynamic IP user
If you are using services provided by
cable ISP, select
connection that gets IP automatically
If y o u r IS P pr ovides y o u wi t h th e
hostname, the MAC address, and the
hear tb eat serve r address , fill th es e
information into the boxes on the setting
page; if not, click
Cable Modem or other
to skip this step.
Next
to enter the “Quick Setup”
Next
to
Next
.
PPPoE user
If you use PPPoE service, select
connection that requires username
and password.
You need to input the username and
password provided by your ISP. Click
to continue.
Next
6
It is known as PPPoE.
ADSL
Page 9

PPTP user
If you are using PPTP services, select
conn ec tion that r equires u sername,
pa sswor d a nd IP ad dress .
us e rnam e , p a sswo r d a n d IP add r ess
provided by your ISP into the fields. Click
to continue.
Next
ADSL
Fi ll in the
Static IP user
If you are using ADSL or other connection
type that uses static IP address, select
or other connection type that uses static
IP address
. Input the IP address, subnet
mask, and default gateway provided by your
ISP. You can specify DNS servers, or get
DNS information automatically.
ADSL
WL-500W Wireless Router Quick Start Guide
herk036@adsl-comfort
3. To set up your wireless interface, specify
an SSID (Service Set Identifier), which
is a unique identier attached to packets
sent over WLAN. This identier emulates
a password when a device attempts to
communicate with your wireless router
via WLAN.
If you want to protect transmitted data, select a
Medium:
Only users with the same WEP key settings can connect to your wireless router
Security Level
to enable encryption methods.
and transmit data using 64bits or 128bits WEP key encryption.
Only users with the same WPA pre-shared key settings can connect to your wireless
High:
router and transmit data using TKIP encryption.
7
Page 10

WL-500W Wireless Router Quick Start Guide
4. Input four sets of WEP keys in the WEP
Key fields (10 hexadecimal digits for
WEP 64bits, 26 hexadecima l digits
for WEP 128bits). You can also let the
system generate the keys by inputting
a Passphrase. Record the PassphraseRecord the Passphrase
and the WEP keys in your notebook,
then click
Finish
.
For example, if we select WEP 64bitsFor example, if we select WEP 64bits
encryption mode and input 11111 as
the Pas sphrase, the WE P Keys ar e
generated automatically.
5. Cli ck
Sa ve& Res t art
to res t art the
wireless router and activate the new
settings.
6. To connect the wireless router from a wireless client, you can use Windows® Wireless
Zero Conguration service to set up the connection. If you use ASUS Wireless Card on
your computer, you can use the One Touch Wizard utility supplied in WLAN Card support
CD for wireless connection.
Conguring ASUS WLAN Card with One Touch Wizard
If you have installed ASUS wireless card together with its utilities and drives on your PC, click
-> All Programs -> ASUS Utility-> WLAN Card -> One Touch Wizard
to launch the One Touch
Start
Wizard utility.
8
Page 11

WL-500W Wireless Router Quick Start Guide
1) Select
Connect to an existing wireless
LA N (St ati on )
to continue.
Next
rad io but ton a nd cli ck
3) Set the authentication and encryption of
your WLAN card the same with those at
WL-500W. In the previous steps the
is
Length
Click
64 bits, Passphrase
to continue.
Next
Key
is 11111
2) One Touch Wizard searches and displays
the a v ailab l e A P s in the
Ne tw ork s
press
list. Sele ct WL -500W and
to continue.
Next
Av a ilabl e
4) It takes several seconds for the wireless
card to associate with WL-500W. Press
to setup TCP/IP for your WLAN Card.
Next
5) Setup the IP address of the WLAN Card
according to your ne tw or k con di ti on .
After the setup is complete, click
Finish
to exit the One Touch Wizard.
9
Page 12

WL-500W Wireless Router Quick Start Guide
Conguring WLAN card with Windows® WZC service
If you use non-ASUS wireless card, you can set up the wireless connection with Windows®
Wireless Zero Conguration (WZC) service.
1) Double-click the wireless network icon on
the task bar to view available networks.
Select y our wireles s ro uter and cl ic k
.
Connect
2) Input the 10-digit keys you have set on
the wireless router and click
Connect
The c o n n e c t i o n is co m p l ete within
several seconds.
.
7. Conguring advanced features
To view and adjust other settings of the wireless router,
enter the Web conguration page of WL-500W. Click
on items on the menu to open a submenu and follow
the instructions to setup the router. Tips show up when
you move your cursor over each item. Refer to user
manual in support CD for detailed information.
10
Page 13

WL-500W Wireless Router Quick Start Guide
4. Application features
The WL-500W Wireless Router provides multiple application features such as
the USB storage share, the Download Master (a download utility), and the USB
printer share. In this Quick Start Guide, the most popular features and their setup
procedures are introduced. For more application features, please refer to the full
version of the user manual included in the support CD.
Warning:
the disk in
Note:
are disabled, it would take more than 20 seconds for WL-500W to reboot.
Before unplugging the USB storage disk from WL-500W, you must eject
Status & Log -> External USB Disk
Before applying change and rebooting WL-500W, make sure all USB applications
page to prevent data corruption.
1) Sharing USB storage
To use this feature, you need to plug a USB storage disk to the USB2.0 port on the
rear panel of WL-500W. Make sure the hard disk is formatted and partitioned properly.
FAT32 has a 2GB le size limitation and do not support les above that size. If
Note:
you want to use les of over 2GB, you must format the disk to EXT2 le system.
Creating user account
To share the data in the USB storage, you need to create
user accounts rst.
1. Click
USB Application -> User List
open the conguration page.
2. I n pu t
3. To de le t e a n ac c o un t,
4. Cl ick
U s e r Na m e
Password
Click
to the list.
select the account from the
list and click
ch a nge s and rest art the
wireless router.
for the accounts.
to add the account
Add
Del
to app ly the
Ap ply
a n d
.
in the left side menu to
Creating share folder and access right
You can create a new share folder or share an existing
folder in your hard disk.
1. Click
USB Application -> Share Nodes
to open the conguration page.
in the left side menu
11
Page 14

WL-500W Wireless Router Quick Start Guide
2. Click
to add a sha re
Add
folder.
3. Select the folder you want to share
from Folder Manager and click Ok.
To create a share folder, input the
folde r name in
and press
Add
Add Folder
.
fi eld
4. Dene the access right for
the share folder by appoint
. Cli c k
and
Ad d
Acce ss
to a dd
User Name
Ri ght
the access right rule. When
fin i s hed, c l i ck
App l y
t o
save the conguration.
5. Set Network Neighbourhood
Mod e to
sh a r ed n o de l i s t
Group to
App l y rule s in
, W ork
WORKGROUP
to
enable all computers within
WORK GR OUP to ac ce ss
WL-500W USB storage.
6. Click
Finish
7. Cli c k
Sa v e & Rest art
restart the wireless router
and activate the settings.
8. Open
My Net wo rk Place
from a computer connected
to WL-5 0 0W. C lick
work group c omputers
you can see W L-500 W in
the
Workgroup
All les on the USB storage
are ready for sharing.
12
.
t o
vi e w
,
category.
Page 15

WL-500W Wireless Router Quick Start Guide
2) Setting up FTP site
WL-500W can also serve as an FTP site. You can make your FTP site accessible to
all users, or set up an access policy to restrict anonymous login. To use this feature,
you need to plug a USB storage disk to the USB2.0 port on the rear panel of WL500W. Make sure the hard disk is formatted and partitioned properly.
1. To allow anonymous login: Set
Netwo rk Neighborh ood Mode
to
Share all partitions in disk
FT P Mode to
partition
directory is the root directory of
rst partition.
To allow accout login only: Set
Network Neighborhood Mode
to
Apply rules in shared node
, FTP Mod e t o
li st
first matched shared node
Click
Add
to specify the access directory
and access right of FTP account.
Lo g i n t o firs t
. The anonymous login
Lo gin to
in the Share Node List
,
.
2. The
Maximum Login User
species the maximum number
of concurrent users. The default
value is 6.
3. Cli c k
settings and reboot. This process
may take several minutes.
4. Ty p e
the address box of your Web
br o w ser a nd p r e ss E n ter t o
login the FTP site.
t o acti v a te t h e
Fin i sh
ftp : / / 1 92.16 8 . 1 .1
eld
i n t o
13
Page 16

WL-500W Wireless Router Quick Start Guide
3) Download Master
The Download Master helps to manage the download tasks without turning your
computer on. To use this function, you need to: 1) mount a USB storage to WL-500W
Wireless Router; and 2) install ASUS Utilities from the support CD.
1. Click
Basic Cong
2. Set
En a ble Down load Mast er
to
. If you want to share the
Yes
do wnlo ade d f ile wit h y o ur LAN
users, set
to
Share
save a n d r e s t a r t th e wi r e l e s s
router.
3. Open Download Master from Start
-> Al l Pro grams -> AS US Ut il ity
->WL -500W W irele ss Rout er ->
Do wnl oad M ast er. Cli ck
Co nnect
500W.
4.
HTTP download (1)
Right click the download link
on the Web page and click
Dow n l o a d using A SUS
Dow n l o a d
step 5 appears to indicate
download progress.
page in USB Application folder.
Enable Downlo a d
. Click
Yes
to as soc ia te with WL-
. A w i ndow i n
Finish
and
Fi le ->
HTTP download (2)
Ri g ht cli c k t he d own l oad
link on the Web page and
click
Properties.
download
14
Address (URL)
Copy the
.
Page 17

WL-500W Wireless Router Quick Start Guide
If you sel e ct
ASUS Downloa d
Do wnl oad usi ng
, you c an see
th e d own l oad tas k i s a dde d to
the
Transfer
list. The blue bars
indicate the progress of download
tasks.
If you copy the download address,
click
Paste the address i nto
File From
Options eld, and click
button in the utility.
Assign
box, select
Getti ng
from
HTTP
Download
button to start.
5. FTP download
Cl i c k
Tr a n sfer
Download Master and select
b utto n of th e
FTP
in the Options eld. Input the FTP
site address, Port number, User
Name, Password. Click Download
to start.
6. BT download
S a ve th e B T s e ed on yo u r
computer. Click
Transfer
button of
the Download Master and select
i n th e Optio n s fi e ld. C l i c k
BT
to loca te the seed file.
Brows e
Click
Download
to start.
7. Click
download le. Open the
butt on to view the
Folde r
Complete
folder to view or copy the nished
files to your local hard disk. The
un f i n i s hed ta s ks are ke pt in
InComplete
folder.
15
Page 18

WL-500W Wireless Router Quick Start Guide
4) Sharing USB printer
You can connect a comptible USB printer to the USB2.0 port of WL-500W to
share the printer with your LAN users. Follow the procedures below to setup your
computers to utilize the printer server function of WL-500W.
Installing USB printer
Plug your USB printer to the USB2.0 port on WL-500W rear
panel. To verify whether your printer is properly installed to the
WL-500W Wireless router, click
Printer Model
share this printer within your LAN.
is correct and
Status & Log -> Status
Printer Status
is
On-Line
Setting up printer client under Windows XP
Follow the steps below to install network printer on your clients.
. If
, you can
1. Run Add Printer Wizard from
Printers and Faxes -> Add a printer
3. Select
16
Create a new port
of port to
click
Standard TCP/IP Port
.
Next
Start ->
and set Type
, then
.
2. Select
4. Clic k
Local printer attached to this
computer
accessing the network printer.
and click
to se tu p TCP/IP po rt for
Next
Next
.
Page 19

WL-500W Wireless Router Quick Start Guide
5. Input the IP address of WL-500W in
the
Printer Name of IP Address
and click
7. S e t
LPRServer
Next
.
Next
P r o t o co l
in
Queue Name
to continue.
to
L P R
eld
an d ty p e
eld. Click
6. Select
8. Press
port setting.
and click
Custom
to finish standard TCP/IP
Next
Settings.
9. Press
to complete the settings
Finish
and return to Add Printer Wizard.
10. Install printer driver from the vendormodel list. If your printer is not in the
list, click
Have Disk
to manually locate
the printer driver.
17
Page 20

WL-500W Wireless Router Quick Start Guide
11. Click
to accept the default name
Next
for the printer.
13. T he inst alla tio n is c omp l ete . Cl ick
to quit the Add Printer Wizard.
Finish
If you have already installed the printer locally on your computer, right click the
Note:
printer icon and select
then select
Port
Property -> Port
Standard TCP/IP Port
for setting procedures.
12. Select
Next
to print a test page. Click
Yes
to print.
tab to add a standard TCP/IP port. Click
and click
New Port
button. Refer to step 5-8
Add
If you use Windows® 98 or ME which does not support Standard TCP/IP port,
Note:
you need to use Romote Port which is supported by WL-500W.
18
 Loading...