

Asus WL-500g Deluxe, WL-500g Quick Installation Guide
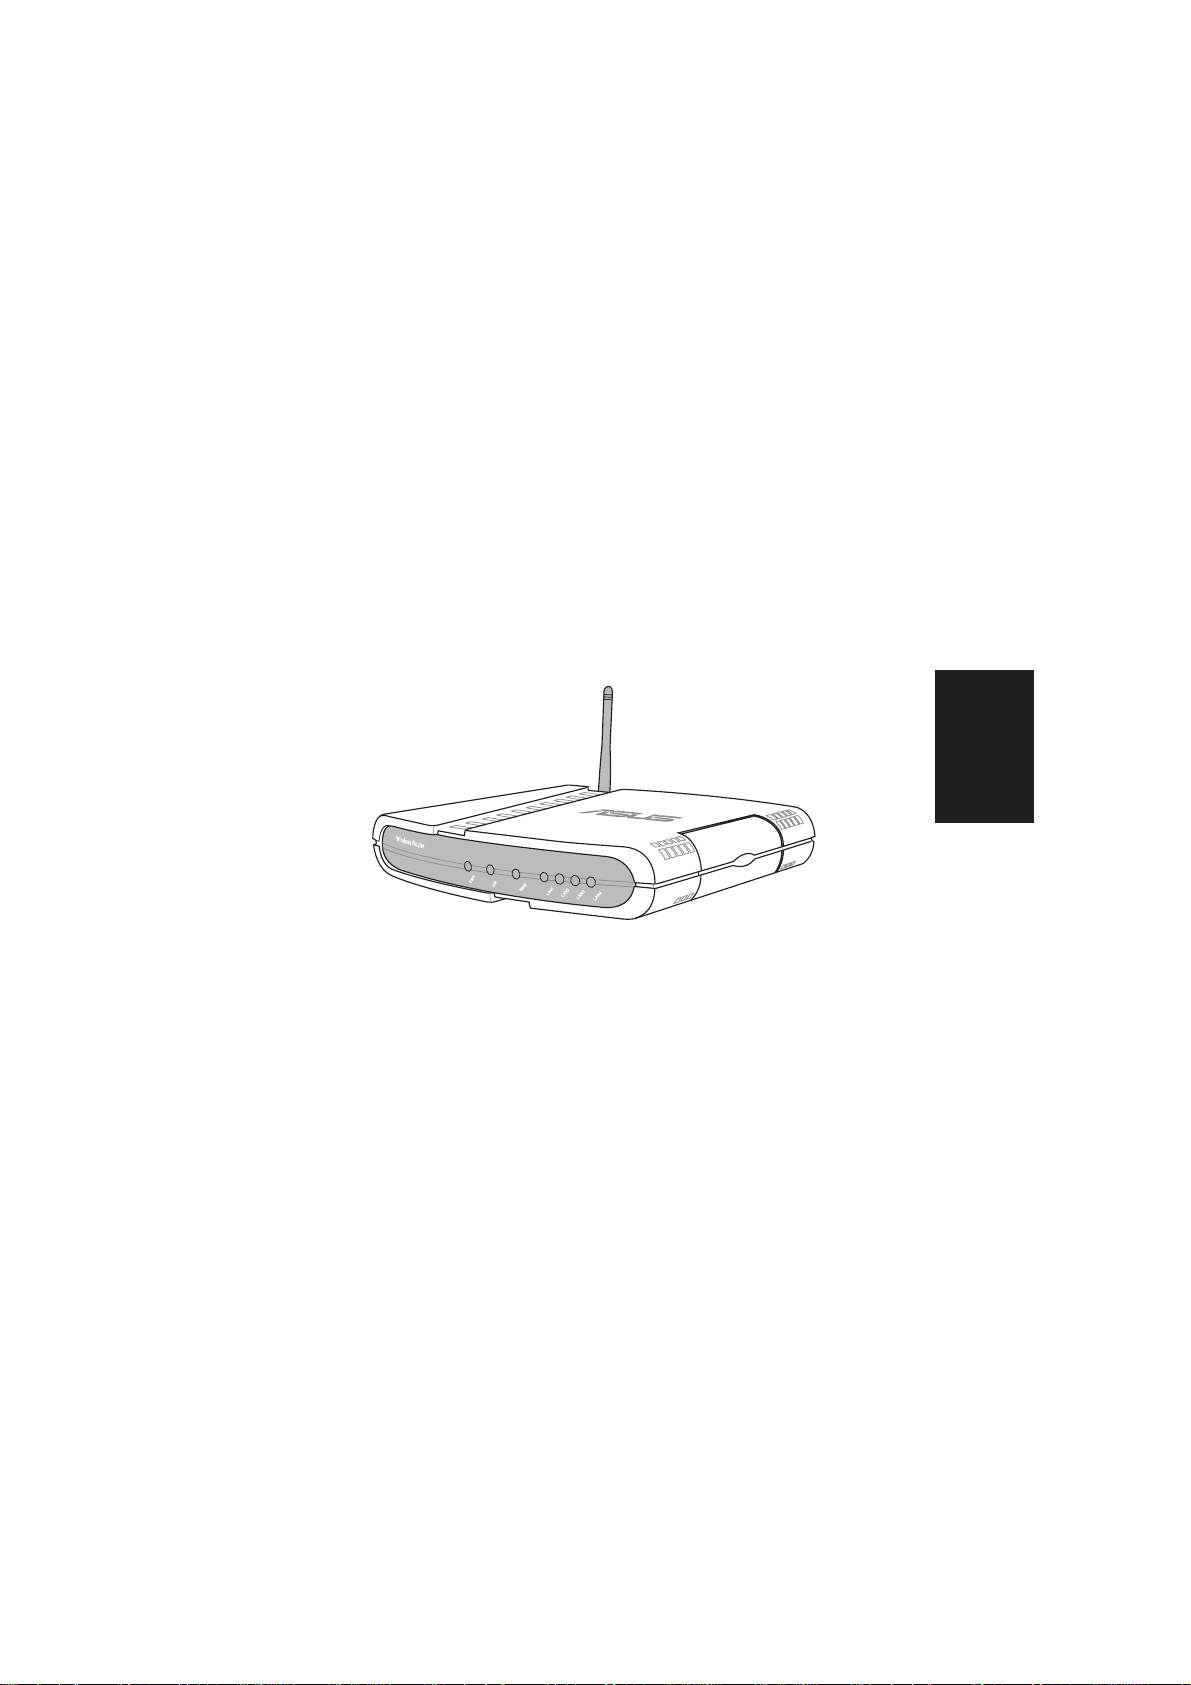
WL500g / WL500g Deluxe Wireless Router
(For 802.11g/b Wireless Clients)
WL500b Wireless Router
(For 802.11b Wireless Clients)
Quick Start Guide
English
English
Hardware and Software Setup
(Step 1)
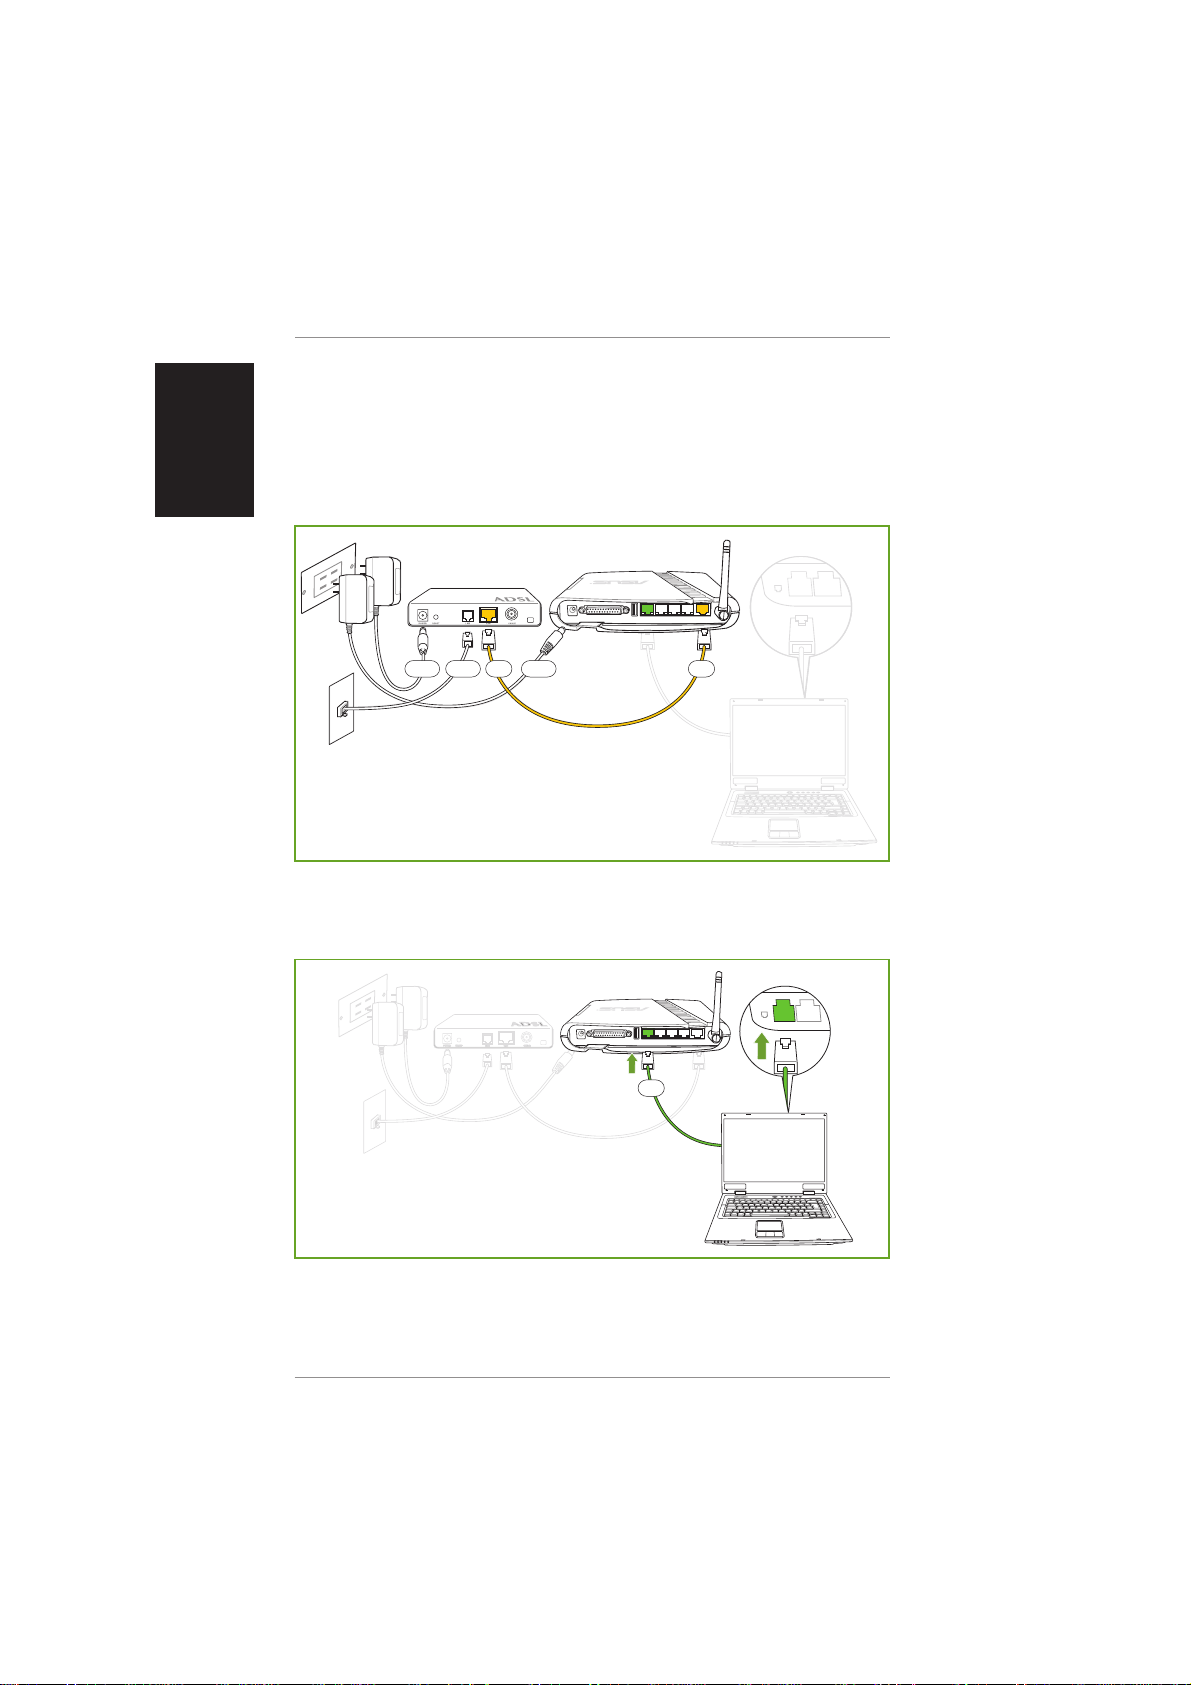
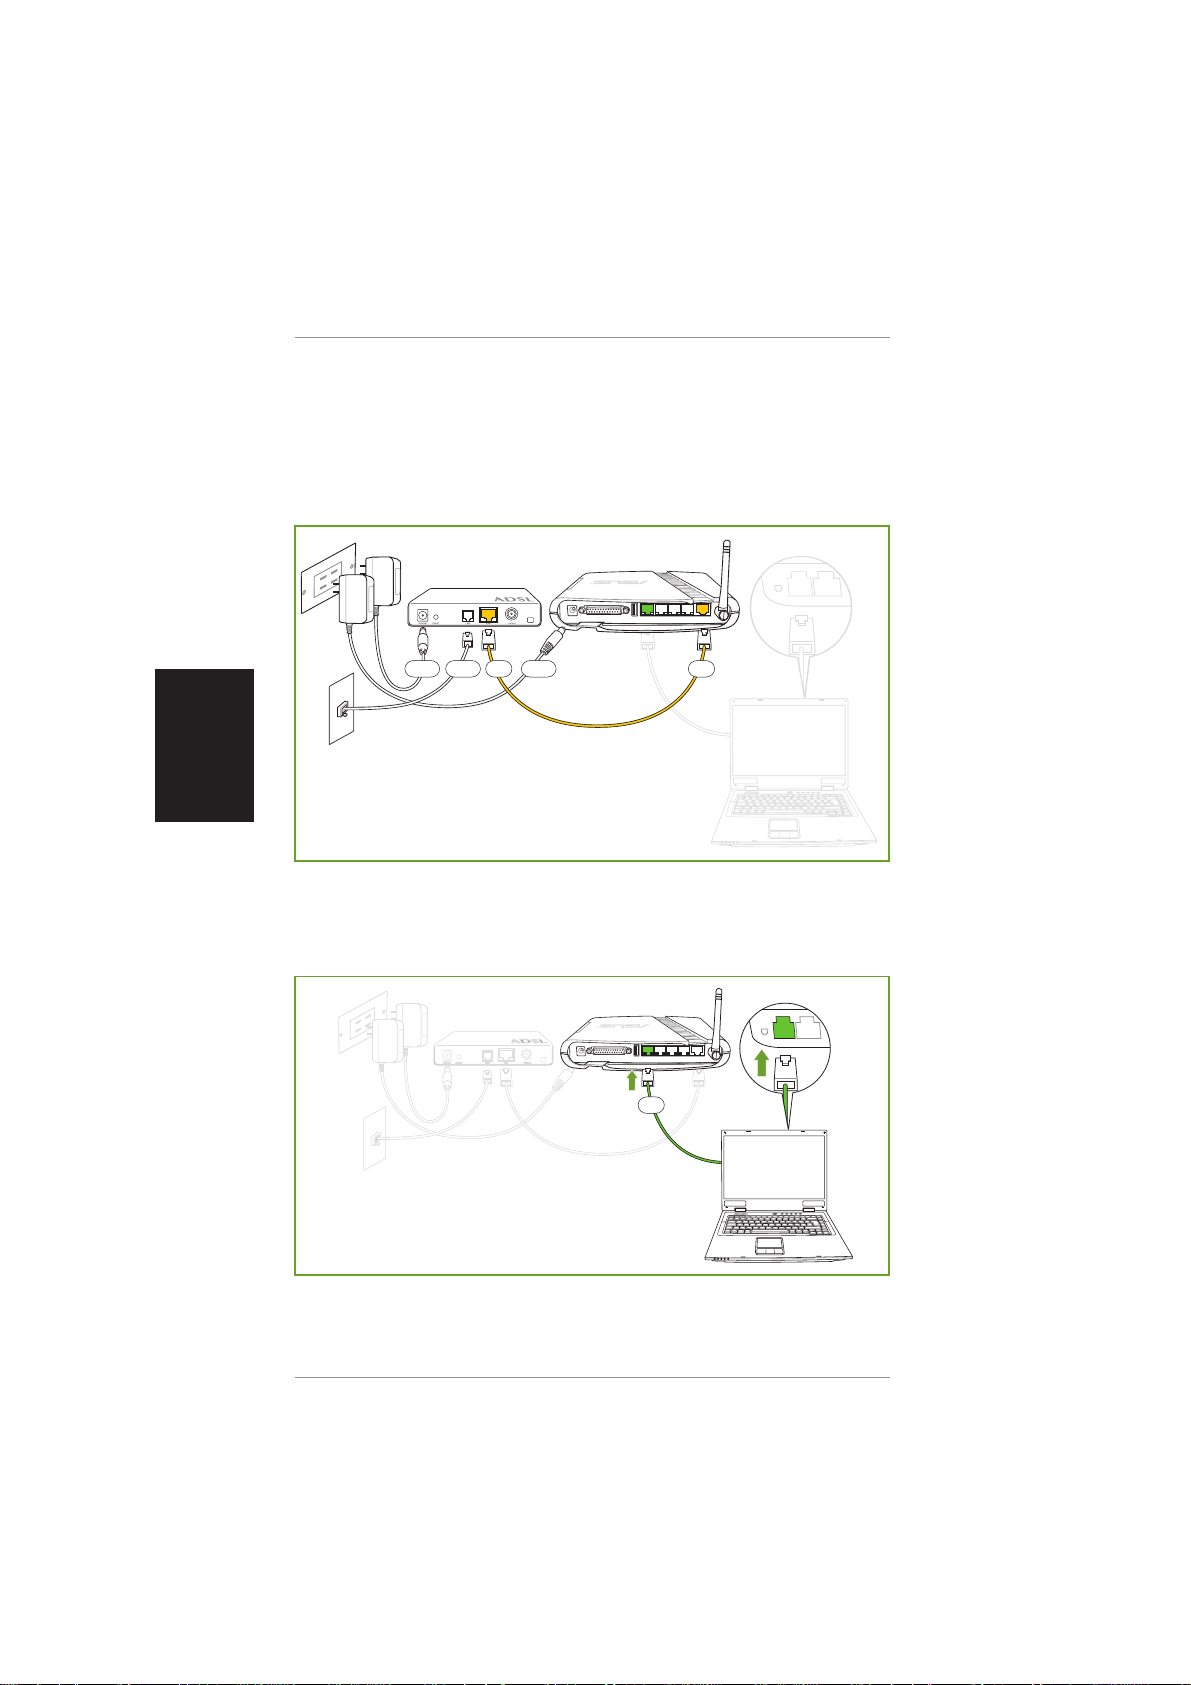
Connect your ADSL Modem and Wireless Router as shown in the illustration. A
LAN cable must be connected between the LAN port on the ADSL and the
WAN port on the Wireless Router.
ADSL Modem
Power Phone LAN LANPower
Telephone Jack
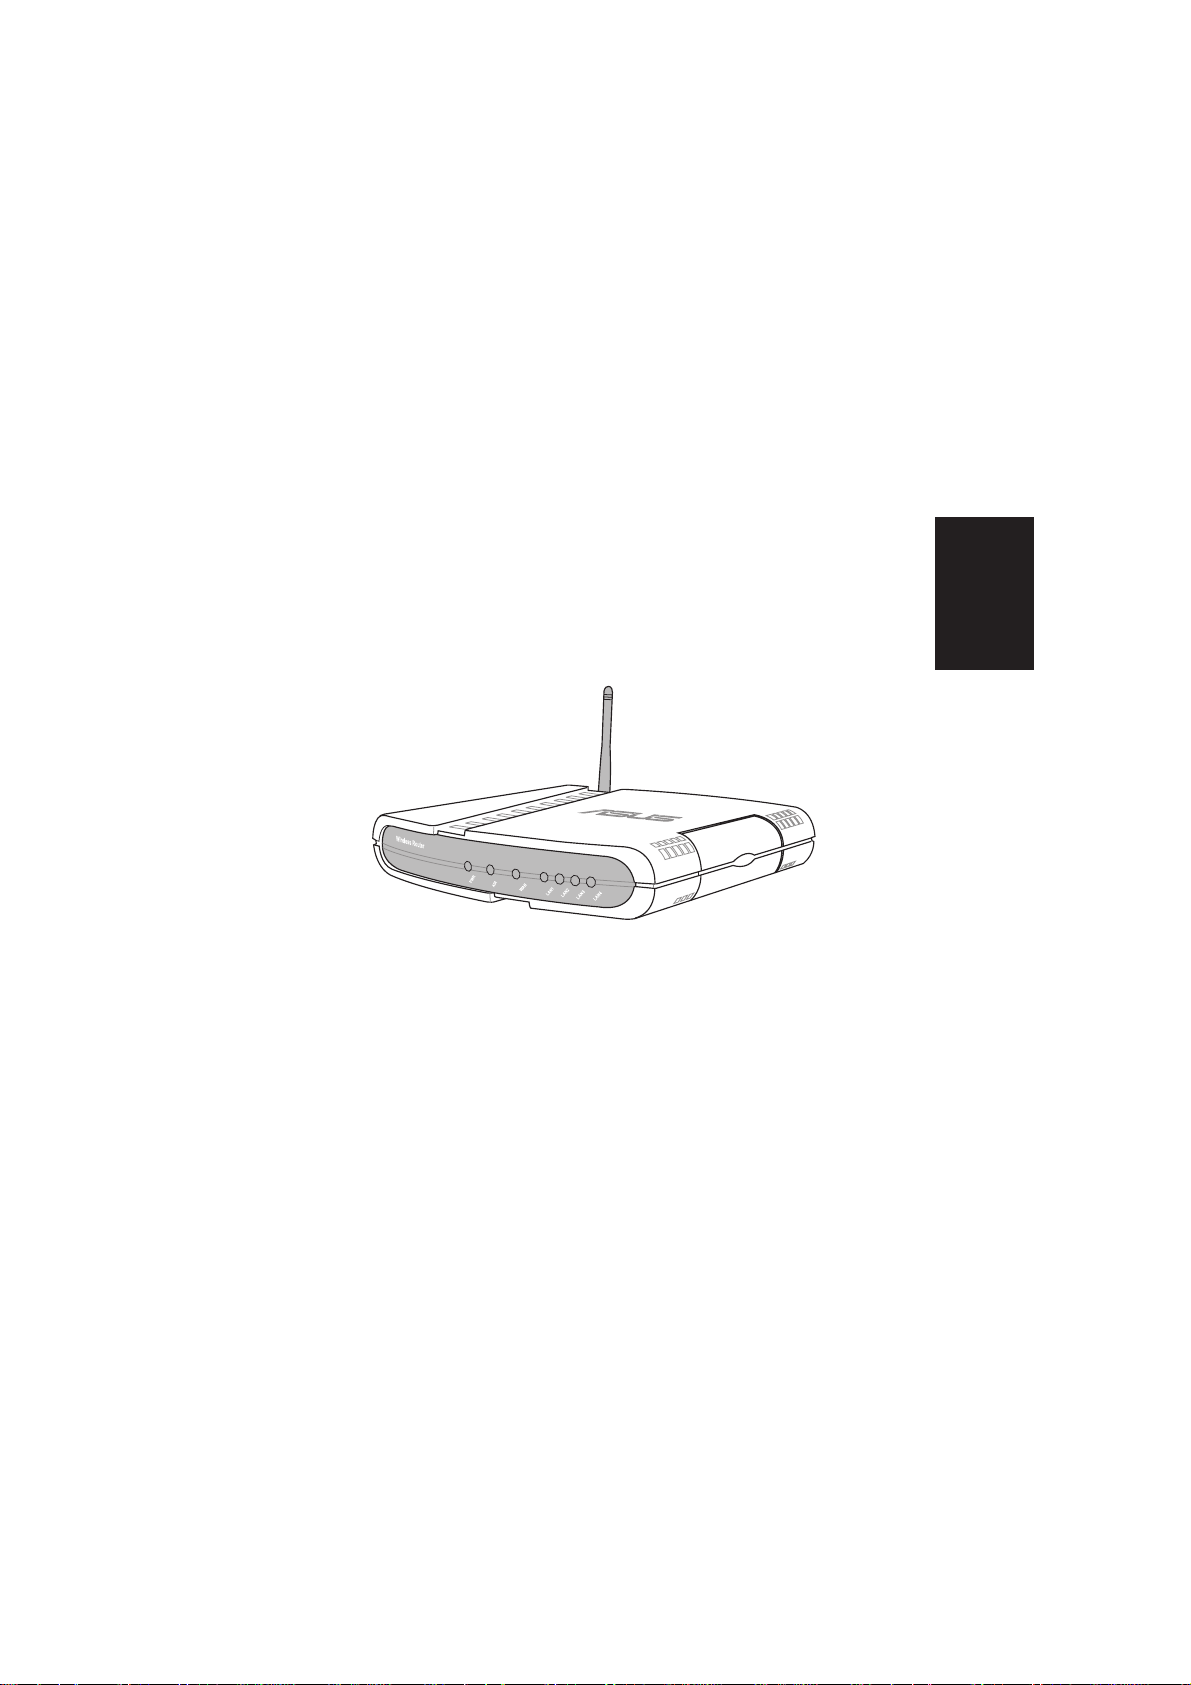
Wireless Router
(Step 2)
Connect the Wireless Router to your computer through the LAN port.
Wireless Router
LAN
Wireless Client
2 ASUS Wireless Router Quick Start
Hardware and Software Setup (Cont.)
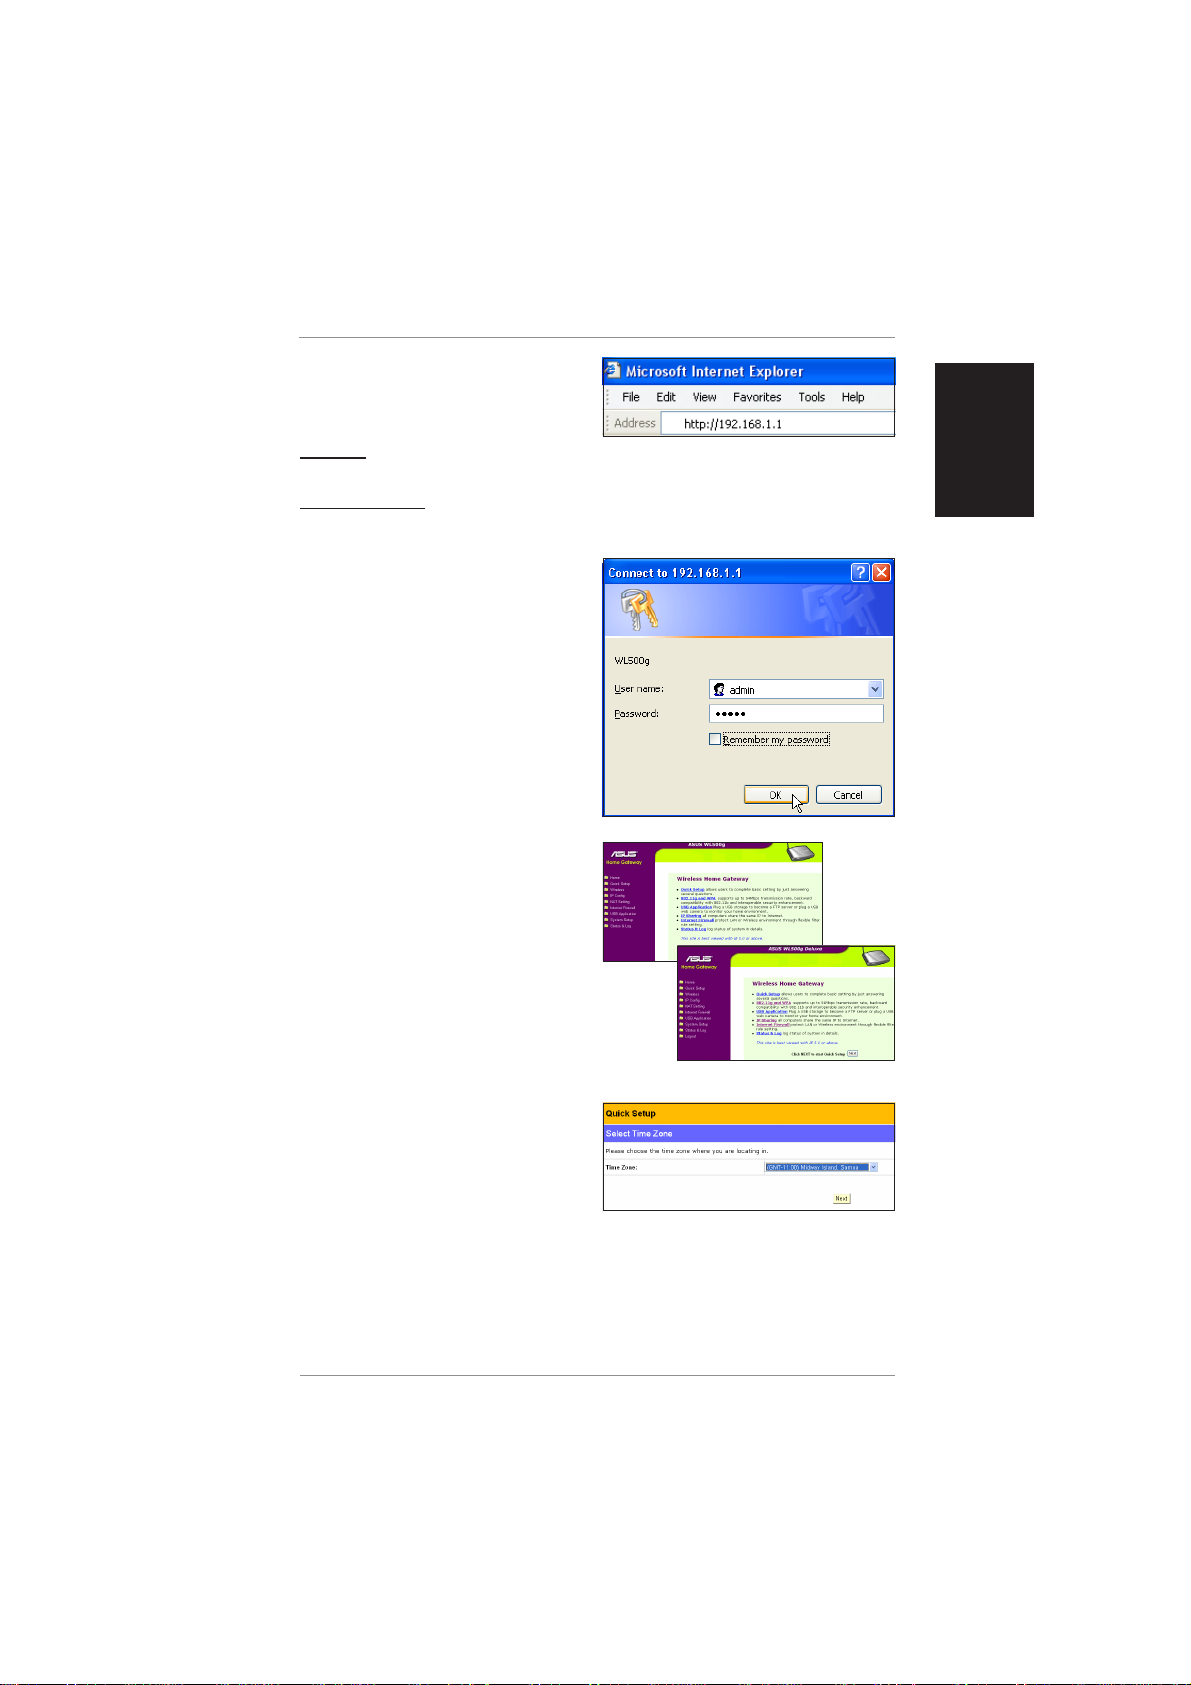
(Step 3)
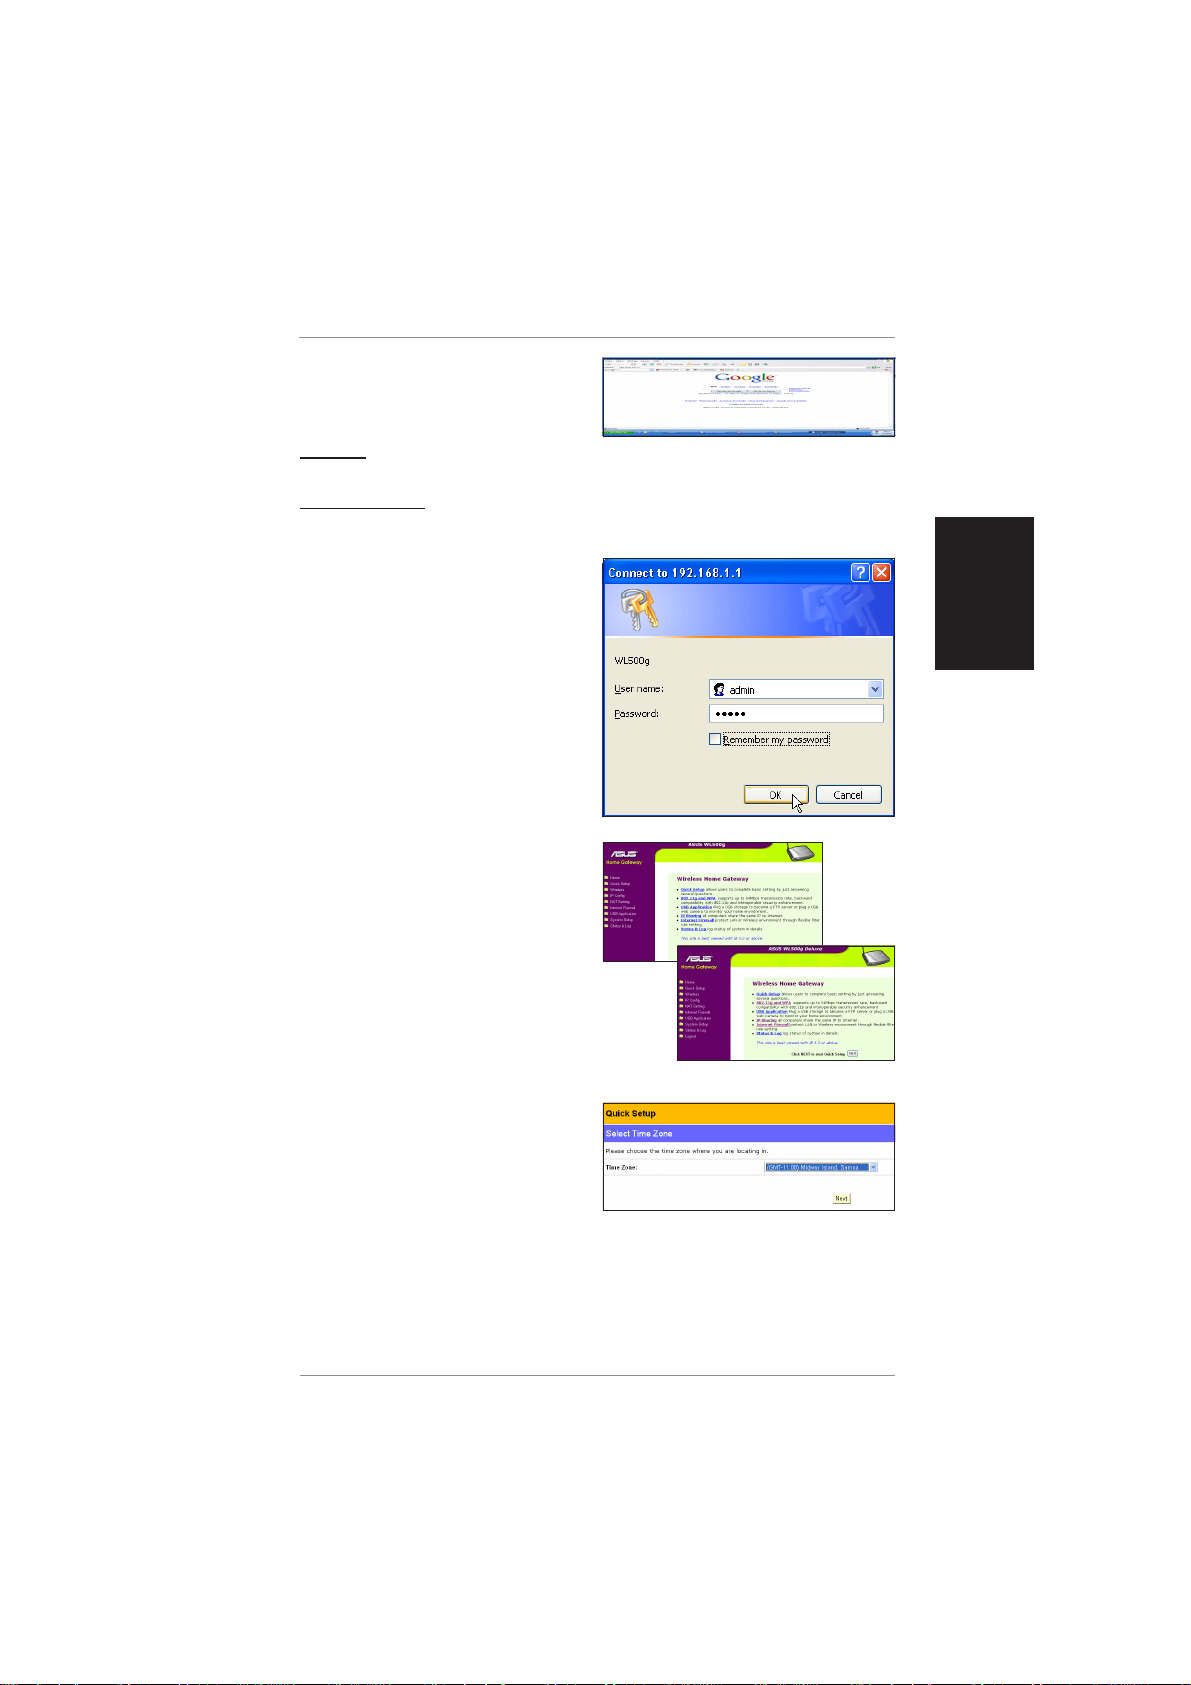
Enter one of the following addresses
in your web browser:
WL500g
[http://my .router] or [http://my.WL500g] or [http://192.168.1.1]
WL500g Deluxe
[http://my .router] or [http://my.WL500g.Deluxe] or [http://192.168.1.1]
(Step 4)
Login with factory default settings:
User name: admin
Password: admin
(Step 5)
The home page displays quick links
to configure the main features of the
Wireless Home Gateway .
Click Next to begin Quick Setup.
WL500g
English
English
(Step 6)
Select your time zone or the closest
region using the pull-down menu.
Click Next to continue.
ASUS Wireless Router Quick Start 3
WL500g Deluxe
English
Hardware and Software Setup (Cont.)
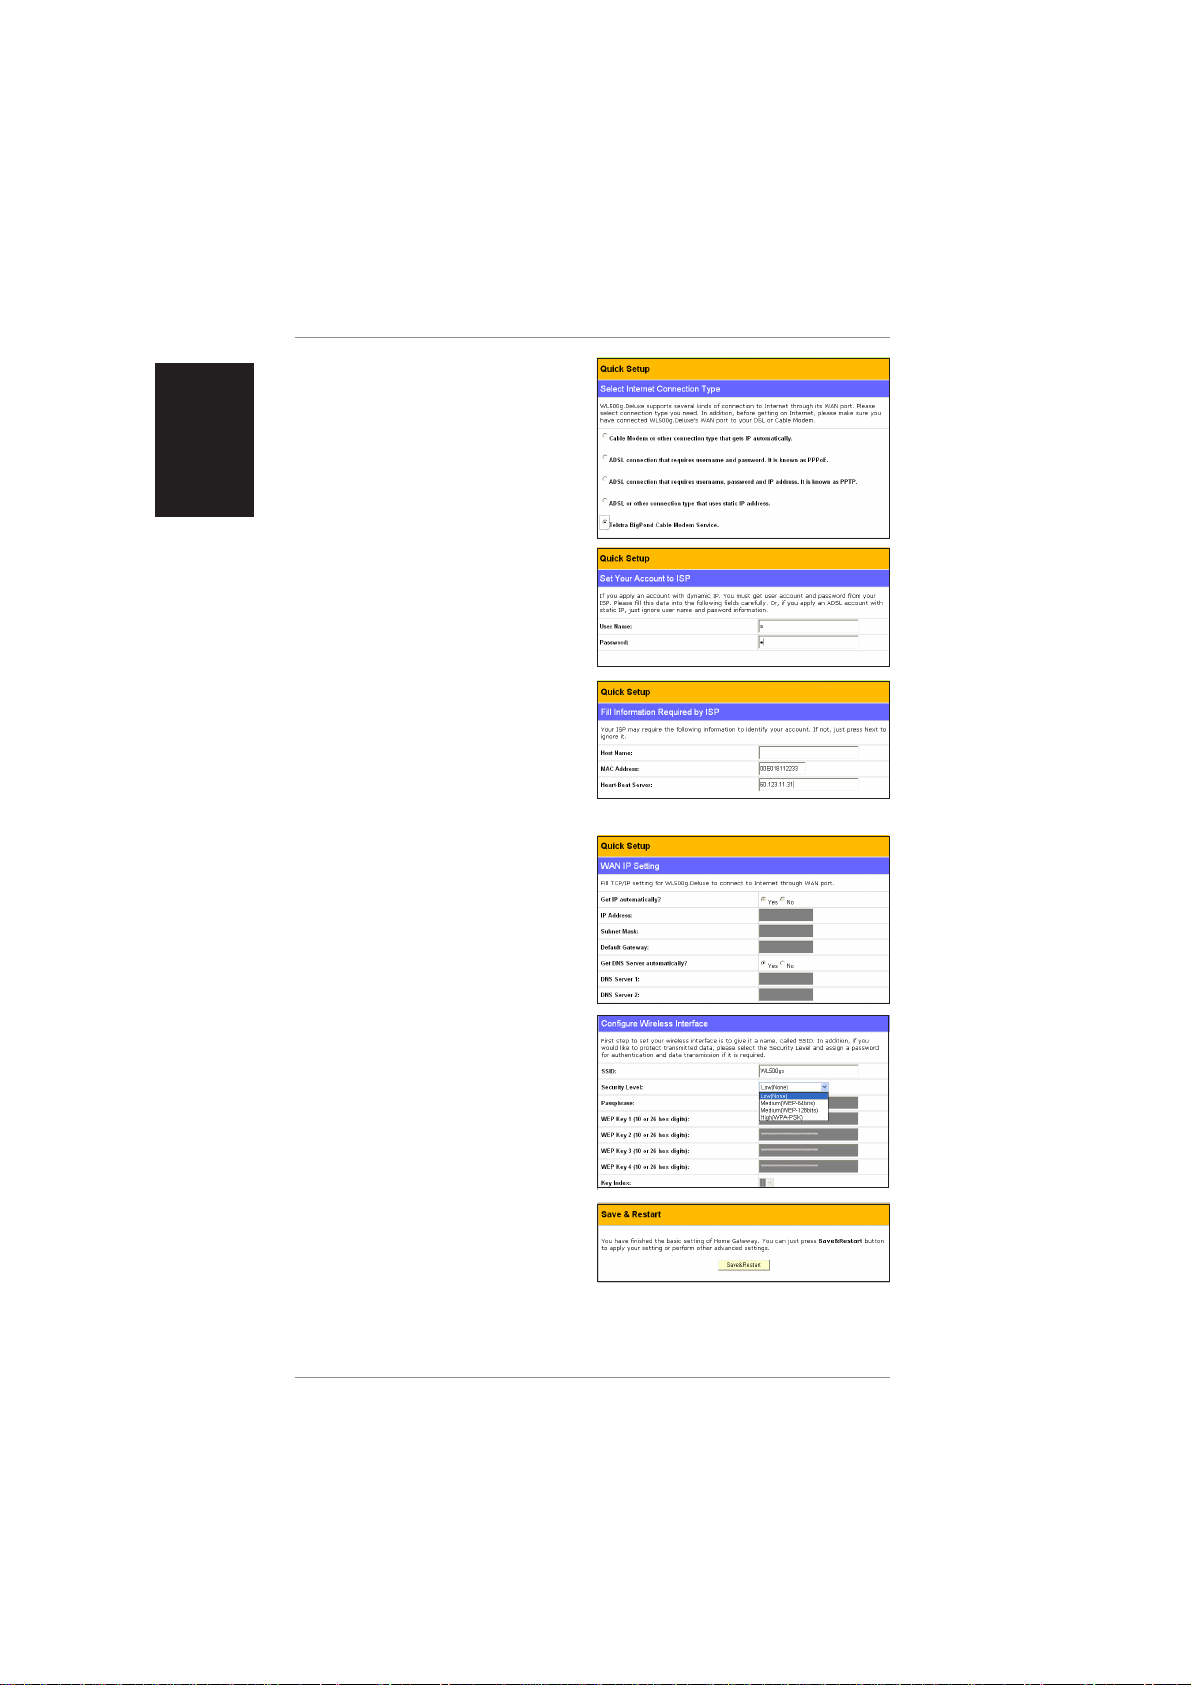
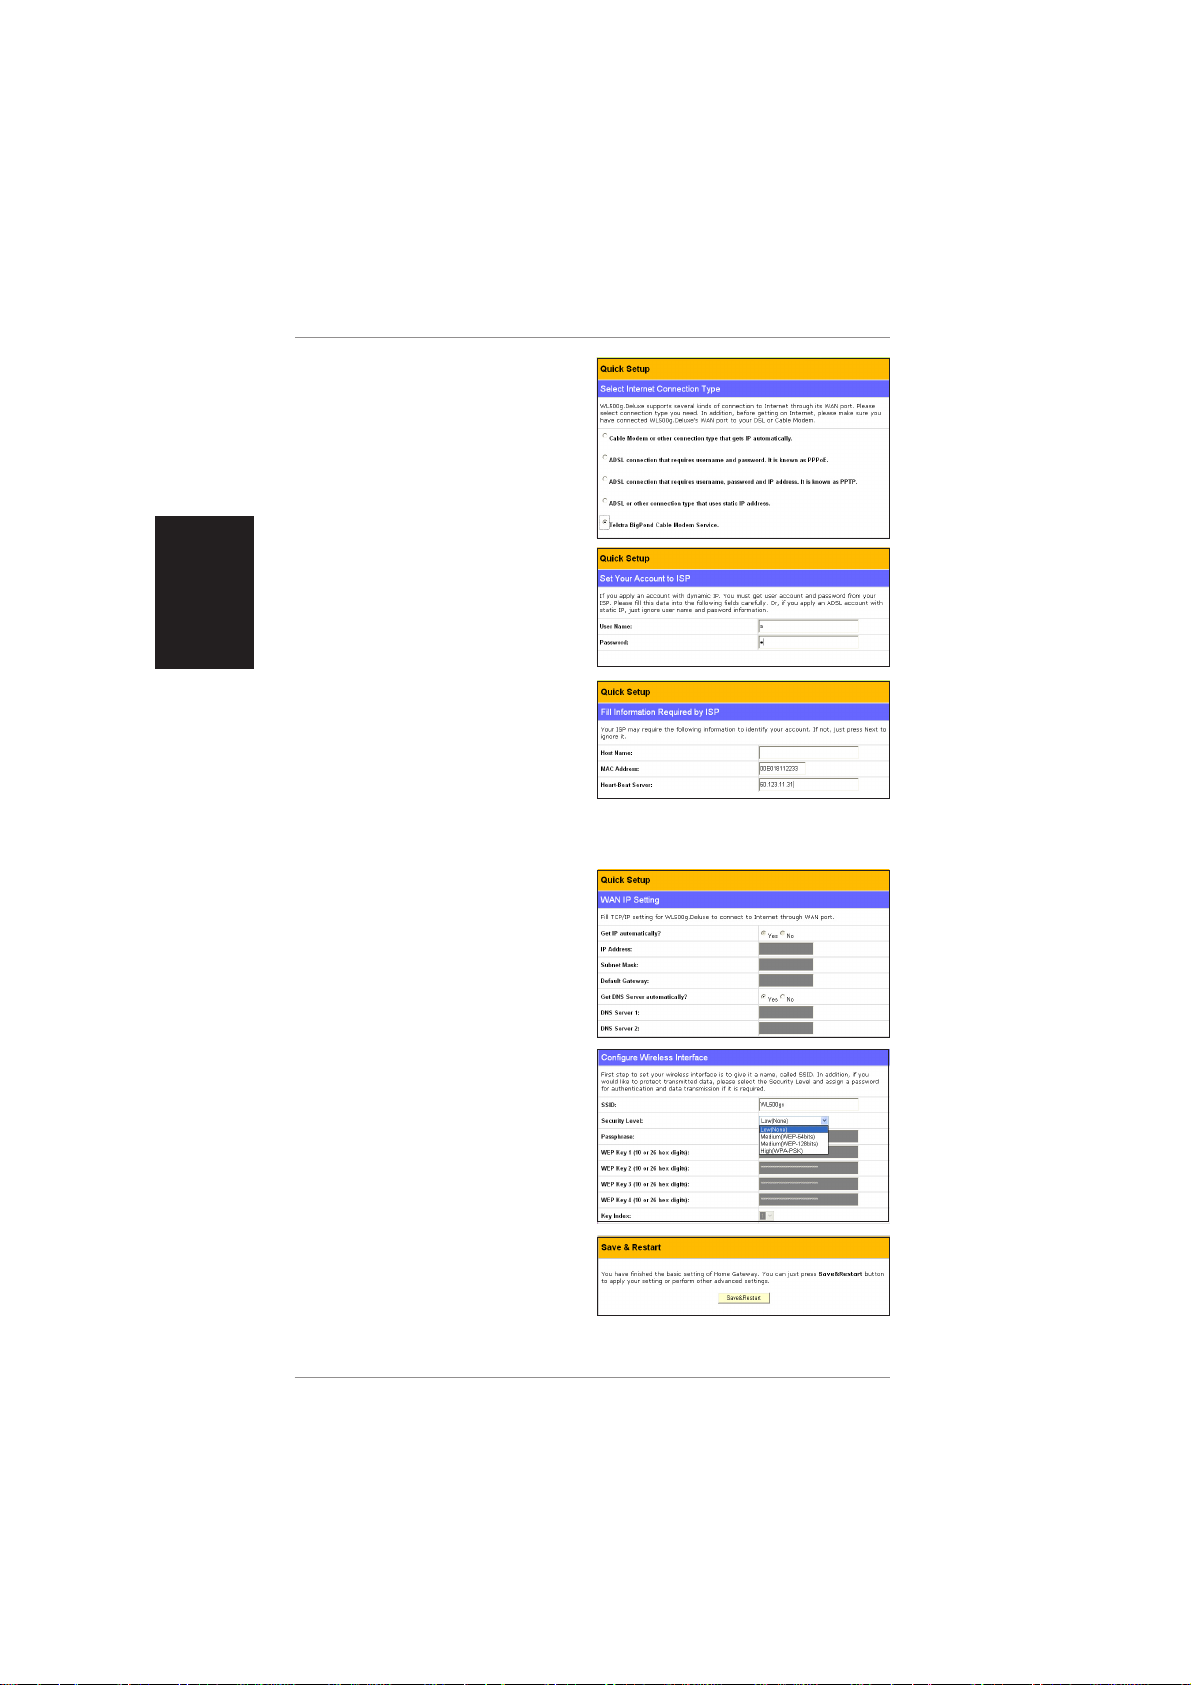
(Step 7)
Select the connection type you have
subscribed to. (“ADSL” uses a standard
phone cable and “Cable” uses a heavy
round TV cable.)
Click Next to continue.
(Step 8)
Enter your subscriber’s account User
Name and Password in order to
connect to your ISP.
Click Next to continue.
(Step 9)
Fill in Host Name and MAC Address
if required by your ISP . Fill in the server
name or server IP address of the Heart-
Beat Server when you are connecting
with BigPond (Telstar BigPond Cable users only). Click Next to continue.
(Step 10)
Normally , you would select Y es to “Get
IP automatically” and “Get DNS Server
automatically”. If you select No to either
one, you will need to input information
from your ISP.
Click Next to continue.
(Step 1 1)
Enter the SSID and make WEP
settings if you want to add security to
your wireless network.
Click Finish to continue.
(Step 12)
Click Save&Restart to save the
settings to the Wireless Router and
enable the new settings.
Click Finish to continue.
4 ASUS Wireless Router Quick Start
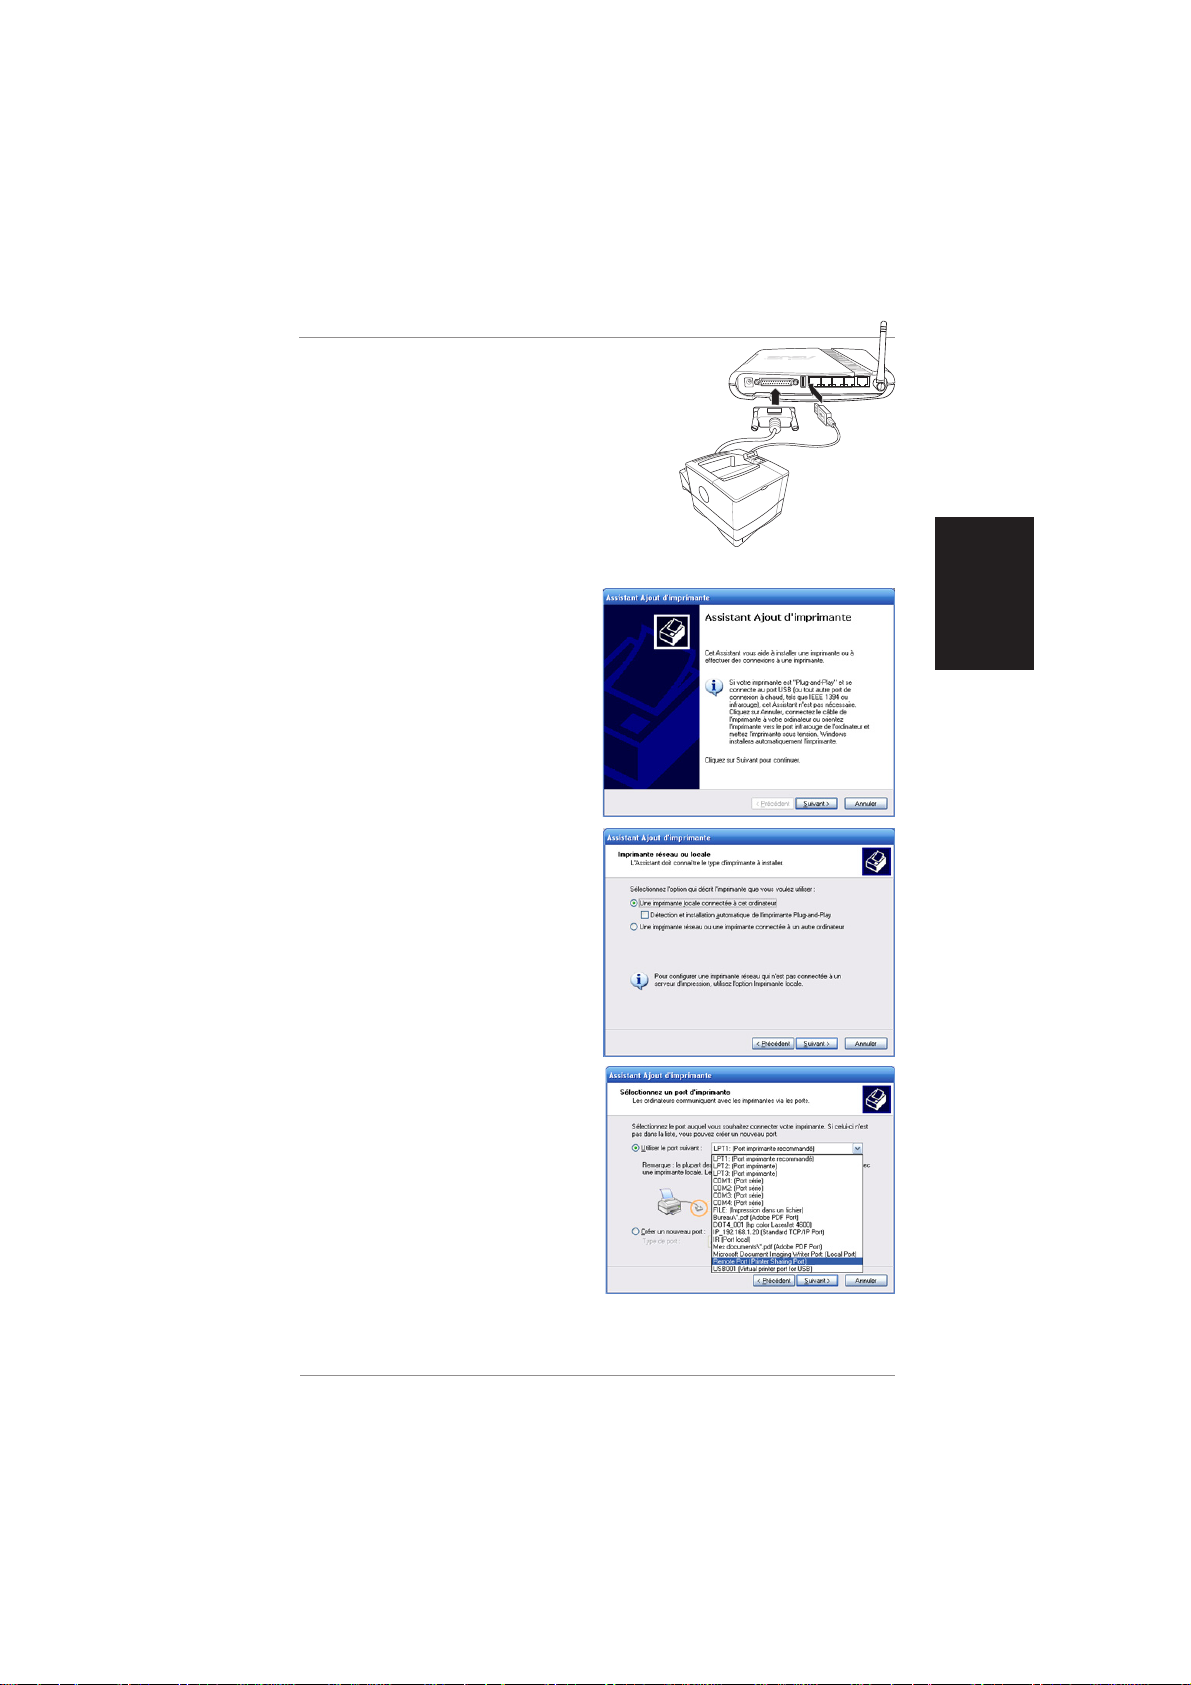
Wireless Printing (Selected Models)
Add Printer Wizard
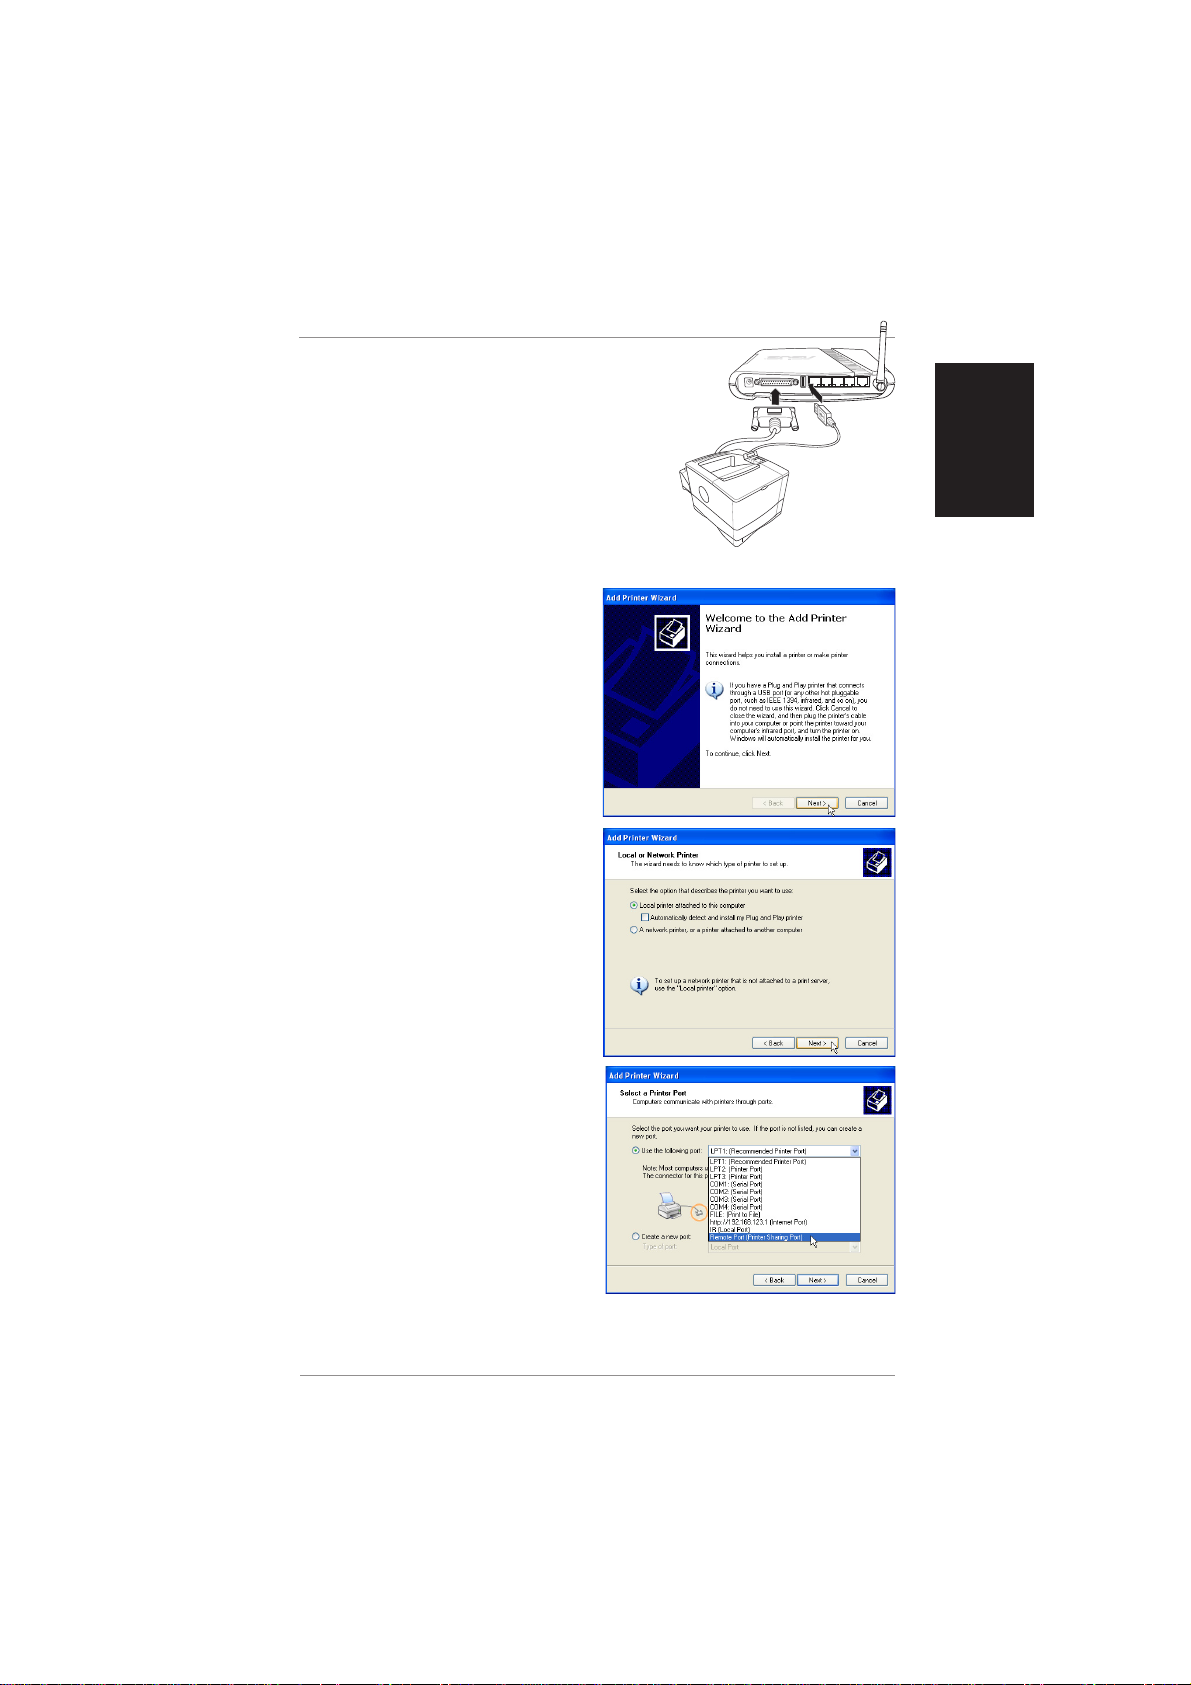
You should add your printer to your computer
to simplify the Wireless Router Printer Setup.
If you run the “Printer Setup Wizard” without
your printer driver installed, it will direct you to
the “Add Printer Wizard”. Connect your printer
to your computer using the parallel port or the
USB port (if available).
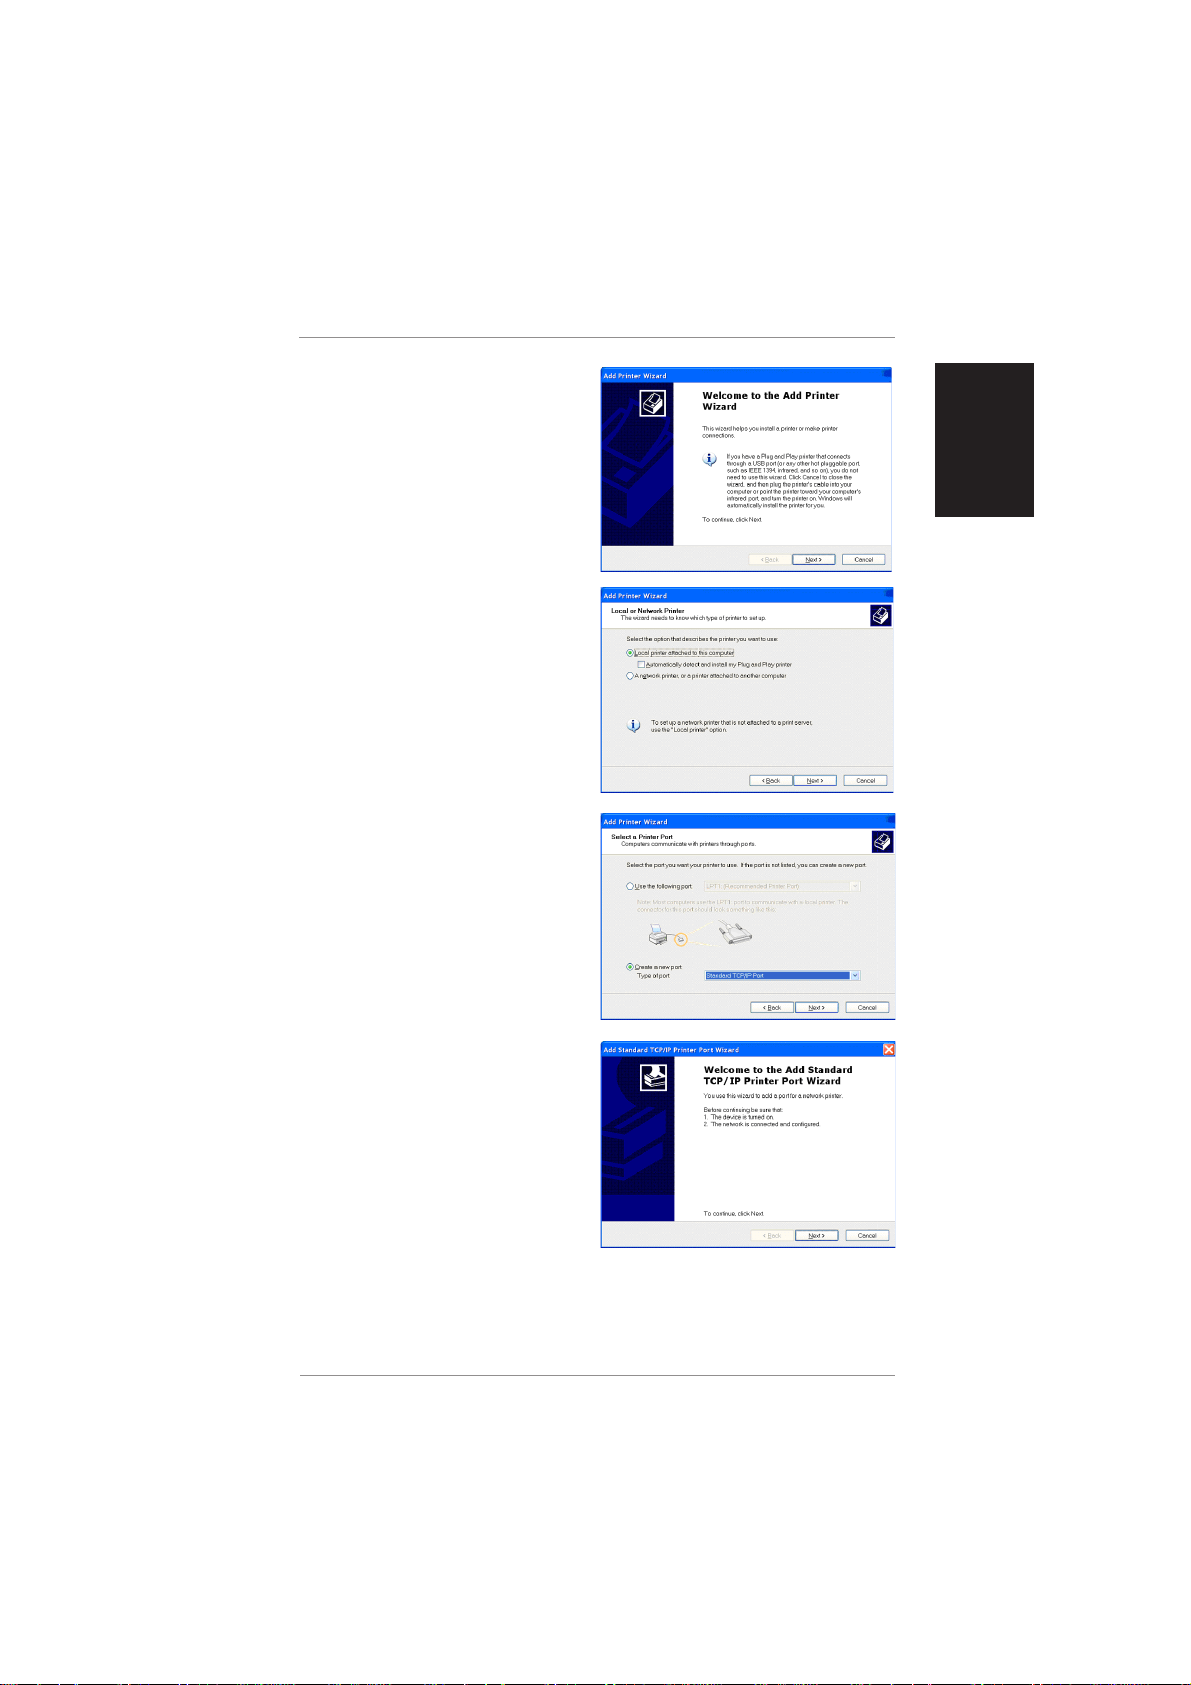
(Step 1)
Run the “Add Printer Wizard” from
Start | Printers and Faxes | Add
Printer.
(Step 2)
Choose “Local printer attached to this
computer”.
English
English
(Step 3)
Select the parallel port or USB port that
your printer is connected to.
ASUS Wireless Router Quick Start 5
Wireless Printing (Cont.)
English
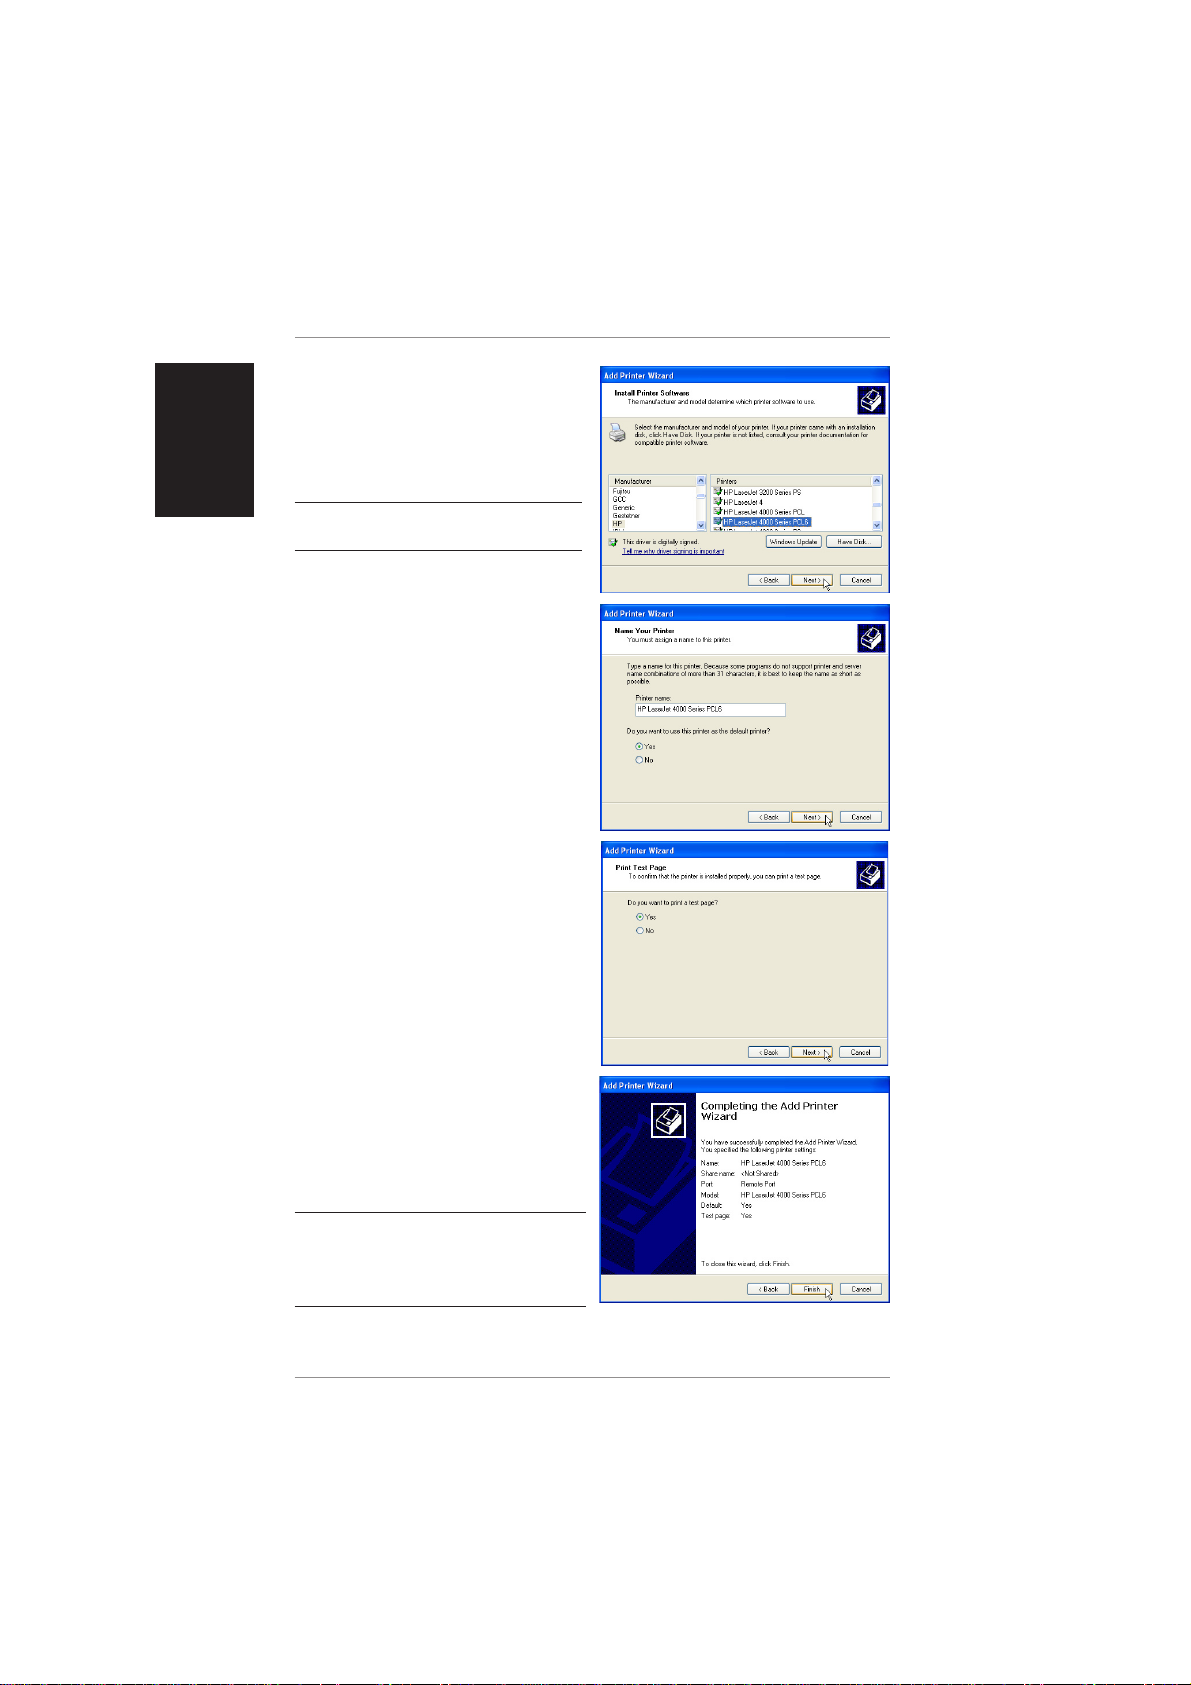
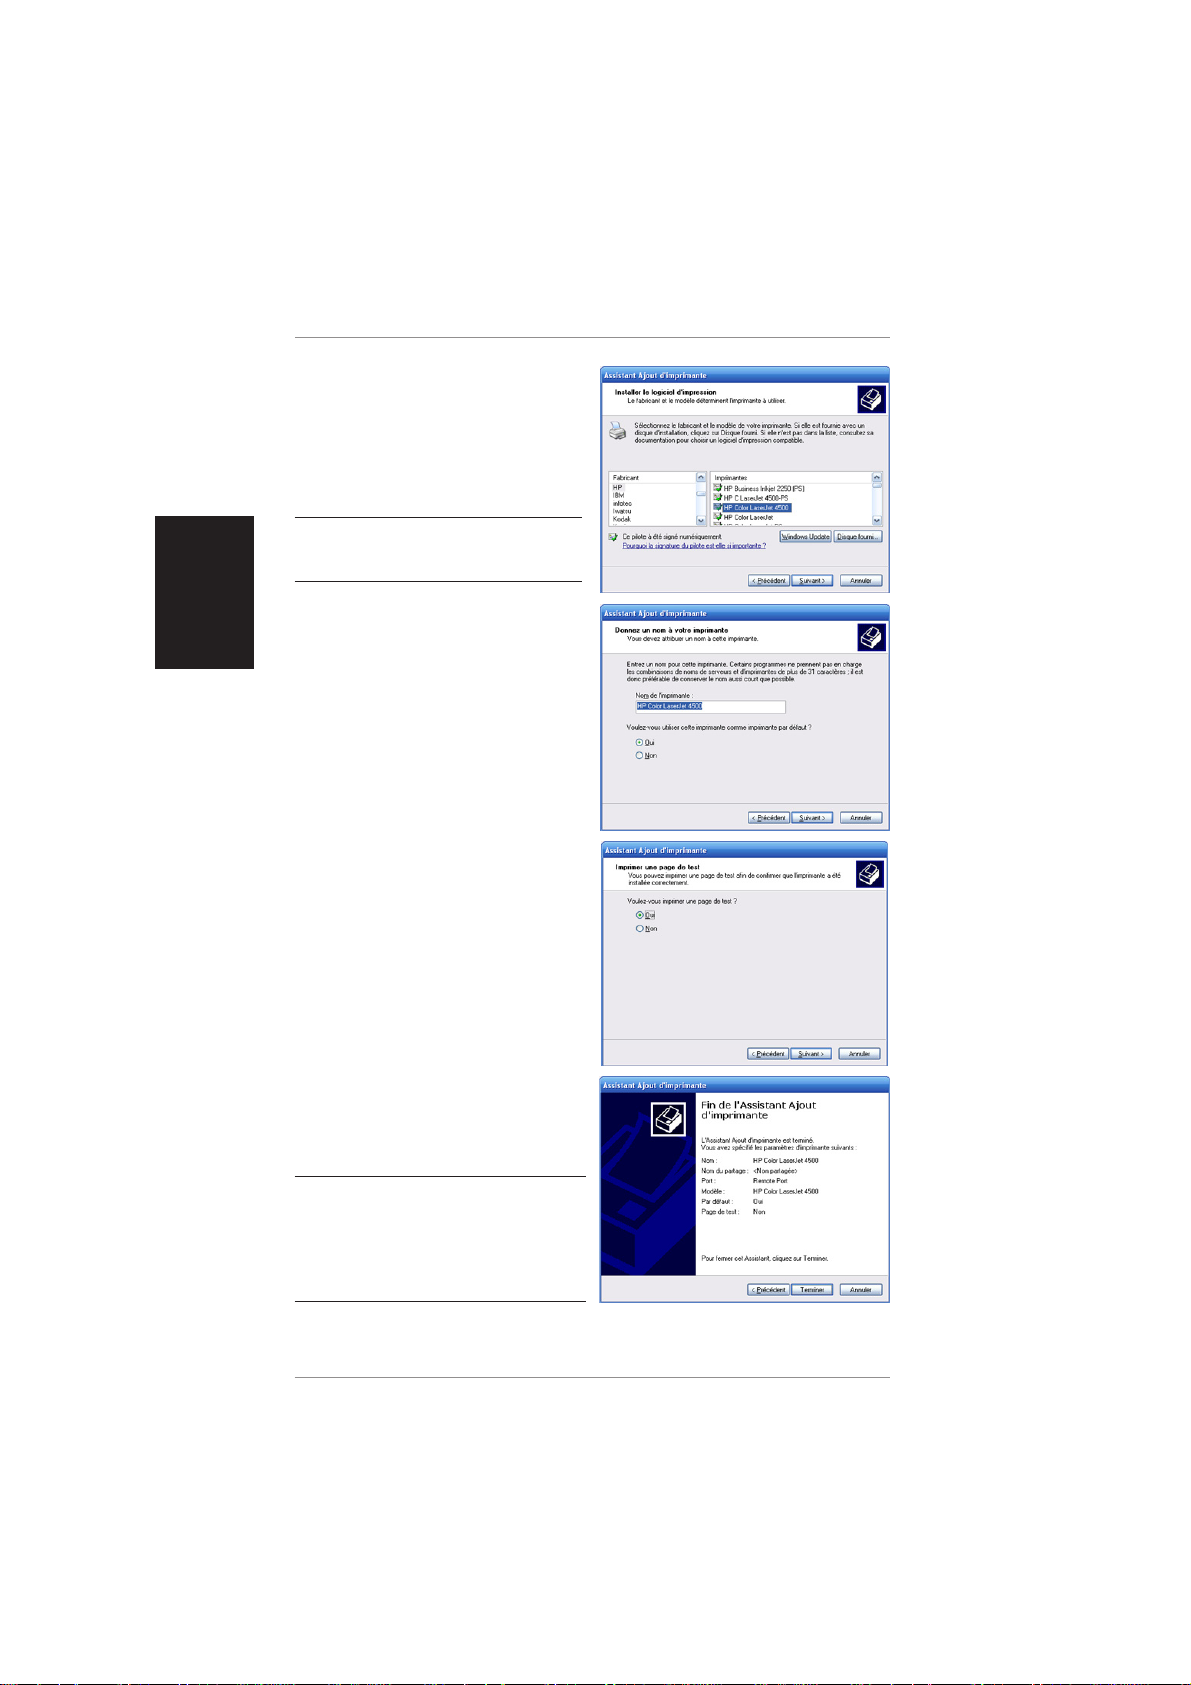
(Step 4)
Find your printer manufacturer and
model. Click Have Disk if you cannot
find your printer in the list and use the
driver provided with your printer.
Note: WL-500g only supports a parallel printer.
WL-500g Deluxe only supports a USB printer.
(Step 5)
Click Next to set this as your default
printer.
(Step 6)
You can print a test page.
(Step 7)
Click Finish to close the wizard.
Note: You can also add printer drivers using
the disc provided by your printer manufacturer.
However, you must disable the manufacturer’s
printer utility (if installed) if you wish to use
the wireless LAN Printer Server function.
6 ASUS Wireless Router Quick Start
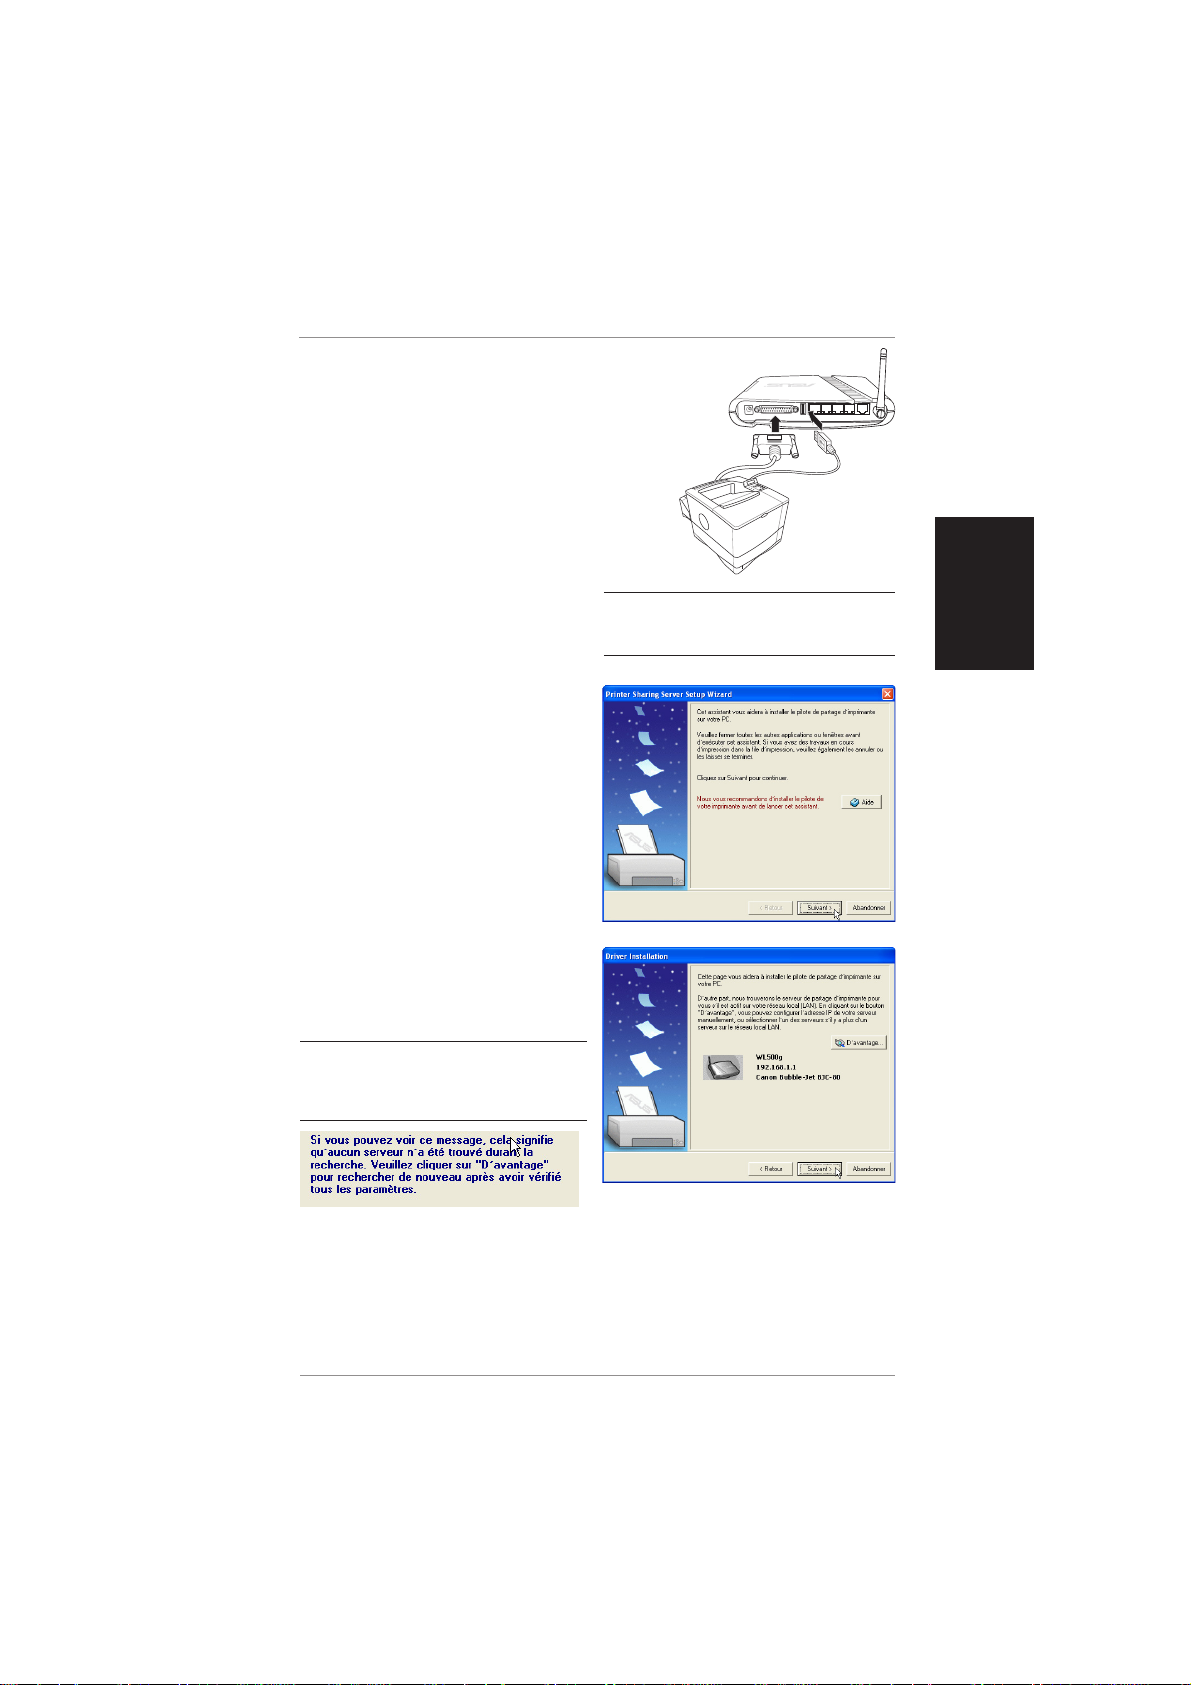
Printer Setup Wizard
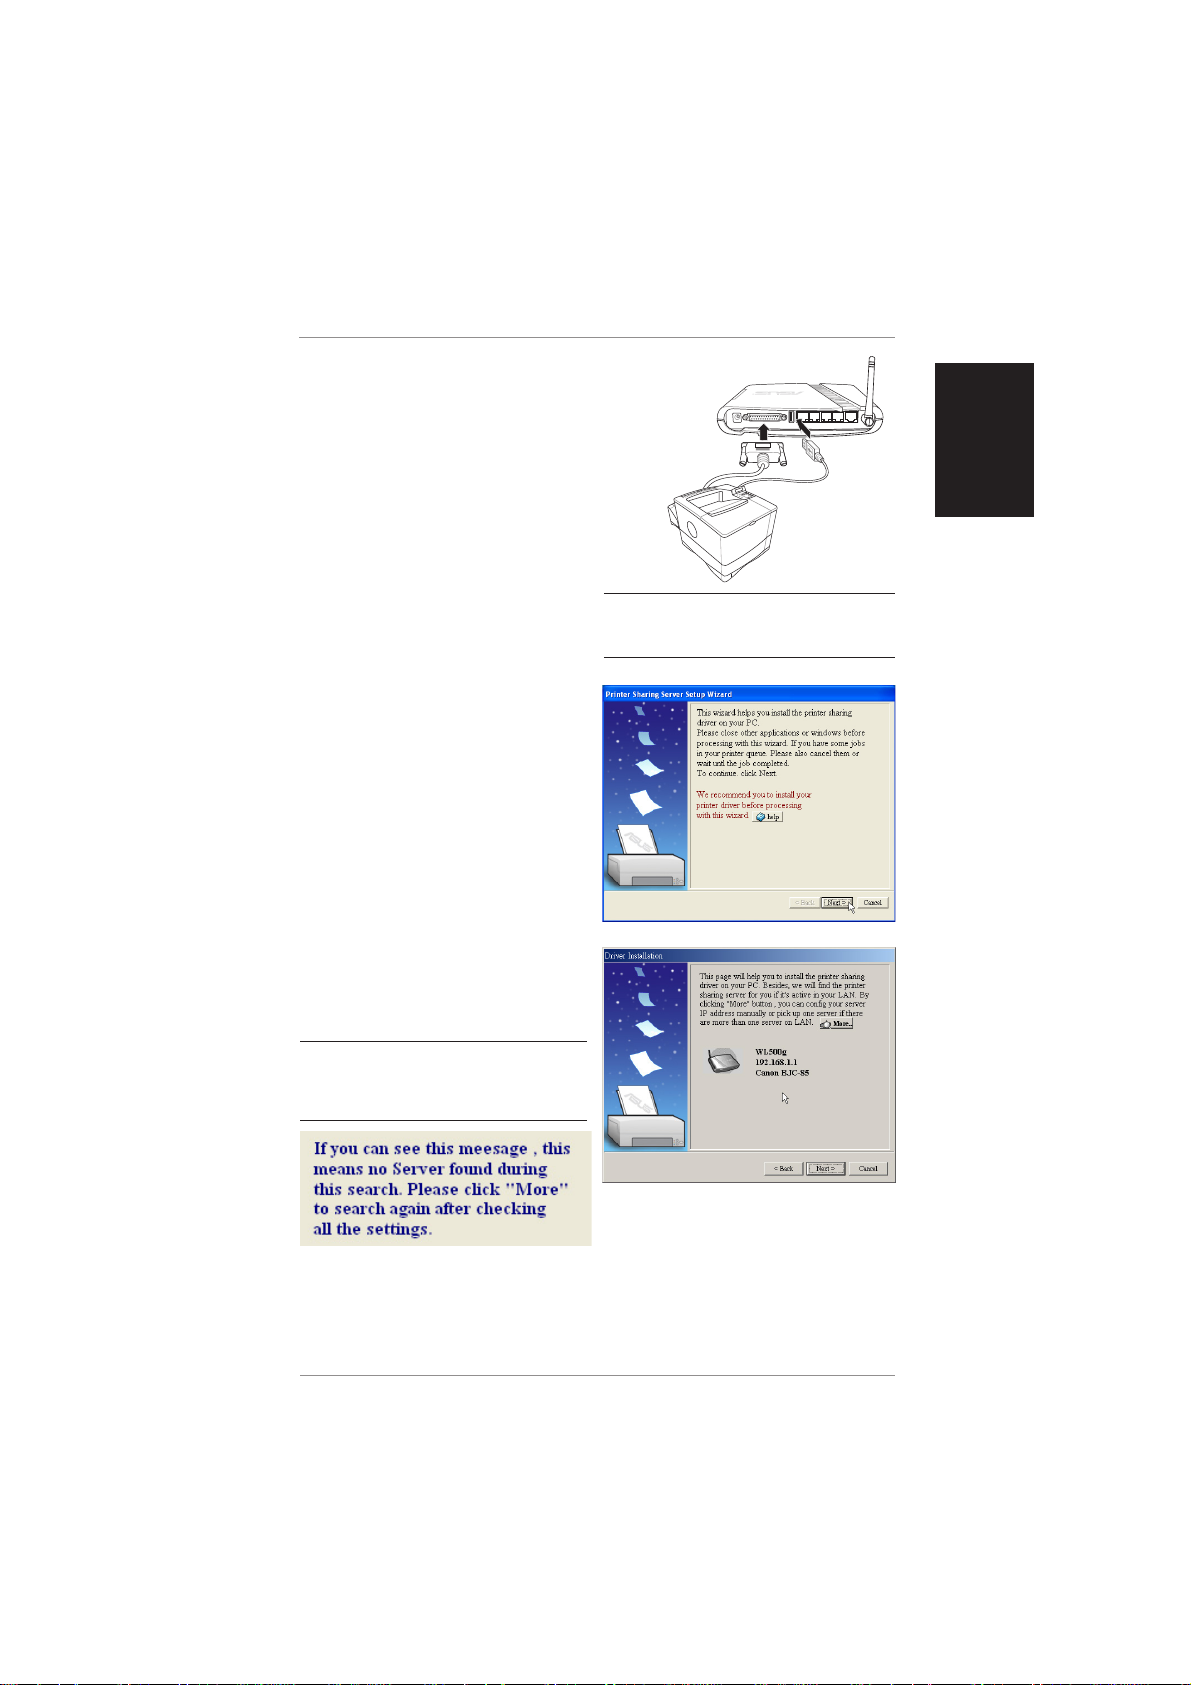
Make sure your printer is connected
to the Wireless Router printer port or
USB port and its power is turned on.
Launch the “Printer Setup Wizard”
through the Start menu. The wizard
will explore all available ASUS
Wireless Routers and model
information of the printers attached to
them in your local network.
(Step 1)
Having a printer installed on the printer
port (LPT1) or a USB port makes the
setup process easier (refer to the
following page).
Note: WL-500g has one parallel port and one
USB port. WL-500g Deluxe has two USB ports
and no parallel port.
English
English
(Step 2)
If the printer is found, the name of the
printer will be shown on this screen.
Note: If there is an error communicating with
the printer, you will get this message. Make
sure that the printer is ON, ready, and connected. Click Back and Next.
ASUS Wireless Router Quick Start 7
English
Printer Setup Wizard (Cont.)
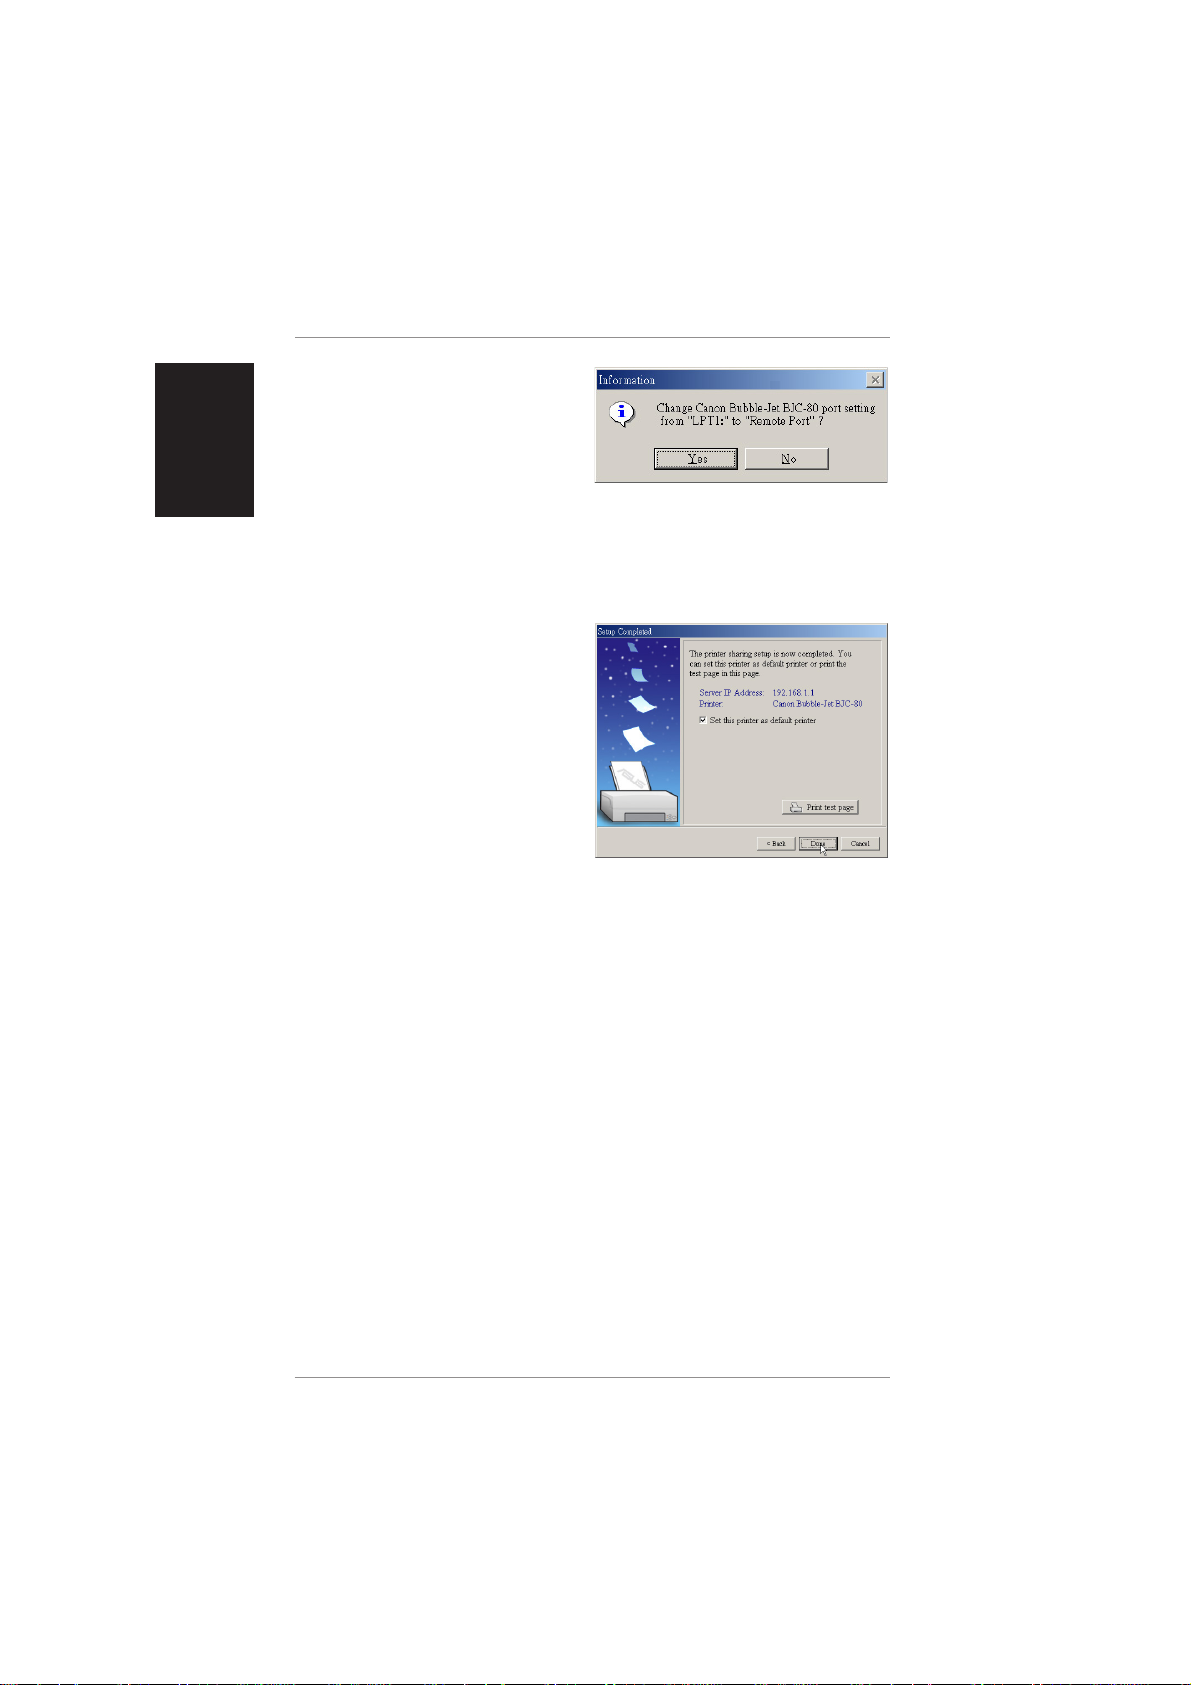
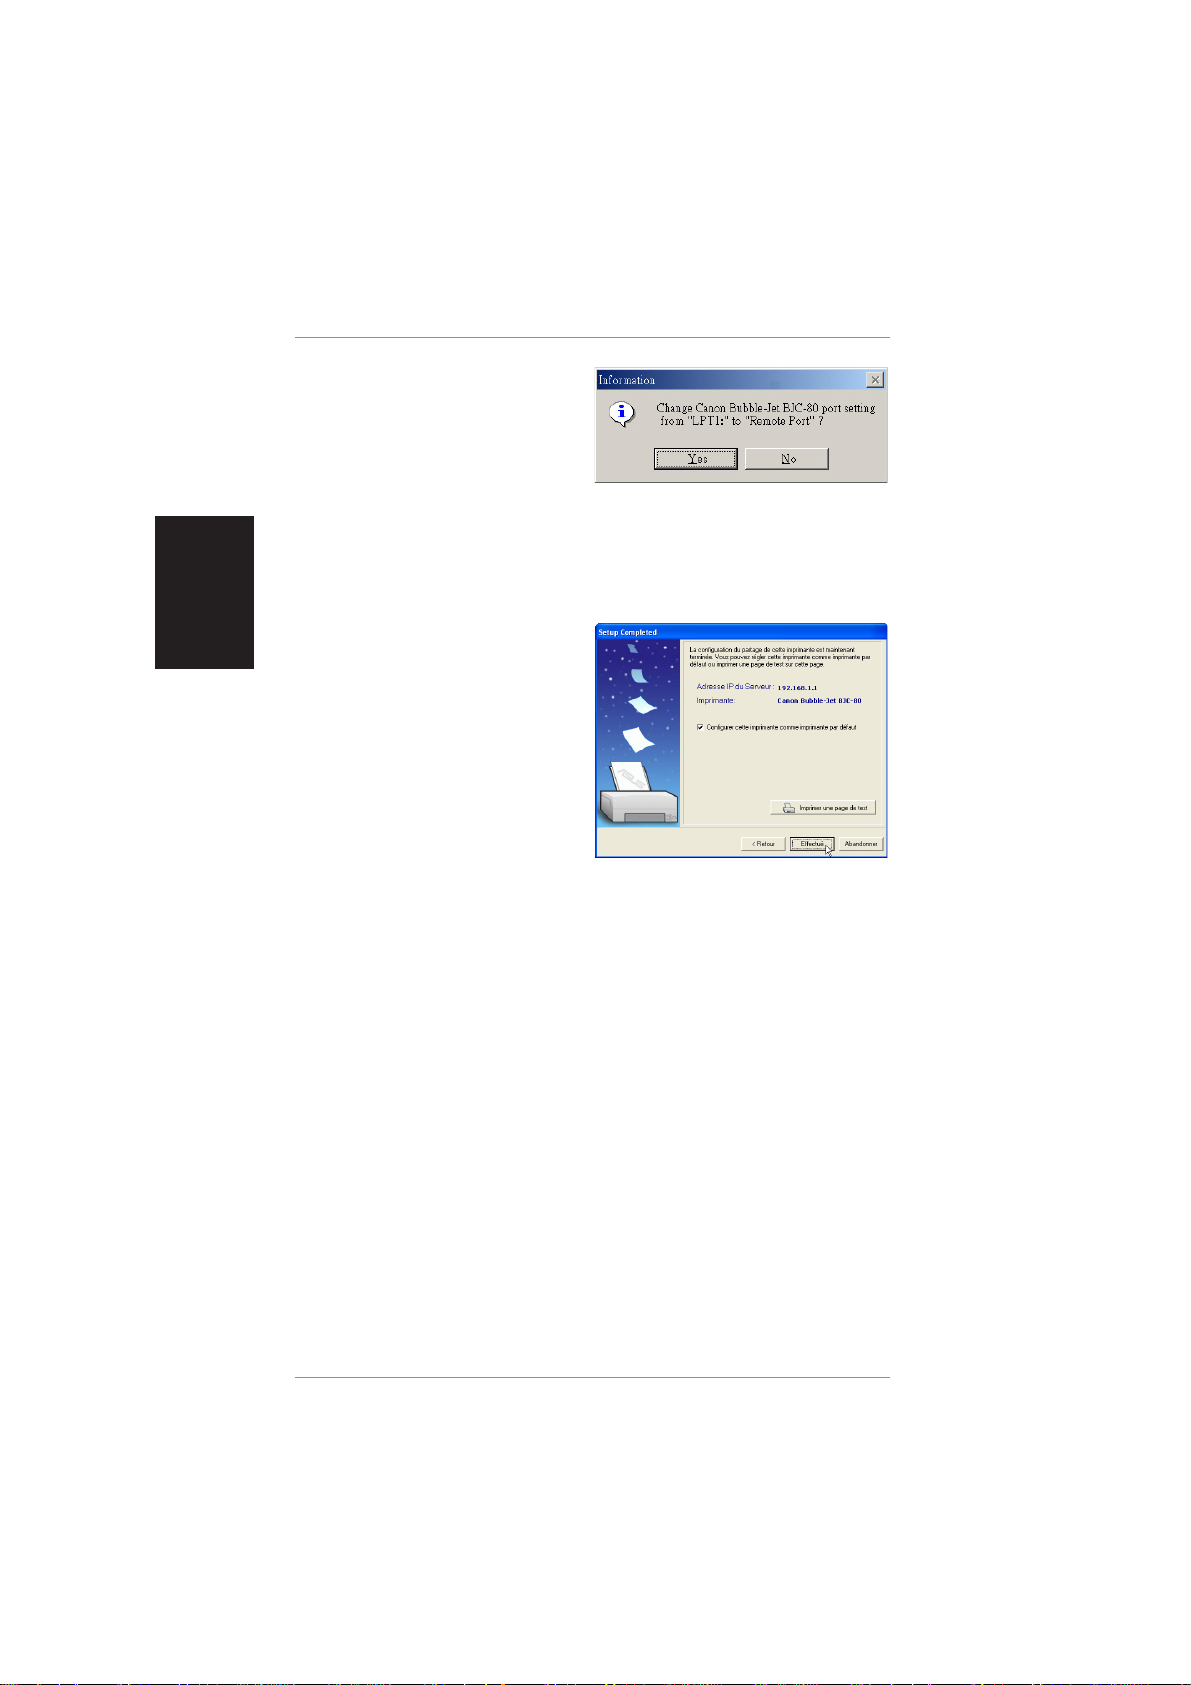
(Step 3)
This setup wizard will change your
default printer to use “Standard TCP/
IP port” which is serviced by the
Wireless Router.
(Windows XP/2000: This setup wizard will guide you to select or add a
“Standard TCP/IP port”. Refer to “Setup for LPR client under Windows XP” for
details.)
(Windows 98/ME: This setup wizard will change your default printer to use
“Remote Port” which is serviced by the Wireless Router .)
(Step 4)
Click Done when setup is complete.
8 ASUS Wireless Router Quick Start
Setup for LPR client (Windows XP)
(Step 1)
Run the “Add Printer Wizard” from Start
| Printers and Faxes | Add Printer.
(Step 2)
Choose “Local printer attached to this
computer” then press Next.
(Step 3)
Click on “Create a new port” and select
“Standard TCP/IP Port” in the pull down
menu. Then press Next.
English
English
(Step 4)
Click Next on the “Add Standard TCP/
IP Printer Port Wizard”.
ASUS Wireless Router Quick Start 9
English
Setup for LPR client (Cont.)
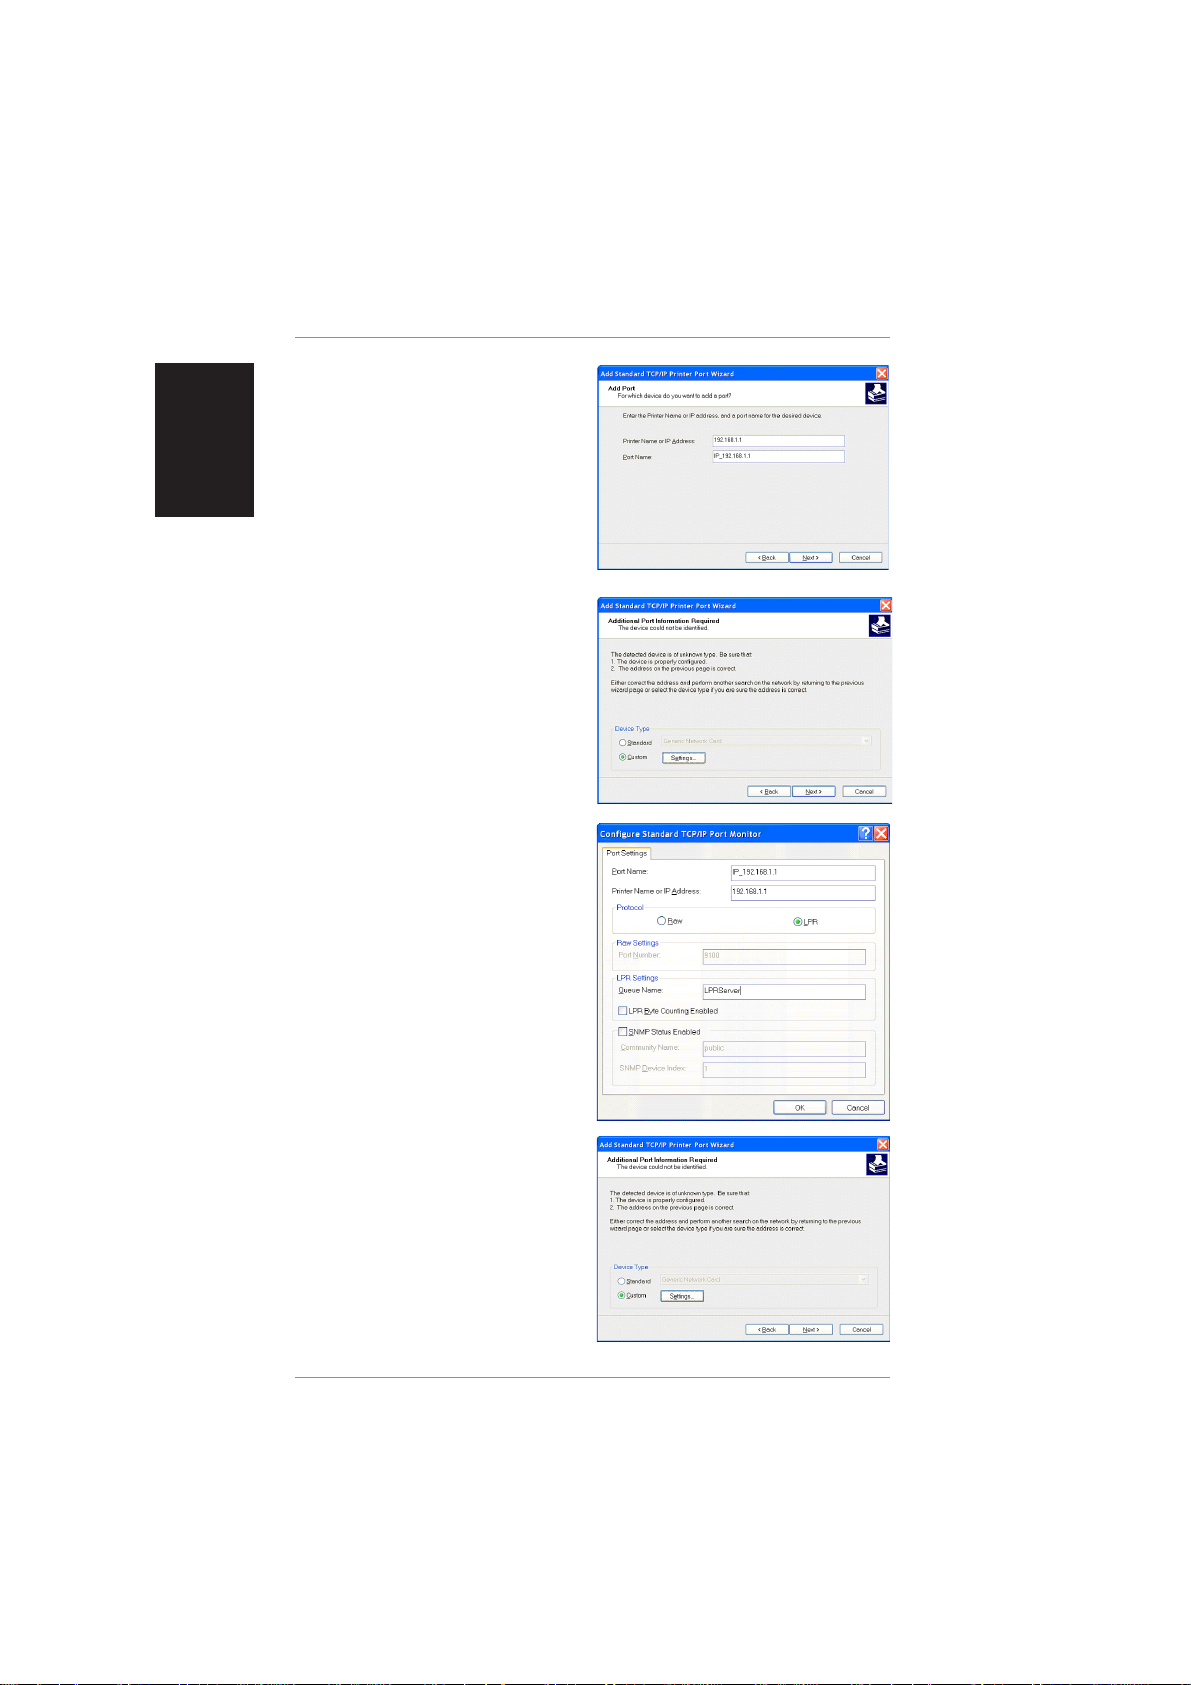
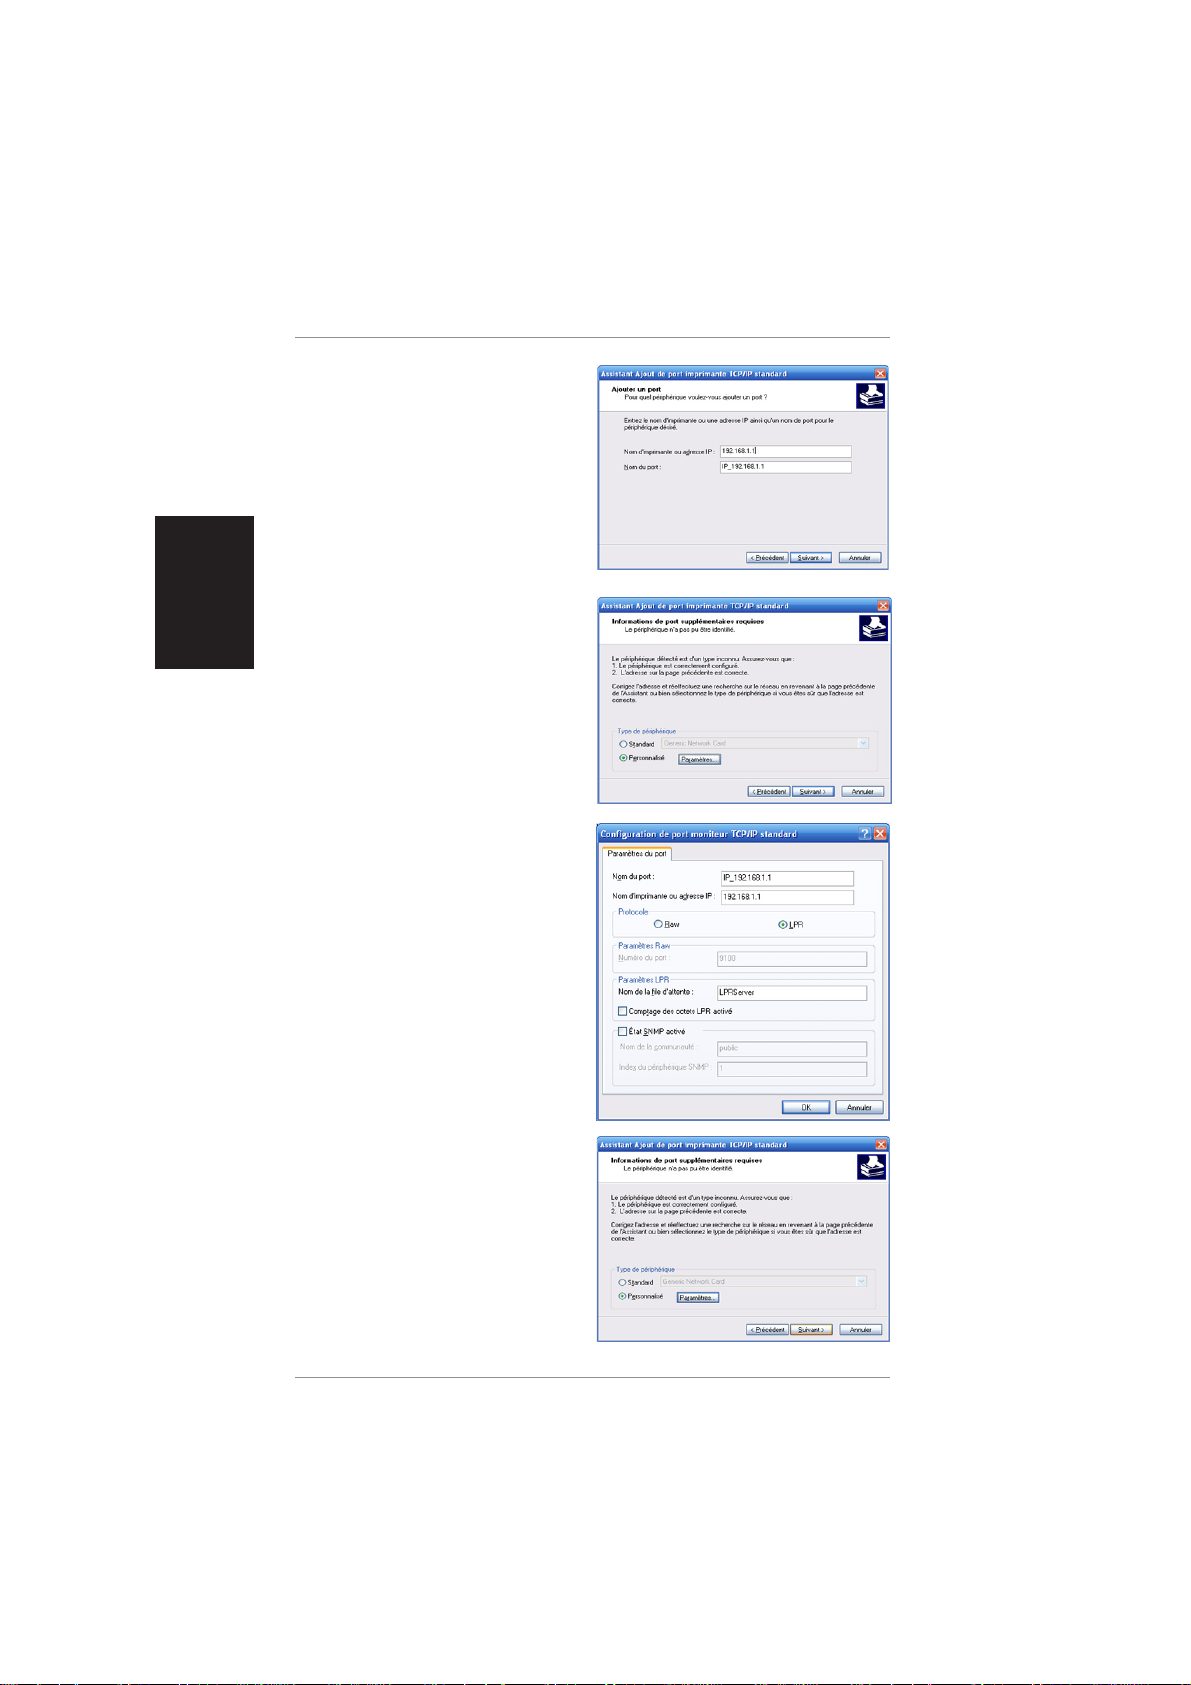
(Step 5)
Input the IP address of the WL500g in
the “Printer Name or IP Address” field
and the press Next.
(Step 6)
Select “Custom” and then click
Settings…
(Step 7)
Select Protocol LPR and type
LPRServer in “Queue Name field”.
(Step 8)
After completing settings, press Next.
10 ASUS Wireless Router Quick Start
Setup for LPR client (Cont.)
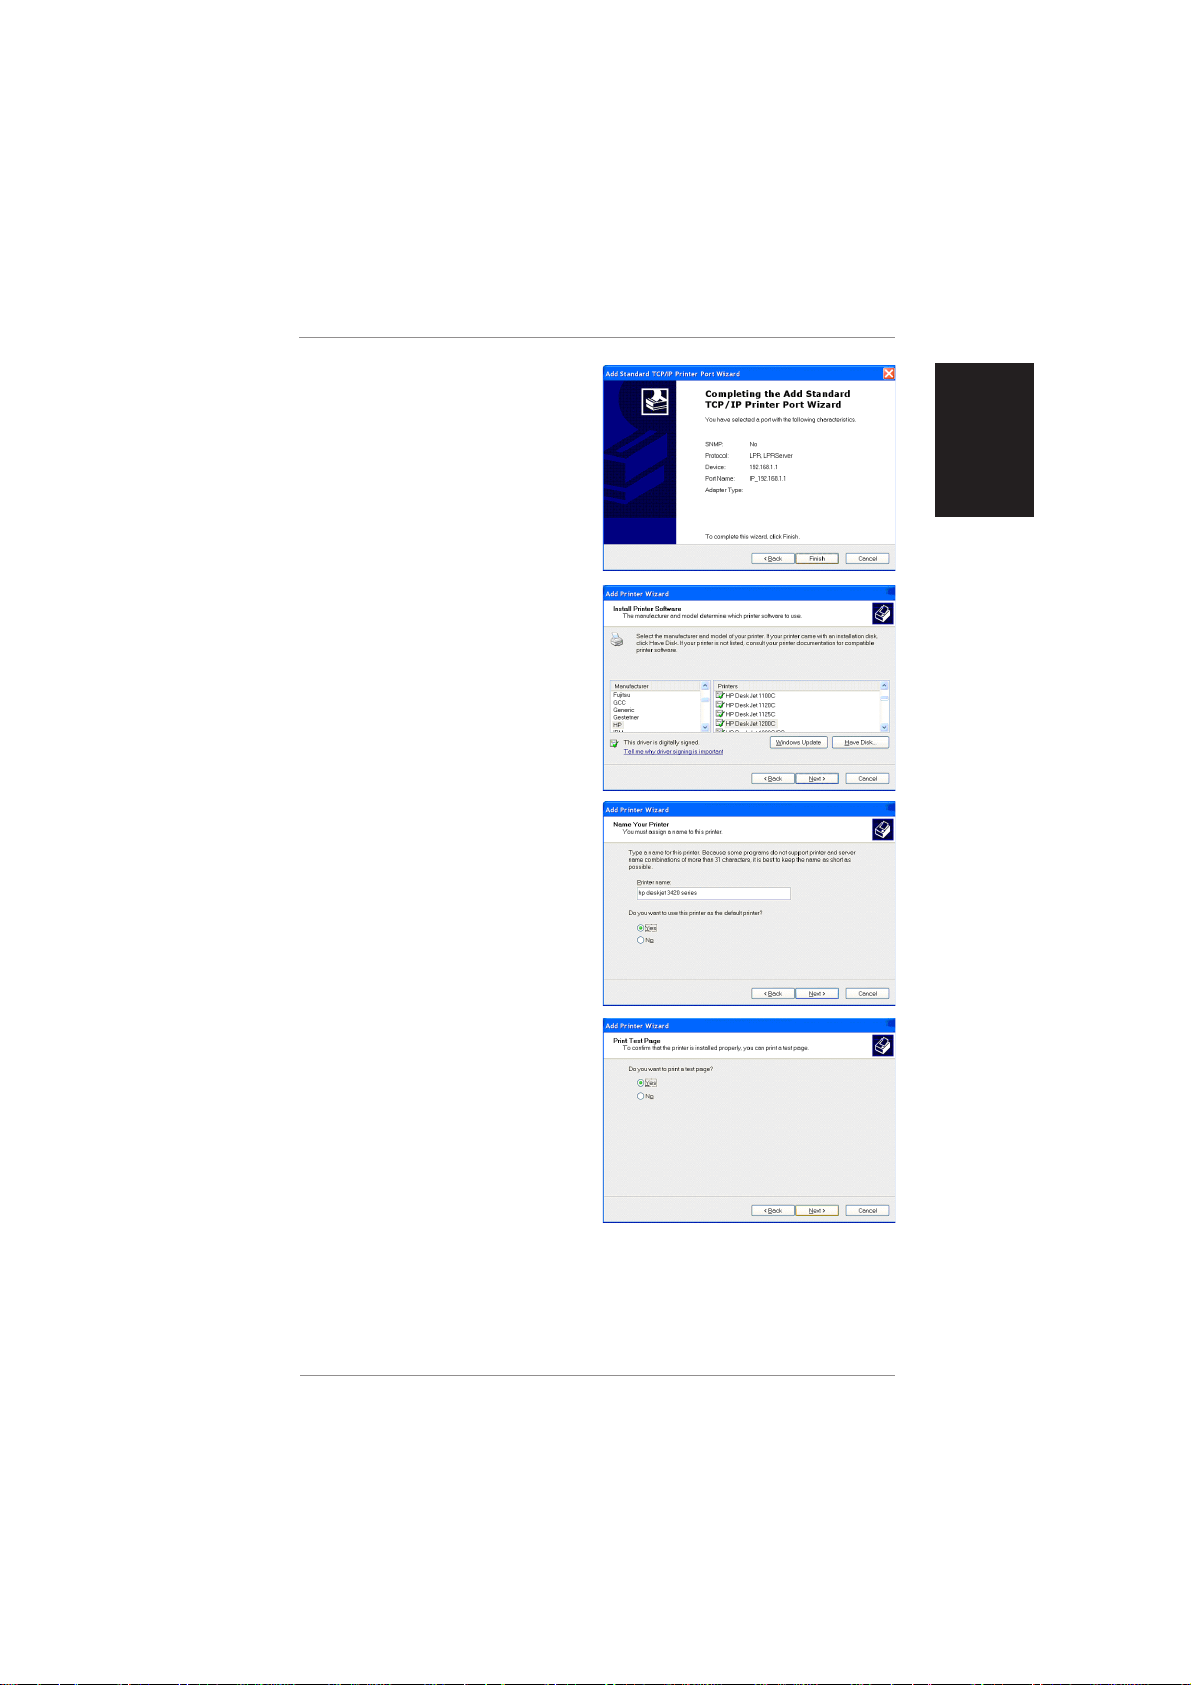
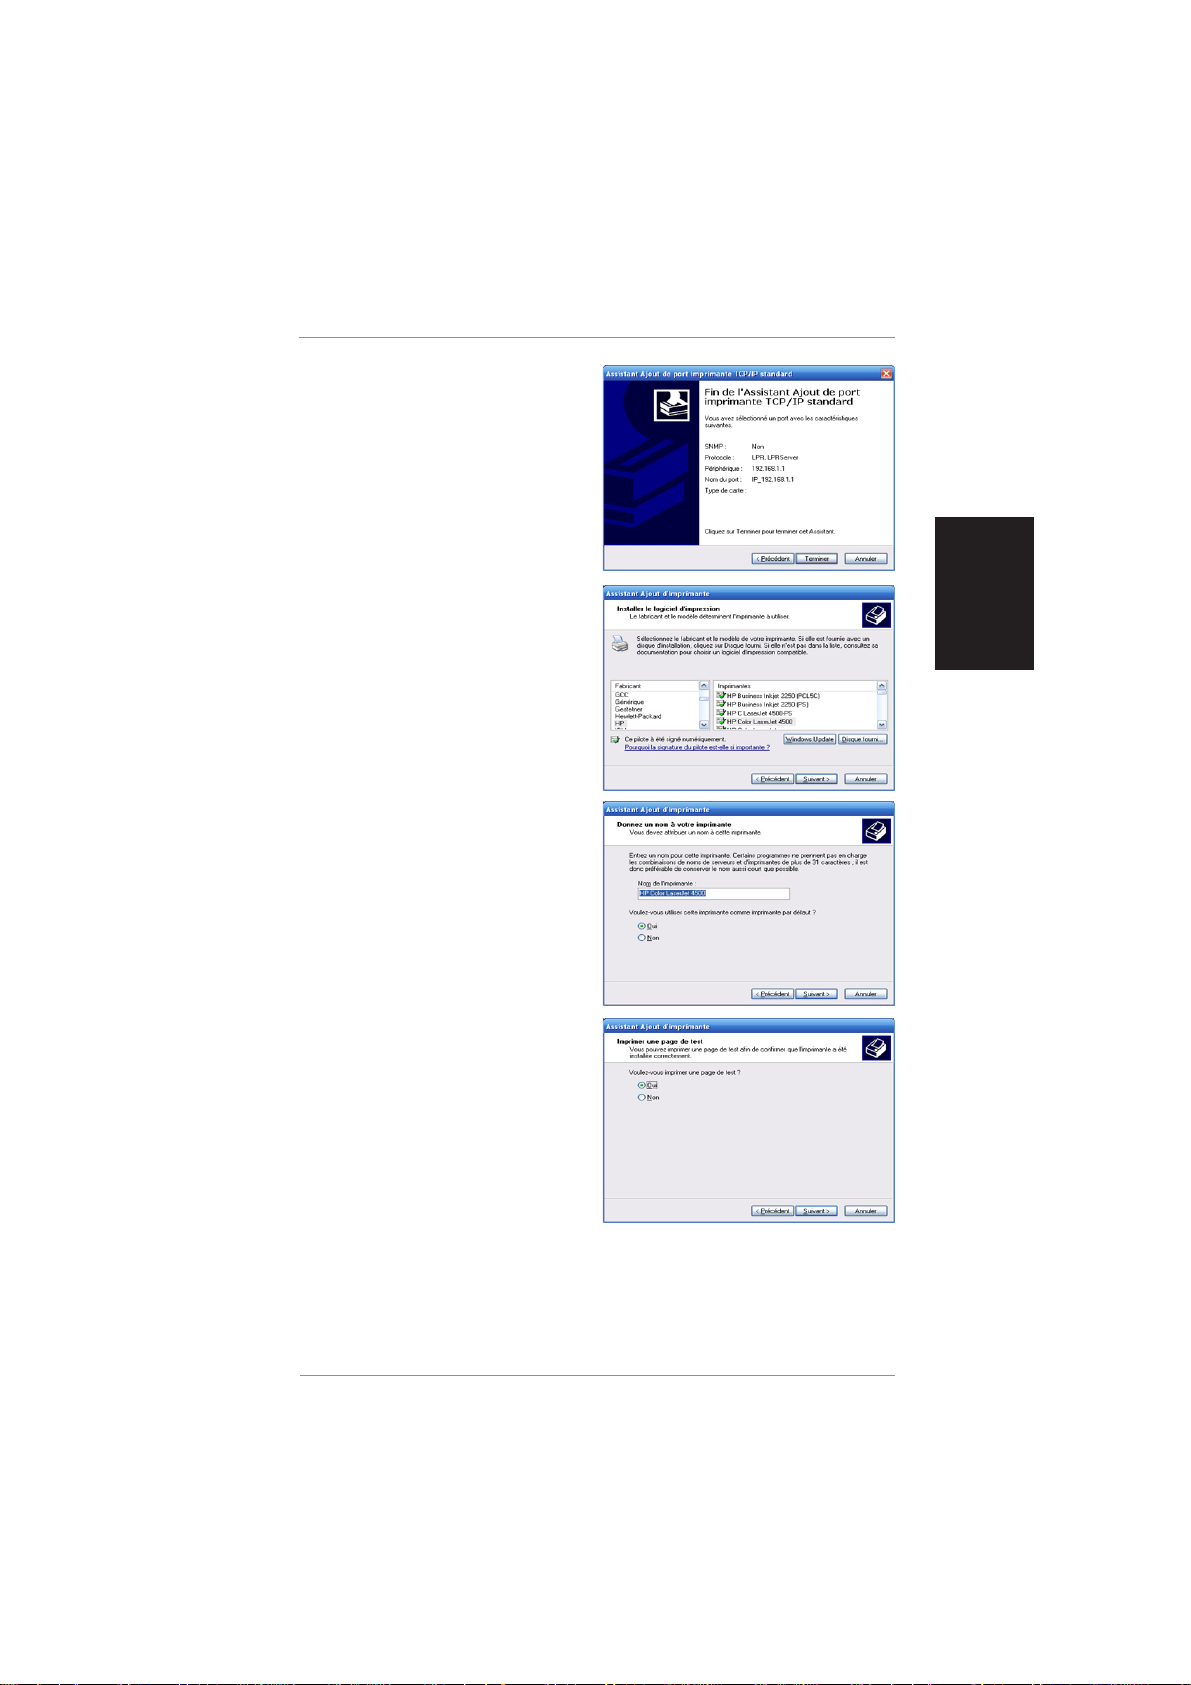
(Step 9)
Press Finish to complete the “Add
Standard TCP/IP Printer Port Wizard”
and go back to “Add Printer Wizard”.
(Step 10)
Find the manufacturer and model of
your printer. Click Have Disk if you
cannot find it in the list and use the
driver provided with your printer.
(Step 11)
Click Next to set this as your default
printer.
English
English
(Step 12)
Select Yes and Next to print a test
page, otherwise select No.
(Step 13)
When the “Add Printer Wizard” is
complete, click Finish to close the
wizard.
ASUS Wireless Router Quick Start 11
English
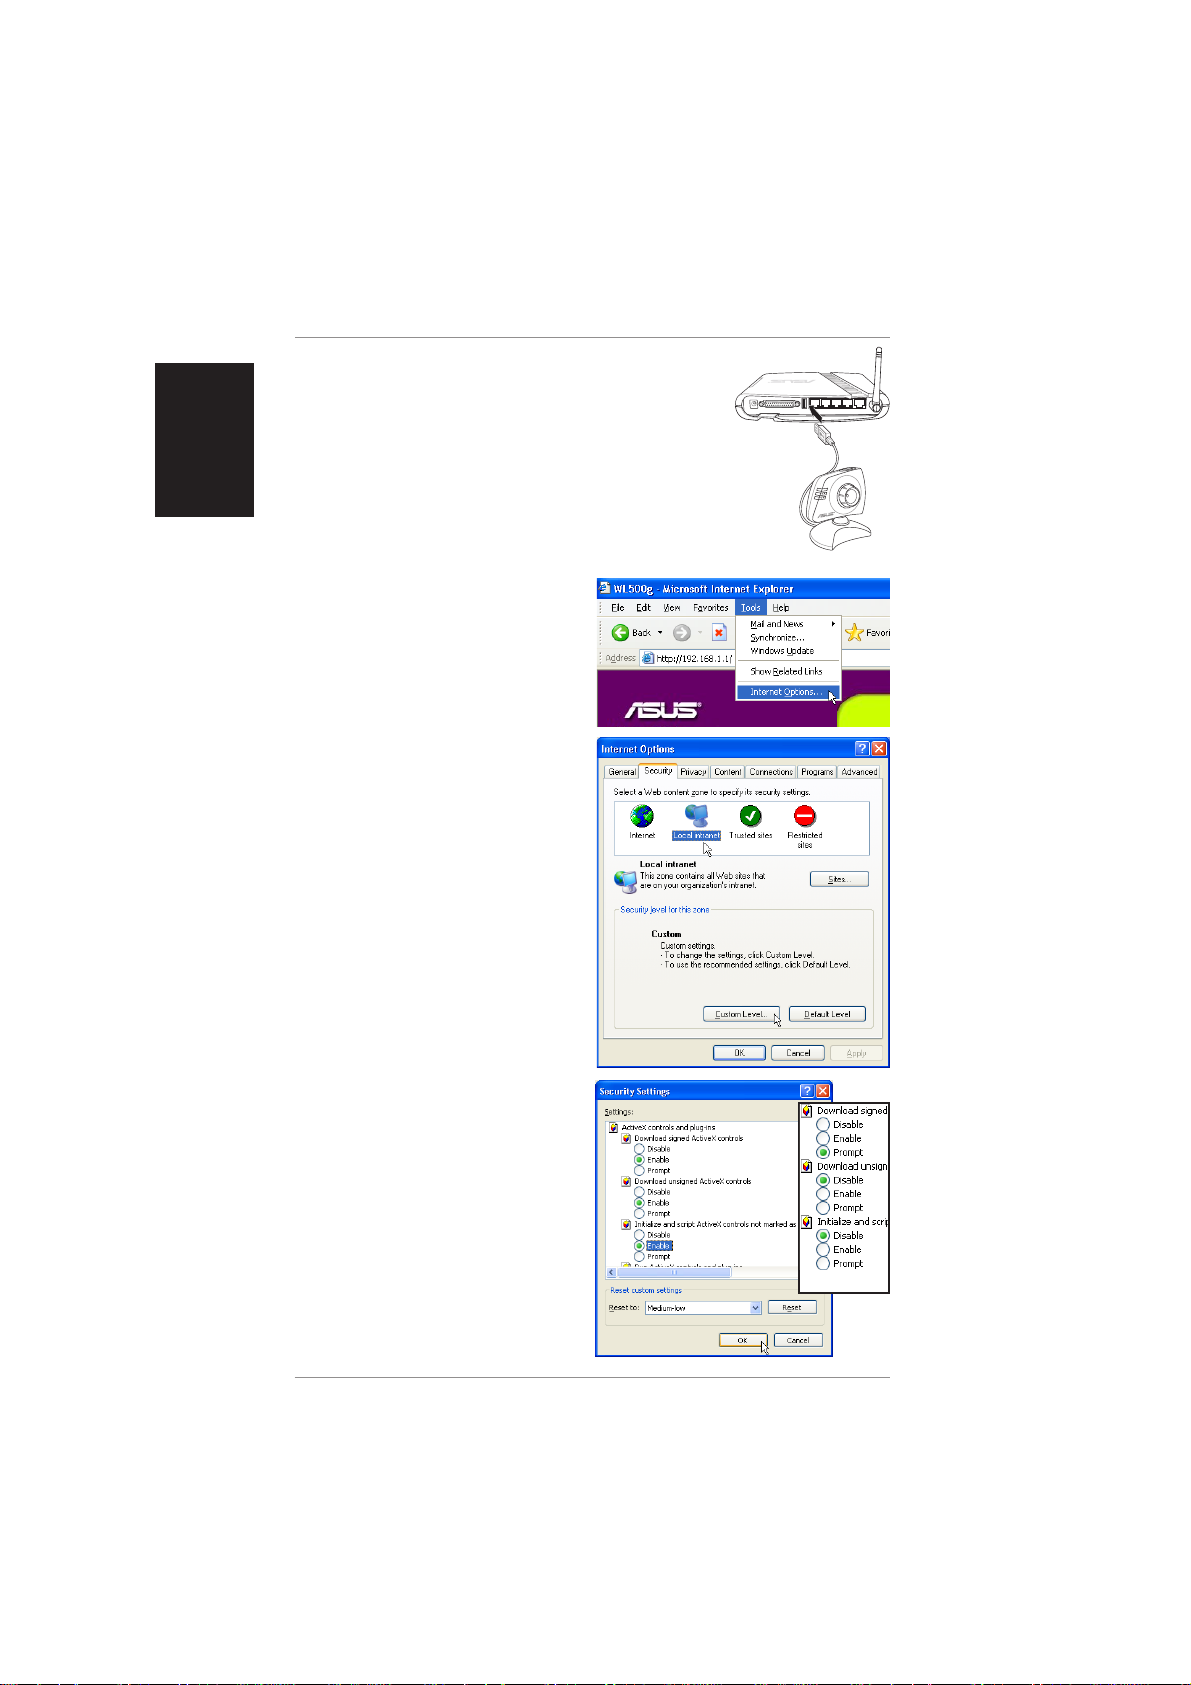
Web Camera Setup
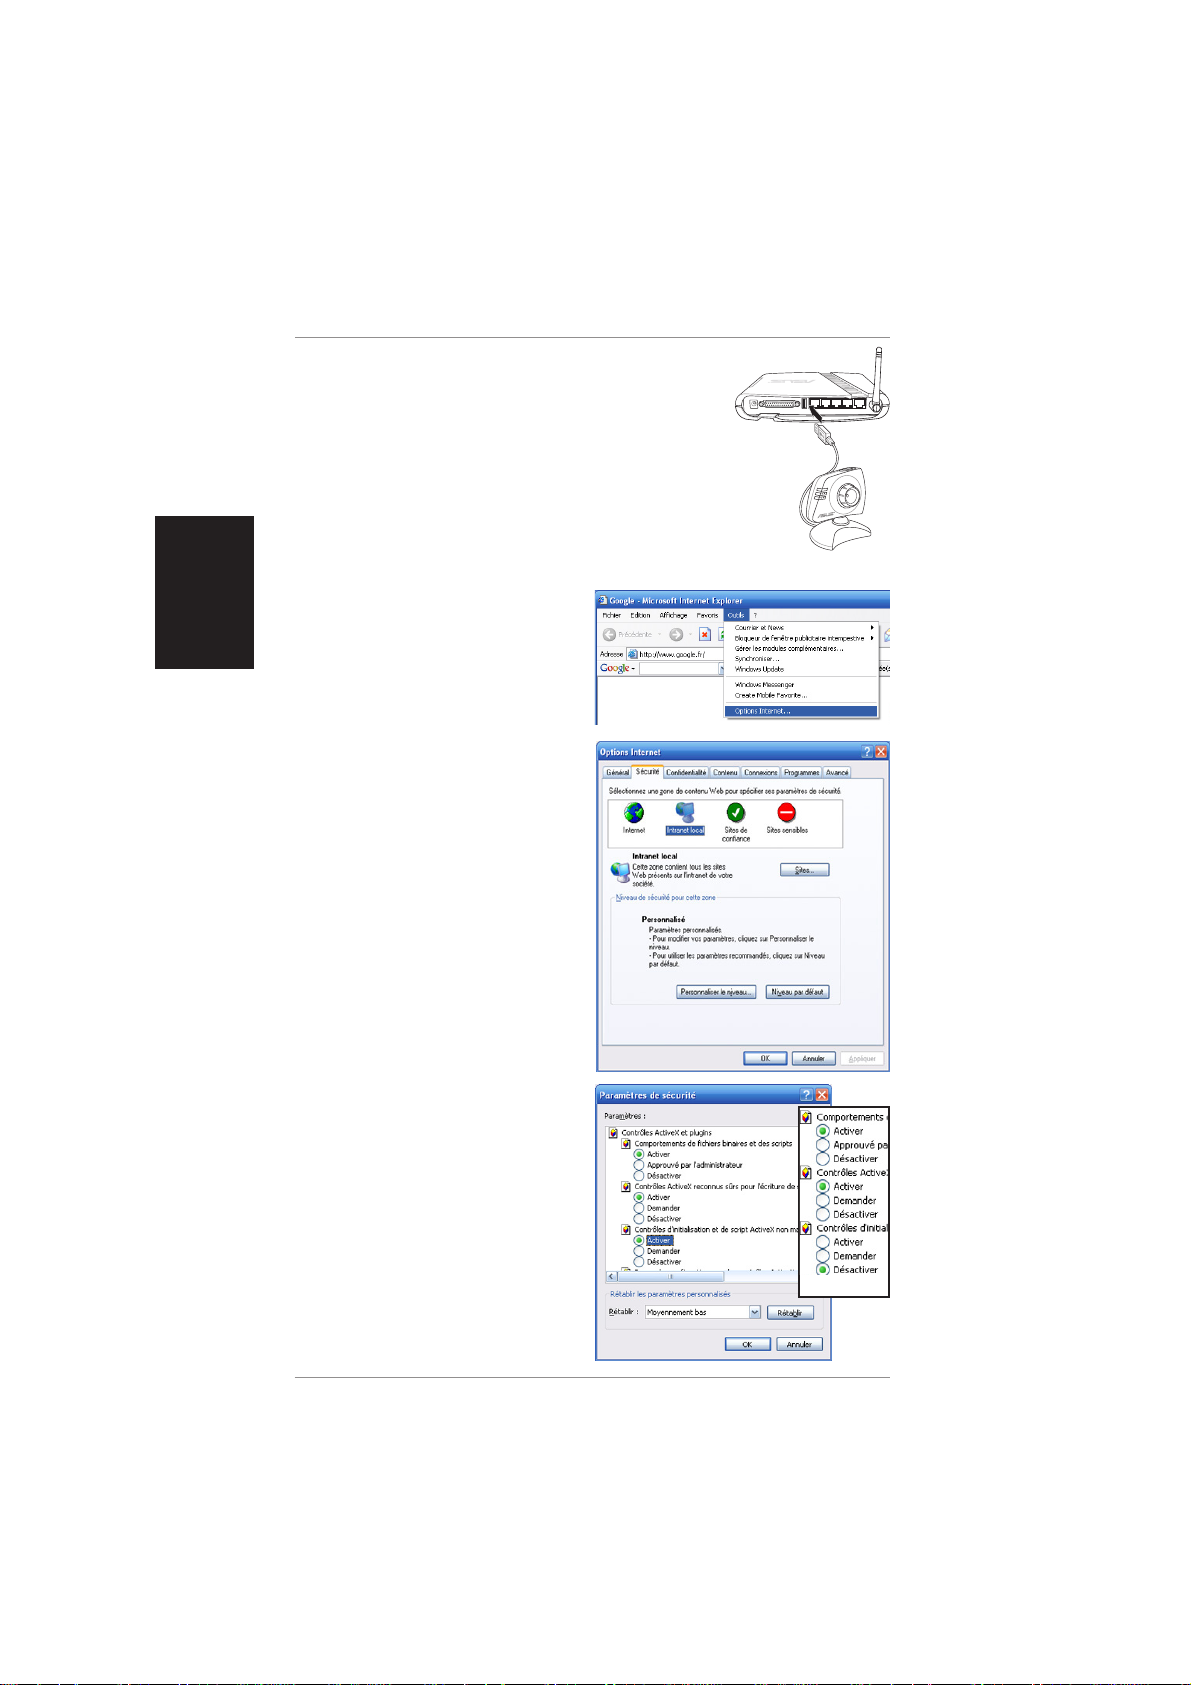
Connect your USB camera using the USB port on the
WL-500b/g Wireless Router.
Internet Browser Setting
For clients that use Netscape or other browser that
don’t support ActiveX, you don’t need additional setting
to view an image in browser. For client that use IE 5.0
or above, you need to set IE to get a better support on
ActiveX as following:
(Step 1)
Go to Internet Options from the
“Tools” menu.
(Step 2)
Click Local Intranet settings and click
Custom Level.
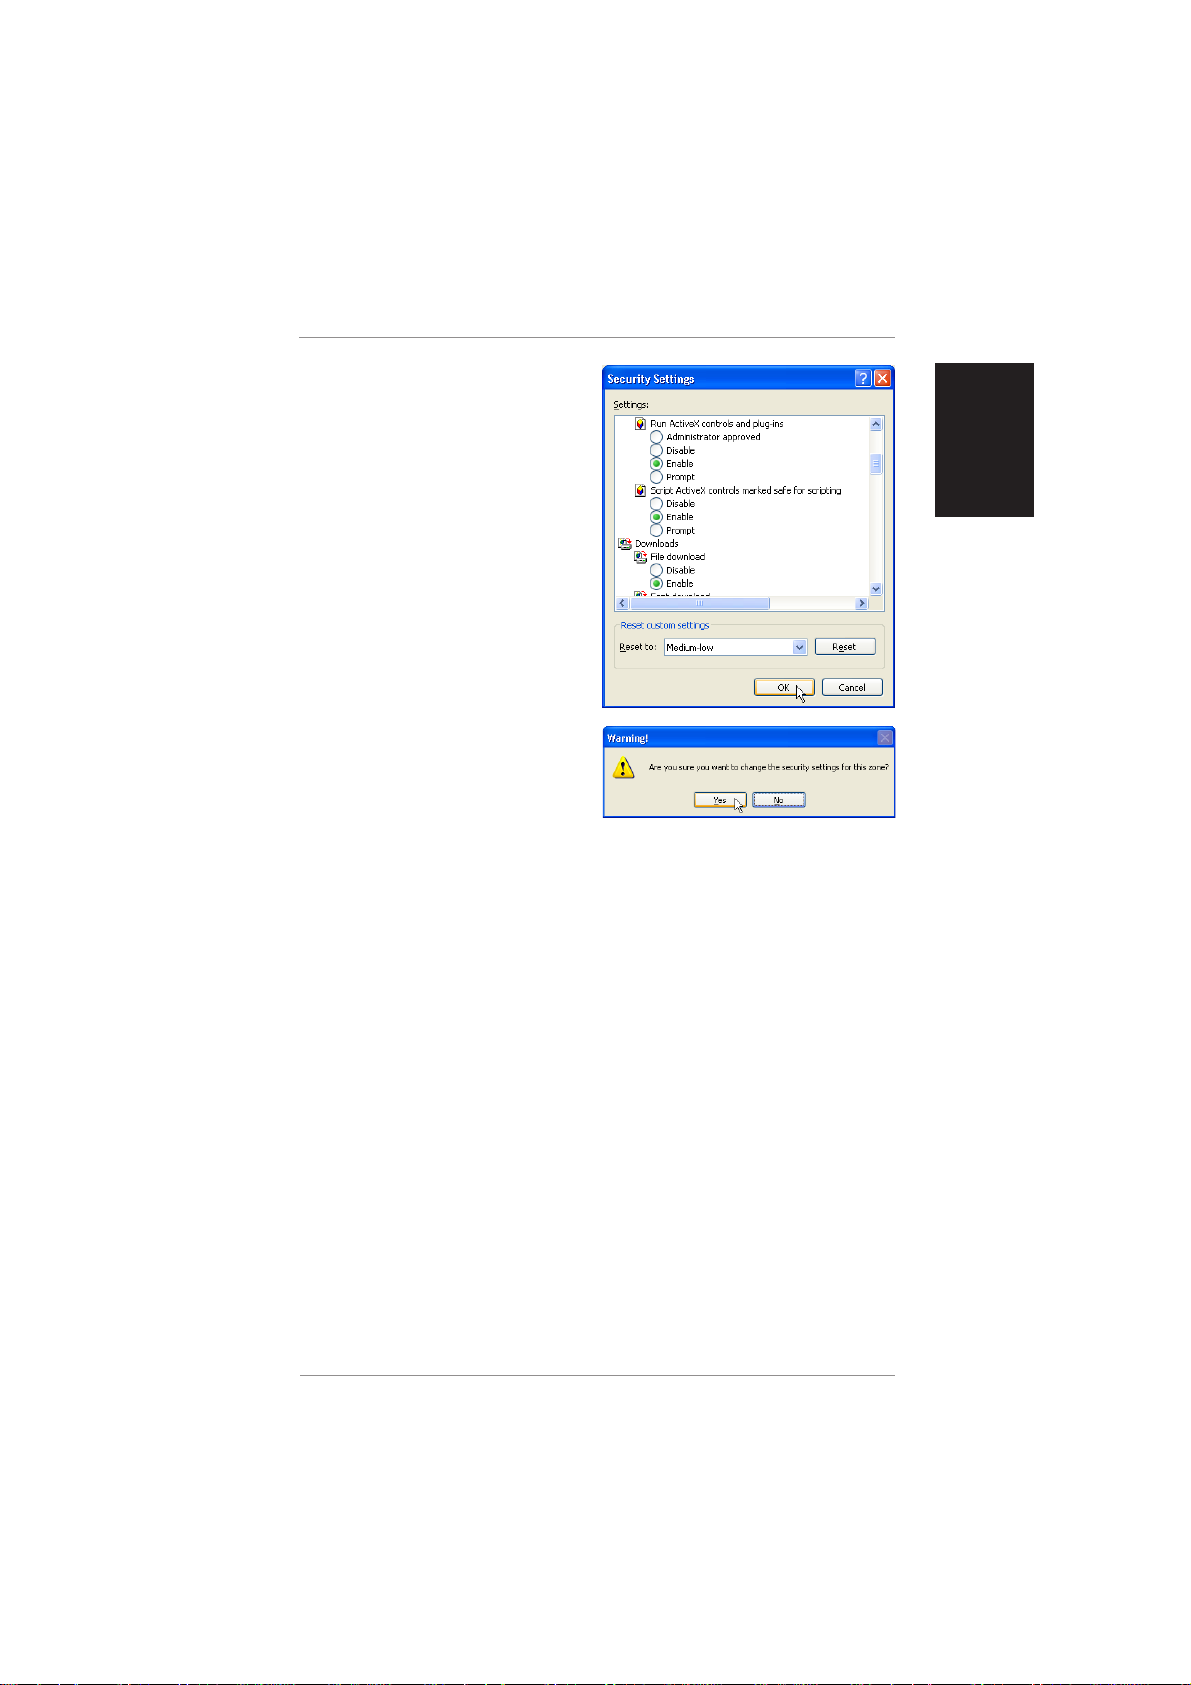
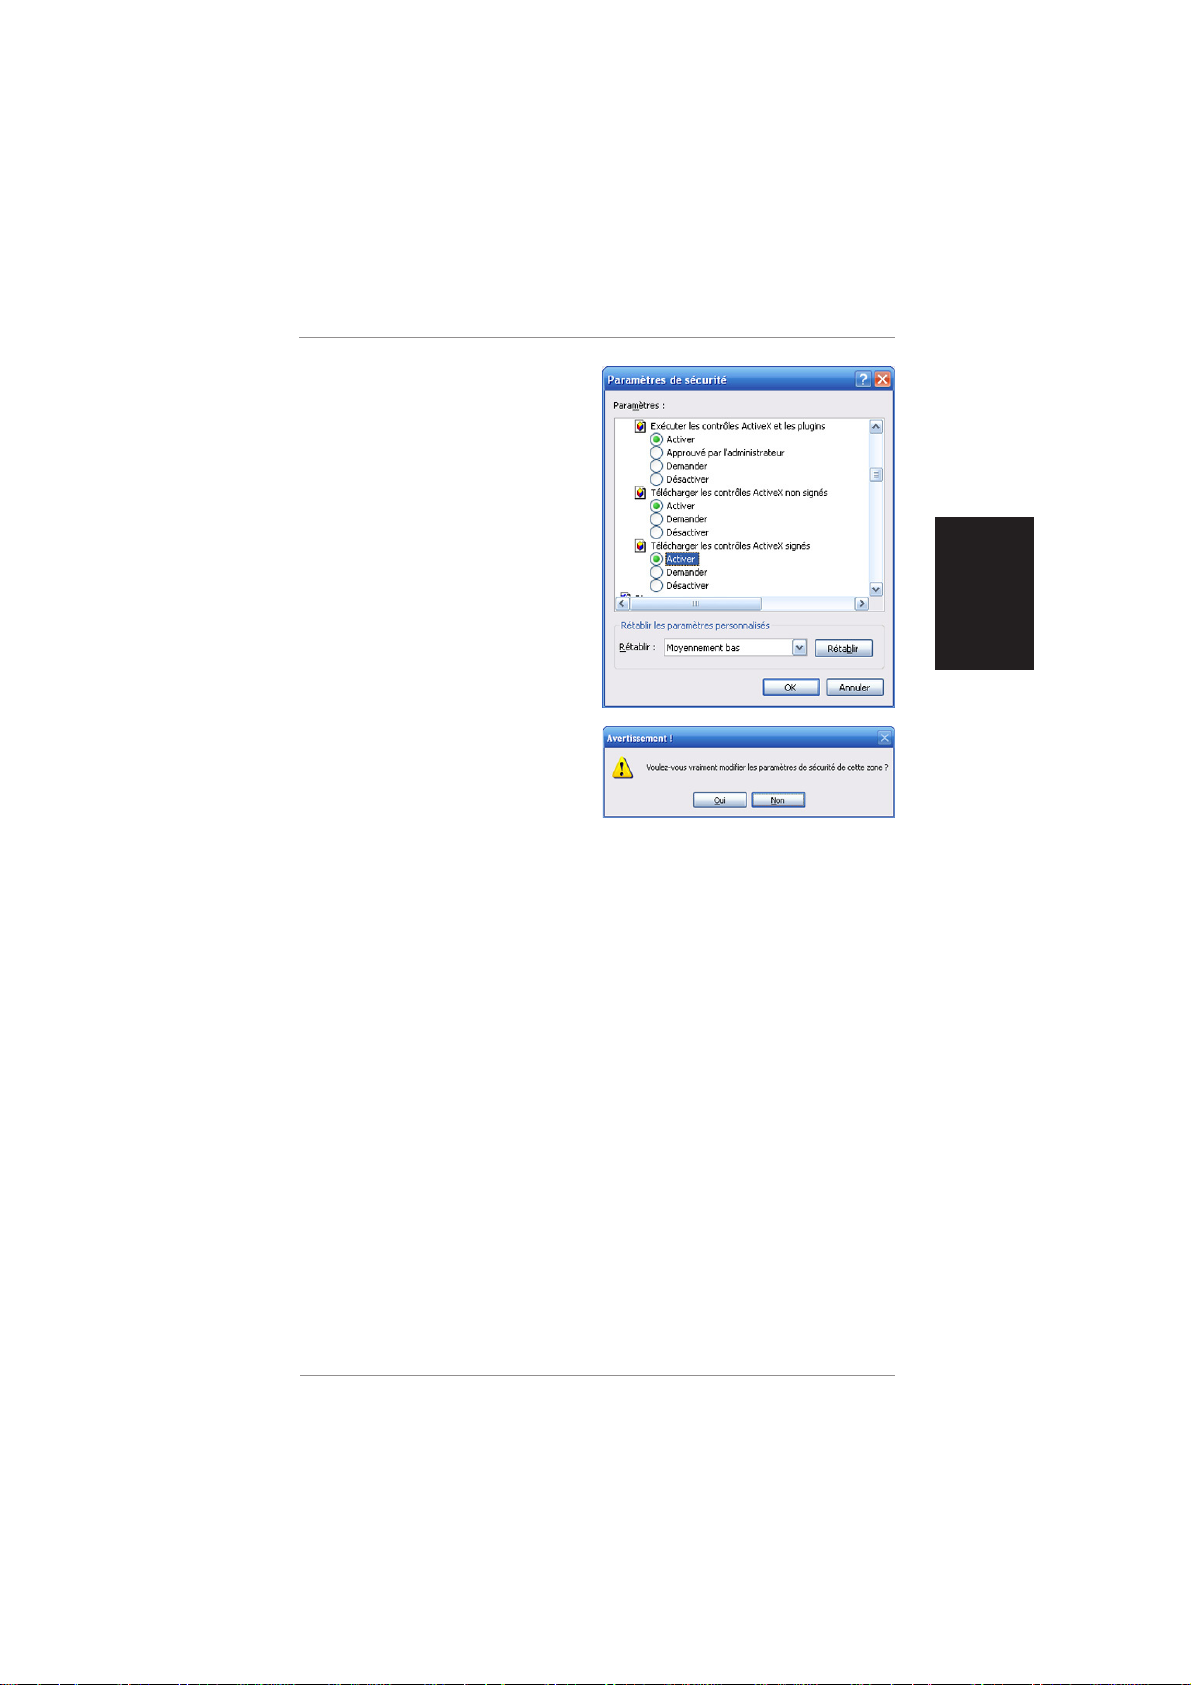
(Step 3)
Enabled the three ActiveX controls and
plug-ins.
By default, these items are disabled
and will prevent the ASUS Wireless
Router’s web camera function from
working.
12 ASUS Wireless Router Quick Start
(Default
Web Camera Setup (Cont.)
(Step 4)
By default, these three items should
already be enabled. Enable them if they
have been changed.
(Step 5)
Click Yes to change the security
settings.
English
English
ASUS Wireless Router Quick Start 13
English
Web Camera Software Setup
The WL-500b/g Wireless Router’s web interface will help you setup the software
portion of the web camera.
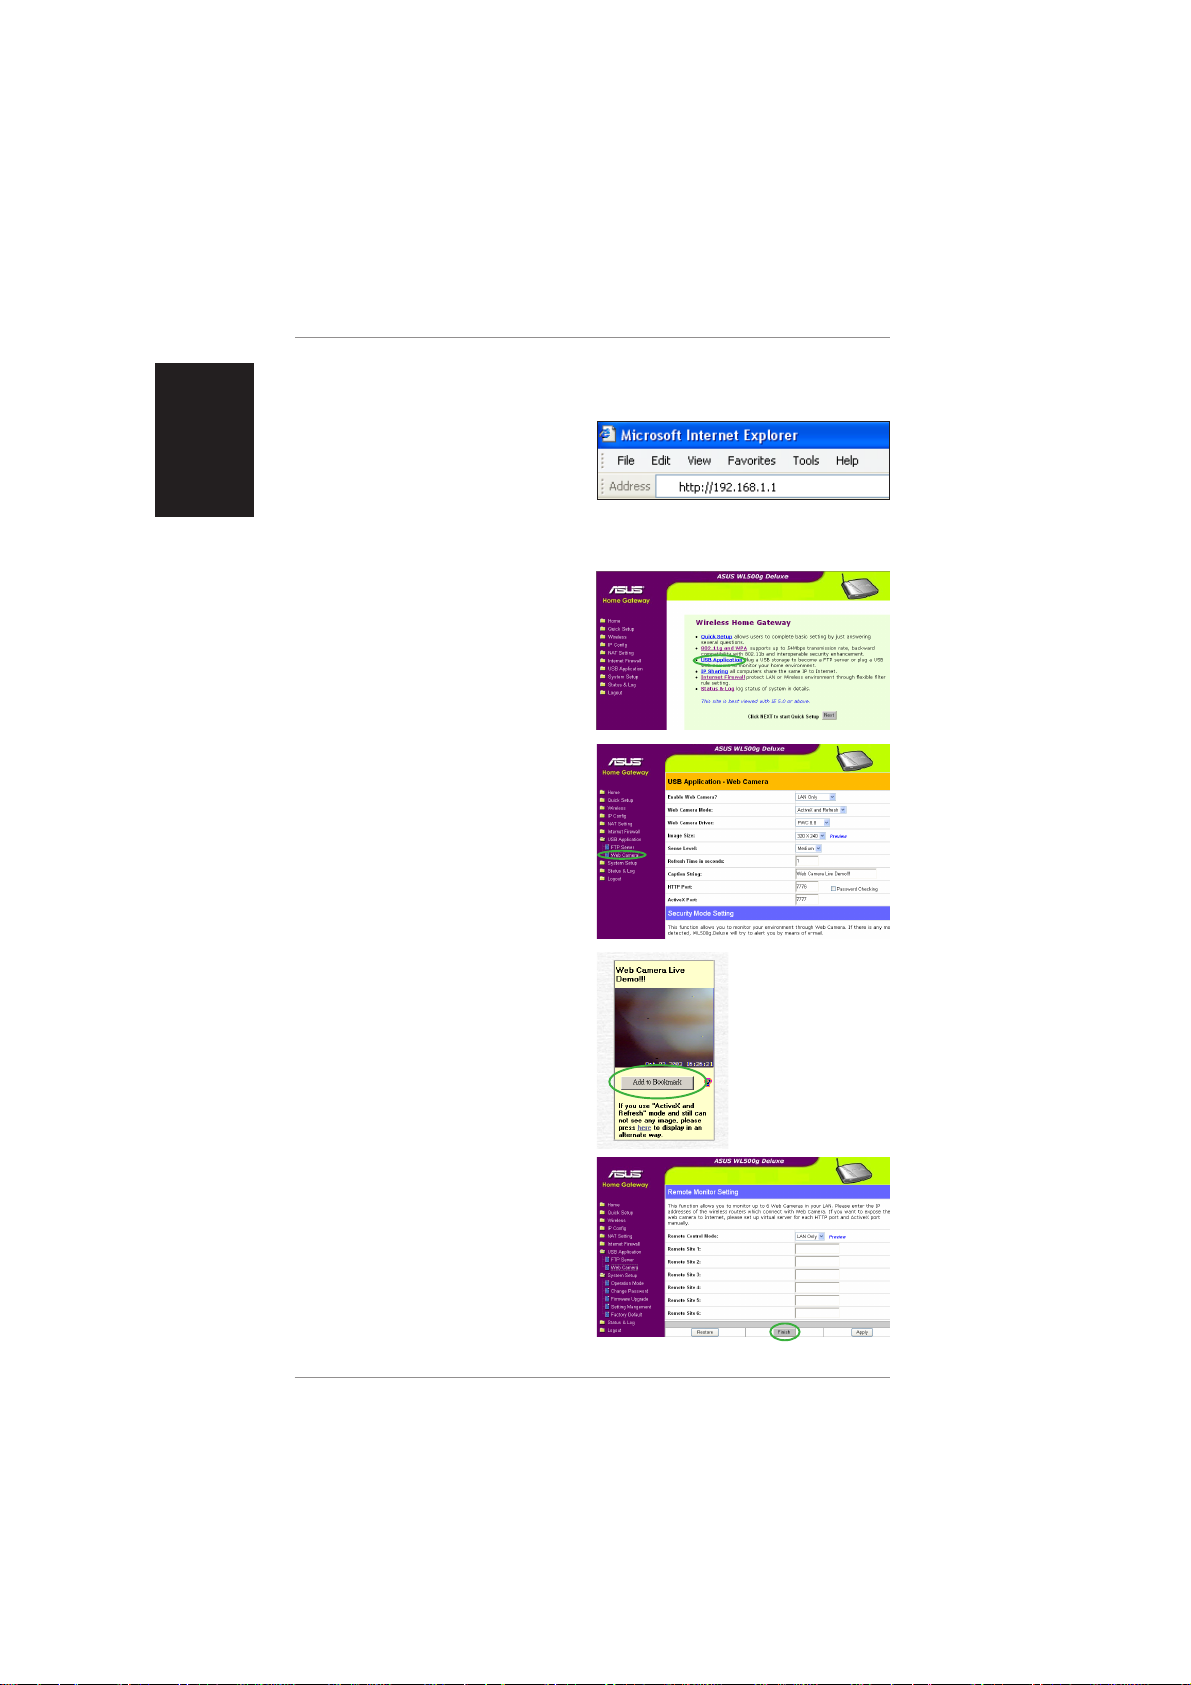
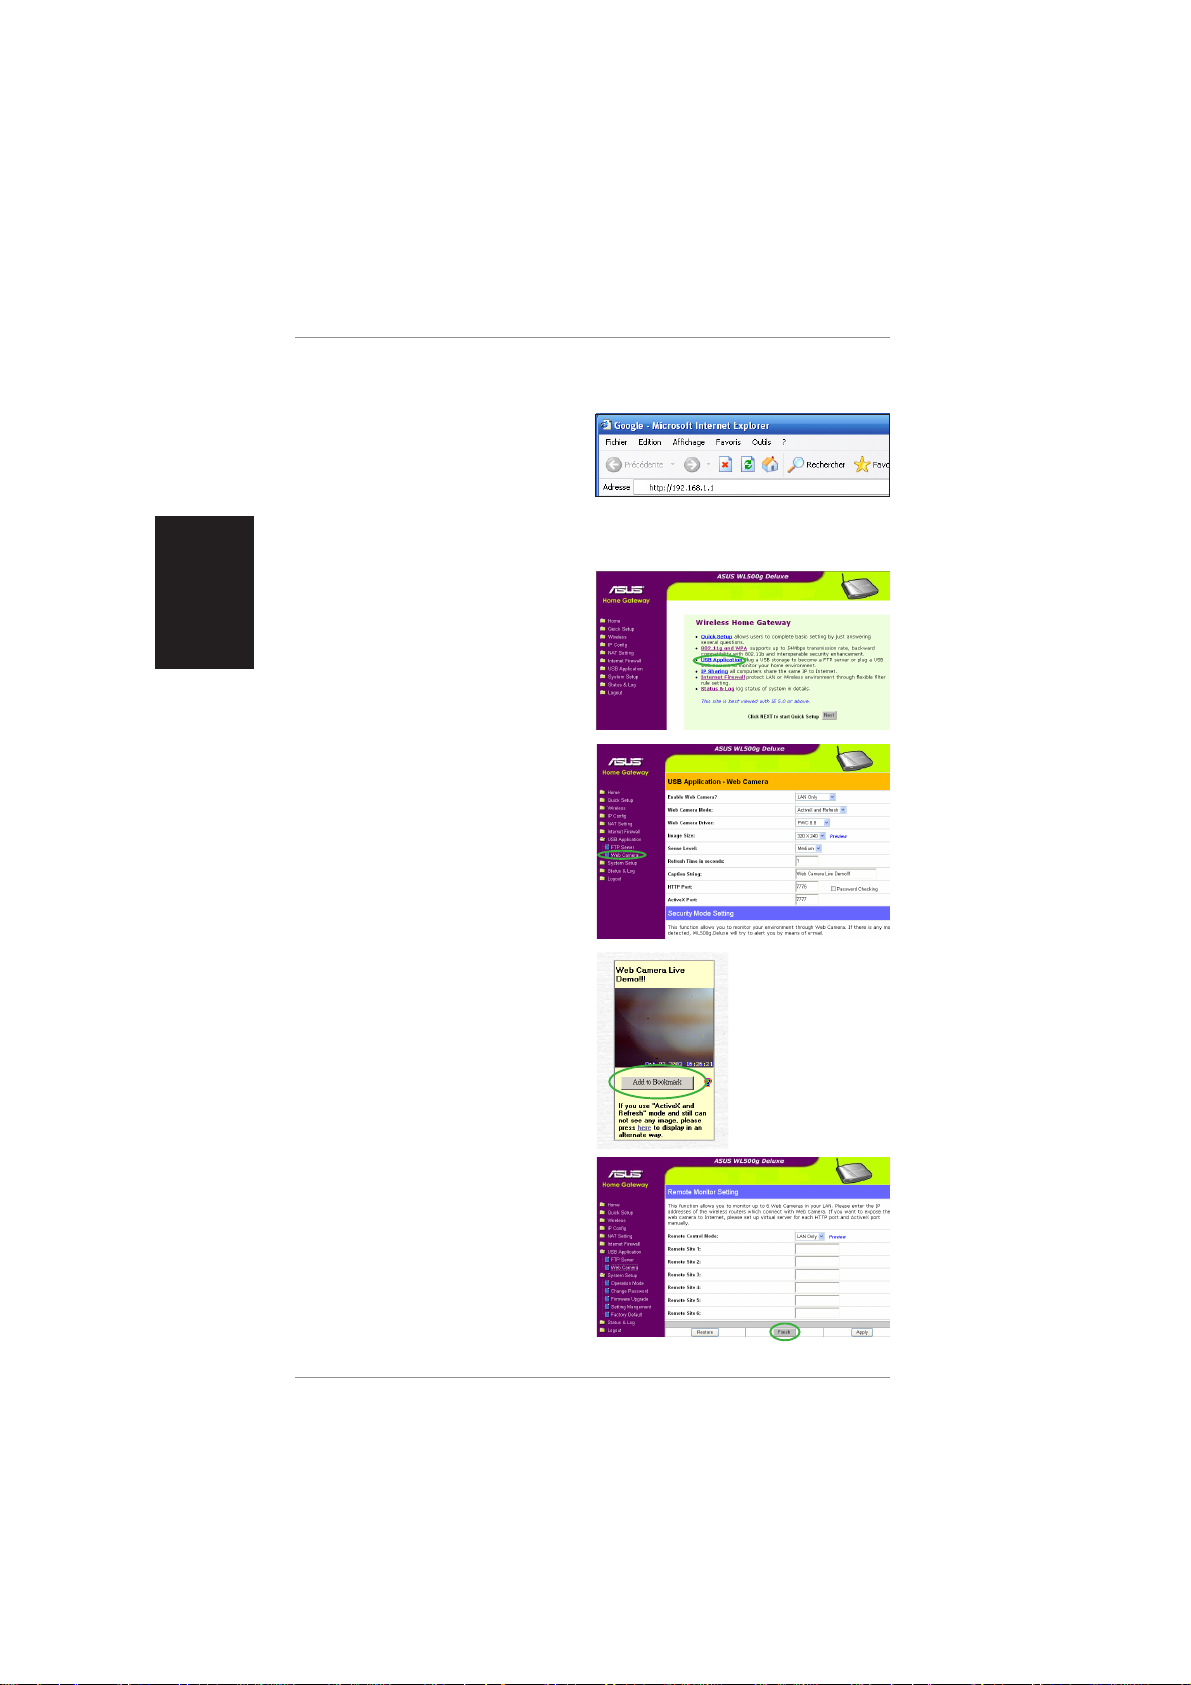
(Step 1)
Open your browser to one of the
following addresses:
http://my .WL500b or http://my .WL500g (depending on model)
http://my .router or http://192.168.1.1
(Step 2)
Select Web Camera under USB
Application on the menu.
(Step 3)
Make settings on this page such as
image size. Click Preview if you want
to see how it would look.
(Step 4)
Click Add to Bookmark to save a link
to this page.
(Step 5)
Make settings to the Remote Monitor
if necessary . Click Finish when you are
done.
14 ASUS Wireless Router Quick Start
Routeur sans fil WL500g / WL500g Deluxe
(pour clients sans fil 802.1 1g/b)
Routeur sans fil WL500b
(pour clients sans fil 802.11b)
Guide de démarage rapide
English
Français

Paramétrage matériel et logiciel
(Etape 1)
Connectez votre modem ADSL et votre routeur sans fil tel que montré dans
l’illustration. Un câble réseau (LAN) doit relier le port LAN du modem ADSL et
le port WAN du routeur sans fil.
Français
Modem ADSL
Power Phone LAN LANPower
Prise téléphone
Routeur sans fil
(Etape 2)
Connectez le routeur sans fil à votre ordinateur via le port LAN.
Routeur sans fil
LAN
Client sans fil
2 Routeur sans fil ASUS: guide de démarrage rapide
Paramétrage matériel et logiciel (suite)
(Etape 3)
Entrez l’une des adresses suivantes
dans votre navigateur Internet:
WL500g
[http://my .router] ou [http://my.WL500g] ou [http://192.168.1.1]
WL500g Deluxe
[http://my .router] ou [http://my.WL500g.Deluxe] ou [http://192.168.1.1]
(Etape 4)
English
Connectez-vous en utilisant les
paramètres par défaut:
login: admin
mot de passe: admin
(Etape 5)
La page d’accueil affiche des
lienspermettant de configurer les
fonctions principales de la passerelle
domestique dans fil .
Cliquez sur Next pour démarrer le
paramétrage rapide.
(Etape 6)
Choisissez votre zone d’heure ou la
région la plus proche en utilisant la liste
déroulante.
Cliquez sur Next pour continuer.
Français
WL500g
WL500g Deluxe
Routeur sans fil ASUS: guide de démarrage rapide 3
Paramétrage matériel et logiciel (suite)
(Etape 7)
Choisissez le type de connexion
auquel vous êtes abonnés. (“ADSL”
utilise un câble téléphonique standard,
alors que “Cable” utilise un câble de
télévision rond.)
Cliquez sur Next pour continuer.
Français
(Etape 8)
Entrez le nom d’utilisateur et le mot de
passe nécessaire à la connexion à
votre FAI (si nécessaire).
Cliquez sur Next pour continuer.
(Etape 9)
Remplissez les champs Host Name et
MAC Address si requis par votre FAI.
Renseignez les champs nom du
serveur ou adresse IP du serveur
Heart-Beat Server lorque vous vous
connectez avec BigPond (Utilisateurs Telstar BigPond uniquement). Cliquez
sur Next pour continuer.
(Etape 10)
Dans la majorité des cas vous allez
choisir “Get IP automatically” et “Get
DNS Server automatically”. Dans le
cas contraire, il vous faudra entrer les
informations fournies par votre FAI.
Cliquez sur Next pour continuer.
(Etape 1 1)
Entrez le SSID et les paramètres WEP
si vous voulez sécuriser votre réseau
sans fil.
Cliquez sur Finish pour continuer.
(Etape 12)
Cliquez sur Save&Restart pour
enregistrer les nouveaux paramètres
et redémarrer en les utilisant.
Cliquez sur Finish.
4 Routeur sans fil ASUS: guide de démarrage rapide
Impression sans fil (selon les modèles)
Assistant d’ajout d’imprimante
Pour simplifier le paramétrage de l’imprimante,
vous devriez la relier à votre PC. Si vous
effectuez l’assistant d’installation d’imprimante
sans pilote d’impression installé, vous seriez
redirigé vers l’assistant d’installation
d’imprimante. Connectez votre imprimante au
port parallèle ou USB de votre ordinateur.
(Etape 1)
Exécutez “Assistant Ajout d’installation
d’imprimante” depuis Démarrer|
Imprimantes et télécopieurs |
Ajouter une imprimante.
(Etape 2)
Choisissez “Une Imprimante locale
connectée à cet ordinateur”.
English
Français
(Step 3)
Choisissez le port parallèle ou USB
auquel votre imprimante est reliée.
Routeur sans fil ASUS: guide de démarrage rapide 5
Français
Impression sans fil (suite)
(Etape 4)
Trouvez le constructeur de votre
imprimante et le modèle. Cliquez sur
Disquette fournie si votre imprimante
n’est pas dans la liste et si vous avez les
pilotes.
Note: le WL-500g supporte une imprimante
parallèle. Le WL-500g Deluxe supporte une
imprimante USB.
(Etape 5)
Cliquez sur Suivant pour en faire
votre imprimante par défaut.
(Etape 6)
Imprimez une page de test.
(Etape 7)
Cliquez sur Terminer pour fermer
l’assistant.
Note: vous pouvez aussi ajouter les pilotes
d’impression en utilisant le disque fourni par
votre constructeur. Il faudra cependant
désactiver l’utilitaire d’impression du
constructeur (si installé) si vous voulez utiliser
la fonction de serveur d’impression LAN sans
fil.
6 Routeur sans fil ASUS: guide de démarrage rapide
Assistant de configuration d’imprimante
Vérifiez que votre imprimante soit
reliée au port imprimante ou USB du
routeur sans fil et qu’ils soient sous
tension. Lancez l’“assistant d’ajout
d’imprimante” via le menu Démarrer.
L’assistant explorera les routeurs
sans fil et les informations sur les
imprimantes qui y sont attachées.
Note: le WL-500g a un port parallèle et un port
USB. Le WL-500g Deluxe a deux ports USB et
aucun port parallèle.
(Etape 1)
Avoir une imprimante installée sur le
port imprimante (LPT1) ou sur le port
USB facilite le processus d’installation
(voir page suivante).
English
Français
(Etape 2)
Si l’imprimante est trouvée, son nom
sera affiché sur cet écran.
Note: en cas d’erreur de communication avec
l’imprimante, vous auriez ce message. Vérifiez
que l’imprimante soit allumée, prête et
connectée. Cliquez sur Retour et Suivant.
Routeur sans fil ASUS: guide de démarrage rapide 7
Français
Assistant de configuration d’imprimante (suite)
(Etape 3)
Cet assistant fera utiliser à votre
imprimante le “Standard TCP/IP port”
servi par le routeur sans fil.
(Windows XP/2000: l’assistant vous
guidera pour choisir ou ajouter un
“Standard TCP/IP port”. Reportez-vous au “Paramétrage d’un client LPR sous
Windows XP” pour plus de détails.)
(Windows 98/ME: l’assistant fera utiliser à votre imprimante par défaut le
“Remote Port” servi par le routeur sans fil.)
(Etape 4)
Cliquez sur Done (Effectué) lorsque
le paramétrage est fini.
8 Routeur sans fil ASUS: guide de démarrage rapide

Paramétrage d’un client LPR (Windows XP)
(Etape 1)
Lancez “Assistant Ajout
d’installation d’imprimante” depuis
le menu Démarrer | Imprimantes et
télécopieurs | Ajouter une
imprimante.
(Etape 2)
Choisissez “Imprimante locale
connectée à cet ordinateur” puis
cliquez sur Suivant.
(Etape 3)
Cliquez sur “Créer un nouveau port”
puis choisissez “Standard TCP/IP
Port” dans le menu déroulant. Cliquez
sur Suivant.
English
Français
(Etape 4)
Cliquez sur Suivant à l’écran “ajout
de port d’imprimante TCP/IP
standard”.
Routeur sans fil ASUS: guide de démarrage rapide 9
Français
Paramétrage d’un client LPR (suite)
(Etape 5)
Entrez l’adresse IP du WL500g dans
le champ “Nom d’imprimante ou
adresse IP” et cliquez sur Suivant.
(Etape 6)
Choisissez “Personnalisé” puis cliquez
sur Paramètres…
(Etape 7)
Choisissez le protocole LPR et tapez
LPRServer dans “Nom de la file
d’attente”.
(Etape 8)
Après avoir fini le paramétrage,
pressez Suivant.
10 Routeur sans fil ASUS: guide de démarrage rapide
Paramétrage d’un client LPR (suite)
(Etape 9)
Cliquez sur Terminer achever le
paramétrage.
English
(Etape 10)
Trouvez le constructeur et le modèle
de l’imprimante. Cliquez sur Disque
Fourni si vous ne trouvez pas votre
imprimante dans la liste et que vous
êtes en possession de son pilote.
(Etape 1 1)
Cliquez sur Suivant pour en faire votre
imprimante par défaut.
(Etape 12)
Choisissez Oui et Suivant pour
imprimer une page de test, sinon
choisissez Non.
Français
(Etape 13)
Quand l’assistant d’ajout d’imprimante
est fini, cliquez sur T erminer.
Routeur sans fil ASUS: guide de démarrage rapide 11
Français
Paramétrage de la Webcam
Connectez votre webcam USB sur le port USB du
routeur sans fil WL-500b/g.
Paramétrage du navigateur Internet
Pour les clients qui utilisent Netscape ou tout autre
navigateur ne supportant pas ActiveX, vous n’avez pas
besoin de paramétrage supplémentaire pour voir une
image dans le navigateur. Pour les clients utilisant IE
5.0 ou supérieur, il faut régler IE pour obtenir un meilleur support ActiveX:
(Etape 1)
Dans le menu Outils allez dans
Options Internet.
(Etape 2)
Cliquez sur Intranet Local settings
puis sur Personnaliser le niveaul.
(Etape 3)
Activez trois contrôles ActiveX et plugins.
Par défaut ces éléments sont
désactivés et empêcheront la
webcam du routeur de fonctionner
correctement.
12 Routeur sans fil ASUS: guide de démarrage rapide
(Default
Paramétrage de la Webcam (suite)
(Etape 4)
Par défaut, trois éléments sont déjà
activés. Activez-les s’ils ont été
modifiés.
(Etape 5)
Cliquez sur Oui pour changer les
paramètres de sécurité.
English
Français
Routeur sans fil ASUS: guide de démarrage rapide 13
Français
Paramétrage logiciel de la webcam
L’interface web du routeur sans fil WL-500b/g vous aidera à paramétrer la
partie logicielle de la webcam.
(Etape 1)
Saisissez l’une des adresses suivantes
dans votre navigateur Internet:
http://my .WL500b ou http://my.WL500g (en fonction des modèles)
http://my .router ouhttp://192.168.1.1
(Etape 2)
Choisissez Web Camera dans
lemenu USB Application.
(Etape 3)
Sur cette page réglez des paramètres
tels que la taille de l’image. Cliquez
sur Preview pour avoir une idée de
ce que cela donnera.
(Etape 4)
Cliquez sur Add to Bookmark tpour
sauvegarder un lien vers cette page.
(Etape 5)
Réglez Remote Monitor si nécessaire.
Cliquez sur Finish une fois fini.
14 Routeur sans fil ASUS: guide de démarrage rapide
WL500g / WL500g Deluxe Wireless Router
(Für 802.11g/b Wireless Clients)
WL500b Wireless Router
(Für 802.11b Wireless Clients)
Kurzanleitung
Deutsch
Deutsch
Hardware- und Softwareeinstellung
(Schritt 1)
Verbinden Sie Ihr ADSL-Modem wie in der Abbildung angezeigt mit dem
Wireless Router. Sie müssen ein LAN-Kabel verwenden, um den LAN-Port
am ADSL-Modem mit dem WAN-Port am Wireless Router zu verbinden.
Deutsch
Wireless Router
Telefonbuchse
ADSL-Modem
Telefon
Strom
LAN LANStrom
(Schritt 2)
Verbinden Sie den Wireless Router über den LAN-Port mit Ihrem
Computer.
Wireless Router
LAN
Wireless Client
2 ASUS Wireless Router Kurzanleitung
 Loading...