

Page 1
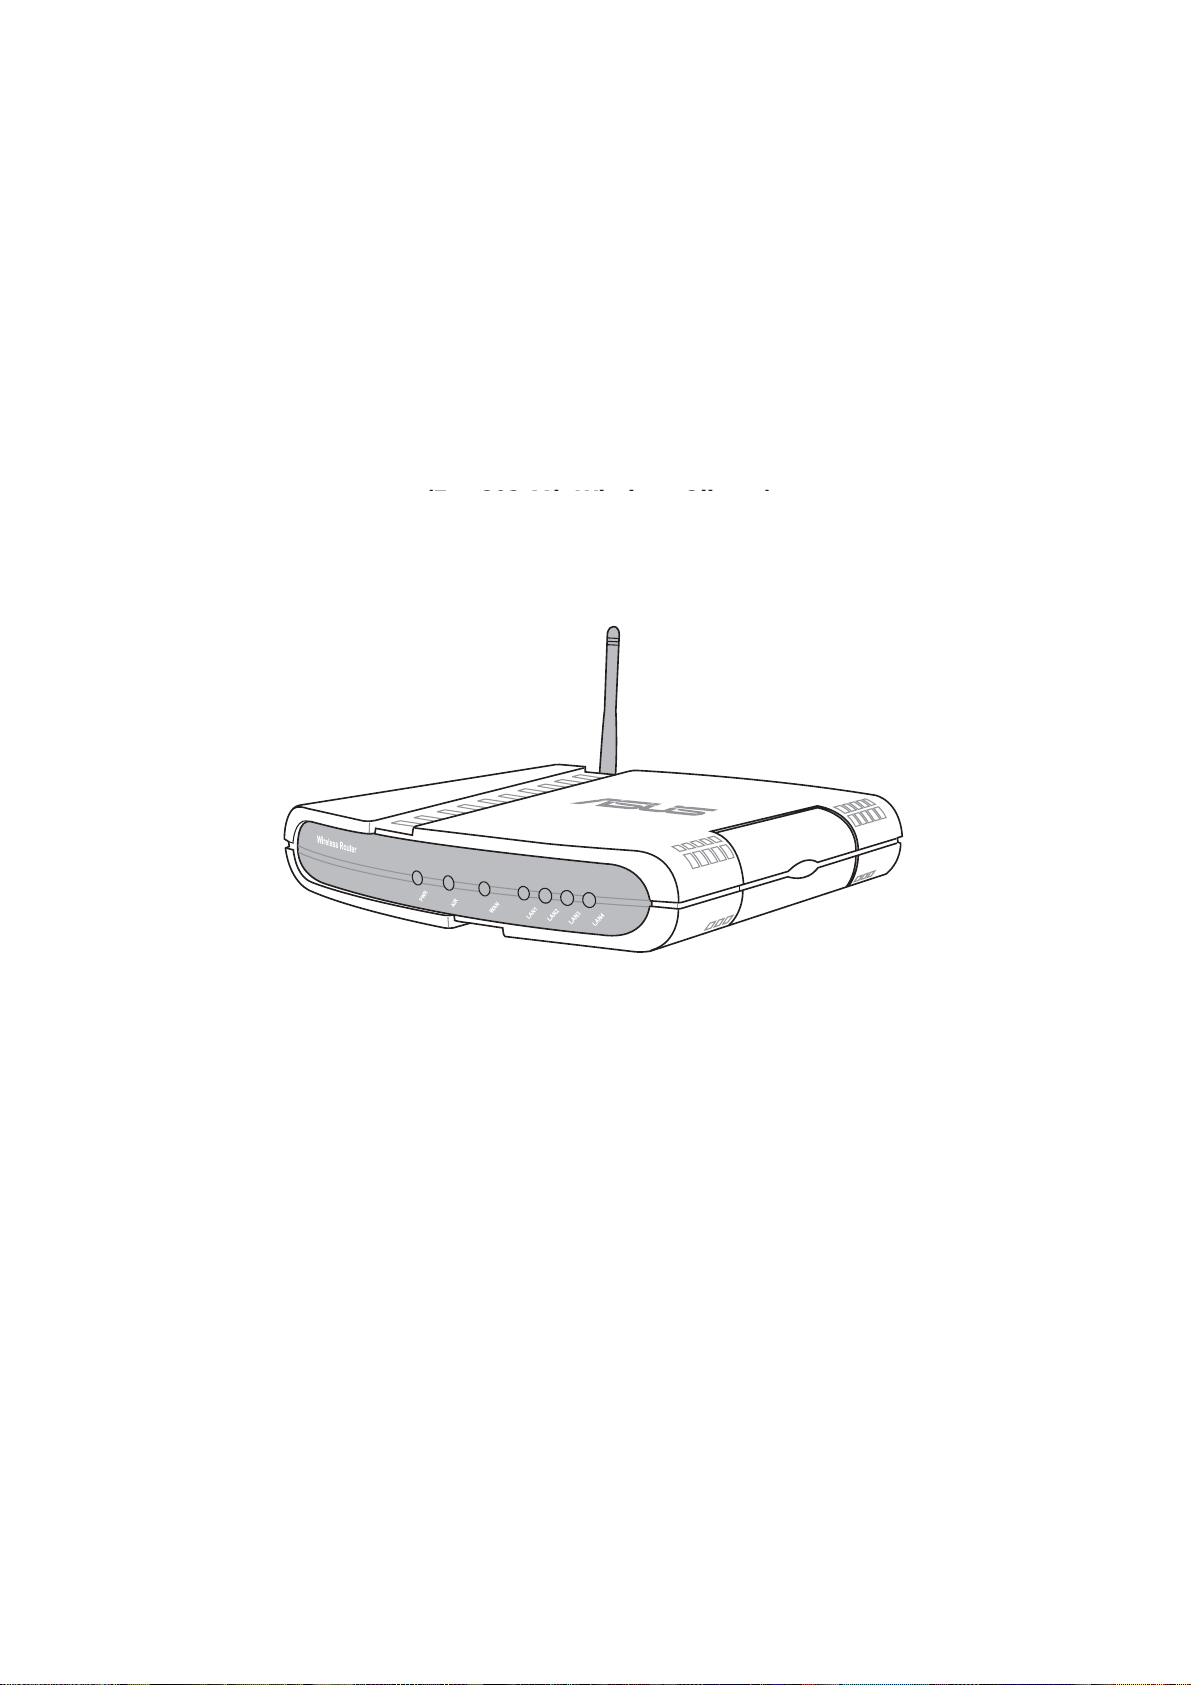
WL500g / WL500g Deluxe Wireless Router
(For 802.11g/b Wireless Clients)
WL500b Wireless Router
(For 802.11b Wireless Clients)
User’s Manual
(pentru clienþii wireless 802.11b)
(pentru clienþii wireless 802.11b)
Manual de utilizare
Page 2

2 ASUS Wireless Router
No part of this manual, including the products and software described in it,
may be reproduced, transmitted, transcribed, stored in a retrieval system,
or translated into any language in any form or by any means, except
documentation kept by the purchaser for backup purposes, without the
express written permission of ASUSTeK COMPUTER INC. (“ASUS”).
ASUS PROVIDES THIS MANUAL “AS IS” WITHOUT WARRANTY
OF ANY KIND, EITHER EXPRESS OR IMPLIED, INCLUDING BUT
NOT LIMITED TO THE IMPLIED WARRANTIES OR CONDITIONS
OF MERCHANTABILITY OR FITNESS FOR A PARTICULAR
PURPOSE. IN NO EVENT SHALL ASUS, ITS DIRECT ORS, OFFICERS,
EMPLOYEES OR AGENTS BE LIABLE FOR ANY INDIRECT,
SPECIAL, INCIDENTAL, OR CONSEQUENTIAL DAMAGES
(INCLUDING DAMAGES FOR LOSS OF PROFITS, LOSS OF
BUSINESS, LOSS OF USE OR DAT A, INTERRUPTION OF BUSINESS
AND THE LIKE), EVEN IF ASUS HAS BEEN ADVISED OF THE
POSSIBILITY OF SUCH DAMAGES ARISING FROM ANY DEFECT
OR ERROR IN THIS MANUAL OR PRODUCT.
Product warranty or service will not be extended if: (1) the product is
repaired, modified or altered, unless such repair, modification of alteration
is authorized in writing by ASUS; or (2) the serial number of the product is
defaced or missing.
Products and corporate names appearing in this manual may or may not be
registered trademarks or copyrights of their respective companies, and are
used only for identification or explanation and to the owners’ benefit, without
intent to infringe.
SPECIFICATIONS AND INFORMATION CONTAINED IN THIS
MANUAL ARE FURNISHED FOR INFORMATIONAL USE ONL Y, AND
ARE SUBJECT T O CHANGE AT ANY TIME WITHOUT NOTICE, AND
SHOULD NOT BE CONSTRUED AS A COMMITMENT BY ASUS. ASUS
ASSUMES NO RESPONSIBILITY OR LIABILITY FOR ANY ERRORS
OR INACCURACIES THAT MAY APPEAR IN THIS MANUAL,
INCLUDING THE PRODUCTS AND SOFTWARE DESCRIBED IN IT.
Copyright © 2004 ASUSTeK COMPUTER INC. All Rights Reserved.
Copyright Information
Product Name: WL500g/WL500g Deluxe/WL500b
Manual Revision: E1697
Release Date: July 2004
Router-ul wireless ASUS
Nici o parte din acest manual, incluzând produsele ºi software-ul descrise în el
nu poate fi reprodusã, transmisã, transcrisã, introdusã într-o bazã de date, ori
tradusã în nici o limbã, în nici o formã ºi prin nici un mijloc, cu excepþia
documentaþiei reþinute de cumpãrãtor în scopul consultãrii ulterioare, fãrã
acordul scris oferit în mod explicit de cãtre ASUSTeK Computer INC. ("ASUS").
ASUS PUNE LA DISPOZIÞIE ACEST MANUAL "CA ATARE", FÃRÃ
GARANÞIE DE VREUN FEL, FIE EXPRIMATÃ SAU IMPLICITÃ, INCLUZÂND,
DAR NEFIIND LIMITATÃ LA, GARANÞIILE IMPLICITE DE
COMERCIALIZARE ªI ÎNTREÞINERE PENTRU UN SCOP ANUME.
ÎN NICI O CIRCUMSTANÞÃ COMPANIA ASUS, DIRECTORII, OPERATORII,
ANGAJAÞII SAU AGENÞII ACESTEIA NU VOR RÃSPUNDE PECUNIAR
PENTRU ORICE DAUNE INDIRECTE, SPECIALE, ACCIDENTALE, ORI PE
CALE DE CONSECINÞÃ (INCLUZÂND DAUNE PROVOCATE DE
SCÃDEREA PROFITULUI, FALIMENT, PIERDERE DE DATE,
ÎNTRERUPERE A AFACERII, SAU ALTE PIERDERI ASEMÃNÃTOARE),
CHIAR DACÃ ASUS A FOST AVERTIZATÃ DE POSIBILITATEA IMINENÞEI
UNOR ASTFEL DE DAUNE PROVOCATE DE UN DEFECT SAU O EROARE
PREZENTÃ ÎN ACEST MANUAL SAU LA PRODUS.
Garanþia sau service-ul produsului nu vor fi extinse în urmatoarele
circumstanþe: (1) dacã asupra produsului se opereazã reparaþii, modificãri sau
intervenþii, cu excepþia situaþiei în care astfel de reparaþii, modificãri sau
intervenþii sunt autorizate în scris de cãtre ASUS; sau (2) numãrul de serie al
produsului este ºters sau lipseºte.
Produsele ºi numele firmelor care apar în acest manual pot sã fie sau nu
înregistrate la marca înregistratã sau sã aibã coyright al respectivelor
companii, ºi sunt folosite doar pentru identificare sau explicare ºi pentru
beneficiul proprietarilor, fãrã intenþia de ofensã.
SPECIFICAÞIILE ªI INFORMAÞIILE CONÞINUTE ÎN ACEST MANUAL SUNT
PUSE LA DISPOZIÞIE PENTRU SCOPURI INFORMATIVE EXCLUSIV, FIIND
PASIBILE DE SCHIMBARE ÎN ORICE MOMENT FÃRÃ AVERTIZARI
PREALABILE, ªI NU VOR FI CONSIDERATE CA UN ANGAJAMENT DIN
PARTEA ASUS. ASUS NU-ªI ASUMÃ NICI O RESPONSABILITATE SAU
OBLIGAÞII PECUNIARE PENTRU NICI O EROARE SAU INACURATEÞE
CARE AR PUTEA APÃREA ÎN ACEST MANUAL, INCLUZÂND PRODUSELE
ªI SOFTWARE-UL DESCRISE ÎN EL.
Copyright C 2004 ASUSTeK Computer INC. Toate drepturile rezervate.
Numele produsului: WL500g/WL500g Deluxe/WL500b
Revizie manual: E1697
Data publicãrii: iulie 2004
Page 3

ASUS Wireless Router 3
Contact Information
ASUSTeK COMPUTER INC. (Asia-Pacific)
Company Address: 15 Li-Te Road, Peitou, Taipei 112
General Telephone: +886-2-2894-3447
General Fax: +886-2-2894-7798
Web Site Address: www.asus.com.tw
General Email: info@asus.com.tw
Technical Support
MB/Others (Tel): +886-2-2890-7121
Notebook (Tel): +886-2-2894-3447
Desktop/Server (Tel): +886-2-2890-7123
Networking (Tel): +886-2-2890-7902
Support Fax: +886-2-2890-7698
ASUS COMPUTER INTERNATIONAL (America)
Company Address: 44370 Nobel Drive, Fremont, CA 94538, USA
General Fax: +1-510-608-4555
Web Site Address: usa.asus.com
General Email: tsd@asus.com
Technical Support
General Support: +1-502-995-0883
Notebook (Tel): +1-510-739-3777 x5110
Support Email: notebooktsd@asus.com
Support Fax: +1-502-933-8713
ASUS COMPUTER GmbH (Germany & Austria)
Company Address: Harkort Str. 25, D-40880 Ratingen, Germany
General Telephone: +49-2102-95990
General Fax: +49-2102-959911
Web Site Address: www.asuscom.de
Online Contact: www.asuscom.de/sales
Technical Support
Component Support: +49-2102-95990
Notebook Support: +49-2102-959910
Online Support: www.asuscom.de/support
Support Fax: +49-2102-959911
ASUS COMPUTER (Middle East and North Africa)
Company Address: P.O. Box 64133, Dubai, U.A.E.
General Telephone: +9714-283-1774
General Fax: +9714-283-1775
Web Site Address: www.ASUSarabia.com
Router-ul wireless ASUS
ASUSTeK COMPUTER INC. (Asia-Pacific)
Adresa: 15 Li-Te Road, Peitou, Taipei 112
Telefon: +886-2-2894-3447
Fax: +886-2-2894-7798
Web Site: www.asus.com.tw
E-mail: info@asus.com.tw
Suport tehnic
MB/Altele (Tel): +886-2-2890-7121
Notebook (Tel): +886-2-2894-3447
Desktop/Server (Tel): +886-2-2890-7123
Networking (Tel): +886-2-2890-7902
Support Fax: +886-2-2890-7698
ASUS COMPUTER INTERNATIONAL (America)
Adresa: 44370 Nobel Drive, Fremont, CA 94538, USA
Fax: +1-510-608-4555
Web Site: usa.asus.com
E-mail: tsd@asus.com
Suport Tehnic
General Support: +1-502-995-0883
Notebook (Tel): +1-510-739-3777 x5110
Support Email: notebooktsd@asus.com
Support Fax: +1-502-933-8713
ASUS COMPUTER GmbH (Germania si Austria)
Adresa: Harkort Str. 25, D-40880 Ratingen, Germany
Telefon: +49-2102-95990
Fax: +49-2102-959911
Web Site: www.asuscom.de
Contact Online: www.asuscom.de/sales
Suport tehnic
Component Support: +49-2102-95990
Notebook Support: +49-2102-959910
Online Support: www.asuscom.de/support
Support Fax: +49-2102-959911
ASUS COMPUTER (Middle East and North Africa)
Adresa: P.O. Box 64133, Dubai, U.A.E.
Telefon: +9714-283-1774
Fax: +9714-283-1775
Web Site: www.ASUSarabia.com
4 ASUS Wireless Router
Informaþii de contact
Page 4

4 ASUS Wireless Router
Federal Communications Commission Statement
This device complies with Part 15 of the FCC Rules. Operation is subject to the
following two conditions:
• This device may not cause harmful interference, and
• This device must accept any interference received, including interference that may
cause undesired operation.
This equipment has been tested and found to comply with the limits for a class B
digital device, pursuant to Part 15 of the Federal Communications Commission (FCC)
rules. These limits are designed to provide reasonable protection against harmful
interference in a residential installation. This equipment generates, uses, and can
radiate radio frequency energy and, if not installed and used in accordance with the
instructions, may cause harmful interference to radio communications. However,
there is no guarantee that interference will not occur in a particular installation. If
this equipment does cause harmful interference to radio or television reception, which
can be determined by turning the equipment off and on, the user is encouraged to try
to correct the interference by one or more of the following measures:
• Reorient or relocate the receiving antenna.
• Increase the separation between the equipment and receiver .
• Connect the equipment into an outlet on a circuit different from that to which the
receiver is connected.
• Consult the dealer or an experienced radio/TV technician for help.
WARNING! The use of a shielded-type power cord is required in
order to meet FCC emission limits and to prevent interference to
the nearby radio and television reception. It is essential that only
the supplied power cord be used. Use only shielded cables to con-
nect I/O devices to this equipment. Y ou are cautioned that changes
or modifications not expressly approved by the party responsible
for compliance could void your authority to operate the equipment.
Reprinted from the Code of Federal Regulations #47, part 15.193, 1993. W ashington
DC: Office of the Federal Register , National Archives and Records Administration,
U.S. Government Printing Office.
Canadian Department of Communications
This digital apparatus does not exceed the Class B limits for radio noise emissions
from digital apparatus set out in the Radio Interference Regulations of the Canadian
Department of Communications.
This Class B digital apparatus complies with Canadian ICES-003.
Cet appareil numérique de la classe B est conforme à la norme
NMB-003 du Canada.
Notices
Router-ul wireless ASUS
Înºtiinþãri
Declaraþia Comisiei Federale de Comunicaþii
Acest dispozitiv este în conformitate cu Partea 15 din Normele FCC. Operarea
va þine cont de urmãtoarele douã condiþii:
- acest dispozitiv nu este permis sã cauzeze interferenþe dãunãtoare, ºi
- acest dispozitiv trebuie sã accepte orice interferenþã primitã, incluzând
interferenþe care pot cauza o operare necorespunzãtoare.
Acest echipament a fost testat ºi este în conformitate cu limitele unui dispozitiv
digital clasa B, conform Pãrþii 15 din Normele FCC (Comisia Federala de
Comunicaþii). Aceste limite sunt proiectate pentru a furniza o protecþie
acceptabilã împotriva inteferenþelor dãunãtoare dintr-o instalaþie rezidenþialã.
Acest echipament genereazã, utilizeazã ºi poate emite unde radio ºi, dacã nu
este instalat ºi utilizat conform instrucþiunilor, poate cauza interferenþe
dãunãtoare comunicaþiilor radio. Totuºi, nu existã garanþii cã nu vor apãrea
interferenîe la o instalare particularã. Dacã acest echipament cauzeazã
interferenþe dãunãtoare recepþiei radio ºi TV care pot fi cauzate de pornirea ºi
oprirea echipamentului, utilizatorul trebuie sã încerce sã corecteze interferenþa
aplicând una din mãsurile de mai jos:
- sã reorienteze sau sã deplaseze antena de recepþie;
- sã mãreascã distanþa dintre echipament ºi receptor;
- sã conecteze echipamentul la o ieºire care este pe un circuit diferit faþã de
cel la care este conectat receptorul;
- sã consulte furnizorul sau un tehnician radio/TV pentru ajutor
ATENÞIE! Este necesarã utilizarea unui cablu de alimentare protejat pentru a
respecta limitele de emisie FCC ºi pentru a preveni interferenþele asupra
recepþiei radio ºi TV din apropriere. Este esenþial sã folosiþi numai cablul de
alimentare furnizat. Utilizaþi numai cablurile protejate pentru a conecta
dispozitivele I/O la acest echipament. Vã avertizãm cã schimbãrile sau
modificãrile care nu sunt aprobate ca fiind corespunzatoare de partea
responsabilã vã pot priva de autoritatea de a opera echipamentul.
Republicat din Codul de Norme Federale #47, partea 15.193, 1993.
Washington DC: Biroul Registraturii Federale, Arhivelor Naþionale ºi
Administrãrii Înregistrãrilor, Imprimeria Guvernamentalã a SUA.
Departamentul Canadian de Comunicaþii
Acest aparat digital nu depãºeºte limitele Clasei B pentru emisiile de zgomot
radio pentru aparatele digitale menþionate in Reglementãrile Interferenþelor
Radio ale Departamentului Canadian de Comunicaþii.
Acest aparat digital de Clasa B este in conformitate cu reglementarea
ICES-003/NMB-OO3 Canada.
Page 5

ASUS Wireless Router 5
FCC Radio Frequency Exposure Caution Statement
In order to maintain compliance with the FCC RF exposure guidelines,
this equipment should be installed and operated with minimum distance 20
cm between the radiator and your body. Use only with supplied antenna.
Unauthorized antenna, modification, or attachments could damage the
transmitter and may violate FCC regulations. Any changes of modifications
not expressly approved by the grantee of this device could void the users
authority to operate the equipment.
Installation and use of this W ireless LAN device must be in strict accordance
with the instructions included in the user documentation provided with the
product. Any changes or modifications (including the antennas) made to
this device that are not expressly approved by the manufacturer may void
the user’s authority to operate the equipment. The manufacturer is not
responsible for any radio or television interference caused by unauthorized
modification of this device, or the substitution or attachment of connecting
cables and equipment other than manufacturer specified. It is the
responsibility of the user to correct any interference caused by such
unauthorized modification, substitution or attachment. Manufacturer and
its authorized resellers or distributors will assume no liability for any damage
or violation of government regulations arising from failing to comply with
these guidelines.
Notices
Router-ul wireless ASUS
Declaraþia FCC de atenþionare faþã de expunerea la frecvenþe
înalte
Pentru a fi în conformitate cu indicaþiile FCC RF referitoare la
expunere, acest echipament trebuie instalat ºi operat de la o distanþã
de minim 20 cm între radiator ºi dumneavoastrã. Utilizaþi numai cu
antena furnizatã. Folosirea de antene neautorizate, modificãri, sau
accesorii pot dãuna transmiþãtorului ºi pot încãlca Reglementarile
FCC. Orice schimbare sau modificare care nu este aprobaTã de
furnizorul acestui dispozitiv poate priva utilizatorul de autoritatea de a
opera echipamentul.
Instalarea ºi utilizarea acestui dispozitiv LAN Wireless trebuie sã fie în
strictã concordanþã cu instrucþiunile incluse în documentaþia furnizatã
împreuna cu echipamentul. Orice schimbãri sau modificari (incluzând
antenele) care nu sunt aprobate de fabricantul acestui dispozitiv pot
priva utilizatorul de autoritatea de a opera echipamentul. Fabricantul
nu este responsabil de interferenþele radio ºi TV cauzate de
modificarile neautorizate ale dispozitivului, sau de înlocuirea sau
ataºarea de cabluri sau echipamente de conectare altele decât cele
specificate de fabricant. Este responsabilitatea utilizatorului sã
corecteze orice interferenþe cauzate de astfel de modificãri, înlocuiri
sau ataºamente neautorizate. Fabricantul ºi comercianþii sau
distribuitorii nu îºi vor asuma rãspunderea pentru defecþiuni sau
încãlcãri ale reglementãrilor guvernamentale datorate nerespectãrii
acestor indicaþii.
Înºtiinþãri
Page 6

6 ASUS Wireless Router
Table of Contents
1. Introduction.......................................................................................... 9
Overview................................................................................................ 9
System Requirements ........................................................................... 9
Features .............................................................................................. 10
The Product Package ..................................................................... 10
The ASUS Wireless Family............................................................. 12
Network Topology ................................................................................ 14
Network Backbone.......................................................................... 14
Agent to an ISP............................................................................... 15
Agent to Another Network ............................................................... 16
LED Indicators ..................................................................................... 17
2. Installation Procedure....................................................................... 18
Wall Mounting Option .......................................................................... 20
Vertical Standing Option ...................................................................... 21
Connecting to the ASUS Wireless Router ........................................... 22
3. Software Configuration..................................................................... 23
Configuring the ASUS Wireless Router ............................................... 23
Setting IP address for Wired or Wireless Connection..................... 23
Installing the ASUS Wireless Router Utilities....................................... 25
Using the Wireless Router for the First Time....................................... 26
1. ASUS Wireless Router Utilities .................................................. 26
2. Connect to the ASUS WLAN Web Manager .............................. 26
3. Set your own password.............................................................. 28
4. Use Quick Setup ........................................................................ 28
Home Gateway Mode.......................................................................... 29
Wireless............................................................................................... 32
Interface .......................................................................................... 32
Bridge/Access Control List.............................................................. 37
Access Control................................................................................ 40
Radius Setting (WL500g/WL500g Deluxe) ..................................... 41
Advanced ........................................................................................ 42
IP Config.............................................................................................. 44
WAN & LAN .................................................................................... 44
DHCP Server .................................................................................. 47
DHCP Server (Cont.) ...................................................................... 48
Router-ul wireless ASUS
Conþinut
1. Introducere .......................................................................9
Privire generalã..........................................................................9
Cerinþele sistemului...................................................................9
Trãsãturi..................................................................................10
Pachetul produsului........................................................10
Gama ASUS Wireless.....................................................12
Topologia reþelei.......................................................................14
Structura reþelei ..............................................................14
De la agent la furnizorul de Internet (ISP)........................15
De la agent la altã reþea..................................................16
Indicatoarele LED....................................................................17
2. Procedura de instalare....................................................18
Opþiunea de montare pe perete...............................................20
Opþiunea de poziþie verticalã....................................................21
Conectarea la un router wireless ASUS...................................22
3. Configurare software.......................................................23
Configurarea router-ului wireless ASUS..................................23
Setarea adresei IP pentru conectarea prin cablu sau
wireless...........................................................................23
Instalarea serviciilor router-ului wireless ASUS.......................25
Prima utilizare a router-ului wireless........................................26
1.Serviciile router-ului wireless ASUS.............................26
2.Conectarea la Web Manager ASUS WLAN..................26
3.Stabilirea propriei parole..............................................28
4.Utilizarea setãrii rapide.................................................28
Modul de accesare de acasã...................................................29
Wireless...................................................................................32
Interfaþa...................................................................................32
Lista de control punte (bridge)/acces..............................37
Controlul accesului..........................................................40
Setarea Radius (WL500g/WL500g Deluxe)....................41
Setãri avansate...............................................................42
Configurarea IP........................................................................44
WAN ºi LAN....................................................................44
Server DHCP...................................................................47
ServerDHCP (Continuare)..............................................48
Page 7

ASUS Wireless Router 7
Table of Contents
Static Route .................................................................................... 49
Miscellaneous ................................................................................. 50
NAT Setting ......................................................................................... 52
Port Trigger ..................................................................................... 52
Virtual Server .................................................................................. 53
Virtual DMZ ..................................................................................... 54
Internet Firewall ................................................................................... 55
Basic Config.................................................................................... 57
URL Filter ........................................................................................ 58
USB Application................................................................................... 59
FTP Server...................................................................................... 59
User Account List ............................................................................ 61
Banned IP List................................................................................. 63
Client Setting................................................................................... 63
Web Camera................................................................................... 64
Web Camera - Client Setting .......................................................... 66
Web Camera vs. DDNS .................................................................. 68
Security Mode Setting..................................................................... 68
Remote Monitor Setting .................................................................. 69
System Setup ...................................................................................... 70
Operation Mode .............................................................................. 70
Router Mode (WL500g/WL500g Deluxe)........................................ 71
Quick Setup in Router Mode........................................................... 71
AP Mode ......................................................................................... 72
Quick Setup in Access Point Mode ................................................. 72
Configure Wireless Interface........................................................... 72
IP Config (Access Point Mode) ....................................................... 73
LAN ................................................................................................. 73
Get IP Automatically........................................................................ 73
Change Password........................................................................... 74
Firmware Upgrade............................................................................... 75
Setting Management....................................................................... 76
Factory Default................................................................................ 77
Restoring Factory Default Settings ................................................. 77
Status & Log ........................................................................................ 78
Firmware Restoration .......................................................................... 80
Using a Hub .................................................................................... 80
Router-ul wireless ASUS
Conþinut
Ruta staticã..............................................................................49
Alte informaþii utile...................................................................50
Setari NAT................................................................................52
Iniþiere port......................................................................52
Server virtual...................................................................53
DMZ virtual......................................................................54
Firewall Internet.......................................................................55
Configurare de bazã........................................................57
Filtru URL........................................................................58
Aplicaþii USB............................................................................59
Server FTP......................................................................59
Listã de conturi utilizator..........................................................61
Listã de IP-uri interzise............................................................63
Setãri client..............................................................................63
Camera video...........................................................................64
Camera video - setãri client.....................................................66
Camera video vs. DDNS..........................................................68
Setarile modului de siguranþã..................................................68
Setarea monitorizãrii de la distanþã.........................................69
Setãri de sistem.…………………………………………………..70
Modul de operare………………......……………………….........70
Modul Router (WL500g/WL500g Deluxe)………..….......71
Setare rapidã în modul Router..………………...……...…71
Modul AP………………………………………..................72
Setare rapidã în Modul Punct de acces………………....72
Configurare interfaþã wireless……………………………..72
Config. IP (Modul Punct de acces)………………………73
LAN…………………………………………......……..…….73
Obþinere automatã a unui IP………………………………73
Schimbarea parolei…………………………………………74
Upgradare Firmware……………………………...…..….…..…75
Managementul setãrilor…………….........…...….……...76
Valori predefinite ………………….……............…..……77
Revenirea la setãrile predefinite....………………...……77
Stare ºi înregistrãri…………………..……………..……..……78
Restaurare Firmware………………..….....……..….………….80
Folosirea unui Hub……….....………..………….……….80
Page 8

8 ASUS Wireless Router
Setup Printer Wizard ........................................................................... 81
Installing the Printer Driver.............................................................. 81
Setup for LPR client under Windows XP ............................................. 84
Printer Setup Wizard....................................................................... 86
V erifying Your Printer ...................................................................... 87
4. Wireless Performance ...................................................................... 89
Site Topography................................................................................... 89
Site Surveys ........................................................................................ 89
Range .................................................................................................. 90
Troubleshooting..................................................................................... 91
Common Problems and Solutions ....................................................... 91
Reset to Defaults ................................................................................. 92
Glossary .............................................................................................. 95
Licensing Information .......................................................................... 98
Availability of source code .............................................................. 98
The GNU General Public License ....................................................... 99
Table of Contents
Router-ul wireless ASUS
Program ajutãtor pentru Setari Imprimantã...................81
Instalarea Driver-ului Imprimanta ..................................81
Setãri pentru client LPR în Windows XP...................................84
Programul ajutãtor pentru setãri imprimantã..................86
Verificarea Imprimantei...................................................87
4. Performanþa wireless...........................................................89
Topografia Site-ului...............................................................89
Privire generalã asupra site-ului............................................89
Raza de acþiune....................................................................90
Probleme ºi soluþii....................................................................91
Probleme frecvente ºi Soluþii.................................................91
Resetarea la valori predefinite...............................................92
Glosar......................................................................................95
Informaþii privind Licenþa .........................................................98
Acces la Codul Sursã...........................................................98
Licenþa Publicã Generalã (GNU).............................................99
Conþinut
Page 9

1. Introduction
ASUS Wireless Router 9
Chapter 1 - Introduction
1. Introduction
Overview
Thank you for purchasing the ASUS Wireless Router. The ASUS Wireless
Router, WL500g/WL500g Deluxe, complies with IEEE 802.11g and
802.11b standards. The ASUS 802.1 1b W ireless Router , WL500b, complies
with IEEE 802.11b standards. The 802.11g is as extension to 802.1 1b (used
in majority of wireless LANs today) that broadens 802.11b’s data rates to
54 Mbps within the 2.4 GHz band using OFDM (orthogonal frequency
division multiplexing) technology. The 802.11g allows backward
compatibility with 802.11b devices but only at 1 1 Mbps or lower, depending
on the range and presence of obstructions. Wireless LANs are
complementary extensions to existing wired LANs, offering complete
mobility while maintaining continuous network connectivity to both
corporate and home Intranets. They add a new level of convenience for
LAN users. PC users stay connected to the network anywhere throughout a
building without being bound by a LAN wires. This is accomplished through
the use of Access Point functionality of ASUS Wireless Routers. ASUS
Wireless Router with built-in Internet gateway capability , allows your family
to share a broadband Modem and one ISP account simultaneously from
different rooms without wires! ASUS Wireless products can keep you
connected anywhere, any time.
System Requirements
T o begin using the ASUS 802.1 1g/802.11b W ireless Router , you must have
the following minimum requirements:
• ADSL/Cable Modem and Broadband Internet Account.
• An Ethernet (10Base-T or 10/100Base-TX) adapter for wired client
• At least one 802.1 1g (54Mbps) or one 802.1 1b (1 1Mbps) wireless adapter
for wireless mobile clients
• TCP/IP and an Internet browser installed
Router-ul wireless ASUS
Capitolul 1 - Introducere
Introducere
Privire generalã
Vã mulþumim pentru cã aþi achiziþionat Router-ul Wireless ASUS. Router-ul
wireless ASUS, WL500g/WL500g Deluxe este în conformitate cu standardele
IEE 802.11g si 802.11b. Router-ul wireless ASUS 802.11g, WL500b este în
conformitate cu standardele IEEE 802.11b. 802.11g este o extensie a 802.11b
(folosit în prezent pentru majoritatea LAN-urilor wireless) care mãreºte rata de
date a 802.11b la 54 Mbps în banda de 2.4 GHz utilizand tehnologia OFDM
(utilizarea multipla a diviziei de frecvenþe ortogonale). 802.11g permite o
compatibilitate inversã cu dispozitivele 820.11b dar numai la 11 Mbps sau mai
puþin, în funcþie de distanþa ºi de prezenþa obstacolelor. LAN-urile wireless sunt
extensii complementare ale LAN-urilor prin cablu existente, care oferã o
mobilitate completã în timp ce menþin o conectare continuã la reþea atât pentru
Intranet-urile corporative cât ºi pentru cele de acasã. Acestea oferã un avantaj
în plus pentru utilizatorii de LAN. Utilizatorii de PC rãmân conectaþi la reþea
oriunde în cadrul unei clãdiri fãrã a fi limitaþi de cablurile LAN. Acesta se
realizeazã folosind funcþionalitatea punctelor de acces ale router-ului wireless
ASUS. Router-ul wireless ASUS cu capacitatea de acces la Internet
încorporatã, permite gamei dumneavoastre sã împartã un modem cu
broadband ºi un cont ISP în acelaºi timp din camere diferite ºi fãrã cabluri!
Produsele wireless ASUS vã pot mentine conectaþi oriunde, oricând
Cerinþele sistemului
Pentru a începe sã utilizaþi router-ul wireless ASUS 802.11g/802.11b, trebuie sã
îndepliniþi urmãtoarele cerinþe minime:
- modem cablu/ADSL ºi cont de Internet broadband
- un adaptor Ethernet (10Base-T sau 10/100Base-TX) pentru clienþii conectaþi
prin cablu
- cel puþin un adaptor wireless 802.11g (54Mbps) sau un 802.11b (Mbps) pentru
clienþii wireless
- TCP/IP ºi un browser de Internet instalat
Page 10

1. Introduction
Chapter 1 - Introduction
10 ASUS Wireless Router
The Product Package
The WL500g/WL500g Deluxe Wireless Router comes with:
• One ASUS 802.11g Wireless Router
• One ASUS Wireless Router Quick Start Guide
• One power adapter (5 Volts DC)
• One support CD (utilities and user’s manual)
• One RJ-45 Ethernet cable (straight-through)
The WL500b Wireless Router comes with:
• One ASUS 802.11b Wireless Router
• One ASUS Wireless Router Quick Start Guide
• One power adapter (5 Volts DC)
• One support CD (utilities and user’s manual)
• One RJ-45 Ethernet cable (straight-through)
Features
The WL500g/WL500g Deluxe and WL500b Wireless Router features
include:
• Wireless Connectivity And Protect Compatibility. WL500g/WL500g
Deluxe Wireless Router enables fastest 54Mbps IEEE 802.11g wireless
transmission but keeps compatibility with existing IEEE 802.11b devices.
WL500g Deluxe increases performance compared with standard 802.11g
when Afterburner mode is enabled. The WL-500b W ireless Router utilizes
the IEEE 802.11b standard.
• Secure wireless connectivity. The integrated Wireless Access Point with
WP A authentication and encryption functionality allows the wireless router
to link a broadband Internet connection to your local network of 802.11g
or/and 802.11b wireless mobile clients securely . The ASUS W ireless Router
is firmware upgradable to support WPA.
• Multiple local network ports. Four 10/100Base-T Ethernet ports, offering
either a connection to a hub or switch on the local wired network or a direct
connection to multiple Ethernet-enabled computers. Build-in DHCP server
allows the W ireless Router to provide IP addresses to clients on your local
network automatically.
Router-ul wireless ASUS
Pachetul produsului
Pachetul Router wireless WL500g/WL500g Deluxe conþine:
- un router wireless 802.11g ASUS
- un ghid pentru pornirea rapidã a router-ului wireless ASUS
- un adaptor alimentare (5 Volþi DC)
- un CD ajutãtor (servicii ºi manual de utilizare)
- un cablu Ethernet RJ-45 (direct)
Pachetul Router wireless WL500b conþine:
- un router wireless 802.11b ASUS
- un ghid pentru pornirea rapidã a router-ului wireless ASUS
- un adaptor alimentare (5 Volþi DC)
- un CD ajutãtor (servicii ºi manual de utilizare)
- un cablu Ethernet RJ-45 (direct)
Trãsãturi
Trãsãturile router-ului wireless WL500g/WL500g Deluxe includ:
- Conectare wireless ºi compatibilitate în siguranþã. Router-ul wireless WL500g/WL500g
Deluxe permite o transmisie fãrã cablu rapidã de 54 Mbps IEEE 802.11 dar menþine
compatibilitatea cu dispozitivele IEEE 802.11b existente. WL500g Deluxe mãreºte
performanþa în comparaþie cu 802.11g standard în momentul în care este activat mdul
"Afterburner". Router-ul wireless WL-500b utilizeazã standardul IEEE 802.11b.
- Conectare wireless securizatã. Punctul de acces wireless încorporat cu autentificare WPA
ºi funcþie de codare permite router-ului wireless sã securizeze o conectare Internet cu
broadband de reþeaua dumneavoastra localã 802.11g sau/ºi 802.11b de clienþii mobili
wireless. Router-ul wireless ASUS are un soft integrat care poate fi actualizat pentru a
suporta un WPA.
- Port-uri multiple în reþeaua localã. Patru port-uri Ethernet 10/100Base-T care oferã fie o
conectare la un hub sau switch într-o o reþea localã prin cablu sau o conectare directã la
multiple calculatoare care deþin Ethernet. Serverul DHCP încorporat permite router-ului
wireless sã furnizeze automat adrese IP clienþilor din reþeaua dumneavoastrã localã
Capitolul 1 - Introducere
Page 11

1. Introduction
ASUS Wireless Router 11
Chapter 1 - Introduction
• Broadband port. The Broadband port connects the Wireless Router to
your cable/DSL modem. Static IP, dynamically IP and PPPoE (PPP over
Ethernet) connection to Internet are supported.
• Shared Internet access. All computers on the local network can access
the Internet through the Wireless Router, using only a single external IP
address.
• Firewall protection. The wireless router use of NAT (Network Address
Translation) provides firewall protection for your local network.
• Childr en Protection. The wireless router allows you to block the Internet
access within a predefined time interval and to block the WWW access
with specific keywords in URL within a predefined time interval.
• USB devices support.
Connecting a USB storage device to the wireless
router enables you to set up an FTP server and share the USB storage device
with Internet or WLAN users. W ith a USB web camera, the wireless router
allows you to monitor locations such as your home or office from any
location through a wireless LAN or over the Internet.
• Printer sharing. With an additional Printer, the ASUS Wireless Router
allows you to share the printer to your local area network. Standard parallel
printers are supported.
• Easy setup and management. Use your web browser from any computer
on the local network to configure the ASUS Wireless Router.
Router-ul wireless ASUS
Capitolul 1 - Introducere
- Port cu broadband. Port-ul cu broadband conecteazà router-ul wireless la modemul dvs.
cu cablu/DSL. Conectãrile la Internet cu IP static, IP dinamic ºi PPPoE (PPP peste
Ethernet) sunt susþinute.
- Acces Internet împãrþit. Toate calculatoarele dintr-o reþea localã pot accesa Internetul cu
ajutorul router-ului wireless, folosind numai o singurã adresã IP externã.
- Protecþie firewall. Utilizarea de cãtre router-ul wireless a unui NAT (Convertirea Adresei
Reþelei) furnizeazã protecþie firewall pentru reþeaua dumneavoastra localã.
- Protecþie copii. Router-ul wireless permite sã blocaþi accesul la Internet într-un interval
de timp predefinit ºi sã blocaþi accesul la WWW cu anumite cuvinte cheie în URL într-un
interval de timp predefinit.
- Susþinerea dispozitivului USB. Conectarea unui dispozitiv de stocare USB la router-ul
wireless vã permite sã montaþi un server FTP ºi sã împãrþiþi dispozitivul de stocare USB
cu utilizatorii de Internet sau de WLAN. Cu o camera web USB, router-ul wireless vã
permite sã monitorizaþi locaþii precum casa dumneavoatrã sau biroul din orice locaþie
printr-un LAN wireless sau prin Internet.
- Împãrþirea imprimantei. Cu ajutorul unei imprimante adiþionale, router-ul wireless ASUS
vã permite sã împãrþiþi imprimantã cu reþeaua dumneavoastrã localã. Sunt acceptate ºi
imprimante standard în paralel.
- Montare ºi management uºor. Folosiþi browser-ul de Internet din orice calculator din
reþea pentru a configura router-ul wireless ASUS.
Page 12
1. Introduction
Chapter 1 - Introduction
12 ASUS Wireless Router
The ASUS WLAN 802.11g
Access Point (WL-300g) creates
a wireless network using the
IEEE 802.11g and 802.11b
wireless standards.
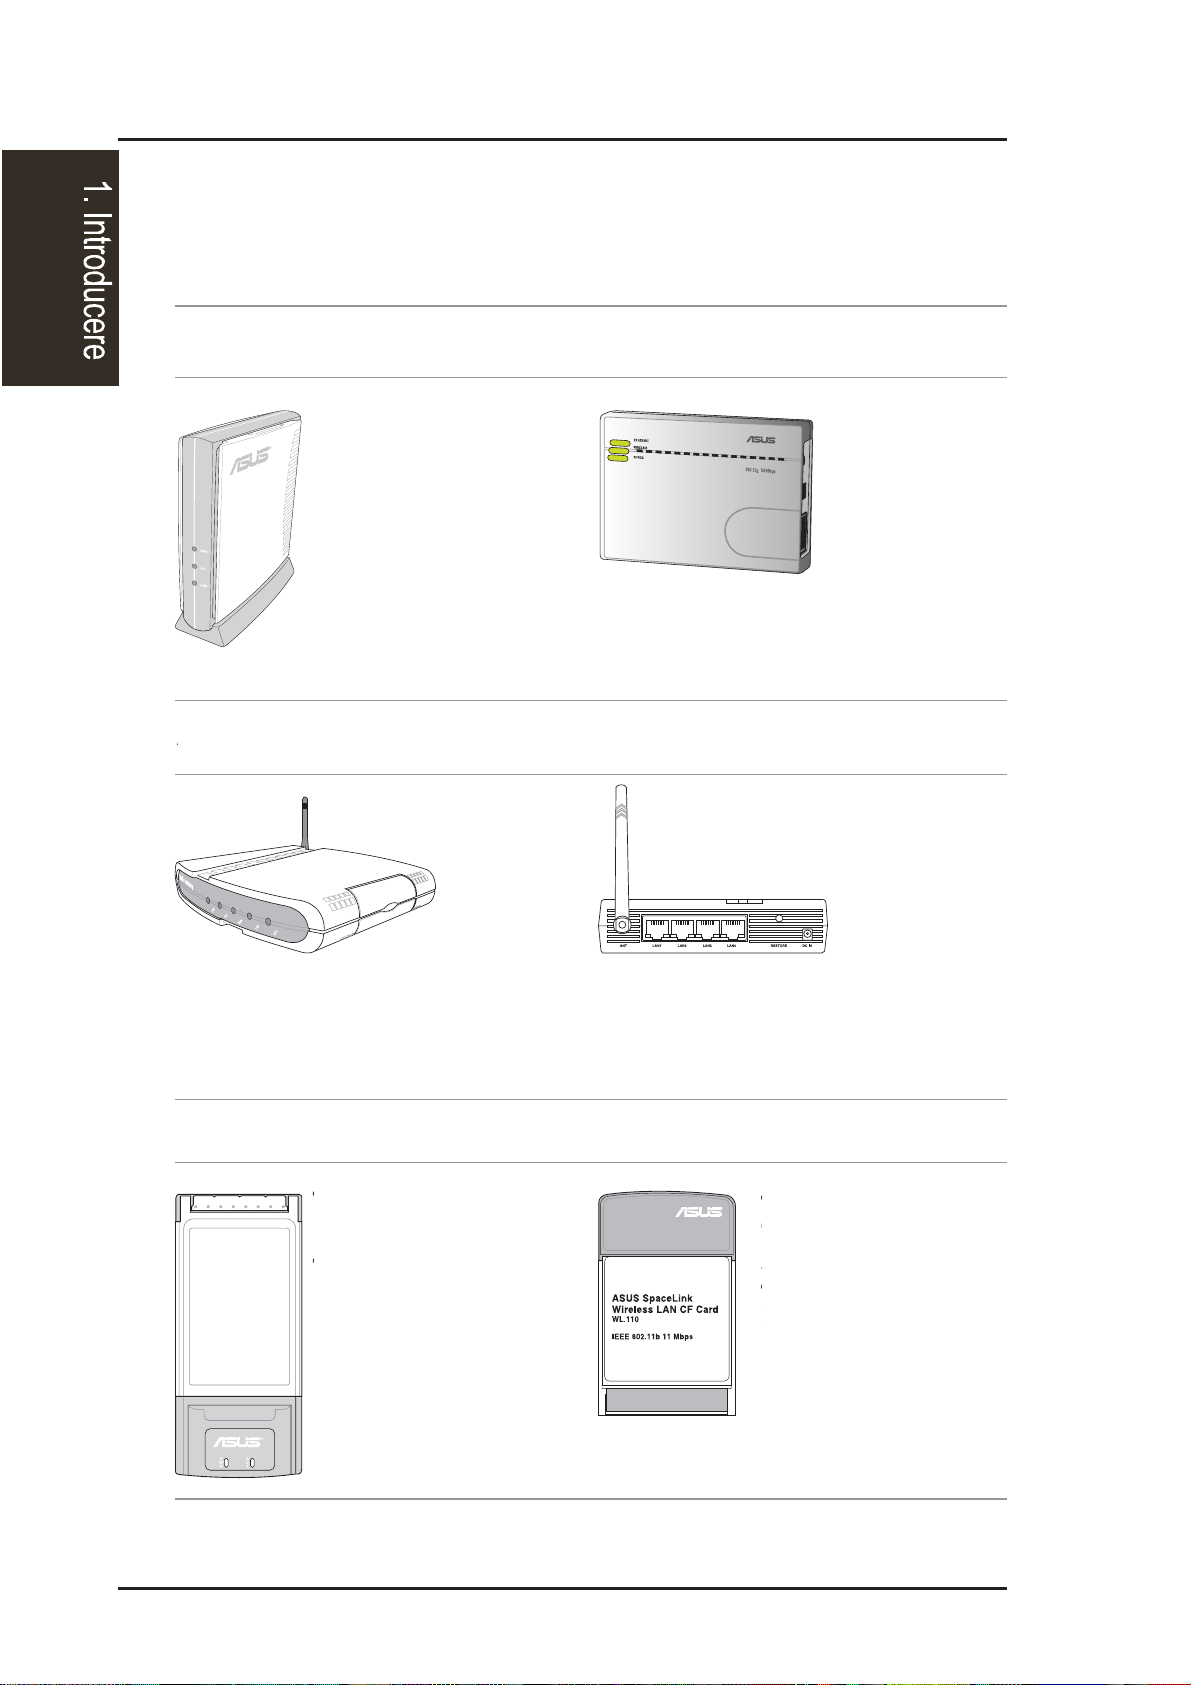
The ASUS Wireless Family
The ASUS W ireless family contains a several wireless network solutions for
802.11g & 802.11b wireless local area networks in the home or office.
The ASUS 802.11b Wireless
CF Card (WL-1 10) is a IEEE
802.11b wireless LAN adapter
that fits into a Compact Flash
Type II slot in a Portable
Digital Assistant (PDA).
The ASUS WLAN PC Card
(WL-107g) is a wireless LAN
adapter that fits into a PCMCIA
T ype II slot in a Notebook PC and
creates a wireless network using
the IEEE 802.11g/b wireless
standards.
The ASUS WLAN Gateway (WL-500g) creates a
wireless network using the IEEE 802.11g/b wireless
standards and allows sharing a single Internet
connection.
The ASUS 3 in 1
Pocket Access Point
(WL-330g) creates a
wireless network
using the IEEE
802.11g/b wireless
standards.
(The illustrations are not to scale.)
Access Point or Client
Access Point & Router
PCMCIA Client Compact Flash (CF) Client
The ASUS WLAN 802.11g Pocket Router (WL-
530g) creates a wireless network using the IEEE
802.11g and 802.11b wireless standards and allows
sharing a single Internet connection.
Router-ul wireless ASUS
Capitolul 1 - Introducere
Gama ASUS wireless
Gama de echipamente wireless ASUS conþine mai multe soluþii wireless pentru
reþelele wireless locale 802.11g si 802.11b de acasã sau de la birou.
Punct de acces sau client
Punctul de acces ASUS
WLAN 802.11g (WL-300g)
creazã o reþea wireless
utilizând standardele
wireless IEEE 802.11g si
802.11b.
Punctul de acces
de buzunar 3 in 1
ASUS (WL-330g)
creaza o reþea
wireless utilizând
standardele
wireless IEEE
802.11g/b.
Punct de acces ºi router
Calea de acces |(Gateway) ASUS WLAN
(WL-500g) creazã o reþea wireless
utilizând standardele wireless IEEE
802.11g/b ºi permite împãrþirea unei
singure conectãri la Internet.
Router-ul de buzunar ASUS WLAN 802.11g (WL530g) creazã o reþea wireless utilizând standardele
wireless IEEE 802.11g ºi 802.11b ºi permite
împãrþirea unei singure conectãri la Internet.
Client PCMCIA
Client Compact Flash
Cardul PC ASUS WLAN
(WL-107g) este un adaptor
LAN wireless care se
monteazã într-un slot
PCMCIA tip II într-un
Notebook PC ºi creazã o
reþea wireless utilizând
standardele wireless IEEE
802.11g/b.
Cardul CF wireless ASUS
802.11b (WL-110) este un
adaptor LAN wireless
IEEE 802.11b care se
monteazã într-un slot
Compact Flash tip II întrun PDA (Portable Digital
Assistent - Asistent Digital
Portabil).
(ilustraþiile nu sunt la scala normalã)
Page 13
1. Introduction
ASUS Wireless Router 13
Chapter 1 - Introduction
The ASUS USB Wireless LAN Adapter (WL-167g)
is thumb-sized and creates a wireless network using
the IEEE 802.11g/b wireless standards and connects
to any computer using USB2.0 connectivity.
The ASUS USB Wireless
LAN Adapter (WL-160g)
creates a wireless network
using the IEEE 802.11g/b
wireless standards and
connects to any computer
using USB2.0 connectivity.
The ASUS WLAN
PCI Card (WL-
138g) is a wireless
LAN adapter that fits
into a standard PCI
slot in a desktop PC
and creates a wireless
network using the
IEEE 802.11g/b
wireless standards.
(The illustrations are not to scale.)
USB Access Point or Client USB Client
PCI Client
802.11g 54Mbps
Access Point & File Server
The ASUS WLAN 802.11g Access Point (WL-
HDD) creates a wireless network using the IEEE
802.11g and 802.1 1b wireless standards. Also serves
as a file server (wireless network attached storage).
Router-ul wireless ASUS
Capitolul 1 - Introducere
Client PCI
Cardul PCI ASUS WLAN (WL138g) este un adaptor LAN
wireless care se monteazã
într-un slot PCI standard întrun PC de birou ºi creazã o
reþea wireless utilizând
standardele wireless IEEE
802.11g/b.
Punct de acces sau client
Client USB
Adaptorul LAN ASUS USB
wireless (WL-160g) creazã o
reþea wireless utilizând
standardele wireless IEEE
802.11g/b ºi se conecteazã la
orice calculator utilizând o
conexiune USB2.0.
Adaptorul LAN ASUS USB
wireless (WL-167g) este de
mãrimea unui deget ºi creazã o
reþea wireless utilizând
standardele wireless IEEE
802.11g/b ºi se conecteazã la
orice calculator utilizând o
conexiune USB2.0.
Punctul de acces ASUS WLAN 802.11g (WL-HDD) creazã
o reþea wireless utilizând standardele wireless IEEE
802.11g/b. De asemenea, poate fi utilizat ca server de
fiºiere (depozit ataºat reþelei wireless).
Punct de acces ºi server fiºiere
Punctul de acces ASUS WLAN 802.11g (WL-HDD) creazã o reþea
wireless utilizând standardele wireless IEEE 802.11g/b. De asemenea,
poate fi utilizat ca server de fiºiere (depozit ataºat reþelei wireless).
(ilustraþiile nu sunt la scala normalã)
Page 14
1. Introduction
Chapter 1 - Introduction
14 ASUS Wireless Router
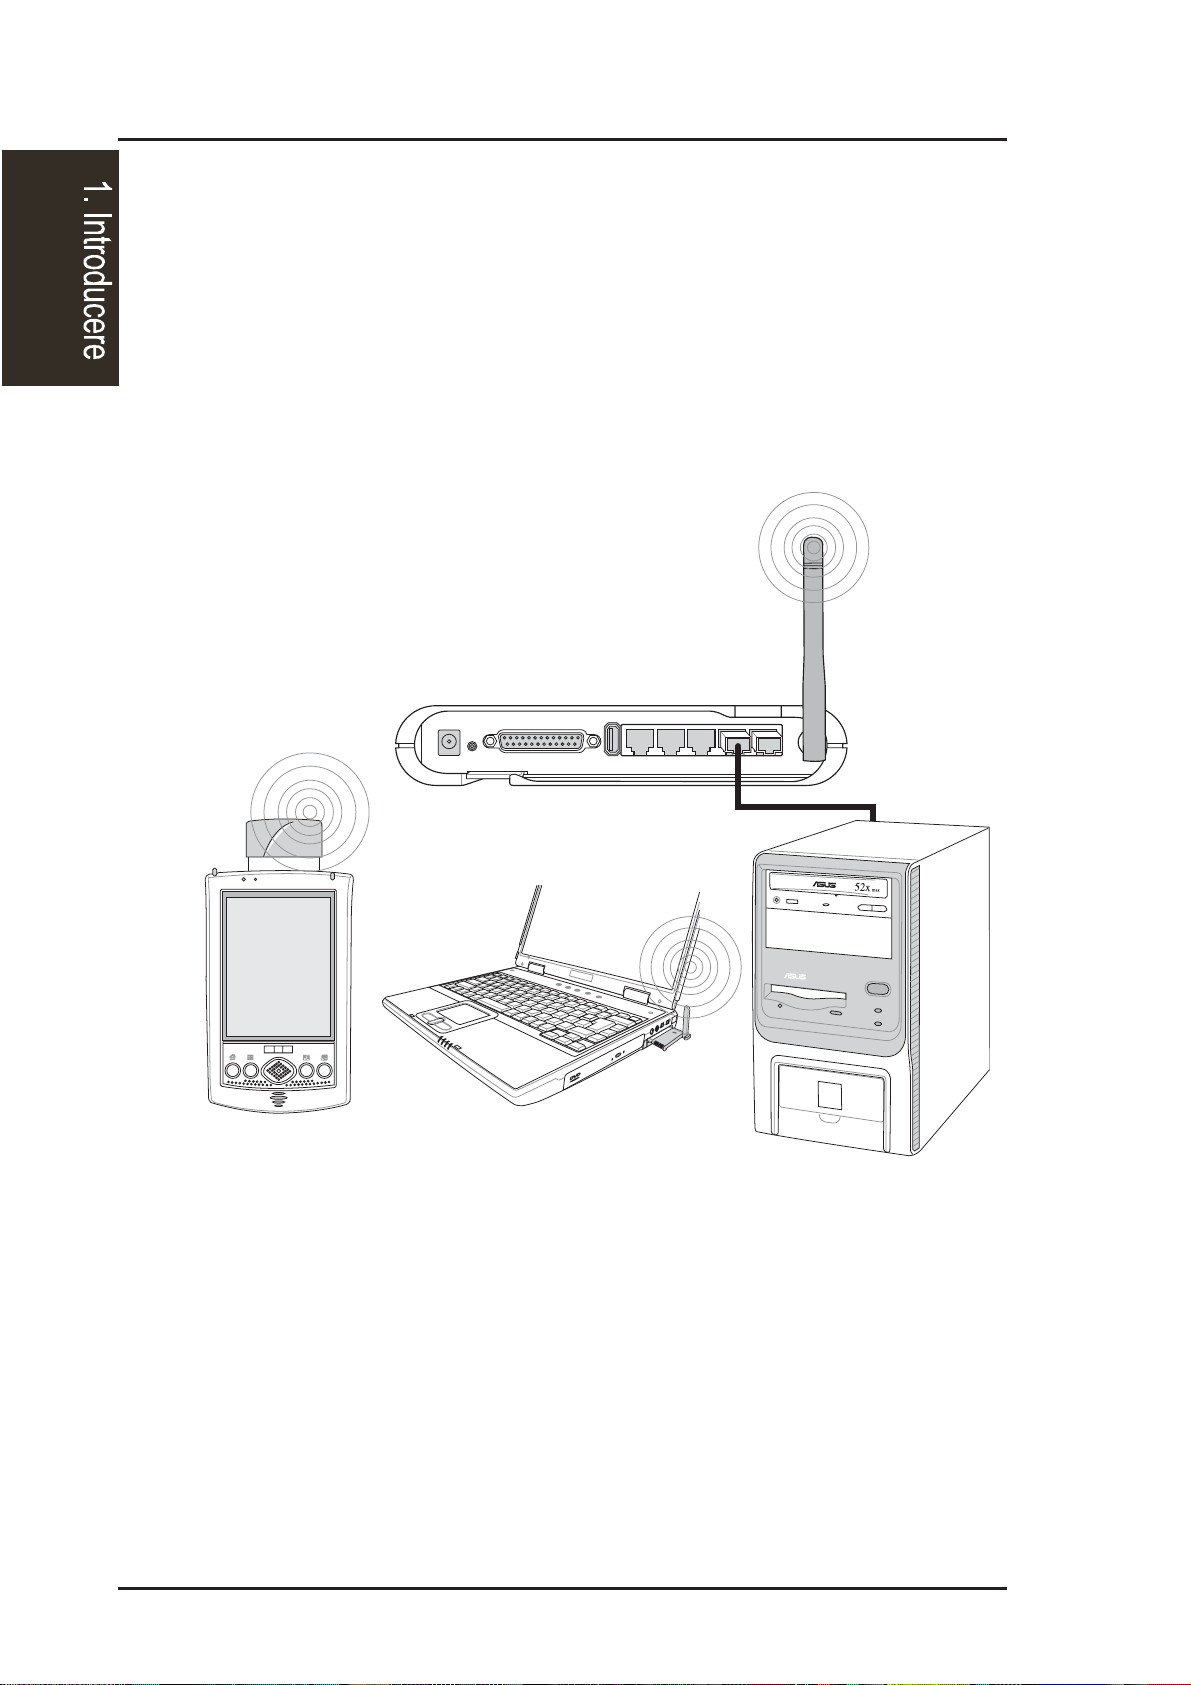
Wireless Client
Wireless Client
ASUS Wireless Router
LAN
Wireless
Wired Client
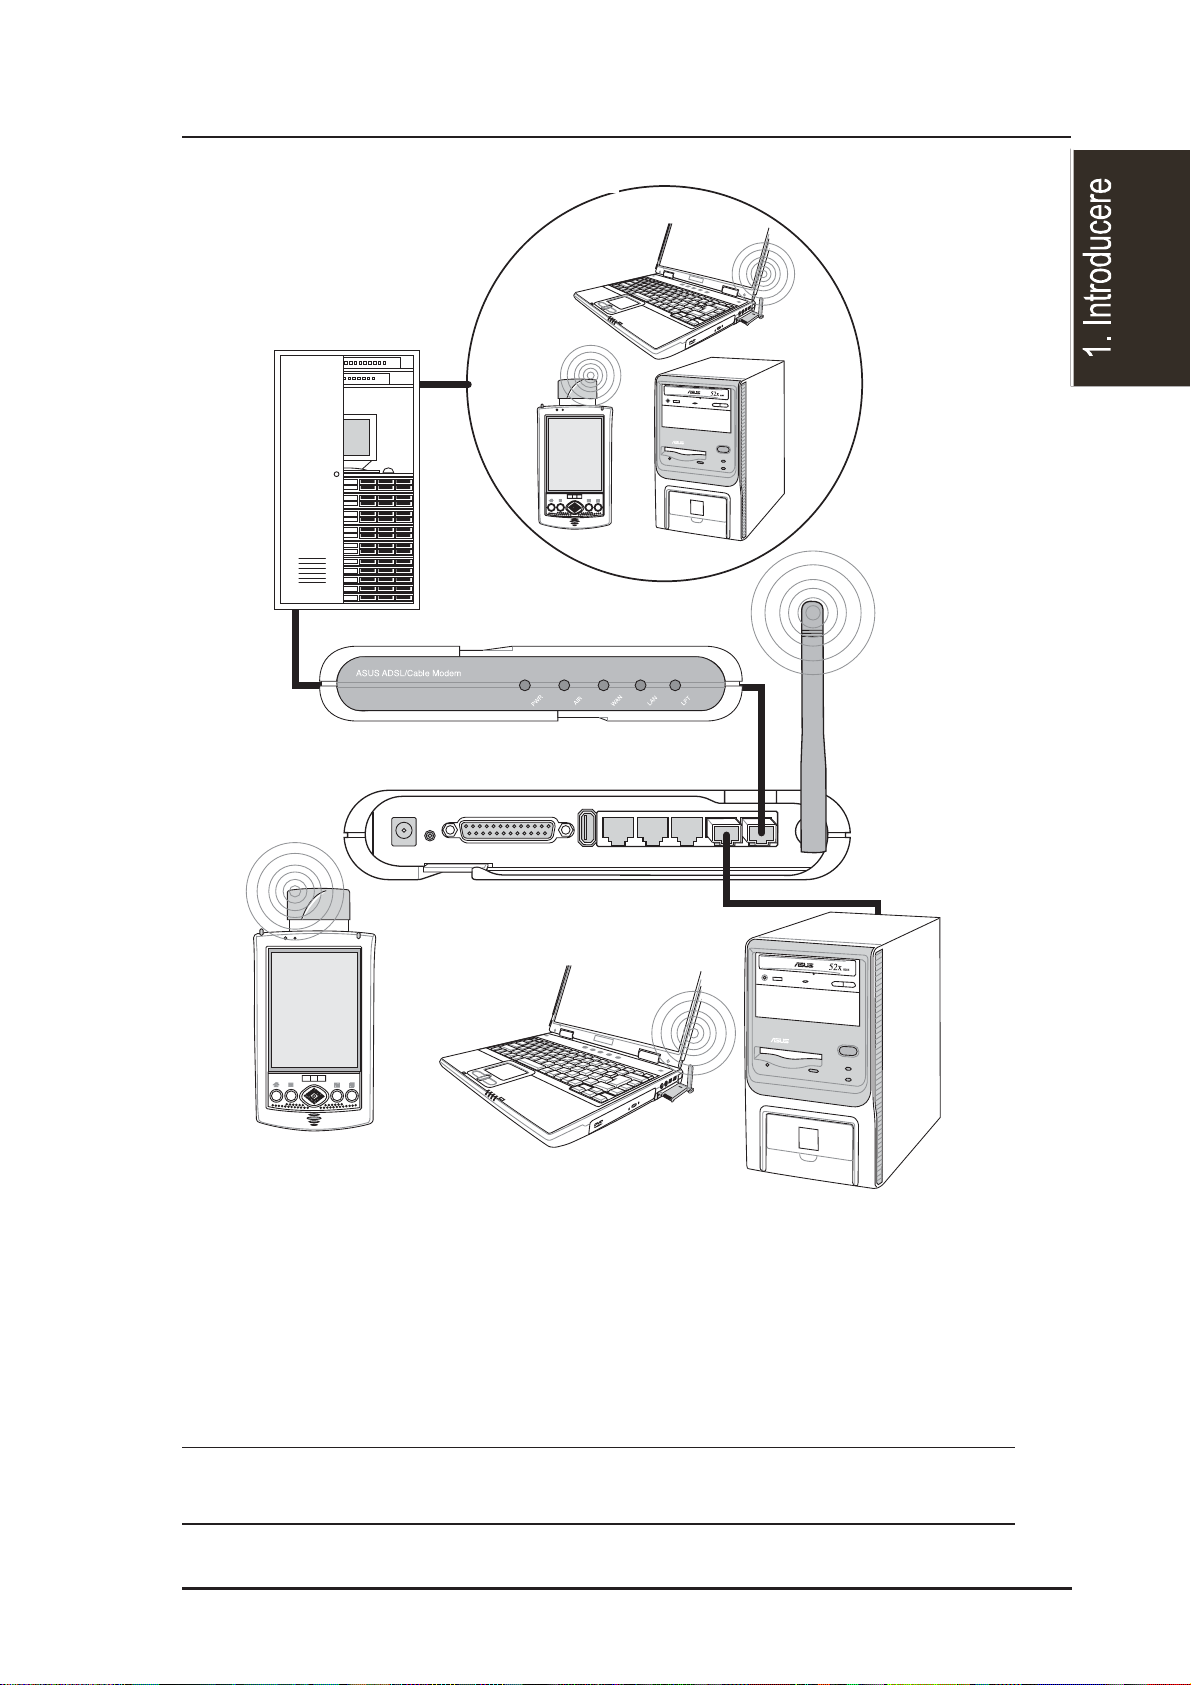
Network Topology
The settings that you need to perform will vary depending on the role that
your ASUS Wireless Router will play.
Network Backbone
No software setting is necessary in the ASUS Wireless Router.
In this topology , the wireless router connects your wired and wireless devices
together to form a local area network (LAN), as shown. To connect a
computer (or other device) to the ASUS Wireless Router , you need a network
cable (UTP-Cat5) with one end connected to one of the LAN ports on the
back of the ASUS W ireless Router and the other in the 10/100 LAN port on
that device. For wireless connections, wireless mobile clients must comply
with the IEEE 802.11b standard.
Router-ul wireless ASUS
Capitolul 1 - Introducere
Topologia reþelei
Setãrile care trebuie realizate vor varia în funcþie de rolul pe care îl va avea
router-ul wireless ASUS.
Punctul central al reþelei
Nu este nevoie sã setaþi software-ul pentru router-ul wireless ASUS.
Dupã cum se poate observa ºi în figurã, în aceastã topologie, router-ul wireless
conecteazã dispozitivele prin cablu ºi cele wireless pentru a realiza o reþea
locala (LAN). Pentru a conecta un calculator (sau alt dispozitiv) la un router
wireless ASUS, va trebuie un cablu de reþea (UTP-Cat5) cu unul din capete
conectat într-un port al LAN-ului din spatele router-ului wireless ASUS ºi celalalt
capãt în port-ul LAN 10/100 al respectivului dispozitiv. Pentru conectãrile
wireless, clienþii wireless trebuie sã respecte standardul IEEE 802.11b.
Page 15
1. Introduction
ASUS Wireless Router 15
Chapter 1 - Introduction
ASUS Wireless Router
Wireles
s
I
nternet Service Provider
Wired Client
Wireless Client
Wireless Client
WAN
LAN
ADSL or Cable Modem
Internet
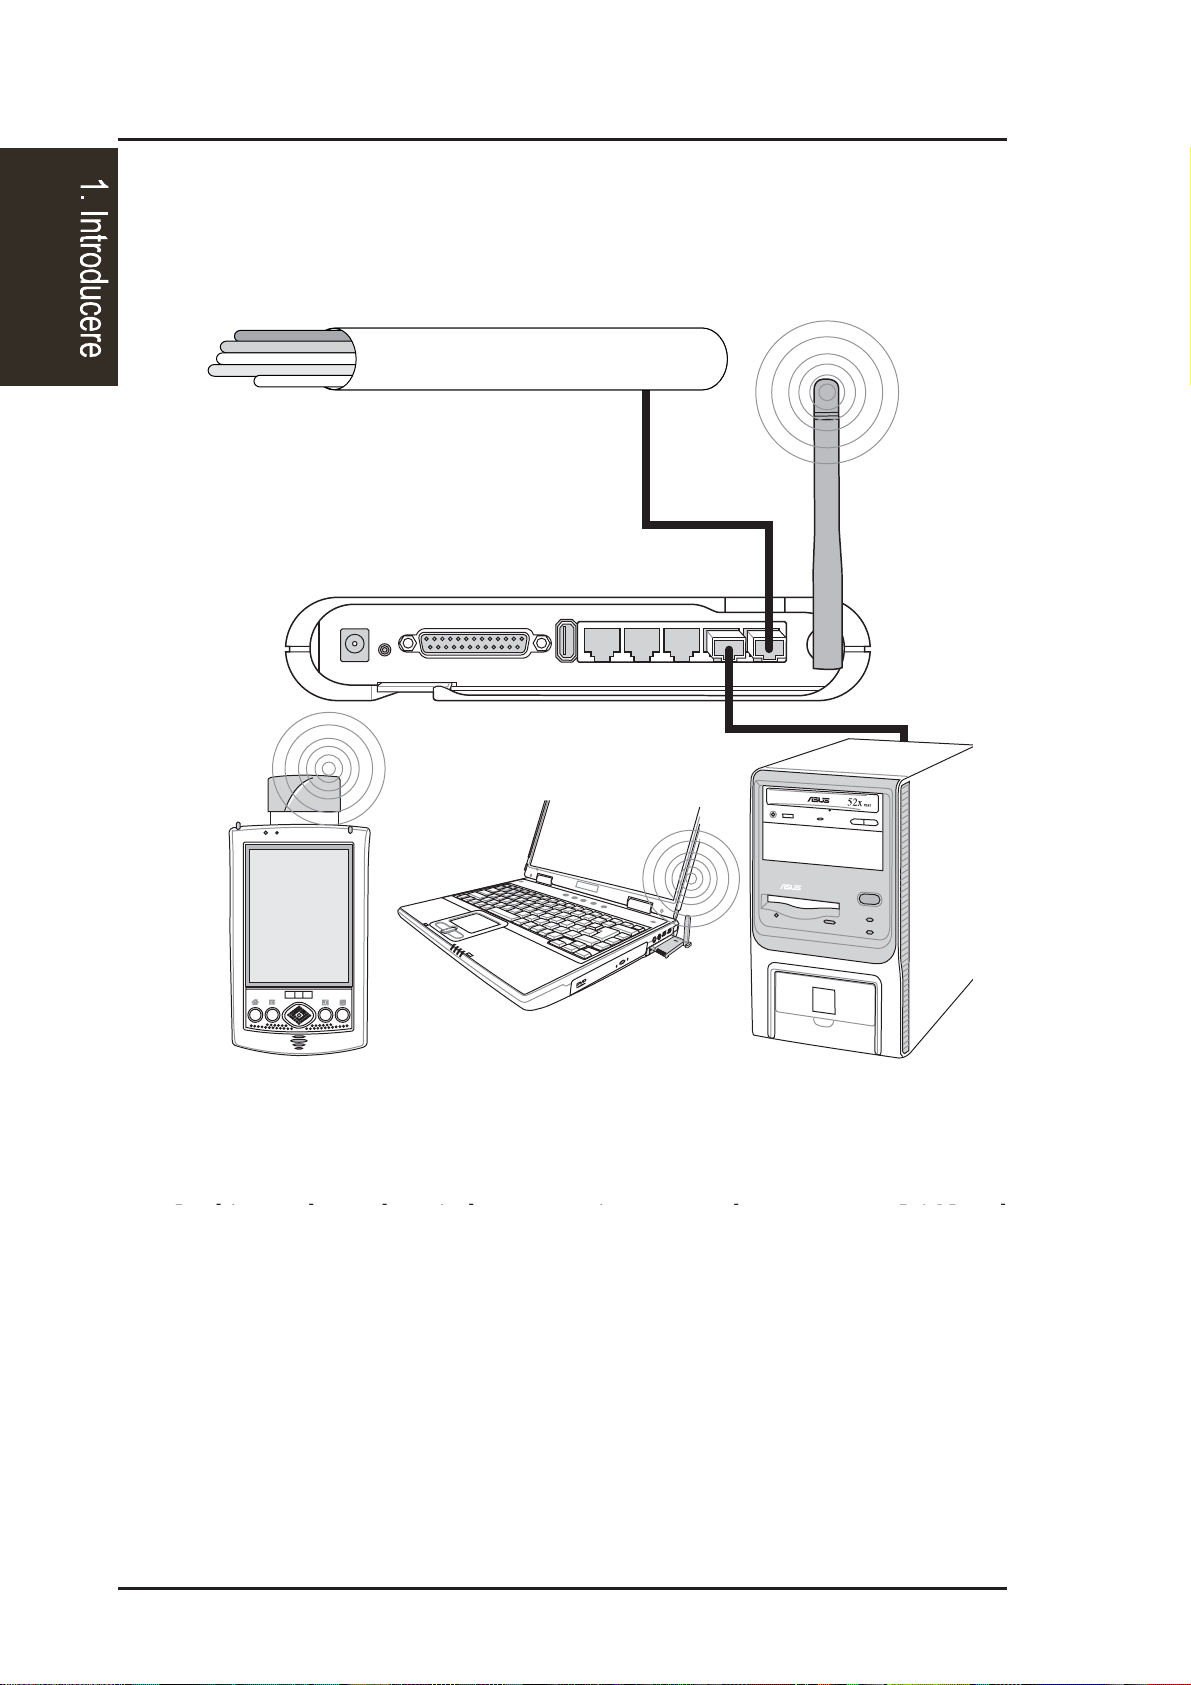
Agent to an ISP
In this topology, the wireless router is not only a backbone of your LAN
but also an agent to your Internet Service Provider (ISP). You may use an
ADSL or Cable modem to communicate with your ISP. Connect the LAN
port on the modem with the WAN port at the back of the ASUS Wireless
Router using a network cable as shown above.
Note: You also need to make sure that other connections on the
ADSL or Cable modem are correct.
Router-ul wireless ASUS
Capitolul 1 - Introducere
De la agent la furnizorul de Internet (ISP)
În aceastã topologie, router-ul wireless nu este numai punctul central in LAN
dar, de asemenea, un agent al furnizorului serviciilor de Internet (Internet
Service Provider - ISP). Puteþi utiliza un modem prin cablu sau ADSL pentru a
comunica cu furnizorul de Internet. Conectaþi port-ul de LAN din modem cu
port-ul WLAN din spatele router-ului wireless ASUS utilizând un cablu de reþea,
dupã cum este indicat in figura de mai sus.
NOTÃ: de asemenea, trebuie sã vã asiguraþi cã celelalte conectãri din
modem-ul prin cablu sau ADLS sunt realizate în mod corect.
Page 16
1. Introduction
Chapter 1 - Introduction
16 ASUS Wireless Router
Wired Client
Wireless Client
Wireless Client
ASUS Wireless Router
WAN
LAN
Wireless
Network Backbone
Agent to Another Network
In this topology, the wireless router is an agent between your LAN and
another network. Use a network cable with one end connected to the WAN
port on the wireless router and the other to the other network as shown
above.
Router-ul wireless ASUS
De la agent la altã reþea
În acestã topologie, router-ul wireless este un agent între LAN-ul
dumneavoastrã ºi altã retea. Utilizaþi un cablu de reþea cu unul din capete
conectate în port-ul WAN din router-ul wireless ºi celãlalt capãt în cealaltã
reþea, dupã cum este indicat ºi în figura de mai sus.
Capitolul 1 - Introducere
Page 17
1. Introduction
ASUS Wireless Router 17
Chapter 1 - Introduction
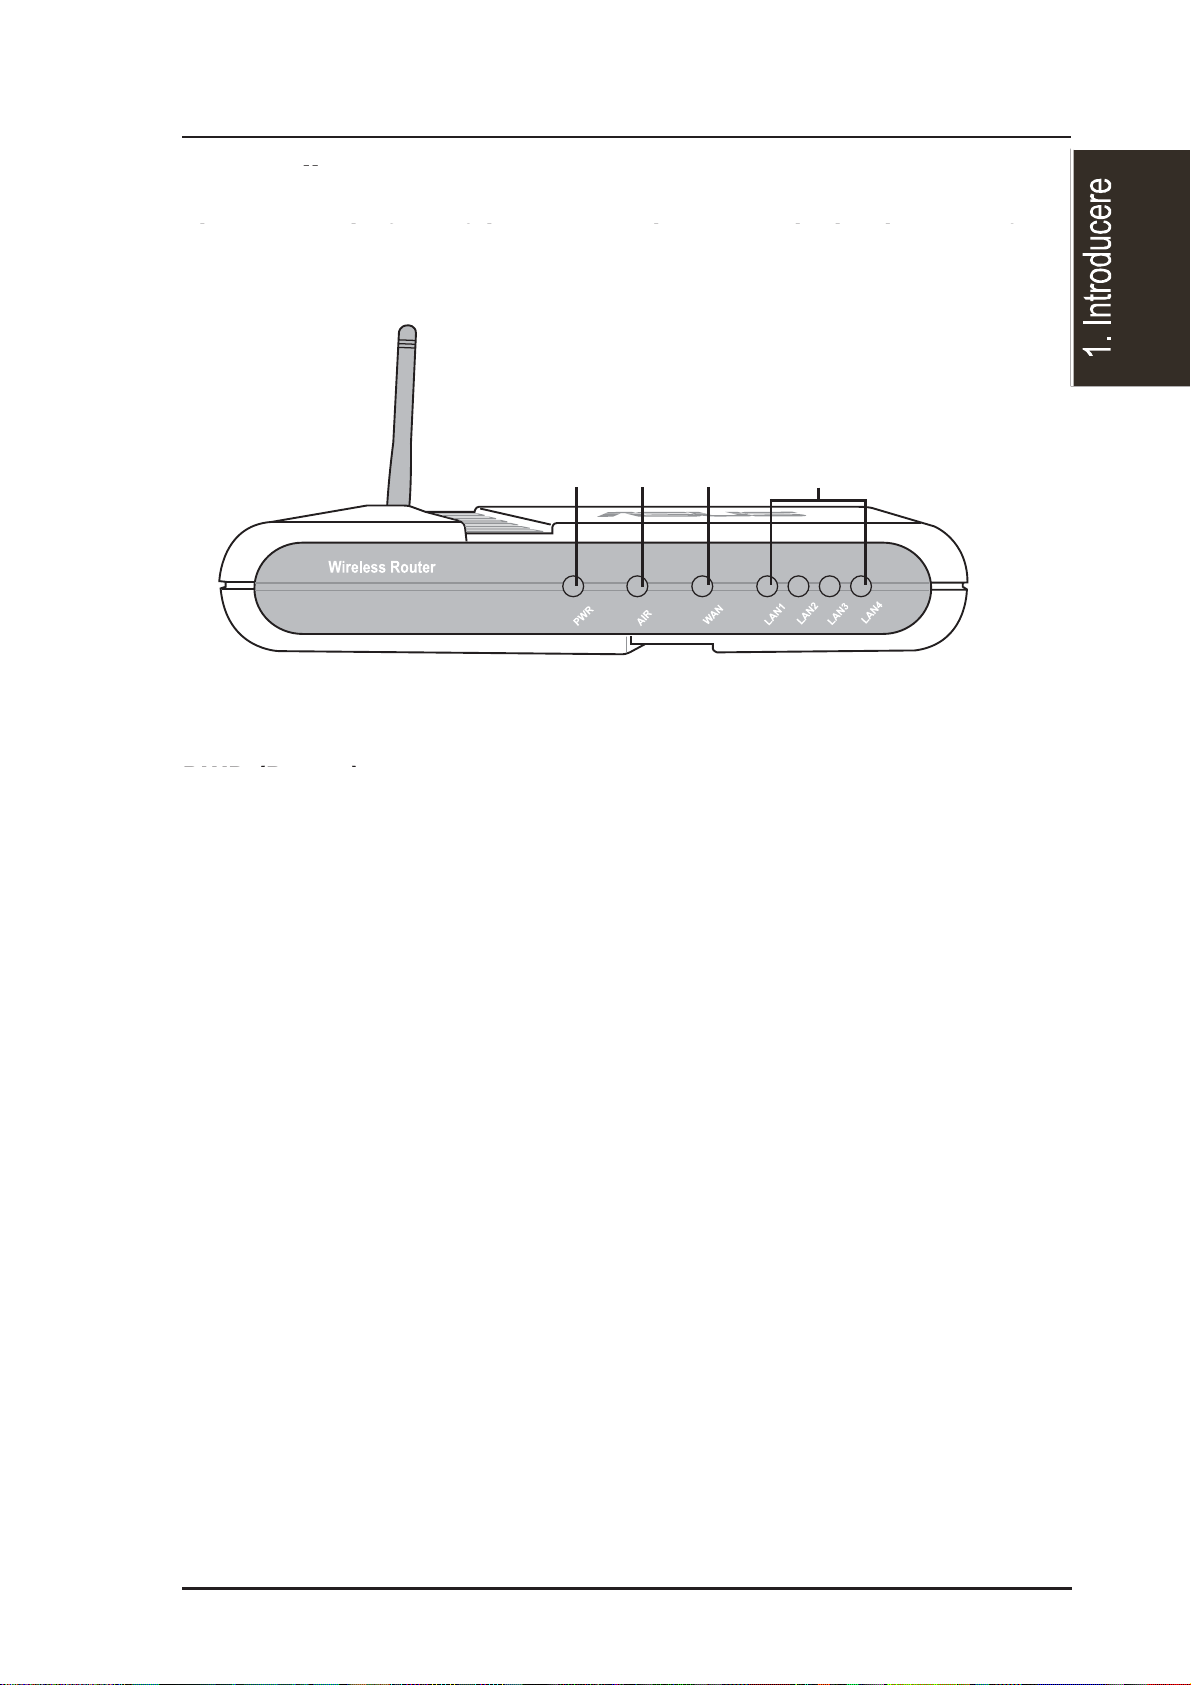
LED Indicators
The LEDs on the front of the ASUS Wireless Router display the status of
the ASUS Wireless Router.
PWR (Power)
Off No power
On System ready
Flashing Firmware upgrade failed
AIR (Wireless Network)
Off No power
On Wireless system ready
Flashing Transmitting or receiving data (wireless)
WAN (Wide Area Network)
Off No power
On Has physical connection to an Ethernet network
Flashing Transmitting or receiving data (through Ethernet wire)
LAN 1-4 (Local Area Network)
Off No power
On Has physical connection to an Ethernet network
Flashing Transmitting or receiving data (through Ethernet wire)
PWR
AIR
WAN LAN
Router-ul wireless ASUS
Indicatoarele LED
LED-ul din partea frontalã a router-ului wireless ASUS afiºeazã starea
acestuia.
PWR (Alimentare)
OFF - nu este alimentat
ON - sistemul este pregãtit
Clipire - actualizarea soft-ului integrat eºuatã
AIR (reþea wireless)
OFF - nu este alimentat
ON - sistemul este pregãtit
Clipire - transmisie sau recepþie de date (wireless)
WAN (Reþea cu arie largã)
OFF - nu este alimentat
ON - exista conectare fizica cu o reþea Ethernet
Clipire - transmisie sau recepþie date (prin cablu Ethernet)
LAN 1-4 (Reþea cu arie locala)
OFF - nu este alimentat
ON - existã conectare fizicã cu o reþea Ethernet
Clipire - transmisie sau recepþie date (prin cablu Ethernet)
Capitolul 1 - Introducere
Page 18

Chapter 2 - Installation
2. Installation
18 ASUS Wireless Router
2. Installation Procedure
Follow these steps to install the ASUS Wireless Router.
1. Determine the best location for the ASUS Wireless Router. Keep in mind
the following considerations:
• The length of the Ethernet cable that connects the ASUS Wireless
Router to the network must not exceed 100 meters.
• Try to place the ASUS Wireless Router on a flat, sturdy surface as
far from the ground as possible, such as on top of a desk or book-
case, keeping clear of obstructions and away from direct sunlight.
• Try to centrally locate the ASUS Wireless Router so that it will pro-
vide coverage to all of the wireless mobile devices in the area. Orien-
tating the antenna vertically should provide the best reception.
• Use only the power supply that came with this unit. Other power
supplies may fit but the voltage and power may not be compatible.
2. Wall mounting or vertical standing is also possible.
It is the responsibility of the installer and users of the ASUS Wire-
less Router to guarantee that the antenna is operated at least 20
centimeters from any person. This is necessary to insure that the
product is operated in accordance with the RF Guidelines for Hu-
man Exposure which have been adopted by the Federal Communi-
cations Commission.
4. LAN Connection: Attach one end of an RJ-45 Ethernet cable to the ASUS
Wireless Router’ s LAN port (any one of the four) and attach the other end
to the RJ-45 Ethernet cable to your desktop computer .
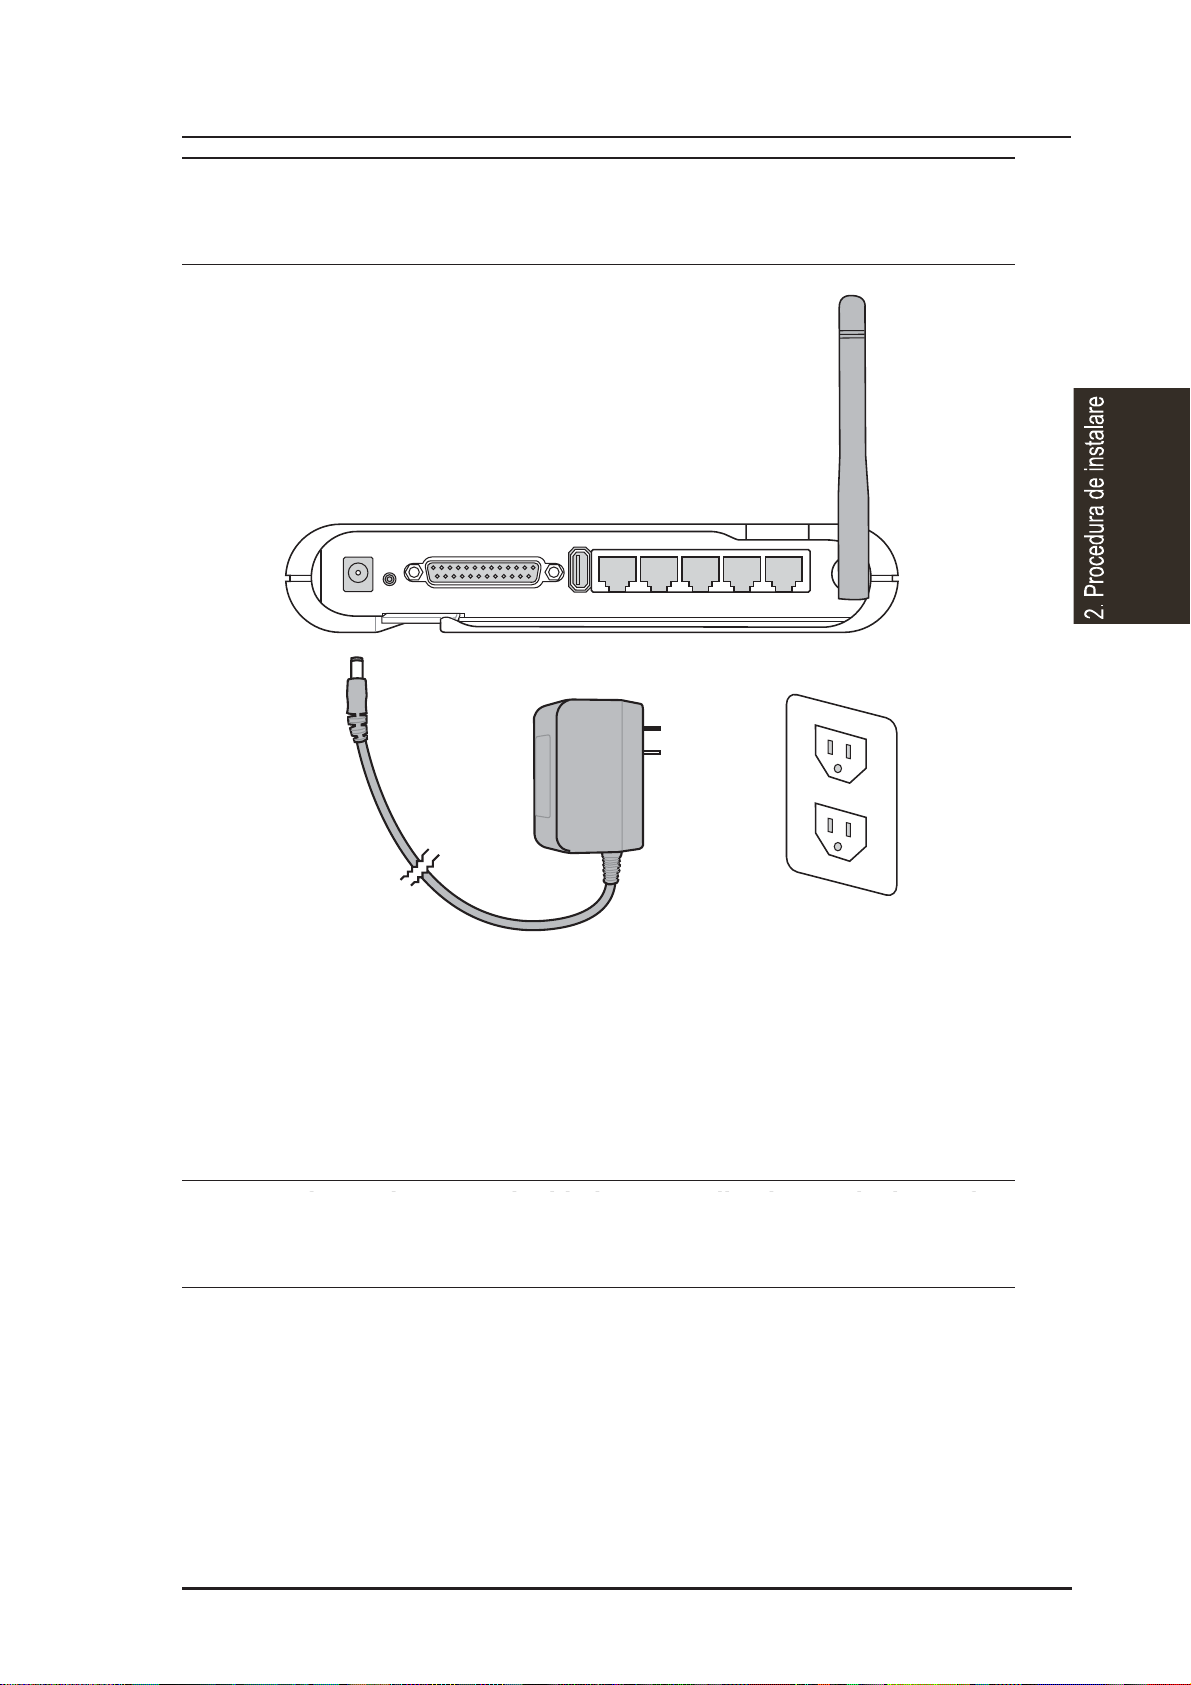
5. Power Connection: The ASUS Wireless Router requires power from an
external power supply . The ASUS Wireless Router ships with a UL listed,
Class 2 power supply (5V). Attach one end of the DC power adapter to the
back of the ASUS Wireless Router and the other end to a power outlet.
The Power LED on the front of the ASUS Wireless Router will light up
when the unit is powered ON. In addition, the green LAN or WAN LEDs
will turn ON to indicate that the ASUS Wireless Router has a physical
Ethernet network connection.
Router-ul wireless ASUS
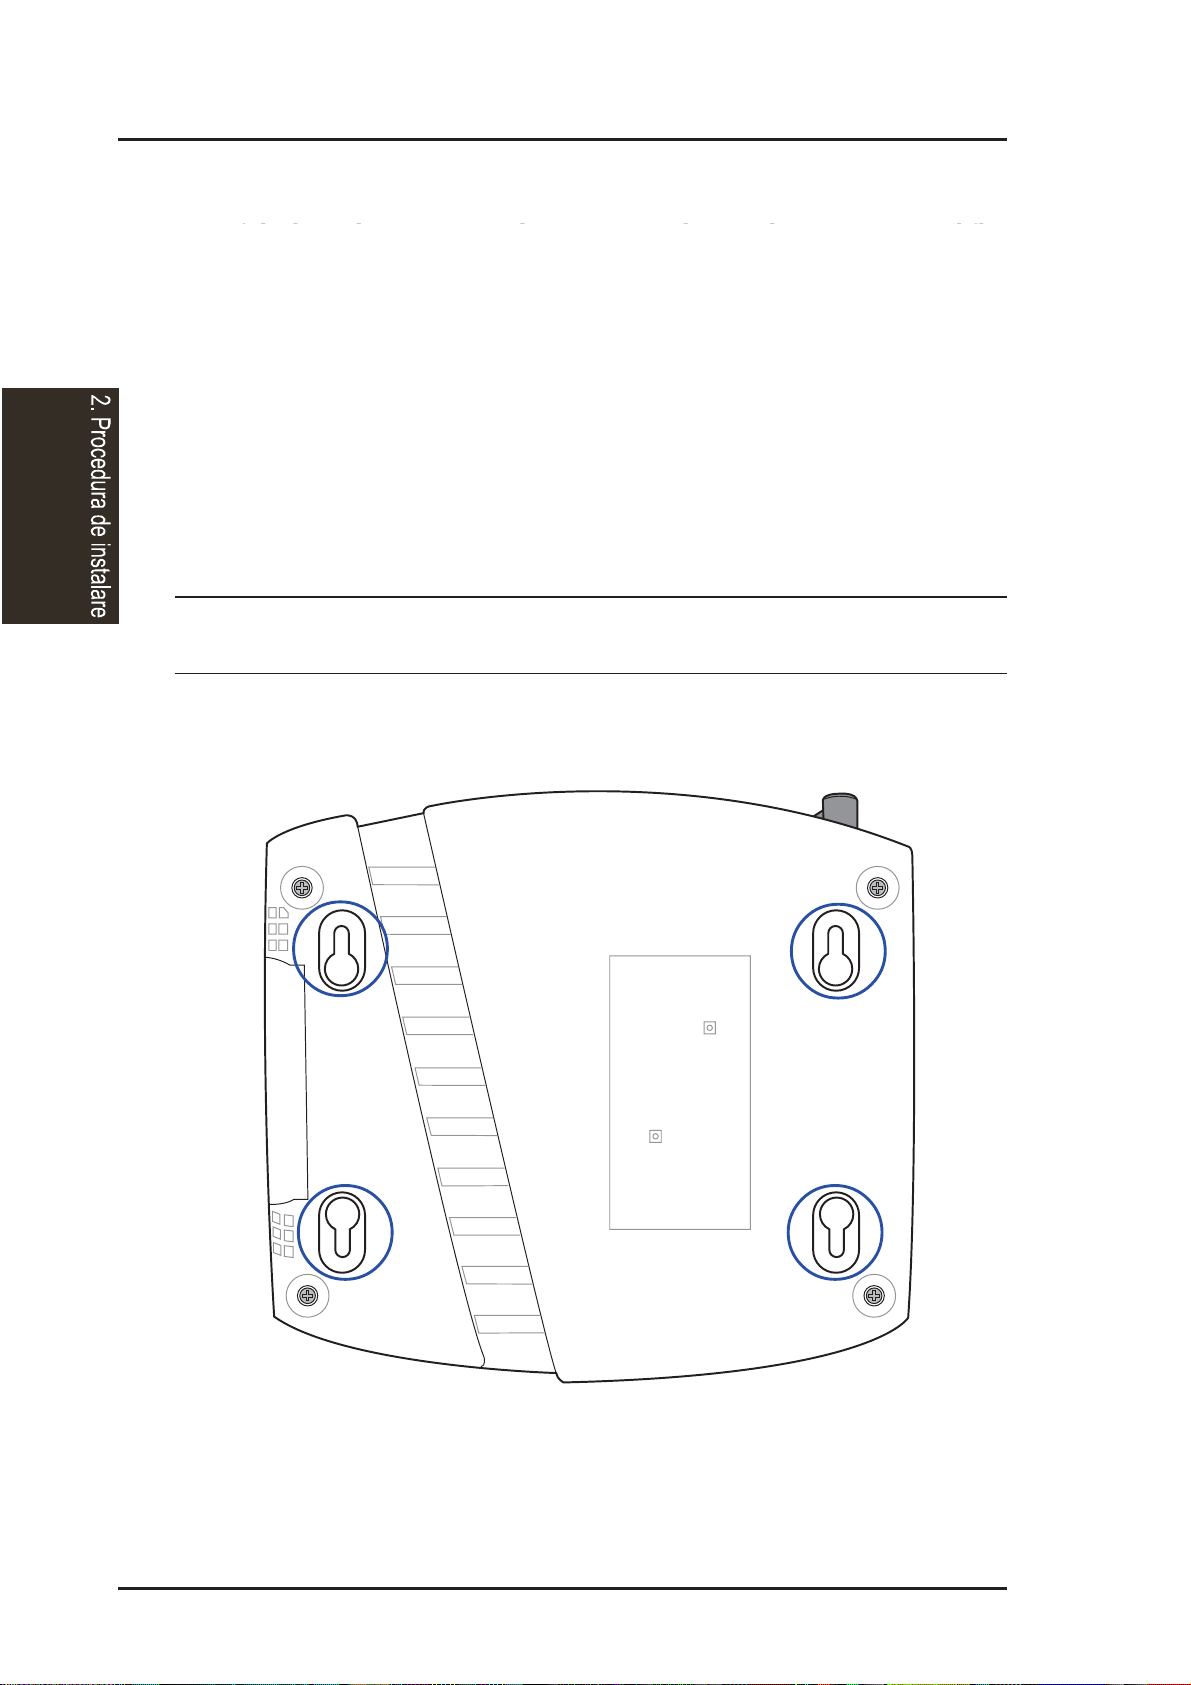
Procedura de instalare
Respectaþi urmãtorii paºi pentru a instala router-ul wireless ASUS.
1. Stabiliþi cea mai bunã locaþie pentru router-ul wireless ASUS. Reþineþi
urmãtoarele menþiuni:
- lungimea cablului Ethernet care conecteazã router-ul wireless ASUS de
reþea trebuie sã nu depaºeascã 100 de metri.
- Încercaþi sã plasaþi router-ul wireless ASUS pe o suprafaþã platã,
rezistentã, cât mai departe de pãmânt, de exemplu pe un birou sau pe
bibliotecã, fãrã alte obiecte în jur, ºi ferit de soare.
- Încercaþi sã pozitionaþi router-ul wireless ASUS în poziþie centralã, astfel
încât sã furnizeze acoperire tuturor dispozitivelor wireless din zonã. Orientarea
verticalã a antenei furnizeazã cea mai bunã recepþie.
- Utilizaþi numai sursa de alimentare a dispozitivului. Alte surse de
alimentare se pot potrivi, dar tensiunea ºi puterea pot sã nu fie compatibile.
2. Este posibilã montarea pe perete sau in poziþie verticalã.
Este resposabilitea persoanei care îl instaleazã ºi a utilizatorului routerului wireless ASUS sã garanteze cã antena se aflã la o distanþã de 20 de
centimeri de orice persoana. Este necesar sã vã asiguraþi cã produsul
funcþioneazã în conformitate cu indicaþiile RF pentru Expunere Umanã
care au fost adoptate de Comisia Federala de Comunicaþii.
3. Conectare LAN: atasaþi un capãt a cablului Ethernet RJ-45 la port-ul LAN al
router-ului wireless ASUS (oricare din cele patru) ºi celalalt capat al cablului
Ethernet RJ-45 la computerul dvs.
4. Conectarea la alimentare: router-ul wireless ASUS necesitã alimentare de la
o sursã externã de alimentare. Router-ul wireless ASUS este livrat cu o sursã
de alimentare Clasa 2, UL listat (5V). Ataºaþi un capãt al adaptorului de
alimentare DC la spatele router-ului wireless ASUS ºi celalalt capãt la o prizã.
LED-ul de alimentare de pe partea frontala a router-ului wireless ASUS se va
aprinde când alimentarea este pornita (ON). În plus, LED-urile verzi LAN sau
WLAN se vor aprinde (ON) pentru a indica cã router-ul wireless ASUS este
conectat fizic la o reþea Ethernet.
Capitolul 2 - Procedura de instalare
Page 19
2. Installation
Chapter 2 - Installation
ASUS Wireless Router 19
Warning: Use the ASUS Wireless Router only with the power adapter
supplied in the product package. Using another power supply may
damage the ASUS Wireless Router.
6. Printer Connection: Connect a printer to the Wireless Router printer
port (WL500g/WL500b only) or USB port to use the router as a printing
server for your local network.
7. USB Connection: Connect a supported USB web camera or USB
storage device to the Wireless Router USB port.
Note: Before using an embedded USB application or device, refer
to the USB storage and USB camera support list on the ASUSTeK
Web site at the following Internet address: http://www.asus.com.
Router-ul wireless ASUS
Atenþie: utilizaþi router-ul wireless ASUS numai cu adaptorul de
alimentare furnizat în pachetul produsului. Utilizând altã sursã de
alimentare poate defecta router-ul wireless ASUS.
5. Conectarea imprimantei: conectaþi o imprimantã la port-ul de imprimanta al
router-ului wireless ASUS (numai WL500g/WL500b) sau la port-ul USB pentru
a utiliza router-ul ca server al imprimantei pentru reþeaua dumneavoastrã localã.
6.Conectare USB: conectaþi o camera video cu USB sau un dispozitiv de
stocare cu USB la un port USB la router-ul wireless.
Notã: Înainte de a utiliza o aplicaþie sau un dispozitiv USB încorporat, verificaþi
lista de informaþii a camerelor video USB ºi a dispozitivelor de stocare USB pe
pagina de Internet a ASUSTeK la urmatoarea adresã: http://www.asus.com.
Capitolul 2 - Procedura de instalare
Page 20
Chapter 2 - Installation
2. Installation
20 ASUS Wireless Router
W all Mounting Option
Out of the box, the ASUS W ireless Router is designed to sit on a raised flat
surface like a file cabinet or book shelf. The unit may also be converted for
mounting to a wall or ceiling.
Follow these steps to mount the ASUS Wireless Router to a wall:
1. Look on the underside for the four mounting hooks.
2. Mark two upper holes in a flat surface using the provided hole template.
3. Tighten two screws until only 1/4” is showing.
4. Latch the upper two hooks of the ASUS Wireless Router onto the screws.
Note: Readjust the screws if you cannot latch the ASUS Wireless
Router onto the screws or if it is too loose.
Router-ul wireless ASUS
Opþiunea de montare pe perete
În momentul în care este scos din cutie, router-ul wireless ASUS este proiectat
pentru a fi plasat pe o suprafaþã planã precum un dulap sau o biblioteca. De
asemenea, unitatea poate fi modificatã pentru a fi montatã pe perete sau pe
tavan.
Respectaþi urmãtorii paºi pentru a monta router-ul wireless ASUS pe perete:
1. Uitaþi-vã pe partea de dedesubt dupã cele patru urechi de prindere.
2. Marcaþi douã gãuri în partea superioarã pe suprafaþa platã utilizând
ºablonul de gãuri furnizat.
3. Strângeþi douã ºuruburi pânã când se mai vede doar 1/4 "(aprox. 56mm).
4. Blocaþi cele douã urechi superioare ale router-ului wireless ASUS pe
ºuruburi.
Notã: Rearanjaþi ºuruburile daca nu puteþi bloca router-ul wireless ASUS pe
ºuruburi sau stã prea lejer.
Capitolul 2 - Procedura de instalare
Page 21
2. Installation
Chapter 2 - Installation
ASUS Wireless Router 21
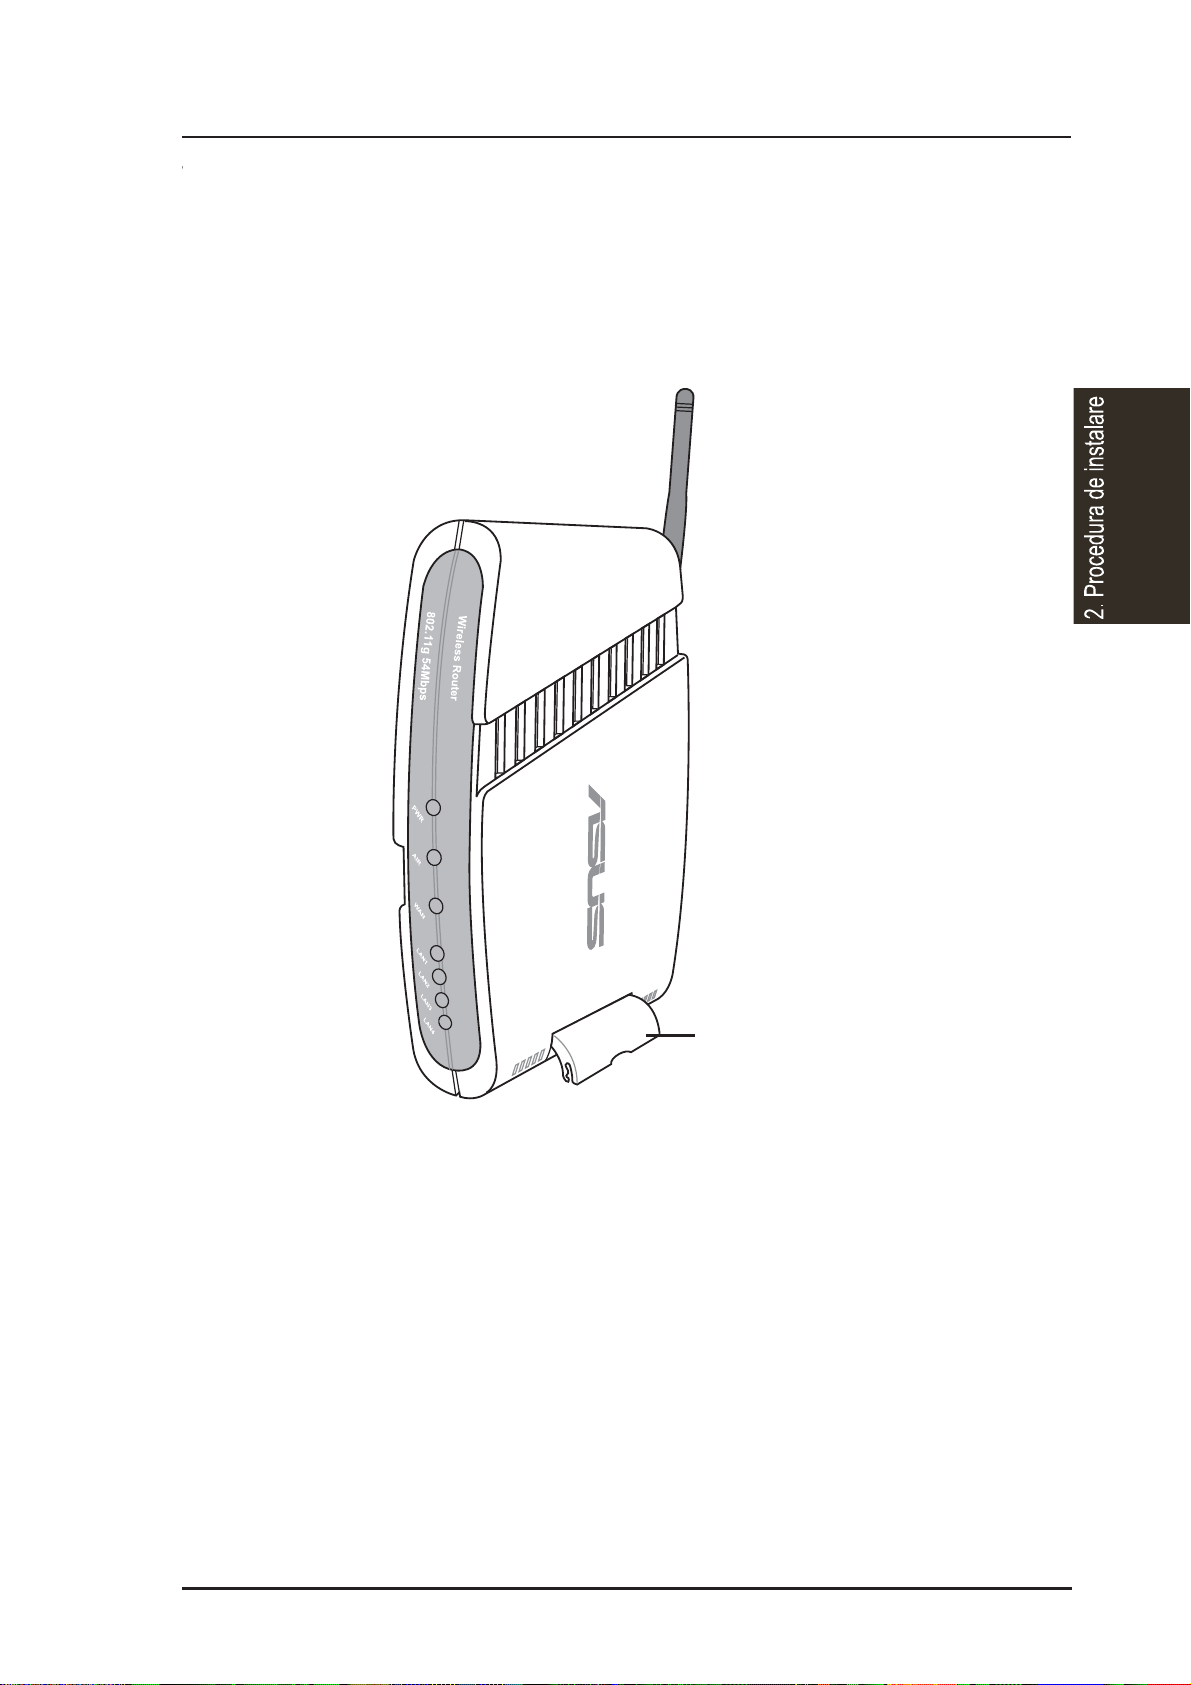
Vertical Standing Option
The ASUS Wireless Router can also stand on its side to save space. Two
hinges can be opened on the right side to support vertical standing. Orientate
the antenna so that it points upwards.
Support Hinge
Router-ul wireless ASUS
Opþiunea de poziþie verticalã
Router-ul wireless ASUS poate sta ºi pe o lateralã, pentru a economisi spaþiu.
Douã suporturi pot fi scoase pe partea dreaptã pentru a susþine poziþia verticalã.
Orientaþi antena în sus.
Capitolul 2 - Procedura de instalare
Page 22
Chapter 2 - Installation
2. Installation
22 ASUS Wireless Router
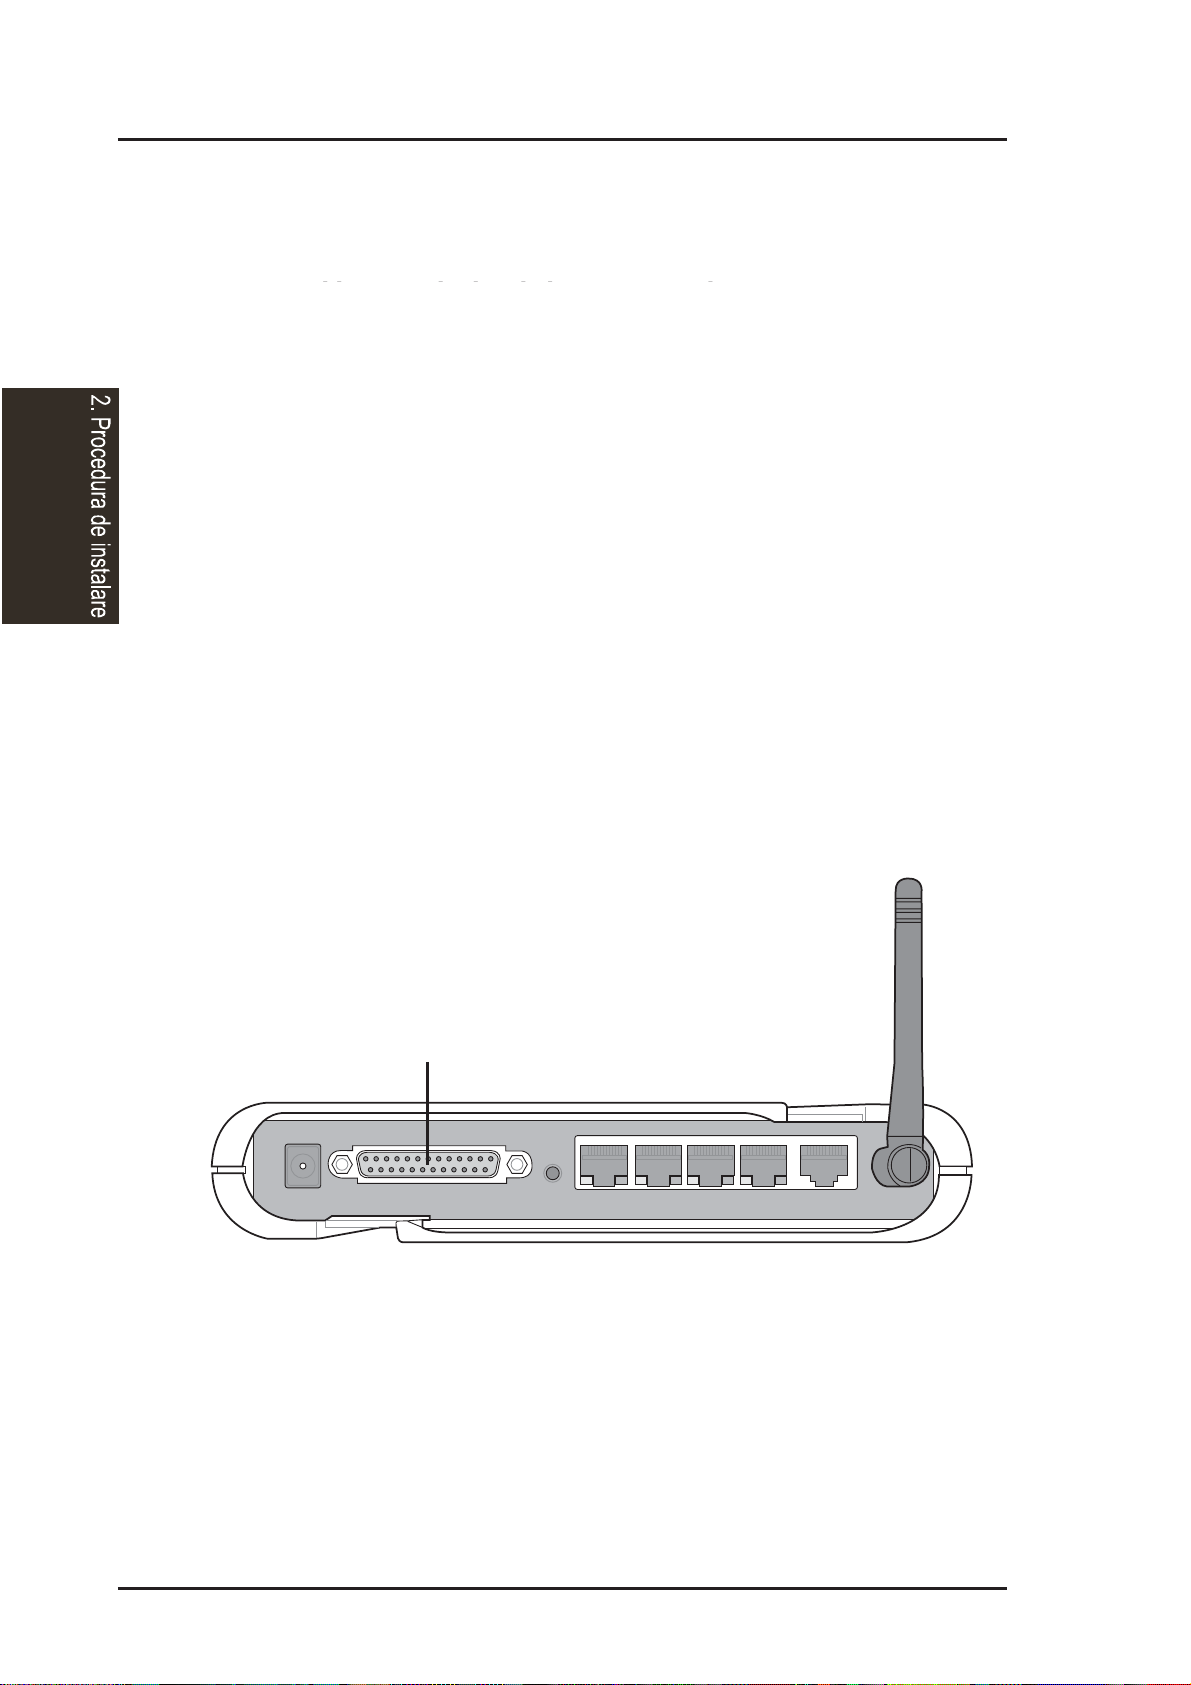
Connecting to the ASUS W ireless Router
Wired Connection
One RJ-45 cable is supplied with the ASUS Wireless Router . Auto crossover
function is designed into the ASUS W ireless Router so you can use either a
straight-through or a crossover Ethernet cable. Plug one end of the cable
into the WAN port on the rear of the ASUS Wireless Router and the other
end into the Ethernet port of your ADSL or Cable modem.
Wireless-Connection
Refer to your wireless adapter user’s manual on associating with the ASUS
Wireless Router . The default SSID of the ASUS Wireless Router is “default”
(lower case), encryption is disabled and open system authentication is used.
Printer Connection (WL500g/WL500b only)
A DB25 parallel cable should be supplied with your printer. Plug the male
connector of this parallel cable into the printer port on the rear of the ASUS
Wireless Router and the centronics end into your printer.
Printer Port
Router-ul wireless ASUS
Conectarea la un router wireless ASUS
Conectarea prin cablu
Un cablu RJ-45 este furnizat împreunã cu router-ul wireless ASUS. Funcþia
automatã de legaturã este montatã în router-ul wireless ASUS pentru ca
dumneavoastrã sã utilizaþi un cablu Ethernet fie direct fir prin legatura.
Introduceþi un capãt al cablului în portul WAN la spatele routerului wireless
ASUS, iar celalalt capãt în portul Ethernet al al ADSL-ului sau modemului cu
cablu al dvs.
Conectarea wireless
Consultaþi manualul de utilizare al adaptorului wireless cât ºi router-ul wireless
ASUS. Dacã SSID-ul standard al router-ului wireless ASUS este "standard"
(scris cu litere mici), codarea este dezactivatã ºi este utilizatã autentificarea
deschisã a sistemului.
Conectarea imprimantei (numai WL500g/WL500b)
Un cablu paralel DB2 este furnizat împreunã cu imprimanta. Conectaþi
conectorul tatã al acestui cablu paralel în port-ul imprimantei din spatele routerului wireless ASUS ºi capãtul din imprimanta dvs.
Capitolul 2 - Procedura de instalare
Page 23

3. Utilities
ASUS Wireless Router 23
Chapter 3 - Software Configuration
3. Software Configuration
Configuring the ASUS Wireless Router
The ASUS Wireless Router can be configured to meet various usage
scenarios. Some of the factory default settings may suit your usage; however,
others may need changing. Prior to using the ASUS Wireless Router, you
must check the basic settings to guarantee it will work in your environment.
Configuring the ASUS Wireless Router is done through a web browser.
You need a Notebook PC or desktop PC connected to the ASUS Wireless
Router (either directly or through a hub) and running a web browser as a
configuration terminal. The connection can be wired or wireless. For the
wireless connection, you need an IEEE 802.11g/b compatible device, e.g.
ASUS WLAN Card, installed in your Notebook PC. Y ou should also disable
WEP and set the SSID to “default” for your wireless LAN device. If you
want to configure the ASUS Wireless Router or want to access the Internet
through the ASUS Wireless Router, TCP/IP settings must be correct.
Normally, the TCP/IP setting should be on the IP subnet of the ASUS
Wireless Router.
Note: Before rebooting your computer, the ASUS Wireless Router
should be switched ON and in ready state.
Setting IP address for Wired or Wireless Connection
Get IP Automatically
The ASUS Wireless Router
incorporates a DHCP server so the
easiest method is to set your PC to
get its IP address automatically and
reboot your computer. So the
correct IP address, gateway, DNS
(Domain Name System Server)
can be obtained from the ASUS
Wireless Router.
Note: Before rebooting your
PC, the ASUS Wireless Router
should be switched ON and in
ready state.
Router-ul wireless ASUS
Capitolul 3 - Configurare Software
Configurare Software
Configurarea router-ului wireless ASUS
Router-ul wireless ASUS poate fi configurat în vederea diferitelor scenarii de
utilizare. Unele setãri standard din fabricã pot coincide cu utilizarea
dumneavoastrã; totuºi, unele pot necesita modificari. Înainte de a utiliza routerul wireless ASUS, trebuie sã verificati setãrile principale pentru a garanta cã va
funcþiona în mediul ales de dumneavoastrã. Configurarea router-ului wireless
ASUS este realizatã prin browser-ul de Internet. Aveþi nevoie de un laptop sau
un calculator conectat la router-ul wireless ASUS (fie direct sau printr-un hub)
ºi care sã ruleze pe un browser de Internet drept terminal de configurare.
Conectarea poate fi prin cablu sau wireless. Pentru conectarea wireless, trebuie
sa aveþi instalat pe calculator un dispozitiv compatibil IEEE 802.11g/b, de
exemplu Cardul WLAN ASUS. De asemenea, trebuie sa dezactivaþi WEP-ul ºi
sã setaþi SSDI-ul pe "standard" pentru dispozitivul LAN wireless. Dacã doriþi sã
configuraþi router-ul wireless ASUS sau vreþi sã accesaþi Internetul prin routerul wireless ASUS, setãrile TCP/IP trebuie corectate. În mod normal, setãrile
TCP/IP trebuie sã fie pe subnet-ul IP al router-ului wireless ASUS.
Notã: înainte de a reporni calculatorul, router-ul wireless ASUS trebuie
pornit þi sã fie pregãtit pentru utilizare.
Setarea adresei IP pentru conectarea prin cablu sau wireless
Obþinerea automatã a unei adrese IP
Router-ul wireless ASUS
încorporeaza un server DHCP ºi
astfel modul cel mai simplu este sã
setaþi calculatorul dumneavoastrã
sã obþina automat adresa IP ºi sã
reporneascã. Deci, adresa IP
corectã, calea de acces, DNS-ul
(Domain Name System Server) pot
fi obþinute prin router-ul wireless
ASUS.
Notã: înainte de a reporni
calculatorul, router-ul wireless
ASUS trebuie pornit ºi sã fie
pregãtit pentru utilizare.
Page 24

3. Utilities
24 ASUS Wireless Router
Chapter 3 - Software Configuration
Setting IP Manually
If you want to set your IP address
manually, the following default
settings of the ASUS Wireless
Router should be known:
• IP address 192.168.1.1
• Subnet Mask 255.255.255.0.
If you set your computer’s IP
manually , it needs to be on the same
segment. For example:
• IP address 192.168.1.xxx (xxx
can be any number between 2
and 254 that is not used by
another device)
• Subnet Mask 255.255.255.0 (same as the ASUS Wireless Router)
• Gateway 192.168.1.1 (this is the ASUS Wireless Router)
• DNS 192.168.1.1 (ASUS Wireless Router IP address or your own).
Router-ul wireless ASUS
Setarea manuala a adresei IP
Dacã doriþi sã setaþi manual adresa IP,
trebuie cunoscute urmãtoarele setãri
standard ale router-ul wireless ASUS:
- adresa IP: 192.168.1.1
- Subnet Mask: 255.255.255.0
Dacã setaþi manual, adresa IP a
calculatorului, trebuie sã fie pe acelaºi
segment. De exemplu:
- adresa IP: 192.168.xxx (xxx poate fi un numãr între 2 si 254 care nu este
utilizat de alt dispozitiv)
- Subnet Mask 255.255.255.0 (aceeaºi ca a router-ului wireless ASUS)
- Calea de acces 192.168.1 (aceasta este router-ul wireless ASUS)
- DNS 192.168.1.1 (adresa IP a router-ul wireless ASUS sau a
dumneavoastrã)
Capitolul 3 - Configurare Software
Page 25
3. Utilities
ASUS Wireless Router 25
Chapter 3 - Software Configuration
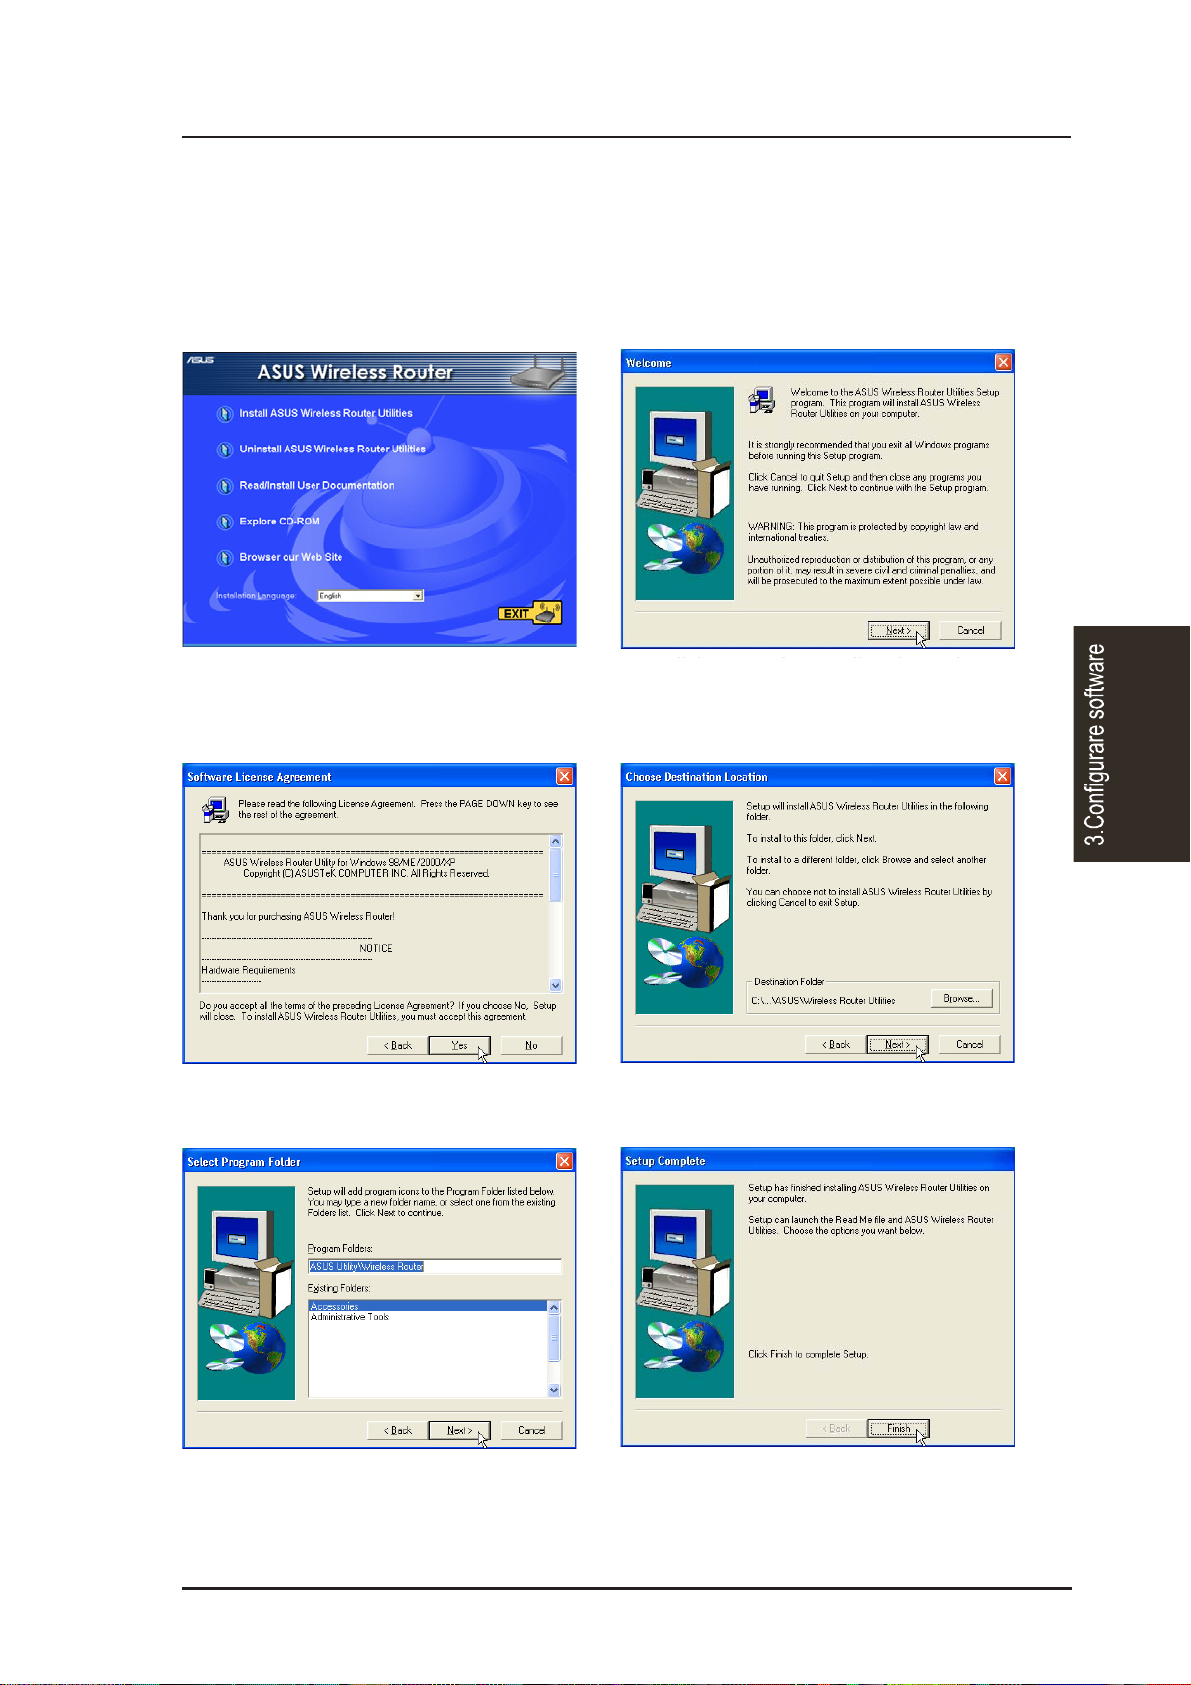
Installing the ASUS Wireless Router Utilities
Follow these steps to install the ASUS Wireless Router Utilities in Microsoft
Windows. Insert the support CD provided with the ASUS W ireless Router and
the menu will appear . (Double-click setup.exe if your autorun has been disabled.)
(1) Select a language and click Install
ASUS Wireless Router Utilities.
(2) Click Next after reading the welcome
screen.
(3) Click Yes after reading the license
agreement.
(5) Click Next to accept the default
program folder or enter another.
(4) Click Next to accept the default
destination folder or enter another.
(6) Click Finish when setup is complete.
Router-ul wireless ASUS
Instalarea serviciilor router-ului wireless ASUS
Respectaþi urmãtorii paºi pentru a instala serviciile router-ului wireless ASUS în
Microsoft Windows. Întroduceþi CD-ul furnizat împreuna cu router-ul wireless
ASUS ºi va aparea un meniu. (daþi dublu-selectaþi "setup.exe" daca funcþia de
pornire automata a fost dezactivatã).
Selectaþi o limbã si daþi selectaþi
"Install ASUS Wireless Router
Utilities".
Selectaþi "Next" dupa ce aþi citit textul
de întâmpinare afiºat.
Daþi selectaþi "Da" dupã ce aþi citit
contractul de licenþã.
Selectaþi "Next" pentru a accepta folderul
destinaþie standard sau introduceþi altul.
Selectaþi "Next" pentru a accepta
folderul program standard sau
introduceþi altul.
Selectaþi "Finish" când setarea este
completã.
Capitolul 3 - Configurare Software
Page 26
3. Utilities
26 ASUS Wireless Router
Chapter 3 - Software Configuration
Using the Wireless Router for the First Time
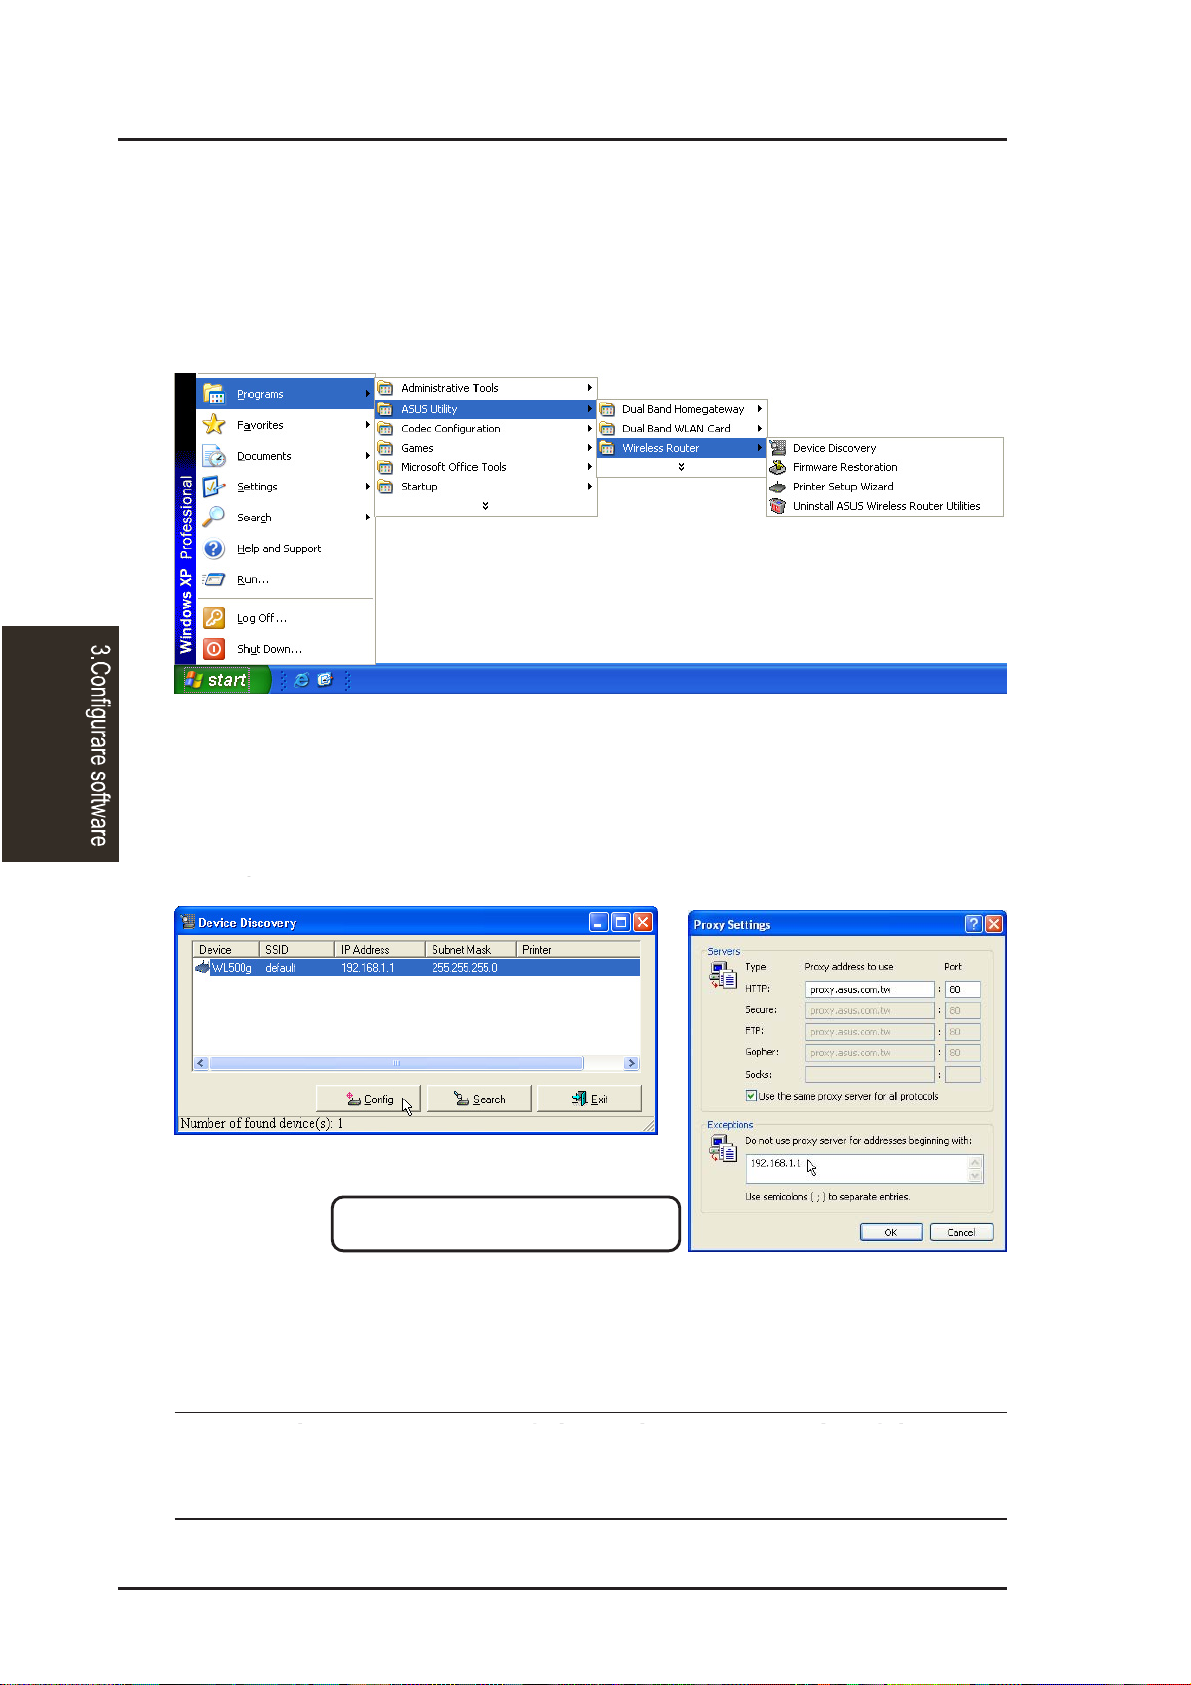
1. ASUS Wireless Router Utilities
Run Device Discovery from “ASUS Utility” in W indows Start Programs.
2. Connect to the ASUS WLAN Web Manager
Run the ASUS WLAN Device Discovery from the Start menu and click
Config when the device is found.
If your computer’s IP is not on the same subnet as the ASUS Wireless Router
(192.168.1.X), you will be asked to change it. The IP address can be any number
from 2 to 254 that is not used by another device. Gateway is not required.
Note: Using a proxy server (Microsoft® Internet Explorer) for your
LAN requires that you set an exception for the ASUS Wireless Router
or else connection will fail.
Add 192.168.1.1 in the Exceptions box if you are
using a proxy server (Microsoft
®
Internet Explorer).
Microsoft® Internet Explorer
Router-ul wireless ASUS
Prima utilizare a router-ului wireless
1.Serviciile router-ului wireless ASUS
Rulaþi "Device Discovery" din "ASUS Utilities" din "Start-Programs" din Windows.
2.Conectarea la Web Manager ASUS WLAN
Rulaþi " ASUS WLAN Device Discovery" din meniul "Start" ºi selectaþi "Config"
în momentul în care este gãsit dispozitivul.
Introduceþi 192.168.1.1 în cãsuþa de excepþii dacã
utilizati un server proxi (Microsoft Internet Explorer).
Daca adresa IP a calculatorului dumneavoastrã nu este pe acelaºi subnet ca
router-ul wireless ASUS (192.168.1.x), vi se va cere sã o schimbaþi. Adresa IP
poate fi orice numãr între 2 si 254 care nu este utilizat de alt dispozitiv. Calea de
acces adresa gateway-ului) nu este necesarã.
Notã: Utilizarea unui server proxi (Microsoft Internet Explorer) pentru
LAN-ul dumneavoastrã necesitã sã setaþi o excepþie pentru router-ul
wireless ASUS, deoarece altfel conectarea va eºua.
Capitolul 3 - Configurare Software
Page 27
3. Utilities
ASUS Wireless Router 27
Chapter 3 - Software Configuration
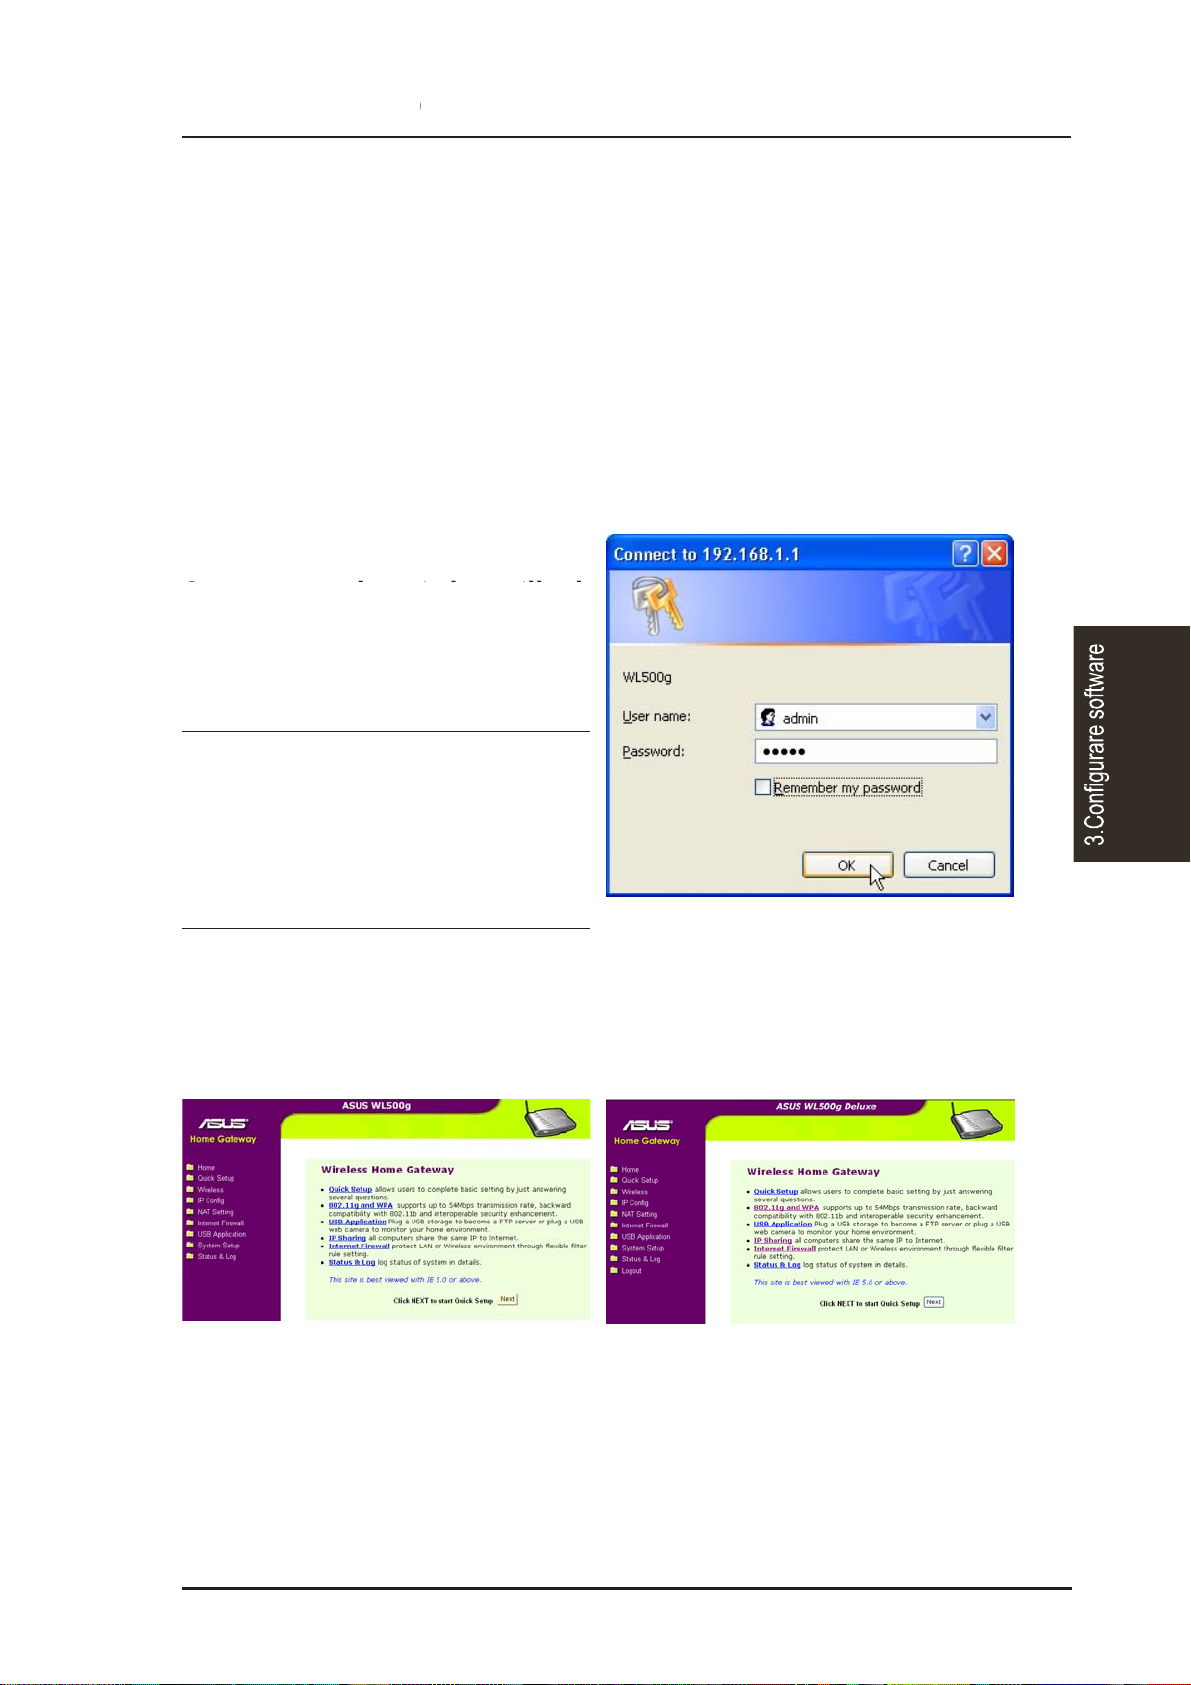
User Name & Password
Once connected, a window will ask
for the User name and Password in
order to log in. The factory default
values are “admin” and “admin”.
Note: If you cannot find any the
ASUS Wireless Routers due to
a problem in the IP settings,
push and hold the “Restore”
button over five seconds to re-
store factory default settings.
Enter Address or Name Manually
Y ou can also open your PC’ s web browser and enter the name or the default
IP address of the ASUS Wireless Router:
WL500g
http://my.router or http://my.WL500g or http://192.168.1.1
WL500g Deluxe
http://my.router or http://my.WL500gx or http://192.168.1.1
Home Page
After logging in, you will see the ASUS Wireless Router home page.
WL500g
WL500g Deluxe
Router-ul wireless ASUS
Introducerea manualã a unei adrese sau a unui nume
Puteþi, de asemenea, sã deschideþi brower-ul de Internet al calculatorului ºi sã
introduceþi numele sau adresa IP standard a router-ului wireless ASUS.
WL500g
http://my.router sau http://my.WL500g sau http://192.168.1.1
WL500g Deluxe
http://my.router sau http://WL500gx sau http://192.168.1.1
Numele utilizatorului ºi parola
Dupa ce va conectaþi, va aparea o
ferestrã în care vi se va cere sã
introduceþi numele utilizatorului ºi parola
pentru a vã conecta. Valorile standard
din fabricã sunt "admin" si "admin".
Notã: Dacã nu gãsiþi nici un router
wireless ASUS datoritã unor probleme
în setãrile adresei IP, selectaþi ºi þineþi
apãsat mai mult de 5 secunde butonul
"Restore" pentru a reveni la setãrile
standard din fabricã.
Pagina de Internet de baza (Home page)
Dupa ce vã conectaþi, va apãrea pagina de Internet de baza a router-ului
wireless ASUS.
Capitolul 3 - Configurare Software
Page 28
3. Utilities
28 ASUS Wireless Router
Chapter 3 - Software Configuration
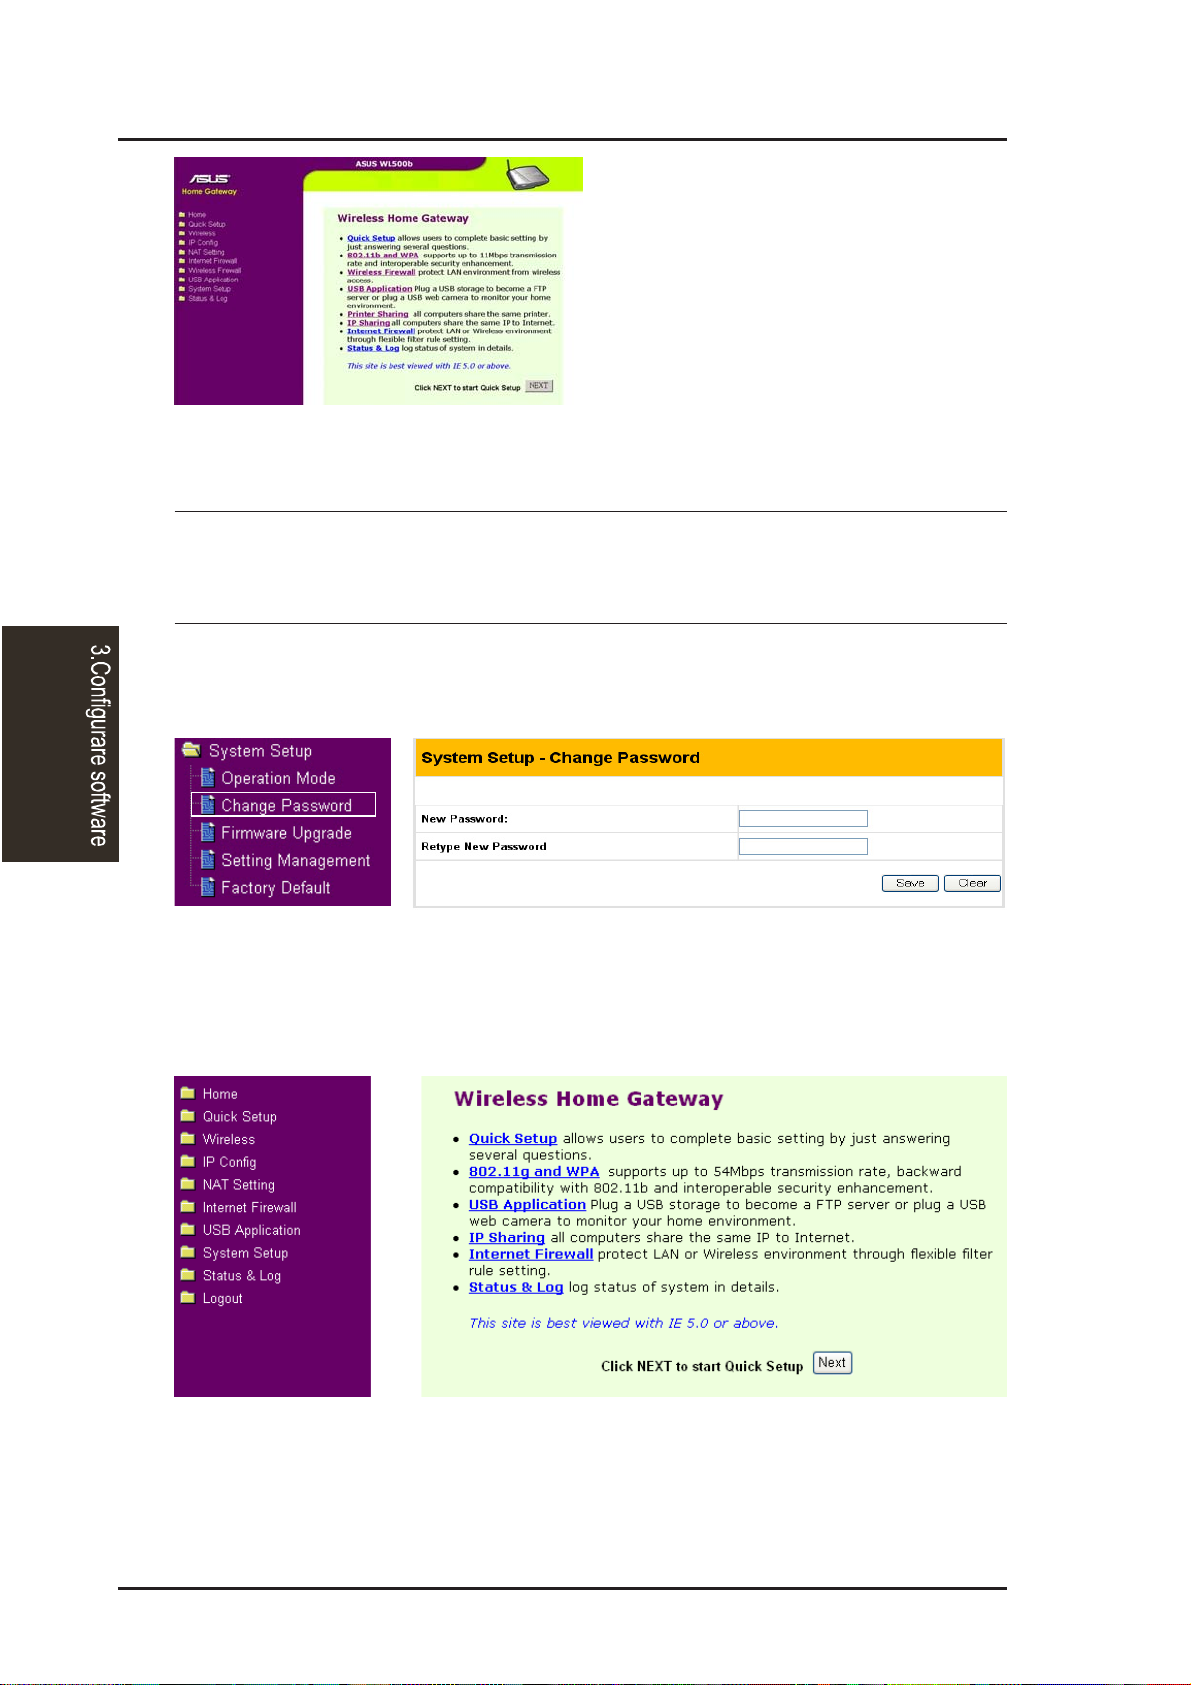
3. Set your own password
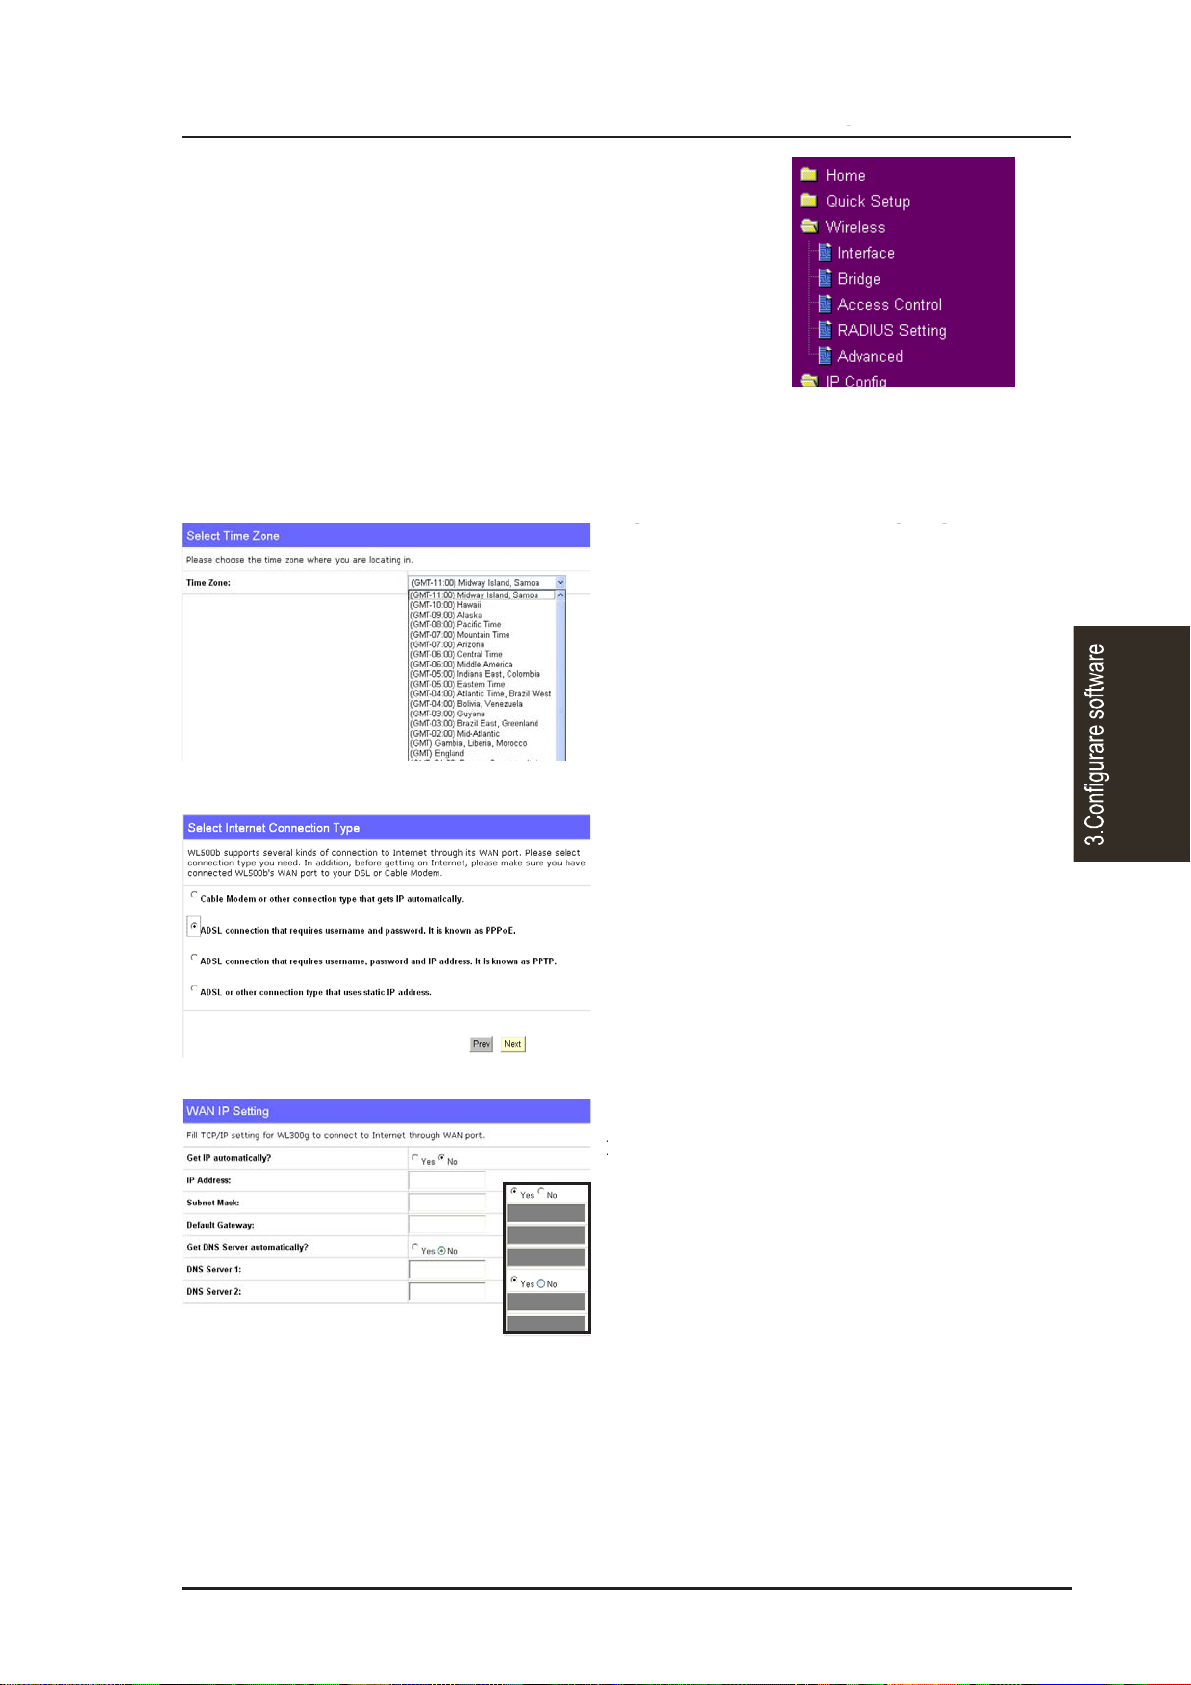
4. Use Quick Setup
IMPORTANT: After entering information on any page, click the
“Apply” button
. If you click any other link, you will be di-
rected to another page and lose your new settings.
WL500b
Router-ul wireless ASUS
IMPORTANT: dupã ce introduceþi informaþii în paginã, selectaþi butonul
"Apply". Dacã accesaþi altã paginã, veþi fi direcþionat cãtre respectiva paginã ºi
veþi pierde noile setãri fãcute.
3.Stabilirea propriei parole
4.Utilizarea setãrii rapide
Capitolul 3 - Configurare Software
Page 29
3. Utilities
ASUS Wireless Router 29
Chapter 3 - Software Configuration
Select your time zone or the closest
region. Click Next to continue.
Home Gateway Mode
There are three operation modes in the ASUS
Wireless Router. The default operation mode of the
ASUS Wireless Router is Home Gateway Mode.
Please refer to “System Setup” – “Operation Mode”
in detail. To start quick setup, click Next to enter
the “Quick Setup” page. Follow the instructions to
setup the ASUS Wireless Router.
Quick Setup in Home Gateway Mode
Select the connection type. Click
Next to continue.
Select “No” to enter the information
manually . “Y es” will disable the field.
Click Next to continue.
Router-ul wireless ASUS
Modul de accesare de acasã
Exista trei moduri de operare a router-ului wireless
ASUS. Modul de operare standard a router-ului wireless
ASUS este modul "Home Gateway". Accesaþi "System
Setup" - "Operation Mode" pentru detalii. Pentru a porni
setarea rapidã, selectaþi "Next" pentru a accesa pagina
"Quick Setup". Respectaþi instrucþiunile pentru a seta
router-ul wireless ASUS.
Setarea rapidã în modul Home Gateway
Selectaþi fusul orar (ora localã) sau
regiunea cea mai apropriatã. Selectaþi
"Next" pentru a continua.
Selectaþi tipul de conectare. Selectaþi
"Next" pentru a continua.
Selectaþi "No" pentru a introduce
informaþiile manual. "Yes" va dezactiva
aria. Selectaþi "Next" pentru a continua.
Capitolul 3 - Configurare Software
Page 30
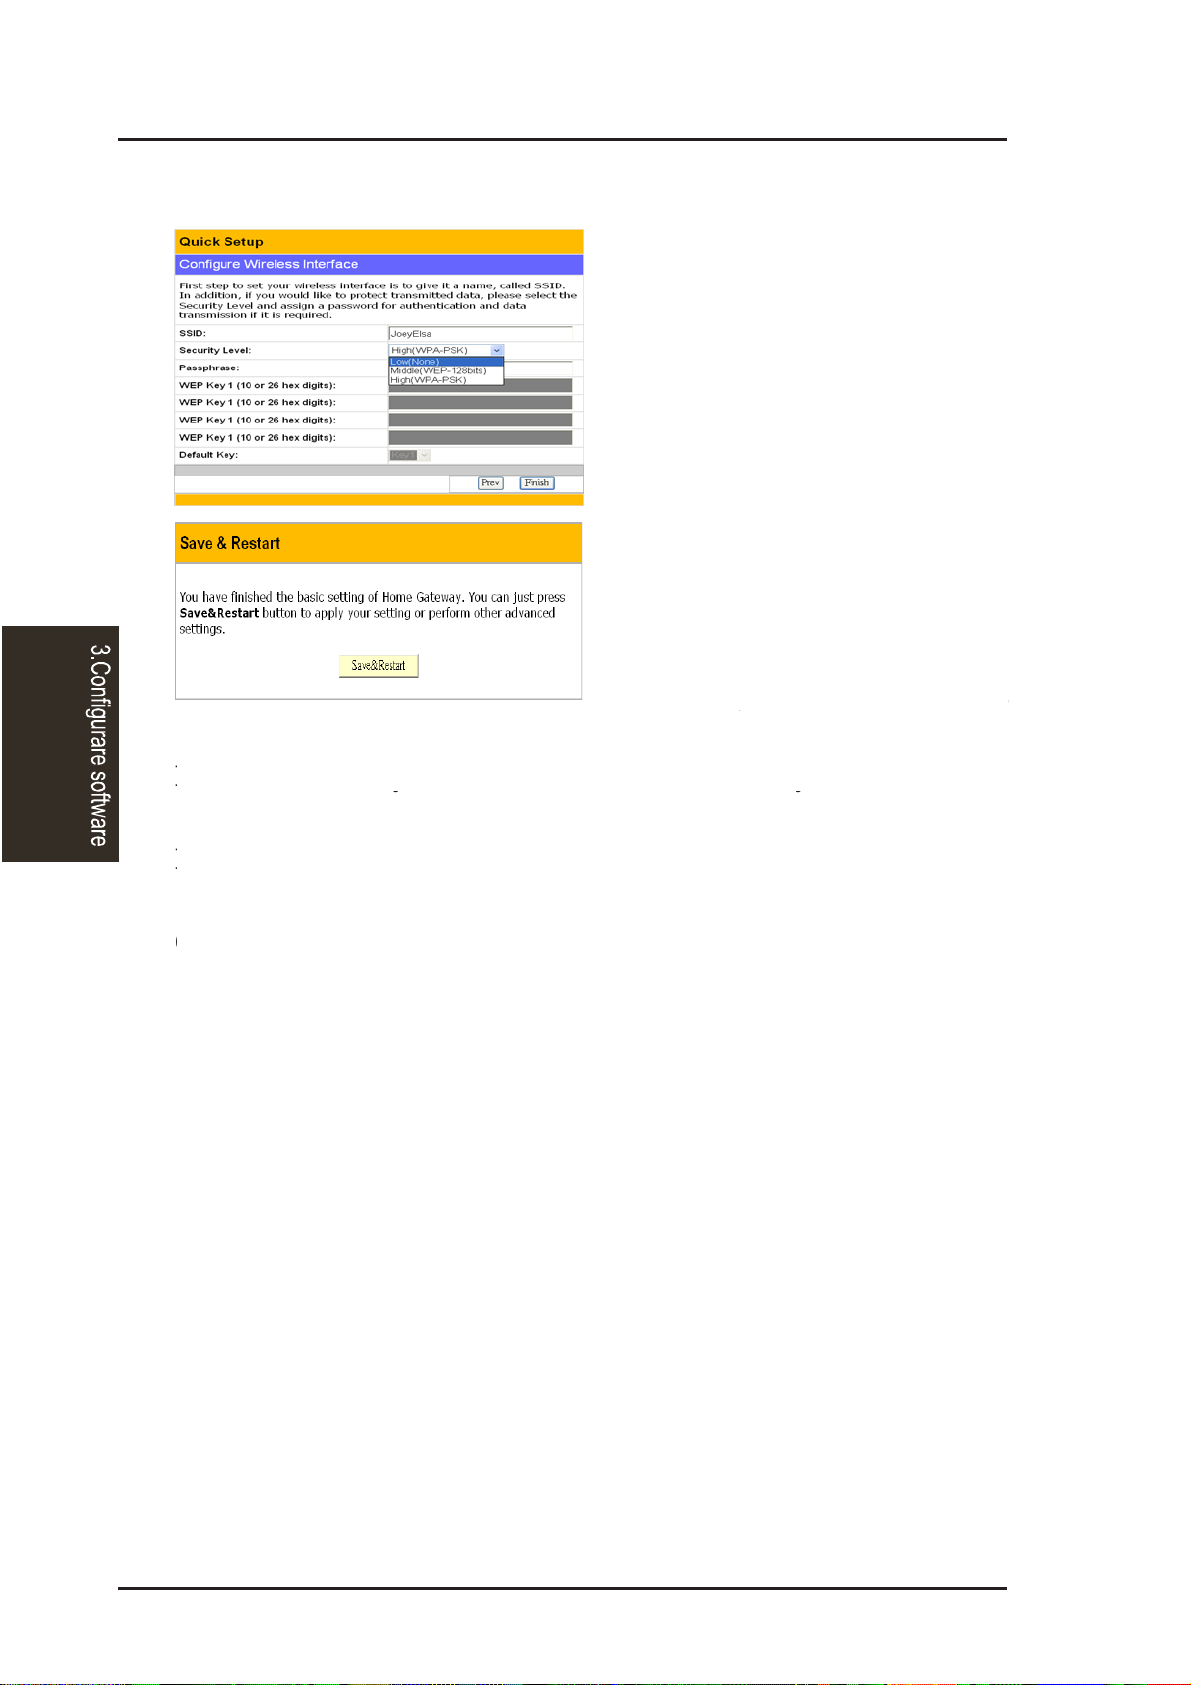
3. Utilities
30 ASUS Wireless Router
Chapter 3 - Software Configuration
To set up your wireless interface,
you must first give it an SSID
(Service Set Identifier). The SSID
is a unique identifier attached to
packets sent over WLANs. This
identifier emulates a password
when a wireless device attempts
communication on the WLAN.
Because an SSID distinguishes
WLANs from each other, access
points and wireless devices trying
to connect to a WLAN must use the
same SSID.
Also, if you want to protect
transmitted data, select a middle or high Security Level.
Middle: allows only those users with the same WEP key to connect to this
access point and to transmit data using 128-bit WEP encryption.
High: allows only those users with the same WP A pre-shared key to connect
to this access point and to transmit data using TKIP encryption.
Click Finish to continue. You are prompted to save the settings. Click
Save&Restart to save the settings to the ASUS W ireless Router and enable
the new settings.
Home Gateway Mode (Cont.)
Router-ul wireless ASUS
Modul de accesare de acasã (Continuare)
Pentru a seta interfaþa wireless,
trebuie mai întâi sã stabiliþi un SSDI
(Service Set Identifier - Identificator
Stabilit Pentru Servicii). SSDI este un
identificator unic ataºat pachetelor
trimise prin WLAN. Acest identificator
permite existenþa unei parole pentru
momentul în care un dispozitiv
wireless încearca o comunicare prin
WLAN. Deoarece SSID-ul poate
identifica un WLAN de altul, punctele
de acces ºi dispozitivele wireless
care încearcã sã se conecteze la un
WLAN trebuie sã utilizeze acelaºi
SSID.
De asemenea, dacã protejaþi datele transmise, alegeþi un nivel de securitate
mediu sau ridicat.
Nivel mediu: permite numai utilizatorilor cu acelaºi cod WEP sã se conecteze
la acest punct de acces ºi sã transmitã date utilizând codarea WEP 128-bit.
Nivel ridicat: permite numai utilizatorilor cu acelaºi cod pre-împãrþit WPA sã se
conecteze la acest punct de acces ºi sã transmitã date utilizând codarea TKIP.
Selectaþi "Finish" pentru a continua. Vi se sugereazã sã salvaþi setãrile.
Selectaþi "Save&Restart" pentru a salva setãrile router-ului wireless ASUS ºi
pentru a permite realizarea unor noi stãri.
Capitolul 3 - Configurare Software
Page 31

3. Utilities
ASUS Wireless Router 31
Chapter 3 - Software Configuration
T o adjust other settings, click an item
on the menu to reveal a submenu and
follow the instructions to setup the
ASUS Wireless Router. Tips are
given when you move your cursor
over each item. The following have
submenu items:
• Wireless
• IP Config
• NAT Setting
• Internet Firewall
• USB Application
• System Setup
• Status & Log
Router-ul wireless ASUS
Pentru a realiza alte setãri, selectaþi un
obiect din meniu pentru a vizualiza un
submeniu ºi respectaþi instrucþiunile de
setare a router-ului wireless ASUS. Vã
sunt oferite câteva indicaþii în momentul
în care plasaþi cursorul pe un obiect.
Urmãtoarele meniuri au submeniuri:
- wireless
- configurare adresa IP
- setãri NAT
- firewall Internet
- aplicaþii USB
- setarea sistemului
- statut ºi log
Capitolul 3 - Configurare Software
Page 32

3. Utilities
32 ASUS Wireless Router
Chapter 3 - Software Configuration
Wireless
Click an item on the menu to reveal a submenu.
Follow the instructions to set up the ASUS W ireless
Router. Tips are displayed when you move your
cursor over an item.
Interface
WL500b WL500g/WL500g Deluxe
SSID
The SSID is an identification string of up to 32 ASCII characters that
differentiate one ASUS Wireless Router AP or Access Point from other
manufacturers. The SSID is also referred to as the “ESSID” or “Extended
Service Set ID.” You can use the default SSID and radio channel unless
more than one ASUS Wireless Router or Access Point is deployed in the
same area. In that case, you should use a different SSID and radio channel
for each ASUS Wireless Router or Access Point. All ASUS W ireless Routers
and ASUS 802.11g/802.11b WLAN client adapters must have the same
SSID to allow a wireless mobile client to roam between the ASUS W ireless
Routers . By default, the SSID is set to “default”.
Router-ul wireless ASUS
Selectaþi un obiect din meniu pentru a vizualiza un
submeniu. Respectaþi instrucþiunile pentru a seta
router-ul wireless ASUS. Vã sunt oferite câteva indicaþii
în momentul în care plasaþi cursorul pe un obiect.
Interfaþa
SSID-ul este este un ºir de identificare de pânã la 32 caractere ASCII care
diferenþiazã un punct de acces al router-ului wireless ASUS de alþi producãtori.
SSID-ul mai poate fi denumit "ESSID" sau "Extended Service Set ID". Puteþi
folosi SSID-ul ºi canalul radio standard în cazul în care un router wireless
ASUS sau un punct de acces (AP - Punct de acces) nu este montat în acea
zonã. În acest caz, ar trebui sã folosiþi un SSID ºi un canal radio diferit pentru
fiecare router wireless ASUS sau punct de acces. Toate router-ele wireless
ASUS ºi adaptoarele pentru client WLAN 802.11g/802.11b ASUS trebuie sã
aibã acelaºi SSID pentru a permite unui client wireless sã se deplaseze între
router-ele wireless ASUS. În varianta standard, SSID-ul este setat pe
"standard".
Capitolul 3 - Configurare Software
Wireless
Page 33

3. Utilities
ASUS Wireless Router 33
Chapter 3 - Software Configuration
Wireless (Cont.)
Channel
The 802.11g and 802.11b specifications supports up to 14 overlapping
channels for radio communication. To minimize interference, configure
each ASUS 802.11g AP to be non-overlapping; select Auto from the Channel
drop-down list to enable the system to select a clear channel during boot up
as your operating channel.
Ensure that ASUS W ireless Routers sharing the same channel (or channels
which are close in number) are as far away from each other as possible,
based on the results of your site survey of the facility . There is a site survey
utility on the ASUS Wireless Router setup CD.
Wireless Mode (WL500g/WL500g Deluxe Only)
This field indicates the 802.11g interface mode. Selecting “Auto” allows
802.11g and 802.11b clients to connect to the ASUS Wireless Router.
Selecting “54g Only” maximizes performance, but prevents 802.11b clients
from connecting to the ASUS Wireless Router. If “54g Protection” is
checked, G-Mode protection of 11g traffic is enabled automatically in the
presence of 11b traffic.
Router-ul wireless ASUS
Canal
Specificaþiile 802.11g si 802.11b susþin pânã la 14 canale de suprapunere
pentru comunicaþiile radio. Pentru a minimaliza interferenþele, configuraþi
fiecare AP 802.11g ASUS astfel încât sã nu existe suprapuneri; selectaþi "Auto"
din lista de canale pentru a permite sistemului sã selecteze în timpul încãrcãrii
un canal liber drept canalul dumneavoastrã de operare.
Asiguraþi-vã cã router-ele wireless ASUS care împart acelaºi canal (sau canale
cu numere apropiate) sunt situate cât mai departe unul de celãlalt, pe baza
rezultatelor analizei locaþiei site-ului referitor la facilitatea dumneavoastrã.
Existã o opþiune de sondaj pe site pe CD-ul de instalare al router-ului wireless
ASUS.
Modul wireless (numai WL500g/WL500g Deluxe)
Aceast câmp indicã modul de interfaþã 802.11g. Selectând "Auto" se permite
clienþilor 802.11g ºi 802.11b sã se conecteze la router-ul wireless ASUS.
Selectând "54g Only" se Gmaximizeazã performanþa, dar clienþii 802.11g nu se
pot conecta la router-ul wireless ASUS. Dacã "54g Protection" este bifat,
protecþia G-Mode a traficului 11g este activatã automat în momentul în care
existã trafic 11b.
Capitolul 3 - Configurare Software
Wireless (Continuare)
Page 34

3. Utilities
34 ASUS Wireless Router
Chapter 3 - Software Configuration
Authentication
Method Encryption Passphrase WEP Key 1~4
Open or shared key None Not required Not required
WEP-64 bits 1~64 characters 10 hex
WEP-128 bits 1~64 characters 26 hex
Shared key WEP-64 bits 1~64 characters 10 hex
WEP-128 bits 1~64 characters 26 hex
WPA-PSK
^
TKIP only * 8~63 characters Not required
AES only * 8~63 characters Not required
WPA
^
TKIP only * Not required Not required
AES only * Not required Not required
Radius with 802.1x
^ Auto Not required Not required
WEP-64 bits 1~64 characters 10 hex
WEP-128 bits 1~64 characters 26 hex
* WL500g/WL500g Deluxe supports AES and TKIP encryption for WPA.
^ WL500b does not support WPA and Radius with 802.1x and WL500b only supports TKIP encryption for WPA-PSK.
WEP Encryption
Traditional WEP encryption is applied when “Open or Shared Key”, “Shared
Key” or “Radius with 802.1x” authentication methods are selected.
WL500g/WL500g Deluxe: When “WPA” or “WPA-PSK” authentica-
tion methods are selected, you still can set WEP encryption for
those clients that do not support WPA/WPA-PSK. Please note that
Key Index for WEP key is limited to 2 or 3 when both WPA and WEP
encryption are supported at the same time.
64/128-bit versus 40/104-bit
The following section explains low-level (64-bit) and high-level (128-bit)
WEP Encryption schemes:
Wireless (Cont.)
Router-ul wireless ASUS
Metoda de autentificare
Codare
Parola Cod WEP 1~4
Cod deschis sau
împãrþit
Cod împãrþit
WPA-PSK^
WPA^
Radius cu 802.1x*
Nici una
WEP-64 biti
WEP-128 biti
WEP-64 biti
WEP-128 biti
Numai TKIP*
Numai TKIP*
Numai TKIP*
Numai AES*
Auto
WEP-64 biti
WEP-128 biti
Nu este necesarã
1-64 caractere
1-64 caractere
1-64 caractere
1-64 caractere
8-63 caractere
8-63 caractere
Nu este necesarã
Nu este necesarã
Nu este necesarã
1-64 caractere
1-64 caractere
Nu este necesarã
10 hex
20 hex
10 hex
26 hex
Nu este necesarã
Nu este necesarã
Nu este necesarã
Nu este necesarã
Nu este necesarã
10 hex
26 hex
* WL500g/Wl500g Deluxe susþine codarea AES ºi TKIP pentru WPA.
* WL500b nu susþine WPA ºi Radius 802.1x ºi WL500b susþine numai codarea TKIP pentru
WPA-PSK.
Codarea WEP
De obicei, codarea WEP este aplicatã când sunt selectate metodele de aplicare
"Cod deschis sau împãrþit", "Cod impartit" sau "Radius cu 802.1x".
WL500g/WL500g Deluxe: când sunt selectate metodele de autentifiare "WPA"
sau "WPA-PSK", puteþi seta codarea WEP pentru acei clienþi care nu susþin
WPA/WPA-PSK. Reþineþi Indexul de coduri pentru codul WEP este limitat la 2
sau 3 cand sunt susþinute în acelaºi timp ambele codãri WPA ºi WEP.
64/128 biti vs 40/104 biti
Urmãtoarea secþiune prezintã schemele de codare WEP la nivel scazut (64 biti)
ºi la nivel ridicat (128 biti):
Capitolul 3 - Configurare Software
Wireless (Continuare)
Page 35

3. Utilities
ASUS Wireless Router 35
Chapter 3 - Software Configuration
Wireless (Cont.)
64-bit WEP Encryption
64-bit WEP and 40-bit WEP are the same encryption method and can
interoperate in a wireless network. This level of WEP encryption uses a
40-bit (10 Hex character) encryption scheme as a secret key, which is set
by the user, and a 24-bit “Initialization Vector” scheme, which is not under
user control.
Together these two schemes make a 64-bit (40 + 24) encryption scheme.
Some vendors refer to this level of WEP as 40-bit and others refer to this as
64-bit. ASUS WLAN products use the term 64-bit when referring to this
lower level of encryption.
128-bit WEP Encryption
104-bit WEP and 128-bit WEP are the same encryption method and can
interoperate on a wireless network. This level of WEP encryption uses a
104-bit (26 Hex character) encryption scheme as a secret key which is set
by the user, and a 24-bit “Initialization Vector”, which is not under user
control.
T ogether these two schemes make a 128-bit (104 + 24) encryption scheme.
Some vendors refer to this level of WEP as 104-bit and others refer to this
as 128-bit. ASUS WLAN products use the term 128-bit when referring to
this higher level of encryption.
Passphrase
Selecting “WEP-64bits” or “WEP-128bits” in the Encryption field generates
four WEP keys automatically. A combination of up to 64 letters, numbers,
or symbols is required. Alternatively , leave this field blank and type in four
WEP keys manually.
¥ WEP-64bit key: 10 hexadecimal digits (0~9, a~f, and A~F)
¥ WEP-128bit key: 26 hexadecimal digits (0~9, a~f, and A~F)
Note: The ASUS WLAN family of products uses the same algorithm
to generate WEP keys, eliminating the need for users to remember
passwords and to maintain compatibility between products. How-
ever, using this method to generate WEP keys is not as secure as
manual assignment.
Router-ul wireless ASUS
Codarea Wep 64 biti
WEP 64 biti ºi WEP 40 biti reprezintã aceeaºi metodã de codare ºi poate
interopera într-o reþea wireless. Acest nivel de codare WEP utilizeazã o schemã
de codare de 40 biti (10 caractere hex) drept cheie secretã setatã de utilizator,
ºi o schema "Vector de Initiere" de 24 biti care nu este cotrolatã de utilizator.
Împreunã, aceste douã scheme reprezintã schema de codare de 64 biti
(40+24). Unii distribuitori numesc acest livel de WEP de 40 biti iar alþii de 64 biti.
Produsele WLAN ASUS utilizeazã termenul 64- biti în momentul în care se
referã la acest nivel scãzut de codare.
Codare Wep 128 biti
WEP 1074 biti ºi WEP 128 biti reprezintã aceeaºi metoda de codare ºi poate
interopera într-o reþea wireless. Acest nivel de codare WEP utilizeazã o schemã
de codare de 104 biti (20 caractere hex) drept cheie secretã setatã de utilizator,
ºi o schemã "Vector de Iniþiere" de 24 biti care nu este cotrolatã de utilizator.
Împreunã, aceste douã scheme reprezintã schema de codare de 12/ biti
(104+24). Unii distribuitori numesc acest livel de WEP de 104 biti iar alþii de 128
biti. Produsele WLAN ASUS utilizeazã termenul 64- biti în momentul în care se
referã la acest nivel ridicat de codare.
Parola
Selectare "WEP-64 biti" sau "WEP-128 biti" în campul de codare genereazã
automat patru coduri WEP. Este necesarã o combinaþie de pânã la 64 litere,
cifre sau simboluri. Altã variantã este de a lãsa liber acest câmp ºi sã tastaþi
manual patru coduri WEP.
cod WEP-64bit: 10 cifre hexadecimale (0~9, a~f, si A~F)
cod WEP-128bit: 26 cifre hexadecimale (0~9, a~f, siA~F)
Notã: gama de produse WLAN ASUS utilizeazã acelaºi algoritm pentru a
genera codurile WEP, eliminând necesitatea ca utilizatorii sã reþinã
parolele sº sã mentinã compatibilitatea dintre produse. Totuºi, utilizarea
acestei metode de a genera codurile WEP nu este la fel de sigurã ca
introducerea manualã.
Capitolul 3 - Configurare Software
Wireless (Continuare)
Page 36

3. Utilities
36 ASUS Wireless Router
Chapter 3 - Software Configuration
Wireless (Cont.)
WEP Key
You can set a maximum of four WEP keys. A WEP key is either 10 or 26
hexadecimal digits (0~9, a~f, and A~F) based on whether you select 64bits
or 128bits in the WEP pull-down menu. The ASUS Wireless Router and
ALL of its wireless clients MUST have at least the same default key.
Key Index
The Default Key field lets you specify which of the four encryption keys
you use to transmit data on your wireless LAN. As long as the ASUS
Wireless Router or wireless mobile client with which you are communicating
has the same key in the same position, you can use any of the keys as the
default key. If the ASUS Wireless Router and ALL of its wireless clients
use the same four WEP keys, select “key rotation” to maximize security.
Otherwise, choose one key in common as the default key.
Network Rotation Key Interval
This field specifies the time interval (in seconds) after which a WPA group
key is changed. Enter ‘0’ (zero) to indicate that a periodic key-change is
not required.
Router-ul wireless ASUS
Cod WEP
Puteþi seta un maxim de patru coduri WEP. Un cod WEP este de fie 10 sau 26
de cifre hexadecimale (0~9, a~f, si A~F) în funcþie de selecþia a 64 biti sau 128
biti din meniul WEP. Router-ul wireless ASUS ºi TOÞI clienþii wireless TREBUIE
sã aibã cel puþin acelaºi cod standard.
Index coduri
Câmpul codului standard va permite sã specificaþi pe care din cele patru coduri îl
folosiþi pentru a transmite date prin LAN-ul wireless. Atâta timp cât router-ul
wireless ASUS sau clientul wireless cu care se comunicã au acelaºi cod în
aceeaºi poziþie, se poate utiliza oricare din coduri drept cod standard. Dacã
router-ul wireless ASUS ºi TOÞI clienþii wireless utilizeazã aceleaºi patru coduri
WEP, selectaþi "rotaþia codurilor" pentru a miximiza siguranþa. Altfel, alegeþi
acelaºi cod drept cod standard.
Intervalul de rotaþie al codului în reþea
Aceast câmp specificã intervalul de timp (în secunde) dupã care este modificat un
cod grup WPA. Introduceþi "0" (zero) pentru a indica cã nu este necesarã o
schimbare periodicã a codului.
Capitolul 3 - Configurare Software
Wireless (Continuare)
Page 37

3. Utilities
ASUS Wireless Router 37
Chapter 3 - Software Configuration
Wireless
Click an item on the menu to reveal a submenu.
Follow the instructions to set up the ASUS W ireless
Router. Tips are displayed when you move your
cursor over an item.
Bridge/Access Control List
AP Only
WDS Only (WL500g/WL500g Deluxe)
Hybrid
Wireless bridge (also known as
Wireless Distribution System or
WDS) allows you to connect to one
or many Access Points.
Router-ul wireless ASUS
Selectaþi un obiect din meniu pentru a vizualiza un
submeniu. Respectaþi instrucþiunile pentru a seta
router-ul wireless ASUS. Vã sunt oferite câteva
indicaþii în momentul în care plasaþi cursorul pe un
obiect.
Lista de control punte/acces
Numai AP
Numai WDS (WL500g/Wl500g Deluxe)
Mixt
Puntea wireless (cunoscuta de
asemenea ca WDS (Wireless
Distribution System - sistem de
distributie wireless) va permite sã vã
conectaþi la unul sau mai multe Puncte
de acces.
Capitolul 3 - Configurare Software
Page 38

3. Utilities
38 ASUS Wireless Router
Chapter 3 - Software Configuration
Wireless (Cont.)
AP Mode
AP (Access Point) Mode configures the ASUS W ireless Router for a specific
application. By default, the ASUS Wireless Router is configured as an
Access Point which enables wireless mobile clients to connect wirelessly
to a wired Ethernet network. The following options are available from the
drop-down list:
AP Only: the ASUS Wireless Router acts only as an Access Point.
WDS Only (WL500g/WL500g Deluxe): the ASUS Wireless Router
can only communicate with other Access Points.
Hybrid: Hybrid allows you to use the ASUS Wireless Router both as
an access point and as a wireless bridge.
Channel
Both Access Points in Wireless Bridge mode must be set to the same channel.
Connect to APs in Remote Bridge List (Yes/No)
Select Yes to connect to access points in the remote bridge list.
Allow anonymous? (Yes/No) (WL500g/WL500g Deluxe)
Select Yes to allow users without accounts to connect.
Note: If “Connect to APs in Remote Bridge List” and “Allow Anony-
mous” are both set to “No”, it means that this AP will not connect with
other APs and therefore the AP mode setting will return to “AP Only”.
Router-ul wireless ASUS
Modul AP
Modul AP (Punct de acces - Punct de Acces) configureazã router-ul wireless
ASUS pentru o aplicaþie specificã. Prin setarea standard, router-ul wireless ASUS
este configurat ca un Punct de Acces care permite clienþilor wireless mobili sã se
conecteze wireless la o reþea prin cablu Ethernet. Urmãtoarele opþiuni sunt
disponibile:
Numai AP: router-ul wireless ASUS are doar rolul de punct de acces.
Numai WS (WL500g/Wl500g Deluxe): router-ul wireless ASUS poate
comunica numai cu alt punct de acces.
Mixt: optiunea mixt vã permite sã utilizaþi router-ul wireless ASUS atât ca
punct de acces cât ºi ca punct wireless.
Canal
Atât modul punct de acces cât ºi cel punte wireless trebuie sã fie stabilite pe
acelaºi canal.
Conectare la AP-urile din lista de punþi la distanþã
Selectaþi "Yes" pentru a vã conecta la punctele de acces din lista de punþi de la
distanþa
Permiterea utilizatorilor anonimi? (Da/Nu) (WL500g/Wl500g Deluxe)
Selectaþi "Yes" pentru a permite utilizatorilor fãrã cont sã se conecteze.
Notã: dacã "Conectare la AP-urile din lista de punþi de la distanþa" ºi "Activare
utilizatori anonimi" sunt amândouã setate pe "No", înseamnã ca AP-ul nu se va
conecta cu alte AP-uri ºi astfel setarea modului AP va reveni la "Numai AP".
Capitolul 3 - Configurare Software
Wireless (Continuare)
Page 39

3. Utilities
ASUS Wireless Router 39
Chapter 3 - Software Configuration
Wireless (Cont.)
MAC Address
Enter the MAC address of the target ASUS Wireless Router in order to
designate which ASUS Wireless Router will be the partner for this ASUS
Wireless Router.
You can setup your wireless environment as shown in this figure:
Note: The content in braces “( )” is the MAC address in the Remote
Bridge List of the AP. For example, WB1 have the MAC address of
WB in its Remote Bridge List.
In this case, there are six ASUS Wireless Routers and they are linked as
wireless bridges. Take one of them, named WB, as an example. WB is not
in “AP Only” mode and “Connect to APs in Remote Bridge List” is set as
“Yes”, so it can connect to WB3. Meanwhile, “allow anonymous” is set as
“Yes” or “Allow anonymous” is set as “No” but it has the MAC addresses
of WB1, WB2, and WB4 in the “Remote Bridge List”, so it can be connected
by WB1, WB2, and WB4.
Router-ul wireless ASUS
Adresa MAC
Introduceþi adresa MAC a þintei router-ului wireless ASUS pentru a desemna
care router wireless ASUS va fi partenerul acestui router wireless ASUS.
Puteþi stabili meniul wireless dupã cum este indicat în figura de mai jos.
Notã: conþinutul dintre paranteze"()" este adresa MAC din lista de punþi de la
distanþã a punctului de acces. De exemplu, WB1 are adresa MAC în lista de
punþi de la distanþa WB.
În acest caz, existã ºase rout-ere wireless ASUS care sunt legate ca punþi
wireless. Sã luãm ca exemplu unul din ele numit WB. WB nu este în modul
"Numai AP" ºi "Conectare la AP-urile din lista de punþi de la distanþa" este setat
ca "Yes", ºi deci se poate conecta cu WB3. În acelaºi timp, "permite utilizator
anonim"este setatã ca "Yes" sau "permite utilizator anonim" este setatã ca "No"
dar are adresele MAC a WB1, WB2 ºi WB4 în "lista de punþi de la distanþã" ºi
astfel se poate conecta cu WB1, WB2 si WB4.
Capitolul 3 - Configurare Software
Wireless (Continuare)
Page 40

3. Utilities
40 ASUS Wireless Router
Chapter 3 - Software Configuration
Wireless
Click an item on the menu to reveal a submenu.
Follow the instructions to set up the ASUS W ireless
Router. Tips are displayed when you move your
cursor over an item.
Access Control
Note: Click the “Finish” button to save your new settings and re-
start the ASUS Wireless Router or click “Save” and restart later.
T o add security , the ASUS W ireless Router has the ability to only associate
with or not associate with wireless mobile clients that have their MAC
address entered into this page.
The default setting of “Disable” will allow any wireless mobile client to
connect. “Accept” will only allow those entered into this page to connect.
“Reject” will prevent those entered into this page from connecting.
Adding a MAC Address
To add a MAC address, enter the 12 hexadecimal characters into the white box
next to “MAC Address:” and click the Add button. The MAC address will be
placed in the control list below . Only a total of 31 MAC addresses can be entered
into this page so determine which will be the lesser; those you wish to accept or
those you wish to reject and click the appropriate “MAC Access Mode”.
Pull down menu items:
Disable (no info required)
Accept (need to input information)
Reject (need to input information)
Router-ul wireless ASUS
Selectaþi un obiect din meniu pentru a vizualiza un
submeniu. Respectaþi instrucþiunile pentru a seta
router-ul wireless ASUS. Vã sunt oferite câteva indicaþii
în momentul în care plasaþi cursorul pe un obiect.
Controlul accesului
Obiecte din meniu;
dezactivare (nu sunt necesare
informaþii)
acceptare (este necesar sã
introduceti informaþii)
respingere (este necesar sþ introduceþi
informaþii)
Pentru a adãuga siguranþa, router-ul wireless ASUS are capacitatea sã se
asocieze numai cu sau sã nu se asocieze cu clienþii wireless care au adresele
MAC pe aceastã paginã.
Setãrile standard ale opþiunii "dezactivare" va permite oricãrui client wireless sã
se conecteze. Opþiunea "acceptare" va permite numai celor din aceastã paginã
sã se conecteze. Opþiunea "respingere" îi va opri pe cei din acestã paginã sã se
conecteze.
Adãugarea unei adrese MAC
Pentru a adãuga o adresã MAC, introduceþi cele 12 caractere hexadecimale în
cãsuþa de lângã "Adresa MAC:" ºi selectaþi tasta "Add". Adresa MAC va fi
adãugatã listei de control. În acestã paginã pot fi introduse maxim 31 de adrese
MAC, deci determinaþi care sunt mai puþine; cele pe care le acceptaþi sau cele pe
care le respingeþi, apoi alegeþi "Modul de acces MAC" corespunzator.
Notã: selectaþi butonul "Finish" pentru a salva noile setãri ºi pentru a reporni
router-ul wireless ASUS sau selectaþi "Save" ºi îl reporniþi mai târziu.
Capitolul 3 - Configurare Software
Page 41

3. Utilities
ASUS Wireless Router 41
Chapter 3 - Software Configuration
Wireless
Click an item on the menu to reveal a submenu.
Follow the instructions to set up the ASUS W ireless
Router. Tips are displayed when you move your
cursor over an item.
Radius Setting (WL500g/WL500g Deluxe)
This section enables you to set up
additional parameters for connection
with a RADIUS Server. Values are
required for this page when the
Authentication Method field in the
Wireless - Interface screen are set as
“WPA” or “Radius with 802.1x”.
Refer to Authentication Method on
page 32.
Server IP Address – specifies the IP address of the RADIUS server to use
for 802.1X wireless authentication and dynamic WEP key derivation.
Server Port – specifies the UDP port number used by the RADIUS server .
Login Secret – specifies the password used to initialize a RADIUS
connection.
Note: A RADIUS server is used for remote user authentication and
accounting. It is primarily used by Internet Service Providers, but
can also be used on any network that needs a centralized authenti-
cation function for its workstations.
Router-ul wireless ASUS
Selectaþi un obiect din meniu pentru a vizualiza un
submeniu. Respectaþi instrucþiunile pentru a seta
router-ul wireless ASUS. Vã sunt oferite câteva
indicaþii în momentul în care plasaþi cursorul pe un
obiect.
Setarea Radius (WL500g/WL500g Deluxe)
Acestã secþiune vã permite sã setaþi
parametrii suplimentari pentru
conectarea la un server Radius. Când
aria "Metoda de autentificare" din
secþiunea "Wireless" - "interfaþa" este
setatã pe "WPA" sau "Radius cu
802.1x", sunt necesare valori pentru
acestã paginã. Vezi "Metoda de
autentificare" de la pagina 29.
Adresa IP a server-ului: specificã adresa IP a server-ului Radius pentru
autentificarea wireless 802.1x ºi pentru derivarea codului WEP dinamic.
Port-ul server-ului: specificã numãrul port-ului UDP utilizat de server-ul Radius
Conectare secretã: specificã parola utilizatã pentru a iniþia o conectare Radius.
Notã: un server Radius este utilizat pentru autentificarea ºi evidenþa
utilizatorilor de la distanþã. În principal este utilizat de furnizorii de servicii de
Internet, dar poate fi folosit în orice reþea care are nevoie de o funcþie
centralizatã de autentificare pentru staþiile de lucru.
Capitolul 3 - Configurare Software
Page 42

3. Utilities
42 ASUS Wireless Router
Chapter 3 - Software Configuration
Wireless
Click an item on the menu to reveal a submenu.
Follow the instructions to set up the ASUS W ireless
Router. Tips are displayed when you move your
cursor over an item.
Advanced
This section allows you to set up
additional parameters for the wireless
router function. We recommend that
you use the default values for all
items in this window.
Enable AfterBurner: (WL500g Deluxe) - Set to Enable to increase
performance for clients (such as WL100gx) that support this function.
Note: Y our network speed will slow down if you have mixed 802.1 1g
and Afterburner clients.
Hide SSID - By default, “No” is selected so that wireless mobile users can
see your ASUS W ireless Router’ s SSID and join. If “Yes” is selected, your
ASUS Wireless Router will not show in site surveys by wireless mobile
clients and they will have to manually enter your ASUS Wireless Router’s
SSID. If you want to restrict access to “your” ASUS W ireless Router , this
is a simple way to do it but for security reasons, don’t forget to change the
SSID to something other than “default”.
Set AP Isolated (WL500g/WL500g Deluxe) - Selecting Yes to prevent
wireless client from communicating with each other.
Data Rate (Mbps) (WL500g/WL500g Deluxe) - This field allows you to
specify the transmission rate. Leave on “Auto” to maximize performance
versus distance.
AfterBurner (WL500g Deluxe only)
Router-ul wireless ASUS
Selectaþi un obiect din meniu pentru a vizualiza un
submeniu. Respectaþi instrucþiunile pentru a seta
router-ul wireless ASUS. Vã sunt oferite câteva indicaþii
în momentul în care plasaþi cursorul pe un obiect.
Perfecþionare
Acesta secþiune vã permite sã setaþi
parametrii adiþionali pentru funcþia
router-ului wireless. Se recomandã
utilizarea valorilor standard pentru
toate obiectele din acestã fereastrã.
Afterburner (numai WL500g Deluxe)
"Afterburner" activat: (WL500g Deluxe) - setaþi pe "activat" pentru a mãri
performanþa clienþilor (precum WL100gx) care utilizeazã aceastã funcþie.
Notã: viteza reþelei va scãdea dacã aveþi clienþi mixti 802.11g ºi Afterburner.
Ascunderea SSID: setarea standard este "No" astfel încât utilizatorii wireless
sa poatã vedea SSID-ul router-ului wireless ASUS ºi sã se conecteze. Daca
este selectat "Yes", router-ul wireless ASUS nu va arata sondajele site-ului
referitor la clienþii wireless ºi vor trebui sã introducã manual SSID-ul router-ului
wireless ASUS. Dacã doriþi sã restrictionaþi accesul la router-ul dumneavoastra
wireless ASUS, acesta reprezintã un mod simplu dar din motive de siguranþa
nu uitaþi sã schimbaþi SSID-ul diferit de "standard".
Setare AP izolat (WL500g/WL500g Deluxe) - selectaþi "Yes" pentru a preveni
comunicarea clienþilor wireless între ei.
Rata de date (Mbps) (WL500g/WL500g Deluxe) - acest câmp vã permite sã
specificaþi rata de transmisie. Lãsaþi pe "Auto" pentru a maximiza performanþa
faþa de distanþã.
Capitolul 3 - Configurare Software
Page 43

3. Utilities
ASUS Wireless Router 43
Chapter 3 - Software Configuration
Wireless (Cont.)
Basic Rate Set (WL500g/WL500g Deluxe) - This field indicates the basic
rates that wireless clients must support. Use “1 & 2 Mbps” only when
backward compatibility is needed for some older wireless LAN cards with
a maximum bit rate of 2Mbps.
Fragmentation Threshold (256-2346) – Fragmentation is used to divide
802.11 frames into smaller pieces (fragments) that are sent separately to
the destination. Enable fragmentation by setting a specific packet size
threshold. If there is an excessive number of collisions on the WLAN,
experiment with different fragmentation values to increase the reliability
of frame transmissions. The default value (2346) is recommended for normal
use.
RTS Thr eshold (0-2347) – The R TS/CTS (Request to Send/Clear to Send)
function is used to minimize collisions among wireless stations. When
RTS/CTS is enabled, the router refrains from sending a data frame until
another RTS/CTS handshake is completed. Enable RTS/CTS by setting a
specific packet size threshold. The default value (2347) is recommended.
DTIM Interval (1-255) (WL500g/WL500g Deluxe) – DTIM (Delivery
Traf fic Indication Message) is a wireless message used to inform clients in
Power Saving Mode when the system should wake up to receive broadcast
and multicast messages. Type the time interval in which the system will
broadcast a DTIM for clients in Power Saving Mode. The default value (3)
is recommended.
Beacon Interval (1-65535) – This field indicates the time interval in
milliseconds that a system broadcast packet, or beacon, is sent to synchronize
the wireless network. The default value (100 milliseconds) is recommended.
Enable Frame Bursting? (WL500g/WL500g Deluxe) – This field allows
you to enable frame-bursting mode to improve performance with wireless
clients that also support frame-bursting.
Enable Radio? (WL500g/WL500g Deluxe) - Selecting “Yes” enables the
wireless function during user-defined dates and times. Wireless users will
not be able to connect on non-selected dates and times.
Date to Enable Radio (WL500g/WL500g Deluxe) - This field defines
the dates that the wireless function will be enabled.
Time to Enable Radio (WL500g/WL500g Deluxe) - This field defines
the time range that the wireless function will be enabled on each of the
selected dates.
Router-ul wireless ASUS
Setarea ratei principale (WL500g/WL500g Deluxe) - acest câmp indicã ratele
principale care pot fi compatibile de clienþii wireless. Utilizaþi "1 & 2 Mbps" numai
atunci când este necesarã compatibilitatea inversã pentru unele carduri LAN
wireless mai vechi care au o rata maxima de biti de 2Mbps.
Pragul de fragmentare (256-2346) - fragmentarea este utilizatã pentru a
împãrþi cadrele 802.11 în pãrþi (fragmente) mai mici care sunt trimise separat la
destinaþie. Activaþi fragmentarea prin setarea unui prag a mãrimii pachetului.
Dacã existã un numãr mare de ciocniri in WLAN, încercaþi diferite valori de
fragmentare pentru a mãri încrederea transmisiei cadrului. Valoarea standard
(2346) este recomandatã pentru utilizarea normalã.
Pragul RTS (0-2347) - funcþia RTS/CTS (Request to Sent/Clear to sent - cerere
de trimitere/ ºtergeþi pentru a trimite) este utilizatã pentru a minimaliza ciocnirile
dintre staþiile wireless. Când este activatã funcþia RTC/CTS router-ul nu
transmite cadrul de date pânã când nu este completã altã comunicare cu
confirmare RTC/CTS. Activaþi funcþia RTC/CTS stabilind un prag specific a
mãrimii pachetului. Valoarea standard (2347) este recomandatã.
Intervalul DTIM (1-255) (WL500g/WL500g Deluxe) - DTIM (Delivery Traffic
Indication Message - mesajul de indicare a traficului livrat) este un mesaj
wireless utilizat pentru a informa clienþii din modul de economie a energiei
referitor la momentul în care trebuie sã se conecteze pentru a emite mesaje.
Tastaþi intervalul de timp în care sistemul va emite un DTIM clienþilor care se aflã
în modul de economie a energiei. Valoarea standard (3) este recomandatã.
Invervalul de semnalizare (1-65535) - acest câmp indicã intervalul de timp în
milisecunde în care sistemul trimite pachetul sau semnalul pentru a sincroniza
reþeaua wireless. Valoarea standard (100 milisecunde) este recomandatã
Activare impuls cadru (WL500g/WL500g Deluxe) - acest câmp vã permite sã
activaþi modul impulsului cadrului pentru a îmbunãtãþi performanþele pentru
clienþii wireless care suporta impulsul cadrului.
Activare radio (WL500g/WL500g Deluxe) - selectaþi "Yes" pentru a activa
funcþia wireless în timpul zilelor ºi perioadelor de timp predefinite de client.
Utilizatorii wireless nu vor putea sã se conecteze în zilele ºi perioadele de timp
neselectate.
Date pentru activare radio (WL500g/WL500g Deluxe) - acest câmp defineºte
zilele în care funcþia wireless va fi activatã.
Timp pentru activare radio (WL500g/WL500g Deluxe) - acest câmp defineºte
perioadele de timp din zilele selectate în care funcþia wireless va fi activatã.
Capitolul 3 - Configurare Software
Wireless (Continuare)
Page 44

3. Utilities
44 ASUS Wireless Router
Chapter 3 - Software Configuration
IP Config
WAN & LAN
Click an item on the menu to reveal a submenu.
Follow the instructions to set up the ASUS W ireless
Router. Tips are displayed when you move your
cursor over an item.
WAN Connection Type
The ASUS Wireless Router supports four connection types to WAN,
including Static IP, PPPoE, PPTP and Automatic IP. WL500g Deluxe
includes “Big Pond” (Telstra) in “WAN Connection Type” and “WAN
Connection Speed”. The WAN setting fields in this page will differ
depending on what kind of connection type you select.
WAN Connection Speed (WL500g Deluxe)
You can use the pull-down menu to change the WAN connection speed if
you do not want to use “Auto negotiation”.
WAN IP Setting
These three items are editable only when WAN Connection Type is set as
Static IP or PPTP.
IP Address - This is IP address of the W ireless Router as seen on the remote
network. If you leave it blank, the router will get IP address from DHCP
Server automatically.
Subnet Mask - This is Subnet Mask of the Wireless Router as seen on the
remote network.
Default Gateway - This is the IP address of default gateway that allows
for contact between the Wireless Router and the remote network or host.
WL500g Deluxe
WL500g
Router-ul wireless ASUS
Configurarea IP
WAN ºi LAN
Selectaþi un obiect din meniu pentru a vizualiza un
submeniu. Respectaþi instrucþiunile pentru a seta
router-ul wireless ASUS. Vã sunt oferite câteva indicaþii
în momentul în care plasaþi cursorul pe un obiect.
Tipul de conectare WAN
Router-ul wireless ASUS conþine patru tipuri de conectãri WAN care includ IP
static, PPPoE, PPTP ºi IP automat. WL500g Deluxe include "Big Pond" (Telstra)
în "tipul de conectare WAN" ºi "viteza de conectare WAN". Câmpurile setãrii
WAN din aceastã pagina vor diferi în funcþie de tipul de conectare pe care îl
alegeþi.
Viteza de conectare WAN (WL500g Deluxe)
Puteþi folosi meniul pentru a schimba viteza de conectare WAN daca nu doriþi sã
utilizaþi "Auto Negotiation".
Setarea IP-ului WAN
Aceste trei obiecte pot fi editate numai când tipul de conectare WAN este setat
pe IP static sau PPTP.
Adresa IP - aceasta este adresa IP a router-ului wireless ASUS, aºa cum se
poate observa pe reþea de la distanþã. Dacã nu scrieþi nimic, router-ul va prelua
automat o adresa IP de la server-ul DHCP.
Subnet mask - aceasta este masca subnet a router-ului wireless, aºa cum se
poate observa pe reþea de la distanþã.
Cale de acces standard - aceasta este adresa IP a cãii de acces standard care
permite contactul între router-ul wireless ºi reþeaua de la distanþa sau gazdã.
Capitolul 3 - Configurare Software
Page 45

3. Utilities
ASUS Wireless Router 45
Chapter 3 - Software Configuration
IP Config (Cont.)
WAN DNS Settings
You can set the DNS setting using any WAN Connection Type (Static IP,
PPPoE, or Automatic IP). WL500g Deluxe includes “Big Pond” and
“WAN Connection Speed” (not shown here).
Get DNS Server automatically? - Normally this is automatic and you
would answer “No” to the question about manually assigning DNS. If you
are given instructions from your ISP to enter DNS addresses, select “Yes”
to manually assigning DNS.
DNS Server 1/DNS Server 2 - If you are given instructions from your ISP
to enter DNS addresses, select “Yes” to manually assigning DNS and enter
the IP addresses here.
WL500g Deluxe
WL500g
WL500g Deluxe
WL500g
PPPoE or PPTP Account
These three items are editable only when WAN Connection Type is set as
PPPoE or PPTP.
User Name - The name of your Internet account provided by your ISP.
Some ISPs work with the entire account name along with the hosting domain
(such as yourname@yourdomain.com) and others require that you enter
only the account name (yourname).
Password - Enter the password for your Internet account.
Idle Disconnect Time in seconds (option) - Enter the number of seconds
of inactivity to disconnect you from your ISP.
Router-ul wireless ASUS
Setãrile DNS ale WAN-ului
Puteþi regla setãrile DNS utilizând orice tip de conectare WAN (IP static, PPPoE
sau IP automat). WL500g Deluxe include "Big Pond" ºi "viteza de conectare
WAN" (nu sunt prezentate aici).
Preluarea automata a serverului DNS? - în mod normal, aceasta se
realizeazã automat ºi aþi raspunde "No" la întrebarea referitoare la atribuirea
manualã a DNS-ului. Dacã primiþi instrucþiuni de la furnizorul de Internet pentru
a introduce adresele DNS, selectaþi "Yes" pentru a atribui manual DNS-ul.
Server 1 DNS/Server 2 DNS - Dacã primi instrucþiuni de la furnizorul de
Internet pentru a introduceþi adresele DNS, selectaþi "Yes" pentru a atribui
manual DNS-ul ºi introduceþi aici adresele IP.
Contul PPPeO sau PPTP
Aceste trei obiecte pot fi editate numai când tipul de conectare WAN este setat
pe PPPeO sau PPTP.
Numele utilizatorului - numele contului dumneavoastrã de Internet furnizat de
furnizorul de Internet. Unii furnizori de Internet solicitã întregul nume al contului
cât þi domeniul gazdã (de exemplu
numeledumneavoastra@domeniuldumneavoastra.com) iar altele solicitã sã
introduceþi numai numele contului (numeledumneavoastrã).
Parola - introduceþi parola pentru contul dumneavoastra de Internet
Timpul de deconectare pentru inactivitate în secunde (opþiune) -
introduceþi numarul de secunde de inactivitate dupã care sã fiþi deconectat de
la furnizorul de Internet.
Capitolul 3 - Configurare Software
Configurarea IP (Continuare)
Page 46

3. Utilities
46 ASUS Wireless Router
Chapter 3 - Software Configuration
Special Requirement from ISP
The following two items may be specified by some ISPs. Check with your
ISP and fill them in if required.
Host Name – Fill this in if required by your ISP.
MAC Address – Fill this in if required by your ISP.
Heart-Beat Server (WL500g Deluxe) - Fill in the server name or server IP
address when you are connecting with BigPond.
LAN IP Setting
IP Address - This is IP address of the W ireless Router as seen in your local
network. The default value is 192.168.1.1.
Subnet Mask - This is Subnet Mask of the W ireless Router as seen in your
local network. The default value is 255.255.255.0.
Host Name - This is Host Name of the Wireless Router as seen in your
local network.
WL500g Deluxe
WL500g
PPPoE MTU - This field is shows the Maximum T ransmission Unit (MTU)
of PPPoE packets.
PPPoE MRU - This field is shows the Maximum Receive Unit (MTU) of
PPPoE packets.
Enable PPPoE Relay - Enable PPPoE relay allows stations in LAN to
setup individual PPPoE connections that are passthrough NAT. It is also
known as PPPoE multi-session.
Router-ul wireless ASUS
PPPOE MTU - acest câmp indicã Unitatea maximã de transmisie (MTU Maximum Transmission Unit) a pachetelor PPPeO.
POOoE MRU - acest câmp indicã Unitatea maxima de recepþie (MTU Maximum Receive Unit) a pachetelor PPPeO.
Activarea releului PPPoE - activarea releului PPPoE permite staþiilor din LAN
sã stabileascã individual conectãri PPPoE care sunt trecute prin NAT. Este de
asemenea cunoscut drept multi-sesiune PPPoE.
Cerinþe speciale ale furnizorului de Internet
Urmãtoarele douã obiecte pot fi specificate de anumiþi furnizori de Internet.
Verificaþi cu furnizorul dumneavoasta de Internet ºi completaþi câmpurile dacã
este necesar.
Numele gazdei - completaþi dacã este solicitat de furnizorul de Internet
Adresa MAC - completaþi dacã este solicitat de furnizorul de Internet
Server Heart-Beat (WL500g Deluxe) - completaþi cu numele server-ului sau cu
adresa IP a serverului în momentul în care vã conectaþi prin BigPond.
Setarea IP-ului LAN-ului
Adresa IP - aceasta este adresa IP a router-ului wireless, aºa cum este vãzutã
în reþeaua localã. Valoarea standard este 192.168.1.1.
Subnet mask - aceasta este masca subnet a router-ului wireless, aºa cum este
vãzutã în reþeaua localã. Valoarea standard este 255.255.255.0.
Numele gazdei - acesta este numele gazdei router-ului wireless, aºa cum este
vãzutã în reþeaua localã.
Capitolul 3 - Configurare Software
Page 47

3. Utilities
ASUS Wireless Router 47
Chapter 3 - Software Configuration
DHCP (Dynamic Host Configuration
Protocol) is a protocol defined for
dynamically assigning IP addresses
to computers in a network. Enabling
the DHCP server allows the Wireless
Router to assign IP address to PC or
NB that is set to obtain an IP address
automatically. The ASUS Wireless
Router supports up to 254 IP addresses for your local network.
Enable the DHCP Server? – This field allows you to enable or disable
DHCP server in the Wireless Router. The default value is “Yes”
Domain Name - This field indicates the Domain Name to provide to clients
that request IP Address from DHCP Server.
IP Pool Starting Address - This field specifies the first address in the pool
to be assigned by the DHCP server in your local network.
IP Pool Ending Address - This field specifies the last address in the pool
to be assigned by the DHCP server in your local network.
Lease Time - This field specifies the amount of connection time a network
user be allowed with their current dynamic IP address.
IP Config (Cont.)
Click an item on the menu to reveal a submenu.
Follow the instructions to set up the ASUS W ireless
Router. Tips are displayed when you move your
cursor over an item.
DHCP Server
Router-ul wireless ASUS
Selectaþi un obiect din meniu pentru a vizualiza un
submeniu. Respectaþi instrucþiunile pentru a seta
router-ul wireless ASUS. Vã sunt oferite câteva
indicaþii în momentul în care plasaþi cursorul pe un
obiect.
Server DHCP
DHPT (Dynamic Host Configuration
Protocol - protocolul dinamic de
configurare a gazdei) este un protocol
proiectat pentru atribuirea dinamicã de
adrese IP pentru calculatoarele din
reþea. Activarea server-ului DHCP
permite router-ului wireless sã atribuie
adrese IP
pentru calculatorul sau laptopul care este setat pentru a obþine automat o
adresa IP. Router-ul wireless ASUS suportã pânã la 254 adrese IP pentru o
reþea localã.
Activarea server-ului DHCP? - acest câmp vã permite sã activaþi sau sã
dezactivaþi server-ul DHCP din router-ul wireless. Valoarea standard este
"Yes".
Numele domeniului- acest câmp indicã numele domeniului furnizat clienþilor
care solicitã adresa IP de la server-ul DHCP.
Adresa IP iniþialã - acest câmp specificã prima adresã atribuitã de server-ul
DHCP în reþeaua dumneavoastrã localã.
Adresa IP finalã - acest câmp specificã ultima adresã atribuitã de server-ul
DHCP în reþeaua dumneavoastrã localã.
Perioada de timp de utilizare - acest câmp specificã timpul de conectare de
care beneficiazã un utilizator cu adresa IP dinamicã curentã.
Capitolul 3 - Configurare Software
Configurarea IP (Continuare)
Page 48

3. Utilities
48 ASUS Wireless Router
Chapter 3 - Software Configuration
IP Config (Cont.)
DHCP Server (Cont.)
DNS and WINS Server Setting
DNS Server 1/DNS Server 2 - This
field indicates the IP address of DNS
to provide to clients that request IP
Address from DHCP Server. You can
leave it blank, then the W ireless Router
will process the DNS request.
WINS Server - The W indows Internet
Naming Service manages interaction
of each PC with the Internet. If you
use a WINS server, enter IP Address
of server here.
Assign IP Address Manually (WL500g Deluxe)
Enable Manual Assignment - Selecting “Y es” allows you to assign a static
IP address to the PC that has the IP address and MAC address mapping set
in the “Manually Assigned IP List”.
Router-ul wireless ASUS
Setarile server-ului DNS si WINS
Serverul DNS 1/ Server-ul DNS 2 acest camp indicã adresa IP a
DNS-ului furnizat clienþilor care
solicitã adresa IP de la server-ul
DHCP. Puteþi sã nu completaþi, ºi
atunci router-ul wireless va procesa
solicitarea DNS.
Server-ul WINS - serviciul de
denumire Internet Windows
administreazã interacþiunile
fiecarui calculator cu Internetul. Daca utilizaþi un server WINS,
introduceþi aici adresa IP.
Atribuirea manuala a adresei IP (WL500g Deluxe)
Activarea atribuirii manuale - selectaþi "Yes" pentru a permite
atribuirea unei adrese IP statice calculatorului care are atribuirea
adresei IP ºi adresei MAC stabilitã în "Lista de IP-uri atribuite
manual".
Capitolul 3 - Configurare Software
Configurarea IP (Continuare)
Page 49

3. Utilities
ASUS Wireless Router 49
Chapter 3 - Software Configuration
IP Config (Cont.)
Click an item on the menu to reveal a submenu.
Follow the instructions to set up the ASUS W ireless
Router. Tips are displayed when you move your
cursor over an item.
Static Route
A route is a possible path from a
given host to another host or
destination. If you append one or
more routers behind the ASUS
Wireless Router to share the same
connection to Internet, you need to
insert predefined rules of route,
called static route, into the ASUS
Wireless Router. Then the ASUS
Wireless Router could know which
router the packets from Internet with different destination IP address can
deliver to.
Apply to routing table? – Selecting “Yes” applies all those rules in Static
Route List into routing table.
Static Route List
Network/Host IP –It stands for the destination IP address of network or
host. So it could be an IP address, such as 192.168.1.1 or a range of IP
address, such as 192.168.0.0 or 192.0.0.0. If a packet with destination IP
address that match to this field or within the range of this field, it will route
to the device set in Gateway field.
Netmask – It stands for the netmask of an added network route.
Gateway - This field stands for the IP address of gateway where packets
are routed. The specified gateway must be reachable first. It means you
have to set up a static route to the gateway beforehand.
Metric - Metric is a value of distance for the network and used to decide
the priority of route rules.
Interface - This field decide which network interface this routing rule is
applied to.
Router-ul wireless ASUS
Selectaþi un obiect din meniu pentru a vizualiza
un submeniu. Respectaþi instrucþiunile pentru a
seta router-ul wireless ASUS. Vã sunt oferite
câteva indicaþii în momentul în care plasaþi
cursorul pe un obiect.
Ruta staticã
O rutã este un posibil traseu de
la o anumitã gazdã la o altã
gazdã sau destinaþie. Dacã
adãugaþi una sau mai multe
rute la un router wireless ASUS
ºi împãrþiþi aceeaºi conectare la
Internet, trebuie sã introduceþi
reguli predefinite ale rutei în
router-ul wireless ASUS.
Apoi, router-ul wireless ASUS poate ºti la care router sã livreze
pachetul cu diferite adrese IP de destinaþie.
Aplicarea tabelului rutelor? - selectaþi "Yes" pentru a aplica toate
regulile din Lista de rute statice în tabelul rutelor.
Lista rutelor statice
Reþea/IP gazdã - reprezintã adresa IP de destinaþie a reþelei sau a
gadzei. Poate fi ºi o adresa IP, precum 192.168.1.1 sau o gamã
de adrese IP, precum 192.168.0.0 sau 192.0.0.0. Dacã un pachet
are adresa IP de destinaþie care se potriveºte cu acest câmp sau
cu o parte din acest câmp, va fi trimis la dispozitivul setat în
câmpul cãii de acces.
Netmask - reprezintã masca de net a unei rute de reþea adãugate.
Calea de acces - acest câmp reprezintã adresa IP sau calea de
acces unde sunt trimise pachetele. Trebuie sã se ajungã la calea
specificã de acces. Acesta înseamnã cã dumneavostrã trebuie sã
setaþi dinainte o ruta staticã la calea de acces.
Metric - reprezintã o valoare a distanþei pentru reþea ºi este utilizat
pentru a decide prioritatea regulilor rutei.
Interfaþa - acest câmp decide la care interfaþa de reþea se aplicã
aceastã regula a rutei.
Capitolul 3 - Configurare Software
Configurarea IP (Continuare)
Page 50

3. Utilities
50 ASUS Wireless Router
Chapter 3 - Software Configuration
IP Config (Cont.)
Click an item on the menu to reveal a submenu.
Follow the instructions to set up the ASUS W ireless
Router. Tips are displayed when you move your
cursor over an item.
Miscellaneous
Enable UPnP – Selecting “Yes” to
enable UPnP, it will allow your
Wireless Router to be found
automatically by systems, such as
Windows XP. And it allows these
systems to automatically configure
the Wireless Router for various
Internet applications, such as gaming
and video conferencing.
Remote Log Server – This feature
allows you to assign a remote server
to record log messages of the
Wireless Router. If you leave it blank, system will record up to 1024
messages on the Wireless Router only.
Time Zone – This field indicates time zone where you are locating in.
NTP Server – NTP Server is a time server on the Internet that allows the
Wireless Router to synchronize its system time to. You can keep the default
IP address or set to the IP address of an NTP server that you prefer.
DDNS Setting
Dynamic - DNS (DDNS) allows user to export host name to Internet through
DDNS service provider. Each time the ASUS Wireless Router connect to
Internet and get an IP address from ISP, this function will update your IP
address to DDNS service provider automatically , so that any user on Internet
can access the ASUS Wireless or servers behind it through a predefined
name registered in DDNS service provider.
Enable the DDNS Client? – Selecting “Yes” to enable DDNS update,
then each time your IP address to WAN is changed, the information will be
updated to DDNS service provider automatically.
Router-ul wireless ASUS
Selectaþi un obiect din meniu pentru a
vizualiza un submeniu. Respectati
instrucþiunile pentru a seta router-ul wireless
ASUS. Vã sunt oferite câteva indicaþii în
momentul în care plasaþi cursorul pe un obiect.
Alte utilizãri
Activare UPnP - selectaþi "Yes"
pentru a activa UPnP, va permite
router-ului wireless sa fie gãsit
automat de sisteme, precum
Windows XP. ªi permite acestor
sisteme sã configureze automat
router-ul wireless pentru diverse
aplicaþii de Internet, precum
jocurile ºi conferinþele video.
Server cu conectare de la distanþã - acestã caracteristicã vã permite
sã atribuiþi un server de la distanþa sã înregistreze mesajele de
conectare ale router-ului wireless. Dacã nu completaþi, sistemul va
înregistra pânã la 1024 de mesaje numai pe router-ul wireless.
Fusul orar - acest câmp indicã fusul orar în care sunteþi localizat.
Server NTP - server-ul NTP este un server de timp pe Internet care
permite router-ului wireless sã se sincronizeze cu sistemul. Puteþi
pãstra adresa IP standard sau puteþi seta o adresa IP a server-ului
NTP dorit.
Setarea DDNS
Dinamic - DNS (DDNS) permite utilizatorului sã exporte numele gazdei
în Internet prin furnizorul de servicii DDNS. De fiecare datã când
router-ul wireless ASUS se conecteazã la Internet ºi preia o adresã IP
de la furnizorul de Internet, acestã funcþie va actualiza automat adresa
IP pentru furnizorul de servicii DDNS, astfel încât orice utilizator de pe
Internet sã poatã accesa router-ul wireless ASUS sau serverele printrun nume predefinit înregistrat la furnizorul de servicii DDNS.
Activarea clientului DDNS? - selectaþi "Yes"pentru a permite
actualizarea DDNS, apoi de fiecare data când este schimbatã adresa
IP pentru WAN, informaþia va fi actualizatã automat pentru furnizorul de
servicii DDNS.
Capitolul 3 - Configurare Software
Configurarea IP (Continuare)
Page 51

3. Utilities
ASUS Wireless Router 51
Chapter 3 - Software Configuration
IP Config (Cont.)
Server – Currently, clients connect to DynDNS or TZO are embedded in
the Wireless Router. You can click Free Trial link behind this field to start
with a free trial account.
User Name or E-Mail Address – This field is used as an identity to log in
Dynamic-DNS service.
Password or DDNS Key –This field is used as a password to log in
Dynamic-DNS service.
Host Name –This field represents the Host Name you register to Dynamic-
DNS service and expect to export to the world.
Enable wildcard? – This field determines if domain name with wildcard
is also redirected to your IP address.
Update Manually –This button allows you to update DDNS database
manually. It is available only when automatic DDNS update failed. You
can get current status of DDNS update from System Log.
Note: Currently, clients connected to DynDNS or TZO are embed-
ded in ASUS Wireless Router. You can click Free Trial link behind
each DDNS service provider to start with a free trial account.
Router-ul wireless ASUS
Server - în prezent, clienþii conectaþi al DynDNS sau TZO sunt incluºi în
router-ul wireless. Puteþi accesa legaturã "Free Trial" din acest câmp
pentru a începe cu un cont gratis de încercare.
Numele utilizatorului ºi adresa de e-mail - acest câmp este utilizat
pentru identificare la conectarea în serviciul Dynamic-DNS.
Parola sau cheie DNS - acest câmp este utilizat drept parolã la
conectarea în serviciul Dynamic-DNS.
Numele gazdei - acest câmp reprezintã numele gazdei pe care l-aþi
înregistrat la serviciul Dynamic-DNS ºi care ar trebui exportat cãtre toatã
lumea.
Activare wildcard? - acest camp determinã dacã numele domeniului cu
wildcard este, de asemenea, redirecþionat la adresa dumneavoastrã IP.
Actualizare manualã - acest buton vã permite sã actualizaþi manual
baza de date DDNS. Este recomanadat numai în cazul în care
actualizarea DSNS automatã eºueazã. Puteþi vizualiza statutul curent a
actualizãrilor DDNS în înregistrarea sistemului (System Log).
Notã: în prezent, clienþii conectaþi al DynDNS sau TZO sunt incluºi in
router-ul wireless. Puteþi accesa legãtura "Free Trial" din acest câmp
pentru a începe cu un cont gratis de încercare.
Capitolul 3 - Configurare Software
Configurarea IP (Continuare)
Page 52

3. Utilities
52 ASUS Wireless Router
Chapter 3 - Software Configuration
NAT Setting
Click this item on the menu to reveal a sub menu.
Follow the instructions to setup the ASUS wireless
router. Tips are given when you move your cursor
over each item.
Port Trigger
This function allows you to open
certain TCP or UDP ports to
communicate with the computers
connected to the WL500g. This is
done by defining trigger ports and
incoming ports. When the trigger port
is detected, the inbound packets to the
specified incoming port numbers are
redirected to your computer.
Enable Port Trigger? - Selecting “Yes” applies all the rules in the Port
Trigger List to the Wireless Router.
Port Trigger List
Trigger Port - This field allows you to enter the port or port range of
outing packets that will trigger port redirect.
Protocol - This field allows you to select the protocol of outgoing packets.
Incoming Port - This field allows you to enter the port or port range of
incoming packets that will be redirected to your computer.
Protocol - This field allows you to select the protocol of incoming packets.
Description - This field keeps information on what the rule is used for.
Router-ul wireless ASUS
Setãri NAT
Selectaþi un obiect din meniu pentru a vizualiza
un submeniu. Respectaþi instrucþiunile pentru a
seta router-ul wireless ASUS. Vã sunt oferite
câteva indicaþii în momentul în care plasaþi
cursorul pe un obiect.
Iniþiere port
Aceastã funcþie vã permite sã deschideþi
anumite port-uri TCP sau UDP pentru a
comunica cu calculatoarele conectate la
WL500g. Acesta este realizatã prin
definirea port-urilor de iniþiere ºi porturilor de primire. Când port-ul de iniþiere
este detectat,
pachetele de primit la numerele specifice
de port de primire, sunt redirecþionate
cãtre calculatorul dumneavoastrã.
Activare iniþiere port? - selectaþi "Yes" pentru a aplica toate regulile din
lista de iniþiere a port-ului la router-ul wireless.
Lista de iniþiere a port-ului
Iniþiere port - acest câmp va permite sã introduceþi port-ul sau gama de
port-uri pentru pachetele de transmis care va iniþia redirecþionarea port-ului.
Protocol - acest câmp va permite sã selectaþi protocolul pentru pachetele
de transmis.
Port pentru primire - acest câmp vã permite sã introduceþi port-ul sau
gama de port-uri a pachetelor de primit care vor fi redirecþionate cãtre
calculatorul dumneavoastrã.
Protocol - acest câmp vã permite sã selectaþi protocolul pentru pachetele
de primit.
Descriere - acest câmp reþine informaþiile referitoare la utilizarea regulilor.
Capitolul 3 - Configurare Software
Page 53

3. Utilities
ASUS Wireless Router 53
Chapter 3 - Software Configuration
NAT Setting (Cont.)
Click this item on the menu to reveal a sub menu.
Follow the instructions to setup the ASUS wireless
router. Tips are given when you move your cursor
over each item.
Virtual Server
T o make services, like WWW, FTP ,
provided by a server in your local
network accessible for outside
users, you should specify a local IP
address to the server . Then, add the
IP address and network protocol
type, port number, and name of the
service in the following list. Based
on the list, the gateway will forward
service request from outside users
to the corresponding local server.
Enable Virtual Server?– Selecting
“Yes” applies all those rules in
Virtual Server List into the Wireless Router.
Virtual Server List
Local IP – This field stands for the destination IP address that you like to
redirect the matched packet to.
Port Range– This field stands for a port number or a range of ports. Once
the destination port of incoming packets matches the port or within the port
range, the incoming packets will be redirect to IP address specified in Local
IP.
Protocol– This field stands for protocol of incoming packets.
Description –This field allows you to record what this rule is used for.
Router-ul wireless ASUS
Selectaþi un obiect din meniu pentru a vizualiza un
submeniu. Respectaþi instrucþiunile pentru a seta
router-ul wireless ASUS. Vã sunt oferite câteva indicaþii
în momentul în care plasaþi cursorul pe un obiect.
Server virtual
Pentru ca serviciile precum WWW si
FTP, furnizate de server pentru
reþeaua dumneavostrã localã, sã fie
accesibile utilizatorilor dinafarã, ar
trebui sã specificaþi o adresã IP
localã pentru server. Apoi, adãugaþi
adresa IP ºi tipul de protocol de
reþea, numãrul port-ului ºi numele
serviciului în urmatoarea lista. Pe
baza acestei liste,
calea de acces va transmite cererile
de servicii din partea utilizatorilor
dinafarã cãtre serverul local
corespunzãtor.
Activarea server-ului virtual? - selectaþi "Yes" pentru a aplica toate regulile
din lista server-ului virtual în router-ul wireless.
Lista server-ului virtual
IP local - acest câmp reprezintã adresa IP destinaþie la care doriþi sã
redirectionaþi pachetele.
Gama port-ului - acest câmp reprezintã un numãr de port sau o gama de porturi. Când port-ul destinaþie a pachetelor de primit coincide cu port-ul sau cu o
gama din port, pachetele de primit vor fi redirectionate la adresa IP specificata
in IP-ul local.
Protocol - acest câmp vã permite sã selectaþi protocolul pentru pachetele de
primit.
Descriere - acest câmp reþine informaþiile referitoare la utilizarea regulilor.
Capitolul 3 - Configurare Software
Setãri NAT (Continuare)
Page 54

3. Utilities
54 ASUS Wireless Router
Chapter 3 - Software Configuration
NAT Setting (Cont.)
Click an item on the menu to reveal a submenu.
Follow the instructions to set up the ASUS W ireless
Router. Tips are displayed when you move your
cursor over an item.
Virtual DMZ
V irtual DMZ allows you to expose
one computer to Internet, so that all
inbound packets will be redirected
to the computer you set. It is useful
while you run some applications
that use uncertain incoming ports.
Please use it carefully.
IP Address of Exposed Station – This field stands for the IP address of the
computer that you want to expose to Internet.
Router-ul wireless ASUS
Selectaþi un obiect din meniu pentru a vizualiza un
submeniu. Respectaþi instrucþiunile pentru a seta
router-ul wireless ASUS. Vã sunt oferite câteva
indicaþii în momentul în care plasaþi cursorul pe un
obiect.
DMZ virtual
DMZ-ul virtual vã permite sã expuneþi un
calculator la Internet, astfel încât toate
pachetele de primit vor fi redirecþionate
cãtre calculatorul setat corespunzãtor.
Este util pentru momentele în care rulaþi
aplicaþii
care utilizeazã port-uri de primire
nesigure. Utilizaþi cu atenþie.
Adresa IP a staþiei expuse - acest câmp reprezintã adresa IP a calculatorului pe
care doriþi sã îl expuneþi la Internet.
Capitolul 3 - Configurare Software
Setãri NAT (Continuare)
Page 55

3. Utilities
ASUS Wireless Router 55
Chapter 3 - Software Configuration
Internet Firewall
Click an item on the menu to reveal a submenu.
Follow the instructions to set up the ASUS W ireless
Router. Tips are displayed when you move your
cursor over an item.
LAN & WAN Filter
WAN to LAN Filter
LAN & WAN filter allows you to block specified packets between LAN
and WAN. At first, you can define the date and time that filter will be
enabled. Then, you can choose the default action for filter in both directions
and insert the rules for any exceptions.
Date to Enable WAN to LAN Filter – This field defines the dates that
WAN to LAN filter will be enabled.
Time of Day to Enable WAN to LAN Filter – This field defines the time
interval that WAN to LAN filter will be enabled.
Packets (LAN to WAN) not specified will be – This field defines those
LAN to WAN packets which are not specified in WAN to LAN Filter T able
will be accepted or dropped.
Filtered ICMP (LAN to WAN) packet types – This field defines a list of
LAN to WAN ICMP packets type that will be filtered. For example, if you
would like to filter Echo (type 8) and Echo Reply (type 0) ICMP packets,
you need to enter a string with numbers separated by blank, such as, "0 5".
Router-ul wireless ASUS
Firewall Internet
Selectaþi un obiect din meniu pentru a vizualiza un
submeniu. Respectaþi instrucþiunile pentru a seta
router-ul wireless ASUS. Vã sunt oferite câteva
indicaþii în momentul în care plasaþi cursorul pe un
obiect.
Filtru LAN ºi WAN
Filtru LAN si WAN
Filtrul LAN ºi WAN vã permite sã blocaþi anumite pachete între LAN si WAN. La
început, puteþi defini zilele ºi perioada de timp în care filtrul va fi activat. Apoi,
puteþi alege acþiunea standard pentru filtru în ambele direcþii ºi introduce reguli
pentru excepþii.
Ziua de activare a filtrului WAN cãtre LAN - acest câmp defineºte zilele în care
filtrul WAN ºi LAN este activat.
Perioada din zi de activare a filtrului WAN catre LAN - acest câmp defineºte
perioada de timp în care filtrul WAN si LAN este activat.
Pachetele (LAN catre WAN) care nu sunt specificate vor fi - acest câmp
defineºte acele pachete LAN ºi WAN care nu sunt specificate în tabelul de filtre
WAN ºi LAN vor fi acceptate sau eliminate.
Tipul de pachete ICMP filtrate (LAN cãtreWAN) - acest câmp defineºte o listã
de tipuri de pachete ICMP LAN catre WAN care vor fi filtrate. De exemplu, dacã
aþi dori sã filtraþi pachetele ICMP Echo (tip 8) si Echo Reply (tip 0), trebuie sã
introduceþi un ºir de numere separate de spaþii, precum "0 5".
Capitolul 3 - Configurare Software
Page 56

3. Utilities
56 ASUS Wireless Router
Chapter 3 - Software Configuration
Internet Firewall (Cont.)
WAN to LAN Filter Table
Source/Destination IP Address - For source or destination IP address,
you can input a specific IP address, such as "192.168.122.1", or IP addresses
within one subnet, such as "192.168.123.*", or "192.168.*.*", or all IP
addresses as "*".
Source/Destination Port or Port Range - For source or destination port
range, you can input a specific port, such as "95", or ports within a range,
such as "103:315", ">100", or "<65535".
Protocol – This field indicates the protocol type of packets this rule like to
filer.
Router-ul wireless ASUS
Tabelul de fitre WAN si LAN
Adresa IP sursã/destinaþie - adresa IP sursã sau destinaþie poate reprezenta
o adresa IP specificã, precum "192.168.122.1" sau adrese IP de pe subnet,
precum "192.168.123.*", sau "192.168.*.*", sau toate adresele IP precum "*".
Port sau gama de port-uri sursã/destinaþie - pentru gama de port-uri
sursã/destinaþie, puteþi introduce un anumit port, precum "95", sau port-uri dintro gama, precum "103:315", ">100" sau "<65535".
Protocol - acest câmp indicã tipul de protocol a pachetelor care sunt filtrate
conform regulii.
Capitolul 3 - Configurare Software
Firewall Internet (Continuare)
Page 57

3. Utilities
ASUS Wireless Router 57
Chapter 3 - Software Configuration
Enable Firewall? – Selecting “Yes”
enables firewall to apply general SPI
rules.
Logged Packet Type – This field
indicates what kind of packets
between WAN and LAN will be
logged.
Enable W eb Access from WAN – This field allows you to specify the port
used to access Web server of the ASUS W ireless Router from Internet. The
default value is 8080. If you know the WAN IP address of the Wireless
Router, open your web browser and enter the IP address. For example:
http://140.113.201.1:8080
If you enable the DDNS with an account, please open your web browser
and enter the host name registered in DDNS service provider . For example:
http://wl500g.homelinux.org:8080
Note: The default web browser port 80, is reserved for the Web server
within your local network.
Port of W eb Access from WAN - This field allows you to specify the port
used to access the W eb server of the ASUS W ireless Router from the Internet.
The default value is 8080.
Responds LPR Request from WAN - This field allows you to decide if
you like to respond to LPR requests from Internet.
Responds Ping Request from WAN - This field allows you to decide if
you like to respond to ping requests from Internet.
Internet Firewall (Cont.)
Click an item on the menu to reveal a submenu.
Follow the instructions to set up the ASUS W ireless
Router. Tips are displayed when you move your
cursor over an item.
Basic Config
Router-ul wireless ASUS
Selectaþi un obiect din meniu pentru a vizualiza un
submeniu. Respectaþi instrucþiunile pentru a seta
router-ul wireless ASUS. Vã sunt oferite câteva indicaþii
în momentul în care plasaþi cursorul pe un obiect.
Configurare de bazã
Activare firewall? - selectaþi "Yes"
pentru a permite firewall-ului sã aplice
regulile generale SPI.
Tip de pachet înregistrat - acest câmp
indicã ce tip de pachete vor fi
înregistrate între WAN si LAN.
Activare acces Internet din WAN - acest câmp vã permite sã specificaþi port-ul
utilizat pentru a accesa server-ul de Internet a router-ului wireless ASUS.
Valoarea standard este 8080. Dacã cunoasteþi adresa IP WAN a router-ului
wireless, deschideþi browser-ul de Internet ºi introduceþi adresa IP. De
exemplu: http://140.113.201.1.1:8080
Dacã activaþi DDNS cu ajutorul unui cont, deschideþi browser-ul de Internet ºi
introduceþi numele gazdei care este înregistrat la furnizorul serviciului DDNS.
De exemplu: http://wl500g.homelinux.org:8080
Notã: port-ul 80 standard al browser-ul de Internet este rezervat pentru
server-ul de Internet din reþeaua dumneavoastrã localã.
Port-ul accesului la Internet din WAN - acest câmp vã permite sã specificaþi
port-ul utilizat pentru a accesa server-ul de Internet al router-ului wireless
ASUS din Internet. Valoarea standard este 8080.
Rãspuns cerere LPR din WAN - acest câmp va permite sã decideþi dacã doriþi
sã rãspundeþi la cererea LPR din Internet.
Rãspuns cerere Ping din WAN - acest câmp vã permite sã decideþi dacã
doriþi sã rãspundeþi la cererea ping din Internet.
Capitolul 3 - Configurare Software
Firewall Internet (Continuare)
Page 58

3. Utilities
58 ASUS Wireless Router
Chapter 3 - Software Configuration
Internet Firewall (Cont.)
Click an item on the menu to reveal a submenu.
Follow the instructions to set up the ASUS W ireless
Router. Tips are displayed when you move your
cursor over an item.
URL Filter
URL Filter allows you to block
specific URL access from your local
network.
Enable URL Filter? – Selecting
“Y es” enables URL Filter and applies
rules in URL Keyword List into the
Wireless Router.
Date to Enable URL Filter– This
field defines the dates that URL filter
will be enabled.
Time of Day to Enable URL Filter – This field defines the time interval
that URL filter will be enabled.
URL Keyword List
URL Keyword – If the URL filter is enabled and URL access contains the
keyword specified in the URL Keyword List, the DNS mapping of this
URL would be blocked.
Router-ul wireless ASUS
Selectaþi un obiect din meniu pentru a vizualiza un
submeniu. Respectaþi instrucþiunile pentru a seta
router-ul wireless ASUS. Vã sunt oferite câteva
indicaþii în momentul în care plasaþi cursorul pe un
obiect.
Filtru URL
Filtrul URL vã permite sã blocaþi
accese URL specifice în reþeaua
dumneavoastrã localã.
Activarea filtrului URL? - selectaþi
"Yes" pentru a permite filtrului URL sa
aplice regulile din lista cuvintelor cheie
URL în router-ul wireless.
Zilele în care este activat filtrul URL - acest câmp defineºte zilele în care va fi
activat filtrul URL.
Lista cuvintelor cheie URL
Cuvânt cheie URL - dacã filtrul URL este activat ºi accesul URL conþine un
cuvânt cheie din lista cuvintelor cheie URL, reprezentarea DNS a acestui URL
va fi blocatã.
Capitolul 3 - Configurare Software
Firewall Internet (Continuare)
Page 59

3. Utilities
ASUS Wireless Router 59
Chapter 3 - Software Configuration
USB Application
Click an item on the menu to reveal a submenu.
Follow the instructions to set up the ASUS W ireless
Router. Tips are displayed when you move your
cursor over an item.
FTP Server
FTP Server Mode – The ASUS
Wireless Router features an
embedded FTP server for USB
storage. Before using the FTP server ,
ensure that your USB device fulfils
the following requirements.
• The FTP server only works with supported USB devices. Supported devices
are listed on the ASUSTeK Web site at http://www.asus.com.
• The ASUS router supports read/write functions for FAT or FAT32 file
systems and read-only functions for NTFS (NT file system) with compressed
or uncompressed files. Encrypted files are not supported. If your USB
storage device is formatted as a FAT or FAT32 file system, configure the
FTP server to work from the first partition (partition 0).
• Devices with multi-partitions will be detected; however, only super users
and anonymous users can access devices configured with multi-partitions.
Other users can only access the directory /ftp_pub or /ftp_pvt/username/ in
partition 0.
Note: WL500g/b only supports USB Storage recognized as a “Mass
Storage Device”. It does not support other types of USB to IDE de-
vices. Most compatible USB storage devices are plug and play; you
do not have to power off the router when connecting these devices.
However, USB external storage cases for IDE devices require you
to restart the router after you connect them.
The following describes the available fields in the FTP Server screen.
Force to Eject USB Disk – When this item is enabled, pressing the “Eject”
button will allow the router to write the cached data back to the USB disk
before you remove the USB disk. Remove the USB Disk only after you
press the button and get the refreshed Web page. Otherwise, you will lose
the cached data.
Router-ul wireless ASUS
Aplicaþii USB
Selectaþi un obiect din meniu pentru a vizualiza un
submeniu. Respectaþi instrucþiunile pentru a seta routerul wireless ASUS. Vã sunt oferite câteva indicaþii în
momentul în care plasaþi cursorul pe un obiect.
Server FTP
Modul server FTP - router-ul
wireless ASUS conþine un server FTP
încorporat pentru stocarea USB.
Înainte de a folosi un server FTP,
asiguraþi-vã cã dispozitivul USB
îndeplineºte urmãtoarele cerinþe:
server-ul FTP funcþioneazã numai cu ajutorul unui dispozitiv USB.
Dispozitivele ajutãtoare sunt menþionate pe pagina de Internet AUSUTeK la
http://www.asus.com.
Router-ul ASUS susþine funcþiile de scriere/citire pentru sistemele de fiºiere
FAT sau FAT32 ºi pentru funcþiile "read-only" pentru NTFS (sistem de fiºiere
NT) care contin fiºiere comprimate sau necomprimate. Fiºierele codificate nu
sunt susþinute. Dacã dispozitivul dumneavoastrã de stocare USB este sub
forma de sistem de fiºiere FAT sau FAT32, configuraþi server-ul FTP pentru a
funcþiona din prima partiþie (partiþia 0).
Dispozitivele cu partiþii multiple vor fi detectate; totuºi, numai super utilizatorii
ºi utilizatorii anonimi pot accesa dispozitivele configurate cu partiþii multiple.
Ceilalþi utilizatori pot numai sã acceseze directorul /ftp_pub sau
/ftp_pvt/username/din partiþia 0.
Notã: WL500g/b suportã numai stocarea USB recunoscutã ca "dispzitiv de
stocare masã". Nu suportã alte tipuri de dispozitive USB pânã la IDE. Cele
mai multe dispozitive de stocare USB sunt "Plug and play" (standard pentru
configurarea automatã a dispozitivelor hard); nu trebuie sã închideþi router-ul
când conectaþi aceste dispozitive. Totuºi, cazurile de stocare externã USB
pentru dispozitivele IDE necesitã repornirea router-ului dupã conectare.
În continuare sunt descrise câmpurile disponibile în pagina server-ului FTP.
Scoaterea forþatã a discului USB - când acest obiect este activat,
selectaþi butonul "Eject" pentru a permite router-ului sã scrie datele primite pe
discul USB înainte de a scoate discul USB. Scoateþi discul USB numai dupã ce
aþi apãsat butonul ºi reîmprospãtaþi pagina de Internet. Altfel, veþi pierde datele
primite.
Capitolul 3 - Configurare Software
Page 60

3. Utilities
60 ASUS Wireless Router
Chapter 3 - Software Configuration
USB Application (Cont.)
Enable FTP Server? – Select Yes to enable the ftp server daemon when
you have connected USB storage to the router.
Allow Anonymous User to Login? – Select Yes to enable an anonymous
user account with all access rights. The User name is anonymous or ftp. No
password is required.)
Login as Anonymous: click Login to log in to this FTP Server with an
Anonymous User account to access a Net Disk.
Allow Super User to Login? – Select Yes to enable a super user account
with all access rights. The user name and password are the same as the
network administrator.
Login as Super User: click Login to log in to this FTP Server with
Super User account to access a Net Disk.
FTP Port – T ype the port number to be used for the FTP server . The default
is 21.
Maximum Users Allowed to Log in – T ype the maximum number of users
allowed to simultaneously log in to the server.
Login Timeout in Seconds – This field enables you to terminate user
connections after users have been connected for the specified period of
time.
Stay Timeout in Seconds –This field enables you to terminate user
connections after users log in but stay idle for the specified period of time.
Initial Script - After inserting a USB disk, the wireless router will look for
the initial script as entered here in the root directory of the USB disk and
execute it. Leaving this blank will disable this function.
Router-ul wireless ASUS
Activarea server-ului FTP - selectaþi "Yes" pentru a activa daemon-ul serverului FTP dupã ce aþi conectat stocarea USB la router.
Conectarea utilizatorilor anonimi permisã - selectaþi "Yes" pentru a activa
contul unui utilizator anonim cu drepturi de acces. Numele utilizatorului este
anonim sau ftp. Nu este necesarã parola.
Conectare ca anonim: selectaþi "Login" pentru a vã conecta
la cest server FTP cu un cont de utilizator anonim pentru a
accesa Net Disk.
Conectarea super utilizatorilor permisã - selectaþi "Yes" pentru a activa
contul unui super utilizator cu drepturi de acces. Numele utilizatorului ºi parola
sunt aceleaºi ca ale administratorului reþelei.
Conectare ca super utilizator: selectaþi "Login" pentru a vã
conecta la acest server FTP cu un cont de super utilizator
pentru a accesa Net Disk.
Port FTP - tastaþi numãrul port-ului utilizat pentru server-ul ftp. Valoarea
standard este 21.
Numãrul maxim de utilizatori care se pot conecta - acest câmp
permite sa încheiaþi conectarea unui utilizator dupã o perioadã determinatã de
timp.
Timpul limitã de conectare în secunde - acest câmp permite sã încheiaþi
conectarea unui utilizator dupã ce utilizatorul s-a conectat dar a fost inactiv
pentru o perioadã determinatã de timp.
Script iniþial - dupã ce aþi introdus discul USB, router-ul wireless va cãuta
script-ul iniþial dupã cum este menþionat pe directorul de bazã a discului USB ºi
îl va executa. Lãsând necompletat va dezactiva acesta funcþie.
Capitolul 3 - Configurare Software
Aplicaþii USB (Continuare)
Page 61

3. Utilities
ASUS Wireless Router 61
Chapter 3 - Software Configuration
USB Application (Cont.)
User Account List
The User Account List enables you to create a user
profile, set the user password, the maximum number
of times the user can log in, and user access rights
.User Name – Type the user name
for the FTP account.
Password – type the password of the
FTP account. Leave the field blank
or type an asterisk (*) for anonymous
access.
Note: The FTP Server only supports “No encrypted password
“protection. Clients connecting with MD4 or MD5 will not be allowed.
Max. Login – This field indicates the maximum logins allowed with this
FTP account. Leave the field blank or type zero (0) to allow unlimited
login.
Rights – This field indicates the rights assigned to this FTP account:
Read/Write/Erase: Users attached to this account can access the USB
storage device, and read, write, and erase files on the drive.
Read/Write: Users attached to this account can access the USB storage
device, and read, and write to the drive; however, users cannot erase
files on the drive.
Read Only: Users attached to this account can access the USB storage
device, and read files on the drive; however, users cannot write to the
drive or erase files.
View Only: Users attached to this account can access the USB storage
device, and view files only.
Private: Users attached to this account can access a private directory in
the USB storage (partition1:/ftp_pvt/User Name), and is allowed all
access privileges (Read/Write/Erase/View). Please see User Account
and Privileges for details.
Router-ul wireless ASUS
Lista de conturi utilizator
Lista de conturi utilizator vã permite sã creaþi un profil
al utilizatorului, sã stabiliþi o parolã a utilizatorului,
numãrul maxim de conectãri ale utilizatorului ºi
drepturile de acces ale utilizatorului.
Numele utilizatorului - tastaþi numele
utilizatorului pentu contul FTP.
Parola - tastaþi parola contului FTP.
Lãsaþi necompletat sau tastaþi "*" pentru
accesul anonim.
Notã: server-ul FTP suportã numai protecþia "parolã ne-codificatã". Nu
este permisã conectarea clienþilor cu MD4 sau MD5.
Conectare maximã - acest câmp indicã numãrul maxim de conectãri
permise prin acest cont FTP. Dacã lãsaþi necompletat sau tastaþi "0" este
permisã conectarea nelimitatã.
Drepturi - acest câmp indicã drepturile acestui cont FTP:
Citiþi/scrieþi/ºtergeþi - utilizatorii ataºaþi acestui cont pot accesa dispozitivul
de stocare USB, ºi pot citi, scrie sau ºterge fiºiere de pe drive.
Citiþi/scrieþi - utilizatorii ataºaþi acestui cont pot accesa dispozitivul de sto
care USB, ºi pot citi sau scrie pe drive; totuºi, utilizatorii nu pot ºterge
fiºiere de pe drive.
Numai citire (read only) - utilizatorii ataºaþi acestui cont pot accesa dis
pozitivul de stocare USB, ºi pot citi fiºierele de pe drive; totuºi utilizatorii
nu pot citi sau ºterge fiºiere de pe drive.
Numai vizualizare - utilizatorii ataºaþi acestui cont pot accesa dispozitivul
de stocare USB, ºi pot numai sã vada fiºierele.
Privat - utilizatorii ataºaþi acestui cont pot accesa un director privat din
dispozitivul de stocare USB (partition1:/ftp_pvt/User Name), ºi au toate
drepturi de acces (citire/scriere/ºtergere/vizualizare). Vezi Contul ºi drep
turile utilizatorului pentru detalii.
Capitolul 3 - Configurare Software
Aplicaþii USB (Continuare)
Page 62

3. Utilities
62 ASUS Wireless Router
Chapter 3 - Software Configuration
USB Application (Cont.)
User Account and Privileges
If you have a USB disk with 3 partitions*, partition 1 is FAT32, partition 2
is FAT, and partition 3 is NTFS, the FTP directories will be constructed as
follows:
\ : Files and directories in partition 1. “Super user” or “anonymous” are allowed to access.
\partition1 : Files and directories in partition 2. “Super user” or “anonymous” are allowed to access.
\partition2 : Files and directories in partition 3. “Super user” or “anonymous” are allowed to read only.
\ftp_pub : User rights set as Read/Write/Erase, Read/Write/Read Only, or View Only, are allowed to share this directory.
\ftp_pvt : User rights set as Private, are only allowed to access the directory with the user name.
The account’s root directory and its access rights on the FTP server are
defined as follows:
Account Condition Root Directory Rights
Anonymous “Allow Anonymous User to Login” is enabled \ Read/Write/Erase
Super User “Allow Super User to Login” is enabled \ Read/Write/Erase
[user] Rights is set as “Read/Write/Erase” \ftp_pub Read/Write/Erase
[user] Rights is set as “Read/Write” \ftp_pub Read/Write
[user] Rights is set as “Read Only” \ftp_pub Read Only
[user] Rights is set as “View Only” \ftp_pub View Only
[user] Rights is set as “Private” \ftp_pvt\[user] Read/Write/Erase
* WL500g/b can manage up to 6 partitions, but if NTFS is used on
partition 1, the system will not be able to create related system
directories, such as ftp_pub or ftp_pvt for the FTP server. In this
case, only “anonymous” or “super user” is allowed to read data in
partition 1, however they will not be able to see any other parti-
tions.
Router-ul wireless ASUS
Contul ºi drepturile utilizatorului
Daca aveþi un disc USB cu 3 partiþii*, partiþia 1 este FAT32, partiþia 2 este FAT si
partiþia 3 este NTFS, directoarele FTP vor fi alcãtuite dupã cum urmeazã:
\ : fiºierele ºi directoarele din partiþia 1. super utilizatorii ºi utilizatorii anonimi au accesul
permis.
\partiþia1: fiºierele ºi directoarele din partiþia 2. super utilizatorii ºi utilizatorii anonimi au accesul
permis
\partiþia2: fiºierele ºi directoarele din partiþia 3. super utilizatorii ºi utilizatorii anonimi au accesul
numai sã citeasca.
\ftp_pub: drepturile utilizatorilor de citire/scriere/ºtergere, citire/scriere/numai citire sau numai
vizualizare, permit împarþirea acestui director.
Directorul de bazã a contului ºi drepturile acestuia de accesare din server-ul FTP
sunt definite dupã cum urmeazã:
Cont Condiþie Director de baza Drepturi
Anomin "conectare utilizator anonim \ citire/scriere/ºtergere
permisã"este activatã
Super utilizator "conectare super utilizator \ citire/scriere/ºtergere
permisã"este activatã
[utilizator] drepturi "citire/scriere/ºtergere" \ftp_pub citire/scriere/ºtergere
[utilizator] drepturi "citire/scriere" \ftp_pub citire/scriere
[utilizator] drepturi "numai citire" \ftp_pub numai citire
[utilizator] drepturi "numai vizualizare" \ftp_pub numai vizualizare
[utilizator] drepturi "privat" \ftp_pvt\[user] citire/scriere/ºtergere
* WL500g/b poate administra pânã la 6 partiþii, dar dacã este utilizat
NTFS pentru partiþia 1, sistemul nu va putea sã creeze directoare de
sistem corespondente, precum ftp_pub sau ftp_pvt pentru serverul FTP.
În acest caz, numai utilizatorii "anonimi" ºi "super utilizatorii" au dreptul
sã citeascã datele din partiþia 1, totuºi ei nu vor putea sã vadã ºi
celelalte partiþii.
Capitolul 3 - Configurare Software
Aplicaþii USB (Continuare)
Page 63

3. Utilities
ASUS Wireless Router 63
Chapter 3 - Software Configuration
USB Application (Cont.)
Click an item on the menu to reveal a submenu.
Follow the instructions to set up the ASUS W ireless
Router. Tips are displayed when you move your
cursor over an item.
Banned IP List
This screen enables you to enter IP addresses that you do not want users
connected to the router to access.
IP Address – This field indicates the
IP address you want to ban. Enter a
specific IP address, such as
192.168.1.5, or IP addresses within
one subnet, such as 192.168.*.*, or
192.168.1.*.
Client Setting
Users can connect to the FTP server using a Web based browser such as IE
or Netscape. To connect to the server, type the FTP URL in the browser
address bar:
ftp://username@[IP address or host name of the router]/
Using other FTP-protocol programs, you can connect to the FTP Server
using either PASV or PORT.
Note: The FTP Server only supports “No encrypted password” pro-
tection. Clients connecting with MD4 or MD5 will not be allowed
access.
Router-ul wireless ASUS
Selectaþi un obiect din meniu pentru a vizualiza un
submeniu. Respectaþi instrucþiunile pentru a seta
router-ul wireless ASUS. Vã sunt oferite câteva indicaþii
în momentul în care plasaþi cursorul pe un obiect.
Lista IP-uri cu accesul interzis
Aceastã paginã vã permite sã introduceþi adresele IP cu care nu doriþi sã se
conecteze utilizatorii la router.
Adresa IP - acest câmp indicã
adrese IP care doriþi sã aibã accesul
interzis. Introduceþi o adresã IP
specificã, precum 192.168.1.5, sau
adresele IP de pe un subnet, precum
192.168.*.* sau 192.168.1.*.
Setãri client
Utilizatorii se pot conecta utilizând un browser de Internet precum IE sau
Netscape. Pentru a vã conecta la server, tastaþi FTP URL în bara adresei
browser-ului: ftp://username@[IP address or host name of the router]/
Utilizând alt program de protocol FTP, vã puteþi conecta la server-ul FTP
utilizând fie PASV fie PORT.
Notã: server-ul FTP suportã numai protecþia "parolã ne-codificatã". Nu
este permisã conectarea clienþilor cu MD4 sau MD5.
Capitolul 3 - Configurare Software
Aplicaþii USB (Continuare)
Page 64

3. Utilities
64 ASUS Wireless Router
Chapter 3 - Software Configuration
USB Application (Cont.)
Click an item on the menu to reveal a submenu.
Follow the instructions to set up the ASUS W ireless
Router. Tips are displayed when you move your
cursor over an item.
Note: Before using the Web Camera, refer to
USB Web Camera support listed on the ASUSTeK Web site at the
following address: http://www.asus.com.
Web Camera
The ASUS Wireless Router
implements several applications for
a USB W eb Camera, enabling you to
capture images and send them over
the Internet.
Enable Web Camera – Selecting
LAN Only enables Web Camera for
LAN users. Selecting LAN and WAN
enables Web Camera for both LAN users and WAN users through firewall.
Web Camera Mode – Select the appropriate camera mode from the drop
down list. ActiveX Only enables users to execute ActiveX clients on an
Windows IE platform to get the best image quality. ActiveX and Refresh
enable users to get a basic image on both IE and other browsers. Refresh
Only will force users both IE and other browser to have still images refreshed
in a specified interval.
Web Camera Driver – When you plug a supported Web Camera into the
wireless router, the appropriate driver is selected automatically. Refer to
the USB Web Camera support list on the following ASUSTeK W eb site for
supported Web Cameras and chipset vendors: http://www.asus.com.
Image Size – Select the image size from the drop down list. 320 x 240
provides a larger image. 160 x 120 provides faster transmission. Click
Preview to see how your web camera appears.
Sense Level – This field indicates the sensitivity at which image movement
is detected.
Router-ul wireless ASUS
Selectaþi un obiect din meniu pentru a vizualiza un
submeniu. Respectaþi instrucþiunile pentru a seta
router-ul wireless ASUS. Vã sunt oferite câteva indicaþii
în momentul în care plasaþi cursorul pe un obiect.
Notã Înainte de a utiliza camera video, accesaþi pagina de suport a
camerei video USB de pe site-ul ASUSTeK la urmatoarea adresã:
http://www.asus.com.
Camera video
Router-ul wireless ASUS
implementeazã câteva aplicaþii pentru
camera video USB, care vã permit sã
captaþi ºi sã trimiteþi imagini prin
Internet.
Camera video activatã - selectaþi numai LAN pentru a activa camera video
pentru utilizatorii LAN. Selectaþi LAN si WAN pentru a activa camera video prin
firewall atât pentru utilizatorii LAN cât ºi pentru cei WAN.
Modul camera video - selectaþi modul camera video corespunzator din listã.
ActiveX Only permite utilizatorilor sã realizeze clienþii ActiveX pe o platformã
Windows IE pentru a beneficia de cea mai bunã calitate a imaginii. ActiveX ºi
Refresh permit utilizatorilor sã beneficieze de o imagine de baza atât pentru IE
cât ºi pentru alte browsere. Refresh Only va forþa pe utilizatorii de IE sau de alte
browsere sã reîmprospãteze imaginile staþionare într-un anumit interval.
Driver-ul camerei video - când conectaþi o camera video la router-ul
wireless, driver-ul corespunzator este selectat automat. Accesaþi pagina de
suport a camerei video USB de pe site-ul ASUSTeK pentru suportul camerei
video ºi distribuitorilor de chipset la urmãtoarea adresã: http://www.asus.com.
Dimensiunea imaginii - selectaþi mãrimea imaginii din listã. 320x x240
reprezintã o imagine mai mare. 160 x 120 furnizeazã o transmisie mai rapidã.
Selectaþi Preview pentru a vedea modul în care va apãrea camera video.
Nivelul de sensibilitate - acest câmp indicã nivelul de sensibilitate de la
care este detectatã miºcarea din imagine.
Capitolul 3 - Configurare Software
Aplicaþii USB (Continuare)
Page 65

3. Utilities
ASUS Wireless Router 65
Chapter 3 - Software Configuration
USB Application (Cont.)
Refresh T ime in Seconds – This field indicates the time interval in seconds
in which the system reloads images. The range of values is 1~65535.
Caption String – This field indicates the text string that is displayed on
your Webcam page.
HTTP Port – This field indicates the port that http server listens on to
communicate. For example, by default, you can connect to your web camera
by using
http://192.168.1.1:7776 without password checking. (The password
checking field is unchecked.)
ActiveX Port – This field indicates the port that server listens on to
communicate with Active X clients.
Router-ul wireless ASUS
Timpul de reîmprospatare în secunde - acest câmp indicã intervalul de
timp în secunde în care sistemul reîncarcã imaginile. Gama de valori este
1~65535.
ªir de captare - acest câmp indicã ºirul de text care este afiºat pe pagina
camerei video.
Port HTTP - acest câmp indicã port-ul la care server-ul http se conecteaza
pentru a comunica. De exemplu, în versiunea standard, va puteþi conecta la
camera video utilizând http://192.168.1.1:7776 fãrã a utiliza o parolã (câmpul
pentru verificarea parolei nu este selectat)
Port-ul ActiveX - acest câmp indicã port-ul la care server-ul se conecteazã
pentru a comunica cu clienþii ActiveX.
Capitolul 3 - Configurare Software
Aplicaþii USB (Continuare)
Page 66

3. Utilities
66 ASUS Wireless Router
Chapter 3 - Software Configuration
USB Application (Cont.)
Web Camera - Client Setting
For clients that use Netscape or other browser that don’t support ActiveX,
you don’t need additional setting to view an image in browser. For client
that use IE 5.0 or above, you need to set IE to get a better support on
ActiveX as following:
1. Open Internet Explorer 5.0 or above.
2. Select Internet Options | Security | Local Intranet | ActiveX Controls.
3. Check that your settings are as follows:
Go to Internet Options from the “Tools”
menu.
Click Local Intranet settings and click
Custom Level.
Router-ul wireless ASUS
Camera video - setãri client
Pentru clienþii care utilizeazã Netscape sau alt browser care nu suportã ActiveX,
nu sunt necesare setãri adiþionale pentru a vedea o imagine în browser. Clienþii
care utilizeazã IE 5.0 sau o versiune peste 5.0, trebuie sã seteze IE pentru a
beneficia de un suport mai bun pentru ActiveX, dupã cum urmeazã:
1. deschideþi Internet Explorer 5.0 sau o versiune mai avansatã
2. selectaþi Internet Options | Security | Local Intranet | ActiveX Controls
3. verificaþi ca setãrile sã fie urmãtoarele:
Gasiþi Internet Options în meniul
"Tools".
Selectaþi setãrile Local Intranet ºi apoi
selectaþi Custom Level.
Capitolul 3 - Configurare Software
Aplicaþii USB (Continuare)
Page 67

3. Utilities
ASUS Wireless Router 67
Chapter 3 - Software Configuration
Enabled the three ActiveX controls and
plug-ins.
By default, these items are
disabled and will prevent
the ASUS Wireless
Router’s web camera
function from working.
By default, these three items should
already be enabled. Enable them if they
have been changed.
Click Yes to change the security settings.
USB Application (Cont.)
Router-ul wireless ASUS
Activaþi cele trei controale ºi conectãri
ActiveX.
Prin setarile standard,
aceste obiecte sunt
dezactivate ºi vor
împiedica camera video a
router-ului wireless ASUS
sã funcþioneze.
Prin setãrile standard, aceste obiecte
sunt deja activate. Activaþi-le dacã au
fost fãcute modificãri.
Selectaþi "Yes" pentru a modifica
setãrile de siguranþã.
Capitolul 3 - Configurare Software
Aplicaþii USB (Continuare)
Page 68

3. Utilities
68 ASUS Wireless Router
Chapter 3 - Software Configuration
USB Application (Cont.)
Web Camera vs. DDNS
Cooperating with DDNS, your can monitor your home environment through
Internet, even through dynamic WAN IP address is applied.
Security Mode Setting
This function allows you to monitor your environment through W eb Camera.
If there is any motion detected, WL500g will try to alert you by means of
email.
Enable Security Mode? – Selecting “Yes” enables the Security Function
on the date and time you set below.
Date to Enable Security Mode – This field defines the dates that Security
Mode will be enabled.
Time to Enable Security Mode – This field defines the time interval that
Security Mode will be enabled.
Send to – This field indicates the email address you like to send to.
Email Server – This field indicates the email server where you like to
deliver your email to. If you leave this field blank, the W ireless Router will
find a Mail Exchanger from your email address in Send to field.
Subject –This field allows you to edit subject of email.
Attach Image File? –This field allows you to attach detected image file
into email.
Router-ul wireless ASUS
Camera video vs DDNS
Cooperând cu DDNS, puteþi monitoriza mediul de acasã prin Internet, chiar dacã
este aplicatã o adresã IP WAN dinamicã.
Setãrile modului siguranþa
Aceastã funcþie vã permite sã monitorizaþi mediul dumneavoastrã prin camera
video. Dacã este detectatã o miºcare, WL500g va încerca sã vã alerteze prin
ajutorul unui e-mail.
Mod siguranþa activat? - selectaþi "Yes" pentru a activa funcþia de securitate în
data ºi intervalul setat mai jos.
Data activãrii modului siguranþa - acest câmp defineºte zilele în care modul de
siguranþa va fi activat.
Perioada de activare a modului siguranþa - acest câmp defineºte intervalele de
timp în care modul de siguranþã va fi activat.
Trimis - acest câmp indicã adresa de mail la care doriþi sã trimiteþi.
Server e-mail - acest câmp indicã server-ul de e-mail la care doriþi sã fie livrat e-
mail-ul. Dacã nu completaþi, router-ul wireless va gãsi un "Mail exchanger" din
adresa dumneavoastrã de mail din câmpul Send to.
Subiect - acest câmp vã permite sã editaþi subiectul e-mail-ului.
Ataºare de fiºier imagine? - acest câmp vã permite sã ataºaþi fiºiere imagine în
e-mail.
Capitolul 3 - Configurare Software
Aplicaþii USB (Continuare)
Page 69

3. Utilities
ASUS Wireless Router 69
Chapter 3 - Software Configuration
Preview
Click Preview behind Remote Control Mode to see the view of all the
web camera sites you set in Remote Site.
Note: WL500g/b supports USB hub functionality. But, you are not
recommended to run more than one USB applications on WL500g/
b at the same time. It may run out of memory sometimes.
USB Application (Cont.)
Remote Monitor Setting
This function allows you to monitor up to 6 Web
Cameras in your LAN. You can enter the IP addresses
of WL500g, WL500b or WL600, which connect with
Web Camera.
Remote Control Mode – Selecting LAN Only you
can only monitor within LAN environment. To allow WAN users viewing
Web Camera in your LAN, please set up Virtual Server rules in the router
acting as the gateway for each router in your LAN plugging with W eb Camera.
Note: When enabling “LAN and W AN” remote control in the Wireless
Router , packets from the Internet with destination ports 8081 to 8086
will be forwarded to the WL500g/b set in Remote Control fields. To
make sure packets from the WL500g/b can be routed back to the
Internet, you should set a static route entry in the WL500g/b with the
same gateway IP address as the IP address of the Wireless Router.
Remote Site 1-6 – This field stands for the IP address and port number of
Remote Site. It should be filled with “[IP Address]:[Connection Port]”.
Router-ul wireless ASUS
Setarea monitorizãrii de la distanþã
Aceastã funcþie vã permite sã monitorizaþi pânã la 6
camere video din LAN. Puteþi introduce adresele IP ale
WL500g, WL500b sau WL600, care se conecteazã cu
camera video
Modul de control de la distantã - selectaþi numai LAN penru a putea monitoriza
mediul din LAN. Pentru a permite utilizatorilor WAN sã vadã camerele video din
LAN, setaþi regulile server-ului virtual din router care va acþiona drept cale de
acces pentru fiecare router din LAN care se conecteazã cu camera video.
Notã: când activaþi controlul de la distanþa "LAN sau WAN" în router-ul
wireless, pachete din Internet care au destinaþie port-urile 8081 pânã la 8086
vor fi retransmise la câmpul controlului de la distanþã setat de WL500g/b.
Pentru a vã asigura cã pachetele vor fi trimise înapoi din WL500g/b în
Internet, ar trebui sã setaþi o intrare a rutei statice în WL500g/b cu aceeaºi
adresã IP a cãii de acces ca adresa IP a router-ului wireless.
Site de la distanþã 1-6 - acest câmp reprezintã adresa IP ºi numarul port-ului pentru
site-ul de la distanþã. Ar trebui completat cu "[adresa IP]:[port de conectare]".
Preview
Selectaþi Preview din Remote Control Mode (modul de control de la distanþã) pentru
a vedea toate site-urile cu camere video setate.
Notã: WL500g/b suportã funcþionalitatea hub USB. Dar, nu este
recomandat sã rulaþi mai mult de o aplicaþie USB pe WL500g/b în acelaºi
timp. Se poate ca uneori sã nu fie suficientã memorie.
Capitolul 3 - Configurare Software
Aplicaþii USB (Continuare)
Page 70

3. Utilities
70 ASUS Wireless Router
Chapter 3 - Software Configuration
System Setup
Click this item on the menu to reveal a sub menu. Follow
the instructions to setup the Wireless Router. Tips are
given when you move your cursor over each item.
Operation Mode
The ASUS Wireless Router supports three operation modes to meet different
requirements. Please select the mode that matches your networking requirements.
Home Gateway
In Home Gateway mode, the WAN
port is assumed to attach to the
Internet via a Cable or DSL modem.
This allows several wireless clients
and PC attached to LAN ports to share
the Internet connection to ISP.
Technically, gateway mode is, NAT
is enabled, WAN connection is
allowed by using PPPoE, or DHCP
client, or static IP. In addition, some
features, which are useful for home
user, such as UPnP and DDNS, are
supported.
Router (WL500g/WL500g Deluxe)
In Router mode, we suppose you use the Ethernet port to connect to LAN in your
company . So, you can set up routing protocol to meet your requirement in office.
T echnically , router mode is, NAT is disabled, static and dynamic routing protocol
are allowed to set, and WAN connection is allowed only by using static IP.
Access Point
In Access Point mode, the ASUS Wireless Router acts as a bridge between
the PC attached to all Ethernet ports (LAN) and the clients on the wireless
LAN (WLAN). Both the LAN and WLAN will be on the same IP subnet,
sharing the same address range. The internal NAT is disabled in this mode
Technically, access point mode is, NAT is disabled, one wan port and four
LAN ports are bridged together.
By default, the ASUS Wireless Router operates in Access Point mode.
Router-ul wireless ASUS
Setare de sistem
Selectaþi un obiect din meniu pentru a vizualiza un
submeniu. Urmaþi instrucþiunile pentru a seta router-ul
wireless ASUS. Vã sunt oferite câteva indicaþii în
momentul în care plasaþi cursorul pe un obiect din
meniu.
Mod de operare
Pentru a îndeplini diferite cerinþe Router-ul wireless ASUS suportã 3 moduri de
operare. Vã rugãm selectaþi modul care se potriveºte cerinþelor dvs. de reþea.
Home Gateway (un mod de a
conecta 2 reþele de computer)
În modul Home Gateway se
presupune cã portul WAN este ataºat
la Internet via Cablu sau modem DSL.
Aceasta permite unor clienþi wireless
ºi PC-uri ataºate la LAN sã împartã
conectarea Internet prin ISP.
Practic, modul Gateway existã, NAT
este activat, conectarea WAN este
activatã folosind PPPoE, sau client
DHCP, sau IP static. În plus, unele
caracteristici ca: UPnP ºi DDNS sunt
compatibile ºi de asemenea sunt
folositoare pentru utilizatorul casnic.
Router (WL500g/WL500g Ediþie de Lux)
În modul Router presupunem cã folosiþi Portul Ethernet pentru a vã conecta la
LAN în compania dvs. Deci, puteþi seta un protocol routing pentru a vã îndeplini
cerinþele.
Practic, modul router existã, NAT nu este activat, protocolul routing static ºi
dinamic permit stabilirea lor, iar conectarea la WAN e activata numai folosind IP
static.
Access Point (Punct de acces)
În modul Access Point, Router-ul wireless ASUS acþioneazã ca o punte între PCul ataºat la toate porturile Ethernet (LAN) ºi clienþii din wireless LAN (WLAN).
Amândouã LAN ºi WLAN vor fi pe aceeaºi subreþea IP împãrþind aceeaºi adresã.
NAT internã nu este activatã în acest mod.
Practic, modul Access Point existã, NAT nefiind activat, un port mai slab ºi 4
porturi LAN legate între ele.
Prin predefinire, Router-ul wireless ASUS opereazã în modul Access Point.
Capitolul 3 - Configurare Software
Page 71

3. Utilities
ASUS Wireless Router 71
Chapter 3 - Software Configuration
System Setup (Cont.)
Router Mode (WL500g/WL500g Deluxe)
After selecting “Router” mode and clicking “Apply”, you will enter the
“Quick Setup” page of the Router mode. Follow the instructions to setup
the ASUS Wireless Router.
Note: The Wireless, IP Config, Internet Firewall, Wireless Firewall
and Web Camera settings in Router Mode are the same as the set-
tings in Home Gateway Mode. To learn more about these settings,
please refer to the Home Gateway Mode in this user’s manual.
Quick Setup in Router Mode
After selecting “Router” mode and
clicking “Apply”, you will enter the
“Quick Setup” page of the Router
mode. Follow the instructions to
setup the ASUS W ireless Router as a
Router.
If you would like to perform other
settings, click the item on the menu
to reveal a sub menu. Follow the
instructions to setup the ASUS
Wireless Router . T ips are given when
you move your cursor over each item.
Router-ul wireless ASUS
Modul Router (WL500g/WL500g Ediþie de Lux)
Dupã ce aþi selectat modul "Router" ºi aþi dat click pe "Apply", veþi intra pe
pagina "Setari Rapide/Quick setup" a modului Router. Urmaþi instrucþiunile
pentru a seta Router-ul wireless ASUS.
Notã: Setãrile din Modul Router: Wireless, Configurare IP, Internet protecþie
Firewall, Protecþie Firewall wireless ºi Camera Web sunt aceleaºi ca la setãrile
din Modul Home gateway. Pentru a afla mai multe despre aceste setãri vã
rugãm consultaþi Modul Home Gateway din acest manual de utilizare.
Setare rapidã în Modul Router
Dupã ce aþi selectat modul Router ºi aþi
dat click pe Apply, veþi intra pe pagina
Setari Rapide a modului Router. Urmaþi
instrucþiunile pentru setarea Router-ului
wireless ASUS ca Router.
Dacã doriþi sã operaþi ºi alte setãri, daþi
click pe numele unui meniu pentru a
vedea submeniul. Urmaþi instrucþiunile
pentru setarea Router-ului wireless
ASUS. Vã sunt oferite câteva indicaþii în
momentul în care plasaþi cursorul pe
fiecare obiect din meniu
Capitolul 3 - Configurare Software
Setare de sistem (Continuare)
Page 72

3. Utilities
72 ASUS Wireless Router
Chapter 3 - Software Configuration
First step for setting your wireless
interface is to give it a name, called
SSID. In addition, if you would like
to protect transmitted data, please
select WEP protection and assign
WEP keys for data transmission.
Your wireless setting will be applied
into all interfaces.
(See next few pages for item
descriptions.)
If you would like to perform other settings, click an item on the
menu to reveal a sub menu. Follow the instructions to setup the
ASUS Wireless Router. Tips are given when you move your cursor
over each item.
System Setup (Cont.)
AP Mode
After selecting “Access Point” mode and clicking “Apply”, you will enter
the “Quick Setup” page of the Access Point mode. Follow the instructions
to setup the ASUS Wireless Router.
Note: The Wireless settings are the same as the settings in Home
Gateway Mode. To learn more about these settings, please refer to
the Home Gateway Mode in this user’s manual.
Quick Setup in Access Point Mode
Click Next to enter the Quick Setup page. Follow the instructions to setup
the ASUS Wireless Router.
Configure Wireless Interface
Router-ul wireless ASUS
Modul AP
Dupa ce aþi selectat modul Access Point ºi aþi dat click pe Apply, veþi intra pe
pagina de "Setãri Rapide" a modului Access Point. Urmaþi instrucþiunile pentru
setarea Router-ului wireless ASUS.
Notã: Setãrile pentru Wireless sunt aceleaºi cu setãrile din Modul Home
Gateway. Pentru afla mai multe despre aceste setari, vã rugãm consultaþi
Modul Home Gateway din acest manual de utilizare.
Setãri Rapide în Modul Access Point
Daþi click pe Next pentru a intra în pagina Quick Setup/Setare Rapidã. Urmaþi
instrucþiunile pentru setarea Router-ului wireless ASUS.
Configurare Interfaþa Wireless
Primul pas pentru setarea interfeþei
wireless este sã îi daþi un nume, SSID.
În plus, dacã doriþi sã protejaþi
informaþiile transmise, vã rugam sã
selectaþi protecþie WEP ºi fixaþi tastele
WEP pentru transmiterea de informaþii.
Setãrile dvs. wireless vor fi aplicate în
toate interfeþele.
(Consultaþi urmãtoarele pagini cu
descrierea obiectelor din meniu).
Dacã doriþi sã realizaþi ºi alte setãri, selectaþi un element din meniu pentru a
vizualiza un submeniu. Respectaþi instrucþiunile pentru a seta router-ul
wireless ASUS. Vã sunt oferite câteva indicaþii în momentul în care plasaþi
cursorul pe un obiect din meniu.
Capitolul 3 - Configurare Software
Setare de sistem (Continuare)
Page 73

3. Utilities
ASUS Wireless Router 73
Chapter 3 - Software Configuration
IP Config (Access Point Mode)
Click this item on the menu to reveal a sub menu.
Follow the instructions to setup the ASUS Wireless
Router. Tips are given when you move your cursor
over each item.
LAN
Get IP Automatically
Select Yes (default) or No to get IP address automatically from a DHCP
server.
Yes
This parameter determines if the ASUS Wireless Router will send out a
DHCP request during bootup. If you have a DHCP server on the network,
set this option so that the ASUS Wireless Router can receive an automatic
IP address assignment.
If you have a DHCP (Dynamic Host Configuration Protocol) server on the
network, then the DHCP server will automatically assign the ASUS Wireless
Router an IP address when the ASUS W ireless Router is powered up. To determine
what IP address has been assigned to the ASUS Wireless Router, review the IP
address on the “Status” page available on the “Main Menu”.
No
The ASUS Wireless Router also accepts a static IP address. You may
manually configure the IP address and subnet mask on the “IP Config”
page. Enter an IP address and a subnet mask in the field provided to assign
the ASUS Wireless Router a static IP address. If you don’t know your
Gateway setting, leave it empty (not 0.0.0.0).
Selection items:
• Yes (no info required)
• No (need to input information)
Click Apply or Finish if you make
any changes.
Router-ul wireless ASUS
Configurare IP (Modul Access Point)
Selectaþi un element din meniu pentru a vizualiza un
submeniu. Respectaþi instrucþiunile pentru a seta routerul wireless ASUS. Vã sunt oferite câteva indicaþii în
momentul în care plasaþi cursorul pe un obiect din meniu
Obiecte de selectare
o Da/Yes (nu e nevoie de nici o
informaþie)
o Nu/No (e nevoie de informaþii)
Daþi click pe Apply (Aplicã) sau Finish
(Terminat) daca operaþi vreo schimbare.
Obþinerea de IP automat
Selectaþi Yes (predefinit) sau No pentru a obþine adresa IP automat de la serverul DHCP.
YES (Da)
Acest parametru determinã dacã Router-ul wireless ASUS va trimite o cerinþa
DHCP în timp ce computerul se aprinde. Dacã aveþi un server DHCP pe reþea
atunci setaþi acestã opþiune pentru ca Router-ul wireless ASUS sã primeascã
automat o adresã IP.
Dacã aveþi un server DHCP (Protocol pentru configurare rapidã a staþiei) pe
reþea, atunci server-ul DHCP va stabili automat o adresã IP pentru Router-ul
wireless ASUS când Router-ul wireless ASUS este pus în funcþiune. Pentru a
determina ce adresã IP a fost stabilitã Router-ului wireless ASUS, revedeþi
adresa IP de pe pagina Status aflata în Meniul Principal (Main Menu ).
No (Nu)
Router-ul wireless ASUS acceptã de asemenea, o adresã IP staticã. Puteþi
configura manual adresa IP ºi masca de subreþea din pagina "Configurare IP".
Introduceþi o adresã IP ºi o mascã de subreþea în câmpul destinat sã asigneze o
adresã IP Router-ului wireless ASUS . Dacã nu cunoaºteþi setãrile de Gateway,
lãsaþi spaþiul gol (nu 0.0.0.0).
Capitolul 3 - Configurare Software
Page 74

3. Utilities
74 ASUS Wireless Router
Chapter 3 - Software Configuration
System Setup (Cont.)
Click this item on the menu to reveal a sub menu.
Follow the instructions to setup the ASUS Wireless
Router. Tips are given when you move your cursor
over each item.
Change Password
This page will allow you to change the default password “admin” (lower
case) to any password of you choice. You can enter any usable characters
between 1-16 characters long (cannot be left blank). Click Save button to
save your new password. If you forget the ASUS Wireless Router’s
password, you can reset the ASUS Wireless Router to its factory settings
(see troubleshooting).
Note: The password is case sensitive.
Router-ul wireless ASUS
Selectaþi un obiect din meniu pentru a vizualiza un
submeniu. Respectaþi instrucþiunile pentru a seta
router-ul wireless ASUS. Vã sunt oferite câteva indicaþii
în momentul în care plasaþi cursorul pe un obiect din
meniu.
Schimbarea Parolei
Aceastã paginã vã permite schimbarea parolei predefinite "admin" (scris cu
litera micã) cu orice altã parolã la alegere. Puteþi scrie cu orice fel de caractere;
între 1-16 maximum de caractere (nu pot fi lãsate necompletate). Daþi click pe
Save (Salveazã) pentru a salva noua dvs. parola. Dacã uitaþi parola pentru
Router-ul wireless ASUS, puteþi reseta Router-ul wireless ASUS folosind
setãrile din fabricã (vezi Probleme ºi Soluþii).
Notã: þineþi cont dacã parola este scrisã cu litere mici sau majuscule
Capitolul 3 - Configurare Software
Setare de sistem (Continuare)
Page 75

3. Utilities
ASUS Wireless Router 75
Chapter 3 - Software Configuration
System Setup (Cont.)
Click this item on the menu to reveal a sub menu.
Follow the instructions to setup the ASUS Wireless
Router. Tips are given when you move your cursor
over each item.
Firmware Upgrade
This page reports the Flash Code (Firmware) version installed in the ASUS
Wireless Router. Periodically , a new Flash Code is available for the ASUS
Wireless Routers on ASUS’s Web site. You can update the ASUS Wireless
Router’s Flash Code using the Firmware Upgrade page under the Advanced
Setup menu of the Web Manager. If you are experiencing a problem with
your ASUS WLAN equipment, a Technical Support representative may
ask you to give your device’s Flash Code (Firmware) version.
Note: The firmware upgrade takes approximately 60 to 90 seconds.
When the firmware upgrade is completed, you will be directed to
the home page.
WL500g Deluxe
WL500g
Router-ul wireless ASUS
Selectaþi un obiect din meniu pentru a vizualiza un
submeniu. Respectaþi instrucþiunile pentru a seta
router-ul wireless ASUS. Vã sunt oferite câteva indicaþii
în momentul în care plasaþi cursorul pe un obiect din
meniu.
Upgradare Firmware (informaþii la zi privind instrucþiunile tehnice ale
computerului stocate de obicei pe cip)
Aceastã pagina vizualizeazã versiunea Codului Flash (Firmware) instalatã în
Router-ul wireless ASUS. Pe pagina de Internet ASUS va fi afiºat în mod
periodic un Cod Flash pentru Router-ul wireless ASUS. Puteþi fi la curent cu
noile informaþii despre Codul Flash al Router-ului wireless ASUS folosind pagina
Firmware Upgrade aflata sub meniul Advaced Setup din Web Manager.
Dacã întâmpinaþi dificultãþi cu echipamentul dvs. ASUS WLAN, un
reprezentant al serviciului Suport Tehnic v-ar putea cere versiunea dispozitivului
dvs. de Cod Flash (Firmware).
Notã: Firmware Upgrade dureazã aproximativ 60 pânã 90 de secunde. Când
upgradarea acestuia este completã, veþi fi direcþionaþi la home page (interfaþa).
Capitolul 3 - Configurare Software
Setare de sistem (Continuare)
Page 76

3. Utilities
76 ASUS Wireless Router
Chapter 3 - Software Configuration
System Setup - Setting Management
Click this item on the menu to reveal a sub menu.
Follow the instructions to setup the ASUS Wireless
Router. Tips are given when you move your cursor
over each item.
Setting Management
This function allows you to save current settings to a file, or load settings
from a file.
Save As a File
Move your cursor over the HERE link on the web page. Then click the
right button of mouse and select Save As... to save current setting into a
file.
Note: When current settings are saved to file, it will be saved to flash
as well.
Load From a File
Specify the path of and name of the downloaded file in the New Setting
File below. Then, click Upload to write the file to. It takes a few time to
finish the process and then the system will reboot.
New Setting File
Click Browse to locate the file.
Router-ul wireless ASUS
Setare de sistem - Management Setãri
Daþi click pe un meniu pentru a vedea un submeniu .
Urmaþi instrucþiunile pentru setarea Router-ului
wireless ASUS. Vã vor fi date informaþii ajutãtoare
atunci când mutaþi cursorul peste numele fiecãrui
obiect din meniu.
Management Setãri
Aceastã funcþie vã permite salvarea setãrilor actuale într-un fiºier sau încãrcarea
setãrilor dintr-un fiºier.
Salvarea ca fiºier
Mutaþi cursorul pe link-ul HERE (AICI) de pe pagina de Internet. Apoi daþi click
pe butonul din dreapta al mouse-ului ºi selectaþi Save As (Salvaþi Ca...) pentru
a salva setãrile actuale într-un fiºier
Notã: când setãrile actuale sunt salvate într-un fiºier ele vor fi salvate ºi
în flash.
Încãrcare dintr-un fiºier
Aceastã opþiune afiºeazã calea ºi numele fiºierului descãrcat în New Settings
File (Fiºierul pentru Setãri Noi). Apoi daþi click pe Upload (Încãrcare) pentru
a scrie fiºierul. Aceastã operaþiune dureazã puþin timp pentru a încheia
procesul de încãrcare a fisierului iar sistemul va porni din nou.
New Settings File
Daþi click pe Browse (Cãutare) pentru a localiza fiºierul.
Capitolul 3 - Configurare Software
Page 77

3. Utilities
ASUS Wireless Router 77
Chapter 3 - Software Configuration
System Setup
Click this item on the menu to reveal a sub menu.
Follow the instructions to setup the ASUS Wireless
Router. Tips are given when you move your cursor
over each item.
Factory Default
Restoring Factory Default Settings
Web Manager
You can reset all settings to their factory defaults through the web manager
using the “Factory Default” page in “Advanced Setup”. Click the Restore
button and wait about 30 seconds before trying to access the ASUS Wireless
Router.
Hardware
You can reset all settings to their factory defaults manually by pushing the
“Restore” button in a hole on the back of the ASUS Wireless Router while
it is ON. Use a pen or straightened paper clip to hold the “Restore” button
depressed over 5 seconds until the power LED on the front of the ASUS
Wireless Router starts blinking.
Note: Y ou will be notified when factory default settings are restored
while using the web manager.
Router-ul wireless ASUS
Daþi click pe un meniu pentru a vedea un submeniu .
Urmaþi instrucþiunile pentru setarea Router-ului
wireless ASUS. Vã vor fi date informaþii ajutãtoare
atunci când mutaþi cursorul peste numele fiecãrui
obiect din meniu
Revenirea la Setãrile Predefinite din Fabrica
Managerul de reþea
Puteti reveni la setãrile predefinite din fabrica cu ajutorul managerului de retea
folosind pagina Factory Default ("Setãri Predefinite din Fabrica") din Advanced
Setup ("Setãri Avansate"). Daþti click pe butonul Restore ºi aºteptaþi
aproximativ 30 de secunde înainte de a accesa Router-ul wireless ASUS.
Componenta Hardware
Puteþi reveni manual la setãrile predefinite din fabricã apãsând butonul Restore
aflat în spatele Router-ului wireless ASUS în timp ce este ÎN FUNCÞIUNE
(funcþia ON). Folosiþi un pix sau o agrafa de birou pentru a þine apãsat butonul
Restore mai mult de 5 secunde pânã când ledul de alimentare din partea din
faþã a Router-ului wireless ASUS începe sã clipeascã.
Notã: Veþi fi informat atunci când se revine la setãrile la setãrile predefinite
din fabricã în timp ce folosiþi managerul de reþea.
Capitolul 3 - Configurare Software
Setare de sistem
Page 78

3. Utilities
78 ASUS Wireless Router
Chapter 3 - Software Configuration
Status & Log
The Status & Log pages give you all the necessary information for monitoring
the Wireless Router’s condition.
Status
System information for WAN, LAN,
and Printer are displayed on this
page. The buttons for WAN interface
allow you to release or renew the IP
address if your WAN Connection
Type is set as Automatic IP. The
button for Printer Server is used to
remove printing jobs manually.
Wireless
Wireless clients, who connect to the
Wireless Router , are displayed on this
page. You can use buttons for radio
control to manually disable or enable
the wireless function.
DHCP Leases
Clients who request IP from DHCP
server of your local area network or
DHCP server in you’re your wireless
network behind W ireless Firewall are
displayed in this page.
WL500g Deluxe
WL500g
Router-ul wireless ASUS
Stare ºi Înregistrãri
Paginile Stare ºi Înregistrãri (Status & Log) vã oferã toate informaþiile necesare
pentru monitorizarea funcþionãrii Router-ului wireless.
Stare
Informarea despre sistemul de operare
pentru WAN, LAN ºi imprimantã este
afiºatã pe aceastã paginã. Butoanele
pentru interfaþa WAN permit eliberarea
sau reînnoirea adresei IP dacã Tipul de
Conectare WAN este setat la IP
Automat. Butonul pentru Server-ul
Imprimantã este folosit pentru
înlãturarea manualã a operaþiunilor de
imprimare.
Wireless
Clienþii wireless, care se conecteazã la
Router-ul wireless sunt afiºaþi pe
aceastã paginã. Puteþi folosi butoane
pentru control radio pentru a dezactiva
sau activa manual funcþia wireless.
Contracte DHCP
Clienþii care cer IP din server-ul DHCP
din aria de reþteaua dvs. localã sau
server-ul DHCP din reþeaua dvs.
wireless din spatele protecþiei Firewall
Wireless, sunt afiºaþi pe aceastã
paginã.
Capitolul 3 - Configurare Software
Page 79

3. Utilities
ASUS Wireless Router 79
Chapter 3 - Software Configuration
Port Forwarding
Information of port forwarding rules,
which are added by Port Mapping,
V irtual Server, V irtual DMZ or UPnP,
are displayed in this page.
Routing Table
Static routing rules or dynamic
routing rules updated by RIP are
displayed in this page.
System Log
The last 1024 system log entries are
recorded in this page.
Status & Log (Cont.)
Router-ul wireless ASUS
Port forwarding (redirecþionare port)
Informaþii despre regulile "port
forwarding" care sunt adãugate de Port
Mapping, Virtual Server, Virtual DMZ
sau UPnP, sunt afiºate pe aceastã
paginã.
Tabel de route
Reguli pentru route statice sau dinamice
aduse la zi de cãtre RIP sunt afiºate pe
aceastã paginã.
Înregistrãrile Sistemului
Ultimele 1024 de înregistrãri ale
sistemului sunt pãstrate pe aceastã
paginã.
Capitolul 3 - Configurare Software
Stare ºi Înregistrãri (Continuare)
Page 80

3. Utilities
80 ASUS Wireless Router
Chapter 3 - Software Configuration
Firmware Restoration
This utility will automatically search out failed ASUS Wireless Routers
and upload a firmware that you specify. The process takes about 3 to 4
minutes and during this process the PWR, AIR, and WAN LEDs will remain
lit while the LAN LED will flash slowly.
The Firmware Restoration utility is an emergency rescue tool to restore a
ASUS W ireless Router which has failed during a previous firmware upload.
A failed firmware upgrade will cause the ASUS Wireless Router to enter a
failure mode, waiting for the user to use the Firmware Restoration utility to
find and upload a new firmware. This is not a firmware upgrade utility and
cannot be used on a working ASUS Wireless Router. Normal firmware
upgrades must be done through the web manager.
Using a Hub
If you have problems upload a firmware while using a network hub, try
connecting your computer directly to the LAN port. Either 10Base-T or
100Base-TX connections will work.
Router-ul wireless ASUS
Revenirea la Firmware (instrucþiunile tehnice ale calculatorului
stocate pe cip)
Aceastã opþiune va cãuta automat Router-i wireless ASUS eºuaþi ºi va încarcã un
firmware pe care îl specificaþi dvs.. Acest proces dureazã între 3 ºi 4 minute iar în
timpul acestui proces LED-urile PWR, AIR, ºi WAN vor rãmâne aprinse în timp ce
LED-ul LAN va clipi uºor.
Utilitarul de Restaurare a Firmware-ului (Firmware Restauration) este o unealtã de
salvare urgenþã pentru revenire la Router-ul wireless ASUS care a eºuat în timpul
încãrcãrii anterioare de firmware. O upgradare firmware eºuatã va cauza routerului wireless ASUS intrarea în modul eºuare, asteptând ca utilizatorul sâ
foloseascâ opþiunea de Restaurare a Firmware-ului pentru a gãsi ºi încarca un nou
firmware. Aceasta nu este o opþiune de upgradare firmware ºi nu poate fi folositã
pe un router wireless ASUS în funcþiune. Upgradãrile normale de firmware trebuie
efectuate prin intermediul managerului web.
Folosirea unui Hub
Daca aveþi probleme cu încãrcarea unui firmware în timp ce folosiþi un hub de
reþea încercaþi sã conectaþi computerul direct la un port LAN. Vor funcþiona fie
conexiunea 10Base-T , fie 100Base-TX .
Capitolul 3 - Configurare Software
Page 81

3. Utilities
ASUS Wireless Router 81
Chapter 3 - Software Configuration
Setup Printer Wizard
Follow the procedures below to set up your computers to utilize the printer
server function of the ASUS Wireless Router.
Installing the Printer Driver
Adding a printer to your computer simplifies the ASUS Wireless Router
Printer Setup Wizard.
You are recommended to install a printer driver by the setup program that
comes with your printer (see following Note), and then continue to the “Printer
Setup Wizard” in the next section. If you run the “Printer Setup Wizard”
without a printer driver installed, you are directed to the “Add Printer W izard”.
Note: Some printer setup utilities require a printer to be physically con-
nected to your PC during installation. Follow the driver installation in-
structions to connect your printer to the PC to install the driver and
reconnect the Wireless Router after the printer driver has been installed.
(1) Run the “Add Printer Wizard” from
Start | Printers and Faxes | Add
Printer .
(2) Choose “Install by the Add Printer
Wizard”.
Router-ul wireless ASUS
Program ajutãtor pentru Setãri Imprimanta
Urmaþi procedurile de mai jos pentru a seta calculatoarele sã utilizeze funcþia
server Imprimantã a Router-ului wireless ASUS.
Instalarea Driver-ului Imprimantã
Adãugarea unei imprimante la computerul dvs. simplificã setarea imprimantei
la Router-ul wireless ASUS.
Vã recomandam instalarea driver-ului Imprimantã prin programul de setãri care
însoþeºte imprimanta (vezi Nota urmãtoare), apoi continuaþi cu Printer Setup
Wizard (Programul ajutãtor pentru setãri imprimantã) în secþiunea urmãtoare.
Dacã alegeþi "Programul ajutator pentru setãri imprimantã" fãrã a fi instalat un
driver de imprimantã, sunteþi direcþionaþi cãtre Add Printer Wizard ("Program
ajutator pentru Adãugare imprimantã").
Notã: Unele utilitãþi pentru setarea imprimantei cer ca imprimanta sã fie conectatã fizic
la computerul dvs. în timpul instalarii. Urmaþi instrucþiunile pentru instalarea driver-ului
sã conectaþi imprimanta la un PC pentru instalarea driver-ului ºi reconectarea routerului wireless dupã ce driver-ul imprimantã a fost instalat.
Alegeþi "Programul ajutãtor pentru
adãugare imprimantã" din Start/
Printers and Faxes / add Printer.
Alegeþi Install by the Add printer
wizard
Capitolul 3 - Configurare Software
Page 82

3. Utilities
82 ASUS Wireless Router
Chapter 3 - Software Configuration
(5) Find your manufacturer and model.
Click Have Disk if you cannot find your
printer in the list and use the driver
provided with your printer.
(6) Click Next to set this as your default
printer.
(3) Choose “Local printer attached to
this computer”.
(4) Choose “Remote Port (Printer Sharing
Port)”. If this is not available, select
LPT1*. You can select a USB port later
in the “Printer Setup Wizard” if you are
using a USB printer.
* WL500b/g also supports standard based network printing protocol,
called, LPR, which is also supported by Windows XP, Windows 2000,
MAC or Unix based system. If you are a Windows XP user , please refer
to Setup for LPR client under Windows XP for setting as a LPR client.
Router-ul wireless ASUS
Alegeþi Local printer attached to
this computer (Imprimanta localã
ataºatã la acest computer)
Alegeþi Remote port (Printer
Sharing Port) (Port la distanþa). Dacã
acesta nu este disponibil selectaþi
LPT1*. Puteþi selecta un port USB mai
târziu în Printer Setup Wizard , dacã
folosiþi o imprimantã USB.
*WL500b/g permite reþea standard bazatã pe protocol de printare numit LPR care e
suportat ºi de un sistem de operare bazat pe Windows XP, Windows 2000, MAC sau
Unix. Dacã sunteþi utilizator Windows XP, vã rugãm consulataþi Setãri pentru client
LPR din Windows XP pentru setãri în calitate de client LPR.
Cãutaþi fabricantul ºi modelul. Daþi
click pe Have CD dacã nu gãsiþi
modelul de imprimantã în listã ºi
folosiþi driver-ul oferit odatã cu
imprimanta.
Daþi click pe Next pentru a seta
opþiunea aceasta ca setare
predefinitã pentru imprimantã
Capitolul 3 - Configurare Software
Page 83

3. Utilities
ASUS Wireless Router 83
Chapter 3 - Software Configuration
(7) You can print a test page.
(8) Click Finish to close the wizard.
Your printer will show in the “Printers and
Faxes” window and the check mark shows
that it is set as your default printer.
Router-ul wireless ASUS
Puteti tipãri o pagina test.
Daþi click pe Finish pentru a închide
aplicaþia.
Imprimanta dvs. va afiºa fereastra
Printers and Faxes, iar semnul bifat
înseamnã ca setarea imprimantei a fost
predefinitã.
Capitolul 3 - Configurare Software
Page 84

3. Utilities
84 ASUS Wireless Router
Chapter 3 - Software Configuration
Setup for LPR client under Windows XP
1. Run the “Add Printer Wizard” from
Start | Printers and Faxes | Add
Printer .
2. Choose “Local printer attached to
this computer” then press Next.
3. Click on “Create a new port” and
select “Standard TCP/IP Port” in
the pull down menu. Then press
Next.
4. Click Next on the “Add Standard
TCP/IP Printer Port Wizard”.
5. Input the IP address of the WL500g
in the “Printer Name or IP Address”
field and the press Next.
6. Select “Custom” and then click
Settings…
Router-ul wireless ASUS
Setãri pentru client LPR în Windows XP
Selectaþi Add Printer Wizard din
meniul Start | Printers and Faxes |
Add
Alegeþi Local printer attached to
this computer ºi apoi apãsaþi Next.
Daþi click pe Create a new port ºi
selectaþi Port Standard TCP/IP
din meniul din josul paginii. Apoi
apasati Next.
Daþi Next la Add Standard TCP/IP
Printer Port Wizard
Completaþi cu adresa IP a
WL500g în spaþiul din dreptul
Printer Name or IP Address ºi
apoi apãsaþi Next.
Selectaþi Custom ºi apoi daþi click
pe Settings.
Capitolul 3 - Configurare Software
Page 85

3. Utilities
ASUS Wireless Router 85
Chapter 3 - Software Configuration
7. Select Protocol LPR and type
LPRServer in “Queue Name field”.
8. After completing settings, press
Next.
9. Press Finish to complete the “Add
Standard TCP/IP Printer Port
Wizard” and go back to “Add
Printer Wizard”.
10. Find the manufacturer and model
of your printer. Click Have Disk if
you cannot find it in the list and use
the driver provided with your printer .
11. Click Next to set this as your
default printer.
12. Select Yes and Next to print a test
page, otherwise select No.
13. When the “Add Printer Wizard” is complete, click Finish to close the wizard.
Router-ul wireless ASUS
Selectaþi Protocol LPR ºi tastaþi
LPRServer din spaþiul pentru
Queue Name Field.
Dupã ce aþi completat setãrile ,
apãsaþi Next.
Apãsaþi Finish pentru a completa
Add Standard TCP/IP Printer Port
Wizard ºi apoi mergeþi înapoi la
Add printer wizard.
Cãutaþi fabricantul ºi modelul
imprimantei dvs.. Daþi click pe Have
Disk dacã nu gãsiþi în listã ºi folosiþi
driver-ul oferit odatã cu imprimanta.
Daþi click pe Next pentru setãri
predefinite.
Selectaþi Yes ºi Next pentru a printa
o paginã test, dacã nu, selectaþi No.
Când e completã Add Printer Wizard, daþi click pe Finish ºi închideþi aplicaþia.
Capitolul 3 - Configurare Software
Page 86

3. Utilities
86 ASUS Wireless Router
Chapter 3 - Software Configuration
Printer Setup Wizard
Make sure your printer is connected to the Wireless Router printer port or
USB port and its power is turned on. Launch the “Printer Setup Wizard”
through the Start menu. The wizard will explore all available ASUS W ireless
Routers and model information of the printers attached to them in your
local network.
(2) If the printer is found, the name of the
printer will be shown on this screen.
(1) Having a printer installed on the printer
port (LPT1) or a USB port makes the
setup process easier (refer to the
following page).
(3) This setup wizard will change your
default printer to use “Standard TCP/
IP port” which is serviced by the ASUS
Wireless Router.
Note: For Windows XP or Windows
2000, this setup wizard will guide you
to select or add a “Standard TCP/IP
port”. Refer to “Setup for LPR client
under Windows XP” for details. For
Windows 98 or Windows ME, this
setup wizard will change your default
printer to use “Remote Port” which is
serviced by the ASUS Wireless Router.
(4) Click Done when setup is complete.
Note: If there is an error communicating with the printer, you will
get this message. Make sure that the printer is ON, ready, and
connected. Click Back and Next.
Router-ul wireless ASUS
Programul ajutãtor pentru setãri imprimantã
Asiguraþi-vã cã imprimanta dvs. e conectatã la Router-ul wireless sau port USB
ºi cã e pusã în funcþiune. Lansaþi "Printer setup wizard" din meniul Start.
Programul ajutãtor va explora toþi Router-ii wireless ASUS ºi informaþiile privind
modelul imprimantei ataºata la ei din reþeaua dvs. localã.
Având o imprimantã instalatã pe
portul imprimantã (LPT1) sau un port
USB, face procesul de setare mai
uºor (consultaþi pagina urmãtoare).
Dacã imprimanta a fost gãsitã, numele
imprimantei va fi afiºat pe ecran.
Notã: Dacã existã vreo eroare în comunicarea cu imprimanta veþi
primi mesaj de eroare. Asiguraþi-vã cã imprimanta este pornitã
(ON), pregatitã ºi conectatã. Daþi click pe Back ºi Next.
Aceastã setare a programului
ajutãtor va schimba predefinirile
imprimantei când folosiþi "Portul
Standard TCP/IP" care e asigurat de
Router-ul wireless ASUS.
Notã: Pentru Windows XP sau Windows 2000, acest
program ajutãtor pentru setãri vã va îndruma sã
selectaþi ºi sã adãugaþi "Portul Standard TCP/IP".
Pentru mai multe detalii consultaþi Setup for LPR client
under Windows XP (Setãri pentru clienþi LPR sub
Windows XP). Pentru Windows 98 sau Windows ME,
acest program ajutator pentru setãri va schimba
predefinirile imprimantei dvs. pentru folosirea Remote
Port care e asiguratã de Router-ul wireless ASUS.
( 4) Daþi click pe Done când
setarea e completã.
Capitolul 3 - Configurare Software
Page 87

3. Utilities
ASUS Wireless Router 87
Chapter 3 - Software Configuration
After setting up the printer, a printer icon
will appear in Windows’ “Printers and
Faxes”. Right click the printer icon and
choose Properties to configure the printer .
If your printer was previously setup, the
ASUS Wireless setup wizard changes the
printing port from the computer’s local LPT1
(parallel) port or USB port to “Standard
TCP/IP port”*. If necessary , you can change
this back at anytime or use Windows “Add
Printer” to setup another printer.
Note: If you use Windows 98 or ME which
do not support “Standard TCP/IP port””, you
need to use “Remote Port” which is
supported by ASUS.
Verifying Your Printer
Router-ul wireless ASUS
Verificarea Imprimantei
Dupã ce aþi setat imprimanta, o icoanã
imprimantã va apare în "Printers and
faxes" din Windows. Daþi click dreapta pe
icoana imprimantã ºi alegeþi Properties
pentru configurarea imprimantei.
Dacã imprimanta dvs. a fost setatã
anterior, programul ajutãtor pentru setãri
a lui ASUS wireless schimbã portul de
printare de la portul local al computerului
LPT1(paralel) sau port USB, la Standard
TCP/IP Port*. Dacã e necesar, puteþi
schimba acest lucru oricând sau, folosiþi
din Windows Add Printer pentru a seta
altã imprimantã.
Notã: Dacã folosiþi Windows 98 sau ME
care nu suportã Portul Standard TCP/IP
atunci trebuie sã folosiþi Remote port
care e suportat de ASUS.
Capitolul 3 - Configurare Software
Page 88

3. Utilities
88 ASUS Wireless Router
Chapter 3 - Software Configuration
When properly setup, the ASUS Wireless
Router will show the printer name in the
“Device Discovery” utility and show “on-
line” under the “Printer Server” on the
“Status” page of the web manager.
Note: If you use LPR client in Windows XP or Windows 2000, Stan-
dard TCP/IP port will be used. Please refer to Setup for LPR client
under Windows XP in details.
Verifying Your Printer (Cont’)
Router-ul wireless ASUS
Notã: Dacã folosiþi client LPR în Windows XP sau Windows 2000, Portul Standard
TCP/IP va fi folosit. Pntru detalii vã rugãm consultaþi Setãri pentru client LPR din
Windows XP
Când e setat în mod corect Router-ul
wireless ASUS va afiþa numele
imprimantei in opþiunea Device
Discovery þi va afiºa "online" sub Printer
Server pe pagina Status a managerului
de reþea.
Capitolul 3 - Configurare Software
Verificarea Imprimantei (Continuare)
Page 89

4. Performance
ASUS Wireless Router 89
Chapter 4 - Wireless Performance
4. Wireless Performance
This section provides the user with ideas for how to improve the performance
of a ASUS Wireless network.
Site Topography
For optimal performance, locate wireless mobile clients and the ASUS
Wireless Routers away from transformers, heavy-duty motors, fluorescent
lights, microwave ovens, refrigerators, and other industrial equipment.
Signal loss can occur when metal, concrete, walls or floors block
transmission. Locate the ASUS Wireless Routers in open areas or add the
ASUS Wireless Routers as needed to improve coverage.
Microwave ovens operate in the same frequency band as the ASUS W ireless
Router. Therefore, if you use a microwave within range of the ASUS
Wireless Router you may notice network performance degradation.
However, both your microwave and your the ASUS Wireless Router will
continue to function.
Site Surveys
A site survey (utility provided with the WLAN PC card and CF card)
analyzes the installation environment and provides users with
recommendations for equipment and its placement. The optimum placement
differs for each model.
Router-ul wireless ASUS
4. Performanþa wireless
Aceastã secþiune vine în ajutorul utilizatorului cu idei pentru îmbunãtãþirea
performanþei unei reþele ASUS wireless.
Topografia Site-ului
Pentru o performanþã optimã îndepãrtaþi clienþii mobili wireless ºi Router-ul
wireless ASUS de transformator, motoarele puternice, luminile fluorescente,
cuptoarele cu microunde, frigiderele, ºi alte echipamente industriale. Pierderea
semnalului poate apare atunci când pereþi sau podele din metal sau beton
blocheaza transmisia. Poziþionaþi Router-ul wireless ASUS în spaþii deschise
sau adãugaþi Router-ii wireless ASUS în mod corect pentru a îmbunãtãþi aria de
acoperire.
Cuptoarele cu microunde functioneaza in aceeasi banda de frecventa ca si
Router-ul wireless ASUS. De aceea, dacã folosiþi cuptorul cu microunde în raza
de funcþionare a unui Router wireless ASUS veþi putea observa scãderi de
performanþã a reþelei. Totuºi ºi cuptorul cu microunde ºi Router-ul wireless
ASUS vor funcþiona în continuare.
Analiza site-ului
Programul de analizã a site-ului (utilitar pus la dispoziþie împreunã cu un card PC
WLAN ºi un card CF) analizeazã locaþia pentru instalare ºi oferã utilizatorilor
recomandãri pentru echipament ºi plasarea acestuia. Plasamentul optim diferã
pentru fiecare model.
Capitolul 4 - Performanþa wireless
Page 90

4. Performance
90 ASUS Wireless Router
Chapter 4 - Wireless Performance
Range
Every environment is unique with different obstacles, barriers, materials,
etc. and, therefore, it is difficult to determine the exact range that will be
achieved without testing. However, has developed some guidelines to
estimate the range that users will see when the product is installed in their
facility, but there are no hard and fast specifications.
Radio signals may reflect off of some obstacles or be absorbed by others
depending on their construction. For example, with two 802.11b radios,
you may achieve up to 1000' in open space outdoors where two devices
have a line of sight, meaning they see each other with no obstacles. However,
the same two units may only achieve up to 300' of range when used indoors.
The IEEE 802.11b specification supports four data rates: 1 1 Mbps, 5.5 Mbps,
2 Mbps, and 1 Mbps. Operation at 1 Mbps provides greater range than
operation at 11 Mbps. The ASUS W ireless Router will automatically adjust
the data rate to maintain a usable radio connection.
Therefore, a client that is close to the ASUS Wireless Router may operate
at 11 Mbps while a client that is on the fringe of coverage may operate at 1
Mbps. As mentioned earlier , you can configure the data rates that the ASUS
Wireless Router will use. Note that if you limit the range of data rates
available to the ASUS Wireless Router, you may reduce the effective
wireless range of the ASUS Wireless products.
Router-ul wireless ASUS
Raza de acþiune
Fiecare mediu este unic, cu diferite obstacole, bariere, materiale, etc. De aceea
este dificil sã se determine raza de acþiune exactã care va fi atinsã fãrã testare.
Totuºi, s-au dezvoltat câteva îndrumãri pentru a estima raza de acþiune pe care
utilizatorii o vor vedea când produsul e instalat în încãpere, dar nu existã
specificaþii clare.
Semnalele radio pot reduce din obstacole sau sã fie absorbite de altele, depinde
de felul în care au fost construite. De exemplu, cu douã echipamente 802.11b
puteþi atinge pânã la 300m afarã, în spaþiu deschis unde douã dispozitive au
aceeaºi linie de întâlnire, adicã, se întâlnesc fãrã obstacole. Dacã sunt folosite în
interior, cele douã echipamente pot atinge doar aprox. 100m.
Specificaþia IEEE802.11b suportã 4 moduri de stocare de date: 11Mbps, 5.5
Mbps, 2 Mbps ºi 1Mbps. Operarea cu 1Mbps oferã o mai mare arie de acoperire
decât la 11Mbps. Router-ul wireless ASUS va ajusta automat modurile de
stocare pentru a menþine o conexiune radio funcþionalã.
Prin urmare, un client care se aflã în apropierea Router-ului wireless ASUS ar
putea opera cu 11Mbps în timp ce un client care este la limita ariei de acoperire
ar putea opera cu 1Mbps. Cum am menþionat mai sus, puteþi configura modurile
pentru stocare de date pe care le va folosi Router-ul wireless ASUS. Nu uitaþi cã
dacã limitaþi raza de acþiune modurilor pentru stocare de date disponibilã Routerului wireless ASUS, s-ar putea reduce efectivitatea distanþelor wireless a
produselor wireless ASUS.
Capitolul 4 - Performanþa wireless
Page 91

Troubleshooting
ASUS Wireless Router 91
Troubleshooting
The ASUS W ireless Router is designed to be very easy to install and operate.
However, if you experience difficulties, use the information in this chapter
to help diagnose and solve problems. If you cannot resolve a problem, contact
Technical Support, as listed on the front of this manual.
Common Problems and Solutions
Problem
ASUS Wireless Router does not power up:
Solution
• Check for faulty the ASUS Wireless Router power supply by measuring
the output voltage with an electrical test meter .
• Check failed AC supply (power outlet)
Problem
Cannot communicate with the ASUS Wireless Router through a wired
network connection.
Solution
• Verify network configuration by ensuring that there are no duplicate IP
addresses. Power down the device in question and ping the assigned IP
address of the device. Ensure no other device responds to that address.
• Check that the cables used have proper pin outs and connectors or use
another LAN cable.
Appendix -Troubleshooting
Router-ul wireless ASUS
Probleme ºi soluþii
Router-ului wireless ASUS este proiectat în aºa fel încât sã poatã fi uºor de
instalat ºi de folosit. Totuºi, dacã întâmpinaþi dificultãþi, folosiþi informaþiile din
acest capitol pentru a diagonstica ºi rezolva problemele. Dacã nu puteþi rezolva
o probleme, contactaþi Suportul Tehnic aflat la începutul acestui manual.
Probleme frecvente ºi Soluþii
Problema
Router-ul wireless ASUS nu porneºte.
Soluþie
Verificaþi dacã problema este la alimentarea cu curent a Router-ului wireless
ASUS, mãsurând volþii curentului electric cu un voltmetru.
Verificaþi acumulatorul AC
Problema
Nu puteþi comunica cu Router-ul wireless ASUS printr-o reþea de comunicare prin
cablu.
Soluþie
Verificaþi configurarea reþelei asigurându-vã cã nu exista mai multe adrese IP.
Deconectaþi dispozitivul în cauzã ºi introduceþi adresa IP a dispozitivului.
Asiguraþi-vã cã nici un alt dispozitiv nu rãspunde la acea adresã.
Verificaþi cablurile folosite ºi dacã au ieºiri ºi conectori adecvaþi sau folosiþi un
alt cablu LAN.
Apendice - Probleme ºi soluþii
Page 92

Troubleshooting
92 ASUS Wireless Router
Problem
The ASUS Wireless Router Web Manager still cannot find or connect to the
ASUS W ireless Router after verifying the IP address and LAN cable, changes
cannot be made, or password is lost.
Solution
In case the ASUS Wireless Router is inaccessible, you can restore
the ASUS Wireless Router’s factory default settings. Use a
straightened paper clip to press the button located in the hole labeled
“Reset” on the back of the ASUS Wireless Router and keep it
depressed over 5 seconds. The LEDs will flash when reset is
successful.
Reset to Defaults
The following are factory default values. These values will be present when you
first receive your the ASUS Wireless Router, if you push the reset button on the
back of the ASUS W ireless Router over 5 seconds, or if you click the “Restore”
button on the “Factory Default” page under “Advanced Setup”.
Appendix -Troubleshooting
Name Default Value
User Name admin
Password admin
Enable DHCP Yes
IP Address 192.168.1.1
Subnet Mask 255.255.255.0
DNS Server 1 192.168.1.1
DNS Server 2 (blank)
SSID default
Domain Name (blank)
Router-ul wireless ASUS
Problema
Managerul de reþea al Router-ului wireless ASUS tot nu poate gãsi sau nu se
poate conecta la Router-ul wireless ASUS dupã ce aþi verificat adresa IP ºi
cablul LAN, schimbãrile nu se pot realiza, sau parola s-a pierdut.
Soluþie
În cazul în care Router-ul wireless ASUS nu este accesibil puteþi sã
reveniþi la setãrile predefinite din fabricã a Router-ului wireless ASUS.
Folosiþi o agrafã de birou, pentru a apãsa butonul "Reset" aflat în
spatele Router-ului wireless ASUS ºi þineþi apãsat mai mult de 5
secunde. LED-ul va clipi atunci când resetarea s-a operat cu succes.
Resetarea la Predefinite
Urmãtoarele valori sunt predefinite de fabricã. Aceste valori exista deja atunci
când primiþi Router-ul wireless ASUS dacã apasaþi butonul "Reset", aflat în
spatele Router-ului wireless ASUS, mai mult de 5 secunde, sau dacã daþi click
pe butonul "Restore" din pagina "factory default" sub "advanced setup".
Nume Valoare Predefinita
Utilizator Admin.
Parola Admin.
Permiteþi DHCP Yes
Adresa IP 192.168.1.1
Masca Subreþea 255.255.255.0
Server DNS 1 192.168.1.1
Server DNS 2 (Spaþiu gol)
SSID Predefinit
Nume Domeniu (Spaþiu gol)
Apendice - Probleme ºi soluþii
Page 93

Troubleshooting
ASUS Wireless Router 93
Problem
My 802.11b PC Card will not associate with the ASUS Wireless Router.
Solution
Follow these steps:
1. Try to bring the devices closer together; the PC Card may be out of range
of the ASUS Wireless Router.
2. Confirm that the ASUS Wireless Router and PC Card have the same SSID.
3. Confirm that the ASUS Wireless Router and PC Card have the same
Encryption settings, if enabled.
4. Confirm that the ASUS Wireless Router ’s Air and Link LEDs are solid
green.
5. Confirm that the authorization table includes or excludes the MAC address
of the WLAN PC card if “W ireless Access Control” is enabled.
Problem
The throughput seems slow.
Solution
T o achieve maximum throughput, verify that your antennas are well-placed,
not behind metal, and do not have too many obstacles between them. If
you move the client closer to the ASUS Wireless Router and throughput
increases, you may want to consider adding a second the ASUS Wireless
Router and implementing roaming.
• Check antenna, connectors and cabling.
• Verify network traffic does not exceed 37% of bandwidth.
• Check to see that the wired network does not exceed 10 broadcast messages
per second.
• Verify wired network topology and configuration.
Appendix -Troubleshooting
Router-ul wireless ASUS
Problema
Cardul meu PC 802.11b nu se asociazã cu Router-ul wireless ASUS.
Soluþie
Urmaþi aceºti paºi:
1. Încercaþi sã aduceþi dispozitivele mai aproape unul de celalalt; cardul PC
ar putea fi în afara semnalului Router-ului wireless ASUS.
2. Confirmaþi faptul cã Router-ul wireless ASUS þi cardul PC au acelaþi SSID.
3. Confirmaþi faptul cã Router-ul wireless ASUS ºi cardul PC au aceleaºi
setãri pentru codare, acolo unde e posibil.
4. Confirmaþi cã LED-urile Air si Link ale Router-ului sunt de culoare verde
aprins.
5. Confirmaþi dacã tabelul de autorizare include sau exclude adresa MAC a
cardului PC WLAN dacã nu e activat Wireless acces Control "Accesul la
Control Wireless".
Problema
Fluxul pare lent.
Soluþie
Pentru a obþine un flux maxim, verificaþi dacã antenele sunt corect plasate, nu în
spatele metalului, ºi cã nu au prea multe obstacole între ele. Dacã mutaþi clientul
mai aproape de Router-ul wireless ASUS iar fluxul creºte, puteþi lua în
considerare adãugarea unui al doilea Router wireless ASUS ºi implementaþi
facilitatea de roaming.
o Verificaþi antena, conectorii ºi cablul.
o Verificaþi ca traficul de retea sã nu depãºeascã 37% din lungimea de
bandã.
o Verificaþi dacã reþeaua cablatã nu depãºeºte 10 mesaje emise pe
secundã.
o Verificaþi topologia ºi configurarea reþelei cablate. (wired network)
Apendice - Probleme ºi soluþii
Page 94

Troubleshooting
94 ASUS Wireless Router
Problem
I cannot find the ASUS Wireless Routers using the ASUS Wireless Router
Discovery.
Solution
T o configure the ASUS W ireless Router through a wireless LAN card, your
computer must be in the same subnet of the ASUS Wireless Router. You
cannot find the ASUS Wireless Routers with subnet different from your
computer within the same gateway . You must change your computer to the
same subnet as the ASUS Wireless Router. The factory default subnet of
the ASUS Wireless Router is "192.168.1.1".
In Windows NT/2000/XP, you must log in with Administrator privi-
leges so that all functions of the ASUS Wireless Router Manager
can function correctly. If you do not log in as a member of the Ad-
ministrator group, you cannot change IP settings but can still run
the Discovery utility if the original IP setting is correct.
Problem
How do I upgrade the firmware on the ASUS Wireless Router?
Solution
Periodically, a new Flash Code is available for ASUS Wireless Routers on
the Web site at http://www.asus.com. Update the ASUS Wireless Routers
Flash Code using the Firmware Upgrade option on the System Setup
menu of the Web manager.
Appendix -Troubleshooting
Router-ul wireless ASUS
În Windows NT/2000/XP, trebuie sã vã conectaþi la privilegiile Administrator
ca toate funcþiile Managerului Router-ului wireless ASUS sã opereze corect.
Dacã nu accesaþi ca membru al grupului Administrator, nu puteþi schimba
setãrile IP dar puteþi folosi opþiunea Discovery dacã setarea IP originalã este
corectã.
Problema
Nu gãsesc web managerul router-ului wireless ASUS folosind ASUS Wireless
Router Discovery
Soluþie
Pentru configurarea Router-ului wireless ASUS printr-un card LAN wireless,
computerul dvs. trebuie sã fie în aceeaºi subreþea a Router-ului wireless
ASUS. Nu puteþi gãsi Router-ul wireless ASUS cu o subreþea diferitã de cea
de cea a computerului dvs. în acelaºi gateway (mod de conectare a douã
reþele de computer). Trebuie sã schimbaþi computerul la acceaºi subreþea ca
ºi cea a Router-ului wireless ASUS. Reþeaua predefinitã din fabricã a Routerului wireless ASUS este "192.168.1.1".
Problema
Cum upgradez (aduc la zi) firmware-ul (instrucþiuni tehnice ale computerului
stocate de obicei pe cip) pe Router-ul wireless ASUS?
Soluþie
În mod periodic, un nou Cod Flash este disponibil Router-ului wireless ASUS pe
pagina de Internet http://www.aus.com. Updataþi la zi Codul Flash al Router-ului
wireless ASUS folosind opþiunea Upgradare Firmware din meniul System Setup din
Managerul de retea
Apendice - Probleme ºi soluþii
Page 95

Appendix
ASUS Wireless Router 95
Glossary
Access Point - An access point is a device that allows wireless clients to
connect to other wireless clients and it acts as a bridge between wireless
clients and a wired Ethernet network.
Broadband - A type of data transmission in which a single medium (such
as cable) carries several channels of data at once.
Channel - Wireless access points allows you to choose different radio
channels in the wireless spectrum. A wireless LAN device operates within
the 2.4 GHz spectrum and a channel is within a FCC specified range, similar
to any radio channel.
Client - A client is the desktop or mobile PC that is connected to your
network.
Device name - Also known as DHCP client ID or network name. Sometimes
provided by an ISP when using DHCP to assign addresses.
DHCP (Dynamic Host Configuration Pr otocol) - This protocol allows a
computer (or many computers on your network) to be automatically assigned
a single IP address from a DHCP server.
DNS Server Address (Domain Name System) - DNS allows Internet host
computers to have a domain name and one or more IP addresses. A DNS
server keeps a database of host computers and their respective domain names
and IP addresses, so that when a user enters a domain name into the Internet
browser, the user is sent to the proper IP address. The DNS server address
used by the computers on your home network is the location of the DNS
server your ISP has assigned.
DSL Modem (Digital Subscriber Line) - A DSL modem uses your existing
phone lines to transmit data at high speeds.
Encryption - This provides wireless data transmissions with a level of
security.
ESSID (Extended Service Set Identifier) - Y ou must have the same ESSID
entered into the gateway and each of its wireless clients. The ESSID is a
unique identifier for your wireless network.
Ethernet - Ethernet networks are connected by cables and hubs, and move
data around. This is a standard for computer networks.
Appendix - Glossary
Router-ul wireless ASUS
Glosar
Access Point: Punctul de acces este un dispozitiv care permite clienþilor wireless
sã se conecteze la alþi clienþi wireless ºi are rolul unei punþi între clienþi wireless
ºi o reþea legatã Ethernet.
Broadband(Banda largã de transmisie de date): un tip de transmisie de date
în care un singur mijloc de transport (cum ar fi cablul) duce mai multe canale de
informaþii odatã.
Channel (Canal de date): punctele de acces wireless vã permit sã alegeþi canale
de radio diferite din spectrul wireless. Un dispozitiv LAN wireless opereazã întrun spectru de 2.4GHz, iar un canal este într-o gama specificatã, similarã cu cea
a oricãrui canal de radio.
Client: Un client poate fi un desktop sau un PC mobil care e conectat la reþea.
Device name (Nume de dispozitiv): de asemenea cunoscut ºi sub denumirea
ID al clientului DHCP sau nume de reþea. Câteodatã acesta e oferit de un ISP
atunci când folosim DHCP pentru a atribui adrese.
DHCP(Protocol pentru configurarea dinamicã a gazdei): Acest protocol
permite computerului (sau mai multor calculatoare din reþea) sã îºi însuºeascã
automat o singurã adresã IP din server-ul DHCP.
DNS Server Address (Nume de domeniu sistem Adresa Server): DNS permite
calculatoarelor din Internet sã aibã un nume de domeniu ºi una sau mai multe
adrese IP, în aºa fel încât atunci când un utilizator scrie un nume de domeniu la
navigarea în Internet, acesta e trimis la adresa IP corectã. Adresa de server DNS
utilizatã de computer în reþeaua dvs. de acasã este locaþia server-ului DNS
atribuitã de ISP-ul dumneavoastrã.
DSL (Digital Subscriber Line) Modem (Modem pentru linie de abonat digitalã):
modemul DSL foloseºte liniile dvs. existente pentru transmiterea de date la viteze
ridicate.
Encryption (Codare): aceasta oferã transmisiei de date wireless un anumit nivel
de securitate.
ESSID -(Identificare set servicii extinse): Trebuie sã aveþi scris acelaºi ESSID în
gateway ºi la fiecare client wireless al sãu. ESSID este un identificator unic pentru
reþeaua dvs. wireless.
Ethernet: reþelele Ethernet sunt conectate prin cabluri ºi hub-uri ºi fac sã circule
informaþia (datele) din jur. Acesta este o procedura standard pentru reþelele de
computere.
Apendice - Glosar
Page 96

Appendix
96 ASUS Wireless Router
Frame-bursting - Refers to burst mode. Burst mode optionally allows a
station to transmit a series of frames without relinquishing control of the
transmission medium.
Firewall - A firewall determines which information passes in and out of a
network. NAT can create a natural firewall by hiding a local network’s IP
addresses from the Internet. A Firewall prevents anyone outside of your
network from accessing your computer and possibly damaging or viewing
your files.
Gateway - A network point that manages all the data traffic of your network,
as well as to the Internet and connects one network to another.
Handshaking - handshaking refers to the signals that are transmitted
between communications networks that establish a valid connection between
two stations.
IEEE - The Institute of Electrical and Electronics Engineers. The IEEE
sets standards for networking, including Ethernet LANs. IEEE standards
ensure interoperability between systems of the same type.
IP Address (Internet Pr otocol) - An IP address consists of a series of four
numbers separated by periods, that identifies a unique Internet computer
host, allowing messages intended for that computer to be delivered to the
correct destination.
ISP (Internet Service Provider) - An ISP is a business that allows
individuals or businesses to connect to the Internet. Users log on to the
Internet using an account with an ISP or Internet Service Provider. ISPs
can serve IP addresses dynamically, or assign static (fixed) IP addresses to
individual computers.
ISP Gateway Address - The ISP Gateway Address is an IP address for the
Internet router. This address is only required when using a cable or DSL
modem.
LAN (Local Ar ea Network) - A LAN is a group of computers and devices
connected together in a relatively small area (such as a house or an office).
Your home network is considered a LAN.
MAC Addr ess (Media Access Contr ol) - A MAC address is the hardware
address of a device connected to a network.
Appendix - Glossary
Router-ul wireless ASUS
Frame-Bursting: se referã la modul burst. Modul Burst permite, opþional, ca o
staþie sã transmitã o serie de cadre fãrã a renunþa la controlul mediului de
transmisie.
Firewall (Protecþie Firewall): o protecþie firewall determinã care informaþie intrã
ºi iese dintr-o reþea. NAT poate crea o protecþie firewall naturalã ascunzând
adresa IP a unei reþele locale de Internet. O protecþie firewall împiedica pe
oricine din afara reþelei sã acceseze computerul dvs. ºi sã deterioreze sau sã
vadã fiºierele dvs..
Gateway: un punct din reþea care administreazã tot traficul de date din reþeaua
dvs. ºi pe cel din/catre Internet precum ºi conecteazã o reþea de altã reþea.
Handshaking- se referã la semnalele care sunt transmise între reþelele de
comunicaþie pentru a stabili o conectare validã între douã staþii.
IEEE (Institutul de inginerie electrica ºi electronica): impune standarde pentru
reþea, inclusiv LAN Ethernet. Standardele IEEE asigurã interoperabilitate între
sisteme de acelaºi tip.
IP (Internet Protocol) Address (Adresa IP): o adresã IP constã într-o serie de 4
numere separate între ele prin puncte care identificã în Internet un computer
unic, permiþând mesajelor destinate acelui computer sã fie distribuite cãtre
destinaþia corectã.
ISP -Internet Service Provider (Provider Servicii Internet): ISP este un furnizor
de servicii care permite persoanelor fizice sau firmelor conectarea la Internet.
Utilizatorii acceseazã Internetul folosind un cont ISP. ISP poate oferi adrese IP
dinamice sau poate sã atribuie calculatoarelor individuale adrese IP fixe.
ISP Gateway Address (Adresa ISP Gateway): este o adresã IP pentru routerul Internet. Aceastã adresa e cerutã numai atunci când folosiþi un cablu sau
modem DSL.
LAN- Local Area Network (Reþea Locala): Un LAN este un grup de calculatoare
ºi dispozitive conectate împreuna într-un spaþiu relativ mic (casã sau birou).
Reþeaua dvs. localã e consideratã ca fiind un LAN.
MAC (Media Access Control) Address (Adresa Control Acces Media): adresa
MAC este adresa Hardware a unui dispozitiv conectat la o reþea.
Apendice - Glosar
Page 97

Appendix
ASUS Wireless Router 97
NA T (Network Address T ranslation) - NA T masks a local network’s group
of IP addresses from the external network, allowing a local network of
computers to share a single ISP account. This process allows all of the
computers on your home network to use one IP address. This will enable
access to the Internet from any computer on your home network without
having to purchase more IP addresses from your ISP.
PC Card - This is an Ethernet card that connects to the PCMCIA slot on
your Notebook PC. This enables the computer to communicate with wireless
access points.
PPP (Point-to-Point Protocol) - PPP is a protocol for communication
between computers using a serial interface, typically a personal computer
connected by phone line to a server.
PPPoE (Point-to-Point Protocol over Ethernet) - Point-to-Point Protocol
is a method of secure data transmission. PPP using Ethernet to connect to
an ISP.
Subnet Mask - A subnet mask is a set of four numbers configured like an
IP address. It is used to create IP address numbers used only within a
particular network.
TCP/IP (T ransmission Control Pr otocol/Internet Protocol) - This is the
standard protocol for data transmission over the Internet. Protocols used to
connect hosts on the Internet.
WAN (Wide Area Network) - A system of LANs, connected together. A
network that connects computers located in separate areas, (i.e., different
buildings, cities, countries). The Internet is a wide area network.
WECA (W ir eless Ethernet Compatibility Alliance) - An industry group
that certifies cross-vender interoperability and compatibility of IEEE
802.11b wireless networking products and to promote that standard for
enterprise, small business, and home environments.
WLAN (Wireless Local Area Network) - This is a group of computers
and other devices connected wirelessly in a small area. A wireless network
is referred to as LAN or WLAN.
Appendix - Glossary
Router-ul wireless ASUS
NAT -Network Address Translation (Translaþie Adresa de Reþea): NAT
mascheaza, un grup de IP-uri din reþeaua locala de reþeaua externã, permiþând
unei reþele locale de calculatoare sã împartã un singur cont ISP. Acest proces
permite tuturor calculatoarelor din reþeaua dvs. localã sã foloseascã o singurã
adresã IP. Aceasta va permite accesul la Internet de la orice computer din
reþeaua dvs. localã fãrã a mai trebui sã utilizaþi mai multe adrese IP de la ISPul dvs.
PC Card (Card PC): acesta este un card Ethernet care se conecteaza la un slot
PCMCIA din Notebook-ul dvs. Aceasta permite computerului sã comunice cu
Access Point-ul wireless.
PPP Point-to-Point Protocol (Protocol Punct la Punct): PPP este un
protocol pentru comunicare între calculatoare folosind o interfaþã serialã, tipic
acesta este un computer personal conectat la un server printr-o linie telefonicã.
PPPoE -Point-to-Point Protocol over Ethernet (Protocol Punct la Punct pe
Ethernet): PPP este o metodã pentru transmiterea sigurã de date. PPPoE
foloseºte Ethernet pentru a se conecta la ISP.
Subnet Mask ( Masca de Subreþea): o masca de subreþea este un set de 4
numere configurate ca o adresa IP. E folositã pentru crearea de numere de
adrese IP folosite numai într-o reþea anume.
TCP/IP -Transmission Control Protocol/ Internet Protocol) ( Protocolul de
Control al Transmisiunii/ Protocol Internet): acesta este protocolul standard
pentru transmiterea de date pe Internet. Un protocol e folosit pentru a lega
gazde pe Internet.
WAN (Wide Area Network): un sistem din mai multe LAN-uri conectate între
ele. O reþea care conecteazã calculatoare din locaþii separate (diferite cladiri,
orase, tari). Internetul este o reþea cu o arie vastã de întindere.
WECA -Wireless Ethernet Compatibility Alliance (Alianþa pentru
Compatibilitatea Wireless Ethernet): un grup industrial care certificã
interoperabilitatea pãrþilor ofertante ºi compatibilitatea produselor de reþea
wireless IEEE 802.11b ºi care promoveazã acest standard pentru
întreprinzãtori, afaceri mici ºi mediul înconjurãtor.
WLAN -Wireless Local Area Network (Arie Localã de Reþea fãrã fir): acesta
este un grup de calculatoare ºi alte dispozitive conectate fãrã fir într-o arie
mica. Când ne referim la o reþea wireless (fãrã fir) spunem LAN sau WLAN.
Apendice - Glosar
Page 98

Appendix
98 ASUS Wireless Router
Appendix - GNU General Public License
Licensing Information
This product includes copyrighted third-party software licensed under the
terms of the GNU General Public License.
Please see The GNU General Public License for the exact terms and
conditions of this license.
Specially, the following parts of this product are subject to the GNU GPL:
• The Linux operating system kernel
• The iptables packet filter and NAT software
• The busybox swiss army knife of embedded linux
• The zebra routing daemon implementation
• The udhcpd DHCP client/server implementation
• The pptp-linux PPTP client implementation
• The rp-pppoe PPPoE client implementation
• The pppd PPP daemon implementation
• The dproxy DNS proxy implementation
• The bridge-utils package
All listed software packages are copyright by their respective authors. Please
see the source code for detailed information.
Availability of source code
ASUSTeK COMPUTER Inc. has exposed the full source code of the GPL
licensed software, including any scripts to control compilation and
installation of the object code. All future firmware updates will also be
accompanied with their respective source code. For more information on
how you can obtain our open source code, please visit our web site.
Router-ul wireless ASUS
Informaþii privind Licenþa
Acest produs include drepturi de autor software pentru o terþã parte licenþiatã
conform condiþiilor impuse de Licenþã Publicã Generalã GNU.
Vã rugãm consultaþi Licenþa Publicã Generalã GNU pentru termenii ºi condiþiile
exacte ale acestei licenþe.
În special, urmãtoarele pãrþi ale acestui produs fac parte din GNU GPL:
o Sistemul kernel de operare Linux .
o Pachetul iptables filtru ºi software NAT.
o busybox swiss army knife din pachetul linux
o Implementarea daemon-ului zebra routing
o Implementarea clientului/server udhcpd DHCP.
o Implementarea clientului PPTP pptp-linux.
o Implementarea clientului PPPoE rp-pppoe.
o Implementarea daemon-ului PPP pppd.
o Implementarea proxy DNS dproxy.
o Pachetul utilitãþi-punte (bridge).
Toate pachetele software din listã conþin drepturi de autor ai autorilor respectivi.
Vã rugãm consultaþi codul sursã pentru informaþii detaliate.
Acces la Codul Sursã
ASUSTeK COMPUTER Inc. A expus întregul cod sursa a software-ului licenþã
GPL, inclusiv scenarii privind compilaþiei control ºi instalarea codului obiect.
Toate updatãrile firmware care urmeazã vor fi însoþite de asemenea, de
respectivul cod sursa. Pentru mai multe informaþii despre cum puteþi sã obþineþi
codul sursã afiºat, vã rugãm vizitaþi pagina noastrã de Internet.
Apendice -Licenþã Publicã Generalã GNU
Page 99

Appendix
ASUS Wireless Router 99
Appendix - GNU General Public License
The GNU General Public License
GNU GENERAL PUBLIC LICENSE
Version 2, June 1991
Copyright (C) 1989, 1991 Free Software Foundation, Inc.
59 Temple Place, Suite 330, Boston, MA 02111-307 USA
Everyone is permitted to copy and distribute verbatim copies of this
license document, but changing it is not allowed.
Router-ul wireless ASUS
Licenþa Publicã Generalã GNU
Licenþa Publicã Generalã GNU
Versiunea a-2-a, Iunie 1991
Copyright (C) 1989, 1991 Free Software Foundation, Inc.
59 Temple Place, Suite 330, Boston, MA 02111-307 USA
Este permisã copierea ºi distribuirea copiilor identice al
acestui document de licenþã , dar este interzisã operarea
oricãrei schimbãri în textul acesteia.
Apendice -Licenþã Publicã Generalã GNU
Page 100

Appendix
100 ASUS Wireless Router
Preamble
The licenses for most software are designed to take away your freedom to
share and change it. By contrast, he GNU General Public License is intended
to guarantee your freedom to share and change free software—to make
sure the software is free for all its users. This General Public License
applies to most of the Free Software Foundation’s software and to any
other program whose authors commit to using it. (Some other Free Software
Foundation software is covered by the GNU Library General Public License
instead.) You can apply it to your programs, too.
When we speak of free software, we are referring to freedom, not price.
Our General Public Licenses are designed to make sure that you have the
freedom to distribute copies of free software (and charge for this service if
you wish), that you receive source code or can get it if you want it, that you
can change the software or use pieces of it in new free programs; and that
you know you can do these things.
To protect your rights, we need to make restrictions that forbid anyone to
deny you these rights or to ask you to surrender the rights. These restrictions
translate to certain responsibilities for you if you distribute copies of the
software, or if you modify it.
For example, if you distribute copies of such a program, whether gratis or
for a fee, you must give the recipients all the rights that you have. You must
make sure that they , too, receive or can get the source code. And you must
show them these terms so they know their rights.
We protect your rights with two steps: (1) copyright the software, and (2)
offer you this license which gives you legal permission to copy, distribute
and/or modify the software.
Also, for each author’s protection and ours, we want to make certain that
everyone understands that there is no warranty for this free software. If the
software is modified by someone else and passed on, we want its recipients
to know that what they have is not the original, so that any problems
introduced by others will not reflect on the original authors’ reputations.
Finally , any free program is threatened constantly by software patents. We
wish to avoid the danger that redistributors of a free program will
individually obtain patent licenses, in effect making the program proprietary .
To prevent this, we have made it clear that any patent must be licensed for
everyone’s free use or not licensed at all.
The precise terms and conditions for copying, distribution and modification
follow.
Appendix - GNU General Public License
Router-ul wireless ASUS
Preambul
Licenþele pentru majoritatea software-urilor sunt proiectate pentru a nu vã permite
împãrþirea sau schimbarea lor. Dimpotrivã, GNU vã garanteazã libertatea de a
împãrþi ºi opera schimbãri într-un software gratuit - pentru a fi siguri cã softwareul este gratuit pentru toþi utilizatorii. Licenþa Publicã Generalã GNU se aplicã
pentru majoritatea software-ului unei Fundaþii cu Software Gratuit dar ºi pentru
oricare alte programe ai cãror autori doresc sã le foloseascã. (În schimb, softwareul altor Fundaþii cu Software Gratuit face parte din Biblioteca Licenþei Publice
Generale GNU). Puteti sã îl aplicaþi ºi programelor dvs..
Când vorbim de software gratuit, ne referim la permisiunea utilizãrii ºi nu la preþ.
Licenþele Generale GNU sunt proiectate pentru a fi sigur faptul cã dvs. aveþi
libertatea de a distribui copii de software gratuit (la cererea dvs., îl puteþi oferi
contra cost), cã puteþi sã primiþi codul sursa dacã doriþi, ca puteþi schimba
software-ul sau sã îi folosiþi componentele în programe noi gratuite ºi ca sã fiþi
informaþi cã puteþi face aceste lucruri.
Pentru a vã proteja drepturile, trebuie sã impunem unele restricþii care sã
împiedice pe oricine vã neagã aceste drepturi sau vã cere sã le cedaþi. Aceste
restricþii se pot implica anumite responsabilitãþi pentru dvs. atunci când distribuiþi
copii ale software-ului, sau dacã îl modificaþi.
De exemplu, dacã distribuiþi copii ale unui astfel de program, gratis sau contra
cost, trebuie sã cedaþi beneficiarilor toate drepturile pe care le aveþi. Trebuie sã vã
asiguraþi cã ºi ei, la rândul lor, primesc sau pot sã obtina codul sursã. Iar dvs.
trebuie sã le arãtaþi aceste condiþii pentru a-ºi cunoaºte drepturile.
Noi vã protejãm drepturile prin 2 paºi: (1) copyright pentru software, ºi (2) vã
oferim aceastã licenþã care vã dã dreptul legal de a copia, distribui ºi / sau
modifica software-ul.
De asemenea, pentru fiecare protecþie a autorului dar ºi pentru protecþia noastrã,
vrem sa ne asigurãm cã este clar faptul cã nu existã nici un fel de garanþie pentru
acest software gratuit. Dacã software-ul este modificat de altcineva ºi este dat mai
departe, vrem sã îi facem pe cei care îl primesc sã ºtie cã ceea ce au nu este
originalul ºi deci orice problemã introdusã de alþii nu se va reflecta în reputaþia
autorului original.
În sfârºit, orice program gratuit este ameninþat în mod constant de patentele de
software. Dorim sã evitãm pericolul ca redistribuitorii unui program gratuit sã
obþinã licenþe autorizate, în acest mod, însuºindu-ºi proprietatea asupra softwareului. Pentru a preveni acest lucru, am arãtat clar cã orice patentare trebuie sã fie
autorizatã în scopul folosirii în mod gratuit pentru fiecare sau dacã nu, pentru
nimeni.
Urmeazã termenii exacþi ºi condiþiile pentru copiere, distribuire ºi modificare
Apendice -Licenþã Publicã Generalã GNU
 Loading...