

Page 1
54Mbps
Pocket Wireless Access Point
(WL-330g)
English
Copyright © 2004 ASUSTeK COMPUTER INC. All Rights Reserved.
Page 2

English
Contents
Conventions ..........................................................................................2
Welcome! ..............................................................................................3
Package contents..................................................................................3
System requirements ............................................................................3
Device installation .................................................................................4
Using DC power..............................................................................4
Using USB bus power .....................................................................4
LED indicators ....................................................................................... 5
Mode switch ..........................................................................................6
Utilities installation .................................................................................6
Wireless Setting Utility ........................................................................... 7
Launching the Wireless Setting Utility .............................................7
Setting up your access point (AP) ................................................... 8
Setting up your Ethernet adapter................................................... 10
Web Configuration Utility .....................................................................12
Launching the Web Configuration utility ........................................ 12
Changing the access point (AP) configuration ............................... 13
Changing the Ethernet adapter configuration ................................17
Device setup .......................................................................................19
Using the device in a local network ...............................................19
Replacing the computer Ethernet cables ....................................... 19
Replacing the cable connections of other devices ......................... 20
Sharing Internet access with other computers ............................... 20
Conventions
To make sure that you perform certain tasks properly, take note of the following
symbols used throughout this guide.
WARNING: Information to prevent injury to yourself when trying to
complete a task.
CAUTION: Information to prevent damage to the components when
trying to complete a task.
IMPORTANT: Information that you MUST follow to complete a task.
NOTE: Tips and additional information to aid in completing a task.
2 ASUS Pocket Wireless Access Point (WL-330g)
Page 3

Welcome!
Thank you for choosing the ASUS WL-330g Pocket Wireless AP!
The WL-330g is a pocket-size access point and wireless Ethernet adapter in
one. Packed with features and latest in wireless technology developed by
ASUS, WL-330g is sure to keep you ahead in the world of wireless computing!
Refer to the User Guide in the support CD for detailed information on the
ASUS WL-330g Pocket Wireless AP.
Package contents
Check the following items in your ASUS WL-330g Pocket Wireless AP package.
Contact your retailer if any item is damaged or missing.
ASUS Pocket Wireless AP (WL-330g)
Compact universal power adapter and plug (100V ~ 240V)
USB adapter and plug
English
RJ-45 connector and cable
Support CD
Quick Start Guide
Soft case
Use only the power adapter and plug that came with the package. Using
other power adapter and plug may damage the device!
System requirements
Before installing the ASUS WL-330g Pocket Wireless AP, make sure that your
computer meets the following requirements:
• An Ethernet RJ-45 port (10Base-T/100Base-TX)
• At least one IEEE 802.11b/g device with wireless capability
• An installed TCP/IP and Internet browser
3ASUS Pocket Wireless Access Point (WL-330g)
Page 4
English
Device installation
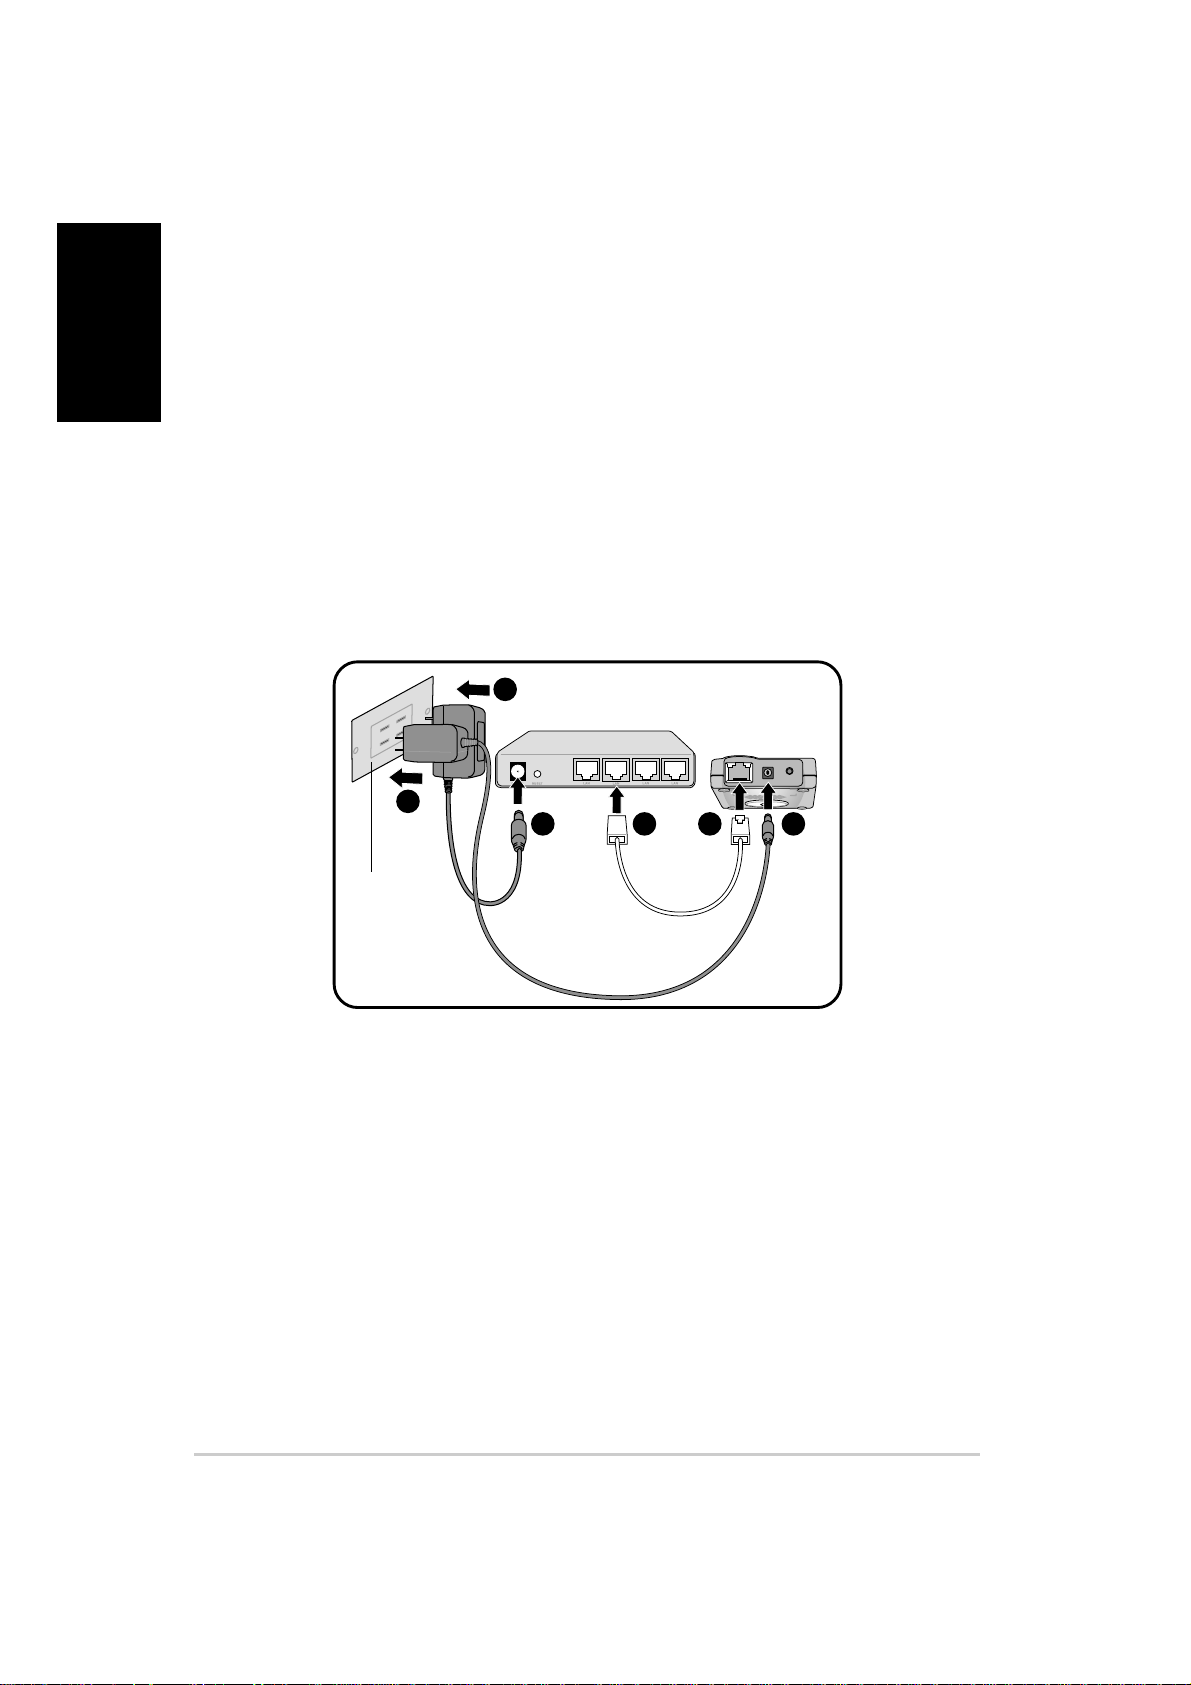
Using DC power
1. Insert one end of the supplied RJ-45 cable to the WL-330g Ethernet port.
2. Insert the other end of the RJ-45 cable to a network hub, switch, router, or
wall patch Ethernet port.
3. Connect the power adapter plug to the WL-330g DC-IN socket.
4. Connect the WL-330g power adapter to a wall socket.
5. Connect the network hub, switch, or router power adapter plug to the DCIN socket of the device.
6. Connect the network hub, switch, or router power adapter to a wall socket.
6
Switch
4
5 2 1
WL-330g
3
Wall socket
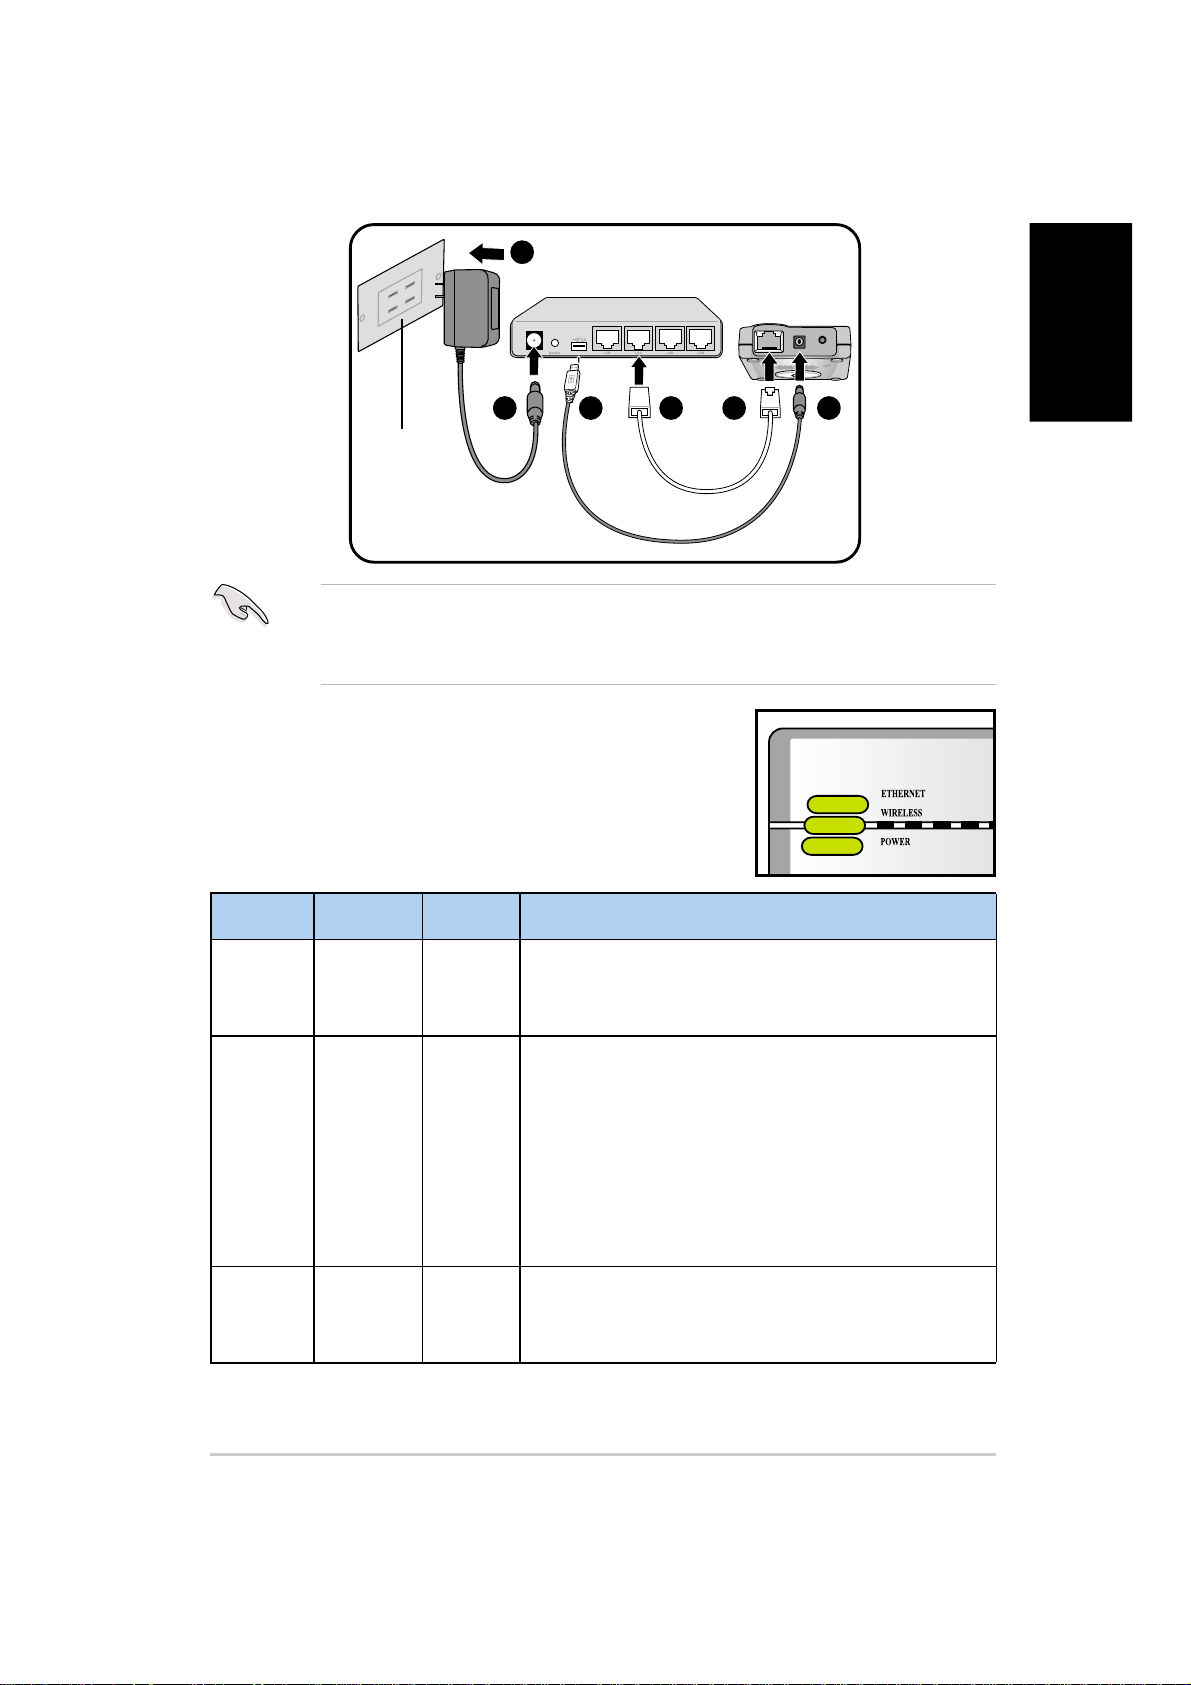
Using USB bus power
1. Insert one end of the supplied RJ-45 cable to the WL-330g Ethernet port.
2. Insert the other end of the RJ-45 cable to the Ethernet port on your
computer, notebook, network hub, switch, router, or wall patch panel.
3. Insert one end of the supplied USB cable to the DC-IN socket of the device.
4. Insert the other end of the USB cable to any available USB port on your
computer, notebook, network hub, switch, or router.
5. Turn on your computer/notebook, or connect the network hub, switch, or
router power adapter to a wall socket.
6. Connect the power adapter of the network hub, switch, or router to a wall
socket.
4 ASUS Pocket Wireless Access Point (WL-330g)
Page 5
6
Switch
WL-330g
USB
5 3
Wall
socket
After installation, check the Power and Ethernet LEDs. These LEDs light
up to indicate that the device is on and has physical connection to an
Ethernet network. Refer to the LED indications below.
4 2 1
LED indicators
The ASUS WL-330g comes with a Power, Wireless,
and Ethernet LED indicators. Refer to the table below
for LED indications.
LED Status Mode* Indication
English
Ethernet On AP/EA The device is connected to an Ethernet network.
Off AP/EA The device is off or not connected to an Ethernet
network.
Wireless On AP The device is on and ready.
On EA The device is associated with an AP or other
wireless device.
Off AP The device is off.
Off EA The device is not associated with an AP or other
wireless device.
Blinking AP/EA The device is transmitting or receiving data.
Power On AP/EA The device in on and ready.
Off AP/EA The device is off or performing boot sequence.
Blinking AP/EA Firmware upgrade failed.
*Modes: AP – Access Point mode EA – Ethernet adapter mode
5ASUS Pocket Wireless Access Point (WL-330g)
Page 6
English
Mode switch
A mode switch located at the bottom side of the
device allows you to change the WL-330g
operation mode from access point to Ethernet
adapter, or vice versa.
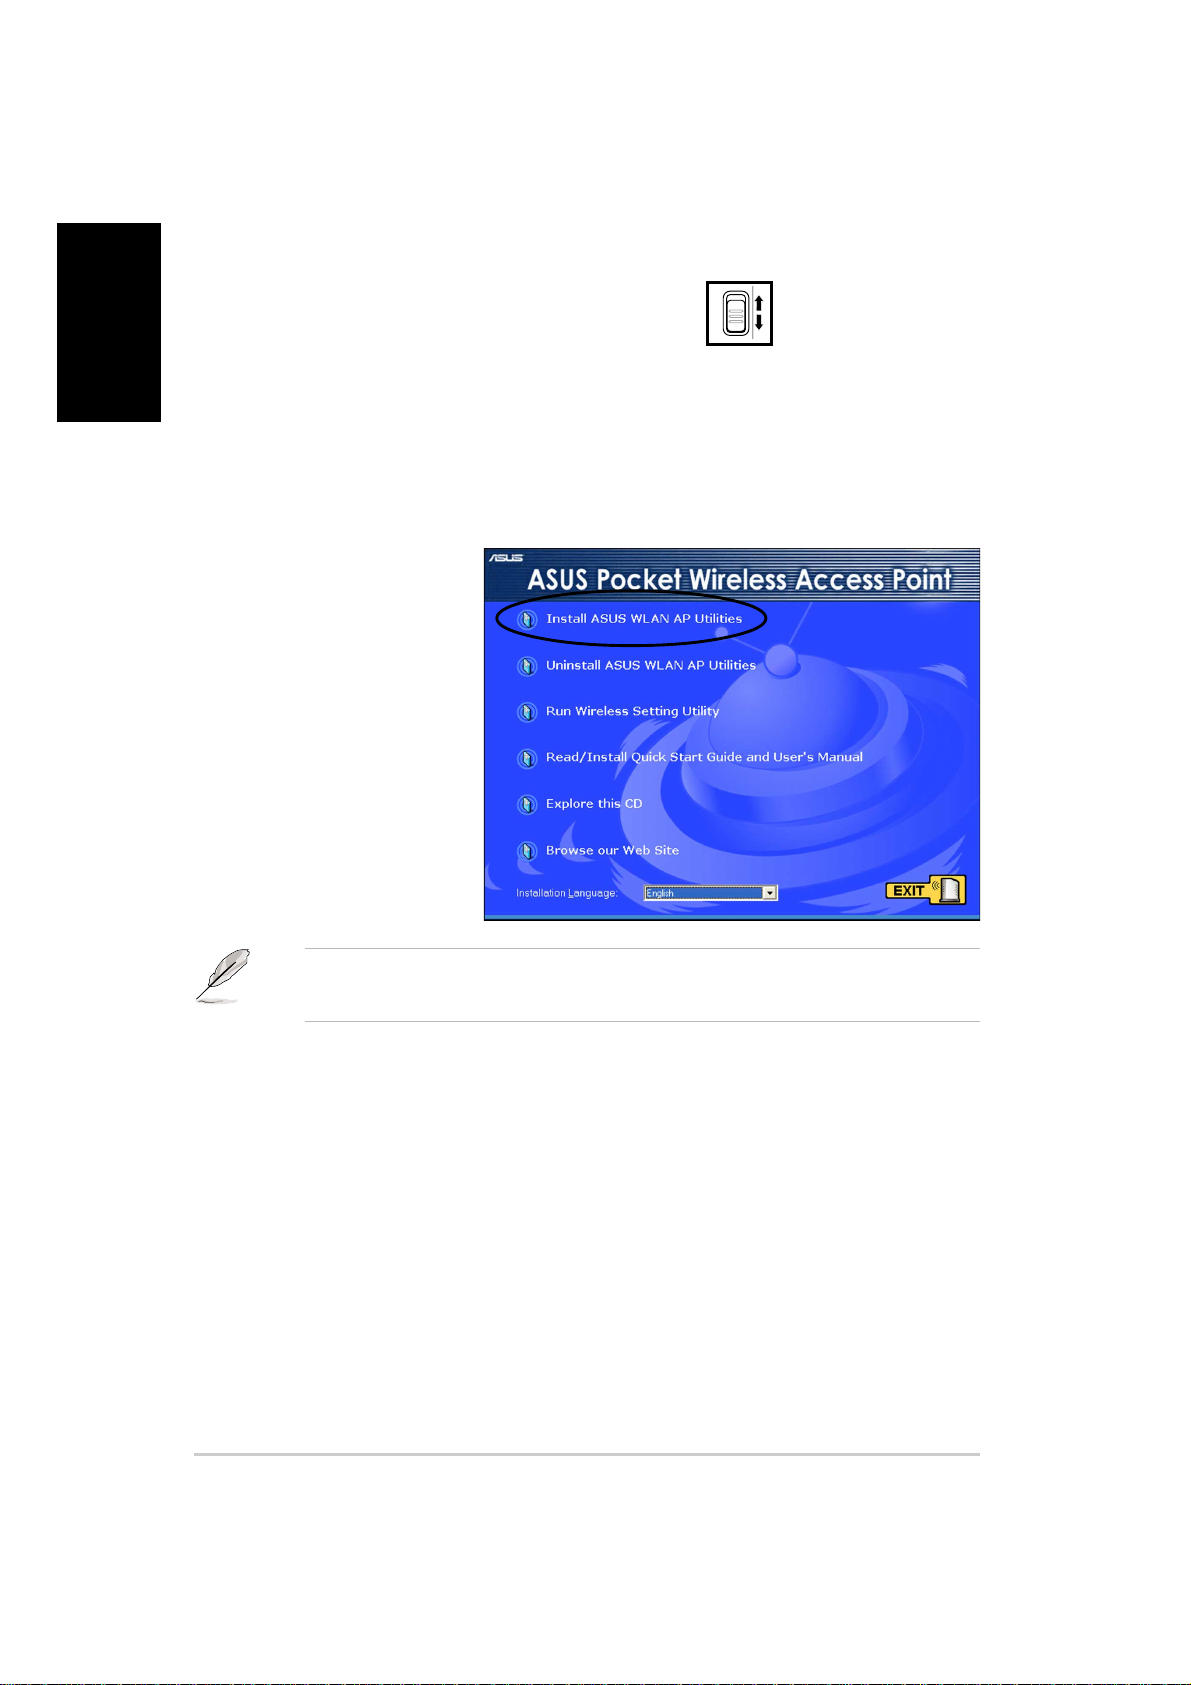
Utilities installation
To install the device utilities to your computer:
1. Place the WL-330g
support CD to the
optical drive.
2. Click “Install ASUS
WLAN AP Utilities”
when the ASUS
Wireless Access Point
WL-330g installation
window appears. The
device utilities are
installed to your
computer .
AP mode
Ethernet adapter mode
If Autorun is NOT enabled in your computer, browse the contents of the
support CD and double click the Setup.exe file to run the CD.
Other support CD options
Uninstall ASUS WLAN AP Utilities. Click this option to uninstall the ASUS
Pocket Wireless AP utilities from your system.
Run Wireless Setting Utility. Click this option to run the Wireless Setting Utility.
ReRead/Install Quick Start Guide and User’s Manual. Click to view the
installation and quick setup guides in PDF format.
Explore this CD. Click this option to explore the support CD contents.
Browse our Web Site. Click this option to visit the ASUS website.
Installation Language. Click the arrow down button to select the installation
language.
Click EXIT to close the installation window.
6 ASUS Pocket Wireless Access Point (WL-330g)
Page 7
Wireless Setting Utility
The Wireless Setting Utility allows you to configure the WL-330g settings. You
can launch this utility directly from the support CD or from the Windows
desktop.
Launching the Wireless Setting Utility
From the support CD
To launch the Wireless Setting Utility from the support CD:
1. Insert the support CD to the optical drive.
2. Click the Run Wireless Setting Utility option when the installation
window appears. Refer to the illustration on the previous page.
3. The Wireless Setting Utility window appears.
From the Windows® desktop
To launch the Wireless Setting Utility from the Windows® desktop:
1. Install the WL-330g utilities
following the steps in the
previous section.
®
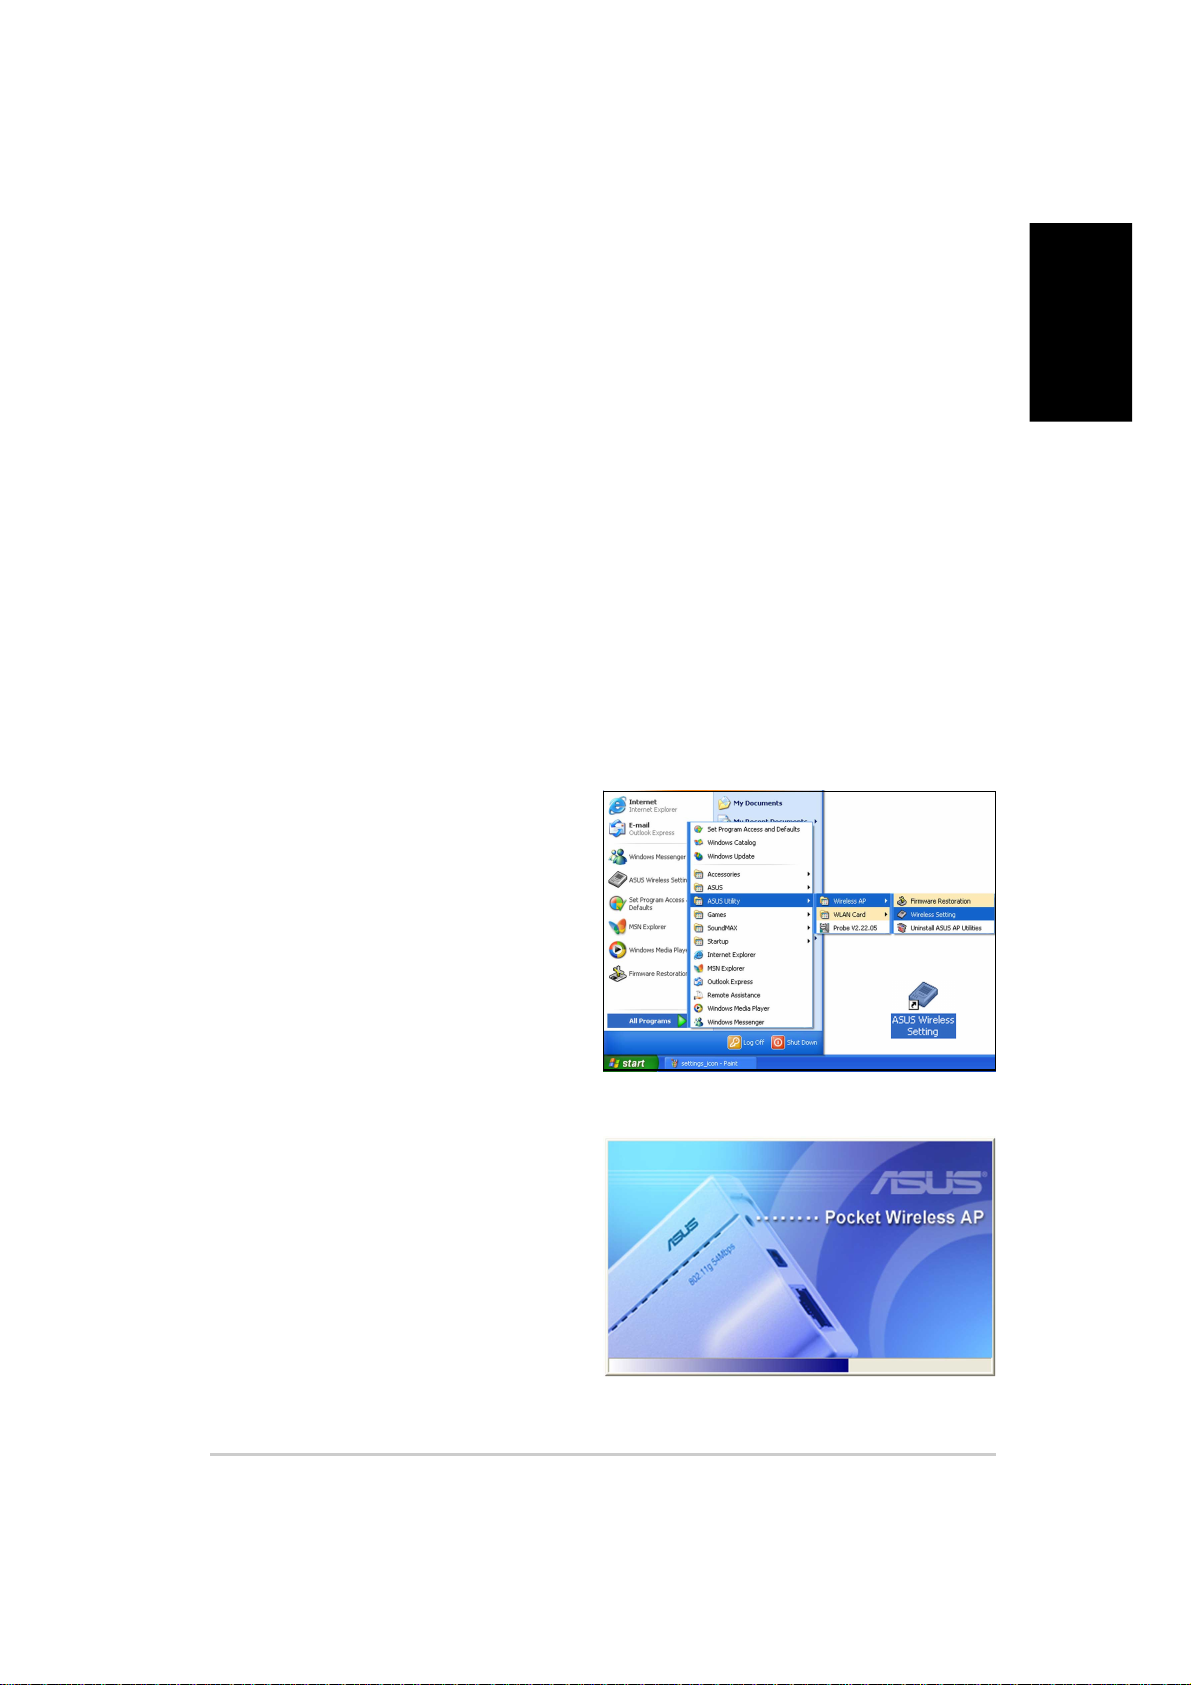
2. From the Windows
click Start > All Programs >
ASUS Utility > Wireless AP >
Wireless Setting.
desktop,
®
English
or
Double-click the ASUS Wireless
Setting icon.
3. The Wireless Setting Utility
window appears.
7ASUS Pocket Wireless Access Point (WL-330g)
Page 8
English
Setting up your access point (AP)
To set up your AP:
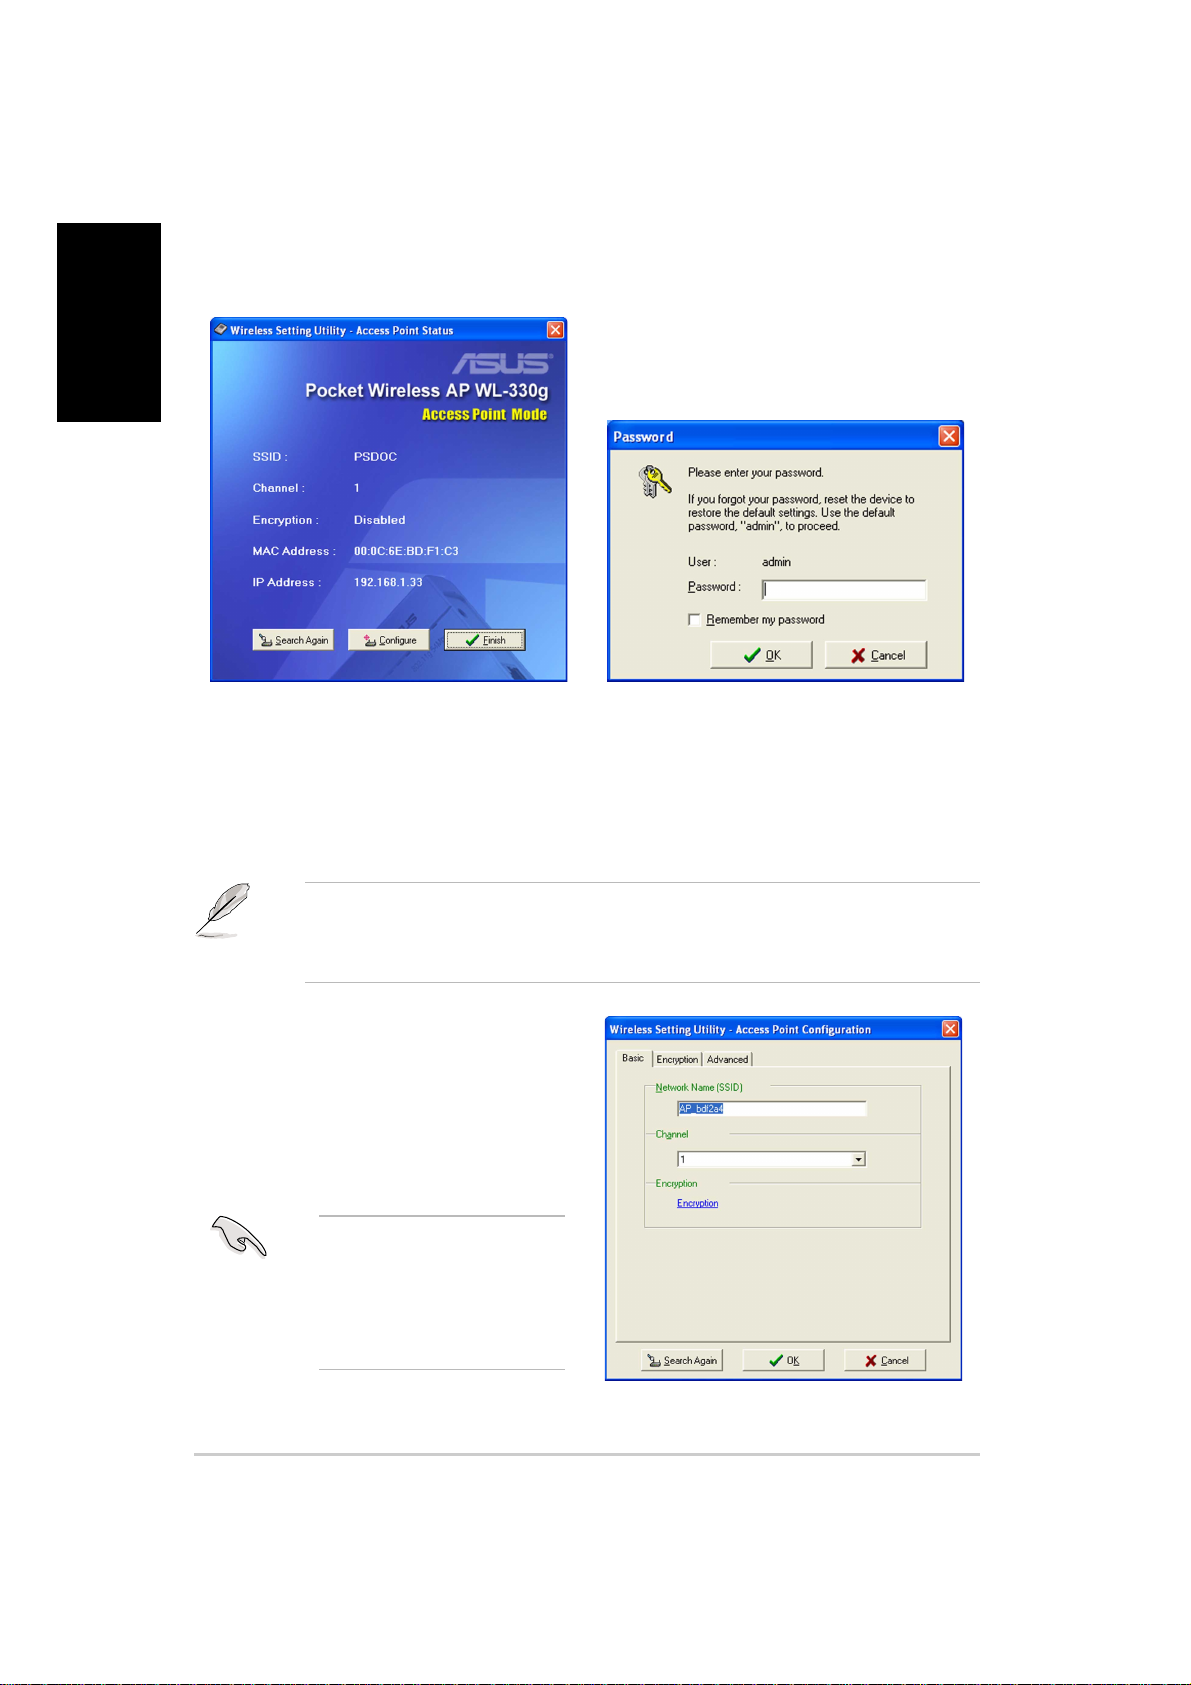
1. The utility auto-detects and
displays the WL-330g SSID,
channel, encryption, MAC, and
IP address. Click Configure to
change these settings.
Checking the Remember my password option allows the utility to auto-fill
the password everytime you enter the Wireless Setting configuration.
Refer to page 16 for details on changing the log-on password.
3. Enter the Network Name
(SSID) and channel you wish to
use. Click the Encryption link
or tab to set the encryption
settings. Otherwise, click OK to
finish setting up the AP.
To establish connection, a
wireless client must have
the same SSID, channel,
and encryption settings
as that of the WL-330g.
2. Log on to the configuration
window using the default
password (admin), check the
Remember my password
option, then click OK.
8 ASUS Pocket Wireless Access Point (WL-330g)
Page 9
English
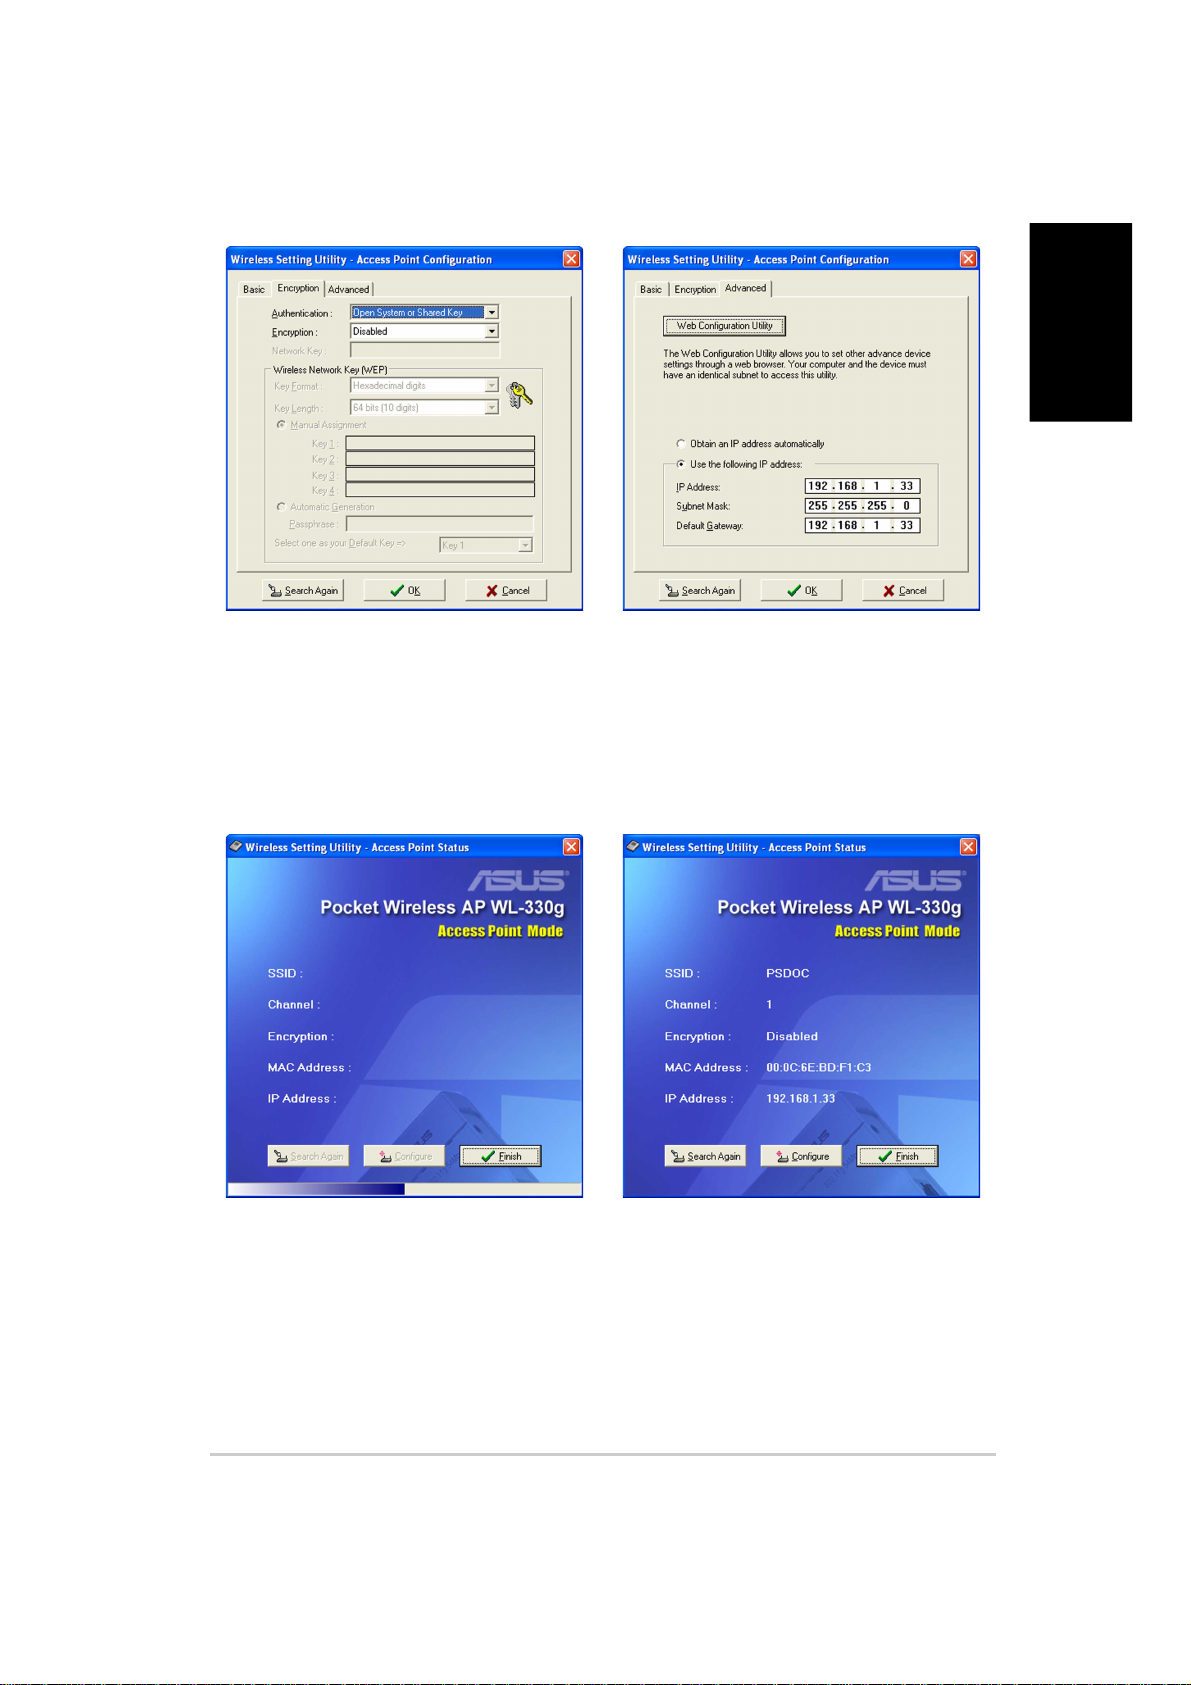
4. Set the WL-330g encryption
settings. Click the Advanced
tab to adjust the WL-330g
network settings. Otherwise,
click OK to finish setting up the
AP.
5. If necessary, adjust the WL-330g
network settings, then click OK
to finish the setup. Otherwise,
click the Web Configuration
Utility button to launch the
configuration utility.
6. The WL-330g applies your
specified settings.
7. After applying your settings,
the utility displays the WL-330g
access point information. Click
Finish to close the utility.
9ASUS Pocket Wireless Access Point (WL-330g)
Page 10
English
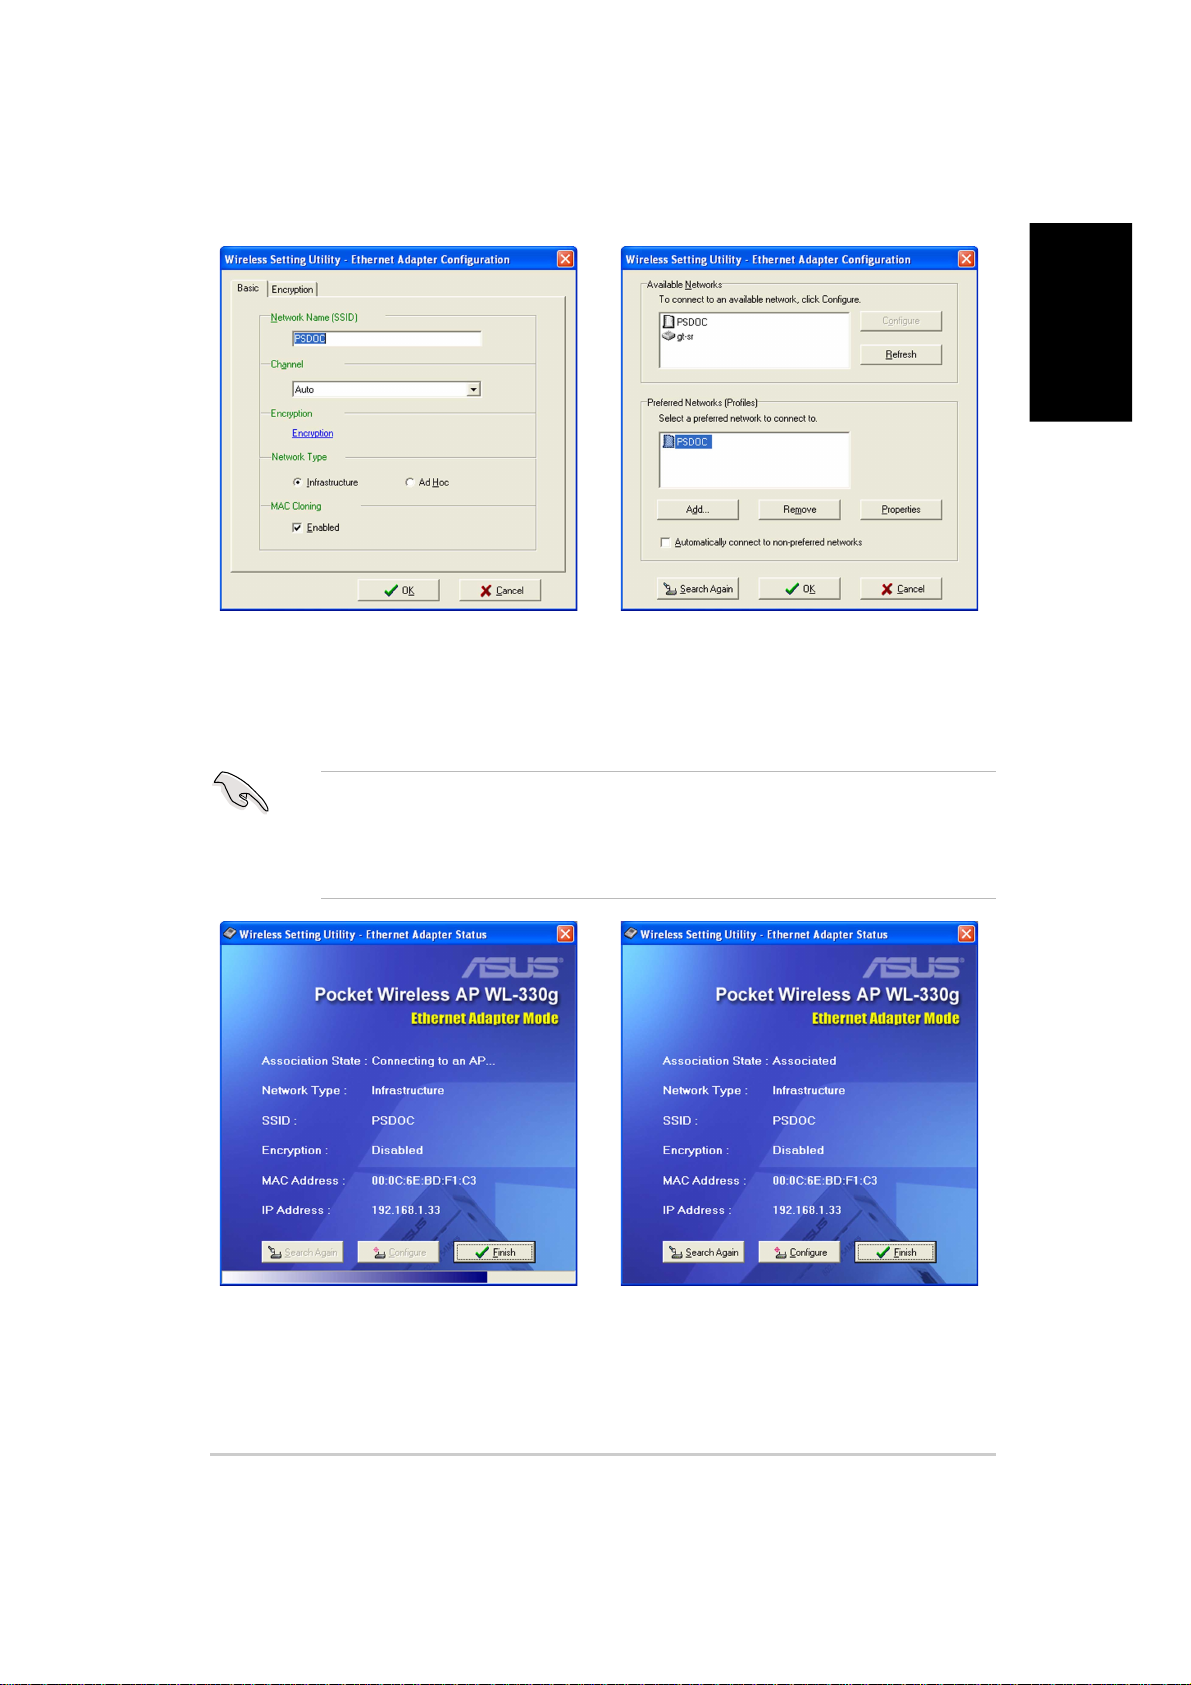
Setting up your Ethernet adapter
Follow these instructions to set up your WL-330g when in Ethernet adapter mode:
Make sure that you switched the WL-330g to Ethernet adapter mode
before launching the Wireless Setting Utility. Use the mode switch to
change the device operating mode.
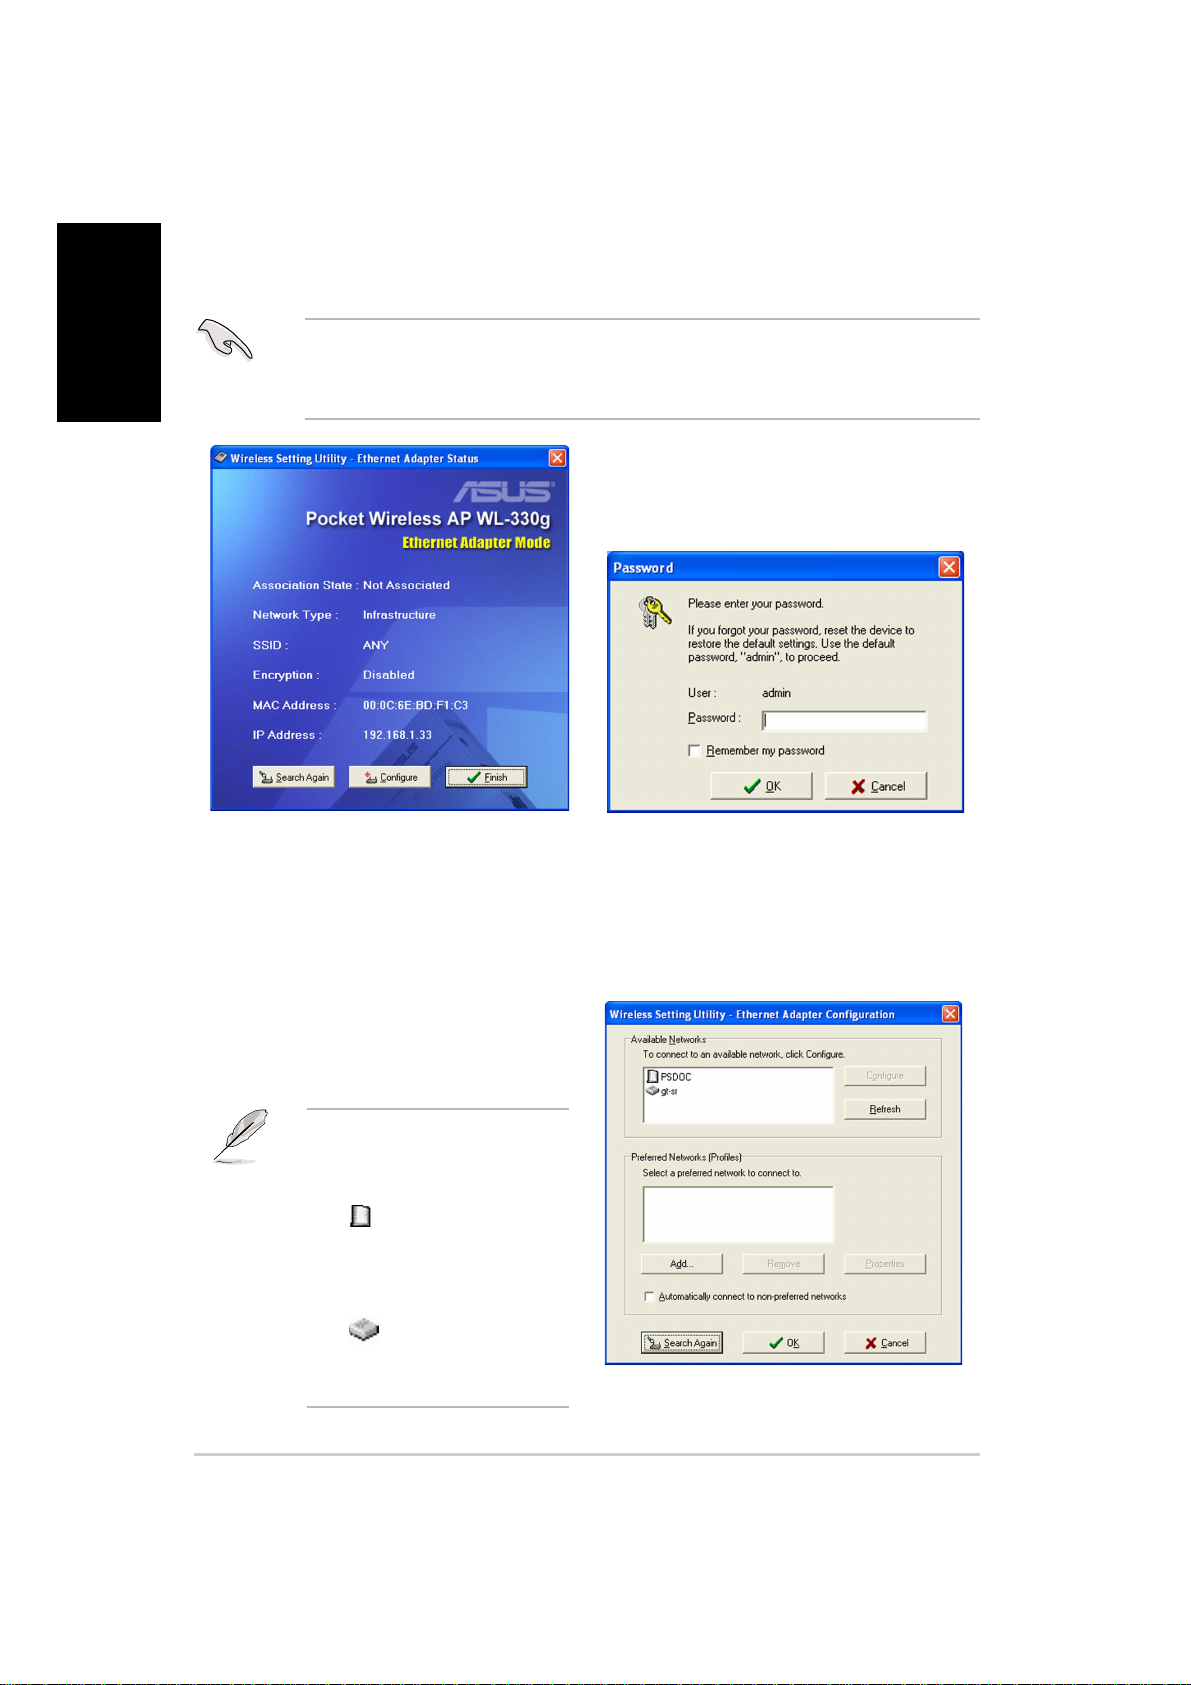
1. The utility auto-detects and
displays the WL-330g Ethernet
adapter settings. Click
Configure to continue.
3. Select a wireless network from
the Available Networks field,
then click Configure.
If you intend to connect to an
AP (Infrastructure mode),
select a network with the AP
icon
connect to another wireless
device (Ad-hoc mode), select
a network with the station
icon
connect to another wireless
network not listed in the field.
. If you wish to
. Click Add to
2. Log on to the configuration
window using the default
password (admin), check the
Remember my password
option, then click OK.
10 ASUS Pocket Wireless Access Point (WL-330g)
Page 11
English
4. The WL-330g automatically
adjusts to the SSID and channel
settings of the selected wireless
network. Click OK.
If the selected network has enabled encryption, use the Encryption tab to
set the WL-330g encryption settings the same with the selected network.
The encryption settings of the network and the WL-330g must be the same
to establish connection.
5. The selected wireless network
appears in the Preferred
Networks field. Select the
network, then click OK.
6. The WL-330g connects to the
selected wireless network.
7. The utility displays the WL-330g
status when connection is
established. Click Finish to
close the utility.
11ASUS Pocket Wireless Access Point (WL-330g)
Page 12
English
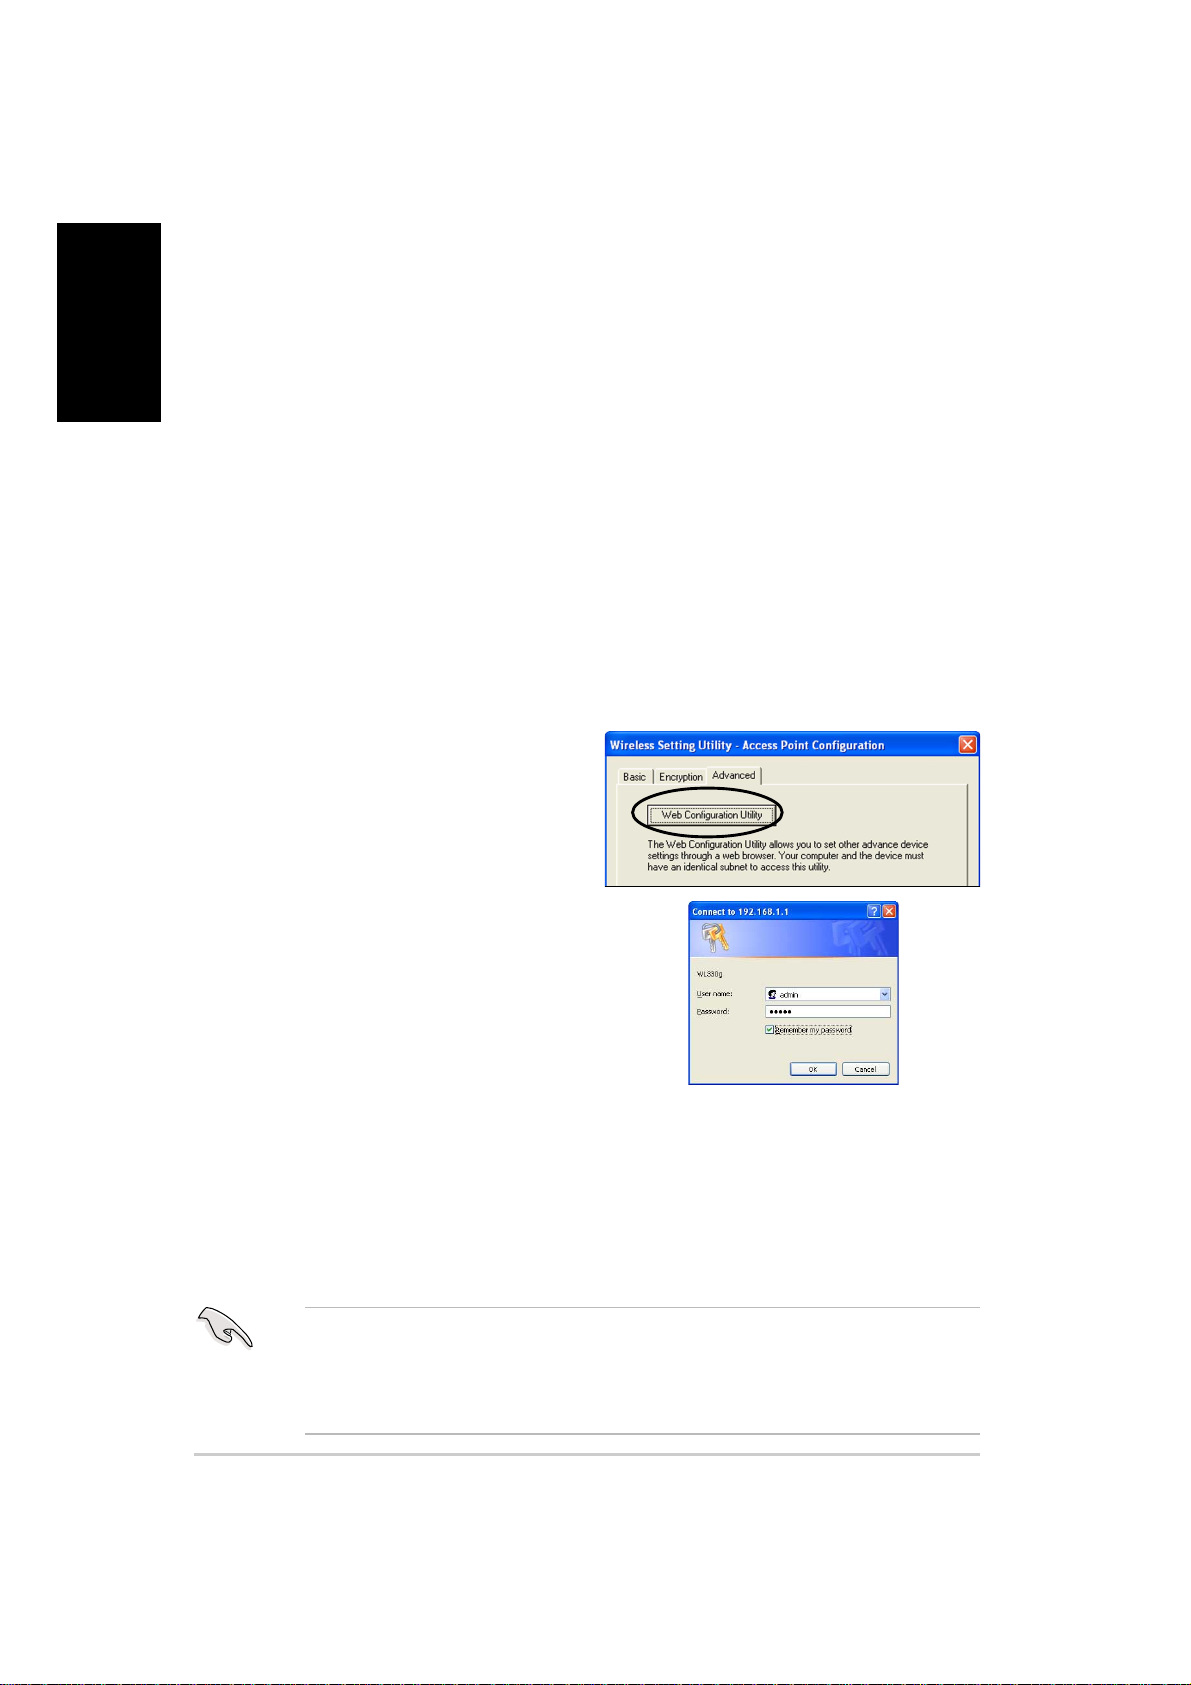
Web Configuration Utility
The Web Configuration utility allows you to change the advanced access point
and Ethernet adapter settings of the WL-330g through a web browser.
Launching the Web Configuration utility
Using the Wireless Setting Utility
To launch the Web Configuration utility using the Wireless Setting utility:
1. Click Start > All Programs > ASUS Utility > Wireless AP > Wireless
Setting.
2. Click Configure when the Wireless Setting Utility window appears.
3. Log on to the configuration window using the default user name (admin)
and password (admin), then click OK.
4. Disable your proxy settings, if any.
5. Click the Advanced tab, then click
the Web Configuration Utility
button.
6. A web browser appears. When
prompted, enter the default user
name (admin) and password
(admin), then click OK. The Web
Configuration utility page appears.
Using an Internet browser
To launch the Web Configuration utility using an Internet web browser:
1. Open a web browser.
2. Disable your proxy settings, if any.
3. Type http://192.168.1.1 on the address bar of the browser, then press <Enter>.
This option requires you to change the IP address of the LAN adapter
where the WL-330g is connected. Make sure the IP address of the
WL-330g and your computer is on the same subnet. Refer to the User
Guide in the support CD for details on how to change the IP settings.
12 ASUS Pocket Wireless Access Point (WL-330g)
Page 13
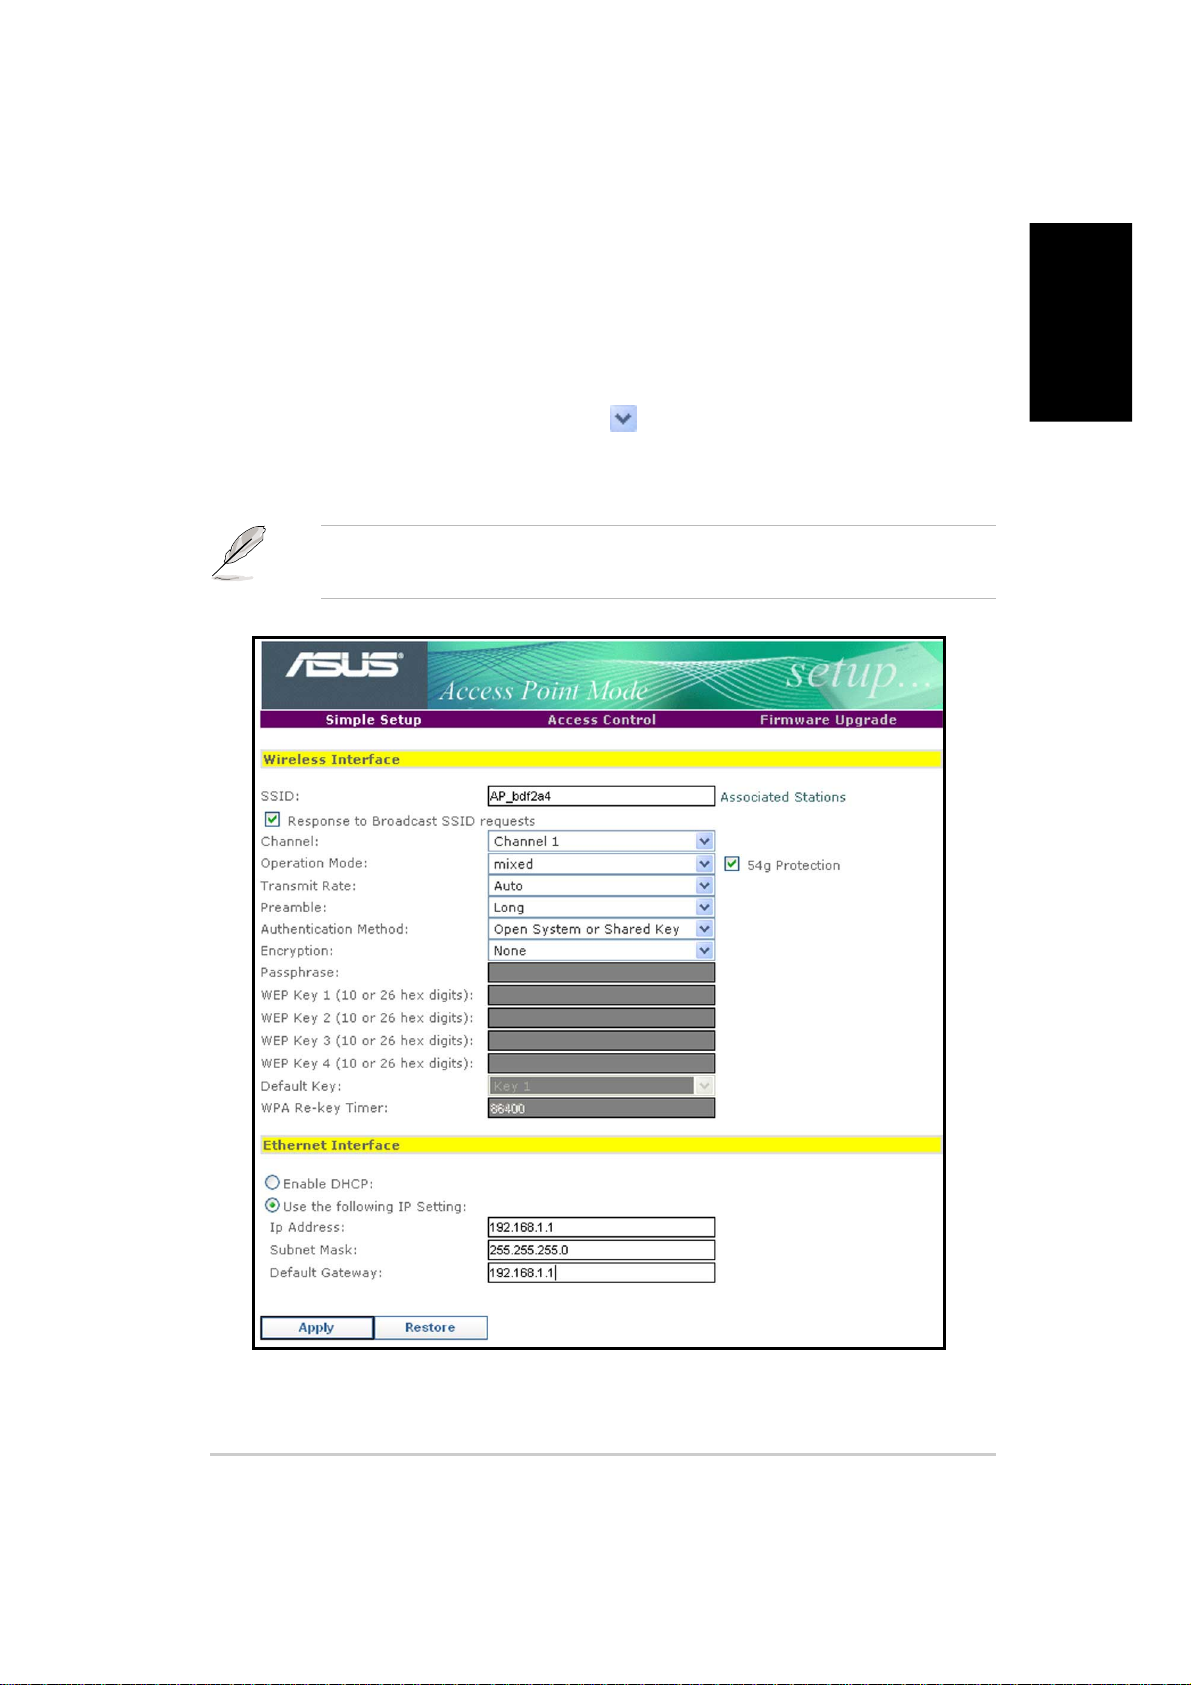
Changing the access point (AP) configuration
Simple Setup page
The Simple Setup page displays the default AP settings of the WL-330g. Use
this page to set the AP channel, operation mode, and security.
English
You can change a setting by clicking the
If you wish to load the default settings, press the device reset button for more
than five seconds, then refresh your browser to display the default values.
Refer to the User Guide in the support CD for the location of the reset
button.
button to display available options.
13ASUS Pocket Wireless Access Point (WL-330g)
Page 14

Setting the AP operating mode
English
You can adjust the WL-330g operating mode to support wireless devices using
IEEE 802.11b or IEEE 802.11g standards. Setting the operating mode to mixed
allows the WL-330g to support both wireless standards.
Table 1: WL-330g operating modes
Operation mode Supported wireless client(s)
B only IEEE 802.11b client(s) only
G only IEEE 802.11g client(s) only
Mixed IEEE 802.11b and IEEE 802.11g clients
Securing your wireless communication
The WL-330g implements the Wi-Fi Protected Access (WPA)-PSK
authentication method to secure communication to and from wireless devices.
This method uses the Temporal Key Integrity Protocol (TKIP) encryption to
enhance the Wired Equivalent Privacy (WEP) encryption.
To enable WPA-PSK:
1. Select WPA-PSK as the
Authentication Method.
2. Type 8 ~ 63 alpha-numeric
characters in the
Passphrase field.
3. Set the WPA Re-key Timer
(1 ~ 2147483647 seconds).
The re-key timer allows you
to set the time interval before the WPA group key is changed.
A shorter re-key interval provides a more secure wireless network.
14 ASUS Pocket Wireless Access Point (WL-330g)
Page 15
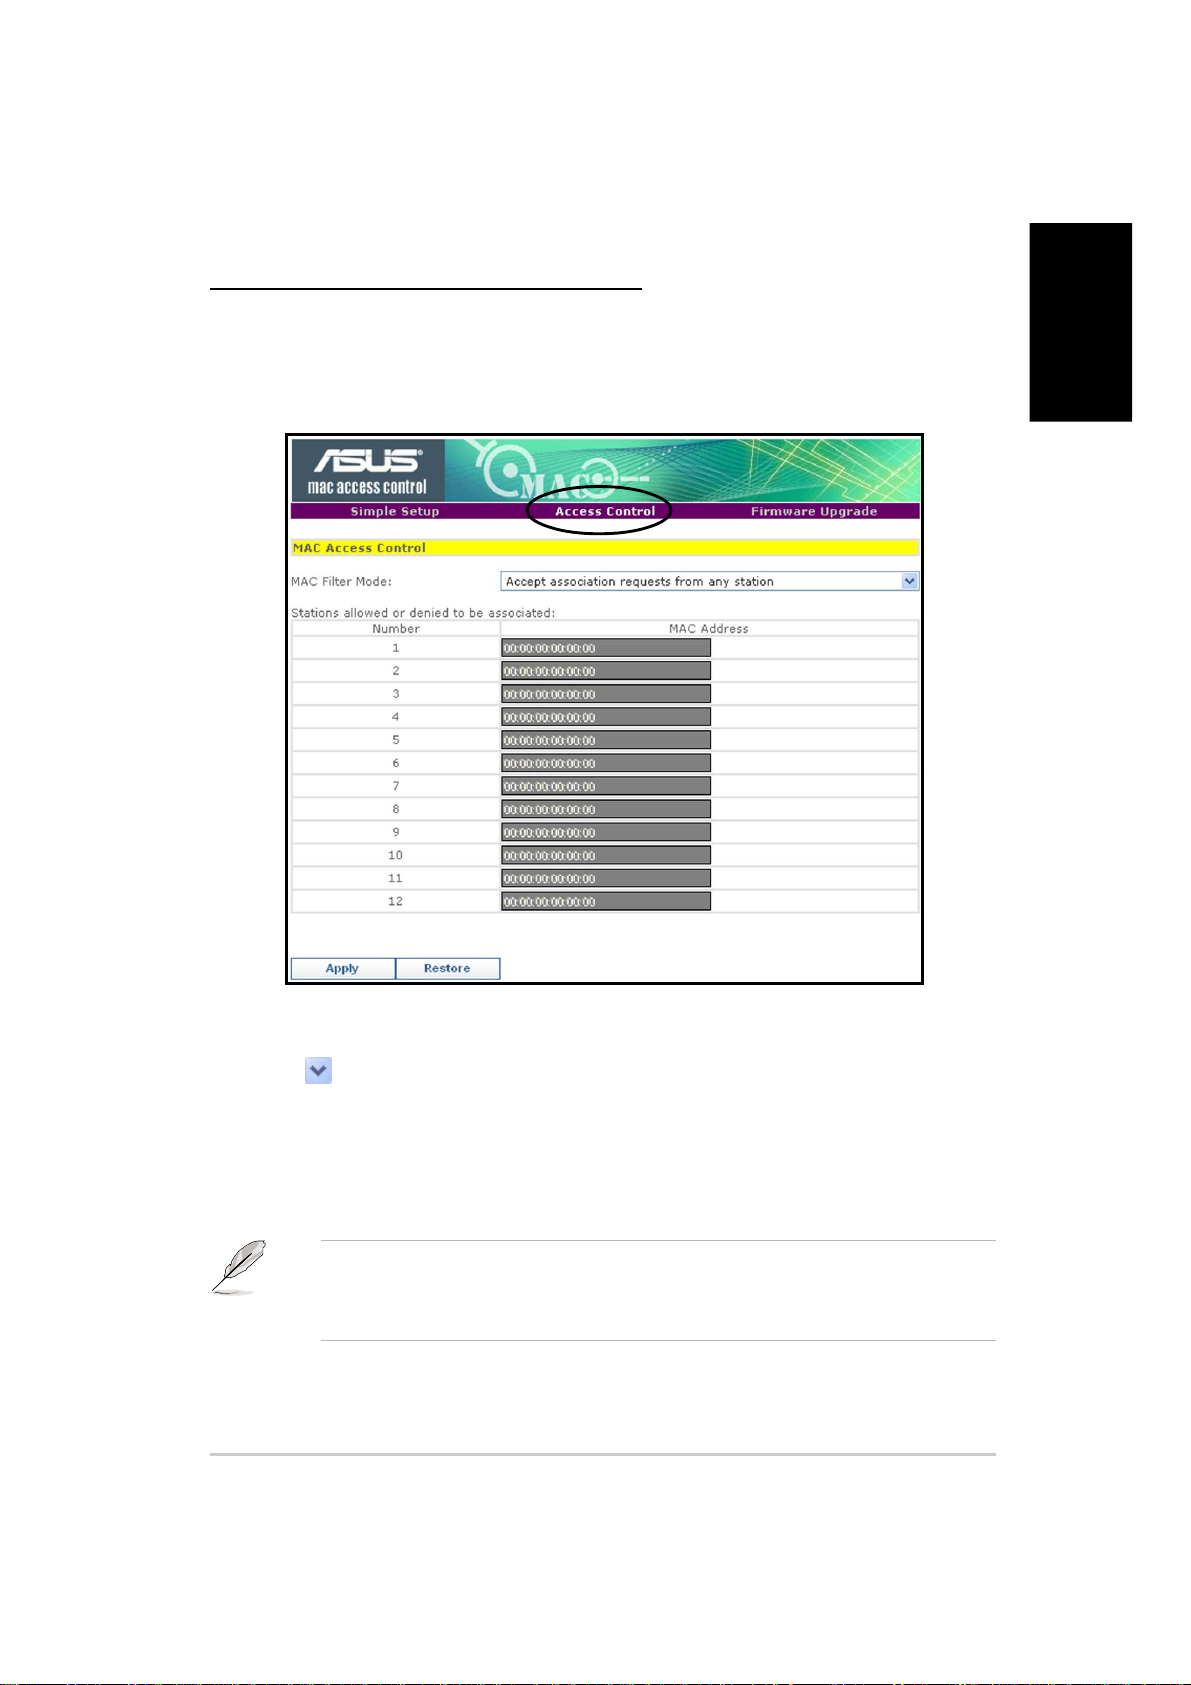
Access Control page
Controlling the wireless network traffic
The MAC Access Control page allows you to control the wireless network traffic
by specifying the MAC addresses of wireless clients allowed to establish
connection to the WL-330g.
English
To specify the wireless clients allowed to establish connection to the WL-330g:
1. Click
below to access this device” from the drop-down menu. The MAC
Address fields are activated.
2. Type the MAC address(es) of the wireless clients allowed to establish
connection to the WL-330g, then click Apply.
, then select the option “Only allow Stations with MAC listed
Selecting “Accept association requests from any station” allows all
wireless clients operating within the WL-330g range to establish
connection.
15ASUS Pocket Wireless Access Point (WL-330g)
Page 16
English
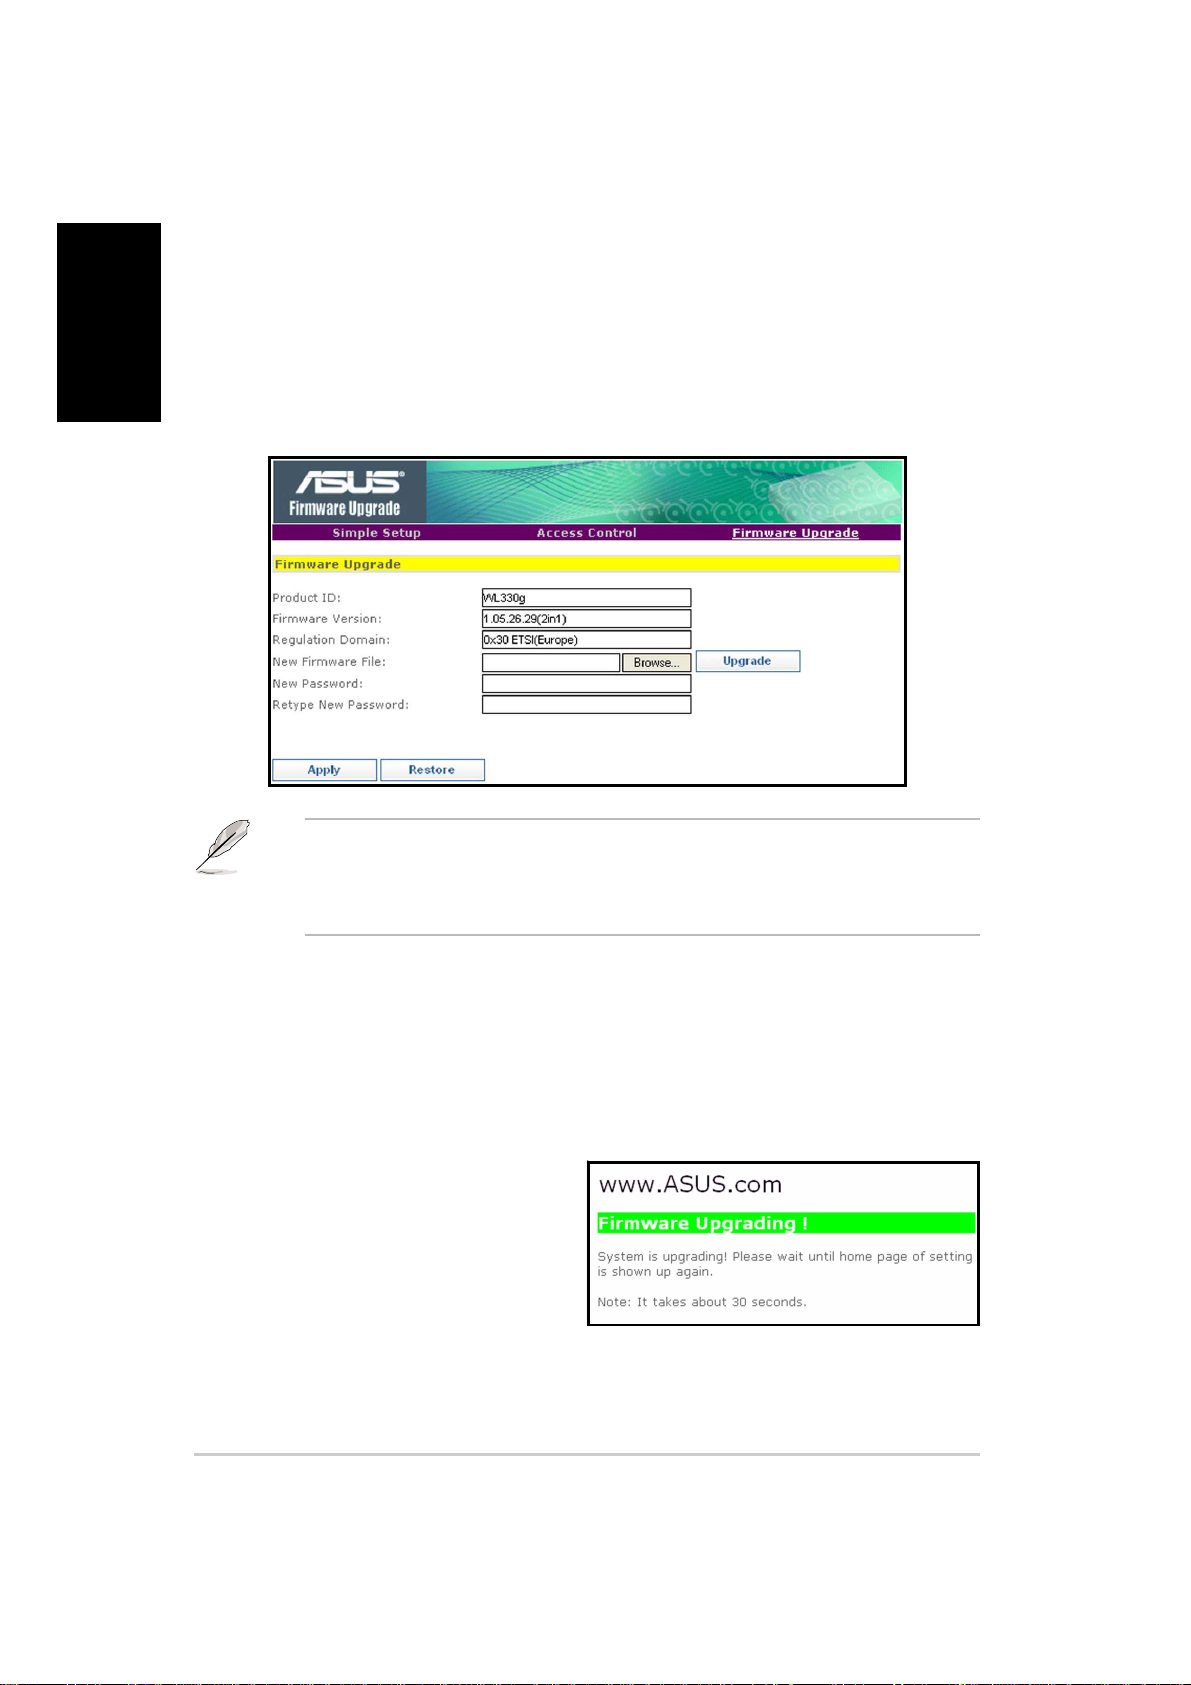
Firmware Upgrade page
The Firmware Upgrade page displays the product ID, firmware version, and
regulation domain. This page also allows you to:
1. upgrade the WL-330g firmware when it becomes outdated or corrupted, and
2. change the log on password.
• The Power LED blinks continuously when the firmware is corrupted or
when the firmware upgrade fails.
• Visit the ASUS website to download the latest firmware for this device.
To upgrade the WL-330g firmware:
1. Download and save the latest firmware from the ASUS website.
2. Launch the Web Configuration Utility, then go to the Firmware Upgrade
page.
3. Click the Browse button to locate the new firmware file.
4. Click Upgrade. A Firmware
Upgrading! message appears.
The browser refreshes after the
firmware upgrade process is
completed.
16 ASUS Pocket Wireless Access Point (WL-330g)
Page 17

Changing the Ethernet adapter configuration
You must switch the device to Ethernet adapter mode using the mode
switch before changing any Ethernet adapter settings.
Simple Setup page
The Simple Setup page allows you to change the basic Ethernet adapter
settings. You can use this page when setting the WL-330g SSID, station mode,
transmission rate, security, and MAC cloning feature.
You can also use the Simple Setup page to enable the Button Scan Mode
feature. This feature allows the WL-330g to automatically connect to a specified
wireless network using the device reset button.
English
Refer to the User Guide in the support CD for detailed description of the
Ethernet adapter settings.
17ASUS Pocket Wireless Access Point (WL-330g)
Page 18
English
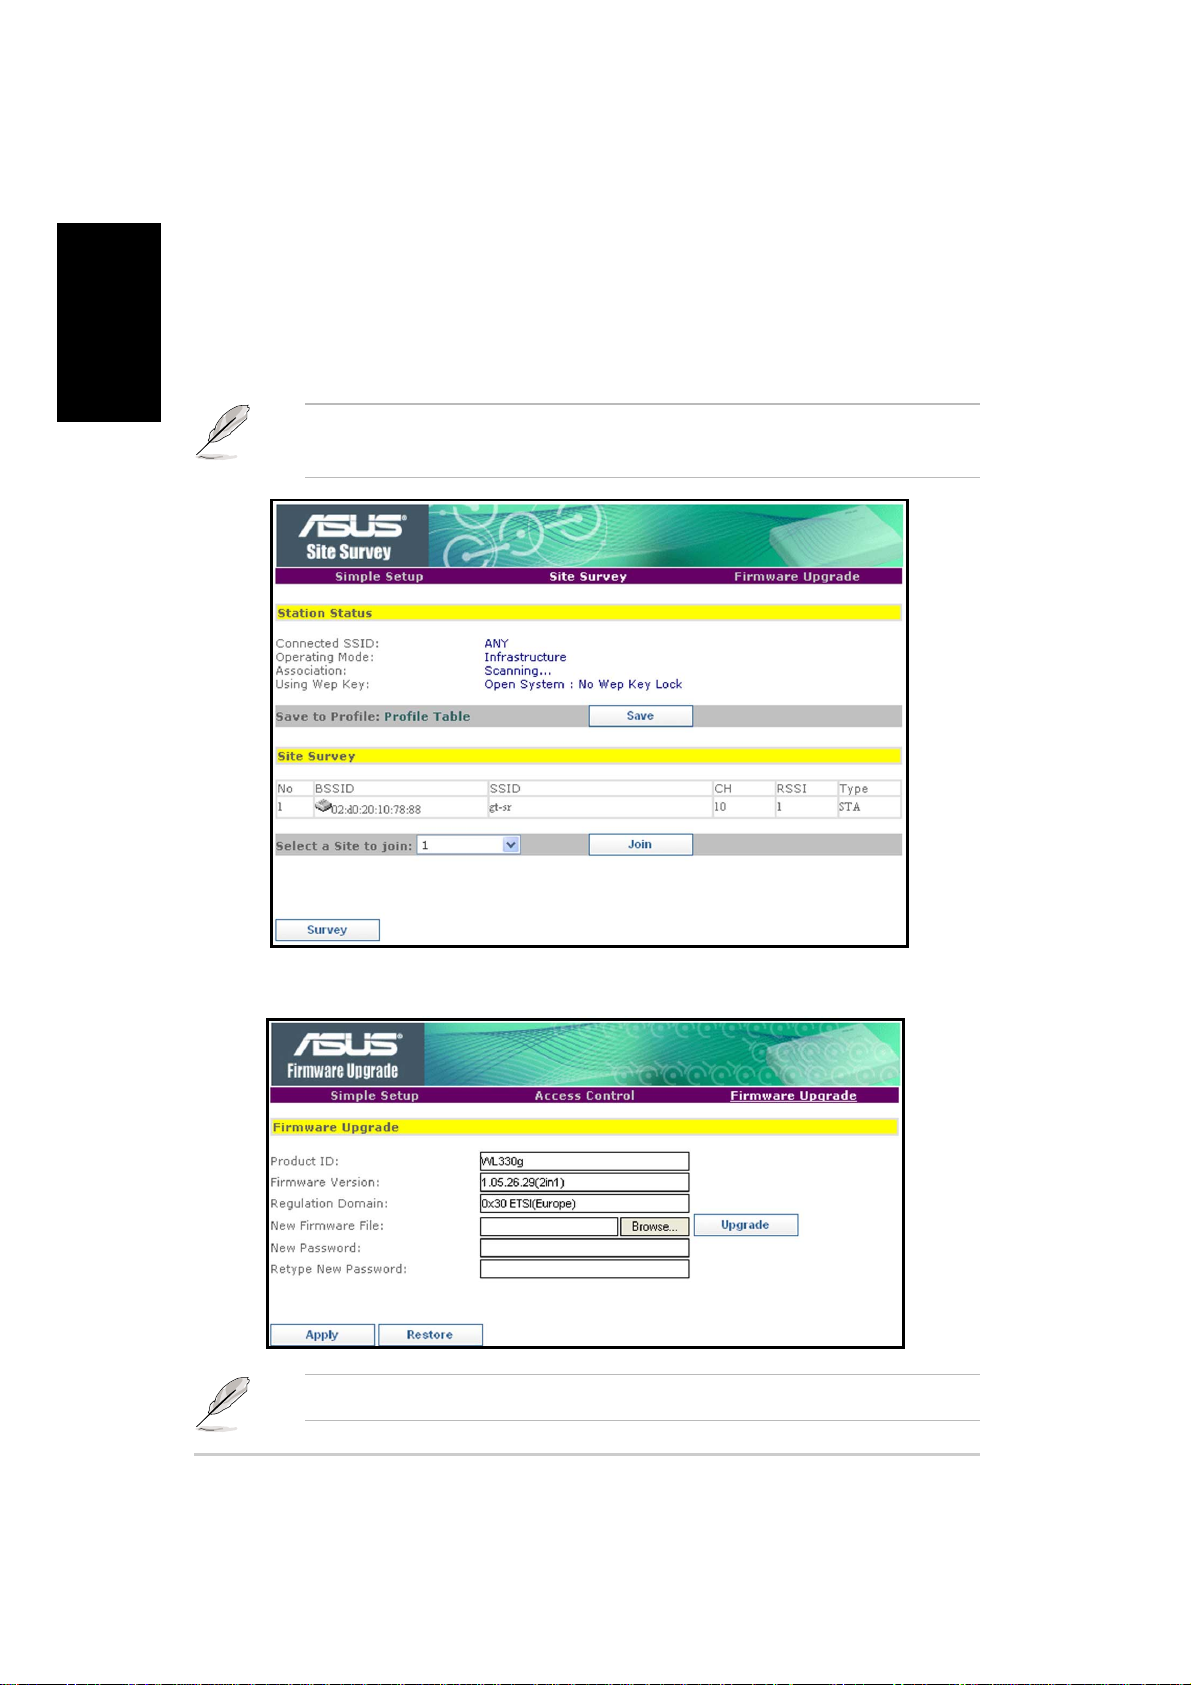
Site Survey page
The Site Survey page allows you to scan and connect to available wireless
networks within the WL-330g range. This page also allows you to save a
wireless network as profile for the Button Scan Mode feature.
Refer to the User Guide in the support CD for details on the Button Scan
Mode feature.
Firmware Upgrade page
Refer to page 16 for details on the Firmware Upgrade page.
18 ASUS Pocket Wireless Access Point (WL-330g)
Page 19

Device setup
Using the device in a local network
You can use the WL-330g to connect a WLAN-enabled computer to a local
network with or without a DHCP server.
To connect a WLAN-enabled computer to a local network:
1. Switch the WL-330g to AP mode. (Default SSID: AP_xxxxxx), then turn on
the device.
2. Connect one end of the supplied RJ-45 cable to the Ethernet port of the
device and the other end to the Ethernet port of the local network.
3. Use the WLAN adapter software in the WLAN-enabled computer to
perform a Site Survey. Make sure the computer’s WLAN adapter is set to
Infrastructure mode.
4. Establish connection with the WL-330g.
5. Set the IP configuration of the computer to establish connection to the
local network. Verify your connection.
Use the Wireless Setting Utility to change the WL-330g SSID or encryption
settings.
Replacing the computer Ethernet cables
English
You can use the WL-330g to replace your WLAN-enabled computer cable
connection to an ADSL or cable modem.
To do this:
1. Switch the WL-330g to AP mode. (Default SSID: AP_xxxxxx), then turn on
the device.
2. Connect one end of the supplied RJ-45 cable to the Ethernet port of the
device and the other end to the Ethernet port of the ADSL or cable modem.
3. Use the WLAN adapter software in the WLAN-enabled computer to
perform a Site Survey. Make sure the computer’s WLAN adapter is set to
Infrastructure mode.
4. Establish connection with the WL-330g.
5. Set the IP configuration of the computer to establish connection to the
local network. Verify your connection.
19ASUS Pocket Wireless Access Point (WL-330g)
Page 20

English
Replacing the cable connections of other devices
You can also use the WL-330g to replace your Xbox, PlayStation
box network cable connection.
To do this:
1. Switch the WL-330g to Ethernet adapter mode using the mode switch.
(Default SSID: ANY)
2. Place the WL-330g nearest the AP you wish to connect, then turn on the device.
3. Connect one end of the supplied RJ-45 cable to the Ethernet port of the
®
device and the other end to the Xbox, PlayStation
2, or set-top box
Ethernet port.
®
4. Set the IP address of the Xbox, PlayStation
2, or set-top box to establish
connection to the local network. Verify your connection.
Make sure the WL-330g MAC cloning feature is enabled when using the
device in this setup. Use the Wireless Setting Utility to enable MAC
cloning. Refer to the User Guide in the support CD for details.
®
2, or set-top
Sharing Internet access with other computers
Refer to the typical network configuration and table below for information on
sharing an Internet access with other computers in your office or home network.
Use the mode switch to set the WL-330g to AP mode before sharing an
Internet connection with other computers in your network.
ADSL/Cable modem WL-330g
If your Internet
connection is
xDSL1 with dynamic IP ISP automatically assigns Depends on the Internet Service
(PPPoE2 account) the IP (using PPPoE dial-up) Provider (ISP)
xDSL with static IP to the provided static IP Depends on the Internet Service
xDSL/Cable with a router No need; the DHCP server Depends on the DHCP server,
and enable DHCP3 server automatically assigns the IP usually about 253
1
xDSL – ADSL (Asymmetric Digital Subscriber Line) or DSL (Digital Subscriber Line)
2
PPPoE – Point-to-Point over Ethernet
3
DHCP – Dynamic Host Configuration Protocol
Then set the IP of
other computer(s)
Provider (ISP)
Wireless computerInternet
Number of allowed
Internet connections
20 ASUS Pocket Wireless Access Point (WL-330g)
Page 21

54Mbps
(WL-330g)
Copyright © 2004 ASUSTeK COMPUTER INC. All Rights Reserved.
Page 22

234
Page 23

Page 24

6
4
5 2 1
3
Page 25

6
USB
5 3
4 2 1
5
Page 26

6
Page 27

®
7
Page 28

8
Page 29

910111213141516171819
Page 30

Page 31

Page 32

Page 33

Page 34

Page 35

Page 36

Page 37

Page 38

Page 39

Page 40

®
®
®
20
WL-330g
Page 41

Page 42

2
Page 43

~
•
•
•
3
Page 44

6
WL-330g
4
5 2 1
3
4
Page 45

6
WL-330g
USB
5 3
4 2 1
5
Page 46

’
6
Page 47

78910111213
Page 48

Page 49

Page 50

Page 51

Page 52

Page 53

Page 54

14
~
~
Page 55

15
Page 56

•
•
16
Page 57

171819
Page 58

Page 59

Page 60

®
®
®
WL-330g
1
xDSL - ADSL (Asymmetric Digital Subscriber Line) or DSL (Digital Subscriber Line)
2
PPPoE - Point-to-Point over Ethernet
3
DHCP - Dynamic Host Configuration Protocol
20
 Loading...