


Asus P8H61-I LX R2.0 Quick Start Guide
A7397
P8H61-I LX R2.0
Motherboard
Quick Start Guide
Français
Bahasa Indonesia
Tiếng Việt
Türkçe
First Edition
May 2012
Copyright © 2012 ASUSTeK Computer
All Rights Reserved
Bienvenue ! / ! / ! / !/
Selamat datang! / Chào mừng! /  /
/  /
/
Hoş Geldiniz!
Ce guide contient les informations essentielles à la configuration de votre système. Suivez les étapes numérotées apparaissant dans le diagramme de la carte mère pour garantir le bon fonctionnement du système. Reportez-vous au manuel de l’utilisateur pour plus de détails sur les composants, le BIOS ainsi que l’installation et la configuration des logiciels.
ドウェア、BIOS
.. , BIOS,
시오.
* .
ผู้ใช้เมนบอร์ดของคุณสำหรับรายละเอียดเพิ่มเติมเกี่ยวกับการติดตั้งและการกำหาร์ดแวร์,
BIOS
Panduan ringkas ini berisi informasi yang paling diperlukan untuk menyiapkan sistem baru Anda. Ikuti langkah-langkah yang ditandai pada tata letak motherboard di bawah ini untuk menyiapkan sistem baru Anda. Untuk info lebih rinci tentang perangkat keras, BIOS, serta penginstalan dan konfigurasi perangkat lunak, lihat panduan pengguna motherboard Anda.
Bu hızlı başlangıç kılavuzu yeni sisteminizi kurmak için en gerekli bilgileri sağlamaktadır. Yeni sisteminizi kurmak için aşağıdaki anakart düzeninde işaretli olan adımları izleyin. Donanım, BIOS ve yazılım kurulumu ve yapılandırması hakkında daha fazla bilgi için ana kart kullanım kılavuzunuza başvurun.
Australia statement notice
From 1 January 2 012 updated warranties apply to all ASUS products, consistent with the Australian Consumer Law. For the latest product warranty details please visit http://support.asus.com. Our goods come with guarantees that cannot be excluded under the Australian Consumer Law. You are entitled to a replacement or refund for a major failure and compensation for any other reasonably foreseeable loss or damage. You are also entitled to have the goods repaired or replaced if the goods fail to be of acceptable quality and the failure does not amount to a major failure.
If you require assistance please call ASUS Customer Service 1300 787 88 or visit us at http://support.asus.com
ASUS P8H61-I LX R2.0
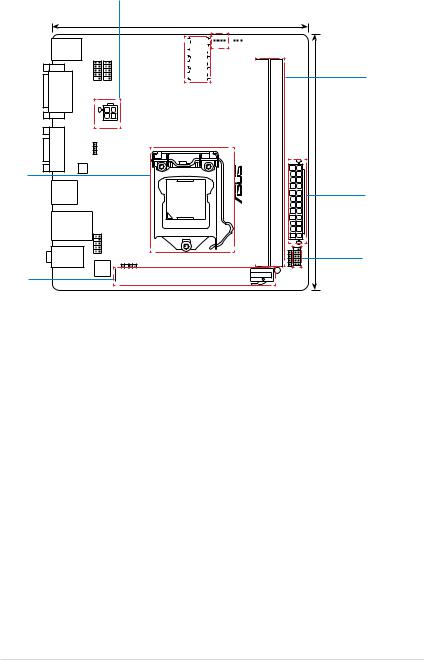
Step 7 |
Step 4 Step 2 |
KBMS |
|
| <![if ! IE]> <![endif]>USB78 |
<![if ! IE]> <![endif]>USB56 |
| <![if ! IE]> <![endif]>DVI |
|
|
ATX12V |
| <![if ! IE]> <![endif]>VGA |
CLRTC |
|
17cm(6.7in) |
|
|
|
|
|
|
|
|
|||||
|
|
SATA3G_1 |
|
|
|
|
|
|
|
|
|
|
|
|
|
|
|
|
|
|
|
|
|
|
|
|
|
|
|
|
|
|
|
|
|
|
|
|
|
|
|
|
|
|
|
|
|
|
|
|
|
|
|
CPU_FAN CHA_FAN |
|
||||
Intel® |
|
SATA3G_2 |
|
|
|
|
|
|
|
|
|
|
|
|
|
|
|
|
|
|
|
|
|
|
|
||||
|
SATA3G_3 |
|
|
|
|
|
|
|
|
|
||||
H61 |
|
|
|
|
|
|
|
|
|
Super |
|
|
||
|
|
SATA3G_4 |
|
|
|
|
|
I/O |
|
|
||||
|
|
|
|
|
|
|
|
|
|
|
|
|
|
|
|
|
|
|
|
|
|
|
|
|
|
|
|
|
|
|
|
|
|
|
|
|
|
|
|
|
|
|
64Mb |
|
|
|
|
|
|
|
|
|
|
|
|
|
|
BIOS |
|
|
|
|
|
|
|
|
|
|
|
|
|
|
|
|
|
|
|
|
|
|
|
|
|
|
|
Lithium Cell |
|
||
|
|
|
|
|
|
|
|
|
|
|
CMOS Power |
|
||
Step 1 |
RTL |
|
|
|
8111F |
|
|
|
|
|
USB34 |
|
<![if ! IE]> <![endif]>LGA1155 |
<![if ! IE]> <![endif]>0.R2 |
|
LAN1_USB12 |
|
<![if ! IE]> <![endif]>LXP8H61I- |
|
|
|
|
|
|
|
AUDIO |
AAFP |
|
|
|
|
VIA |
SPDIF_OUT |
|
|
|
VT1708S |
PCIEX16 |
|
Step 5 |
|
|
|
|
|
|
|
|
<![endif]> DDR3 DIMMA1 (64bit, 240-pin module)
|
|
|
Step 3 |
| <![if ! IE]> <![endif]>DIMMB1 (64bit, 240-pin module) |
<![if ! IE]> <![endif]>EATXPWR |
<![if ! IE]> <![endif]>17cm(6.7in) |
Step 7 |
| <![if ! IE]> <![endif]>DDR3 |
|
|
|
|
<![if ! IE]> <![endif]>SPEAKER |
<![if ! IE]> <![endif]>F PANEL |
Step 6 |
|
|
|
|
SB_PWR |
|
|
|
ASUS P8H61-I LX R2.0

Step 1
Installer le CPU
CPU
CPU
CPU
Pasang CPU
Lắp CPU
CPU’yu takın
1 |
2 |
B
4 5 C
A
3
6
|
ASUS P8H61-I LX R2.0 |
 Loading...