

Page 1
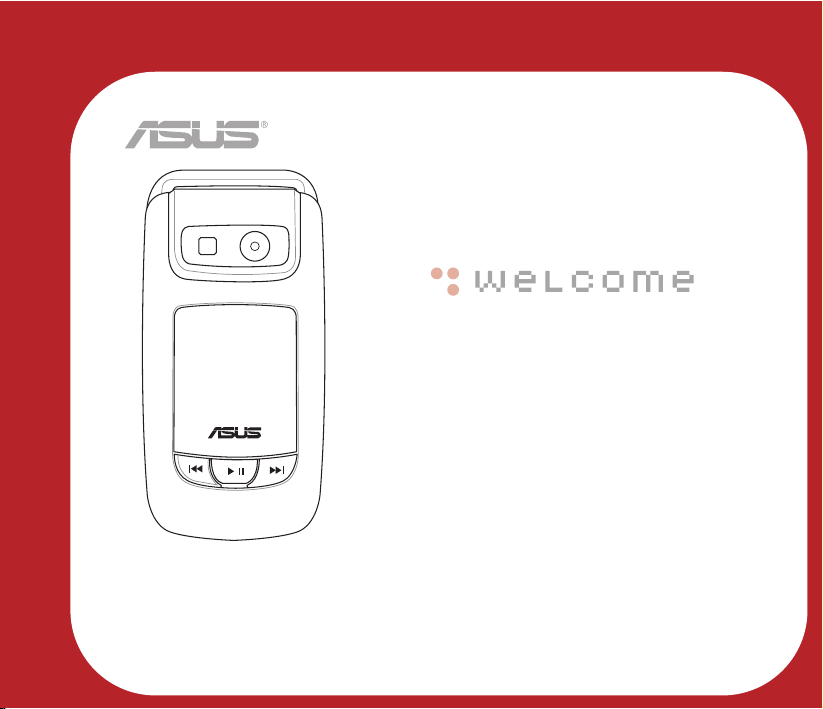
ASUS M307
Page 2

Preface
Preface
Congratulations on your purchase of an ASUS M307 mobile phone. Read this manual
carefully and keep it in a safe place for future reference.
About this manual
Every effort has been made to ensure that the contents of this manual are correct and
up to date. However, the manufacturer makes no guarantee regarding the accuracy of
the contents, and reserves the right to make changes without notice.
2
Page 3

Safety Precautions
Safety Precautions
For your safety and to keep your phone in good operating condition, read the following
tips and reminders carefully before using your phone.
Do not use your phone while driving, unless you use an earphone or hands-free car
kit.
Switch off the phone while in an aircraft. Wireless devices may cause interference in
the aircraft communication and navigation systems.
Switch off the phone when you are inside a hospital or near medical equipment.
Follow hospital rules and regulations on using devices that may cause interference.
Do not use the phone where blasting is in progress. Strictly observe restrictions
where required.
Use the phone to call for help or to help others during emergencies.
Ensure that the phone is switched off before removing the battery or SIM card.
Refer phone servicing only to qualified personnel.
Treat battery with care. Do not take it apart, expose to fire or high temperature, or
short circuit with metal objects.
Use only approved accessories. Do not connect incompatible products or devices.
3
Page 4

Safety Precautions
4
For use with battery: MANUFACTURER - WELLDONE for M307 Model. Risk of
explosion if battery is replaced by an incorrect type. Dispose of used batteries
according to the instructions.
Switch off the phone when refueling. Do not use the phone near fuels or chemicals.
Always keep the phone dry and free from dust.
Follow the instructions in this user guide.
*SAR: 0.594W/kg for GSM Head; 0.487W/kg for DCS Head.
Page 5

Copyright
Copyright 2006 ASUS All Rights Reserved.
No part of this manual, including the products and software described in it, may be
reproduced, transmitted, transcribed, stored in a retrieval system, or translated into any
language in any form or by any means, except documentation kept by the purchaser for
backup purposes, without the express written permission of ASUS INC. ("ASUS").
Product warranty or service will not be extended if: (1) the product is repaired, modified
or altered, unless such repair, modification of alteration is authorized in writing by
ASUS; or (2) the serial number of the product is defaced or missing.
ASUS provides this manual "as is" without warranty of any kind, either express or
implied, including but not limited to the implied warranties or conditions of
merchantability or fitness for a particular purpose. In no event shall ASUS, its directors,
officers, employees, or agents be liable for any indirect, special, incidental, or
consequential damages (including damages for loss of profits, loss of business, loss of
use or data, interruption of business and the like), even if ASUS has been advised of
the possibility of such damages arising from any defect or error in this manual or
product.
Specifications and information contained in this manual are furnished for informational
use only, and are subject to change at any time without notice, and should not be
construed as a commitment by ASUS. ASUS assumes no responsibility or liability for
any errors or inaccuracies that may appear in this manual, including the products and
software described in it.
5
Page 6
Package Contents
Products and corporate names appearing in this manual may or may not be
registered trademarks or copyrights of their respective companies, and are
used only for identification or explanation and to the owners' benefit, without
intent to infringe.
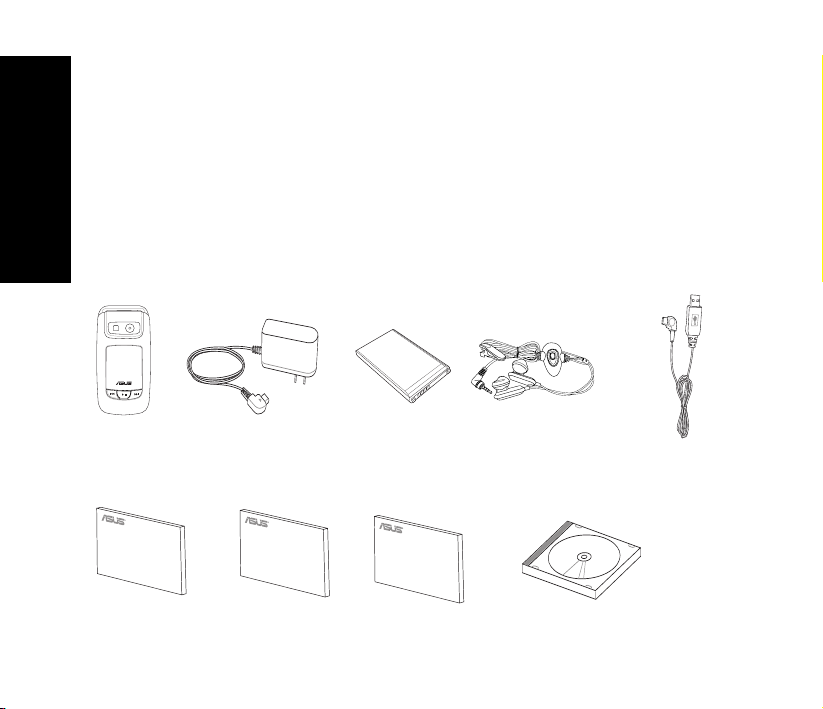
Package contents
The following illustration displays the package contents of your new phone.
700 mAh
Travel ChargerM307 Handset
Li-ion Battery
Stereo Headset
USB cable
6
User’s Manual
Quick Start Guide
Warranty Card
Handset Manager CD-ROM
Page 7

Welcome
The M307 is a stylish and fashionable new phone from Asus, with all the functions and
utilities to make it a useful tool in today's mobile world. The M307 comes equipped with
a built-in camera, MMS/SMS messaging capability, organizer, Java games, audio
player, WAP, GPRS, and a miniSD card slot. In addition to the built-in internal phone
memory, the miniSD card* provides additional memory where you can store your
contact information, messages, text, graphics, and audio files. The M307's audio player
enables you to play back your favorite music.
Features
Wide variety of calling and messaging functions
Built-in camera
Media center with audio player, and games for your entertainment
MMS and SMS messaging capability
Personal information organizer with alarm, calendar, calculator and other useful tools
to manage your time
WAP and GPRS capability to check e-mail or browse web service
Welcome
7
Page 8

Contents
Preface .................................... 2
About this manual .................. 2
Safety Precautions ................. 3
Copyright ................................ 5
Package Contents .................. 6
Welcome ................................. 7
Contents.................................. 8
Overview of M307 ................... 15
Rear View............................... 16
Front View .............................. 16
Left View ................................ 16
Getting Started ....................... 16
SIM & Battery Installation ...... 17
SIM & Battery Uninstallation . 18
The Mini SD
Installation & Uninstallation .. 18
Battery Charging .................... 19
Start Charging ........................ 19
In Charging........................... 19
8
Low Battery Indicators.......... 19
Charging Complete ................ 20
Turning On and Off ................ 20
SOS........................................ 20
Input PIN Code....................... 20
Calls Making ........................... 20
Common Calls........................ 20
International Calls .................. 21
Speed Dialing ......................... 21
Call Ending ............................. 21
Volume Adjustment ................ 21
Silent & Hands-free Speaker . 21
Call Answering ....................... 21
Phonebook.............................. 22
Add a New Contact ................ 22
Search a Contact ................... 23
Copy the Phonebook.............. 23
Copy a Contact ...................... 23
Delete All Contacts................. 23
Page 9

Delete a Contact .................... 23
Edit Group .............................. 23
Set Up My Phone Number ..... 24
Other Functions ..................... 24
Reject a Call ........................... 24
Speed Dial.............................. 24
Call Waiting ............................ 24
Hide My Number .................... 24
Call Barring ............................ 24
Call Forwarding ...................... 25
Fixed Dialing .......................... 26
Other Functions...................... 26
Call Log ................................... 26
Missed Calls ........................... 27
Answered Calls ...................... 27
Dialed Calls ............................ 27
Call Cost................................. 27
Check Call Cost ................... 27
Clear Counters ..................... 28
Call Cost’s Limit ................... 28
Call Time ................................. 28
Call Filter ................................. 29
Ignore List Modification .......... 29
Ignore List Deletion ................ 29
Privileged List Modification..... 29
Privileged List Deletion........... 29
Filter Setting ........................... 29
Security ................................... 30
PIN ......................................... 30
Phone Lock Code................... 30
Text Entry ................................ 30
Basics...................................... 30
Text Input Methods ................ 31
Multitap Text Entry ................. 31
Smart Text Entry ..................... 32
Common Words Text Entry ... 32
Symbols text Entry................. 32
Common Settings .................. 33
Contents
9
Page 10

Contents
Date/Time ................................ 33
Language ................................ 33
Shortcut .................................. 33
LED .......................................... 33
Auto Keyboard Lock .............. 33
Greeting Text .......................... 34
Factory Settings ..................... 34
Firmware Upgrade.................. 34
Manner .................................... 35
Personalized Manners ........... 35
Idle Mode................................. 35
Icons Introduction .................. 36
Quick Function Keys ............. 36
Main Menu............................... 37
Messages ................................ 38
Text Message(SMS) ................ 38
Message Reading/Inbox ........ 38
Functions................................ 38
10
Message Composing & Sending
............................................ 38
Outbox.................................... 39
Common Words ..................... 39
SMS Settings ......................... 39
SMS Memory ......................... 40
Private SMS ............................ 40
Cell Broadcast ........................ 41
Chatting Rooms ..................... 41
Set Chatting Room ................. 41
Start Chatting ......................... 41
Other Functions...................... 42
Multimedia Message(MMS) ... 42
Reading MMS/MMS Inbox ..... 42
Composing MMS.................... 42
Composing Text ................... 42
Adding Image ....................... 43
Adding Audio ........................ 43
Adding Slide ......................... 43
Other Options ....................... 43
Page 11

Adding Attachment ............... 43
Sending MMS......................... 43
MMS Settings ......................... 44
MMS Memory ......................... 44
MMS Outbox .......................... 44
Screen Display ....................... 46
Wallpaper ............................... 46
Wallpaper from built-in images
............................................ 46
Wallpaper from user’s images
............................................ 46
Idle Screen ............................. 46
Other Screen Setups.............. 46
Camera .................................... 47
Capture.................................... 47
Hot Keys for Capturing ........... 47
Camera Settings .................... 48
Other Settings ........................ 49
Video Recorder....................... 49
Hot Keys for Video Recording 49
Video Recorder Settings ........ 50
Photo Editing .......................... 51
My Album ............................... 51
Private Album ......................... 52
Image Gallery.......................... 52
Video Editing .......................... 52
My Video ................................ 52
Video Playing.......................... 53
MP3 Player .............................. 54
Playing MP3 Music................. 54
Interface of the MP3 Player.... 54
MP3 Player Settings............... 55
Playlist Editor ....................... 55
Playlist Manager................... 55
Category............................... 56
My Favorite .......................... 57
Play Single Song .................. 57
Playback............................... 57
Contents
11
Page 12

Contents
Equalizer .............................. 58
Detail .................................... 58
Language Learning .............. 58
Ringtone Settings .................. 58
Composer ............................... 58
Keyboard and Notes Table ... 59
Other Functions of Composer
Other Options for Incoming
Games ..................................... 60
Java Settings.......................... 60
Network ................................... 61
How to Set Up WAP................ 61
WAP Setup .............................. 61
Edit the WAP Profile............... 61
WAP Settings ......................... 62
Web Page Browsing............... 62
12
Network Selection .................. 63
............................................ 59
Ringtone .............................. 60
STK .......................................... 63
Alarm Setup ............................ 64
Dictionary................................ 64
Calendar .................................. 65
Check the Calendar ............... 65
Go To Date ........................... 65
Schedule an Appointment ...... 65
Check and Edit a Schedule .... 65
Calculator................................ 66
World Clock ............................ 66
Voice Recorder ....................... 66
Other Functions...................... 66
Voice Recognition .................. 67
Name Dialing .......................... 67
Record Name Dialing ............. 67
Make a Call with Name Dialing68
Voice Command ..................... 68
Record Voice Command ........ 68
Give Voice Command ............ 69
Page 13

Currency Exchange ............... 69
Stopwatch ............................... 70
Memory Status ....................... 70
Mass Storage .......................... 71
Installing the Handset Manager
............................................ 72
Starting the Handset Manager
............................................ 73
Main Panel .............................. 73
Settings, Information, and Online
Help .................................... 74
Navigating the Handset Manager
Tools ................................... 75
Navigating Media Files .......... 75
Transferring Files to and from the
Handset .............................. 76
Handset Manager Folder Loca-
tion ..................................... 77
Handset Manager Icon ........... 77
Contents
13
Page 14

14
Page 15
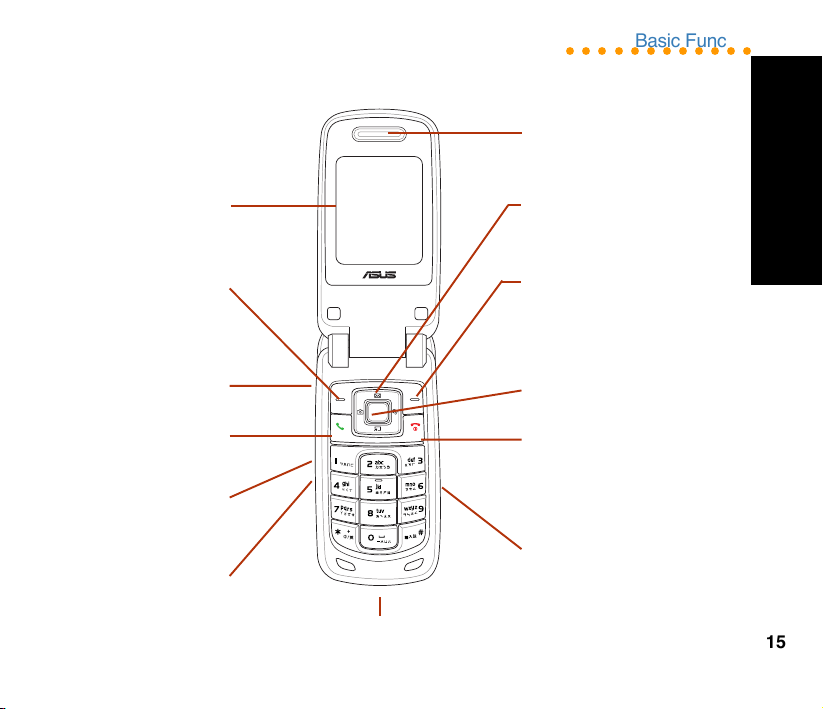
Overview of M307
○○○○○○○○○○○○
Receiver
Basic Functions
Overview
Screen
Left Soft Key: For the
main menu display;
lower left corner item
selection
Earphone Jack
Call Key: For a call
answering; call logs
Camera Key
Volume Key: For
volume adjustment
Joystick Keys:
For navigation and short cuts
Right soft key: For phonebook
display; on-screen lower right
corner item selection
Enter Key: For the selected
menu item confirmation
Power/End key: For power
turning on/off; a call termination;
menu exit
Charger / USB Port: For battery charge and computer connection
Mini SD Card Slot: For
mini SD card installation
15
Page 16
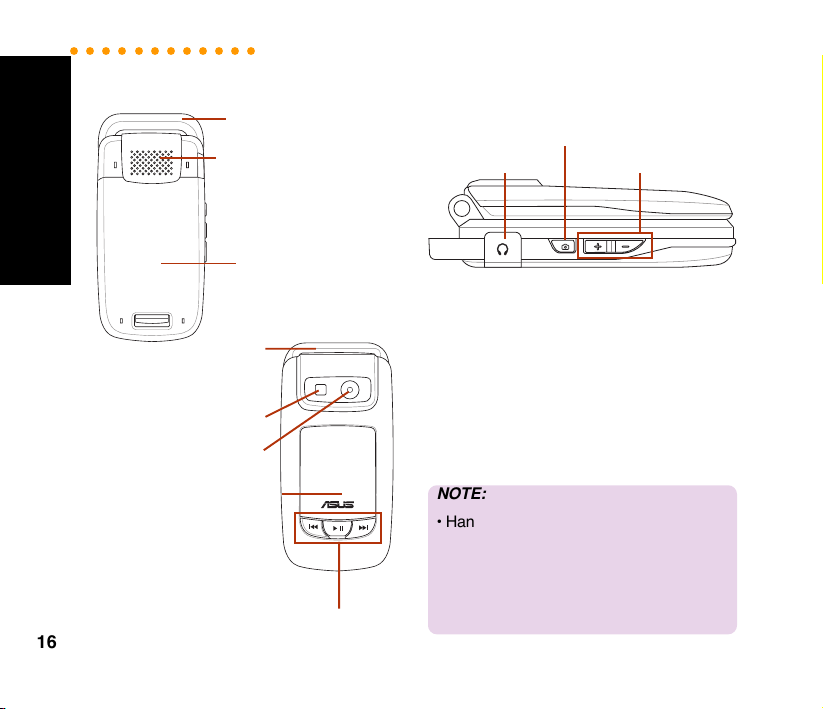
ASUS M307
○○○○○○○○○○○○
Getting Started
Rear View
Started
Getting
Antenna
Outer Speaker
Battery
Left View
Earphone Jack
Photo
Capture
Button
Volume
Adjustment
Buttons
16
Antenna
Photoflash
Camera Lens
Outer Screen
Front View
MP3 Function Keys
Getting Started
When registering with a service provider,
users will receive a SIM card. The SIM card
is a computer chip that enables phone
making work, containing the phone number,
phonebook information, and service
provider information.
NOTE:
• Handle the SIM card with care and do not
bend it or expose it to static electricity or
dirt.
• Be sure to turn off the phone before
inserting the SIM card.
Page 17
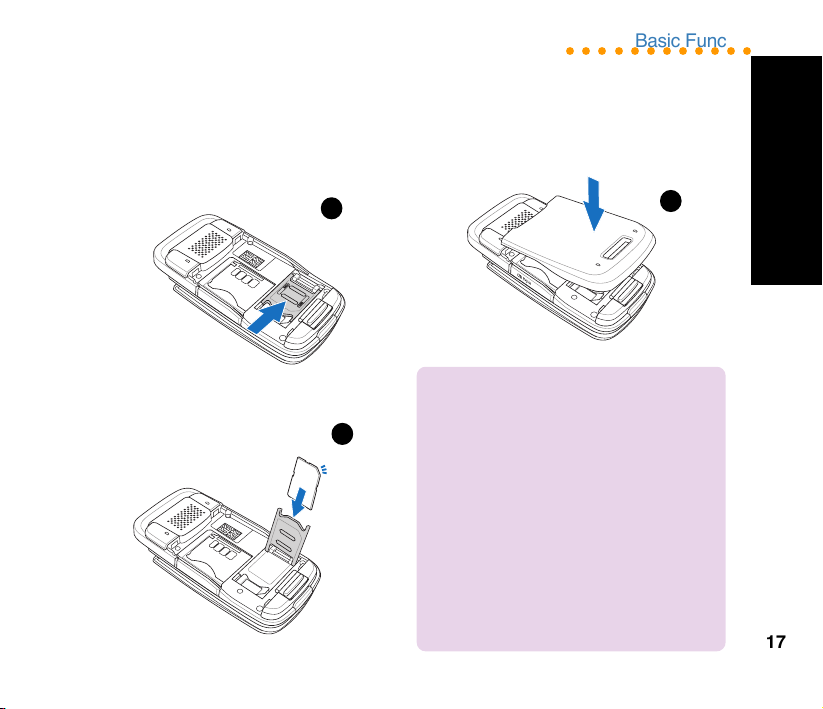
The SIM Card & Battery
Installation
1. Push rightward and unlock the SIM card
holder.
1
○○○○○○○○○○○○
Basic Functions
3. Reinstall the battery and press to snap it
back into place.
3
SIM Installation
SD
mini
OPEN
LOCK
2. insert the SIM card in the correct
orientation with the gold contacts
facedown.
SD
mini
2
NOTE:
• Use only the battery recommended by the
manufacturer. An incompatible battery may
cause danger.
• Dispose of the used batteries as instructed
by the manufacturer or ask your local
authorities for assistance.
• Keep the SIM card out of children’s reach.
Be careful when handling, inserting, or
removing a SIM card to avoid damaging its
gold contacts.
17
Page 18
ASUS M307
○○○○○○○○○○○○
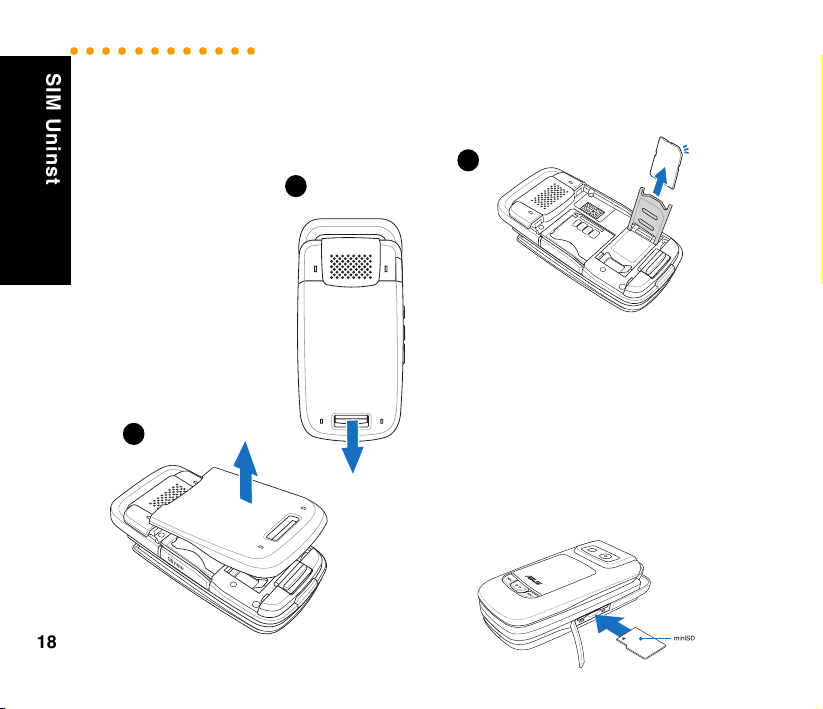
SIM Uninstallation
The SIM card & Battery
Uninstallation
1. The battery
compartment has
a cover latch at
the top. Push the
latch forward.
2. Lift upward the
battery to remove
it.
2
3. Push rightward to unlock the SIM card
holder and withdraw the SIM card from it.
3
1
SD
mini
The mini SD Card
Installation & Uninstallation
1. Install: Open the cover and place the mini
SD card into the slot with the gold contact
facedown.
2. Uninstall: Press the mini SD card and it
will uninstall itself.
18
Page 19
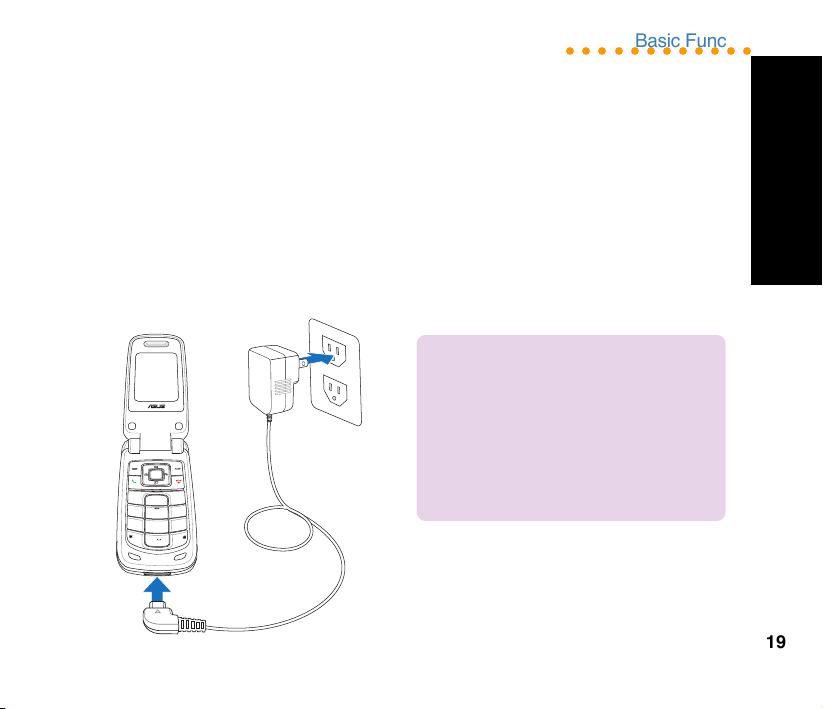
Battery Charging
1. Start Charging
1.Connect the charger to a wall outlet.
2.Connect the charger to the charger port
at the bottom of the phone in a correct
orientation.
3.The battery will then be charged, and the
screen will display a charging animation.
.
def
1
ㄅ
abc
3
ㄆ
ㄇ
ㄈ
ㄏ
ㄎ
2
ㄍ
ㄉㄊㄋㄌ
o
mn
hi
g
6
4
ㄙ
j
ㄘ
kl
ㄗ
ㄐ
ㄑ
ㄒ
5
ㄓㄔㄕㄖ
p
yz
q
x
r
w
s
7
9
tuv
ㄚ
ㄥ
ㄛ
ㄤ
ㄜ
ㄝ
ㄢㄣ
8
ㄞㄟㄠㄡ
+
法
入
⁄⁄/
輸
›^
0
ㄧㄨㄩㄦ
○○○○○○○○○○○○
Basic Functions
1-1. In Charging
1. If the phone is on, the charging animation
will appear on the right upper corner of
the display. The phone can still be used
during its charging process, but it will
prolong the charging time.
2. If the phone is off, the charging animation
will appear on the display. The phone can
still be turned on and used during its
charging process. Just press the left soft
key (Startup).
NOTE:
1. Strongly suggest users not to use the
mobile phone in charging for the
healthy’s sake.
2. It takes four hours to fully charge the
phone for the first time usage and two
hours to charge it after that.
1-2. Low Battery Indicators
The battery indicator in the upper right corner
of the screen indicates how much charge
remains in the battery. When the battery is
Battery Charging
19
Page 20
ASUS M307
○○○○○○○○○○○○
Turning On and Off
low, the phone will emit a double beep sound
with a message “Battery Low” on the screen
to alert users.
2. Charging Complete
The screen will display a charged animation
after the battery is fully charged.
NOTE:
The first-time battery charging will
take 4 hours to complete. After that, the
charging time will shorten to 2 hours.
Turning On and Off
Flip open the phone and press to turn
the phone on and off.
1. SOS
If the SIM card is not installed, the display will
show Check SIM Card! after users turn the
phone on. Press (SOS) to make an
emergency call or press to cancel.
20
NOTE:
If Check SIM Card! message
shows up when the SIM card is installed.
Please contact the service provider for
further help.Emergency number differs in
different countries and areas. For some
reason, users may fail to make the
emergency call in some countries. Make
the SOS call only when in emergency.
2. Input PIN Code
SIM card comes with a PIN code. Key in the
PIN code after users turn on the phone and
press to clear and re-enter when
misdialing. Press to confirm after that.
When the name of service provider shows up,
the mobile is ready to use.
Calls Making
1. Common Calls
1. Flip open the phone and enter the number
for dialing. Press (right soft key) to
clear the last number and long press to
clear all.
Page 21

2. After the phone number is completed,
press (left soft key) to save it to the
phonebook. Or press to start
connecting.
2. International Calls
Long press (asterisk key) until the “+” is
shown and, then enter the country code, the
city or area code and phone number
respectively.
○○○○○○○○○○○○
Basic Functions
Call Ending
Press to end the call.
Volume Adjustment
Press buttons on the left side to adjust
the volume during the call.
Silent and Hands-free
International Calls
3. Speed Dialing
3-1. From the phonebook
Users are suggested to save phone numbers
to the phonebook for a faster dialing.
In the idle mode, press to enter the
phonebook and use the joysticks (up and
down) to select a contact name for dialing.
Press to start connecting.
3-2. From Call Log
Press to show the dialed and received
call history. Select a contact and press
to connect the number.
Speaker
Press to start the silence function and
again to stop it during the call.
Press while dialing or long press
during connecting to enable the speaker and
again to disable it.
Call Answering
You can only answer the phone call when the
phone is on. When a call is coming, the phone
will alert users with a ringtone or a vibration
based on users’ previous setup. The display
will show the incoming number, contact name
(only on the contact list) or hidden number.
21
Page 22
ASUS M307
○○○○○○○○○○○○
Phonebook
The display will also show the picture if users
have set up earlier in the phonebook.
1. Users could just flip open the phone to
answer the phone.
2. For answering the call by pressing any key,
go to Settings > Call Settings > Answering
Mode and select Any Key.
Functions During Connection
During a phone call, users can press to
use the following functions.
Option Discription
Hold to hold the call
New Call to hold the call and
End Call to end the call
Speaker to enable or disable the
Send SMS to compose and send
Search Names to search the
Voice Record to record the call
22
Call Record to check the call
make a new call
speaker
a SMS
phonebook during the
connection
history
Phonebook
The phonebook is used to store contacts’
information, including phone numbers, fax
numbers, addresses, and e-mails. Users can
also set up special ringtones, pictures and
group.
1. Add a New Contact
Press to enter the phonebook and press
Option to select Add > To SIM or > To
Handset. Press to confirm and start
editing.
1. Key in the information of the contact such
as name, cellphone no., home no., company
no., fax no., address, e-mail and etc.. Users
can also group the contact or set up a picture
and ringtone.
2. Press (Save) to finish editing.
NOTE:
If contacts are saved To SIM, only names
and phone numbers can be edited. And the
contact cannot be saved only with a name
or a phone number.
Page 23

2. Search a Contact
Press to enter the phonebook and press
Option to choose Quick Find or Name
Search.To search a contact, enter the name
of the contact or partial of it and possible
contact names will show up.
3. Copy All Contacts
Press to enter the phonebook and press
Option to select Copy > All Records. Choose
Handset to SIM to copy all contacts from
phone to SIM card or SIM to Handset to do it
reversely.
4. Copy a Contact
Press to enter the phonebook and press
Option to select Copy > Selected Record.
Choose To SIM to copy a contact from phone
to SIM card or To Handset to do it reversely.
○○○○○○○○○○○○
Basic Functions
6. Delete a Contact
Press to enter the phonebook and select
a contact. Press Option > Delete > Selected
Record and press (Yes) to confirm the
deletion.
7. Edit Group
Press to enter the phonebook and press
Option to select Settings > Group Set.
Choose a wanted group and press to Edit.
The name, melody, and LED Color of the
selected group will be ready for editing.
Group a contact
1. Enter the phonebook and select a contact
and press to view its information.
2. Press > Modify > Group > . Select
a group name and press > to confirm
the setup.
Search a Contact
5. Delete All Contacts
Press to enter the phonebook and press
Option to select Delete > All Records.
Choose From SIM or From Handset to delete
all contacts in the SIM card or in the phone.
NOTE:
Only contacts saved in the phone
can be grouped.
23
Page 24
ASUS M307
○○○○○○○○○○○○
Other Functions
The default group names in the phone is as
the following: Friends, Family, Business,
Colleagues, VIP, Normal, Internet. Users can
edit the existed group names.
8. Set Up My Phone Number
1. Go to Settings > Phone Settings > My
Phone Number > > Add.
2. Key in a name and press to confirm.
3. Enter the phone number and press to
confirm. The maximum is two sets.
Other Functions
1. Reject a Call
If users want to reject the incoming call, press
to select Reject. The caller will be
transferred to users' voice mail or a busy signal
will be heard. (depending on users' service
provider)
2. Speed Dial
1. Go to Settings > Call Settings > Speed
24
Dial > Number List.
2. The number one to nine corresponds to the
keypad number one to nine. Select a number
and press to Modify. Enter the phone
number or press (Names) to choose a
contact and press to confirm.
3. After the setup, go to Settings > Call
Settings > Speed Dial > Status Setting to
activate the setup.
3. Call Waiting
Go to Settings > Call Settings > Call Waiting
to Activate or Deactivate the function.
Press to answer the other incoming call
during a phone call.
4. Hide My Number
If users want to hide their phone number when
making a phone call. Go to Settings > Call
Settings > Hide My No. to activate the
function. The default setting is Set by
Network.
5. Call Barring
This function needs the support of the service
provider and a Network Code password to
Page 25

function.
All options can be found in Settings > Phone
Settings > Call Barring.
NOTE:
1. The function of Call Barring needs
support from users’ service provider.
2. The default Network Code password
varies according to service providers.
3. Go to Settings > Phone Settings >
Security > Network Code to change
the password.
○○○○○○○○○○○○
Basic Functions
6. Call Forwarding
This function enables users to forward the
incoming call to another phone number. Go
to Settings > Call Settings > Call
Forwarding. Select a status and press
to Activate or Deactivate this function. When
the call forwarding is enabled, users can enter
the phone number for the forwarding call or
press (Names) to select a contact to
confirm.
Call Forwarding Options
Call Forwarding
Call Barring Options
Option Discription
Out-All to bar all outgoing calls
Out-int. Calls to bar all outgoing
international calls
Out-exc. to bar all outgoing calls to
Home non-service provider based
region
In-All to bar all incoming calls
In-Roaming to bar all incoming calls
when roaming
Options Discription
All Calls to forward all calls
When Busy to forward calls when busy
Not Answered to forward calls when
not answered
Not Reachable to forward calls when
not reachable
25
Page 26

ASUS M307
○○○○○○○○○○○○
Fixed Dailing
NOTE:
The function of Call Forwarding
needs supports from users’ service
providers. After this function is activated, a
icon will show on the display to remind
users.
7. Fixed Dialing
This function limits users to dial fixed phone
numbers.
1. Activate this function
Enter Settings > Call Settings > Fixed
Dialing > Status Setting > On. Key in PIN2
code to enable or disable this function.
2.Create a number list
Enter Settings > Call Settings > Fixed
Dialing > Number List. Press to choose
Add. Key in PIN2 code and then edit names
and phone numbers.
NOTE:
Fixed Dialing needs the support of
users' service provider. For users' PIN2
code, please contact the service provider
26
for more details.
8. Other Functions
Options Discription
Auto Redial Auto-redial when failing
to connect
Speed Dial Assign phone numbers
to keypad number 1~9.
Dial the assigned phone
number by pressing the
corresponding keypad.
Money Keeper Remind users or directly
end the call after a
period of time.
Answering Mode Set up the answering
mode to Any Key or Flip.
Call Summary Display user’s connect
ing time after a phone
call.
Call Log
Press to check the information of “missed
calls,” “dialed calls,” “answered calls.”
Page 27

The limit of the Call Log is 60 calls and 20
records for each missed call, dialed call,
answered call. The previous history record will
be dropped from the list when the quota is
exceeded.
1. Missed Calls
When there is a missed call, the screen will
alert users with a missed call message.
1. Press to check the missed call
number.
2. And press to check the information of
the missed call, such as date and time.
3. Press after step 1 to delete the record,
send a SMS, save the number or save to
call barring list.
Users can also check the missed calls by
refering to Calls > Missed Calls.
○○○○○○○○○○○○
2. Press to delete the record, send a
SMS, save the number or save to call
barring list.
Basic Functions
3. Dialed Calls
Go to Calls > Dialed Calls to select a dialed
call.
1. Press to check the information of the
missed call, such as date and time.
2. And press to delete the record, send
a SMS, save the number or save to call
barring list.
4. Call Cost
Check Call Cost
Go to Calls > Call Cost to check Last Call
Cost and All Calls’ Cost.
Missed Calls
2. Answered Calls
Go to Calls > Answered Calls to select an
answered call.
1. Press to check the information of the
answered calls such as date and time.
NOTE:
Call Cost is a network service, which
needs supports from service providers.
Users need to contact the service provider
before using this function.
27
Page 28

ASUS M307
○○○○○○○○○○○○
Call Time
Clear Counters
Go to Calls > Call Cost > Clear Counters
and key in PIN2 code. Press to confirm.
Users can use this function after a monthly
phone bill comes out.
NOTE:
PIN2 code can only accept incorrect
input three times and the SIM card will be
locked after that. Please contact the service
provider for the unlock code “PUK2” if the
situation mentioned above happens.
Call Costs’ Limit
Users can set up a limit to the total call cost.
When the limit is exceeded, the phone then
can only receive calls.
1. Go to Calls > Call Cost > Call Costs’
Limit and key in the PIN2 code. The
window of cost limit will show up.
2. Enter the planned limits and press to
confirm.
3. If the limit is set to zero, then the Call
Costs’ Limit will not function.
28
NOTE:
1. When the call costs’ limit is exceeded,
users can still make the SOS calls
when in emergency.
2. The Call Costs’ Limit will only function
with the service provider’s support.
Please contact the service provider
before using this function.
Call Time
M307 helps users to easily and precisely
monitor their call time. Just go to Calls > Call
Time to check the Last Duration, All Calls,
Answered Calls, and Dialed Calls.
Users can clear the call time counting after a
period of time, just go to Calls > Call Time >
Clear Counters. Press to confirm and
enter the phone password. (Default password
is 1234.)
Page 29

Call Filter
Call filter helps users avoid unwanted calls.
Just put unwelcomed callers’ phone number
on the Ignore List. Unwelcomed calls will be
transferred to users’ voice mail or the busy
signal will be heard depending on the service
provider and users will be informed with a
missed call message.
Ignore List Modification
1. Go to Calls > Call Filter > Ignore List.
2. The first default option “Unknown Call” can
only be enabled or disabled. Press to
select this option, all unknown calls will
be blocked.
3. Select an “EMPTY” space and press
to start modifying. Enter the number for
ignoring and press to confirm.
Ignore List Deletion
1. Go to Calls > Call Filter > Ignore List.
2. Select a phone number and press to
choose Delete or Delete All to delete the
number or all blocked numbers.
○○○○○○○○○○○○
Moreover, the function of Call Filter also helps
users to make a personal Privileged List.
Callers out of the list will be transferred to
users’ voice mail or the busy signal will be
heard depending on the service provider and
users will be informed with a missed call
message.
Basic Functions
Privileged List Modification
1. Go to Calls > Call Filter > Privileged List.
2. Select an “EMPTY” space and press
to start modifying. Enter the number to
give privilege and press to confirm.
Privileged List Deletion
1. Go to Calls > Call Filter > Privileged List.
2. Select a phone number and press to
choose Delete or Delete All to deprive
the privilege of the selected number or all
phone numbers.
Filter Setting
Go to Calls > Call Filter > Filter Setting.
Users can stop the this function or activate
either Ignore List or Privileged List.
Call Filter
29
Page 30

ASUS M307
○○○○○○○○○○○○
Securrity
Security
1. PIN
To protect users’ privacy and avoid personal
information theft, users can activate PIN
protection. In this way, users have to enter
the PIN code before turning on the phone and
use.
1. To activate PIN protection, go to Settings
> Phone Settings > Security > PIN.
2. Enter the PIN code to enable or disable
this proctection.
3. Press > Modifiy to modify the PIN
code.
2. Phone Lock Code
Phone lock code offers an extra protection for
your own privacy. When this function is
activated:
1. Go to Settings > Phone Settings >
Security > Phone Lock Code.
2. Enter the password to Activate or
Deactivate the lock.
30
3. Press > Modify to change the
password. Or press > Deactivate to
disable this function.
1. The password is limited to 8 numbers.
2. PIN, PIN2, and Network Code are
provided by the service providers.
3. The default Phone Lock Code is 1234.
Text Entry
To add contact names to the phonebook, send
a text message, or use the WAP browser,
M307 provides several text input methods for
users to choose from. Users can either key in
letters respectively or use predictive text entry,
which helps complete possible words for
users. Also, Chinese characters (traditional
and simplified) input and symbols insertion are
enabled.
Basics
1. Use the alphanumeric keyboard to enter
letters and numbers. Each key is assigned
several different characters.
Page 31

2. Press the right soft key to delete a letter
when mis-typing.
3. To enter symbols or spaces between
words, press the asterisk key, and the
symbol table will be shown. Use the
Joystick Keys to navigate and select the
needed symbol.
Key Assigned Characters
. , ? ! @ : ‘ ( ) % & 1
A B C 2
D E F 3
G H I 4
J K L 5
M N O 6
P Q R S 7
T U V 8
W X Y Z 9
0, symbol table list
○○○○○○○○○○○○
Basic Functions
Text Input Methods
For text entry, press to switch input
methods (the default is abc; press to
switch to ABC) for entering small letters or
capitalized ones. Select eng to use the
predictive text entry, and navigate with joystick
keys to select the wanted words.
Multitap Text Entry
Multitap text entry enables users to enter
individual letters one by one. This is ideal for
adding a phonebook entry or entering a WAP
address.
When pressing a key, the characters assigned
to the key will appear in the upper right corner
of the screen. Repeated presses to select one
for entering. Enter the next letter in the same
way after the previous selected letter appears
on the screen.
Text Input Methods
31
Page 32

ASUS M307
○○○○○○○○○○○○
Smart Text Entry
Smart Text Entry
Smart text entry is a predictive text entry
method. It uses a built-in dictionary to predict
the word users are typing. Users can choose
the correct word by pressing keys without
selecting the right letters and obtain the words
suggested by the phone. By reducing the
number of keystrokes, the smart text entry
method helps users to key in messages more
quickly.
Whenever a key is pressed, a list of possible
characters or character combinations is
created. To enter text, use the joystick keys to
find the wanted character combination. Press
the right joystick key to proceed the message
composing. If mistakes happen, press to
clear.
Note:
For smart text entry to work properly, ensure
the language settings in your phone match
the language you want to type in. For
language settings, see Phone Settings
under Settings.
Common Words Text Entry
Common Words text entry allows users to
create a list of useful common phrases for
message composing. To use this time-saving
method, select Option > Common Words
when editing a message to input built-in
phrases or go to SMS > SMS Settings >
Common Words to customize common
words.
Symbols Text Entry
With this method, users can enter various
types of symbols. Select Option > Input
Method > Insert Symbols. A list of symbols
is displayed. Use the joystick keys to select
the desired symbol and select OK when done.
Users can also press the key “0” as a shortcut
to open the symbol table.
32
Page 33

Common Settings
Common Settings
Language
Common Settings
○○○○○○○○○○○○
Common Settings
In the Settings section, users can customize
their preference setup, such as ringtones,
display settings, date/time or language.
Date/Time
Go to Settings > Phone Settings > Date/
Time.
1. Select Set Date/Time and key in with
keypad. Press to confirm.
2. Go to Set Time Zone to locate your home
city or the nearest one and press to
confirm.
3. Go to Date Format and set a wanted
format--DD.MM.YYYY, MM.DD.YYYY, or
YYYY.MM.DD.
4. Go to Time Format to choose 24-Hour
or 12-Hour.
5. Users have to press to select Show
Date and Show Time in Settings >
Displays Settings > Main Idle Screen
first and the date/time will show up then.
Go to Settings > Phone Settings >
Language to set up the language display.
Shortcut
Go to Settings > Phone Settings > Shortcut.
Selcct an (EMPTY) space and press to
start editing. Choose one function from the
Shortcut List and press to confirm.
LED
Go to Settings > Phone Settings > LED to
start or stop the LEDs, including Mtc LED,
Event LED, Charging LED, Low Battery,
and Normal LED.
Auto Keyboard Lock
This function can prevent users from
misdialing or necessary operation.
1. Go to Settings > Phone Settings > Auto
Keyboard Lock.
2. Select a time interval and press to
confirm.
33
Page 34

ASUS M307
○○○○○○○○○○○○
Greeting Teext
When the keyboard is locked, users can still
press to answer the incoming call and
operate other functions normally during the
call. The keyboard will remain locked after
users end or reject the call.
Greeting Text
Users can personalize the greeting text.
Simply go to Settings > Phone Settings >
Greeting Text. Enter an unique greeting text
and press to confirm.
Factory Settings
This function will help users to restore to the
default settings and keep users’ Phonebook,
Organizer and Message.
1. Go to Settings > Phone Settings >
Factory Settings.
2. Key in the Phone Lock Code and press
to confirm. The phone will auto-restart
and restore to the default settings.
Greeting Text
Firmware Upgrade
Users can easily upgrade the firmware of
M307 with a mini SD card.
1. Download the latest firmware file (.bin file)
from tw.asus.com.
2. Place the bin file into a mini SD card and
install the card to the phone or save the
file to the phone through the mini USB
cable.
3. Restart and go to Settings > Phone
Settings > Firmware Upgrade.
4. Locate the latest bin file From Phone or
From Memory Card and press to
confirm.
5. After the upgrading , remember to restart
the phone.
34
Page 35

Manner
Manner
In the Manner menu, users can select
manners, including Normal, Meeting, Indoor,
Outdoor, Custom and even further
personalize and rename those manners.
NOTE:
Long press in the idle mode,
users can enter the Manner menu directly.
Personalized Manners
1. Go to Manner menu and press to
select Personalize.
2. Manners for personalization is as
following:
Option Discription
Incoming to change the incoming
ringtone
Message to change the incoming
message tone
Ring Mode including Silent, Ring Only,
Vibrate, Vib. and Ring, or
Vib. then Ring
Common Settings
○○○○○○○○○○○○
Option Discription
Message Mode including Silent, Ring
Only, Vibrate, Vib. and
Ring
Volume including Incoming,
Message, Earpiece,
Key Tone and
Multimedia Volume
Misc Tones Switch including Key Tone,
Connect Vib., Battery
Low, Alert Tone,
PowerOn/Off, Charger
Tone and Flip Tone
Idle Mode
When the phone is on but not in use, it is in its
idle mode. There will be lots of icons on the
display. Press to enter the main menu
and to the phonebook.
Manner
35
Page 36

ASUS M307
○○○○○○○○○○○○
Icons Introduction
Icons Introduction
Icon Discription
signal strength
call forwarding activated
line 1 or line 2 selected
ringtone enabled
ringtone and vibrate disabled
keyboard locked
vibrate enabled
alarm clock set
text message received
multimedia message received
e-mail received
in roaming
chatting rooms activated
ignore list enabled
privileged call enabled
battery status
fly mode enabled
Quick Function Keys
Quick Function Key
When in the idle mode, quick function keys
available are as the following.
Icon Discription
SMS Inbox
Shortcut Menu
Camera Menu
Fun Center
Photo Capture Activation
Volume Adjustment
Buttons; the upper one to
increase and the lower one
to decrease volume
Main Menu
Phonebook
Call Records
One press to idle mode
Long press to turn on/off the
phone
36
Page 37

Main Menu
Main Menu
In the idle mode, press to enter the main
menu and navigate with joysticks.Press
to select an item. For exit from the main menu
or sub-menu, simply press or . The
table beneath will introduce the icons and
functions in the main menu.
Icon Discription
Network: Enables users to
specify the WAP and data
settings and set up GSM and
GPRS settings. Provides access to the
internet and to STK SIM card service.
Messages: Enables users to
check, compose and send SMS,
MMS, or Email. Also, enables
users to chat and broadcast messages.
Manner: Enables users to set up
and personalize manners,
including ringtones, volumes,
ring types and answer modes.
Common Settings
○○○○○○○○○○○○
Icon Discription
Settings: Enables users to set
up the phone, display, ringtones,
network, security, call and also
restore to the factory default settings.
Camera: Enables users to take
pictures and record videoes.
Users can also save and send the
files to friends.
Media Center: Enables users to
play MP3 music files, play JAVA
games and compose ringtones.
Organizer: Contains useful tools,
including an alarm, schedule
planner, calculator, currency and unit
convertor, stopwatch, file manager and etc.
Phonebook: Helps users to
manage names and phone
numbers for easy access and caller
recognition.
Calls: Stores information about
dialed, answered, missed calls.
Main Menu
37
Page 38

ASUS M307
○○○○○○○○○○○○
Text Message
Messages
M307 supports SMS and MMS message
service. SMS enables users to read, compose,
send and receive text messages; while MMS
allows users to receive and send multimedia
messages. If the message quota is exceeded,
users have to delete old messages for the new
ones.
Text Message SMS
1. Message Reading Inbox
When a new message arrives, the screen will
alert users with a new message animation.
Just flip open the phone and press to read
or go to Message > SMS Inbox to read it.
Functions
In the Inbox menu, select one message and
press to read it or press to make a
phone call. When reading a message, users
can use the following functions by pressing
.
38
Option Discription
Detail to show the receive time
Reply to reply to the sender
Forward to forward the message
Delete to delete the message
Save Number to save the sender’s no.
NOTE:
In the Inbox menu, options available
are View, Delete, Copy, Move to Folder and
Save Number. When reading a message,
the functions above will show up.
2. Message Composing &
Sending
1.
Select Message > Edit SMS.
2. Press to “To:.” Enter the number or
press to select a contact and press
to confirm.
2. Press to enter “Content:” and start
editing the contents. Users can edit
content directly or press to apply
Common Words.
Text Messagge
Page 39

Outbox
NOTE:
Users can use and to
switch the input methods.
3. After the editing is over, press to
confirm and press > Send.
4. “Save to outbox” message will show up
and press Yes to save it to outbox.
Functions available when sending a SMS:
Option Discription
Send to send the message
Save to save the message without
sending it
3. Outbox
When users save the message to the outbox,
select a message to read and press to use
the following funcions.
Option Discription
View to read the message
Delete to delete the message
○○○○○○○○○○○○
Option Discription
Copy to copy Selected Record or
All Records To SIM or To
Handset
Move to Folder to move the message to
other folder
Save Number to add the record To SIM or
To Handset
Message
4. Common Words
M307 builds in some Common Words for
users to edit message. Users can also
personalize their own common words.
Go to Message > SMS Settings > Common
Words to select one and press to edit .
5. SMS Settings
Users can change SMS setups in the SMS
Settings menu.
Outbox
39
Page 40

ASUS M307
○○○○○○○○○○○○
SMS Memory
Option Discription
Service Center to modify the service
Send Format to set up the send format:
Validity Period to set up the validity period
Common Words to edit common words
Delivery Rpt. to activate the report
Reply Path to enable or disable the
Default Saved to set up the saved media
Media as To SIM or To Handset
6. SMS Memory
Users can check the SMS memory status In
Handset and In SIM Card.
40
center number
Implicit, Text, Fax,
ERMES, Paging, X400
and E-mail
for the message
function after the message
is delivered
replay path
Private SMS
Users are able to prevent others from prying
by saving important SMS to the private SMS
folder.
1. Go to Message > SMS Inbox and select
a SMS.
2. Press and choose Move to Folder >
Selected Record or All Records >
Private SMS. Confirm the operation.
NOTE:
Only messages saved in the handset
can be moved to the private SMS folder.
3.
Go to Message > Folder Management
> Private SMS and key in the password
“1234” (default) to enter the private folder
to read messages.
NOTE:
The default password of the handset
is1234. Users are able to customize their
own password by refering to Settings >
Phone Settings > Security > Phone Lock
Code.
Private SMS
Page 41

Cell Broadcast
Cell Broadcast
○○○○○○○○○○○○
Chatting Rooms
Message
Cell Broadcast
Cell broadcast can offer users messages about
weather, latest news, or financial market.
The broadcast has been defaultly set up, users
only need to activate and use this function.
Option Discription
Activate to start or stop the function
Topics to edit broadcast messages
topic wished to receive
Language to set up supported
language
Read to read the received
Message messages
NOTE
: This function needs supports of the
service provider. Please contact the service
provider for more details.
This function enables users to use chatting
rooms as MSN and after activate the setup,
certain messages will be placed in the chatting
room instead of SMS Inbox.
Users can directly edit messages in the chatting
room and there will be records of the sent
messages.
1. Set Chatting Room
1. Enter Message > Chatting Rooms >
Room 1 and press .
2. Set up your preferred name in the Set My
Nickname.
3. In the option of Set Chatting Room, set
up Friend’s Name / Friend’s Number
and Activate it to start using.
2. Start Chatting
1. After activate the chatting rooms,
Message > Chatting Rooms
one chatting room and press to confirm.
enter
to select
41
Page 42

ASUS M307
○○○○○○○○○○○○
Multimedia Message
2. Press > Send. Key in messages and
press to send. The reply messages will
be saved in this chatting room.
3. Press to exit from the chatting room.
3. Other Functions
Other functions of the chatting rooms available
for users are as following:
Option Discription
Clear Chatting to clear chatting rooms
Room by pressing > Clear
Chatting Room > >
and all the setups
and messages will be
cleared
Save to Memory to save messages to the
Card mini SD card after it is
installed
Multimedia Message
Multimedia Message
MMS
Via WAP/GPRS, MMS offers users a more
colorful and interesting message service with
audio and image files attachment.
1. Reading MMS MMS Inbox
When a new MMS arrives, the screen will
inform users with a MMS animation.
2. Composing MMS
Composing Text
1. Go to Message > MMS > Edit MMS.
2. Select “Content:” and press > >
Add Text to start editing.
3. When finish editing, press to confirm.
4. If users would like to edit or delete the text,
simply press to Edit, set up Duration
or Delete.
42
Page 43

Composing MMS
Adding Image
1. After the text part is done, press >
Add Image > .
2. Locate the wanted image and press to
confirm the addition.
3.
If users would like to edit or delete the
image, simply press to Edit, set up
Duration or Delete.
Adding Audio
1. After the image part is done, press >
Add Audio > .
2. Locate the audio file and press to
confirm the addition.
3.
If users would like to edit or delete the
audio, simply press to Edit, set up
Duration or Delete.
Adding Slide
A slide can only hold a combination of text,
image and audio. To have a multi-slide MMS,
just press > Add Slide and repeat the
previous steps to add text, image and audio.
○○○○○○○○○○○○
Message
Other Options
1. Delete Slide: to delete a slide in the multi-
slide MMS.
2. Slide Duration: to set up the duration
time.
3. Preview: to preview the MMS.
Adding Attachment
1. After the MMS is done, go back the Edit
MMS menu to select Attachment.
2. Press to Add Image, Add Audio,
and Add Video.
3. Press to return to the Edit MMS
menu.
3. Sending MMS
1. There are To:, Cc:, Bcc:, Subject: in the
Edit MMS menu.
2. Users cannot enter phone numbers
directly. Just highlight To: and press >
> Add. Users can add a recipient
from phonebook, or enter the phone
number. Press to confirm and press
to return the menu.
Sending MMS
43
Page 44

ASUS M307
○○○○○○○○○○○○
MMS Settings
3. For more recipients, repeat the previous
step.
4. Press > Send > to send the MMS.
Users can find a copy in the MMS Outbox.
Other options for sending MMS:
Option Discription
Preview to preview the MMS
Send to send the MMS
Save to save the MMS to the
Settings to set up MMS sending
4. MMS Settings
Enter Message > MMS Settings
Option Discription
Validity Period to set up the valid period
Delay Delivery to set up the delivery time
Read Report to ask for notes after
44
outbox without attachments
recipients receive
message (function only
when recipients agree to
send)
Option Discription
MMS Settings
Delivery Report to receive reports from
the service provider
Auto Download to auto-download any new
MMS
Sender Visibility to hide or show sender’s
number to recipients
Storage Setting to set up the MMS storage
place, handset or memory
card
Profiles to select and edit user’s
service provider. (default
settings are strongly
recommended)
5. MMS Memory
Users can check MMS Memory status.
6. MMS Outbox
No matter users send the MMS directly or
choose to save it as a draft, there will be a copy
in the MMS Outbox. Select one and press
there will be options as following:
Page 45

MMS Memory
Option Discription
View to view the content
Send to send the message
Delete to delete the selected MMS
Delete All to delete all MMS
Move to to move the MMS to
Handset handset
Move to to move the MMS to the
Memory Card memory card
○○○○○○○○○○○○
Message
MMS Outbox
45
Page 46

ASUS M307
○○○○○○○○○○○○
Screen Display
Screen Display
1. Wallpaper
Wallpaper from built-in images
1. Go to Settings > Display Settings >
Wallpaper > Main Wallpaper/ Sub
Wallpaper.
2. Navigate upward and downward to browse
the built-in images and select one. Press
and press > Set as > Main
Wallpaper/ Sub Wallpaper.
2. Idle Screen
Screen Display
Go to Settings > Display Settings > Main
Idle Screen/ Sub Idle Screen.
Users can enable or disable Show Manner/
Show Date/Show Time, Analog Clock, Digital
Clock, Business Clock in the Sub Idle Screeen
option. In the Main Idle Screen option, users
can start or stop function displays such as
Show Operator, Show Manner, Show Date,
Show Time.
3. Other Screen Setups
46
Wallpaper from user’s images
1. To set the images captured with M307
camera as the wallpaper, please go to
Camera > My Album > Handset.
2. Locate the wanted picture and press
> Set as > Main Wallpaper. Name it and
press to confirm.
3. Repeat the previous steps in the built-in
images section to set up the wallpaper.
Option Discription
Brightness adjust the brightness with
left / right joystick keys
Theme choose Theme 1 or 2 for
M307
Animation set up power on/off
animation
Clean enable or disable the
Wallpaper clean wallpaper (only
pictures without words)
Page 47

Camera
Option Discription
Backlight Timer set up the backlight
time to save power
Sleep Timer set up the sleep time to
save power
Camera
M307 is equipped with a 2.0 mega pixel
camera, which supports photo capture,
continuous shots, video recording. Users can
set the image and video files as the wallpaper
or power on/off animation. Even, users can
easily share all the image and video files to
families or friends with MMS or e-mail.
Capture
1. Go to Camera > Capture; or press the left
joystick key and choose Capture; or
press button on the left side.
2. Preview in the screen and press to
capture.
○○○○○○○○○○○○
3. If the picture is satisfactory, then press
to save it to my album and if not, press
to discard it.
NOTE:
When the phone is not flipped open,
long press to activate the flashlight
function.
Image
Hot Keys for Capturing
M307 offers many hot keys for a convenient
image capturing.
Option Discription
Increase Decrease Brightness
Zoom In / Out
Frame
Effect: repeated presses can
switch different effect settings.
Caputre Mode: repeated
presses can switch different
capture modes.
Camera
47
Page 48

ASUS M307
○○○○○○○○○○○○
Camera Settings
Option Discription
Flash Switch: repeated
presses can enable or disable
the photoflash.
Capture Timer: repeated
presses can set up the delay
seconds.
Multi-Capture: repeated
pressess can set up the number
of shots.
Storage Set.: repeated pressess
can set up the storage position.
Photo Quality: repeated
pressess can set up the photo
quality.
Photo Size: repeated pressess
can set up the photo size.
Photo Orientation: repeated
pressess can set up the photo
orientation.
48
Camera Settings
Camera Settings
Go to Camera > Capture > > Settings
and adjust the following setups.
1. Photo Size: resize it with left / right joystick
keys. Options:176x224, Portrait,
1200x1600, 960x1280, 480x640,
240x320.
2. Photo Quality: adjust qualities with left /
right joystick keys. Options: Nice, Normal,
Economic.
3. Capture Mode: switch modes with left /
right joystick keys. Options: Auto, Night,
Indoor, Outdoor, Cloudy, Sunset, Lamp.
4. Brightness: increase and decrease
brightness with left / right joystick keys.
5. Contrast: increase and decrease contrast
with left / right joystick keys.
6. Auto Focus: switch the focus setup with
left / right joystick keys. Options: Auto,
Semi-Auto, Manual.
7. Multi-Capture Interval: switch the interval
with left / right joystick keys. Options:1
Sec, 3 Sec, 5 Sec, 0.1 Sec, 0.5 Sec.
Page 49

Video Recorder
8. Photo Orientation: switch the orientation
with left / right joystick keys. Options:
Vertical, Horizontal.
9. Flash Switch: start or stop the flash with
left / right joystick keys.
10. Capture Sounds: Sound 1-3 to choose
from.
11. Storage Set.: set up the storage position
with left / right joystick keys. Options:
Handset, Memory Card.
12. AC Frequency: adjust the frequency with
left / right joystick keys. Options: 50 HZ, 60
HZ.
Other Settings
1. My Album: browse the pictures in the
album.
2. Preview Effects: preview pictures with
different effects.
3. Frame: switch different frames with left /
right joystick keys.
○○○○○○○○○○○○
4. Capture Timer: set up delay seconds
with left / right joystick keys.
5. Multi-Capture: set up the number of
shots with left / right joystick keys. Options:
Off, 4 Shots, 6 Shots, 9 Shots, 16 Shots.
Image
Video Recorder
1. Go to Camera > Video Recorder and
press to start video taping.
2. After the recording stops, press to
save or press to stop the recording and
save it automatically. Press to exit
video recording. The file will be in the My
Video folder.
Hot Keys for Video Recording
M307 is designed with several hot keys for a
convenient video recording.
Option Discription
Increase Decrease Brightness
Zoom In / Out
Video Recorder
49
Page 50

ASUS M307
○○○○○○○○○○○○
Video Recorder
Video Recorder Settings
Go to Camera > Video Recorder > >
Settings and adjust the following setups.
1. My Video: view the video in my video
folder.
2. Preview Effects: preview pictures with
different effects.
50
Preview Effect: repeated
pressescan switch different
effect settings.
Record Mode: repeated
presses can switch different
capture modes.
Flash Switch: repeated
presses can enable or
disable the photoflash.
Record Sound: repeated
pressess can enable or
disable the voice recording.
Video Size: repeated
pressess can resize the
video.
3. Video Size: resize it with left / right joystick
keys. Options: 320X240, 176x224, power
on/off animation.
4. Record Mode: switch modes with left /
right joystick keys. Options: Auto, Night,
Indoor, Outdoor, Cloudy, Sunset, Lamp.
5. Record Sound: enable or disable the
voice recording during the video recording.
6. Brightness: increase and decrease
brightness with left / right joystick keys.
7. Contrast: increase and decrease contrast
with left / right joystick keys.
8. Flash Switch: start or stop the flash with
left / right joystick keys.
9. AC Frequency: adjust the frequency with
left / right joystick keys. Options: 50 HZ, 60
HZ.
Video Recorder
Page 51

Photo Editing
Photo Editing
1. My Album
The captured images will be saved in My
Album. Go to Camera > My Album > Handset
/ Memory Card and select a picture for editing.
Press to use the following function.
Option Discription
View to view the selected image
Change View to change ways of browsing
images, Thumbnail or Name
List
Find to search images with file
names
Set as to set the image as Main
Wallpaper, Sub Wallpaper
or Default Portrait
Save as to save the image as Main
Wallpaper, Sub Wallpaper
(Portrait)
○○○○○○○○○○○○
Option Discription
Hide to hide the image to Private
Album
Delete to delete the selected image
Delete All to delete all images
Rename to rename the image
Edit Image to edit the image, including
Special Effect, Inserting
Frame, Inserting Text,
Rotating, Flipping.
Four in One to combine favorite images
together
Send MMS to send the image via MMS
Detail to view the detail of the
image, including Name,
Formate, Size and etc.
Slide Show to slide show the images
Storage to check the storage status
NOTE:
Users can also find My Album in
Media Center > Image Gallery.
Image
Photo Editing
51
Page 52

ASUS M307
○○○○○○○○○○○○
Private Album
2. Private Album
Personal pictures can be saved in the Private
Album.
1. Go to Media Center > Image Gallery >
Private Album and enter password
(default :1234) before viewing the pictures.
3. To move the images back to My Album,
just press > Unhide > > . The
images will then be moved to My Album.
NOTE:
The default Phone Lock Code is
1234. To change the code, go to Settings >
Phone Settings > Security > Phone Lock
Code.
Image Gallery
There are five folders, My Album, Main
Wallpaper, Sub Wallpaper, Frame, Private
Album, in the image gallery. Users are able to
browse and edit all the images in these folders.
Just follow the instructions in the previous
page.
52
Video Editing
Video Editing
My Video
The recorded video will be saved in My Video.
Go to Camera > My Video and press to
operate the following functions:
Option Discription
View to view the selected video
Change View to change ways of browsing
videoes, Thumbnail or
Name List
Find to search videoes with file
names
Set as to set the video as the power
on animation or power off
animation
Delete to delete the selected video
Delete All to delete all videoes
Rename to rename the video
Detail to view the detail of the
image, including Name,
Formate, Size and etc.
Storage to check the storage status
Page 53

Video Playing
NOTE:
Users can also find My Video in
Media Center > Animation.
Video Playing
Users can go to Camera > My Video. Select
a video to and press to play it.
During the video playing, users can use the
following functions:
Option Discription
press to play or pause the video
press to adjust the volume
press to play the video in vertical
or horizontal orientation
press to show or hide the video
information
○○○○○○○○○○○○
Image
Video Playing
53
Page 54

ASUS M307
○○○○○○○○○○○○
Playing MP3 Music
MP3 Player
M307 is equipped with a high quality MP3
player for digital music files.
Go to Media Center > MP3 Player and the
interface on the right side will show up. Or,
users can simply press to enter the media
center menu.
NOTE:
Insert the mini SD card before using
this function and do not remove the memory
card when the player is in use.
2. Interface of the MP3 Player
Title
54
1. Playing MP3 Music
1. When users enter Media Center > MP3
Player for the first time, the player will
automatically create a playlist “Playlist_All.
m3u” and put all the music stored in “My
Music” in the memory card to the list.
2. Press for previous or next songs,
and press to show the current list or
to stop.
3. Press to adjust the volume.
4. Or press to activate the MP3 player
when the phone is close.
Source
Volume
Previous
Play / Pause
Stop
NOTE:
To avoid unnecessary operation,
users can lock and unlock the cover function
buttons by pressing .
Play Time
Next
Page 55

3. MP3 Player Settings
Go to Media Center > MP3 Player and press
to use the following functions.
Playlist Editor
1. Go to Media Center > MP3 Player and
press to enter the Playlist Editor.
2. Press to use the functions below.
Option Discription
Play to play the music
Add to add music to My Music
Delete to delete the selected music
Replace to replace the selected
music with music in My
Music
Add All to add all music in My Music
folder to the list
Delete All to delete all music on the list
Appraisal to give comments on
musics depending on
users’ preference
○○○○○○○○○○○○
Option Discription
Reset Hit Rate to reset the hit rate
Save to save the playlist
Detail to view the detail of the
music
3. Press to save the setup.
NOTE:
When users remove the music on
the playlist, the music file will not be deleted
and remain in My Music folder.
Music
Playlist Manager
In addition to the auto-generated playlist
Playlist_All.m3u, users can use this function
to create other playlists.
NOTE:
Users can have different playlists
for different situations and moods. A song
can be put on various playlists.
MP3 Player Settings
55
Page 56

ASUS M307
○○○○○○○○○○○○
Catergory
1. Go to Media Center > MP3 Player and
press to select Playlist Manager.
2. Press to use the functions below.
Option Discription
Edit to edit the playlist
Play Playlist to play all the songs on the
playlist
Add to add a new playlist
Delete to delete the selected list
Rename to rename the list
Refresh to refresh the playlist after
some songs are removed
from the My Music folder
Category
When using M307 to read or play new installed
MP3 music, please operate the function
Update Category (Media Center > MP3
Player > > Category > Update Category)
first. And then the information about the new
added music will be added to the phone.
Other functions in the Category:
1. Folder: users can browse the sub-menu
in the My Music folder.
2. Artist and Album: if users have updated
category, users will see the catergory of
the artists or the albums after selecting
these two options.
56
NOTE:
1. If the playlist needs no refresh, the
option will not be allowed to choose.
2. Only Playlist_All.m3u can be refreshed.
3. Appraisal: users can grade on all the
music and search music with different
standard.
4. Top 10: top 10 songs will be shown on the
list.
5. Recently Played: the recently played list
can be easily replayed here.
Page 57

NOTE:
Users can directly select songs and
play in every category and save it as a
playlist, which will be set up as the default
playlist until users change the playlist.
My Favorite
Go to Media Center > MP3 Player and press
to select My Favorite for the following
functions.
1. View: to edit My Favorite list and save it
as a playlist.
2. Add Current Song: to add the current
song to My Favorite.
3. Add Current List: to add the current list to
My Favorite.
Play Single Song
If users want to play a certain song outside of
the playlist, just go to Media Center > MP3
Player > > Play Single Song.
Users will then be trasferred to My Music.
Select a wanted song and press to confirm
the playing.
○○○○○○○○○○○○
Music
NOTE:
1. When entering a folder with MP3 music
files, users can simply select and press
to play the music.
2. Functions only in Settings > Memory
Card Manager.
Playback
M307 offers various ways of playing music,
including Once, Repeat List, Repeat Song,
Shuffle Once, Shuffle Repeat.
Go to Media Center > MP3 Player > >
Playback.
1. Use upward and downward navigation
keys to select a playback and
press to confirm. The selected item will
be marked with .
2. If users choose to repeat, there will be a
icon on the MP3 Player interface.
3. If users choose to shuffle, there will be a
icon on the MP3 Player interface.
My Favorite
57
Page 58

ASUS M307
○○○○○○○○○○○○
Ringtone Settings
Equalizer
Go to Media Center > MP3 Player > >
Equalizer. Users can apply different
equalizers, including Normal, Classic, Pop,
Bass, Rock and None.
NOTE:
Users can apply a different equalizer
even when the music is playing.
Detail
Users can check the information about the
songs in the option such as Name, Album,
Title, Artist and etc.
Language Learning
1. During the MP3 playing, pressing the
camera button on the left side will
make a mark A and a second time pressing
will make a mark B. The player will
repeatedly play A to B extract.
2. To cancel the playing, press the camera
button once more.
Ringtone Settings
In the Settings > Ringtone Settings, users
can set up their preferred ringtones for incoming
calls, messages, key tone, ring mode, message
mode and etc.. M307 has lots of built-in music
for users to choose from.
Or users can customize their own music by
going to Media Center > Music > Ringtone >
Composer.
Composer
The Composer serves as a tool for users to
compose their own music.
1. Go to Media Center > Music > Ringtone
> Composer. Press and select Add.
2. A blank staff will show up and users can
use the keypad to start music composing.
3. Press and select Play for previewing
the new composed tune.
4. According to personal needs, users can
adjust the Tempo or play the tune with
wished Instruments.
58
Page 59

5. When users finish composing, press
> Save and key in a wanted file name.
Press to confirm the composing and
saving.
Keyboard and Notes Table
Key Discription
Do
Re
Me
Fa
So
La
Ti
Rest
to prolong the note
to shorten the note
to rise the note an octave
to add/ subtract a dotted note
to flat a note or rise a
semitone
○○○○○○○○○○○○
Music
Other Functions of Composer
Other functions available for users when using
the composer.
Option Discription
Play to play the selected tune
Set as t o set the tune as the
Incoming incoming ringtone
Add to compose a new tune
Edit to edit the selected tune
Delete to delete the selected tune
Delete All to delete all tunes in the
composer
Rename to rename the selected tune
Copy to to copy the selected tune
Memory card to the memory card
Detail to check the information of
the selected tune
Composer
59
Page 60

ASUS M307
○○○○○○○○○○○○
Games
Other Options for Incoming Ringtone
In addition to MP3 music or self-composed
tunes, the incoming ringtone can be set up in
other ways as following.
1. Music in Media Center > Music >
Ringtone > Default Ringtone or
Download Ringtone can all be set as the
incoming ringtone.
2. Music in Media Center > Music > My
Recording or My Music can all be set as
the incoming ringtone.
Games
M307 comes with several built-in JAVA games.
Users will not feel bored with all these
interesting games.
Java Settings
Go to Media Center > Java Games and press
to adjust the settings.
Option Discription
Sound Setting to adjust volume with
keys
Network t o customize DNS IP
Setting and network profile
Sleep Time to set up the sleep time
Delete to delete the selected item
MIDlet Info to check the information of
the downloaded Java
games
Java Info to check the file amounts
and the memory status
Install from to install Java games
Memory Card from memory card
60
Page 61

Network
The built-in browser of M307, which supports
WAP 1.2.1 and WAP 2.0 enables users to
browse most WML WAP web pages. In addition
to WAP, M307 also supports GPRS Multi-slot
Class 10.
Push Inbox enables users to get messages
such as news website addresses or MMS
information.
How to Set Up WAP
The WAP allows you to configure the network
settings of the mobile phone and surf the
Internet.
NOTE:
Network service needs supports
from the service provider. Please contact
the service provider for more details.
WAP Setup
Before using WAP, users have to apply for this
service from the service provider and configure
the settings.
○○○○○○○○○○○○
1. Go to Network > WAP > Profiles.
2. Select the service provider and press
> Activate > to activate WAP service.
Network
Edit the WAP Profile
If users’ service provider is not on the list,
users can edit their own profile.
1. Go to Network > WAP > Profiles and
choose an unnamed profile. Press >
Modify to start editing.
2. Users have to enter the data from the
service provider to complete the setup.
Option Discription
Name to enter the name of the
service provider
WAP Settings to enter the Gateway IP,
Login Name, Password,
Homepage and etc.
CSD Settings to change the dial-up
number, call type, login
name, password, and
linger time in a CSD type of
connection
WAP Setup
61
Page 62

ASUS M307
○○○○○○○○○○○○
Web Browsing
Option Discription
GPRS Settings to change the APN, login
GPRS Adv. Set. to change advance GPRS
Message Server to set the message server
WAP Settings
Other settings available for users:
Option Discription
Use Cache to activate or deactivate
Push Message to activate or deactivate
Show Image to view or block webpage
Wrap Text to turn text wrapping on or
62
name, and password in a
GPRS type of connection
settings including data
and header compression,
authentication, and
quality of service
for the MMS messages
cache using
push message
images
off
Option Discription
Clear Cache to delete the contents of
the Internet cache
Clear Cookies to delete saved cookies
in the cache
Clear Password to clear all password in
the password list
Security Settings to select and activate
Internet security settings
Factory Settings to restore the phone’s
original WAP settings
Web Page Browsing
After adjusting or changing the necessary
Internet settings, users are now ready to surf
the Internet with the handset.
Press to use the functions below when
surfing the internet.
Back Forward
Stop Reload
Homepage Set Homepage
Page 63

Go to URL Show Address
Bookmark Set Bookmark
Save Image Edit
About Exit Browser
Network Selection
When users’ M307 cannot receive signal but
the service provider operate normally. First
check the SIM card and see if it is broken. If
there is nothing wrong with the SIM card, then
users can try to connect to the network through
manual setup.
Go to Settings > Network Selection and
choose Manual. There will be a list of serivce
providers. Choose the right provider to register.
Unless the phone fails to select the network
normally, the option Auto will save users a lot
of trouble.
○○○○○○○○○○○○
Network
STK
The STK (Sim Tool Kit) list allows users to view
and use value-added services offered by the
phone operator.
1. Go to Network > STK.
2. Select one tool and press to use it or
press to cancel and press to
abort.
NOTE:
1. The contents of this menu are SIMdependent and varies from one phone
operator to another. Inquire with the phone
operator the complete list of services that
they offer.
2. If the phone operator has no value added
service, a Service Not Available message
appears when users access this menu.
Network Selection
63
Page 64

ASUS M307
○○○○○○○○○○○○
Alarm Setup
Alarm Setup
M307 enables users to set up 5 alarm clock for
wake up alarm or reminders for important
schedules.
1. Go to Organizer > Alarm and press to
select one. Press to adjust the
following Alarm Setting.
Option Discription
Alarm Time to key in the alarm time
Alarm Type to choose Once or Repeat
Ringtone to choose a ringtone
Remind options: Ringtone,
Setting Vibrate or Vib. and Ring
Set Volume to set the volume
Set Ring to decide the ring time
Time
2. When the alarm rings, press to stop it,
or press to start the alarm for the lazy.
The alarm will ring 5 minutes later.
3. When the alarm rings, press to start
the alarm for the lazy if the phone is not
flipped open.
4. The alarm will still work normally, even if
the handset is not switched on, .
Dictionary
M307 offers users Chinese-English and
English-Chinese dictionary for a quick
understanding of unknown vocabularies.
NOTE
Insert the mini SD card before using
this dictionary function.
1. Go to Organizer > Dictionary. Use
and keys to switch the input methods.
2. Press to clear the mis-input letters.
3. When finish spelling, press to read the
meaning of the word in Chinese.
64
Page 65

Calendar
M307 can help users schedule important
meetings, and appointments.
Check the Calendar
1. Go to Organizer > Calendar, and navigate
with joystick keys on the calendar.
2. Press volume adjustment keys
on the left side to check the next or the
previous month.
3. Today will be marked with blue letters,
and the days with schedules will be marked
with black frame.
Go To Date
1. Go to Organizer > Calendar.
2. Press > Go To Date and press to
confirm.
3. Enter the specific date and press to
check the schedule of that day.
Other Functions
○○○○○○○○○○○○
Schedule an Appointment
1. Go to Organizer > Calendar.
2. Press > Add.
3. Enter the Title, Record Type, Start Time,
End Time, Repeat Type and other
information about the appointment.
4. Press to save the schedule.
The phone will alert users with ringtones or
vibration when the schedule time comes.
Check and Edit a Schedule
1. Go to Organizer > Calendar. Select a
date with schedule and press to check.
2. Or press > View All > to check all
the schedules.
3. Press again to View, Edit, Delete
and Delete All schedules.
Calendar
65
Page 66

ASUS M307
○○○○○○○○○○○○
Calculator
Calculator
Voice Recorder
66
The calculator of M307 can help users with
basic calculating jobs. Go to Organizer >
Calculator to use the functions below.
Function Keyboard
number input the number keyboard
the joystick keys
Clear
C/AC
.
Back
World Clock
Go to Organizer > World Clock, users can
check the time all over the world.
Voice recorder enables users to record a
speech or any voice users want to record.
1. Go to Organizer > Voice Recorder.
2. Press > Record or just press to
start recording.
3. Press to stop the recording and save
it to My Recording; press to stop the
recording and discard it.
Other Functions
Go to Organizer > Voice Recorder. Select a
recording and press to do the following
operations.
Option Discription
Play to play the recording
Set as to set the recording as the
incoming ringtone
Delete to delete the recording
Delete All to delete all the recordings
Rename to rename the recording
Page 67

Option Discription
Detail to check the detailed
information of the recording
Send MMS to send the recording via
MMS
Voice Recognition
Voice recognition allows users to do the Name
Dialing or the Voice Command.
Name Dialing
Any words can be used as the command for
the name dialing. Users can thus easily voicedial the number without efforts.
Record Name Dialing
1. Go to Organizer > Voice Recognition >
Name Dialing.
2. Select EMPTY and press > Record
Voice.
3. Say the name after the message Please
say the name after beep!.
Other Functions
○○○○○○○○○○○○
4. Repeat the same move after the message
Please say again after beep!.
5. If the second time recognition fails, the
message
will appear again for the third time
recording. If all fail, please start from the
step two to record it again.
6. Enter the phone number after the recording
or press to access the phonebook to
select a contact. Edit the name and press
7. Confirm the name dialing recording by
pressing again.
NOTE
only include ten sets.
8. Press to use the following functions.
Option Discription
Play to play the selected name
Delete to delete the selected name
Delete All to delete all the name dialing
Please say again after beep!
to confirm.
The function of name dialing can
dialing
dialing
Voice Recognition
67
Page 68

ASUS M307
○○○○○○○○○○○○
Voice Command
NOTE:
1. The function of name dialing has
nothing to do with language but the
recorder’s voice
2. Please record the name dialing in a
quiet surroundings.
3. Please use clear and specific names
for each name dialing, and avoid similar
names for different phone numbers.
4. Noisy environment may affect the
operation of the name dialing.
Make a Call with Name Dialing
1. Flip open the phone and long press the
camera button on the left side.
2.
Say the name after the message Please
say the name or command after beep!.
3. If the recognition succeeds, the phone will
start the connection. If it fails, the message
Please say again after beep! will appear.
The phone only accepts operation failure
three times.
Voice Command
Any words or phrases can be used to operate
the voice command.
Record Voice Command
1.
Go to Organizer > Voice Recognition >
Voice Command.
2. Select a function and press to Record
Voice.
3.
Say the command after the message
Please say the command after beep!.
4.
Repeat the same move after the message
Please say again after beep!.
5. If the second time recording fails, the
message
will appear again for the third time
recording. If all fail, please start from the
step two to record it again.
6. After the recording succeeds, the icon
will turn into .
Please say again after beep!
68
Page 69

7. Press to do the following operation.
Option Discription
Play to play the voice command
Delete to delete the selected voice
command
Delete All to delete all voice
commands
Add Item to add a voice command
item (users have to delete
one before add one.)
Delete Item to delete a voice command
item
Restore All to restore the default setting
and the added items will be
cleared
NOTE:
Please avoid the same words or
phrases for name dialing and voice
command in order not to affect the voice
recognition operation.
Other Functions
○○○○○○○○○○○○
Give Voice Command
1. Flip open the phone and long press the
camera button on the left side.
2.
Say the name after the message Please
say the name or command after beep!.
3.
If the recognition succeeds, the phone will
enter the corresponding options. If it fails,
the message Please say again after
beep! will appear. The phone only accepts
operation failure three times.
Currency Exchange
1. Go to Organizer > Currency Exchange
> > Add Rate.
2. Use the upward and downward joysticks
to set currency 1 and 2. Use the leftward
and rightward joystick keys to change the
currency.
3. Enter the currency rate and press to
confirm.
4. Press > Calculate and enter the
amount in the currency 1 and the currency
2 will show the corresponding moeny.
Currency Exchange
69
Page 70

ASUS M307
○○○○○○○○○○○○
Stopwatch
NOTE:
Before using the function of currency
exchange, users have to add rate first.
5. Press to use the following function.
Option Discription
Modify Rate to modify rate
Delete Rate to delete rate
List Currency to list the built-in currency
Stopwatch
1. Go to Organizer > Stopwatch and use
the upward and downward joystick keys
to switch between Lap Stopwatch and
Split Stopwatch.
2. Press to start the stopwatch and press
to mark the time.
3. Press again to pause the stopwatch
and press clear the time.
4. Press to exit the stopwatch.
70
and press to add, modify
or delete the currencies
Memory Status
This option will show the memory status of the
Phonebook, SMS, Calendar, Shared
Memory, and Memory Card.
Press or use the upward and downward
joystick keys to show the next page
and the previous page.
1.
Phonebook:
space In Handset and In SIM Card.
2.
SMS:
and In SIM Card.
3.
Calendar: to check the Event Status and
Holiday space.
4. Share Memory Status: to check the Used
Space and Free Space in the built-in
Shared Memory.
6. Memory Card Status: to check the Used
Space and Free Space in the memory
card.
NOTE:
Users cannot check the memory
card status without the card installation.
to check the phonebook
to check the SMS space In Handset
Page 71

Mass Storage
M307 supports mini SD card, so users can
use the handset as a card reader for an easy
file storage and transmission.
1. Connect the USB cable to the handset
and the PC.
2. Go to Settings > Transmit > Mass
Storage, and press to confirm.
3. A message Mass storage connecting,
please do not remove the USB cable!
will show up.
4. Click My Computer on the desktop, a
Removable Disk will appear.
5. Browse, edit, delete, upload and download
files from the mini SD card.
6. Press (Close) to remove the
Removable Disk after editing.
NOTE:
Do not remove the USB cable during
this function operating.
Other Functions
○○○○○○○○○○○○
Mass Storage
71
Page 72

ASUS M307
○○○○○○○○○○○○
Install Handset Manager
Installing the Handset
Manager
Ensure that the following system requirements
are met:
Software:
• Microsoft Windows 98 or above system
Hardware:
• USB 2.0 port
• CD-ROM driver
You can also edit voice mail details or connect
to a voice mail account here.
NOTE
:
Voice mail is a service provider
feature. Contact your service provider for
voice mail numbers and settings or other
voice mail assistance.
To install the Handset Manager software:
1. Insert the software CD into your computer
to start installation.
2. On the start-up page, select the mobile
phone model and interface you wish to
72
install.
3. Turn on the phone and connect it to the
computer using the supplied USB cable.
When you turn on the phone, the phone
prompts you to select a type of USB
connection. Select COM Port.
4. Click OK on the phone keypad to proceed.
5. Click Install Handset Manager.
NOTE
:
• Make sure the mobile phone is switched
on and correctly connected with the USB
data cable before installation.
• Most systems already support USB.
However, if your system does not, install a
USB driver before installing the Handset
Manager software.
• To uninstall software, click the Add/
Remove Programs icon in the control panel.
Select the ASUS M307 USB-Handset
Manager from the list. Click the Remove
button and follow the instructions on screen.
Page 73

Web Page Browsing
Starting the Handset
Manager
To start the Handset Manager:
1. Connect your handset to a USB port on
your computer using the supplied USB
data cable, then turn on your handset.
2. A list of connection types appears in the
handset window. Select COM Port.
3. Select Asus M307 USB-Handset Manager
> Asus M307 USB-Handset Manager from
the computer’s program list, OR
Right click the phone icon in the system
tray in the lower right corner of the screen.
Select Handset Manager.
4. An animation in the Handset Manager
main panel shows your connection status.
NOTE
:
• Be sure to unplug the USB cable after use.
The computer may not boot as usual if you
start the computer with the phone’s USB
cable connected.
Handset Manager
○○○○○○○○○○○○
• When disconnecting the mobile phone
from the computer while using Handset
Manager, first turn off the handset, then
disconnect the USB cable. When
transmitting data to the Handset Manager,
don’t disconnect the handset.
• While transmitting and editing data, don’t
operate the phone and Handset Manager
at the same time.
• Don’t install Java Games through Handset
Manager while simultaneously playing Java
games in the mobile phone.
Main Panel
The following illustration shows the main
panel. Access all the Handset Manager
functions from this Panel.
Start Handset Manager
73
Page 74

ASUS M307
○○○○○○○○○○○○
Main Panel
Access the Handset Manager tools by clicking
on the icons at the bottom of the screen. Each
tool has its own interface, which opens when
you click on the icon.
Phonebook Message
Album MMS
File Manager Video
Sound
Clicking the three buttons in the upper right
corner of the main Handset Manager panel
does the following:
Closes Handset Manager and minimizes
the system tray.
Minimizes Handset Manager to the task
bar.
74
Opens online help and settings.
Settings, Information, and
Online Help
You can access several items related to
settings, information, and online help by
clicking on the icon.
• Select Help Topics to open online help.
You can also open online help from the
program list: Asus M307 USB-Handset
Manager > User’s Guide.
• Under Settings, you can select whether
to run the Handset Manager automatically
when you start the computer. You can also
set the computer port, handset model, and
interface type manually here.
• Select Handset Version to see the model
name and firmware version of the phone,
when the phone is connected. Select
About Handset Manager to see the
version of Handset Manager installed in
your computer.
Page 75

Navigating the Handset
Manager Tools
No matter which Handset Manager tool you
are working with, you can access functions
and commands in the following three ways.
The Messages window is shown as an
example.
1. Right-click to bring up the pop-up menu
or click icons on the menu toolbar, OR
2. Click on the File button in the upper
left corner to choose from a drop-down
menu, OR
3. Click on the icons in the upper right of the
window.
File Button
Icons for Functions
Handset Manager
○○○○○○○○○○○○
When you move the mouse over an icon, a
pop-up window tells you the name of the
button.
NOTE:
You must exit one tool before
launching another.
Navigating Media Files
The interfaces for media tools-MMS, Sound,
or Album and Video-are quite similar. The
Album interface is shown here.
1
2
3
1. Preview Pane 2. Phone File Location
3. Phone Files 4. Icons for Functions
5. File Path/ Browse Icon
6. Thumbnails of Computer Files
4
Handset Manager Tools
5
6
75
Page 76

ASUS M307
○○○○○○○○○○○○
Navigate Media Files
• The left preview pane shows a preview of
the files you select. A drop-down menu
on the left lets you select the location of
phone files. Select Handset or Memory
Card.
• Thumbnails of files in the phone are shown
in the lower left pane.
• Icons in the upper right corner give access
to various functions, such as copy, paste,
and delete. Also in the upper right, a frame
shows the current file path, next to the
browse icon . If you want to choose
another file location, click this icon. The
browse icon and drop down menus give
you access to computer files only.
• Thumbnail views of computer files in the
selected location are shown in the lower
right pane.
Transferring Files to and from
the Handset
•To edit a file in your handset, download
the file to your computer by clicking on
the Download icon in the upper right.
76
The download function does not save the
file on your computer. To save the file on
your computer you first download it as
described above and then right-click and
select Save from the dropdown menu. You
can then save the file to a specific location
on your hard disk.
•To add a file to the handset, click on the
Update icon .
•To refresh the folder display click the
Refresh icon .
NOTE:
• As used in the Handset Manager software,
the term update has the same meaning as
upload.
• You do not necessarily need to select a
folder on the phone’s handset or miniSD
card. The Handset Manager automatically
locates the appropriate folder for the file
type.
Page 77

Handset Manager Folder
Location
The Handset Manager creates a default folder
in the My Documents folder in Windows. Find
this folder in My Documents > Mobile Action >
Handset Manager. There are also sub-folders
for the different types of files you can work
with in the Handset Manager.
NOTE:
To locate handset files using the
handset screen, go to Organizer > File
Manager.
Handset Manager Icon
A Handset Manager icon appears in the
system tray, even when the Handset Manager
is minimized. By right-clicking the Handset
Manager icon in the system tray, you can
select the following Handset Manager
functions: Handset Manager, SyncManager,
SyncManager Settings, and Exit.
The appearance of the icon in the system tray
indicates the current status:
Handset Manager
○○○○○○○○○○○○
Handset Manager is connected with the
handset.
SyncManager has launched autosynchronization.
The handset is disconnected from
Handset Manager.
NOTE:
When you close the Handset
Manager window, the application remains
running in the background. To completely
exit Handset Manager, right click and select
Exit.
Navigate Media Files
77
Page 78

ASUS M307
○○○○○○○○○○○○
78
 Loading...