

Page 1
Getting Started
mini
SD
LOCK
OPEN
mini
SD
Overview
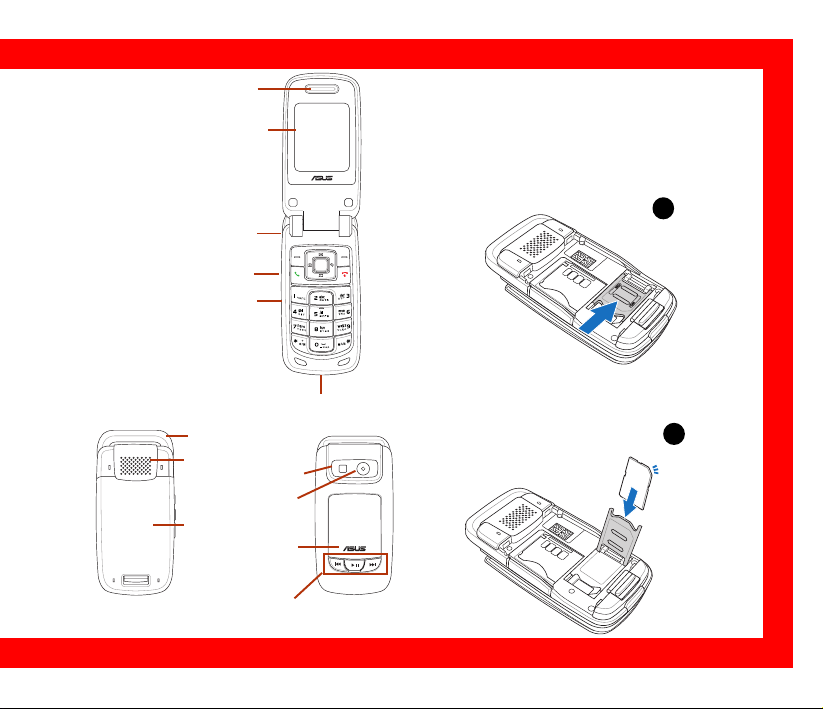
Receiver
The SIM Card & Battery
Screen
Installation
1. Push rightward and unlock the SIM card
holder.
1
Earphone Jack
Camera Key
Volume Key
2. insert the SIM card in the correct orientation
Charger / USB Port
Antenna
with the gold contacts facedown.
2
Outer Speaker
Photoflash
Camera Lens
Battery
Outer Screen
MP3 Function Keys
1
Page 2

3. Reinstall the battery and press to snap it back
into place.
The mini SD Card Installation
& Uninstallation
1. Install: Open the cover and place the mini SD
card into the slot with the gold contact
facedown.
2. Uninstall: Press the mini SD card and it will
uninstall itself.
2
SIM Installation
Battery Charging
1. Connect the charger to a wall outlet.
3
2. Connect the charger to the charger port at
the bottom of the phone in a correct
orientation.
3. The battery will then be charged, and the
screen will display a charging animation.
def
1
ㄅ
abc
3
ㄆ
ㄇ
ㄈ
ㄏ
ㄎ
2
ㄍ
ㄉㄊㄋㄌ
o
mn
hi
g
6
4
ㄙ
j
ㄘ
kl
ㄗ
ㄐ
ㄑ
ㄒ
5
ㄓㄔㄕㄖ
p
yz
q
x
r
w
s
7
9
tuv
ㄚ
ㄥ
ㄛ
ㄤ
ㄜ
ㄝ
ㄢㄣ
8
ㄞㄟㄠㄡ
+
法
入
⁄⁄/
輸
›^
0
ㄧㄨㄩㄦ
.
Page 3
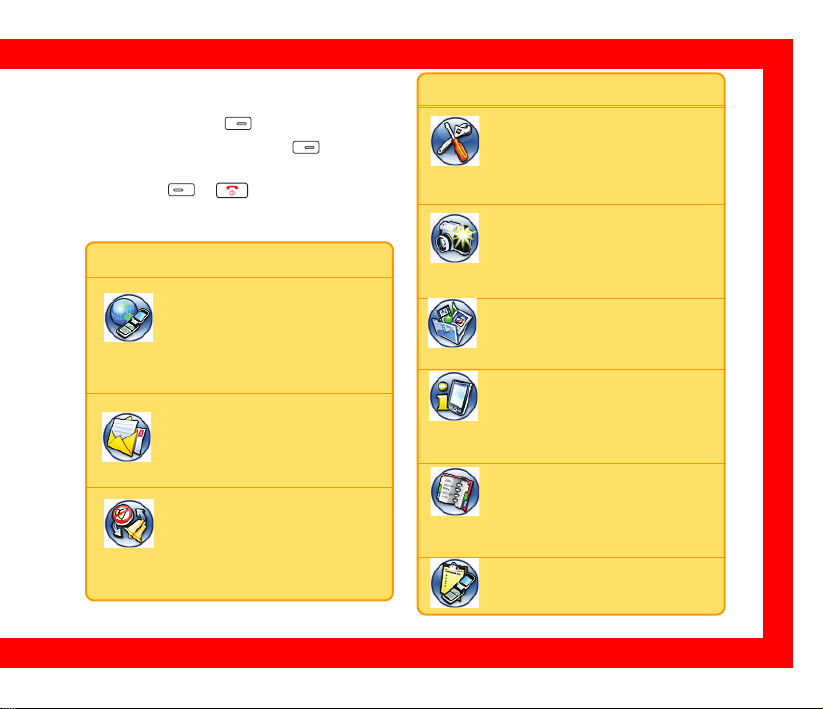
Main Menu
In the idle mode, press to enter the main menu
and navigate with joysticks.Press to select an
item. For exit from the main menu or sub-menu,
simply press or . The table beneath will
introduce the icons and functions in the main menu.
Icon Discription
Network: Enables users to
specify the WAP and data
settings and set up GSM and
GPRS settings. Provides access to the
internet and to STK SIM card service.
Messages: Enables users to
check, compose and send SMS,
MMS, or Email. Also, enables
users to chat and broadcast messages.
Manner: Enables users to set up
and personalize manners,
including ringtones, volumes,
ring types and answer modes.
Icon Discription
Settings: Enables users to set
up the phone, display, ringtones,
network, security, call and also
restore to the factory default settings.
Camera: Enables users to take
pictures and record videoes.
Users can also save and send the
files to friends.
Media Center: Enables users to
play MP3 music files, play JAVA
games and compose ringtones.
Organizer: Contains useful tools,
including an alarm, schedule
planner, calculator, currency and unit
convertor, stopwatch, file manager and etc.
Phonebook: Helps users to
manage names and phone
numbers for easy access and caller
recognition.
Calls: Stores information about
dialed, answered, missed calls.
3
Page 4

Calls Making
Silent and Hands-free
Common Calls
1. Flip open the phone and enter the number for
dialing. Press (right soft key) to clear the
last number and long press to clear all.
2. After the phone number is completed, press
(left soft key) to save it to the phonebook.
Or press to start connecting.
Speed Dialing
3-1. From the phonebook
In the idle mode, press to enter the phonebook
and use the joysticks (up and down) to select a
contact name for dialing. Press to start
connecting.
3-2. From Call Log
Press to show the dialed and received call
history. Select a contact and press to connect
the number.
Call Ending
Press to end the call.
4
Speaker
Press to start the silence function and again
to stop it during the call.
Press while dialing or long press during
connecting to enable the speaker and again to
disable it.
Call Answering
You can only answer the phone call when the phone
is on. When a call is coming, the phone will alert
users with a ringtone or a vibration based on users’
previous setup. The display will show the incoming
number, contact name (only on the contact list) or
hidden number. The display will also show the
picture if users have set up earlier in the phonebook.
1. Users could just flip open the phone to answer
the phone.
2. For answering the call by pressing any key, go
to Settings > Call Settings > Answering Mode
and select Any Key.
Page 5

Call Log
Press to check the information of “missed
calls,” “dialed calls,” “answered calls.”
The limit of the Call Log is 60 calls and 20 records
for each missed call, dialed call, answered call. The
previous history record will be dropped from the
list when the quota is exceeded.
Common Settings
In the Settings section, users can customize their
preference setup, such as ringtones, display
settings, date/time or language.
Date/Time
Go to Settings > Phone Settings > Date/Time.
1. Select Set Date/Time and key in with keypad.
Press to confirm.
2. Go to Set Time Zone to locate your home city
or the nearest one and press to confirm.
3. Go to Date Format and set a wanted format-
-DD.MM.YYYY, MM.DD.YYYY, or YYYY.MM.
DD.
4. Go to Time Format to choose 24-Hour or 12-
Hour.
5. Users have to press to select Show Date
and Show Time in Settings > Displays
Settings > Main Idle Screen first and the date/
time will show up then.
Shortcut
Go to Settings > Phone Settings > Shortcut.
Selcct an (EMPTY) space and press to start
editing. Choose one function from the Shortcut
List and press to confirm.
Manner
In the Manner menu, users can select manners,
including Normal, Meeting, Indoor, Outdoor,
Custom and even further personalize and rename
those manners.
Wallpaper
Wallpaper from built-in images
1. Go to Settings > Display Settings >
Wallpaper > Main Wallpaper/ Sub
Wallpaper.
5
Page 6

2. Navigate upward and downward to browse the
built-in images and select one. Press and
press > Set as > Main Wallpaper/ Sub
Wallpaper.
Wallpaper from user’s images
1. To set the images captured with M307 camera
as the wallpaper, please go to Camera > My
Album > Handset.
2. Locate the wanted picture and press >
Set as > Main Wallpaper. Name it and press
to confirm.
3. Repeat the previous steps in the built-in
images section to set up the wallpaper.
Ringtone Settings
In the Settings > Ringtone Settings, users can
set up their preferred ringtones for incoming calls,
messages tone, ring mode, message mode and
etc.. Or users can customize their own music by
going to Media Center > Music > Ringtone >
Composer.
SMS Composing/Sending
1. Select Message > Edit SMS.
6
2. Press to “To: .” Enter the number or press
to select a contact and press to
confirm.
2. Press to enter “Content:” and start editing
the contents. Users can edit content directly
or press to apply Common Words.
3. After the editing is over, press to confirm
and press > Send.
4. “Save to outbox” message will show up and
press Yes to save it to outbox.
MMS Composing/Sending
Composing Text
1. Go to Message > MMS > Edit MMS.
2. Select “Content:” and press > > Add
Text to start editing.
3. When finish editing, press to confirm.
4. If users would like to edit or delete the text,
simply press to Edit, set up Duration or
Delete.
Adding Image
1. After the text part is done, press > Add
Image > .
Page 7

2. Locate the wanted image and press to
confirm the addition.
3. If users would like to edit or delete the image,
simply press to Edit, set up Duration or
Delete.
Adding Audio
1. After the image part is done, press > Add
Audio > .
2. Locate the audio file and press to confirm
the addition.
3. If users would like to edit or delete the audio,
simply press to Edit, set up Duration or
Delete.
Adding Slide
A slide can only hold a combination of text, image
and audio. To have a multi-slide MMS, just press
> Add Slide and repeat the previous steps to
add text, image and audio.
Sending MMS
1. There are To:, Cc:, Bcc:, Subject: in the Edit
MMS menu.
2. Users cannot enter phone numbers directly.
Just highlight To: and press > > Add.
Users can add a recipient from phonebook, or
enter the phone number. Press to confirm
and press to return the menu.
3. For more recipients, repeat the previous step.
4. Press > Send > to send the MMS.
Users can find a copy in the MMS Outbox.
MP3 Player
M307 is equipped with a high quality MP3 player
for digital music files.
Go to Media Center > MP3 Player and the
interface on the right side will show up. Or, users
can simply press to enter the media center
menu.
Source
Volume
Previous
Title
Stop
Play Time
Next
Play / Pause
7
Page 8

Playing MP3 Music
1. When users enter Media Center > MP3
Player for the first time, the player will
automatically create a playlist “Playlist_All.
m3u” and put all the music stored in “My Music”
in the memory card to the list.
2. Press for previous or next songs, and
press to show the current list or to
stop.
3. Press to adjust the volume.
4. Or press to activate the MP3 player when
the phone is close.
In addition to the auto-generated playlist
Playlist_All.m3u, users can use this function to
create other playlists.
1. Go to Media Center > MP3 Player and press
to select Playlist Manager.
2. Press to use the functions below.
Capture
1. Go to Camera > Capture; or press the left
joystick key and choose Capture; or press
button on the left side.
8
2. Preview in the screen and press to capture.
3. If the picture is satisfactory, then press to
save it to my album and if not, press to
discard it.
Video Recorder
1. Go to Camera > Video Recorder and press
to start video taping.
2. After the recording stops, press to save
or press to stop the recording and save it
automatically. Press to exit video
recording. The file will be in the My Video
folder.
 Loading...