


Asus ET2411INTI, ET2210IUKS, ET2411IUTI, ET2210IUTS, ET2411IUKI User’s Manual
...User Guide for Windows® 8
System requirements
To facilitate a smoother transition from your previous operating system, read the system requirements below before upgrading to Windows® 8:
Processor
RAM
Hard disk space
Graphics card
Screen resolution
1GHz or faster
1GB (32-bit) or 2 GB (64-bit)
16 GB (32-bit) or 20 GB (64-bit)
Microsoft DirectX9 graphics device with WDDM driver
1024 x 768 for Windows® apps
1366 x 768 for Snap feature
NOTE: For updates on these system requirements, visit http://www.windows.microsoft.com/en- us/windows-8/faq
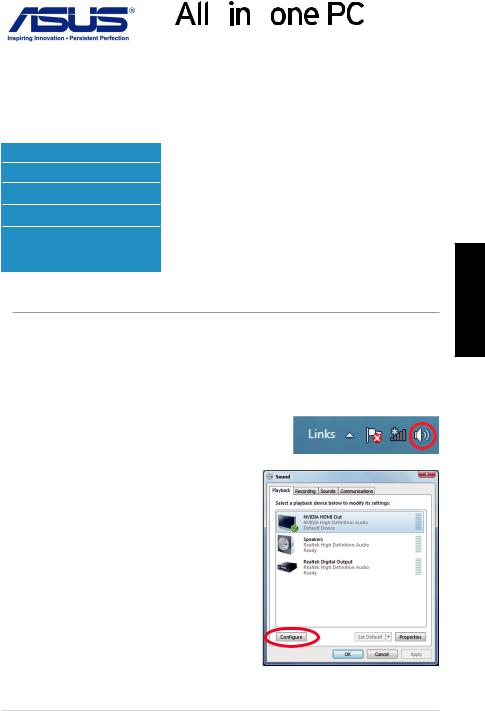
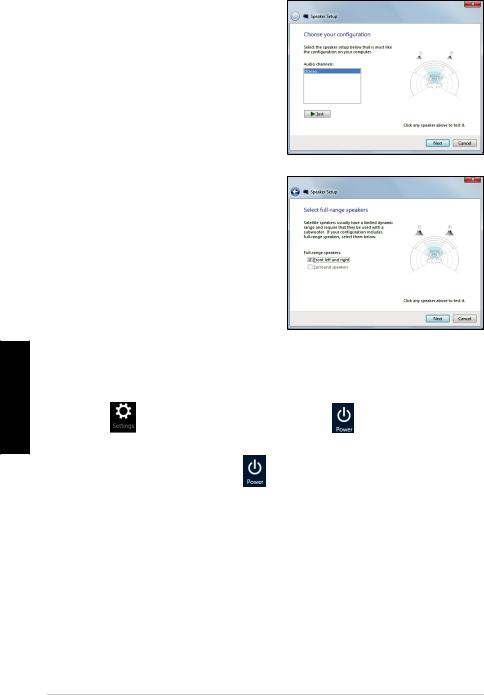
Configuring the audio output via an HDMI device
If you want to use a high-definition TV as an audio output device, connect it to your Home Theater PC and follow the steps below to configure the audio settings.
1.From the Start screen, click Desktop to launch the Desktop Mode.
2.Right-click the Volume Mixer icon on the Windows® taskbar and click Playback devices.
3.From the Playback screen, select Digital Audio (HDMI).
4.Click Configure and the Speaker Setup window pops up.
E7671 / First Edition / August 2012 |
|
<![endif]>English
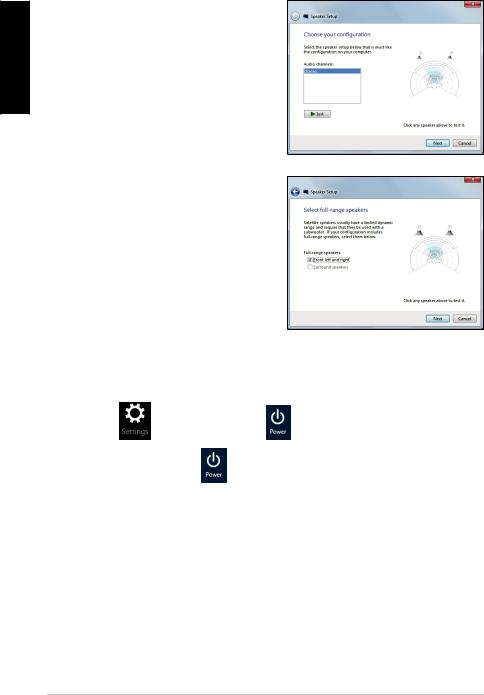
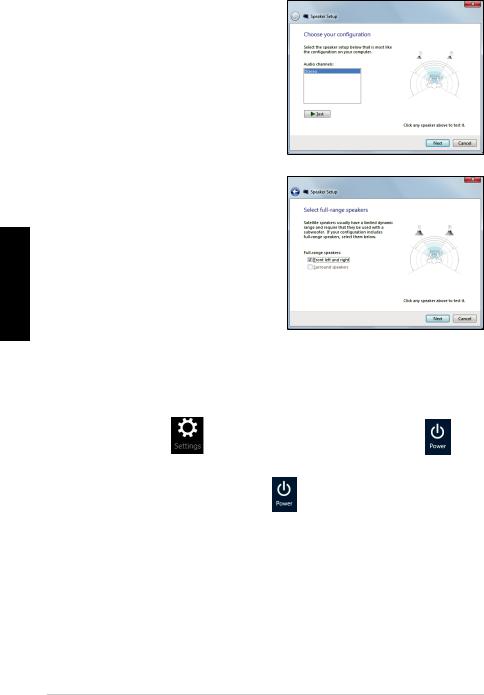
5.Select Stereo and click Next.
<![if ! IE]><![endif]>English
6.Tick the Front left and right option, and click Next.
7.Click Finish to exit the speaker setup.
Turning your All-in-one PC off
Do any of the following to shut down your All-in-one PC:
• |
Tap from |
the Charm bar then tap |
> Shut down to do a normal shutdown. |
|
• |
From the log-in screen, tap |
> Shut down. |
||
•If your All-in-one PC is unresponsive, press and hold the power button for at least four
(4) seconds until your All-in-one PC turns off.

Entering the BIOS Setup
Windows® 8 boot time is quite fast, so we developed three ways for you to quickly access the BIOS (Basic Input and Output System), which stores system hardware settings that are needed for system startup in your All-in-one PC.
To quickly access the BIOS, do any of the following:
•When your All-in-one PC is off, press the power button for at least four (4) seconds to access the BIOS directly.
•Press the power button for at least four (4) seconds to shut down your All-in-one PC, then press the power button again to turn your All-in-one PC back on, and press <F2> during POST.
•When your All-in-one PC is off, disconnect the power cord from your All-in-one PC’s power connector. Reconnect the power cord and press the power button to turn on your All-in-one PC. Press <F2> during POST.
NOTE: POST (Power-On Self Test) is a series of software controlled diagnostic tests that run when you turn on your All-in-one PC.
WARNING! Inappropriate BIOS settings may result to instability or boot failure. We strongly recommend that you change the BIOS settings only with the help of a trained service personnel.
<![endif]>English

<![endif]>English
Connecting to the Internet
Access emails, surf the Internet, and share applications via social networking sites on or from your All-in-one PC using wireless/Wi-Fi or wired connection.
Wi-Fi connection
To set up your Wi-Fi connection:
1.Do the following steps to activate Wi-Fi in your All-in-one PC:
a)Launch the Charm bar.
b) Tap |
and tap |
. |
c)Select an access point from the list of available Wi-Fi connections.
2.Tap Connect to start the network connection.
NOTE: You may be prompted to enter a security key to activate the Wi-Fi connection.
3.If you want to enable sharing between your All-in-one PC and other wireless-enabled systems, tap Yes, turn on sharing and connect to devices. Tap No, don't turn on sharing or connect to devices if you do not want to enable the sharing function.
Wired connection
To set up your wired connection:
1.Use a network (RJ-45) cable to connect your All-in-one PC to a DSL/cable modem or a local area network (LAN).
2.Turn on your computer.
3.Configure the necessary Internet connection settings.
NOTES:
•For more details, refer to the sections Configuring a dynamic IP/PPPoE network connection or Configuring a static IP network connection.
•Contact your Internet Service Provider (ISP) for details or assistance in setting up your Internet connection.

Configuring a dynamic IP/PPPoE network connection
To configure a dynamic IP/PPPoE or static IP network connection:
1.From the Start screen, click Desktop to launch the Desktop mode.
2. From the Windows® taskbar, right-click the network icon |
and click Open Network |
and Sharing Center. |
|
3.From the Open Network and Sharing Center screen, click Change Adapter settings.
4.Right-click on your LAN and select Properties.
5.Click Internet Protocol Version 4(TCP/IPv4) and click Properties.
6.Click Obtain an IP address automatically and click OK.
NOTE: Continue to the next steps if you are using PPPoE connection.
7.Return to the Network and Sharing Center and then click Set up a new connection or network.
8.Select Connect to the Internet and click Next.
9.Select Broadband (PPPoE) and click Next.
10.Enter your User name, Password, and Connection name. Click Connect.
11.Click Close to finish the configuration.
12.Click the network icon in the taskbar and click the connection you just created.
13.Enter your user name and password. Click Connect to connect to the Internet.
Configuring a static IP network connection
To configure a static IP network connection:
1.Repeat steps 1 to 4 of the previous section Configuring a dynamic IP/PPPoE network connection.
2 Click Use the following IP address.
3.Enter the IP address, Subnet mask and Gateway from your service provider.
4.If needed, enter the preferred DNS Server address and alternative address.
5.When done, click OK.
<![endif]>English

<![endif]>English
Recovering your system
Resetting your All-in-one PC
The Reset your PC option restores your PC to its factory default settings.
IMPORTANT! Back up all your data before using this option.
To reset your All-in-one PC:
1.Press <F9> during bootup.
2.From the screen, click Troubleshoot.
3.Select Reset your PC.
4.Click Next.
5.Select Only the drive where the Windows is installed.
6.Select Just remove my files.
7.Click Reset.
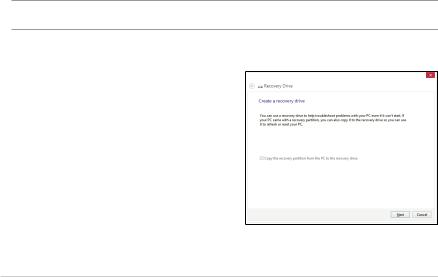
Recovering from a system image file
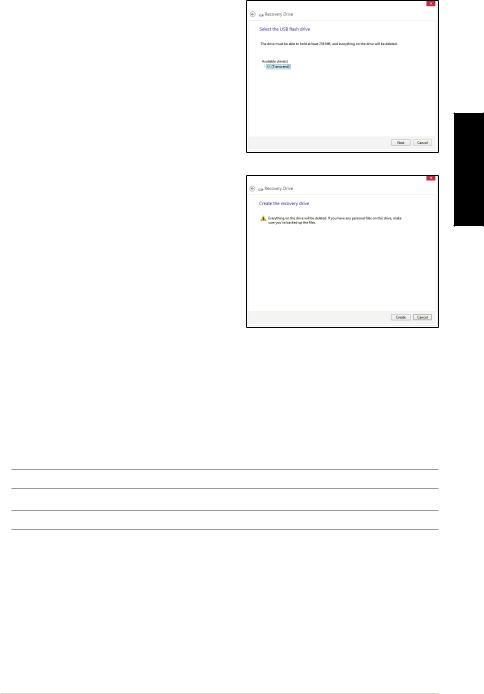
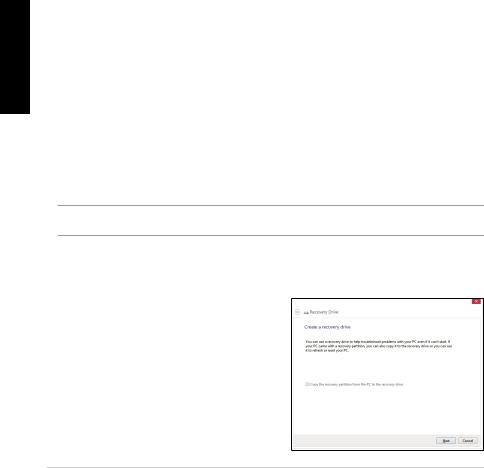
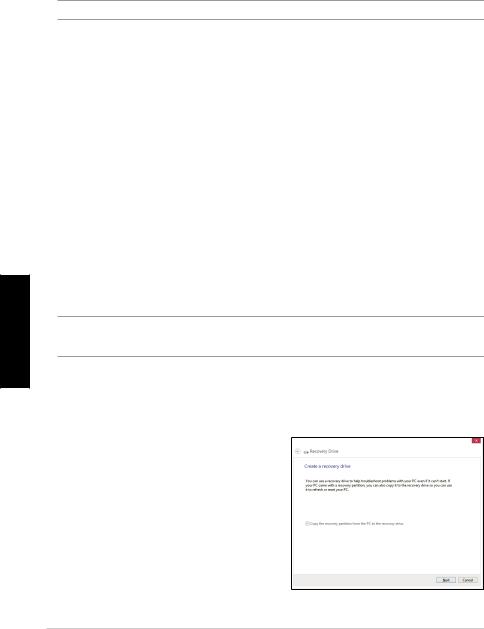
You can create a USB recovery drive and use this to recover your All-in-one PC’s settings.
Creating a USB recovery drive
WARNING! All files on your USB storage device will be permanently deleted during the process. Before you proceed, ensure that you back up all your important data.
To create a USB recovery drive:
1.Launch the Control Panel from the All Apps screen.
2.From the Control Panel’s System and Security, click Find and fix problems.
3.Click Recovery > Create a recovery drive.
4.Click Next.
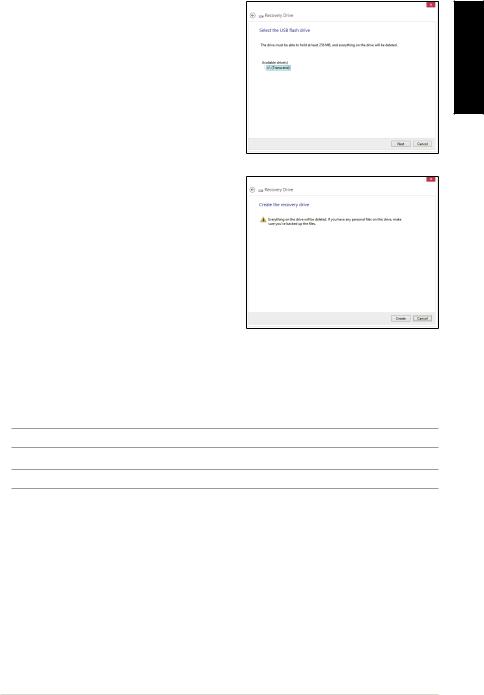
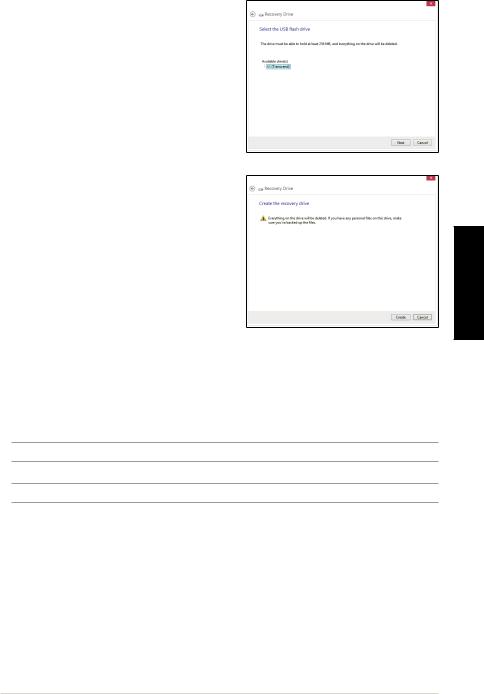
5.Select the USB storage device where you want to copy the recovery files.
6.Click Next.
7.Click Create. Wait for a while for the process to complete.
8.When the process is completed, click Finish.
Removing everything and reinstalling Windows
Restoring your All-in-one PC to its original factory settings can be done using the Remove everything and reinstall option in PC Settings. Refer to the steps below to use this option.
IMPORTANT! Back up all your data before using this option.
NOTE: This process may take a while to complete.
1.Launch the Charm bar.
2.Click Settings > Change PC Settings > General.
3.Scroll down to view the Remove everything and reinstall Windows option. Under this option, click Get Started.
4.Follow the onscreen instructions to complete the reinstallation and reset process.
<![endif]>English

<![endif]>English
NOTE: Download the multi-language versions
of this user manual from the ASUS Support site at http://support.asus.com

Guide Windows® 8
Pré-requis système
Pour faciliter la mise à niveau de votre système d’exploitation, assurez-vous que votre système puisse satisfaire aux critères de transition vers Windows® 8 :
Processeur
Mémoire vive
Espace disque libre
Processeur graphique
Résolution d’écran
1GHz ou plus
1 Go (32-bits) ou 2 Go (64-bits)
16 Go (32-bits) ou 20 Go (64-bits)
Puce graphique compatible Microsoft DirectX9 et pilote WDDM
1024 x 768 pour les applications Windows
1366 x 768 pour la fonctionnalité Snap
REMARQUE :consultez le lien suivant pour d’éventuelles mises à jour de ces pré-requis système http://www.windows.microsoft.com/fr-fr/windows-8/faq
Configurer la sortie audio HDMI
Si vous souhaitez utiliser un téléviseur HD comme dispositif de sortie audio, connectez-le à votre ordinateur et suivez les instructions suivantes.
1.À partir de l’écran d’accueil, cliquez sur Bureau pour basculer vers ce mode d’affichage.
2.Faites un clic droit sur l’icône Volume de la barre des tâches du Bureau de Windows® puis cliquez sur Périphériques de lecture.
3.Sur l’onglet Lecture, sélectionnez le périphérique de sortie HDMI utiliser.
4.Cliquez sur Configurer pour voir apparaître la fenêtre de configuration des haut-parleurs.
F7671 / Première édition / Août 2012
<![endif]>Français

<![endif]>Français
5.Sélectionnez Stéréo et cliquez sur Suivant.
6.Cochez les cases Avant gauche et droit, puis cliquez sur Suivant.
7.Cliquez sur Terminé pour quitter.
Éteindre votre All-in-one PC
Utilisez l’une des trois méthodes suivantes pour éteindre votre ordinateur :
•À partir de la Barre des charmes, cliquez sur  >
>  > Arrêter.
•À partir de l’écran d’ouverture de session, cliquez sur  > Arrêter.
•Si l’ordinateur ne répond pas ou s’il est bloqué, maintenez le bouton d’alimentation enfoncé pendant environ quatre (4) secondes pour forcer l’ordinateur à s’éteindre.
10
Accéder à l’interface de configuration du BIOS
Le BIOS (Basic Input and Output System) stocke divers paramètres matériels du système.
Le délai de démarrage de Windows® 8 étant très rapide, ASUS a développé trois méthodes d’accès rapide à l’interface de configuration du BIOS :
Utilisez l’une des méthodes suivantes pour accéder rapidement au BIOS : |
|
• Lorsque le All-in-one PC est éteint, appuyez pendant environ quatre (4) secondes sur le |
|
bouton d’alimentation pour accéder directement au BIOS. |
|
• Appuyez environ quatre (4) secondes sur le bouton d’alimentation pour l’éteindre, |
|
appuyez de nouveau sur le bouton d’alimentation pour le rallumer puis appuyez sur la |
<![if ! IE]> <![endif]>Français |
l’initialisation des tests du POST. |
|
touche F2 lors de l’initialisation des tests du POST. |
|
• Si l’ordinateur est éteint, allumez-le puis appuyez rapidement sur la touche F2 lors de |
|
REMARQUE :le POST (Power-On Self Test) est une série de tests de diagnostic exécutés à chaque démarrage de l’ordinateur.
AVERTISSEMENT ! Une mauvaise utilisation du BIOS peut entraîner une instabilité du système ou un échec de démarrage. Il est fortement recommandé de ne modifier les paramètres du BIOS qu’avec l’aide d’un technicien qualifié.
11

Connexion Internet
Consultez vos emails, surfez sur Internet et partagez des applications sur vos réseaux sociaux par le biais de la connexion filaire ou sans fil Wi-Fi de votre ordinateur All-in-one PC.
Connexion Wi-Fi
Pour configurer une connexion réseau sans fil :
1. |
Suivez les instructions suivantes pour activer la connexion sans fil de votre All-in-one |
||||
|
|
PC : |
|
|
|
|
|
|
|
|
|
| <![if ! IE]> <![endif]>Français |
|
a) |
Ouvrez la Barre des charmes. |
|
|
|
b) |
Cliquez sur |
puis sur |
. |
|
|
|
||||
|
|
c) |
Sélectionnez un point d’accès dans la liste des réseaux Wi-Fi disponibles. |
||
|
2. |
Cliquez sur Connecter. |
|
||
REMARQUE :une clé de sécurité peut vous être demandé avant de pouvoir établir la connexion au réseau Wi-Fi.
3.Choisissez d’activer ou non le partage sans fil entre votre All-in-one PC et d’autres appareils sans fil faisant parti du même réseau.
Connexion filaire
Pour configurer une connexion réseau filaire :
1.Utilisez un câble réseau (RJ-45) pour relier votre All-in-one PC à un modem câble ou DSL ou ) un routeur.
2.Allumez votre All-in-one PC.
3.Configurez les paramètres de connexion Internet nécessaires.
REMARQUES :
•Pour plus de détails, consultez les sections Configurer une connexion réseau PPoE ou à adresse IP dynamique et Configurer une connexion réseau à adresse IP fixe.
•Contactez votre FAI (Fournisseur d’accès à Internet) pour plus de détails sur la configuration de vos paramètres Internet.
12

Configurer une connexion réseau PPoE ou à adresse IP dynamique |
|
||
Pour configurer une connexion réseau PPoE ou à adresse IP dynamique : |
|
||
1. |
À partir de l’écran d’accueil / Démarrer, cliquez sur Bureau. |
|
|
2. |
Dans la zone de notification de Windows®, faites un clic droit sur l’icône réseau puis |
|
|
|
cliquez sur Ouvrir le Centre Réseau et partage. |
|
|
3. |
Cliquez sur Modifier les paramètres de la carte. |
|
|
|
|||
4. |
Faites un clic droit sur votre adaptateur réseau puis sélectionnez Propriétés. |
<![if ! IE]> <![endif]>Français |
|
5. |
Cliquez d’abord sur Protocole Internet version 4 (TCP/IPv4) puis sur Propriétés. |
||
|
|||
6. |
Cochez l’option Obtenir une adresse IP automatiquement, puis cliquez sur OK. |
|
|
REMARQUE :suivez les instructions suivantes si vous souhaitez établir une connexion Internet par le biais du protocole PPPoE.
7.Retournez au Centre Réseau et partage, puis cliquez sur Configurer une nouvelle connexion ou un nouveau réseau.
8.Sélectionnez Se connecter à Internet puis cliquez sur Suivant.
9.Sélectionnez Haut-débit (PPPoE) puis cliquez sur Suivant.
10.Entrez votre nom d’utilisateur et mot de passe, puis spécifiez le nom de la connexion. Cliquez sur Connecter.
11.Cliquez sur Fermer pour terminer la configuration.
12.Cliquez sur l’icône réseau de la zone de notification du Bureau suivi de la connexion récemment créée.
13.Entrez si nécessaire votre nom d’utilisateur et mot de passe. Cliquez sur Connecter pour établir une connexion à Internet.
Configurer une connexion réseau à adresse IP fixe
Pour configurer une connexion réseau à adresse IP fixe :
1. Répétez les étapes 1 à 4 de la section précédente. 2 Cochez l’option Utiliser l’adresse IP suivante.
3.Entrez les informations relatives à l’adresse IP, masque de sous-réseau et passerelle telles que fournies par votre fournisseur d’accès à Internet.
4.Si nécessaire, spécifiez une ou deux adresses de serveur DNS.
5.Une fois terminé, cliquez sur OK.
13
Restaurer le système
Réinitialiser votre All-in-one PC
L’option de réinitialisation de Windows® 8 permet de restaurer votre ordinateur dans son état de fonctionnement initial.
|
|
IMPORTANT ! Faites une copie de sauvegarde de vos données avant d’utiliser cette fonctionnalité. |
|
|
|
|
|
|
Pour réinitialiser votre ordinateur : |
||
|
|||
| <![if ! IE]> <![endif]>Français |
1. |
Appuyez sur <F9> au démarrage de l’ordinateur. |
|
2. |
Cliquez sur Troubleshoot (Dépannage). |
||
|
|||
|
3. |
Sélectionnez l’option Reset your PC (Réinitaliser votre ordinateur). |
|
|
4. |
Cliquez sur Next (Suivant). |
|
|
5. |
Sélectionnez Only the drive where the Windows is installed (Seulement le lecteur ou |
|
|
|||
|
|
Windows est installé). |
|
|
6. |
Sélectionnez Just remove my files (Ne supprimer que mes fichiers). |
|
|
7. |
Cliquez sur Reset (Réinitialiser). |
|
Restauration à partir d’un fichier image système
Vous pouvez créer un lecteur de restauration USB et l’utiliser pour restaurer les paramètres de votre système.
Créer un lecteur de restauration USB
AVERTISSEMENT ! Tous les fichiers contenus sur le support de stockage USB seront supprimés lors du processus de restauration. Faites une copie de sauvegarde de vos données avant de continuer.
Pour créer un lecteur de restauration USB :
1.Ouvrez le Panneau de configuration à partir de la liste des applications complète.
2.Dans le Panneau de configuration, cliquez sur Système et sécurité > Rechercher et résoudre les problèmes.
3.Cliquez sur Recovery (Restauration) >
Create a recovery drive (Créer un lecteur de restauration).
4.Cliquez sur Next (Suivant).
14
5.Sélectionnez le périphérique de stockage USB à utiliser pour la copie des fichiers de restauration.
6.Cliquez sur Next (Suivant).
7.Cliquez sur Create (Créer). Patientez quelques minutes.
8.Une fois le processus terminé, cliquez sur Finish (Terminé).
Tout supprimer et réinstaller Windows®
La restauration de votre All-in-one PC dans son état de fonctionnement initial peut être effectuée à partir de l’option Tout supprimer et réinstaller Windows de l’écran «Paramètres du PC» de Windows® 8. Suivez les instructions suivantes pour restaurer la configuration initiale de votre ordinateur.
IMPORTANT! Faites une copie de sauvegarde de vos données avant d’utiliser cette fonctionnalité.
REMARQUE :le processus de réinitialisation peut prendre du temps.
1.Ouvrez la Barre des charmes.
2.Cliquez sur Paramètres > Plus de paramètres PC > Général.
3.Faites défiler le volet de droite jusqu’à l’option Tout supprimer et réinstaller Windows. Sous cette option, cliquez sur Commencer.
4.Suivez les instructions apparaissant à l’écran pour compléter la procédure de restauration.
<![endif]>Français
15

<![endif]>Français
REMARQUE : téléchargez la version multilingue de ce guide sur le site Web d’ASUS : http://support.asus.com
16
|
|
|
|
|
|
|
Bedienungsanleitung für |
||||
Systemvoraussetzungen |
|
|
|
|
Windows® 8 |
Damit die Umstellung von Ihrem bisherigen Betriebssystem reibungslos funktioniert, schauen Sie sich die nachstehenden Systemvoraussetzungen an, bevor Sie auf Windows® 8 aktualisieren:
Prozessor |
Mindestens 1 GHz |
|
RAM |
|
|
1 GB (32 Bit) oder 2 GB (64 Bit) |
||
Freier Festplattenspeicherplatz |
|
|
16 GB (32 Bit) oder 20 GB (64 Bit) |
||
Grafikkarte |
|
|
Microsoft DirectX9-Grafikkarte mit WDDM-Treiber |
||
Bildschirmauflösung |
|
|
1024 x 768 für Windows®-Apps |
||
|
|
|
|
|
1366 x 768 für Einrasten-Funktion |
|
|
|
|
|
|
HINWEIS: Aktuellste Hinweise zu Systemvoraussetzungen finden Sie hier: http://www.windows. microsoft.com/en-us/windows-8/faq
Audioausgabe für HDMI-Geräte konfigurieren
Wenn Sie ein HD-Fernsehgerät als Audioausgabegerät nutzen möchten, verbinden Sie das Fernsehgerät mit Ihrem PC und konfigurieren die Audioeinstellungen, wie in den nachstehenden Schritten gezeigt.
1.Klicken Sie zum Wechseln in den Desktop-Modus im Startbildschirm auf Desktop.
2.Klicken Sie mit der rechten Maustaste auf das Lautstärkesymbol in der Windows®-Taskleiste, klicken Sie dann auf Playback devices (Wiedergabegeräte).
3.Im Wiedergabegeräte-Bildschirm wählen Sie
Digital Audio (HDMI) (Digitalaudio (HDMI)).
4.Klicken Sie auf Configure (Konfigurieren), das Lautsprechereinstellungen-Fenster erscheint.
G7671 / Erste Ausgabe / August 2012 |
17 |
<![endif]>Deutsch
<![endif]>Deutsch
5.Wählen Sie Stereo, klicken Sie dann auf
Next (Weiter).
6.Markieren Sie die Option Front left and right (Front links und rechts), klicken Sie dann auf Next (Weiter).
7.Klicken Sie zum Beenden der Lautsprechereinstellungen auf Finish (Fertigstellen).
Alles-in-Einem-PC abschalten
Zum Herunterfahren Ihres Alles-in-Einem-PCs stehen Ihnen folgende Möglichkeiten zur Verfügung:
• |
In der Charms-Leiste |
: Klicken Sie zum regulären Herunterfahren auf |
> |
|
|
Shut down (Herunterfahren). |
|
|
|
• |
Im Anmeldungsbildschirm: Tippen Sie auf |
> Shut down (Herunterfahren). |
||
•Falls Ihr Alles-in-Einem-PC nicht reagieren sollte, halten Sie die Ein-/Austaste mindestens 4 Sekunden lang gedrückt, bis sich der PC abschaltet.
18

BIOS-Setup aufrufen
Windows® 8 startet recht flott, daher können Sie das BIOS auf drei unterschiedliche Weisen aufrufen. Das BIOS (Basic Input and Output System) speichert Systemhardwareeinstellungen, die zum Systemstart Ihres Alles-in-Einem-PCs erforderlich sind.
In das BIOS-Setup gelangen Sie auf folgende Weisen:
•Bei ausgeschaltetem Alles-in-Einem-PC: Halten Sie die Ein-/Austaste mindestens 4 Sekunden lang gedrückt; Sie gelangen direkt ins BIOS.
•Schalten Sie Ihren Alles-in-Einem-PC aus, indem Sie die Ein-/Austaste mindestens 4 Sekunden lang gedrückt halten. Anschließend schalten Sie den PC wieder ein und drücken beim Selbsttest die <F2>-Taste.
•Trennen Sie im abgeschalteten Zustand das Stromkabel vom Netzteil des Alles-in-Einem- PCs. Schließen Sie das Stromkabel wieder an, schalten Sie Ihren Alles-in-Einem-PC über die Ein-/Austaste ein. Drücken Sie beim Selbsttest die <F2>-Taste.
HINWEIS: Der Selbsttest besteht aus einer Reihe diagnostischer Prüfungen, die nach dem Einschalten Ihres Alles-in-Einem-PCs ausgeführt werden.
WARNUNG! Falsche BIOS-Einstellungen können das System instabil machen oder den Systemstart komplett vereiteln. Wir empfehlen dringend, BIOS-Einstellungen nur mit Unterstützung einer Fachkraft durchzuführen.
<![endif]>Deutsch
19

Mit dem Internet verbinden
Über die kabellose WLAN-Verbindung oder per Kabelverbindung Ihres Alles-in-Einem-PCs können Sie eMails abrufen, im Internet surfen oder Anwendungen über SozialnetzwerkSeiten freigeben.
WLAN-Verbindung
So richten Sie eine WLAN-Verbindung ein:
1.Mit den folgenden Schritten aktivieren Sie das WLAN Ihres Alles-in-Einem-PCs:
a)Rufen Sie die Charms-Leiste auf.
<![endif]>Deutsch
b) Tippen Sie auf |
, dann auf |
. |
c)Wählen Sie einen Zugangspunkt aus der Liste mit erreichbaren WLANVerbindungen.
2.Tippen Sie zum Herstellen der Netzwerkverbindung auf Connect (Verbinden).
HINWEIS Eventuell werden Sie nach einem Sicherheitsschlüssel zum Zugriff auf die WLANVerbindung gefragt.
3.Wenn Sie Daten Ihres Alles-in-Einem-PCs mit anderen WLAN-fähigen Geräten teilen möchten, tippen Sie auf Yes, turn on sharing and connect to devices (Ja, Freigabe aktivieren und mit Geräten verbinden). Tippen Sie auf No, don’t turn on sharing or connect to devices (Nein, Freigabe nicht aktivieren, nicht mit Geräten verbinden), wenn Sie die Freigabefunktion nicht nutzen möchten.
Kabelverbindung
So richten Sie eine Netzwerk-Kabelverbindung ein:
1.Verbinden Sie Ihren Alles-in-Einem-PC über ein Netzwerkkabel (RJ-45) mit einem DSL-/Kabelmodem oder einem lokalen Netzwerk (LAN).
2.Schalten Sie Ihren Computer ein.
3.Konfigurieren Sie die erforderlichen Internetverbindungseinstellungen.
HINWEISE:
•Weitere Hinweise finden Sie in den Abschnitten Dynamische IP/PPPoE-Netzwerkverbindung konfigurieren und Statische IP-Netzwerkverbindung konfigurieren.
•Weitere Unterstützung zur Einrichtung Ihrer Internetverbindung erhalten Sie von Ihrem Internetanbieter.
20
Dynamische IP/PPPoE-Netzwerkverbindung konfigurieren
So konfigurieren Sie eine dynamische IP/PPPoEoder statische IPNetzwerkverbindung:
1.Klicken Sie zum Wechseln in den Desktop-Modus im Metro-Startbildschirm auf
Desktop.
2.In der Windows®-Taskleiste klicken Sie mit der rechten Maustaste auf das
Netzwerksymbol ( ), anschließend klicken Sie auf Open Network and Sharing Center (Netzwerkund Freigabecenter öffnen).
3.Im Netzwerkund Freigabecenter klicken Sie auf Change Adapter settings (Adaptereinstellungen ändern).
4.Klicken Sie mit der Maustaste auf Ihr LAN, wählen Sie Properties (Eigenschaften).
5.Klicken Sie auf Internet Protocol Version 4 (TCP/IPv4) (Internetprotokoll Version 4 (TCP/IPv4), klicken Sie dann auf Properties (Eigenschaften).
6.Klicken Sie auf Obtain an IP address automatically (IP-Adresse automatisch beziehen), anschließend klicken Sie auf OK.
HINWEIS: Fahren Sie mit den nächsten Schritten fort, wenn Sie eine PPPoE-Verbindung nutzen.
7.Kehren Sie zum Network and Sharing Center (Netzwerkund Freigabecenter) zurück, klicken Sie dann auf Set up a new connection or network (Neue Verbindung oder neues Netzwerk einrichten).
8.Wählen Sie Connect to the Internet (Verbindung mit dem Internet herstellen), klicken Sie dann auf Next (Weiter).
9.Wählen Sie Broadband (PPPoE) (Breitband (PPPoE), klicken Sie dann auf Next (Weiter).
10.Geben Sie Benutzernamen, Kennwort und Verbindungsname ein. Klicken Sie auf Connect (Verbinden).
11.Klicken Sie zum Abschluss der Konfiguration auf Close (Schließen).
12.Klicken Sie auf das Netzwerksymbol in der Taskleiste, klicken Sie dann die soeben erstellte Verbindung an.
13.Geben Sie Benutzernamen und Kennwort ein. Klicken Sie zur Verbindung mit dem Internet auf Connect (Verbinden).
Statische IP-Netzwerkverbindung konfigurieren
So konfigurieren Sie eine statische IP-Netzwerkverbindung:
1.Wiederholen Sie die Schritte 1 – 4 des vorherigen Abschnitts Configuring a dynamic
IP/PPPoE network connection (Dynamische IP/PPPoE-Netzwerkverbindung konfigurieren).
2 Klicken Sie auf Use the following IP address (Folgende IP-Adresse verwenden).
3.Geben Sie IP-Adresse, Subnetzmaske und Gateway ein (diese Angaben erhalten Sie von Ihrem Internetanbieter).
4.Bei Bedarf geben Sie die bevorzugte DNS-Serveradresse und eine alternative Adresse ein.
5.Klicken Sie zum Abschluss auf OK.
<![endif]>Deutsch
21
System wiederherstellen
Alles-in-Einem-PC auf die Werkseinstellungen rücksetzen
Die Option Reset your PC (PC auf Werkseinstellungen rücksetzen) stellt den Auslieferungszustand Ihres PCs wieder her.
|
|
WICHTIG! Sichern Sie zuvor sämtliche Daten, bevor Sie diese Funktion nutzen. |
|
|
|
|
|
|
So setzen Sie Ihren Alles-in-Einem-PC auf die Werkseinstellungen zurück: |
||
|
1. |
Drücken Sie beim Systemstart die <F9>-Taste. |
|
|
2. |
Im anschließend erscheinenden Bildschirm klicken Sie auf Troubleshoot |
|
|
|
(Problemlösung). |
|
|
3. |
Wählen Sie Reset your PC (PC-Werkseinstellungen). |
|
|
4. |
Klicken Sie auf Next (Weiter). |
|
|
5. |
Wählen Sie Only the drive where the Windows is installed (Nur Laufwerk, auf dem |
|
| <![if ! IE]> <![endif]>Deutsch |
|
Windows installiert wurde). |
|
6. |
Wählen Sie Just remove my files (Lediglich meine Dateien entfernen). |
||
|
|||
|
7. |
Klicken Sie auf Reset (Werkseinstellungen). |
|
Wiederherstellung mit einer System-Image-Datei durchführen
Sie können einen USB-Wiederherstellungsdatenträger anlegen und diesen zur Wiederherstellung Ihrer PC-Einstellungen nutzen.
USB-Wiederherstellungsdatenträger anlegen
WARNUNG! Bei dieser Aktion werden sämtliche Dateien des USB-Datenträgers unwiederbringlich gelöscht. Vergessen Sie nicht, sämtliche wichtigen Daten zu sichern, bevor Sie fortfahren.
So legen Sie einen USB-Wiederherstellungsdatenträger an:
1.Starten Sie im Alle Apps-Bildschirm die Systemsteuerung.
2.Im System und Sicherheit-Abschnitt der Systemsteuerung klicken Sie auf Find and fix problems (Probleme finden und beheben).
3.Klicken Sie auf Recovery > Create a recovery drive (Wiederherstellung > Wiederherstellungsdatenträger anlegen).
4.Klicken Sie auf Next (Weiter).
22
5.Wählen Sie den USB-Datenträger, auf den die Wiederherstellungsdateien kopiert werden sollen.
6.Klicken Sie auf Next (Weiter).
7.Klicken Sie auf Create (Erstellen). Warten Sie, bis die Aktion abgeschlossen ist.
8.Klicken Sie nach dem Abschluss auf auf
Finish (Fertigstellen).
<![if ! IE]><![endif]>Deutsch
Alles entfernen und Windows neu installieren
Wenn Sie Ihren Alles-in-Einem-PC auf die ursprünglichen Werkseinstellungen rücksetzen möchten, können Sie dies über die Option„Alles entfernen und neu installieren“ in den PCEinstellungen erledigen. Mit den folgenden Schritten können Sie diese Möglichkeit nutzen.
WICHTIG! Sichern Sie zuvor sämtliche Daten, bevor Sie diese Funktion nutzen.
HINWEIS: Diese Aktion kann einige Zeit dauern.
1.Rufen Sie die Charms-Leiste auf.
2.Klicken Sie auf Settings (Einstellungen )> Change PC Settings (PC-Einstellungen
ändern) > General (Allgemein).
3.Blättern Sie bis zur Option Remove everything and reinstall Windows (Alles entfernen und Windows neu installieren) nach unten. Klicken Sie hier auf Get Started (Starten).
4.Lassen Sie sich von den Anweisungen auf dem Bildschirm durch die Neuinstallation leiten.
23

<![endif]>Deutsch
HINWEIS: Eine mehrsprachige Version dieser Bedienungsanleitung können Sie über die ASUS-
Kundendienstseiten herunterladen: http://support.asus.com
24

Guida a Windows® 8
Requisiti del sistema
Per facilitare la transizione al nuovo sistema operativo, leggere i requisiti del sistema necessari per effettuare l’aggiornamento a Windows® 8:
Processore
RAM
Spazio su HDD
Scheda video
Risoluzione schermo
1GHz o più potente
1GB (32-bit) oppure 2 GB (64-bit)
16 GB (32-bit) oppure 20 GB (64-bit)
Dispositivo grafico Microsoft DirectX9 con driver WDDM
1024 x 768 per le applicazioni Windows®
1366 x 768 per la funzione Snap
NOTA: per ulteriori informazioni, visitare http://www.windows.microsoft.com/en-us/windows-8/faq
Configurazione dell’uscita audio via dispositivo HDMI
Per utilizzare un televisore ad alta definizione come dispositivo di uscita audio, collegarlo ad un PC Home Theater e seguire la procedura sottostante per configurare le impostazioni audio.
1.Dalla schermata Start, cliccare su Desktop per avviare la modalità Desktop.
2.Cliccare sull’icona Mixer Volume sulla barra delle applicazioni di Windows® e selezionare
Playback devices.
3.Dalla schermata Playback, selezionare Digital Audio (HDMI).
4.Premere Configure e appare la finestra per la configurazione degli altoparlanti.
<![endif]>Italiano
I7671 / Prima edizione / Agosto 2012 |
25 |
<![endif]>Italiano
5.Selezionare Stereo e premere Next.
6.Selezionare l’opzione Front left and right e premere Next.
7.Premere Finish per uscire dalla pagina di configurazione degli altoparlanti.
Spegnimento di All-in-one PC
Per spegnere All-in-one PC procedere in uno dei seguenti modi:
• |
Toccare |
Settings dalla Charm Bar, quindi toccare |
Power > Shut down per |
|
|
eseguire un normale arresto del sistema. |
|
|
|
• |
Dalla schermata di accesso, toccare |
Power > Shut down. |
||
•Se All-in-one PC non risponde, premere e tenere premuto il pulsante di accensione per almeno quattro secondi, sino a completo arresto del sistema.
26

Accesso al BIOS
L’avvio di Windows® 8 è molto rapido, pertanto è necessario attenersi ad una delle seguenti modalità per accedere velocemente al BIOS (Basic Input and Output System), dove sono salvate le impostazioni hardware, necessarie per avviare All-in-one PC.
Per un accesso rapido al BIOS, procedere in uno dei seguenti modi:
•Quando All-in-one PC è spento, premere il pulsante di accensione per almeno quattro secondi per accedere direttamente al BIOS.
•Premere il pulsante di accensione per almeno quattro secondi per arrestare il sistema di All-in-one PC, quindi premerlo di nuovo per riaccendere il computer, e premere <F2> in fase di POST.
•Quando All-in-one PC è spento, disconnettere il cavo di alimentazione dal connettore dell’alimentazione sul computer, quindi riconnetterlo e premere il pulsante di accensione per accendere All-in-one PC. Premere <F2> in fase di POST.
NOTA: il POST (Power-On Self Test) è rappresentato da una serie di test di diagnostica, controllati da un software, che si esegue durante l’accensione di All-in-one PC.
ATTENZIONE! Impostazioni del BIOS non idonee possono causare instabilità o errori in fase di avvio. Per questo motivo, è consigliabile apportare modifiche alle impostazioni del BIOS soltanto con l’assistenza di personale tecnico qualificato.
<![if ! IE]><![endif]>Italiano
27

Connessione a internet
Tramite la connessione via cavo o wireless/Wi-Fi, è possibile accedere alla posta elettronica, navigare in internet e condividere applicazioni tramite i social network su e da All-in-one PC.
Connessione Wi-Fi
Per configurare la connessione Wi-Fi:
1.Per attivare la funzione Wi-Fi in All-in-one PC, attenersi alla seguente procedura:
a)Avviare la Charm Bar.
 b) Cliccare prima su
  Settings poi sull’icona di rete
  .
.
c)Selezionare un punto di accesso dall’elenco delle connessioni Wi-Fi disponibili.
2.Premere Connect per avviare la connessione di rete.
NOTA: per attivare la connessione Wi-Fi, potrebbe essere richiesto l’inserimento di una chiave di protezione.
3.Per attivare la funzione di condivisione di All-in-one PC con altri sistemi abilitati wireless, selezionare Yes, turn on sharing and connect to devices. In caso contrario, selezionare No, don't turn on sharing or connect to devices.
Connessione via cavo
Per configurare la connessione via cavo:
| <![if ! IE]> <![endif]>Italiano |
1. |
Utilizzare un cavo di rete (RJ-45) per collegare All-in-one PC con un modem DSL/via |
|
||
|
|
cavo o con una rete LAN (Local Area Network). |
|
2. |
Accendere il computer. |
|
3. |
Configurare le necessarie impostazioni di connessione a internet. |
NOTE:
•Per approfondimenti, consultare la sezione Configurazione di una connessione di rete con IP dinamico/ PPPoE o Configurazione di una connessione di rete con IP statico.
•Contattare l’ISP (Internet Service Provider) per approfondimenti o assistenza nella configurazione della connessione a internet.
28

Configurazione di una connessione di rete con IP dinamico/PPPoE
Per configurare una connessione di rete con IP dinamico/PPPoE:
1.Dalla schermata Start, cliccare su Desktop per avviare la modalità Desktop.
2. Dalla barra delle applicazioni di Windows®, cliccare sull’icona di rete |
e selezionare |
Open Network and Sharing Center. |
|
3.Dalla schermata Open Network and Sharing Center, selezionare Change Adapter settings.
4.Cliccare sulla rete LAN e selezionare Properties.
5.Cliccare su Internet Protocol Version 4(TCP/IPv4) e selezionare Properties.
6.Cliccare su Obtain an IP address automatically e premere OK.
NOTA: se si utilizza una connessione PPPoE, continuare la procedura.
7. |
Ritornare a Network and Sharing Center e cliccare su Set up a new connection or |
|
|
|
network. |
|
|
8. |
Selezionare Connect to the Internet e premere Next. |
|
|
9. |
Selezionare Broadband (PPPoE) e premere Next. |
|
|
10. |
Inserire User name, Password e Connection name. Premere Connect. |
|
|
|
|||
11. |
Premere Close per terminare la configurazione. |
<![if ! IE]> <![endif]>Italiano |
|
12. |
Cliccare sull’icona di rete nella barra delle applicazioni e poi sulla connessione appena |
||
|
|||
|
creata. |
|
|
13. |
Inserire nome utente e password. Premere Connect per avviare la connessione a |
|
|
|
internet. |
|
|
|
|
|
Configurazione di una connessione di rete con IP statico
Per configurare una connessione di rete con IP statico:
1. Ripetere i passaggi 1 - 4 del paragrafo precedente. 2 Cliccare su Use the following IP address.
3.Inserire indirizzo IP, Subnet mask e Gateway forniti dall’ISP (Internet Service Provider).
4.Se necessario, immettere l’indirizzo del server DNS preferito e alternativo.
5.Al termine, premere OK.
29
<![endif]>Italiano
Ripristino del sistema
Ripristino del sistema di All-in-one PC
L’opzione Reset your PC consente di ripristinare le impostazioni di fabbrica del PC.
IMPORTANTE! Prima di utilizzare questa opzione, effettuare una copia di riserva di tutti i dati.
Per ripristinare il sistema di All-in-one PC:
1.Premere <F9> in fase di caricamento iniziale.
2.Dalla schermata che appare, cliccare su Troubleshoot.
3.Selezionare Reset your PC.
4.Premere Next.
5.Selezionare Only the drive where the Windows is installed.
6.Selezionare Just remove my files.
7.Cliccare su Reset.
Ripristino da un file immagine del sistema
E’ possibile creare un’unità di ripristino USB ed utilizzarla per ripristinare le impostazioni di All-in-one PC.
Creazione di un’unità di ripristino USB
ATTENZIONE! Durante il processo, saranno eliminati in modo permanente tutti i file contenuti nel dispositivo di archiviazione USB. Prima di procedere, assicurarsi di aver effettuato una copia dei dati importanti.
Per creare un’unità di ripristino USB:
1.Avviare il pannello di controllo dalla schermata All Apps.
2.Da System and Security del pannello di controllo, cliccare su Find and fix problems.
3.Selezionare Recovery > Create a recovery drive.
4.Premere Next.
30
 Loading...