


LED projector
E-Manual
F1 Series 
1 |
LED projector E manual |
E14384 First Edition July 2018
COPYRIGHT AND WARRANTY INFORMATION
No part of this manual, including the products and software described in it, may be reproduced, transmitted, transcribed, stored in a retrieval system, or translated into any language in any form or by any means, except documentation kept by the purchaser for backup purposes, without the express written permission of ASUSTeK COMPUTER INC. (“ASUS”).
Product warranty or service will not be extended if: (1) the product is repaired, modified or altered, unless such repair, modification of alteration is authorized in writing by ASUS; or (2) the serial number of the is defaced or missing.
ASUS PROVIDES THIS MANUAL “AS IS”WITHOUT WARRANTY OF ANY KIND, EITHER EXPRESS OR IMPLIED, INCLUDING BUT NOT LIMITED TO THE IMPLIED WARRANTIES OR CONDITIONS OF MERCHANTABILITY OR FITNESS FOR A PARTICULAR PURPOSE. IN NO EVENT SHALL ASUS, ITS DIRECTORS, OFFICERS, EMPLOYEES OR AGENTS BE LIABLE FOR ANY INDIRECT, SPECIAL, INCIDENTAL, OR CONSEQUENTIAL DAMAGES (INCLUDING DAMAGES FOR LOSS OF PROFITS, LOSS OF BUSINESS, LOSS OF USE OR DATA, INTERRUPTION OF BUSINESS AND THE LIKE), EVEN IF ASUS HAS BEEN ADVISED OF THE POSSIBILITY OF SUCH DAMAGES ARISING FROM ANY DEFECT OR ERROR IN THIS MANUAL OR PRODUCT.
Products and corporate names appearing in this manual may or may not be registered trademarks or copyrights of their respective companies, and are used only for identification or explanation and to the owners’ benefit, without intent to infringe.
SPECIFICATIONS AND INFORMATION CONTAINED IN THIS MANUAL ARE FURNISHED FOR INFORMATIONAL USE ONLY, AND ARE SUBJECT TO CHANGE AT ANY TIME WITHOUT NOTICE, AND SHOULD NOT BE CONSTRUED AS A COMMITMENT BY ASUS. ASUS ASSUMES NO RESPONSIBILITY OR LIABILITY FOR ANY ERRORS OR INACCURACIES THAT MAY APPEAR IN THIS MANUAL, INCLUDING THE PRODUCTS AND SOFTWARE DESCRIBED IN IT.
Copyright © 2018 ASUSTeK COMPUTER INC. All Rights Reserved.
LIMITATION OF LIABILITY
Circumstances may arise where because of a default on ASUS’ part or other liability, you are entitled to recover damages from ASUS. In each such instance, regardless of the basis on which you are entitled to claim damages from ASUS, ASUS is liable for no more than damages for bodily injury (including death) and damage to real property and tangible personal property; or any other actual and direct damages resulted from omission or failure of performing legal duties under this Warranty Statement, up to the listed contract price of each product.
ASUS will only be responsible for or indemnify you for loss, damages or claims based in contract, tort or infringement under this Warranty Statement.
This limit also applies to ASUS’ suppliers and its reseller. It is the maximum for which ASUS, its suppliers, and your reseller are collectively responsible.
UNDER NO CIRCUMSTANCES IS ASUS LIABLE FOR ANY OF THE FOLLOWING: (1) THIRD-PARTY CLAIMS AGAINST YOU FOR DAMAGES; (2) LOSS OF, OR DAMAGE TO, YOUR RECORDS OR DATA; OR (3) SPECIAL, INCIDENTAL, OR INDIRECT DAMAGES OR FOR ANY ECONOMIC CONSEQUENTIAL DAMAGES (INCLUDING LOST PROFITS OR SAVINGS), EVEN IF ASUS, ITS SUPPLIERS OR YOUR RESELLER IS INFORMED OF THEIR POSSIBILITY.
SERVICE AND SUPPORT
Visit our multi-language web site at https://www.asus.com/support
2 |
LED projector E manual |
Table of Contents |
|
About this manual ..................................................................................................... |
5 |
Conventions used in this manual ................................................................................... |
6 |
Typography................................................................................................................ |
6 |
Multi-language versions ............................................................................................... |
6 |
Safety precautions...................................................................................................... |
7 |
Using your LED projector. ............................................................................................... |
7 |
Servicing and replacement of parts ................................................................................... |
7 |
Caring for your LED projector ........................................................................................... |
8 |
Proper disposal. ........................................................................................................... |
8 |
Chapter 1: Knowing your LED projector |
|
Features............................................................................................................... |
10 |
Top view. ............................................................................................................... |
10 |
Front view. ............................................................................................................... |
12 |
Rear view ............................................................................................................... |
13 |
Left side . ............................................................................................................... |
14 |
Right side. ............................................................................................................... |
15 |
Bottom view . ............................................................................................................... |
16 |
LED projector remote control..................................................................................... |
17 |
Replacing the battery ................................................................................................. |
19 |
Chapter 2: Setting up |
|
Operating your LED projector ................................................................................... |
22 |
Connect the LED projector to the power adapter. ............................................................. |
22 |
Connect the LED projector to your device......................................................................... |
24 |
Adjust the height of the LED projector............................................................................ |
28 |
Press the power button................................................................................................ |
30 |
Adjust the image focus................................................................................................ |
31 |
Appendices |
|
Federal Communications Commission Statement.............................................................. |
|
Regional notice for California.............................................................................................. |
|
Global Environmental Regulation Compliance and Declaration .68 ASUS Recycling/Takeback |
|
Services. ....................................................................................................................... |
|
Specifications for P3 series LED projector ............................................. |
|
Support PC Timings .............................................................................................. |
|
3 |
LED projector E manual |
About this manual
This manual provides information about the hardware and software features of your LED projector through the following chapters:
Chapter 1: Knowing your LED Projector
This chapter details the parts of your LED projector and its accompanying remote control.
Chapter 2: Setting up
This chapter shows you how to set up your LED projector and use its parts for input device connection.
Chapter 3: Using the onscreen display menu
This chapter talks about the features of your LED projector’s onscreen display menu and how to navigate it using the control panel.
Appendices
This section includes safety notices for your LED projector.
4 |
LED projector E manual |
Conventions used in this manual
To highlight key information in this manual, some text are presented as follows:
IMPORTANT! This message contains vital information that must be followed to complete a task.
NOTE: This message contains additional information and tips that can help complete tasks.
WARNING! This message contains important information that must be followed to keep you safe while performing tasks and prevent damage to your LED projector's data and components.
Typography
Bold = This indicates a menu or an item that must be selected. Italic = This indicates sections that you can refer to in this manual.
Multi-language versions
Download other language versions of this E-Manual via this website: https://www.asus.com/support
5 |
LED projector E manual |
Safety precautions
Using your LED projector
•Refer to the manual and take note of the safety instructions before operating your LED projector.
•Follow the notes and warnings stated in the user manual.
•Do not place your LED projector on uneven or unstable surfaces.
•Do not use your LED projector in smoky environments. Smoke residue may cause build-up on critical parts and damage the LED projector or decrease its performance.
•Keep the LED projector’s plastic packages out of the reach of children.
•Do not block or place anything near the LED projector’s ventilation holes. Doing so may cause internal heat build-up that can degrade picture quality and damage the projector.
•Ensure that the operating voltage of your LED projector
matches the voltage of your power source.
Servicing and replacement of parts
•Do not disassemble or attempt to service this LED projector by yourself. Contact your local ASUS service center for assistance.
•When replacing parts of your LED projector, purchase items as specified by ASUS and contact your local service center for assistance.
6 |
LED projector E manual |
Caring for your LED projector
•Switch off then unplug the LED projector from the power outlet before cleaning it.
•When cleaning the LED projector’s housing, use a clean soft cloth dampened with water or a mix of water and neutral detergent. Wipe it dry using a soft dry cloth.
•Ensure that the lens is cool before cleaning it. Gently wipe the lens using a lens cleaning paper. Do not touch the lens with your hands.
•Do not use liquid or aerosol cleaners, benzene, or thinners on
your LED projector.
• Never operate this LED projector immediately after moving it from a cold location. When the LED projector is exposed to a drastic change in temperature, moisture may condense on the lens and its other internal parts. To prevent this, use the unit two
(2) hours after an extreme or sudden change in temperature occurs.
Proper disposal
Do not throw your LED projector in municipal waste. This product has been designed to enable proper reuse of parts and recycling. The symbol of the crossed out wheeled bin indicates that the product (electrical, electronic equipment and mercury-containing button cell battery) should not be placed in municipal waste. Check
local regulations for disposal of electronic products.
Do not throw the battery in municipal waste. The symbol of the crossed out wheeled bin indicates that the battery should not be placed in municipal waste.
7 |
LED projector E manual |
Chapter 1:
Knowing your LED projector
8 |
LED projector E manual |
Features
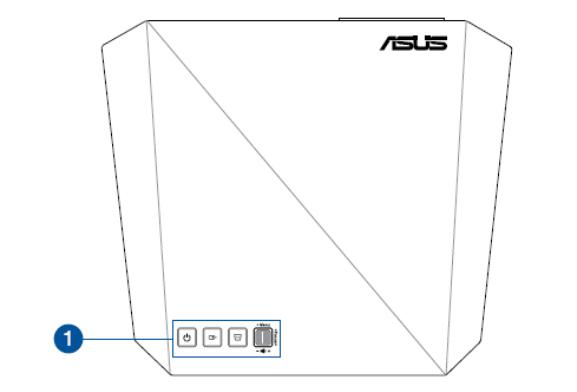
Top view
9 |
LED projector E manual |

Control panel buttons
The control panel buttons allow you to navigate the onscreen display menu. Individually, these buttons also correspond to a specific LED projector setting as indicated below.
NOTE:
•For more information on using the control panel buttons to access your LED projector’s settings, refer to the Accessing your LED projector’s settings section in this manual.
•In the event that your LED projector becomes unresponsive, press and hold the power button for at least five (5) seconds until your LED projector shuts down.
10 |
LED projector E manual |
Front view
 Lens cover
The lens cover protects the lens from scratches and possible dirt build-up.
IMPORTANT! Remove the lens cover before using your LED projector.
 Lens
Lens
The lens projects video or image files onscreen from your input device.
WARNING! Do not touch the lens using your hands or any sharp object.
 Remote sensor
The remote sensor detects signal from your LED projector’s remote control, allowing you to access the LED projector’s control panel from a distance of up to 7 meters and a receiving angle of ±30 degrees.
11 |
LED projector E manual |

Rear view
Power (DC) input port
Insert the bundled power adapter into this port to charge the battery pack and supply power to your LED projector.
WARNING! The adapter may become warm to hot while in use. Do not cover the adapter and keep it away from your body while it is connected to a power source.
IMPORTANT! Use only the bundled power adapter to charge the battery pack and supply power to your LED projector.
Remote sensor
The remote sensor detects signal from your LED projector’s remote control, allowing you to access the LED projector’s control panel from a distance of up to 7 meters and a receiving angle of ±30degrees.
HDMI/MHL ports
These ports are for the HDMI (High-Definition Multimedia Interface) connectors and also support MHL (Mobile HI-Definition Link) compatible devices. These port are HDCP compliant for HD DVD, Blu-ray, and other protected content playback.
12 |
LED projector E manual |
 Loading...