

Page 1

ARISTON
ilt - In Electric
Double Oven And Grill
DOV317 and DOV317 IX
Installation And Users Book
Page 2

IDENTIFICATION OF MODELS
DOV 317 - Brown (code 15858)
DOV 317 - White (code 15859)
DOV 317 IX- Stainless Steel (code 17085)
Data badge is located centrally below the main oven
Page 3

...Contents...
<=> General Data.......................................................................................................... 2
Installation
General.....................................................................................................................3
>=> Step 1 - Prepare cabinet......................................................................................... 4
Step 2 - Prepare cabinet for electrical supply
>=> Step 3 - Removal of oven 8 grill doors
■=> Step 4 - Connect to electrical supply...................................................................... 6
<=> Step 5 - Secure to cabinet...................................................................................... 6
■=> Step 6 - Before using ............................................................................................. 7
«=> Step 7 - Testing user functions............................................................................... 7
Using
■=> Get to know your cooker..........................................................................................8
.................................................................
................................... ....................
5
5
■=> Get to know the controls..........................................................................................9
■=> Know your controls Top Oven/GriH.......................................................................10
■=> Know your controls Fan Oven ..............................................................................11
o Know your controls Programmer...........................................................................12
■=> Using your programnner................................................................................ 13-14
t=> Using your grill.......................................................................................................15
Grilling chart............................................................................................................16
Using your top oven.............................................................................................. 17
«=> Top oven cooking chart..........................................................................................18
■=> Using your fan oven...............................................................................................19
<=> Fan oven cooking chart......................................................................................... 20
«=> Fan oven cooking guide
■=> Cleaning..........................................................................................................23-24
<=> General...................................................................................................................25
.................................................................................
21-22
one
Page 4

...General Data...
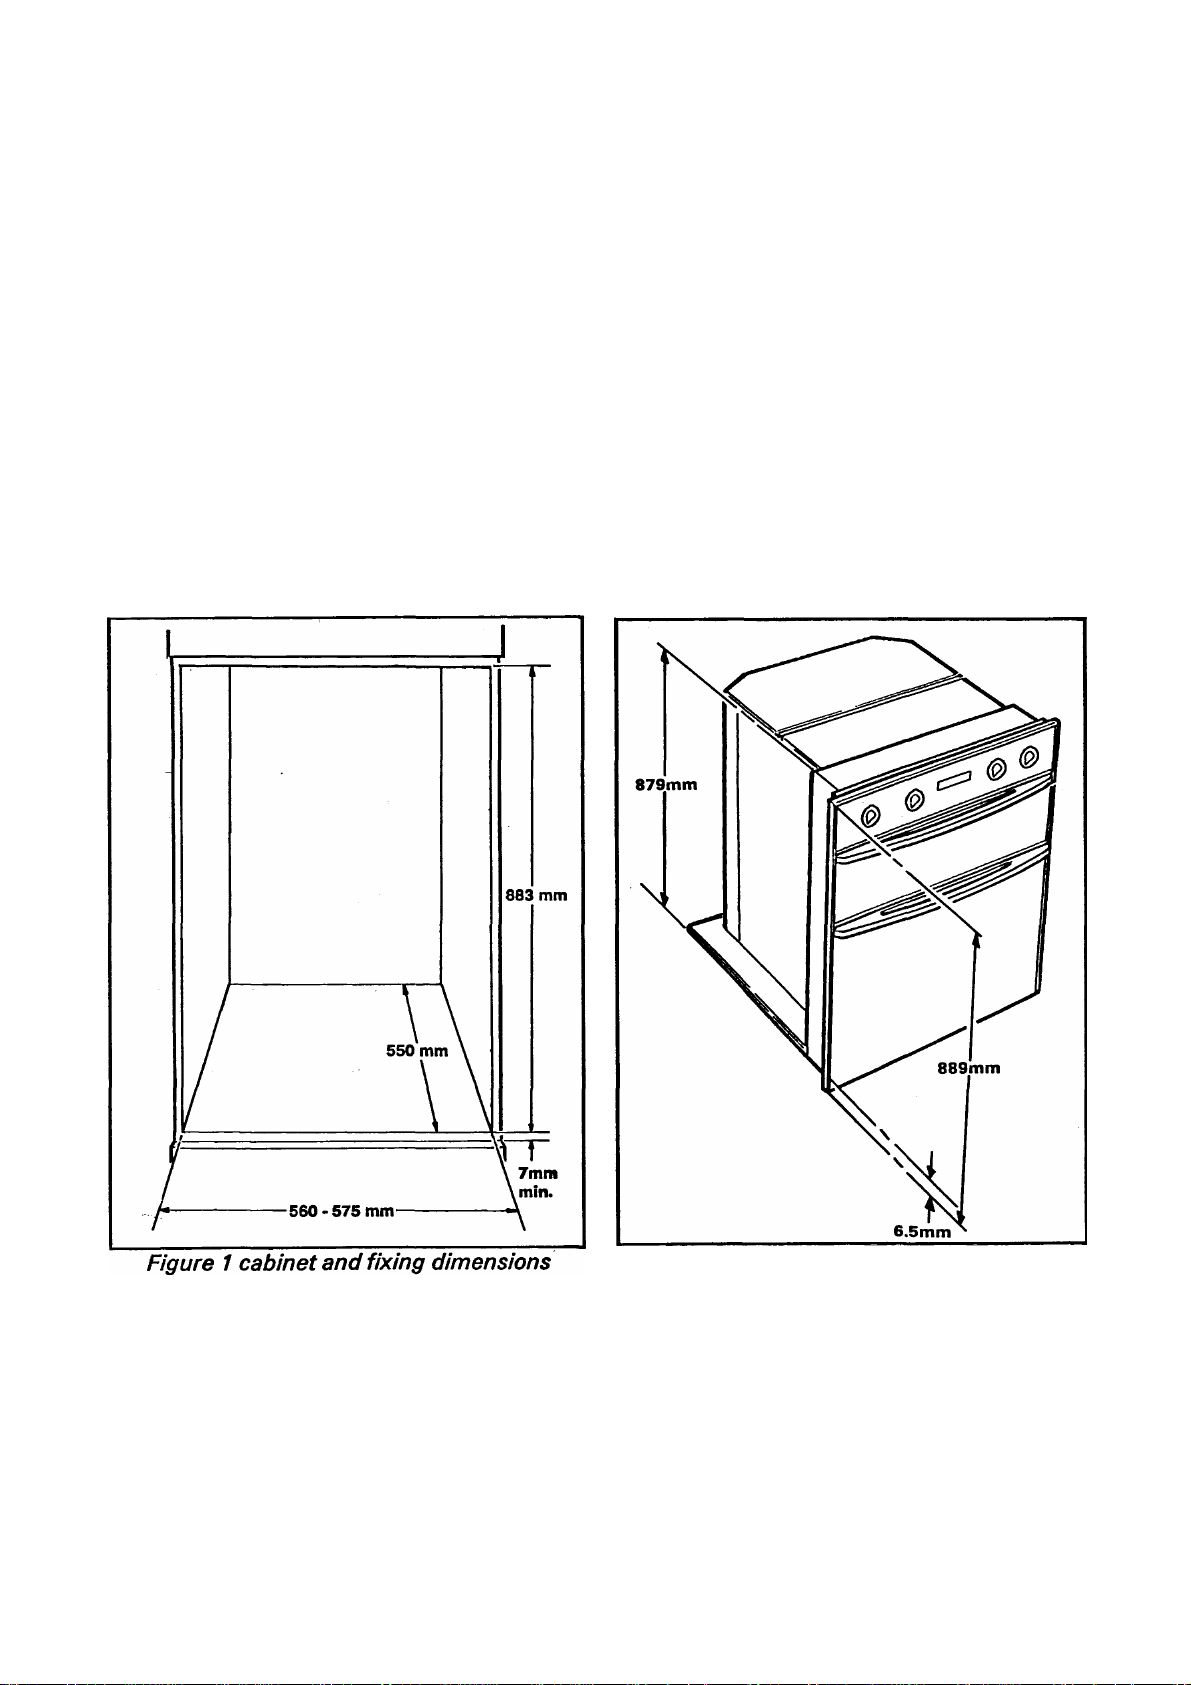
0 Cabinet Dimensions
The Built-in Oven and Grill Unit is designed to fit into cabinets with internal dimensions
of: Depth - 550mm Height - 883mm minimum Width - 560-575mm.
The minimum depth of the shelf on which the appliance stands should be 500mm.
Appliance Dimensions
Height
Width
Depth
889 mm
595 mm
550 mm
z>
o
o
o
o
Power Rating
Power Rating
Oven Lamp
Power Rating 2.5kW
Fan motor 46 watts
Programmer
Oven Lamp
inner element x 1.00 kW
Outer element X 1.20kW
1 X 1.8kW
25 watt 230 volt S.A.E.S.(300^*0 rated)
6 push button type
25 watt 230 volt S.A.E.S. (300^*0 rated)
Tangential type - 15 watts
Total operating power consumption
4.8kW
Grill
Top Oven
Oven
Cooling fan
Total power
Voltage
Protection against overheating of surrounding surfaces
This appliance is of type "x”
WARNING - ^THIS APPLIANCE MUST BE EARTHED"
220-240 volts at 50Hz
two
Mains supply
Page 5

...Installation - General...
w The installer
The appliance must be installed by a qualified electrician with ail electrical and
installation requirements made in accordance with the latest edition of the I.E.E.
Regulations.
Warning - Do Not Attempt To Lift This Appiiance By Using The Door Handies
This appliance conforms to EMC directive 89/336/EEC.
The oven must be connected to the electricity supply via a minimum of a 6.0mm twin
& earth cable to a 30 amp double pole control switch which has a minimurh of 3mm
contact to contact gap. The switch must be located on or recessed In the wall adjacent
to the oven housing cabinet.
When an electric hob is to be fitted adjacent to the Aristón DOV 317 then a 45 amp
double pole cooker control switch may be used to feed both appliances via separate
cables.
IMPORTANT’ THIS APPUANCE MUST BE EARTHED
Position
Location
Careful thought should be given to the location of the appliance; make sure the
cooker is adjacent to work surfaces, and avoid locating:-
— in a main "traffic path" of the kitchen or home.
— where open oven doors will obstruct or create an awkward working situation.
— in a draughty location which may cause a poor air circulation around the cooker.
It is also necessary to consider the fact that when using the cooker some parts are
going to get warm or even hot.
The panels of adjacent furniture should be made of heat proof material and in the
case of veneered furniture units, the glue used should resist temperatures of up to
90°C.
If your cooker is near a window, make sure that there are no long curtains or drapes
which could blow over the cooker and catch fire.
Failure to install the appliance correctly could invalidate the warranty, liability claims
and could lead to prosecution.
This appliance is only intended for domestic cooking of foods in a domestic
environment and should not be used for any other purpose.
three
Page 6
...Installation - Steps...
STEP 1 PREPARE CABINET
• With the cabinet in its intended position, check the appliance base support shelf
is level, the cabinet sides are vertical and that the cabinet is firmly secured to
the rear wall.
• Small inaccuracies in the cabinet can be dealt with by applying suitable shims,
providing that the dimensions shown in figure 1 are maintained. If the cabinet
is such that the appliance can not be installed level it must be rectified before
proceeding with the installation.
• Remove all packaging from the appliance.
• Figure 2 shows the critical appliance dimensions for fixing into the cabinet.
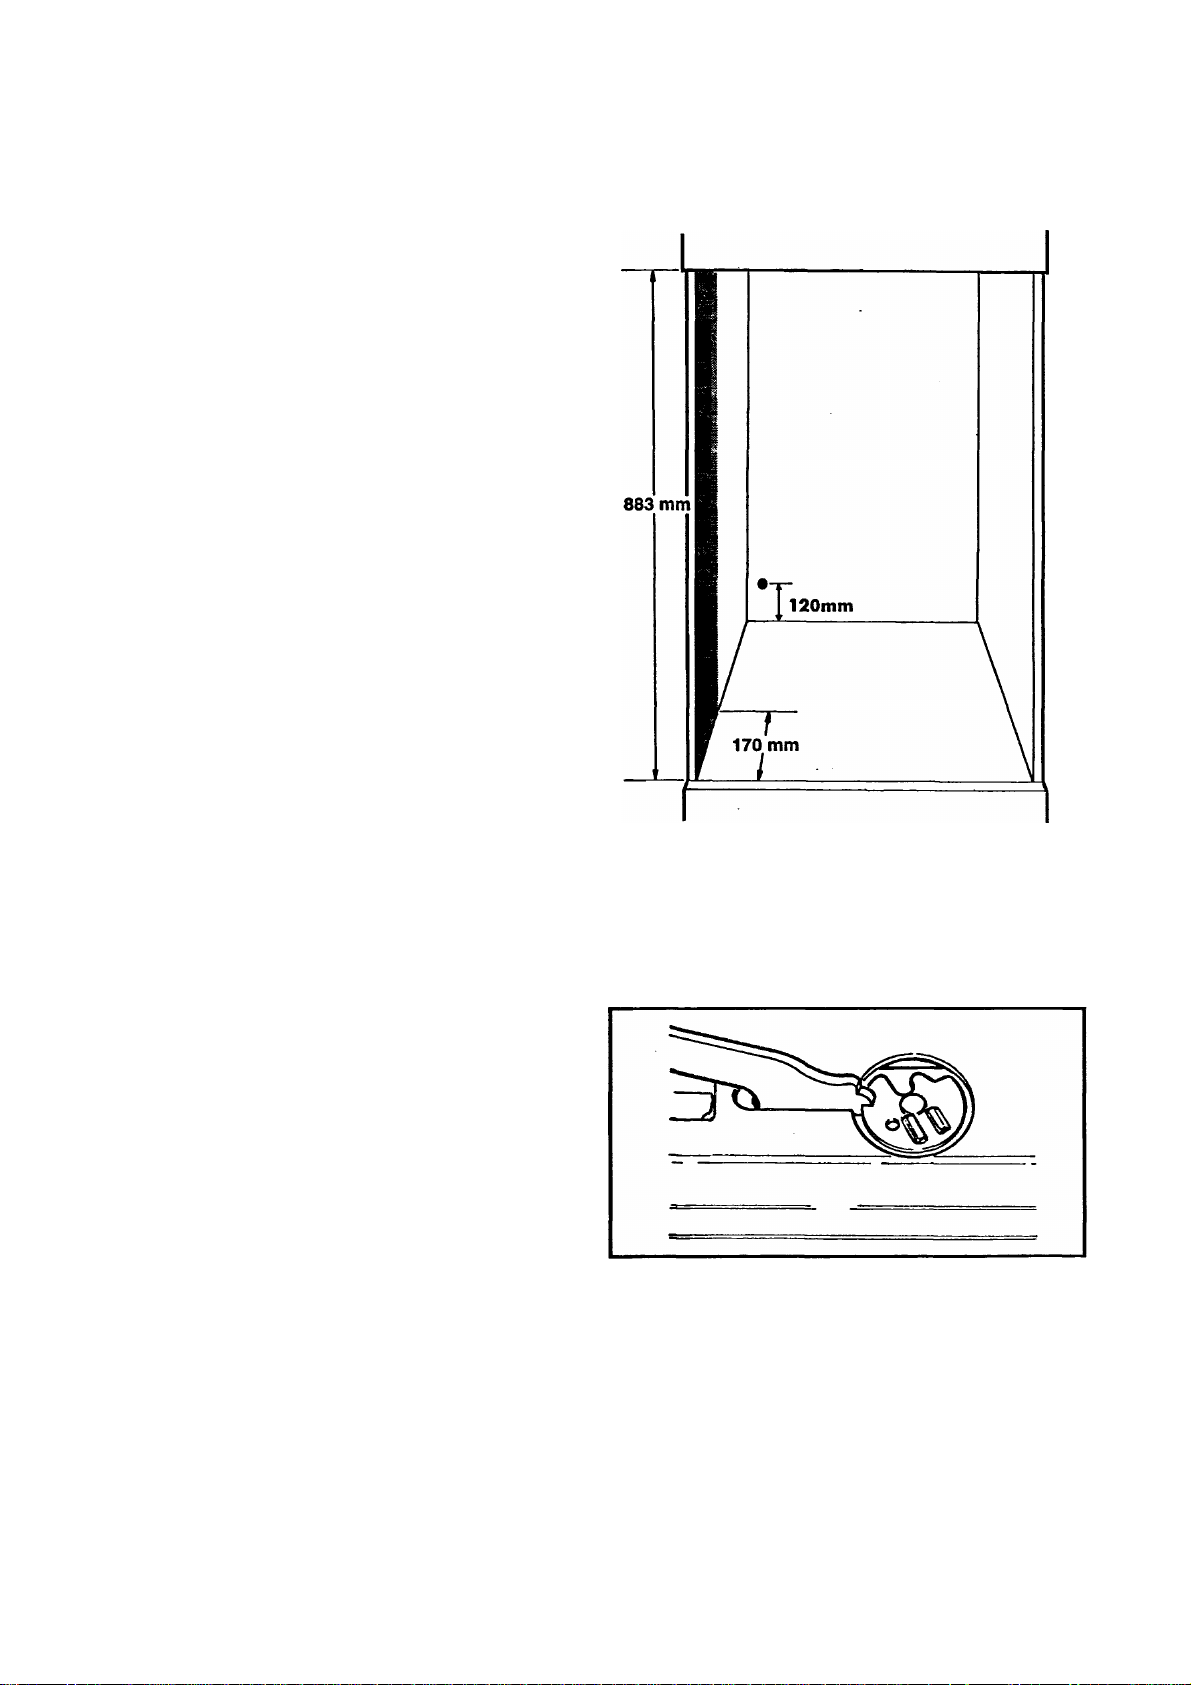
• Note - Any projections within the cabinet must not encroach into an area between
0 and 883mm above the appliance base support shelf and 0 to 170mm from the
front edge of the cabinet on either side (see figure 3)
four
Figure 2 appliance dimensions
Page 7
...Installation - Steps...
STEP 2 PREPARE CABINET FOR ELECTRICAL SUPPLY
• The electrical supply cable should
enter the cabinet at a height of
approx. 120mm from the base shelf
(see figure 3)and as close to the left
hand side wall of cabinet as
possible.
A metre "tail" from the back of the
cabinet is sufficient to allow
connection and any withdrawal.
Note - If too much cable is used, then
problems may occur when pushing
the appliance into the housing.
Figure 3 no projections 6 cable position
STEP 3 REMOVAL OF OVEN AND GRILL DOORS.
• Open each door fully, turn both
hinge locking discs clockwise to the
locked position as shown in figure 4,
and slide out the inner glass.
• Grasp the door adjacent to the
hinges and pull upwards and
forwards to remove.
Figure 4 locked position of hinges
five
Page 8
...Installation - Steps...
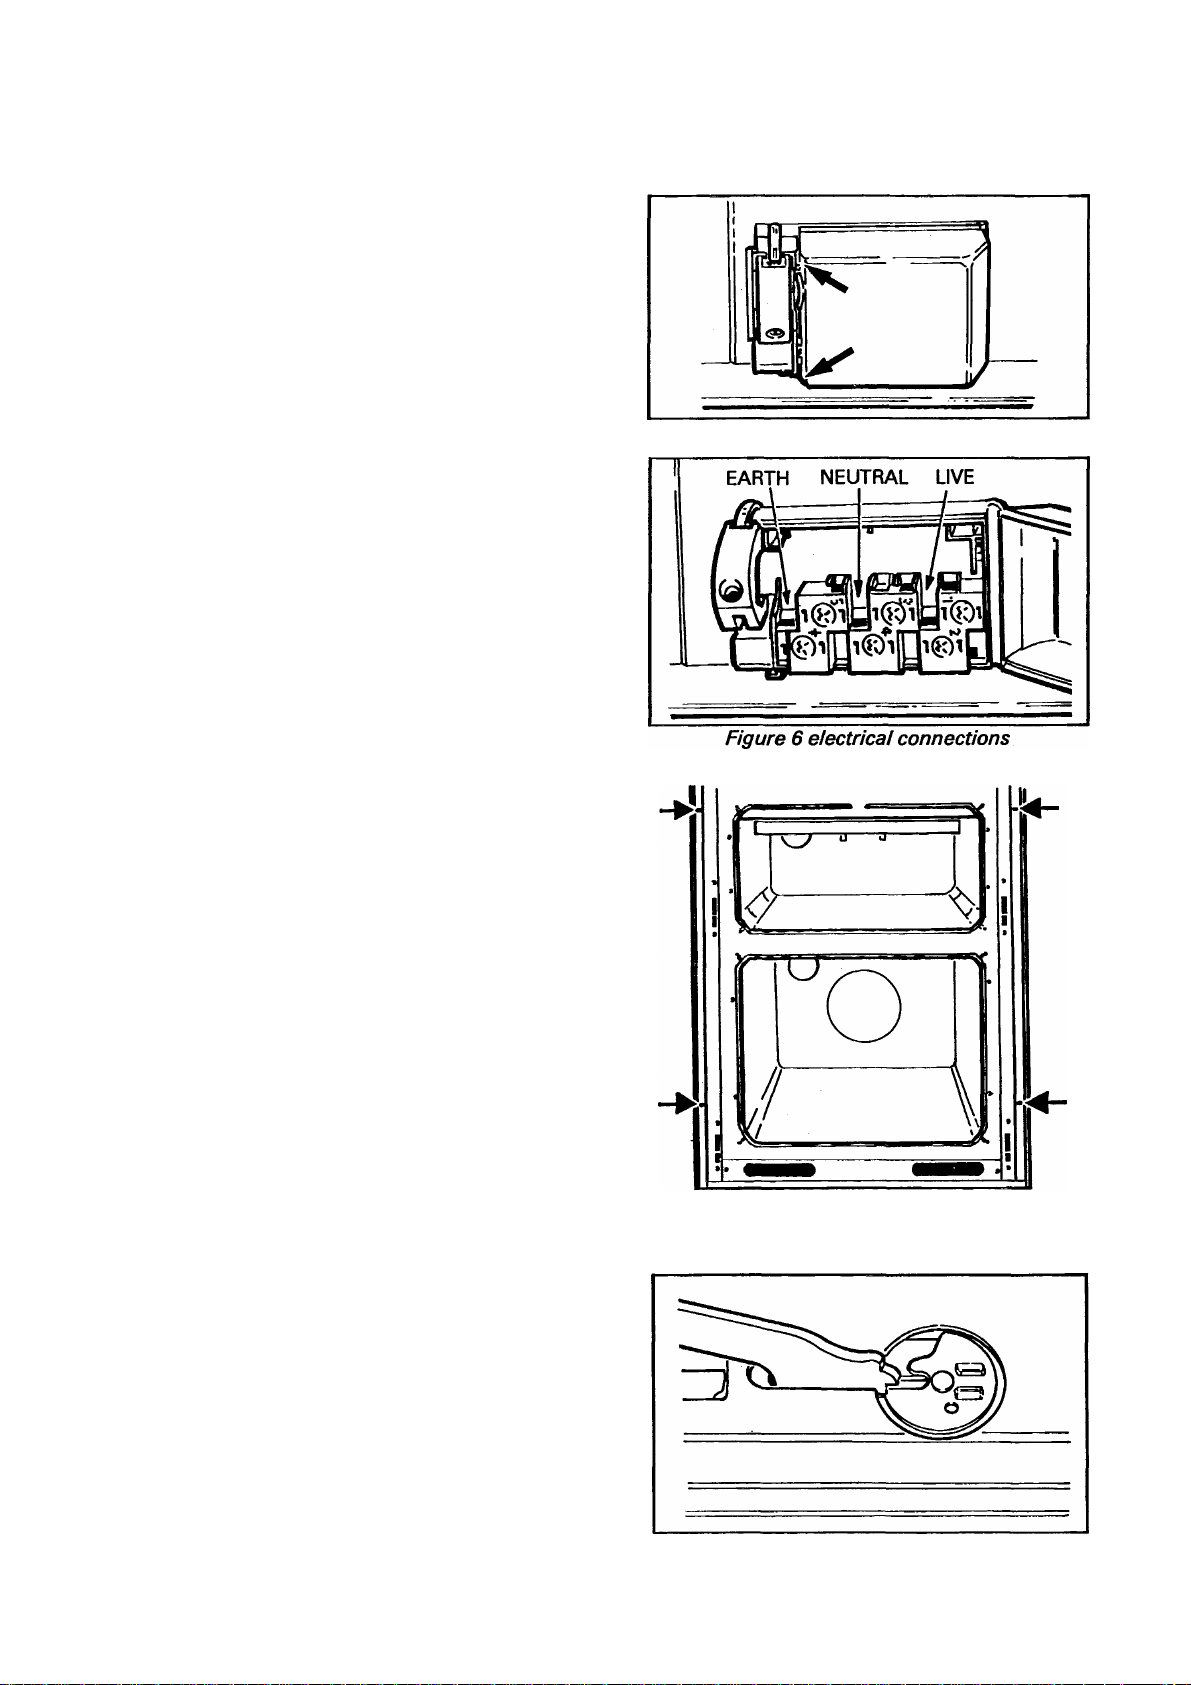
STEP 4
Remove screw securing the cable
clamp and lift up clamp
From the arrowed positions shown in
figure 5, prise open the cover using a
flat bladed screwdriver
Feed the cable through the cable clamp
and make the connection to the terminal
block.
Note - ensure the correct connection
of the cable as shown in figure 6.
Refit the terminal block cover and
secure the mains cable securely with
the cable clamp.
CONNECT TO ELECTRICAL SUPPLY
Figure 5 opening terminai block cover
STEP 5 SECURE TO CABINET
• Raise appliance onto the cabinet base and
slide Into position making sure the cable
does not become trapped or kinked.
• Using four chipboard screws (not
supplied) secure the appliance to the
side edges of the cabinet (positions
arrowed in figure 7).
• Note - If the cabinet is not made of a
high quality material then use the four
cabinet fixing plates provided to secure
the appliance to the cabinet.
• Replace the oven and grill doors by
reversing the removal order, and turn
locking disc anti-clockwise to the
normal position as shown in figure 8.
Replace oven door inner glass making
sure text THIS SURFACE MUST BE
NEAREST FACE TO THE OVEN is
legible.
Figure 7 location of securing holes
SIX
Figure 8 hinge normal unlocked position
Page 9

...Installation - Steps...
STEP 6 BEFORE USING
• Before using for the first time after installation. Remove any cardboard
packaging from inside the oven and grill chambers and remove any protective
film that may be on the panels, trims or oven furniture.
• It is recommended to run the oven and grill for half an hour (refer to the relevant
page for operation of each function) to burn off the newness of the elements.
Note - this may produce an unpleasant odour - this is normal.
STEP 7 TESTING USER FUNCTIONS
• Turn on the electricity supply to the appliance.
• Set the time of day on programmer. Make sure that the programmer is set to
the "MANUAL" position - refer to Using Your Programmer on page 12.
• Turn the main oven control knob clockwise to its first position (defrost symbol).
Check that the oven interior lamp is lit and the main oven fan is running.
• Turn the main oven control knob clockwise to its second position (fan symbol).
Open the oven door and turn the thermostat control knob to approx. 200®C.
• Close the oven door Check that the fan is operating Check that the "oven
temperature" neon is now lit. Check that the "oven temperature" neon goes out
when the temperature required is reached.
• Turn the main oven control knob clockwise to its third position (oven lamp
symbol). Check that the oven interior lamp Is lit and the fan is stationary.
• Open the grill compartment door and turn the grill/top oven control knob
clockwise to 100®C. Check that the "top oven" neon is lit and top oven light
comes on. Close grill compartment door. Check that the "top oven" neon goes
out when the temperature required is reached.
• Open grill compartment door. Turn the grill/top oven control knob clockwise
through the top oven mode to the grill inner heat mode. Turn the grill power
control knob to min. Check that the "grill on" neon is lit. Check that only one
element is functioning. Check that the power control Is working correctly.
• Turn the grill/top oven knob clockwise only to the full grill mode position. Check that
the "grill on" neon is lit. Check that both elements are functioning.
• Turn the grill/top oven knob anti clockwise only to the "off" position.
Note - The top oven/grill control knob can only be turned "on" in a clockwise
direction and "off" in an anticlockwise direction - to do otherwise could result
in damage to either the switch or control knob.
seven
Page 10

...Get to Know Your Cooker...
A
B
C
D
E
F
G
H Grill/Top Oven Door
Control Panel 1
Main Oven Controls J
Grill/Top Oven Controls K
Grill/Top Oven light
Grill Element M
Grill/Top Oven Shelf N
Grill Pan fr Grander P
eight
Main Oven Light
Main oven shelf runners
Main Oven Fan
L
Meat Tin fr Grander
Two Oven Shelves
Removable Inner Door Glass
Main Oven Door
Page 11

...Know Your Controls...
MAIN OVEN CONTROL KNOB FUNCTIONS
"OFF" POSITION - When selected the main oven will be off except for
the main oven clock display.
"DEFROST"POSITION ~ When selected the oven light and fan only will
operate without the addition of heat and can therefore be used to speed
up the rate of defrosting.
"FAN OVEN"POSITION - When selected the light, fan and main oven
element will operate & circulate heat around the main oven. This position
will also allow the main oven thermostat control knob to operate.
"LIGHT ONLY"POSITION - When selected the main oven light only is
turned on. The main oven fan and element will not operate.
MAIN OVEN THERMOSTAT CONTROL KNOB
This control can only be used inconjunction with the main oven fan
setting and allows the selection of the required temperature between
m
TOP OVEN/GRILL CONTROL KNOB FUNCTIONS
60°C and 220°C.
"TOP OVEN"POSITION - When selected the light comes on and the oven
cavity is conventionally heated using both top and bottom elements.
Temperatures can be selected between 60°C and 220°C.
"INNER GRILL" POSITION - When Selected the inner grill element only
is heated.
"FULL GRILL" POSITION - When selected both the grill elements are
heated allowing the full grilling area.
GRILL POWER CONTROL KNOB
This control can only be used inconjunction with the Inner grill or Full
□
grill settings allowing the selection of the required power settings.
nme
Page 12

...Know Your Controls - Top Oven/Grill...
O Top oven/grill control knob
Top Oven/Grill cavity lamp
— As soon as the Top oven/ Grill control knob is turned from its "Off" position marked
I
the cavity lamp will come on and a cooling fan will blow air below the control panel.
Both of these functions will stay on until the marker on the control knob is back in the
top centre position.
Top Oven
— Simply turn the top oven/grill control knob clockwise to the oven temperature
required - from 60® C to 230® C.
— The top oven light will come on and the temperature indicator neon will light as soon
as the control knob has been turned past its lowest temperature setting and will remain
on until the temperature inside the oven has reached the selected temperature. Once
the oven is up to temperature, the indicator neon will keep turning on and off, this is
normal, and shows that the thermostat Is working correctly by switching the element
on and off to maintain the selected temperature.
— To turn off from any position, rotate the control knob in an anticlockwise direction
until the marker on the control knob Is in the top centre position marked
I.
— Note - The top oven/grill control knob can be turned "on" in a ciockwise direction
only - to do otherwise could result in damage to either the switch or control knob.
Grill
— The grill can be used in a number of modes depending on the dish you are grilling.
— Simply turn the control knob in a clockwise direction through the top oven mode to
the desired grill mode (full *^or innet^).
— The grill modes are fixed positions therefore the control knob must be positioned
along side the relevant symbol where a click or fixed position is felt.
— The modes are as follows:
— Full grill - in this mode both grill elements are used.
— Inner grill - in this mode the inner grill element only is used.
— As soon as a grill mode has been selected, the grill Indicator neon will light and the
required power can then be selected by using the grill power control knob.
— To turn off from any position, rotate the control knob anticlockwise until the marker
on the control knob is in the top centre position marked
— It is important to remember after grilling to turn both grill controls to their respective
"off" positions.
I.
ten
Page 13

...ICnow Your Controls - Fan Oven...
S Fan oven control
Oven Cavity Lamp
— As soon as the main oven control knob is turned from its "Off" position the oven cavity
lamp will come on and a cooling fan will blow air below the control panel. Both of
these functions will stay on until the marker on the control knob is in the top centre
position marked
To Operate Tan Oven
— Simply turn the main oven control knob clockwise to the main fan oven position ®and
then select the temperature required by using the main oven thermostat control
knob®.
The fan oven temperature indicator neon will light as soon as the temperature
selector control knob has been turned past its lowest temperature setting (60®C)
and will remain on until the temperature inside the oven has reached the
selected temperature. Once the oven is up to temperature, the indicator neon
will keep turning on and off, this is normal, and shows the thermostat is
switching the element on and off to maintain the selected temperature.
To turn Off
— Rotate the main oven control knob in either direction until the marker on the control
knob is in the top centre position® and then rotate the thermostat control knob until
the marker is In the "off" position.
eleven
Page 14

...Know Your Controls - Programmer...
z> Button
o Button ^^ duration of auto cooktime
o
Button
o
Button
Button
o
o
Button
This programmer operates in the 24 hour mode - for example 1pm is set as 13.00.
The programmer will only control the main oven, the grill and top oven are not
affected and cannot be controlled by the programmer.
When either the
the display can be made using the“H or — buttons. If no adjustment has been made
within five seconds the display reverts back fto the time of day and no more
adjustment can be made without re-selecting the function.
A
A
O"
^
—
+
or ^^ button is pressed, adjustment of that function time on
switch from auto to manual
end of auto cooktime
minute minder
display down
display up
If when setting any of the required programmer functions you should "overshoot"
the required display setting, press the — button to decrease the displayed time.
Setting Time of Day
^ Switch on the eiectricity supply.
The programmer will flash 0.00 AUTO.
^ Simultaneously press and hold in the buttons marked ^^ &
—r
and hold in the + or — buttons to set the time of day.
Release the buttons and the time is now set and the symbol is illuminated in
the centre of the display to indicate that the programmer is in the manual mode.
twelve
, then press
Page 15

... Using Your Programmer...
Auto Cooking
^ Press button ^ and then press and hold in the + button.
Set the length of cooking time required, this will be displayed in hours and minutes.
^ Press button and then within 5 seconds press and hold in the \ button.
^ This will set the end time of cooking.
When the + button is released the current time of day and XheAUTO symbol
will be displayed.
^ Select the main oven position and then the oven temperature required by
turning the main oven and oven thermostat control knobs.
The oven will automatically switch itself on, cook and switch off at the required
time.
Note - When the auto cooking starts the symbol is illuminated in the centre
of the display.
^ At the end of the cooking period AUTO will flash, the bleeper will sound and
the symbol is extinguished.
Press any function button to cancel bleeper.
ill|,
Press the w button will return the programmer back to manual.
Turn the main oven and oven thermostat control knobs to the "off" position.
fill.
I
^ Checks during auto cooking.
During auto cooking you can check the remaining cooking time by pressing button
During auto cooking you can check the time the oven is going to switch off by
pressing button .
Semi Auto Cooking
^ Select the main oven position and then the oven temperature required by
turning the main oven and oven thermostat control knobs.
Press button and then within 5 seconds press and hold in the "i" or —
buttons to set the length of cooking time you require is displayed.
The display will show the length of cooktime required.
IheAUTO and will be displayed. The display will then revert back to the time
of day.
If at any time you need to check on the cooking finish time, press and the
end of cook time will be displayed for a few seconds before reverting back to the
time of day display.
^ At the end of the cooking period AUTO will flash, the bleeper will sound and
the symbol will be extinguished.
SSS
Press any function button to cancel the bleeper.
Press the button will return the programmer back to manual.
Turn the main oven and oven thermostat control knobs to the "off" position.
|ll|i
thirteen
Page 16

... Using Your Programmer...
Minute Minder
^ Press button A and then press the or—buttons to set the required length
of time.
<i> The interval time requested, the^ and will be displayed. After five seconds
the display will revert back to the time of day and the ^ and will remain
displayed.
^ The time remaining can be displayed by pressing the
At the end of the timed period the bieeper will sound, the will stay
illuminated and the ^ will go out.
Press any function button to cancel the bleeper.
The programmer will remain in manual mode.
Note - The minute minder can be cancelled at any time by pressing the
and then the — button to return the display to 0.00.
A
button.
/#//,
A
button
Audible Signal Selection
Pressing button — without having selected a previous function within 5
seconds will allow you to change the tone of the bieeper.
By releasing and re-pressing the — button, up to three different bleeper tones
can be selected.
Cooking Hints When Using a Programmer
Please remember the oven is not a refrigerator and especially in periods of warm
weather, it should not be used as a storage cupboard for perishable foods. When
cooking perishable food by automatic control, certain precautions should be taken
to prevent food spoilage:
Do
Make sure that all food is cold (preferably straight from the fridge) and fresh.
Keep the delay period as short as possible by cooking stews and joints by the
long slow method.
Be particularly careful over food selection during warm weather.
When cooking poultry, ensure that it is cold but not frozen when placed in the oven.
Cover dishes with foil or lids to prevent loss of liquid. Foods which are strong
smelling should also be covered.
Protect foods which discolour by brushing with fat or water to which lemon
juice has been added.
Use frozen vegetables and fruit as they are Ideal for this type of cooking.
^ Do not
Place food in an oven which is warm from previous use.
Cook dishes such as plate pies or custard tarts - wet mixtures standing on
uncooked pastry for a long time are unsatisfactory.
Use cream as it may curdle. It can be added just before serving.
fourteen
Page 17

...Using Your Grill...
O Grilling
• Hinge down the door.
• CAUTION - when using the grill it is important to leave the grill door open.
• There are three grilling heights available - these are obtained by
positioning the top oven shelf between the runner supports (see illustration on
page 17). Never position the shelf on top of the runner supports. The grill pan
and brander can then slide onto the shelf and should be pushed to the fixed
stop position.
• Each of the three positions can be varied by using the brander grid in the high
position or by reversing the brander In the grill pan to give the low position.
In the low position fats drain away more easily and this is recommended for
either thick foods or foods with a high fat content.
• Select the grill mode and power settings required.
• Load the grill pan brander with the food to be grilled and slide the grill pan into
position.
O Useful Hints when Grilling
• Preheating although not essential will ensure quicker grilling times.
e.g. For grilling rare meats a preheat of approximately five minutes is
recommended.
• Position food on the pan in the centre of the grilling area.
• When cooking steak, bacon, etc., the highest shelf position Is used, however,
to suit Individual tastes and styles a different shelf position can be chosen.
• The grill brander can be placed in the raised position for toasting bread, grilling
bacon and any other thin foods or it can be placed in the lower position for
cooking thicker Items such as chops or chicken pieces.
• Seal the foods to be grilled on a high setting and then turn down as necessary
to cook through to the centre.
• Always use the grill with the brander in position and do not line the grill pan with
aluminium foil.
• See grilling chart on page sixteen for examples of grilling.
Opiate Warming
• The grill compartment can be used for warming plates or dishes when the grill
pan Is removed and the main oven is in use. Do not turn the grill on when
warming the plates or dishes.
Caution - accessible parts may be hot when the grill is used !
Young children should be kept away!
fifteen
Page 18

...Grill Cooking Chart...
GRILLING CHART
Type of food
Bread, Crumpets, Tea Cakes etc. yes
Sausages, Bacon, Beefburgers etc. yes
Chops, Chicken pieces etc. yes
Steaks
Fish
Whole fish
Fillets/steaks
Breaded
Browning of Au Gratin dishes etc. yes
Preheat
yes
(Smins
for rare
steaks)
yes
yes
yes
Recommended shelf
position
1 or 2 depending on thickness max.
1 or 2 depending on thickness max. 10-15 minutes
1 or 2 depending on thickness
1 or 2 depending on thickness
2or3
1 or2
2
2 or 3 with or without grill pan
depending on size of dish
Power
control knob
setting
max.
then reduce to 3
or 4
max.
then reduce
if desired
3,4 or max.
depending on
preference
max. 5-10 minutes
Approximate
cooking time
3 - 6 minutes
15-30 minutes
10-25 minutes
depending on
thickness and
15-25 minutes
degree
sixteen
Page 19

...Using Your Top Oven...
O Top Oven
• The top oven is the smaller of the two ovens and is designed for use with the busy
cook in mind and is therefore the ideal solution should the main oven be full.
• Your top oven performs in much the same way as most conventional ovens,
that is, it uses an element top and bottom of the cavity.
O To use
• Hinge down the door. Remove the grill pan.
• Close the door and select the oven temperature required.
• Pre-heat the oven to the required temperature - the top oven temperature indicator
neon will go out when the required oven temperature has been reached.
• There are four shelf positions available-these are obtained by positioning
the top oven shelf between the runner supports and on the base of the top oven
cavity. Never position the sheif on top of the runner supports.
Note - Shelf position one is highest and position four is the base of the cavity
(The base is for Top oven use only) (see Illustration below).
• Place the food in the oven to be cooked for the length of time required.
O Tips for Top Oven Use
• When operating both the main fan oven and the top oven together it may be
necessary to either Increase the temperature setting or allow a longer cooking
time in the top oven only.
• Delicate foods - When baking delicate foods such as cake, it is important that
the food to be cooked is placed In the oven as soon as the top oven temperature
indicator neon has gone out. If this is missed then It is important to wait until
the neon goes out for the second time.
Note - this is only necessary when cooking delicate foods and is not necessary
when cooking casseroles, baked potatoes etc.
•
• For maximum baking performance it Is recommended that a baking tray no
larger than 300mm wide x 270mm deep be used.
• Place the baking tray or food to be cooked centrally under the element.
• The top oven can be used to roast joints of meat up to 31b (1.36Kg) or poultry
upto approximately 61b (2.7Kg).
seventeen
Page 20

...Top Oven Cooking Charts...
Top Oven Cooking Chart
Food Preheat
Scones Yes
Small Cakes
Victoria Sandwich
Sponge Sandwich (fatless) Yes
Swiss Roll Yes
Semi Rich Cakes
Shortcmst Pastry
Puff Pastry
Yorkshire Pudding (Large) Yes
Yorkshire Pudding
(Individual) Yes 210/220°C - Approx. 15-25 mins.
Milk Puddings
Baked Egg Custard Yes 140/150“C-Approx. %-lHr.
Bread 5(X)g(1ib) Yes
Meringues
Note - if soft margarine is used for cake making please refer to manufacturers instructions on the tub, temperatures
recommended in this chart refer to cakes made with block margarines or butter.
Yes
Yes
Yes
Yes
Yes
Yes
Yes
140/150°C - Approx. 2 - 3Hrs. Depending on Size. 3
Temperature & time
220°C - Approx. 10-15 mins.
180°C - Approx. 15-20 mins.
170°C - Approx. 20 - 30 mins. 2
180/190°C - Approx. 15-20 mins. 2or3
200°C - Approx. 10-15 mins. 2
190/200°C - Time Depends on Size. 2or3
200/220“C - Time Depends on Size. 1 or2
190/210°C - Approx. 25 - 35 mins.
130/140°C - Approx. 2 - 2V2Hrs.
220/220°C - Approx. 20 - 30 mins. 2or3
90/100°C - Approx. 2 - 3Hrs. 2or3
Shelf
Position
2
2
2or3
2or3
3
3
Top Oven Meat Cooking Guide
Meat
Beef
Lamb Yes 180°C. 25 - 35 mins/lb -1* 25 mins.
Pork
Veal
Chicken
Casserole cooking Yes
The settings and times shown in this table give results to satisfy average tastes but you can vary the times if you
Preheat
Yes 180°C. 25 - 35 mins/lb 25 mins.
Yes
Yes
Yes 180°C. 20 - 25 mins/lb + 20 mins.
wish to get the exact result you require.
Temperature and time Shelf position
180°C. 35 - 40 nvns/lb + 35 mins.
180°C. 40 mins/lb + 40 mins.
150°C2-3Hrs
3 or shelf runner
placed on base of
oven cavity
depending on size
eighteen
Page 21

...Using Your Fan Oven...
O Fan Oven Cooking in General
Unlike a conventional electric oven, which cooks food by natural convection,
the hot air system has been designed to circulate hot air throughout the entire
oven.
• The way in which the oven now cooks the food is far more efficient and effective
so lower temperatures should be used (see conversion chart on page 21). The
cooking times stay the same.
Note - It is recommended that recipe temperatures are reduced by 10°C to allow
for this efficiency although greater reductions may be necessary to suit
personal tastes and preferences.
• With this method of cooking you can also cook different foods on several shelf
positions at the same time without any transfer of smell or taste from one dish
to the other.
• As hot air is available almost as soon as you switch on the oven, pre-heating is
usually not necessary. With some foods such as scones, yorkshire pudding,
yeast dough's, pastries or soufflés, better results can be achieved if the oven
is pre-heated. A 5 to 10 minute pre-heating time is sufficient.
• When cooking with hot air it is not necessary to turn meat or indeed baste it.
The hot air cooks the food from ail sides, sealing it quickly from the outside
leaving the inside succulent and moist.
O To Use
• Turn the main oven control knob to the fan oven symbol
• The oven temperature Is then selected by turning the main oven thermostat control
knob to the required temperature setting. A thermostat controls the oven temperature
- when the temperature selected has been reached, the oven temperature indicator
neon will go out.
• The oven control knob Is marked in degrees Celsius.
O Shelf Positions
There are six shelf positions counting from the top of the oven, the shelves may be
moved up or down to accommodate large utensils.
O Oven Shelves
There are two shelves provided In the main oven. It is also possible to batch bake on
three levels using the top oven shelf. The shelves should be evenly spaced when
batch baking, using for example shelf positions two, four and six. If two or more
dishes are to be cooked on the same shelf, leave 13mm (V2") space between them
for the correct circulation of air.
nineteen
Page 22

...Fan Oven Cooking Chart...
Fan Oven cooking Chart
Food Temperature and time
Scones
small cakes
victoria sandwich
Sponge sandwich
(fatless)
Swiss roil
Semi-rich cakes
Christmas cake
Shortcmst pastry
(plate tarts)
Puff pastry
Yorkshire puddings
(large)
Yorkshire puddings
(individual)
Milk pudding
baked custard
Bread - 500g (1 lb) size 225° - for first 10 mins and then 200°C for approx, further 25 mins
Meringues
160/170°C - Approx. 20 to 30 mins depending on size
190/210°C - 7 inch tins approx. 15 mins
approx. 125/140°C - according to size and richness of mixture
20Q^25°C - time depending on size
225°C - approx. 20 mins depending on depth
210°C-8to 10 mins
170/180°C-20 mins
200/210°C - Approx. 9 to 12 mins
140/150°C - Approx 1 to 1 Vi hours
200°C - approx. 40 mins
200/225°C-35to40mins
130°C - approx. 1 Vi to 2 hours
130"C-35to45mins
75/90°C - large - approx. 3 hours
small - 2 to ¿Vihrs
Note - if soft margarine is used for cake making please refer to manufacturers instructions on the tub, temperatures
recommended in this chart refer to cakes made with block margarines or butter.
O Oven management
• When arranging to cook a complete menu which will make use of available oven
space, collect the utensils intended to hold the food and see that they fit
together on the shelves. The space taken should not, however, exceed 300mm
(12 inches) square on any shelf.
• A meat thermometer can be a great help when roasting meat and should be
inserted In the thicker part of the meat. The thermometer is most useful with beef
ensuring that you have it cooked to your particular taste. It is still necessary to work
out the approximate length of cooking time In order to know what time cooking
should be started. Make sure the thermometer does not touch the bone.
O Baking
• When cooking large quantities of food for home freezing or for parties, it may
be necessary to increase the given cooking times to allow for the loss of heat
due to the extra time taken to load the oven, and the larger mass of food.
twenty
Page 23

...Fan Oven Cooking Guide...
O Conversion Chart
• The chart below is a guide to help you understand the different terminology in
recipe books etc, where recipes are given with temperatures in Fahrenheit and
such terms as cool, moderate and hot etc, you can then convert them to the
setting you require in your fan oven.
Heat of Oven
Very cool
Very cool
Cool
Cool
Moderate
Moderate 4
Fairly hot
Fairly hot
Hot
Very hot
Terms in recipe books
Gas Mark
V4
V2
1 275
2 300
3
5
6
7
8
T
225
250
325 160
350
375
400
425
450
“C
110
120
140
150
180
190
200
220
230 220
What setting
for fan oven
Electric Fan
Oven
100
110
130
140
150
170
180
190
210
O Meat tin
Cooking a small joint in a large tin will cause fat to overheat then splutter and splash.
To cut down the amount of splashing when high temperature roasting:
• Use a meat tin having an anti-splash trivet.
• Use a smaller tin.
• Fill the spaces around the meat with the potatoes etc., to be roasted.
• Make sure all meat and vegetables are dry before being roasted.
O Aluminium Foil
Joints cooked in a tin covered with aluminium foil - adjust cooking time by adding a
further 5 to 10 mins per lb. (500g) to the times given in the cooking chart. Joints
wrapped in aluminium foil in the form of a parcel - follow manufacturers instructions
given on the packet.
OHints
The times given can only be a guide for the average joint as the shape and proportion
of bone must also betaken into consideration. If the joint is very thin a shorter cooking
time will be required.
twenty-one
Page 24

...Fan Oven Cooking Guide...
All meat should be thoroughly thawed before cooking. Wipe the meat with damp
kitchen paper or wash very quickly in cold water and dry well.
To reduce the fuming and spluttering, which often occurs with high temperature
roasting, raise the meat on a trivet and place Vi a pint of water in the roasting tin. This
may be replenished if necessary then used as a concentrated stock for gravy.
When cooking a complete meal In the oven It may be necessary to raise the oven
temperature towards the end of the cooking period - for example to cook a Yorkshire
Pudding to serve with roast beef.
The recommended times may vary depending whether you prefer meat rare, medium
or well cooked.
Z>PouUty
If the bird Is frozen it must be completely thawed before cooking, the best results will
be obtained if the thawing takes place slowly In a cool atmosphere. The flesh of the
bird should be quite soft before cooking commences. Remember to remove the
giblets which are usually packed in polythene and frozen inside the bird.
The time taken to thaw depends on the size of the bird, and the instructions on the
pack should be followed.
All birds should be thoroughly rinsed with cold water before cooking. Allow the water
to run right through the bird, drain and dry well with absorbent kitchen paper.
The main oven will hold an oven ready turkey of 9Kg (201b).
O Cooking Time
A completely accurate time for roasting cannot be given, as it depends on the size
and age of the bird. The cooking chart below is intended as a general guide.
Meat
Beef
Lamb
Pork 170/180°C approx. 30 to 40 nvns po* lb (500g) + 30 to 40 mins over
Veal
Chicken
17G/180°C approx. 20 to 35 mins per lb (500g) + 20 to 30 mins over
17G/180°C approx. 25 - 35 mins per lb (500g) + 20 to 35 mins over
170/180°C approx. 30 to 40 nvns per lb (500g) + 30 to 40 mins over
170/180°C approx. 15 to 20 mins per lb (500g) + 20 mins over
Temperature and time
Turkey
Casserole
cooking
The settings and times shown in this table give results to satisfy average tastes but you can vary the times if you wish to get the
Test to see if poultry is cooked by gently moving the leg, which should feel loose at the joint, or pierce the thigh with a fine s/rewec
150/160°C up to 14 lb (7 kilo) allow 12 nvns per lb (29 mins per kilo) + 12 mins over.
N.B. • for larger birds allow 10 mins per lb over 14 lbs and roast at approximately 150°C
150°C approx. 1 Vz to 2 hours depending upon size of cubes of meat.
exact result you require.
the juices should be almost colourless.
twenty-two
Page 25

...Cleaning...
O General
All necessary cleaning can be carried out without removing panels, covers etc. that
require the use of tools. Access to other parts of the cooker must only be gained by
authorised service persons after complete electrical isolation.
Allow the cooker to cool before attempting to clean it.
Always disconnect the electrical supply to the appliance before undertaking any
cleaning operation.
To keep the cooker looking at its best. It is better to wipe up any spills as they occur,
this will prevent them burning on and becoming more difficult to remove.
Do not use aerosol cleaners in the oven as they could damage the fan motor unit and
cannot be wiped off the fan blade.
Material
Enamel is a thin coating of glass fused onto metal, and as such needs to be
Vitreous enamel
Glass
(not continuous
dean enamel)
NON DECORATIVE
Chromium plated or
Stainless steel
Plastic
Lacquer
Polyester coating
Anodised aluminium
Any cleaners such as aerosol sprays or caustic cleaners for use on enamel must have the Vitreous
treated with care. Clean by wiping frequently with hot soapy water. Any obstinate
marks can be removed by using a mild paste or cream cleaner or a soap
impregnated steel wool pad rubbed gently on to the surface. After cleaning, rinse
or wipe dry with a cloth wrung out in clean water. Removable parts can be
Wipe with a cloth wrung out in hot soapy water, rinse or wipe dry with a cloth
wrung out in clean water. A chromium or stainless steel cleaner may be used
Wipe wnth a soft cloth wrung out in hot soapy water
Enamel Development Council (V.E.D.C.) seal of approval
Cleaning Method Recommended
soaked if necessary before cleaning
occasionally.
Wipe with a cloth wrung out in hot soapy water.
Do not use abrasives.
Do not use abrasives.
O Cleaning Decorative Stainless Steel
• Stainless steel may become marked if it comes Into contact with hard water or
strong detergents (ie those containing phosphorous) for long periods of time.
It is therefore recommended that after any cleaning process to rinse thoroughly
and dry any water droplets.
•
• The stainless steel surfaces may be cleaned with any cleaning products made
specially for stainless steel. Always polish in the direction of the metal ridges
to obtain a perfect shine.
NEVER use any abrasive products however soft they feel as they may scratch
the metal surfaces.
twenty-three
Page 26

...Cleaning...
O Grill/Top Oven Cleaning
• The Grill/top oven cavity is made of high quality enamel and should be cleaned
by wiping with a damp cloth. If necessary use a cream cleaner or a soap
impregnated steel wool pad.
• The grill splash plate is made of the same enamel as the top oven cavity and
can be easily removed for cleaning.
Note - It is important that the grill is NEVER used without the splash plate in
position.
• Oven furniture - clean with a cream cleaner and a non scratch scourer. Do not
use wire wool as this will cause fine scratches to occur and will result in the
oven shelves being very difficult to clean. The shelves may be placed in a
dishwasher to clean.
O Removal of Inner Door Glass for Cleaning
• Pull down the oven or grill door.
• Turn both hinge locking discs clockwise to the locked position as shown in
figure 9.
• Using both hands grip the top and bottom edges of the inner door glass and
carefully slide out the glass panel.
• When replacing, gently slide the panel back into position making sure the text
" THIS SURFACE MUST BE NEAREST FACE TO THE OVEN" is legible.
• Turn both locking discs anti-clockwise to the normal position as shown \n figure
10.
twenty-four
Page 27

...General...
O Quick check points
^ Uneven cooking in the oven-
^ Check that space has been left for the heat to circulate.
Place a spirit level (or meat tin with water in it) on the grid shelf and check that
cooker is level. If not, arrange for your supplier to level it for you.
O Aluminium foil
<i> Do not use aluminium foil in the oven for anything apart from covering dishes and
food. It must never be allowed to cover any venting slots In the oven or come into
contact with the fan, back, base or sides of the oven. Do not cover oven shelves
with foil.
Oin case of difficulty
If you have difficulty in using any part of your cooker, first check that you are using
it correctly by re-reading the appropriate section of this booklet. If you still experience
difficulty, or if any part of the cooker Is damaged, please contact your supplier, give
details of the problem and quote the numbers stamped on the data badge which is
situated centrally below the main oven. Arrangements will be made for your cooker
to be inspected, and If necessary adjusted, or replacement parts may be supplied.
O Safety
Obviously during use your cooker will become hot, therefore to prevent accidents It
is advisable to supervise young children.
O Oven lamp replacement
The oven interior bulbs cannot be covered under the guarantee and are not available
as a free of charge item. However they are easy to replace :
^ CAUTiON Aiways turn aii the controis to the off position and disconnect the
appiiance from the eiectricity suppiy before repiacing the oven iamps.
^ Fan Oven oniy Ensure that the oven and lamp cover are coo! before proceeding.
Remove four screws securing rear oven panel (one in each corner) and remove
panel.
^ Unscrew the lamp cover glass anticlockwise and remove.
Unscrew the bulb anticlockwise and replace with new one - 25 watt240 volt Small
Edison Screw - ( 25w S.E.S )rated at 300°C.
^ Replace lamp cover glass and rear oven panel.
Top Oven/Grili only Ensure that the oven and lamp cover are coo! before
proceeding.
Unscrew the lamp cover glass anticlockwise and remove.
Unscrew the bulb anticlockwise and replace with new one - 25 watt240 volt Small
Edison Screw - ( 25w S.E.S )rated at 300°C.
eg-
Replace lamp cover glass and rear oven panel.
twenty-five
Page 28

ARISTON
ARISTON SERVICE HOTLINE
Should your appliance ever require servicing, just call us on
0345 30 40 50
LOCAL CALL CHARGE ONLY
V
Your local Aristón Engineer will only fit genuine parts and all
work is guaranteed by the manufacturer
Strict accuracy of illustrations and specifications is not guaranteed.
Modifications to design and materials may be necessary
subsequent to publication.
C€
MERLONI DOMESTIC APPLIANCES
Merloni House
3 Cowley Business Park
High Street
Cowley
Uxbridge
Middlesex UBS 2AD
055752800/03
 Loading...