


7HPF 604 RU-HA
Operating Instructions
HOB
GB
English, 1
RS
Русскии, 8
7HPF 604 RU/HA
7HPF 604 IX RU/HA
Contents
Warnings, 2
Installation, 3-4
Positioning
Electrical connections
Description of the appliance, 5
Overall view
Precautions and tips, 6
General safety
Disposal
Practical Advice on Using the Electric Hot Plates
Maintenance and care, 7
Switching the appliance off
Cleaning the appliance
Technical data
Assistance
GB
GB

Warnings
GB
WARNING: The appliance and its accessible parts become hot during use.
Care should be taken to avoid touching heating elements. Children less than
8 years of age shall be kept away unless continuously supervised. This
appliance can be used by children aged from 8 years and above and
persons with reduced physical, sensory or mental capabilities or lack of
experience and knowledge if they have been given supervision or instruction
concerning use of the appliance in a safe way and understand the hazards
involved. Children shall not play with the appliance. Cleaning and user
maintenance shall not be made by children without supervision.
WARNING: Unattended cooking on a hob with fat or oil can be dangerous
and may result in fire. NEVER try to extinguish a fire with water, but switch off
the appliance and then cover flame e.g. with a lid or a fire blanket.
WARNING: Danger of fire: do not store items on the cooking surfaces.
Never use steam cleaners or pressure cleaners on the appliance.
The appliance is not intended to be operated by means of an external timer
or separate remote control system.
2

Installation
600mm min.
600mm min.
700mm min.
560 m
m.
4
5
m
m
.
! Before operating your new appliance please read
this instruction booklet carefully. It contains important
information for safe use, installation and care of the
appliance.
! Please keep these operating instructions for future
reference. Pass them on to possible new owners of
the appliance.
Positioning
! Keep packaging material out of the reach of
children. It can become a choking or suffocation
hazard (see Precautions and tips).
! The appliance must be installed by a qualified
professional according to the instructions provided.
Incorrect installation may cause harm to people and
animals or may damage property.
55
mm
475
mm
555
mm
Hook fastening diagram
Hooking position Hooking position
for top H=20 mm for top H=30 mm
Front
GB
Fitting the appliance
It is possible to instal them next to furniture which is
higher than the working board. For a correct
installation of the cooking top the following
precautions must be followed:
• Kitchen cabinets adjacent to the appliance and
taller than the top of the hob must be at least 600
mm from the edge of the hob.
• Hoods must be installed according to their relative
installation instruction manuals and at a minimum
distance of 650 mm from the hob.
• Place the wall cabinets
adjacent to the hood at a
minimum height of 420 mm
from the hob (see figure).
• If the hob is installed
beneath a wall cabinet, the
latter must be situated at a
minimum of 700 mm above the
hob (see figure).
Hooking position Back
for top H=40 mm
! Use the hooks contained in the “accessory pack”
• Where the hob is not installed over a built-in oven,
a wooden panel must be installed as insulation.
This must be placed at a minimum distance of 20
mm from the lower part of the hob.
Ventilation
To ensure adequate ventilation, the back panel of
the cabinet must be removed. It is advisable to
install the oven so that it rests on two strips of wood,
or on a completely flat surface with an opening of at
least 45 x 560 mm (see diagrams).
• The installation cavity should have the dimensions
indicated in the figure.
Fastening hooks are provided, allowing you to
fasten the hob to tops that are between 20 and 40
mm thick. To ensure the hob is securely fastened to
the top, we recommend you use all the hooks
provided.
3

GB
Where a hob is installed above an oven without a
forced ventilation cooling system, adequate
ventilation must be provided inside the cabinet by
means of air holes through which air can pass (see
figure).
Electrical connection
The electric hobs are supplied without power supply
cable since the cable must be sized according to
the type of electrical connection used (see attached
connection diagram). Follow these steps to connect
the cable:
Connecting the supply cable to the mains
Install a standardised plug corresponding to the
load indicated on the data plate.
The appliance must be directly connected to the
mains using an omnipolar circuit-breaker with a
minimum contact opening of 3 mm installed between
the appliance and the mains. The circuit-breaker
must be suitable for the charge indicated and must
comply with current electrical regulations (the earthing
wire must not be interrupted by the circuit-breaker).
The supply cable must not come into contact with
surfaces with temperatures higher than 50°C.
! The installer must ensure that the correct electrical
connection has been made and that it is compliant
with safety regulations.
Before connecting to the power supply, make sure
that:
• The appliance is earthed and the plug is compliant
with the law.
• Open the terminal box by removing the screws "V"
and opening the cover (see figure).
• Connect the wires as shown in the diagram.
• Fix the cable using the cable clamp "F", replace the
cover and fasten it using the screws "V" (see
figure).
1
V
2
5
4
3
F
H05RR-F 5x1.5 CEI-UNEL 35363
380-400V 3N~
380-400V 2N~
H05RR-F 4x1.5 CEI-UNEL 35363
220-230V 1N~
H05RR-F 3x2.5 CEI-UNEL 35363
1 2
R
S
12345
R
1
2
4
3
T
S
3
R
5
N
N
4
5
N
• The socket can withstand the maximum power of
the appliance, which is indicated on the data plate.
• The voltage is in the range between the values
indicated on the data plate.
• The socket is compatible with the plug of the
appliance. If the socket is incompatible with the
plug, ask an authorised technician to replace it. Do
not use extension cords or multiple sockets.
! Once the appliance has been installed, the power
supply cable and the electrical socket must be
easily accessible.
! The cable must not be bent or compressed.
! The cable must be checked regularly and replaced
by authorised technicians only (see Assistance).
! The manufacturer declines any liability should
these safety measures not be observed.
! If the appliance is to be installed above a built-in
electric oven, the electrical connection of the hob and
the oven must be carried out separately, both for
electrical safety purposes and to make extracting the
oven easier.
4
Description of the
appliance
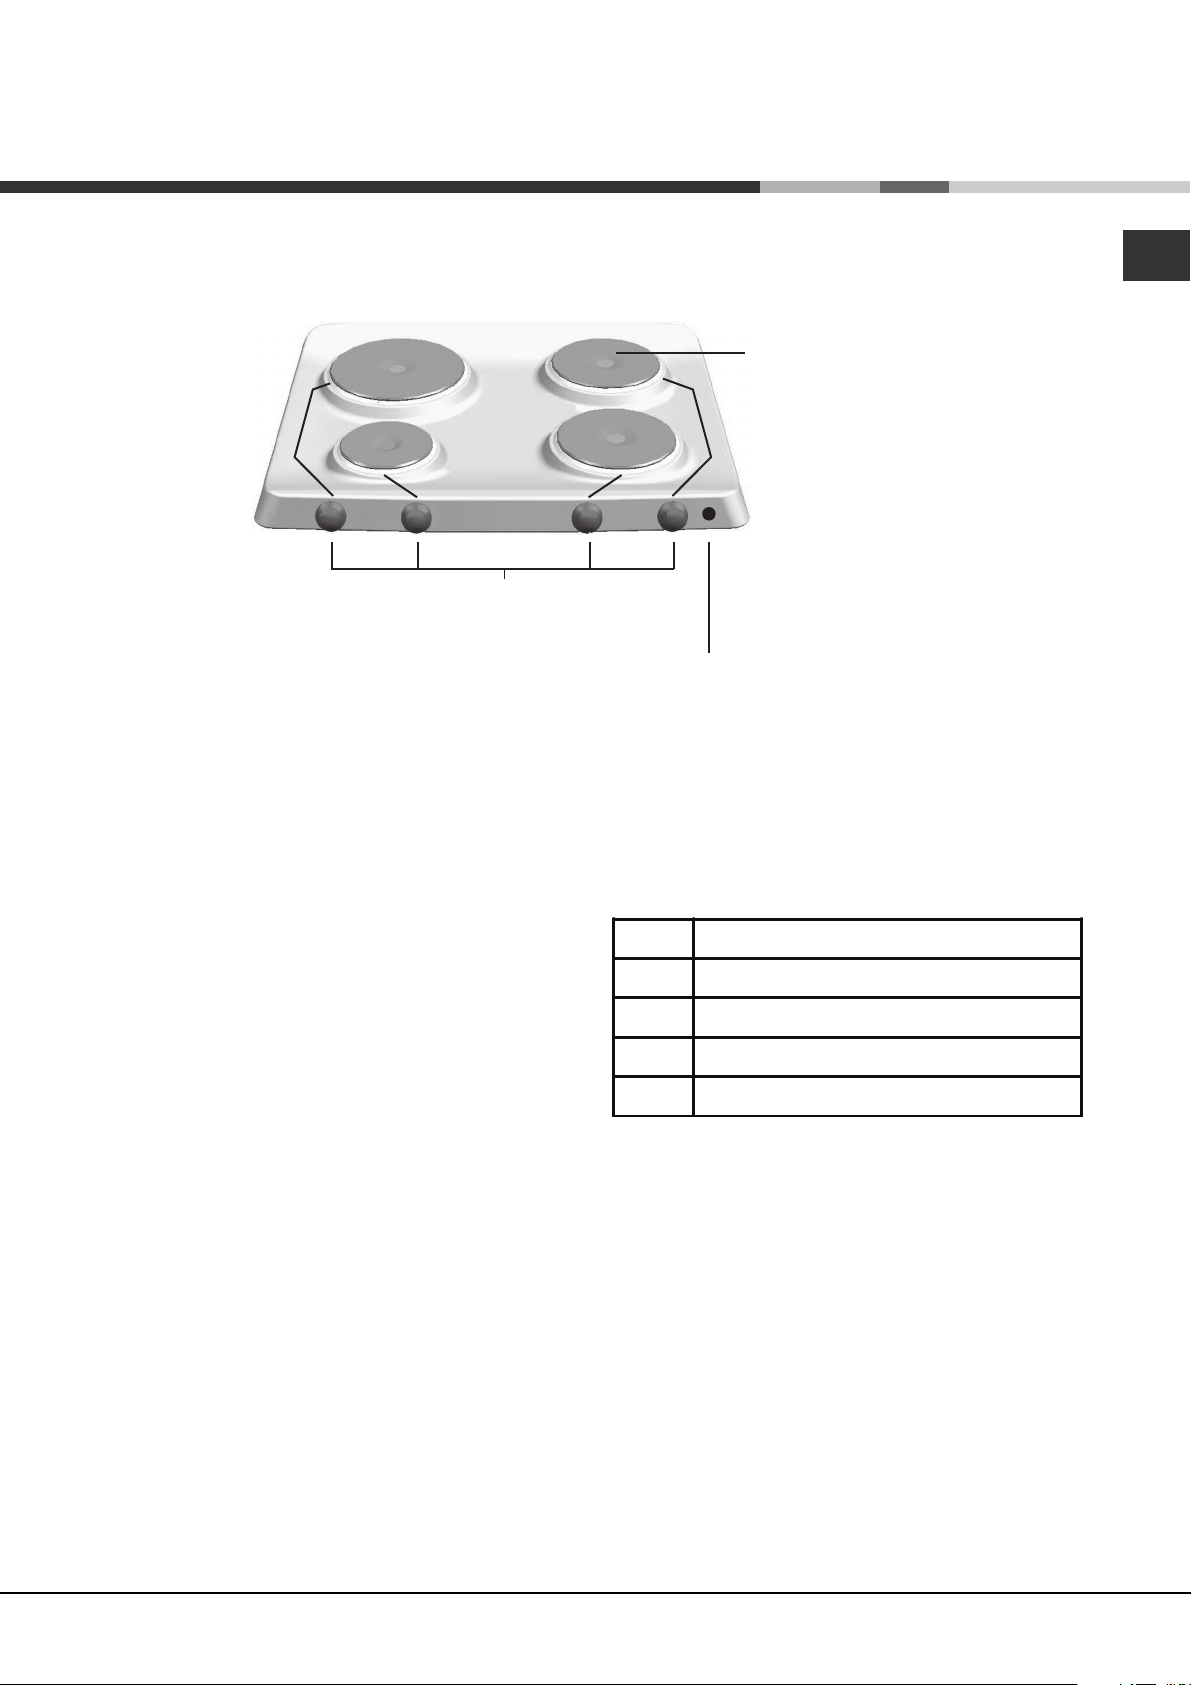
Overall view
Control knobs for the cook-top
ELECTRIC PLATE
• The ELECTRIC PLATE vary in diameter and
power: "normal" and "fast". The latter can be
identified by a red boss in the center of the hot
plate itself.
GB
ELECTRIC PLATE
Pilot lamp of the
ELECTRIC PLATE
• The ELECTRIC PLATE control knob is a device
used to regulate power.
The knob may be turned clockwise or anticlockwise and set to six different positions:
! The position of the corresponding electric hot plate
is indicated on each control knob.
• The ELECTRIC PLATE ON indicator light switches
on whenever the knob is moved from the 'off'
position.
Setting Normal or Fast Plate
0
Off
1
Low
2 - 5
! Please refer to the "Practical Advice on Using the
Electric Hot Plates" section for a list of the relative
positions and their recommended uses.
6
Medium
High
5
 Loading...