


1
ARCHOS™ MOBILE TV & RECORDER |
® |
|
AV 700 TV
Mobile TV & Recorder / Video Player & Recorder / Music Player & Recorder / Photo Viewer / USB 2.0 Hard Drive
English Language User Manual
User Manual for ARCHOS™ AV 700 TV series
Version 1.2
Please visit www.archos.com to download the most recent manual and software for this product.
2
Dear Customer,
ARCHOS™ thanks you for your choice of this exciting AV 700 TV product. The AV 700 TV is designed to be the companion to your home entertainment system. With the optional docking pod connected to your television, you can easily connect your AV 700 TV to the pod as desired. Optionally, you can connect it to your computer with the included USB Cable. By connecting to a computer, you get the advantage of being able to download legal music and video content from the Internet. Since it is a PlaysForSure™ device, you have a wide choice of music and video content available on the Internet. For more information about the PlaysForSure™ program, see www.playsforsure.com.
This manual will explain, in detail, the functionality of your device. The better you know how to use it, the more enjoyment you will get from it. Remember, with the AV 700 TV, you can…
•Watch Digital TV on the built-in screen, a television or video projector
•Record your favorite Digital TV programs directly onto your AV 700 TV
•Play MPEG-4 & WMV video files on the built-in screen, a television or video projector
•Record and edit MPEG-4 video files from a television or other video device (with optional accessories)
•Listen to MP3, WMA, or WAV music files or PlaysForSure™ downloaded music files
•Record music files into digital format directly from your hi-fi without a computer (with optional accessories)
•Synchronize your Windows® Media Player music and video library to your AV 700 TV
•View JPEG and BMP digital photos and create slide shows
•Copy Pictures from your digital camera via the built in host USB port
•Store .DOC, .PDF, or any type of data files – it’s a portable hard drive too!
We wish you many years of enjoyment from your AV 700 TV product. Please do register your product at our website www.archos.com/register/products.html to ensure that you get access to our help line and to be informed of free software updates for your product.
Wishing you the best TV, Video, Music, and Photo experience,
The ARCHOS™ TEAM
Please take the time to read though this manual. There are many things that this device can do that you may not be aware of.
__________
As our engineers are always updating and improving the software, your device’s software may have a slightly different appearance or modified functionality than presented in this manual.
2

3
Table of Contents
|
|
1 INTRO – Buttons and Connections |
7 |
|
||
|
|
|
1.1 |
Remote Control Description |
9 |
|
|
|
2 INTRO – First Time Usage |
10 |
|
||
|
|
|
2.1 |
Plugging in the AC Adapter |
10 |
|
|
|
|
2.2 |
Turning on the AV 700 TV |
10 |
|
|
|
|
2.3 |
Shutting off the AV 700 TV and Battery saving features |
10 |
|
|
|
|
2.4 |
Changing the Interface Language |
11 |
|
|
|
|
2.5 |
Foreign Character Sets |
11 |
|
|
|
|
2.6 |
Caring for the AV 700 TV |
11 |
|
|
|
|
2.7 |
Hardware Reset |
12 |
|
|
|
3 TV – Watching Digital TV |
13 |
|
||
|
|
|
3.1 |
Tuning Digital TV on the AV 700 TV |
13 |
|
|
|
|
3.2 |
Watching Digital TV |
16 |
|
|
|
|
3.3 |
Digital TV Action Icons |
17 |
|
|
|
|
3.4 |
Watching Digital TV in your Car* |
19 |
|
|
|
4 TV – Recording Digital TV |
21 |
|
||
|
|
|
4.1 |
Recording Digital TV with the AV 700 TV |
21 |
|
|
|
|
4.2 |
Setting the Scheduler |
21 |
|
|
|
|
4.3 |
Viewing Digital TV recordings on your computer |
22 |
|
|
|
5 VIDEO – Playing Video Files |
23 |
|
||
|
|
|
5.1 |
Video Playback Action Icons |
24 |
|
|
|
|
5.2 |
Resume Function |
25 |
|
|
|
6 VIDEO – Playing Video Files from the Internet |
26 |
|
||
|
|
|
6.1 |
Protected Internet Video content |
26 |
|
|
|
|
6.2 |
Non Protected Internet Video Content |
26 |
|
|
|
|
|
|
3 |
|
|
|
|
|
|
|
|
|
4 |
|
|
|
||
|
|
|
|
|
|
|
|
|
7 |
VIDEO – Recording Video Files |
27 |
|
|
|
|
|
||||
|
|
8 |
VIDEO – Creating MPEG-4 Video Files with your Computer |
28 |
|
|
|
|
|
8.1 |
Installing the PC Software |
29 |
|
|
|
|
8.2 |
Using MPEG-4 Translator |
31 |
|
|
|
9 |
MUSIC – Playing Music Files |
33 |
|
|
|
|
|
9.1 |
Button Control |
34 |
|
|
|
|
9.2 |
Play Screen Icons |
35 |
|
|
|
|
9.3 |
Browsing through your Music Library |
36 |
|
|
|
|
9.4 |
Playing Through your Stereo System |
37 |
|
|
|
|
9.5 |
Setting a Bookmark |
37 |
|
|
|
|
9.6 |
The Resume Function |
38 |
|
|
|
10 |
MUSIC – Putting Music onto your AV 700 TV |
39 |
|
|
|
|
|
10.1 |
Synchronizing Music from Windows Media® Player (WMP) to the AV 700 TV |
39 |
|
|
|
|
10.2 |
Comparison of Windows Media Player 10 to Windows Media Player 9 |
40 |
|
|
|
|
10.3 |
Transferring your CD collection to the AV 700 TV |
41 |
|
|
|
|
10.4 |
Installing Windows Media® Player 10 (WMP10) |
41 |
|
|
|
11 |
MUSIC – Playlists |
42 |
|
|
|
|
|
11.1 |
Playing a Playlist |
42 |
|
|
|
|
11.2 |
Creating a Playlist |
42 |
|
|
|
|
11.3 |
Saving a Playlist |
43 |
|
|
|
|
11.4 |
Adding songs to a Playlist while listening to Music |
44 |
|
|
|
12 |
MUSIC – Recording Music |
45 |
|
|
|
|
13 |
MUSIC – Using iTunes™ with your AV 700 TV |
46 |
|
|
|
|
14 |
PHOTO – Viewing Photos |
47 |
|
|
|
|
|
14.1 |
Viewing Photos |
47 |
|
|
|
|
14.2 |
Viewing a slideshow |
49 |
|
|
|
|
14.3 |
Transferring photos to your AV 700 TV |
49 |
|
|
|
15 |
GAMES – Playing Mophun® Games |
51 |
|
|
|
4 |
|
|
|
|
|
|
|
|
|
|
|
|
|
|
|
|
|
|
|

5
16 BROWSER – Using the Browser |
52 |
|
16.1 |
Navigating the Directory Structure |
53 |
16.2 |
File and Folder Operations |
54 |
16.3 |
Using the Virtual Keyboard |
57 |
|
17 |
Connecting/Disconnecting the AV 700 TV to/from your PC |
58 |
|
|
|
|
17.1 |
USB Connection Type (‘Hard Drive’ or ‘Windows Device’) |
58 |
|
|
|
17.2 |
Connecting the AV 700 TV |
58 |
|
|
|
17.3 |
Disconnecting the AV 700 TV from your Computer |
60 |
|
|
18 |
Connecting Devices to the USB Host Port |
62 |
|
|
|
19 |
SETTINGS |
63 |
|
|
|
|
19.1 |
Sound Settings |
63 |
|
|
|
19.2 |
Play Mode Settings |
64 |
|
|
|
19.3 |
Clock Settings |
65 |
|
|
|
19.4 |
Display Settings |
66 |
|
|
|
19.5 |
Appearance settings |
67 |
|
|
|
19.6 |
Power Settings |
67 |
|
|
|
19.7 |
System Settings |
68 |
|
|
|
19.8 |
TV control |
69 |
|
|
20 |
Updating the AV 700 TV Firmware Operating System (OS) |
70 |
|
|
|
21 |
Replacing the battery |
72 |
|
|
|
22 |
Recording Audio with the Optional Docking Pod/Travel Kit |
73 |
|
|
|
|
22.1 |
Docking Pod Cable Connections |
73 |
|
|
|
22.2 |
Travel Kit Cable Connections |
74 |
|
|
|
22.3 |
Recording Procedure |
75 |
|
|
|
22.4 |
Where is the Recording Saved? |
77 |
|
|
|
22.5 |
Audio Editing |
77 |
|
|
23 |
Recording External Video with the Optional Docking Pod/Travel Kit |
79 |
|
|
|
|
23.1 |
Docking Pod Cable Connections |
79 |
|
|
|
|
|
5 |
|
|
|
|
|
|
|
|
6 |
|
|
|
|
|
|
|
|
|
|
|
|
|
23.1.1 TV Docking Pod Description |
79 |
|
|
|
|
|
||
|
|
|
23.1.2 Connecting the TV Docking Pod to your Television System - Connect & Test Method |
80 |
|
|
|
|
23.1.3 Connection Diagram |
84 |
|
|
|
23.2 |
Travel Kit Cable Connections |
86 |
|
|
|
23.3 |
Recording Video Files from External Sources |
87 |
|
|
|
23.4 |
Setting the Recording Parameters |
88 |
|
|
|
23.5 |
Where is the Recording Saved? |
90 |
|
|
|
23.6 |
Editing Video Files |
90 |
|
|
|
23.7 |
Copy Protection |
93 |
|
|
|
23.8 |
Docking Pod-Specific Options |
93 |
|
|
|
|
23.8.1 Manually Setting the Scheduler |
93 |
|
|
|
|
23.8.2 Automated Yahoo!® TV Recording Scheduler |
95 |
|
|
|
|
23.8.3 Setting the Infrared Emitter Code |
97 |
|
|
24 |
Troubleshooting |
100 |
|
|
|
|
24.1 |
USB Connection issues |
100 |
|
|
|
24.2 |
Charging and Power issues |
101 |
|
|
|
24.3 |
AV 700 TV locks up (freezes operation) or Stops |
101 |
|
|
|
24.4 |
File issues, corrupted data, formatting, and partitioning |
101 |
|
|
25 |
Technical Specifications |
104 |
|
|
|
26 |
Legal and Safety Notices |
106 |
|
|
|
6 |
|
|
|
|
|
|
|
|
|
|
|
|
|
|
|
|

7
1INTRO – Buttons and Connections
aMove UP (also increases volume during media playback)
bMove DOWN (also decreases volume during media playback)
cMove LEFT (also plays previous song or fast reverse through song or video)
dMove RIGHT (also plays next song or fast forward through song or video)
eAccelerate UP – go up the list of items at high speed
fAccelerate Down – go down the list of items at high speed
gInfrared sensor for the remote control
hLeft and right loud speakers
iOn indicator
jHard drive activity indicator (read/write)
kBattery charger indicator (blinks when battery is charged*)
7
8
l TV out indicator (indicates that video is being sent to a connected external television) m Play/Enter/On – Hold for 3 seconds to switch on the device
nStop/Escape/Off – Hold for 3 seconds to switch off the device
oUP action button (move up on the list of action icons)
pSELECT action button (select the highlighted action icon)
qDOWN action button (move down on the list of action icons)
aAntenna connector for Digital TV
bLCD/TV button – Hold down to switch between the LCD and an external TV display
cUSB 2.0 Full speed USB Host port – to connect compatible devices
dMulti-connect jack* – for headphones, TV Docking Pod, and AV in/out connections
eUSB 2.0 High speed device port (USB 1.1 compatible) to connect to your computer
fPower Connector (Use only the supplied ARCHOS™ power charger/adapter)
gBattery latch
8
9
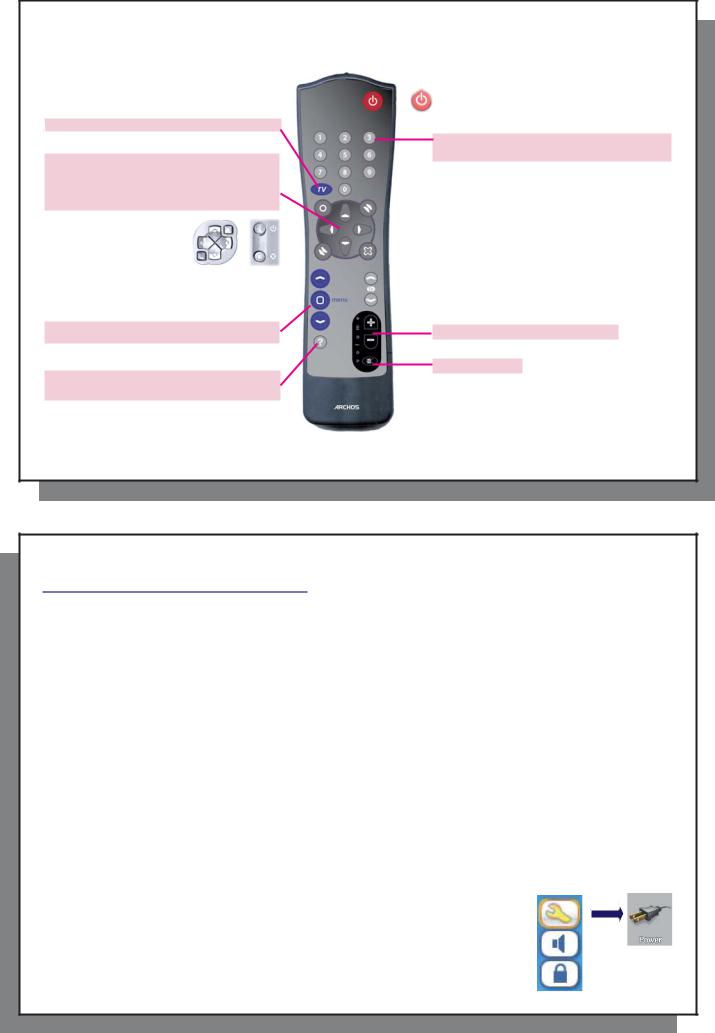
1.1Remote Control Description
Switch between Built-in & External Video
This group of buttons acts as the navigation and acceleration buttons on the left of the AV 700 TV and the Play & Stop buttons on the right side.
Action icon select and execute buttons
Displays Action icon descriptions, if activated (Setup > Display)
Standby / Wake Up
Numeric entry: to access a Digital TV channel directly, enter its number.
Increase / Decrease Volume
Mute sound
9
10
2INTRO – First Time Usage
2.1 Plugging in the AC Adapter
•Use only the included ARCHOS™ charger/adapter.
•You can charge the internal battery of the AV 700 TV by plugging the included adapter/charger directly into the device, or you can charge it by plugging the adapter/charger into the optional TV Docking Pod and connecting your AV 700 TV to the optional TV Docking Pod.
•Before using for the first time, charge the batteries completely. The charge indicator (CHG) light just below the navigation pad will start to blink when the battery is charged.
2.2 Turning on the AV 700 TV
•Hold the PLAY/ON button for 3 seconds. The green “On” indicator light will turn on. Be patient, it will take a few seconds for the operating system to boot up.
•If the unit shuts off after holding the ON button for several seconds, plug in the ARCHOS™ adapter/charger to make sure the batteries get charged.
2.3 Shutting off the AV 700 TV and Battery saving features
To shut off the unit, press and hold the STOP/ESC/OFF button for 3 seconds.
In the Power menu [Display setup screen Power: Battery Operation] there is a Power Off parameter. It is factory set to 6 minutes. Thus, if your AV 700 TV is idle for 6 minutes, it will shut itself off. This setting can be changed from one to nine minutes or to never.
In the Power menu [Display setup screen Power: Battery Operation] there is a
Backlight Off parameter to save battery power (the lighting of the screen consumes a lot of the battery power). It is factory set to 60 seconds. That is, if the AV 700 TV is not being used, the screen will shut off in order to save battery life. To turn the screen back on, just click once on any button. See the section Power in the Settings chapter for a complete explanation.
10

11
2.4 Changing the Interface Language
The AV 700 TV interface can be set to English (default), French,
Spanish, German, or Russian.
•Using the UP action button, highlight the Settings icon (showing a wrench) and then click the center SELECT action button.
•Highlight the Display icon and click the PLAY/ENTER button.
•Highlight the Language parameter using the UP/DOWN buttons.
•Click the RIGHT or LEFT button to choose the desired language.
•The language displayed will change immediately.
•Click on the STOP/ESC button to return to the Setup page and again to return to the main menu screen.
2.5 Foreign Character Sets
You have the possibility to display your file names, folder names, and music tags in various character sets (ex: Korean, Japanese, Simplified Chinese, etc.). You can find the language files CodePage_name.4FZ in the font folder under /Data/Asian Fonts on the AV 700 TV hard drive or on the ARCHOS™ website under the heading Software. If, for example, you would like to have the Korean language display, then you would copy the file CP949.4FZ into the folder /system on the AV 700 TV and shut down and restart the AV 700 TV. File names, folder names, and music tags written using the Microsoft® codepage for the language will now be displayed in that character set. Only one .4FZ can be used at a time, thus you should only put one .4FZ file into the /system folder. When an .4FZ language file is used, the interface language will be set to English.
2.6 Caring for the AV 700 TV
The ARCHOS™ Video AV 700 TV is an electronic product that needs to be treated with more care than typical consumer electronic products.
•Do not subject it to shock.
•Do not subject it to heat. Keep it ventilated by keeping it on its feet with the fold-out stand (especially when connected to a computer).
•Keep the AV 700 TV away from water and excessively humid areas.
11
12
•Keep the AV 700 TV away from high electromagnetic fields.
•Keep any connected cords to the AV 700 TV neatly arranged. This light product could fall if a cord is accidentally pulled by a child.
•Do not open up the AV 700 TV. There are no user serviceable parts inside. Opening will void your warranty.
2.7 Hardware Reset
In the event that your AV 700 TV freezes operation (due to electrostatic phenomena for example), you can actuate a hardware reset by holding down on the STOP/ESC button for 15 seconds. In normal operation, the STOP/ESC button will shut down the AV 700 TV after being held down for 3 seconds.
12
13
3TV – Watching Digital TV
3.1Tuning Digital TV on the AV 700 TV
Before you can use your AV 700 TV to watch Digital TV for the first time, you will need to tune it to receive the available programs in your area. You may also need to do this when you enter a different coverage area, for instance when you travel a long distance.
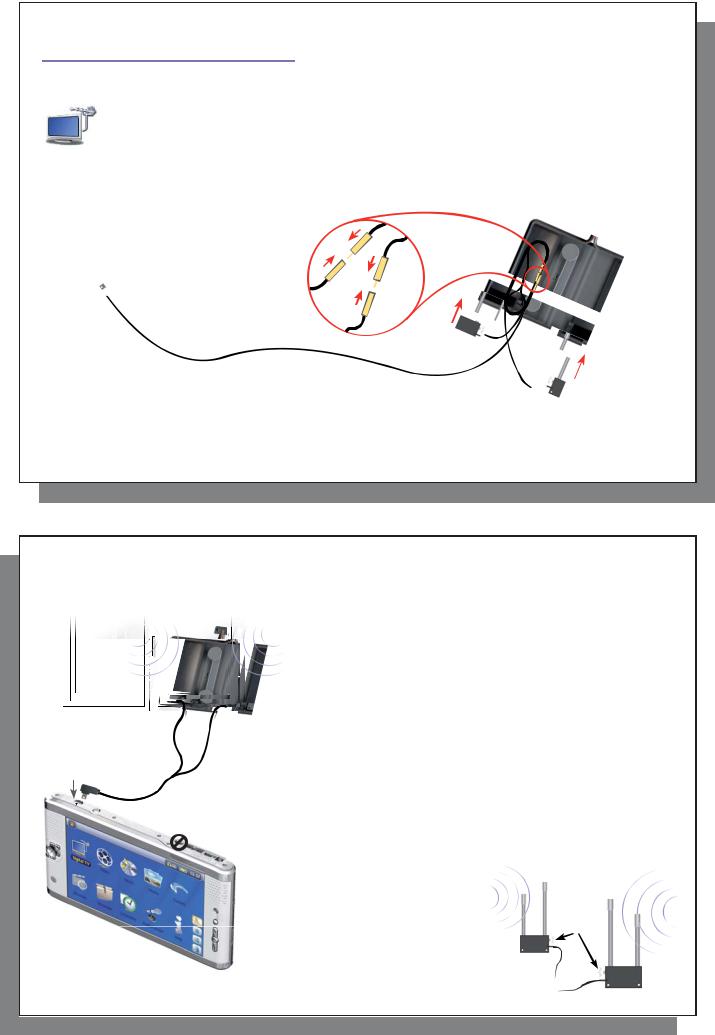
Setting Up and Connecting the Antennas
Your AV 700 TV comes with a set of two amplified antennas along with their cable and carrying case. Start by assembling these elements as shown in this picture.
M = Master M
S
S = Slave
Then, connect the antennas to the antenna connector of your AV 700 TV. This port is next to the TV/LCD button on the top of the device, and is marked with this symbol:  .
.
Attention: DO NOT connect the antennas to the ‘USB A’ port of the AV 700 TV!
13
14
Positioning the Antennas for Optimal Reception
You must now make sure that your antennas are in a position that allows for good reception. In most situations, you will be able to obtain a good quality signal by leaving the antennas in the opened carrying case.
•For an optimal reception, unfurl the cables of the antennas (leaving the antennas in their pockets) and place them as far as possible from the AV 700 TV device, and as close as possible to a window. Never place the antennas less than 80cm (30 inches) from the AV 700 TV. Try different orientations to determine which one offers the best reception (see signal quality icon further down).
•Deploy the antennas away from any electromagnetic source such as a TV or PC, and away from any metal parts (at least 30 cm/12”).
• The supplied antennas are directional antennas: the most sensitive side is the front side, with the shortest element. In some areas, reception may be very poor, and you may need to take the antennas out of their pockets. In such a case, turn them in opposite directions, as far away from each other as possible.
Note that both of the antennas have a power LED that will light up once they are correctly plugged in.
FRONT |
BACK |
POWER
LED
BACK |
FRONT |
14

15
Note: you can use the AV 700 TV as a Digital TV tuner at home and connect the AV 700 TV to your home antenna using the supplied Antenna Adapter Cable (IMPORTANT: use only the ARCHOS™ supplied cable, and connect only to a regular aerial antenna outlet, not a cable TV service outlet).
Signal quality icon:
This icon is located in the status bar. The color and the number of bars indicate the level of quality of the received signal. The icon is split in two parts, showing reception for the
left and right antennas separately. When you move the antennas, allow a few seconds Master Slave before the icon reflects any change.
Please note that if you use your home antenna and the supplied Antenna Adapter Cable, it is normal that only the left side of the icon will show signal quality.
Scanning for Channels
From the Main Menu of the AV 700 TV, select the Digital TV menu icon and press the ENTER button. Using the action buttons, select Digital TV Settings and then select Scan. Your device will scan through the available channels (this can take a few minutes). You can now watch TV!
Note: to avoid losing these new settings the next time you scan for channels, you can save them as a preset (see
Digital TV Settings in section 3.3 - Digital TV Action Icons).
15
16
3.2Watching Digital TV
To watch Digital TV, simply select the Digital TV menu icon on the main screen and press the ENTER button. You can then browse through the available channels by using the LEFT and RIGHT buttons, as shown here:
volume up |
display channel list |
|||
|
|
|||
previous |
|
next |
||
channel |
|
|
|
channel |
|
|
|
volume down |
|
When you change channels, an information screen about the current program and the following program will be shown for a few seconds, as shown in this picture.
Channel number
Channel name
 Current program timeline
Current program start time and title
Next program start time and title
Channel List
Press either of the acceleration buttons to display the list of available channels. You can then use the UP/DOWN buttons to select a channel and press the ENTER button to jump directly to the highlighted channel.
display channel list |
highlight previous channel |
 go to highlighted channel
hide channel list
highlight next channel
Alternatively, you can also go directly to a channel by typing its number on the supplied remote control.
16
17
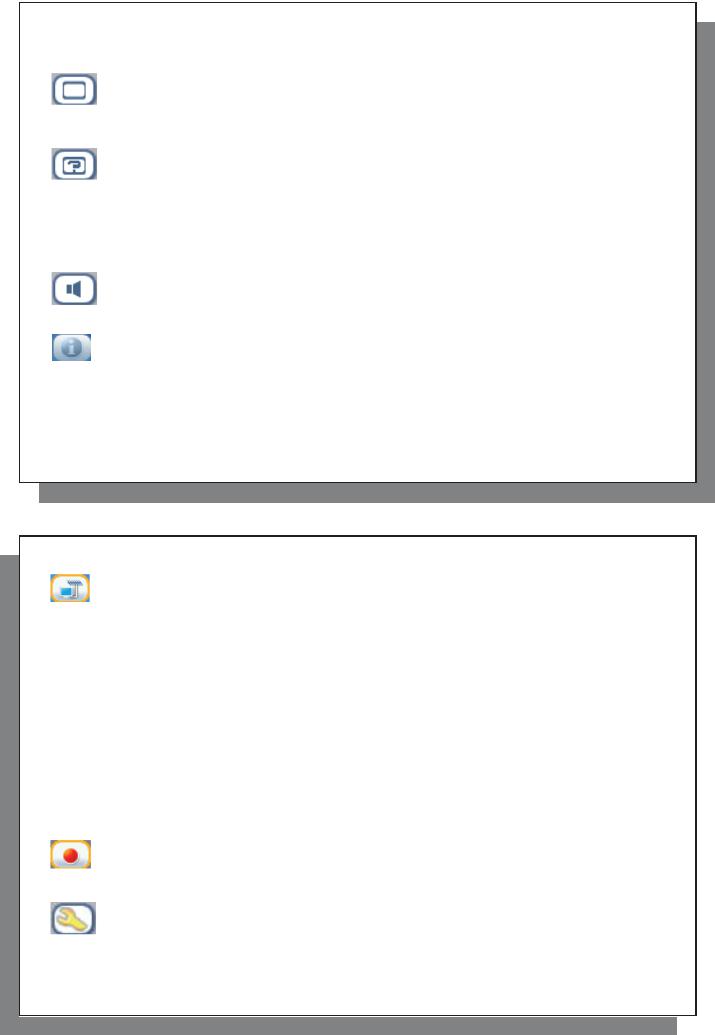
3.3Digital TV Action Icons
Hide Text Overlay
Select this icon to shut off the On Screen Display (the status bar, action icons and other overlaid informational graphics).
Video Format
Change the way the image is displayed on the built-in LCD screen of your AV 700 TV or on your TV:
Auto |
Adjusts the video size to best adapt to the built-in screen or television. |
Maximized Image |
Enlarge the image to fill the screen. |
Original Picture |
The entire picture will always be seen on the TV and the built-in screen, no cutting. |
Built-in speaker on/off
Turn on or off the built-in loudspeakers.
Current Program Info
Information will be displayed on your screen about the program you’re viewing, its duration, and potentially other programming information. Note that this information is provided by the TV stations themselves and may not always be available.
17
18
Digital TV Settings
This menu allows you to manage the Digital TV channels:
Preset 1-5 |
selecting one of these presets will change the set of currently available channels to ones you |
|
have previously preset. |
Scan |
will search for available channels (see section Tuning Digital TV on the AV 700 TV). |
Save |
saves the current set of channels as a preset. Use this option just after scanning if you have |
|
traveled and want to save the local Digital TV settings as preset 1, 2, 3, 4 or 5. |
Sort |
will open the list of current channels and allow you to sort them to a different order and to |
|
delete the ones that you don’t want to keep. |
|
- Use the UP/DOWN buttons to highlight a channel number, then the RIGHT button to |
|
highlight the channel name. |
|
- The UP/DOWN buttons will then allow you to move the channel to a different position. |
|
- To delete a channel, highlight its name and press the STOP button. |
|
- Press the LEFT button to go back to highlighting a channel number. |
|
- To exit, highlight any channel number and press the STOP button. |
Start Recording
This will start recording the channel you’re watching (see section Recording Digital TV).
Video Settings
This will display the available settings, such as sound settings, LCD brightness, etc.
18
19
3.4Watching Digital TV in your Car*
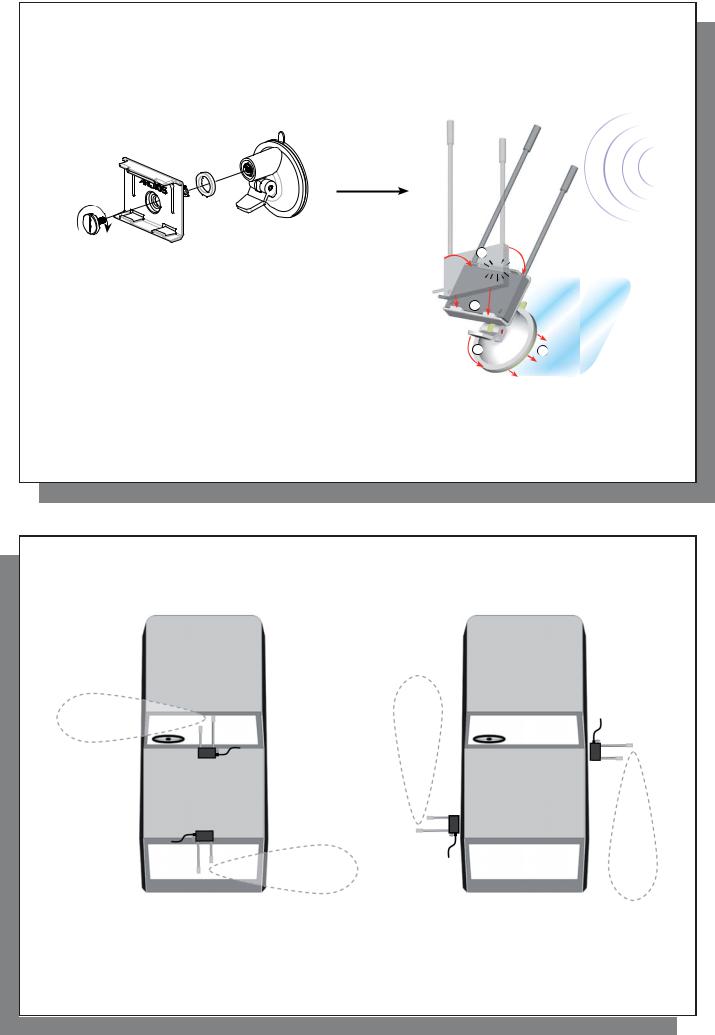
With the AV 700 TV, you have the possibility to watch Digital TV on the move. For best reception while moving, the supplied antennas can be taken out of their carrying case to be mounted on the supplied car antenna support systems. You will first need to assemble the car antenna support systems, clip the antennas into place and then apply the support systems to a flat and smooth surface (such as a window area that does not interfere with the driver’s view).
For best reception, it is advised to place the antennas in opposite directions (the front of the antennas, with the shortest element, must not be directed towards metal parts), one on each side of the vehicle (front and back, or left and right).
As reception conditions vary with vehicle types and other external conditions, it is advised to try different positions for the antennas to determine which one offers the best results.
Note: if traveling long distances, you may need to re-scan for channels from time to time.
|
|
|
|
BACK |
OF |
ANTENNA |
|
|
ANTENNA |
|
|
|
|
|
|
|
|
||||
|
|
|
|
|
|
|
|
FRONT |
OF |
|
2 |
|
|
|
|
|
|
|
|
||
|
|
|
|
|
|
|
|
|
||
|
|
|
|
|
|
|
|
|
|
|
|
|
|
|
|
|
|
|
|
|
|
|
|
click! |
|
|
|
|
|
|
|
|
|
|
|
|
|
|
|
|
|
||
1
4 |
3 |
* Safety Notice: for the driver and passengers’ safety, and to comply with some countries’ road regulations, the AV 700 TV should not be placed such that it is viewable by the driver (see additional notices and disclaimers in the legal section of this manual).
19
20
Examples of positions where the supplied antennas can be mounted on a car
(Local laws may prohibit mounting on certain windows of your vehicle)
20
21
4TV – Recording Digital TV
4.1Recording Digital TV with the AV 700 TV
The AV 700 TV allows you to record your favorite TV programs very easily. While you’re watching TV, all you have to do is select the Start Recording action icon and the AV 700 TV will instantly start recording the program you’re watching. To stop the recording, simply select the Stop Recording action icon. Note that while recording Digital TV, you will not be able to change channels.
Where is the Recording Saved?
The default location for Digital TV recordings is the folder called Video. Files recorded from Digital TV are named automatically from the program’s title. To view a recording, go to the main menu and select the Video icon. You will see your recording here.
4.2Setting the Scheduler
If you would like to make a Digital TV recording for a future date or time, you can use the scheduler. You can find it in the main menu. You can program up to twenty different recordings up to one month in advance. Once you program your dates and times of recording, press the action button OK to set them.
IMPORTANT: your AV 700 TV must be plugged in and powered by the adapter/charger. If left alone, the AV 700 TV will go on standby itself after a few minutes. At the programmed time, it will turn on and make the recording.
21
22
1. Click the Scheduler icon.
2. Select the line you want to edit using the UP and DOWN buttons, then press RIGHT to start editing.
3. Set each line with the desired date, time and channel. Make sure that the letter before the channel number is D (D stands for Digital TV and A stands for Analog recording - see section 23.8 of the full manual about using the scheduler for Analog recordings with the optional TV Docking Pod).
4. Click on the save icon to save the program. Click on the STOP/ESC button to return to the previous screen.
5.Make sure the adapter/charger is connected to the device. Set the AV 700 TV to Standby (red ‘standby’ button on remote control) or go back to the main menu screen and allow it to automatically (after a couple minutes of inactivity) go into standby mode.
Notes about setting the Scheduler:
•The scheduler automatically reorganizes the recording events chronologically.
•In order for a scheduled recording to start, you must leave the AV 700 TV in the main menu screen or set it to standby mode (press Standby button on remote control). That is, if you are listening to music, watching a video, or looking at photos on your AV 700 TV, it will not interrupt you in order to go make the scheduled recording.
•When the AV 700 TV user interface is in English, the Date format is set to Month/Day.
•If the end time is earlier than the start time, then it is assumed that you start recording on the start date, and the recording ends on the following day at the end time.
•Once a scheduled recording has been made, or the date of a recording has been passed, without the recording having been made (the AV 700 TV was not in Standby mode), the schedule entry will be erased from the scheduler.
•Some recordings can create files that are larger than 2 gigabytes (GB) each. The AV 700 TV will create multiple files in order to make long recordings.
4.3Viewing Digital TV recordings on your computer
If you want to view your Digital TV recordings on your computer, you will have to install software that can read videos in MPEG-2 TS format (.TS extension). One possibility is the VLC Player (www.videolan.org).
22
23
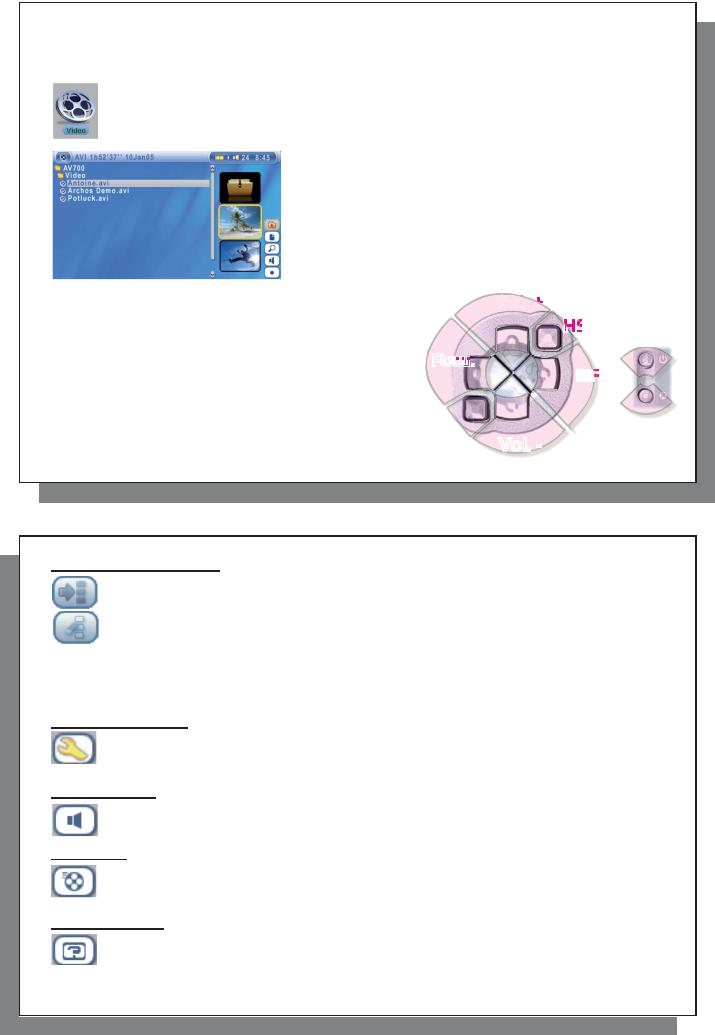
5VIDEO – Playing Video Files
Click on the Video icon in the main menu, highlight the desired video file, and then click on PLAY/GO. The thumbnail images on the right side will show you a frame from the highlighted video file (center) as well as a frame from the file above and the file below the highlighted one. By clicking on the Video icon in the main menu, you will enter into a ‘video only’ mode. Other playable file types, for example music files, that may be in this folder are only listed if you enter the folder via the Browser.
To watch your videos on a television, you must hold down the LCD/TV button for two seconds (or click on the TV button on the remote control). The AV 700 TV screen will go black and the video will be sent out to your connected television. Switch your television to auxiliary video input (often found just below channel 1 – sometimes called L1 or L2). If you don’t see a clear color image, you may have to set your AV 700 TV to your local television standard (NTSC-North America or PAL-Europe) in / Display from the main menu.
Button controls while playing a video file
Vol + |
Increase volume |
Vol - |
Decrease volume |
Rew. |
Fast Rewind |
FF |
Fast Forward |
HSR |
High speed reverse |
HSA |
High speed advance |
>I |
Play/Pause |
X |
Stop |
Voll. +
|
|
HSA |
||
|
|
|||
Rew |
|
|
|
>I |
|
|
|
|
|
HSR |
|
|
F |
X |
|
|
|||
|
|
|
||
|
|
|
|
|
|
Vol. - |
|||
23
24
Video Browser Action Icons
Hide the Thumbnails
Reset thumbnails. The thumbnail images on the right side of the screen will be reset to their original default setting.
5.1 Video Playback Action Icons
While a video file is playing, click on the Select action button. The action icons on the right of the screen allow you to make video adjustments to your personal taste.
Play & Sound Settings
Use this setting if you would like to have the video files play one after the other, or just play one and stop. You can also adjust the sound settings and the amount of time the On Screen Display (OSD) information remains on the screen when you start a video file.
Built-in Speakers
Turn on or off the built-in loud speakers.
Slow Motion
Put the video into slow-motion view. You can cycle through the values Normal , ½ , ¼ , and 1/8 speed. The sound is muted when in slow motion. While in slow mode and paused, you can step image per image with the RIGHT button.
Set Screen Format
Video files come in various aspect ratios. That is, they can be TV sized (almost a square image), or in cinema size (much longer than high). To change the screen to your personal tastes, the following screen format options are available.
24
25
Auto Format |
Default mode. Adjusts the video size to best adapt to the built-in screen or television. |
Maximized Image |
Enlarge the image to fill the screen (LCD or TV). Sides may get slightly cut in this mode. |
Full Picture Format |
The entire picture will always be seen on the television and the built-in screen. No cutting. |
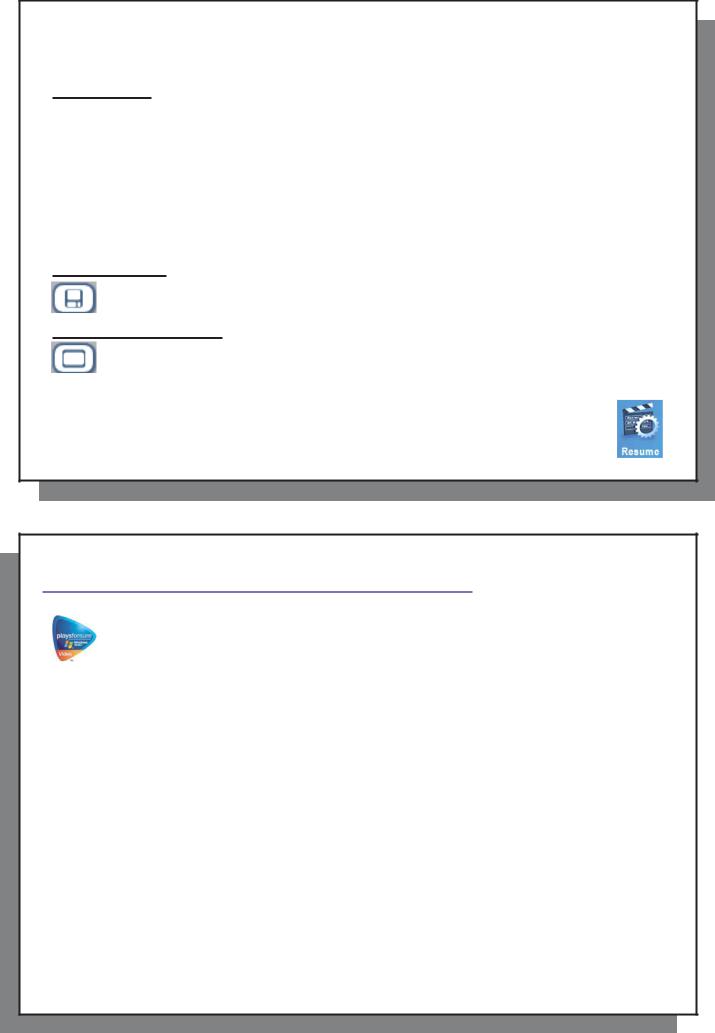
Set a Book mark
If you are watching a video and would like to place a bookmark in it in order to continue from this point at another time, you can use the Bookmark function. Highlight the icon and click on the Select action button. This will set a bookmark in the video file at the current position. You can only set one bookmark per file. When you look at the file in your browser, it will have a yellow check mark on its icon indicating that this file has a bookmark set within it. You can have a maximum of 16 files book-marked. Setting more bookmarks will then start to erase the oldest bookmarks. The next time you play this video file, you will be presented with three options:
Resume |
Start playing from the book-marked position. |
Ignore |
Keep the bookmark but start playing from the very beginning. |
Clear |
Clear the bookmark from this file and start playing from the very beginning. |
Save as Thumbnail
Save the current image on the screen as the video file’s thumbnail in the Video browser view.
On Screen Display (OSD) off
Select this icon to shut off the On Screen Display (the status bar, action icons, and other overlaid informational graphics).
5.2 Resume Function
When you turn on your AV 700 TV you may notice that the icon which is highlighted on the main screen is not the Video icon but rather the Resume icon. This icon is highlighted when the AV 700 TV can resume the last played audio or video file.
25
26
6VIDEO – Playing Video Files from the Internet
When using Windows Media® Player 10, you will have the advantage of being able to download protected video content from the Internet. When you see the PlaysForSure™ symbol on a web site for Windows® Portable Media Center (PMC)*, then these protected downloads will be playable on your AV 700 TV.
6.1 Protected Internet Video content
If you check the PlaysForSure™ website (www.playsforsure.com) you will find web retailers who offer rental, subscription, or purchasable video content. Remember, web sites must carry the PlaysForSure™ symbol in order for their videos to play on the AV 700 TV.
6.2Non Protected Internet Video Content
The AV 700 TV plays .AVI files that are encoded in MPEG-4 format. It can play such video files at a maximum size of 720 x 576 pixels (25 frames/second). It can also play .WMV files (WMV9 SP) up to a maximum size of 352 x 288**. The AV 700 TV will not directly play files of type .mov, .mpg, or .mpeg.
The number of encoding and compression schemes currently used to create video files is very extensive and seems to change on a weekly basis. There are so many standards and formats that it is very possible that the video file you download from the Internet will not play right away on your device. Due to certain “variations”, even when video files are formatted in “MPEG-4” they may not play right away.
If you have some video files that do not play directly on your AV 700 TV, they will have to be converted first. Windows Media® Player 10 (Available only for Windows XP) will convert your video file automatically when you sync the file that is on your PC to the AV 700 TV. It will display a little message ‘converting’.
You can also use the software MPEG-4 Translator included on the AV 700 TV hard drive to re-encode your video files into the proper MPEG-4 SP format that the AV 700 TV can play. See the chapter Video – creating MPEG-4 video files with your computer for more details.
*MPEG-4: ISO standard by Moving Picture Experts Group ; AVI: audio/video file container by Microsoft . MPEG- 4 SP with B-frames AVI up to 704x480@30f/s NTSC or 720x576@25f/s PAL.
**Microsoft WMV9 SP up to 352x288@30f/s and 800 kb/s ; supports WM DRM.
26
27
7VIDEO – Recording Video Files
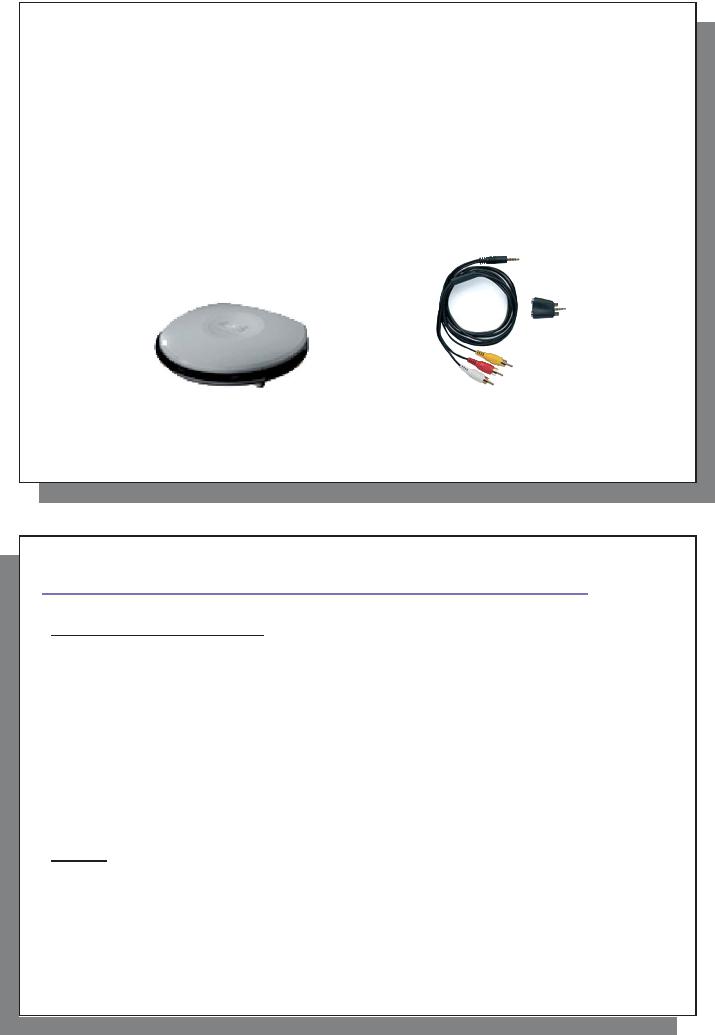
It is possible to record external video with your AV 700 TV. To do so, you will need the optional Docking Pod, which will give you a permanent and instant connection to your home entertainment system and allow you to record from your satellite receiver, cable box, VCR or Camcorder directly onto your AV 700 TV device.
If you want to make recordings from a place other than where your pod is connected, then you can purchase the AV Travel Kit to bring along with your ARCHOS™ device and record from any other audio or video source.
See the chapter Recording External Video with the Optional Docking Pod/Travel Kit for instructions on how to record video.
Docking Pod |
AV Travel Kit |
These optional devices can be purchased from the ARCHOS™ website: www.archos.com.
27
28
8VIDEO – Creating MPEG-4 Video Files with your Computer
How to create an MPEG-4 video file
Video files that come from your digital camcorder, sent to you via e-mail, or which are freely available on the Internet are encoded in many different ways. If not already in the proper MPEG-4 Simple Profile or WMV9 Simple Profile format, a transformation operation must be done in order that these video files can be played by the AV 700 TV. This transformation process is called re-encoding.
There are basically two ways to do this; 1) Use the Synchronize button in Windows Media® Player 10 or 2) Use the PC tools which are available on the AV 700 TV’s hard drive. The first method is very simple and merely requires that you synchronize a video file in your Media Player library to your AV 700 TV. You do not have much control in this converting process though and Windows Media® Player determines which video types it will and will not re-encode. The second method, although it requires some learning, will allow you to have much more control over the final quality of the re-encoded (converted) video file. It is described below. There are other tools available on the Internet, some free and some for sale, that can also convert your video files into the appropriate MPEG-4 video file format for the AV 700 TV. See the web site www.mpegmobile.com for a list of a few of them.
PC Tools
The AV 700 TV is delivered with two Windows® based programs that allow you to create MPEG-4 Simple Profile
.AVI video files. They are the MPEG-4 Translator and Virtual Dub™. The MPEG-4 Translator will call the Virtual Dub program and give it the correct parameters to encode your video from its original format, .avi or .mpg (mpeg 1), and then encode it into an MPEG-4 SP .AVI file. The file will be scaled in order to be played back properly.
28
29
8.1 Installing the PC Software
If your video file is not an MPEG-4 Simple Profile .avi file of the proper size, you will need to re-encode it using the following utilities. For the AV 700 TV, you will need to create an AVI file that is MPEG-4 Simple Profile with a resolution up to 720 x 576 (depending on frame rate) and a sound track that is stereo MP3 or WAV. In actuality, in all cases, a resolution beyond 640x480 does not add any advantage.
MPEG-4 codec (Compression/Decompression)
In order for MPEG-4-Translator to compress the video in a file of the format MPEG-4 SP that the AV 700 TV can read, it requires an MPEG-4 codec to be installed on your computer.If you do not have the approporiate codec installed, MPEG-4 Translator will tell you on start up which codec it requires. You will be able to download it for free from the Internet.
Virtual Dub™
A utility for transcoding one video file into another. This is a general purpose transfer and cleanup utility which has many options allowing for even the most difficult video translations. When you install it with the ARCHOS™ Installation Utility, it will automatically unzip. It will prompt you to save it to C:\Program Files\VirtualDub. You should use this default directory location. Otherwise you will have to instruct the MPEG-4 Translator program where to find it. For more information on Virtual Dub™ see the website - http://www.virtualdub.org.
MPEG-4 Translator
This program, developed by Archos, is a “Front-end” for the Virtual Dub program. It has a simple interface which you use and it then tells Virtual Dub how to process the video file. It sets all the parameters for Virtual Dub specifically to create a video file in the right size and format to be read by the AV 700 TV. When you run it for the first time, the MPEG-4 Translator will need to locate the Virtual Dub program. If you did not install Virtual Dub in the default location, you will have to show the program where Virtual Dub is. If you forget, Windows® will give you an error when you try to launch it.
29
30
MP3 Sound Codec
If MPEG-4 Translator detects a suitable MP3 codec on your PC, it will use it, and your video file sound track will be MP3. Otherwise, it will use the standard IMA ADPCM codec. There are MP3 encoders (usually packaged together as an encoder and decoder) available on the Web for you to download. If you choose to use the LAME codec, make sure that you have a version built with the ACM front-end. You can find other MP3 codecs on the web by using the search terms ACM, MP3 and CODEC in your favorite web search engine. Once this MP3 codec is installed into your system, MPEG-4 Translator will be able to create final video files with MP3 sound, even if the source video file does not have an MP3 sound track.
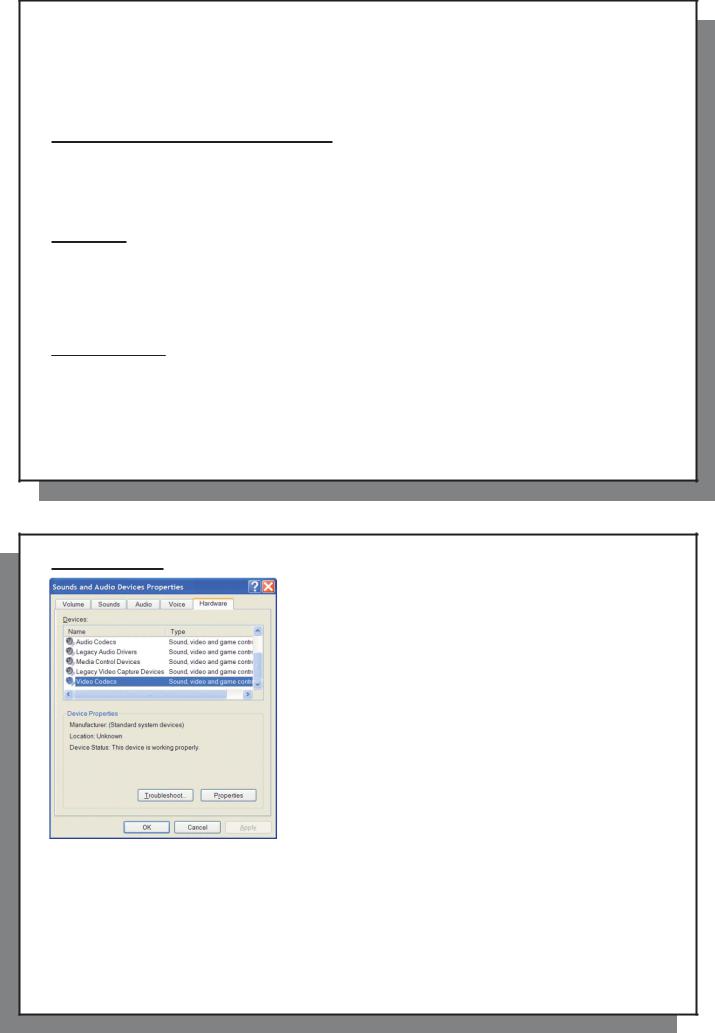
If you are unsure what codecs (audio and/or video) have been installed on your computer, you can see the list by going to the following location.
For Windows XP, click on Start > Settings > Control Panel > Sounds andAudio Devices Properties > Hardware, choose Audio Codecs, then click on Properties. You will find a list here of all the audio codecs that are installed on your computer. Decoding of MPEG 2 video files is currently not supported by MPEG-4 Translator. These are usually .mpg or .mpeg format files, not the required AVI file. There are other tools found on the Internet (FlaskMPEG, Rippack, etc.) that may be downloaded in order to help you with these file types. A good starting place is the website www.digital-digest.com.
30

31
8.2 Using MPEG-4 Translator
Here you see the image of the main MPEG-4 Translator program. When you first run the program, if the required codec has not been installed yet. You should download the codec and install it on your computer. If the Virtual dub program has not been installed, you will also be notified, and you should install it (either with the ARCHOS™ Installation Utility or the Virtual Dub website). If you have placed the Virtual Dub program in a folder other than the installer default folder, it will ask you to locate the file.
Select Source & Destination Files
In this example, a source file 24 hours of Lemans.avi has been selected as the source video. You can see on the bottom of the window its original characteristics (width 720, height 576, frame rate 30). Next, you must then tell the program where to place (Set Destination file) the newly recoded version of the file (don’t worry, it will not erase the original). You should give it a new descriptive name, such as shown above Lemans_AV 700 TV.avi. Make sure you add the .avi extension.
Change Settings
32
Target & Priority
Next, you can change the parameters (Change Settings) of the encoder to adjust the level of quality of the final image. Like MP3 music, the higher the bit rate setting is made, the higher the quality of the music, or video in this case, that you will get. However, this will also take up more space on your hard drive. A setting of 900 kbps will give you a nice looking image for viewing on a television. For near DVD quality, you can set it up to 1200 kbps.
31
If the AV 700 TV device is not listed, select “ARCHOS™ Default”. You will see a Priority box appear. This control is to allow you to select which feature of the video to be guarded. If for example you are reencoding a video file that is 800x600 in resolution and 30 frames per second, this is beyond the maximum resolution that the AV 700 TV can play. Thus, the MPEG-4 Translator program will have to decrease
the resolution. Choosing LCD optimizes the final video format for viewing on the built in LCD screen. Choosing the TV option will optimize the movie to keep the highest possible frame rate. You can see what the size and frame rate will be by looking at the Video Image Size : Destination parameters. When choosing TV, it is understood that the output will be optimized for a television, and not the built-in screen.
Start
Click on Start and the program will call Virtual Dub to start processing the video. Depending on the power and speed of your computer, this could take real time (a 60 minute long video re-encoded in about 60 minutes) or much longer. As shown to the left, you will see the progress as it processes the video file. If the Start button is grayed out, it would be for one of two reasons. 1) The source file is not a true AVI file. Even if the file name ends with .avi, the internal file data determines if it is truly an AVI file. 2) The Virtual Dub program was not located when MPEG-4 Translator was started up. Close the program, restart it, and make sure you locate the Virtual Dub program.
32
33
9MUSIC – Playing Music Files
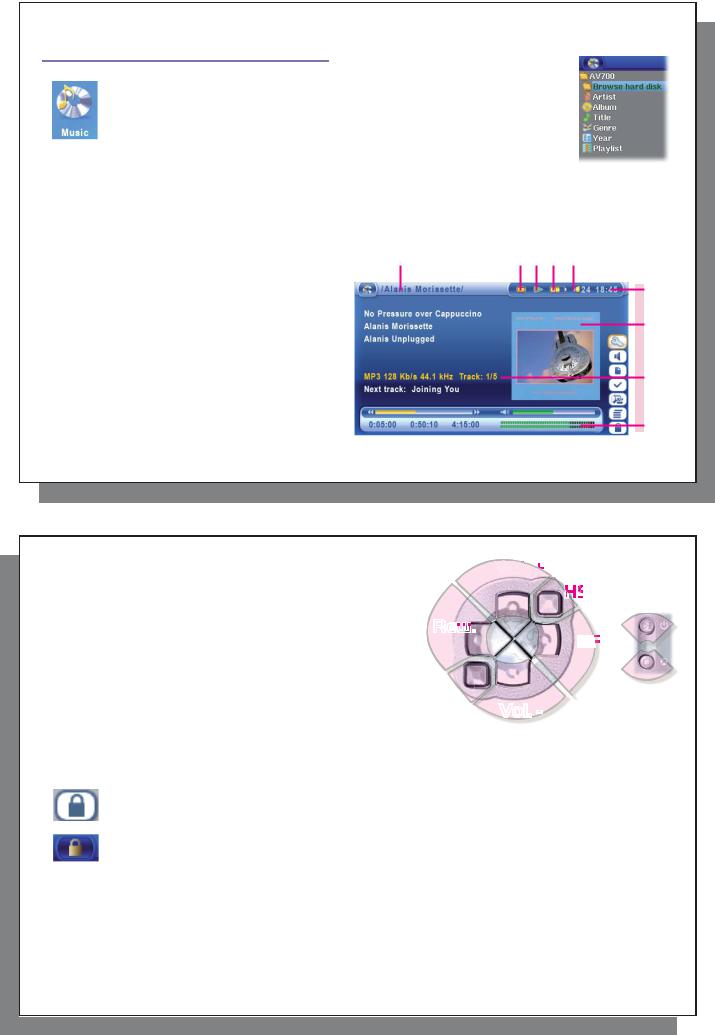
When you click on the music icon in the main screen, you will be sent directly to the ARCLibrary. From here you can choose to either browse your music by the file system (Browse hard drive) or by music characteristics (Album, Artist, title, Genre, Year). Use the LEFT, RIGHT, UP, and DOWN buttons to locate one of the factory installed music samples and then click on PLAY. If you hear nothing at first, make sure you have adjusted the volume control on the headphone cord.
1.Current Directory
2.Play Mode: One Directory
3.Status: Playing
4.Battery level
5.Volume (maximum:99)
6. Artist* or parent folder |
1 |
7.Album* or current folder
8.Song title* or file name
9.Next track to be played
10. |
Relative location in the track |
6 |
|
|
|
|
|||
7 |
|
|
||
11. |
Elapsed, remaining, and total song time |
|
|
|
8 |
|
|
||
12. |
Time of Day |
|
|
|
|
|
|
||
13. |
Album picture* |
|
|
|
14. |
File format and rec info |
9 |
|
|
15. |
Volume level meters |
|
|
|
|
|
|||
|
|
|
||
*If the file contains these tag data |
10 |
|
|
|
|
|
|||
|
|
11 |
|
|
|
|
|
|
|
34
9.1Button Control
Vol + Increase the Volume
HSA High speed advance
FFClick once: Play the next song in the folder or playlist. Hold: Fast forward through the song.
Rew Click once: Play the previous song in the folder or playlist (during first 10 seconds of song) otherwise go to the beginning of the song.
Hold: Fast reverse through the song. HSR High speed reverse
Vol. - Decrease the Volume >| Play/pause/resume X Stop Song
2 3 4 5
12
13
14
15
33
Voll. +
|
|
HSA |
||
|
|
|||
|
|
|||
Rew |
|
|
|
>I |
|
|
|
|
|
HSR |
|
|
F |
X |
|
|
|||
|
|
|
||
|
|
|
|
|
|
Vol. - |
|||
To lock the AV 700 TV buttons, select the lock action icon on the main screen and press the Select button.
The AV 700 TV will display the “locked” icon in the top left corner of the screen. Press the Select button again to unlock the buttons. You can still use the UP and DOWN buttons to change the volume.
34
 Loading...