


ENGLISH
 404
404
ENGLISH USER MANUAL
Version 3
Please visit www.archos.com/manuals
to download the latest version for this manual.
Dear Customer,
thank you for choosing this Archos product. We hope that you will enjoy using it and that it will give you entire satisfaction for many years to come.
Please do register your product on our website (www.archos.com/register) to ensure that you get access to our help line and to be informed of free software updates for your product.
Wishing you the best Multimedia experience,
The Archos Team
All the information contained in this manual was correct at the time of publication. However, as our engineers are always updating and improving our products, your device’s software may have a slightly different appearance or modified functionality than presented in this manual.

Important Safety Instructions
1)Read these instructions.
2)Keep these instructions.
3)Heed all warnings.
4)Follow all instructions.
5)Do not use this apparatus near water.
6)Clean only with dry cloth.
7)Do not block any ventilation openings. Install in accordance with the manufacturer’s instructions.
8)Do not install near any heat sources such as radiators, heat registers, stoves, or other apparatus (including amplifiers) that produce heat.
9)Do not defeat the safety purpose of the polarized or grounding-type plug. A polarized plug has two blades with one wider than the other. A grounding type plug has two blades and a third grounding prong. The wide blade or the third prong are provided for your safety. If the provided plug does not fit into your outlet, consult an electrician for replacement of the obsolete outlet.
10)Protect the power cord from being walked on or pinched particularly at plugs, convenience receptacles, and the point where they exit from the apparatus.
11)Only use attachments/accessories specified by the manufacturer.
12)Use only with the cart, stand, tripod, bracket, or table specified by the manufacturer, or sold with the apparatus.
When a cart is used, use caution when moving the cart/ apparatus combination to avoid injury from tip-over.
13)Unplug this apparatus during lightning storms or when unused for long periods of time.
14)Refer all servicing to qualified service personnel. Servicing is required when the apparatus has been damaged in any way, such as power-supply cord or plug is damaged, liquid has been spilled or objects have fallen into the apparatus, the apparatus has been exposed to rain or moisture, does not operate normally, or has been dropped.
Table Of Contents
Introduction................................................................... |
5 |
ARCHOS device description. . . . . . . . . . 5 INTERFACE LANGUAGE . . . . . . . . . . . . . 9 BATTERY . . . . . . . . . . . . . . . . . . . 9 PRODUCT CARE. . . . . . . . . . . . . . . . 10
1. Playing Video......................................................... |
11 |
1.1BROWSING THROUGH YOUR VIDEOS . . . . . . 11
1.2Video playback . . . . . . . . . . . . . 13
1.3VIDEO SETTINGS. . . . . . . . . . . . . . 15
1.4Putting videos onto your ARCHOS device . . . . . 16
1.5 Recording Video . . . . . . . . . . . . . 17
2. Playing Music....................................................... |
18 |
2.1The arclibrary and the music browser. . . . 18
2.2Playing music . . . . . . . . . . . . . . 20
2.3MUSIC SETTINGS . . . . . . . . . . . . . 22
2.4Sound Settings. . . . . . . . . . . . . 23
2.5Playlists. . . . . . . . . . . . . . . . 25
2.6Putting music onto your ARCHOS device. . . . . .29
2.7 Recording AUDIO. . . . . . . . . . . . . 30
3. Using the AudioCorder.................................... |
31 |
3.1AudioCorder settings screen. . . . . . . 31
3.2BUILT-IN Microphone Recording PROCEDURE 32
3.3Line-Level recordings. . . . . . . . . . 33
4. Viewing Photos................................................. |
34 |
4.1The photo WALL and the photoLIBRARY. . . . 34
4.2VIEWING PHOTOS . . . . . . . . . . . . . 37
CONTINUED ON NEXT PAGE...
4.3PHOTO SETTINGS . . . . . . . . . . . . . 39
4.4Playing a slideshow . . . . . . . . . . . 40
4.5VIEWING PHOTOS WHILE LISTENING TO MUSIC. . 40
4.6Transferring photos to your ARCHOS DEVICE. 41
5. Using the Browser........................................ |
42 |
5.1Navigation . . . . . . . . . . . . . . . 43
5.2Using the Virtual Keyboard. . . . . . . . 45
5.3Using the PDF Reader. . . . . . . . . . . 46
6. Computer Connection................................. |
49 |
6.1‘Windows Media Device’ or ‘PC Hard Drive’. . . .49
6.2Connection Steps. . . . . . . . . . . . 49
6.3Disconnection. . . . . . . . . . . . . . 52
7. setup screen...................................................... |
54 |
7.1Language Settings. . . . . . . . . . . . 54
7.2Display Settings. . . . . . . . . . . . . 55
7.3Appearance settings. . . . . . . . . . . 56
7.4Clock Settings . . . . . . . . . . . . . 57
7.5Power Settings. . . . . . . . . . . . . 58
7.6 TV control. . . . . . . . . . . . . . . 59
7.7System Settings. . . . . . . . . . . . . 60
7.8Updating the Firmware. . . . . . . . . . 62
8. Optional Functionalities......................... |
64 |
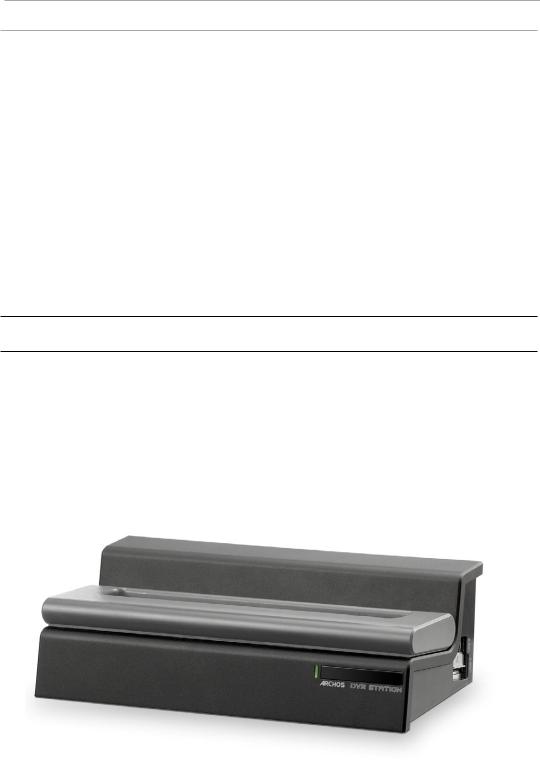
8.1DVR Station & DVR Travel Adapter presentation. 64
8.2Recording Video . . . . . . . . . . . . . 64
8.3Setting the Scheduler . . . . . . . . . . 69
8.4Recording Audio (external source). . . . 76
8.5USB Host Connection. . . . . . . . . . . 77
Technical Specifications................................... |
79 |
Technical Support information................. |
82 |

Introduction
ARCHOS device description
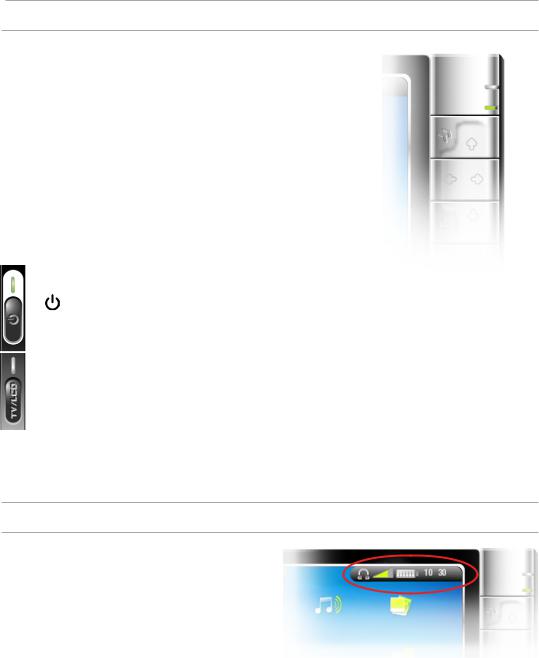
Buttons
On the Left Side of the Device:
TV
LCD
Press and hold to switch on/off.
Press once to switch the display of the image between TV and built-in LCD screen.
Press and hold to lock the buttons of your ARCHOS device.
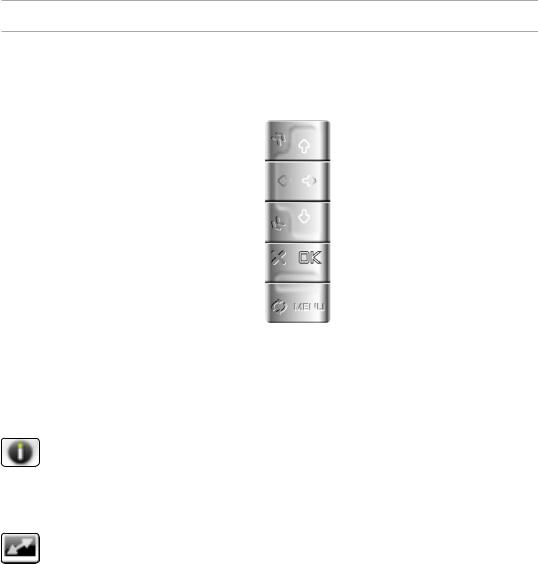
Main Navigation Buttons:
Navigation pad
up/down accelerator buttons
Escape / Back / Stop
OK Enter / Go / Play/Pause
 Tab between available screens MENU Display the available menu items
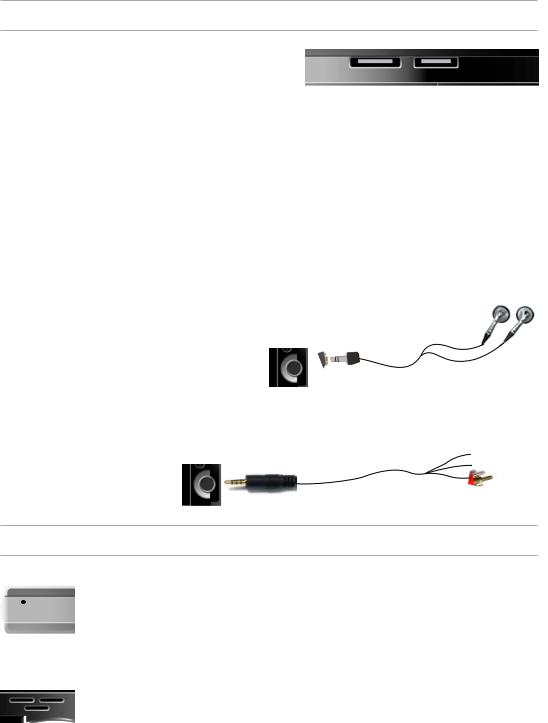
Connectors
Underneath the Device: the Docking Connectors
•Connect your ARCHOS device to your computer.
•Charge the battery of your ARCHOS via USB.
•Connect a compatible external device to your ARCHOS with the optional Docking Adapter.
•Record external video via the optional DVR Station.
On the Left Side: AV Out Jack
Audio: plug in the supplied headphones.
Video: plug in an Archos AV cable to connect to your TV, hi-fi, etc.
Built-in Microphone and Loudspeaker
The built-in microphone is situated underneath the device.
See: Using the AudioCorder.
The built-in loudspeaker is on the top, above the buttons.
LED Indicators
HDD Hard Disk Drive activity indicator
HDD the light flickers when the hard drive is active (playing/transferring files).
CHG Battery charge indicator
-light on: the battery is charging.
-flashing: the battery is fully charged.
|
ON/OFF indicator |
TV |
Video display indicator |
LCD |
the light is on when the image is displayed on |
|
an external display. |
HDD CHG
Interface Description
Status Bar
•In the top right corner of the screen, the status bar indicates the volume, the battery level, the current time, the playback status of your device, etc.
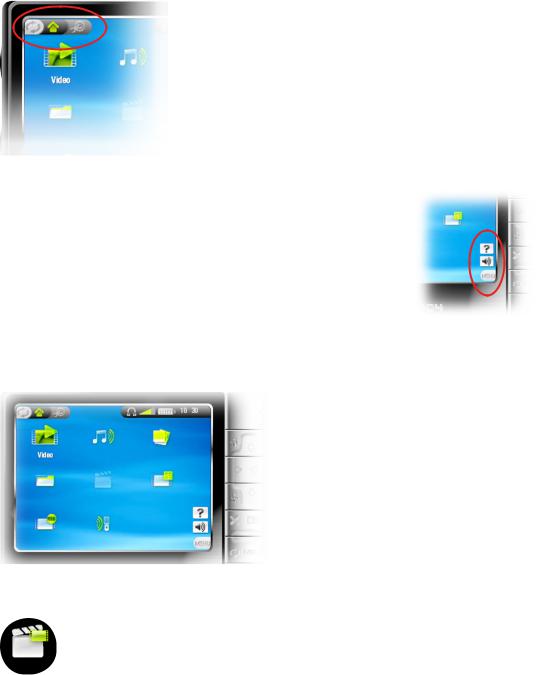
Tabs
•In the top left corner of the screen, the tabs area shows other available
applications and screens (settings, home screen, etc.). They vary, depending on where you are in the interface.
•Press  to switch between these different screens.
Menu
•In the lower right corner of the screen, the menu area shows the menu icons.
•Press MENU to display the available menu items.
•This is a contextual menu: the available options will vary, depending on where you are in the interface.
Home Screen
• This is the main screen of your ARCHOS device,
showing its main functions.
• Select an icon with the navigation pad and press OK to use the particular function.
The Resume Icon
•Sometimes the Resume icon is highlighted in the Home Screen when you turn on the ARCHOS. This means that you can resume the last-played music or video file, if it was interrupted before the end.
•If the Resume icon is grayed out, it means that no music or video file playback can be resumed.

INTERFACE LANGUAGE
Changing the Language
•The interface of your ARCHOS device is available in English, French and German.
•More languages are available from www.archos.com. See Updating the Firmware for instructions on installing these language packs.
To change the system’s language:
1.From the Home Screen, press  to access the Setup screen.
. Highlight the language icon and press OK.
3.Select a different language using the  /
/ buttons (your settings are saved instantly).
4.Press  to exit.
Other Character Sets
•File names, folder names and music tags can be displayed in various character sets, such as Japanese, Korean,
Simplified Chinese, etc.
•You can enable these character sets in the Language settings screen (see Language Settings for further instructions).
BATTERY
Battery Charge
Before using your ARCHOS device for the first time, charge the battery for two hours.

The battery of your ARCHOS device charges via your computer’s USB port:
1.plug the Archos USB Cable into your ARCHOS device (which is off),
. plug the Archos USB Cable into your computer (which is turned on),
3.the ARCHOS device will turn on and start charging.
•A lightning bolt symbol will flash over the battery icon in the task bar while the battery is charging:  .
.
•The CHG indicator LED is on while the battery is charging; it will blink when the battery is fully charged.
PRODUCT CARE
Caring for your Archos Device
Your ARCHOS device is an electronic product that needs to be treated with care:
•Do not subject it to unnecessary shock or vibration.
•Do not subject it to heat, keep it ventilated (especially when connected to a computer).
•Keep it away from water and excessively humid areas.
•Keep it away from high electromagnetic fields.
•Keep any connected wires neatly arranged: the device could fall if a cable is accidentally pulled by a child.
•Do not open it up. There are no user-serviceable parts inside. Opening will void your warranty.
hardware reset
In the event that your ARCHOS device freezes operation
(due to electrostatic phenomena, for example), you can reset it
by pressing the button for 15 seconds.
10
1. Playing Video
In the Home Screen, highlight the Video icon and press OK to enter the video mode.
1.1BROWSING THROUGH YOUR VIDEOS
•There are two types of views for you to browse through your videos:
-the Video List
-the Video Browser
•You can switch between the two views by pressing  at any time while browsing in video mode.
•When browsing in video mode, only video files are shown.
The Video List
•the Video List (default view) only shows the video files in the Video folder of the ARCHOS’s hard drive (it does not show videos located in subfolders).
•To view videos from a different folder, press  to switch to the Video Browser view, navigate to another folder, and press
  again to go back to the Video List.
11

The Video Browser
•the Video Browser allows you to navigate to other folders within the Video folder. It is based on the Archos File Browser.
See: Using the Browser.
•Both views display a motion thumbnail of the highlighted video as well as various information about the video file.
•If you have saved a video frame as a thumbnail (see: Video Playback Menu Items), the thumbnail will no longer play the highlighted video file, but show that image instead.
Video List & Browser Menu Items
Info
-displays a message box with all the available information about the highlighted video file.
-Press  to close the info screen.
Delete
-allows you to delete the highlighted video file. A confirmation screen will pop up.
Rename
-allows you to change the name of the highlighted video file using the virtual keyboard.
-see: Using the Virtual Keyboard.
12

Resume video
-will resume playing the highlighted video from the bookmark.
Clear bookmark
 - will remove the bookmark from the highlighted video file.
Resume video and Clear bookmark only appear in the menu when a bookmarked video file is highlighted (icon:  ).
).
Reset thumbnails
-will delete all user-defined thumbnails and restore motion thumbnails.
Sound
-will display the sound settings screen (see: Sound Settings). Press  to return to the video mode.
1.2Video playback
Highlight a video file, press OK to play it.
Video Playback Screen
current play mode 
current display format volume level
video progression bar
the menu overlay disappears after a few seconds
13
Video Playback Button Controls
During video playback, the buttons of your ARCHOS device will act as follows:
accelerated fast forward |
|
|
|
increase volume |
|
|
|||
fast rewind |
|
|
|
fast forward |
|
|
|||
accelerated fast rewind |
|
|
|
decrease volume |
|
|
|||
stop |
|
|
|
pause/play |
|
|
|||
|
|
|
|
display the menu |
|
|
|
|
|
|
|
|
|
|
Video Playback Menu Items |
|
|
||
|
|
|
|
|
Info |
|
|
||
-displays a message box with all the available information about the current video file.
-Press  to close the info screen.
Format
-allows to change the way the image is displayed.
-Auto: adjusts the video size to best adapt to the built-in screen or TV.
-Full Screen: displays the entire picture on the screen.
-Maximized: enlarges the picture to fill the screen.
-Original: displays the picture in its original format.
Speed
 - will play the current video in slow motion or high speed
14
Set bookmark
-sets a bookmark at the current spot in the video.
-Only one bookmark per file is allowed.
-You can bookmark up to 16 files.
-Video files with a bookmark appear with the  icon.
icon.
Save frame as...
-Thumbnail: saves the current image as a new thumbnail for this file (overwrites the previously set thumbnail,if any).
-Wallpaper: the current image will be defined as your device’s background image.
Sound
-will display the sound settings screen (see: Sound Settings). Press  to exit this screen.
Settings
 - will display the video settings screen (see next chapter).
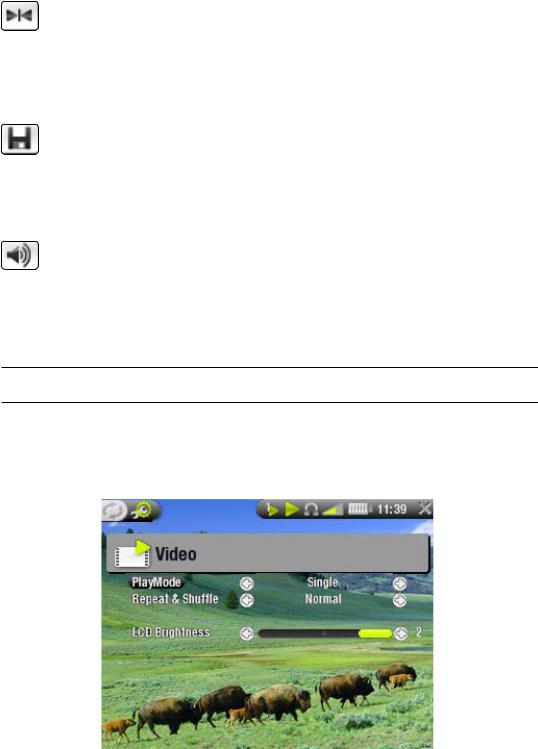
1.3 VIDEO SETTINGS
You can access the Video Settings screen via the Settings menu item while playing a video file. Use  /
/ to highlight a different parameter, then use
  /
/ to select a different setting.
15
• PlayMode (a status bar icon shows the current mode)
- Single  plays only one video file and stops
- Folder  plays all video files in the current folder
•Repeat & Shuffle (a status bar icon shows the current mode)
-Normal (no icon) plays the video selection once and stops
- Repeat |
plays the video selection repeatedly |
- Shuffle |
plays videos in a random order |
•LCD Brightness
-adjusts the level of brightness of the built-in screen
1.4 Putting videos onto your ARCHOS device
There are two main methods to transfer your own videos onto the ARCHOS:
•Synchronize your videos with Windows Media® Player 10 (or higher)
®This method requires your ARCHOS’s USB connection to operate in ‘Windows Media Device’ mode (see: System Settings). Windows Media® Player 10 (or higher) will copy the videos you have selected directly in the Video folder of the ARCHOS.
•Copy and Paste your video files from your computer into the Video folder of your ARCHOS (see: Computer Connection for details on how to connect your ARCHOS device to your computer).
16
Creating Compatible Video Files with Your Computer
If some of your videos don’t play on your ARCHOS device, you may need to transcode them to a compatible format.
•The easiest way to do this is by using Windows Media® Player 10 (or higher) to transfer videos to your ARCHOS in ‘Windows Media Device’ mode. Windows Media® Player 10 (or higher) will automatically convert most formats to the WMV format that your device can play.
•If you don’t want to use Windows Media® Player 10 (or higher), a search on the Internet should allow you to find suitable utility programs to do this job.
1.5Recording Video
•Your ARCHOS device can record video, via its VideoCorder function.
•You will need the optional DVR Station or DVR Travel Adapter to record video.
•See: Optional Functionalities to learn more about this feature.
17
2. Playing Music
In the Home Screen, highlight the Music icon and press OK to enter the music mode.
2.1The arclibrary and the music browser
•There are two types of views for you to browse through your songs:
-the ARCLibrary
-the Music Browser
•When browsing through your music, only music files are shown.
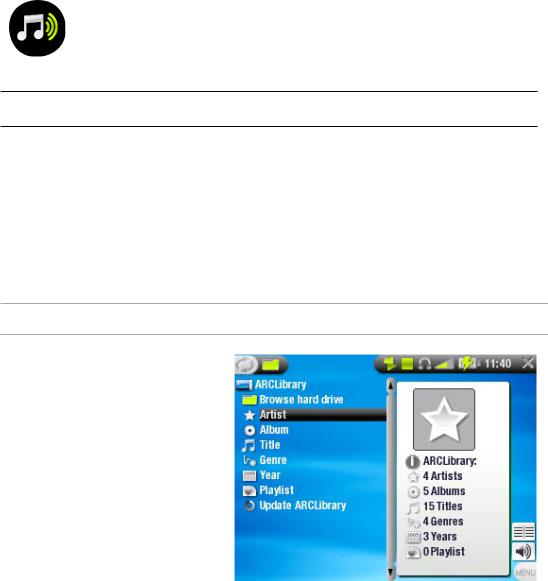
The ArcLibrary
•the ArcLibrary (default view) shows your music sorted in categories (Artist, Album, Title, Genre, etc.) if your music files contain these tags.
•When new music is added to the Music folder of the ARCHOS, the ARCLibrary will
need to be updated. By default, this is done automatically, but you can choose to do it manually via the ‘Update ARCLibrary’ option in the ARCLibrary (also see: System Settings).
18
•If some of your music files do not contain tags, they will be classified as ‘(Unknown)’ in the ARCLibrary.
The Music Browser
•the music browser allows you to navigate the Music folder of your device’s hard drive. It is based on the Archos File Browser.
•To use it, highlight ‘Browse Hard Drive’ in the initial ArcLibrary view and press OK. See: Using the Browser.
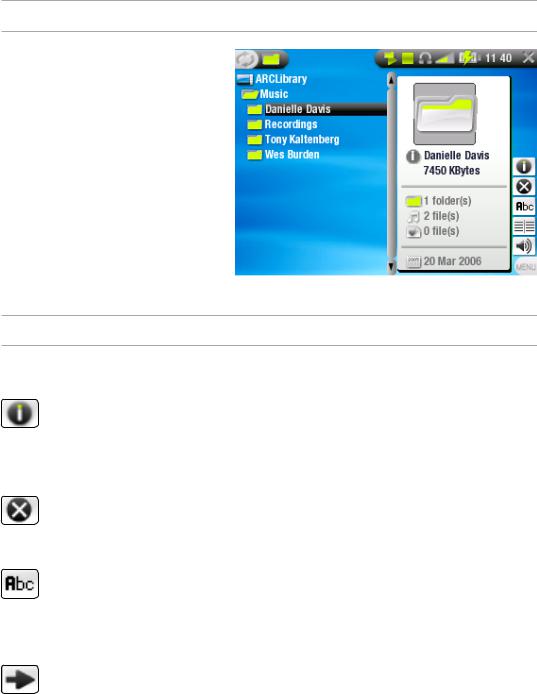
ARCLibrary* and Music Browser Menu Items
Info
-displays a message box with all the available information about the highlighted music file.
-Press  to close the info screen.
Delete
-allows you to delete the highlighted music file. A confirmation screen will pop up.
Rename
-allows you to change the name of the highlighted music file using the virtual keyboard.
-see: Using the Virtual Keyboard.
Resume song
-will resume playing the highlighted music file from the bookmark.
19

Clear bookmark
 - will remove the bookmark from the highlighted music file.
Resume song and Clear bookmark only appear in the menu when a track with a bookmark is highlighted (icon:  ).
).
Show playlist
-opens a playlist edition window on the right (see: Playlists).
Sound
-will display the sound settings screen (see: Sound Settings). Press  to return to the music mode.
*in the ArcLibrary, only the Show playlist and Sound menu items are available.
2.2Playing music
Highlight an audio file, press OK to play it.
Music Playback Screen
current play mode  previous track
song title  artist name
  album title
track number next track volume level
remaining time  elapsed time
progression bar
20
Music Playback Button Controls
During music playback, the buttons of your ARCHOS device will act as follows:
accelerated fast forward
press once: back to the beginning of the song, or previous song (in the first
10 seconds of a track) hold: fast rewind
accelerated fast rewind stop
tabs back to the browser or ARCLibrary window that you launched the song from
increase volume
press once: next song hold: fast forward
decrease volume pause/play
display the menu
Music Status Icons
Status bar icons tell you if your ARCHOS is:
playing |
paused |
stopped |
Music Playback Menu Items
Info
-displays a message box with all the available information about the current music file.
-Press  to close the info screen.
Home
-allows you to go back to the Home Screen while playing music, in order to browse your hard drive, play a photo slideshow, etc.
21
Set bookmark
-sets a bookmark at the current spot in the audio file.
-Only one bookmark per file is allowed.
-You can bookmark up to 16 files.
-Music files with a bookmark appear with the  icon.
icon.
Sound
-will display the sound settings screen (see: Sound Settings). Press  to exit this screen.
Settings
 - will display the music settings screen (see next chapter).
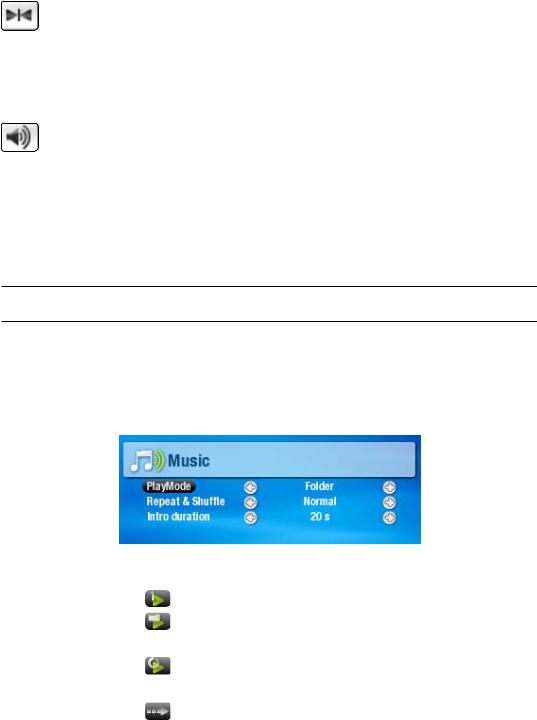
2.3 MUSIC SETTINGS
You can access the Music Settings screen via the Settings menu item while playing a song. Use  /
/ to highlight a different parameter, then use
  /
/ to select a different setting.
• PlayMode |
(a status bar icon shows the current mode) |
- Single |
plays only one music file and stops. |
- Folder |
plays all music files in the current folder |
|
or album. |
- All |
plays all music files in the ARCHOS |
|
device. |
- Queue |
allows you to select a track to be played |
|
after the current one is over. |
22
- while a track is playing, press  to switch to the browser window, select a track and
|
press OK: this is your queued track, and the |
|
status bar icon becomes . |
|
- you can only queue one track at a time. |
|
- if you do not select a song to queue before |
|
the end of the current track, the ARCHOS will |
- Scan |
play the next track in the folder or album. |
plays the first few seconds of each track. |
|
|
- you can define the length to play in Intro |
|
duration. |
-if you want to play the whole song, press OK while its intro is playing; the music player will then revert to the Folder play mode.
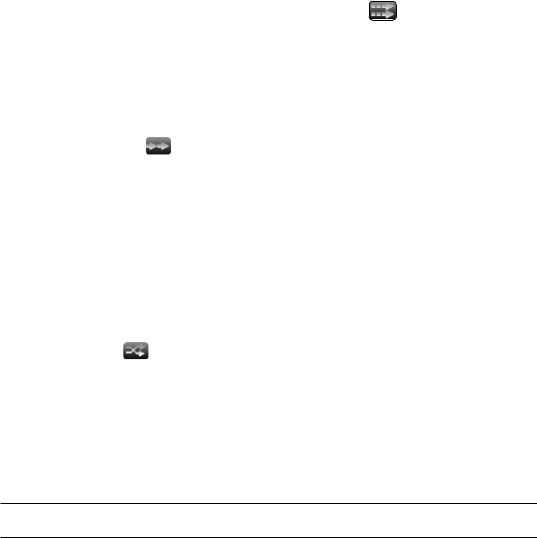
•Repeat & Shuffle (a status bar icon shows the current mode)
-Normal plays the track selection once and stops.
- Repeat (no icon) plays the track selection repeatedly.
- Shuffle  plays random tracks from the selection.
-shuffle is not available when PlayMode is set to All.
• Intro duration
-defines for how long each track will be played in the Scan play mode.
2.4Sound Settings
This screen allows you to adjust the sound settings of your ARCHOS device to your personal taste. Use  /
/ to highlight a different parameter, then use
  /
/ to select a different setting.
23
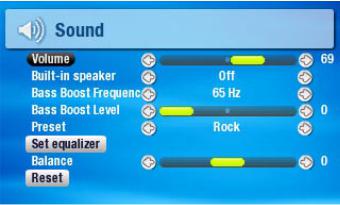
•Volume
-adjusts the output volume.
•Built-in loudspeaker
- ON |
the loudspeaker is always on. |
- OFF |
the loudspeaker is always off. |
- Automatic |
the built-in loudspeaker automatically turns |
|
off when you plug in headphones or an AV |
|
Cable. |
•Bass Boost Frequency
-adjusts the lower frequency that will be boosted.
•Bass Boost Level
-adjusts the bass boosting level.
•Preset
-allows you to quickly select a sound profile.
•Set equalizer
-allows you to use a custom sound profile. Highlight and press OK to enter the equalizer screen.
•Balance
-allows you to balance the sound between the left and right speakers.
•Reset
-highlight and press OK to reset sound parameters to the default values.
24
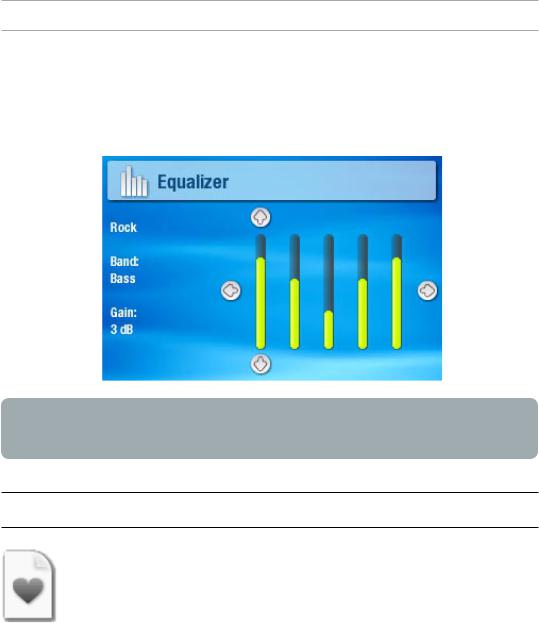
Equalizer Screen
Your ARCHOS device features a 5-band equalizer.
•Use  /
/ to highlight a different frequency range (Bass, Mid. bass, Mid. range, Mid. treble or Treble).
•Use  /
/ to change the gain level for these frequencies.
It is advised that you change these settings while listening to music, in order to be able to appreciate the sound changes.
2.5Playlists
•A playlist is a list of audio tracks that the music player will automatically play one after the other.
•On your ARCHOS device, you can play, create and edit as many playlists as you want.
•In the Archos Browser, playlists are the files with the
 icon.
icon.
•When playing a playlist, the  icon will appear in the status bar.
25
 Loading...