


www REGISTER YOUR PRODUCT!
ÄÄOn the web at http://arnovatech.com/register
Thank you for choosing this ARNOVA product. We hope that you will enjoy using it and that it will give you satisfaction for many years to come. Once you unpack your ARNOVA product, we recommend that you take a few minutes to register it (http://arnovatech.com/register). This will allow you to get access to ARNOVA technical support (http://arnovatech.com/support).
English
?NEED HELP?
On our Website: See the Frequently Asked Questions section on http://arnovatech.com/faq
Contact our Technical Support Team: Visit http://arnovatech.com/support for e-mail support.
Please register your product before contacting Technical Support (see Register your Product).
As we are often updating and improving our products, your device’s software may have
a slightly different appearance or modified functionality than presented in this Quick Start Guide.
UserGuide_Arnova_10G2_PN110212_book.indd 1
P/N: 110212
1
31/10/2011 11:02:45
English
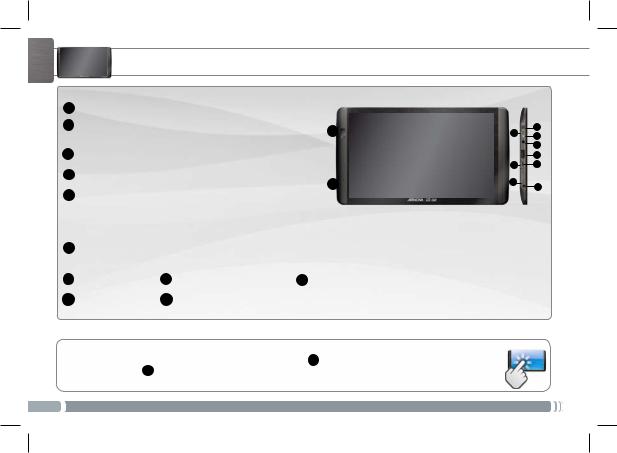
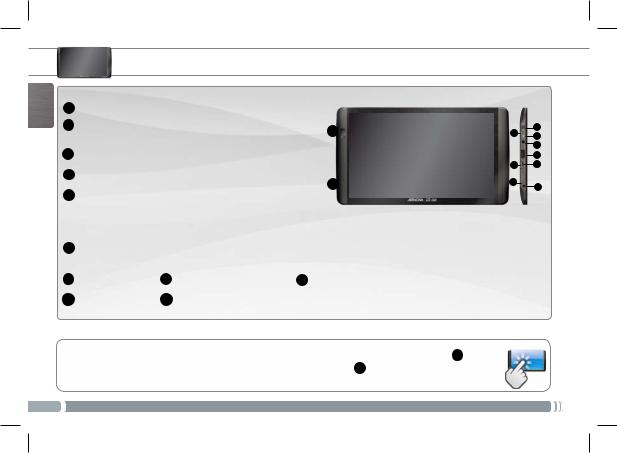
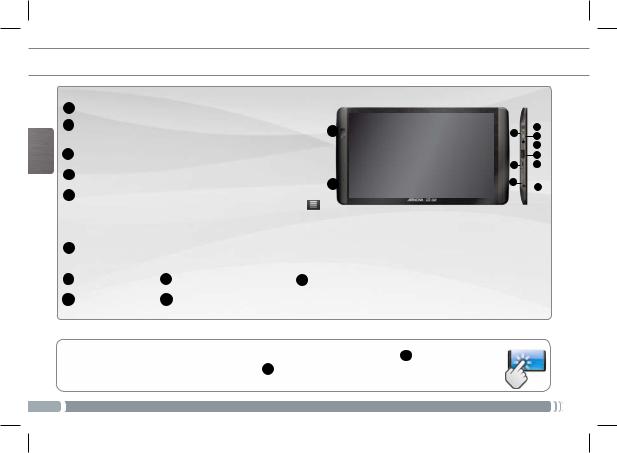
DESCRIPTION OF THE DEVICE
1 |
Volume + / Volume - |
|
2 |
Charging indicator: Red light: battery charging / |
11 |
|
Green: battery charged. |
|
|
|
3 On/Off button: enables to turn on or turn off the device.
4 Headphone jack
10
5USB Host port: to connect a keyboard, a mouse or a mass storage USB device.
Go on the Home screen, tap on the Menu icon , then select Settings/USB Mode select. If the Host Mode is off, tap on the Host Mode line to turn it on. Important: turn off the Host Mode after use.
6Micro-USB port: to connect your ARNOVA to your computer, using the included USB cable (to transfer files)
7 |
Micro-SD card |
8 Power connector |
9 Hardware Reset |
10 |
Microphone |
11 Camera |
|
Important:
Your device is frozen.You can turn it off. Press the ON/OFF button 3 for 10 seconds or press the reset button. See Hardware Reset 9 .
2
1
2 3
4
5
7 6
9
8
???
UserGuide_Arnova_10G2_PN110212_book.indd 2 |
31/10/2011 11:03:05 |
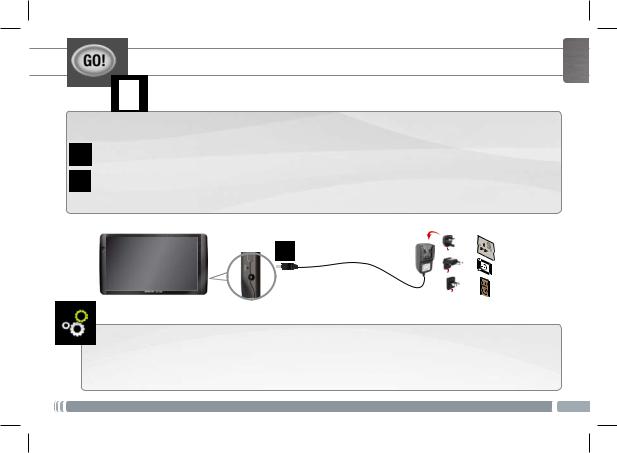
STARTING UP
▲! Before using your ARNOVA for the first time, completely charge the battery!
 Charging the Battery
1Connect the supplied power cable to the ARNOVA Power connector and to a wall outlet.
2The ARNOVA device will turn on and start charging. The Power indicator light is red while the battery is charging. It will turn green when the battery is fully charged.
English
UK
1
EUR 
US
Installation Wizard
The first time you start up your ARNOVA, the installation wizard will bring you through a few screens to help you set up the principal settings: Language, country, time, etc.
3
UserGuide_Arnova_10G2_PN110212_book.indd 3 |
31/10/2011 11:03:24 |
English
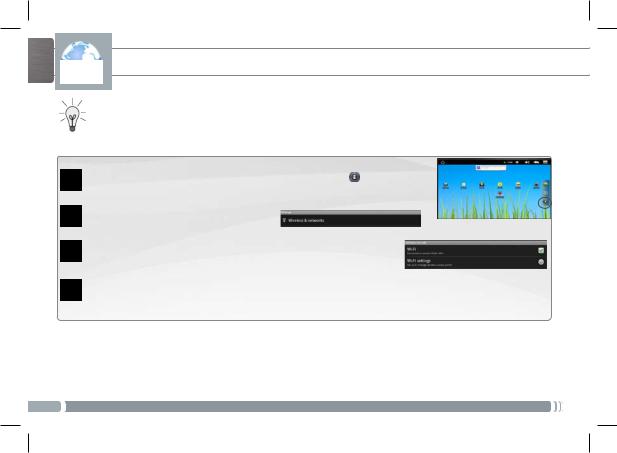
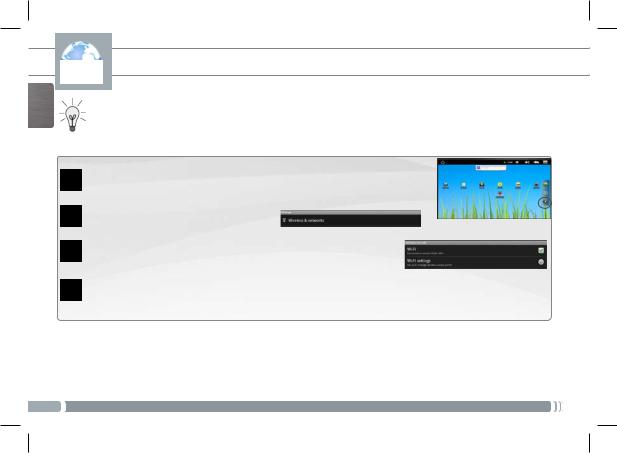
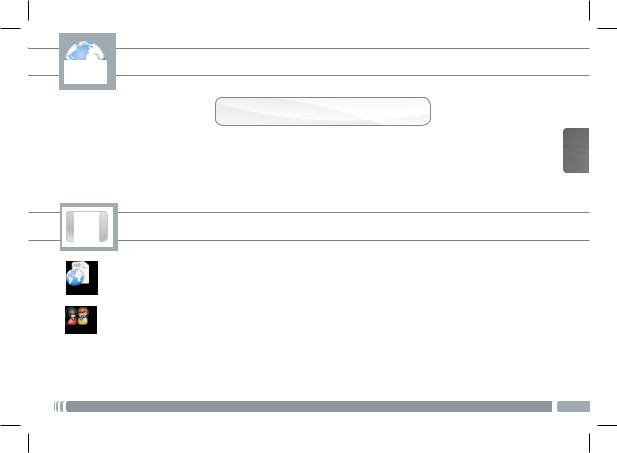
www CONNECTING TO THE WIFI NETWORK
For this procedure to work, you need to be in a WiFi zone that will allow you to connect to it. Every time the ARNOVA is in range of a network that you have already configured once, it will attempt to make a connection.
1 |
To configure a new WiFi network, go on the Home screen, tap Settings . |
|
2 In the Settings screen, select Wireless & networks.
If the WiFi is off, tap on the Wi-Fi line to turn it on. Then select Wi-Fi settings. The ARNOVA
3will scan for available WiFi networks and display them at the bottom of the screen.
4Tap on the network you want to connect to, enter the required network information* and then tap on Connect. Your ARNOVA will establish a connection to that WiFi hot spot.
*For free access WiFi points, there is no need to enter any special information. For secured networks, you will need either a key (a series of numbers and/or letters) of the type WEP, WPA, or WPA2. To obtain the exact connection parameters required, contact the Internet service provider.
4
UserGuide_Arnova_10G2_PN110212_book.indd 4 |
31/10/2011 11:03:26 |

THE ARNOVA INTERFACE
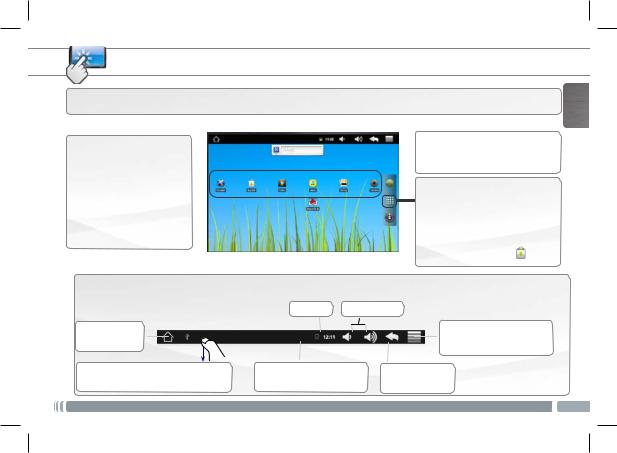
Your ARNOVA device is equipped with a capacitive touchscreen. Use your finger pulp to navigate.
These are the default Android™ shortcuts (Web Browser, EMail, etc.). Tap on an icon to open the corresponding application.You can customize the Home screen by adding/removing shortcuts and widgets, etc. See next page.
Home Screen
 Settings shortcut
 Web browser shortcut Application button
Tap on this icon to reveal all the Android™ applications installed on your ARNOVA (games, various tools, etc.). You can copy them onto the Home screen.You can get more Android™ applications from AppsLib .
English
Top bar of the Interface (varies according to the screen you are in)
|
|
Time |
Volume -/+ |
|
|
|
▼ |
▼ |
|
Return to the |
▼ |
|
|
▼ |
Home screen |
|
|
||
|
|
|
|
|
|
|
▼ |
|
▼ |
Notification icons: drag the top bar downwards |
Status icons: (WiFi connection |
Return to the |
||
to reveal the notification messages (if any). |
status, battery level, etc.) |
|
previous screen |
|
Menu: gives menu options according to the current screen.
5
UserGuide_Arnova_10G2_PN110212_book.indd 5 |
31/10/2011 11:03:37 |
English
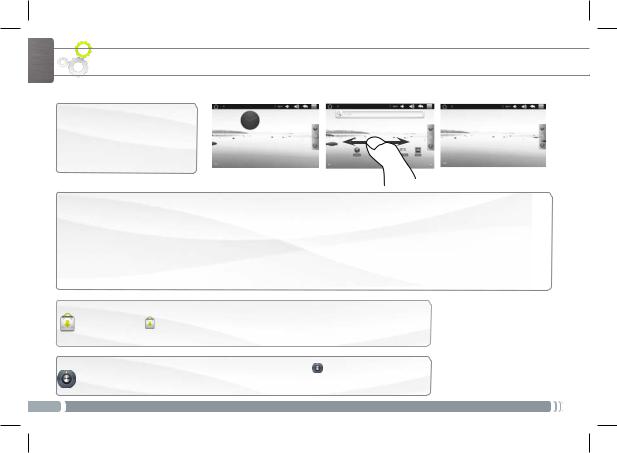
 CUSTOMIZING YOUR PRODUCT
The extended Home screen
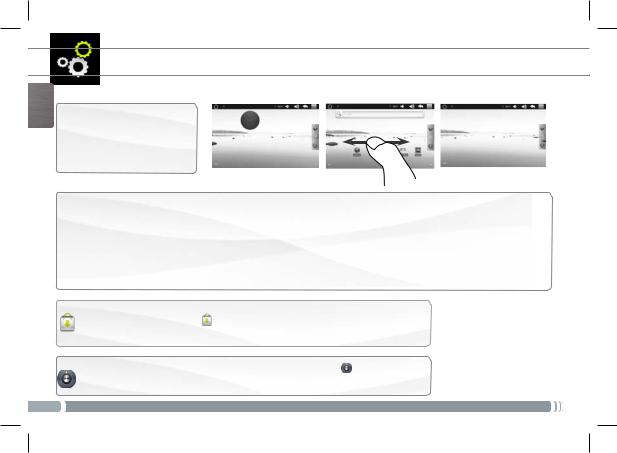
Slide your finger horizontally on the screen to go to the left or right side of the extended Home screen.
Customizing the Home screen items
-- To add a Home screen item (shortcuts, widgets, etc.), hold your finger on the screen at an empty location, then choose from the list.You can also tap on the Menu icon and select Add
  , at the bottom of the screen.
-- To move a Home screen item, hold your finger onto it until it gets larger, then drag it to the desired location, and release your finger.
-- To remove a Home screen item, hold your finger onto it, drag it onto the recycle bin (while you’re holding an item, the Applications tab, on the right side of the screen, turns into a recycle bin) and release your finger.
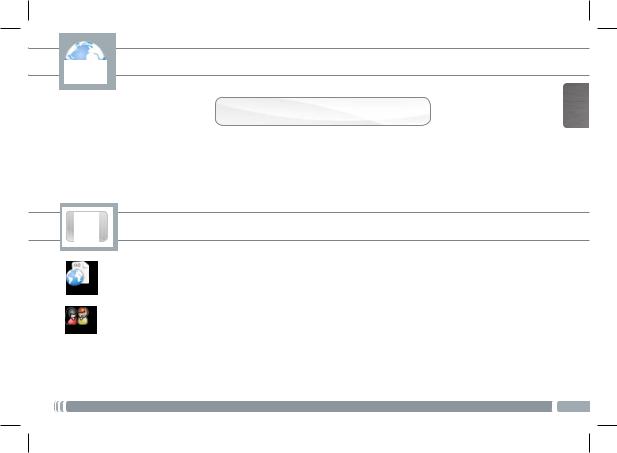
Adding more applications with APPSLIB : With the ARNOVA connected to the Internet, tap on the AppsLib icon . This online library of free and purchasable applications has thousands of fun games and useful applications to download and use.
Changing the Settings: From the Home screen, tap on Settings |
and choose a category: |
Wireless controls, Sound & display, Date & time, etc. |
|
6
UserGuide_Arnova_10G2_PN110212_book.indd 6 |
31/10/2011 11:03:39 |
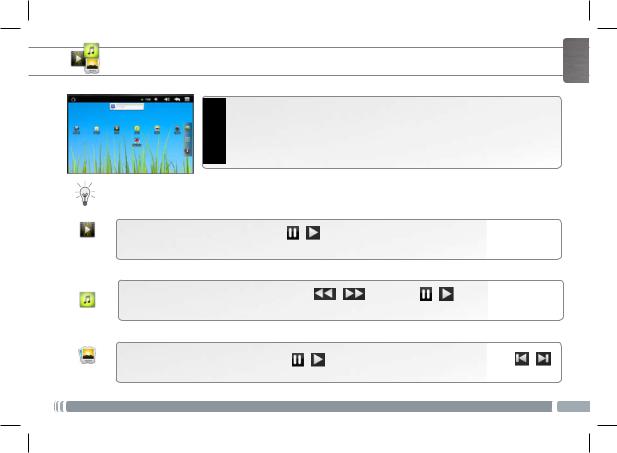
PLAYING MULTIMEDIA FILES
1From the Home screen, tap on the video, audio or photo icon.
2The ARNOVA will display a list of files or folders corresponding to the selected category.
3Tap on an item to start playing it.
Only in Video and Photo modes: to display/hide the on-screen controls, tap anywhere on the screen.
English
To pause or resume a video, tap on the icon |
/ |
(bottom of screen). To go to any particular point in the video, |
|
||||
slide the progression bar to the desired point. |
|
|
|
|
|
|
|
Video |
|
|
|
|
|
|
|
To play the next or previous song, tap on the icons |
/ |
. Use the icons |
/ |
and the progression bar as |
|||
in the video player screen (see above). |
|
|
|
|
|
|
|
Music |
|
|
|
|
|
|
|
To start or pause a slide show, tap on the icon |
/ |
. To view the next or previous photo, tap on the icons |
/ |
. |
|||
Photo |
|
|
|
|
|
|
|
7
UserGuide_Arnova_10G2_PN110212_book.indd 7 |
31/10/2011 11:03:41 |
English
8
 TRANSFERRING MEDIA TO YOUR ARNOVA
1Connect the supplied USB cable to the ARNOVA and to a running computer.
2The ARNOVA will turn on. Within a few seconds the ARNOVA will appear as an icon on your computer.
3You can transfer your media files to the ARNOVA either by copy/pasting them into the respective folders using Windows® Explorer (or the Finder on a Mac®), or by using Windows Media® Player. Open Windows Media Player® and then use the Sync tab to synchronize your music, videos, and photos onto your ARNOVA. See Windows Media Player®’s Help to learn more about this.
4Once all your file transfers are finished, close Windows® Explorer and any other program that may have read or written to the ARNOVA. Click on the ‘safely remove’ icon in the system tray, next to the clock.You can now unplug the USB cable.
UserGuide_Arnova_10G2_PN110212_book.indd 8 |
31/10/2011 11:03:42 |
www ENREGISTREZ VOTRE PRODUIT !
ÄÄSur Internet : http://arnovatech.com/register
Merci d’avoir choisi ce produit ARNOVA. Nous espérons que vous aurez plaisir à l’utiliser et qu’il vous donnera satisfaction pendant de nombreuses années. Après avoir déballé votre produit ARNOVA, nous vous conseillons de prendre quelques minutes pour l’enregistrer (http://arnovatech.com/register). Cela vous permettra d’avoir accès au support technique ARNOVA (http://arnovatech.com/support).
?BESOIN D’AIDE ?
Sur notre site Web: Consultez la Foire Aux Questions (FAQ) sur http://arnovatech.com/faq
Français
Contactez notre équipe d’assistance technique: Allez sur http://arnovatech.com/support pour une assistance par e-mail.
Veuillez enregistrer votre produit avant de contacter notre équipe d’assistance technique (voir enregistrez votre Produit).
Comme nous mettons à jour et améliorons régulièrement nos produits, le logiciel de votre appareil peut présenter une interface ou des fonctionnalités légèrement différentes de celles décrites dans ce guide.
9
UserGuide_Arnova_10G2_PN110212_book.indd 9 |
31/10/2011 11:03:43 |
DESCRIPTION DE L’APPAREIL
Français |
1 |
Volume + / Volume - |
|
|
|
||
|
2 |
Témoin de charge : rouge : batterie en charge / |
11 |
|
|
vert : batterie chargée. |
|
|
|
|
3 Bouton On/Off : permet d’allumer ou d’éteindre l’appareil.
4 Prise casque
10
5Port USB hôte : permet de connecter un clavier, une souris ou une clé USB. Allez sur l’écran d’accueil, appuyez sur
l’icône de Menu , puis sélectionnez Paramètres/USB Mode de sélection. Si le Host Mode est désactivé, appuyez sur la ligne Host Mode pour l’activer. Important: désactiver le Host Mode après utilisation.
6Port micro-USB : permet de connecter votre ARNOVA à un ordinateur, à l’aide du câble USB fourni (pour transférer des fichiers).
7 Lecteur de cartes |
8 Connecteur d’alimentation |
9 Réinitialisation de l’appareil |
Micro-SD |
|
|
10 Microphone intégré |
11 Caméra |
|
Important:
Votre produit ne réagit plus. Vous pouvez l’arrêter en actionnant pendant 10 secondes le bouton ON/OFF 3 ou en utilisant le bouton de réinitialisation (reset). Voir Réinitialisation de l’appareil 9 .
10
UserGuide_Arnova_10G2_PN110212_book.indd 10
1
2 3
4
5
7 6
9
8
???
31/10/2011 11:03:52
PREMIÈRE UTILISATION
▲! Avant d’utiliser votre ARNOVA pour la première fois, chargez complètement sa batterie !
 Charger la batterie
1Branchez le câble d’alimentation fourni sur le connecteur d’alimentation de l’ARNOVA et sur une prise secteur.
2Votre ARNOVA s’allume et commence à se charger. Le témoin de charge est rouge lorsque la batterie est en charge. Il est vert lorsque la batterie est complètement chargée.
Français
UK
1
EUR 
US
Assistant d’installation
La première fois que vous allumez l’ARNOVA, l’assistant d’installation vous aide à configurer les principaux réglages de l’appareil : la langue, le pays, l’heure, etc.
11
UserGuide_Arnova_10G2_PN110212_book.indd 11 |
31/10/2011 11:04:01 |
Français
www SE CONNECTER À UN RÉSEAU WIFI
Pour suivre cette procédure, vous devez vous situer dans une zone WiFi vous permettant de vous connecter. Chaque fois que l’ARNOVA détectera un réseau que vous avez déjà configuré, il tentera de s’y connecter.
1
2
3
4
Pour configurer un nouveau réseau WiFi, allez sur l’écran d’accueil, appuyez sur Paramètres  .
.
Dans l’écran des Paramètres, sélectionnez
Connexions sans fil & Réseaux.
Si le WiFi est désactivé, appuyez sur la ligne Wi-Fi pour l’activer. Puis, sélectionnez
Paramètres Wi-Fi. L’ARNOVA recherche les réseaux WiFi disponibles et les affiche.
Appuyez sur l’un des réseaux disponibles, saisissez les informations réseau demandées* et appuyez ensuite sur Se conecter. Votre ARNOVA se connecte alors à ce point d’accès WiFi.
* Pour vous connecter à un réseau WiFi ouvert, il n’est pas nécessaire de saisir les informations réseau. Pour un réseau protégé, vous devrez soit entrer une clé (une suite de chiffres et/ou de lettres) du type WEP, WPA ou WPA2. Pour obtenir les paramètres de connexion exacts, contacter le fournisseur d’accès à Internet.
12
UserGuide_Arnova_10G2_PN110212_book.indd 12 |
31/10/2011 11:04:02 |
L’INTERFACE DE L’ARNOVA
Votre ARNOVA est équipé d’un écran tactile capacitif. Utiliser la pulpe de votre doigt pour naviguer.
Ecran d’accueil
Voici les raccourcis Android™ par défaut (Navigateur Web,
E-mail, etc.). Appuyez sur une icône pour ouvrir l’application
correspondante. Vous pouvez  personnaliser l’écran d’accueil
en ajoutant/supprimant des raccourcis et des widgets, etc.
Voir page suivante.
 Raccourci Paramètres
 Raccourci Navigateur Web Bouton applications
Appuyez sur cette icône pour afficher toutes les applications Android™ installées sur votre ARNOVA (jeux, différents outils, etc.). Il est possible de les copier sur l’écran d’accueil. Vous pouvez obtenir d’autres applications Android™ depuis AppsLib .
Français
Partie supérieure de l’interface (varie selon votre position dans l’interface)
Retour à l’écran |
▼ |
|
d’Accueil |
||
|
Icônes de Notification : faites glisser la barre supérieure de l’écran vers le bas pour afficher les messages de notification.
Heure Volume -/+
▼ |
▼ |
▼
Icônes de Statut : (état de la connexion WiFi, niveau de batterie, etc.)
▼
▼
Retour à l’écran précédent
Menu : vous donne accès aux options de menu disponibles.
13
UserGuide_Arnova_10G2_PN110212_book.indd 13 |
31/10/2011 11:04:11 |
PERSONNALISATION DE L’APPAREIL
Français
L’écran d’accueil étendu
Faites glisser votre doigt horizontalement sur l’écran pour aller sur le côté gauche ou droit de l’écran d’accueil étendu.
Personnalisation des éléments de l’écran d’accueil
-- Pour ajouter un élément (raccourci, widget, etc.), maintenez votre doigt appuyé sur un emplacement vide de l’écran, puis choisissez parmi la liste d’options.Vous pouvez aussi appuyer sur l’icône de Menu et sélectionner Ajouter
  , en bas de l’écran.
-- Pour déplacer un élément, maintenez votre doigt appuyé dessus jusqu’à ce qu’il s’agrandisse, faites-le glisser vers l’emplacement souhaité, et relâchez votre doigt.
-- Pour supprimer un élément de l’écran d’accueil, maintenez votre doigt appuyé dessus, faites-le glisser vers la corbeille (le bouton Applications, sur la droite, se transforme en corbeille lorsque vous maintenez un élément appuyé) et relâchez votre doigt.
Ajouter d’autres d’applications avec APPSLIB : Connectez votre ARNOVA à un réseau WiFi, puis appuyez sur l’icône AppsLib . Ce portail de téléchargement vous propose des milliers d’applications gratuites et payantes: jeux, outils pratiques. Choisissez une application et téléchargez-la.
Modification des paramètres : Sur l’écran d’accueil, appuyez sur Paramètres |
et choisissez une |
catégorie : Connexions sans fil, Sons et affichage, Date et heure, etc. |
|
14 |
|
UserGuide_Arnova_10G2_PN110212_book.indd 14 |
31/10/2011 11:04:12 |

LECTURE DE FICHIERS MULTIMÉDIA
1Sur l’écran d’accueil, appuyez sur l’icône vidéo, audio ou photo.
2L’ARNOVA affiche la liste de fichiers/dossiers correspondant à la catégorie sélectionnée.
3Appuyez sur un élément pour l’ouvrir.
Français
Uniquement dans les modes Vidéo et Photo : pour afficher/masquer les options disponibles, appuyez n’importe où sur l’écran.
Pour mettre en pause/relancer une vidéo, appuyez sur l’icône |
/ |
(en bas de l’écran). Pour naviguer dans la |
|||||
vidéo, utilisez la barre de progression (en bas de l’écran) et faites-la glisser jusqu’à la zone désirée. |
|
|
|||||
Vidéo |
|
|
|
|
|
|
|
Pour lire la chanson précédente/suivante, appuyez sur les icônes |
|
/ |
. Utilisez les icônes |
/ |
et la |
||
barre de progression de la même façon que dans le lecteur vidéo (voir ci-dessus). |
|
|
|||||
Musique |
|
|
|
|
|
|
|
Pour démarrer/mettre en pause un diaporama, appuyez sur l’icône |
/ |
. Pour afficher la photo suivante ou |
|||||
précédente, appuyez sur les icônes |
/ |
. |
|
|
|
|
|
Photo |
|
|
|
|
|
|
|
15
UserGuide_Arnova_10G2_PN110212_book.indd 15 |
31/10/2011 11:04:12 |
Français
16
 TRANSFERT DE FICHIERS MULTIMÉDIA
1Connectez le câble USB fourni à votre ARNOVA et à un ordinateur allumé.
2L’ARNOVA s’allume. Après quelques secondes, l’ARNOVA apparaît sous la forme d’une icône sur votre ordinateur.
3Pour transférer vos fichiers sur l’ARNOVA, vous pouvez les copier/coller directement dans les dossiers respectifs de l’appareil (avec Windows® Explorer ou le Finder sur Mac®), ou vous pouvez également utiliser Windows Media® Player. Lancez Windows Media Player®, puis utilisez l’onglet Synchroniser pour synchroniser vos chansons, vidéos et photos avec votre ARNOVA. Consultez l’aide de Windows Media Player® pour en savoir plus à ce sujet.
4Une fois que tous les transferts de fichiers sont terminés, fermez Windows Media® Player ou tout autre programme susceptible d’utiliser l’ARNOVA. Cliquez ensuite sur l’icône de retrait du périphérique en toute sécurité dans la barre des tâches, à côté de l’horloge. Vous pouvez à présent déconnecter le câble USB.
UserGuide_Arnova_10G2_PN110212_book.indd 16 |
31/10/2011 11:04:13 |
www REGISTRIEREN SIE IHR PRODUKT!
ÄÄIm Internet unter http://arnovatech.com/register
Vielen Dank, dass Sie sich für dieses Produkt von ARNOVA entschieden haben. Wir hoffen, Sie werden viel Freude daran haben und dass es Ihnen für viele Jahre zuverlässige Dienste leisten wird. Nachdem Sie Ihr ARNOVA-Produkt ausgepackt haben, empfehlen wir Ihnen, sich ein paar Minuten Zeit zu nehmen, und es zu registrieren (http://arnovatech.com/register). Dadurch erhalten Sie Zugriff auf den technischen Support von ARNOVA (http://arnovatech.com/support).
DEUT SCH
?SIE BENÖTIGEN HILFE?
Auf unserer Website: Für häufig gestellte Fragen (FAQ) siehe http://arnovatech.com/faq
Kontaktieren Sie unseren technischen Kundendienst: Sie erhalten unter http://arnovatech.com/support Hilfe per E-Mail.
Bitte registrieren Sie Ihr Produkt, bevor Sie Kontakt mit dem technischen Support aufnehmen (siehe Registrieren Sie Ihr Produkt).
Da unsere Produkte kontinuierlich aktualisiert und weiterentwickelt werden, kann die Software Ihres Geräts in Erscheinung und Funktionalität geringfügige Abweichungen zu den Darstellungen in dieser Kurzbedienungsanleitung aufweisen.
17
UserGuide_Arnova_10G2_PN110212_book.indd 17 |
31/10/2011 11:04:14 |
 BESCHREIBUNG DES ARNOVA
DEUTSCH
1 |
Lautstärke Tasten |
|
|
|
|
|
2 |
Ladeanzeige: rote Anzeige: Akku wird geladen / |
11 |
2 |
|
1 |
|
|
Grüne Anzeige: Akku geladen.. |
|
|
|
||
|
|
3 |
||||
|
|
|
||||
|
|
|
|
|
|
|
3 |
EIN/AUS-Taste: erlaubt das Gerät einzuschalten oder auszuschalten. |
|
|
|
4 |
|
|
|
|
5 |
|||
4 |
Kopfhöreranschluss |
|
7 |
|
|
6 |
|
|
|||||
10 |
9 |
|
|
|
||
5 |
USB Host-Port: Zur Verwendung einer Tastatur, einer Maus oder |
|
|
8 |
||
|
|
|
|
|||
|
|
|
|
|
||
ein USB-Stick. Tippen Sie auf dem Desktop auf das Menü Icon
und wählen anschließend Einstellungen/USB Mode select.Wenn das Host port ausgeschaltet ist, tippen Sie auf die Host port
Zeile um es einzuschalten. Wichtig: Schalten Sie den Host Port nach Gebrauch aus.
6 Micro USB Port: Um Ihren ARNOVA mit Ihrem Computer zu verbinden, verwenden Sie das mitgelieferte USB Kabel (um Dateien zu übertragen).
7 |
Micro SD Karten Slot |
8 |
10 |
Eingebautes Mikro |
11 |
Strom anschluss |
9 Hardware-Reset |
Camera
wichtig: |
??? |
Ihr Gerät ist abgestürzt, bitte schalten Sie es aus. Drücken und halten Sie den Ein-/Aus-Taste 3 für 10 Sekunden oder drücken Sie den Reset-Schalter, Hardware-Reset 9 .
18
UserGuide_Arnova_10G2_PN110212_book.indd 18 |
31/10/2011 11:04:23 |
 Loading...