

Page 1
100
5
100
2
3
100
6
4
1
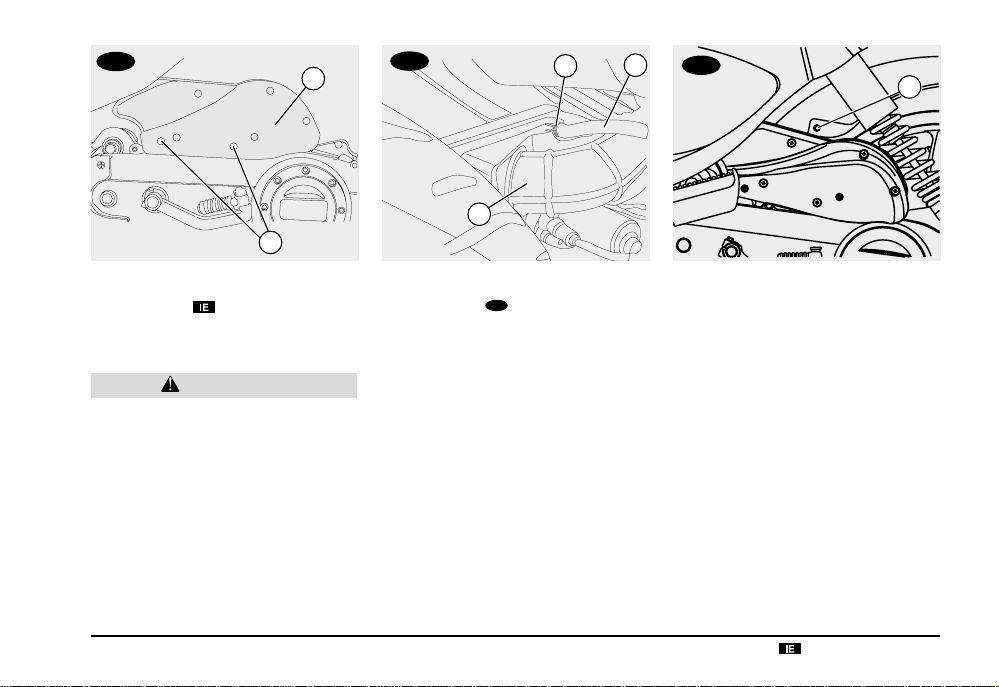
REMOVING AIR CLEANER BOX
ASSEMBLY
Carefully read page 47 (MAINTENANCE).
CAUTION
The disassembly and reassembly operations of the air cleaner box assembly are
difficult and complicated. Contact an
aprilia Official Dealer.
REMOVING AIR CLEANER BOX
ASSEMBLY
Carefully read page 47 (MAINTENANCE).
♦
Position the vehicle on the centre stand,
on a solid and level surface, see page 46
(POSITIONING THE VEHICLE ON THE
CENTRE STAND).
♦
Unscrew and remove the two screws (1)
keeping the relative stop nuts.
♦
Unloose the splash guard fixing screw with
filter box (6).
♦
Withdraw clamp (2) from the air tube (3)
using a suitable tool (3).
♦
Unloose the fixing clamp and remove the
air cleaner-carburettor tube (4) from the
air cleaner (5).
♦
Remove the air cleaner box assembly (5).
100
use and maintenance
Scarabeo 50 - Scarabeo 100 4T
57
Page 2
100
6
4
1
1
aprilia
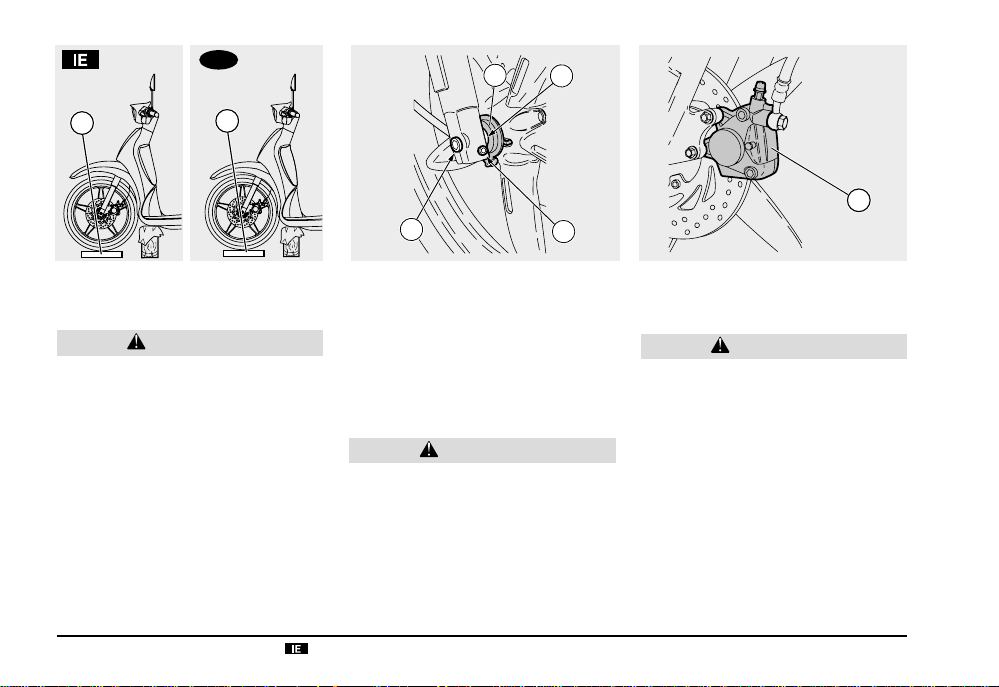
FRONT WHEEL
DISASSEMBLY
CAUTION
The disassembly and reassembly operations of the front wheel may result difficult and complicated for an unskilled
operator.
Contact an aprilia Official Dealer if necessary.
If you wish to perform this operation personally, follow the steps below.
Carefully read page 47 (MAINTENANCE).
Upon disassembly and reassembly of the
wheel, be careful not to damage the pipeline, discs and brake pads.
use and maintenance
58
Scarabeo 50 - Scarabeo 100 4T
3
♦ Position the vehicle on the centre stand,
2
on a solid and level surface.
NOTE Arrange for a support with a base
of 200x200mm and suitable height.
♦ Place the support under the vehicle and a
spongy cloth between them, so that the
front wheel can move freely and the vehicle cannot fall down.
CAUTION
Make sure that the vehicle is stable.
♦ Put a suitable support (1) under the tyre to
hold the wheel in the right position, after
releasing it.
♦ Unloose screw (2) of the wheel pin clamp.
♦ Completely unscrew the wheel pin (3).
Wheel pin-nut driving torque:
50 Nm (5.0 kgm).
5
♦ Hold the front wheel and manually remove
the wheel pin (3).
♦ Keep the washer (4).
CAUTION
Do not actuate the front brake lever after
removing the wheel to prevent the caliper
pistons from falling out of their seats,
causing the brake fluid to leak out.
In this case, contact an aprilia Official
Dealer that will carry out the required
maintenance operations.
♦ Move the front wheel forward until the disc
can be removed from the brake caliper (5).
♦ Remove the front wheel.
♦ Disable the odometer transmission (6).
Page 3

REASSEMBLY
Carefully read page 47 (MAINTENANCE).
CAUTION
While reassembling the wheel, be careful
not to damage the brake pipe, the disc
and the pads.
To reassemble the front wheel, proceed as
follows:
♦ Smear a thin layer of grease on the whole
length of the wheel pin (3), see page 90
(LUBRICANT CHART).
♦ Position the wheel between the fork rods,
onto the support (1).
♦ Insert the tang (8) of the odometer trans-
mission (7) in the seat on the wheel hub.
WARNING
Risk of personal injury. Do not use your
fingers to align the holes.
♦ Move the wheel to align the central hole
with the holes on the fork.
7
4
2
3
♦ Insert the wheel between the rods. Insert
with care the disc in the brake caliper.
♦ Insert the washer (4) between the
odometer transmission (7) and the fork
right-hand rod.
♦ Fully insert the wheel pin (3) and tighten it
manually.
♦ Tighten the wheel pin (3).
Wheel pin nut driving torque:
50 Nm (5.0 kgm).
♦ Pull the front brake lever and repeatedly
push down the handlebar to allow the fork
to sink.
This allows the fork rods to bed properly.
♦ Tighten the screw (2) of the wheel pin
clamp.
Driving torque of the wheel pin clamp
screws: 12 Nm (1.2 kgm).
8
♦ Make sure that the following components
are not dirty:
– tyre;
– wheel;
– brake discs.
CAUTION
After reassembly, pull the front brake lever repeatedly and check the correct functioning of the braking system.
Check the wheel centering.
Have the driving torques, centering and
balancing of the wheel checked by your
aprilia Official Dealer, in order to avoid
accidents that may be harmful for you
and/or other people.
use and maintenance
Scarabeo 50 - Scarabeo 100 4T
59
Page 4

REAR WHEEL
DISASSEMBLY
CAUTION
The disassembly and reassembly operations of the rear wheel may result difficult and complicated for an unskilled operator. Contact an aprilia Official Dealer
if necessary.
If you wish to perform this operation personally, follow the steps below.
Carefully read page 47 (MAINTENANCE).
Before performing the following opera-
tions, allow the engine and silencer to
cool down to the ambient temperature in
order to avoid burns.
On disassembly and reassembly of
the wheel, be careful not to damage the
pipeline, disc and brake pads.
♦ Position the vehicle on the centre stand,
on a solid and level surface.
♦ Remove the silencer, see page 66 (RE-
MOVING THE EXHAUST SILENCER).
♦ Remove the cover (1).
100
2
2
1
1
NOTE T o be able to unloose the wheel nut
(2) it is necessary to block the wheel.
♦
Completely pull the rear brake lever (3),
interposing a card (4), and keep it pulled
by means of a plastic clamp (5).
♦ Unscrew and remove the wheel nut (2) and
the washer.
NOTE Upon reassembly, change the wheel
nut (special type).
Wheel nut (2) driving torque:
110 Nm (11 kgm).
♦ Release the rear brake lever.
100
♦
Unloose the splash guard, see page
57.
100
♦
Withdraw the wheel.
♦ Remove the rear brake caliper, see
page 64 (REMOVING THE REAR BRAKE
CALIPERS
).
4
3
5
♦ Withdraw the wheel.
NOTE Use aprilia Genuine Spare Parts
only.
♦ After reassembly, make sure that the fol-
lowing components are not dirty:
– tyre;
– wheel;
brake discs.
–
CAUTION
After reassembly, pull the rear brake lever repeatedly and check the correct functioning of the braking system. Check the
wheel centering.
Have the driving torques, centering and
balancing of the wheel checked by your
aprilia Official Dealer, in order to avoid
accidents that may be harmful for you and/
or other people.
use and maintenance
60
Scarabeo 50 - Scarabeo 100 4T
Page 5

1
CHECKING THE BRAKE PAD
WEAR
Carefully read page 31 (BRAKE FLUID recommendations), page 32 (DISC
BRAKES), page 47 (MAINTENANCE).
Check the brake pad wear after the first 500
km (312 mi) and successively every 2000
km (1250 mi).
The wear of the brake pads depends on the
use, on the kind of drive and on the road.
The wear will be greater when the vehicle is
driven on dirty or wet roads.
WARNING
Check the wear of the brake pads especially before every trip.
To carry out a rapid checking of the wear of
the front pads, proceed as follows:
♦ Position the vehicle on the centre stand,
on a solid and level surface.
♦ Remove the brake caliper cover (1).
♦ Carry out a visual check between brake
disc and pads.
WARNING
The excessive wear of the friction material would cause the contact of the pad
metal support with the disc, with consequent metallic noise and production of
sparks from the caliper; braking efficiency, safety and soundness of the disc
would thus be negatively affected.
use and maintenance
♦ If the thickness of the friction material (even
of one pad only) has reduced to about 1.5
mm, replace both pads.
WARNING
Have the pads changed by your aprilia
Official Dealer.
Scarabeo 50 - Scarabeo 100 4T
61
Page 6

100
1
CHECKING THE BRAKE SHOES
WEAR
Carefully read the instructions on page
33 (REAR DRUM BRAKE
page 47 (MAINTENANCE).
Check the rear brake shoes wear after the
first 1000 km (625 mi) and then every 4000
km (2500 mi).
62
100
use and maintenance
100
) and
Scarabeo 50 - Scarabeo 100 4T
To check the rear brake shoes wear follow
the steps below:
100
♦ Remove the rear wheel, see page 60
(REAR WHEEL).
♦ Now check the thickness of the friction ma-
terial, that should never be lower than 1mm.
If the thickness of the friction material has
reached the limit value, if you notice irregularities in the operation or if the parts are
damaged, contact an aprilia Official
Dealer that will see to their replacement.
INSPECTING THE FRONT AND
REAR SUSPENSIONS
Carefully read page 47 (MAINTENANCE).
Check the tightening of all the parts and the
functioning of the front and rear suspension
articulated joints after the first 1000 km (625
mi), and then every 4000 km (2500 mi).
CAUTION
If you notice irregularities in the operation or if the help of a qualified technician is necessary, contact your aprilia
Official Dealer.
Page 7

100
aprilia
CHECKING THE STEERING
Carefully read page 47 (MAINTENANCE).
Check the steering play every now and then.
To check the steering it is necessary to:
♦ Position the vehicle on the centre stand,
on a solid and level surface.
NOTE Arrange for a support with base of
200x200mm and of a suitable height.
CAUTION
Make sure that the vehicle is stable.
♦ Place the support under the vehicle and a
spongy cloth between them, so that the
front wheel can move freely and the vehicle cannot fall down.
♦ Shake the fork in the direction of travel.
NOTE Do not shake the fork excesively,
otherwise you may take in consideration the
movement of the stand, thus observing an
incorrect slack.
Repeat the previous operation more than
once.
♦ If you find that there is a considerable slack,
contact your aprilia Official Dealer to restore the optimal steering conditions.
use and maintenance
CHECKING
THE ENGINE FULCRUM AXIS
Carefully read page 47 (MAINTENANCE).
Periodically check the slack existing between
the engine pin bushes and the engine pin.
To carry out this operation, proceed as follows:
♦ Position the vehicle on the centre stand,
on a solid and level surface.
♦ Shake the wheel transversally with respect
to the riding direction.
♦ If you find that there is a considerable slack,
contact your aprilia Official Dealer, to restore the optimal operating conditions.
Scarabeo 50 - Scarabeo 100 4T
63
Page 8

2
3
4
6
5
1
REMOVING THE
REAR BRAKE CALIPER
Carefully read page 47 (MAINTENANCE).
CAUTION
When disassembling the brake caliper, be
careful not to damage the pipeline, disc
and brake pads.
♦ Position the vehicle on the centre stand on
a solid and level surface.
♦ Unloose and remove the two screws (1).
Tightening torque of brake caliper screws
(1): 27 Nm (2.7 kgm).
WARNING
On reassembly of the brake caliper, replace the caliper fixing screws (1) with two
new screws of the same type.
use and maintenance
64
Scarabeo 50 - Scarabeo 100 4T
CAUTION
Do not actuate the rear brake lever after
removing the brake caliper to prevent the
pistons from falling out of their seats,
causing the brake fluid to leak out.
In this case, contact an aprilia Official
Dealer that will carry out the required
maintenance operations.
♦ Carefully withdraw the brake caliper (2)
from the brake disc.
WARNING
After reassembling, repeatedly actuate
the rear brake lever and check the braking system functioning.
REMOVING
THE REAR-VIEW MIRRORS
Carefully read page 47 (MAINTENANCE).
♦ Position the vehicle on the centre stand,
on a solid and level surface.
♦ Lift the protective case (3).
CAUTION
Hold the rear-view mirror (4), to prevent
it from accidentally falling down.
♦ Hold the screw (5) and unloose the nut (6)
completely.
♦ Remove the rear-view mirror (4).
Page 9

2
5
7
1
1
REMOVING THE LOWER
HANDLEBAR COVER
Carefully read page 47 (MAINTENANCE).
♦ Position the vehicle on the centre stand,
on a solid and level surface.
♦ Unscrew and remove the two screws (1)
shown by the arrows.
♦ Unscrew and remove the two screws (2).
CAUTION
Proceed with care to avoid damaging the
tang (4) seat (3).
♦ ★ Using a small screwdriver, lift the tang
(4) found inside the front handlebar cover
(5).
♦ ★ Repeat the above operation also on the
lower part of the handlebar cover.
4
3
CAUTION
Handle the plastic or painted components
with care and avoid scraping or damaging them.
♦ Remove the front handlebar cover (5) tak-
ing care not to break the tangs.
NOTE On reassembly, check that the tangs
are fitted properly.
use and maintenance
6
REMOVING
THE INSPECTION COVER
Carefully read page 47 (MAINTENANCE).
CAUTION
Handle the painted components with care
and avoid scraping or damaging them.
♦ Position the vehicle on the centre stand,
on a solid and level surface.
♦ ★ Unscrew and remove the screw (6).
♦ Remove the inspection cover (7).
Scarabeo 50 - Scarabeo 100 4T
65
 Loading...