

Page 1

1
3
REMOVING
THE EXHAUST SILENCER
Carefully read page 47 (MAINTENANCE).
♦ Position the vehicle on the centre stand,
on a solid and level surface.
WARNING
Before you go on with the following operations, allow the engine and the silencer
to cool down to the ambient temperature
to avoid burns.
use and maintenance
66
Scarabeo 50 - Scarabeo 100 4T
2
♦ Unloose and remove the two fixing screws
(1) from the engine silencer.
Screws (1) driving torque:
25 Nm (2.5 kgm).
♦ Unloose and remove screws (2).
Screws (2) driving torque:
12 Nm (1.2 kgm).
♦ Remove the exhaust silencer (3).
NOTE On reassembly, replace the seal
between the exhaust manifold and the silencer with a new one.
Page 2
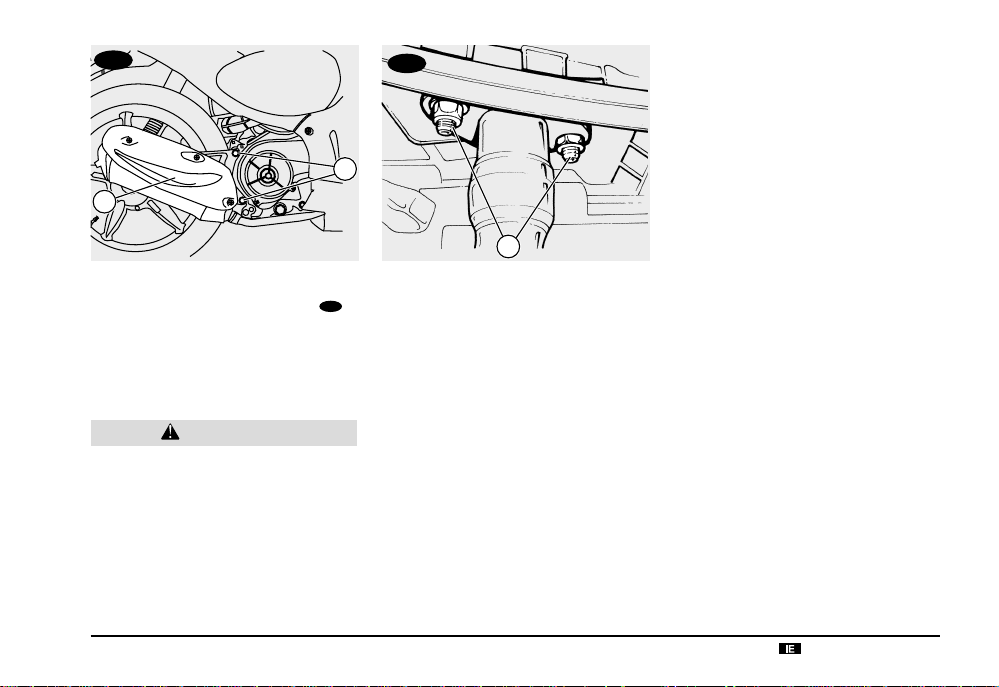
100
3
100
1
2
REMOVING
THE EXHAUST SILENCER
Carefully read page 47 (MAINTENANCE).
♦ Position the vehicle on the centre stand,
on a solid and level surface.
100
WARNING
Before you go on with the following operations, allow the engine and the silencer
to cool down to the ambient temperature
to avoid burns.
♦ Remove the inspection cover, see page 65
(REMOVING THE INSPECTION COVER).
♦ Unloose and remove the two fixing screws
(1) from the engine silencer.
Screws (1) driving torque:
25 Nm (2.5 kgm).
♦ Unloose and remove the two nuts (2).
Nuts (2) driving torque:
12 Nm (1.2 kgm).
♦ Remove the exhaust silencer (3).
use and maintenance
NOTE On reassembly, replace the seal
between the exhaust manifold and the silencer with a new one.
Scarabeo 50 - Scarabeo 100 4T
67
Page 3
3
100
2
1
2
1
REMOVING THE FOOTBOARD
Carefully read page 47 (MAINTENANCE).
♦ Remove the inspection cover, see page 65
(REMOVING THE INSPECTION COVER).
♦ ★ Unloose and remove the two screws (1).
♦ ★ Unloose and remove the three screws
(2) located under the footboard.
CAUTION
Proceed with care to avoid damaging the
tangs and/or relevant seats.
♦ Slightly lift the rear part of the footboard
(3) and withdraw it from the base of the
inner shield.
use and maintenance
68
Scarabeo 50 - Scarabeo 100 4T
CAUTION
Do not force the lower shield as it is fixed
to the frame with only two front screws.
NOTE On reassembly, first insert the two
central tangs and then the side tangs. Before you insert the three screws (2), visually
check that the footrest - screw holes are
aligned.
2
1
1
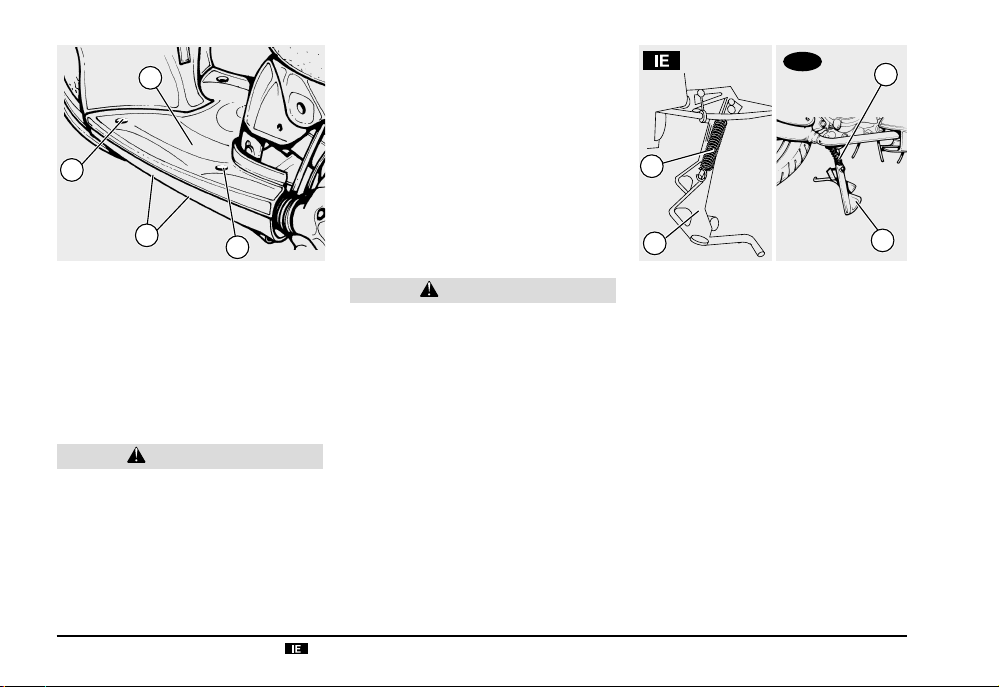
CHECKING THE STAND
Carefully read page 47 (MAINTENANCE).
Make sure the stand (1) rotates freely.
Perform the following checks:
♦ The springs (2) must not be damaged,
worn, rusty or weak.
♦ The stand must rotate freely. If necessary,
grease the articulated joint, see page 90
(LUBRICANT CHART).
Page 4

100
3
4
CHECKING THE SWITCHES
Carefully read page 47 (MAINTENANCE).
The vehicle is provided with two switches:
– stoplight switch on the rear brake control
lever (3);
– stoplight switch on the front brake control
lever (4).
To reach the switches:
♦ Remove the lower handlebar cover, see
page 65 (REMOVING THE LOWER HANDLEBAR COVER).
Periodically carry out the following checks:
♦ Make sure that there are no dirt or mud
deposits on the switch; the pin must be able
to move without interferences, returning automatically to its initial position.
♦ Make sure that the cables are connected
correctly.
IDLING ADJUSTMENT
Carefully read page 47 (MAINTENANCE).
Adjust the idling after the first 500 km (312
mi) and every time it is irregular.
To carry out this operation, proceed as follows:
♦ Drive for a few miles until the engine
reaches the normal running temperature,
then stop the engine.
100
♦
Remove the inspection cover, see
page 65 (REMOVING THE INSPECTION
COVER).
♦ Connect an electronic revolution counter
to the spark plug cable.
use and maintenance
WARNING
Before proceeding, make sure that the
room in which you are working is properly ventilated.
♦ Start the engine.
The minimum speed of the engine (idling)
must be about 1500 ± 100 rpm; in this case
the engine does not make the rear wheel
rotate.
The minimum speed of the engine (idling)
must be about 1800 ± 100 rpm; in this case
the engine does not make the rear wheel
rotate.
Scarabeo 50 - Scarabeo 100 4T
100
69
Page 5

100
1
If necessary:
♦ Act on the adjusting screw (1) positioned
on the carburettor.
By SCREWING IT (clockwise), you increase
the engine rpm.
By UNSCREWING IT (anticlockwise), you
decrease the engine rpm.
♦ Twist the throttle grip, accelerating and de-
celerating a few times to make sure that it
functions correctly and to check if the idling
speed is constant.
NOTE Do not act on the air adjusting screw,
to avoid variations of the carburation setting.
CAUTION
If necessary, contact your aprilia Official
Dealer.
use and maintenance
70
Scarabeo 50 - Scarabeo 100 4T
2
3
4
ADJUSTING
THE ACCELERATOR CONTROL
Carefully read page 47 (MAINTENANCE).
The ideal slack of the accelerator control
should be about 2-3 mm, that can be measured on the throttle grip.
To adjust the slack, proceed as follows:
♦ Position the vehicle on the centre stand,
on a solid and level surface.
♦ Remove the protection element (2).
♦ Loosen the nut (3).
♦ Act on the adjuster (4), positioned at the
beginning of the accelerator control cable.
After the adjustment:
♦ Tighten the nut (3), thus locking the adjuster
(4) and put back the protection element (2).
WARNING
After the adjustment, make sure that the
rotation of the handlebar does not modify
the engine idling rpm and that the throttle grip returns smoothly and automatically to its original position after being
released.
Page 6

100
1
1
SPARK PLUG
Carefully read page 47 (MAINTENANCE).
Check the spark plug after the first 500 km
(312 mi), and
mi).
Check or change the spark plug every 8000
km (5000 mi).
Periodically remove the spark plug and clean
it carefully, removing carbon deposits;
change it if necessary.
To gain access to the spark plug:
♦ Remove the inspection cover, see page 65
(REMOVING THE INSPECTION COVER).
To remove and clean the spark plug:
♦ Remove the spark plug cap (1).
♦
Remove all the dirt from the base of the
spark plug, then unscrew it with the spanner you will find in the tool kit and extract it
change
every 4000 km (2500
100
from its seat, taking care that neither dust
nor other substances enter the cylinder.
♦ Make sure that there are neither carbon
deposits, nor corrosion marks on the electrode and on the central porcelain part; if
necessary, clean them with the special
cleaners for spark plugs, with an iron wire
and/ or a metal brush.
♦ Energetically blow some air, in order to pre-
vent the removed residues from getting into
the engine. If the spark plug has crackings
on the insulating material, corroded electrodes or excessive deposits, it must be
changed.
♦ Check the spark plug gap with a thickness
gauge. The gap must be 0.5 - 0.6 mm; if
necessary adjust it, carefully bending the
earth electrode.
♦ Make sure that the washer is in good con-
ditions. With the washer on, screw the
spark plug by hand in order not to damage
the thread.
use and maintenance
♦ Tighten the spark plug by means of the
spanner you will find in the tool kit, giving it
half a turn to compress the washer.
Spark plug driving torque:
20 Nm (2.0 kgm)
CAUTION
The spark plug must be well tightened,
otherwise the engine may overheat and
be seriously damaged.
Use the recommended type of spark plug
only, see page 86 (TECHNICAL DAT A), in
order not to compromise the life and performance of the engine.
♦ Connect the spark plug pipe (1).
♦
Keep the pipe in the same position as
before its disassembly.
♦ Refit the inspection cover, page 65 (RE-
MOVING THE INSPECTION COVER).
Scarabeo 50 - Scarabeo 100 4T
71
Page 7

BATTERY
Carefully read page 47 (MAINTENANCE).
WARNING
Risk of fire.
Keep fuel and other flammable substances away from the electrical components.
CAUTION
Never invert the connection of the battery
cables.
Connect and disconnect the battery with
the ignition switch in position “
erwise some components may be damaged.
Connect first the positive cable (+) and
then the negative cable (–).
Disconnect following the reverse order.
”, oth-
Check the electrolyte level and the terminals
tightening after the first 500 km (312 mi) and
then every 4000 km (2500 mi) or 12 months.
100
Check the electrolyte level and the terminals
tightening after the first 1000 km (625 mi)
and then every 4000 km (2500 mi) or 12
months.
WARNING
The electrolyte in the battery is toxic and
caustic and if it gets in contact with the
skin it can cause burns, since it contains
sulphuric acid. Wear protection clothes,
a face mask and/or goggles during maintenance operations.
In case of contact with the skin, rinse with
plenty of water.
In case of contact with the eyes, rinse with
plenty of water for fifteen minutes, then
consult an oculist without delay.
If the electrolyte is accidentally swallowed, drink a lot of water or milk, then
continue drinking milk of magnesia or
vegetable oil and consult a doctor without delay.
The battery gives off explosive gases;
keep it away from flames, sparks, cigarettes and any other source of heat.
During the recharging or the use, make
sure that the room is properly ventilated
and avoid inhaling the gases released
during the recharging.
KEEP AWAY FROM CHILDREN.
Do not incline the vehicle too much, in
order to avoid dangerous leaks of the
battery fluid.
The electrolyte is corrosive.
Do not pour or spill it, especially on the
plastic parts.
NOTE If servicing or technical advice is
required, contact an aprilia Official Dealer
that will certainly give you accurate and fast
assistance.
use and maintenance
72
Scarabeo 50 - Scarabeo 100 4T
 Loading...