

Page 1

Congratulations on your purchase of the Apple VideoPhone Kit. You can
use the equipment in your kit to exchange live video and sound, view and
annotate content in a shared window, and transfer files with other users.
If you install the optional Farallon Timbuktu Pro software, you can also
use the shared desktop feature to share applications with other Timbuktu
Pro users and observe or control their computers while conferencing. (An
additional 8 MB of random-access memory [RAM] is required for
Timbuktu Pro.)
You can connect with other Apple VideoPhone users or users with compatible
conferencing software (such as Netscape’s audioconferencing software for
®
Macintosh, Windows, and UNIX
) over
m a high-speed local area network (LAN), such as Ethernet
m the Internet, using a standard V.34 28.8 kbps modem, an ISDN modem, an
ISDN-to-Ethernet router, or a direct Ethernet connection (To access the
Internet, you must have an Internet Service Provider.)
Note: If you’re videoconferencing over the Internet, the quality of video and
sound will vary depending on Internet traffic, the type of computer you are
using, and network bandwidth.
1
Page 2

What’s in this booklet
This booklet contains information on how to
m connect the camera to your computer, and adjust the camera
m install the Apple VideoPhone conferencing software
m make calls over the Internet, using your Apple VideoPhone Kit and a
standard V.34 28.8 kbps modem or an ISDN modem
In addition, you will find technical specifications for the camera.
IMPORTANT
For onscreen instructions on using the camera and software, open
the Apple VideoPhone program and choose Apple VideoPhone Guide from
the Guide (h) menu. The Guide is your resource for all information about
using the Apple VideoPhone software. For more information on using
onscreen Guides, see the manual that came with your computer.
For additional information, consult the QuickTime Conferencing World Wide
Web site, located at the following address:
http://qtc.quicktime.apple.com
.
System requirements
To install and use the Apple VideoPhone Kit, you must have the following:
m an AV-equipped Macintosh computer with a PowerPC
and 16 MB of RAM (An additional 8 MB of RAM is required for
Timbuktu Pro.)
m system software version 7.5.3 or later (System 7.5.3 is provided in this kit.)
It is recommended that you install the System 7.5.5 Update (also provided
in this kit).
m a microphone (For instructions on how to connect the microphone to your
computer, see the manual that came with your computer.)
m a pair of speakers or headphones (recommended)
™
microprocessor
2
Page 3

Care and cleaning instructions
For your own safety and that of your equipment, always take the following
precautions:
m Keep your camera away from sources of liquids, such as washbasins,
bathtubs, shower stalls, and so on.
m Protect your camera from dampness or wet weather, such as rain, snow,
and so on.
m Keep these instructions handy for reference by you and others.
To clean the camera, do the following:
1 Make sure the camera is disconnected from the computer.
2 Wipe plastic surfaces lightly with a clean, soft cloth dampened with water.
3 Clean the lens only with tissue intended for camera lenses, available from any
photographic supply store.
Connecting the camera to your Macintosh
1 Turn off the computer.
2 Attach the integrated cable to the camera and the S-video input port on the back of
the computer.
Attach the single plug at one end of the cable to the S-video input port on the
back of the computer. Then attach the two plugs at the other end of the cable
to the Video Out and DC In ports on the camera.
(æ) S-video input port
V
+
+
-
VIDEO OUT
DC IN 12V
IRIS
æ
POWER
ON
OFF
V
+
+
-
-
VIDEO OUT
DC IN 12V
IRIS
3
Page 4

Positioning the camera
After connecting the camera to your computer, you would typically set it on
top of the computer’s monitor, pointing at your face.
NEAR
FOCUS
∞
You can also attach the camera to a tripod.
Tripod screw
50Hz 60Hz
You can pan the camera (rotate it left or right on its base) as much as 40
degrees in either direction. You can tilt it upward as much as 10 degrees, or
downward as much as 20 degrees.
4
Page 5
You may also need to adjust the camera to accommodate ambient lighting
conditions. For example, it’s usually best not to point the camera toward a
bright light source, such as an outside window. Any subject in front of such
a light source is likely to appear in shadow.
For the best picture in a variety of lighting conditions, use the iris adjustment
knob described in the next section, “Using the Camera Controls.”
Use the following settings with your videoconferencing software:
Video source settings:
m
m
Video image settings:
built-in AV digitizer, S-Video input, and NTSC format
default settings; use the iris adjustment knob for
best results
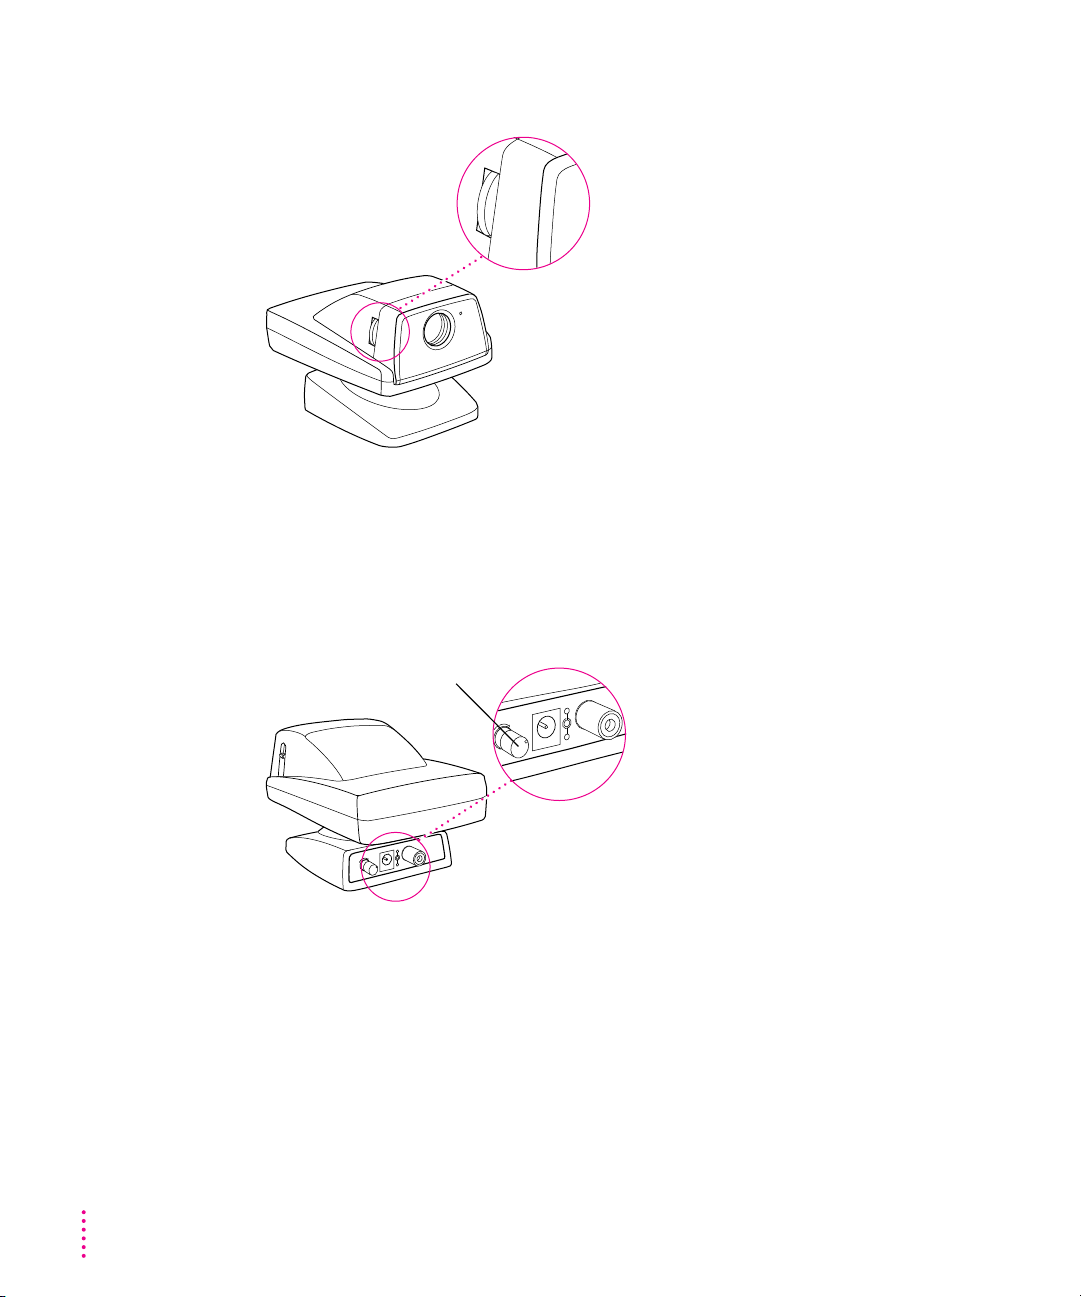
Using the camera controls
The camera has four simple controls:
Power switch
POWER
ON
Power light
POWER
ON
OFF
OFF
To open the lens cover and turn the camera on, move the power switch to the
On position. The power light next to the lens glows green.
5
Page 6
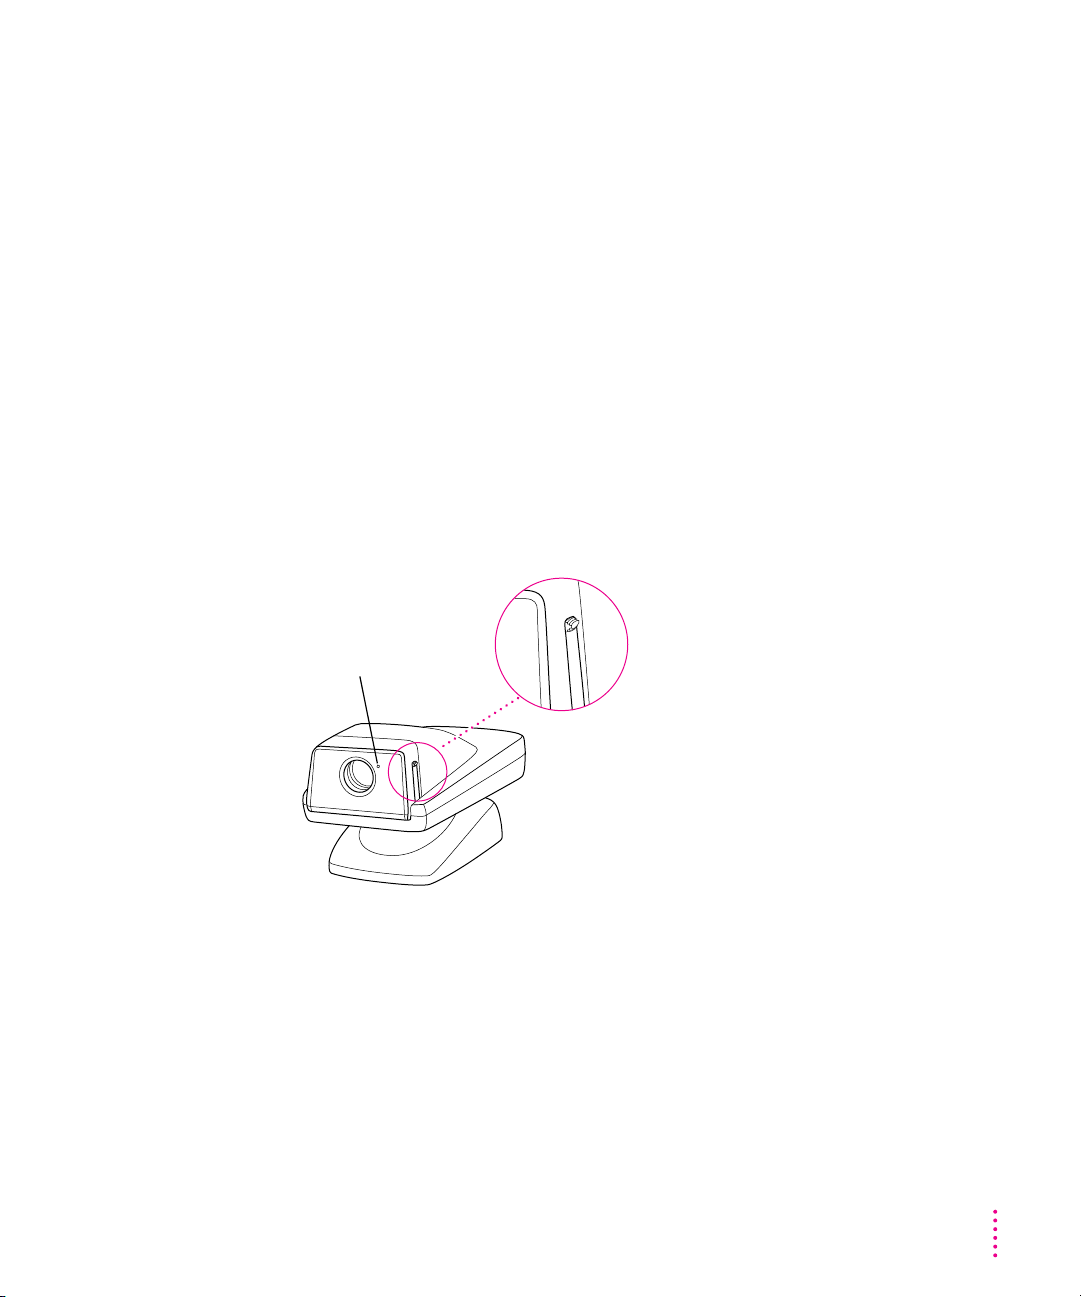
Manual focus dial
NEAR
FOCUS
∞
NEAR
FOCUS
∞
The camera can focus from two inches to infinity. Use the manual focus dial
to adjust the focus. To learn how to display an image on your screen, see the
Apple VideoPhone Guide, available in the Guide (h) menu when Apple
VideoPhone is the active program.
Iris (aperture)
Iris adjustment knob
V
+
+
POWER
ON
OFF
V
+
+
-
-
VIDEO OUT
DC IN 12V
IRIS
-
VIDEO OUT
DC IN 12V
IRIS
The iris adjustment knob is on the back of the camera, next to the DC In port.
Use this knob to adjust the image brightness for the best picture in different
lighting conditions. (For information about software adjustments you can
make to improve color, brightness, and contrast, see the Apple VideoPhone
Guide, available in the Guide [h] menu when Apple VideoPhone is the
active program.)
6
Page 7
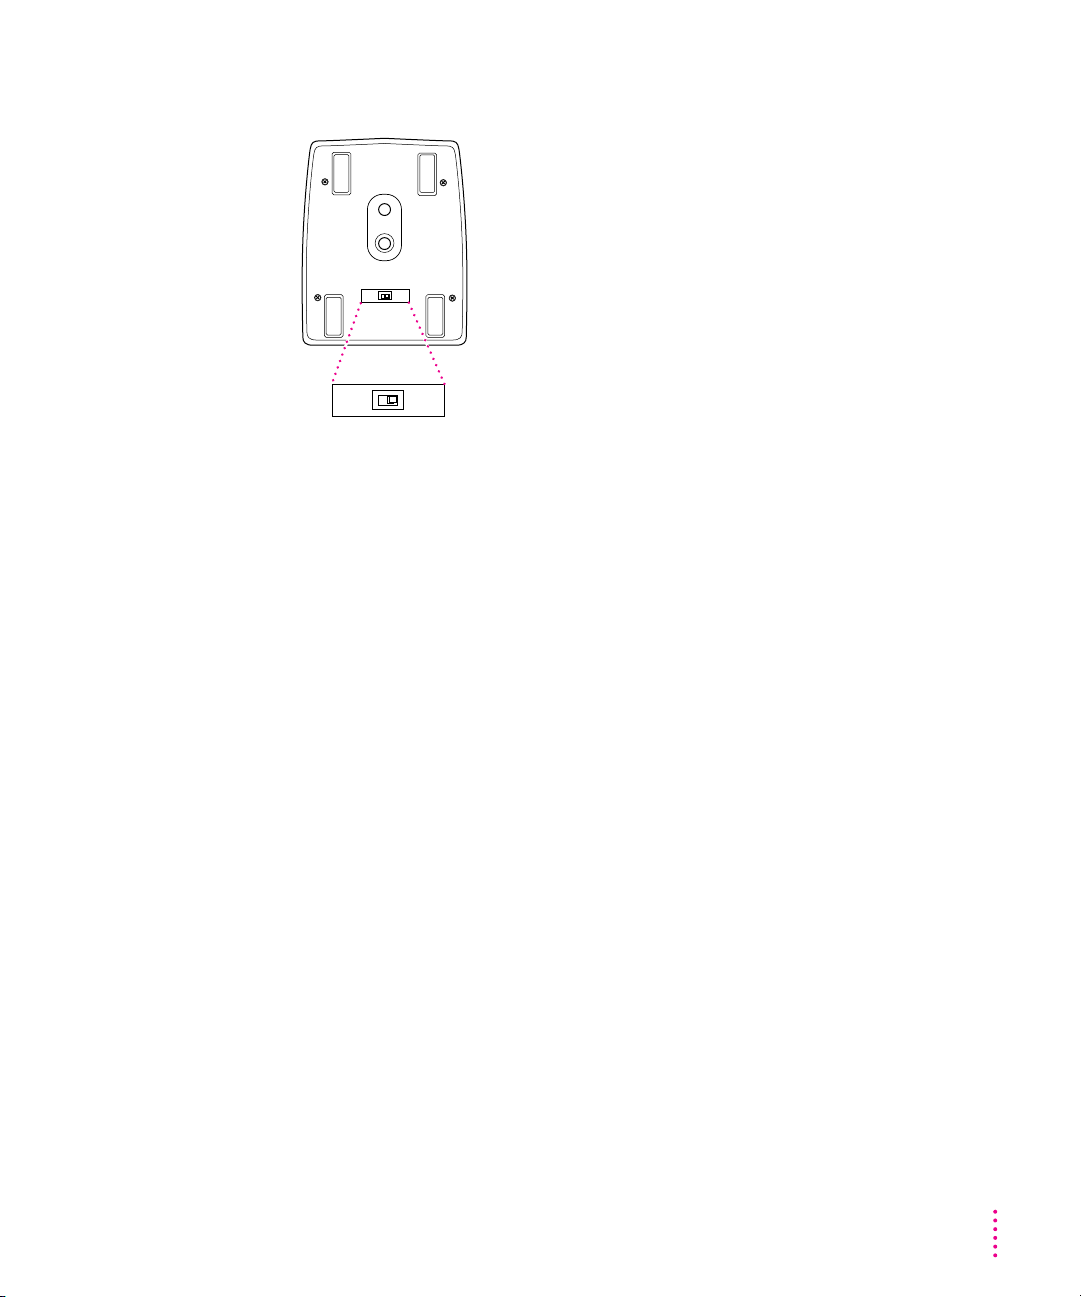
50 Hz/60 Hz switch
50Hz 60Hz
50Hz 60Hz
In some countries, indoor lighting uses 50 Hz AC power. If you are using
the camera in one of these regions, set this switch to 50 Hz to prevent
image flicker.
If you are using a Power Macintosh 7100 AV or 8100 AV computer,
videoconferencing performance will improve if you connect your monitor
to the standard monitor port on the AV card instead of the built-in highdensity monitor port. See the manual that came with your computer for
more information.
IMPORTANT
Depending on which computer you have and the amount of
video RAM (VRAM) your computer has, your system may or may not be
able to display the Apple VideoPhone video images in color. To display the
Apple VideoPhone video images in color, you may have to decrease your
monitor resolution, decrease the number of colors displayed, or install
additional VRAM. (For more information, see the manual that came with
your computer.)
Note: If you have two monitors connected to your computer, the Apple
VideoPhone video images will appear only on the main monitor. For
instructions on how to designate the main monitor, see the manual that
came with your computer.
7
Page 8

Installing the software
This section describes how to install the software you need to begin using
your Apple VideoPhone Kit. The software is located on the Apple VideoPhone
Kit CD-ROM disc.
First, start up your computer using the Apple VideoPhone Kit CD. To do so,
follow these steps:
1 Insert the
2 Turn your computer off.
Apple VideoPhone Kit
CD into your CD-ROM drive.
The CD-ROM disc will remain in the CD-ROM drive.
3 Hold down the C key on your keyboard and restart your computer.
Continue to hold down the key until you see the Welcome to Macintosh message.
IMPORTANT
If your computer will not start up from the Apple VideoPhone Kit
CD, you need to specify the CD as the startup disk in the Startup Disk control
panel. Open the Apple (K) menu and choose Control Panels, then doubleclick the Startup Disk control panel to open it. In the control panel, click the
Apple VideoPhone Kit CD icon, then close the control panel and restart your
computer.
Once the computer has started up from the CD, install the following software:
m System 7.5.3 (If you are already using system software version 7.5.3 or later,
you can skip this step.)
m System 7.5.5 Update (You don’t need to install this update, but it’s highly
recommended.)
m Open Transport 1.1.1
m Apple VideoPhone software
You may also want to install Farallon Timbuktu Pro, which enables you to
share applications with other Timbuktu Pro users, and Adobe Acrobat
™
Reader, which you’ll need to read the electronic Timbuktu Pro user’s manual.
8
Page 9

IMPORTANT
After you have installed the software you want, you need to
restart your computer. If you specified the Apple VideoPhone Kit CD as your
startup disk in the Startup Disk control panel, you must reset the Startup Disk
control panel before you restart your computer.
Installing System 7.5.3
If system software version 7.5.3 or later is already installed on your computer,
you can skip this step.
System 7.5.3 includes all the enhancements introduced in System 7.5,
System 7.5 Update 1.0, and System 7.5 Update 2.0. Before you install the
system software, see the electronic document “About System 7.5,” available
in the System 7.5.3 Software Install folder on the CD.
Before you begin, use the Drive Setup program to update your disk drivers.
You may also want to use the Disk First Aid program to test and, if necessary,
repair the disk on which you’re going to install the update. (The Drive Setup
and Disk First Aid programs are located on the CD, in the Disk Tools folder.)
Follow these steps to install System 7.5.3:
1 Open the System 7.5.3 Software Install folder on the CD.
2 Double-click the Installer icon to open it.
3 Read the message that appears. If you agree to the terms, click Agree.
4 In the Easy Install dialog box, make sure the disk named in the Destination Disk section
is the one on which you want to install the software. If it isn’t, click Switch Disk until the
correct disk name appears.
5 Click Install.
All necessary system software is installed on the selected disk.
6 When installation is complete, click Quit.
9
Page 10

Installing the System 7.5.5 Update
If the System 7.5.5 Update is already installed on your computer, you can skip
this step.
The System 7.5.5 Update is an update to System 7.5.3. It includes system
software enhancements that improve the reliability and performance of all
Macintosh and Mac OS–based computers that use system software version
7.5.3. For additional information, see the electronic document “About System
7.5.5 Update,” available in the System 7.5.5 Update Install folder on the CD.
Before you begin, you may want to use the Drive Setup program to update
your disk drivers. You may also want to use the Disk First Aid program to test
and, if necessary, repair the disk on which you’re going to install the update.
(The Drive Setup and Disk First Aid programs are located on the CD, in the
Disk Tools folder.)
Follow these steps to install the System 7.5.5 Update:
1 Open the System 7.5.5 Update Install folder on the CD.
2 Double-click the Installer icon to open it.
10
3 Read the message that appears. If you agree to the terms, click Agree.
4 In the Easy Install dialog box, make sure the disk named in the Destination Disk section
is the one that contains the system software you want to update. If it isn’t, click Switch
Disk until the correct disk name appears.
5 Click Install.
All necessary system software is installed on the selected disk.
6 When installation is complete, click Quit.
Page 11

Installing Open Transport 1.1.1
After you install the system software, follow these steps to install Open Transport:
1 Open the Open Transport 1.1.1 Install folder located on the CD.
2 Double-click the Installer icon to open it.
3 Read the message that appears, then click Continue.
4 In the Easy Install dialog box, make sure the disk named in the Destination Disk section
is the one on which you installed the system software. If it isn’t, click Switch Disk until
the correct disk name appears.
5 Click Install.
6 When the installation is complete, click Quit.
Installing Apple VideoPhone software
After you install Open Transport, follow these steps to install the Apple
VideoPhone software:
1 Open the Apple VideoPhone Install folder on the CD.
2 Double-click the Installer icon to open it, then click Continue.
3 Read the message that appears. If you agree to the terms, click Agree.
4 In the Easy Install dialog box, make sure the disk named in the Destination Disk section
is the one on which you want to install the software. If it isn’t, click Switch Disk until the
correct disk name appears.
11
Page 12

5 Click Install.
6 When the installation is complete, click Quit.
If you don’t want to install the optional software—Timbuktu Pro and Acrobat
Reader—restart your computer. If you want to install the optional software,
go to the next section.
IMPORTANT
If you specified the Apple VideoPhone Kit CD as your startup disk
in the Startup Disk control panel, you must reset the Startup Disk control
panel before you restart your computer. Open the Apple menu and choose
Control Panels, then double-click the Startup Disk control panel to open it. In
the control panel, click the name of the disk you normally use as your startup
disk, then close the control panel and restart your computer.
Installing Farallon Timbuktu Pro (optional)
Timbuktu Pro allows you to share your desktop with other Timbuktu Pro users
and observe and control their computers while conferencing. (A total of 24
MB of RAM is required to use Timbuktu Pro with Apple VideoPhone.)
To install the Timbuktu Pro software, follow these steps:
1 Open the Farallon Timbuktu Pro Install folder on the CD.
2 Double-click the Installer icon to open it.
12
3 Read the message that appears, then click Continue.
4 In the Easy Install dialog box, make sure the disk named in the Destination Disk section
is the one on which you want to install the software. If it isn’t, click Switch Disk until the
correct disk name appears.
5 Click Install.
Page 13

6 When the installation is complete, click Quit.
For information on how to use Timbuktu Pro, see the electronic manual
included in the Timbuktu Pro Install folder on the Apple VideoPhone Kit CD.
Note: To open and read the electronic Timbuktu Pro manual, use the Acrobat
Reader software. For information on how to install the Acrobat Reader
software, see the next section.
Installing Adobe Acrobat Reader (optional)
To install the Acrobat Reader software, follow these steps:
1 Copy the Acrobat Reader Install folder from the CD to your hard disk.
2 Restart your computer.
IMPORTANT
If you specified the Apple VideoPhone Kit CD as your startup disk
in the Startup Disk control panel, you must reset the Startup Disk control
panel before you restart your computer. Open the Apple menu and choose
Control Panels, then double-click the Startup Disk control panel to open it. In
the control panel, click the name of the disk you normally use as your startup
disk, then close the control panel and restart your computer.
3 Open the Acrobat Reader Install folder on your hard disk.
4 Double-click the Installer icon to open it.
5 Read the message that appears, then click Continue.
6 In the Easy Install dialog box, make sure the disk named in the Install Location section is
the one on which you want to install the software. If it isn’t, click Switch Disk until the
correct disk name appears.
7 Click Install.
8 When the installation is complete, click Restart.
13
Page 14

Opening Apple VideoPhone
The Apple VideoPhone program is located on your hard disk, in a folder
named Apple VideoPhone. (If you have more than one hard disk, the folder is
located on the disk you specified in the Easy Install dialog box.)
To open Apple VideoPhone, double-click its icon.
Can’t find Apple VideoPhone? If you can’t find the Apple VideoPhone
program, you need to install the Apple VideoPhone software. For
instructions, see the section “Installing Apple VideoPhone Software,” earlier
in this booklet.
For onscreen instructions on setting up your equipment and using the Apple
VideoPhone program, you can use the Apple VideoPhone Guide. To open the
Guide, make sure Apple VideoPhone is the active program; then, open the
Guide menu (marked with the h icon) and choose Apple VideoPhone Guide.
To improve the performance of Apple VideoPhone, it’s recommended that you
turn off virtual memory. To turn off virtual memory, follow these steps:
14
1 Open the Apple menu and choose Control Panels.
2 Double-click the Memory control panel to open it.
3 In the Virtual Memory section of the Memory control panel, click Off.
4 Close the control panel.
Page 15

Conferencing over the Internet
This section describes how you can use the Apple VideoPhone Kit and a
standard V.34 28.8 modem or ISDN modem to make calls over the Internet.
Before you can access the Internet, you need to register with an Internet
Service Provider.
Registering with an Internet Service Provider
An Internet Service Provider, or ISP, is a company that can provide you with
Internet access. If you are using an ISDN modem, make sure to tell the
provider you choose that you’ll be using ISDN to connect to the Internet.
If you already have an account with a service provider, you can use that account.
Once you have an account with a provider, use the Apple Internet Dialer
program (located in the Extras folder) to connect to the Internet with
your modem.
IMPORTANT
you if you have questions about monthly access charges or billing, or if you
have trouble connecting to the Internet.
The Internet Service Provider with whom you register will help
Setting up the Apple Internet Dialer
Follow these instructions to set up the Apple Internet Dialer:
1 Double-click the Apple Internet Dialer icon, located in the Extras folder inside the Apple
VideoPhone folder.
Can’t find the Apple Internet Dialer? If you can’t find the Apple Internet
Dialer program, you need to install the Apple VideoPhone software. For
instructions, see the section “Installing Apple VideoPhone Software,” earlier
in this booklet.
2 The first time you open the Apple Internet Dialer, a welcome message appears. Read the
text, then click OK.
15
Page 16

3 Enter the appropriate information in each panel. You can advance to the next panel by
clicking Next.
Your Internet Service Provider will give you the appropriate information.
Please consult your Internet Service Provider directly if you have any
questions about what to enter in each panel.
4 In the last panel, click OK.
5 In the Modem pop-up menu, choose the name of your modem.
If you can’t find the name of your modem, choose Add/Modify Modem from
the Modem pop-up menu to create a new modem option.
6 In the Port pop-up menu, choose Modem Port.
7 In the Touch Tone section, click Yes.
If you are in a region that does not support touch-tone dialing and you are
using a standard 28.8 modem, click No.
Note: You can’t use an ISDN modem in a region that does not support
touch-tone dialing.
Connecting to the Internet
16
Once you have entered the Internet Service Provider account information into
the Apple Internet Dialer, you are ready to connect to the Internet.
To connect to the Internet, follow these instructions:
1 If necessary, double-click the Apple Internet Dialer icon.
2 Click Dial Phone.
When you are connected to the Internet, you can open Apple VideoPhone
and connect to other users with Apple VideoPhone or compatible
conferencing software.
Page 17

Disconnecting from the Internet
To disconnect from the Internet, click Disconnect in the Apple Internet
Status window.
IMPORTANT
When you use the Apple Internet Dialer to connect to the
Internet, the dialer automatically replaces the current TCP/IP configuration
with settings that are specific to the dialer. When you are done using the
dialer, you can restore the previous settings in the TCP/IP control panel. Note
that you must restore these settings to continue using your videoconferencing
software in a non-Internet network environment.
To restore your previous settings, follow these steps:
1 Open the Apple (K) menu and choose Control Panels.
2 Double-click the TCP/IP control panel to open it.
3 Choose Configurations from the File menu.
4 Click Default (or the name of the configuration you typically use), then click Make Active.
5 Close the control panel.
Camera technical information
Lens
m Focal length: 6.0 millimeters (mm)
m F-stop: 2.8
m Focus: Manual (2 inches to infinity)
Pick-up system
m Image device: 1/3 inch CCD
m Pixels (approx.): Effective: 250,000 (512 x 492)
Total: 270,000 (542 x 497)
Sensitivity
m Standard illumination: 1,500 lux
m Minimum illumination: 60 Hertz (Hz) mode: 5 lux
50 Hz mode: 10 lux
m Maximum illumination: 100,000 lux
17
Page 18

Video output signals
m Signal type: NTSC composite
m Impedance: 75 ohms
m Level: 1.0± 20% Vp-p (75 ohms terminated)
m Signal-to-noise ratio: 46 decibels (dB) (weighted)
m Horizontal resolution: 320 TV lines (center portion)
Power
m Voltage: DC 11 ~ 16 volts (V)
m Consumption: 1.9 watts (W) (typical)
Connectors
m DC input: 5.5-mm diameter
-
+
m Video output: RCA standard jack
General
m Weight: Approx. 200 grams
m Size (mm): 75 (height) x 75 (width) x 124 (depth)
m White balance: Automatic
(control range 2,700º Kelvin [K] ~ 6500º K)
m Exposure: Automatic (use iris adjustment knob to adjust
the aperture manually)
m Cable length: Integrated cable, 8 feet
AC power adapter
m Voltage: DC 11 ~ 16 V
m Consumption: Approx. 1.9 W (typical)
m DC input: 5.5-mm diameter
-
+
18
Page 19

Communications regulation information
FCC statement
This equipment has been tested and found to comply with the limits for a Class B digital device
in accordance with the specifications in Part 15 of FCC rules. See instructions if interference to
radio or television reception is suspected.
Radio and television interference
The equipment described in this manual generates, uses, and can radiate radio-frequency
energy. If it is not installed and used properly—that is, in strict accordance with Apple’s
instructions—it may cause interference with radio and television reception.
This equipment has been tested and found to comply with the limits for a Class B digital device
in accordance with the specifications in Part 15 of FCC rules. These specifications are designed
to provide reasonable protection against such interference in a residential installation. However,
there is no guarantee that interference will not occur in a particular installation.
You can determine whether your computer system is causing interference by turning it off. If
the interference stops, it was probably caused by the computer or one of the peripheral devices.
If your computer system does cause interference to radio or television reception, try to correct
the interference by using one or more of the following measures:
m Turn the television or radio antenna until the interference stops.
m Move the computer to one side or the other of the television or radio.
m Move the computer farther away from the television or radio.
m Plug the computer into an outlet that is on a different circuit from the television or radio.
(That is, make certain the computer and the television or radio are on circuits controlled by
different circuit breakers or fuses.)
If necessary, consult an Apple-authorized service provider or Apple. See the service and support
information that came with your Apple product. Or, consult an experienced radio/television
technician for additional suggestions.
IMPORTANT
could void the FCC Certification and negate your authority to operate the product.
This product was tested for FCC compliance under conditions that included the use of Apple
peripheral devices and Apple shielded cables and connectors between system components. It is
important that you use Apple peripheral devices and shielded cables and connectors between
system components to reduce the possibility of causing interference to radios, television sets,
and other electronic devices. You can obtain Apple peripheral devices and the proper shielded
cables and connectors through an Apple-authorized dealer. For non-Apple peripheral devices,
contact the manufacturer or dealer for assistance.
Changes or modifications to this product not authorized by Apple Computer, Inc.,
19
Page 20
Industry Canada statement
This Class B device meets all requirements of the Canadian Interference-Causing equipment
regulations.
Cet appareil numérique de la Class B respecte toutes les exigences du Règlement sur le matériel
brouilleur du Canada.
VCCI Class 2 statement
20
Page 21

Apple
VideoPhone Kit
Installation Manual
Page 22

K Apple Computer, Inc.
© 1996 Apple Computer, Inc. All rights reserved.
Under the copyright laws, this manual may not be copied, in whole or in part, without the
written consent of Apple. Your rights to the software are governed by the accompanying
software license agreement.
The Apple logo is a trademark of Apple Computer, Inc., registered in the U.S. and other
countries. Use of the “keyboard” Apple logo (Option-Shift-K) for commercial purposes without
the prior written consent of Apple may constitute trademark infringement and unfair
competition in violation of federal and state laws.
Every effort has been made to ensure that the information in this manual is accurate. Apple is
not responsible for printing or clerical errors.
Apple Computer, Inc.
1 Infinite Loop
Cupertino, CA 95014-2084
408-996-1010
http://www.apple.com
Apple, the Apple logo, Mac OS, Macintosh, Power Macintosh, and QuickTime are trademarks
of Apple Computer, Inc., registered in the U.S. and other countries.
Disk First Aid is a trademark of Apple Computer, Inc.
Adobe and Acrobat are trademarks of Adobe Systems Incorporated or its subsidiaries and may
be registered in certain jurisdictions.
PowerPC and the PowerPC logo are trademarks of International Business Machines
Corporation, used under license therefrom.
UNIX is a registered trademark in the United States and other countries, licensed exclusively
through X/Open Company, Ltd.
Simultaneously published in the United States and Canada.
Mention of third-party products is for informational purposes only and constitutes neither an
endorsement nor a recommendation. Apple assumes no responsibility with regard to the
performance or use of these products.
 Loading...