

Page 1

The Xerox DocuPrint
N3225 and N4025
Network Laser Printers
User Guide
Page 2

Copyright protection claimed includes all forms of matters of
copyrightable materials and information now allowed by
statutory or judicial law or hereinafter granted, including without
limitation, material generated from the software programs which
are displayed on the screen such as styles, templates, icons, screen
displays, looks, etc.
Printed in the United States of America.
XEROX® and all Xerox product names and product numbers
mentioned in this publication are registered trademarks of the
Xerox Corporation. Other company trademarks are also
acknowledged. PCL is a trademark of the Hewlett-Packard
Company. MS, MS-DOS, Windows NT, Microsoft LAN Manager,
Windows 95 and Windows 98 are trademarks of Microsoft
Corporation. Adobe® and PostScript® are trademarks of Adobe
Systems Incorporated. TrueType is a trademark of Apple
Computer, Inc. OS/2 is a trademark of International Business
Machines. Sun and Solaris are trademarks of Sun Corporation.
This printer contains emulations of Hewlett-Packard PCL 5e and
PCL 6 command languages (recognizes HP PCL 5e and PCL 6
commands) and processes these commands in a manner
compatible with Hewlett Packard LaserJet printer products.
This product includes an implementation of LZW licensed under
U.S. Patent 4.558.302.
Changes are periodically made to this document. Technical
updates will be included in subsequent editions.
Copyright ©2000, Xerox Corporation. All Rights Reserved.
Page 3

Contents i
Safety Notes ................................................................ 1
Note, Caution and Warning Symbols ...................................... 2
Electrical Safety ...................................................................... 3
Maintenance Safety................................................................ 4
Operational Safety ................................................................. 5
Chapter 1
Getting to Know Your Printer
Introduction ........................................................................ 1-3
Printer Features ................................................................... 1-4
Paper Handling ................................................................ 1-4
Automatic Tray Sequencing .............................................. 1-6
Connectivity ..................................................................... 1-7
Page Description Languages ............................................. 1-8
Edge to Edge Printing ....................................................... 1-8
Automatic Language Sensing and Switching ..................... 1-8
Resolution ........................................................................ 1-9
Fonts................................................................................ 1-9
Automatic Font/Macro Saving .......................................... 1-9
Print Speed .................................................................... 1-10
..................................
User Guide
1-1
Page 4

Memory Expansion......................................................... 1-10
Hard Disk Drive Option .................................................. 1-11
Secure Printing ............................................................... 1-11
Proof Printing ................................................................. 1-11
Send Once, RIP Once, Print Many................................... 1-12
Power Saver ................................................................... 1-13
Printer Generated Reports............................................... 1-14
Printer Components........................................................... 1-15
Printing a Configuration Sheet ........................................... 1-18
Printer Documentation ...................................................... 1-19
Printed Documentation .................................................. 1-19
Product CD .................................................................... 1-20
Printer Management Software CD .................................. 1-20
Chapter 2
Chapter 3
Loading Print Media
Selecting Print Media........................................................... 2-2
Storing Paper ...................................................................... 2-7
Loading Paper ..................................................................... 2-8
Trays 1, 2, and 3 (if installed) .......................................... 2-9
Trays 4 and 5 in the 2,500 Sheet Feeder ........................ 2-14
50 Sheet Bypass Feeder .................................................. 2-17
100 Envelope Feeder ...................................................... 2-23
Automatic Tray Switching .................................................. 2-24
Paper Size/Type Mismatch ............................................. 2-25
Duplex (Two-Sided) Printing .............................................. 2-26
Printing
Introduction ........................................................................ 3-2
Using the Printer Drivers ...................................................... 3-3
...................................................................
Installing the Printer Drivers ............................................. 3-4
Configuring the Printer Drivers.......................................... 3-4
Using the Driver’s Features ............................................... 3-5
...............................................
2-1
3-1
User Guide
Using the Control Panel ....................................................... 3-9
Page 5

The Display.................................................................... 3-10
The Indicator Lights........................................................ 3-11
The Keys ........................................................................ 3-12
Menu Options ................................................................ 3-14
Printing a Password Job.................................................. 3-28
Deleting a Password Job ................................................. 3-29
Generating a Printer Report ............................................ 3-30
Using the 10-bin Mailbox/Collator.................................. 3-31
Duplex Printing .............................................................. 3-32
Using the Finisher .............................................................. 3-34
Features ......................................................................... 3-34
Bin Capacity................................................................... 3-37
Stapling Positions ........................................................... 3-38
Paper Output Exception Conditions................................. 3-43
Chapter 4
Chapter 5
Maintaining the Printer
Regular Printer Maintenance................................................ 4-2
Cleaning the Printer ......................................................... 4-2
Replacing the Laser Print Cartridge ...................................... 4-3
Standard Configuration.................................................... 4-4
Duplex Configuration ....................................................... 4-7
Replacing the Maintenance Kit........................................... 4-10
Adding Staples to the Finisher ............................................ 4-11
Troubleshooting
Before You Begin Troubleshooting ........................................ 5-3
Hardware......................................................................... 5-4
Software .......................................................................... 5-4
Trays and Covers.............................................................. 5-4
Consumables ................................................................... 5-4
Error Messages .................................................................... 5-5
Paper Jams .......................................................................... 5-6
What Causes a Paper Jam?............................................... 5-6
......................................................
...........................................
4-1
5-1
User Guide
Page 6

Clearing Paper Jams ......................................................... 5-6
Clearing Area A (Without Duplex Module) ...................... 5-14
Clearing Area A (With Duplex Module) ........................... 5-16
Clearing Area B .............................................................. 5-18
Clearing Area C.............................................................. 5-18
Clearing Area D.............................................................. 5-19
Clearing Area E .............................................................. 5-20
Clearing Area F............................................................... 5-20
Clearing Area G.............................................................. 5-21
Clearing Area H.............................................................. 5-21
Clearing Tray 5 .............................................................. 5-22
Clearing the Duplex Module ........................................... 5-24
Solving Printing Problems .................................................. 5-26
Solving Print Quality Problems ........................................... 5-30
Additional Sources of Troubleshooting Assistance ............... 5-38
Appendix A
Appendix B
Printer Specifications
Notices and Certifications
FCC Notices...USA ............................................................... B-2
Radio Frequency ............................................................... B-2
Certifications...Canadian ..................................................... B-5
60 HZ, 115V.................................................................... B-5
European Markets ............................................................... B-6
EN55022......................................................................... B-7
Safety Extra Low Voltage Approval....................................... B-8
...............................................
.......................................
A-1
B-1
User Guide
Page 7

Safety Notes
The printer and its recommended consumable supplies
have been designed and tested to meet strict safety
requirements. Attention to the following notes will ensure
the continued safe operation of your printer.
❖ 1
Page 8
Note, Caution and Warning Symbols
Note, Caution and Warning
Symbols
Throughout this User Guide and the other printer guides,
several symbols are used to emphasize useful, important
and critical information. They are as follows:
This symbol indicates particularly useful or helpful
information about your printer.
This symbol indicates a caution against performing any
action that may damage your printer or degrade
performance.
2 ❖ User Guide
This symbol indicates a warning against performing any
action that may lead to physical injury.
When these symbols are used within a step they are
smaller, but equally important.
Page 9

Electrical Safety
Electrical Safety
• Use the power cord supplied with your printer.
• Do not place the printer where people may step on the
power cord.
• Do not place objects on the power cord.
• Do not override or disable electrical or mechanical
interlocks.
• Do not block or cover slots and openings on the
printer. Without adequate ventilation, the printer may
overheat.
Do not push objects into slots and openings on the
printer. Making contact with a voltage point or shorting
out a part could result in fire or electrical shock.
• If you notice unusual noises or odors, Power Off the
printer immediately and disconnect the power cord
from the electrical outlet. Call the manufacturer or
your dealer to correct the problem.
• If you notice that the power cord is damaged or that
the printer may have been accidentally damaged,
Power Off the printer immediately, disconnect the
power cord, and call the manufacturer or your dealer.
❖ 3
Page 10

Maintenance Safety
Maintenance Safety
• Do not attempt any maintenance procedure that is not
specifically described in the documentation supplied
with your printer.
• Do not use aerosol cleaners. The use of unapproved
supplies can cause poor performance and could create
a dangerous situation.
• Do not let dust accumulate on the printer; use a
slightly damp cloth to remove dust.
• Use the supplies and cleaning materials only as
directed in this manual. Keep all these materials out of
the reach of children.
• Do not remove the covers or guards that are fastened
with screws unless you are installing optional
equipment. There are no parts that you can maintain
or service behind these covers.
• Follow the maintenance procedures provided in
Chapter 4.
4 ❖ User Guide
Page 11

Operational Safety
Operational Safety
Your printer and supplies were designed and tested to
meet strict safety requirements. These include safety
agency examination, approval, and compliance with
established environmental standards.
Your attention to the following safety guidelines will help
to ensure the continued safe operation of your printer.
• Use the materials and supplies specifically designed for
your printer. The use of unsuitable materials may result
in poor performance and possibly a hazardous
situation.
• Follow all warnings and instructions marked on, or
supplied with, the printer.
• Place the printer in a dust free area where the
temperature range is 41 to 95
relative humidity is 15 to 85%.
• Choose a location for the printer with sufficient space
around it for operation and maintenance.
• Place the printer in an area where there is adequate
space for ventilation and servicing. The recommended
spacing is 10 in. (25cm) behind the printer, 10 in.
(25 cm) on either side of the printer, 24 in. (61 cm) in
front of the printer and 30 in. (75 cm) above the
printer.
• Do not subject your printer to severe changes in
temperature and/or humidity.
o
F (5 to 35oC) and the
❖ 5
Page 12

Operational Safety
• Do not place the printer near a heat source or in direct
sunlight.
• Do not place the printer in line with the cold air flow
from an air-conditioning system.
• Place the printer on a level, solid surface with adequate
strength for the weight of the machine. The weight of
the printer without any packing materials is 99-105
lbs. (45-48 kg).
• If you plan to move the printer, always make sure that
the print cartridge carrier is in its rest position. To
ensure this, Power Off your printer before you Power
Off your computer.
• Take care not to drop your printer.
• Repack your printer in its original carton, whenever
possible, to transport or ship it. Be sure to remove the
toner cartridge before packing the printer.
• Frequent operation of the Power switch is not
recommended.
• Do not Power Off the printer while printing.
6 ❖ User Guide
• Do not move the printer while printing.
Page 13

Getting to Know Your Printer Chapter1
Introduction ...................................................................... 1-3
Printer Features ................................................................. 1-4
Paper Handling .............................................................. 1-4
Automatic Tray Sequencing ............................................ 1-6
Connectivity ................................................................... 1-7
Page Description Languages ........................................... 1-8
Edge to Edge Printing ..................................................... 1-8
Automatic Language Sensing and Switching ................... 1-8
Resolution ...................................................................... 1-9
Fonts .............................................................................. 1-9
Automatic Font/Macro Saving ........................................ 1-9
Print Speed .................................................................. 1-10
Memory Expansion ....................................................... 1-10
Hard Disk Drive Option ................................................ 1-11
Secure Printing ............................................................. 1-11
Proof Printing ............................................................... 1-11
Send Once, RIP Once, Print Many ................................. 1-12
Power Saver ................................................................. 1-13
Chapter 1: Getting to Know Your Printer ❖ 1-1
Page 14

Getting to Know Your Printer
Printer Generated Reports ............................................. 1-14
Printer Components ......................................................... 1-15
Printing a Configuration Sheet ......................................... 1-18
Printer Documentation .................................................... 1-19
Printed Documentation ................................................ 1-19
Product CD .................................................................. 1-20
Printer Management Software CD ................................ 1-20
1-2 ❖ User Guide
Page 15

Introduction
Introduction
In this chapter you will become familiar with the features
of your printer and learn where to locate specific printer
parts.
Before you use your printer, make sure that you perform
all the steps outlined in the Quick Install Guide that came
with the printer and install the necessary cables.
Your printer may have one or more optional features
installed. First verify your exact equipment options before
proceeding further. If you see features described in this
section that are not available with the equipment you
have, you can easily add them yourself. For more
information, see the separate Supplies/Options Guide
provided with your printer.
There are two different printer configurations:
•The tabletop configuration.
• The console configuration (sitting on top of the
optional 2,500 Sheet Feeder).
Samples of each configuration are shown later in this
chapter; however, the figures throughout this guide may
show either configuration when illustrating a feature or
procedure.
Chapter 1: Getting to Know Your Printer ❖ 1-3
Page 16

Printer Features
Printer Features
Your printer has many special features that allow you to
achieve the results you need for your specific print job.
Features vary slightly according to the options you are
using and the memory installed in the printer. This
section will help you become familiar with your printer’s
features and capabilities.
Paper Handling
Your printer has several paper input source and paper
output options as described below. For a listing of
supported media types and sizes, refer to “Acceptable media
sizes and capacities for input trays” (page 2-4) and
“Acceptable media sizes and capacities for output bins”
(page 2-6).
Standard Input Sources
The printer comes with three standard input sources:
• Tray 1 (500 sheets)
• Tray 2 (500 sheets)
• Bypass Feeder (50 sheets)
Input Options
Two input options are available:
•The 2,500 Sheet Feeder consists of one 500 sheet tray
and two 1,000 sheet trays, increasing the total input
capacity to 3,500 sheets.
•The 100 Envelope Feeder holds 100 envelopes. It
replaces the 50 Sheet Bypass Feeder.
1-4 ❖ User Guide
Page 17

Printer Features
Standard Output
The printer comes with two standard output destinations.
•The 200 Sheet Face-up Bin holds up to 200 sheets of
Letter/A4 paper.
•The 500 Sheet Face-down Bin with offset capability
holds up to 500 sheets of paper and can offset print
jobs.
Output Options
Two additional output destinations are available.
•The 10-bin Mailbox/Collator sits on top of the
Face-down Bin. Output can be directed to any one of
its 10 bins, and each bin has a capacity of 100 sheets of
20 lb. paper. There are two different Mailbox/Sorter
modes:
— Mailbox Mode: Each mailbox bin can be addressed
individually using the job destination functionality
contained in the printer driver.
— Sorter Destination Mode: The mailbox works like a
copier sorter when multiple sets are printed. When
up to 10 sets are requested, the first set is sent to Bin
1, the second set to Bin 2, and so on.
If more than 10 sets are selected, the entire job is sent
to the Face-down Bin.
Chapter 1: Getting to Know Your Printer ❖ 1-5
Page 18

Printer Features
• 2000 Sheet Finisher can be installed only on console
versions of the printer (i.e., versions which have the
2,500 Sheet Feeder). It has three output bins with a
total maximum capacity of 2,000 unstapled sheets, up
to 667 unstapled sheets per bin. There is stapling
capability for all three bins. Stapled output is delivered
face down.
The stapler can staple sets of up to 50 sheets. It has
three stapling positions.
The customer-replaceable stapling cartridge contains
5,000 staples.
Duplex Printing
You can print two-sided documents when you install the
Duplex Module option.
Refer to the Supplies/Options Guide for information about
ordering printer input and output options.
Automatic Tray
Sequencing
The printer allows you to set automatic tray sequencing
for jobs. When an input tray runs out of paper, the printer
automatically switches to another tray (if another tray is
loaded with the same size and type paper). That means
you don't have to load paper as often. You can also install
the optional 2,500 Sheet Feeder (with one 500 sheet tray
and two 1,000 sheet trays) to extend your printing
capacity.
1-6 ❖ User Guide
Page 19

Printer Features
Connectivity
The printer contains the following standard interfaces for
connecting to a host computer or network:
• IEEE 1284 Parallel
• Universal Serial Bus (USB)
• 10/100Base-T Ethernet
Optional interfaces:
• 10Base2 Ethernet
•Token Ring
• RS232 Serial
Installing an optional network interface disables the onboard 10/100Base-T Ethernet interface. Removing an
optional network interface enables the on board 10/
100Base-T Ethernet functionality again.
For information about supported network environment
and protocols, refer to the Technical Information Guide on
your Product CD.
Chapter 1: Getting to Know Your Printer ❖ 1-7
Page 20

Printer Features
Page Description
Languages
Edge to Edge Printing
Automatic Language
Sensing and
Switching
Your printer includes these Page Description Languages
(PDLs):
• An emulation of HP PCL 5e
•An emulation of HP PCL 6
•An emulation of HP PJL
• Adobe PostScript 3
You can print PostScript and PCL Emulation jobs all the
way to the edge of the page. However, there is a 4 mm
border on all edges, with all paper sizes, where print
quality cannot be guaranteed.
Edge to Edge printing may be selected via the Control
Panel for PCL jobs or via print drivers for both PCL and
PostScript jobs. Note that selecting this feature will cause
PCL jobs printing to be shifted up to the top of the page
and left to the edge of the page.
The printer can process both PCL and PostScript jobs.
When the printer's Language Sensing option is on, the
printer samples the incoming data stream to determine
which language the print job requires. The printer then
switches to the proper interpreter for that job.
1-8 ❖ User Guide
Language Sensing can be set individually for each port, or
protocol within a port, from the Parallel, Serial, USB,
Ethernet, Token Ring, and Novell Menus by setting the
appropriate PDL setting as the default.
With the Language Sensing option on, the printer
automatically samples each print job and switches to the
appropriate processing language.
Page 21

Printer Features
Resolution
Fonts
Automatic Font/
Macro Saving
The printer provides the following resolutions:
• 600 x 600 dots per inch (dpi)
• 1200 x 1200 dpi quality
• 300 x 300 dpi (PCL 5e only)
The printer is set to print at 600 x 600 dpi (dots per inch).
You can also print draft-quality jobs in which the printer
automatically reduces the amount of toner by two-thirds
(and prints a draft-quality output). Draft Mode can be
selected on a per job basis from the printer drivers.
The PCL emulations use TrueType, Intellifont and bitmap
fonts. There are 35 Intellifont fonts and 10 TrueType fonts
resident in the printer. Other fonts many be downloaded
to system RAM, Flash Memory or the optional hard disk.
PostScript 3 includes 136 fonts, of which 39 are resident
in the printer. The remaining fonts are available on the
product CD for downloading to system RAM, Flash
Memory or the optional hard disk.
When you are printing both PostScript and PCL jobs, the
printer will automatically save downloaded fonts, macros,
and the entire PostScript environment when it switches
Printer Description Languages. This saves you from
having to download fonts, macros, and headers every
time the program switches between PostScript and PCL.
Chapter 1: Getting to Know Your Printer ❖ 1-9
Page 22

Printer Features
Print Speed
Memory Expansion
Print speed depends on the model/configuration of your
printer and the complexity of your print jobs. Maximum
rated print speed is either 32 ppm or 40 ppm.
The base printer contains 12 MB of Flash memory and 32
MB of DRAM installed as standard. There are three option
slots each supporting 16, 32, or 64 MB DRAM DIMMS or 8
MB Flash ROM DIMMs.
The maximum DRAM memory, both on-board and added
via DIMMs is 192 MB. Memory added beyond this limit is
ignored.
Additional memory provides the following enhanced
printer capabilities:
• Additional font cache
• Additional download space for fonts, macros and
images
• Increased throughput for complex pages, duplex pages
and larger paper sizes (A3/Ledger)
• Increased PostScript VM
• Collated sets without the Hard Disk Drive
1-10 ❖ User Guide
You can essentially increase the resident fonts of the
printer or create resident macros by installing Flash
DIMMs and downloading resources permanently to this
memory.
Flash Memory DIMMs are installed in the same way as
DRAM DIMMs and in the same slots. Refer to the
instructions packed with the DIMMs or to Appendix C of
the System Administrator Guide on the CD-ROM.
Page 23

Printer Features
Hard Disk Drive
Option
Secure Printing
Proof Printing
An optional Hard Disk Drive is also available, and is used
for storing fonts, forms and macros, enabling secure and
proof job printing and automatic collation of multiple
sets of a document. (Refer to Chapter 3 of the System
Administrator Guide for more information about using the
Hard Disk Drive to download fonts and macros.)
The printer allows users to define and control what are
called “secure jobs.” When a secure job is sent to the
printer, printing is delayed until the password associated
with that job is entered at the printer’s Control Panel.
Secure jobs are defined and enabled either via printer
drivers or via a sequence of PJL commands. (Refer to
Chapter 3 of the System Administrator Guide). This feature
requires the Hard Disk Drive option.
The printer allows you to view and proofread the first set
of a multiple set job before printing the remaining sets.
This is called “proof printing”. When you send a proof job
to the printer, only the first set is printed immediately.
You can then go to the printer and proof the first set.
Depending on the outcome of the proofing, you can then
decide either to continue printing the remaining sets or to
delete the job by entering the Password Menu via the
Printer Control Panel. Proof printing jobs are defined and
enabled either via the printer drivers or via a sequence of
PJL commands. (Refer to Chapter 3 of the System
Administrator Guide). This feature requires the Hard Disk
Drive option.
Chapter 1: Getting to Know Your Printer ❖ 1-11
Page 24

Printer Features
Send Once, RIP Once,
Print Many
The printer driver sends data to the printer only once,
regardless of the number of copies specified. This
conserves valuable network resources and allows users to
resume their applications quickly.
Once the data reaches the printer, it analyzes the job to
determine the amount of memory the rasterized data will
require. If there is sufficient memory, it will perform
Raster Image Processing (RIP) only once and hold the
rasterized pages in memory for use in printing each
successive copy.
Rasterizing is a time consuming part of the printing
process. On many small group laser printers, raster
processing is repeated for each successive copy. The ability
of the printer’s intelligence to determine that particular
jobs need to be rasterized once allows multiple sets to be
produced at rated printer speeds. This enhances job
performance.
Send Once, RIP Once, Print Many is performed
automatically by the printer.
1-12 ❖ User Guide
Page 25

Printer Features
Power Saver
After 60 minutes of inactivity, the printer automatically
turns off internal components to reduce the amount of
electricity used. The printer automatically turns those
components back on when it receives a print job.
Using the printer's Control Panel menu system, you can
send the printer into Power Saver mode after your choice
of 15, 30, 60, 90, 120 or 180 minutes of inactivity. Sixty
minutes is the default. You can also disable the Power
Saver mode entirely.
Chapter 1: Getting to Know Your Printer ❖ 1-13
Page 26

Printer Features
Printer Generated
Reports
You can print any of the following reports from the Print
Menu.
• The Configuration Sheet lists printer name, software
revision level, communication parameters settings,
options installed, current option setting in the Control
Panel's menu system and print counts.
• The PCL Demo provides a sample of the printer's
capabilities and lists the printer's key features.
• The PCL Font List shows the PCL fonts that are
currently available. The list includes resident fonts,
fonts stored on the hard disk or flash memory and
permanent fonts downloaded to system memory.
• The PS Font List shows the PostScript fonts that are
currently available. The list includes resident fonts,
fonts stored on the hard disk or downloaded to system
memory.
• The Menu Map option prints a page showing the
structure of the control panel menu tree.
• The Test Print is used by service and repair technicians
if problems occur with the printer.
• The Disk Directory lists disk statistics and the disk file
system directory, including fonts, forms, and macros.
1-14 ❖ User Guide
• The Flash Directory prints a copy of the flash directory.
• The Fault History lists the last 100 faults that occurred
in the printer.
See Chapter 3: Configuring the Printer in this User Guide and
Chapter 1 of the System Administrator Guide for
information about the Print Menu.
Page 27
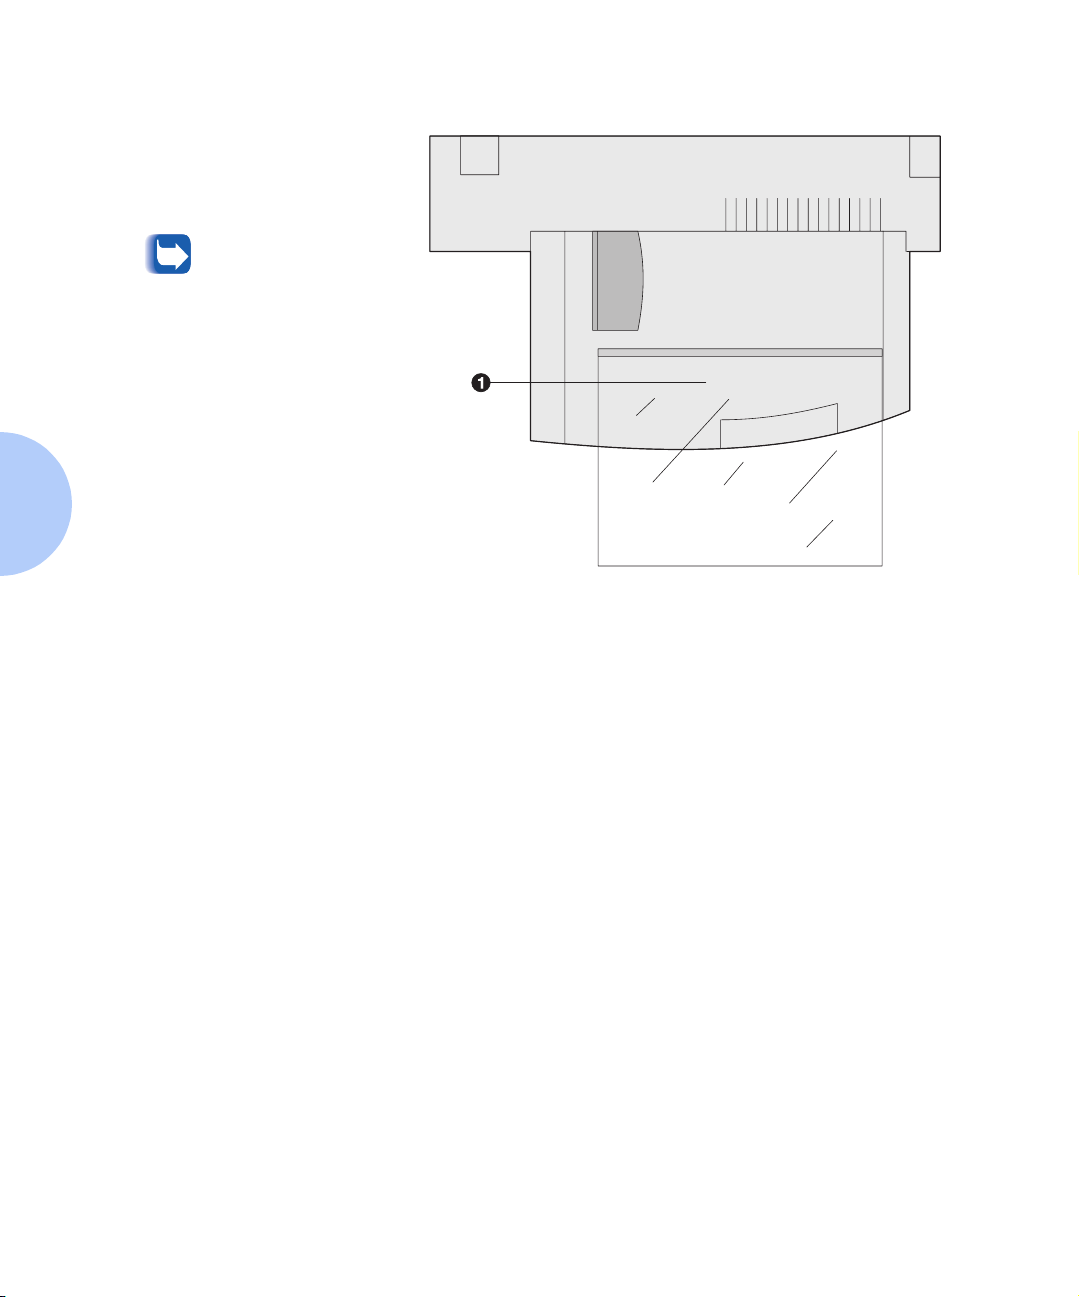
Printer Components
The major components of the printer are indicated in
Figures 1.1 to 1.4.
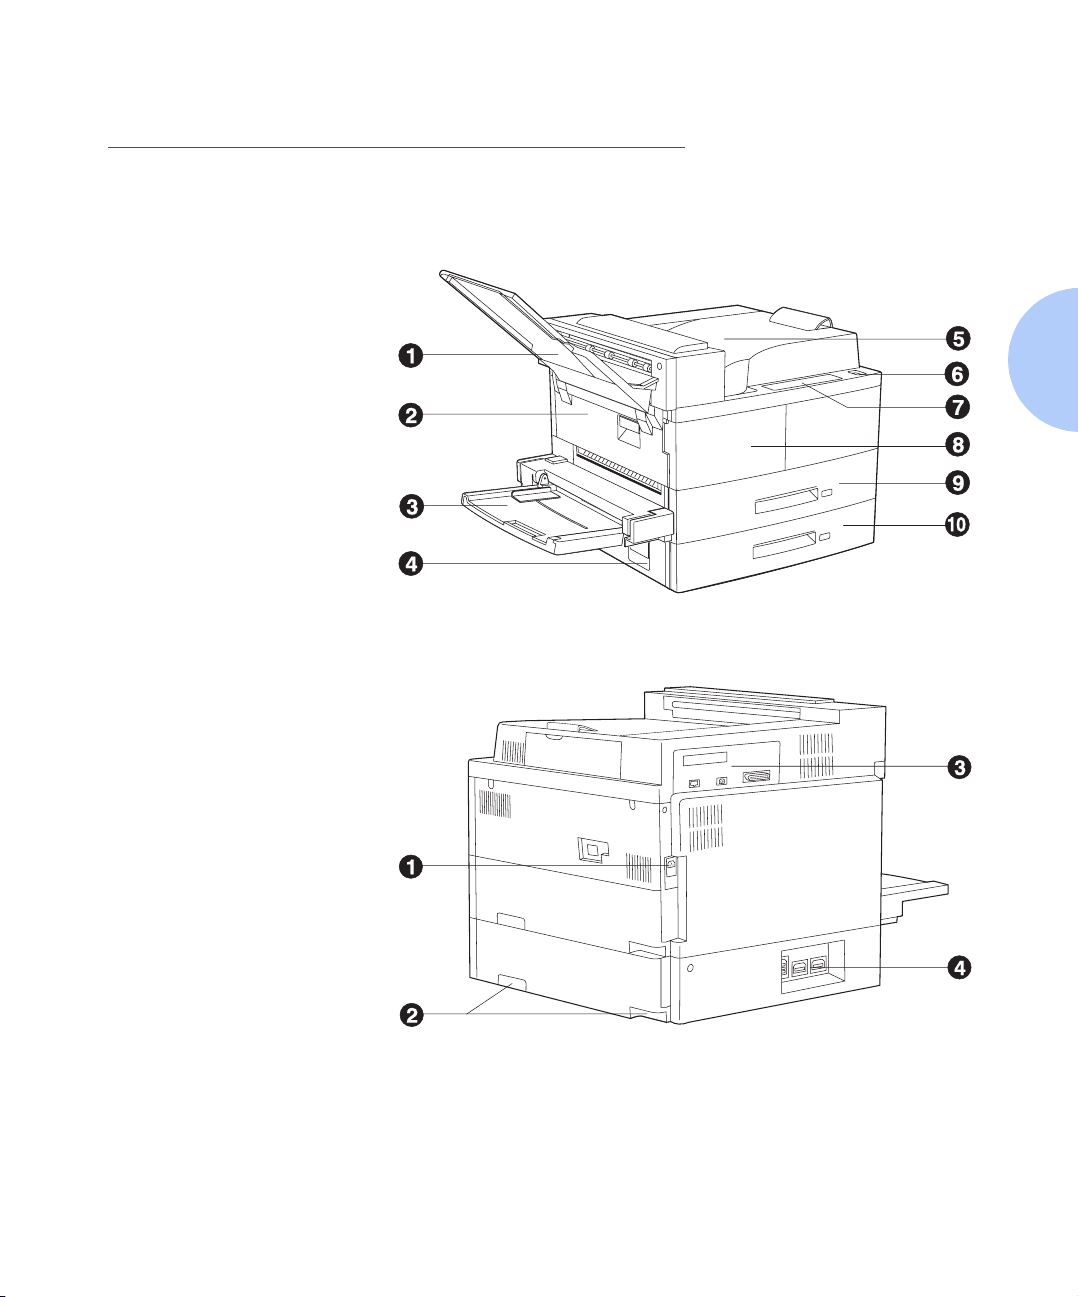
Figure 1.1 Base printer components
Front View
1 Face-up Output Bin
2 Door A
3 50 Sheet Bypass Feeder
4 Door B
5 Face-down Output Bin
6 Power switch
7 Control Panel
8 Front cover
9 Paper Tray 1
10 Paper Tray 2
Printer Components
Rear View
1 Power cord receptacle
2 Hand grips
3 Controller Board with host/
network interface ports.
4 Connectors for optional
2,500 Sheet Feeder, 10-bin
Mailbox/Collator, Finisher
and Duplex Module
Chapter 1: Getting to Know Your Printer ❖ 1-15
Page 28
Printer Components
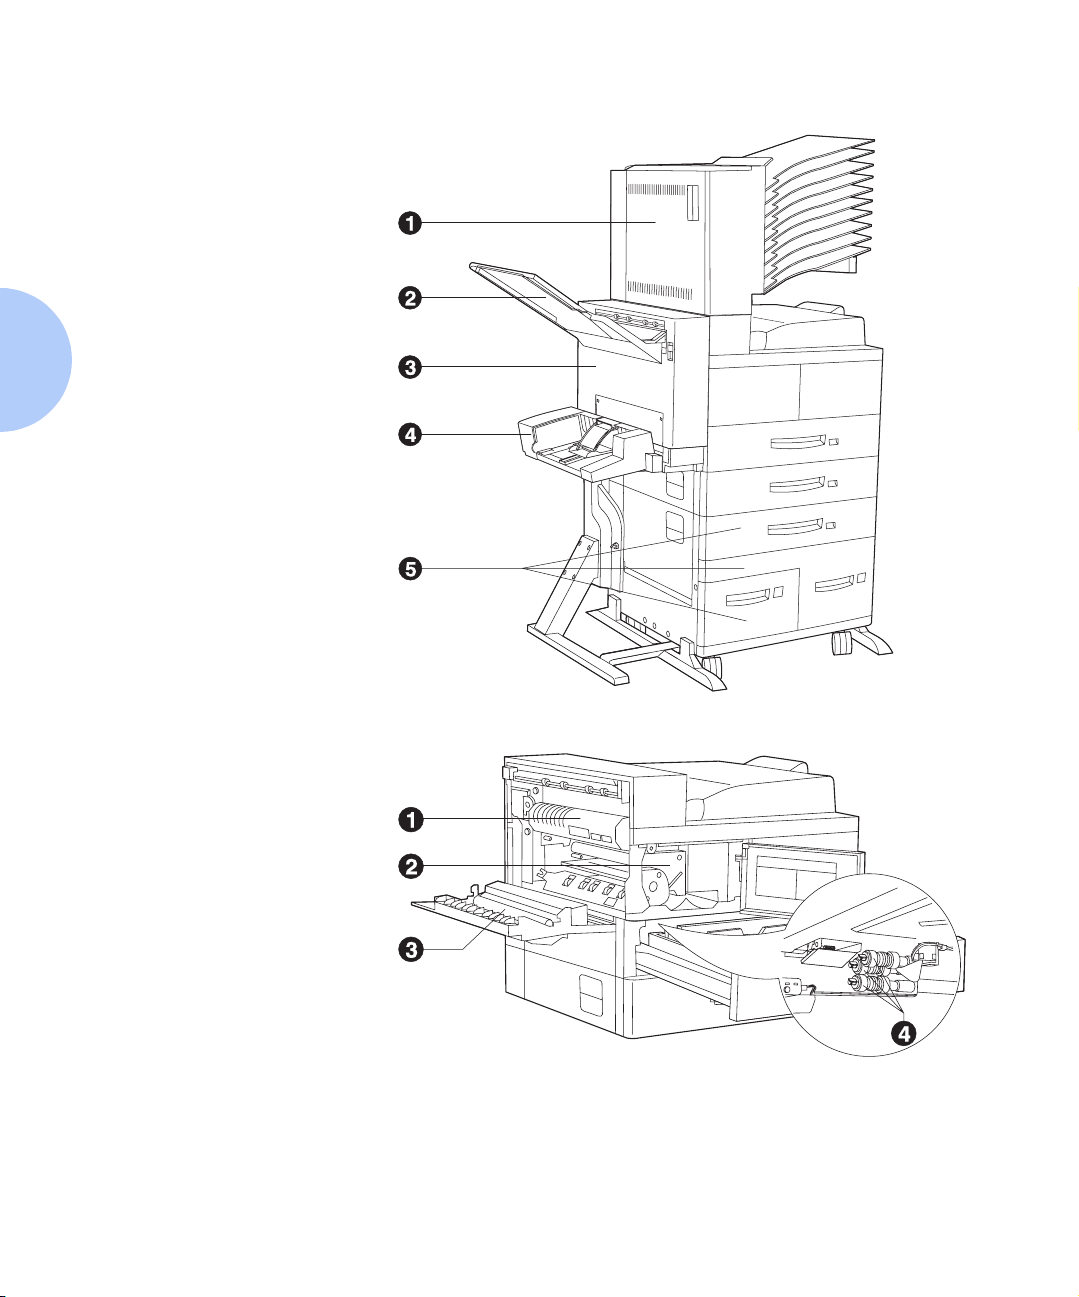
Figure 1.2 Console configuration with options
Front View
1 10-bin Mailbox/Collator
2 Face-up Output Bin
3 Duplex Module
4 100 Envelope Feeder
5 2,500 Sheet Feeder (with
Paper Trays 3, 4, and 5)
Figure 1.3 Customer replaceable components
Front View, Covers Open
1 Fuser
2 Laser Print Cartridge
3 Bias Transfer Roll (BTR)
4 Feedrolls
1-16 ❖ User Guide
Page 29
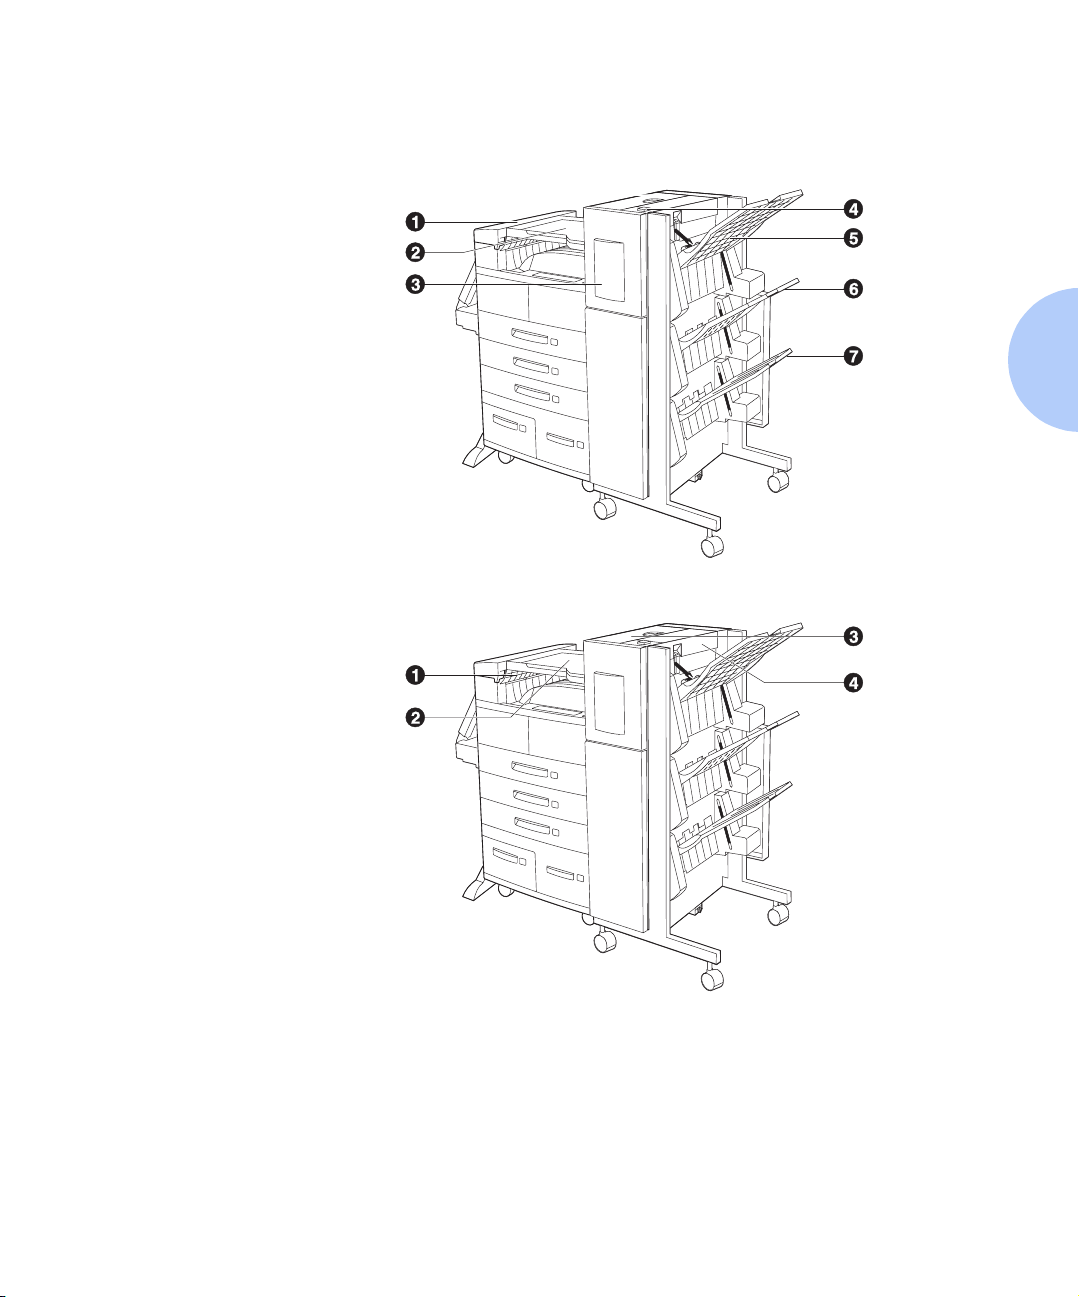
Figure 1.4 Finisher components
Front View
1 Transport Cover
2 Paper Transport
3 Staple Access Door
4 Unload Button
5 Output Bin 1
6 Output Bin 2
7 Output Bin 3
Printer Components
Top Vie w
1 Area E
2 Area F
3 Door G
4 Area H
Chapter 1: Getting to Know Your Printer ❖ 1-17
Page 30

Printing a Configuration Sheet
Printing a Configuration Sheet
A very convenient way of both testing basic printer
operation and determining how your printer is configured
is to print a Configuration Sheet.
The following operator sequence from the printer Control
Panel will cause a Configuration Sheet to be printed:
1. Press Menu Up or Menu Down until you see:
Menus
Print Menu
on the Display.
2. Press Item Up or Item Down until you see:
Print Menu
Config Sheet
on the Display.
3. Press Enter . The Configuration Sheet will be
printed.
1-18 ❖ User Guide
Page 31

Printer Documentation
Printer documentation is provided in several different
places. This section will serve as an initial roadmap to that
documentation.
Printer Documentation
Printed
Documentation
You have received the following pieces of documentation:
1. A Quick Install Guide which shows you how to get the
printer up and running.
2. This User Guide which provides you with the basic
information needed to use your printer. (More
detailed user information is contained in your System
Administrator Guide on your product CD.)
3. The Quick Network Install Guide which briefly shows
you how to connect your printer to a network in your
specific environment. (More detailed Network/
Environment information is contained in the
Technical Information Guide on your product CD.)
Chapter 1: Getting to Know Your Printer ❖ 1-19
Page 32

Printer Documentation
Product CD
This CD contains the following pieces of information:
•The User Guide
•The System Administrator Guide
The System Administrator Guide also contains a
considerable amount of more detailed user
information.
The documents on the CD are provided as PDF files with
hyperlink capabilities that allow you to easily jump to and
access different areas of the document. In addition, after
you access the page or pages of information that you are
seeking, you can print the page(s) that you need rather
than print the entire chapter or the manual. If you do not
have a PDF reader on your system, you can also install
one from this CD.
Printer drivers are also contained on this CD. The majority of
driver documentation is provided via the HELP files included
with the drivers.
Printer Management
Software CD
1-20 ❖ User Guide
User Guides are provided for each of the major printer
management utilities. Consult the booklet enclosed with
each CD for more information.
Since these CDs provide so much important information,
please ensure that you store them in a safe place.
Page 33

Loading Print Media Chapter2
Selecting Print Media ......................................................... 2-2
Storing Paper .................................................................... 2-7
Loading Paper ................................................................... 2-8
Trays 1, 2, and 3 (if installed) ........................................ 2-9
Trays 4 and 5 in the 2,500 Sheet Feeder ...................... 2-14
50 Sheet Bypass Feeder ................................................ 2-17
100 Envelope Feeder .................................................... 2-23
Automatic Tray Switching ................................................ 2-24
Paper Size/Type Mismatch ........................................... 2-25
Duplex (Two-Sided) Printing ............................................ 2-26
Chapter 2: Loading Print Media ❖ 2-1
Page 34

Selecting Print Media
Selecting Print Media
This chapter will help you understand what kinds of
paper you can use with the printer and also how to
properly position paper in the different paper input
sources.
Table 2.1 on page 2-4 lists the size paper, envelopes, and
other print media you can use with all input trays.
Table 2.2 on page 2-6 lists the capacities of the printer’s
output bins.
The printer supports paper weights as follows:
• 17-75 lbs. (64-200 g/m
• 17-44 lbs. (64-165 g/m
• 17-28 lbs. (64-105 g/m
2
) via paper trays
2
) via the 50 Sheet Bypass Feeder
2
) with duplex
• The optional 2,500 Sheet Feeder supports 17-28 lbs.
(64-105 g/m
2
)
Using sizes other than those listed in Table 2.1, or media not
recommended for laser printers, may result in jams and print
quality problems.
2-2 ❖ User Guide
Page 35

Selecting Print Media
The following media are unacceptable for use in the
printer. Their use may cause high rates of jamming and
other paper-handling problems:
• Excessively thick or thin paper
• Heavily textured paper
• Paper that has already been printed on (pre-printed
letterhead is allowed)
• Wrinkled, torn, or bent paper
• Moist or wet paper
• Curled paper
• Paper with an electrostatic charge
• Glued paper
• Paper with special coating
• Paper unable to withstand a temperature of 150º C
(302º F)
• Thermal paper
• Carbon paper
• Universal transparencies
• Paper with paper fasteners, ribbons, staples, tape, etc.
attached
• Label stock with exposed backing sheet.
Chapter 2: Loading Print Media ❖ 2-3
Page 36

Selecting Print Media
Table 2.1 Acceptable media sizes and capacities for input trays
Media Size
297x420 mm
A3
210x297 mm
A4
148x210 mm
A5
105x148 mm
A6
Statement
B5-JIS
B4-JIS
Executive
Letter
Folio
Legal
Ledger
Capacity
1
For acceptable media sizes for use with Duplex Module, see Table 2.3 on page 2-26
2
SEF = Short Edge Feed, LEF = Long Edge Feed.
3
Maximum capacity using 20 lb. (80 g/m2) stock.
1
5.5x8.5”
182x257mm
257x364mm
7.25x10.5”
8.5x11”
8.5x13”
8.5x14”
11x17”
SEF
LEF
SEF
SEF
SEF
LEF
LEF
SEF
LEF
SEF
2
2
LEF
LEF
Tray 1
•• •
••••
••
••
••
•• •
••••
••••
•• •
•• •
•• •
500 500/tray 1000/tray 50 100
Tray 2
Tray 3
Tray 4
Tray 5
50 Sheet
.
Bypass
Feeder
•
100
Envelope
Feeder
2-4 ❖ User Guide
Table 2.1 Page 1 of 2
Page 37

Selecting Print Media
Table 2.1 Acceptable media sizes and capacities for input trays
Media Size
1
Tray 1
Tray 2
Tray 3
Tray 4
Tray 5
Envelopes
COM-10
Monarch
110x220mm
DL
162x229mm
C5
4.1x9.5”
3.8x7.5”
LEF
LEF
LEF
LEF
Transparencies
210x297 mm
A4
Letter
8.5x11”
LEF
LEF
Labels
210x297 mm
A4
Letter
8.5x11”
LEF
LEF
Custom
Width: 110-297mm/3.9-11.7”
Length: 148-432mm/5.8-17”
Capacity
3
500 500/tray 1000/tray 50 100
(continued)
50 Sheet
Bypass
Feeder
•
•
•
•
•
•
•
•
•
100
Envelope
Feeder
•
•
•
•
Table 2.1 Page 2 of 2
1
For acceptable media sizes for use with Duplex Module, see Table 2.3 on page 2-26.
2
SEF = Short Edge Feed, LEF = Long Edge Feed.
3
Maximum capacity using 20 lb. (80 g/m2) stock.
Chapter 2: Loading Print Media ❖ 2-5
Page 38

Selecting Print Media
Table 2.2 Acceptable media sizes and capacities for output bins
Media Size Face-down Bin Face-up Bin
297x420 mm
A3
210x297 mm
A4
148x210 mm
A5
105x148 mm
A6
Statement
182x257mm
B5-JIS
257x364mm
B4-JIS
Executive
Letter
Folio
Legal
Ledger
7.25x10.5”
8.5x11”
8.5x13”
8.5x14”
11x17”
5.5x8.5”
•• • •
•• • •
•• • •
••
•• • •
•• • •
•• • •
•• • •
•• • •
•• • •
•• • •
•• • •
Envelopes
COM-10
Monarch
DL
C5
4.1x9.5”
3.8x7.5”
110x220mm
162x229mm
•
•
•
•
•
•
•
•
10-bin Mailbox/
Collator
3-Bin Finisher/
Stapler
1
1
1
1
1
Transparencies
210x297 mm
A4
Letter
8.5x11”
•
•
Labels
210x297 mm
A4
8.5x11”
Letter
Custom
Capacity
1
Maximum capacity for these sizes is 333 sheets/bin.
2
Maximum capacity using 20 lb. (80 g/m2) stock.
2-6 ❖ User Guide
2
•
•
••
500 200 100/bin 667/bin
•
•
•
•
Page 39

Storing Paper
Storing Paper
Print quality is optimized when paper and other print
media are stored properly. Proper storage ensures
optimum print quality and trouble-free printer options.
• Store the paper on a flat surface, in a relatively low
humidity environment.
• Avoid storing paper in such a way as to cause
wrinkling, bending, curling, etcetera.
• Do not unwrap paper until you are ready to use it, and
rewrap any paper you are not using.
• Do not expose paper to direct sunlight or high
humidity.
Chapter 2: Loading Print Media ❖ 2-7
Page 40

Loading Paper
Loading Paper
The printer accepts paper from the following input trays:
• Trays 1 (500 sheets) and 2 (500 sheets) in the printer
(see page 2-9)
• Tray 3 (500 sheets), the top tray in the optional 2,500
Sheet Feeder (see page 2-9)
• Trays 4 (1,000 sheets), the lower left tray, and 5 (1,000
sheets), the lower right tray, in the optional 2,500
Sheet Feeder (see page 2-14)
• The 50 Sheet Bypass Feeder in the printer (see
page 2-17)
• The optional 100 Envelope Feeder (see page 2-23)
• Do not attempt to load paper during printing into a
tray that is currently in use.
• Do not overfill the trays.
• Use only the media specified in Table 2.1 on page 2-4
and avoid using the media listed on page 2-2.
The multiple trays of the printer enable you to dedicate specific
trays to specific sizes and types of paper. For example, if you
have applications that require printing on letterhead, you can
dedicate one of the printer’s trays to that paper stock.
2-8 ❖ User Guide
Page 41

Loading Paper
Trays 1, 2, and 3 (if
installed)
Trays 1 and 2 in the printer, and Tray 3 in the optional
2,500 Sheet Feeder, hold up to 500 sheets of 20 lb.
(80 g/m
Media” (page 2-2) for acceptable paper sizes and weights.
2
) paper each. Refer to the section “Selecting Print
Pull out the tray (Tray 1 is shown) until it stops.
1
Prepare a stack of paper, making sure the tops of the
2
sheets are aligned.
Gently lift the paper guide and slide it all the way until it
3
stops.
If you are replacing paper of the same size, skip to Step 5
on page 2-10.
Chapter 2: Loading Print Media ❖ 2-9
Page 42
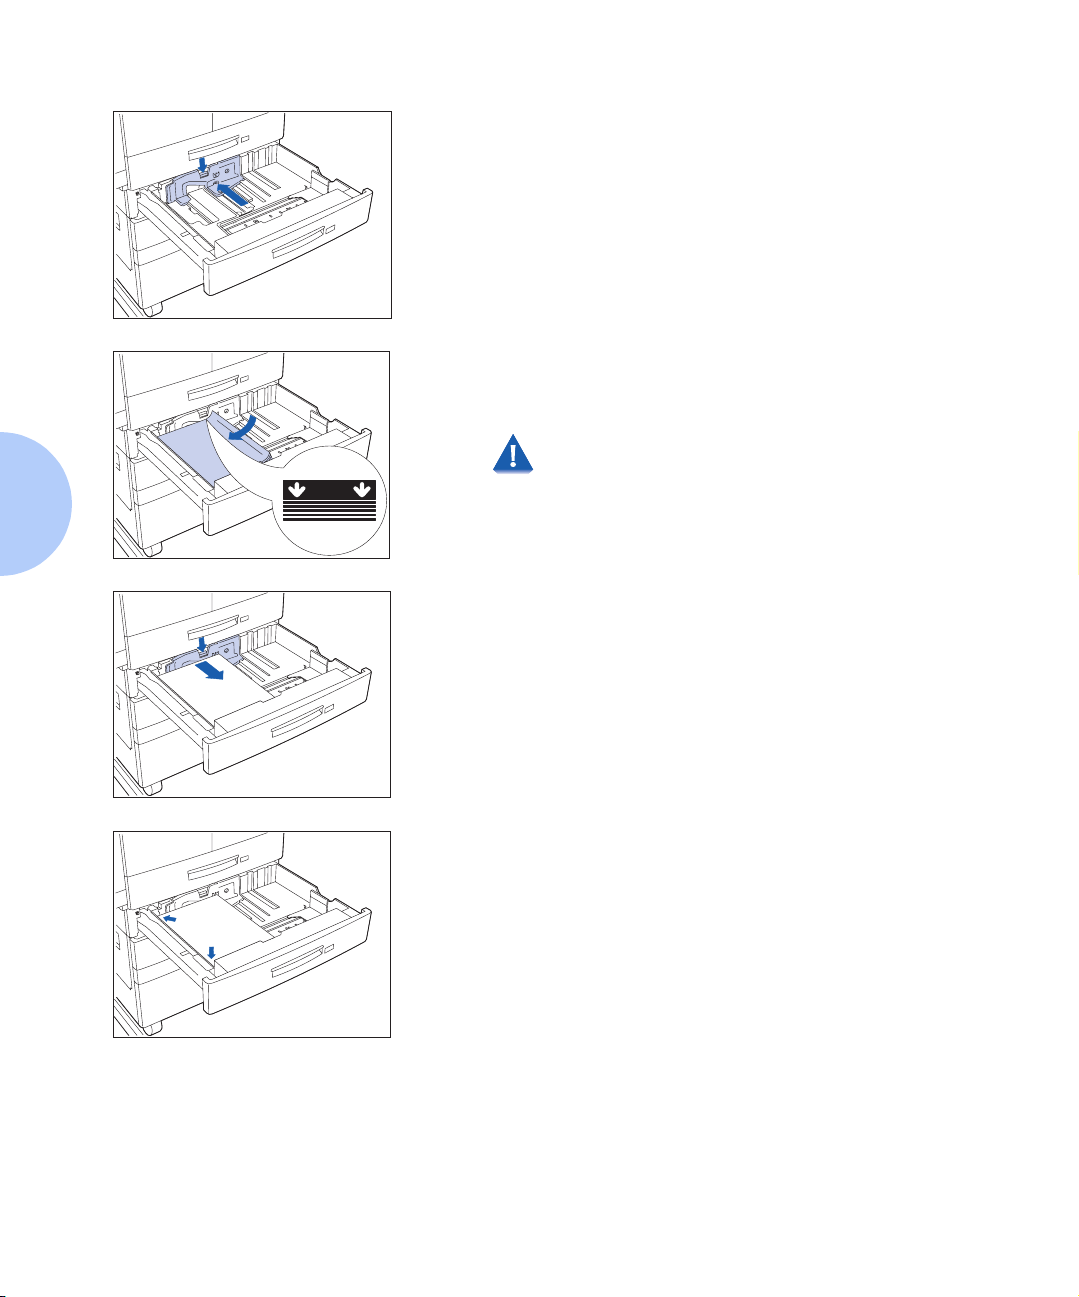
Loading Paper
Press down the gray handle and slide the side guide all the
4
way until it stops.
Place the paper in the tray, between the guides (see
5
Figure 2.1 on page 2-12 and Figure 2.2 on page 2-13 for
orientation).
Do not stack paper above the indicated mark.
Adjust the side guide to the paper length.
6
2-10 ❖ User Guide
Align the edges of the paper stack.
7
Page 43

Loading Paper
Adjust the paper guide to the paper width.
8
Make sure the guide is locked firmly in the guide
hole on the bottom of the tray, and that both the
side and width guides are set correctly for the size
of paper you are using.
If changing paper size, you may want to insert the correct
9
paper size label in the paper size slot on the front of the
tray.
Push the tray all the way back into the printer until it
10
latches.
Chapter 2: Loading Print Media ❖ 2-11
Page 44

Loading Paper
Figure 2.1 Trays 1/2/3 paper orientation (long edge feed)
Top Vie w
Duplex printing
1
Simplex printing
2
Load the following paper sizes
with the long edge on the left
(leading into the printer):
Letter
Statement
Executive
A4
A5
B5-JIS
2-12 ❖ User Guide
Page 45

Figure 2.2 Trays 1/2/3 paper orientation (short edge feed)
Top View
Duplex printing
1
Simplex printing
2
Load the following paper sizes
with the short edge on the left
(leading into the printer):
Legal
Folio
Ledger
A3
B4-JIS
The paper in this illustration
looks like letter or A4 size
paper, but it is not. The
graphic is only a generic
representation of the paper
sizes listed above.
Loading Paper
Chapter 2: Loading Print Media ❖ 2-13
Page 46
Loading Paper
Trays 4 and 5 in the
2,500 Sheet Feeder
Trays 4 and 5 in the optional 2,500 Sheet Feeder hold up
to 1,000 sheets of 20 lb. (80 g/m
Letter and Executive size only). The following procedure
uses Tray 4 as an example, but can be used for Tray 5 as
well.
Pull out the tray until it stops.
1
Prepare a stack of paper, making sure the tops of the
2
sheets are aligned.
2
) paper each (in A4,
2-14 ❖ User Guide
Page 47
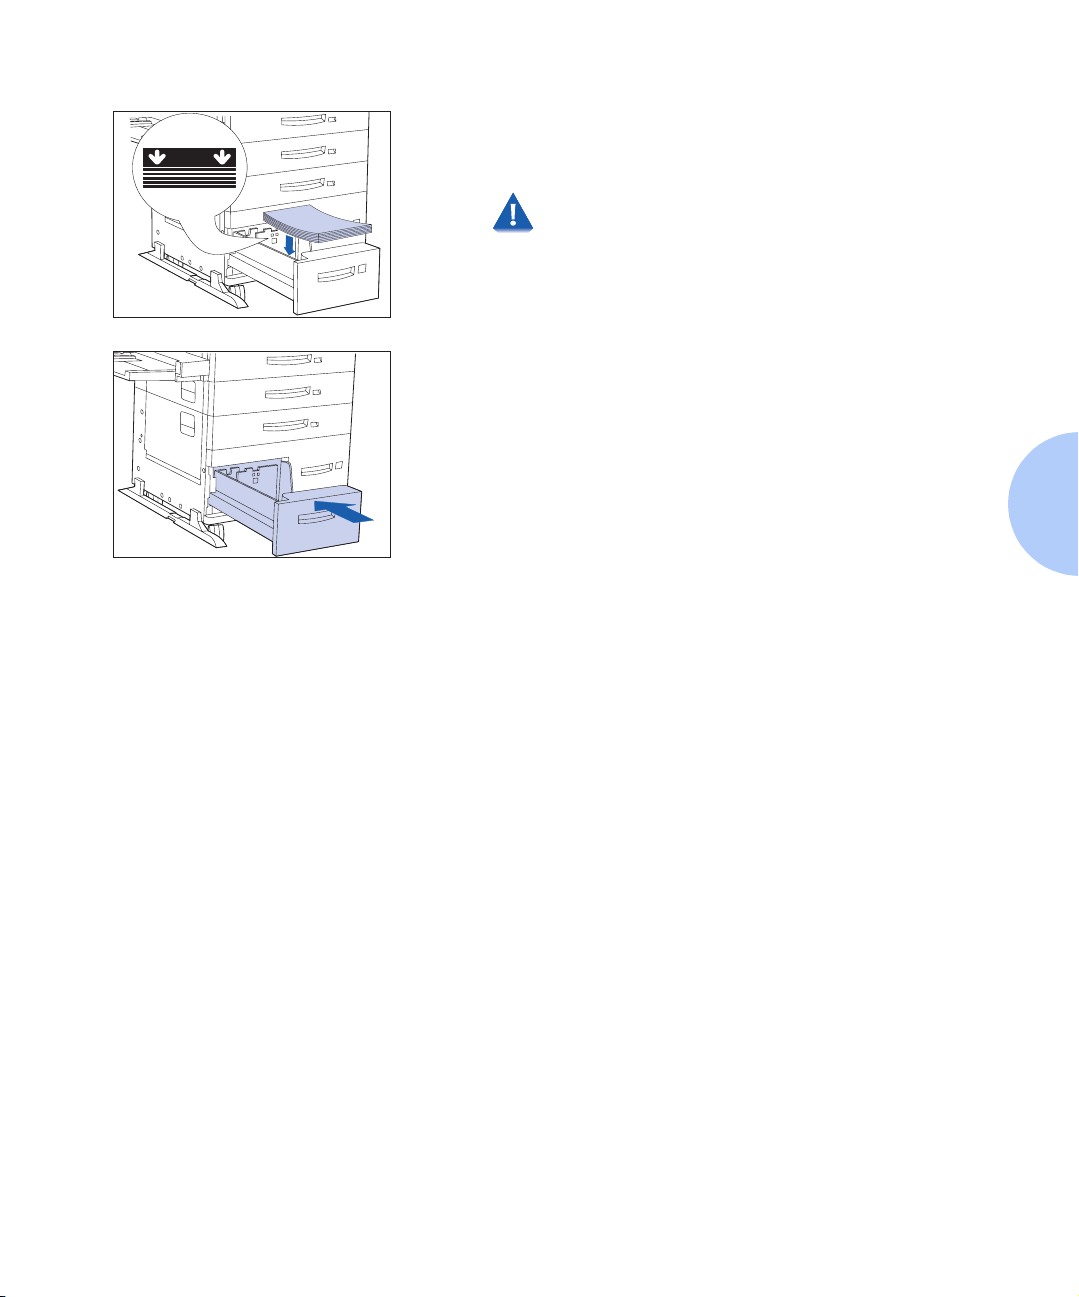
Place paper in the tray, against the left side (refer to
3
Figure 2.3 on page 2-16 for orientation). Slide back the
stop.
Do not stack paper above the indicated mark.
Push the tray back in.
4
.
Loading Paper
Chapter 2: Loading Print Media ❖ 2-15
Page 48

Loading Paper
Figure 2.3 Trays 4 and 5 paper orientation
Top Vie w Tray 4
Duplex printing
1
Simplex printing
2
Load the following sizes with the
long edge on the left (leading
into the printer):
Letter
Executive
A4
Top Vie w Tray 5
Duplex printing
1
Simplex printing
2
Load the following sizes with the
long edge on the left (leading
into the printer):
Letter
Executive
A4
2-16 ❖ User Guide
Page 49
Loading Paper
50 Sheet Bypass
Feeder
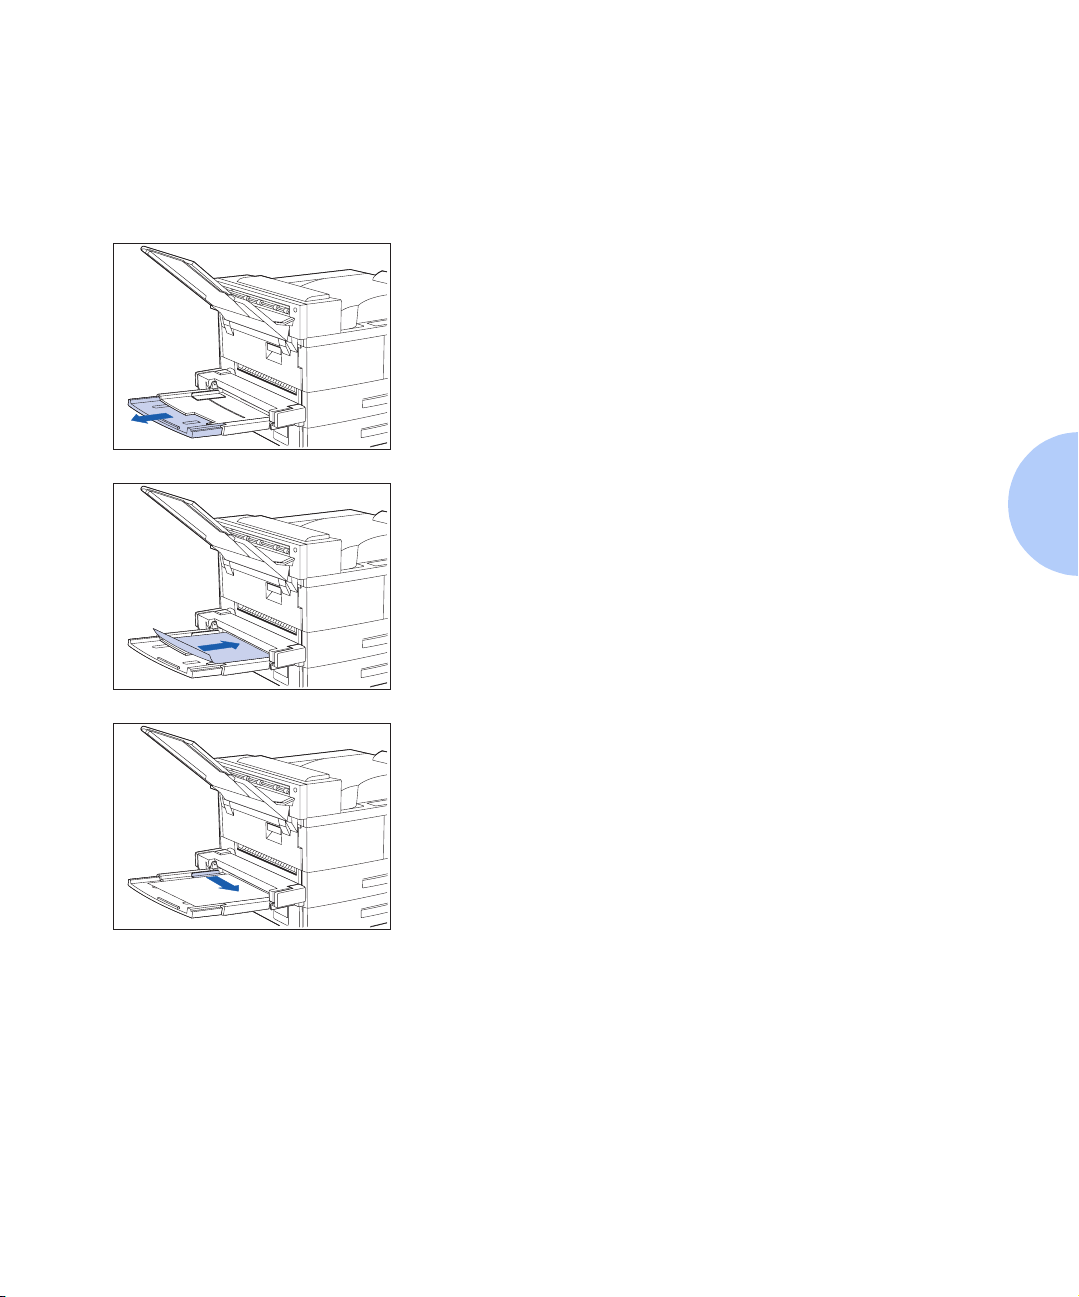
The 50 Sheet Bypass Feeder holds up to 50 sheets of 20 lb
(80 g/m
(page 2-2) for acceptable media sizes and weights.
2
) paper. Refer to the section “Selecting Print Media”
If necessary, pull out the extension tray to fit the length of
1
paper to be used.
Place the paper along the right side of the Bypass Feeder
2
(refer to Figure 2.4 on page 2-19 and Figure 2.5 on
page 2-20 for paper orientation, and to Figure 2.6 on
page 2-21 for envelope orientation).
Push the paper guide slightly to touch the paper stack (to
3
ensure contact with the paper sensor).
Chapter 2: Loading Print Media ❖ 2-17
Page 50

Loading Paper
Push the paper as far as it can go into the printer.
4
When finished printing from the Bypass Feeder, remove
5
any remaining paper from the tray and push back the
extension tray (if necessary), as paper will be fed from the
Bypass Feeder if it is selected in the tray sequence.
2-18 ❖ User Guide
Page 51

Figure 2.4 50 Sheet Bypass Feeder paper orientation (long edge feed)
Top Vie w
Simplex printing
1
Duplex printing
2
Load the following paper sizes
with the long edge leading into
the printer:
Letter
Statement
Executive
A4
A5
Loading Paper
Chapter 2: Loading Print Media ❖ 2-19
Page 52

Loading Paper
Figure 2.5 50 Sheet Bypass Feeder paper orientation (short edge feed)
Top Vie w
Simplex printing
1
Duplex printing
2
Load the following paper sizes
with the short edge leading into
the printer:
Legal
Folio
Ledger
A3
A6
2-20 ❖ User Guide
Page 53

Loading Paper
Figure 2.6 50 Sheet Bypass Feeder envelope orientation
1
Top Vie w
Com-10, DL, or Monarch
1
Envelope
C5 Envelope
2
1
Some PostScript applications require that the envelopes be loaded with the return address corner on the right side
of the stack and leading as the envelopes go into the printer. Test your application for proper orientation.
Chapter 2: Loading Print Media ❖ 2-21
Page 54
Loading Paper
Figure 2.7 50 Sheet Bypass Feeder Transparency orientation
Top Vie w
Transparency
1
The stripe must be on the
leading edge of the
transparency. The rough
side of the transparency is
up and the smooth side is
down.
2-22 ❖ User Guide
Page 55

Loading Paper
100 Envelope Feeder
The 100 Envelope Feeder is an optional paper handling
device available for the printer. Refer to Table 2.1 on
page 2-4 for acceptable envelope sizes.
Prepare a stack of envelopes, making sure all flaps are
1
closed and the envelopes are not stuck together.
Lift the envelope stopper and insert the stack with the
2
flap-side up and the long edges leading into the printer.
Slide the side guide so that it touches the edges of the
3
envelope stack lightly.
To avoid paper jams, do not stack envelopes above
the paper limit mark, and do not attempt to add
envelopes while printing.
Chapter 2: Loading Print Media ❖ 2-23
Page 56

Automatic Tray Switching
Automatic Tray Switching
Automatic tray switching, available for both PCL and
PostScript jobs, enables you to group two or more input
trays together into one logical tray, and in a specific order
in which the trays will be searched to satisfy an input
request. Tray switching is useful for:
• Increasing paper capacity.
When the current paper tray runs out of paper, the
printer automatically switches to the next tray in the
sequence, provided that the paper size and type in the
next tray is the same size and type as that in the
current tray.
• Searching for the correct paper size and type.
If the paper size and type specified in your software
application does not match the size paper loaded in
the current paper tray, the printer automatically
searches the next tray in the sequence for a paper size
and type that matches.
• Loading paper in one tray while printing from another
tray (filling an empty tray while printing).
Tray switching is made possible via the Tray Sequence
item in the Control Panel’s Tray Menu. It enables
grouping of Trays 1 and 2 in the printer, the 50 Sheet
Bypass Feeder, and Trays 3, 4, and 5 in the 2,500 Sheet
Feeder (if installed) into a variety of sequence
combinations. Tray switching can also be turned off.
The 50 Sheet Bypass Feeder is referred to as the MBF (for Multiple
Bypass Feeder) in the Control Panel’s Tray Sequence settings.
2-24 ❖ User Guide
Page 57

Automatic Tray Switching
Paper Size/Type
Mismatch
Paper size/type mismatch occurs when the requested size
is not available in the printer. This can be caused by
running out of paper in a tray that is configured for the
requested paper, or by requesting a paper that is not
configured in the printer. The printer goes off-line under
paper mismatch conditions. It automatically returns
on-line and continues printing after the paper mismatch
condition is resolved.
If a tray is configured for the requested paper, but the tray
is out of paper, the display prompts you to load the
requested paper (size and type) in the appropriate tray.
After the tray is loaded, printing continues.
If the request is for paper that is not configured in the
printer, you are prompted to load the requested paper in
the first tray of the Multi Bypass Feeder setting.
If you do not want to load paper in the first tray of the
setting, two options are available:
• One of the trays may be loaded with the requested size
paper and reconfigured via the Tray Menu to match
the requested paper type.
• Va l ue Up or Value D o wn may be pressed to
scroll through all the trays, displaying the size and
type paper in each tray. If one of these alternate papers
is acceptable, pressing Enter will cause printing to
continue on the new paper. Trays are searched in the
order specified in the Tray Sequence setting.
Chapter 2: Loading Print Media ❖ 2-25
Page 58

Duplex (Two-Sided) Printing
Duplex (Two-Sided) Printing
Once the optional Duplex Module is installed and Duplex
printing is enabled in the Control Panel, you can print
two-sided (duplex) jobs. Duplex printing can also be
enabled from your printer driver.
Use only the size paper listed in Table 2.3 for two-sided
jobs. Do not use envelopes, card stock, transparencies, or
label paper for duplex jobs.
Table 2.3 Paper sizes used with the Duplex Module
Paper Size
(297 x 420 mm)
A3
(210 x 297 mm)
A4
(148 x 210 mm)
A5
(257 x 364 mm)
B4-JIS
(182 x 257 mm)
B5-JIS
Statement
Executive
Letter
Folio
Legal
Ledger
(5.5 x 8.5” / 140 x 216 mm)
(7.25 x 10.5” / 216 x 279 mm)
(8.5 x 11” / 216 x 279 mm)
(8.5 x 13” / 216 x 330 mm)
(8.5 x 14” / 216 x 356 mm)
(11 x 17” / 279 x 432 mm)
17-28 lb (64-105g/m2)
17-28 lb (64-105g/m2)
17-28 lb (64-105/m2)
17-28 lb (64-105g/m2)
17-28 lb (64-105g/m2)
17-28 lb (64-105g/m2)
17-28 lb (64-105g/m2)
17-28 lb (64-105g/m2)
17-28 lb (64-105g/m2)
17-28 lb (64-105g/m2)
17-28 lb (64-105g/m2)
Weight
Refer to Figure 2.1 on page 2-12 and to Figure 2.4 on
page 2-19 for the proper orientation of drilled paper and
letterhead when printing duplex.
2-26 ❖ User Guide
Page 59

Printing Chapter3
Introduction ...................................................................... 3-2
Using the Printer Drivers .................................................... 3-3
Installing the Printer Drivers ........................................... 3-4
Configuring the Printer Drivers ........................................ 3-4
Using the Driver’s Features ............................................. 3-5
Using the Control Panel ..................................................... 3-9
The Display .................................................................. 3-10
The Indicator Lights ...................................................... 3-11
The Keys ...................................................................... 3-12
Menu Options .............................................................. 3-14
Printing a Password Job ................................................ 3-28
Deleting a Password Job ............................................... 3-29
Generating a Printer Report .......................................... 3-30
Using the 10-bin Mailbox/Collator ................................ 3-31
Duplex Printing ............................................................ 3-32
Using the Finisher ............................................................ 3-34
Features ....................................................................... 3-34
Bin Capacity ................................................................. 3-37
Stapling Positions ......................................................... 3-38
Paper Output Exception Conditions ............................... 3-43
Chapter 3: Printing ❖ 3-1
Page 60

Introduction
Introduction
This chapter provides information on:
• Using printer drivers to control the printer’s output.
• The features of the printer’s Control Panel, and its use
to generate printer reports such as the Configuration
Sheet.
For information on network-specific printing issues and
printer management software, refer to the documentation
on the printer’s CD-ROM.
3-2 ❖ User Guide
Page 61

Using the Printer Drivers
Your printer offers many special features that are designed
to produce the highest quality black and white prints
while giving you the flexibility you need to print a variety
of documents. These features are accessed through the
printer drivers.
The way these features are accessed depends on both the
printer driver that you are using and your computer’s
operating system.
Your printer supports the PCL printer drivers listed in
Table 3.1 and the PostScript printer drivers listed in
and 3.2.
To take full advantage of all the printer's features when
printing PCL or PostScript jobs, install the appropriate
printer driver(s).
Table 3.1 PCL Emulation printer drivers
Environment Printer Driver
Using the Printer Drivers
Windows Windows 95/98
Windows NT 4.0
Chapter 3: Printing ❖ 3-3
Page 62

Using the Printer Drivers
Table 3.2 PostScript printer drivers
Environment Printer Driver
Installing the Printer
Drivers
Configuring the
Printer Drivers
Windows
IBM OS/2
Macintosh
UNIX
(Sun Solaris, Sun OS,
SCO UNIX, IBM AIX,
HP-UX, DEC)
Inside the cover of the Product CD-ROM case is a booklet
with instructions on how to load your printer drivers. In
addition, your System Administrator can download
drivers directly to your workstation.
When you initially use any of your printer drivers, make
sure to properly configure them for the printer and its
installed options (such as the Hard Drive and 2500 Sheet
Feeder). These settings are displayed under the driver’s
“Printer Configuration” tab. If you are not certain which
options your printer will support, you can check by
printing a Configuration Sheet at the printer’s Control
Panel, as described in the section “Generating a Printer
Report” (page 3-30).
Windows 95/98
Windows NT 3.5.1
Windows NT 4.0
OS/2 Version. 2.1
OS/2 WARP
System 7.x, 8.x
Sun Solaris 2.5, 2.5.1, 2.6
Sun OS 4.14
IBM AIX 4.2.x, 4.3.x
HP-UX 10.x, 11.x
3-4 ❖ User Guide
Page 63

Using the Printer Drivers
Using the Driver’s
Features
At a minimum, your printer’s drivers enable you to
control the following aspects of printing:
• Select an input tray from which to draw paper or other
print media.
• Select an output bin to which the print job will be
delivered.
• Select simplex or duplex operation (if the duplex
option is installed).
• Select paper size, orientation and media.
• Select the number of copies.
•Select collating.
• Select stapling for jobs sent to the Finisher.
Table 3.3 on page 3-6 lists a general overview of other
features supported by your printer’s drivers. Note that
some features may not be supported by some of the
drivers. This may help you determine which drivers to
install and use
Brief descriptions of these features follow the table.
For more complete descriptions of the drivers and their
functionality, use the driver’s online help. Actual driver
capabilities may be determined by invoking the specific drivers.
Chapter 3: Printing ❖ 3-5
Page 64

Using the Printer Drivers
Table 3.3 Printer driver features
Feature
Driver
Secure
Printing
Proof
Printing
Cover
Sheets
Edge-
to-Edge
N-Up
Water-
mark
Overlay Duplex
PCL 5e
Windows 95/98 C C CCCCCC
Windows NT 4.0 C C CCCCCC
PCL 6
Windows 95/98 C C CCCCNC
Windows NT 4.0 C C CCCCNC
PostScript
Windows 95/98 C C CCCCNC
Windows NT 4.0C C CCCCNC
MAC PS
OS/2 PS
N N NNNNNN
N N NNNNNN
UNIX PS
Sun Solaris 2.5,
2.5.1, 2.6
N N NNNNNN
Sun OS 4.14 N N NNNNNN
IBM AIX, 4.2.x,
4.3.x
HP-UX 10.x, 11.xN N NNNNNN
C = Feature only available with printer’s custom driver. N = Feature not available.
3-6 ❖ User Guide
N N NNNNNN
Page 65

Using the Printer Drivers
Secure Printing
Use this feature when your printer is used as a remote
workgroup printer and you need to print a confidential
document. It is only available when the optional hard
drive is installed.
To use this feature, select Secure Print and enter a 4-digit
numeric password, where each digit can be any numeric
value between 0 and 7. Your job will be held by the
printer until you enter the password at the printer’s
Control Panel to release it.
For more information, see the section “Printing a Password
Job” (page 3-28). You can also choose to delete the job
without printing it, as described in the section “Deleting a
Password Job” (page 3-29).
Proof Printing
Use this feature when you have a job with multiple copies
but want to check the first copy before proceeding with
the remainder of the job. It is only available when the
optional hard drive is installed.
To use this feature, specify the number of copies to be
printed, then select Proof Print and enter a 4-digit
numeric password, where each digit can be any numeric
value between 0 and 7. The printer will output the first set
of the job immediately, but hold the remaining sets until
you enter the password at the printer’s Control Panel to
release them.
For more information, see the section “Printing a Password
Job” (page 3-28). You can also choose to delete the job
without printing the remaining sets, as described in the
section “Deleting a Password Job” (page 3-29).
Chapter 3: Printing ❖ 3-7
Page 66

Using the Printer Drivers
Cover Sheets
Use this feature when you want the first page of your
document to be printed on different paper stock. In this
way, you can specify the paper size or media type to be
used for the front cover of the document.
Edge-to-Edge
This feature lets you print text and images to the physical
edge of the page. If not selected, the printer defaults to
predetermined printable areas for each paper size. (When
printing edge-to-edge there may be some loss of data at
the edge due to mechanical and physical restraints.)
N-Up
This feature forces the printer to print N number of pages
on a single physical sheet of paper. It is useful for
previewing a document’s layout.
Watermark and Overlay
3-8 ❖ User Guide
Use these features when you want your output to contain
background text (independent of that provided by the
printing application) across the first page or every page of
a document. The driver enables you to specify the text, its
font, size, position on the page and rotation angle, and
you can save it for use on any document.
Duplex
Use this feature (available only when the optional duplex
unit is installed) to print two-sided jobs. For more
information on duplex printing, see page 3-32.
Page 67

Using the Control Panel
The Control Panel:
• Displays information about the status of the printer (or
the job in progress).
• Provides the means for changing printer settings and
printer defaults to control how it operates.
• It allows you to print reports and password-protected
pages stored on the optional hard drive.
As shown in Figure 3.1, your printer’s Control Panel will
either have icons and text, or icons only.
Figure 3.1 Control Panel
Using the Control Panel
1. Indicator lights
2. Two-line by 16-character display
3. Control keys (8)
North America Control Panel
Alternate Panel
Chapter 3: Printing ❖ 3-9
Page 68

Using the Control Panel
The Display
The Control Panel's display performs two functions.
• It informs you of printer status conditions, such as
when toner is low, when a paper tray is empty, when a
job is in process, and so on. For example, when you
turn on the printer, the display will show after
warming up:
Ready
This message appears whenever the printer is online
and ready to accept print jobs. The display will also
show:
Processing...
when processing data, and:
Waiting
when waiting for more data.
• It presents a hierarchy of menu options and settings to
configure and control the printer.
3-10 ❖ User Guide
For example, when you press Menu Up or Menu
Down , you will see the following two-line message
on the display:
Menus
Item
Menu
(such as System Menu or Job Me nu)
See “Menu Options” (page 3-14) for more information
on indicators.
Page 69

Using the Control Panel
The Indicator Lights
The Control Panel contains four indicator lights. Table 3.4
describes the function of each Indicator Light.
Table 3.4 Indicator lights and their functions
Light Function
On Line (Green)
Form Feed (Green)
Lights when the printer is online.
Flashes when the printer is going from online to offline.
Lights when the printer experiences a form feed timeout—that is,
when a PCL job has formatted a partial page, the printer is waiting for
more data in order to continue processing the job, and a user-defined
timeout period has expired with no new data arriving in the input
buffer. This timeout applies to all ports. The timeout value may be set
to any value between 5 and 300 seconds. The default value is 30
seconds.
When lit, you can print a partial page by entering the Job menu,
scrolling to the Form Feed item and pressing Enter . When not in
the menu system, a partial page can be printed by pressing Enter .
PostScript does not print partial pages and consequently the Form
Feed light is not turned On.
This light is turned Off when either an actual Form Feed character is
received or the Form Feed function is invoked by pressing Enter
on the Job Menu when the Form Feed item is displayed.
Fault (Amber)
Data (Green)
Lights whenever operator intervention is required in order to allow
printing to continue.
Flashes to indicate that a print job is being processed by either
PostScript, PCL or PJL, or is being spooled to the disk (e.g., a proof or
secure job). If data are not being processed, or either PostScript or
PCL is processing a job but waiting for data (input buffer empty), this
light is Off.
Chapter 3: Printing ❖ 3-11
Page 70

Using the Control Panel
The Keys
The Control Panel keypad consists of eight keys,
identified with international symbols and/or labeled in
English. The keys are also numbered 0 - 7.
Table 3.5 describes the function of each key.
Table 3.5 Control Panel keys and their functions
Key Description
On Line
Menu Up
Menu Down
• If the printer is online and not in the menu system, takes the printer offline. All pages
currently in the paper path are printed and then printing pauses until the printer is
brought online again.
• If the printer is online and in the menu system, exits the menu system.
• If the printer is offline and not in the menu system, brings the printer online.
• If the printer is offline and in the menu system, exits the menu system and brings the
printer online.
• If not in the menu system, enters the menu system and displays the first menu.
• If in the menu system, causes the Control Panel to scroll through the menus in order
from top to bottom.
• If not in the menu system, enters the menu system and displays the first menu.
• If in the menu system, causes the Control Panel to scroll through the menus in order
from bottom to top.
Item Up
3-12 ❖ User Guide
• If in the menu system, and an item is displayed, causes the Control Panel to scroll
• If not in the menu system, this key is ignored.
through the values in the current menu from bottom to top.
Table 3.5 Page 1 of 2
Page 71

Using the Control Panel
Table 3.5 Control Panel keys and their functions
(continued)
Key Description
Item Down
Value Up
Value Do wn
• If in the menu system, causes the Control Panel to scroll through the items in the
current menu from top to bottom.
• If not in the menu system, this key is ignored.
• If in the menu system, and an item is displayed, causes the Control Panel to scroll
through the values for the current item from bottom to top and displays the default
value for the current item. When setting a numeric value, increases the value by the
step amount. It is subject to auto-repeat if held down more than 1 second.
• If not in the Menu system and a paper mismatch condition does not exist, this key is
ignored.
• If a paper mismatch condition exists, scrolls through the alternate paper that may be
used instead of the requested paper.
• If in the menu system, and an item is displayed, causes the Control Panel to scroll
through the values for the current item from top to bottom and displays the default
value for the current item. When setting a numeric value, decreases the value by the
step amount. It is subject to auto-repeat if held down more than 1 second.
• If not in the Menu system and a paper mismatch condition does not exist, this key is
ignored.
• If a paper mismatch condition exists, scrolls through the alternate paper that may be
used instead of the requested paper.
Enter
• If the current display is a value for an item, causes the value to be entered as the
default value for this item.
• If the current display is an action to be invoked (e.g., “PCL Font List”, “Restart
Printer”), causes the action to occur.
• If not in the menu system and the FormFeed LED indicates that a partial page exists,
causes an implied PCL reset and the partial page is printed.
• If a paper mismatch condition exists and a request to use an alternate paper is
displayed, causes printing on paper currently loaded in the selected tray (Print
Anyway).
Table 3.5 Page 2 of 2
Chapter 3: Printing ❖ 3-13
Page 72

Using the Control Panel
Menu Options
Table 3.6 on the next page lists the variables that can be
controlled at the printer’s Control Panel, organized by
menu in the order in which they appear when scrolling
through the display.
Since these variables are generally used in configuring the
printer’s default settings—a System Administrator’s
task—specific details of the menu items and their values
are contained in the System Administrator Guide on the
product CD.
In addition, the System Administrator Guide lists all the
operations associated with the Control Panel keys and
lists the specific key processes which need to be executed
to set any of these variables.
Printer settings selected in your application of printer driver
override the default settings in the Control Panel when you
submit your print jobs for printing.
3-14 ❖ User Guide
Page 73

Table 3.6 Menu Options
Menu Description and Items
Using the Control Panel
Job Menu
Password Menu
Allows you to cancel the job currently processed by PCL or PostScript, or to force a
form feed on a partially formatted job in PCL.
Cancel Job
Form Feed
Restart Printer
Allows you to print or delete proof jobs or secure jobs.
All Jobs print
Filename n Print
All Jobs delete
Filename n
Delete
Cancels the job currently printing.
Causes a partial PCL page to be ejected when the Form Feed
LED is on.
Re-boots the printer as if the power was cycled, but bypasses
power on diagnostics.
Print all jobs sent with a specific password.
Print one or more jobs out of several sent with a specific
password.
Delete all jobs sent with a specific password.
Delete one or more jobs out of several sent with a specific
password.
Table 3.6 Page 1 of 13
Chapter 3: Printing ❖ 3-15
Page 74

Using the Control Panel
Table 3.6 Menu Options
(continued)
Menu Description and Items
Tra y Menu
Allows you to access tray settings for PCL and PostScript jobs.
1
Envelope Size
Defines the envelope size that is loaded in the envelope
feeder.
1
Envelope Type
Defines the envelope type that is loaded in the envelope
feeder.
MBF Size
MBF Type
1
1
Tra y 1 Type
Tra y 2 Type
Tra y 3 Type
Tra y 4 Type
Tra y 5 Type
2
2
2
Tra y Sequence
Defines the paper size that is loaded in the MBF.
Defines the paper type that is loaded in the MBF.
Defines the type of paper installed in Tray 1.
Defines the type of paper installed in Tray 2.
Defines the type of paper installed in Tray 3.
Defines the type of paper installed in Tray 4.
Defines the type of paper installed in Tray 5.
Defines the order in which trays are used when more than
one tray meets the size and type requirements.
3-16 ❖ User Guide
Custom Size
Defines the paper size that is used in formatting pages
printed from the MBF when it is set to custom size (which
overrides the MBF standard sizes).
1
Envelope and MBF are mutually exclusive because the Envelope Feeder replaces the
Multi-sheet Bypass Feeder.
2
Appears only when the 2,500 Sheet Feeder is installed.
Table 3.6 Page 2 of 13
Page 75

Using the Control Panel
Table 3.6 Menu Options
(continued)
Menu Description and Items
PCL Menu
Allows you to establish the default configuration for the printer when printing PCL
emulation jobs.
Font Number
Pitch
Point Size
Symbol Set
Orientation
Form Length
Line Terminat
Sets the default font in PCL.
Sets the pitch of the default font in PCL when the default
font already selected is a scalable fixed pitch font.
Sets the point size of the default font in PCL when the default
font already selected is a scalable proportional spaced font.
Sets the default font symbol set used in PCL.
Sets the default orientation (portrait, landscape) used in PCL.
Sets the default number of lines per page used in PCL.
Enables the setting of an additional carriage return after
every line feed appearing in PCL text.
Table 3.6 Page 3 of 13
Chapter 3: Printing ❖ 3-17
Page 76

Using the Control Panel
Table 3.6 Menu Options
(continued)
Menu Description and Items
System Menu
Allows you to set general printer features.
Language
Paper Size
Paper Type
Page Policy
Policy Timeout
Print Quantity
Duplex
Draft Mode
Edge-to-Edge
Sets the language used for Control Panel display messages
and generated reports.
Sets the default paper size used in PCL and PostScript.
Sets the default paper type used in PostScript and PCL.
Allows the printer to automatically select an alternate paper
size and/or type if the requested size and/or type is not
loaded.
Directs the printer as to how long to wait before taking the
action defined by the setting of the Page Policy item.
Sets multiple copies of each page (not collated sets).
Enables or disables duplex printing for PostScript and PCL
jobs (and appears only when the optional duplex unit is
installed).
Enables or disables a reduced toner mode for draft printing.
Enables or disables edge-to-edge printing in PCL.
3-18 ❖ User Guide
XIE
Sets the default Xerox Image Enhancement (XIE) mode.
Table 3.6 Page 4 of 13
Page 77

Using the Control Panel
Table 3.6 Menu Options
(continued)
Menu Description and Items
System Menu
(continued)
Resolution
Output Timeout
Output Offset
Output Dest
Staple Mode
Print PS Errors
Power Saver
Config Legal/B4
Config Exec/B5
Sets the default resolution for PCL and PostScript jobs.
Determines how many seconds the system will wait after a
bin is filled before directing output to an alternate bin.
Enables or disables alternately offsetting output from jobs.
Sets the default paper output destination for PCL and
PostScript jobs.
Selects the default staple position (when the Finisher is
installed.)
Controls the use of the built-in PostScript error handler or
debugger.
Defines a period of inactivity after which time the printer will
enter a low power state.
Selects which of these sizes will be recognized by the tray
size switches.
Selects which of these sizes will be recognized by the tray
size switches.
Defaults
Sets the type of factory defaults to use when a “Factory
Default” is performed.
Table 3.6 Page 5 of 13
Chapter 3: Printing ❖ 3-19
Page 78

Using the Control Panel
Table 3.6 Menu Options
(continued)
Menu Description and Items
Parallel Menu
Serial Menu
Allows you to set options for the parallel port connection.
Port Enable
Port Timeout
Parallel PDL
Binary PS
Bidirectional
Allows you to set options for the serial port connection (and appears only if the
optional serial port is installed).
Port Enable
Port Timeout
Serial PDL
Enables or disables the parallel port.
Sets the time for determining when to end an incomplete
print job and poll the next port in the polling sequence.
Sets the default Print Description Language emulation for the
parallel port.
Enables or disables the binary mode of PostScript for jobs
received on the parallel port.
Enables or disables bi-directional communications through
the parallel port.
Enables or disables the serial port.
Sets the time for determining when to end an incomplete
print job and poll the next port in the polling sequence.
Sets the default Print Description Language emulation for the
serial port.
3-20 ❖ User Guide
Flow Control
Baud Rate
Binary PS
Sets the handshaking parameters for the serial port.
Sets the baud rate for the serial port.
Enables or disables the binary mode of PostScript for jobs
received on the serial port.
Table 3.6 Page 6 of 13
Page 79
Using the Control Panel
Table 3.6 Menu Options
(continued)
Menu Description and Items
USB Menu
Ethernet Menu
Allows you to set options for the USB port connection.
Port Enable
Port Timeout
USB PDL
Binary PS
Allows you to set options for the Ethernet port connection.
LPR Enable
LPR Banner
LPR PDL
LPR Binary PS
DLC/LLC Enable
Enables or disables the USB port.
Sets the time for determining when to end an incomplete
print job and poll the next port in the polling sequence.
Sets the default Print Description Language emulation for the
USB port.
Enables or disables the binary mode of PostScript for jobs
received on the USB port.
Enables or disables the Ethernet LPR protocol.
Enables or disables the LPR banner sheet.
Sets the default Print Description Language emulation for the
Ethernet LPR protocol.
Enables or disables the LPR binary mode of PostScript.
Enables or disables the Ethernet DLC/LLC protocol.
DLC/LLC PDL
DLC/LLC Bin PS
NetBEUI Enable
Sets the default emulation for the Ethernet DLC/LLC
protocol.
Enables or disables the DLC/LLC binary mode of PostScript.
Enables or disables the Ethernet NetBEUI interface.
Table 3.6 Page 7 of 13
Chapter 3: Printing ❖ 3-21
Page 80

Using the Control Panel
Table 3.6 Menu Options
(continued)
Menu Description and Items
Ethernet Menu
(continued)
NetBEUI PDL
NetBEUI Bin PS
AppSocket Enabl
AppSocket PDL
AppSocket Bin PS
ETalk Enable
HTTP Enable
IP Address Res
IP Address
Sub Net Mask
Default Gateway
Sets the default emulation for the Ethernet NetBEUI interface.
Enables or disables the NetBEUI binary mode of PostScript.
Enables or disables the Ethernet AppSocket interface.
Sets the default Print Description Language emulation for the
Ethernet AppSocket interface.
Enables or disables the AppSocket binary mode of PostScript.
Enables or disables the Ethernet EtherTalk protocol.
Enables or disables the Ethernet HTTP Server protocol.
Sets the method used to resolve (assign) the IP address,
including Sub Net mask and default gateway.
Sets the four byte IP address. This item appears only if the IP
Address Res is set to static.
Sets the four byte Sub Net Mask address. This item appears
only if the IP Address Res is set to static.
Sets the four byte Default Gateway address.
3-22 ❖ User Guide
Port Timeout
Speed
Sets the time for determining when to end an incomplete
print job and poll the next port in the polling sequence.
Sets the speed of the 10/100 Ethernet interface and whether
half or full duplex Ethernet. 10 MB is the default.
Table 3.6 Page 8 of 13
Page 81

Using the Control Panel
Table 3.6 Menu Options
(continued)
Menu Description and Items
Token Ring
Menu
Allows you to set options for the Token Ring port connection (and appears only if
the optional Token Ring interface is installed).
LPR Enable
LPR Banner
LPR PDL
LPR Binary PS
DLC/LLC Enable
DLC/LLC PDL
DLC/LLC Bin PS
NetBEUI Enable
NetBEUI PDL
NetBEUI Bin PS
Enables or disables the Token Ring LPR protocol.
Enables or disables the LPR banner sheet.
Sets the default Print Description Language emulation for the
Token Ring LPR protocol.
Enables or disables the LPR binary mode of PostScript.
Enables or disables the Token Ring DLC/LLC protocol.
Sets the default emulation for the Token Ring DLC/LLC
protocol.
Enables or disables the DLC/LLC binary mode of PostScript.
Enables or disables the Token Ring NetBEUI interface.
Sets the default Print Description Language emulation for the
Token Ring NetBEUI interface.
Enables or disables the NetBEUI binary mode of PostScript.
AppSocket Enabl
AppSocket PDL
AppSocket Bin PS
Enables or disables the Token Ring AppSocket interface.
Sets the default Print Description Language emulation for the
Token Ring AppSocket interface.
Enables or disables the AppSocket binary mode of PostScript.
Table 3.6 Page 9 of 13
Chapter 3: Printing ❖ 3-23
Page 82

Using the Control Panel
Table 3.6 Menu Options
(continued)
Menu Description and Items
Token Ring
Menu
(continued)
TTalk Enable
HTTP Enable
IP Address Res
IP Address
Sub Net Mask
Default Gateway
Port Timeout
Source Routing
Speed
LAA
Enables or disables the Token Ring TokenTalk protocol.
Enables or disables the Token Ring HTTP Server protocol.
Sets the method used to resolve (assign) the IP address,
including Sub Net mask and default gateway.
Sets the four byte IP address. This item appears only if the IP
Address Res is set to static.
Sets the four byte Sub Net Mask address. This item appears
only if the IP Address Res is set to static.
Sets the four byte Default Gateway address.
Sets the time for determining when to end an incomplete
print job and poll the next port in the polling sequence.
Sets the source routing option.
Sets the default ring speed of the Token Ring interface.
Sets the six byte Locally Administered Address.
Table 3.6 Page 10 of 13
3-24 ❖ User Guide
Page 83

Using the Control Panel
Table 3.6 Menu Options
(continued)
Menu Description and Items
Novell Menu
Allows you to modify Novell parameters.
Novell Enable
Novell PDL
Novell Binary PS
Novell Mode
Frame Type
Polling Interval
PServer Name
Primary Server
NDS Tree
NDS Context
Enables or disables the Novell protocol.
Sets the default Print Description Language emulation for the
Novell protocol.
Enables or disables the Novell binary mode of PostScript.
Sets the PServer mode for the Novell protocol.
Sets the frame type used for the Novell protocol.
Sets the rate (in seconds) at which the PServer issues polling
requests for assigned queues.
Sets the name of the PServer in this printer.
Sets the name of the Primary file server.
Sets the NDS Tree character string.
Set the NDS context string.
Table 3.6 Page 11 of 13
Chapter 3: Printing ❖ 3-25
Page 84

Using the Control Panel
Table 3.6 Menu Options
(continued)
Menu Description and Items
Print Menu
Allows you to generate printer reports.
Config Sheet
PCL Demo
PCL Font List
PS Font List
Menu Map
Test Print
Disk Directory
Hex Mode
Restart Printer
Prints a Configuration Sheet showing the printer's current
information and menu settings.
Prints a sample page demonstrating the printer's capabilities.
Prints a list of PCL fonts currently loaded.
Prints a complete list of all PostScript language typefaces.
Prints a page showing the structure of the Control Panel
Menu Tree.
Prints a “test pattern” for analysis of print quality over the
entire page (intended for use by the service technician).
Prints a copy of the disk directory (and appears only if the
optional hard drive is installed).
Enables or disables hex dump mode, which prints the data
stream as hex codes instead of interpreting it as print data.
Reboots the printer as if the power was cycled but bypasses
the power on diagnostics.
3-26 ❖ User Guide
Table 3.6 Page 12 of 13
Page 85

Using the Control Panel
Table 3.6 Menu Options
(continued)
Menu Description and Items
Reset Menu
Allows you to access printer reset functions (and appears only when the printer is
powered on while holding down the Online and Enter keys).
Factory Defaults
Network Defaults
Demo Mode
Delete All Jobs
Disk Initialize
Disk Format
Flash Format
Resets menus to factory defaults.
Resets parameters in the Ethernet, Token Ring, and Novell
Menus to factory defaults.
Places the printer in demo mode.
Deletes all secure jobs from the hard disk (and appears only if
the optional hard drive is installed).
Initializes the hard disk (and appears only if the optional hard
drive is installed).
Formats the hard disk (and appears only if the optional hard
drive is installed).
Formats flash memory (and appears only if the optional Flash
ROM DIMM is installed).
Table 3.6 Page 13 of 13
Chapter 3: Printing ❖ 3-27
Page 86

Using the Control Panel
Printing a Password
Job
To print a password job sent to the printer and stored in
the optional hard drive (such as a secure job or proof job),
follow these steps:
At the Control Panel, press Menu Up or Menu Down
1
until you see:
Menus
Password Menu
Press Item Up or Item Down and you will see:
2
Enter Password
_xxx
Enter the job’s numeric password and you will see:
3
All Jobs
Print
Press Enter to print all jobs.
4
OR:
Press Item Up and Item Down to scroll through the jobs,
then press Enter when the job you wish to print is shown.
Repeat this step as necessary to release more than one job.
3-28 ❖ User Guide
When done, press Online.
5
Page 87

Using the Control Panel
Deleting a Password
Job
To delete a password job sent to the printer and stored in
the optional hard drive (such as a secure job or proof job),
follow these steps:
At the Control Panel, press Menu Up or Menu Down
1
until you see:
Menus
Password Menu
Press Item Up or Item Down and you will see:
2
Enter Password
_xxx
Enter the job’s numeric password and you will see:
3
All Jobs
Print
Press Value Up or Valu e Do w n and you will see:
4
All Jobs
Delete
Press Enter to delete all jobs.
5
OR:
Press Item Up and Item Down to scroll through the jobs,
then press Enter when the job you wish to delete is
shown with
as necessary to delete more than one job.
When done, press Online.
6
Delete
on the line under it. Repeat this step
Chapter 3: Printing ❖ 3-29
Page 88

Using the Control Panel
Generating a Printer
Report
Your printer provides the following reports that can be
printed:
• Configuration Sheet
•PCL Demo
•PCL Font List
• PostScript Font List
•Menu Map
• Test Print
• Disk Directory (if the optional hard drive is installed)
•Fault History
To print one of these reports, follow these steps:
At the Control Panel, press Menu Up or Menu Down
1
until you see:
Menus
Print Menu
Press Item Up or Item Down until you see the page you
2
want to print (such as Config Sheet).
3-30 ❖ User Guide
Press Enter to print the page.
3
Page 89

Using the Control Panel
Using the 10-bin
Mailbox/Collator
The 10-bin Mailbox/Collator is an optional output device
available for the printer. It handles all supported paper
sizes, except A6 and envelopes, in 10 individually
addressable bins at up to 100 sheets per bin.
Mailbox Sorter Modes
There are two different Mailbox/Sorter modes provided by
the 10-Bin Collator:
•Mailbox Mode: Each mailbox bin can be addressed
individually using the job destination functionality
contained in the printer driver.
•Sorter Destination Mode: The mailbox works like a
copier sorter when multiple sets are printed. When up
to 10 sets are requested, the first set is sent to Bin 1, the
second set to Bin 2, and so on.
If more than 10 copies are selected, the entire job is sent
to the Face-down Bin.
Printing to the Mailbox/Collator
To send a job to the mailbox, use a printer driver to select
a specific bin for the output destination for your job or
select the sorter mode and then print your job.
Chapter 3: Printing ❖ 3-31
Page 90

Using the Control Panel
Duplex Printing
With the optional duplex unit installed, you can print
two-sided (duplex) jobs.
Use only the paper size listed in Table 2.3 on page 2-26.
Do not use envelopes, postcards, transparencies, or label
paper for duplex jobs.
To print duplex, select it in your printer driver when you
set printer properties (for all jobs) or when you print a
document for a specific job.
To ensure that duplex jobs print in the proper orientation,
set the driver’s Orientation and Duplex options to the
appropriate settings, as shown in Figure 3.2 on page 3-33.
Refer to Chapter 2 for the proper orientation of drilled
paper and letterhead when printing duplex.
3-32 ❖ User Guide
Page 91

Figure 3.2 Duplex binding orientation and Control Panel menu settings
Using the Control Panel
Portrait Orientation: Set Duplex to
Landscape Orientation: Set Duplex to
Long Edge
Long Edge
.
Portrait Orientation: Set Duplex to
Landscape Orientation: Set Duplex to
.
Short Edge
Short Edge.
.
Chapter 3: Printing ❖ 3-33
Page 92

Using the Finisher
Using the Finisher
Features
The finisher option has three output bins with a total
maximum capacity of 2,000 unstapled sheets, up to 667
unstapled sheets per bin. Stapled output can be sent to all
three bins.
Built-in Stapler
The stapler can staple sets of up to 50 sheets. It has three
stapling modes (Front for portrait, Back for landscape, and
Dual for booklet mode). The customer-replaceable
stapling unit contains 5,000 staples which are packaged as
a supply item, in sets of three, for a total of 15,000 staples
per package. The finisher comes with one staple cartridge
of 5,000 staples.
Capacity Handling
The finisher is programmed to ensure that there is enough
space remaining in the bin to output a job of from two to
50 pages. Up to 50 sheets can be stapled.
Stapled sets are kept in a compiler bin and ejected once a
complete set has been stapled. Output is delivered to the
finisher bins face down only.
The finisher has an elevator that positions one of the
three output bins to receive output from the compiler bin.
The finisher home position is when Bin 2 receives output
from the compiler bin. Finisher bin selection can be made
from printer drivers.
3-34 ❖ User Guide
Page 93

Using the Finisher
Job Offsetting
The finisher supports offsetting of printed jobs in all three
bins.
Supported Paper Sizes
All sizes of paper can be sent to the finisher except A6 and
Envelopes. Mixed sizes of paper can be sent to the finisher
bins as long as all the paper within a single job is the same
size. Mixed paper sizes within the same job cannot be
compiled and stapled. See Table 3.7 on page 3-37 for
supported paper sizes.
Output Destination
With a finisher installed, the user may select the following
output destinations: Face Down Bin, Face Up Bin, Finisher
Bin 1, Finisher Bin 2, and Finisher Bin 3. Output
destination can also be set by the System Administrator.
Output Bin Sensing
Each finisher bin senses not only the height of each stack,
but also the number of stapled sets delivered to each
stack. When the number of stapled sets delivered to the
bin reaches 100 for long edge feed (LEF) paper sizes, or 50
for short edge feed (SEF) paper sizes, as shown in Table 3.7
on page 3-37, the bin is reported as full.
Chapter 3: Printing ❖ 3-35
Page 94

Using the Finisher
Bin Level Sensors
Finisher sensors can detect the following bin conditions:
•Empty
•50%
•Full
When a bin is full and the stack height does not allow
additional sets to be sent to it, the destination of
additional sets directed to the full bin is determined by
the Output Timeout system parameter in the printer’s
System Menu.
Safety Limitation
When Finisher Bin 3 is selected, the bins are raised to the
highest position. In the interest of safety, they will only
remain in this position for one minute following the last
page delivered to Bin 3. After one minute, the bins are
lowered to align Bin 2 with the output paper path.
Unload Button
The Unload Button temporarily interrupts printing and
places the finisher in the home position to allow the
operator to remove output. It also signals the controller to
sense stack height in the bins and resume printing after
the stack has been removed. Figure 1.4 on page 1-17
illustrates the position of the unload button.
3-36 ❖ User Guide
Page 95

Using the Finisher
Bin Capacity
Each Finisher Bin is capable of stacking up to 667 sheets
of 20 lb. paper for long edge feed (LEF) paper sizes and
333 sheets for short edge feed (SEF) paper sizes.
The maximum stack height is decreased when stapled sets
are delivered to each bin, since stapled sets affect the
stability of the output stack.
Table 3.7 lists the supported paper sizes and the
maximum capacity for each bin based upon whether the
output is unstapled or stapled.
Table 3.7 Maximum Capacity Per Bin
Capacity
Paper Size
Unstapled
Sheets
(8.5 x 11”)
Letter
Statement
Executive
A4
A5
(7.25 x 10.5”) LEF 667 100
(210 x 297mm)
(148 x 210mm) LEF 667 100
LEF 667 100
(5.5 x 8.5”) LEF 667 100
LEF 667 100
Capacity
Stapled Sets
(182 x 257 mm) LEF 667 100
B5-JIS
(8.5 x 14”) SEF 333 50
Legal
(8.5 x 13”) SEF 333 50
Folio
(11 x 17”) SEF 333 50
Ledger
(287 x 420mm)
A3
(257 x 364 mm) SEF 333 50
B4-JIS
SEF 333 50
Chapter 3: Printing ❖ 3-37
Page 96

Using the Finisher
Stapling Positions
Stapling positions can be set at the User Interface or by
the System Administrator.
Letter, Statement, B5-JIS and Executive Paper
Figure 3.3 illustrates the approximate position of staples
for Letter, Statement, B5-JIS and Executive paper in
Portrait, Landscape, and Inverse Landscape Modes based
upon the stapling position indicated in the left hand
column.
Figure 3.3 Stapling positions for Letter, Statement,
B5-JIS and Executive paper
Stapling
Position
Position 1
Position 2
Portrait Landscape
/
\
AA A
Inverse
Landscape
\
3-38 ❖ User Guide
|
AA A
|
—
Dual
|
——
AA A
——
|
Page 97

Using the Finisher
A4 Paper
Figure 3.4 illustrates the approximate position of staples
for A4 paper in Portrait, Landscape, and Inverse
Landscape Modes based upon the stapling position
indicated in the left hand column.
Figure 3.4 Stapling positions for A4 paper
Stapling
Position
Position 1
Position 2
Dual
Portrait Landscape
/
\
Inverse
Landscape
AA A
\
/
AA A
\
|
——
AA A
——
|
/
Chapter 3: Printing ❖ 3-39
Page 98

Using the Finisher
A5 Paper
Figure 3.5 illustrates the approximate position of staples
for A5 paper in Portrait, Landscape, and Inverse
Landscape Modes based upon the stapling position
indicated in the left hand column.
Figure 3.5 Stapling positions for A5 paper
Stapling
Position
Position 1
Position 2
Dual
Portrait Landscape
/
\
Inverse
Landscape
AA A
\
\
/
AA A
/
|
——
AA A
——
|
3-40 ❖ User Guide
Page 99

Using the Finisher
A3 Paper
Figure 3.6 illustrates the approximate position of staples
for A3 paper in Portrait, Landscape, and Inverse
Landscape Modes based upon the UI parameters indicated
in the left hand column.
Figure 3.6 Stapling positions for A3 paper
Stapling
Position
Position 1
Position 2
Dual
Portrait Landscape
\
Inverse
Landscape
/
AA A
/
/
\
AA A
\
——
||
AA A
||
Chapter 3: Printing ❖ 3-41
Page 100

Using the Finisher
Ledger, Legal, B4-JIS and Folio Paper
Figure 3.7 illustrates the approximate position of staples
for Ledger, Legal, B4-JIS and Folio paper in Portrait,
Landscape, and Inverse Landscape Modes based upon the
UI parameters indicated in the left hand column.
Figure 3.7 Stapling positions for Ledger, Legal, B4-JIS
and Folio paper
Stapling
Position
Position 1
Position 2
Dual
Portrait Landscape
\
Inverse
Landscape
/
AA A
/
|
—
AA A
—
——
||
AA A
||
3-42 ❖ User Guide
 Loading...