

Page 1

PRELIMINARY DRAFT — APPLE CONFIDENTIAL
iPhone
User Guide
For iOS 5.0 Software
Page 2

PRELIMINARY DRAFT — APPLE CONFIDENTIAL
Contents
11
Chapter 1: iPhone at a Glance
11 iPhone Overview
12 Buttons
15 Status Icons
18
Chapter 2: Getting Started
18 Viewing the User Guide on iPhone
18 What You Need
19 Installing the SIM Card
19 Setup and Activation
19 Connecting iPhone to Your Computer
20 Connecting to the Internet
23 Adding Mail, Contacts, and Calendar Accounts
26
Chapter 3: Basics
26 Using Apps
30 Customizing the Home Screen
33 Typing
37 Printing
39 Searching
40 Siri
41 Voice Control
43 Notification Center
43 Twitter
44 Apple Earphones with Remote and Mic
45 AirPlay
46 Bluetooth Devices
47 Battery
49 Security Features
50 Cleaning iPhone
50 Restarting or Resetting iPhone
51
Chapter 4: iCloud, Syncing, and File Sharing
51 About iCloud
2
Page 3

PRELIMINARY DRAFT — APPLE CONFIDENTIAL
51 Setting up iCloud
52 Backing up with iCloud
53 Checking iCloud storage
53 Syncing with iTunes
55 iPhone Settings Panes in iTunes
58 Manually Managing Content
58 Transferring Purchased Content to Another Computer
59 File Sharing
60
Chapter 5: Phone
60 Phone Calls
67 Visual Voicemail
69 Contacts
69 Favorites
69 Call Forwarding, Call Waiting, and Caller ID
70 Ringtones, Ring/Silent, and Vibrate
71 International Calls
72 Settings options
74
Chapter 6: Mail
74 Setting Up Email Accounts
74 Checking and Reading Email
76 Working with Multiple Accounts
76 Sending Email
77 Using Links and Detected Data
78 Viewing Attachments
78 Printing Messages and Attachments
79 Organizing Email
80 Searching Email
80 Changing Mail Settings
84
Chapter 7: Safari
84 Viewing Webpages
86 Searching
87 Printing Webpages, PDFs, and Other Documents
87 Viewing Web Videos on a TV
87 Bookmarks
88 Web Clips
88 Setting options
89
Chapter 8: Music
89 Getting Music, Videos, and More
89 Music and Other Audio
Contents
3
Page 4

PRELIMINARY DRAFT — APPLE CONFIDENTIAL
98 Chapter 9: Messages
98 Sending and Receiving Messages
99 Sending Messages to a Group
100 Including Photos, Videos, and More
100 Editing Conversations
101 Searching Messages
101 Setting Options
102
Chapter 10: Calendar
102 About Calendar
103 Viewing your calendars
104 Adding events
104 Responding to invitations
105 Searching calendars
105 Subscribing to calendars
106 Importing calendar events from Mail
106 Syncing calendars
106 Calendar accounts and settings
108
Chapter 11: Photos
108 Viewing photos and videos
109 Slideshows
109 Sharing photos and videos
11 0 Copying and pasting
11 0 YouTube
11 0 Printing photos
11 0 Setting options
111
Chapter 12: Camera
111 About Camera
112 Taking photos and videos
112 HDR photos
113 Viewing and sharing photos and videos
113 Editing photos
113 Trimming videos
11 4 Uploading photos and videos to your computer
11 5
Chapter 13: YouTube
11 5 About YouTube
11 5 Playing Videos
11 6 Browsing and Searching for Videos
117 Watching YouTube on a TV
117 Keeping Track of Videos You Like
4
Contents
Page 5

PRELIMINARY DRAFT — APPLE CONFIDENTIAL
11 8 Sharing Videos, Comments, and Ratings
11 8 Getting More Information About a Video
11 9 Sending Videos to YouTube
120
Chapter 14: Stocks
120 Viewing Stock Quotes
121 Getting More Information
12 2
Chapter 15: Maps
12 2 Finding and Viewing Locations
12 6 Getting Directions
128 Showing Tra∑c Conditions
128 Finding and Contacting Businesses
129 Sharing Location Information
129 Bookmarking Locations
130
Chapter 16: Weather
130 Viewing Weather Summaries
131 Getting More Weather Information
13 2
Chapter 17: Notes
13 2 About Notes
13 2 Writing Notes
13 2 Reading and Editing Notes
13 3 Searching Notes
13 3 Printing or Emailing Notes
134
Chapter 18: Reminders
134 Sample Print Section
134 Sample AppleTopic Section
13 5
Chapter 19: Clock
13 5 World Clocks
13 5 Alarms
13 6 Stopwatch
13 6 Timer
13 8
Chapter 20: Game Center
13 8 About Game Center
13 9 Signing In to Game Center
13 9 Playing Games
140 Purchasing and Downloading Games
140 Playing with Friends
141 Game Center Settings
Contents
5
Page 6

PRELIMINARY DRAFT — APPLE CONFIDENTIAL
142 Your Status and Account Information
143
Chapter 21: Newsstand
143 Sample Print Section
143 Sample AppleTopic Section
14 4 Chapter 22: iTunes Store
14 4 About the iTunes Store
14 4 Finding music, videos, and more
145 Following artists and friends
146 Purchasing music, audiobooks, and tones
147 Purchasing or renting videos
148 Streaming or downloading podcasts
148 Checking download status
149 Syncing purchased content
149 Automatic Downloads
149 Changing the browse buttons
149 Viewing account information
149 Verifying downloads
151
Chapter 23: App Store
151 About the App Store
151 Finding and downloading Apps
15 3 Automatic downloads
15 3 Deleting Apps
154 Store settings
15 5
Chapter 24: Settings
15 5 Airplane Mode
15 6 Wi-Fi
157 Location Services
15 8 VPN
15 8 Personal Hotspot
15 8 Notifications
15 9 Carrier
15 9 Sounds and the Ring/Silent Switch
160 Brightness
160 Wallpaper
160 General
171
Chapter 25: Videos
171 About Videos
171 Playing Videos
17 2 Searching for Videos
6
Contents
Page 7

PRELIMINARY DRAFT — APPLE CONFIDENTIAL
17 2 Watching Rented Movies and TV Shows
17 3 Watching Videos on a TV
174 Deleting Videos from iPhone
174 Home Sharing
17 5 Setting a Sleep Timer
17 5 Converting Videos for iPhone
17 6
Chapter 26: Contacts
17 6 About Contacts
17 6 Syncing Contacts
17 6 Searching Contacts
17 7 Adding and editing contacts
17 8 Unified contacts
17 8 Accounts and settings
180
Chapter 27: Calculator
180 Using the Calculator
180 Scientific Calculator
181
Chapter 28: Compass
181 About the Compass
182 Calibrating the Compass
182 Finding Direction
182 Using Compass with Maps
183
Chapter 29: Voice Memos
183 About Voice Memos
184 Recording
184 Listening to a Recording
185 Managing and Sharing Recordings
185 Syncing Voice Memos
186
Chapter 30: Nike + iPod
186 Activating Nike + iPod
187 Linking a Sensor
187 Working Out with Nike + iPod
187 Sending Workouts to Nikeplus.com
188 Calibrating Nike + iPod
188 Nike + iPod Settings
190
Chapter 31: iBooks
190 About iBooks
191 Syncing books and PDFs
191 Using the iBookstore
Contents
7
Page 8

PRELIMINARY DRAFT — APPLE CONFIDENTIAL
19 2 Reading Books
19 3 Reading PDFs
194 Changing a book’s appearance
194 Searching books and PDFs
19 5 Looking up the Definition of a Word
19 5 Having a book read to you
19 5 Printing or emailing a PDF
196 Organizing the bookshelf
19 7 Bookmark and note Syncing
19 7 Automatic Downloads
198
Chapter 32: Accessibility
198 Universal Access Features
199 VoiceOver
211 Zoom
212 Large Text
212 White on Black
212 Speak Selection
213 Speak Auto-text
213 Custom Vibrations
213 LED Flash for Alerts
214 AssistiveTouch
214 Using AssistiveTouch with an Adaptive Accessory
215 Mono Audio
215 Triple-Click Home
215 Closed Captioning and Other Helpful Features
217 Hearing Aid Compatibility
218
Appendix A: International Keyboards
218 Adding keyboards
218 Switching keyboards
219 Chinese
221 Japanese
221 Korean
222 Vietnamese
223
Appendix B: Support and Other Information
223 Apple iPhone Support Site
223 Restarting and resetting iPhone
223 Backing up iPhone
225 Updating and restoring iPhone software
226 Safety, software, and service information
227 Using iPhone in an enterprise environment
8
Contents
Page 9

PRELIMINARY DRAFT — APPLE CONFIDENTIAL
228 Using iPhone with other carriers
228 Disposal and recycling information
229 Apple and the environment
229 iPhone operating temperature
231
Index
242 Chapter 33: Get answers fast
242 Get answers fast
Contents
9
Page 10

Page 11
PRELIMINARY DRAFT — APPLE CONFIDENTIAL
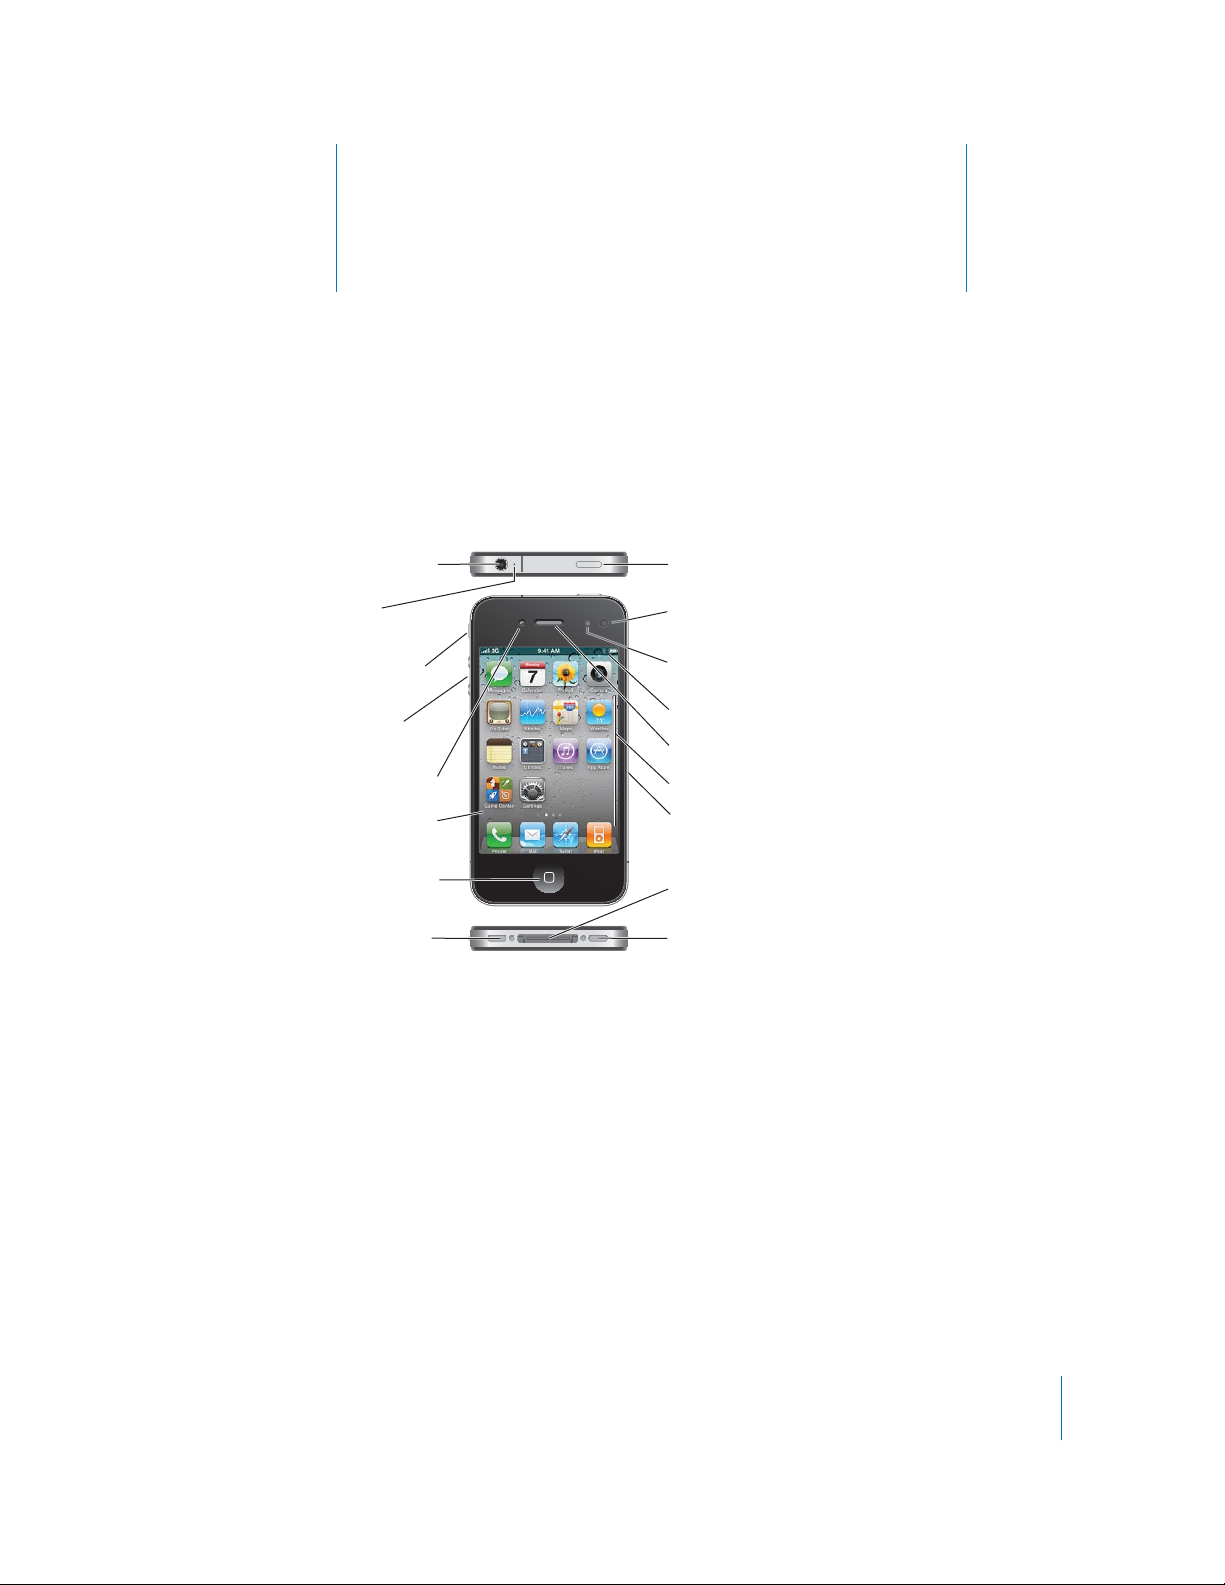
iPhone at a Glance
iPhone Overview
1
Your iPhone and the Home screen may look di∂erent, depending on the model of
iPhone you have and whether you’ve customized your Home screen.
11
Page 12

PRELIMINARY DRAFT — APPLE CONFIDENTIAL
Accessories
The following accessories are included with iPhone:
Apple Earphones
with Remote and Mic
Dock Connector to USB Cable
USB power adapter
SIM eject tool
Note: The SIM eject tool is not included in all countries or regions.
Item What you can do with it
Apple Earphones with Remote and Mic Listen to music, videos, and phone calls. Use
the built-in microphone to talk. Press the center
button to answer or end a call. When listening to
iPod, press the button to play or pause a song, or
press twice quickly to skip to the next track. Use
the + and – buttons to adjust the volume. Press
and hold the center button to use Voice Control.
Dock Connector to USB Cable Use this cable to connect iPhone to your
computer to sync and charge. The cable can be
used with the optional dock or plugged directly
into iPhone.
USB power adapter Connect the power adapter to iPhone using
the included cable, then plug it into a standard
power outlet to charge iPhone.
SIM eject tool (not included in all countries or
regions)
Eject the SIM card tray.
Buttons
On/O∂ Sleep/Wake Button
When you’re not actively using iPhone, you can lock it to turn o∂ the display and save
the battery.
When iPhone is locked, nothing happens if you touch the screen. iPhone can still
receive calls, text messages, and other updates. You can also:
listen to music
12
Chapter 1 iPhone at a Glance
Page 13

PRELIMINARY DRAFT — APPLE CONFIDENTIAL
adjust the volume using the buttons on the side of iPhone (or on the iPhone
earphones) while you’re on a phone call or listening to music
use the center button on iPhone earphones to answer or end a call, or to control
audio playback (see “Controlling Audio Playback” on page 90)
Lock iPhone Press the On/O∂ Sleep/Wake button.
Unlock iPhone Press the Home
Wake button, then drag the slider.
Turn iPhone completely o∂ Press and hold the On/O∂ Sleep/Wake button for
a few seconds until the red slider appears, then
drag the slider. When iPhone is o∂, incoming calls
go straight to voicemail.
Turn iPhone on Press and hold the On/O∂ Sleep/Wake button
until the Apple logo appears.
button or the On/O∂ Sleep/
By default, if you don’t touch the screen for a minute, iPhone locks automatically. To
turn auto-lock o∂, or to change how long before iPhone locks, see “Auto-Lock” on
page 164. To require a passcode to unlock iPhone, see “Passcode Lock” on page 164.
Home Button
Press the Home button at any time to go to the Home screen, which contains your
iPhone apps. Tap any app icon to get started. To see apps you’ve recently used, doubleclick the Home button. See “Opening and Switching Apps” on page 26.
Volume Buttons
When you’re on the phone or listening to songs, movies, or other media, the buttons
on the side of iPhone adjust the audio volume. Otherwise, the buttons control the
volume for the ringer, alerts, and other sound e∂ects.
Chapter 1 iPhone at a Glance
13
Page 14

PRELIMINARY DRAFT — APPLE CONFIDENTIAL
WARNING: For important information about avoiding hearing loss, see the Important
Product Information Guide at www.apple.com/support/manuals/iphone.
Volume
up
Volume
down
You can also adjust the volume using the onscreen slider control. To reveal the control,
double-click the Home button, then flick the bottom of the screen left-to-right
twice.
To set a volume limit for music and videos on iPhone, see “UNRESOLVABLE CROSS-
REFERENCE” on page ###.
Ring/Silent Switch
Flip the Ring/Silent switch to put iPhone in ring mode or silent mode.
In ring mode, iPhone plays all sounds. In silent mode, iPhone doesn’t ring or play alerts
and other sound e∂ects.
Important: Clock alarms, audio apps such as iPod, and many games still play sounds
through the built-in speaker when iPhone is in silent mode.
By default, when you get a call, iPhone vibrates whether it’s in ring mode or silent
mode. If iPhone is in ring mode, you can silence a call by pressing the On/O∂ Sleep/
Wake button or one of the volume buttons. Press a second time to send the call to
voicemail.
14
Chapter 1 iPhone at a Glance
Page 15

PRELIMINARY DRAFT — APPLE CONFIDENTIAL
For information about changing sound and vibrate settings, see “Sounds and the Ring/
Silent Switch” on page 159.
Status Icons
The icons in the status bar at the top of the screen give information about iPhone:
Status icon What it means
Cell signal* Shows whether you’re in range of the
cellular network and can make and receive
calls. The more bars, the stronger the
signal. If there’s no signal, the bars are
replaced with “No service.”
Airplane mode Shows that airplane mode is on—you
cannot use the phone, access the Internet,
or use Bluetooth® devices. Non-wireless
features are available. See “Airplane
Mode” on page 155.
UMTS/EV-DO Shows that your carrier’s 3G UMTS (GSM)
or EV-DO (CDMA) network is available, and
iPhone can connect to the Internet over
that network. See “How iPhone Connects
to the Internet” on page 20.
EDGE Shows that your carrier’s EDGE network
is available (GSM models), and iPhone
can connect to the Internet over that
network. See “How iPhone Connects to the
Internet” on page 20.
GPRS/1xRTT Shows that your carrier’s GPRS (GSM) or
1xRTT (CDMA) network is available, and
iPhone can connect to the Internet over
that network. See “How iPhone Connects
to the Internet” on page 20.
Wi-Fi* Shows that iPhone is connected to the
Internet over a Wi-Fi network. The more
bars, the stronger the connection. See
“Joining a Wi-Fi Network” on page 20.
Chapter 1 iPhone at a Glance
15
Page 16

PRELIMINARY DRAFT — APPLE CONFIDENTIAL
Status icon What it means
Image
"file:///Volumes//projectfiles/Sweet/iPhone/Content/in-progress/Telluride/LL/Art/IL_sync.ai"
not found.
Syncing Shows that iPhone is syncing content
<<WITH ITUNES? ICLOUD?>>.
Personal Hotspot Shows that iPhone is connected to
another iPhone providing a Personal
Hotspot (GSM models). See “Personal
Hotspot” on page 22.
Network activity Shows over-the-air syncing or other
network activity. Some third-party apps
may also use the icon to show an active
process.
Call Forwarding Shows that Call Forwarding is set up
on iPhone (GSM models). See “Call
Forwarding” on page 69.
VPN Shows that you’re connected to a network
using VPN. See “Network” on page 162.
Lock Shows that iPhone is locked. See “On/O∂
Sleep/Wake Button” on page 12.
TTY Shows that iPhone is set to work with a
TTY machine. See “TTY Support (Available
in Some Areas)” on page 216.
Play Shows that a song, audiobook, or podcast
is playing. See “Playing Songs and Other
Audio” on page 90.
Portrait orientation lock Shows that the iPhone screen is locked
in portrait orientation. See “Viewing in
Portrait or Landscape Orientation” on
page 29.
Alarm Shows that an alarm is set. See “Alarms” on
page 135.
Location services Shows that an app is using location
services. See “Location Services” on
page 157.
Bluetooth* Blue or white icon: Bluetooth is on and
a device, such as a headset or car kit, is
connected. Gray icon: Bluetooth is on, but
no device is connected. No icon: Bluetooth
is turned o∂. See “Bluetooth Devices” on
page 46.
Battery Shows battery level or charging status. See
“Battery” on page 47.
16
Chapter 1 iPhone at a Glance
Page 17

PRELIMINARY DRAFT — APPLE CONFIDENTIAL
* The use of certain accessories with iPhone may a∂ect wireless performance.
Chapter 1 iPhone at a Glance
17
Page 18

PRELIMINARY DRAFT — APPLE CONFIDENTIAL
Getting Started
2
WARNING: To avoid injury, read all operating instructions in this guide and safety
information in the iPhone Important Product Information Guide at www.apple.com/
support/manuals/iphone before using iPhone.
Viewing the User Guide on iPhone
The iPhone User Guide can be viewed on iPhone in Safari, and in the free iBooks app.
View the user guide in Safari: Tap
To add an icon for the guide to the Home screen, tap , then tap “Add to Home
Screen.” To view it in a di∂erent language, tap “Change Language” on the main
contents page.
View the user guide in iBooks:
1 If you haven’t installed iBooks, open App Store, search for and install “iBooks.”
2 Open iBooks and tap Store.
3 Search for “iPhone User,” then select and download the user guide.
For more information about iBooks, see Chapter 31, “iBooks,” on page 190.
, then tap the iPhone User Guide bookmark.
What You Need
To use iPhone, you need:
A wireless service plan with a carrier that provides iPhone service in your area
A Mac or a PC with a USB 2.0 port and one of the following operating systems:
Mac OS X v10.5.8 or later
Windows 7, Windows Vista, or Windows XP Home or Professional (SP3)
Screen resolution on your computer set to 1024 x 768 or higher
iTunes 10.1.2 or later, available at www.itunes.com/download
QuickTime 7.6.2 or later (for playing videos recorded with iPhone, on your computer)
18
Page 19

PRELIMINARY DRAFT — APPLE CONFIDENTIAL
Installing the SIM Card in
An Apple ID (such as an iTunes Store account) for App Store, iTunes, and other
online purchases
An Internet connection for your computer (broadband is recommended)
Installing the SIM Card
If your SIM card wasn’t preinstalled, you must install it before you can use iPhone.
Micro SIM
card tray
Paper clip
or SIM
eject tool
Install the SIM card:
1 Insert the end of a paper clip or SIM eject tool into the hole on the SIM card tray.
Push firmly, straight in until the tray pops out.
2 Pull out the SIM card tray and place the SIM card in the tray as shown.
3 With the tray aligned and the SIM card on top, carefully replace the tray.
Micro SIM
card
Setup and Activation
To set up and activate iPhone, turn on iPhone and follow the Setup Assistant. If you
don’t have a SIM card installed, iPhone must be connected to a Wi-Fi network or to
your computer with iTunes open to complete activation. In locations where you have a
choice of carriers, the SIM card must be installed to complete the initial activation.
During setup, you can copy your apps, settings, and content from another iPhone by
restoring from an iCloud Backup or from iTunes—options on the Set Up iPhone screen.
Connecting iPhone to Your Computer
Use the included Dock Connector to USB Cable to connect iPhone to your computer.
Connecting iPhone to your computer allows you to sync information, music, and other
content with iTunes. You can also sync with iTunes wirelessly. See Chapter 4, “iCloud,
Syncing, and File Sharing,” on page 51.
Chapter 2 Getting Started
19
Page 20

PRELIMINARY DRAFT — APPLE CONFIDENTIAL
You can disconnect iPhone from your computer at any time, including to answer a
phone call. If you disconnect iPhone while a sync is in progress, some data may not
get synced until the next time you connect iPhone to your computer.
Connecting to the Internet
How iPhone Connects to the Internet
When an app needs to use the Internet, iPhone does the following, in order, until
connected:
Connects over the most recently used available Wi-Fi
network.
Shows a list of Wi-Fi networks in range, and connects using the one you choose.
Connects over the cellular data network.
If a Wi-Fi or cellular data network isn’t available, iPhone can’t connect to the Internet.
Check with your carrier for cellular data access in your area.
Joining a Wi-Fi Network
Many Wi-Fi networks can be used free of charge including, in some countries or
regions, Wi-Fi hotspots provided by your carrier. Some Wi-Fi networks require a fee. To
join a Wi-Fi network at a hotspot where charges apply, you can usually open Safari to
see a webpage that allows you to sign up for service.
Turn on Wi-Fi and join a network:
1 In Settings, tap Wi-Fi, then tap to turn on Wi-Fi.
2 Select one of the available networks.
3 If necessary, enter a password and tap Join (networks that require a password appear
20
with a lock
When connected, the Wi-Fi
Once you join a Wi-Fi network, iPhone automatically connects to it whenever the
network is in range. If more than one previously used network is in range, iPhone joins
the one last used.
Chapter 2 Getting Started
icon).
icon appears in the status bar.
Page 21

PRELIMINARY DRAFT — APPLE CONFIDENTIAL
For information about configuring Wi-Fi settings, see “Wi-Fi” on page 156.
Voice and Data Access on the Cellular Network
If iPhone is connected to the Internet via the cellular data network, the (UMTS/EVDO ), (EDGE), or (GPRS/1xRTT) icon appears in the status bar.
The 3G (UMTS) cellular network supports simultaneous voice and data
communications on GSM models. For all other cellular connections, you can’t use
Internet services while you’re talking on the phone unless iPhone also has a Wi-Fi
connection to the Internet. Depending on your model of iPhone and the network
connection, you may not be able to receive calls while iPhone transfers data over the
cellular network—when downloading a webpage, for example.
GSM: On an EDGE or GPRS connection, incoming calls may go directly to voicemail
during data transfers. For incoming calls that you answer, data transfers are paused.
CDMA: On EV-DO connections, data transfers are paused when you answer incoming
calls. On 1xRTT connections, incoming calls may go directly to voicemail during data
transfers. For incoming calls that you answer, data transfers are paused.
Data transfer resumes when you end the call.
Turn 3G on (GSM models): In Settings, choose General > Network and tap Enable 3G.
When you’re outside your carrier’s network, you may be able to access the Internet
through another carrier. To enable email, web browsing, and other data services
whenever possible, turn Data Roaming on.
Turn Data Roaming on: In Settings, choose General > Network and turn Data
Roaming on.
Important: Roaming charges may apply. To avoid data roaming charges, make sure
data roaming is turned o∂.
For more information about setting cellular data network options, see “Network” on
page 162.
Internet Access on an Airplane
Airplane mode turns o∂ the iPhone cellular, Wi-Fi, Bluetooth, and GPS transmitters and
receivers to avoid interfering with aircraft operation. Airplane mode disables many
of the iPhone features. In some countries or regions, where allowed by the aircraft
operator and applicable laws and regulations, you can turn on Wi-Fi while airplane
mode is on, to use apps that require an Internet connection.
You may also be allowed to turn on Bluetooth to use Bluetooth devices with iPhone.
For more information, see “Airplane Mode” on page 155.
Chapter 2 Getting Started
21
Page 22

PRELIMINARY DRAFT — APPLE CONFIDENTIAL
VPN Access
VPN (virtual private network) provides secure access over the Internet to private
networks, such as the network at your company or school. Use Network settings to
configure and turn on VPN. See “Network” on page 162.
Personal Hotspot
You can use Personal Hotspot (iPhone 4 or later) to share an Internet connection
with a computer or another Wi-Fi device—such as an iPod, iPad, or other iPhone—
connected to your iPhone via Wi-Fi. You can also use Personal Hotspot to share an
Internet connection with a computer that’s connected to your iPhone via Bluetooth or
USB.
Note: This feature may not be available in all countries or regions. Additional fees may
apply. Contact your carrier for more information, including the number of devices that
can share an Internet connection at the same time.
If the Set Up Personal Hotspot button appears in your General > Network settings,
you first need to set up the service with your carrier. You can contact your carrier by
tapping that button.
Personal Hotspot works only if iPhone is connected to the Internet over the cellular
data network.
Share an Internet connection:
1 In Settings, choose Personal Hotspot (or choose General > Network > Personal
Hotspot, if Personal Hotspot doesn’t appear at the top level of Settings).
2 Turn on Personal Hotspot.
3 Connect a computer or other device to iPhone:
Wi-Fi: On the device, choose iPhone from the list of available Wi-Fi networks. Enter
the Wi-Fi password for iPhone when prompted.
USB: Connect your computer to iPhone using the Dock Connector to USB Cable. In
your computer’s Network preferences, choose iPhone.
On a Mac, a pop-up window appears the first time you connect, saying “A new
network interface has been detected.” Click Network Preferences, configure the
network settings for iPhone, then click Apply. On a PC, use the Network Control
Panel to configure the iPhone connection.
Bluetooth: On iPhone, choose Settings > General > Bluetooth and turn on
Bluetooth. Then refer to the documentation that came with your computer to pair
and connect iPhone with your device.
When a device is connected, a blue band appears at the top of the iPhone screen.
Personal Hotspot remains on when you connect with USB, even when you aren’t
actively using the Internet connection.
22
Chapter 2 Getting Started
Page 23

PRELIMINARY DRAFT — APPLE CONFIDENTIAL
Note: The Personal Hotspot icon appears in the status bar of an iPhone (GSM
models) using the Personal Hotspot of another iPhone.
Change the Wi-Fi password for iPhone: In Settings, choose Personal Hotspot > Wi-Fi
Password, then enter a password of at least 8 characters.
Changing the password disconnects any devices that are sharing the Internet
connection.
Monitor your cellular data network usage: In Settings, choose General > Usage.
Adding Mail, Contacts, and Calendar Accounts
About Accounts
iPhone works with MobileMe, Microsoft Exchange, and many of the most popular
Internet-based email, contacts, and calendar service providers. If you don’t already
have an email account, you can get a free account online at www.yahoo.com, www.
google.com, or www.aol.com. You can also try MobileMe, free for 60 days, at www.
me.com.
You can add contacts using an LDAP or CardDAV account if your company or
organization supports it. See “Syncing Contacts” on page 176.
You can add a CalDAV calendar account. See “Syncing calendars” on page 106.
You can subscribe to iCal (.ics) calendars or import them from Mail. See “Subscribing to
calendars” and “Importing calendar events from Mail” on page 106.
Setting Up MobileMe Accounts
A MobileMe Free Account is available to any customer with an iPhone 4or later,
running iOS 4.2 or later.
Set up a MobileMe Free Account:
1 In Settings, tap “Mail, Contacts, Calendars.”
2 Tap Add Account, then tap MobileMe.
3 Enter your Apple ID and password, or tap Create Free Apple ID.
4 Follow the onscreen instructions.
Verify your email address, if required.
5 For your security, make sure Find My iPhone is turned on.
Only one MobileMe account at a time can be used for Find My iPhone and for syncing
contacts, calendars, bookmarks, and notes. See “Security Features” on page 49.
To use Gallery, iDisk, and Find My iPhone on iPhone, download the free MobileMe
Gallery, MobileMe iDisk, and Find My iPhone apps from the App Store.
Chapter 2 Getting Started
23
Page 24

PRELIMINARY DRAFT — APPLE CONFIDENTIAL
Setting Up Microsoft Exchange Accounts
To use Microsoft Exchange on iPhone, you need to add an account with your Microsoft
Exchange account settings. See your service provider or system administrator for those
settings.
iPhone uses the Exchange ActiveSync protocol to sync email, calendars, and contacts
over the air with the following versions of Microsoft Exchange:
Exchange Server 2003 Service Pack 2
Exchange Server 2007 Service Pack 1
Exchange Server 2010
When setting up the account, you can choose which Exchange services you want to
use with iPhone:
Mail
Contacts
Calendars
Services you turn on are synced automatically over the air without having to connect
iPhone to your computer. See “UNRESOLVABLE CROSS-REFERENCE” on page ###.
You can set up multiple Exchange accounts.
Set up an Exchange account:
1 In Settings, tap “Mail, Contacts, Calendars.”
2 Tap Add Account, then tap Microsoft Exchange.
3 Enter your complete email address, domain (optional), user name, password, and a
description. The description can be whatever you like.
iPhone supports Microsoft’s Autodiscovery service, which uses your user name and
password to determine the address of the Exchange server. If the server’s address
can’t be determined, you’re asked to enter it. (Enter the complete address in the Server
field.) Once you connect to the Exchange server, you may be prompted to change your
passcode to match the policies set on the server.
4 Tap the items you want to use on iPhone (mail, contacts, and calendars) and set how
many days of email you want to sync to iPhone.
Setting Up Google, Yahoo!, and AOL Accounts
For many popular accounts (Google, Yahoo!, AOL), iPhone enters most of the settings
for you. When setting up the account, you can choose which account services you
want to use with iPhone. Services you turn on are synced automatically over the air
without having to connect iPhone to your computer. See “UNRESOLVABLE CROSS-
REFERENCE” on page ###.
24
Chapter 2 Getting Started
Page 25

PRELIMINARY DRAFT — APPLE CONFIDENTIAL
Set up an account:
1 In Settings, tap “Mail, Contacts, Calendars.”
2 Tap Add Account, then tap Google, Yahoo!, or AOL.
3 Enter your name, complete email address, password, and a description. The description
can be whatever you like.
4 Tap the items you want to use on iPhone. Available items depend upon the service
provider.
Setting Up Other Accounts
Choose Other Accounts to set up other accounts for mail (such as POP), contacts (such
as LDAP or CardDAV ), or calendars (such as CalDAV). Contact your service provider or
system administrator to get the account settings you need.
Set up an account:
1 In Settings, tap “Mail, Contacts, Calendars.”
2 Tap Add Account, then tap Other.
3 Choose the account type you want to add (Mail, Contacts, or Calendars).
4 Enter your account information and tap Save.
Chapter 2 Getting Started
25
Page 26

PRELIMINARY DRAFT — APPLE CONFIDENTIAL
Basics
3
Using Apps
The high-resolution Multi-Touch screen and simple finger gestures make it easy to use
iPhone apps.
Opening and Switching Apps
You open an app on iPhone by tapping its icon on the Home screen.
26
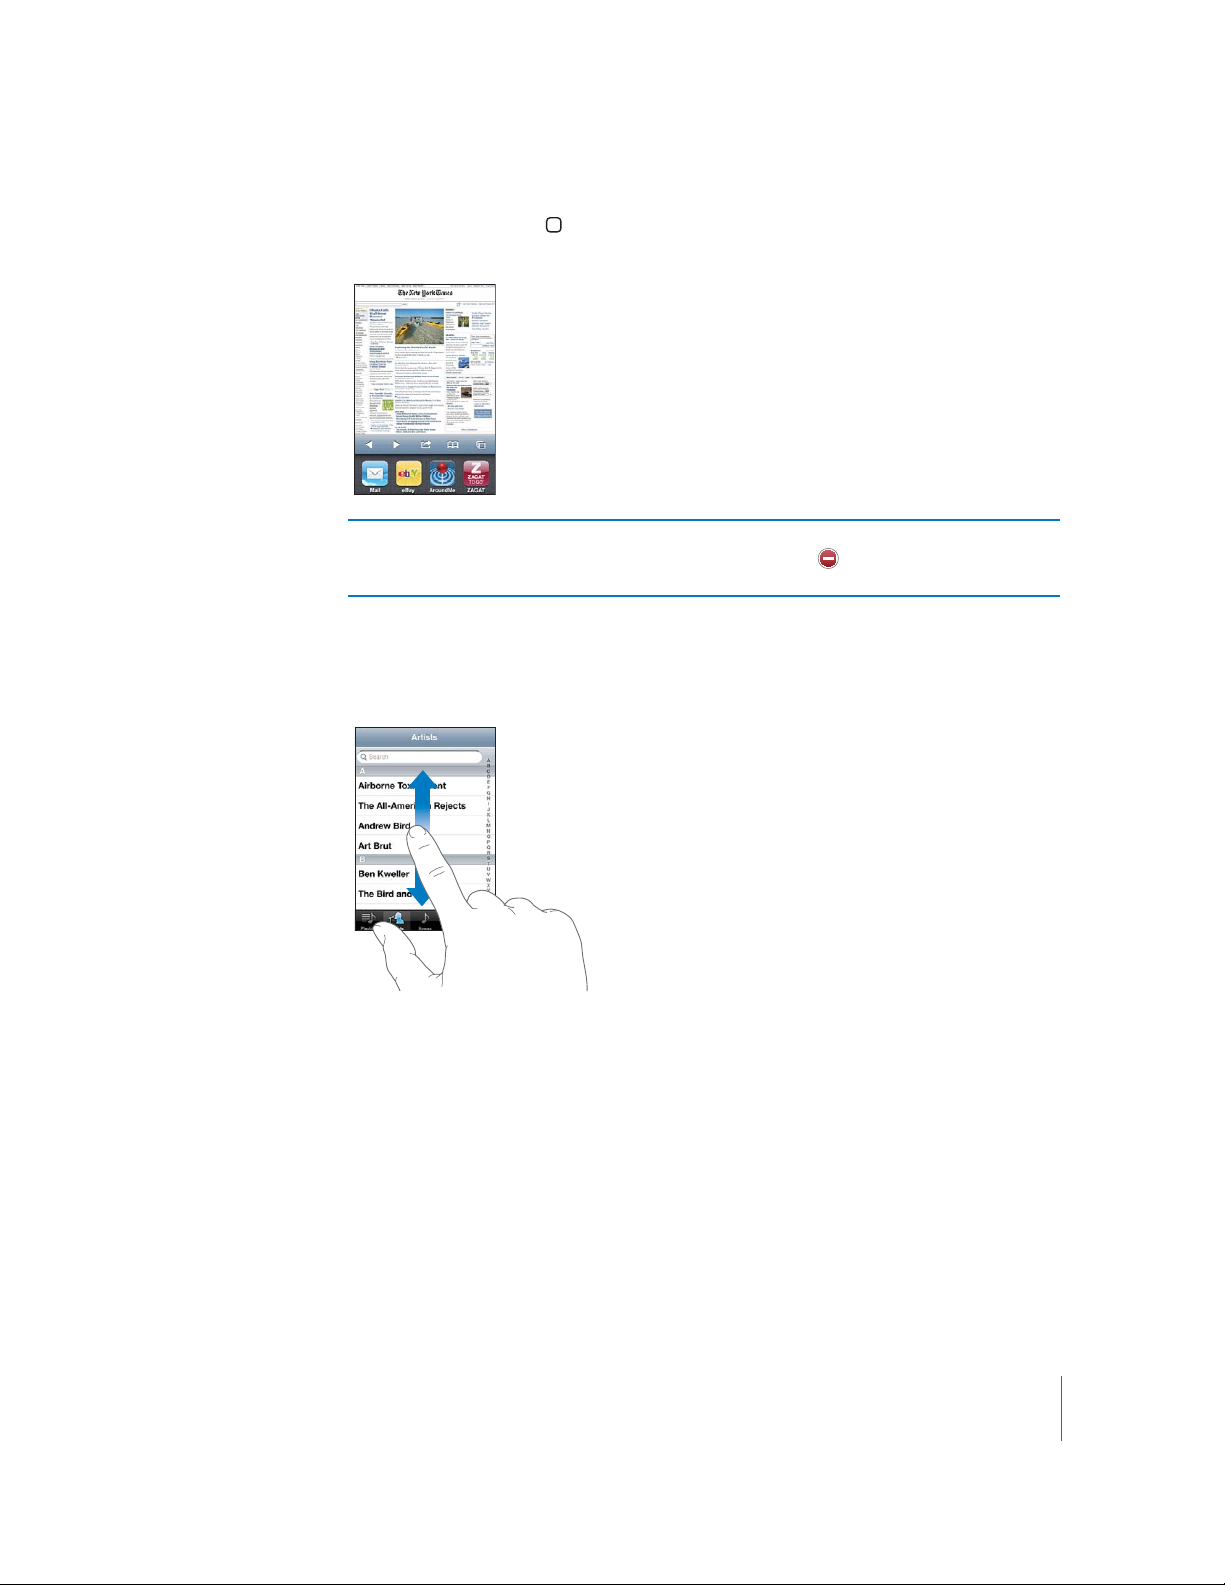
To return to the Home screen, press the Home button below the display.
Page 27
PRELIMINARY DRAFT — APPLE CONFIDENTIAL
Double-click the Home button to view your most recently used apps, which appear
at the bottom of the screen. Tap an app to open it, or flick to see more apps.
Remove an app from the recents list Touch and hold the app icon until it begins to
jiggle, then tap
recents list also forces it to quit.
. Removing an app from the
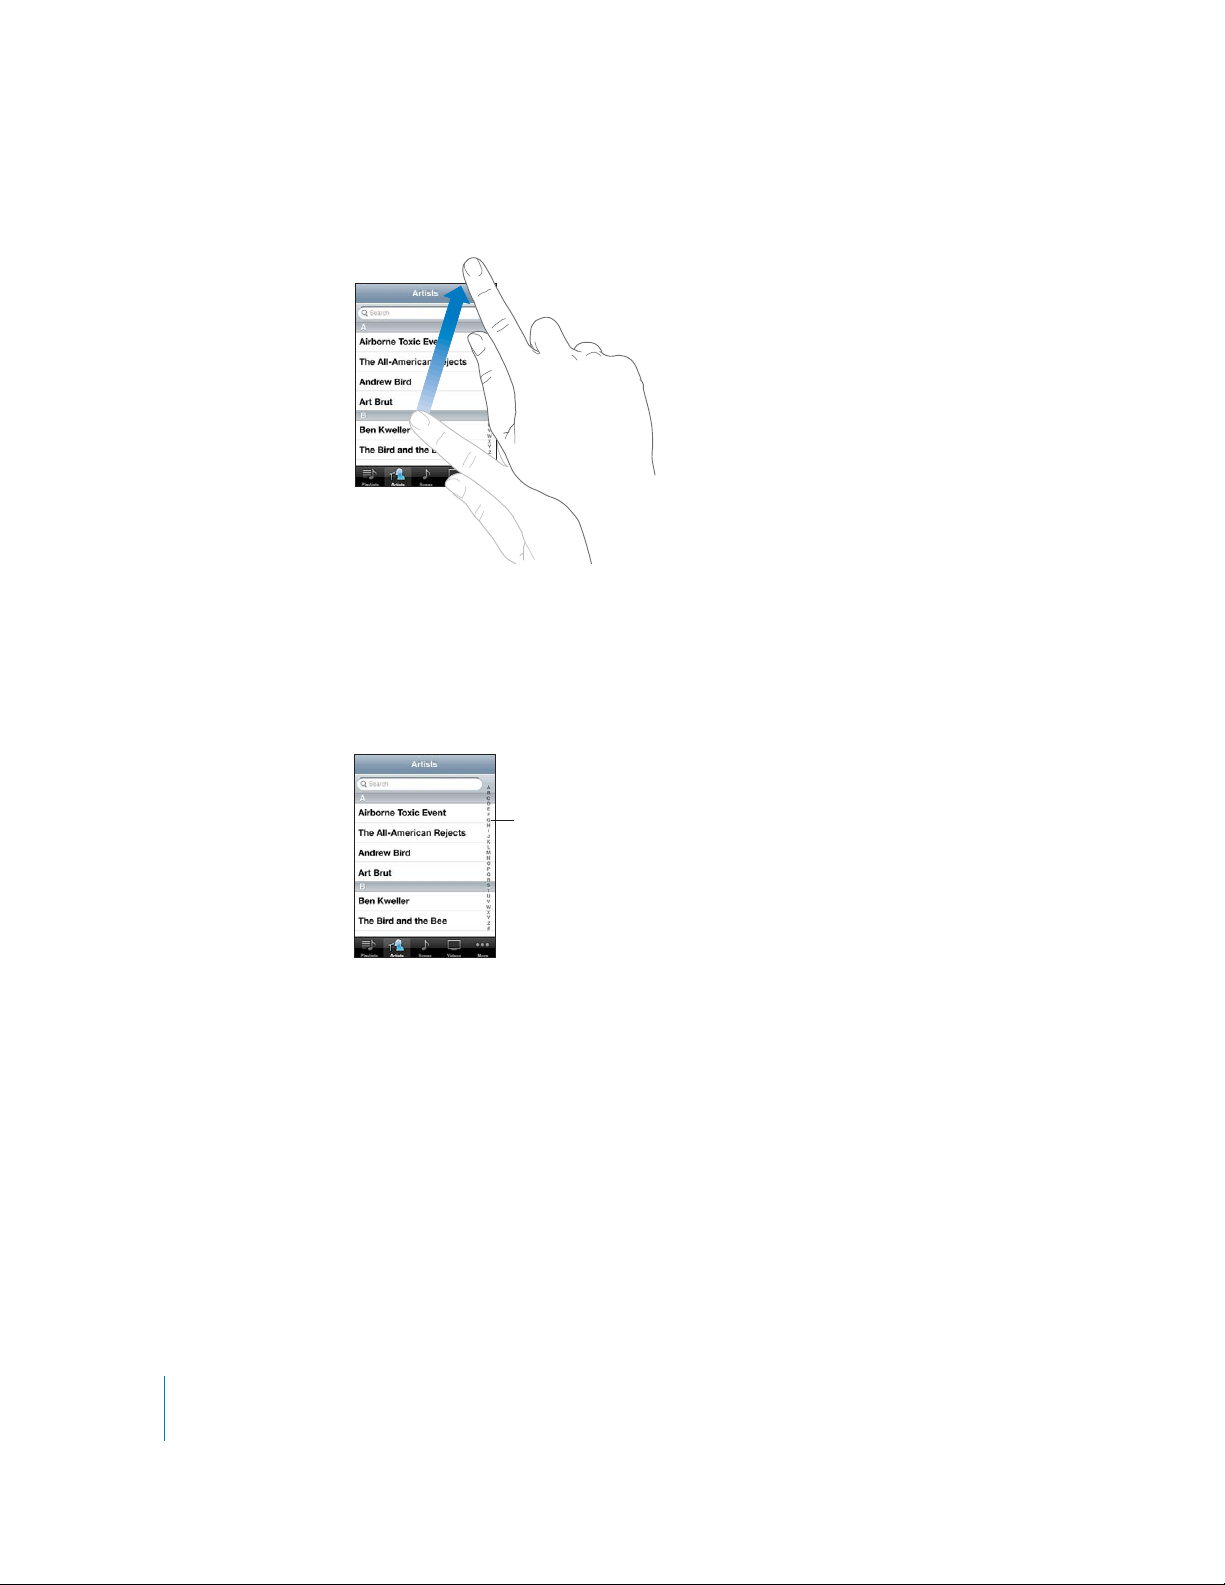
Scrolling
Drag up or down to scroll. On some screens such as webpages, you can also scroll side
to side.
Dragging your finger to scroll won’t choose or activate anything on the screen.
Chapter 3 Basics
27
Page 28
PRELIMINARY DRAFT — APPLE CONFIDENTIAL
Flick to scroll quickly.
You can wait for the scrolling to come to a stop, or touch anywhere on the screen to
stop it immediately. Touching the screen to stop scrolling won’t choose or activate
anything.
To quickly scroll to the top of a list, webpage, or email, just tap the status bar at the top
of the screen.
28
Tap an item in a list to choose it. Depending on the list, tapping an item can do
di∂erent things—for example, it may open a new list, play a song, open an email, or
show someone’s contact information so you can call that person.
Chapter 3 Basics
Page 29
PRELIMINARY DRAFT — APPLE CONFIDENTIAL
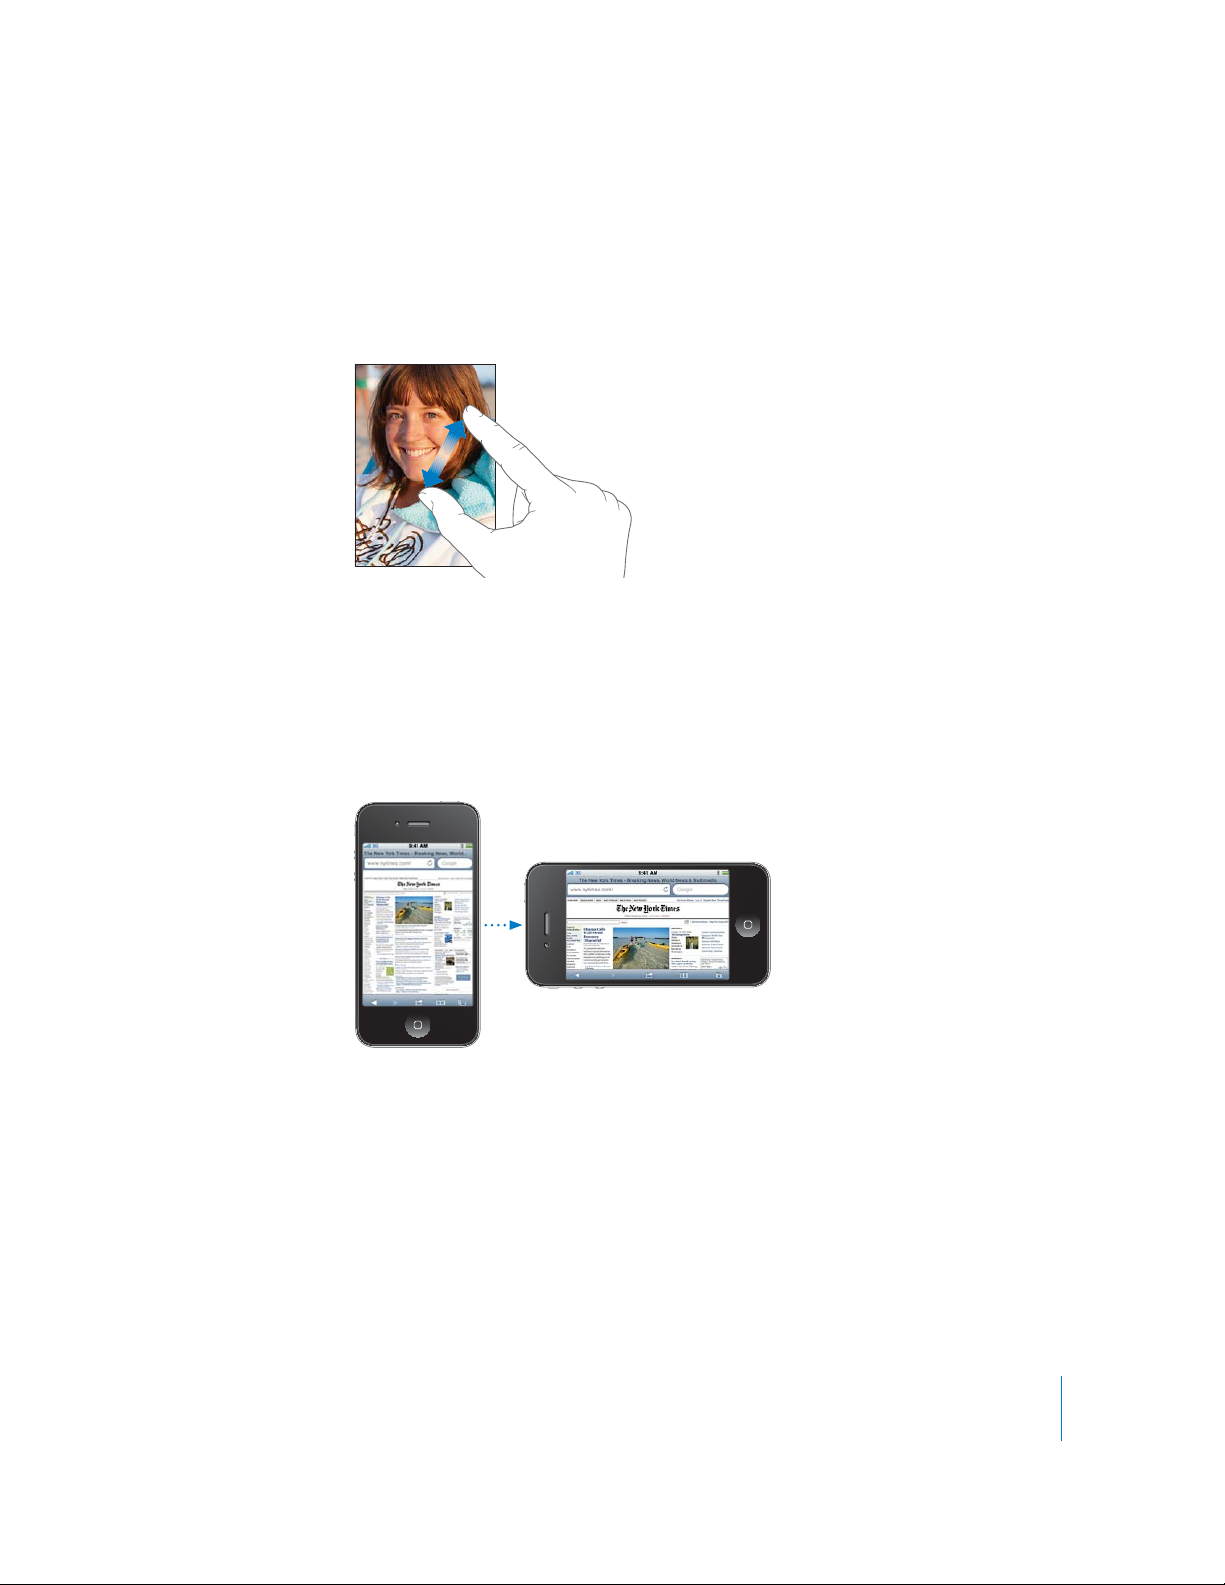
Zooming In or Out
When viewing photos, webpages, email, or maps, you can zoom in and out. Pinch your
fingers together or apart. For photos and webpages, you can double-tap (tap twice
quickly) to zoom in, then double-tap again to zoom out. For maps, double-tap to zoom
in and tap once with two fingers to zoom out.
Zoom is also an accessibility feature that lets you magnify the screen with any app
you’re using, to help you see what’s on the display. See “Zoom” on page 211.
Viewing in Portrait or Landscape Orientation
Many iPhone apps let you view the screen in either portrait or landscape orientation.
Rotate iPhone and the display rotates too, adjusting automatically to fit the new
screen orientation.
You may prefer landscape orientation for viewing webpages in Safari, or when
entering text, for example. In landscape orientation:
Webpages scale to the wider screen, making the text and images larger.
The onscreen keyboard is larger, which may help increase your typing speed and
accuracy.
Movies viewed in Videos and YouTube appear only in landscape orientation. Street
views in Maps also appear only in landscape orientation.
Chapter 3 Basics
29
Page 30
PRELIMINARY DRAFT — APPLE CONFIDENTIAL
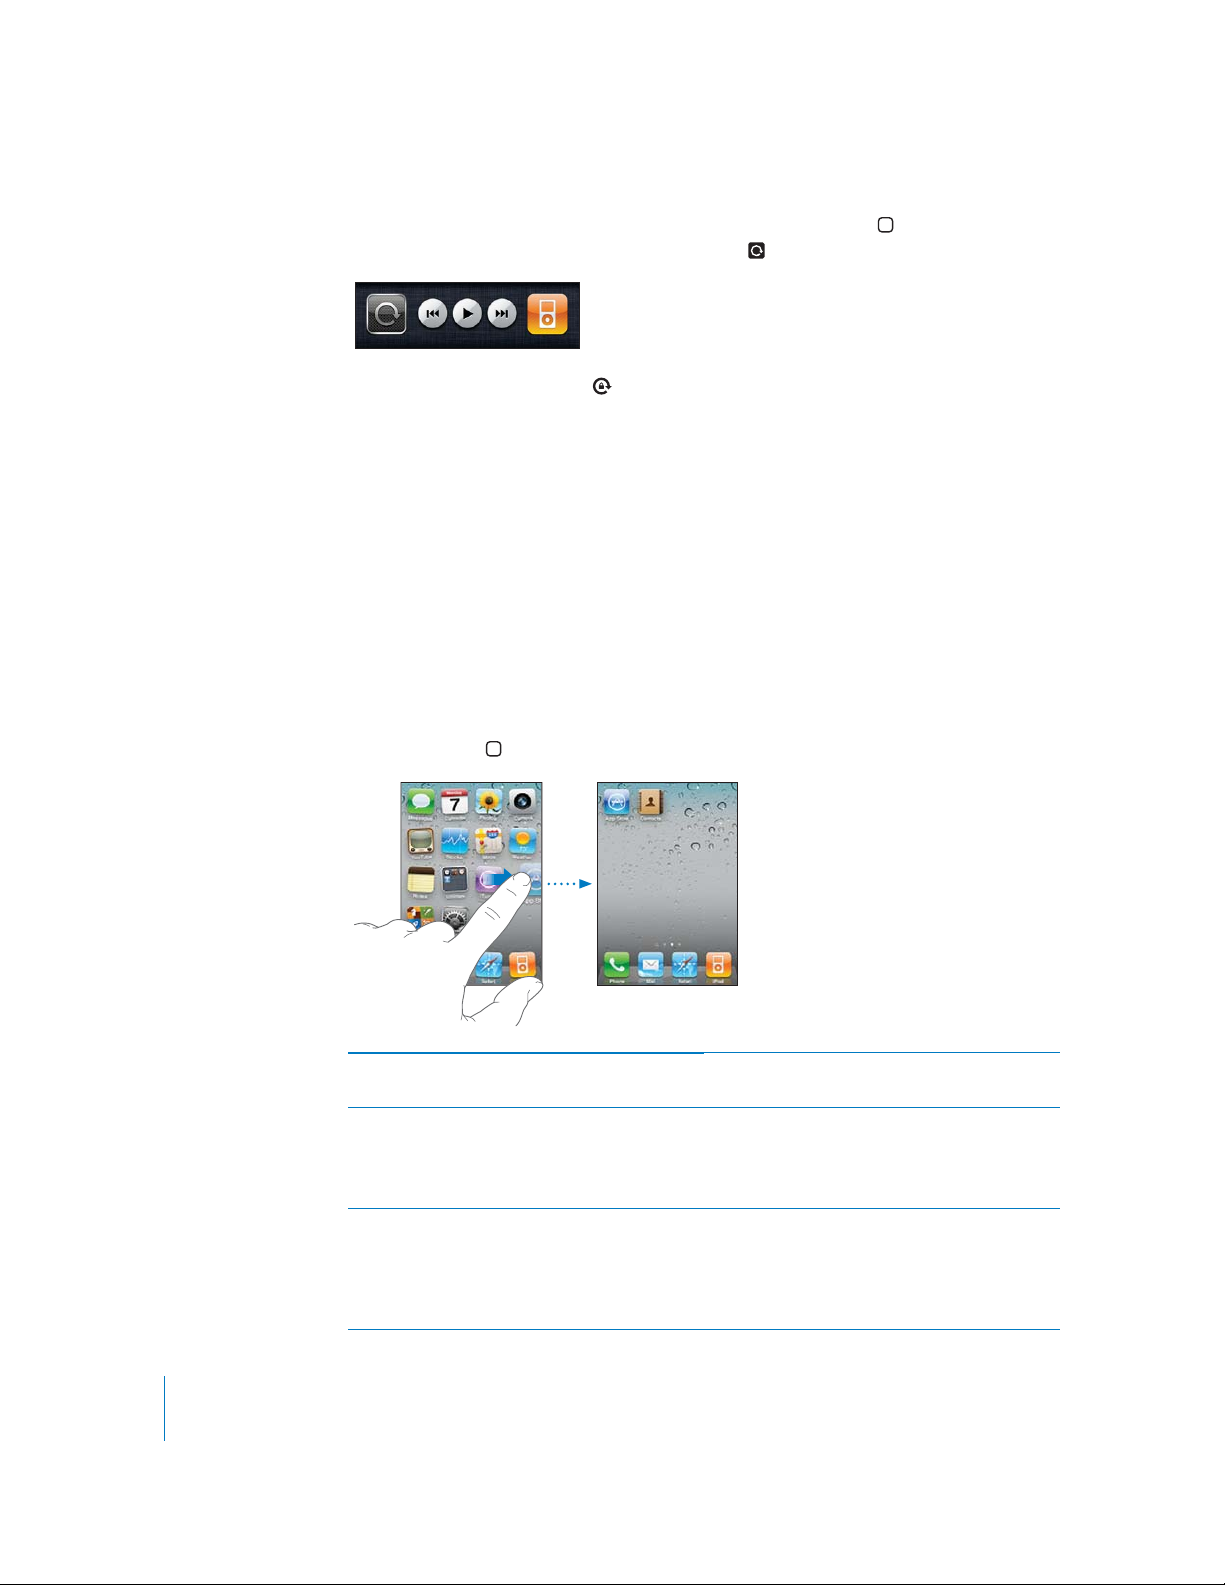
Lock the screen in portrait orientation: Double-click the Home button, flick the
bottom of the screen from left to right, then tap .
The portrait orientation lock ( ) icon appears in the status bar when the screen
orientation is locked.
Customizing the Home Screen
Rearranging Icons
You can customize the layout of icons on the Home screen—including the Dock
icons along the bottom of the screen. If you want, arrange them over multiple Home
screens. You can also organize apps by collecting them in folders.
Rearrange icons:
1 Touch and hold any icon on the Home screen until it begins to jiggle.
2 Arrange the icons by dragging them.
3 Press the Home
button to save your arrangement.
30
Move an icon to another screen While arranging icons, drag an icon to the side of
the screen.
Create additional Home screens While arranging icons, flick to the rightmost
Home screen, then drag an icon to the right edge
of the screen.
You can create up to 11.
Reset your Home screen to the default layout In Settings, choose General > Reset, then tap
Reset Home Screen Layout.
Resetting the Home screen removes any folders
you’ve created and applies the default wallpaper
to your Home screen.
Chapter 3 Basics
Page 31

PRELIMINARY DRAFT — APPLE CONFIDENTIAL
You can add icons on the Home screen to open your favorite webpages. See “Web
Clips” on page 88.
When iPhone is connected to your computer, you can customize your Home screens
using iTunes. In iTunes, select iPhone in the Devices list, then click Apps at the top of
the screen.
Organizing with Folders
Folders let you organize icons on the Home screen. You can put up to 12 icons in a
folder. iPhone automatically names a folder when you create it, based on the icons you
use to create the folder, but you can change the name anytime you want. Like icons,
folders can be rearranged by dragging them around the Home screen. You can move
folders to a new Home screen or to the Dock.
Create a folder: Touch and hold an icon until the Home screen icons begin to jiggle,
then drag the icon onto another icon.
iPhone creates a new folder that includes the two icons, and shows the folder’s name.
You can tap the name field and enter a di∂erent name.
You can also create folders within iTunes.
Create a folder using iTunes: With iPhone connected to your computer, select iPhone
in the Devices list in iTunes. Click Apps at the top of the screen, and on the Home
screen near the top of the window, drag an app on top of another.
Chapter 3 Basics
31
Page 32

PRELIMINARY DRAFT — APPLE CONFIDENTIAL
Add an icon to a folder While arranging icons, drag the icon onto the
folder.
Remove an icon from a folder While arranging icons, tap to open the folder,
then drag the icon out of the folder.
Open a folder Tap the folder. You can then tap an app icon to
open that app.
Close a folder Tap outside the folder, or press the Home button.
Delete a folder Move all icons out of the folder. The folder is
deleted automatically when empty.
Rename a folder While arranging icons, tap to open the folder,
then tap the name at the top and use the
keyboard to enter a new name. Press the Home
button to save your changes.
When you finish organizing your Home screen, press the Home button to save your
changes.
Many apps, such as Phone, Messages, Mail, and the App Store, display an alert
badge on their Home screen icon with a number (to indicate incoming items) or an
exclamation mark (to indicate a problem). If these apps are contained in a folder, the
badge appears on the folder. A badge with a number shows the total number of items
you haven’t attended to, such as incoming phone calls, email messages, text messages,
and updated apps to download. A badge with an exclamation mark indicates a
problem with an app.
32
Adding Wallpaper
You can set an image or photo as wallpaper for the Lock screen. You can also set
wallpaper for your Home screen. You can choose an image that came with iPhone, a
photo from your Camera Roll, or a photo synced to iPhone from your computer.
The Lock screen wallpaper also appears when you’re on a call with someone you don’t
have a contact photo for.
Set wallpaper:
1 In Settings, choose Wallpaper, tap the image of the Lock and Home screens, then tap
Wallpaper or an album.
2 Tap to choose an image or photo. If you choose a photo, drag to position it and pinch
to zoom in or out, until it looks the way you want.
Chapter 3 Basics
Page 33

PRELIMINARY DRAFT — APPLE CONFIDENTIAL
3 Tap Set, then choose whether you want to use the photo as wallpaper for your Lock
Screen, Home screen, or both.
Typing
The onscreen keyboard appears anytime you need to type.
Entering Text
Use the keyboard to enter text, such as contact information, email, text messages, and
web addresses. The keyboard corrects misspellings, predicts what you're typing, and
learns as you use it.
Depending on the app you’re using, the intelligent keyboard may suggest corrections
as you type, to help prevent mistyped words.
Enter text:
1 Tap a text field, such as in a note or new contact, to bring up the keyboard.
2 Tap keys on the keyboard.
Start by typing with just your index finger. As you get more proficient, you can type
more quickly using two thumbs.
As you type, each letter appears above your thumb or finger. If you touch the wrong
key, you can slide your finger to the correct key. The letter isn’t entered until you
release your finger from the key.
Chapter 3 Basics
33
Page 34

PRELIMINARY DRAFT — APPLE CONFIDENTIAL
Alternatively, use Siri to dictate your text ( only). Tap
Delete the previous character Tap .
Type uppercase Tap the Shift key before tapping a letter. Or
touch and hold the Shift key, then slide to a letter.
Quickly type a period and space Double-tap the space bar. (You can turn
this feature on or o∂ in Settings > General >
Keyboard.)
Turn caps lock on Double-tap the Shift
key again to turn caps lock o∂. (You can turn
this feature on or o∂ in Settings > General >
Keyboard.)
Show numbers, punctuation, or symbols Tap the Number
to see additional punctuation and symbols.
Type letters or symbols that aren’t on the
keyboard
Image
"file:///Volumes//projectfiles/Sweet/iPhone/Content/in-progress/Telluride/LL/Art/BASICS_AltChars.ai"
not found.
Touch and hold the related letter or symbol, then
slide to choose a variation.
Image
"file:///Volumes//projectfiles/Sweet/iPhone/Content/in-progress/Telluride/LL/Art/IL_siri.ai"
not found.
key. TTap the Shift
key. Tap the Symbol key
34
the onscreen keyboard, then speak. Tap Done when you finish. See “Siri” on page 40.
Dictionary
For many languages, iPhone has dictionaries to help you type. The appropriate
dictionary is activated when you select a supported keyboard.
For a list of supported languages, see www.apple.com/iphone/specs.html.
iPhone uses the active dictionary to suggest corrections or complete the word you’re
typing. You don’t need to interrupt your typing to accept the suggested word.
Suggested
word
Chapter 3 Basics
on
Page 35

PRELIMINARY DRAFT — APPLE CONFIDENTIAL
Accept or reject dictionary suggestions:
B To reject the suggested word, finish typing the word as you want it, then tap the “x” to
dismiss the suggestion before typing anything else. Each time you reject a suggestion
for the same word, iPhone becomes more likely to accept your word.
Note: If you’re entering Chinese or Japanese, tap one of the suggested alternatives.
B To use the suggested word, type a space, punctuation mark, or return character.
iPhone also underlines words you’ve already typed that might be misspelled.
Use spell checking to replace a misspelled word: Tap the underlined word, then tap
one of the suggested corrections.
If none of the suggestions is correct, you can correct the spelling of the selected word
by retyping it. To leave the word unchanged, tap somewhere else in the message area.
Turn auto-correction on or o∂: Choose General > Keyboard, then turn AutoCorrection on or o∂. Auto-Correction is on by default.
Turn spell checking on or o∂: Choose General > Keyboard, then turn Check Spelling
on or o∂. Spell checking is on by default.
Cut, Copy, and Paste
The touchscreen makes it easy to make changes to text you’ve entered. An onscreen
magnifying glass helps you position the insertion point precisely where you need it.
Grab points on selected text let you quickly select more or less text. You can also cut,
copy, and paste text and photos within apps, or across multiple apps.
Chapter 3 Basics
35
Page 36

PRELIMINARY DRAFT — APPLE CONFIDENTIAL
Position the insertion point: Touch and hold to bring up the magnifying glass, then
drag to position the insertion point.
Select text: Tap the insertion point to display the selection buttons.
Tap Select to select the adjacent word or tap Select All to select all text. You can also
double-tap to select a word. In read-only documents, such as webpages, or email or
text messages you’ve received, touch and hold to select a word.
36
Drag the grab points to select more or less text.
Cut or copy text: Select text, then tap Cut or Copy.
Paste text: Tap the insertion point and tap Paste. The last text that you cut or copied is
inserted. Or select text and tap Paste to replace the text.
Undo the last edit: Shake iPhone and tap Undo.
Bold, Italics, and Underline
Para
Keyboard Layouts
You can use Settings to set the keyboard layouts for software and hardware keyboards.
The available layouts depend on the keyboard language.
Chapter 3 Basics
Page 37

PRELIMINARY DRAFT — APPLE CONFIDENTIAL
Select a keyboard layout: In Settings, choose General > Keyboard > International
Keyboards, then select a keyboard. For each language, you can make separate
selections for both the onscreen software and any external hardware keyboards.
The software keyboard layout determines the layout of the keyboard on the iPhone
screen. The hardware keyboard layout determines the layout of an Apple Wireless
Keyboard connected to iPhone.
Using an Apple Wireless Keyboard
For ease of typing, you can use an Apple Wireless Keyboard (available separately).
The Apple Wireless Keyboard connects via Bluetooth, so you must pair the keyboard
with iPhone. See “Pairing a Bluetooth Device with iPhone” on page 46.
Once the keyboard is paired with iPhone, it connects whenever the keyboard is within
range (up to 30 feet). You can tell that the keyboard is connected if the onscreen
keyboard doesn’t appear when you tap in a text field.
Switch the language when using a hardware keyboard: Press and hold the
Command key, then tap the space bar to display a list of available languages. Tap the
space bar again to choose a di∂erent language.
Disconnect a wireless keyboard from iPhone: Press and hold the power button on
the keyboard until the green light goes o∂.
iPhone disconnects the keyboard when it’s out of range.
Unpair a wireless keyboard from iPhone: In Settings, choose General > Bluetooth, tap
next to the device name, then tap “Forget this Device.”
You can apply di∂erent layouts to a wireless keyboard. See Appendix A, “International
Keyboards,” on page 218 and “Keyboard Layouts” on page 36.
Printing
AirPrint
AirPrint lets you print wirelessly to AirPrint-enabled printers. You can print from these
iOS apps:
Mail—email messages and attachments that can be viewed in Quick Look
Photos—photos
Safari—webpages, PDFs, and other attachments that can be viewed in Quick Look
iBooks—PDFs
Other apps available from the App Store may also support AirPrint.
Chapter 3 Basics
37
Page 38

PRELIMINARY DRAFT — APPLE CONFIDENTIAL
An AirPrint-enabled printer doesn’t need setup—just connect it to the same Wi-Fi
network as iPhone. (If you’re not sure whether your printer is AirPrint-enabled, refer to
its documentation.)
For more information, go to support.apple.com/kb/HT4356.
Printing a Document
AirPrint uses your Wi-Fi network to send print jobs wirelessly to your printer. iPhone
must be connected to the same wireless network as the AirPrint printer.
Print a document:
1 Tap
2 Tap Select Printer to select a printer.
3 Set printer options such as number of copies and double-sided output (if the printer
4 Tap Print.
or (depending on the app you’re using), then tap Print.
supports it). Some apps also let you set a range of pages to print.
See the status of a print job: Double-click the Home
button, then tap Print Center.
The Print Center app appears as the most recent app when a document is printing. A
badge on the app icon shows how many documents are queued for printing.
If you’re printing more than one document, select a print job to see its status summary.
Cancel a print job: Double-click the Home
button, tap Print Center, select the print
job (if you’re printing more than one document), then tap Cancel Printing.
38
Chapter 3 Basics
Page 39

PRELIMINARY DRAFT — APPLE CONFIDENTIAL
Searching
You can search many apps on iPhone, including Mail, Calendar, iPod, Notes, Messages,
and Contacts. You can search an individual app, or search all apps at once using
Search.
Go to Search: On the main Home screen, flick left to right or press the Home
button.
From the Search screen, press the Home button to return to the main Home screen
page.
Search iPhone: On the Search screen, enter text in the Search field. Search results
appear as you type. Tap an item in the list to open it. Tap Search to dismiss the
keyboard and see more results.
Icons next to the search results show which app the results are from.
iPhone may display a top hit for you at the top of the list, based on your previous
searches. The Safari search results include options to search the web or to search
Wikipedia.
App What’s searched
Contacts First, last, and company names
Mail To, From, and Subject fields of all accounts (the
text of messages isn’t searched)
Calendar Event titles, invitees, locations, and notes
iPod Music (names of songs, artists, and albums) and
the titles of podcasts, videos, and audiobooks
Messages Names and text of messages
Notes Text of notes
Chapter 3 Basics
39
Page 40

PRELIMINARY DRAFT — APPLE CONFIDENTIAL
Siri
Siri ( not available in all areas) lets you use iPhone by speaking to it. You can ask
Search also searches the names of the native and installed apps on iPhone, so if you
have a lot of apps, you may want to use Search to locate and open apps.
Open apps from Search: Enter the app name, then tap to open the app directly from
the search results.
Use the Spotlight Search setting to specify which contents are searched and the order
the results are presented in. See “Spotlight Search” on page 164.
Siri to make a call, respond to text messages, get directions, schedule reminders and
meetings, and more.
For example:
Say “what was that last song?” to learn the name and artist of the last song played
Say “call mom” to call your mother (if you’ve included your mother’s name in your
own contact info)
Say “reply I’ll by there” to send a reply to the email you’re reading
Say “what’s the weather?” to get the current local weather, then say “what about this
weekend” to get the local weather for the weekend
Siri can help with the following apps:
Phone—make a phone or FaceTime call
Music—control music playback
Mail—send and search email
Messages—read and send text messages
Calendar—create and view events
Reminders—create, search, and update reminders
Clock—get the date and time for major cities, set alarms, and start the timer
Notes—create, search, or add to notes
Contacts—look up contacts
Maps—find locations, get directions, and contact businesses
Find My Friends—locate friends
Stocks—get stock info
Safari—search the web
For more examples, say “what can you do.” <<IS THERE GOING TO BE A WEBPAGE WITH
MORE INFO ABOUT THIS FEATURES?>>.
40
Chapter 3 Basics
Page 41

PRELIMINARY DRAFT — APPLE CONFIDENTIAL
Image
"file:///Volumes//projectfiles/Sweet/iPhone/Content/in-progress/Telluride/LL/Art/BSC_siri.ai"
not found.
Use Siri:
1 With the screen on (locked or unlocked), hold iPhone to your ear.
You can also press and hold Home button or, you’re using a headset, press and hold
the center button.
2 Afer the tone, ask a question or tell Siri what to do.
Image
"file:///Volumes//projectfiles/Sweet/iPhone/Content/in-progress/Telluride/LL/Art/IL_siri.ai"
Make another request
not found.
.
Cancel a request
Tap
Image
"file:///Volumes//projectfiles/Sweet/iPhone/Content/in-progress/Telluride/LL/Art/IL_siri.ai"
not found.
Say “cancel,” or tap
Image
"file:///Volumes//projectfiles/Sweet/iPhone/Content/in-progress/Telluride/LL/Art/IL_siri.ai"
Tap
not found.
on the
Dictate text
onscreen keyboard, speak the text, then tap
Done. Tap Start to dictate more text.
To set options, go to Settings > General > Siri. You can:
Turn Siri on or o∂
Set the language
Set when you want voice feedback
Choose your contact card for personal info
Turn “raise to speak” on or o∂
Voice Control
Voice Control (iPhone 3GS and iPhone 4) lets you make phone calls and control iPod
music playback using voice commands.
.
Chapter 3 Basics
41
Page 42

PRELIMINARY DRAFT — APPLE CONFIDENTIAL
Note: Voice Control may not be available in all languages.
Use Voice Control: Press and hold the Home button until the Voice Control screen
appears and you hear a beep. You can also press and hold the center button on the
iPhone earphones.
Use the following commands to make calls or play songs.
For best results:
Speak into the iPhone microphone as if you were making a phone call. You can also
use the microphone on your Bluetooth headset or compatible Bluetooth car kit.
Speak clearly and naturally.
Say only iPhone commands and names, and numbers. Pause slightly between
commands.
Use full names.
42
For more about using Voice Control, including information about using Voice Control
in di∂erent languages, go to support.apple.com/kb/HT3597.
Voice Control normally expects you to speak voice commands in the language that’s
set for iPhone (the setting in General > International > Language). Voice Control
settings let you change the language for speaking voice commands. Some languages
are available in di∂erent dialects or accents.
Change the language or country: In Settings, choose General > International > Voice
Control and tap the language or country.
Voice Control for the iPod app is always on, but for better security you can prevent
voice dialing when iPhone is locked.
Prevent voice dialing when iPhone is locked: In Settings, choose General > Passcode
Lock and turn Voice Dial o∂. Unlock iPhone to use voice dialing.
See “Voice Dialing” on page 61 and “Using Voice Control with iPod” on page 94.
Chapter 3 Basics
Page 43

PRELIMINARY DRAFT — APPLE CONFIDENTIAL
Notification Center
The Notification Center displays local weather information, your personalized stock
ticker, and alerts about:
missed phone calls and voice messages
new email
new text messages
reminders
calendar events
friend requests (Game Center)
Alerts appear on the lock screen, or briefly at the top of the screen if you’re using
iPhone. You can see all current alerts by revealing the Notification Center.
Reveal the Notification Center: Swipe down from the top of the screen.
Image
"file:///Volumes//projectfiles/Sweet/iPhone/Content/in-progress/Telluride/LL/Art/BASICS_notifications.ai"
not found.
Respond to an alert Lock screen: Swipe the alert from left to right.
Notifications Center: Tap the alert.
Remove an alert from the Notification Center Tap
, then tap Clear.
Go to Settings > Notifications to turn notifications on or o∂, and set which alerts you
receive and how they appear.
Twitter
Sign in to your Twitter account (or create a new account) in Settings to enable tweets
with attachments from the following apps:
Camera—with photo from the Camera Roll
Photos—with photo
Safari—with webpage
Maps—with location
YouTube—with video
Sign in to (or create) a Twitter account:
1 In Settings, tap Twitter.
2 Enter the user name and password for an existing account, or tap Create New Account.
Chapter 3 Basics
43
Page 44

PRELIMINARY DRAFT — APPLE CONFIDENTIAL
To add another account, ap Add Account.
FPO
In Camera or Photos, tap the Action
button to tweet a photo.
Tweet a photo, video, or webpage View the item, tap , then tap Tweet. (If isn’t
showing, tap the screen.)
To include your location, tap Add Location.
Tweet a location in Maps Tap the location pin, tap
then tap Tweet.
Add Twitter user names and photos to your
contacts
Turn Twitter on or o∂ for Photos or Safari In Settings, go to Twitter.
In Settings, go to Twitter, then tap Update
Contacts.
, tap Share Location,
44
You can install and use the Twitter app to tweet, view your timeline, direct messages to
other tweeters, search for trending topics, and more. In Settings, go to Twitter, then tap
Install. To learn how to use the Twitter app, open the app, tap the More (...) button, tap
“Accounts & Settings,” tap Settings, then tap Manual.
Apple Earphones with Remote and Mic
The Apple Earphones with Remote and Mic included with iPhone feature a
microphone, volume buttons, and an integrated button that allows you to answer and
end calls easily, and control audio and video playback.
Image
"file:///Volumes//projectfiles/Sweet/iPhone/Content/in-progress/Telluride/LL/Art/SqueezeMic.ai"
not found.
Chapter 3 Basics
Page 45

PRELIMINARY DRAFT — APPLE CONFIDENTIAL
Plug in the earphones to listen to music or make a phone call. Press the center button
to control music playback and answer or end calls, even when iPhone is locked.
Pause a song or video Press the center button. Press again to resume
playback.
Skip to the next song Press the center button twice quickly.
Return to previous song Press the center button three times quickly.
Fast-forward Press the center button twice quickly and hold.
Rewind Press the center button three times quickly and
hold.
Adjust the volume Press the + or – button.
Answer an incoming call Press the center button.
End the current call Press the center button.
Decline an incoming call Press and hold the center button for about two
seconds, then let go. Two low beeps confirm you
declined the call.
Switch to an incoming or on-hold call and put
the current call on hold
Switch to an incoming or on-hold call and end
the current call
Use Voice Control Press and hold the center button. See “Voice
Press the center button. Press again to switch
back to the first call.
Press and hold the center button for about two
seconds, then let go. Two low beeps confirm you
ended the first call.
Control” on page 41.
If you get a call while the earphones are plugged in, you can hear the ringtone
through both the iPhone speaker and the earphones.
AirPlay
You can wirelessly stream music, photos, and video to your HDTV or speakers using
AirPlay and Apple TV.
You can also use AirPlay to stream audio to an Airport Express or AirPort Extreme base
station. Other AirPlay-enabled receivers are available from third-parties, see the Apple
Store for details.
Stream content to an AirPlay-enabled device:
1 Make sure iPhone and the device (such as an Apple TV) are connected to the same Wi-
Fi network.
2 Start the video, slideshow, or music, then tap
want to use. Some devices may ask for a passcode.
Chapter 3 Basics
and choose the AirPlay device you
45
Page 46

PRELIMINARY DRAFT — APPLE CONFIDENTIAL
Once streaming starts, you can exit the app.
Switch output from AirPlay back to iPhone Open the app you’re streaming from. Tap ,
then choose iPhone from the list.
Bluetooth Devices
You can use iPhone with the Apple Wireless Keyboard and other Bluetooth devices,
such as Bluetooth headsets, car kits, and stereo headphones. Third-party Bluetooth
headphones may support volume and playback controls. See the documentation that
came with your Bluetooth device. For supported Bluetooth profiles, go to support.
apple.com/kb/HT3647.
Pairing a Bluetooth Device with iPhone
WARNING: For important information about avoiding hearing loss and about driving
safely, see the Important Product Information Guide at www.apple.com/support/
manuals/iphone.
Before you can use a Bluetooth device with iPhone, you must first pair them.
Pair a Bluetooth headset, car kit, or other device with iPhone:
1 Follow the instructions that came with the device to make it discoverable or to set it to
search for other Bluetooth devices.
2 In Settings, choose General > Bluetooth and turn Bluetooth on.
3 Choose the device on iPhone, and enter its passkey or PIN number. See the
instructions about the passkey or PIN that came with the device.
After you pair a Bluetooth device to work with iPhone, you must make a connection to
have iPhone use the device for your calls. See the documentation that came with the
device.
When iPhone is connected to a Bluetooth headset or car kit, outgoing calls are routed
through the device. Incoming calls are routed through the device if you answer using
the device, and through iPhone if you answer using iPhone.
Pair an Apple Wireless Keyboard with iPhone:
1 In Settings, choose General > Bluetooth and turn Bluetooth on.
2 Press the power button on the Apple Wireless Keyboard to turn it on.
3 On iPhone, select the keyboard listed under Devices.
4 Type the passkey on the keyboard as instructed, then press Return.
Note: You can pair only one Apple Wireless Keyboard with iPhone at a time. To pair a
di∂erent keyboard, you must first unpair the current one.
46
Chapter 3 Basics
Page 47

PRELIMINARY DRAFT — APPLE CONFIDENTIAL
For more information, see “Using an Apple Wireless Keyboard” on page 37.
Bluetooth Status
The Bluetooth icon appears in the iPhone status bar at the top of the screen:
or : Bluetooth is on and a device is connected to iPhone. (The color depends on
the current color of the status bar.)
: Bluetooth is on but no device is connected. If you’ve paired a device with iPhone,
it may be out of range or turned o∂.
No Bluetooth icon: Bluetooth is turned o∂.
Unpairing a Bluetooth Device from iPhone
You can unpair a Bluetooth device if you don’t want to use it with iPhone any more.
Unpair a Bluetooth device:
1 In Settings, choose General > Bluetooth and turn Bluetooth on.
2 Tap
next to the device name, then tap “Forget this Device.”
Battery
iPhone has an internal rechargeable battery.
Charging the Battery
WARNING: For important safety information about charging iPhone, see the
Important Product Information Guide at www.apple.com/support/manuals/iphone.
The battery icon in the upper-right corner shows the battery level or charging status.
You can also display the percentage of the battery charge. See “Software Update” on
page 161.
Charging Charged
Charge the battery: Connect iPhone to a power outlet using the included Dock
Connector to USB Cable and USB power adapter.
Chapter 3 Basics
47
Page 48

PRELIMINARY DRAFT — APPLE CONFIDENTIAL
Charge the battery and sync iPhone: Connect iPhone to your computer using the
included Dock Connector to USB Cable. Or connect iPhone to your computer using the
included cable and the Dock, available separately.
Unless your keyboard has a high-powered USB 2.0 port, you must connect iPhone to a
USB 2.0 port on your computer.
Important: The iPhone battery may drain instead of charge if iPhone is connected to a
computer that’s turned o∂ or is in sleep or standby mode.
If you charge the battery while syncing or using iPhone, it may take longer to charge.
Important: If iPhone is very low on power, it may display one of the following images,
indicating that iPhone needs to charge for up to ten minutes before you can use it.
If iPhone is extremely low on power, the display may be blank for up to two minutes
before one of the low-battery images appears.
48
or
Maximizing Battery Life
iPhone uses lithium-ion batteries. To learn more about how to maximize the battery
life of iPhone, go to www.apple.com/batteries.
Replacing the Battery
Rechargeable batteries have a limited number of charge cycles and may eventually
need to be replaced. The iPhone battery isn’t user replaceable; it can be replaced
only by an authorized service provider. For more information, go to www.apple.com/
support/iphone/service/battery.
Chapter 3 Basics
Page 49

PRELIMINARY DRAFT — APPLE CONFIDENTIAL
Security Features
Security features help protect the information on iPhone from being accessed by
others.
Passcodes and Data Protection
You can set a passcode that you must enter each time you turn on or wake up iPhone.
Set a passcode: Choose Settings > General > Passcode Lock and enter a 4-digit
passcode, then enter the passcode again to verify it. iPhone then requires you to enter
the passcode to unlock it or to display the passcode lock settings.
Setting a passcode turns on data protection. Data protection uses your passcode as
the key for encrypting mail messages and their attachments stored on iPhone. (Data
protection may also be used by some apps available in the App Store.) A notice at
the bottom of the Passcode Lock screen in Settings shows whether data protection is
enabled.
To increase iPhone security, turn o∂ Simple Passcode and use a longer passcode with
a combination of numbers, letters, punctuation, and special characters. See “Passcode
Lock” on page 164.
Important: On an iPhone 3GS that didn’t ship with iOS 4 or later, you must also restore
iOS software to enable data protection. See “Restoring iPhone” on page 225.
Prevent voice dialing when iPhone is locked: In Settings, choose General > Passcode
Lock and turn Voice Dial o∂. Unlock iPhone to use voice dialing.
Find My iPhone
Find My iPhone helps you locate and secure your iPhone using the free Find My
iPhone app on another iPhone, iPad, or iPod touch, or using a Mac or PC with a web
browser. Find My iPhone includes:
Locate on a map: View the approximate location of your iPhone on a full-screen
map
Display a Message or Play a Sound: Lets you compose a message that will appear
on your iPhone screen, or play a sound at full volume for two minutes, even if the
Ring/Silent switch is set to silent
Remote Passcode Lock: Lets you remotely lock your iPhone and create a 4-digit
passcode, if you haven’t set one previously
Remote Wipe: Lets you protect your privacy by erasing all media and data on
iPhone, restoring it to factory settings
Use Find My iPhone: You need to turn on Find My iPhone on iPhone before you can
use these features. See “Setting Up MobileMe Accounts” on page 23.
To locate your missing iPhone and use the other Find My iPhone features, download
the free Find My iPhone app from the App Store on another iOS device, or sign in to
me.com in a web browser on a Mac or PC.
Chapter 3 Basics
49
Page 50

PRELIMINARY DRAFT — APPLE CONFIDENTIAL
Note: Find My iPhone requires a MobileMe account. MobileMe is Apple’s online
service, which provides Find My iPhone for free to iPhone 4 customers, and additional
features with a paid subscription. MobileMe may not be available in all countries or
regions. For more information, see “Setting Up MobileMe Accounts” on page 23, or go
to www.apple.com/mobileme.
Cleaning iPhone
Clean iPhone immediately if it comes in contact with any contaminants that may cause
stains, such as ink, dyes, makeup, dirt, food, oils, or lotions. To clean iPhone, disconnect
all cables and turn o∂ iPhone (press and hold the On/O∂ Sleep/Wake button, then
slide the onscreen slider). Then use a soft, slightly damp, lint-free cloth. Avoid getting
moisture in openings. Don’t use window cleaners, household cleaners, compressed air,
aerosol sprays, solvents, alcohol, ammonia, or abrasives to clean iPhone. The front cover
of iPhone 3GS and the front and back covers of iPhone 4 are made of glass and have
an oleophobic coating. To clean these surfaces, simply wipe with a soft, lint-free cloth.
The ability of this coating to repel oil will diminish over time with normal usage, and
rubbing the screen with an abrasive material will further diminish its e∂ect and may
scratch the glass.
For more information about handling iPhone, see the iPhone Important Product
Information Guide at www.apple.com/support/manuals/iphone.
50
Restarting or Resetting iPhone
If something isn’t working right, try restarting iPhone, force quitting an app, or
resetting iPhone.
Restart iPhone: Press and hold the On/O∂ Sleep/Wake button until the red slider
appears. Slide your finger across the slider to turn o∂ iPhone. To turn iPhone back on,
press and hold the On/O∂ Sleep/Wake button until the Apple logo appears.
If you can’t turn o∂ iPhone or if the problem continues, you may need to reset iPhone.
A reset should be done only if turning iPhone o∂ and on doesn’t resolve the problem.
Force quit an app: Press and hold the On/O∂ Sleep/Wake button for a few seconds
until a red slider appears, then press and hold the Home
You can also force an app to quit by removing it from the recents list. See “Opening
and Switching Apps” on page 26.
Reset iPhone: Press and hold both the On/O∂ Sleep/Wake button and the Home
button for at least ten seconds, until the Apple logo appears.
For more troubleshooting suggestions, see Appendix B, “Support and Other
Information,” on page 223.
Chapter 3 Basics
button until the app quits.
Page 51

PRELIMINARY DRAFT — APPLE CONFIDENTIAL
iCloud, Syncing, and File Sharing
4
About iCloud
iCloud stores your music, photos, apps, documents, contacts, calendars, and mail on
the Internet so it’s always available from all your devices. Everything is kept up to date
and you don’t have to sync or manage the files. The apps that come with your iPhone
are ready to use iCloud, and many App Store apps will use it too.
You get 5 GB of free storage, and your purchased music, apps, and books don’t count
against your free space. To purchase additional space go to Settings > iCloud >
Storage & Backup.
iCloud is not available in all regions. For more information about iCloud, go to: www.
icloud.com
Setting up iCloud
Use your Apple ID to access your iCloud account.
Sign on or create an iCloud accout: In Settings, tap iCloud.
After you have signed in, you can choose the information you want to store on iCloud:
Mail
Contacts
Calendars
Reminders
Bookmarks
Notes
Documents & Data
51
Page 52

PRELIMINARY DRAFT — APPLE CONFIDENTIAL
Turn iCloud on or o∂ Go to Settings > iCloud then turn iCloud on or o∂
for each type of information.
Turn Photo Stream on or o∂ Go to Settings > iCloud.
Photo Stream automatically sends photos from
the Camera Roll to iCloud.
When Photo Stream is on, you also automatically
receive photos from other devices that use your
iCloud account and have Photo Stream turned
on. These appear in the Photo Stream album
in Photos. For more information about Photo
Stream see Chapter 11, “Photos,” on page 108
Turn document storage on or o∂ Go to Settings > iCloud > Documents & Data.
When this setting is on, apps that work with
iCloud, such as Pages, will automatically use it for
storing their documents and data.
You can also set if iCloud will use the cellular
network to transfer documents and data.
When this o∂, iCloud will wait until your device
connects to a Wi-Fit network before updating
information.
Turn Find my iPhone on or o∂ Go to Settings > iCloud.
When Find my iPhone is on, visit www.icloud.com
to locate, lock, or wipe your device.
52
Backing up with iCloud
You can set iPhone to back up the camera roll, accounts, documents, and settings to
iCloud.
Back up to iCloud
Go to Settings > iCloud > Storage & Backup, then turn iCloud Backup on or o∂. B
iPhone will back up automatically when it has a Wi-Fi connection, is locked, and
connected to a power source. The date and time of the last backup is listed at the
bottom of the Storage & Backup screen.
Chapter 4 iCloud, Syncing, and File Sharing
Page 53

PRELIMINARY DRAFT — APPLE CONFIDENTIAL
Backup immediately Go to Settings > iCloud > Storage & Backup.
Under Backup, tap Back Up Now.
iPhone requires a Wi-Fi, not cellular, connection
to back up.
Manage your back ups Go to Settings > iCloud > Storage & Backup,
then tap Manage Storage. Tap the name of
your iPhone to see how much space is taken
by the backup, iCloud space remaining, and the
estimated size of your next backup.
Change Camera Roll back up options Go to Settings > iCloud > Storage & Backup,
then tap Manage Storage. Tap the name of your
iPhone, then trun Camera Roll backup on or o∂.
Delete backup Go to Settings > iCloud > Storage & Backup,
then tap Manage Storage. Tap the name of your
iPhone. Tap Delete Backup to remove the backup
from iCloud and stop backing up iPhone.
Restoring from back up To restore from back up, reset iPhone to erase
all settings and information. See “Resetting
iPhone” on page 169
The setup assistant, after you sign into your
iCloud account, allows you to restore the back up.
iCloud keeps only one backup of your device; you
can only restore from the most recent backup.
Checking iCloud storage
You can see how much iCloud storage space you’re currently using and purchase more
space.
Task
Go to Settings > iCloud > Storage & Backup, then tap Manage Storage. B
Tap the name of your iPhone to view backup information. See “Backing up with
iCloud” on page 52.
Tap Buy More Storage to purchase additional space.
Para
Syncing with iTunes
You sync iPhone with your computer using iTunes. You connect iPhone to your
computer using USB, or you can set up iTunes to sync wirelessly using Wi-Fi. You can
set iTunes to sync any or all of the following:
Contacts—names, phone numbers, addresses, email addresses, and more
Calendars—appointments and events
Chapter 4 iCloud, Syncing, and File Sharing
53
Page 54

PRELIMINARY DRAFT — APPLE CONFIDENTIAL
Email account settings
Webpage bookmarks
Notes
Tones
Music
Photos and videos (in your computer’s photo application or folder)
iTunes U collections
Podcasts
Books and audiobooks
Movies, TV shows, and music videos
Apps downloaded from the App Store
You can adjust sync settings whenever iPhone is connected to your computer.
Music, audiobooks, podcasts, books, ringtones, iTunes U collections, videos, and apps
are synced from your iTunes library. If you don’t already have content in iTunes, the
iTunes Store (not available in all countries or regions) makes it easy to preview content
and download it to iTunes. You can also add music to your iTunes library from your
CDs. To learn about iTunes and the iTunes Store, open iTunes and choose Help >
iTunes Help.
Contacts, calendars, notes, and webpage bookmarks are synced with applications
on your computer. New entries or changes you make on iPhone are synced to your
computer, and vice versa.
iTunes also lets you sync photos and videos from an application or from a folder.
Email account settings are synced only from your computer’s email application to
iPhone. This allows you to customize your email accounts on iPhone without a∂ecting
email account settings on your computer.
Note: You can also set up email accounts directly on iPhone. See “Adding Mail,
Contacts, and Calendar Accounts” on page 23.
Purchases you make on iPhone in the iTunes Store or the App Store are synced back
to your iTunes library. You can also purchase or download content and apps from the
iTunes Store on your computer, and then sync them to iPhone.
You can set iPhone to sync with only a portion of what’s on your computer. For
example, you might want to sync only a group of contacts from your address book,
certain music playlists, or only unwatched video podcasts.
Set up iTunes syncing:
1 Connect iPhone to your computer, and open iTunes, if it doesn’t open automatically.
54
Chapter 4 iCloud, Syncing, and File Sharing
Page 55

PRELIMINARY DRAFT — APPLE CONFIDENTIAL
2 In iTunes, select iPhone in the Devices list.
3 Configure the sync settings in each of the settings panes.
4 Click Apply in the lower-right corner of the screen.
Set up wireless iTunes syncing:
1 Connect iPhone to your computer, and open iTunes, if it doesn’t open automatically.
To configure wireless iTunes syncing, you must first connect iPhone to your computer
using USB.
2 In iTunes, select iPhone in the Devices list.
3 In the Summary settings pane, under Options, turn on “Sync over Wi-Fi connection.”
4 Click Apply in the lower-right corner of the screen.
When Wi-Fi syncing is turned on, iPhone automatically syncs when it is connected to
a power source, both iPhone and your computer are connected to the same wireless
network, and iTunes is open on the computer.
See TK XREF TO SETTINGS.
To change sync settings you must connect iPhone to your computer using USB.
See“iPhone Settings Panes in iTunes” on page 55 for information about the available
settings.
iPhone Settings Panes in iTunes
The following sections provide an overview of each of the iPhone settings panes. For
more information, open iTunes and choose Help > iTunes Help.
Note: To view the panes, select your iPhone in the Devices list, in iTunes. Additional
panes may be available, depending on the types of content in your iTunes library.
Summary Pane
Select “Open iTunes when this iPhone is connected” to have iTunes open and sync
iPhone automatically whenever you connect it to your computer. Deselect this option
if you want to sync only by clicking the Sync button in iTunes. You can temporarily
override this settings by holding down Command and Option (Mac) or Shift and
Control (PC) until you see your iPhone appear in the sidebar.
Select “Sync only checked songs and videos” if you want iTunes to skip unchecked
items in your iTunes library when syncing.
Select “Sync over Wi-Fi connection” to wirelessy sync iPhone with iTunes. See “Syncing
with iTunes” on page 53
Select “Prefer standard definition videos” if you want iTunes to sync standard definition
instead of high definition videos (iPhone 4).
Chapter 4 iCloud, Syncing, and File Sharing
55
Page 56

PRELIMINARY DRAFT — APPLE CONFIDENTIAL
Select “Convert higher bit rate songs to 128 kbps AAC” if you want iTunes to convert
larger audio files to the standard iTunes audio format during syncing.
Select “Manually manage music and videos” to turn o∂ automatic syncing in the Music
and Video settings panes. See “Manually Managing Content” on page 58.
Select “Encrypt backup” if you want to encrypt the information stored on your
computer when iTunes makes a backup. Encrypted backups are indicated by a lock
icon, and a password is required to restore the backup. If you don’t select this option,
passwords (such as those for mail accounts) are not included in the backup. See
“Backing up iPhone” on page 223.
To turn on Accessibility features, click Configure Universal Access. See
Chapter 32, “Accessibility,” on page 198.
Info Pane
The Info pane lets you configure the sync settings for your contacts, calendars, email
accounts, and web browser.
Contacts
Sync contacts with applications such as Mac OS X Address Book, Yahoo! Address
Book, and Google Contacts on a Mac, or with Yahoo! Address Book, Google Contacts,
Windows Address Book (Outlook Express), Windows Contacts (Vista and Windows 7),
or Microsoft Outlook 2003, 2007, or 2010 on a PC. (On a Mac, you can sync contacts
with multiple applications. On a PC, you can sync contacts with one application at a
time.)
If you sync with Yahoo! Address Book, you only need to click Configure to enter your
new login information when you change your Yahoo! ID or password after you’ve
set up syncing.
Calendars
Sync calendars from applications such as iCal on a Mac, or from Microsoft Outlook
2003, 2007, or 2010 on a PC. (On a Mac, you can sync calendars with multiple
applications. On a PC, you can sync calendars with only one application at a time.)
Mail Accounts
Sync email account settings from Mail on a Mac, and from Microsoft Outlook 2003,
2007, or 2010 or Outlook Express on a PC. Account settings are transferred only from
your computer to iPhone. Changes you make to an email account on iPhone don’t
a∂ect the account on your computer.
Note: The password for your Yahoo! email account isn’t saved on your computer,
so it can’t be synced and must be entered on iPhone. In Settings, choose “Mail,
Contacts, Calendars,” tap your Yahoo! account, and enter the password.
Web Browser
56
Chapter 4 iCloud, Syncing, and File Sharing
Page 57

PRELIMINARY DRAFT — APPLE CONFIDENTIAL
You can sync bookmarks with Safari on a Mac, or with Safari or Microsoft Internet
Explorer on a PC.
Notes
Sync notes in the Notes app with notes in Mail on a Mac or with Microsoft Outlook
2003, 2007, or 2010 on a PC.
Advanced
These options let you replace the information on iPhone with the information on
your computer during the next sync.
Apps Pane
Use the Apps Pane to sync App Store apps, arrange apps on the iPhone Home screen,
or copy documents between iPhone and your computer.
Select “Automatically sync new apps” to sync new apps to iPhone that you
downloaded or synced from another device. If you delete an app on iPhone, you can
reinstall it from the Apps pane as long as it was previously synced.
You can create documents on iPhone with apps that support file sharing, and then
copy those documents to your computer. You can also copy documents from your
computer to iPhone, and use them with apps that support file sharing. See “File
Sharing” on page 59.
Ringtones Pane
Use the Ringtones pane to select the ringtones you want to sync to iPhone.
Music, Movies, TV Shows, Podcasts, iTunes U, and Books Panes
Use these panes to specify the media you want to sync. You can sync all music, movies,
TV shows, podcasts, iTunes U collections, books and audiobooks, or select the content
you want.
If you create a playlist folder (collection of playlists) in iTunes, the folder and its playlists
will be synced to iPhone. You can’t create playlist folders directly on iPhone.
If you listen to part of a podcast or audiobook, your place in the story is included if you
sync the content with iTunes. If you started listening to the story on iPhone, you can
pick up where you left o∂ using iTunes on your computer—or vice versa.
If you want to watch a rented movie from your computer on iPhone, sync it using the
Movies pane in iTunes.
Only songs and videos encoded in formats that iPhone supports are synced. For
information about which formats are supported, go to www.apple.com/iphone/specs.
html.
Important: If you delete an item from iTunes, it will also be deleted from iPhone the
next time you sync.
Chapter 4 iCloud, Syncing, and File Sharing
57
Page 58

PRELIMINARY DRAFT — APPLE CONFIDENTIAL
Photos Pane
On a Mac, you can sync photos with Aperture or iPhoto 4.0.3 or later, and videos with
iPhoto 6.0.6 or later. On a PC, you can sync photos with Adobe Photoshop Elements
8.0 or later. You can also sync photos and videos from any Mac or PC folder that
contains images.
Manually Managing Content
The manually managing feature lets you choose just the music, videos, and podcasts
you want to have on iPhone.
Set up iPhone for manually managing content:
1 Connect iPhone to your computer.
2 In iTunes, select iPhone in the sidebar.
3 Click Summary at the top of the screen and select “Manually manage music and
videos.”
4 Click Apply.
Add items to iPhone Drag a song, video, podcast, or playlist in your
iTunes library to iPhone (in the sidebar). Shiftclick or Command-click (Mac) or Control-click
(Windows) to select multiple items to add at the
same time.
iTunes syncs the content immediately. If you
deselect “Manually manage music and videos,”
the content you added manually is removed from
iPhone the next time iTunes syncs content.
Remove items from iPhone With iPhone connected to your computer,
select iPhone in the iTunes sidebar, and click
its disclosure triangle to show contents. Select
a content area, such as Music or Movies, then
select the items you want to delete and press the
Delete key on the keyboard.
Removing an item from iPhone doesn’t delete it
from your iTunes library.
58
Note: Genius doesn’t work if you manually manage content. See “Using Genius on
iPhone” on page 96.
Transferring Purchased Content to Another Computer
You can transfer content on iPhone that was purchased using iTunes on one
computer to an iTunes library on another authorized computer. The computer must be
authorized to play content purchased using your Apple ID.
Chapter 4 iCloud, Syncing, and File Sharing
Page 59

PRELIMINARY DRAFT — APPLE CONFIDENTIAL
Authorize a computer Open iTunes on the computer and choose Store
> Authorize Computer.
Transfer purchased content Connect iPhone to the other computer. In iTunes,
choose File > Transfer Purchases from iPhone.
File Sharing
File Sharing lets you transfer files via USB between iPhone and your computer. You can
share files created with a compatible app and saved in a supported format.
Apps that support file sharing appear in the File Sharing Apps list in iTunes. For
each app, the Files list shows the documents that are on iPhone. See the app’s
documentation for how it shares files; not all apps support this feature.
Transfer a file from iPhone to your computer:
1 Connect iPhone to your computer.
2 In iTunes, select iPhone in the Devices list, then click Apps at the top of the screen.
3 In the File Sharing section, select an app from the list on the left.
4 On the right, select the file you want to transfer, then click “Save to” and choose a
destination on your computer.
Transfer a file from your computer to iPhone:
1 Connect iPhone to your computer.
2 In iTunes, select iPhone in the Devices list, then click Apps at the top of the screen.
3 In the File Sharing section, select an App, then click Add.
4 Select a file, then click Choose (Mac) or OK (PC).
The file is immediately transferred to your device and can be opened using an app
that supports that file type. To transfer more than one file, select each additional file.
Delete a file from iPhone Select the file in the Files list, then press the
Delete key.
Chapter 4 iCloud, Syncing, and File Sharing
59
Page 60

PRELIMINARY DRAFT — APPLE CONFIDENTIAL
Phone
5
Phone Calls
Making Calls
Making a call on iPhone is as simple as tapping a name and number in your contacts,
tapping one of your favorites, or tapping a recent call to return it. Buttons at the
bottom of the Phone screen give you quick access to your favorites, recent calls, your
contacts, and a numeric keypad for dialing manually.
60
WARNING: For important information about driving safely, see the Important Product
Information Guide at www.apple.com/support/manuals/iphone.
Return a missed call Do one of the following:
Phone: Tap Recents, then tap the name or
number
Locked screen: Flick the notification from left
to right
Notification Center: Tap the missed call
Dialing Manually
You can use the keypad to dial a phone number manually.
Dial a number:
1 Tap Keypad.
Page 61

PRELIMINARY DRAFT — APPLE CONFIDENTIAL
You can use Siri ( or Voice Control (iPhone 4 and iPhone 3GS) to call someone in
2 Enter the number, then tap Call.
Paste a number to the keypad Tap the screen above the keyboard, then tap
Enter a soft (2-second) pause Touch the “*” key until a comma appears.
Enter a hard pause (to pause dialing until you
tap the Dial button)
Redial the last number Tap Keypad, tap Call, then tap Call again.
Voice Dialing
your contacts, or to dial a specific number.
Note: Siri and Voice Control may not be available in all languages. For more
information, see “Siri” on page 40 and “Voice Control” on page 41.
Paste.
Touch the “#” key until a semicolon appears.
Make a phone call by voice:
1 Depending on your model:
iPhone 4S
n94: If the screen is not on, press the On/O∂ button, then hold iPhone to your ear.
iPhone 4 or iPhone 3GS: Press and hold the Home button until you hear the tone.
You can also press and hold the center button on the iPhone earphones.
2 Say “call” or “dial,” then say the name or number.
For example:
Call John Appleseed
Call John Appleseed at home
Call John Appleseed, mobile
For best results, speak the full name of the person you’re calling. When voice dialing a
number, speak each digit separately—for example, say “four one five, five five five, one
two one two.”
Note: For the “800” area code in the U.S., you can say “eight hundred.”
Prevent voice dialing when iPhone is locked In Settings, go to General > Passcode Lock, then
turn Voice Dial o∂.
Receiving Calls
When you receive a call, tap Answer. If iPhone is locked, drag the slider. You can also
press the center button on your iPhone earphones.
Chapter 5 Phone
61
Page 62

PRELIMINARY DRAFT — APPLE CONFIDENTIAL
Silence a call Press the On/O∂ Sleep/Wake button or either
volume button. You can still answer the call after
silencing it, until it goes to voicemail.
Decline a call Do one of the following to send a call directly to
voicemail:
Press the On/O∂ Sleep/Wake button twice
quickly.
Press and hold the center button on the
iPhone earphones for about two seconds. Two
low beeps confirm that the call was declined.
Tap Decline (if iPhone is awake when a call
comes in).
Block calls and maintain Wi-Fi access to the
Internet
In Settings, turn on Airplane Mode, then tap Wi-Fi
to turn it on.
While On a Call
When you’re on a call, the screen shows call options.
P7OVULVYSH[LY!
P7OVULVYSH[LY!
P7OVUL.:/VSKI\[[VU!
The call options may vary, depending on which iPhone you’re using.
Use another app during a call Press the Home button, then tap an app icon.
To return to the call, tap the green bar at the top
of the screen.
End a call Tap End Call. Or press the center button on your
iPhone earphones.
62
Chapter 5 Phone
Page 63

PRELIMINARY DRAFT — APPLE CONFIDENTIAL
Second Calls
During a call, you can make or receive another call. If you receive a second call, iPhone
beeps and shows the caller’s information and a list of options.
Note: Making and receiving a second call may be an optional service in some
countries or regions. Contact your carrier for more information.
Respond to a second incoming call:
To ignore the call and send it to voicemail: Tap Ignore.
To hold the first call and answer the new one: Tap Hold Call + Answer.
To end the first call and answer the new one: With GSM, tap End Call + Answer. With
CDMA, tap End Call and when the second call rings back, tap Answer, or drag the
slider if the phone is locked.
If you’re on a FaceTime video call, you can either end the video call and answer the
incoming call, or decline the incoming call.
Make a second call Tap Add Call. The first call is put on hold.
Switch between calls Tap Swap. The active call is put on hold.
With CDMA, you can’t switch between calls if the
second call was outgoing, but you can merge the
calls. If you end the second call or the merged
call, both calls are terminated.
Merge calls Tap Merge Calls.
With CDMA, you can’t merge calls if the second
call was incoming.
Conference Calls
With GSM, you can set up a conference call to talk with up to five people at a time,
depending on your carrier.
Note: Conference calling may be an optional service in some countries or regions.
Contact your carrier for information.
Create a conference call:
1 Make a call.
2 Tap Add Call and make another call. The first call is put on hold.
3 Tap Merge Calls. The calls are merged on one line and everyone can hear each other.
4 Repeat steps two and three to add additional calls.
Chapter 5 Phone
63
Page 64

PRELIMINARY DRAFT — APPLE CONFIDENTIAL
Drop one call Tap Conference and tap next to a call. Then
tap End Call.
Talk privately with a call Tap Conference, then tap Private next to a call.
Tap Merge Calls to resume the conference call.
Add an incoming call Tap Hold Call + Answer, then tap Merge Calls.
If your service includes conference calling, iPhone always has a second line available in
addition to the conference call.
Note: You can’t make a FaceTime video call when you’re on a conference call.
FaceTime
FaceTime video calls (iPhone 4 or later) let you see as well as hear the person you’re
talking to. You can make a video call to someone with a Mac or iOS device that
supports FaceTime. No setup is needed, but you must have a Wi-Fi connection to the
Internet. By default, FaceTime uses the front camera so the person you call can see
your face; switch to the rear camera to share what you see around you.
Note: FaceTime may not be available in all countries or regions.
Make a FaceTime call:
1 In Contacts, choose a name.
2 Tap FaceTime.
3 Tap the email address or phone number the person uses for FaceTime.
To call someone who has an iPhone 4 or later, you can start by making a voice call,
then tap FaceTime.
64
Chapter 5 Phone
Page 65

PRELIMINARY DRAFT — APPLE CONFIDENTIAL
When the voice call is established, you see the image from the other person’s iPhone.
An inset shows what the other person sees. You can drag the inset to any corner, and
you can use FaceTime in portrait or landscape orientation.
If you move away from your Wi-Fi network, or it otherwise becomes unavailable, you’ll
get an option to redial the number for a voice call.
Note: When you make a FaceTime video call, your phone number is displayed even if
caller ID is blocked or turned o∂.
Make a FaceTime call using Siri or Voice Control Press and hold the Home button until you hear
the tone. Then say “FaceTime,” followed by the
name of the person to call.
Block FaceTime calls Turn o∂ FaceTime. In Settings, go to FaceTime.
You can also disable FaceTime in Restrictions. See
“Restrictions” on page 165.
Use your Apple ID or an email address for
FaceTime
In Settings, got to FaceTime, then tap “Use your
Apple ID for FaceTime” or Add An Email. See
“FaceTime” on page 64.
Using a Bluetooth Device for Calls
You can make and receive calls using a Bluetooth device paired with iPhone. See
“Pairing a Bluetooth Device with iPhone” on page 46.
For information about using a Bluetooth device, see the documentation that came
with the device.
Chapter 5 Phone
65
Page 66

PRELIMINARY DRAFT — APPLE CONFIDENTIAL
Bypass your Bluetooth device Do one of the following:
Answer a call by tapping the iPhone screen.
During a call, tap Audio and choose iPhone or
Speaker Phone.
Turn o∂ Bluetooth in Settings > General >
Bluetooth.
Turn o∂ the Bluetooth device, or move out of
range. You must be within about 30 feet of
a Bluetooth device for it to be connected to
iPhone.
Emergency Calls
If iPhone is locked with a passcode, you may still be able to make an emergency call.
Make an emergency call when iPhone is locked:
1 On the Enter Passcode screen, tap Emergency Call.
2 Dial the number using the numeric keypad.
In the U.S., location information (if available) is provided to emergency service
providers when you dial 911.
With CDMA, when an emergency call ends, iPhone enters Emergency call mode to allow
a call back from emergency services. While in this mode, data transmission and text
messages are blocked.
Exit emergency call mode (CDMA): Do one of the following:
Tap the back button.
Press the Sleep/Wake or Home button.
Use the keypad to dial a non-emergency number.
66
Emergency call mode ends automatically after a few minutes, as determined by your
carrier.
Important: You should not rely on wireless devices for essential communications,
such as medical emergencies. Use of any cellular phone to call emergency services
may not work in all locations. Emergency numbers and services vary by country or
region. Only emergency numbers valid in the country or region where you’re making
the call will work, and sometimes an emergency call cannot be placed due to network
unavailability or environmental interference. Some cellular networks may not accept
an emergency call from iPhone if it doesn’t have a SIM card or if the SIM card is locked
(GSM), or if you haven’t activated your iPhone. If you’re on a FaceTime video call, you
must end that call before you can call an emergency number.
Chapter 5 Phone
Page 67

PRELIMINARY DRAFT — APPLE CONFIDENTIAL
Visual Voicemail
Setting Up Voicemail
On iPhone, visual voicemail lets you see a list of your messages and choose which ones
to listen to or delete, without having to listen to instructions or prior messages.
Note: Visual voicemail may not be available in all countries or regions, or may be an
optional service. Contact your carrier for more information. If visual voicemail isn’t
available, tap Voicemail and follow the voice prompts to retrieve your messages.
The first time you tap Voicemail, iPhone prompts you to create a voicemail password
and record your voicemail greeting.
Change your greeting:
1 Tap Voicemail, tap Greeting, then tap Custom.
2 Tap Record when you’re ready to start.
3 When you finish, tap Stop. To review, tap Play.
To rerecord, repeat steps 2 and 3.
4 Tap Save.
Use your carrier’s default greeting Tap Voicemail, tap Greeting, then tap Default.
Set an alert sound for new voicemail In Settings, go to Sounds, then turn New
Voicemail on. The alert sounds once for each new
voicemail.
Note: If the Ring/Silent switch is o∂, iPhone won’t
sound alerts.
Change the voicemail password In Settings, choose Phone > Change Voicemail
Password.
Checking Voicemail
When you tap Phone, iPhone shows the number of missed calls and unheard
voicemail messages.
Chapter 5 Phone
67
Page 68

PRELIMINARY DRAFT — APPLE CONFIDENTIAL
Tap Voicemail to see a list of your messages.
Unheard
messages
Return the call
Listen to a voicemail message:
1 Tap Voicemail.
2 Tap a message.
If you’ve already heard the message, tap the message again to replay it. Use
pause and resume playback.
Play/Pause
Speakerphone (Audio,
when a Bluetooth device
is connected. Tap to
choose audio output.)
Contact info
Scrubber bar
Skip to any point in
a message: Drag the
playhead.
and to
68
Once you listen to a message, it’s saved until your carrier erases it.
Check voicemail from another phone Dial your own number or your carrier’s remote
access number.
Deleting Messages
Select a message, then tap Delete.
Note: In some countries or regions, deleted visual voicemail messages may be
permanently erased by your carrier.
Listen to a deleted message Tap Deleted Messages (at the end of the list),
then tap the message.
Undelete a message Tap Deleted Messages (at the end of the list),
then tap the message and tap Undelete.
Delete messages permanently Tap Deleted Messages (at the end of the list),
then tap Clear All.
Chapter 5 Phone
Page 69

PRELIMINARY DRAFT — APPLE CONFIDENTIAL
Contacts
From a contact’s Info screen, a quick tap lets you make a phone call, create an email
message, find their location, and more. See “Searching Contacts” on page 176.
Favorites
Favorites gives you quick access to your most-used phone numbers.
Add a contact’s phone number to your favorites list:
1 Tap Contacts.
2 Choose a contact.
3 Tap “Add to Favorites.”
4 Choose a phone number or email address (for FaceTime calls).
5 On iPhone 4 or later, choose whether to save as a voice or FaceTime call.
To call a favorite, tap Favorites and choose a contact. If
appears next to a name,
iPhone makes a FaceTime call.
Add a contact to favorites from the recents list Tap Recents and tap next to the contact’s
name, then tap “Add to Favorites.”
Delete a contact from your favorites Tap Favorites and tap Edit. Then tap
contact or number and tap Remove.
Reorder your favorites list Tap Favorites and tap Edit. Then drag
contact to a new place in the list.
Call Forwarding, Call Waiting, and Caller ID
Call Forwarding
You can set iPhone to forward incoming phone calls to a another number.
Note: FaceTime calls are not forwarded.
Turn on call forwarding (GSM):
1 In Settings, go to Phone > Call Forwarding.
2 On the “Forward to” screen, enter the you’re forwarding calls to.
Turn on call forwarding (CDMA):
1 Enter *72, followed by the number you’re forwarding calls to.
2 Tap Call.
next to a
next to a
To turn o∂ call forwarding (CDMA), enter *73, then tap Call.
Chapter 5 Phone
69
Page 70

PRELIMINARY DRAFT — APPLE CONFIDENTIAL
With GSM,
range of the cellular network when you set iPhone to forward calls, or calls won’t be
forwarded.
appears in the status bar when call forwarding is on. You must be in
Call Waiting
Call waiting gives you the options to take an incoming call when you’re already on the
phone. You can:
ignore the incoming call
put the current call on hold and answer the incoming one
end the current call and answer the incoming one
See “Second Calls” on page 63. If you’re on a call and call waiting is turned o∂, incoming
calls go directly to voicemail.
Turn on call waiting (GSM):
In Settings, go to Phone > Call Waiting. B
Disable call waiting for a call (CDMA):
With CDMA, call waiting is on by default.
Enter *70, then dial the number. B
To disable call waiting for a subsequent call, you must again enter *70 before dialing
the number.
70
Caller ID
Caller ID displays your name or phone number to the person you call—if the
recipient’s equipment has that capability and you haven’t turned o∂ or blocked the
feature.
Note: For FaceTime calls, your phone number is displayed even if caller ID is turned o∂
or blocked.
Turn caller ID on or o∂ (GSM):
In Settings, go to Phone > Show My Caller ID. B
Block caller ID for a call (CDMA):
With CDMA, caller ID is on by default.
Enter *67, then dial the number. B
Ringtones, Ring/Silent, and Vibrate
iPhone comes with ringtones that sound for incoming calls, Clock alarms, and the
Clock timer. You can also purchase ringtones from songs in iTunes. Use the switch
Ring/Silent switch to turn the ringer on or o∂, and Sound settings to set the vibrate
options.
Chapter 5 Phone
Page 71

PRELIMINARY DRAFT — APPLE CONFIDENTIAL
Set the default ringtone:
In Settings, go to Sounds > Ringtone. B
Turn the ringer on or o∂
Flip the switch on the side of iPhone. See “ B Ring/Silent Switch” on page 14.
Important: Clock alarms still sound even if you set the Ring/Silent switch to silent.
Set iPhone to vibrate:
In Settings, go to Sounds. B
Separate controls let you set vibrate for both ring mode and silent mode.
Assign a di∂erent ringtone for a contact In Contacts, choose a contact, tap edit, then tap
Ringtone and choose a ringtone.
Purchase a ringtone from the iTunes Store See “Purchasing music, audiobooks, and tones” on
page 146.
For more information, see “Sounds and the Ring/Silent Switch” on page 159.
International Calls
Making International Calls from Your Home Area
For information about making international calls from your home area, including rates
and other charges that may apply, contact your carrier or go to your carrier’s website.
Using iPhone Abroad
When traveling abroad, you may be able to use iPhone to make calls, send and
receive text messages, and use apps that access the Internet, depending on available
networks.
Enable international roaming:
Contact your carrier for information about availability and fees. B
Important: Voice, text message, and data roaming charges may apply. To avoid charges
for data delivered via the cellular network (including visual voicemail) when roaming
outside your carrier's network, turn o∂ Data Roaming.
Chapter 5 Phone
71
Page 72

PRELIMINARY DRAFT — APPLE CONFIDENTIAL
Turn o∂ Data Roaming In Settings, go to General > Network.
Turning Data Roaming o∂ disables data
transmission over the cellular network. Apps
that depend on Internet access are disabled
unless iPhone has access to the Internet via a
Wi-Fi connection. Visual voicemail delivery is
suspended when roaming unless your carrier
does not charge for it.
Set iPhone to add the correct prefix when
dialing from another country
Set the carrier to use In Settings, go to Carrier. This option is available
Get voicemail when visual voicemail isn’t
available
Turn o∂ cellular data In Settings, go to General > Network.
Turn o∂ cellular services In Settings, tap Airplane Mode to turn it on, then
In Settings > Phone, turn on International Assist
(not available in all areas). This lets you use
contacts and favorites to make U.S. calls, without
having to add a prefix or country code.
only when you’re traveling outside your carrier’s
network, and with carriers that have roaming
agreements with your service provider. For more
information, see “Carrier” on page 159.
Dial your own number (with CDMA, dial your
number followed by #), or touch and hold “1” on
the numeric keypad.
tap Wi-Fi and turn Wi-Fi on.
Incoming phone calls are sent to voicemail.
To make and receive calls again and get your
voicemail messages, turn airplane mode o∂.
72
Settings options
In Settings, go to iPhone to:
See the phone number for your iPhone
Turn call forwarding, call waiting, and caller ID on or o∂ (GSM)
Turn TTY on or o∂
Change your voicemail password (GSM)
Turn international assist on or o∂—when calling from abroad, international assist
lets you call contacts and favorites in the U.S. without having to add a prefix or
country code (GSM)
Lock your SIM to require a PIN when you turn iPhone on (required by some carriers)
In Settings go to Facetime to:
Turn FaceTime on or o∂
Use your Apple ID for FaceTime
Chapter 5 Phone
Page 73

PRELIMINARY DRAFT — APPLE CONFIDENTIAL
Add an email address for FaceTime <<WHAT’S THE DIFFERENCE BETWEEN THIS AND
“USE YOUR APPLE ID FOR FACETIME”?>>
Chapter 5 Phone
73
Page 74

PRELIMINARY DRAFT — APPLE CONFIDENTIAL
Mail
6
Mail works with iCloud, Microsoft Exchange, and many of the most popular email
systems—including Yahoo!, Google, Hotmail, and AOL—as well as other industrystandard POP3 and IMAP email systems. You can send and receive photos, videos, and
graphics, and view PDFs and other attachments. You can also print messages, and
attachments that open in Quick Look.
Setting Up Email Accounts
You can set up email accounts in either of the following ways:
Set up an account directly on iPhone. See “ Adding Mail, Contacts, and Calendar
Accounts” on page 23.
In iTunes, use the iPhone settings panes to sync email accounts settings from your
computer. See “iPhone Settings Panes in iTunes” on page 55.
Checking and Reading Email
In Mail, the Mailboxes screen gives you quick access to all your inboxes and other
mailboxes.
When you open a mailbox, Mail retrieves and displays the most recent messages.
The number of messages retrieved is determined by your Mail settings. See
“UNRESOLVABLE CROSS-REFERENCE” on page ###.
74
Page 75
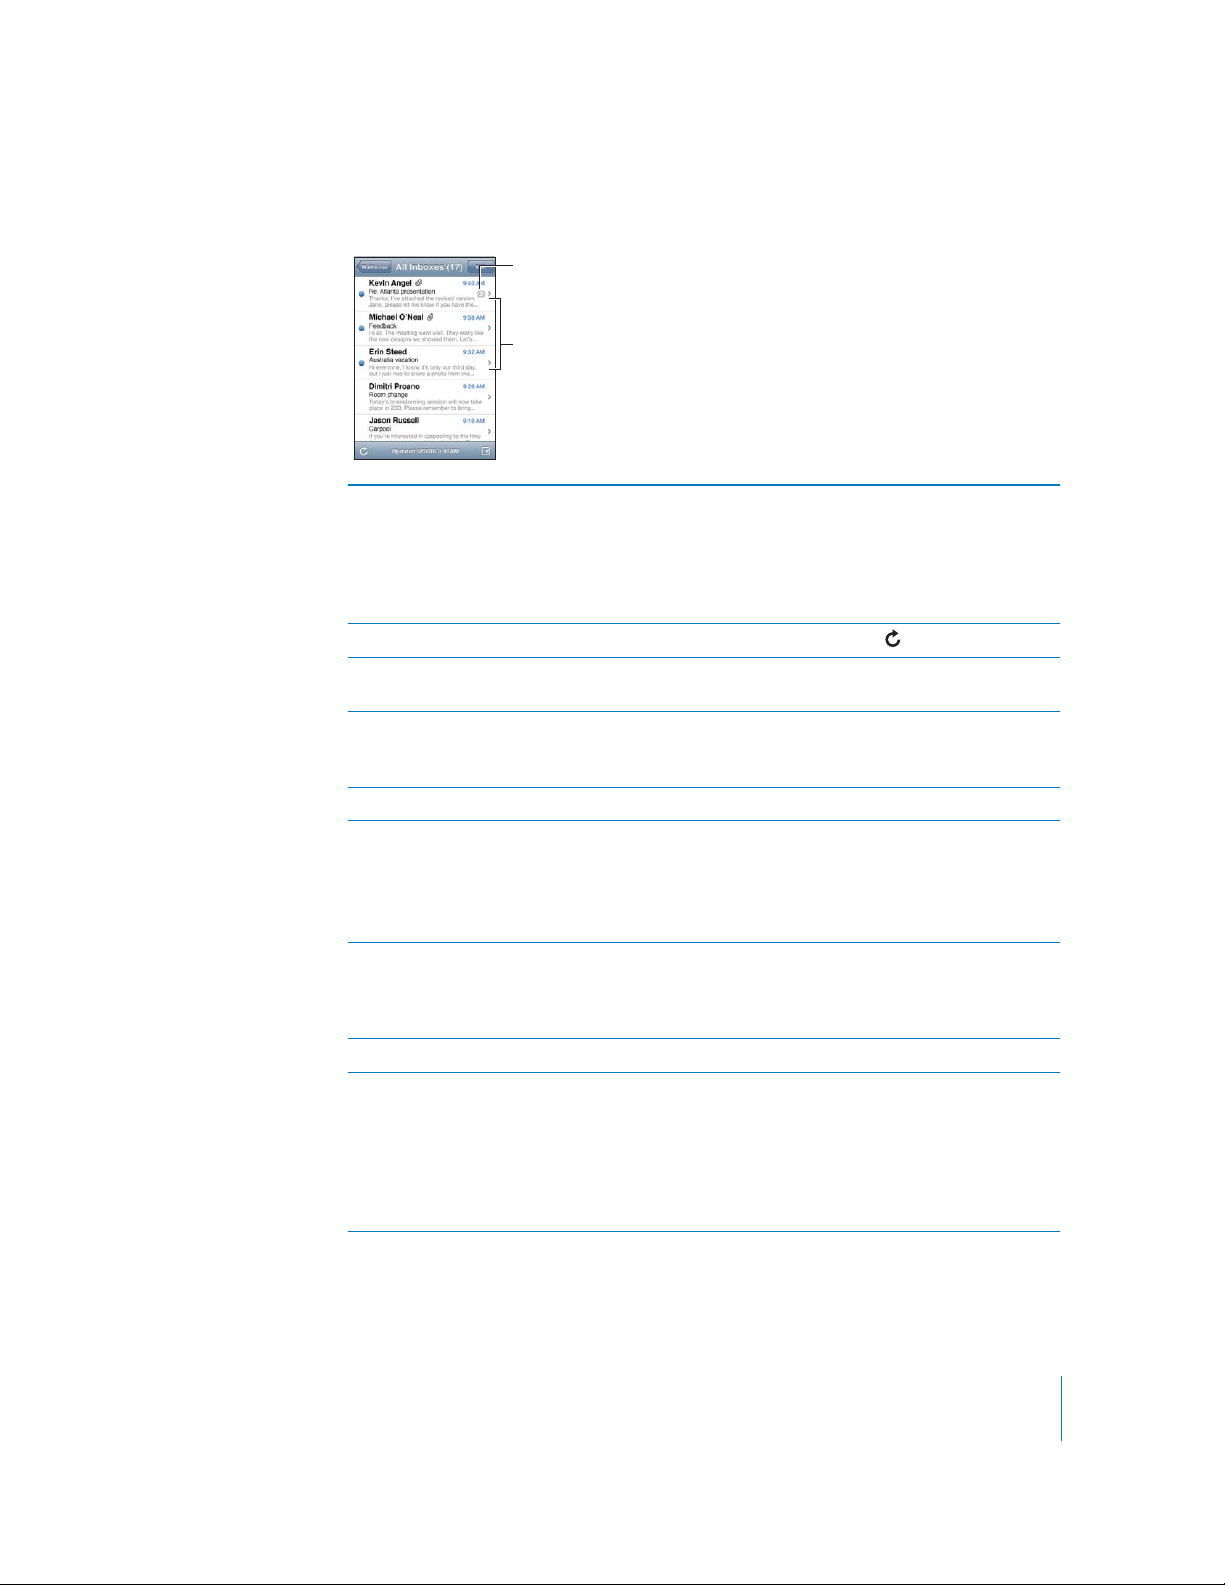
PRELIMINARY DRAFT — APPLE CONFIDENTIAL
Organize messages by thread If you organize messages by thread, related
messages appear as a single entry in the mailbox.
In Settings, choose “Mail, Contacts, Calendars,”
and tap the switch to turn Organize By Thread on
or o∂. See “UNRESOLVABLE CROSS-REFERENCE” on
page ###.
Check for new messages Choose a mailbox, or tap
Load additional messages Scroll to the bottom of the list of messages and
tap Load More Messages.
Zoom in on part of a message Double-tap an area of the message. Double-tap
again to zoom out. Or pinch apart or together to
zoom in or out.
Resize any column of text to fit the screen Double-tap the text.
See all the recipients of a message Tap Details.
Tap a name or email address to see the recipient’s
contact information. Then tap a phone number,
email address, or text message to contact the
person. Tap Hide to hide the recipients.
Add an email recipient to your contacts list Tap the message and, if necessary, tap Details
to see the recipients. Then tap a name or email
address and tap Create New Contact or “Add to
Existing Contact.”
Mark a message as unread Open the message and tap “Mark as Unread.”
Open a meeting invitation Tap the invitation. You can get contact
information for the organizer and other invitees,
set an alert, add notes to the event, and add
comments that are included in your response
emailed to the organizer. You can accept,
tentatively accept, or decline the invitation. See
“Responding to invitations” on page 104.
at any time.
Chapter 6 Mail
75
Page 76

PRELIMINARY DRAFT — APPLE CONFIDENTIAL
Working with Multiple Accounts
If you set up more than one account, the Accounts section of the Mailboxes screen
lets you access your accounts. You can also tap All Inboxes to see all of your incoming
messages consolidated into one list.
When writing a new message, tap the From field to select the account from which to
send the message.
Sending Email
You can send an email message to anyone who has an email address.
Compose a message
Tap B
Add a recipient from Contacts Type a name or email address in the To field, or
.
tap
If you’re composing a message from your
Microsoft Exchange account and have access
to your enterprise Global Address List (GAL),
matching addresses from Contacts appear first,
followed by matching GAL addresses.
Rearrange recipients To move a recipient from one field to another,
such as from To to Cc, drag the recipient’s name
to the new location.
Make text bold, italic, or underlined Tap the insertion point to display the selection
buttons, then tap Select. Drag the points to select
the text that you want to style. Tap TK > BUTTON,
then tap B/I/U. Tap Bold, Underline, or Italic to
apply the style.
Send a photo or video in an email message In Photos, choose a photo or video, tap
tap Email Photo or Email Video. You can also copy
and paste photos and videos.
To send multiple photos or videos, tap
viewing thumbnails in an album. Tap to select the
photos and videos, tap Share, then tap Email.
, then
while
76
Chapter 6 Mail
Page 77

PRELIMINARY DRAFT — APPLE CONFIDENTIAL
Paste and send a photo or video in an email
message
Save a draft of a message to complete later Tap Cancel, then tap Save. The message is saved
Reply to a message Tap
Quote a portion of the message you’re replying
to or forwarding
Forward a message Open a message and tap
Share contact information In Contacts, choose a contact, tap Share Contact
In Photos, touch and hold a photo or video until
the Copy command appears. Tap Copy. Go to
Mail and create a new message. Tap to place
the insertion point where you want the video,
then tap the insertion point to display the edit
commands and tap Paste.
To copy multiple videos, in Photos, open an
album, tap
then tap Copy.
in the Drafts mailbox.
or tap Reply All to reply to the sender and all
recipients. Type your return message, then tap
Send.
Files or images attached to the initial message
aren’t sent back.
Touch and hold to display the selection buttons.
Drag the grab points to select the text you want
to include in your reply, then tap
To change the indendation of the quoted text,
touch and hold to display the selection buttons,
then tap TK > BUTTON. Tap Quote Level, then tap
Increase or Decrease.
Add one or more email addresses, type your
message, then tap Send.
When you forward a message, you can include
the files or images attached to the original
message.
at the bottom of the Info screen, then tap Email.
, tap to select photos and videos,
. Tap Reply to reply only to the sender
.
, then tap Forward.
Using Links and Detected Data
Your iOS device detects web links, phone numbers, email addresses, dates, and other
types of information that you can use to open a webpage, create a preaddressed email
message, create or add information to a contact, or perform some other useful action.
Detected data appears as blue underlined text. Tap the data to use its default action,
or touch and hold it to see other actions. For example, for an address, you can display
the location in Maps, or add it to Contacts.
Chapter 6 Mail
77
Page 78

PRELIMINARY DRAFT — APPLE CONFIDENTIAL
Viewing Attachments
iPhone displays image attachments in many commonly used formats (JPEG, GIF, and
TIFF) inline with the text in email messages. iPhone can play many types of audio
attachments, such as MP3, AAC, WAV, and AIFF. You can download and view files
(such as PDF, webpage, text, Pages, Keynote, Numbers, and Microsoft Word, Excel, and
PowerPoint documents) that are attached to messages you receive.
View an attached file
Tap the attachment to open it in Quick Look. (You may need to wait while it B
downloads before viewing.)
Open an attached file Touch and hold the attachment then choose
an application to open it. If none of your apps
support the file, and it isn’t one that Quick Look
supports, you can see the name of the file but
you can’t open it.
Save an attached photo or video Touch and hold the photo or video, then tap Save
Image or Video. The item is saved to the Camera
Roll in the Photos app.
Quick Look supports the following document types:
.doc, .docx Microsoft Word
.htm, .html webpage
.key Keynote
.numbers Numbers
.pages Pages
.pdf Preview, Adobe Acrobat
.ppt, .pptx Microsoft PowerPoint
.rtf Rich Text Format
.txt text
.vcf contact information
.xls, .xlsx Microsoft Excel
78
Printing Messages and Attachments
You can print email messages, and attachments that can be viewed in Quick Look.
Print an email message
Tap B
, then tap Print.
Para
Chapter 6 Mail
Page 79

PRELIMINARY DRAFT — APPLE CONFIDENTIAL
Print an inline image Touch and hold the image, then tap Save Image.
Then open Photos and print the image from the
Camera Roll album.
Print an attachment Tap the attachment to view it in Quick Look, then
and tap Print.
tap
For more information about printing and printer options, see “Printing” on page 37.
Organizing Email
You can organize messages in any mailbox, folder, or search results window. You
can delete messages one at a time, or select a group to delete all at once. You can
also move messages from one mailbox or folder to another in the same account or
between di∂erent accounts. You can add, delete, or rename mailboxes and folders.
Delete a message
Open the message and tap B
You can also delete a message directly from the mailbox message list by swiping left
or right over the message title, then tapping Delete.
Archive a message Some mail accounts, such as iCloud and Google,
Recover a message Deleted messages are moved to the Trash
Flag and mark messages as read When viewing a list of messages, tap Edit, select
Delete multiple messages When viewing a list of messages, tap Edit, select
.
support archiving instead of deleting messages.
When you archive a message it is moved from
your Inbox to All Mail so it can still be retreived
later. Turn archving on or o∂ in Settings > Mail,
Contacts, Calendars.
mailbox. To change how long a message stays in
Trash before being deleted permanently, go to
Settings > Mail, Contacts, Calendars.
the messages you want then tap Mark. Choose
Flag or Mark as Read.
the messages you want to delete, then tap
Delete.
Chapter 6 Mail
79
Page 80

PRELIMINARY DRAFT — APPLE CONFIDENTIAL
Move multiple messages When viewing a list of messages, tap Edit, select
the messages you want to move, then tap Move
and choose a mailbox.
Tap Accounts to choose a mailbox or folder for
another account.
Move a message to another mailbox or folder When viewing a message, tap
mailbox or folder.
Add a mailbox Go to mailboxes, tap Edit, then tap New Mailbox.
You can specify the location of the mailbox, such
as inside another mailbox.
Delete or rename a maibox Go to mailboxes, tap Edit and then tap a mailbox.
Enter a new name or location for the mailbox. Tap
Delete Mailbox to delete it and all the mail and
submailboxes it contains.
Searching Email
You can search the To, From, and Subject fields of email messages. Mail searches the
downloaded messages in the currently open mailbox. For iCloud, Exchange, and some
IMAP mail accounts, you can also search messages on the server.
Search email messages
1 Open a mailbox, scroll to the top, and enter text in the Search field.
2 Tap From, To, Subject, or All to choose which fields you want to search.
, then choose a
80
If your mail accounts support it, messages on server are also searched.
Mail messages can also be included in searches from the Home screen. See
“Searching” on page 39.
Changing Mail Settings
There are numerous settings you can select for Mail and for your mail accounts. In
Settings, go to “Mail, Contacts, Calendars”. You can set up:
Microsoft Exchange
iCloud
MobileMe
Google
Yahoo!
AOL
Microsoft Hotmail
Other POP and IMAP mail systems
Chapter 6 Mail
Page 81

PRELIMINARY DRAFT — APPLE CONFIDENTIAL
Accounts
The Accounts section lets you set up accounts on iPhone. The specific settings that
appear depend on the type of account you’re setting up. Your service provider or
system administrator should be able to provide the information you need to enter.
Change an account’s settings
Choose “Mail, Contacts, Calendars,” choose an account, then make the changes you B
want.
Changes you make to an account’s settings on iPhone aren’t synced to your computer,
so you can configure your accounts to work with iPhone without a∂ecting the account
settings on your computer.
Stop using an account service Choose “Mail, Contacts, Calendars,” choose an
account, then turn an account service (such as
Mail, Calendars, or Notes) o∂.
If an account service is o∂, iPhone doesn’t display
or sync information with that account service
until you turn it back on.
Set whether drafts, sent messages, and deleted
messages are stored on iPhone
Set how long before messages are removed
permanently from Mail
Adjust email server settings Go to Settings > “Mail, Contacts, Calendars,”
Go to Settings > “Mail, Contacts, Calendars,”
choose an account, then tap Advanced. Choose
the location of Draft Mailbox, Sent Mailbox, or
Deleted Mailbox.
If you store messages on iPhone, you can see
them even when iPhone isn’t connected to the
Internet.
Go to Settings > “Mail, Contacts, Calendars,”
choose an account, then tap Advanced. Tap
Remove, then choose a time: Never, or after one
day, one week, or one month.
choose an account, then tap Host Name, User
Name, or Password under Incoming Mail Server
or Outgoing Mail Server. Ask your network
administrator or Internet service provider for the
correct settings.
Chapter 6 Mail
81
Page 82

PRELIMINARY DRAFT — APPLE CONFIDENTIAL
Adjust SSL and password settings Go to Settings > “Mail, Contacts, Calendars,”
choose an account, then tap Advanced. Ask
your network administrator or Internet service
provider for the correct settings.
Turn Archive Messages on or o∂ (Google and
iCloud accounts)
Delete an account Choose “Mail, Contacts, Calendars,” choose
Send signed and encrypted messages Go to Settings > “Mail, Contacts, Calendars,”
Choose “Mail, Contacts, Calendars,” choose your
Google or iCloud account, then turn Archive
Messages on or o∂. See “Organizing Email” on
page 79.
an account, then scroll down and tap Delete
Account.
Deleting an account means you can no longer
access the account with your iPhone. All email
and the contacts, calendar, and bookmark
information synced with the account are
removed from iPhone. However, deleting an
account doesn’t remove the account or its
associated information from your computer.
choose an account, then tap Advanced. Turn on
S/MIME, then select certificates for signging and
encrypting outgoing messages.
To install identify certificates, obtain a
configuration profile from your system
administrator, or download certificates using
Safari, or receive them in Mail attachments.
82
Mail
Mail settings, except where noted, apply to all accounts you’ve set up on iPhone.
Set options for mail:
Go to Settings > “Mail, Contacts, Calendars” . You can: B
Set how many messages are downloaded at a time.
Set how many lines of each message are shown in the message list.
Set a minimum font size for messages.
Set whether To or Cc labels are shown in message lists.
Turn o∂ message deletion confirmations.
Set whether messages are organized by thread.
Set whether you receive a copy of every message you send.
Add a signature to your messages.
Set whether to indent messages included in your reply.
Set the default email account for sending messages from apps, such as Photos or
Maps.
Chapter 6 Mail
Page 83

PRELIMINARY DRAFT — APPLE CONFIDENTIAL
To change the tone played when mail is received, go to Settings > Sounds.
Fetch New Data
This setting lets you turn Push on or o∂ for MobileMe, iCloud, Microsoft Exchange,
Yahoo!, and any other push accounts on iPhone. Push accounts deliver new
information to iPhone whenever new information appears on the server (some delays
may occur) and there’s an internet connection. You might want to turn Push o∂ to
suspend delivery of email and other information, or to conserve battery life.
When Push is o∂, and with accounts that don’t support push, data can still be
fetched—that is, iPhone can check with the server and see if new information is
available. Use the Fetch New Data setting to determine how often data is requested.
For optimal battery life, don’t fetch too often.
Set Push settings:
Choose “Mail, Contacts, Calendars” > Fetch New Data. B
To conserve battery life, fetch less frequently. Setting Push to OFF (or setting Fetch to
Manually on the Fetch New Data screen) overrides individual account settings.
Chapter 6 Mail
83
Page 84

PRELIMINARY DRAFT — APPLE CONFIDENTIAL
Safari
7
Safari lets you surf the web and view webpages on iPhone as if you were on your
computer. Create bookmarks on iPhone and sync them with your computer. Add
web clips to quickly access your favorite sites directly from the Home screen. Print
webpages, PDFs, and other documents that open in Quick Look.
Viewing Webpages
You can view webpages in either portrait or landscape orientation. Rotate iPhone and
the webpage rotates too, automatically adjusting to fit the page.
Image
"file:///Volumes//projectfiles/Sweet/iPhone/Content/in-progress/Telluride/LL/Art/SFRI_overview.ai"
not found.
84
Opening Webpages
Open a webpage: Tap the address field (on the left side of the title bar), then type the
web address and tap Go. If the address field isn’t visible, tap the status bar at the top of
the screen to quickly scroll to the address field at the top of the webpage.
As you type, web addresses that start with those letters appear. These are bookmarked
pages or recent pages you’ve opened. Tap an address to go to that page. Keep typing
if you want to enter a web address that’s not in the list.
Erase the text in the address field: Tap the address field, then tap
.
Zooming and Scrolling
Zoom in or out: Double-tap a column on a webpage to expand the column. Double-
tap again to zoom out.
You can also pinch to zoom in or out manually.
Page 85

PRELIMINARY DRAFT — APPLE CONFIDENTIAL
Scroll around a webpage Drag up, down, or sideways. When scrolling,
you can touch and drag anywhere on the page
without activating any links.
Scroll within a frame on a webpage Use two fingers to scroll within a frame on a
webpage. Use one finger to scroll the entire
webpage.
Scroll quickly to the top of a webpage Tap the status bar at the top of the iPhone screen.
Navigating Webpages
Links on webpages typically take you to another place on the web.
Follow a link on a webpage: Tap the link.
You can also use web links to make a phone call, display a location in Maps, play
streaming audio, or create a preaddressed Mail message. To return to Safari after a link
opens another app, press the Home
See a link’s destination address Touch and hold the link. The address pops up
Stop a webpage from loading Tap
Reload a webpage Tap
Return to the previous or next page Tap or at the bottom of the screen.
Return to a recently viewed page Tap
Create a preaddressed Mail message Touch and hold an email web link, then tap New
Create a new or add to an existing contact Touch and hold a web link containing contact
Send a webpage URL via email Tap
Save an image or photo to your Camera Roll
album
View a webpage video on an Apple TV Start playing the video, then tap
button and tap Safari.
next to your finger. You can touch and hold an
image to see if it has a link.
.
.
and tap History. To clear the history list,
tap Clear.
Message.
information, then tap Create New Contact or Add
to Existing Contact.
and tap “Mail Link to this Page.”
Touch and hold the image, then tap Save Image.
Apple TV. If
the Apple TV you’re looking for, make sure iPhone
is on the same wireless network.
When you finish, Tap
the list.
doesn’t appear or if you don’t see
and choose iPhone from
and choose
Opening Multiple Pages
You can have up to eight pages open at a time. Some links automatically open a new
page instead of replacing the current one.
Chapter 7 Safari
85
Page 86

PRELIMINARY DRAFT — APPLE CONFIDENTIAL
The number inside the at the bottom of the screen shows how many pages are
open. If there’s no number inside, just one page is open. For example:
= one page is open
= three pages are open
Open a new page: Tap and tap New Page.
Go to another page: Tap
and flick left or right. Tap the page you want to view.
Close a page: Tap and tap .
Entering Text and Filling Out Forms
Some webpages have text fields and forms to fill out. You can set Safari to remember
names and passwords of websites you visit and fill out text fields automatically with
information from Contacts. In Settings, go to Safari > AutoFill.
Bring up the keyboard Tap inside a text field.
Move to another text field Tap another text field, or tap the Next or Previous
button.
Submit a form Once you finish filling out a form, tap Go or
Search. Most pages also have a link you can tap
to submit the form.
Close the keyboard without submitting the
form
Tap Done.
Enable AutoFill to help you fill out web forms: In Settings, choose Safari > AutoFill,
then do one of the following:
To use information from contacts, turn Use Contact Info on, then choose My Info and
select the contact you want to use.
Safari uses information from Contacts to fill in contact fields on web forms.
To use information from names and passwords, turn Names & Passwords on.
When this feature is on, Safari remembers names and passwords of websites you
visit and automatically fills in the information when you revisit the website.
To remove all AutoFill information, tap Clear All.
Searching
Use the search field to enter words and phrases for searching both the web and the
current webpage. As you type, suggested and recent searches appear.
Search the web:
1 Tap the search field (on the right side of the title bar).
86
Chapter 7 Safari
Page 87

PRELIMINARY DRAFT — APPLE CONFIDENTIAL
2 Type a word or phrase that describes what you’re looking for, then tap a suggestion
from the list or tap Search.
3 Tap a link in the list of search results to open a webpage.
Find the search word or phrase on the current webpage: Scroll to the bottom of the
results list, then tap the entry below On This Page to find the first occurrence of the
search word or phrase. To find subsequent occurrences, tap Next.
By default, Safari searches using Google. You can use other search engines.
Set Safari to search using a di∂erent search engine: In Settings, choose Safari >
Search Engine, then choose a di∂erent search engine.
Printing Webpages, PDFs, and Other Documents
You can print webpages, PDFs, and other documents that open in Quick Look from
Safari.
Print a webpage, PDF, or Quick Look document: Tap
Printer to select a printer, then set printer options such as number of copies and
double-sided output (if the printer supports it). If you’re printing a PDF or other Quick
Look document, you may be able to set the range of pages you want to print. Then tap
Print.
, then tap Print. Tap Select
For more information, see “Printing” on page 37.
Viewing Web Videos on a TV
You can view QuickTime and other supported web videos on a TV by connecting
iPhone to your TV or AV receiver using an Apple Component AV Cable, Apple
Composite AV Cable, Apple VGA Adapter, or Apple Digital AV Adapter (iPhone 4), or
wirelessly using AirPlay and Apple TV. See “Watching Videos on a TV” on page 173.
Bookmarks
You can bookmark webpages you want to return to later.
Bookmark a webpage: Open the page and tap
When you save a bookmark you can edit its title. By default, bookmarks are saved at
the top level of Bookmarks. Tap Bookmarks to choose another folder.
If you use Safari on a Mac, or Safari or Microsoft Internet Explorer on a PC, you can sync
bookmarks with the web browser on your computer.
Sync bookmarks with your computer:
1 Connect iPhone to your computer.
2 In iTunes, select iPhone in the Devices list.
. Then tap Add Bookmark.
Chapter 7 Safari
87
Page 88

PRELIMINARY DRAFT — APPLE CONFIDENTIAL
3 Click Info at the top of the screen, select “Sync … bookmarks” under Other, then click
Apply.
See “iPhone Settings Panes in iTunes” on page 55.
Sync bookmarks with MobileMe: In Settings on iPhone, select Bookmarks in your
MobileMe account. See “Setting Up MobileMe Accounts” on page 23.
Open a bookmarked webpage: Tap
see the bookmarks inside.
Edit a bookmark or bookmark folder: Tap
bookmark or folder you want to edit, then tap Edit. Then do one of the following:
To make a new folder, tap New Folder.
To delete a bookmark or folder, tap , then tap Delete.
To reposition a bookmark or folder, drag .
To edit the name or address, or to put it in a di∂erent folder, tap the bookmark or folder.
When you finish, tap Done.
, then choose a bookmark or tap a folder to
, choose the folder that has the
Web Clips
Add web clips to the Home screen for fast access to your favorite webpages. Web clips
appear as icons on the Home screen, and you can arrange your web clips along with
the other icons. See “Customizing the Home Screen” on page 30.
Add a web clip: Open the webpage and tap
When you open a web clip, Safari automatically zooms and scrolls to the area of the
webpage that was displayed when you saved the web clip. The displayed area is also
used to create the icon for the web clip on your Home screen, unless the webpage
comes with its own custom icon.
When you add a web clip, you can edit its name. If the name is too long (more than
about 10 characters), it may appear abbreviated on the Home screen.
Web clips aren’t bookmarks, and aren’t synced by MobileMe or iTunes.
. Then tap “Add to Home Screen.”
Delete a web clip:
1 Touch and hold any icon on the Home screen until the icons start to jiggle.
2 Tap
3 Tap Delete, then press the Home button to save your arrangement.
in the corner of the web clip you want to delete.
Setting options
Para
88
Chapter 7 Safari
Page 89

PRELIMINARY DRAFT — APPLE CONFIDENTIAL
Music
8
Use the iPod app to enjoy your favorite music, widescreen videos, and more. Browse
your content on iPhone by playlists, artists, songs, videos, or other categories, or
browse your album artwork using Cover Flow. Play your music on AirPlay speakers or
sound systems, or watch your videos on a TV using AirPlay and Apple TV.
Getting Music, Videos, and More
There are two ways to get music, videos, and other content onto iPhone:
Transfer music, videos, and more onto iPhone by syncing content from iTunes on
your computer. You can sync all of your media, or you can select specific songs,
videos, podcasts, and iTunes U collections. See “Syncing with iTunes” on page 53.
Use the iTunes Store on iPhone to purchase and download songs, albums, TV shows,
movies, music videos, ringtones, and audiobooks directly to iPhone. You can also
stream and download audio and video podcasts, as well as iTunes U content. After
listening to a podcast or watching a TV show, you can tap a built-in link to get more
episodes from the iTunes Store. See Chapter 22, “iTunes Store,” on page 144.
Music and Other Audio
The high-resolution Multi-Touch display makes listening to songs on iPhone as much
a visual experience as a musical one. You can scroll through your playlists, or use Cover
Flow to browse your album artwork.
WARNING: For important information about avoiding hearing loss, see the Important
Product Information Guide at www.apple.com/support/manuals/iphone.
89
Page 90

PRELIMINARY DRAFT — APPLE CONFIDENTIAL
Playing Songs and Other Audio
You can browse content on iPhone by playlists, artists, songs, videos, and other
categories, or browse your album artwork using Cover Flow. Playlist folders, which you
can sync from iTunes, let you organize playlists into groups.
Browse your collection: Tap Playlists, Artists, or Songs. Tap More to browse Albums,
Audiobooks, Compilations, Composers, Genres, iTunes U, Podcasts, or Videos.
You can replace the browse buttons at the bottom of the screen with buttons you use
more frequently. Tap More, tap Edit, then drag an icon over the button you want to
replace.
Get more podcast episodes: Tap Podcasts (tap More first, if Podcasts isn’t visible), then
tap a podcast to see a list of episodes. Tap “Get More Episodes…” to see a list of more
episodes in the iTunes Store.
Browse Genius Mixes: Tap Genius (tap More first, if Genius isn’t visible). If Genius
doesn’t appear, you need to turn on Genius in iTunes, and then sync iPhone with
iTunes. See “Using Genius on iPhone” on page 96.
Play a song: Tap the song.
Shake to shuπe: Shake iPhone to turn shuπe on and change songs. Shake anytime to
change to another song.
You can turn Shake to Shuπe on or o∂ in Settings > Music.
90
Controlling Audio Playback
When you play a song, the Now Playing screen appears.
Chapter 8 Music
Page 91

PRELIMINARY DRAFT — APPLE CONFIDENTIAL
Pause a song Tap , or press the center button on the iPhone
earphones.
Resume playback Tap
Raise or lower the volume Drag the volume slider or use the buttons on
Play music on AirPlay speakers or Apple TV Tap
Switch from AirPlay back to iPhone Tap
Restart a song or a chapter in an audiobook or
podcast
Skip to the next song or chapter in an
audiobook or podcast
Go to the previous song or chapter in an
audiobook or podcast
Rewind or fast-forward Touch and hold
Return to the iPod browse lists Tap
Return to the Now Playing screen Tap Now Playing.
Display a song’s lyrics Tap the album artwork when playing a song.
, or press the center button on the iPhone
earphones.
the side of iPhone. You can also use the volume
buttons on the iPhone earphones.
, then choose the speakers or Apple TV. If
doesn’t appear or if you don’t see the AirPlay
system you’re looking for, make sure iPhone is on
the same wireless network.
and choose iPhone from the list.
.
Tap
, or press the center button on the iPhone
Tap
earphones twice quickly.
twice, or press the center button on the
Tap
iPhone earphones three times quickly.
or . The longer you hold
the control, the faster the song rewinds or fastforwards. On the iPhone earphones, press the
center button twice quickly and hold to fast
forward, or three times quickly and hold to
rewind.
, or swipe to the right over the album
artwork.
(Lyrics appear if you’ve added them to the song
using the song’s Info window in iTunes.)
Display audio playback controls from another app: Double-click the Home button,
then flick from left to right along the bottom of the screen.
The controls operate the currently playing app, or the most recent app that played, if
the audio is paused. The icon for the active app appears on the right. You can tap the
icon to open the app.
Flick right again to display an onscreen volume control and the AirPlay button (when
in range of an Apple TV).
Chapter 8 Music
91
Page 92

PRELIMINARY DRAFT — APPLE CONFIDENTIAL
Display audio playback controls from the Lock screen: Double-click the Home
button.
Additional Audio Controls
To display additional controls, tap the album artwork on the Now Playing screen.
The repeat, Genius, and shuπe controls appear along with the scrubber bar. You can
see elapsed time, remaining time, and the song number. The song’s lyrics also appear, if
you’ve added them to the song in iTunes.
Use the scrubber bar to skip to any point along the timeline. You can adjust the scrub
rate from high-speed to fine by sliding your finger down as you drag the playhead
along the scrubber bar.
Set iPhone to repeat songs Tap . Tap again to set iPhone to repeat only
Skip to any point in a song Drag the playhead along the scrubber bar. Slide
Tell your Ping followers you like a song Tap
Make a Genius playlist Tap
the current song.
= iPhone is set to repeat all songs in the
current album or list.
= iPhone is set to repeat the current song
over and over.
= iPhone isn’t set to repeat songs.
your finger down to adjust the scrub rate. The
scrub rate becomes slower the farther down you
slide your finger.
.
= You’ve already said that you like this song.
. The Genius playlist appears, with buttons
that let you create a new Genius playlist, refresh
the current one, or save the playlist. See “Using
Genius on iPhone” on page 96.
92
Chapter 8 Music
Page 93

PRELIMINARY DRAFT — APPLE CONFIDENTIAL
Post a Ping comment about a song Tap .
Set iPhone to shuπe songs Tap
Shuπe the tracks in any playlist, album, or other
list of songs
Hide lyrics In Settings, choose iPod, then turn Lyrics &
. Tap again to set iPhone to play songs
in order.
= iPhone is set to shuπe songs.
= iPhone is set to play songs in order.
Tap Shuπe at the top of the list. For example, to
shuπe all the songs on iPhone, choose Songs >
Shuπe.
Whether or not iPhone is set to shuπe, if you tap
Shuπe at the top of a list of songs, iPhone plays
the songs from that list in random order.
Podcast Info o∂.
Podcast and Audiobook Controls
Additional controls and information appear on the Now Playing screen when you
begin playback.
The email, 30-second repeat, and playback speed controls appear along with the
scrubber bar. You can see elapsed time, remaining time, and the episode or chapter
number.
Use the scrubber bar to skip to any point along the timeline. You can adjust the scrub
rate from high-speed to fine by sliding your finger down as you drag the playhead
along the scrubber bar.
30-second repeatEmail
Playback
speed
Scrubber bar
Send an email link to this podcast Tap .
Skip to any point Drag the playhead along the scrubber bar. Slide
Play back the last 30 seconds Tap
Playhead
your finger down to adjust the scrub rate. The
scrub rate becomes slower the farther down you
slide your finger.
.
Chapter 8 Music
93
Page 94

PRELIMINARY DRAFT — APPLE CONFIDENTIAL
Set the playback speed Tap . Tap again to change the speed.
= Play at double speed.
= Play at half speed.
= Play at normal speed.
Show or hide the controls Tap in the center of the screen.
Hide podcast information In Settings, choose iPod, then turn Lyrics &
Podcast Info o∂.
Using Voice Control with iPod
You can use Voice Control to control music playback on iPhone.
Note: Voice Control may not be available in all languages.
Use Voice Control: Press and hold the Home button until the Voice Control screen
appears and you hear a beep. Then use the commands described below to play songs.
You can also press and hold the center button on the iPhone earphones to bring up
Voice Control.
Control music playback Say “play” or “play music.” To pause, say “pause”
or “pause music.” You can also say “next song” or
“previous song.”
Play an album, artist, or playlist Say “play,” then say “album,” “artist,” or “playlist”
and the name.
Shuπe the current playlist Say “shuπe.”
Find out more about the currently playing song Say “what’s playing,” “what song is this,” “who
sings this song,” or “who is this song by.”
Use Genius to play similar songs Say “Genius,” “play more like this,” or “play more
songs like this.”
Cancel Voice Control Say “cancel” or “stop.”
94
Browsing Album Artwork in Cover Flow
When you’re browsing music, you can rotate iPhone sideways to see your iTunes
content in Cover Flow and browse your music by album artwork.
Chapter 8 Music
Page 95

PRELIMINARY DRAFT — APPLE CONFIDENTIAL
Browse album artwork Drag left or right.
See the tracks on an album Tap the album artwork or .
Play any track Tap the track. Drag up or down to scroll through
the tracks.
Return to the artwork Tap the title bar. Or tap
Play or pause the current song Tap
or . You can also press the center button
on the iPhone earphones.
again.
Viewing All Tracks on an Album
See all the tracks on the album that contains the current song: On the Now Playing
screen, tap . Tap a track to play it. Tap the album artwork thumbnail to return to the
Now Playing screen.
Rating bar
Back to Now
Playing
screen
Album tracks
In track list view, you can assign ratings to songs. You can use ratings to create smart
playlists in iTunes that dynamically update to include, for example, your highest rated
songs.
Rate a song: Drag your finger across the rating bar to give the song zero to five stars.
Searching Audio Content
You can search the titles, artists, albums, and composers of songs, podcasts, and other
content you’ve synced to iPhone.
Search music: Enter text in the search field at the top of a song list, playlist, artist list,
or other view of your iPod content. (Tap the status bar to scroll quickly to the top of a
list and reveal the search field.)
Search results appear as you type. Tap Search to dismiss the keyboard and see more of
the results.
Audio content is included in searches from the Home screen. See “Searching” on
page 39.
Chapter 8 Music
95
Page 96

PRELIMINARY DRAFT — APPLE CONFIDENTIAL
Using Genius on iPhone
Genius finds songs in your iTunes library that go great together. A Genius playlist is a
collection of songs that are picked for you to go with a song you choose from your
library. A Genius Mix is a selection of songs of the same kind of music. Genius Mixes
are recreated each time you listen to them, so they’re always new and fresh.
You can create Genius playlists in iTunes and sync them to iPhone. You can also create
and save Genius playlists directly on iPhone.
Genius Mixes are created automatically for you by iTunes. iTunes creates di∂erent
mixes depending on the variety of music you have in your iTunes library. For example,
you may have Genius Mixes that highlight R&B songs, or Alternative Rock songs.
To use Genius on iPhone, first turn on Genius in iTunes, then sync iPhone with iTunes.
Genius Mixes are synced automatically, unless you manually manage your music and
choose which mixes you want to sync in iTunes. Genius is a free service, but it requires
an Apple ID.
When you sync a Genius Mix, iTunes may select and sync songs from your library that
you haven’t specifically chosen to sync.
Browse Genius Mixes: Tap Genius (tap More first, if Genius isn’t visible). The number
of dots at the bottom of the screen shows the number of mixes you’ve synced from
iTunes, and indicates which mix you’re viewing. Flick left or right to access your other
mixes.
Play a Genius Mix: Tap the mix or tap
.
Make a Genius playlist on iPhone:
1 Tap Playlists (tap More first, if Playlists isn’t visible), then tap Genius Playlist.
2 Tap a song in the list. Genius creates a playlist with additional songs that go great with
that song.
You can also make a Genius playlist of songs that go great with the song you’re
playing. Tap the album artwork on the Now Playing screen to display additional
controls, then tap
.
Save a Genius playlist: In the playlist, tap Save. The playlist is saved in Playlists with
the title of the song you picked.
You can make and save as many Genius playlists as you want. If you save a Genius
playlist created on iPhone, it syncs back to iTunes the next time you connect.
Refresh a Genius playlist: In the playlist, tap Refresh.
Refreshing a playlist creates a playlist of di∂erent songs that go great with the song
you picked. You can refresh any Genius playlist, whether it was created in iTunes and
synced to iPhone, or created directly on iPhone.
96
Chapter 8 Music
Page 97

PRELIMINARY DRAFT — APPLE CONFIDENTIAL
Make a Genius playlist using a di∂erent song: Tap Genius Playlist, then tap New and
pick a song.
Delete a saved Genius playlist: Tap the Genius playlist, then tap Delete.
Once a Genius playlist is synced back to iTunes, you won’t be able to delete it directly
from iPhone. You can use iTunes to edit the playlist name, stop syncing, or delete the
playlist.
Creating Playlists
You can create and edit your own playlists on iPhone. You can also edit playlists synced
from iTunes on your computer.
Create a playlist:
1 Tap Playlists (tap More first, if Playlists isn’t visible), then tap “Add Playlist…”
2 Type a name for your playlist, then tap Save.
3 Browse for songs using the buttons at the bottom of the screen. Tap any song or video
to add it to the playlist. Tap Add All Songs at the top of any list of songs to add all the
songs in the list.
4 When you finish, tap Done.
When you make a playlist and then sync iPhone to your computer, the playlist is
synced to your iTunes library.
Edit a playlist:
1 Tap Playlists (tap More first, if Playlists isn’t visible), then tap the playlist you want to
edit.
2 Tap Edit, then do one of the following:
To move a song higher or lower in the list, drag next to the song.
To delete a song from the playlist, tap next to a song, then tap Delete. Deleting a
song from a playlist doesn’t delete it from iPhone.
To add more songs, tap .
3 When you finish, tap Done.
When you edit a playlist and then sync iPhone to your computer, the playlist is synced
to your iTunes library.
Delete a playlist: In Playlists, tap the playlist you want to delete, then tap Delete (scroll
to the top of the list to reveal the Delete button). Confirm by tapping Delete Playlist.
Clear a playlist: In Playlists, tap the playlist you want to clear, then tap Clear (scroll to
the top of the list to reveal the Clear button). Confirm by tapping Clear Playlist.
Chapter 8 Music
97
Page 98

PRELIMINARY DRAFT — APPLE CONFIDENTIAL
Messages
9
Sending and Receiving Messages
WARNING: For important information about driving safely, see the Important Product
Information Guide at www.apple.com/support/manuals/iphone.
Messages supports text messages with other SMS, MMS, and other iOS devices
running iOS 5, via iMessage. With MMS and iMessage, you can also include photos,
videos, and other info.
98
iMessage lets you send unlimited messages over Wi-Fi or cellular connections to other
iOS devices. You can see when the other person is typing, and let others be notified
when you’ve read their messages. Messages are encrypted, and because iMessages are
displayed on all of your iOS 5 devices logged into the same account, you can start a
conversation on one of your iOS devices, then continued it on another.
Note: SMS and MMS require a cellular connection, and may not be available in all
areas. Additional fees may apply.
Send a text message:
1 Open Messages, then tap
2 Tap and choose a contact, or enter a phone number, name, or email address
manually.
3 Tap the text field above the keyboard.
4 Enter a message, then tap Send.
Note: An alert badge
alert to try sending the message again.
.
appears if a message can’t be sent. In a conversation, tap the
Page 99

PRELIMINARY DRAFT — APPLE CONFIDENTIAL
Conversations are saved in the Messages list. A blue dot indicates unread messages.
Tap a conversation to view or continue it.
Text messages
you sent
Text messages
from the other
person
Reply to a message Type your reply, then tap Send.
Resume a previous conversation Tap the conversation in the Messages list, then
enter a message and tap Send.
Display earlier messages in the conversation Scroll to the top (tap the status bar) and tap Load
Earlier Messages.
Start a conversation from Favorites or Recents In Phone, tap Favorites or Recents. Tap
a name or number, then tap Text Message.
Receive texts at an email account In Settings, choose Messages > Receive At > Add
Another Email.
Call, FaceTime, or email someone Tap a conversation in the Messages list, scroll to
the top, then tap one of the buttons.
Follow a link in a message Tap the link. A link may open a webpage in Safari,
or make a phone call, for example.
Forward a conversation Select a conversation, then tap Edit. Tap circles
on the left to select parts to include, then tap
Forward.
Add someone to your contacts list Tap a phone number in the Messages list, then
tap “Add to Contacts.”
next to
Sending Messages to a Group
Group messaging (not available in all areas) lets you send a message to multiple
recipients. Group messaging must be turned on (go to Settings > Messages), and
requires MMS or iMessage
Chapter 9 Messages
99
Page 100

PRELIMINARY DRAFT — APPLE CONFIDENTIAL
Sending messages to a group:
1 Tap .
2 Tap
to choose contacts, or enter phone numbers, names, or email addresses
manually.
If you enter a phone number manually, tap Return to add another recipient.
Replies are sent only to you—they aren’t copied to the other people in the group.
Including Photos, Videos, and More
With iMessage or MMS, you can include photos, videos, locations, contact info, and
voice memos (MMS only).
Send a photo or video:
1 Tap
2 Tap “Take Photo or Video,” or tap “Choose Existing.”
.
The size limit of attachments is determined by your carrier. If necessary, iPhone may
compress the photo or video.
Send a location In Maps, tap for a location, tap Share Location
(bottom of screen), then tap Message.
Send contact info In Contacts, choose a contact, tap Share Contact
(bottom of screen), then tap Message.
Send a voice memo In Voice Memos, tap
want to send, tap Share, then tap Message.
Save a photo or video you receive to your
Camera Roll album
Copy a photo or video Touch and hold the attachment, then tap Copy.
Save contact information you receive Tap the contact bubble, then tap Create New
Tap the photo or video in the conversation, tap
, then tap Save Image or Save Video.
Contact or “Add to Existing Contact.”
, tap the voice memo you
Editing Conversations
If you want to keep just part of a conversation, you can delete the parts you don’t
want. You can also delete entire conversations from the Messages list.
Edit a conversation:
1 Tap Edit.
2 Tap circles on the left to select parts to delete.
3 Tap Delete.
10 0
Chapter 9 Messages
 Loading...