

Page 1
K
Service Source
ADB Devices
Keyboards
Mouse Devices
Page 2

K
Service Source
T ak e Apart
ADB Devices
Page 3

Take Apart Keyboard - 1
Keyboard
No preliminary steps are
required before you begin
this procedure.
Note:
To remove and replace
keyswitches, refer to
“Keyswitch Replacement”
in Additional Procedures.
Caution:
precautions in Bulletins/
Safety.
Review the ESD
Page 4

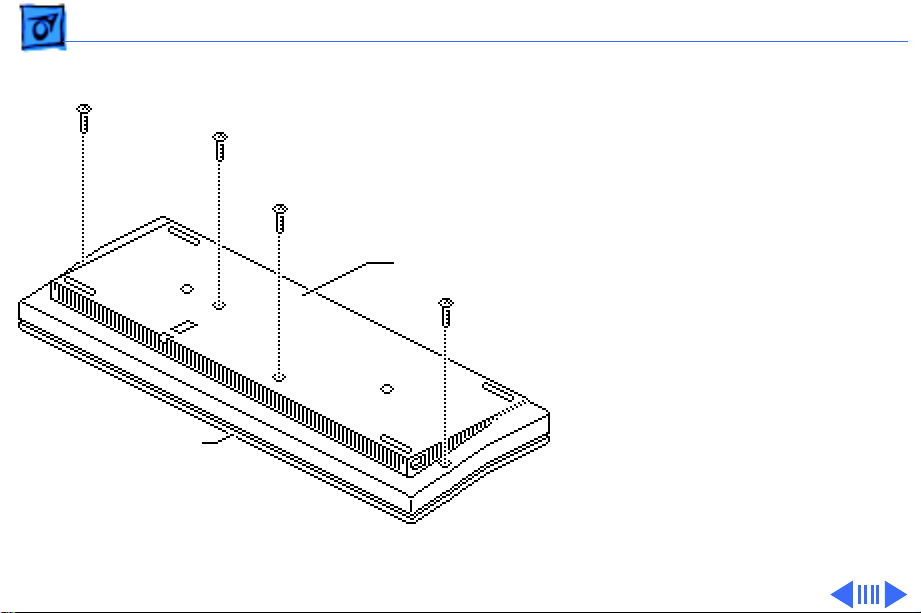
Take Apart Keyboard - 2
1 Disconnect the keyboard
from the computer and
disconnect the ADB cable
and mouse from the
keyboard.
2 Remove the three screws
Bottom Case
from the bottom of the
keyboard.
Top Case
Page 5

Take Apart Keyboard - 3
3 Lift off the top case.
4 Lift out the keyboard
Top Case
mechanism.
Bottom Case
Keyboard
Mechanism
Replacment Note:
Reassembly of the keyboard
is easier with the
components facing up
rather than down.
Page 6

Take Apart Extended Keyboard - 4
Extended Keyboard
No preliminary steps are
required before you begin
this procedure.
Note:
To remove and
replace keyswitches, refer
to “Keyswitch
Replacement” in Additional
Procedures.
Caution:
precautions in Bulletins/
Safety.
Review the ESD
Page 7
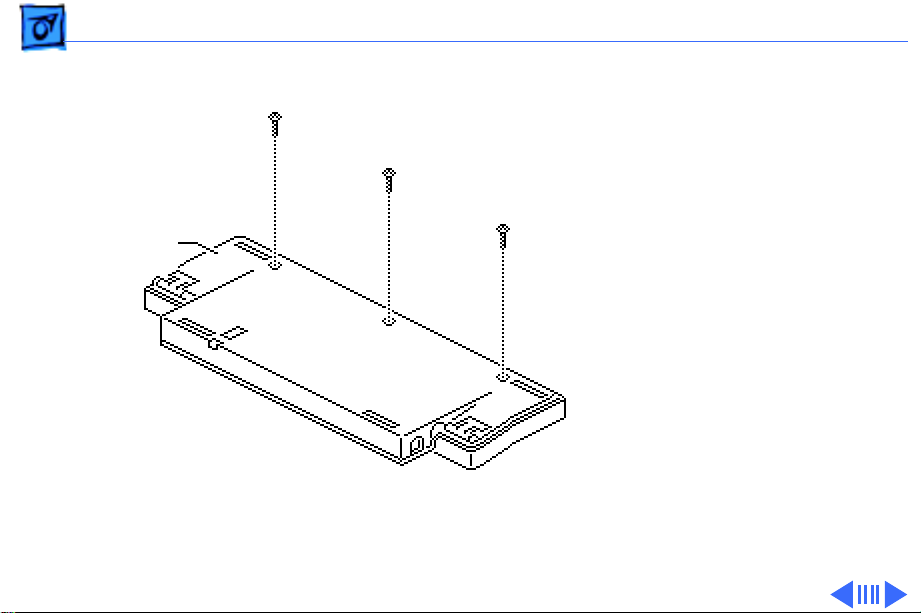
Take Apart Extended Keyboard - 5
1 Disconnect the keyboard
from the computer and
disconnect the ADB cable
and mouse from the
keyboard.
2 Remove the four screws
Bottom Case
from the bottom of the
keyboard.
Top Case
Page 8

Take Apart Extended Keyboard - 6
3 Lift off the top case.
4 Lift out the keyboard
mechanism.
Top Case
Replacement Note:
Reassembly of the keyboard
is easier with the
components facing up
rather than down.
Keyboard
Mechanism
Bottom Case
Page 9

Take Apart Keyboard II - 7
Keyboard II
No preliminary steps are
required before you begin
this procedure.
Note:
If you are exchanging
the Apple Keyboard II, do not
remove the keyboard
mechanism; return the
entire keyboard to Apple
(without the cable).
Note:
To remove and replace
keyswitches, refer to
“Keyswitch Replacement”
in Additional Procedures.
Page 10
Take Apart Keyboard II - 8
Bottom Case
Caution:
Review the ESD
precautions in Bulletins/
Safety.
1 Disconnect the keyboard
from the computer and
disconnect the ADB cable
and mouse from the
keyboard.
2 Remove the three screws
from the bottom of the
keyboard.
Page 11

Take Apart Keyboard II - 9
3 Grasp the bottom and top
of the case. Push in on
the tabs and lift off the
top cover.
Top Case
Bottom Case
Page 12

Take Apart Keyboard II - 10
Note:
There are two
versions of the Apple
Keyboard II, Version A and
Version B; the parts are not
interchangeable. To
differentiate Version A from
Version B, check the serial
numbers on the bottom case.
Version A serial numbers
start with the letter “M”;
Version B serial numbers
start with the letter “S” or
“T.”
This Take Apart topic
contains separate
procedures for each version
of the keyboard.
Page 13

Take Apart Keyboard II - 11
V ersion A:
Encoder Board
Connector
Bottom Case
Clip
Ribbon Cable
1 Remove the three screws
that secure the keyboard
to the encoder board.
2 Disconnect the ribbon
cable from its connector.
3 Slide the keyboard out
from under the clips in
the bottom case and
remove the keyboard.
4 Lift the encoder board
out of the bottom case.
Page 14

Take Apart Keyboard II - 12
Caps Lock Switch
Connector
Encoder Board
Bottom Case
Ribbon Cables
Ribbon Cable
Connectors
Clip
Version B:
1 Remove the three screws
that secure the keyboard
to the encoder board.
2 Disconnect the two
ribbon cables from their
connectors.
3 Unplug the Caps Lock
switch connector from
the encoder board and
remove the keyboard.
4 Remove the six screws
with captive washers and
lift the encoder board out
of the case bottom.
Page 15

Take Apart Extended Keyboard II - 13
Extended Keyboard II
No preliminary steps are
required before you begin
this procedure.
Note:
If you are exchanging
an Apple Extended Keyboard
II, do not remove the
keyboard mechanism;
return the entire keyboard
to Apple (without the cable).
Note:
To remove and replace
keyswitches, refer to
“Keyswitch Replacement”
in Additional Procedures.
Page 16

Take Apart Extended Keyboard II - 14
Top Case
Bottom Case
Caution:
Review the ESD
precautions in Bulletins/
Safety.
1 Disconnect the keyboard
from the computer and
disconnect the ADB cable
and mouse from the
keyboard.
2 Remove the screw from
the bottom case.
3 Pull the rear edge of the
top case up and away
from the bottom case
until the top case snaps
loose.
Page 17

Take Apart Extended Keyboard II - 15
4 Pivot the rear of the top
case toward the front of
the keyboard and detach
Keyboard Assembly
the top case from the
bottom case.
Bottom Case
ADB Connector
ADB
Slot
5 Lift the two ADB
connectors from their
slots.
6 Press back the two
plastic latches and lift
the keyboard assembly
until it clears the
latches.
Page 18

Take Apart Extended Keyboard II - 16
7 Pull the keyboard
assembly toward the
back of the bottom case
to separate it from the
front foot.
Foot Return Spring
Side Clip
Replacement Note:
Be sure
the five tabs on the front
edge of the keyboard
assembly are in the holders
in the bottom case.
8 Slide the foot return
spring out from the side
clips.
Page 19

Take Apart Extended Keyboard II - 17
9 Spread the plastic clips
and pull the height
adjustment lever up and
out.
Page 20

Take Apart Extended Keyboard II - 18
10 Spread the rear foot
plastic clips and lift out
the rear foot.
Replacement Note:
foot should be between the
two side clips with the two
guides a third of the way in
from each side.
The rear
Page 21

Take Apart AppleDesign Keyboard - 19
AppleDesign Keyboard
No preliminary steps are
required before you begin
this procedure.
The AppleDesign Keyboard is
repaired through wholeunit exchange. Refer to the
Service Source parts
database for part number
and ordering information.
Page 22

Take Apart AppleDesign Keyboard - 20
The AppleDesign Keyboard
replaces the Apple Standard
Keyboard II. It is similar in
appearance to the Apple
Extended Keyboard II, but it
comes with the ADB cable
attached.
Page 23

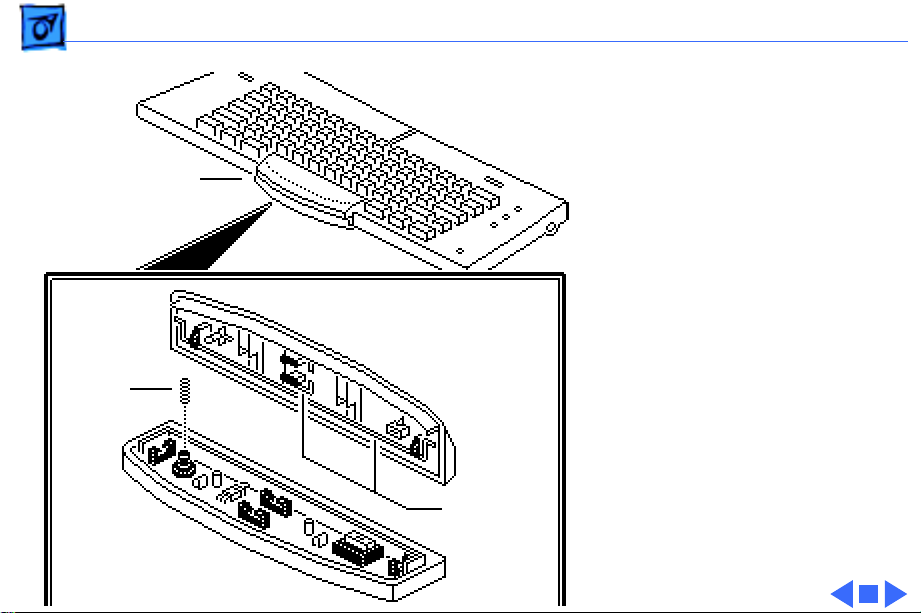
Take Apart Adjustable Keyboard - 21
Adjustable Keyboard
Before you begin,
disconnect the keyboard.
Note:
To remove and replace
keycaps, refer to
“Adjustable Keyboard
Keycaps” in Additional
Procedures.
Remove palm rests.
Page 24
Take Apart Adjustable Keyboard - 22
Spacebar Assembly
Pry off the spacebar cap.
Spring
Spacebar
Replacement Caution:
There are two stabilizer
bars at right angles to each
other and a loose spring in
the spacebar. Take care to
reseat both stabilizer bars
and the loose spring when
you replace the spacebar
cap.
Stabilizer
Bars
Page 25

K
Service Source
Additional Procedures
ADB Devices
Page 26

Additional Procedures Keyswitch Replacement - 1
Keyswitch Replacement
Before you begin, remove
the keyboard mechanism.
Caution:
precautions in Bulletins/
Safety.
Review the ESD
Page 27

Additional Procedures Keyswitch Replacement - 2
1 Using a screwdriver, lift
up on one of the four
Keycap
sides of the keycap and
remove the keycap.
2 Apply fresh solder to
Keyswitch
the two keyswitch
connections to prepare
them for desoldering.
3 Desolder the contacts
using a solder sucker.
(If necessary, use
needlenose pliers to
wiggle the pins and free
the keyswitch.)
Page 28

Additional Procedures Adjustable Key-board Keycaps - 3
Adjustable Keyboard Keycaps
Before you begin,
disconnect the keyboard.
Caution:
precautions in Bulletins/
Safety.
Note:
Adjustable Keyboard are
removable.
Pry off the keycaps
Review the ESD
The keycaps on the
Page 29

Additional Procedures Adjustable Key-board Keycaps - 4
Stabilizer Bar
Hook
Keycap
Support
Stabilizer Bar
Replacement Note:
The
Spacebar, Delete, Return,
Tab, Shift, Enter, and “0”
keys use stabilizer bars to
secure the keycaps.
To replace keycaps, snap
the stabilizer bar into the
back of the key. Slide the
stabilizer bar hook into the
keycap support. Press to
reseat the keycap.
Page 30

K
Service Source
Exploded V ie w
ADB Devices
Page 31

Exploded View 1
Extended
Keyboard
Keyboard
Extended
Keyboard II
Adjustable
Keyboard II
AppleDesign
Keyboard
Keyboard
 Loading...