

Page 1
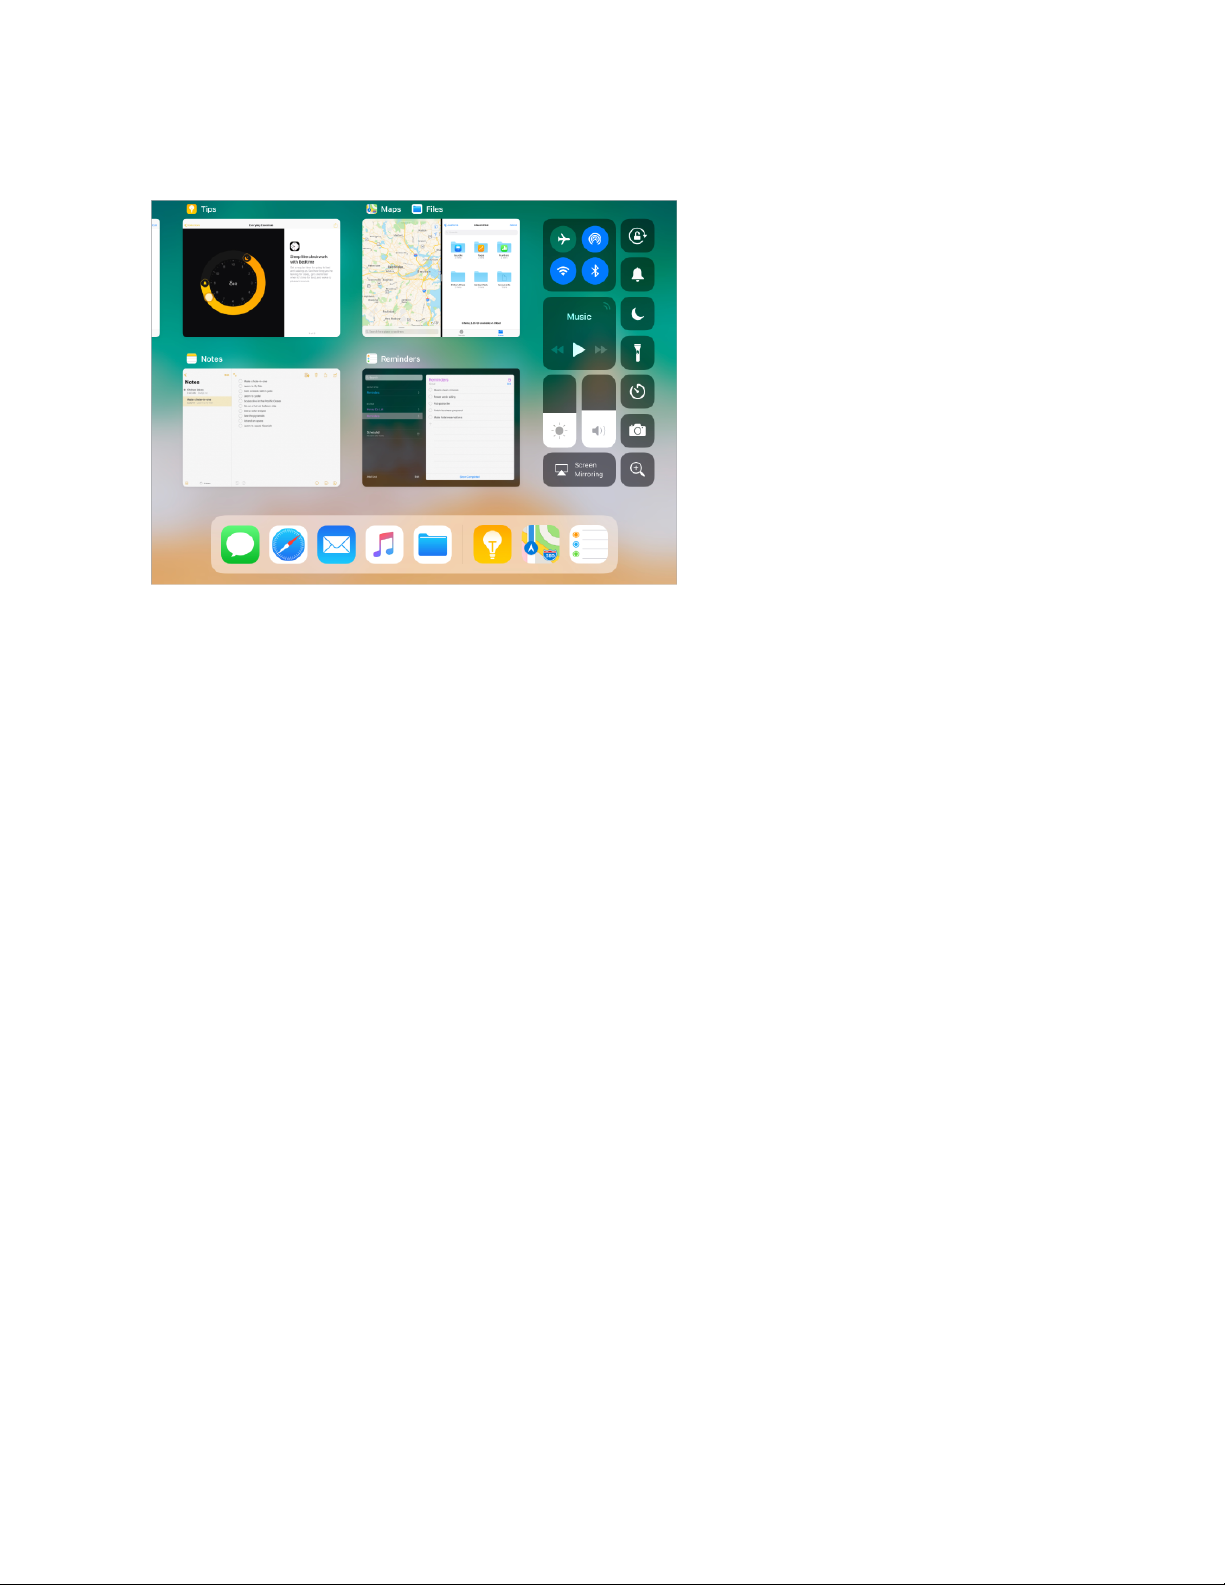
Use the App Switcher. To reve al all yo ur open apps, swipe up fro m the bottom edge. If
the Dock isnʼt already showing when you begin to swipe, swipe long enough to display
the Dock then the App Switcher. You can also double-click the Home button. To see more
apps, swipe right. To switch to another app, tap it.
Swipe between open apps. Swipe right or left with four or five fingers. To turn off the
multifinger swipe gesture, go to Settings > General > Multitasking & Dock.
Close an app. If an app isnʼt working properly, you can force it to close. (Typically, there
is no reason to close an app; closing it doesnʼt save battery power, for example.) In the
App Switcher, swipe up on the app. Then try opening the app again.
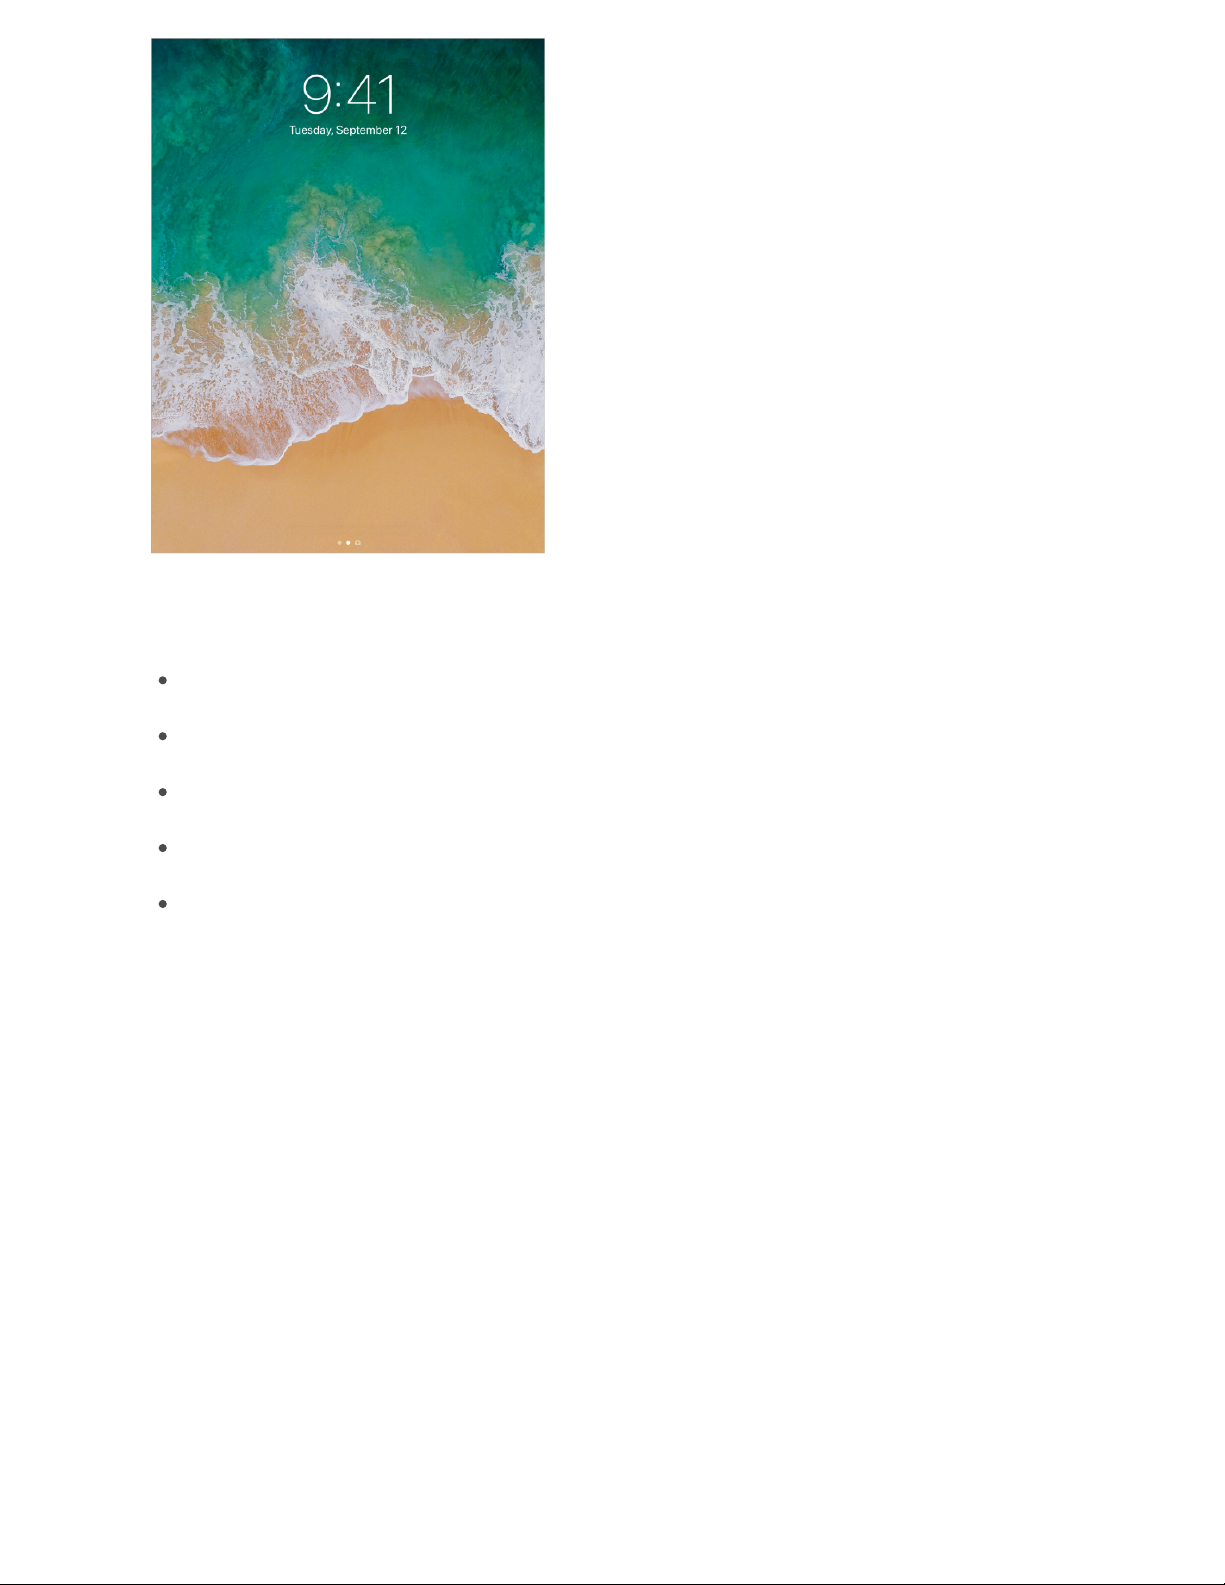
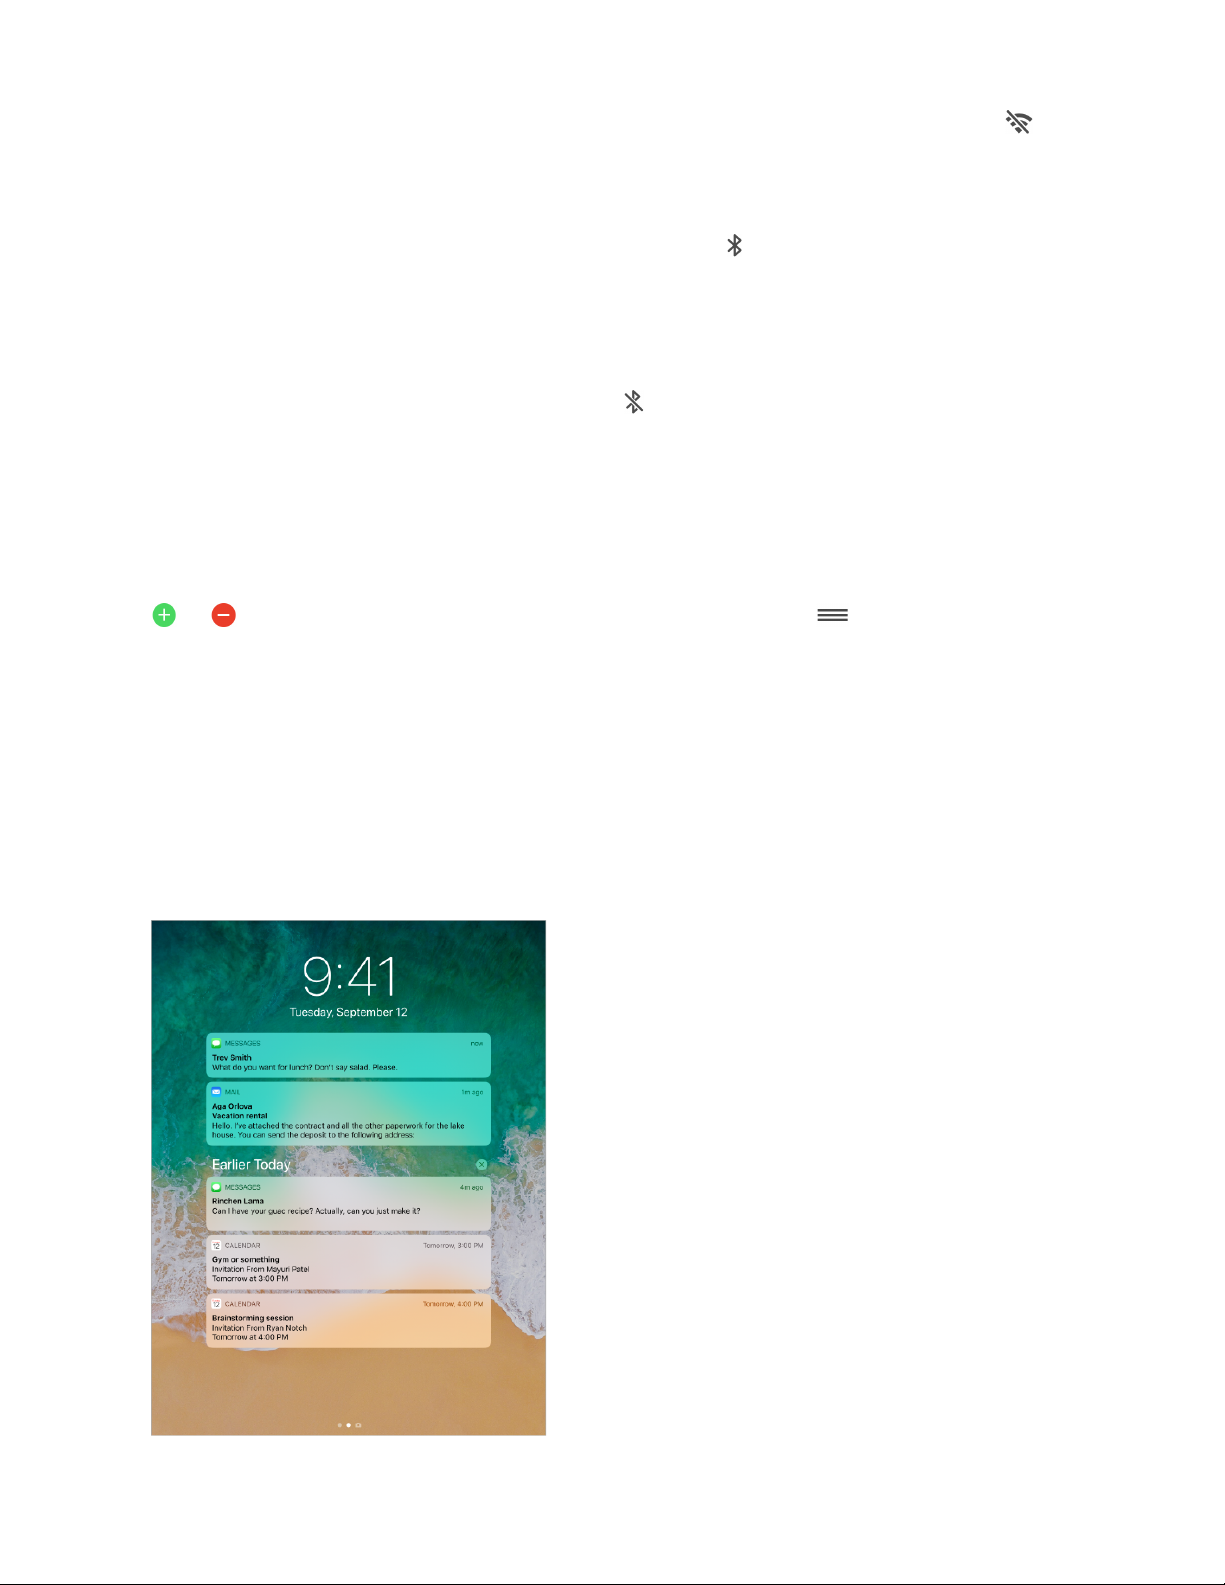
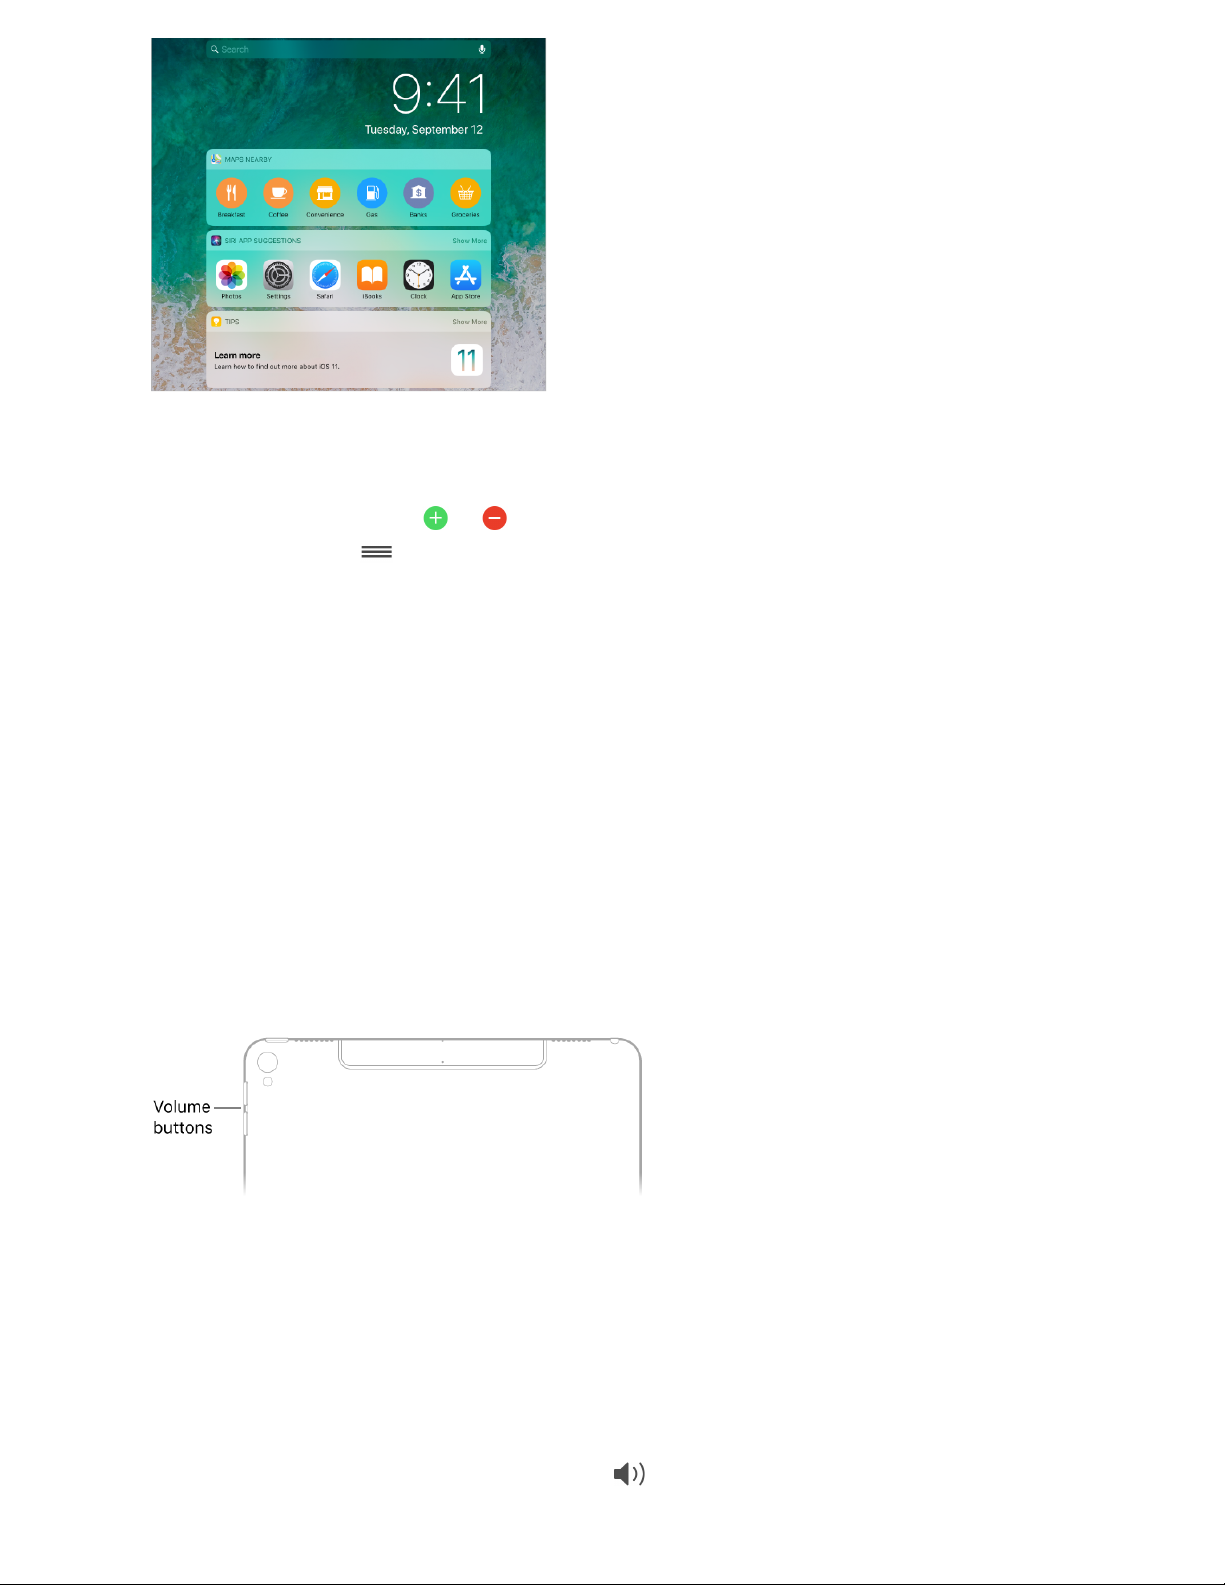
Lock screen
The Lock screen, which shows the current time and date and your most recent
notifications, appears when you turn on or wake iPad.
Page 2
You c an quic kly acc ess th e feat ures a nd informati on you need m ost from the Lock
screen, even while iPad is locked:
Open Camera: Swipe left. (See .)
Open Control Center: Swipe up from the bottom edge. (See .)
See earlier notifications: Swipe up from the center. (See .)
See Today View: Swipe right. (See .)
Start drawing and taking notes: (On supported models) Tap Apple Pencil on the Lock
screen. Whatever you create is .
Unlock iPad. Press the Home button, then enter the passcode (if required).
Choose what you can access from the Lock screen. Go to Settings > Touch ID &
Passcode (supported models) or Settings > Passcode (other models). You can change
access to Today View, Recent Notifications, Control Center, and more.
Show notification previews on the Lock screen. Go to Settings > Notifications > Show
Previews, then tap Always. (Notification previews include text from Messages, lines from
Mail messages, and details about Calendar invitations. See .)
Control Center
Control Center gives you instant access to airplane mode, Do Not Disturb, a flashlight,
and other handy features.
Take photo s
Control Center
Notifications
Today View
saved in Notes
Notifications
Page 3
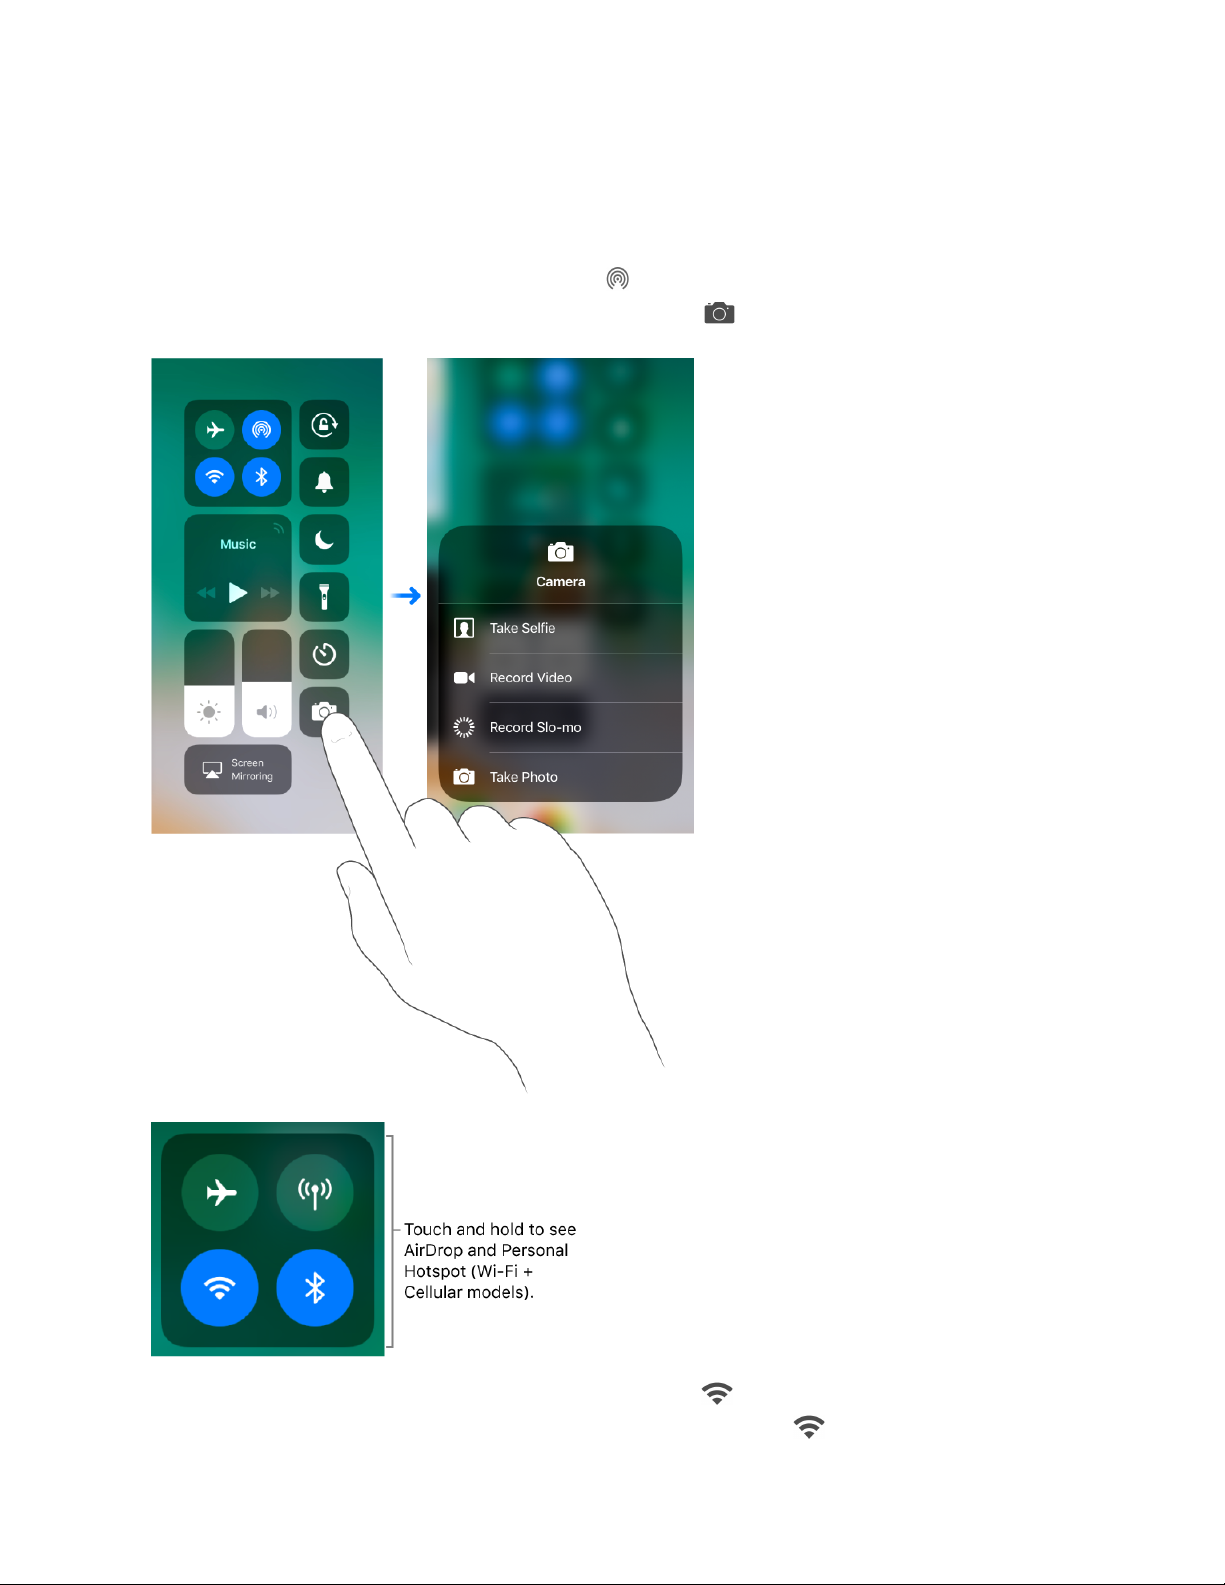
Open Control Center. Swipe up from the bottom edge. If the Dock isnʼt already showing
when you begin to swipe, swipe long enough to display the Dock then Control Center.
When iPad is unlocked, you can also open Control Center by double-clicking the Home
button.
Access more controls. Many controls offer additional options. To see available options,
touch and hold a control. For example, AirDrop options are available when you touch and
hold the top-left group of controls, then tap . Options to take a selfie, take a photo, or
record a video are available when you touch and hold .
Temporar ily disc onnect fr om a Wi-Fi ne two rk. Tap . To reconnect, tap it again. To
see the name of the connected Wi-Fi network, touch and hold .
Page 4
Because Wi-Fi isnʼt turned off when you disconnect from a network, AirPlay and AirDrop
still work, and iPad joins known networks when you change locations or restart iPad. To
turn off Wi-Fi, go to Settings > Wi-Fi. (To turn on Wi-Fi again in Control Center, tap .)
For information about turning Wi-Fi on or off in Control Center while in airplane mode,
see .
Temporar ily disc onnect fr om Bl uetooth devi ces. Tap . To allow connections, tap the
button again.
Because Bluetooth isnʼt turned off when you disconnect from devices, location accuracy
and other services are still enabled. To turn off Bluetooth, go to Settings > Bluetooth. To
turn on Bluetooth again in Control Center, tap . For information about turning Bluetooth
on or off in Control Center while in airplane mode, see .
Close Control Center. Tap the s cr een or press th e Home bu tt on. Yo u can al so tap an a pp
in the App Switcher.
Add and organize controls. Go to Settings > Control Center > Customize Controls. Tap
or to add or remove controls. To rearrange controls, touch next to a control,
then drag it to a new position.
Notifications
Notifications help you keep track of whatʼs new. They let you know if you missed a call, if
the date of an event moved, and more. You can customize your notifications so you see
only whatʼs important to you.
Respond when iPad is locked. To uc h and hold the notification.
Travel with iPad
Travel with iPad
Page 5

Respond when iPad is unlocked. Tap the not if ication t o open t he app.
Respond without leaving the current app. Pull down on the notification when it appears
at the top of your screen. To dismiss it without responding, swipe it up. This feature
works with text and email messages, calendar invitations, and more.
See recent and earlier notifications from any screen. Swipe down from the top to see
recent notifications, then scroll up to see older notifications. From the notifications
screen, you can also do the following:
Respond to a notification: Tap it.
Open Camera: Swipe left. (To avoid removing a notification, swipe from the right
edge.)
See Today View: Swipe right. (To avoid opening a notification, swipe from the left
edge.)
Start drawing and taking notes: (On supported models) Tap the screen with
Apple Pencil.
Return to where you left off: Swipe up from the bottom edge, or press the Home
button.
Remove a notification. Swipe it left. Or, touch and hold the notification, then tap . To
remove a group of notifications, tap .
Set notification preferences. Go to Settings > Notifications.
Choose when to show notification previews: Tap Show Previews, then choose an
option. When you select When Unlocked, previews also appear on the Lock screen.
Previews include text from Messages, lines from Mail messages, and details about
Calendar invitations.
Set the notification style for an app: Tap the app, then choose options.
Choose whether to show recent notifications on the Lock screen. Go to Settings >
Touch ID & Passcode (supported models) or Settings > Passcode (other models), then
below Allow Access When Locked, turn on Recent Notifications.
Silence all your notifications. Go to Settings > Do Not Disturb. You can also use Siri to
turn Do Not Disturb on or off. Say “Turn on Do Not Disturb” or “Turn off Do Not Disturb.”
Today V i e w
Get information from your favorite apps, at a glance. Choose from Maps Nearby,
Calendar, Notes, News, Reminders, and more.
Page 6
Open Today View. Swipe right from the left edge of the Home screen or the Lock screen.
Add and organize Today View widgets. To choose which widgets appear, t ap Edit at the
bottom of the screen. Tap or to add or remove widgets. To arrange the order of
your widgets, touch , then drag to a new position.
Choose whether to allow access to Today View when iPad is locked. Go to Settings >
Touch ID & Passcode (supported models) or Settings > Passcode (other models).
Control the volume
Use the Volume buttons on the side of iPad to adjust the volume of songs and other
media, alerts, and sound effects. You can also use Siri to turn the volume up or down.
Just say “Turn up the volume” or “Turn down the volume.” Use Control Center (or on
some iPad models, the Side Switch) to silence audio alerts and notifications.
WARNING: For important information about avoiding hearing loss, see
.
Lock the ringer and alert volumes. Go to Settings > Sounds, then turn off Change with
Buttons.
Note: To limit the maximum headset volume, go to Settings > Music > Volume Limit. To
prevent changes to the volume limit, go to Settings > General > Restrictions > Volume
Limit.
Use Control Center to adjust the volume. When iPad is locked or when youʼre using
another app, open Control Center, then drag .
Important safety
information
Page 7

Mute the sound. Press and hold the Volume Down button.
You c an also use ei ther volume button to .
Put iPad in ring or silent mode. Open Control Center, then tap .
Use Do Not Disturb. to temporarily silence alerts and
notifications. Open Control Center, then tap to turn Do Not Disturb on or off.
Do Not Disturb, and the Side Switch (available on some models) set to silent, donʼt mute
the audio from music, podcasts, movies, and TV shows.
Sounds and silence
You c an chan ge or t urn off the so unds iPad pl ays w hen yo u get a Fac eTime or Wi- Fi call ,
text message, email, reminder, or other type of notification.
Set sound options. Go to Settings > Sounds for options such as alert tones and
ringtones, and ringer and alert volumes.
To temporarily silence incoming calls, aler ts , and sound effe cts, .
To put iPad in ring or silent mode, open Control Center, then tap .
Tip: If youʼre not hearing or seeing incoming calls and notifications when you expect,
open Control Center, then check whether Do Not Disturb is on. If is highlighted, tap it
to turn off Do Not Disturb. (When Do Not Disturb is on, also appears in the status bar.)
Do Not Disturb
To quickly silence iPad, whether yo uʼre going to dinner or going to sleep, turn on Do Not
Disturb. It silences notifications and FaceTime and Wi-Fi calls and prevents them from
lighting up the screen.
Turn on Do Not Disturb. Open Control Center, then tap . You can also use Siri to turn
Do Not Disturb on or off. Say “Turn on Do Not Disturb” or “Turn off Do Not Disturb.”
When Do Not Disturb is on, appears in the status bar.
Allow FaceTime and Wi-Fi calls when Do Not Disturb is on. Go to Settings > Do Not
Disturb. To allow incoming calls from selected groups, tap Allow Calls From. To allow
repeated calls to come through for emergency situations, turn on Repeated Calls.
Allow FaceTime and Wi-Fi calls and messages from emergency contacts when Do
Not Disturb is on. Go to Contacts, select a contact, tap Edit, tap Text Tone or Ringtone,
then turn on Emergency Bypass.
take a photo or record a video
Turn on Do Not Disturb
turn on Do Not Disturb
Page 8
Schedule quiet hours. Go to Settings > Do Not Disturb, turn on Scheduled, then set the
start time and end time for your quiet hours.
Set when to silence iPad. To set whether Do Not Disturb silences iPa d only when itʼs
locked, or even when itʼs unlocked, go to Settings > Do Not Disturb.
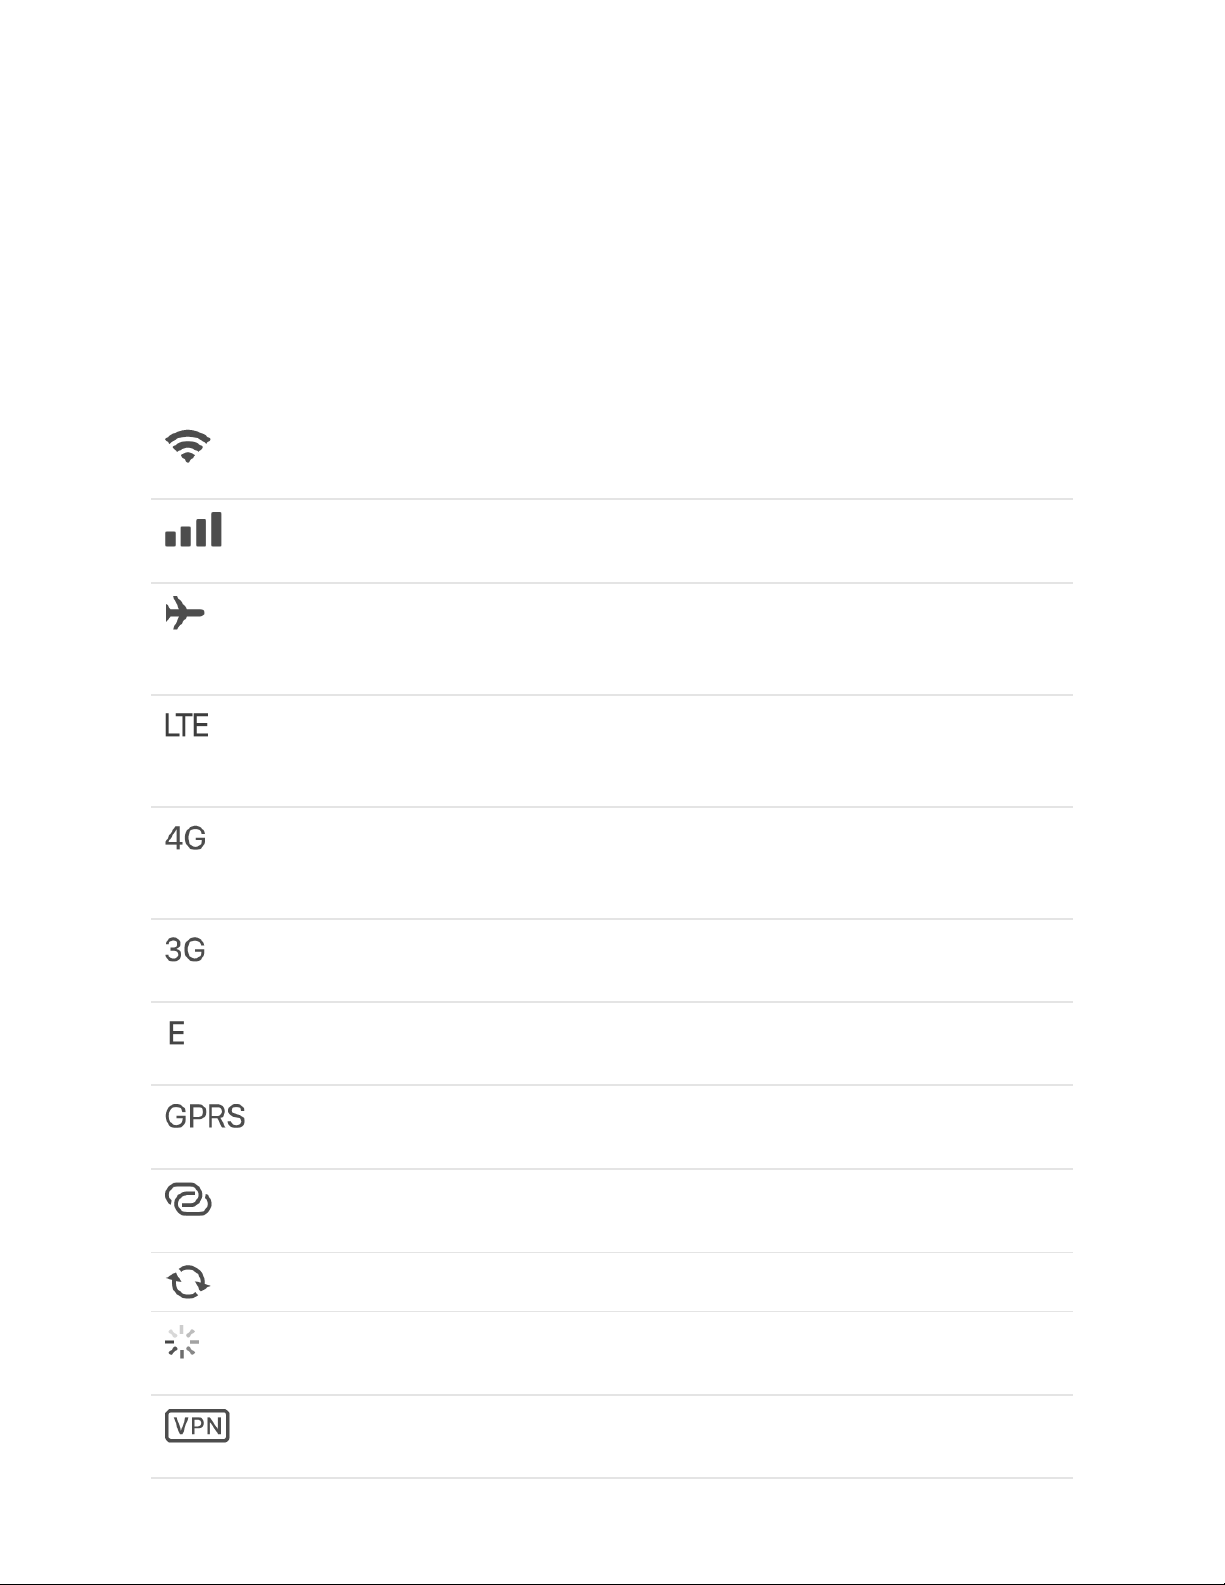
Status icons
The icons in the status bar at the top of the screen provide information about iPad:
Status icon What it means
Wi-Fi iPad has a Wi-Fi Internet connection. The more bars, the
stronger the connection. See .
Cell signal iPad (Wi-Fi + Cellular models) is in range of the
cellular network. If thereʼs no signal, “No service” appears.
Airplane mode Airplane mode is on. Nonwireless features are
available, but wireless functions may be disabled. See
.
LTE iPad (Wi-Fi + Cellular model) is connected to the Internet
over a 4G LTE network (not available in all regions). See
.
4G iPad (Wi-Fi + Cellular model) is connected to the Internet
over a 4G network. (not available in all regions). See
.
3G iPad (Wi-Fi + Cellular model) is connected to the Internet
over a 3G network. See .
EDGE iPad (Wi-Fi + Cellular model) is connected to the Internet
over an EDGE network. See .
GPRS iPad (Wi-Fi + Cellular model) is connected to the Internet
over a GPRS network. See .
Personal Hotspot iPad is providing a Personal Hotspot for
another device. See .
Syncing iPad is syncing with iTunes. See .
Activity There is network or other activity. Some third-party
apps use this icon to show app activity.
VPN iPad is connected to a network using VPN. See
.
Connect to Wi-Fi
Travel with
iPad
Cellular
data settings
Cellular data
settings
Cellular data settings
Cellular data settings
Cellular data settings
Personal Hotspot
Sync iPad
VPN
settings
Page 9
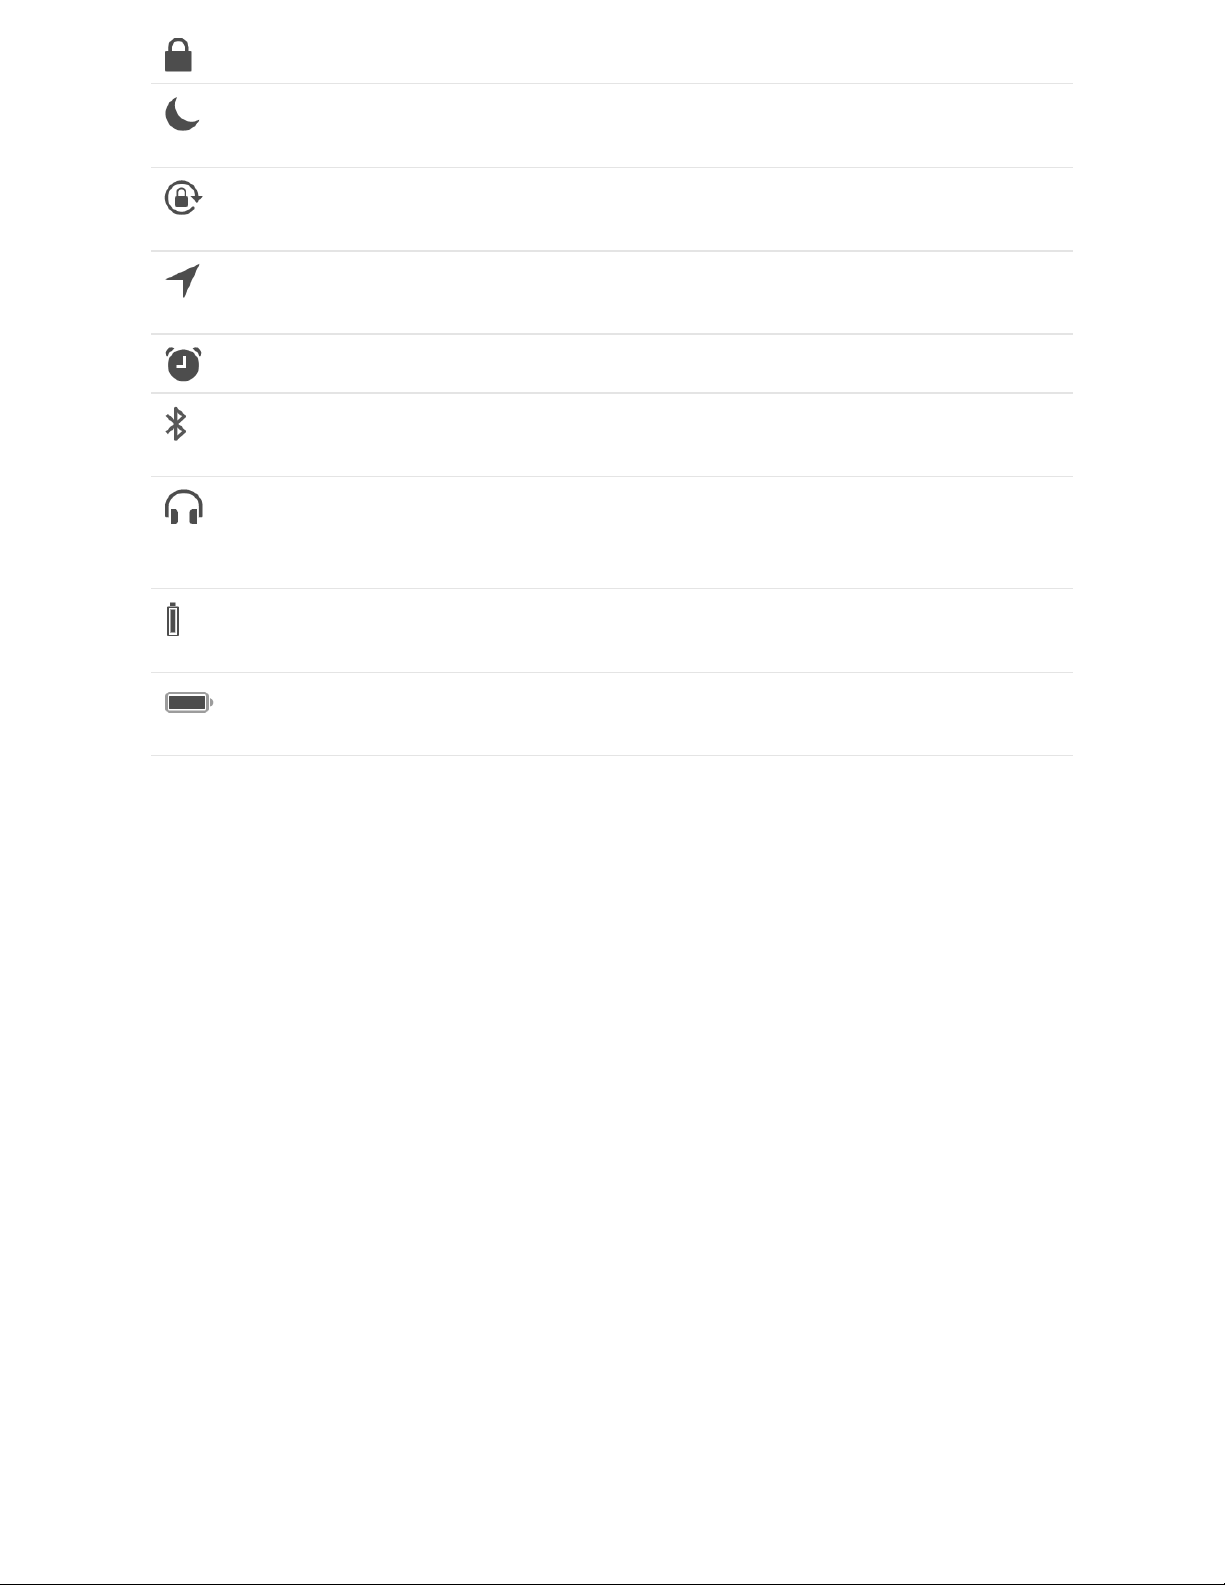
Lock iPad is locked. See .
Do Not Disturb Do Not Disturb is turned on. See
.
Orientation lock Screen orientation is locked. See
.
Location Services An app is using Location Services. See
.
Alarm An alarm is set. See .
Bluetooth® Bluetooth is on and connectable. See
.
Headphones connected iPad is paired with Bluetooth
headphones that are turned on and within Bluetooth range. See
.
Bluetooth battery Shows the battery level of a supported
paired Bluetooth device.
Battery Shows the battery level or charging status. See
.
Change the screen orientation
Many apps give you a different view when you rotate iPad.
Lock screen
Do Not
Disturb
Change the
screen orientation
Location Services
Set an alarm or bedtime schedule
Connect
Bluetooth devices
Connect Bluetooth devices
Charge
and monitor the battery
Page 10

Lock the screen orientation. Open Control Center, then tap .
When the screen orientation is locked, appears in the status bar.
On iPad models with a side switch, you can also set the side switch to lock the screen
orientation instead of silencing sound effects and notifications. Go to Settings > General.
Below “Use Side Switch to,” tap Lock Rotation.
Page 11

Multitask
Use multiple apps at the same time
On supported models, you can work with more than one app at the same time.
Use Split View to keep two apps open in resizable views.
Use Slide Over to slide an app over another open app. On supported models, you can
even work on one app in Slide Over while working on two others that are open in Split
View.
Use Picture in Picture to watch a movie or use FaceTime while working with other apps.
Page 12

You c an use Slide O ver an d Split View w ith many app s inclu ding Sa fari, Notes, Photos ,
and Calendar. You can use Picture in Picture with FaceTime, Videos, and more. For more
information, see , , and .
Turn off Split View and Slide Over. Go to Settings > General > Multitasking & Dock,
then turn off Allow Multiple Apps.
Split View
On supported models, Split View keeps two apps open in resizable views.
Open a second app in Split View. While using an app, swipe up from the bottom to
reveal the Dock. Touch and hold an app in the Dock, drag it to the right or left edge of the
screen, then lift your finger. If two apps are already open, drag over the app you want to
replace.
To give both apps equal space, drag the app divider to the center of the scre en.
Apps that you use together in a Split View are paired, so they both open when you select
either from the App Switcher or from the Dock.
Split View Slide Over Picture in Picture
Page 13

Open Split View from the Home screen. Touch and hold an app on the Home screen or
in the Dock, drag it a fingerʼs width or more, then continue holding it while you tap a
different app with another finger. After the second app opens, drag the app youʼre
holding to the left or right edge of the screen, then lift your finger. (If you donʼt initially
drag the first app far enough, all of the apps on the Home screen begin to jiggle, which
allows you to rearrange your Home screen. To start over without rearranging, press the
Home button.)
Close Split View. Drag the app divider to the left or right, depending on which app you
want to close.
Turn Split View into Slide Over. Swipe down from the top of an app in the smaller view.
(See .)
Slide Over
On supported models, you can work on an app that slides in front of another open app.
Open an app in Slide Over. While using an app, swipe up from the bottom to reveal the
Dock. Touch and hold an app in the Dock, then drag it above the Dock.
If an app is already open in Slide Over, itʼs replaced by the app you drag from the Dock.
To open a third app in Slide Over when the scre en is in Split View, drag the app from the
Dock to the Split View app divider. (See .) On supported models, you can work
on all three apps simultaneously.
Slide Over
Split View
Page 14

Open an app in Slide Over from the Home screen. Tou ch and hold an app on the Home
screen or in the Dock, drag it a fingerʼs width or more, then continue holding it while you
tap a different app with another finger. After the second app opens, lift your finger. (If you
donʼt initially drag the first app far enough, all of the apps on the Home screen begin to
jiggle, which allows you to rearrange your Home screen. To start over without
rearranging, press the Home button.)
Move an app in Slide Over off and on the screen. Drag the top of the Slide Over
window off the right edge of the screen. To view it again from any other open app, swipe
from the right.
Move an app in Slide Over to the other side of the screen. Drag from the top of the
Slide Over window.
Turn Slide Over into Split View. Swipe down from the top of the Slide Over window. (See
.)
Picture in Picture
On supported models, you can watch a movie or use FaceTime while you use other apps.
Split View
Page 15

Use Picture in Picture. When watching a video or using FaceTime, press the Home
button or tap . The video screen scales down to a corner of your display so you can
see the Home screen and open other apps.
Resize the video window. Pinch open to make the small video window larger; pinch
closed to shrink it again.
Show and hide controls. Tap the vide o window.
Pause and resume play. To pause, tap in the video window. To play again, tap .
Move the video window. Drag it to a different corner of the screen.
Hide the video window. Drag it off the left or right edge of the screen.
Close the video window. Ta p .
Return FaceTime or a video to full screen. Tap in the small video window.
Turn Picture in Picture off. Go to Settings > General > Multitasking & Dock, then turn off
Persistent Video Overlay.
Page 16

Enter text
Ty p e a n d e d i t t e x t
Tap a text field to s ee the on screen keyboard, the n tap let te rs to type.
You c an also rest your fingers on the onscreen keyboa rd, th en star t typing normally. The
placement of the keys invisibly adjusts based on where youʼve rested your fingers. If you
stop typing, the placement of the keys resets after two seconds (on supported models).
Type uppercase letters. Ta p Shift o r touch th e Shift k ey and sl id e to a l et ter.
Turn on Caps Lock. Double-tap Shift.
Enter numbers, punctuation, or symbols. To enter the character fro m the top of a ke y,
swipe down on the key. Or tap the Number key or the Symbol key , then type.
Enter accented letters or other alternate characters. Tou ch and hold a ke y, then slide
to choose one of the options.
Quickly end a sentence with a period and a space. Double-tap the space bar.
Page 17

Correct spelling. If you see a word underlined in red, tap it to see suggested corrections.
If the word you want doesnʼt appear, type the correction.
Hide the onscreen keyboard. Tap t he Key board key .
Set options for typing or add keyboards. Touch and hold or , then slide to
Keyboard settings. Or go to Settings > General > Keyboard.
You c an also or to enter
text. To dictate instead of typing, see .
Select text. Tap the i ns er ti on po in t to disp la y the sele ct ion o pt ions. O r double-tap a
word to select it. Drag the grab points to select more or less text. In read-only
documents, such as webpages, touch and hold to select a word.
You c an cut, copy, or paste over sel ected text. With Un ivers al Clip board, you can als o
.
You c an to move selected text within an app and to copy and paste it
to other apps.
With some apps, you can also make text bold, italic, and underlined (tap B/I/U); see
suggestions in Look Up; or have Siri suggest alternative text. You may need to tap to
see all the appʼs options. When you choose Look Up, you see suggested information from
the web and other apps. To turn off Suggestions in Look Up, go to Settings > Siri &
Search.
Revise text. Touch and hold the te xt to show the magnifying glass, then drag to position
the insertion point.
use an iPad Pro Smart Keyboard an Apple Wireless Keyboard
Dictate
cut
or copy something on one Apple device, and paste it to another
use drag and drop
Page 18

Turn your keyboard into a trackpad. To uc h and hold the ke yboard with two fingers until
it turns light gray. To select text with drag points, continue holding the keyboard until
drag points appear on the insertion point, then move your fingers.
To use the trackpad to move the insertion point, touch and hold the key board with two
fingers until it turns light gray, then—before drag points appear on the insertion point—
drag the insertion point to a new location.
Use the Shortcut Bar. Copy and paste selected text, or style your text to be bold, italic,
or underline—right from the Shortcut Bar at the top of your keyboard.
Note: The Shortcut Bar differs from app to app. The features described here may not be
available with all apps.
Undo the last edit. Use the Shortcut Bar, or shake iPad, then tap Undo.
Justify text. Select the text, then tap the left or right arrow (not always available).
Page 19

Predictive text
As you write, Siri predicts your next word, suggests emoji that could take the place of
your word, and makes other suggestions based on your recent activity and information
from your apps (not available for all languages). In Messages, for example, when you type
something like:
“My number is ,” your phone number appears as an option.
“Iʼm at ,” your current location appears as an option.
Tap a word to choose it , or ac ce pt a hi gh lighted pr ediction b y entering a s pace or
punctuation. When you tap a suggested word, a space appears after the word. If you
enter a comma, period, or other punctuation, the space is deleted. Reject a suggestion by
tapping your original word (shown as the predictive text option with quotation marks).
Turn off predictive text. To uch and hold or , slide to Keyboard settings, then turn
off Predictive.
When you turn off predictive text, iPad may still try to suggest corrections for misspelled
words. To accept a correction, enter a space or punctuation, or tap return. To reject a
correction, tap the “x.” If you reject the same suggestion a few times, iPad stops
suggesting it.
Dictate
You c an dictate text in stead o f typin g it. M ake s ure En able Di ctation is tur ned on (go to
Settings > General > Keyboard, then turn on Enable Dictation). On iPad Pro models, you
can use dictation when youʼre not connected to the Internet.
Note: Dictation may not be available in all languages or in all regions, and features may
vary. Cellular data charges may apply. See .
Dictate text. Tap on the iPad keyboard, then speak. When you finish, tap . To insert
dictated text, tap to place the insertion point, then tap . You can also replace selected
text by dictating.
Cellular data settings
Page 20

Add punctuation or format text. Say the punctuation or format. For example, “Dear
Mary comma the check is in the mail exclamation mark” becomes “Dear Mary, the check
is in the mail!” Punctuation and formatting commands include:
quote … end quote
new paragraph
new line
cap—to capitalize the next word
caps on … caps off—to capitalize the first character of each word
all caps—to make the next word all uppercase
all caps on … all caps off—to make the enclosed words all uppercase
no caps on … no caps off—to make the enclosed words all lowercase
no space—to eliminate the space between two words (not available for all languages)
no space on … no space off—to run a series of words together (not available for all
languages)
smiley—to insert :-)
frowny—to insert :-(
winky—to insert ;-)
Save keystrokes
A shortcut lets you enter a word or phrase by typing just a few characters. For example,
type “omw” to enter “On my way!” That oneʼs already set up for you, but you can also
add your own.
Page 21

Create a shortcut. Touch and hold or , slide to Keyboard settings, then tap Text
Replacement.
Have a word or phrase you use and donʼt want it corrected? Create a shortcut, but
leave the Shortcut field blank.
Use iCloud to keep your personal dictionary up to date on your other devices. Go to
Settings > [your name] > iCloud, then turn on iCloud Drive.
Keyboard layouts
You c an type with a split keybo ard th atʼs at the botto m of th e scre en, or undocked and in
the middle of the screen.
Adjust the keyboard. To uc h and hold , then:
Use a split keyboard: Slide your finger to Split, then release. Or spread the keyboard
apart from the middle using two fingers.
Move the keyboard to the middle of the screen: Slide your finger to Undock, then
release.
Return to a full keyboard: Slide your finger to Dock and Merge, then release.
Return a full keyboard to the bottom of the screen: Slide your finger to Dock, then
release.
Turn Split Keyboard on or off. To uch and hold or , slide to Keyboard settings, then
select Split Keyboard. Or go to Settings > General > Keyboard, then turn Split Keyboard
on or off.
Note: The split keyboard option is not available on iPad Pro (12.9-inch).
iPad Pro Smart Keyboard
Use iPad Pro Smart Keyboard to hold your iPad Pro in just the right position—for typing,
watching movies, drawing, and more. Attach the keyboard to the Smart Connector on the
side.
Page 22

Quickly switch between apps. Press and hold the Command key, then press Tab until
you reach the app you want to open.
View keyboard shortcuts. Press and hold the Command key to see shortcuts for an
app.
Open Search. Press Command-Space.
Tip: If youʼve added a Chinese, Korean, Japanese, or Hebrew keyboard, you can use
the Caps Lock key to quickly switch back and forth between Latin script and the other
keyboard youʼre using.
For more information about iPad Pro Smart Keyboard, see the Apple Support article
.
Use an Apple Wireless Keyboard
You c an use an Appl e Wire less Keyboard ( avai lable s eparate ly) to enter text on you r iPad .
The keyboard connects via Bluetooth, so you must first pair it with iPad.
Note: The Apple Wireless Keyboard may not support keyboard features that are on your
device. For example, you canʼt enable dictation with Apple Wireless Keyboard.
Pair an Apple Wireless Keyboard with iPad. Turn the keyboard on. On iPad, go to
Settings > Bluetooth and turn on Bluetooth, then tap the keyboard when it appears in the
Devices list.
Once itʼs paired, the keyboard reconnects to iPad whenever itʼs in range—up to about 33
feet (10 meters). When itʼs connected, the onscreen keyboard doesnʼt appear.
View keyboard shortcuts. Press and hold the Command key to see shortcuts for an
app.
Quickly switch between apps. Press and hold the Command key, then press Tab until
you reach the app you want to open.
Open Search. Press Command-Space.
Tip: If youʼve added a Chinese, Korean, Japanese, or Hebrew keyboard, you can use
the Caps Lock key to quickly switch back and forth between Latin script and the other
keyboard youʼre using.
Save your batteries. Tur n off the wireless keyboard when not in use. To turn off the
keyboard, press and hold the On/Off switch until the green light goes off.
Use
your Smart Keyboard with iPad Pro
Page 23

Add or change keyboards
You c an turn typing featu res, s uch as spell checkin g, on o r off; add keyboards for writ ing
in different languages; and change the layout of your onscreen keyboard or Apple
Wireless Keyboard.
If youʼve added keyboards in other languages, you can type in two languages without
having to switch between keyboards. Your keyboard automatically switches between the
two languages you type in most often. (Not available for all languages.)
Tip: On iPad Pro (12.9-inch), if youʼve added a Chinese, Korean, Japanese, or Hebrew
keyboard, you can use the Caps Lock key to quickly switch back and forth between Latin
script and the other keyboard youʼre using.
Set typing features. Touch and hold or , then slide to Keyboard settings. Or go to
Settings > General > Keyboard.
Add a keyboard for another language. Go to Settings > General > Keyboard >
Keyboards > Add New Keyboard.
Switch keyboards. Touch and hold or , then slide to the name of the keyboard.
You c an also tap or to switch from one keyboard to the other. Continue tapping to
access other enabled keyboards.
For information about international keyboards, see .
Change the keyboard layout. Go to Settings > General > Keyboard > Keyboards, select
a keyboard, then choose a layout.
For more information about your keyboard, see the Apple Support article
.
Search
When you search on iPad, you get results from the Internet, from media and other
content on your iPad, from iTunes and the App Store, and from your apps, like Maps and
Contacts. In Settings, you can specify which apps you want to be included in search
results.
Search with iPad. To show Searc h fro m the Home screen, sw ipe dow n fro m the center.
To show Search fro m an app, sw ipe dow n fro m the top, then sw ipe fro m the left edge of
the screen.
Hide the keyboard and see more results on the screen: Tap .
Use international keyboards
Get help with
the keyboard on your iPhone, iPad, or iPod touch
Page 24

Open a suggested app: Tap it.
Get more information about a search suggestion: Tap it, then tap one of the results to
open it.
Start a new search: Tap in the search field.
Choose which apps to include in search. Go to Settings > Siri & Search, tap an app,
then turn Search & Siri Suggestions off or on.
Turn off Suggestions in Search. Go to Settings > Siri & Search, then turn off
Suggestions in Search.
Turn off Location Services for suggestions. Go to Settings > Privacy > Location
Services. Tap System Services, then turn off Location-Based Suggestions.
Search in apps. Many apps include a search field so you can find something within the
app. For example, in the Maps app, you can search for a specific location. Tap the search
field and type your search.
Drag and drop items
With drag and drop, you can use a finger to copy items from one app to another, or move
items within an app. For example, you can drag text from Safari into an email, an image
from Photos into a note, or a calendar event into a text message. (Not all third-party apps
support drag and drop.)
Page 25

Move an item. Tou ch and hold the item until it lifts up (if itʼs t ex t, select it first), then drag
it to another location within the app. If you drag to the bottom or top of a long document,
it automatically scrolls.
Copy an item between open apps. , then touch and hold the item
until it lifts up (if itʼs text, select it first). Drag it to the other app. As you drag, appears
wherever you can drop the item. If you drag to the bottom or top of a long document, it
automatically scrolls. If you want to drag the item to a new note or email message, for
example, open the new note or email message first so you can drag the item directly to it.
Copy an item to an app on the Home screen or in the Dock. Tou ch and hold the ite m
until it lifts up (if itʼs text, select it first). While you continue to hold the item, use another
finger to click the Home button, or swipe up from the bottom to display the Dock. Drag
the item over the other app to open it (a ghost image of the item appears under your
finger as you drag). You can drag over items in the app to navigate to where you want to
drop the item (as you drag, appears wherever you can drop the item). For example,
you can drag over the notes list to open the note where you want to drop the item, or you
can use another finger to open a new note where you can drop the item.
Select multiple items to drag and drop. Tou ch and hold an item, drag it slightly, then
continue holding it while you tap additional items with another finger. A badge indicates
the number of selected items. You can then drag all of the items together.
If you change your mind. Lift your finger before dragging, or drag the item off the
screen.
Use Markup
In apps including Notes, Mail, and iBooks, you can annotate images, notes, PDFs,
screenshots, and more with built-in drawing tools. In some apps, you can also add text,
speech bubbles and other shapes, and signatures.
Mark it up. Tap , then use your finger to draw. Or on supported models, touch
Apple Pencil to the screen. (With Apple Pencil, thereʼs no need to tap .)
To mark up a screenshot right after yo u take it, tap the thumbnail that appears fo r a fe w
moments in the bottom-left corner of the screen. (To share a screenshot after you mark it
up, tap .)
Choose a markup tool. Tap th e pencil, m arker, o r pen to ol. Switch t o the er as er—or t ap
—if you make a mistake.
Open the two apps
Page 26

Move your drawings. Tap , drag around one or more drawings to make a selection, lift
your finger, then drag your selection to a new location.
Zoom in. Pinch open so you can draw the details, then pinch closed to zoom back out. To
navigate when youʼre zoomed in, drag two fingers.
Add text. Ta p , then tap Text. Tap the text box, tap Edit, then type your text. To change
the font or layout, tap . To move the text box, drag it.
Add your signature. Ta p , then tap Signature.
Add a shape. Ta p , then tap a shape. To move the shape, drag it. To resize it, drag any
blue dot.
To fill the shape with color or change the line thickness, tap . To adjust the form of a
shape that has a green dot, drag the dot. To delete or duplicate a shape, tap it then
choose an option.
Magnify a portion of the screen. Ta p , then tap Magnifier. To change the
magnification level, drag the green dot. To change the size of the magnifier, drag the blue
dot.
Charge and monitor the battery
iPad has an internal, lithium-ion rechargeable battery. Lithium-ion technology currently
provides the best performance for your device. Compared with traditional battery
technology, lithium-ion batteries are lighter, charge faster, last longer, and have a higher
power density for more battery life. To understand how your battery works so you can get
the most out of it, see the website .
Apple Lithium-ion Batteries
Page 27

WARNING: For important safety information about the battery and charging iPad, see
.
Charge the battery. The best way to charge the iPad battery is to connect iPad to a
power outlet using the included cable and USB power adapter.
The battery icon in the upper-right corner of the status bar shows the battery level or
charging status.
Important: If iPad is very low on power, it may display an image of a nearly depleted
battery, indicating that iPad needs to charge for up to 20 minutes before you can use it. If
iPad is extremely low on power, the display may be blank for up to 2 minutes before the
low-battery image appears.
Note: Connecting iPad to a power outlet can start an iCloud backup or wireless iTunes
syncing. See and .
You c an also charg e the b attery by co nnecting iPad to yo ur computer. However, iPad may
charge slowly when you connect it to a USB 2.0 port on your computer. If your Mac or PC
doesnʼt provide enough power to charge iPad, a Not Charging message appears in the
status bar.
Important: If iPad is connected to a computer thatʼs turned off, the iPad battery may
drain instead of charge. Look for next to the battery icon to make sure iPad is charging.
Show percentage of battery remaining in the status bar. Go to Settings > Battery,
then turn on Battery Percentage.
See proportion of battery used by each app. Go to Settings > Battery.
The battery usage information for each app appears after using iPad for a while—in some
cases, up to an hour, depending on the type of use.
Important safety information
Back up iPad Sync iPad
Page 28

Rechargeable batteries, like those found in iPad, have a limited number of charge cycles
and may eventually need to be replaced. The iPad battery should be replaced by Apple or
an authorized service provider. For more information, go to the
.
Find My Friends
Find My Friends is a great way to share your location with people who are important to
you. Friends and family members who share their locations with you appear on a map, so
you can quickly see where they are. You can set notifications for friends and family
members to alert you when they leave from or arrive at various locations.
Note: For more information about Find My Friends, refer to the Help in the app.
Turn on Share My Location. Go to Settings > [your name] > iCloud > Share My Location.
Share your location with a friend. Open Find Friends, then tap Add. Select a contactʼs
name, or type a name in the To field. Choose how long you want to share your location.
Share your location using AirDrop. Ta p Ad d, th en selec t a frie nd who ap pe ars in
AirDrop. Choose how long you want to share your location.
Set a notification. Select a friend, then tap Notify Me. Choose whether you want to be
notified when a friend leaves from or arrives at a location. Choose the friendʼs current
location, or tap Other to create a new location for the notification.
Tr a v e l w i t h iP a d
Some airlines let you keep your iPad turned on if you switch to airplane mode. Wi-Fi and
Bluetooth are disabled so you canʼt make or receive FaceTime calls or use features that
require wireless communication, but you can listen to music, play games, watch videos,
or use other apps that donʼt require Internet access.
Turn on airplane mode. Open Control Center, then tap .
Battery service and
recycling website
Page 29

You c an also turn airplane mode on or off in Set tings. When ai rplane mode is on,
appears in the status bar at the top of the screen.
Turn on Wi-Fi or Bluetooth while in airplane mode. If your airline allows it, you can use
Wi-Fi or Bluetooth while in airplane mode. Open Control Center, turn on airplane mode,
then tap (for Wi-Fi) or (for Bluetooth).
If you turn on Wi-Fi or Bluetooth while in airplane mode, it will be on the next time you
return to airplane mode. To turn off Wi-Fi or Bluetooth while in airplane mode, open
Control Center, then tap or .
When you travel abroad, you may be able to sign up for cellular service with a carrier in
the country youʼre visiting, right from your iPad (available on iPad models with cellular
and Touch ID). For more information, see .
Sign up for cellular service
Page 30

Make requests
Talk in g to Sir i is a qu ic k way to get th in gs done . Ask Siri to set an al arm, fi nd a
destination, book a ride or a table, or send a love note. Siri can even change the lighting
in a room with HomeKit-controlled lights. And the more you use Siri, the better it knows
what you need.
Note: To use Siri, iPad must be connected to the Inte rnet. See .
Cellular charges may apply.
Hey Siri. To summon Siri, simply say “Hey Siri,” then make your request. For example,
say “Hey Siri, howʼs the weather today?”
The onscreen response from Siri often includes information or images that you can tap to
get more info or take further action.
To turn Hey Siri on or off, go to Settings > Siri & Search > Liste n fo r “Hey Siri.”
Note: On some models, Hey Siri is recognized only when iPad is connected to a power
source.
Siri
Connect to the Internet
 Loading...