

Page 1

2-Way Active Monitor with Integrated DSP
T
S
A
T
E
E
Quick Start Owner’s Manual
(ENGLISH)
BOX CONTEN
x SPEAKER
x POWER CABLE
x RS-232 9-xPIN CABLE
CD-ROM
Manual de inicio rápido para el usuario
(ESPAÑOL)
CON NIDOS DTE E LA CAJ
x ALTAVOZ
x CABLE DE ALIMENTACIÓN
x CABLE DE LOS 9-
x CD-ROM
PERNOS RS-232
Schnellbedienungsanleitung
(DEUTSCH)
SCHACHTELINHAL
x LAUTSPRECHER
ENERGIE KABLE x
x CD-ROM
RS-232 KABELx 9-STIFTE
Manuel d’utilisation du propriétaire
(FRANÇAIS)
CONTENU DE LA BOÎT
x HAUT-PARLEUR
x CABLE D’ALIMENTATION
x CÂBLE DES
x CD-ROM
9-GOUPILLES RS-232
Manuale rapido di utilizzazione
(ITALIANO)
CONTENUTO DELLA CONFEZION
x ALTOPARLANTE
CAVO DI ALIMENTAZIONEx
CAVO DEI 9-PERNI RS-232 x
x CD-ROM
Page 2
ProLinear DSP Quick Start Guide
(ENGLISH)
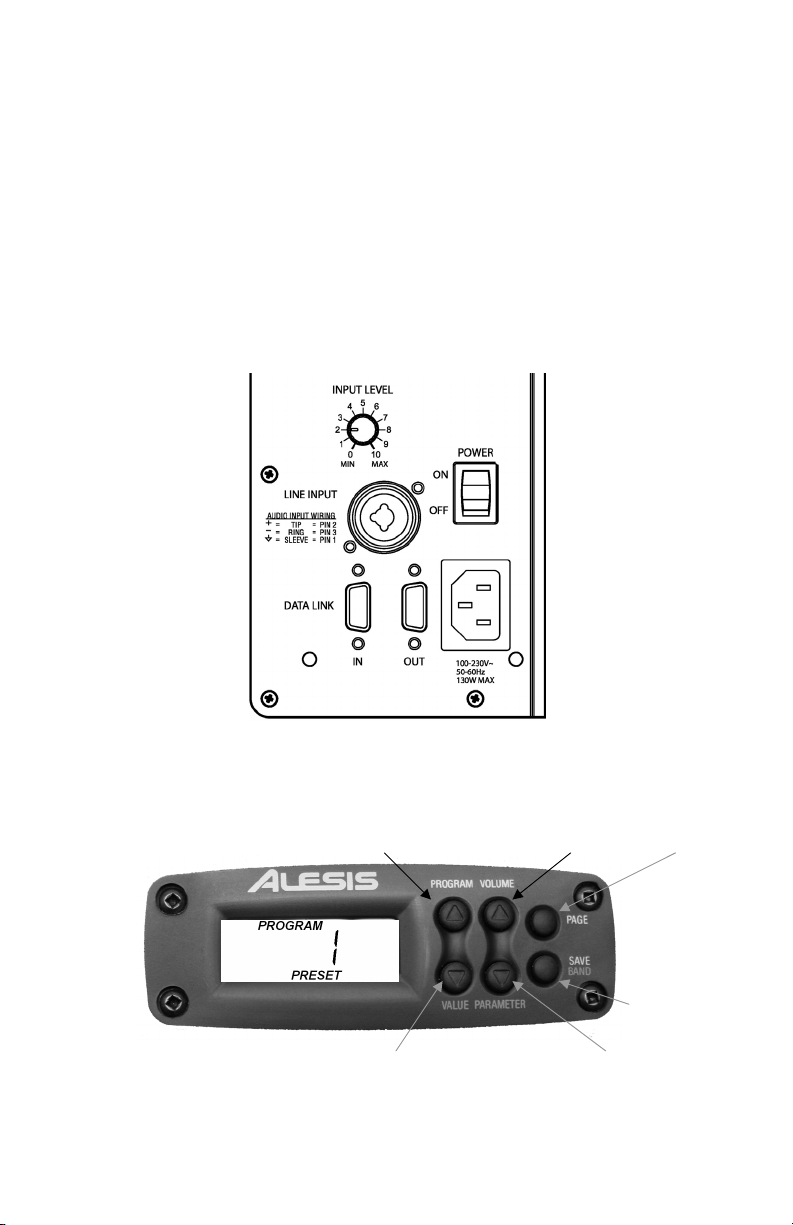
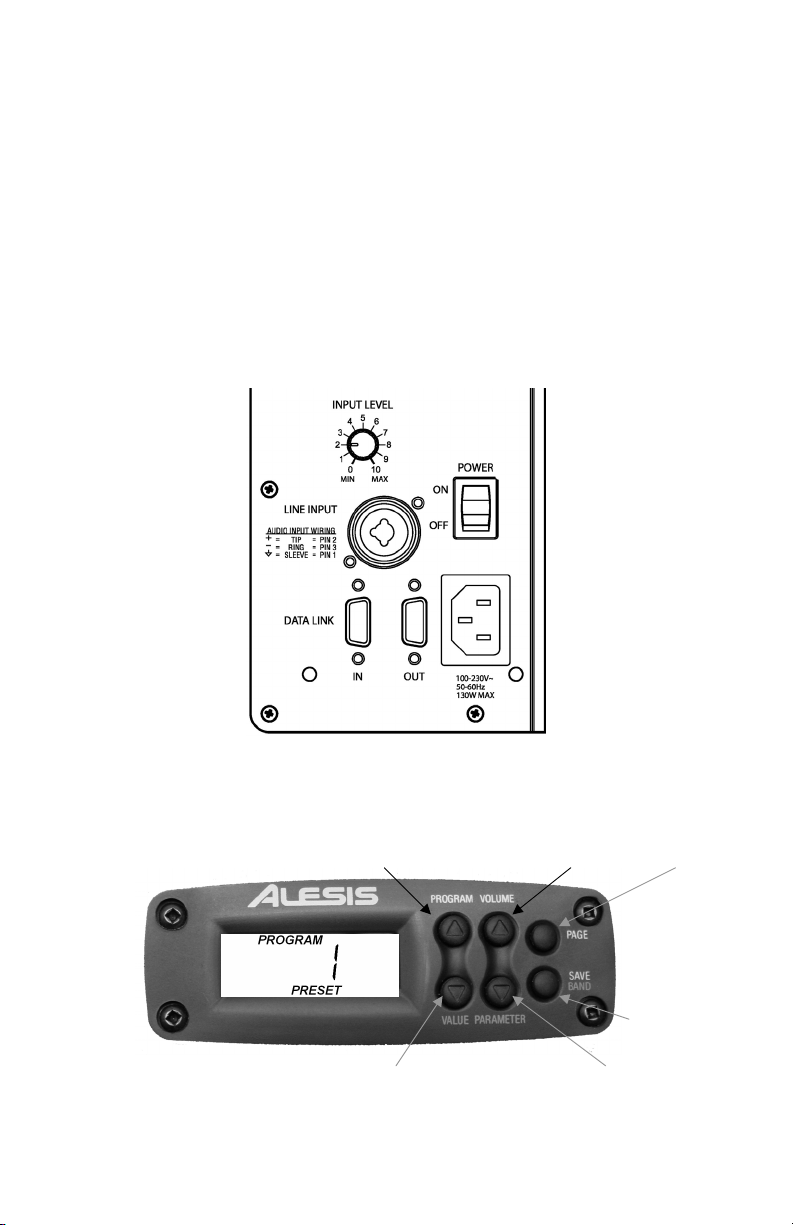
Connecting and Starting the ProLinear DSP
1. Turn the rear panel Input Level control to the Minimum position.
2. Connect the power cable to the speaker.
3. Connect the audio source’s output to the speaker with a TRS or XLR connector.
4. Turn on the audio source.
5. Turn on the ProLinear DSP.
6. After about five seconds, the front LCD panel will flash
7. The speaker will enter Program mode (see the Front Panel picture).
8. With the audio source material playing, gradually turn up the Input Level control until the speaker is
playing the audio material at a comfortable level.
dSP
, followed by the software version number.
ProLinear DSP Rear Panel
The Front Panel
The ProLinear DSP front panel has a display and six buttons for operating the speaker.
The primary functions of the buttons are labeled in white. Edit mode functions (Value, Parameter and Band)
are labeled in blue.
PROGRAM / VALUE Up
PROGRAM / VALUE Down
VOLUME / PARAMETER Up
SAVE / BAND
VOLUME / PARAMETER Down
PAGE
Page 3
Selecting a Program
Within Program mode, you can use the PROG buttons to select any one of the sixteen Programs:
PROGRAM Up
PROGRAM Down
PRESET
1. Flat 1. Warmth
2. Hi Fi (Smile) 2. Bass Boost
3. White Cone 3. Bass Cut
4. Faux Finnish 4. Treble Boost
5. Studio Cube 5. Treble Cut
6. Boom Box 6. AM Radio
7. BBC Dip 7. Narrow
8. 80 Hz High Pass 8. Portable Radio
USER
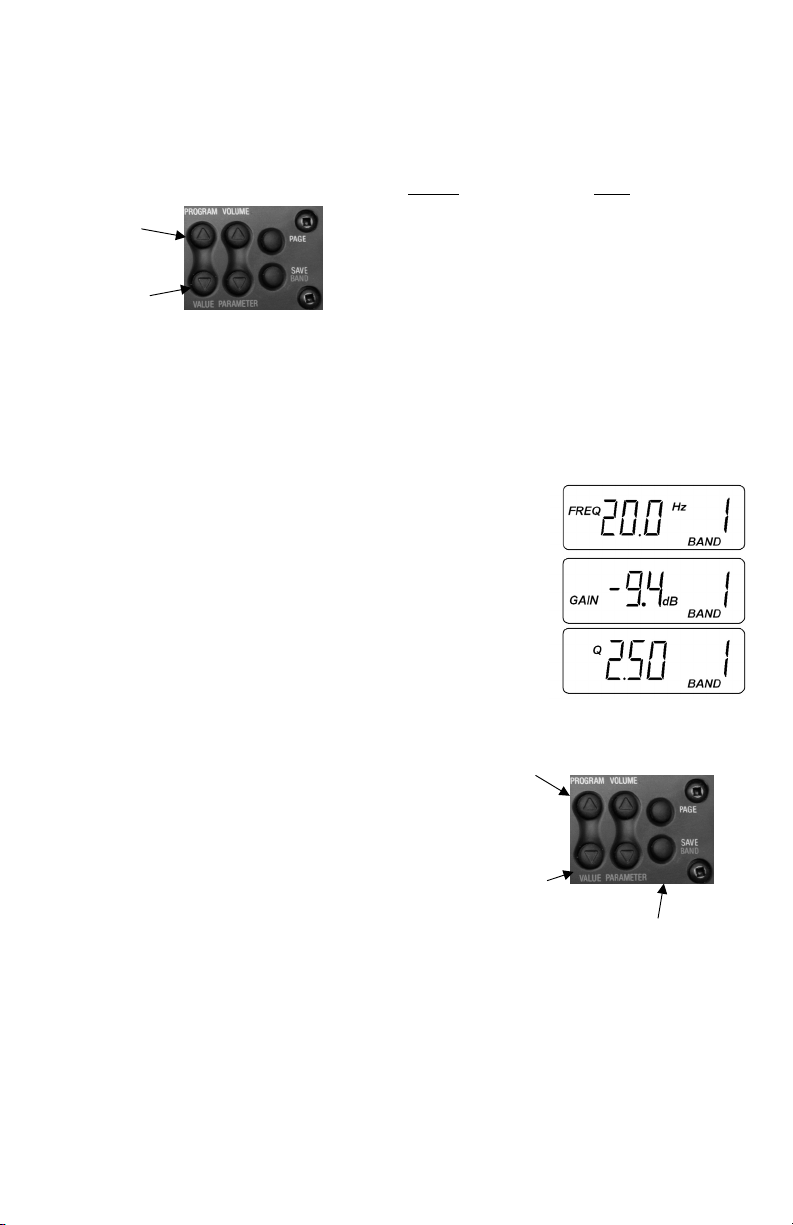
Editing a Program
When creating an equalization curve for the first time, you may want to begin with Program Preset 1 “Flat.” It
has no equalization applied.
Within each Program is a four-band parametric equalizer. There are three parameters for each Band:
x Frequency – The center frequency of the equalizer Band
x Gain – The amount of boost or cut applied to the equalizer Band
x Q – The width of the frequency range controlled by the Band
The three Edit
mode screens
To edit a Program:
1. Push the PAGE button once to enter Edit mode.
2. Use the PARAMETER buttons to select a parameter to edit.
3. Use the VALUE buttons to change the value of the parameter.
4. Repeat steps 2 and 3 for all three parameters for that Band.
5. When you are done editing that Band, press the BAND button to
select another Band to edit.
6. Repeat steps 2 through 5 for each Band.
7. If you want to save your edited Program, see Saving a Program
below.
8. If you do not want to save your edited Program, press the PAGE
button to return to Program mode and select another Program.
Saving a Program
There are eight User Program locations available for saving your edited
Programs. To do this:
1. Press the SAVE button once. The LCD will begin to blink.
2. Use the PROG buttons to select the User Program location for the
edited Program.
3. Press the SAVE button. The word SAVED will light for about two
seconds to let you know that the settings were saved.
PROGRAM Up
PROGRAM Down
SAVE
Page 4
ProLinear DSP Guía de inicio rápido
(ESPAÑOL)
Conectando y encendiendo el ProLinear DSP
1. Gire el control de nivel de entrada del panel trasero a la posición Mínima.
2. Conecte el cable de alimentación al bafle.
3. Conecte la salida de la fuente de audio al bafle con un conector TRS o XLR.
4. Encienda la fuente de audio.
5. Encienda el ProLinear DSP.
6. Después de unos cinco segundos, en el panel LCD frontal se visualizará “
número de versión del software.
7. El bafle comenzará en el modo Program (Programa) (vea la foto del panel frontal).
8. Mientras suena el material de la fuente de audio, suba el control de nivel de entrada gradualmente
hasta que el bafle haga sonar el material de audio a un nivel agradable.
dSP
”, seguido por el
Panel trasero del ProLinear DSP
El panel frontal
El panel frontal del ProLinear DSP tiene una pantalla y seis botones para operar el bafle.
Las funciones principales de los botones están marcadas con una etiqueta blanca. Las funciones del modo
Editar (Valor, Parámetro y Banda) están marcadas con una etiqueta azul.
PROGRAM / VALUE Up
PROGRAM / VALUE Down
VOLUME / PARAMETER Up
SAVE / BAND
VOLUME / PARAMETER Down
PAGE
Page 5

Seleccionando un programa
En el modo Programa, usted puede utilizar los botones PROG para seleccionar cualquiera de los dieciséis
programas:
USUARIO
PROGRAM Up
PROGRAM Down
PREDETERMINADO
1. Flat 1. Calidez (Warmth)
2. Alta fidelidad (Smile) 2. Refuerzo de graves
3. White Cone 3. Atenuación de graves
4. Faux Finnish 4. Refuerzo de agudos
5. Studio Cube 5. Atenuación de agudos
6. Boom Box 6. Radio AM
7. BBC Dip 7. Estrecha (Banda)
8. Paso alto de 80 Hz 8. Radio portátil
Editando un programa
Cuando cree una curva de ecualización por primera vez, será recomendable que comience con el programa
predeterminado 1 “Flat”. No se le ha aplicado ecualización.
Dentro de cada programa hay un ecualizador paramétrico de cuatro bandas. Existen tres parámetros para
cada banda:
x Frecuencia – La frecuencia central de la banda del ecualizador
x Ganancia – La cantidad de refuerzo o atenuación aplicados a la banda
del ecualizador
x Q – La anchura del rango de frecuencia que controla la banda
Para editar un programa:
1. Pulse el botón PAGE (PÁGINA) una vez para entrar en modo
Editar.
2. Use los botones PARAMETER (PARÁMETRO) para seleccionar
un parámetro que desee editar.
3. Utilice los botones VALUE (VALOR) para cambiar el valor del
parámetro.
4. Repita los pasos 2 y 3 para los tres parámetros de esa banda.
5. Cuando termine de editar dicha banda, pulse el botón BAND
(BANDA) si desea seleccionar otra banda para editar.
6. Repita los pasos 2 - 5 para cada banda.
7. Si desea guardar su programa editado, consulte la sección
“Guardando un programa” incluida aquí abajo.
8. Si no desea guardar su programa editado, pulse el botón PAGE
(PÁGINA) para volver al modo Programa y seleccione otro
programa.
The three Edit
mode screens
Guardando un programa
Existen ocho ubicaciones de programas de usuario disponibles para guardar
los programas que usted ha editado. Para hacer esto:
1. Pulse el botón SAVE (GUARDAR) una vez. El indicador LCD
comenzará a parpadear.
2. Utilice los botones PROG para seleccionar la ubicación de Programa
de usuario para el programa que ha editado.
3. Pulse el botón SAVE (GUARDAR). La palabra SAVED (GUARDAR)
se iluminará por unos dos segundos para confirmarle que
las selecciones han sido guardadas.
PROGRAM Down
PROGRAM Up
SAVE
Page 6

ProLinear DSP Schnellaufbauanleitung
(DEUTSCH)
Anschluß und Inbetriebnahme des ProLinear DSP
1. Stellen Sie den Eingangspegelregler an der hinteren Seite des Gerätes auf die minimalste Position.
2. Schliessen Sie das Audiokabel an den Lautsprecher an.
3. Schliessen Sie den Ausgang der Audioquelle an den Lautsprecher mit einem TRS- oder XLR-Stecker
an.
4. Schalten Sie die Audioquelle ein.
5. Schalten Sie den ProLinear DSP ein.
6. Nach etwa fünf Sekunden blinkt in der LCD-Anzeige an der Vorderseite des Gerätes
von der Nummer der Softwareversion.
7. Der Lautsprecher geht nun in den Programmodus über (betrachten Sie das Bild der Vorderseite)
8. Mit der Audioquelle nun im Spielbetrieb, drehen Sie den Eingabepegelregler langsam auf, bis der
Lautsprecher das Material der Audioquelle in einem angenehmen Pegel wiedergibt.
ProLinear DSP Rückseite
Die Vorderseite
Die Vorderseite des ProLinear DSP hat eine Anzeige und sechs Bedienelemente zur Kontrolle des
Lautsprechers.
Die erstrangigen Funktionen der Bedienelemente sind in weiß beschriftet. Editiermodusfunktionen (Wert,
Parameter und Band) sind in blau beschriftet.
PROGRAM / VALUE Up
VOLUME / PARAMETER Up
dSP
auf, gefolgt
PAGE
PROGRAM / VALUE Down
SAVE / BAND
VOLUME / PARAMETER Down
Page 7

Auswahl eines Programmes
Im Programmodus können Sie die PROG-Bedienelemente zur Auswahl jedes der 16 Programme benutzen:
USER
PROGRAM Up
PROGRAM Down
VOREINGESTELLT
1. Flach 1. Warmth
2. Hi Fi (Smile) 2. Bass Boost
3. White Cone 3. Bass Cut
4. Faux Finnish 4. Treble Boost
5. Studio Cube 5. Treble Cut
6. Boom Box 6. AM Radio
7. BBC Dip 7. Narrow
8. 80 Hz High Pass 8. Portable Radio
Veränderung eines Programms
Falls Sie eine Abgleichkurve zum ersten Mal einstellen, fangen Sie am besten mit dem voreingestellten
Programm 1 “Flat” an. Dort findet kein Abgleich statt.
In jedem Programm befindet sich ein parametrischer Vier-Band-Abgleich. Für jedes Band gibt es drei
Parameter:
x Frequenz – die Mittelfrequenz des Abgleichbands
x Gain – die Verstärkung oder Herunternahme welche dem Band zugeführt wird
x Q – die Breite des Frequenzbereichs welche das Band steuert
Um ein Programm zu verändern:
1. Drücken Sie den PAGE-Knopf einmal, um in den Editiermodus zu
gelangen.
2. Verwenden Sie die PARAMETER-Knöpfe, um ein zu veränderndes
Parameter zu wählen.
3. Benutzen Sie die VALUE-Knöpfe um den Wert des Parameters zu
verändern.
4. Wiederholen Sie die Schritte 2 und 3 für alle drei Parameter des
Bandes.
5. Wenn Sie mit dem Editieren dieses Bandes fertig sind, drücken Sie
den BAND-Knopf, um ein anderes Band zum Editieren
auszuwählen.
6. Wiederholen Sie die Schritte 2 bis 5 für jedes Band.
7. Falls Sie Ihr verändertes Programm abspeichern wollen, lesen Sie
bitte im untenstehenden Abschnitt Speichern eines Programms
nach.
8. Falls Sie Ihr editiertes Programm nicht abspeichern möchten,
drücken Sie den PAGE-Knopf um zum Programmodus
zurückzukehren und wählen Sie ien anderes Programm aus.
The three Edit
mode screens
Speichern eines Programms
Es stehen acht Speicherplätze für User-Programme zur Verfügung, um Ihre
editierten Programme abzuspeichern. Um dies zu tun, müssen Sie:
1. Den SAVE-Knopf einmal drücken. Die LCD-Anzeige fängt
an zu blinken.
2. Die PROG-Knöpfe benutzen, um den Speicherplatz für das editierte
Programm auszuwählen.
3. Den SAVE-Knopf drücken. Das Wort SAVED leuchtet für etwa zwei
Sekunden aufleuchten, um Ihnen mitzuteilen, daß die
Einstellungen gespeichert wurden.
PROGRAM Up
PROGRAM Down
SAVE
Page 8

Guide d'utilisation rapide pour le ProLinear DSP
(FRANÇAIS)
Installation du ProLinear DSP
1. Ajustez le niveau du son au minimum.
2. Branchez le cbble d'alimentation ` l'enceinte.
3. Branchez la sortie de la source sonore ` l'enceinte avec un connecteur TRS ou XLR.
4. Mettre sous tension la source audio.
5. Mettre sous tension le ProLinear DSP.
6. Aprhs environ cinq secondes, sur le panneau ` cristaux liquides avant, les lettres
suivies de la version du logiciel.
7. L'enceinte entrera en mode " Program " (voir le diagram du panneau avant).
8. Enclenchez la lecture sur une source sonore et augmentez progressivement le volume.
dSP
clignoteront,
Panneau arrihre du ProLinear DSP
Panneau avant
Le panneau avant du ProLinear DSP dispose d'un afficheur et de six touches pour le fonctionnement de
l'enceinte.
Les fonctions de chaque touche sont indiquies en blanc. Les fonctions du mode Edit (Value [Valeur],
Parameter [Paramhtre] et Band [friquence]) sont indiquies en bleu.
PROGRAM / VALUE Up
PROGRAM / VALUE Down
VOLUME / PARAMETER Up
SAVE / BAND
VOLUME / PARAMETER Down
PAGE
Page 9

Silectionner un programme
En mode Program vous pouvez utiliser les touches PROG pour silectionner un des seize programmes:
PROGRAM Up
PROGRAM Down
PRESET (Pririglage)
1. Flat 1. Chaleur (Warmth)
2. Hi Fi (Smile) 2. Bass boost (amplification)
3. White Cone 3. Bass Cut (coupure)
4. Faux Finnish 4. Amplification des aigus
5. Studio Cube 5. Coupure des aigus
6. Boom Box 6. Radio AM
7. BBC Dip 7. Narrow (Bande itroite)
8. Passe-haut 80 Hz 8. Radio Portable
USER (utilisateur)
Modifier un Programme
Lorsque vous criez une courbe d'igalisation pour la premihre fois, il est recommandi de commencer avec le
programme pririgli (Program Preset) numiro 1 " Flat ". Aucune igalisation n'est appliquie.
Parmi chaque programme il y a un igaliseur paramitrique quatre bandes. Il y a trois paramhtres pour chaque
bande :
x Friquence – La friquence centrale de la bande de l'igaliseur
x Gain – La quantiti de renforcement ou de coupure appliquie ` la bande de
l'igaliseur
x Q – La largeur de la bande de friquence commandie par l'igaliseur
The three Edit
mode screens
Pour modifier un programme (Program):
1. Appuyez sur la touche PAGE une fois pour entrer en mode
modification (Edit).
2. Appuyez sur la touche PARAMETER pour silectionner un
paramhtre ` modifier.
3. Utilisez la touche VALUE pour modifier la valeur d'un paramhtre.
4. Ripitez les itapes 2 et 3 pour les trois paramhtres pour cette
bande.
5. Lorsque vous avez termini les modifications pour cette bande,
appuyez sur la touche BAND pour silectionner une autre bande `
modifier.
6. Ripitez les itapes 2 ` 5 pour chacune des bandes.
7. Si vous disirez sauvegarder les modifications apporties au
programme, voir la section " Sauvegarder un programme ".
8. Si vous ne disirez pas sauvegarder les modifications apporties au
programme, appuyez sur la touche PAGE pour retourner en mode
Program et silectionner un autre programme.
Sauvegarder un programme
Il y a huit emplacements pour sauvegarder les programmes modifiis. Pour
sauvegarder les modifications apporties ` un programme :
1. Appuyez une fois sur la touche SAVE. L'afficheur va commencer `
clignoter.
2. Utiliser les touches PROG pour silectionner un des emplacements
pour enregistrer le programme modifii.
3. Appuyez sur la touche SAVE. Le mot SAVED apparantra pendant
deux secondes pour vous signaler que les riglages ont iti
sauvegardis.
PROGRAM Up
PROGRAM Down
SAVE
Page 10

Manuale Rapido di Utilizzazione ProLinear DSP
(ITALIANO)
Connessione ed Avviamento del ProLinear DSP
1. Impostare il comando del Livello degli Ingressi sul pannello posteriore sulla posizione di minimo
(Minimum).
2. Collegare il cavo dell’alimentazione allo speaker.
3. Collegare l’uscita della sorgente audio allo speaker con un connettore TRS o XLR.
4. Accendere la sorgente audio.
5. Accendere il ProLinear DSP.
6. Dopo circa cinque secondi, sul pannello anteriore LCD lampeggerà la scritta DSP, seguita dal
numero di versione del software.
7. Lo speaker entrerà in modalità Program (come illustrato nell’immagine‘Il Pannello Anteriore’).
8. Con la sorgente audio attivata, alzare gradualmente il comando del Livello degli Ingressi fino a
quando lo speaker raggiungerà un livello confortevole di suono del materiale audio.
Pannello Posteriore ProLinear DSP
Il Pannello Anteriore
Il pannello anteriore del ProLinear DSP presenta un display e sei tasti per azionare lo speaker.
Le funzioni primarie dei tasti sono etichettate in bianco. Le funzioni in modalità Edit (Valore, Parametro e
Banda) sono etichettate in blu.
PROGRAM / VALUE Up
VOLUME / PARAMETER Up
PAGE
PROGRAM / VALUE Down
SAVE / BAND
VOLUME / PARAMETER Down
Page 11

Selezionare un Programma
In modalità Program, è possibile utilizzare i tasti PROG per selezionare uno dei sedici Programmi:
PROGRAM Up
PROGRAM Down
PREIMPOSTATO
1. Flat 1. Warmth
2. Hi Fi (Smile) 2. Amplificazione Bassi
3. White Cone 3. Taglio Bassi
4. Faux Finnish 4. Amplificazione Acuti
5. Studio Cube 5. Taglio Acuti
6. Boom Box 6. AM Radio
7. BBC Dip 7. Narrow
8. 80 Hz High Pass 8. Portable Radio
UTENTE
Editare un Programma
Al momento di creare una curva di equalizzazione per la prima volta, potreste iniziare con il Programma
Preimpostato n. 1 “Flat”. Ad esso non è applicata equalizzazione.
Per ciascun Programma è predisposto un equalizzatore parametrico a quattro bande. Ogni Banda è
caratterizzata da tre parametri:
x Frequenza – Frequenza centrale della Banda dell’equalizzatore
x Guadagno (Gain) – La quantità di aumento o di diminuzione applicata alla
Banda dell’equalizzatore
x Q – Ampiezza della gamma di frequenza controllata dalla Banda
Editare un Programma:
1. Push the PAGE button once to enter Edit mode.
2. Utilizzare i tasti PARAMETER per selezionare un parametro da
editare.
3. Utilizzare i tasti VALUE per cambiare il valore del parametro.
4. Ripetere le fasi 2 e 3 per i tre parametri della Banda.
5. Una volta terminata l’operazione per quella Banda, premere il tasto
BAND per selezionare un’altra Banda da editare.
6. Ripetere le fasi da 2 a 5 per ciascuna Banda.
7. Per salvare il Programma editato, vedi la successiva procedura
Salvare un Programma.
8. Nel caso in cui non desideriate salvare il Programma editato,
premere il tasto PAGE per ritornare in modalità Program e
selezionare un altro Programma.
The three Edit
mode screens
Salvare un Programma
Per il salvataggio dei Programmi da voi editati sono a vostra disposizione
otto canali Programma Utente (User Program):
1. Premere il tasto SAVE. Il display LCD inizierà a lampeggiare.
2. Utilizzare i tasti PROG per selezionare il canale Programma Utente
per il Programma editato.
3. Premere il tasto SAVE. La parola SAVED si accenderà per circa due
secondi a indicare il salvataggio delle impostazioni.
PROGRAM Up
PROGRAM Down
SAVE
Page 12

7-51-0142-A
 Loading...