

Page 1

User Guide
English ( 2 – 6 )
Guía del usuario
Español ( 7 – 11 )
Guide d’utilisation
Français ( 12 – 16 )
Guida per l’uso
Italiano ( 17 – 21 )
Benutzerhandbuch
Deutsch ( 22 – 26 )
Appendix
English ( 27 )
Page 2
2
User Guide (English)
Introduction
Box Contents
PA80 Powered Mixer
(2) 10” Passive Speakers
(2) Speaker Cables
User Guide
Safety & Warranty Manual
Support
For the latest information about this product (system requirements, compatibility information, etc.) and product
registration, visit alesis.com.
For additional product support, visit alesis.com/support.
Stand-Mounting
• Always install speakers in accordance with applicable electrical and building codes.
• Install the speaker according to its maximum weight.
• Do not mount multiple speakers on the same stand or pole.
• Always verify that the stand or pole is on a flat, level, and stable surface. Also, fully extend the legs of tripod-
style stands, and ensure its legs do not present a trip hazard.
• Inspect the stand (or pole and associated hardware) before each use and do not use equipment with worn,
damaged, or missing parts.
• Always be cautious in windy, outdoor conditions. You may need to place additional weight (e.g., sandbags) on
stand's base to improve stability. Do not attach banners or similar items to any part of a speaker system. Such
attachments could act as a sail and topple the system.
• Unless you are confident that you can handle the speaker's weight, ask another person to help you lift it onto
the stand or pole.
• Make sure your cables are out of the way of performers, production crew, and audience so they will not trip
over them, pulling the speaker off the stand or pole.
Sound Level
Permanent hearing loss may be caused by exposure to extremely high noise levels. The U.S. Occupational Safety
and Health Administration (OSHA) has specified permissible exposures to certain noise levels. According to OSHA,
exposure to high sound pressure levels (SPL) in excess of these limits may result in hearing loss. When using
equipment capable of generating high SPL, use hearing protection while such equipment is under operation.
Hours per day SPL (dB) Example
8 90 Small gig
6 92 Train
4 95 Subway train
3 97 High level desktop monitors
2 100 Classical music concert
1.5 102 Riveting machine
1 105 Machine factory
0.50 110 Airport
0.25 or less 115 Rock concert
Page 3

3
Setup
Important: Connect cables with all equipment powered off, and ensure that all volume controls are turned
down.
To setup the mixer and speakers:
1. Position the mixer in the middle of the speakers, with enough distance between the speakers for
maximum stereo separation.
2. Plug the speaker cables into the left and right Speaker Outputs on the back of the mixer.
3. Set all channel Level knobs to their minimum positions, set the Master Level knob to zero, and set
EQs flat.
4. Connect your mic or instrument to the channel.
5. Set the Master Level knob to no more than 70%.
6. Connect the mixer’s power cable to a power outlet, and set the power switch to On.
7. Adjust the channel Level knob to reach the desired level without distortion.
To set up a mic or instrument on another channel, repeat Steps 4–7.
Installation Tips
• Place the speakers in a position that allows for unobstructed sound projection. In many instances, it is
beneficial to place speakers on tripod stands at a suitable height in order to achieve maximum
dispersion and reach.
• Avoid pointing the microphone directly at the speaker. This can cause feedback or damage speaker
components as well as your hearing.
Cleaning
When necessary, use compressed air or a dry cloth to keep the mixer clean and dust-free. Do not use any
solvents such as benzol or alcohol.
Connection Diagram
Items not listed in
Introduction > Box Contents are sold separately.
Guitar
Drum Machine
Microphone
USB Flash Drive
Power
Passive Speakers (included)
Page 4
4
Features
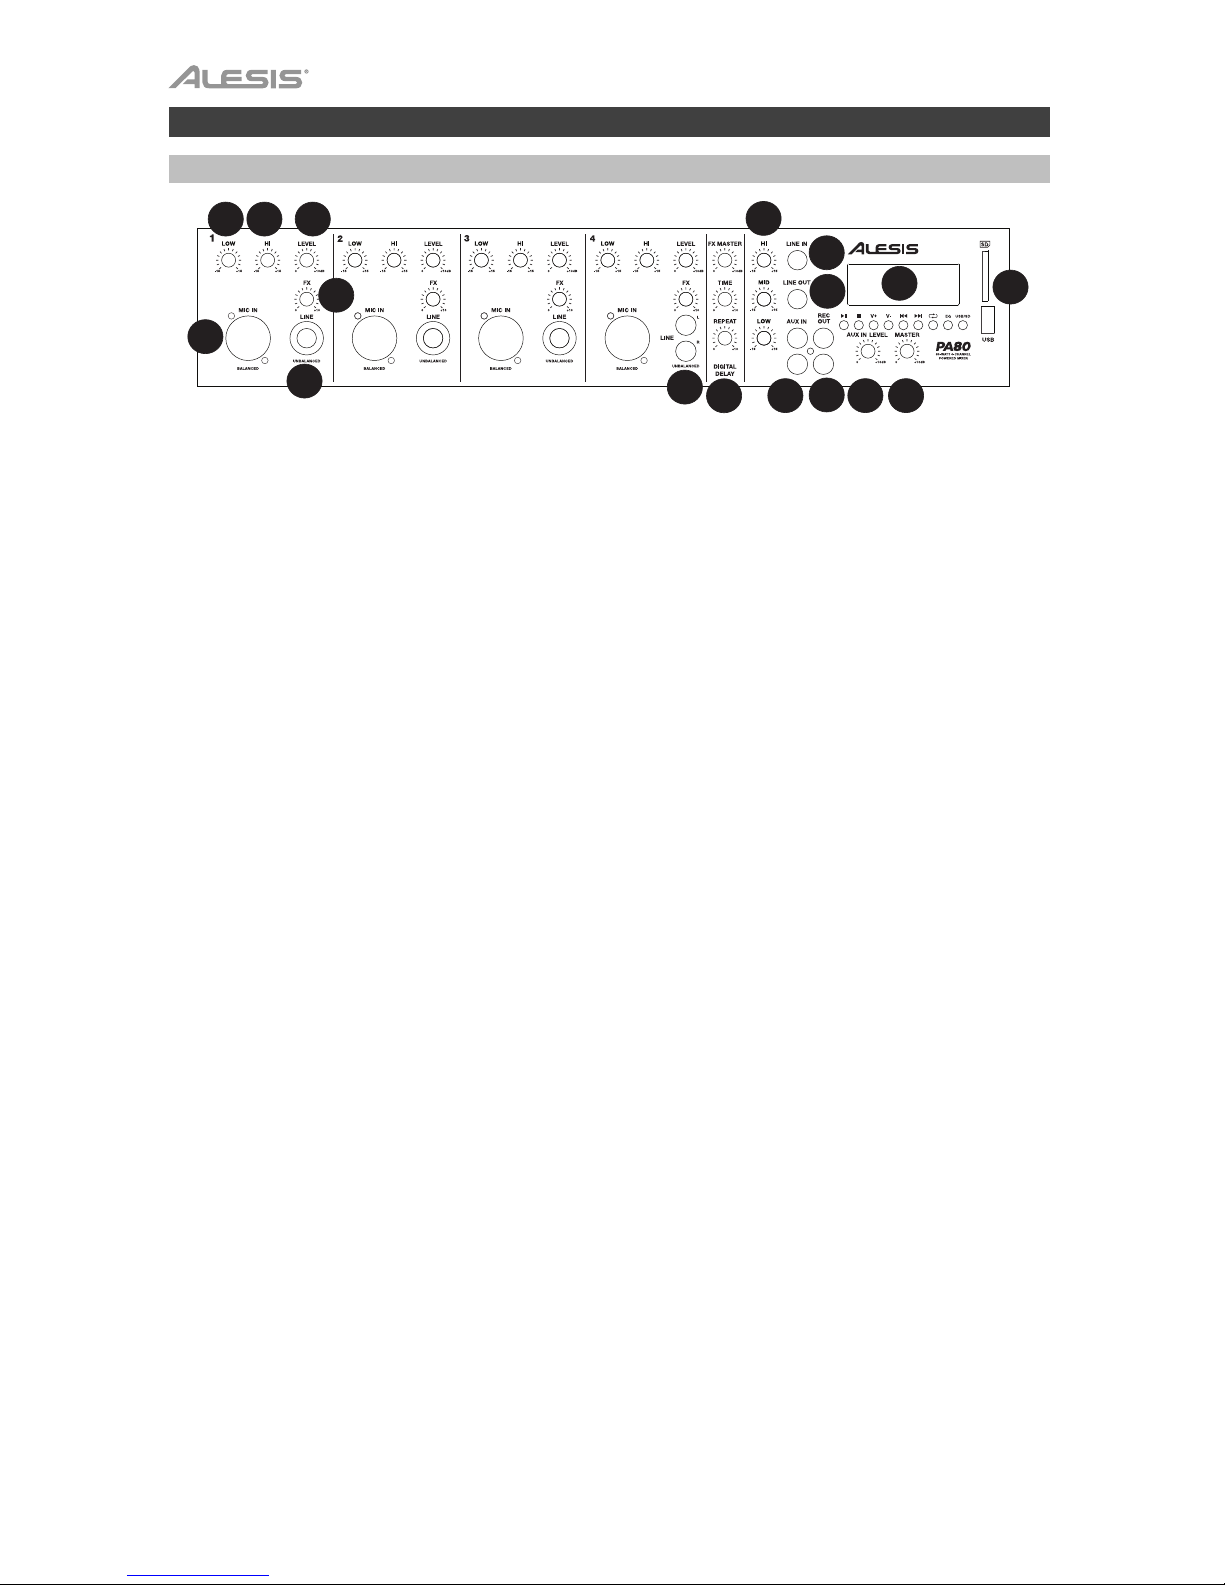
Mixer, Front Panel
1. Low: Adjust this knob to increase or decrease the low (bass) frequencies of the channel.
2. Hi: Adjust this knob to increase or decrease the high (treble) frequencies of the channel.
3. Level: Adjust this knob to increase or decrease the channel volume.
4. Mic Input (Balanced): Connect a dynamic microphone here using a standard XLR cable.
5. Channel Line Input (Unbalanced): Connect a guitar, synthesizer, drum machine, CD player, or other
line-level device here using a standard 1/4” TS cable.
6. FX Control: Adjust this knob to control the signal level which will be sent to the built-in digital delay.
7. RCA Line Input: Connect an external device to this input using standard RCA cables. This can be
used to connect to a CD player, computer, tablet, smartphone, etc. As most mobile devices are
equipped with stereo 1/8" (3.5mm) audio outputs, you will likely need a stereo 1/8"-to-RCA adapter
cable (sold separately).
8. 3-Band EQ: The signal from all input channels will go through this 3-band equalizer and then to the
Speaker Output. There are three knobs that control the EQ:
• Hi: Adjusts the high-frequency range of the sound.
• Mid: Adjusts the mid-range of the sound.
• Low: Adjusts the low-frequency range of the sound.
9. Digital Delay: The signal from all input channels is sent to the built-in digital delay and then sent to the
Speaker Output. There are three knobs to control the digital delay:
• FX Master: Adjusts the balance of the "wet" and "dry" signal.
• Time: Adjusts the time interval of the delay. Turn this knob to the right to increase the time
interval between two delays.
• Repeat: Adjusts how long the delay sustains. Turn this knob to the right to make the delay
repeat for longer.
10. Line Input: Connect a line-level device to this unbalanced 1/4" (6.35mm) mono input using a standard
1/4" TS cable. Please turn your device’s volume down before connecting to this input.
11. Line Output: Connect a line-level device to this unbalanced 1/4" (6.35mm) mono output using a
standard 1/4” TS cable. The Line Output signal will mirror the Speaker Output signal.
12. Aux In: Connect an external device to this input using a standard RCA cable. The signal will be sent
directly to the Speaker Output.
13. Record Out: Connect this output to a tape deck, computer soundcard, or a portable recorder. This
signal mirrors the Speaker Outputs.
14.
Aux In Level: Adjust this knob to control the signal level of the Aux In.
15. Master Level Control: Adjust this knob to control the signal level that is sent to the Speaker Output.
16. USB Port & SD Card Slot: Connect your USB flash drive or SD card to play MP3 music files.
17. USB/SD Digital Player: Use these controls to play MP3 music files on your connected USB flash
drive or SD card. See Mixer, USB/SD Digital Player to learn more.
1 2 3
4
5
6
7
8
9
10
10
11
11
12
12
13
13
141415
15
16
16
17
17
Page 5

5
Mixer, USB/SD Digital Player
Important: To use the controls described below, you must have a USB flash drive connected to the USB
port or an SD card connected to the SD card slot.
To access an inserted SD card or USB flash drive:
1. Hold the Mode button for 2 seconds to turn the display on (if it is not already).
2. Press and release the Mode button to select the SD card or USB flash drive.
3. Use the Previous Track and Next Track buttons to scroll through files and press Play to hear the file.
4. Use the V+ and V- buttons to adjust the volume of the source.
1. Play/Pause: Plays or pauses the track.
2. Stop: Stops playback of the track.
3. V+: Press and hold this button to increase the
track volume.
4. V-: Press and hold this button to decrease the
track volume.
5. Previous Track: Selects the previous track.
6. Next Track: Selects the next track.
7. Repeat: Press this button to cycle through the
Repeat Mode options: Random, Single, All.
8. EQ: Press this button to cycle through the digital
equalization presets that you can apply to the
track: Pop, Rock, Jazz, Classic, Normal.
(Equalization is applied only to MP3 file
playback on a connected USB flash drive or SD
card, not to other audio sources or inputs.).
9. Mode: Selects the media source: a USB flash drive or an SD card.
10. Mode (display): Shows the currently selected media source: a USB flash drive or an SD card.
11. Play Time (display): Shows the current time of the current track.
12. Repeat (display): The Repeat symbol appears when a track has been set to repeat: Random (plays
random tracks), Single (repeats a single track), or All (plays through all tracks from the source).
13. EQ (display): Shows the current EQ preset.
14. Play/Pause/Stop (display): These symbols (►, II, ) appear when a track is being played, paused, or
stopped.
15. Number (display): Shows the current track number playing.
16. Name (display): Shows the name of the file being played.
1 2 3 4 5 6 7 8 9
1111121213
13
10
10
14
14
15
15
16
16
U: 00:50
Single Pop
100: Track Name.mp3
Page 6
6
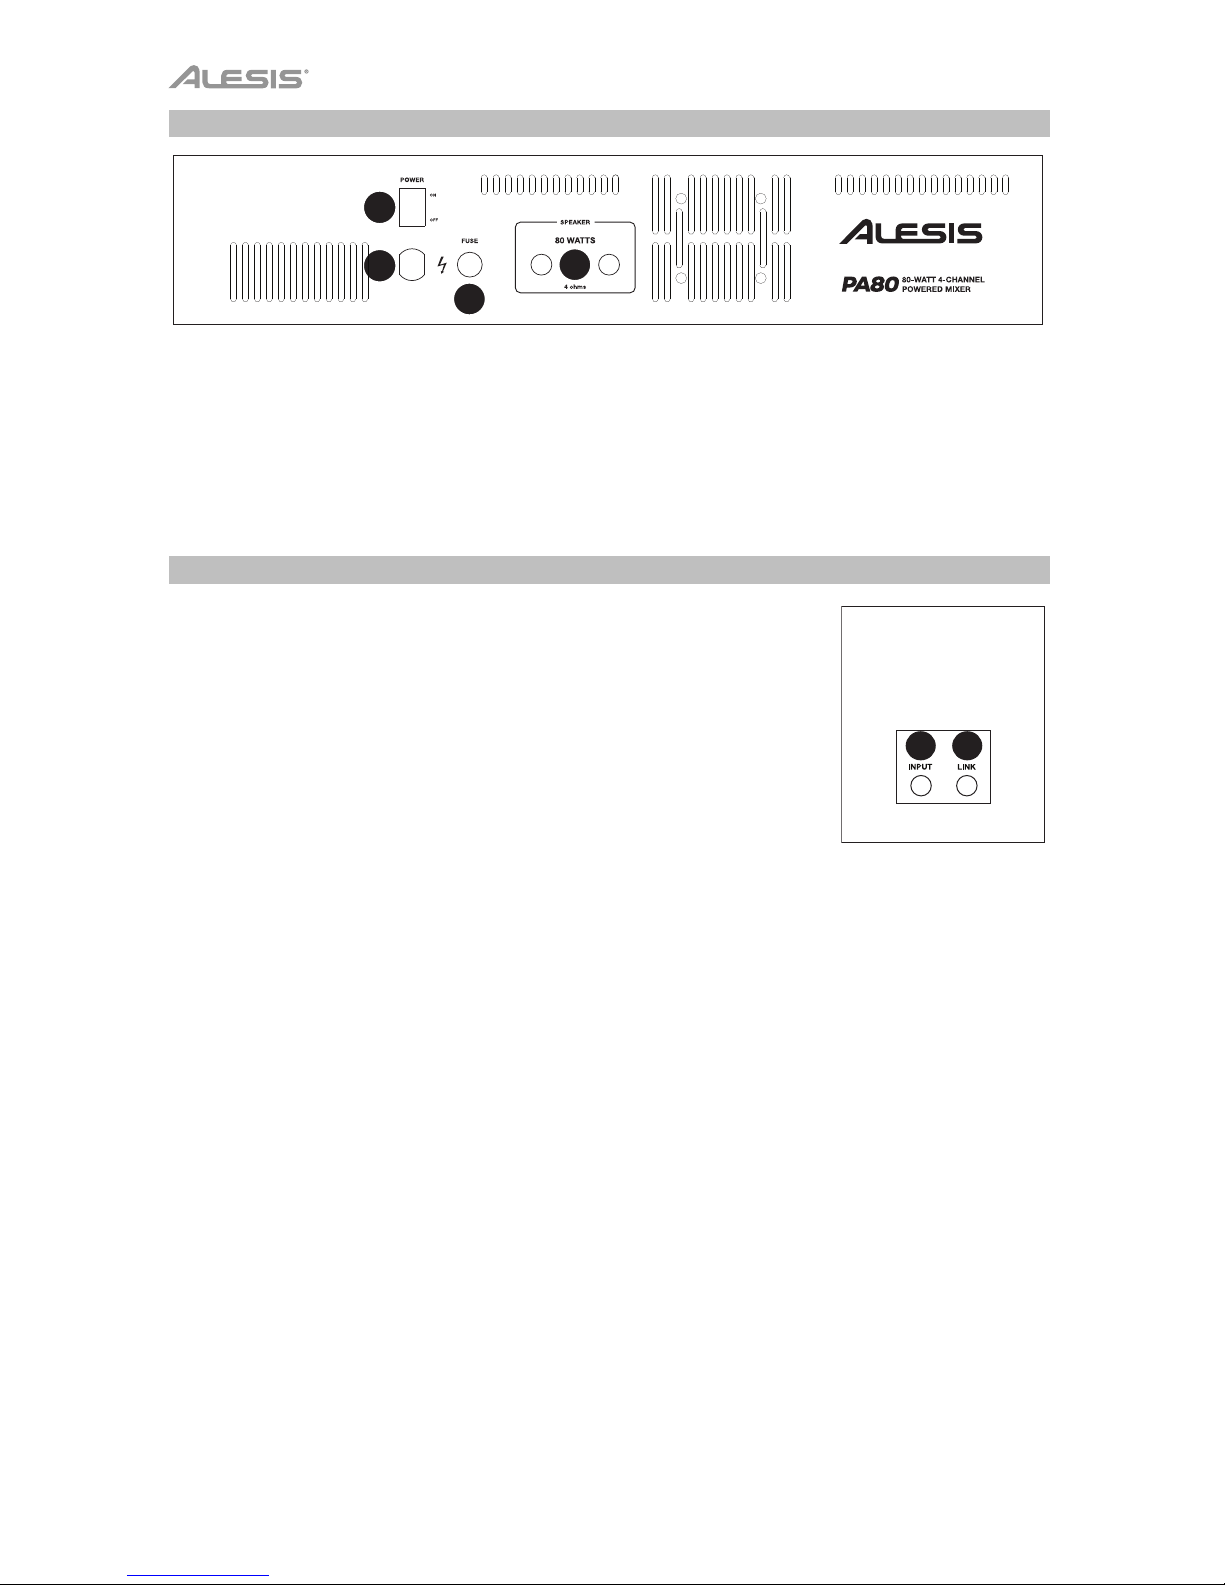
Mixer, Rear Panel
1. Power Switch: Use this switch to power the mixer on/off.
2. Power Connector: The integrated power cord is located here.
3. Fuse Holder: The fuse should only be changed by a qualified technician. If the fuse continues to blow
after replacing, discontinue use of this mixer until it is repaired.
4. Speaker Output: Connect the two included non-powered (passive) speakers to these outputs. If using
4 speakers at the same time, use 8–16 Ω speakers. When using only one speaker, use a 4–8 Ω
speaker.
Speaker, Rear Panel
1. Input: Connect the Speaker Output of the mixer here.
2. Link: Connect this output to the input of another 8–16 Ω passive
speaker.
1 2
1
2
3
4
Page 7

7
Guía del usuario (Español)
Introducción
Contenido de la caja
Mezclador alimentado PA80
(2) Altavoces pasivos de 10"
(2) Cables para altavoces
Guía del usuario
Manual sobre la seguridad y garantía
Soporte
Para obtener la información más reciente acerca de este producto (requisitos de sistema, información de
compatibilidad, etc.) y registrarlo, visite alesis.com
Para soporte adicional del producto, visite alesis.com/support.
Montaje en soporte
• Instale siempre los altavoces de acuerdo con los códigos de electricidad y construcción aplicables.
• Instale el altavoz de acuerdo a su peso máximo.
• No monte varios altavoces en el mismo soporte o columna.
• Verifique siempre que el soporte o columna esté sobre una superficie plana, nivelada y estable. Asimismo,
extienda totalmente las patas de los soportes tipo trípode y asegúrese de que las patas no representen un
riesgo de tropiezo.
• Inspeccione el soporte (o columna y elementos de fijación asociados) antes de cada uso y no utilice equipos
con piezas desgastadas, dañadas o faltantes.
• Tenga siempre cuidado en condiciones de viento a la intemperie. Es posible que deba colocar peso adicional
(como bolsas de arena) en la base del soporte para mejorar la estabilidad. No fije pancartas o elementos
similares a ninguna parte del sistema de altavoces. Tales agregados pueden funcionar como velas y hacer
volcar el sistema.
• Salvo que tenga confianza de que puede manejar el peso del altavoz, solicite a otra persona que le ayude a
levantarlo para colocarlo en el soporte o columna.
• Asegúrese de que los cables estén fuera del camino de los intérpretes, personal de producción y audiencia, de
modo que no tropiecen con ellos y hagan caer el altavoz del soporte o columna.
Nivel de sonido
La exposición a niveles muy altos de ruido puede causar pérdidas auditivas permanentes. La Administración de
Seguridad y Salud Ocupacional de EE.UU. (OSHA) ha especificado los niveles de exposición permisibles a ciertos
niveles de ruido. Según la OSHA, la exposición a niveles de presión sonora (SPL) elevados que excedan estos
límites puede causar pérdidas auditivas. Cuando utilice equipos capaces de generar SPL elevados, use
protecciones auditivas mientras dichos equipos están en funcionamiento.
Horas diarias SPL (dB) Ejemplo
8 90 Música de bajo volumen
6 92 Tren
4 95 Tren subterráneo
3 97 Monitores de escritorio de alto nivel
2 100 Concierto de música clásica
1,5 102 Remachadora
1 105 Máquina fabril
0,50 110 Aeropuerto
0,25 o menos 115 Concierto de rock
Page 8

8
Instalación
Importante: Conecte los cables estando todos los equipos apagados y asegúrese de que todos los
controles de volumen maestro estén al mínimo.
Como instalar el mezclador y los altavoces:
1. Ubique el mezclador en el medio de los altavoces, con suficiente distancia entre los altavoces para una
máxima separación estéreo.
2. Enchufe los cables del altavoz en las salidas de altavoz izquierda y derecha en la parte posterior del
mezclador.
3. Ajuste todas las perillas Level (Nivel) a sus posiciones mínimas, la perilla Master Level (Nivel maestro)
a cero y la ecualización plana.
4. Conecte su micrófono o instrumento al canal.
5. Ajuste la perilla Master Level a no más de 70%.
6. Conecte el cable de corriente del mezclador a una toma de corriente y coloque el interruptor de
encendido en On (encendido).
7. Ajuste la perilla Level del canal hasta alcanzar el nivel deseado sin distorsiones.
Para ajustar un micrófono o instrumento en otro canal, repita los pasos 4–7.
Consejos para la instalación
• Coloque los altavoces en una posición que permita una proyección de sonido sin obstrucciones. En
muchos casos, es beneficioso colocar los altavoces en trípodes a una altura apropiada a fin de lograr la
mayor dispersión y alcance.
• Evite apuntar el micrófono directamente al altavoz. Esto puede causar acople o dañar los componentes
del altavoz así como su oído.
Limpieza
Cuando sea necesario, utilice aire comprimido o un trapo seco para mantener al mezclador limpio y libre de
polvo. No utilice solventes tales como benzol o alcohol.
Diagrama de conexión
Los elementos que no se enumeran en Introducción > Contenido de la caja se venden por separado.
Guitarra
Caja de ritmos
Micrófono
Unidad flash USB
Suministro
eléctrico
Altavoces pasivos (incluidos)
Page 9

9
Características
Mezclador, panel frontal
1. Bajas: Ajuste esta perilla para aumentar o disminuir las frecuencias bajas (graves) del canal.
2. Altas: Ajuste esta perilla para aumentar o disminuir las frecuencias altas (agudos) del canal.
3. Nivel: Gire esta perilla para aumentar o disminuir el volumen del altavoz.
4. Entrada de micrófono (balanceada): Conecte aquí un micrófono dinámico mediante un cable XLR
estándar.
5. Entrada de línea del canal (no balanceada): Conecte aquí una guitarra, sintetizador, caja de ritmos,
reproductor de CD u otro dispositivo de nivel de línea mediante un cable TS de 1/4 pulg. estándar.
6. Control de efectos: Ajuste esta perilla para controlar el nivel de la señal que se enviará al delay
(retardo) digital integrado.
7. Entrada de línea RCA: Conecte a esta entrada un dispositivo externo utilizando cables RCA estándar.
Esta entrada puede utilizarse para conectar un reproductor de CD, ordenador, tableta, teléfono
inteligente [smartphone], etc. Dado que la mayoría de los dispositivos móviles están equipados con
salidas de audio de 1/8 pulg. (3,5 mm), probablemente necesiten un cable adaptador de 1/8 pulg. a
RCA (se vende por separado).
8. Ecualizador de 3 bandas: La señal proveniente de todos los canales de entrada atravesará este
ecualizador de 3 bandas y luego irá hacia la salida del altavoz. Hay tres perillas que controlan el
ecualizador:
• Altas: Ajusta el rango de alta frecuencia del sonido.
• Medios: Ajusta el rango medio del sonido.
• Bajas: Ajusta el rango de baja frecuencia del sonido.
9. Delay (Retardo) digital: La señal proveniente de todos los canales de entrada se envía al delay digital
integrado y luego hacia la salida del altavoz. Hay tres perillas que controlan el delay digital:
• Maestro de efectos: Ajusta el balance de la señal con o sin efectos.
• Tiempo: Ajusta el intervalo de tiempo del delay. Gire esta perilla la derecha para aumentar el
intervalo de tiempo entre dos delays.
• Repetición: Ajusta la cantidad de tiempo durante el que se sostiene el delay. Gire esta perilla a
la derecha para hacer que el delay se repita durante más tiempo.
10. Entrada de línea: Conecte un dispositivo de nivel de línea a esta entrada monoaural no balanceada de
1/4 pulg. (6,35 mm) mediante un cable TS de 1/4 pulg. Baje el volumen de su dispositivo antes de
conectarlo a esta entrada.
11. Salida de línea: Conecte un dispositivo de nivel de línea a esta salida monoaural no balanceada de 1/4
pulg. (6,35 mm) mediante un cable TS de 1/4 pulg. La señal de salida de línea imitará la señal de salida
del altavoz.
12. Entrada auxiliar:
Conecte a esta entrada un dispositivo externo utilizando un cable RCA estándar. La
señal se enviará directamente a la salida del altavoz.
13. Salida de grabación: Conecte esta salida a una unidad de cinta magnética, la tarjeta de sonido de un
ordenador o un grabador portátil. Esta señal imita las salidas de los altavoces.
14. Nivel de entrada auxiliar: Ajuste esta perilla para controlar el nivel de la señal de la entrada auxiliar.
15. Control del nivel maestro: Ajuste esta perilla para controlar el nivel de la señal que se envía a la salida
del altavoz.
16. Puerto USB y ranura para tarjeta SD: Conecte aquí una unidad de memoria USB o su tarjeta SD para
reproducir archivos de música MP3.
17. Reproductor digital USB/SD: Utilice estos controles para reproducir archivos MP3 de música en su
unidad de memoria USB o tarjeta SD conectada. Consulte Mezclador, reproductor digital de USB/SD
para aprender más.
1 2 3
4
5
6
7
8
9
10
10
11
11
12
12
13
13
141415
15
16
16
17
17
Page 10

10
Mezclador, reproductor digital de USB/SD
Importante: Para utilizar los controles que se describen a continuación, debe tener una unidad de memoria
USB conectada al puerto USB o una tarjeta SD conectada a la ranura para tarjetas SD.
Como acceder a una tarjeta SD o unidad de memoria USB insertada:
1. Mantenga pulsado el botón Mode (modo) durante 2 segundos para encender la pantalla (si no estuviera
ya encendida).
2. Pulse y suelte el botón Mode para seleccionar la tarjeta SD o unidad de memoria USB.
3. Utilice los botones Previous Track (pista anterior) y Next Track (pista siguiente) para recorrer los
archivos y pulse Play (reproducir) para escuchar el archivo.
4. Utilice los botones V+ y V- para ajustar el volumen de la fuente.
1. Reproducir/Pausa: Reproduce la pista o la pone
en pausa.
2. Detener: Detiene la reproducción de la pista.
3. V+: Mantenga pulsado este botón para aumentar el
volumen de la pista.
4. V-: Mantenga pulsado este botón para disminuir el
volumen de la pista.
5. Pista anterior: Selecciona la pista anterior.
6. Pista siguiente: Selecciona la pista siguiente.
7. Repetición: Pulse este botón para alternar las
opciones de los modos de repetición: Random
(aleatorio), Single (individual) y All (todos).
8. Ecualizador: Pues este botón para recorrer los
presets de ecualización digitales que puede aplicar sobre la pista: Pop, Rock, Jazz, Clásica, Normal.
(La ecualización sólo se aplica a la reproducción de un archivo mp3 desde una unidad de memoria
USB o tarjeta SD conectada y no a otras fuentes o entradas de audio).
9. Modo: Seleccione el modo del medio: una unidad de memoria USB o una tarjeta SD.
10.
Modo (pantalla): Muestra la fuente del medio seleccionada actualmente: una unidad de memoria USB o
una tarjeta SD.
11. Tiempo de reproducción (pantalla): Muestra el tiempo actual de la pista actual.
12. Repetición (pantalla): El símbolo de repetir aparece cuando se establece la repetición para una pista.
Random (aleatorio) reproduce pistas aleatorias, Single (individual) repite una única pista o All (todas)
reproduce todas las pistas de la fuente.
13. Ecualizador (pantalla): Muestra el preset de ecualización actual.
14. Reproducir/Pausa/Detener (pantalla): Estos símbolos (►, II, ) aparecen cuando se está
reproduciendo, poniendo en pausa o deteniendo una pista.
15. Número (pantalla): Muestra el número de la pista que se está reproduciendo actualmente.
16. Nombre (pantalla): Muestra el nombre del archivo que se está reproduciendo.
1 2 3 4 5 6 7 8 9
1111121213
13
10
10
14
14
15
15
16
16
U: 00:50
Single Pop
100: Track Name.mp3
Page 11

11
Mezclador, panel trasero
1. Interruptor de encendido: Use este interruptor para encender y apagar el mezclador.
2. Conector de corriente: El cable de corriente integrado se encuentra aquí.
3. Portafusibles: El fusible sólo debe ser reemplazado por un técnico calificado. Si el fusible vuelve a
quemarse después de su reemplazo, suspenda el uso de este mezclador hasta que sea reparado.
4. Salida para altavoces: Conecte a estas salidas los dos altavoces no alimentados (pasivos) incluidos.
Si está utilizando 4 altavoces al mismo tiempo, utilice altavoces de 8–16 Ω. Si está utilizando sólo un
altavoz, que sea de 4–8 Ω.
Altavoz, panel trasero
1. Entrada: Conecte aquí la salida del altavoz del mezclador.
2. Enlace: Conecte esta salida a la entrada de otro altavoz pasivo de 8
–16 Ω.
1 2
1
2
3
4
Page 12

12
Guide d’utilisation (Français)
Présentation
Contenu de la boîte
Console de mixage amplifiée PA80
(2) enceintes passives de 25,4 cm
(2) câbles d’enceinte
Guide d'utilisation
Consignes de sécurité et informations concernant la garantie
Assistance
Pour les dernières informations concernant ce produit (la configuration système minimale requise, la compatibilité,
etc) et l’enregistrement du produit, veuillez visitez le site alesis.com.
Pour de plus amples informations, visitez alesis.com/support.
Montage sur support
• Toujours installer des enceintes conformément aux codes de l'électricité et du bâtiment en vigueur.
• Installer l’enceinte en tenant compte de son poids maximal.
• Ne pas monter plusieurs enceintes sur le même support ou le même pied.
• Toujours vérifier que le support ou le pied est sur une surface plane, stable et au niveau. Déployer entièrement
les pieds des supports de style trépied et vérifier qu’ils ne présentent pas un risque de trébuchement.
• Vérifier le support (ou pied et la quincaillerie) avant chaque utilisation et ne pas utiliser de l’équipement avec des
pièces usées, endommagées ou manquantes.
• Faire preuve de prudence lorsqu'utilisé à l’extérieur dans des conditions venteuses. Il peut être nécessaire de
placer un poids supplémentaire (p. ex., des sacs de sable) sur la base du support afin d’améliorer sa stabilité.
Ne pas fixer de bannières ou autres objets similaires au système de sonorisation. Ces objets pourraient prendre
dans le vent et renverser le système.
• À moins d’être certain de pouvoir gérer le poids de l’enceinte, demander à une autre personne de vous aider
afin de le placer sur le support ou le pied.
• Toujours s'assurer que les câbles sont tenus éloignés des artistes, de l’équipe de production et du public afin
qu'ils ne puissent trébucher sur le câble et faire tomber l’enceinte de son support.
Niveau sonore
L'exposition aux niveaux extrêmement élevés de bruit peut causer une perte d'audition permanente. Le comité de
santé et de sécurité au travail des États-Unis (OSHA) a établi des durées d'exposition acceptables pour certains
niveaux de bruit. Selon la OSHA, une exposition à des niveaux de pression acoustique (NPA) au-dessus de ces
limites peut avoir comme conséquence une perte d'audition. Lors de l’utilisation d’équipement capable de générer
des niveaux de pression acoustique élevés, il faut prendre des mesures afin de protéger son ouïe lorsque cette unité
est en fonction.
Heures par jour NPA (dB) Exemple
8 90 Petite salle de spectacle
6 92 Train
4 95 Rame de métro
3 97 Moniteurs de table à niveaux élevés
2 100 Concert de musique classique
1,5 102 Riveteuse
1 105 Usine de fabrication
0,50 110 Aéroport
0,25 ou moins 115 Concert rock
Page 13

13
Installation
Important : Raccordez tous les câbles alors que tous les appareils sont hors tension et que toutes les
commandes de volume général sont au minimum.
Pour installer la console de mixage et les enceintes :
1. Placez la console de mixage au milieu des deux enceintes en laissant assez de distance entre les
deux afin d'obtenir un maximum de séparation stéréophonique.
2. Branchez les câbles d'enceintes dans les sorties enceinte gauche et droite à l'arrière de la console
de mixage.
3. Réglez tous les boutons de niveau pour tous les canaux et le bouton de niveau de sortie général à
zéro, puis aplanissez l’égalisation.
4. Branchez votre microphone ou votre instrument sur le canal.
5. Réglez le bouton de niveau général à moins de 70 %.
6. Branchez le câble d’alimentation de la console de mixage à une prise secteur et réglez l’interrupteur
d’alimentation sur On afin de la mettre sous tension.
7. Ajustez le bouton de niveau du canal afin d’atteindre le niveau souhaité sans qu’il y ait de distorsion.
Pour installer un microphone ou un instrument sur un autre canal, répétez les étapes 4 à 7.
Conseils d'installation
• Placez les enceintes dans une position qui permet une projection du son sans obstruction. Dans bien
des cas, il est avantageux de placer les enceintes sur trépied à une hauteur convenable afin d'obtenir
une dispersion maximale.
• Évitez de diriger le microphone directement sur l’enceinte. Cela peut provoquer de la rétroaction ou
endommager des composants de l’enceinte ainsi que votre ouïe.
Nettoyage
Lorsque nécessaire, utilisez de l'air comprimé ou un chiffon sec afin de garder la console de mixage propre
et sans poussière. Veuillez ne pas utiliser de solvants tels que le benzol ou l'alcool.
Schéma de connexion
Les éléments qui ne figurent pas dans la section Présentation > Contenu de la boîte sont vendus séparément.
Guitare
Module de
percussion
Microphone
Clé USB
Alimentation
Enceintes passives (incluses)
Page 14

14
Caractéristiques
Console de mixage, panneau avant
1. Basses : Ce bouton permet d'augmenter et de diminuer les basses fréquences du canal.
2. Hautes : Ce bouton permet d'augmenter et de diminuer les hautes fréquences du canal.
3. Niveau : Ce bouton permet d'augmenter et de diminuer le volume du canal.
4. Entrée microphone (asymétrique) : Cette entrée permet de brancher un microphone
électrodynamique en utilisant un câble XLR standard.
5. Entrée à niveau ligne du canal (asymétrique) : Cette entrée permet de brancher un appareil à niveau
ligne, comme une guitare, un synthétiseur, module de percussion, un lecteur de disques compacts en
utilisant un câble TS 6,35 mm.
6. Commande d’effet : Ce bouton permet d’ajuster le niveau du signal audio transmis à l’effet de retard
numérique intégré.
7. Entrée RCA à niveau ligne : Cette entrée permet de brancher un appareil externe en utilisant des
câbles RCA standard. Elle peut être utilisée pour brancher un lecteur de disques compacts, ordinateur,
tablette, smartphone, etc. Comme la plupart des appareils mobiles sont équipés de sorties audio stéréo
3,5 mm, vous aurez probablement besoin d'un câble adaptateur 3,5 mm à RCA (vendu séparément).
8. Égalisation 3 bandes : Le signal de tous les canaux d'entrée est acheminé à cet égaliseur 3 bandes,
puis à la sortie enceinte. Il y a trois boutons qui commandent l'égalisation :
• Hautes : Ce bouton permet d'ajuster le niveau des hautes fréquences.
• Moyennes : Ce bouton permet d'ajuster le niveau des fréquences moyennes.
• Basses : Ce bouton permet d'ajuster le niveau des basses fréquences.
9. Effet de retard numérique : Le signal de tous les canaux d'entrée est acheminé à l’effet de retard
numérique intégré, puis à la sortie enceinte. Il y a trois boutons qui commandent l’effet de retard
numérique :
• Effet général : Ce bouton permet d'ajuster l'équilibre « traité/non traité » du signal.
• Durée : Ce bouton permet de régler l’intervalle du retard. Tournez ce bouton vers la droite afin
d'augmenter l'intervalle entre deux retards.
• Répétition : Ce bouton permet d'ajuster combien de temps le retard est répété. Tournez ce
bouton vers la droite afin d'augmenter la répétition du retard.
10. Entrée ligne : Cette entrée asymétrique mono 6,35 mm permet de brancher un appareil à niveau ligne
en utilisant un câble TS 6,35 mm standard. Veuillez diminuer le volume de votre appareil avant de le
brancher à cette entrée.
11. Sortie ligne : Cette sortie asymétrique mono 6,35 mm permet de brancher un appareil à niveau ligne en
utilisant un câble TS 6,35 mm standard. Le signal de sortie ligne sera identique au signal de sortie
enceinte.
12. Entrée auxiliaire :
Cette entrée permet de brancher un appareil externe en utilisant un câble RCA
standard. Le signal sera transmis directement à la sortie enceinte.
13. Sortie d'enregistrement : Cette sortie permet de brancher un lecteur cassettes, une carte son
d’ordinateur ou un enregistreur portable. Le signal sera identique au signal des sorties enceinte.
14. Niveau de l’entrée auxiliaire : Ce bouton permet d’ajuster le niveau du signal de l’entrée auxiliaire.
15. Commande de niveau général : Ce bouton permet d’ajuster le niveau du signal transmis à la sortie
enceinte.
16. Ports USB et carte SD : Ces ports permettent de brancher une clé USB ou une carte SD afin de faire
la lecture de fichiers MP3.
17. Écran du lecteur USB/SD : Utilisez ces commandes pour faire la lecture des fichiers MP3 sur la clé
USB ou la carte SD branchée. Veuillez consulter la section Console de mixage, lecteur USB/SD afin
d’en savoir plus.
1 2 3
4
5
6
7
8
9
10
10
11
11
12
12
13
13
141415
15
16
16
17
17
Page 15

15
Console de mixage, lecteur USB/SD
Important : Pour utiliser les commandes décrites ci-dessous, une clé USB doit être insérée dans le port
USB ou une carte SD doit être insérée dans le port de carte SD.
Pour accéder à une carte SD ou à une clé USB insérée :
1. Maintenez la touche Mode enfoncée pendant 2 secondes afin d’allumer l’écran (s’il n'est pas déjà
allumé).
2. Appuyez et relâchez le bouton Mode pour sélectionner la carte SD ou la clé USB.
3. Utilisez les touches Piste précédent et Piste suivante pour parcourir les fichiers, puis appuyez sur la
touche de lecture afin de lancer la lecture du fichier.
4. Utilisez les touches V+ et V+ pour régler le volume de la source.
1. Lancer/interrompre la lecture : Cette touche
permet de lancer ou d’interrompre la lecture de la
piste.
2. Arrêt de lecture : Cette touche permet d’arrêter
la lecture de la piste.
3. V+ : Maintenez cette touche enfoncée pour
augmenter le volume de la piste.
4. V- : Maintenez cette touche enfoncée pour
diminuer le volume de la piste.
5. Piste précédente : Cette touche permet de
sélectionner la piste précédente.
6. Piste suivante : Cette touche permet de
sélectionner la piste suivante.
7. Lecture répétée : Cette touche permet de
parcourir les différents modes de lecture répétée :
aléatoire, simple, toute.
8. Égalisation : Cette touche permet de parcourir les différents paramètres d’égalisation que vous pouvez
appliquer à la piste : Pop, Rock, Jazz, Classique, Normal. (Les paramètres d’égalisation s’appliquent
uniquement à la lecture des fichiers MP3 sur la clé USB ou la carte SD branchée, pas aux autres
sources audio ou entrées.)
9. Mode : Cette touche permet de sélectionner la source multimédia : clé USB ou carte SD.
10. Mode (écran) : Affiche la source multimédia sélectionnée : clé USB ou une carte SD.
11. Durée (écran) : Affiche la durée de la piste sélectionnée.
12. Répétition (écran) : Le symbole de répétition s’allume lorsqu'une piste a été programmée avec une
répétition : aléatoire (lecture aléatoire des pistes), simple (lecture répétée d’une piste) ou toutes
(lecture de toutes les pistes de la source).
13. Égalisation (écran) : Affiche le paramètre d’égalisation sélectionné.
14. Lancer/interrompre/Arrêt de lecture (écran) : Ces symboles (►, II, ) apparaissent lorsqu’une piste
est lancée, interrompue ou arrêtée.
15. Numéro (écran) : Affiche le numéro de la piste sélectionnée.
16. Nom (écran) : Affiche le nom du fichier sélectionné.
1 2 3 4 5 6 7 8 9
1111121213
13
10
10
14
14
15
15
16
16
U: 00:50
Single Pop
100: Track Name.mp3
Page 16

16
Console de mixage, panneau arrière
1. Interrupteur d'alimentation : Utilisez cet interrupteur pour mettre la console de mixage sous et hors
tension.
2. Entrée d'alimentation : Ceci est le câble d'alimentation intégré.
3. Compartiment de fusible : Le fusible ne doit être remplacé que par un technicien qualifié. Si le fusible
continue de sauter après avoir été remplacé, cessez d'utiliser l’appareil et faites-le inspecter par un
technicien.
4. Sortie enceinte : Branchez les deux enceintes passives comprises à ces sorties. Si vous utilisez 4
enceintes en même temps, utilisez des enceintes de 8–16 Ω. Lorsque vous utilisez une seule enceinte,
utiliser des enceintes de 4–8 Ω.
Enceinte, panneau arrière
1. Entrée : Branchez la sortie d’enceinte de la console de mixage à cette
entrée.
2. Raccordement en série : Branchez cette sortie à l’entrée d’une autre
enceinte passive de 8–16 Ω.
1 2
1
2
3
4
Page 17

17
Guida per l’uso (Italiano)
Introduzione
Box Contents
PA80 Powered Mixer
(2) Altoparlanti passivi da 10"
(2) cavi degli altoparlanti
Guida per l'uso
Istruzioni di sicurezza e garanzia
Assistenza
Per conoscere le ultime informazioni in merito a questo prodotto (i requisiti di sistema complete, compatibilità, ecc) e
per la registrazione del prodotto, recarsi alla pagina alesis.com.
Per ulteriore assistenza, recarsi alla pagina alesis.com/support.
Montaggio su supporto
• Installare sempre gli altoparlanti in conformità con i codici elettrici ed edilizi vigenti.
• Installare l'altoparlante in base al suo peso massimo.
• Non
montare più altoparlanti sullo stesso supporto o palo.
• Verificare sempre che il supporto o il palo si trovi su una superficie pianeggiante, uniforme e stabile. Inoltre,
estendere interamente le gambe di supporti a tripode e assicurarsi che non rappresentino un pericolo di
inciampo.
• Ispezionare il supporto (o il palo e i dispositivi di fissaggio ad esso associati) prima di ciascun utilizzo e non
utilizzare dispositivi che presentino parti usurate, danneggiate o mancanti.
• Prestare sempre la massima attenzione in condizioni di vento, all'aperto. Per migliorare la stabilità potrebbe
essere necessario collocare peso aggiuntivo (ad es. sacchi di sabbia) sulla base del supporto. Non fissare
banner o articoli simili a qualsiasi parte di un impianto di altoparlanti. Questi potrebbero fungere da vela e far
rovesciare l'impianto.
• A meno di non avere la certezza di poter gestire il peso dell'altoparlante, chiedere a un'altra persona aiuto per
sollevarlo sul supporto o sul palo.
• Assicurarsi che i cavi non intralcino i musicisti, il team di produzione e il pubblico, in modo che non rischino di
inciamparvi, facendo cadere l'altoparlante dal supporto o dal palo.
Livello audio
L'esposizione a livelli audio estremamente elevati può causare la perdita permanente dell'udito. L'OSHA americana
(Occupational Safety and Health Administration) ha specificato i livelli di esposizione consentiti a certi tipi di rumore.
Secondo l'OSHA, l'esposizione a elevati livelli di pressione audio (SPL) che superino tali limiti può causare la perdita
dell'udito. Al momento di utilizzare attrezzature in grado di generare un elevato SPL, servirsi di dispositivi di
protezione dell'udito per tutto il tempo in cui tale attrezzatura è in uso.
Ore al giorno SPL (dB) Esempio
8 90 Piccolo concerto
6 92 Treno
4 95 Metropolitana
3 97 Monitor da tavolo di alto livello
2 100 Concerto di musica classica
1,5 102 Macchina ribaditrice
1 105 Fabbrica
0,50 110 Aeroporto
0,25 o meno 115 Concerto rock
Page 18

18
Configurazione
Importante: collegare i cavi con tutti i dispositivi spenti e assicurarsi che tutti i comandi volume Master
siano spenti.
Per impostare il mixer e gli altoparlanti:
1. Posizionare il mixer al centro degli altoparlanti posti a una distanza sufficiente, l'uno dall'altro, per il
massimo della separazione stereo.
2. Inserire i cavi dell'altoparlante nelle uscite altoparlante sinistra e destra sul retro del mixer.
3. Impostare tutte le manopole Level di canale sul minimo, la manopola Main Level su zero e gli EQ piatti.
4. Collegare il mic o lo strumento al canale.
5. Impostare la manopola Master Level su non più del 70%.
6. Collegare il cavo di alimentazione del mixer a una presa elettrica e impostare l'interruttore di
alimentazione su On.
7. Regolare la manopola Level di canale in modo da raggiungere il livello desiderato senza distorsione.
Per impostare un microfono o uno strumento su un altro canale, ripetere le Fasi 4-7.
Consigli per l'installazione
• Collocare gli altoparlanti in una posizione che consenta la proiezione dell'audio senza ostacoli. In diversi
casi è utile collocare gli altoparlanti su treppiedi ad un'altezza adeguata per ottenere il massimo della
dispersione e della portata.
• Evitare di puntare il microfono direttamente verso l'altoparlante. Questo può causare ritorno o
danneggiare i componenti dell'altoparlante, nonché l'udito.
Pulizia
Quando occorre, servirsi di aria compressa o di un panno asciutto per mantenere il mixer pulito e libero
dalla polvere. Non servirsi di solventi quali benzolo o alcol.
Schema dei collegamenti
Elementi non elencati sotto Introduzione > Contenuti della confezione sono venduti separatamente.
Chitarra
Drum Machine
Microfono
Flash drive USB
Alimentazione
Altoparlanti passivi (in dotazione)
Page 19

19
Caratteristiche
Mixer, pannello anteriore
1. Low (bassi): girare questa manopola per alzare o abbassare le frequenze basse (bass) del canale.
2. Hi (acuti): girare questa manopola per alzare o abbassare le frequenze alte (treble) del canale.
3. Level (livello): girare questa manopola per alzare o abbassare il volume del canale.
4. Ingresso mic (bilanciato): collegare un microfono dinamico a questo livello servendosi di un cavo
standard XLR.
5. Ingresso di linea di canale (non bilanciato): collegare qui una chitarra, un sintetizzatore, una drum
machine, un lettore CD o altri dispositivi a livello di linea servendosi di un cavo standard TS da 1/4”.
6. Controllo FX: regolare questa manopola per controllare il livello di segnale che sarà inviato al delay
digitale incorporato.
7. Ingresso di linea RCA: collegare un dispositivo esterno a questo ingresso servendosi di cavi
standard RCA. Può essere utilizzato per collegare un lettore CD, computer, tablet, smartphone, ecc.
Poiché la maggior parte dei dispositivi mobili sono dotati di uscite audio stereo da 1/8" (3,5 mm),
probabilmente occorrerà un cavo adattatore da stereo 1/8" a RCA (venduto separatamente).
8. EQ a 3 bande: il segnale proveniente da tutti i canali di ingresso passeranno attraverso questo
equalizzatore a 3 bande e quindi all'uscita dell'altoparlante. Tre manopole controllano l'EQ:
• Hi (acuti): regola la gamma di frequenze alte del suono.
• Medi: regola la gamma di frequenze medie del suono.
• Low (bassi): regola la gamma di frequenze basse del suono.
9. Delay digitale: il segnale proveniente da tutti i canali di ingresso viene inviato al delay digitale
incorporato e quindi all'uscita dell'altoparlante. Tre manopole controllano il delay digitale:
• Master FX: regola l'equilibriodel segnale "bagnato" e "asciutto".
• Time (tempo): regola l'intervallo di tempo del delay. Girare questa manopola verso destra per
aumentare l'intervallo di tempo tra due delay.
• Repeat (Ripeti): regola il tempo per il quale viene sostenuto il delay. Girare questa manopola
verso destra per far ripetere il delay più a lungo.
10. Ingresso di linea: Collegare un dispositivo a livello di linea a questo ingresso mono non bilanciato da
1/4" (6,35 mm) servendosi di un cavo TS standard da 1/4". Prima di effettuare il collegamento
all'ingresso, abbassare il volume del dispositivo.
11. Uscita di linea: collegare un dispositivo a livello di linea a questa uscita mono non bilanciata da 1/4"
(6,35 mm) servendosi di un cavo TS standard da 1/4". Il segnale di uscita di linea rispecchierà il
segnale di uscita dell'altoparlante.
12.
Ingresso Aux: collegare un dispositivo esterno a questo ingresso servendosi di un cavo standard
RCA. Il segnale sarà inviato direttamente all'uscita altoparlante.
13. Uscita Record: collegare questa uscita a una piastra di registrazione, alla scheda audio di un
computer o a un registratore portatile. Questo segnale rispecchia le uscite altoparlante.
14. Aux In Level: regolare questa manopola per controllare il livello di segnale dell'ingresso Aux.
15. Comando livello Master: regolare questa manopola per controllare il livello di segnale che sarà
inviato all'uscita altoparlante.
16. Porta USB e slot per scheda SD: collegare un drive flash USB o una scheda SD per riprodurre file
musicali MP3.
17. Lettore digitale USB/SD: servirsi di questi comandi per riprodurre file musicali MP3 sul drive flash
USB o sulla scheda SD collegati. Per
saperne di più, si veda Mixer, lettore digitale USB/SD.
1 2 3
4
5
6
7
8
9
10
10
11
11
12
12
13
13
141415
15
16
16
17
17
Page 20

20
Mixer, lettore digitale USB/SD
Importante: per utilizzare i comandi descritti qui di seguito, occorre avere un drive flash USB collegato alla
porta USB o una scheda SD collegata alla slot per scheda SD.
Per accedere a una scheda SD o a un drive flash USB inseriti:
1. Tenere premuto il tasto Mode per 2 secondi per accendere il display (se non è già acceso).
2. Premere e rilasciare il tasto Mode per selezionare la scheda SD o il drive flash USB.
3. Servirsi dei tasti Previous Track (traccia precedente) e Next Track (traccia successiva) per
scorrere lungo i file e premere Play per ascoltare il file.
4. Servirsi dei tasti V+ e V- per regolare il volume della fonte.
1. Play/Pause: riproduce o interrompe
temporaneamente la traccia.
2. Stop: interrompe la riproduzione della traccia.
3. V+: tenere premuto questo tasto per aumentare
il volume della traccia.
4. V-: Tenere premuto questo tasto per ridurre il
volume della traccia.
5. Traccia precedente: seleziona la traccia
precedente.
6. Traccia successiva: seleziona la traccia
successiva.
7. Repeat (Ripeti): premere questo tasto per
commutare tra le opzioni di ripetizione (Repeat):
Random, Single, All
(casuale, singola, tutte).
8. EQ: premere questo tasto
per scorrere tra i preset di equalizzazione digitale che si possono applicare
alla traccia: Pop, Rock, Jazz, Classic, Normal. (L'equalizzazione si applica solo alla riproduzione di
file MP3 su un drive flash USB o su una scheda SD collegati, non ad altre fonti audio o ingressi.)
9. Modalità: seleziona la fonte dei media: una chiavetta USB flash o una scheda SD.
10. Modalità (display): mostra a display la fonte dei media attualmente selezionata: una chiavetta USB
flash o una scheda SD.
11. Play Time (tempo di riproduzione) (display): mostra il tempo corrente della
traccia corrente.
12. Repeat (ripeti) (display): il simbolo Repeat compare quando una traccia è stata impostata in modo da
essere ripetuta: Random (riproduce tracce in sequenza casuale), Single (ripete una singola traccia),
oppure All (riproduce tutte le tracce della fonte).
13. EQ (display): mostra i preset EQ correnti.
14. Play/Pause/Stop (display): questi simboli (►, II, ) compaiono quando una traccia viene riprodotta,
interrotta momentaneamente o fermata.
15. Number (numero) (display): mostra il numero di traccia attualmente in corso di riproduzione.
16. Name (nome) (display): mostra il nome del file riprodotto.
1 2 3 4 5 6 7 8 9
1111121213
13
10
10
14
14
15
15
16
16
U: 00:50
Single Pop
100: Track Name.mp3
Page 21

21
Mixer, panello posteriore
1
2
3
4
1. Interruttore di alimentazione: servirsi di questo interruttore per accendere e spegnere il mixer.
2. Connettore di alimentazione: il cavo di alimentazione integrato è situato a questo livello.
3. Portafusi: il fusibile deve essere sostituito unicamente da un tecnico qualificato. Se il fusibile continua a
saltare dopo la sostituzione, interrompere l'uso del mixer fino a quando non viene riparato.
4. Uscita casse: collegare i due altoparlanti non alimentati (passivi) in dotazione a queste uscite. Se si
utilizzano 4 altoparlanti contemporaneamente, servirsi di altoparlanti 8–16 Ω. Quando si utilizza un solo
altoparlante, servirsi di un altoparlante da 4–8 Ω.
Altoparlante, pannello posteriore
1. Ingresso: collegare l'uscita altoparlante del mixer a questo livello.
2. Link: collegare
questa uscita all'ingresso di un altro altoparlante passivo
8–16 Ω.
1 2
Page 22

22
Benutzerhandbuch (Deutsch)
Einführung
Lieferumfang
PA80 Aktivmixer
(2) 10” Passive Lautsprecher
(2) Lautsprecherkabel
Benutzerhandbuch
Sicherheitshinweise und Garantieinformationen
Kundendienst
Für aktuelle Informationen zu diesem Produkt (Systemanforderungen, Informationen zur Kompatibilität etc.) und zur
Produktregistrierung besuchen Sie alesis.com.
Um weitere Unterstützung zu Ihrem Produkt zu erhalten, besuchen Sie alesis.com/support.
Montage am Ständer
• Installieren Sie Lautsprecher stets laut geltenden Elektro- und Bauvorschriften.
• Installieren Sie den Lautsprecher in Übereinstimmung mit seinem maximalen Gewicht.
• Montieren Sie niemals mehrere Lautsprecher am selben Ständer oder Mast.
• Sorgen Sie stets dafür, dass die Ständer oder Maste auf einer flachen, ebenen und stabilen Fläche stehen.
Ziehen Sie die Standbeine des stativähnlichen Ständers vollständig heraus und sorgen Sie dafür, dass die
Beine keine Stolpergefahr darstellen.
• Überprüfen Sie den Ständer (oder Mast samt zugehörigen Komponenten) vor jedem Einsatz und verwenden Sie
nie Geräte mit verschlissenen, beschädigten oder fehlenden Teilen.
• Lassen Sie bei windigen Verhältnissen im Freien besondere Vorsicht walten. Möglicherweise müssen Sie
zusätzliche Gewichte (z.B. Sandsäcke) auf der Ständerbasis platzieren, um die Stabilität zu gewährleisten.
Bringen Sie keine Transparente oder ähnliches an irgendwelchen Teilen eines Lautsprechersystems an. Solche
Konstruktionen könnten wie ein Segel wirken und das System zu Fall bringen.
• Wenn Sie sich nicht sicher sind, ob Sie den Lautsprecher alleine heben können, bitten Sie eine andere Person
beim Heben auf einen Ständer/Mast um Hilfe.
• Sorgen Sie dafür, dass die Kabel den Künstlern, der Produktions-Crew oder dem Publikum nicht im Weg sind,
so dass niemand über Kabel stolpern kann und den Lautsprecher vom Ständer oder Mast reißen kann.
Schallpegel
Eine Exposition gegenüber extrem hohen Lärmpegeln kann zu bleibenden Hörschäden führen. Die Occupational
Safety and Health Administration (OSHA) der US-Regierung hat zulässige Expositionswerte für bestimmte
Lärmpegel festgelegt. Laut OSHA können Belastungen durch Schalldruckpegel (SPL), die diese Grenzwerte
überschreiten, zu Hörverlust führen. Tragen Sie beim Einsatz von Geräten, die einen hohen Schalldruck erzeugen
können, stets einen Gehörschutz.
Stunden pro Tag SPL (dB) Beispiel
8 90 Kleines Konzert
6 92 Zug
4 95 U-Bahn
3 97 Leistungsstarke Desktop-Monitore
2 100 Konzert mit klassischer Musik
1.5 102 Nietmaschine
1 105 Maschinenfabrik
0.50 110 Flughafen
0,25 oder weniger 115 Rock-Konzert
Page 23

23
Setup
Wichtig: Nehmen Sie Kabelverbindungen nur bei ausgeschalteten Geräten vor und sorgen Sie dafür, dass
alle Hauptlautstärkeregler auf Null gestellt wurden.
Aufstellen von Mixer und Lautsprechern:
1. Positionieren Sie den Mixer in der Mitte zwischen den beiden Lautsprechern. Achten Sie darauf, dass
die Lautsprecher genügend Abstand voneinander haben, um eine maximale Stereotrennung zu erzielen.
2. Schließen Sie die Lautsprecherkabel an den linken und rechten Lautsprecherausgang auf der
Rückseite des Mixers an.
3. Stellen Sie alle Kanalpegelregler auf die Minimalpositionen ein, bringen den Gesamtlautstärkeregler
auf Null und alle EQs in die neutrale Position.
4. Schließen Sie Ihr Mikrofon oder Instrument an den Kanal an.
5. Stellen Sie den Gesamtlautstärkeregler auf maximal 70%.
6. Verbinden Sie das Netzkabel des Mixers mit einer Steckdose und stellen den Netzschalter auf Ein.
7. Passen Sie den Kanalpegelregler an, um den gewünschten Pegel ohne Verzerrung zu erreichen.
Um ein Mikrofon oder Instrument auf einem anderen Kanal einzurichten, wiederholen Sie die Schritte 4-7.
Installationstipps
• Platzieren Sie die Lautsprecher an einer Stelle, die eine ungehinderte Klangprojektion gewährleistet. In
vielen Fällen ist es vorteilhaft, die Lautsprecher in geeigneter Höhe auf Stativen zu montieren, um eine
maximale Dispersion zu erzielen.
• Vermeiden Sie es, Mikrofone direkt auf den Lautsprecher zu richten. Dies kann zu Rückkoppelungen
oder Schäden an Lautsprecherkomponenten oder Ihrem Gehör führen.
Reinigung
Wenn nötig, verwenden Sie Druckluft oder ein trockenes Tuch, um den Mixer sauber und staubfrei zu
halten. Verwenden Sie keine Lösungsmittel wie Benzol oder Alkohol.
Anschlussdiagramm
Teile, die nicht unter Einführung > Lieferumfang angegeben sind, sind separat erhältlich.
Gitarre
Drum Machine
Mikrofon
USB-Stick
Stromversorgung
Passive Lautsprecher
(inkludiert)
Page 24

24
Funktionen
Mixer, Frontseite
1. Tief: Mit diesem Regler reduzieren oder erhöhen Sie die tiefen Frequenzen (Bässe) des Kanals.
2. Höhen: Mit diesem Regler reduzieren oder erhöhen Sie die hohen Frequenzen (Höhen) des Kanals.
3. Pegel: Verwenden Sie diesen Regler, um den Kanalpegel einzustellen.
4. Mic-Eingang (Symmetrisch): Schließen Sie hier ein dynamisches Mikrofon mit einem
standardmäßigen XLR-Kabel an.
5. Kanal-Line-Eingang (unsymmetrisch): Schließen Sie Gitarre, Synthesizer, Drum-Machine, CD-Player
oder ein anderes Line-Gerät mit einem 1/4" TS-Kabel an.
6. FX-Steuerung: Mit diesem Regler können Sie den Signalpegel regulieren, der an den integrierten
digitalen Delay gesendet wird.
7. Cinch Line-Eingang: Sie können diesen Eingang mit einem externen Gerät verbinden, indem Sie
handelsübliche Cinch-Kabel verwenden. Dieses kann verwendet werden, um CD-Player, Computer,
Tablet, Smartphone etc. anzuschließen. Da die meisten mobilen Geräte mit Stereo 1/8" (3.5mm)
Audioausgängen ausgestattet sind, müssen Sie wahrscheinlich ein Stereo 1/8"-auf-CinchAdapterkabel verwenden (separat erhältlich).
8. 3-Band EQ: Das Signal von allen Eingangskanälen wird durch diesen 3-Band-Equalizer und dann an
den Lautsprecherausgang gesendet. Es gibt drei Regler zum Einstellen des EQ:
• Höhen: Passt den Hochfrequenzbereich des Klangs an.
• Mitten: Passt den mittleren Bereich des Klangs an.
• Tief: Passt den tiefen Frequenzbereich des Klangs an.
9. Digitaler Delay: Das Signal von allen Eingangskanälen wird an den integrierten digitalen Delay und
dann an den Lautsprecher-Ausgang gesendet. Der digitale Delay wird über drei Regler gesteuert:
• FX Master: Stellt die Balance des verarbeiteten ("wet") und unverarbeiteten ("dry") Signals ein.
• Zeit: Stellt das Zeitintervall des Delay ein. Drehen Sie diesen Regler nach rechts, um das
Zeitintervall zwischen zwei Verzögerungen zu erhöhen.
• Wiederholen: Legt fest, wie lange die Verzögerung nachklingt. Drehen Sie diesen Regler nach
rechts, um die Delay-Wiederholung zu verlängern.
10. Line-Eingang: Schließen Sie ein Line-Level-Gerät mit einem 1/4" TS-Kabel an diesen
unsymmetrischen 1/4" (6,35 mm) Mono-Eingang an. Bitte reduzieren Sie die Lautstärke Ihres Geräts,
bevor Sie eine Verbindung herstellen.
11. Line-Ausgang: Schließen Sie ein Line-Level-Gerät mithilfe eines standardmäßigen 1/4" TS-Kabels an
diesen unsymmetrischen 1/4" (6,35 mm) Mono-Ausgang an. Das Line-Ausgangssignal wird das
Lautsprecher-Ausgangssignal spiegeln.
12. Aux-Eingang: Sie können diesen Eingang mit einem externen Gerät verbinden, indem Sie
handelsübliche Cinch-Kabel verwenden. Das Signal wird direkt an den Lautsprecher-Ausgang
gesendet.
13. Aufnahmeausgang: Verbinden Sie diesen Ausgang mit einem Kassettendeck, einer Computer-
Soundkarte oder einem tragbaren Aufnahmegerät. Dieses Signal spiegelt die Lautsprecherausgänge.
14. Aux In-Pegel:
Mit diesem Regler stellen Sie den Signalpegel des Aux In ein.
15. Gesamtlautstärkeregler: Mit diesem Regler stellen Sie den Signalpegel ein, der an den Lautsprecher-
Ausgang gesendet wird.
16. USB-Anschluss & SD-Kartensteckplatz: Verbinden Sie Ihren USB-Stick oder stecken Ihre SD-Karte
ein, um MP3-Musikdateien abzuspielen.
17. USB/SD Digital Player: Mit diesen Bedienelementen können Sie MP3-Musikdateien am
angeschlossenen USB-Stick oder der SD-Karte abspielen. Siehe Mixer, USB/SD Digital Player, um
mehr zu erfahren.
1 2 3
4
5
6
7
8
9
10
10
11
11
12
12
13
13
141415
15
16
16
17
17
Page 25

25
Mixer, USB/SD Digital Player
Wichtig: Um die unten beschriebenen Bedienelemente zu verwenden, müssen Sie einen USB-Stick in den
USB-Port oder eine SD-Karte in den SD-Kartensteckplatz gesteckt haben.
So greifen Sie auf eine eingelegte SD-Karte oder einen USB-Stick zu:
1. Halten Sie die Modus-Taste 2 Sekunden lang gedrückt, um die Anzeige zu aktivieren (falls Sie nicht
bereits aktiv ist).
2. Halten Sie die Modus-Taste kurz gedrückt und wählen dann die SD-Karte oder den USB-Stick aus.
3. Verwenden Sie die Tasten Vorheriger Track und Nächster Track, um durch die Dateien zu blättern
und drücken Wiedergabe, um die Datei zu hören.
4. Verwenden Sie die Tasten V+ und V-, um die Lautstärke der Quelle einzustellen.
1. Wiedergabe/Pause: Zum Wiedergeben oder
Pausieren des Tracks.
2. Stopp: Stoppt die Wiedergabe des Tracks.
3. V+: Halten Sie diese Taste gedrückt, um die
Lautstärke des Tracks zu erhöhen.
4. V-: Halten Sie diese Taste gedrückt, um die
Lautstärke des Tracks zu verringern.
5. Vorheriger Track: Wählt den vorherigen Track
aus.
6. Nächster Track: Wählt den nächsten Track aus.
7. Wiederholen: Drücken Sie diese Taste, um
durch die Wiederholungsoptionen zu blättern:
Zufall, Einzeln, Alle.
8. EQ: Drücken Sie diese Taste, um durch die
digitale Equalizer-Presets zu blättern, die Sie pro Track anwenden können: Pop, Rock, Jazz, Klassik,
Normal. (Der Equalizer wird nur bei der Wiedergabe von MP3-Dateien auf einem angeschlossenen
USB-Stick oder einer SD-Karte angewendet, nicht jedoch auf andere Audioquellen oder Eingänge).
9. Modus: Wählt die Medienquelle: USB-Stick oder SD-Karte.
10. Modus (Display): Zeigt die aktuell ausgewählte Medienquelle: USB-Stick oder SD-Karte.
11. Wiedergabezeit (Display): Zeigt die aktuelle Zeit des aktuellen Tracks.
12. Wiederholen (Display): Das Wiederholungssymbol wird angezeigt, wenn ein Track auf Wiederholen
eingestellt wurde: Zufall (Zufallswiedergabe der Tracks), Einzel (wiederholt einen einzelnen Track)
oder Alle (spielt alle Tracks einer Quelle).
13. EQ (Display): Zeigt das aktuelle EQ-Preset.
14. Wiedergabe/Pause/Stopp (Display): Diese Symbole (►, II, ) werden angezeigt, wenn ein Track
abgespielt, pausiert oder gestoppt wird.
15. Nummer (Display): Zeigt die Tracknummer des wiedergegebenen Tracks.
16. Name (Display): Zeigt den Namen der wiedergegebenen Datei.
1 2 3 4 5 6 7 8 9
1111121213
13
10
10
14
14
15
15
16
16
U: 00:50
Single Pop
100: Track Name.mp3
Page 26

26
Mixer, Rückseite
1. Netzschalter: Verwenden Sie diesen Schalter, um den Mixer ein-/auszuschalten.
2. Stromanschluss: Das integrierte Netzkabel befindet sich hier.
3. Sicherungshalter: Die Sicherung darf nur von einem qualifizierten Techniker gewechselt werden.
Wenn die Sicherung nach dem Austausch durchbrennt, stellen Sie die Verwendung des Mixers ein, bis
das Gerät repariert ist.
4. Lautsprecherausgang: Verbinden Sie die beiden mitgelieferten, nicht angetriebenen (passiven)
Lautsprecher mit diesen Ausgängen. Bei der gleichzeitigen Verwendung von 4 Lautsprechern
verwenden Sie 8–16Ω Lautsprecher. Wenn nur ein Lautsprecher verwendet wird, verwenden Sie einen
4–8Ω Lautsprecher.
Lautsprecher, Rückseite
1. Eingabe: Schließen Sie den Lautsprecherausgang hier an den Mixer an.
2. Link: Verbinden Sie diesen Ausgang mit dem Eingang eines weiteren 8–
16Ω Passivlautsprechers.
1 2
1
2
3
4
Page 27

27
Appendix (English)
Technical Specifications
Power
115V / 230V AC, 50/60 Hz
PA 80 Dimensions
(width x depth x height)
9.0” x 18.6” x 5.5”
22.8 cm x 47.2 cm x 14 cm
PA 80 Weight
13.7 lbs.
6.2 kg
Speaker Dimensions (each)
(width x depth x height)
11” x 13.1” x 20.5”
4.3 cm x 5.1 cm x 8.1 cm
Speaker Weight (each)
18.7 lbs.
8.5 kg
Specifications are subject to change without notice.
Trademarks & Licenses
Alesis is a trademark of inMusic Brands, Inc., registered in the U.S. and other countries.
All other product or company names are trademarks or registered trademarks of their
respective owners.
Page 28

alesis.com
Manual Version 1.3
 Loading...