

Page 1

Nanopiano
REFERENCE MANUAL
by Connor Freff Cochran
© 1997 Alesis Corporation
––––––––––––––––––––––––––––––––––––––––––––––––––––
–––––
NanoPiano Reference Manual 1
Page 2

Your Shipping Carton
Should Contain The
Following Items:
NanoPiano
AC power adapter
1 rackmounting screw
Alesis warranty card
Reference Manual
Program Chart
If anything is missing, please contact your dealer or Alesis
immediately.
PLEASE NOTE: The warranty card is important. Really. Don’t
just throw it away. We’ll be able to take better care of you now,
and serve you better in the future, if you fill it out and send it in.
Alesis Contact Info
Alesis Corporation
3630 Holdredge Avenue
Los Angeles, CA 90016
phone: 1-800-5-ALESIS (800-525-3747)
e-mail: alecorp@alesis1.usa.com
website: www.alesis.com
––––––––––––––––––––––––––––––––––––––––––––––––––––
–––––
2 NanoPiano Reference Manual
Page 3

WELCOME!
Back in 1979 my band’s keyboard player and I went on a quest
to find the Perfect Stage Piano. There was a shiny new Yamaha
Grand in the recording studio where we were working, but for
live performances we needed something (a) portable, and (b)
affordable. We also wanted it to (c) sound great, since we loved
the music we were making and wanted audiences to hear it at its
best. With these three goals in mind we set off searching
through the music stores of New York City.
What did we find? Disappointment.
Keep in mind that these were the “pre-everything” days — pre-
MIDI, pre-sampling, pre-digital synths. The “piano” keyboards
that were any good cost at least five thousand dollars, and were
so heavy it would take three roadies to haul them on and off
stage. The keyboards that cost less — a mere two grand —
sounded bad. The ones that were truly portable got that way by
physically chopping off all but the middle octaves, drastically
limiting what you could play. And none of these instruments had
more than one sound.
I will not mention what we wound up buying. Suffice to say that
for quite a while afterwards we felt weighted down, poorer, and
deeply compromised.
But time and technology have marched on, and happier days
are here. Today I am no longer stuck with an expensive, limited,
quasi-piano behemoth. I have a NanoPiano instead.
Portable? Pick yours up and see. At not quite 1.25 pounds, I bet
you could shot-put it over the roof of your high-school
gymnasium. I have a friend who carries his to the studio in a
fanny pack.
Affordable? Oh yeah. (But you know that, or you wouldn’t be
reading this.)
––––––––––––––––––––––––––––––––––––––––––––––––––––
–––––
NanoPiano Reference Manual 3
Page 4

Great sounding? Absolutely. Inside this little box are 256 of the
most musical programs you’ll ever find in one instrument. The
centerpiece, of course, is the true stereo, phase-accurate grand
piano. But the goodie list doesn’t stop there. In addition you will
find lots of useful alternate grand pianos, plus spinets, electric
pianos, clavinets, strings, synth pads, vocal pads, organs,
combinations, splits, and more, all constructed from linear, noncompressed 48kHz 16-bit samples that are stored in eight
megabytes of on-board ROM.
And while I’m grinning, let me also mention some other things I
particularly appreciate about the unit — like 64 voices of
polyphony, the same built-in multieffects chip that Alesis uses in
their Q2 pro-class signal processor, complete MIDI control, and
incredibly simple operation.
Not bad, eh?
The bottom line is that the NanoPiano is deceptive. It looks
small and simple, and it is. But it is also a serious power tool for
all players, from the touring professional to the stay-at-home
hobbyist. Gold and platinum records have been made using the
sounds inside this box. Now you have them, too, for next-to-no
cost and zero hassle.
I really like the NanoPiano, and with good reason: I’m having a
blast with mine. I wish you lots of happy music-making with
yours.
Connor Freff Cochran
April 1997
––––––––––––––––––––––––––––––––––––––––––––––––––––
–––––
4 NanoPiano Reference Manual
Page 5

TABLE OF CONTENTS
WELCOME!
TABLE OF CONTENTS
0. WE INTERRUPT THE MANUAL IN PROGRESS... 6
Important Safety Instructions 7
Instructions To The User 8
CE Declaration of Conformity 9
1. CONNECTIONS 10
Power 11
Audio 12
MIDI 14
As A Single Slave (the IN Jack) 15
As Part Of A Chain (OUT/THRU Jack, Pt. 1) 15
Limited Computer Editing (OUT/THRU Jack, Pt. 2) 17
Rackmounting 18
2: INSTANT FUN 19
Demo Sequence 20
Playing It Yourself 21
3: GET TO KNOW YOUR NANO 22
The Specs 23
What They Mean When They Say “64 Voices” 24
The Front 26
The Back 27
The Programs and ROM Sounds 28-61
4: MIDI RULES 62
The Basics 63
The Not-So-Basics 65
MIDI Implementation Chart 66
5: CREDITS 67
––––––––––––––––––––––––––––––––––––––––––––––––––––
–––––
NanoPiano Reference Manual 5
Page 6

0: We Interrupt The Manual In Progress For Some Stuff
You Might Not Feel Like Reading, But Which Has To Be Here
Anyway
Important Safety Instructions
Instructions To The User
CE Declaration of Conformity
Many of you — no, let’s be honest, most of you — are going to
skip over this section.
That’s probably okay, assuming you’ve had prior experience
with audio gear and electronic instruments. This is basic stuff
that you most likely already know. Feel free to leap to the next
section (CONNECTIONS) and begin hooking up and playing
your new NanoPiano.
Beginners, however, are strongly advised to read the Important
Safety Instructions. A little basic knowledge is a good thing.
––––––––––––––––––––––––––––––––––––––––––––––––––––
–––––
6 NanoPiano Reference Manual
Page 7

Important Safety
Instructions
WARNING — When using your NanoPiano, certain precautions
should always be followed, such as:
1) Read all the instructions first.
2) Do not use your NanoPiano near water. Why? Water is a
terrific conductor of electricity. You risk damaging your
NanoPiano and shocking yourself if you use it near things
like bathtubs, washbowls, and kitchen sinks, or in wet
basements or around swimming pools.
3) Your NanoPiano doesn’t make any sound by itself — no
built-in speakers — but be careful when you are setting the
volume levels of anything you plug it into. If your amplifier,
headphones, or speakers are set too loud, then you could
produce sound levels capable of causing permanent hearing
loss. That’s “permanent” as in “forever,” which is definitely
not something you want. So be cautious. Don’t play your
NanoPiano for long periods of time at uncomfortably high
volume levels. And if you ever experience any hearing loss
or ringing in your ears, consult an audiologist immediately.
4) Don’t put your NanoPiano on or near any radiators, heat
registers, or other strong heat sources.
5) The “wall-wart” AC power supply for your NanoPiano should
be unplugged from the outlet whenever the unit is going to
go unused for a long period of time.
6) Be careful that you don’t drop things on, or spill liquids into,
your NanoPiano.
7) If for any reason your NanoPiano is damaged, or stops
working, don’t try to fix it yourself. All repairs should be
handled by Alesis-qualified service personnel. If the store
where you bought your NanoPiano can’t help, contact Alesis
directly for the name and number of the authorized service
location nearest you.
––––––––––––––––––––––––––––––––––––––––––––––––––––
–––––
NanoPiano Reference Manual 7
Page 8

Instructions To The User
This equipment has been tested and found to comply with the
limits for a class B digital device, pursuant to Part 15 of the FCC
Rules. These limits are designed to provide reasonable
protection against harmful interference in a residential
installation. This equipment generates, uses, and can radiate
radio frequency energy and, if not installed and used in
accordance with the instructions, may cause harmful
interference to radio communications. However, there is no
guarantee that interference will not occur in a particular
installation. If this equipment does cause harmful interference to
radio or television reception, which can be determined by turning
the equipment off and on, the user is encouraged to try and
correct the interference by one or more of the following
measures:
_ Reorient or relocate the receiving antenna.
_ Increase the separation between the equipment and
receiver.
_ Connect the equipment into an outlet on a circuit different
from that to which the receiver is connected.
_ Consult the dealer or an experienced radio/TV technician for
help.
This equipment has been verified to comply with the limits for a
class B computing device, pursuant to FCC Rules. In order to
maintain compliance with FCC regulations, shielded cables must
be used with this equipment. Operation with non-approved
equipment or unshielded cables is likely to result in interference
to radio and TV reception. The user is cautioned that changes
and modifications made to the equipment without the approval
of manufacturer could void the user’s authority to operate this
equipment.
––––––––––––––––––––––––––––––––––––––––––––––––––––
–––––
8 NanoPiano Reference Manual
Page 9

CE Compliance
––––––––––––––––––––––––––––––––––––––––––––––––––––
–––––
NanoPiano Reference Manual 9
Page 10

1: CONNECTIONS
Power
Audio
MIDI
Rackmounting
In this section, I’ll show you how to put it all together.
TIP: Don’t discard your NanoPiano box and packing materials.
Instead, tuck them away someplace safe (they won’t take up
much room). In the unlikely event that you need to return your
unit to your dealer or to Alesis for servicing, they’ll come in
handy.
––––––––––––––––––––––––––––––––––––––––––––––––––––
–––––
10 NanoPiano Reference Manual
Page 11
Power
Included with your NanoPiano is a “wall-wart” style power
adapter which is already set for the voltage of the country your
unit was shipped to. Connecting it is simple: just insert the
prongs on the wall-wart end into an electrical outlet, and the
single plug on the adapter end into the 9VAC~ POWER jack on
the NanoPiano’s back panel.
That’s all it takes. Be aware, though, that there is no ON/OFF
switch on the NanoPiano. Whenever it is plugged into an active
outlet, the unit is on. (To check this, look at the POWER
indicator LED on the front panel. It will glow whenever your
NanoPiano is getting electricity.)
Leaving your NanoPiano on all the time won’t hurt it. You won’t
use up much electricity, either, since the NanoPiano operates on
a miniscule amount of power.
If you’d prefer to turn the unit off when you aren’t working with it,
instead of leaving it on, there’s a simple solution. Plug the unit
into a power strip with a built-in ON/OFF switch, and use the
power strip switch to turn off the juice when required.
––––––––––––––––––––––––––––––––––––––––––––––––––––
–––––
NanoPiano Reference Manual 11
Page 12
Audio
There are two quarter-inch audio output jacks on the back of the
NanoPiano. One of them is marked LEFT and the other is
marked RIGHT. To get set up for audio, just run mono audio
cables from these outputs to the corresponding LEFT and
RIGHT input jacks on your mixer, amplifier, power amp, or
powered speakers.
In a pinch you can get by with hooking up only one of the audio
outputs, but I don’t recommend it. If you do that you’ll be missing
out on half the true-stereo sound in each program, not to
mention big chunks of stereo reverb and effects. If only one
audio jack is in use, then the NanoPiano automatically sums its
output signal to mono.
And besides — with all the money you saved buying the
NanoPiano in the first place, you really ought to be able to afford
two audio cables (preferably good ones).
TIPS:
Here are some things to avoid when working with audio cables.
You experienced folks should check these out, too, instead of
rushing ahead, because this is an area where you may know
less than you think you do. (I can’t begin to tell you how many
supposedly “professional” musicians and recording engineers
I’ve seen break the following rules, to their very real regret.)
_ Do NOT bundle audio cables and AC power cords together.
The field from the alternating current in the power cord will
––––––––––––––––––––––––––––––––––––––––––––––––––––
–––––
12 NanoPiano Reference Manual
Page 13

leak through even well-shielded cables, inducing noise and
distortion in your audio signal.
_ Do NOT run audio cables near other sources of obvious
electromagnetic interference such as monitors, computers,
and power transformers (including the wall-wart end of the
NanoPiano’s own AC adapter).
_ Do NOT run audio cables where they can be stepped on or
tripped over. Falling and hurting yourself is an obvious
danger, of course. Less obvious is the invisible damage
done to the cable itself. Every time you step on a cable you
compress the insulation between center conductor and the
shield, degrading performance and reducing the cable’s
reliability. You may not notice a problem right away, but
eventually you will.
_ Do NOT twist the cable if you can possibly avoid it, or force
it to make sharp right angle turns. Doing these things will
damage the insides of the cable even faster than stepping
on them.
_ NEVER unplug a cable by pulling on the cable itself. This
puts a dangerous strain on the soldered connections
between the cable and the plug, and can easily make a
cable go bad (or at least intermittent) on you. The proper
way to take a plug out of a jack is the same way you put it in
— with a firm grasp on the body of the plug itself.
_ ALWAYS keep your plugs and jacks clean and unoxidized.
Occasional use of solvent cleaners like Tweek and
Cramolin, which are available at any electronics shop, can
greatly improve the electrical contact between your
connectors.
––––––––––––––––––––––––––––––––––––––––––––––––––––
–––––
NanoPiano Reference Manual 13
Page 14

MIDI
Ten years ago MIDI was still a strange new thing to most
musicians and computer users. Not any more, so I’ll keep this
part short.
The basics: MIDI stands for Musical Instrument Digital Interface,
which is a 16-channel serial data exchange and control system
for musical devices. MIDI works by supplying a way for the
microprocessors in your various electronic musical devices to
pass messages back and forth over a special network of cables.
These cables, which are used only for MIDI data and nothing
else, plug into special five-pin DIN jacks which are typically
labeled IN, OUT, and THRU. The IN jack receives MIDI data.
The OUT jack transmits it. And the THRU jack automatically
echoes and re-transmits whatever data is being received at the
IN jack (this last function has a special use I’ll get to in a
minute).
One of the important things to remember about MIDI is that data
flow is strictly one-way. Make sure you always plug the OUT
jack of one instrument into the IN jack of another, and viceversa. The other choices — OUT to OUT, or IN to IN — won’t
work.
If you’ll look on the back of your NanoPiano you’ll see that it
doesn’t have an IN, and OUT, and a THRU. Instead it has an IN
and a combined OUT/THRU. There are good reasons for this:
(1) the NanoPiano doesn’t have a built-in keyboard or anything
else to play, so it doesn’t really need an OUT jack; (2) combining
OUT and THRU jacks saves a little on the cost, bringing the
unit’s price down; and (3) it makes the back panel less crowded.
How should you hook your NanoPiano into your MIDI system?
That depends on how you intend to use it.
AS A SINGLE SLAVE
(the IN Jack)
––––––––––––––––––––––––––––––––––––––––––––––––––––
–––––
14 NanoPiano Reference Manual
Page 15

To play your NanoPiano directly from any MIDI source —
keyboard, drum pads, woodwind controller, guitar controller,
computer, etc. — just run a MIDI cable from the MIDI OUT of
the controlling device to the MIDI IN jack on the back of the
NanoPiano. Then turn the NanoPiano’s MIDI CHANNEL knob to
the same MIDI channel (from 1-16) that the controlling
instrument is transmitting on.
PLEASE NOTE: This is important to remember. The NanoPiano
can only respond to one MIDI channel at a time. If it is set to
receive on MIDI channel 2, for example, it will ignore MIDI
messages coming in over channel 1, or channels 3-16.
To make sure the NanoPiano is receiving data, play the
controlling instrument while watching the MIDI indicator LED on
the NanoPiano’s front panel. If everything is set properly, the
LED should light up. If you don’t see the light, double-check your
cable connections and MIDI channel settings.
AS PART OF A DAISY-CHAIN
(the OUT Jack, Part 1)
When you want to control several MIDI devices at the same
time, there are two ways to do it. The first is to buy a MIDI
interface with multiple OUTs, and then run separate MIDI cables
from this interface to all the different devices. This is called a
“star” network and it is the preferable way to go, if you can afford
it.
The second way is to “daisy-chain” several units together.
––––––––––––––––––––––––––––––––––––––––––––––––––––
–––––
NanoPiano Reference Manual 15
Page 16
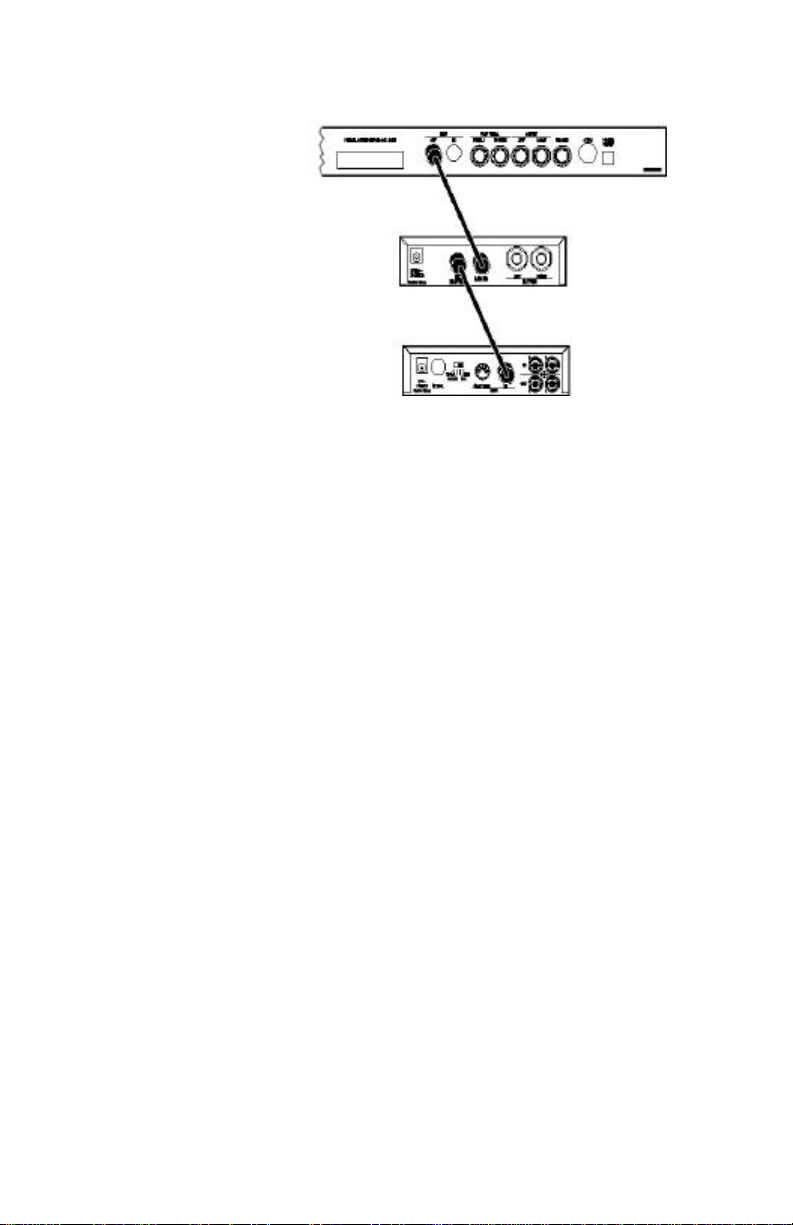
A daisy-chain is where the OUT/THRU jack on the NanoPiano
comes into use. After connecting the controller’s OUT to the
NanoPiano’s IN, you’d continue the chain by running a MIDI
cable from the NanoPiano’s OUT/THRU to the next instrument’s
IN jack, then another cable from that instrument’s THRU to the
next instrument’s IN, and so on down the line until you were
finished. Now when you play your controller, each device will
respond to the MIDI data and “pass it on down” the line.
PLEASE NOTE: As a general rule of thumb, daisy chains
should be no longer than three instruments in a row. Any more
than that and you risk accumulating data transmission errors
that could cause stuck notes, unexpected program changes, and
inaccurate control.
In really big MIDI setups, you might find yourself combining a
basic star network with selected short daisy-chains, usually of
instruments which you either can’t (or don’t want to) edit with
your computer. Which brings us to...
––––––––––––––––––––––––––––––––––––––––––––––––––––
–––––
16 NanoPiano Reference Manual
Page 17

LIMITED COMPUTER EDITING
(The OUT Jack, Pt. 2)
The NanoPiano’s 256 programs are stored on the circuitboard as
EPROM data, and can’t be changed. You can still use a
computer, though, to edit one program at a time.
Here’s the trick. If you connect your computer’s MIDI OUT to the
NanoPiano’s MIDI IN, and the NanoPiano’s OUT to the
computer’s IN, then you can use a commercial librarian/editor
program (such as Mark of the Unicorn’s Unisyn) to edit the
contents of the NanoPiano’s edit buffer. This would allow you,
for example, to change the samples in a program, pick a new
LFO waveform, adjust its attack envelope, radically alter its
effects settings, and so forth. Then you could save this new
program in your computer and download it into the NanoPiano’s
edit buffer any time you wanted.
What you can’t do is permanently store this changed sound in
the NanoPiano itself, because the unit has no battery-backed
RAM. Whatever editing you did would vanish when you turned
the unit’s power off.
––––––––––––––––––––––––––––––––––––––––––––––––––––
–––––
NanoPiano Reference Manual 17
Page 18

Rackmounting
Your NanoPiano will sit happily on any flat surface, and thanks
to its four rubber feet it won’t slide around too much. But if you
are interested in a more secure and permanent installation, then
rackmounting is the way to go.
On the underside of your unit you will find a mounting nut
already built into the box. This nut is positioned so it will line up
with the hole in most standard rack-mount adapters for onethird-rack sized products. Simply place the NanoPiano on the
adapter tray, line up the mounting nut with the hole in the
adapter, and screw the unit into place using the mounting screw
that came with your NanoPiano at purchase.
Your local music store can certainly supply you with an adapter
that will work to mount your NanoPiano into a rack. Ask for a
single-space rack shelf, rack tray, or universal rack adapter, and
make sure it has pre-drilled holes in the bottom that match up
with the NanoPiano’s mounting nut.
––––––––––––––––––––––––––––––––––––––––––––––––––––
–––––
18 NanoPiano Reference Manual
Page 19

2: INSTANT FUN
Demo Sequence
Playing It Yourself
Once you’re set up, this section will show you the two quickest
ways to explore the programs in your NanoPiano.
––––––––––––––––––––––––––––––––––––––––––––––––––––
–––––
NanoPiano Reference Manual 19
Page 20

Demo Sequence
Built into your NanoPiano is a musical demo — Chopin’s CSharp Minor Waltz.
To run it:
1) Make sure your audio is hooked up and the power on.
2) Set the CHANNEL, CATEGORY, and PROGRAM knobs
straight up, to the “twelve o’clock” position.
3) Set the EFFECTS knob all the way counter-clockwise.
Then...
4) Turn EFFECTS all the way to the right in one quick turn.
At this point the MIDI indicator LED will turn on, and you will
hear the TrueStereo piano program begin to play the Chopin
waltz. (The reason the indicator light is flashing is because the
demo is playing from MIDI data stored in the NanoPiano ROM.)
To shut the demo off, either turn the EFFECTS knob all the way
to the left again in one quick turn, or turn the unit’s power off.
Having an on-board sequence like this is useful in two different
ways.
First, it allows you to check your NanoPiano at any time in order
to make sure it’s working. Second, it provides an easy way to
hear the unit’s 256 different programs.
Give it a try! Start the sequence going, then step through all 16
different PROGRAM knob settings, listening to the 16 different
programs grouped together under the ACOUSTIC PIANO
category. When you’re done with that, turn the CATEGORY
knob to PIANO & STRINGS and go through the 16 different
PROGRAM settings that you’ll find there. And when you’re done
with that, go ahead and experiment with turning the CATEGORY
and PROGRAM knobs at will.
––––––––––––––––––––––––––––––––––––––––––––––––––––
–––––
20 NanoPiano Reference Manual
Page 21

Of course, some programs — especially the ones in the
EFFECT category — will sound pretty strange playing a Chopin
waltz. But hey, it’s the ‘90s...and since I doubt we’ll be hearing
any complaints from Chopin’s lawyers, go have a blast.
Playing It Yourself
That’s what you bought it for, isn’t it?
Go right ahead, then. Double-check all the necessary
connections — power, audio, MIDI — and start playing! When
you get tired of a particular program, just use the CATEGORY
and PROGRAM knobs to shift to something new.
––––––––––––––––––––––––––––––––––––––––––––––––––––
–––––
NanoPiano Reference Manual 21
Page 22

3: GET TO KNOW
YOUR NANO
The Specs
The Front
The Back
The Programs and ROM sounds
In this section I’ll quickly step you through the basic features,
specs, and controls of the NanoPiano. You’ll also find a
reference section listing all 80 sounds in the on-board ROM and
all 256 programs (with room to take some notes of your own).
––––––––––––––––––––––––––––––––––––––––––––––––––––
–––––
22 NanoPiano Reference Manual
Page 23

The Specs
Sound Generation Method: sample playback 16 bit Linear
48kHz Sample ROM
Synthesis: QS Composite Synthesis™
Voices: 64, each with sweepable lowpass filter, 3 envelope
generators, 3 LFOs, programmable effects send and QS
Modulation Matrix, dynamic voice allocation
Available Waveform Memory: 8 Megabytes
Program Memory: 256 presets
Effects: QS Parallel Matrix Effects™ (4 independent stereo
multieffect processing busses)
MIDI Connections: MIDI In, MIDI Out/Thru
Audio Outputs: Stereo Left and Right outputs
Power Requirements: 9 VAC, 5 Volt Amps external
Transformer, UL and CSA Approved
Dimensions: (WxHxD) 5.5” x 1.5” x 4.5”
Weight: 1.25 lbs.
––––––––––––––––––––––––––––––––––––––––––––––––––––
–––––
NanoPiano Reference Manual 23
Page 24

What They Mean When They Say
“64 Voices”
Once upon a time it was simple. A “voice,” in synth parlance,
meant a single note of polyphony. A five voice instrument like
the Sequential Circuits Prophet 5™ could play five simultaneous
notes. A 16 voice instrument like the Yamaha DX7™ could play
16 notes. And so on.
Then things got complicated, when synth programmers got deep
into digital design and figured out how to create even more
complicated and interesting sonic textures by stacking voices
together in combination. Suddenly the “number of voices =
polyphony” equation didn’t directly apply anymore.
In one program on an instrument, for example, playing a single
key might trigger a flute voice and a choir voice simultaneously:
one note, two voices. Another program in the same instrument
might stack another two voices into the mix: one note, four
voices. If such an instrument had 16 voices to start with, playing
just four notes would max it out.
It’s important for you to understand that interaction.
The NanoPiano is a 64-voice instrument. Some of its programs
trigger only one voice per note played. With those programs,
you’ll have 64 notes of available polyphony. Other programs
trigger two voices per note, giving you 32 voices of available
polyphony. Still others trigger four voices per note, allowing you
16 notes of polyphony.
This sounds more daunting than it actually is, thanks to another
item you’ll find back there in the specs: Dynamic Allocation. In
simplest terms, dynamic allocation is a very slick, very smart bit
of software that keeps track of what you are playing and invisibly
“steals” voices that are already sounding, in order to keep up as
you play.
––––––––––––––––––––––––––––––––––––––––––––––––––––
–––––
24 NanoPiano Reference Manual
Page 25

In a well-programmed instrument, dynamic allocation is so
transparent a process you’ll never notice it happening. And the
NanoPiano is a very well-programmed instrument.
Here’s a test that proves it.
Set the CATEGORY knob to ACOUSTIC PIANO and the
PROGRAM knob to 1. Then turn the volume up, step on your
controller keyboard’s sustain pedal, and run your hand up the
whole keyboard in one long glissando. Do NOT let go of the
sustain pedal when you are finished. Instead, just listen to the
lovely, long, naturally fading decay and see if you can tell how
the NanoPiano is managing to sound like it has more voices
than it actually has. I think you’ll be pretty impressed.
––––––––––––––––––––––––––––––––––––––––––––––––––––
–––––
NanoPiano Reference Manual 25
Page 26

The Front
The front of the NanoPiano has two indicator LEDs and five
knobs. Taking them from left to right...
POWER: This indicator will glow whenever the NanoPiano is
hooked up to a live electrical outlet.
MIDI: This indicator will flash whenever the NanoPiano is either
receiving or sending MIDI data. (You’ll notice that it lights up
when the unit is playing its onboard demo sequence.)
VOLUME: This knob controls the stereo output volume. All the
way to the left is off. All the way to the right is full on. For
maximum audio quality I recommend turning the volume knob
to full on, and lowering the NanoPiano’s signal to proper levels
at your mixer or amp input.
EFFECT: Although many NanoPiano programs have more than
one effect built into them, each program has one specific effect
that can be adjusted in real time from this knob. Turning it all the
way to the left lowers the specified effect to nothing, while
turning it all the way to the right takes the effect to its maximum
programmed level. (The other effects in any given program are
also adjustable, but only via MIDI.)
CHANNEL: This knob sets which MIDI channel the NanoPiano
will respond to, from 1 to 16. (It also has an impact on the
function of the MIDI indicator LED, which will only flash if there
is MIDI data coming in over the selected channel. Data coming
in over other channels will be ignored.)
CATEGORY: This knob has no printed name on the front panel
— there wasn’t room — but its function should be rapidly
apparent once you start playing around with it. The 256
programs in the NanoPiano are organized in 16 sets of 16
programs each. This is the knob you turn to select which set the
PROGRAM knob will be selecting from.
PROGRAM: You’ll turn this one a lot. It selects which program
in a given category will play in response to incoming MIDI data.
––––––––––––––––––––––––––––––––––––––––––––––––––––
–––––
26 NanoPiano Reference Manual
Page 27

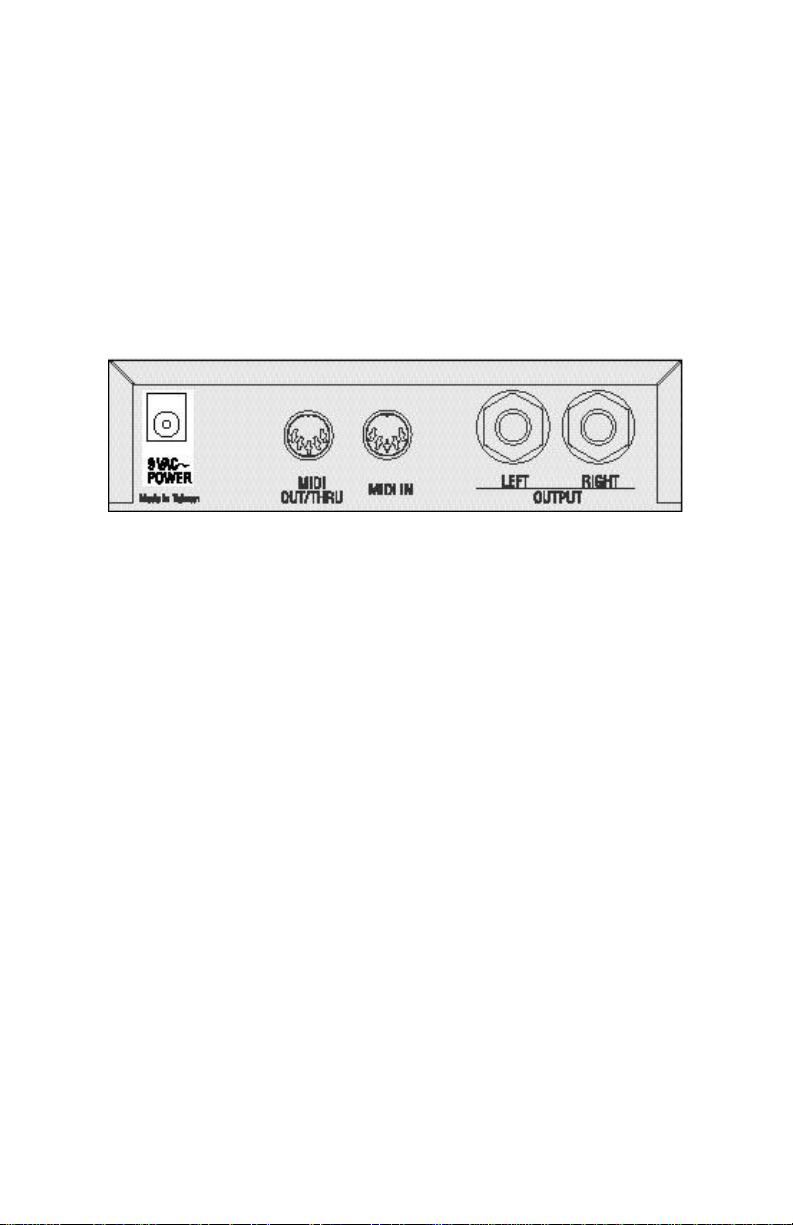
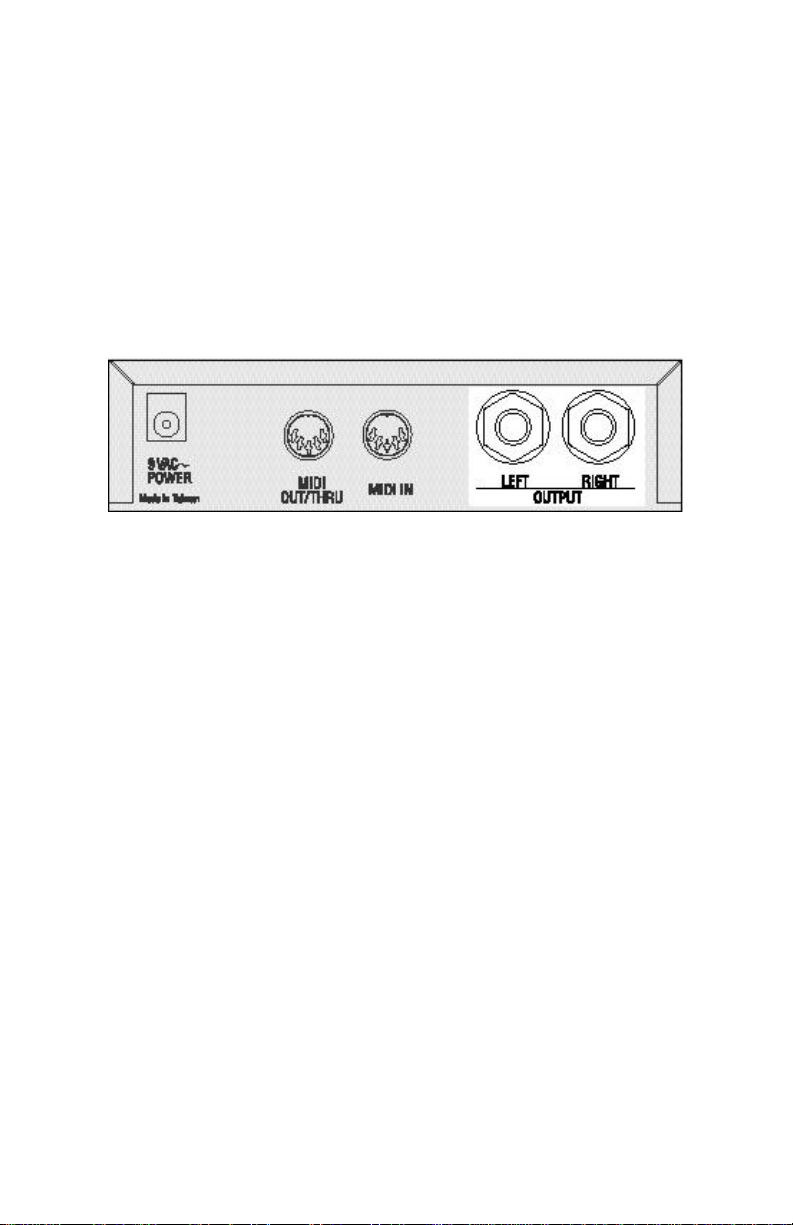
The Back
The back of the NanoPiano has five connectors: one for power,
two for MIDI, and two for audio.
POWER: This jack supplies electricity to the NanoPiano through
the 9-volt AC adapter supplied by Alesis.
MIDI OUT/THRU: The only original MIDI messages sent out by
this 5-pin DIN jack are certain responses to commands from an
external source (sequencer, editor/librarian, etc.). At all other
times what it does is automatically echo and re-transmit any
MIDI data entering through the MIDI IN jack.
MIDI IN: This 5-pin DIN jack receives incoming MIDI data from
external sources and controllers.
The Programs and ROM
Sounds
On the following pages you will find reference charts for all 256
NanoPiano programs, organized by category. The chart shows
the MIDI bank select command and MIDI program number for
each program, its number on the front panel PROGRAM knob,
and its name.
There is also a space for you to write in notes of your own
regarding what you think of each sound, or any ideas you might
have for using it.
––––––––––––––––––––––––––––––––––––––––––––––––––––
–––––
NanoPiano Reference Manual 27
Page 28

Acoustic Piano
BANK
SELECT
0 or 1 000 1 TrueStereo
0 or 1 001 2 TrueStr8va
0 or 1 002 3 TrueStr8vb
0 or 1 003 4 Velo Piano
0 or 1 004 5 DarkGrand1
0 or 1 005 6 DarkGrand2
0 or 1 006 7 DarkGrand3
0 or 1 007 8 DarkGrand4
0 or 1 008 9 Ballad Pno
0 or 1 019 10 Spinet
0 or 1 010 11 BriteGrnd1
MIDI
PROGRAM
KNOB
NUMBER
PROGRAM
NAME
0 or 1 011 12 BriteGrnd2
0 or 1 012 13 Titanium88
0 or 1 013 14 Wire Piano
0 or 1 014 15 HousePiano
0 or 1 015 16 Player Pno
––––––––––––––––––––––––––––––––––––––––––––––––––––
–––––
28 NanoPiano Reference Manual
Page 29

––––––––––––––––––––––––––––––––––––––––––––––––––––
–––––
NanoPiano Reference Manual 29
Page 30

PROGRAM
NAME
TrueStereo
TrueStr8va
TrueStr8vb
Velo Piano
DarkGrand1
DarkGrand2
DarkGrand3
DarkGrand4
Ballad Pno
Spinet
BriteGrnd1
NOTES
BriteGrnd2
Titanium88
Wire Piano
HousePiano
Player Pno
––––––––––––––––––––––––––––––––––––––––––––––––––––
–––––
30 NanoPiano Reference Manual
Page 31

––––––––––––––––––––––––––––––––––––––––––––––––––––
–––––
NanoPiano Reference Manual 31
Page 32

Piano & Strings
BANK
SELECT
0 or 1 016 1 Pno&Strgs1
0 or 1 017 2 Pno&Strgs2
0 or 1 018 3 Pno&Strgs3
0 or 1 019 4 PianoMorph
0 or 1 020 5 Pno&BrtStr
0 or 1 021 6 BrtPno&Str
0 or 1 022 7 Egrnd&Strg
0 or 1 023 8 Pno&LoStrg
0 or 1 024 9 OctPno&Str
0 or 1 025 10 UprPno&Str
0 or 1 026 11 PnoStFlang
MIDI
PROGRAM
KNOB
NUMBER
PROGRAM
NAME
0 or 1 027 12 EgrnStFlng
0 or 1 028 13 PnoStakStr
0 or 1 029 14 SynPnoStrg
0 or 1 030 15 Tap&String
0 or 1 031 16 ShortyP&S
––––––––––––––––––––––––––––––––––––––––––––––––––––
–––––
32 NanoPiano Reference Manual
Page 33

––––––––––––––––––––––––––––––––––––––––––––––––––––
–––––
NanoPiano Reference Manual 33
Page 34

PROGRAM
NAME
Pno&Strgs1
Pno&Strgs2
Pno&Strgs3
PianoMorph
Pno&BrtStr
BrtPno&Str
Egrnd&Strg
Pno&LoStrg
OctPno&Str
UprPno&Str
PnoStFlang
NOTES
EgrnStFlng
PnoStakStr
SynPnoStrg
Tap&String
ShortyP&S
––––––––––––––––––––––––––––––––––––––––––––––––––––
–––––
34 NanoPiano Reference Manual
Page 35

––––––––––––––––––––––––––––––––––––––––––––––––––––
–––––
NanoPiano Reference Manual 35
Page 36

Piano Layer
BANK
SELECT
0 or 1 032 1 Hollywood
0 or 1 033 2 BalladKeys
0 or 1 034 3 PianoClav1
0 or 1 035 4 PianoClav2
0 or 1 036 5 PianoVibes
0 or 1 037 6 Perc Piano
0 or 1 038 7 Fantapiano
0 or 1 039 8 AlloyPiano
0 or 1 040 9 Piano&Org1
0 or 1 041 10 Piano&Org2
0 or 1 042 11 Piano&Org3
MIDI
PROGRAM
KNOB
NUMBER
PROGRAM
NAME
0 or 1 043 12 Piano&Pipe
0 or 1 044 13 PnoTriLayr
0 or 1 045 14 PnoSqrLayr
0 or 1 046 15 Hybridor
0 or 1 047 16 Airiano
––––––––––––––––––––––––––––––––––––––––––––––––––––
–––––
36 NanoPiano Reference Manual
Page 37

––––––––––––––––––––––––––––––––––––––––––––––––––––
–––––
NanoPiano Reference Manual 37
Page 38

PROGRAM
NAME
Hollywood
BalladKeys
PianoClav1
PianoClav2
PianoVibes
Perc Piano
Fantapiano
AlloyPiano
Piano&Org1
Piano&Org2
Piano&Org3
NOTES
Piano&Pipe
PnoTriLayr
PnoSqrLayr
Hybridor
Airiano
––––––––––––––––––––––––––––––––––––––––––––––––––––
–––––
38 NanoPiano Reference Manual
Page 39

––––––––––––––––––––––––––––––––––––––––––––––––––––
–––––
NanoPiano Reference Manual 39
Page 40

Piano FX
BANK
SELECT
0 or 1 048 1 Tori’s Ice
0 or 1 049 2 Nickel Pno
0 or 1 050 3 Copper Pno
0 or 1 051 4 Iron Pno
0 or 1 052 5 TapKlavier
0 or 1 053 6 TapTheBox
0 or 1 054 7 DrkCavePno
0 or 1 055 8 SpinetRoom
0 or 1 056 9 Flangiano
0 or 1 057 10 LezlyPiano
0 or 1 058 11 5th Piano
MIDI
PROGRAM
KNOB
NUMBER
PROGRAM
NAME
0 or 1 059 12 Rave Knave
0 or 1 060 13 Staggered
0 or 1 061 14 Quickstep
0 or 1 062 15
0 or 1 063 16 Pianoscape
––––––––––––––––––––––––––––––––––––––––––––––––––––
–––––
40 NanoPiano Reference Manual
Random Pno
Page 41

––––––––––––––––––––––––––––––––––––––––––––––––––––
–––––
NanoPiano Reference Manual 41
Page 42

PROGRAM
NAME
Tori’s Ice
Nickel Pno
Copper Pno
Iron Pno
TapKlavier
TapTheBox
DrkCavePno
SpinetRoom
Flangiano
LezlyPiano
5th Piano
NOTES
Rave Knave
Staggered
Quickstep
Random Pno
Pianoscape
––––––––––––––––––––––––––––––––––––––––––––––––––––
–––––
42 NanoPiano Reference Manual
Page 43

––––––––––––––––––––––––––––––––––––––––––––––––––––
–––––
NanoPiano Reference Manual 43
Page 44

E. Piano
BANK
SELECT
0 or 1 064 1 Rock Roads
0 or 1 065 2 Soft Roads
0 or 1 066 3 Suitcase
0 or 1 067 4 ClascWurly
0 or 1 068 5 DirtyWurly
0 or 1 069 6 Soft FM EP
0 or 1 070 7 Eep Iano
0 or 1 071 8 CrystlRoad
0 or 1 072 9 Wave Piano
0 or 1 073 10 NanoTines1
0 or 1 074 11 NanoTines2
MIDI
PROGRAM
KNOB
NUMBER
PROGRAM
NAME
0 or 1 075 12 WurlyRoadz
0 or 1 076 13 SuperRoadz
0 or 1 077 14 Whirl Lee
0 or 1 078 15 No Quarter
0 or 1 079 16 Crunchy EP
––––––––––––––––––––––––––––––––––––––––––––––––––––
–––––
44 NanoPiano Reference Manual
Page 45

––––––––––––––––––––––––––––––––––––––––––––––––––––
–––––
NanoPiano Reference Manual 45
Page 46

PROGRAM
NAME
Rock Roads
Soft Roads
Suitcase
ClascWurly
DirtyWurly
Soft FM EP
Eep Iano
CrystlRoad
Wave Piano
NanoTines1
NanoTines2
NOTES
WurlyRoadz
SuperRoadz
Whirl Lee
No Quarter
Crunchy EP
––––––––––––––––––––––––––––––––––––––––––––––––––––
–––––
46 NanoPiano Reference Manual
Page 47

––––––––––––––––––––––––––––––––––––––––––––––––––––
–––––
NanoPiano Reference Manual 47
Page 48

EP Layer
BANK
SELECT
0 or 1 080 1 EP&Strgs1
0 or 1 081 2 EP&Strgs2
0 or 1 082 3 EP & Vox 1
0 or 1 083 4 EP & Vox 2
0 or 1 084 5 EP & Vox 3
0 or 1 085 6 EP & Vox 4
0 or 1 086 7 WhirlStrng
0 or 1 087 8 Whirl Vox
0 or 1 088 9 Dyno 5 Vox
0 or 1 089 10 EP & Organ
0 or 1 090 11 EP & Saw
MIDI
PROGRAM
KNOB
NUMBER
PROGRAM
NAME
0 or 1 091 12 EP & Pad
0 or 1 092 13 DigiEP&Syn
0 or 1 093 14 Roads&Syn
0 or 1 094 15 Richman
0 or 1 095 16 Dyna5Strgs
––––––––––––––––––––––––––––––––––––––––––––––––––––
–––––
48 NanoPiano Reference Manual
Page 49

––––––––––––––––––––––––––––––––––––––––––––––––––––
–––––
NanoPiano Reference Manual 49
Page 50

PROGRAM
NAME
EP&Strgs1
EP&Strgs2
EP & Vox 1
EP & Vox 2
EP & Vox 3
EP & Vox 4
WhirlStrng
Whirl Vox
Dyno 5 Vox
EP & Organ
EP & Saw
NOTES
EP & Pad
DigiEP&Syn
Roads&Syn
Richman
Dyna5Strgs
––––––––––––––––––––––––––––––––––––––––––––––––––––
–––––
50 NanoPiano Reference Manual
Page 51

––––––––––––––––––––––––––––––––––––––––––––––––––––
–––––
NanoPiano Reference Manual 51
Page 52

Chromatic
BANK
SELECT
0 or 1 096 1 Real Clav
0 or 1 097 2 Obligaclav
0 or 1 098 3 Clavitube
0 or 1 099 4 TrueHarpsi
0 or 1 100 5 8’4’Harpsi
0 or 1 101 6 Harpsi&Pad
0 or 1 102 7 Kool Vibes
0 or 1 103 8 Tine Vibes
0 or 1 104 9 DigitlVibe
0 or 1 105 10 BriteMarim
0 or 1 106 11 Woody Xylo
MIDI
PROGRAM
KNOB
NUMBER
PROGRAM
NAME
0 or 1 107 12 Wood Sign
0 or 1 108 13 Ingrid
0 or 1 109 14 Metalwork
0 or 1 110 15 Broken Toy
0 or 1 111 16 FlangdMuse
––––––––––––––––––––––––––––––––––––––––––––––––––––
–––––
52 NanoPiano Reference Manual
Page 53

––––––––––––––––––––––––––––––––––––––––––––––––––––
–––––
NanoPiano Reference Manual 53
Page 54

PROGRAM
NAME
Real Clav
Obligaclav
Clavitube
TrueHarpsi
8’4’Harpsi
Harpsi&Pad
Kool Vibes
Tine Vibes
DigitlVibe
BriteMarim
Woody Xylo
NOTES
Wood Sign
Ingrid
Metalwork
Broken Toy
FlangdMuse
––––––––––––––––––––––––––––––––––––––––––––––––––––
–––––
54 NanoPiano Reference Manual
Page 55

––––––––––––––––––––––––––––––––––––––––––––––––––––
–––––
NanoPiano Reference Manual 55
Page 56

Organ
BANK
SELECT
0 or 1 112 1 Moregistrs
0 or 1 113 2 Warm Organ
0 or 1 114 3 2 Stops
0 or 1 115 4 HiPercOrgn
0 or 1 116 5 More Percs
0 or 1 117 6 Harmonious
0 or 1 118 7 B-Cussion
0 or 1 119 8 Concussion
0 or 1 120 9 Slow Pipes
0 or 1 121 10 Positiv 4’
0 or 1 122 11 Positv8’4’
MIDI
PROGRAM
KNOB
NUMBER
PROGRAM
NAME
0 or 1 123 12 Principal+
0 or 1 124 13 Puff Pipes
0 or 1 125 14 No Perc B
0 or 1 126 15 PaintChips
0 or 1 127 16 Surf Organ
––––––––––––––––––––––––––––––––––––––––––––––––––––
–––––
56 NanoPiano Reference Manual
Page 57

––––––––––––––––––––––––––––––––––––––––––––––––––––
–––––
NanoPiano Reference Manual 57
Page 58

PROGRAM
NAME
Moregistrs
Warm Organ
2 Stops
HiPercOrgn
More Percs
Harmonious
B-Cussion
Concussion
Slow Pipes
Positiv 4’
Positv8’4’
NOTES
Principal+
Puff Pipes
No Perc B
PaintChips
Surf Organ
––––––––––––––––––––––––––––––––––––––––––––––––––––
–––––
58 NanoPiano Reference Manual
Page 59

––––––––––––––––––––––––––––––––––––––––––––––––––––
–––––
NanoPiano Reference Manual 59
Page 60

Bass
BANK
SELECT
2 000 1 FatUpright
2 001 2 Box Bass
2 002 3 Fingered
2 003 4 Pixx
2 004 5 FlangrBass
2 005 6 Fretless 1
2 006 7 Fretless 2
2 007 8 Octaver 1
2 008 9 Octaver 2
2 009 10 Acid Bass
2 010 11 PedalDrone
MIDI
PROGRAM
KNOB
NUMBER
PROGRAM
NAME
2 011 12 Pressure
2 012 13 Y Bass
2 013 14 Power Bass
2 014 15 Bondo Bass
2 015 16 BassHarmnc
––––––––––––––––––––––––––––––––––––––––––––––––––––
–––––
60 NanoPiano Reference Manual
Page 61

––––––––––––––––––––––––––––––––––––––––––––––––––––
–––––
NanoPiano Reference Manual 61
Page 62

PROGRAM
NAME
FatUpright
Box Bass
Fingered
Pixx
FlangrBass
Fretless 1
Fretless 2
Octaver 1
Octaver 2
Acid Bass
PedalDrone
NOTES
Pressure
Y Bass
Power Bass
Bondo Bass
BassHarmnc
––––––––––––––––––––––––––––––––––––––––––––––––––––
–––––
62 NanoPiano Reference Manual
Page 63

––––––––––––––––––––––––––––––––––––––––––––––––––––
–––––
NanoPiano Reference Manual 63
Page 64

String
BANK
SELECT
2 016 1
2 017 2
2 018 3
2 019 4
2 020 5
2 021 6
2 022 7
2 023 8
2 024 9
2 025 10
2 026 11
MIDI
PROGRAM
KNOB
NUMBER
PROGRAM
NAME
RichString
MarcatoEns
Arco Bows
StrPadDecy
BrtStrgPad
LushStrngs
StringMood
Film Score
OctaString
HugeString
Big String
2 027 12
2 028 13
2 029 14
2 030 15
2 031 16
––––––––––––––––––––––––––––––––––––––––––––––––––––
–––––
64 NanoPiano Reference Manual
FifthsAura
String&Pad
OB Strings
HyerString
Eurostring
Page 65

––––––––––––––––––––––––––––––––––––––––––––––––––––
–––––
NanoPiano Reference Manual 65
Page 66

PROGRAM
NAME
RichString
MarcatoEns
Arco Bows
StrPadDecy
BrtStrgPad
LushStrngs
StringMood
Film Score
OctaString
HugeString
Big String
NOTES
FifthsAura
String&Pad
OB Strings
HyerString
Eurostring
––––––––––––––––––––––––––––––––––––––––––––––––––––
–––––
66 NanoPiano Reference Manual
Page 67

Synth Pad
BANK
SELECT
2
2
2
2
2
2
2
2
2
2
2
MIDI
PROGRAM
032
033
034
035
036
037
038
039
040
041
042
KNOB
NUMBER
1
2 OohDecyPad
3
4
5
6
7
8
9
10
11
PROGRAM
NAME
Light Vox
Vox In Box
Coed Oohs
Night Vox
SoftMorphi
FilterWave
VCO Swell
LightForce
ExpndngPad
VibratoPad
2
2
2
2
2
043
044
045
046
047
12
13
14
15
16
Transcndnt
Syn Flange
Bali Hai
WarmStrPad
PowrStrPad
––––––––––––––––––––––––––––––––––––––––––––––––––––
–––––
NanoPiano Reference Manual 67
Page 68

––––––––––––––––––––––––––––––––––––––––––––––––––––
–––––
68 NanoPiano Reference Manual
Page 69

PROGRAM
NAME
Light Vox
OohDecyPad
Vox In Box
Coed Oohs
Night Vox
SoftMorphi
FilterWave
VCO Swell
LightForce
ExpndngPad
VibratoPad
NOTES
Transcndnt
Syn Flange
Bali Hai
WarmStrPad
PowrStrPad
––––––––––––––––––––––––––––––––––––––––––––––––––––
–––––
NanoPiano Reference Manual 69
Page 70

––––––––––––––––––––––––––––––––––––––––––––––––––––
–––––
70 NanoPiano Reference Manual
Page 71

Lead
BANK
SELECT
2 048 1 Lucky Lead
2 049 2 Tri Lead
2 050 3 Pulse Lead
2 051 4 SynTrumpet
2 052 5 VoltagePad
2 053 6 70sAmbient
2 054 7 Analead
2 055 8 Funk Lead
2 056 9 Slippery
2 057 10 Dualalead
2 058 11 MiniLeader
MIDI
PROGRAM
KNOB
NUMBER
PROGRAM
NAME
2 059 12 Hi Buzz
2 060 13 Analogos
2 061 14 SynClvLead
2 062 15 Bigee Sawz
2 063 16 Sawtooth 5
––––––––––––––––––––––––––––––––––––––––––––––––––––
–––––
NanoPiano Reference Manual 71
Page 72

––––––––––––––––––––––––––––––––––––––––––––––––––––
–––––
72 NanoPiano Reference Manual
Page 73

PROGRAM
NAME
Lucky Lead
Tri Lead
Pulse Lead
SynTrumpet
VoltagePad
70sAmbient
Analead
Funk Lead
Slippery
Dualalead
MiniLeader
NOTES
Hi Buzz
Analogos
SynClvLead
Bigee Sawz
Sawtooth 5
––––––––––––––––––––––––––––––––––––––––––––––––––––
–––––
NanoPiano Reference Manual 73
Page 74

––––––––––––––––––––––––––––––––––––––––––––––––––––
–––––
74 NanoPiano Reference Manual
Page 75

Split
BANK
SELECT
2 064 1 Jazz Duo
2 065 2 Ballad Duo
2 066 3 DrkPnoSplt
2 067 4 Chorusplit
2 068 5 BrtPnoSplt
2 069 6 EgrndSplit
2 070 7 EP Split 1
2 071 8 EP Split 2
2 072 9 WurlySplit
2 073 10 FM Split
2 074 11 Bass&Vibes
MIDI
PROGRAM
KNOB
NUMBER
PROGRAM
NAME
2 075 12 Bass&Organ
2 076 13 Uprite&Str
2 077 14 Uprite&Vox
2 078 15 SynthSplit
2 079 16 Saw Man
––––––––––––––––––––––––––––––––––––––––––––––––––––
–––––
NanoPiano Reference Manual 75
Page 76

––––––––––––––––––––––––––––––––––––––––––––––––––––
–––––
76 NanoPiano Reference Manual
Page 77

PROGRAM
NAME
Jazz Duo
Ballad Duo
DrkPnoSplt
Chorusplit
BrtPnoSplt
EgrndSplit
EP Split 1
EP Split 2
WurlySplit
FM Split
Bass&Vibes
NOTES
Bass&Organ
Uprite&Str
Uprite&Vox
SynthSplit
Saw Man
––––––––––––––––––––––––––––––––––––––––––––––––––––
–––––
NanoPiano Reference Manual 77
Page 78

––––––––––––––––––––––––––––––––––––––––––––––––––––
–––––
78 NanoPiano Reference Manual
Page 79

Effect
BANK
SELECT
2 080 1 TremCloud
2 081 2 MandoPiano
2 082 3 PnoGrvyard
2 083 4 Monolith
2 084 5 Dang Bells
2 085 6 Circulate
2 086 7 Telemetry
2 087 8 T-Minus 1
2 088 9 T-Minus 2
2 089 10 MonstrMash
2 090 11 Creeps
MIDI
PROGRAM
KNOB
NUMBER
PROGRAM
NAME
2 091 12 Power Up
2 092 13 HighGlissz
2 093 14 Tire Iron
2 094 15 StereoTomb
2 095 16 Metronome
––––––––––––––––––––––––––––––––––––––––––––––––––––
–––––
NanoPiano Reference Manual 79
Page 80

––––––––––––––––––––––––––––––––––––––––––––––––––––
–––––
80 NanoPiano Reference Manual
Page 81

PROGRAM
NAME
TremCloud
MandoPiano
PnoGrvyard
Monolith
Dang Bells
Circulate
Telemetry
T-Minus 1
T-Minus 2
MonstrMash
Creeps
NOTES
Power Up
HighGlissz
Tire Iron
StereoTomb
Metronome
––––––––––––––––––––––––––––––––––––––––––––––––––––
–––––
NanoPiano Reference Manual 81
Page 82

––––––––––––––––––––––––––––––––––––––––––––––––––––
–––––
82 NanoPiano Reference Manual
Page 83

Piano & Pad
BANK
SELECT
2
2
2
2
2
2
2
2
2
2
2
MIDI
PROGRAM
096
097
098
099
100
101
102
103
104
105
106
KNOB
NUMBER
1
2
3
4
5
6
7 Pno&OrgPad
8 Pno&SynPad
9
10 Pno&LowPad
11 Pno&SawPad
PROGRAM
NAME
SftPno&Pad
LA Studio
PnoPad5ths
BrtPno&Pad
Egrand&Pad
Pno&HiPad
PnoFlutPad
2
2
2
2
2
107
108
109
110
111
12 PnoTremPad
13
14
15
16
Cinema EP
Wurly&Pad
DigiEP&Pad
FMPno&Pad
––––––––––––––––––––––––––––––––––––––––––––––––––––
–––––
NanoPiano Reference Manual 83
Page 84

––––––––––––––––––––––––––––––––––––––––––––––––––––
–––––
84 NanoPiano Reference Manual
Page 85

PROGRAM
NAME
SftPno&Pad
LA Studio
PnoPad5ths
BrtPno&Pad
Egrand&Pad
Pno&HiPad
Pno&OrgPad
Pno&SynPad
PnoFlutPad
Pno&LowPad
Pno&SawPad
NOTES
PnoTremPad
Cinema EP
Wurly&Pad
DigiEP&Pad
FMPno&Pad
––––––––––––––––––––––––––––––––––––––––––––––––––––
–––––
NanoPiano Reference Manual 85
Page 86

––––––––––––––––––––––––––––––––––––––––––––––––––––
–––––
86 NanoPiano Reference Manual
Page 87

Piano & Vox
BANK
SELECT
2 112 1 Pianooohs
2 113 2 PnoVox Pad
2 114 3 LiteVoxPno
2 115 4 Pno&FlVox1
2 116 5 Pno&FlVox2
2 117 6 Vox In Pno
2 118 7 Uprite&Vox
2 119 8 EgrandVox1
2 120 9 EgrandVox2
2 121 10 EgrandVox3
2 122 11 PnoVoxFlng
MIDI
PROGRAM
KNOB
NUMBER
PROGRAM
NAME
2 123 12 EP Vox Pad
2 124 13
2 125 14 Wurly&Vox
2 126 15 EP&Vox5ths
2 127 16 DarkLounge
––––––––––––––––––––––––––––––––––––––––––––––––––––
–––––
NanoPiano Reference Manual 87
DarkEP&Vox
Page 88

––––––––––––––––––––––––––––––––––––––––––––––––––––
–––––
88 NanoPiano Reference Manual
Page 89

PROGRAM
NAME
Pianooohs
PnoVox Pad
LiteVoxPno
Pno&FlVox1
Pno&FlVox2
Vox In Pno
Uprite&Vox
EgrandVox1
EgrandVox2
EgrandVox3
PnoVoxFlng
NOTES
EP Vox Pad
DarkEP&Vox
Wurly&Vox
EP&Vox5ths
DarkLounge
––––––––––––––––––––––––––––––––––––––––––––––––––––
–––––
NanoPiano Reference Manual 89
Page 90

––––––––––––––––––––––––––––––––––––––––––––––––––––
–––––
90 NanoPiano Reference Manual
Page 91

Sound ROM
This is a list of the sample families that are built in to the
NanoPiano’s 8 megabytes of sound ROM. They are the “raw
materials” that the programs combine, in different ways, to
create the unit’s 256 programs.
Piano GrndPianoL
GrndPianoR
DarkPno1 L
DarkPno1 R
DarkPno2 L
DarkPno2 R
DarkPno3 L
DarkPno3 R
BritePno1L
BritePno1R
BritePno2L
BritePno2R
BritePno3L
BritePno3R
NoHammer L
NoHammer R
SoftPianoL
SoftPianoR
VeloPianoL
VeloPianoR
TapPiano L
TapPiano R
E Spinet 1
E Spinet 2
Toy Pno L
Toy Pno R
KeyTrack 1
KeyTrack 2
Stretch L
Stretch R
PianoWaveL
PianoWaveR
BriteRoads
BrtRdsWave
Dark Roads
DrkRdsWave
Chromatic Clavinet
Organ Perc Organ
Bass Fretless
Soft Roads
SftRdsWave
Velo Roads
Wurly Wave
FM Tines
Soft Tines
VelAtkTine
Digital EP
Piano Trem
PnoKnock L
PnoKnock R
Metronome
ClavntWave
VelAtkClav
Harpsicord
HarpsiWave
VAtkHarpsi
Vibraphone
VibesWave
Varimba
Marimba
MarimbaSft
MarimbaVel
Xylophone
Fantastic
FantstcWav
Drawbars
Pipe Organ
Principale
FretlsTone
––––––––––––––––––––––––––––––––––––––––––––––––––––
–––––
NanoPiano Reference Manual 91
Page 92

AcoustBass
SynAcoustc
BassHarmnc
Synth Vocal Oohs
LushStrngs
AttkStrngs
Analog Pad
Wave Sine
Sawtooth
Square
Triangle
––––––––––––––––––––––––––––––––––––––––––––––––––––
–––––
92 NanoPiano Reference Manual
Page 93

4: MIDI RULES
The Basics
The Not-So-Basics
MIDI Implementation Chart
––––––––––––––––––––––––––––––––––––––––––––––––––––
–––––
NanoPiano Reference Manual 93
Page 94

The Basics
The NanoPiano receives on one MIDI channel at a time, which
is set by the CHANNEL knob on the front panel.
During MIDI playback you can change categories and programs
at any time, either by sending Bank Select or Program Change
messages, or by turning the CATEGORY or PROGRAM knobs
on the front panel.
There are 256 programs in the NanoPiano. But there are only
128 MIDI program numbers (000-127). To make it possible to
activate any of the 256 programs via MIDI, they have been
separated into two BANKS of 128 programs each.
The first bank is selected by sending a Controller 0 command
(Bank Select) with a value of either 0 or 1. This bank consists of
the eight categories listed on the right side of the CATEGORY
knob:
Acoustic Piano
Piano & Strings
Piano Layer
Piano FX
E. Piano
EP Layer
Chromatic
Organ
The second bank is selected by sending a Controller 0
command (Bank Select) with a value of 2. This bank consists of
the eight categories listed on the left side of the CATEGORY
knob:
Bass
String
Synth Pad
Lead
Split
Effect
Piano & Pad
––––––––––––––––––––––––––––––––––––––––––––––––––––
–––––
94 NanoPiano Reference Manual
Page 95

Piano & Vox
PLEASE NOTE: It’s possible to get confused here, if you don’t
pay attention, by the interaction of the CATEGORY knob and
incoming MIDI Program Change commands.
First, when you send Bank Select and Program Change
commands, the front panel knobs don’t move. This means that
you could easily be playing ACOUSTIC PIANO 1 via MIDI, say,
while the two knobs point toward EFFECT 12. Don’t be fooled.
Secondly, the latest Bank Select command that the NanoPiano
receives, either from its front panel or over MIDI, is what it pays
attention to. For an example of this, consider the following
situation. Using MIDI, you select Bank 1 and a certain program
you like. Then someone comes along (while you aren’t looking)
and turns the CATEGORY knob to one of the Bank 2 categories.
Now Bank 2 is selected, and if all you send the NanoPiano is a
Program Change command (instead of a Bank Select followed
by a Program Change) you won’t get the program you wanted.
Instead, you’ll get the same-numbered program in Bank 2.
TIP: Because of this, I suggest that you always send both a
Bank Select command and a Program Change command,
together, when controlling your NanoPiano via MIDI.
CONTROLLER 0 vs. CONTROLLER 32: Some sequencers
automatically use Controller 32 commands for selecting banks
on an instrument. Please be aware that the NanoPiano does not
respond to Controller 32 commands. The only way to select
banks on a NanoPiano via MIDI is to use Controller 0.
––––––––––––––––––––––––––––––––––––––––––––––––––––
–––––
NanoPiano Reference Manual 95
Page 96

The Not-So-Basics
I mentioned earlier that using MIDI gives you real-time control
over lots more program parameters than you can adjust from
the front panel. Here I’d like to encourage you to experiment
with just that.
Sending Mod Wheel data, for example, does some very neat
things in various programs. In some (like most of the electric
pianos) it will adjust tremolo. In organs it will speed up and slow
down the lezlie speaker effect. In other programs it will open the
filter for a nice waaah sound. Try it and see.
But don’t stop there. The four MIDI controllers used across the
board in the Alesis QS series of synthesizers will yield great
results, too. These controllers are 12 (often filter control), 13, 91
(often envelope length), and 93.
––––––––––––––––––––––––––––––––––––––––––––––––––––
–––––
96 NanoPiano Reference Manual
Page 97

MIDI Implementation Chart
Transmitted Recognized Remarks
BASIC Default 1-16 1-16
CHANNEL Changed 1-16 1-16
MODE Default X Modes 3, 4
Messages X All Notes Off
Altered X X
NOTE X 0-127
NUMBER True Voice X 0-127
VELOCITY Note On X O 7-bit Resolution
Note Off X O
AFTERTOUCH Key’s X O
Ch’s X O
PITCH BENDER X O
CONTROL 1 X O Mod Wheel
CHANGE 7 X O Volume
10 X O Panning
11 X O Expression
64 X O Sustain Pedal
123 X O All Notes Off
Effect Knob X O CC #12*
PROGRAM
CHANGE True # X 0-127
SYSTEM EXCLUSIVE O O
SYSTEM Song Pos X X
COMMON Song Sel X X
Tune X X
SYSTEM Clock X X
REAL TIME Message X X
AUX Local Control X X
All Notes Off X O
Active Sense X X
Reset X X
––––––––––––––––––––––––––––––––––––––––––––––––––––
–––––
NanoPiano Reference Manual 97
Page 98

Notes: * The setting of the effect knob responds to Controller #12
by default on Power-Up. This Controller number may be changed
to 0-120 by SysEx.
––––––––––––––––––––––––––––––––––––––––––––––––––––
–––––
98 NanoPiano Reference Manual
Page 99

5: CREDITS
SOUND ROM DEVELOPMENT
Erik Norlander
Taiho Yamada
Robert Rampley
Mike Struble
Athan Billias
PROGRAM DEVELOPMENT
Erik Norlander
Taiho Yamada
Mike Peake
Andrew Schlesinger
SOFTWARE
Grant Kraus
Marcus Ryle
Michel Doidic
MECHANICAL DESIGN
David Douglass
Ron Roberts
Rick Souffle
ELECTRICAL DESIGN
Chris Asmus
John Hancock
Mike Murphy
ASIC DESIGN
Frank Thomson
Grant Kraus
TECHNICAL ASSISTANCE
Craig Devin
...and thanks to KEITH BARR, for believing in the vision.
All trademarks property of their respective holders.
––––––––––––––––––––––––––––––––––––––––––––––––––––
–––––
NanoPiano Reference Manual 99
 Loading...