

Page 1

Nanobass
REFERENCE MANUAL
by Connor Freff Cochran
© 1997 Alesis Corporation
–––––––––––––––––––––––––––––––––––––––––––––––––––––––––––––––––
––––––
NanoBass Reference Manual 1
Page 2

Unpacking and Inspection
Your Shipping Carton Should Contain The Following Items:
1 NanoBass
1 AC power adapter
1 rackmounting screw
1 Alesis warranty card
1 Reference Manual
1 Program Chart
If anything is missing, please contact your dealer or Alesis immediately.
PLEASE NOTE: The warranty card is important. Really. Don’t just throw it away.
We’ll be able to take better care of you now, and serve you better in the future, if
you fill it out and send it in.
ALESIS CONTACT INFO:
Alesis Corporation
3630 Holdredge Avenue
Los Angeles, CA 90016
phone: 1-800-5-ALESIS (800-525-3747)
e-mail: alecorp@alesis1.usa.com
website: www.alesis.com
© 1997 Alesis Corporation
All Trademarks property of their respective holders.
–––––––––––––––––––––––––––––––––––––––––––––––––––––––––––––––––
––––––
2 NanoBass Reference Manual
Page 3

Welcome!
Musician jokes are legion, but the one that comes to mind right now runs as
follows:
Stanley and Livingstone, on trek through the jungles of darkest Africa, are
awakened one night by the distant, maniacal pulsing of tribal drums. Unable to
return to sleep, they leave their tent and make themselves a cup of tea at the
campfire. The drums continue for hours, finally stopping at dawn. At noon that
day, while taking a break from hacking a path through the thick vegetation, the
two British explorers finally get to ask one of the bearers about the drums. The
man becomes extremely agitated. When pressed on the subject, he says only
one thing: “Oh no, no. Drums no problem. Much worse when drums stop.” That
night the two explorers are woken again by the drums, and the night after that as
well, but no matter how hard they push for an explanation all they hear, again
and again, is the same useless reply: “Oh no, no. Much worse when drums stop.”
Finally, exhausted from lack of sleep, unable to go further, they give up and turn
the expedition around, returning to their base at the nearest trading outpost. All
the way back the bearers seem much relieved.
Immediately on arrival, the explorers seek out the chief from whom they’d hired
the bearers and demand an explanation. “Oh no, no,” the old man says, “Drums
no problem. Much worse — “
“— when drums stop. Yes, old bean, we’ve got that part,” snarls Stanley.
Meanwhile Livingstone loses it, screaming “But why is it worse when the drums
stop!?”
“Bass solo,” says the chief.
(Just kidding. Some of my best friends are bassists, I swear it.)
You are now the proud owner of a tremedously powerful little box. Inside it you
will find 256 truly extraordinary bass programs, all constructed from linear, noncompressed 48kHz 16-bit samples that are stored in four megabytes of on-board
ROM. Electric basses, acoustic basses, synth basses, clavinet basses...they’re
all here, and more, in an incredibly low cost/zero hassle package.
And while I’m grinning, let me also mention some other things I particularly
appreciate about the unit — like 64 voices of polyphony, the same built-in
–––––––––––––––––––––––––––––––––––––––––––––––––––––––––––––––––
––––––
NanoBass Reference Manual 3
Page 4

multieffects chip that Alesis uses in their Q2 pro-class signal processor,
complete MIDI control, and incredibly simple operation.
Have a blast!
Connor Freff Cochran
April 1997
–––––––––––––––––––––––––––––––––––––––––––––––––––––––––––––––––
––––––
4 NanoBass Reference Manual
Page 5

TABLE OF CONTENTS
WELCOME!
TABLE OF CONTENTS
0. WE INTERRUPT THE MANUAL IN PROGRESS... 7
Important Safety Instructions 8
Instructions To The User 9
1. CONNECTIONS 11
Power 12
Audio 13
MIDI 15
As A Single Slave (the IN Jack) 15
As Part Of A Chain (the OUT/THRU Jack, Pt. 1) 16
Limited Computer Editing (the OUT/THRU Jack, Pt. 2) 17
Rackmounting 18
2: INSTANT FUN 19
Demo Sequence 20
Playing It Yourself 21
3: GET TO KNOW YOUR NANO 23
The Specs 24
What They Mean When They Say “64 Voices” 24
Why In The World Would I Want 64 Voices Of Bass? 25
The Front 27
The Back 28
The Programs 29-61
The Sound ROM 62-66
4: MIDI RULES 67
The Basics 68
The Not-So-Basics 69
–––––––––––––––––––––––––––––––––––––––––––––––––––––––––––––––––
––––––
NanoBass Reference Manual 5
Page 6

MIDI Implementation Chart 71
5: APPENDIX — Creative Tips 73
6: CREDITS 77
–––––––––––––––––––––––––––––––––––––––––––––––––––––––––––––––––
––––––
6 NanoBass Reference Manual
Page 7

0: We Interrupt The Manual In
Progress For Some Stuff You Might
Not Feel Like Reading, But Which
Has To Be Here Anyway
Important Safety Instructions
Instructions To The User
Many of you — no, let’s be honest, most of you — are going to skip over this
section.
That’s probably okay, assuming you’ve had prior experience with audio gear and
electronic instruments. This is basic stuff that you most likely already know. Feel
free to leap to the next section (CONNECTIONS) and begin hooking up and
playing your new NanoBass.
Beginners, however, are strongly advised to read the Important Safety
Instructions. A little basic knowledge is a good thing.
–––––––––––––––––––––––––––––––––––––––––––––––––––––––––––––––––
––––––
NanoBass Reference Manual 7
Page 8

Important Safety Instructions
WARNING — When using your NanoBass, certain precautions should always be
followed, such as:
1) Read all the instructions first.
2) Do not use your NanoBass near water. Why? Water is a terrific conductor of
electricity. You risk damaging your NanoBass and shocking yourself if you
use it near things like bathtubs, washbowls, and kitchen sinks, or in wet
basements or around swimming pools.
3) Your NanoBass doesn’t make any sound by itself — no built-in speakers —
but be careful when you are setting the volume levels of anything you plug it
into. If your amplifier, headphones, or speakers are set too loud, then you
could produce sound levels capable of causing permanent hearing loss.
That’s “permanent” as in “forever,” which is definitely not something you
want. So be cautious. Don’t play your NanoBass for long periods of time at
uncomfortably high volume levels. And if you ever experience any hearing
loss or ringing in your ears, consult an audiologist immediately.
4) Don’t put your NanoBass on or near any radiators, heat registers, or other
strong heat sources.
5) The “wall-wart” AC power supply for your NanoBass should be unplugged
from the outlet whenever the unit is going to go unused for a long period of
time.
6) Be careful that you don’t drop things on, or spill liquids into, your NanoBass.
(If you have to drink something while in the vicinity of your NanoBass, then
avoid glasses and soda cans in favor of portable plastic bottles with quicksnap lids, like the kind you’d use when bicycling or at the gym.)
7) If for any reason your NanoBass is damaged, or stops working, don’t try to
fix it yourself. All repairs should be handled by Alesis-qualified service
personnel. If the store where you bought your NanoBass can’t help, contact
Alesis directly for the name and number of the authorized service location
nearest you.
–––––––––––––––––––––––––––––––––––––––––––––––––––––––––––––––––
––––––
8 NanoBass Reference Manual
Page 9

Instructions To The User
This equipment has been tested and found to comply with the limits for a class B
digital device, pursuant to Part 15 of the FCC Rules. These limits are designed
to provide reasonable protection against harmful interference in a residential
installation. This equipment generates, uses, and can radiate radio frequency
energy and, if not installed and used in accordance with the instructions, may
cause harmful interference to radio communications. However, there is no
guarantee that interference will not occur in a particular installation. If this
equipment does cause harmful interference to radio or television reception,
which can be determined by turning the equipment off and on, the user is
encouraged to try and correct the interference by one or more of the following
measures:
_ Reorient or relocate the receiving antenna.
_ Increase the separation between the equipment and receiver.
_ Connect the equipment into an outlet on a circuit different from that to which
the receiver is connected.
_ Consult the dealer or an experienced radio/TV technician for help.
This equipment has been verified to comply with the limits for a class B
computing device, pursuant to FCC Rules. In order to maintain compliance with
FCC regulations, shielded cables must be used with this equipment. Operation
with non-approved equipment or unshielded cables is likely to result in
interference to radio and TV reception. The user is cautioned that changes and
modifications made to the equipment without the approval of manufacturer could
void the user’s authority to operate this equipment.
–––––––––––––––––––––––––––––––––––––––––––––––––––––––––––––––––
––––––
NanoBass Reference Manual 9
Page 10

CE Conformity Page
–––––––––––––––––––––––––––––––––––––––––––––––––––––––––––––––––
––––––
10 NanoBass Reference Manual
Page 11

1: CONNECTIONS
Power
Audio
MIDI
Rackmounting
In this section, I’ll show you how to put it all together.
TIP: Don’t discard your NanoBass box and packing materials. Instead, tuck them
away someplace safe (they won’t take up much room). In the unlikely event that
you need to return your unit to your dealer or to Alesis for servicing, they’ll come
in handy.
–––––––––––––––––––––––––––––––––––––––––––––––––––––––––––––––––
––––––
NanoBass Reference Manual 11
Page 12
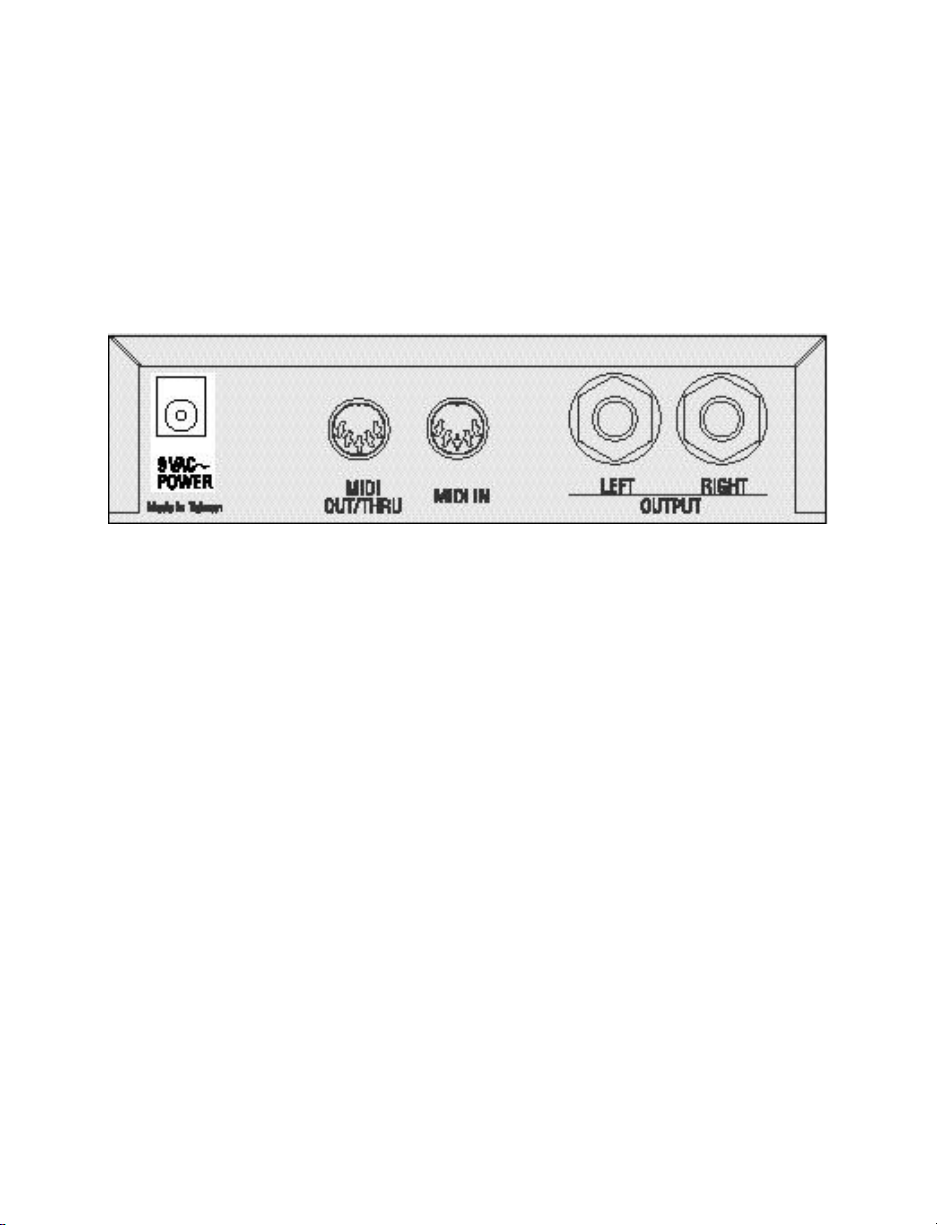
Power
Included with your NanoBass is a “wall-wart” style power adapter which is
already set for the voltage of the country your unit was shipped to. Connecting it
is simple: just insert the prongs on the wall-wart end into an electrical outlet, and
the single plug on the adapter end into the 9VAC~ POWER jack on the
NanoBass’s back panel.
That’s all it takes. Be aware, though, that there is no ON/OFF switch on the
NanoBass. Whenever it is plugged into an active outlet, the unit is on. (To check
this, look at the POWER indicator LED on the front panel. It will glow whenever
your NanoBass is getting electricity.)
Leaving your NanoBass on all the time won’t hurt it. You won’t use up much
electricity, either, since the NanoBass operates on a miniscule amount of power.
If you’d prefer to turn the unit off when you aren’t working with it, instead of
leaving it on, there’s a simple solution. Plug the unit into a power strip with a
built-in ON/OFF switch, and use the power strip switch to turn off the juice when
required.
–––––––––––––––––––––––––––––––––––––––––––––––––––––––––––––––––
––––––
12 NanoBass Reference Manual
Page 13
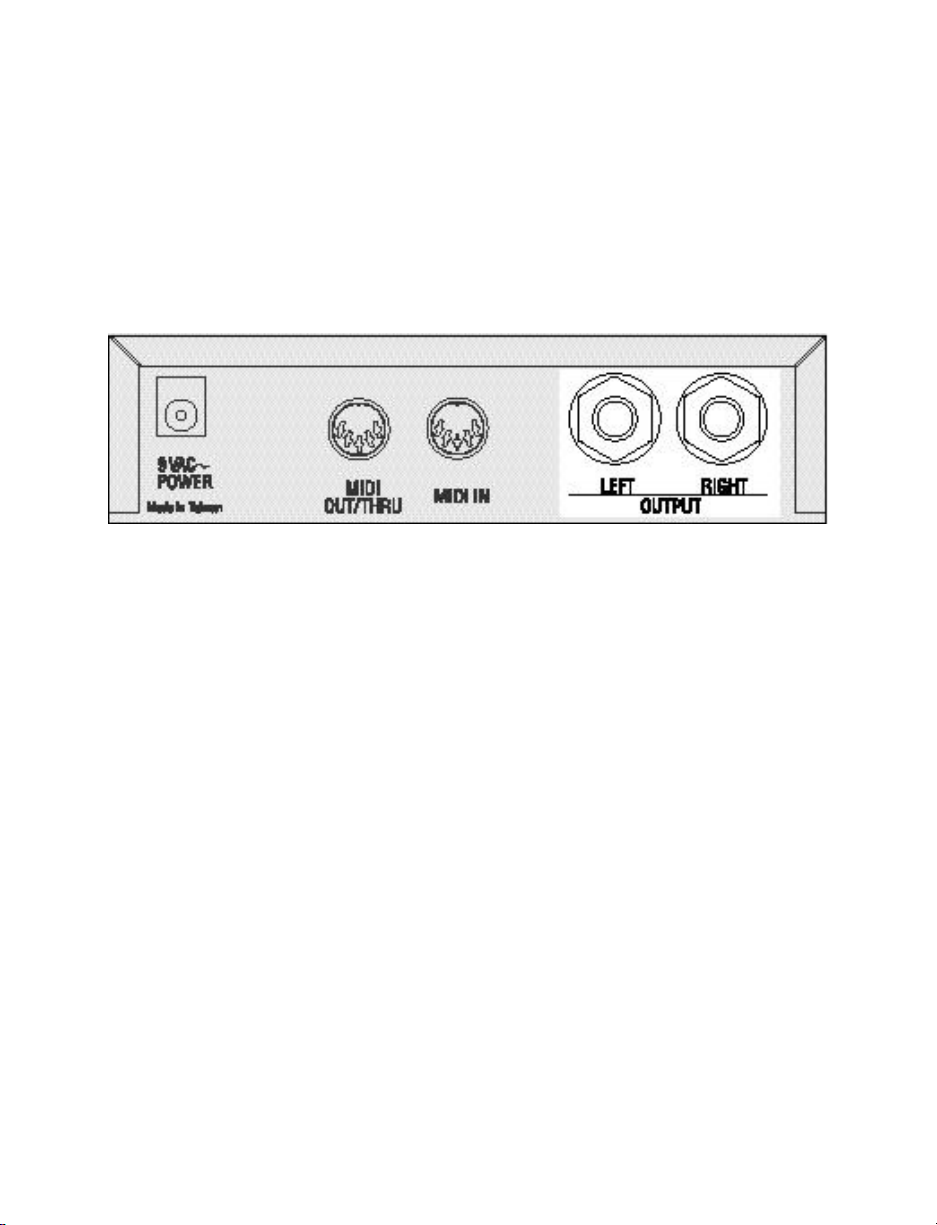
Audio
There are two quarter-inch audio output jacks on the back of the NanoBass. One
of them is marked LEFT and the other is marked RIGHT. To get set up for
audio, just run mono audio cables from these outputs to the corresponding LEFT
and RIGHT input jacks on your mixer, amplifier, power amp, or powered
speakers.
In a pinch you can get by with hooking up only one of the audio outputs, but I
don’t recommend it. If you do that you’ll be missing out on half the true-stereo
sound in each program, not to mention big chunks of stereo reverb and effects.
If only one audio jack is in use, then the NanoBass automatically sums its output
signal to mono.
And besides — with all the money you saved buying the NanoBass in the first
place, you really ought to be able to afford two audio cables (preferably good
ones).
TIPS:
Here are some things to avoid when working with audio cables. You experienced
folks should check these out, too, instead of rushing ahead, because this is an
area where you may know less than you think you do. (I can’t begin to tell you
how many supposedly “professional” musicians and recording engineers I’ve
seen break the following rules, to their very real regret.)
_ Do NOT bundle audio cables and AC power cords together. The field from
the alternating current in the power cord will leak through even well-shielded
cables, inducing noise and distortion in your audio signal.
–––––––––––––––––––––––––––––––––––––––––––––––––––––––––––––––––
––––––
NanoBass Reference Manual 13
Page 14

_ Do NOT run audio cables near other sources of obvious electromagnetic
interference such as monitors, computers, and power transformers (including
the wall-wart end of the NanoBass’s own AC adapter).
_ Do NOT run audio cables where they can be stepped on or tripped over.
Falling and hurting yourself is an obvious danger, of course. Less obvious is
the invisible damage done to the cable itself. Every time you step on a cable
you compress the insulation between center conductor and the shield,
degrading performance and reducing the cable’s reliability. You may not
notice a problem right away, but eventually you will.
_ Do NOT twist the cable if you can possibly avoid it, or force it to make sharp
right angle turns. Doing these things will damage the insides of the cable
even faster than stepping on them.
_ NEVER unplug a cable by pulling on the cable itself. This puts a dangerous
strain on the soldered connections between the cable and the plug, and can
easily make a cable go bad (or at least intermittent) on you. The proper way
to take a plug out of a jack is the same way you put it in — with a firm grasp
on the body of the plug itself.
_ ALWAYS keep your plugs and jacks clean and unoxidized. Occasional use
of solvent cleaners like Tweek and Cramolin, which are available at any
electronics shop, can greatly improve the electrical contact between your
connectors.
–––––––––––––––––––––––––––––––––––––––––––––––––––––––––––––––––
––––––
14 NanoBass Reference Manual
Page 15

MIDI
Ten years ago MIDI was still a strange new thing to most musicians and
computer users. Not any more, so I’ll keep this part short.
The basics: MIDI stands for Musical Instrument Digital Interface, which is a 16channel serial data exchange and control system for musical devices. MIDI
works by supplying a way for the microprocessors in your various electronic
musical devices to pass messages back and forth over a special network of
cables. These cables, which are used only for MIDI data and nothing else, plug
into special five-pin DIN jacks which are typically labeled IN, OUT, and THRU.
The IN jack receives MIDI data. The OUT jack transmits it. And the THRU jack
automatically echoes and re-transmits whatever data is being received at the IN
jack (this last function has a special use I’ll get to in a minute).
One of the important things to remember about MIDI is that data flow is strictly
one-way. Make sure you always plug the OUT jack of one instrument into the IN
jack of another, and vice-versa. The other choices — OUT to OUT, or IN to IN
— won’t work.
If you’ll look on the back of your NanoBass you’ll see that it doesn’t have an IN,
and OUT, and a THRU. Instead it has an IN and a combined OUT/THRU. There
are good reasons for this: (1) the NanoBass doesn’t have a built-in keyboard or
anything else to play, so it doesn’t really need an OUT jack; (2) combining OUT
and THRU jacks saves a little on the cost, bringing the unit’s price down; and (3)
it makes the back panel less crowded.
How should you hook your NanoBass into your MIDI system? That depends on
how you intend to use it.
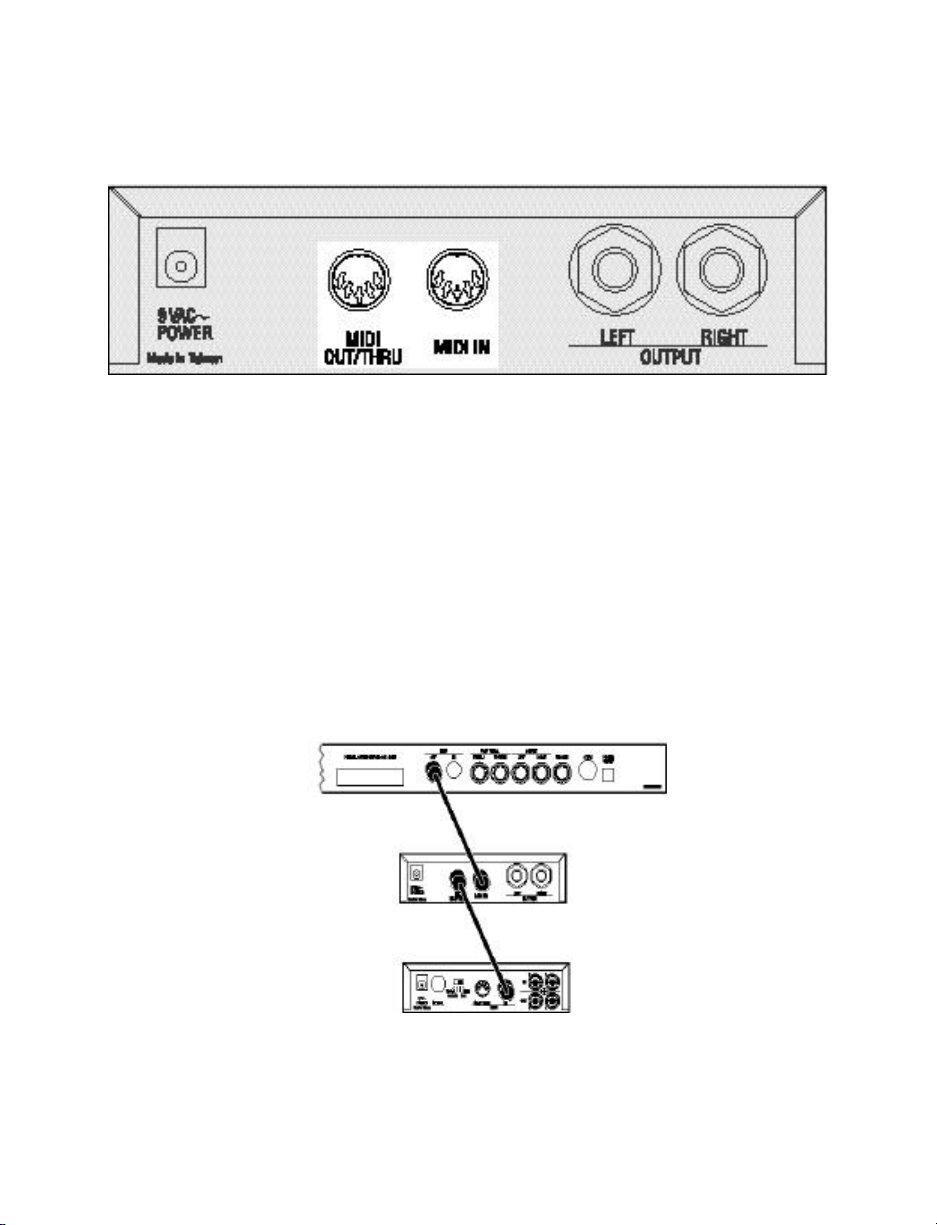
AS A SINGLE SLAVE (the IN Jack)
To play your NanoBass directly from any MIDI source — keyboard, drum pads,
woodwind controller, guitar controller, computer, etc. — just run a MIDI cable
from the MIDI OUT of the controlling device to the MIDI IN jack on the back of
the NanoBass. Then turn the NanoBass’s MIDI CHANNEL knob to the same
MIDI channel (from 1-16) that the controlling instrument is transmitting on.
PLEASE NOTE: This is important to remember. The NanoBass can only
respond to one MIDI channel at a time. If it is set to receive on MIDI channel 2,
–––––––––––––––––––––––––––––––––––––––––––––––––––––––––––––––––
––––––
NanoBass Reference Manual 15
Page 16
for example, it will ignore MIDI messages coming in over channel 1, or channels
3-16.
To make sure the NanoBass is receiving data, play the controlling instrument
while watching the MIDI indicator LED on the NanoBass’s front panel. If
everything is set properly, the LED should light up. If you don’t see the light,
double-check your cable connections and MIDI channel settings.
AS PART OF A DAISY-CHAIN (the OUT Jack, Part 1)
When you want to control several MIDI devices at the same time, there are two
ways to do it. The first is to buy a MIDI interface with multiple OUTs, and then
run separate MIDI cables from this interface to all the different devices. This is
called a “star” network and it is the preferable way to go, if you can afford it.
The second way is to “daisy-chain” several units together.
A daisy-chain is where the OUT/THRU jack on the NanoBass comes into use.
After connecting the controller’s OUT to the NanoBass’s IN, you’d continue the
–––––––––––––––––––––––––––––––––––––––––––––––––––––––––––––––––
––––––
16 NanoBass Reference Manual
Page 17

chain by running a MIDI cable from the NanoBass’s OUT/THRU to the next
instrument’s IN jack, then another cable from that instrument’s THRU to the next
instrument’s IN, and so on down the line until you were finished. Now when you
play your controller, each device will respond to the MIDI data and “pass it on
down” the line.
PLEASE NOTE: As a general rule of thumb, daisy chains should be no longer
than three instruments in a row. Any more than that and you risk accumulating
data transmission errors that could cause stuck notes, unexpected program
changes, and inaccurate control.
In really big MIDI setups, you might find yourself combining a basic star network
with selected short daisy-chains, usually of instruments which you either can’t (or
don’t want to) edit with your computer. Which brings us to...
LIMITED COMPUTER EDITING (The OUT Jack, Pt. 2)
The NanoBass’s 256 programs are stored on the circuitboard as EPROM data,
and can’t be changed. You can still use a computer, though, to edit one program
at a time.
Here’s the trick. If you connect your computer’s MIDI OUT to the NanoBass’s
MIDI IN, and the NanoBass’s OUT to the computer’s IN, then you can use a
commercial librarian/editor program (such as Mark of the Unicorn’s Unisyn) to
edit the contents of the NanoBass’s edit buffer. This would allow you, for
example, to change the samples in a program, pick a new LFO waveform, adjust
its attack envelope, radically alter its effects settings, and so forth. Then you
could save this new program in your computer and download it into the
NanoBass’s edit buffer any time you wanted.
What you can’t do is permanently store this changed sound in the NanoBass
itself, because the unit has no battery-backed RAM. Whatever editing you did
would vanish when you turned the unit’s power off.
Rackmounting
Your NanoBass will sit happily on any flat surface, and thanks to its four rubber
feet it won’t slide around too much (even though it's so light). But if you are
interested in a more secure and permanent installation, then rackmounting is the
way to go.
–––––––––––––––––––––––––––––––––––––––––––––––––––––––––––––––––
––––––
NanoBass Reference Manual 17
Page 18

On the underside of your unit you will find a mounting nut already built into the
box. This nut is positioned so it will line up with the hole in most standard rackmount adapters for one-third-rack sized products. Simply place the NanoBass on
the adapter tray, line up the mounting nut with the hole in the adapter, and screw
the unit into place using the mounting screw that came with your NanoBass at
purchase.
Your local music store can certainly supply you with an adapter that will work to
mount your NanoBass into a rack. Ask for a single-space rack shelf, rack tray, or
universal rack adapter, and make sure it has pre-drilled holes in the bottom that
match up with the NanoBass’s mounting nut.
–––––––––––––––––––––––––––––––––––––––––––––––––––––––––––––––––
––––––
18 NanoBass Reference Manual
Page 19

2: INSTANT FUN
Demo Sequence
Playing It Yourself
Once you’re set up, this section will show you the two quickest ways to explore
the programs in your NanoBass.
–––––––––––––––––––––––––––––––––––––––––––––––––––––––––––––––––
––––––
NanoBass Reference Manual 19
Page 20

Demo Sequence
Built into your NanoBass is a musical demo showcasing seven of the unit’s 256
programs, one after the other.
To run it:
1) Make sure your audio is hooked up and the power on.
2) Set the CHANNEL, CATEGORY, and PROGRAM knobs straight up,
to the “twelve o’clock” position.
3) Set the EFFECTS knob all the way counter-clockwise. Then...
4) Turn EFFECTS all the way to the right in one quick turn.
At this point the MIDI indicator LED will turn on, and you will hear Dave Bryce
and Taiho Yamada wig out on bass. (The reason the indicator light is flashing is
because the demo is playing from MIDI data stored in the NanoBass ROM.)
To shut the demo off, either turn the EFFECTS knob all the way to the left again
in one quick turn, or turn the unit’s power off.
Having an on-board sequence like this is useful because it allows you to check
your NanoBass at any time in order to make sure it’s working, and to help set
audio levels during soundchecks or recording sessions.
–––––––––––––––––––––––––––––––––––––––––––––––––––––––––––––––––
––––––
20 NanoBass Reference Manual
Page 21

Here are the seven different programs, in order, just in case you particularly like
one and want to find it quickly:
BANK
SELECT
0 or 1 001 ACOUSTIC 2 StereoAcou
0 or 1 103 ACID 8 RaveSaw MW
0 or 1 089 FUNK 10 FunkMan
2 110 DRONE 15 The Swell
2 031 INDUSTRIAL 16 CyberBass
0 or 1 032 ELEC 1 1 Jaco
2 121 EFFECT 10 FM Pulse
2 002 RAP 3 SuperNotch
MIDI
PROGRAM
CATEGORY
SETTING
KNOB
NUMBER
PROGRAM
NAME
Playing It Yourself
That’s what you bought it for, isn’t it?
Go right ahead, then. Double-check all the necessary connections — power,
audio, MIDI — and start playing! When you get tired of a particular program, just
use the CATEGORY and PROGRAM knobs to shift to something new.
–––––––––––––––––––––––––––––––––––––––––––––––––––––––––––––––––
––––––
NanoBass Reference Manual 21
Page 22

–––––––––––––––––––––––––––––––––––––––––––––––––––––––––––––––––
––––––
22 NanoBass Reference Manual
Page 23

3: GET TO KNOW YOUR NANO
The Specs
The Front
The Back
The Programs and ROM sounds
In this section I’ll quickly step you through the basic features, specs, and controls
of the NanoBass. You’ll also find a reference section listing all of the sounds in
the on-board ROM and all 256 programs (with room to take some notes of your
own).
–––––––––––––––––––––––––––––––––––––––––––––––––––––––––––––––––
––––––
NanoBass Reference Manual 23
Page 24

The Specs
Sound Generation Method: sample playback 16 bit Linear 48kHz Sample
ROM
Synthesis: QS Composite Synthesis™
Voices: 64, each with sweepable lowpass filter, 3 envelope generators, 3 LFOs,
programmable effects send and QS Modulation Matrix, dynamic voice allocation
Waveform Memory: 4 Megabytes, 264 samples
Program Memory: 256 presets
Effects: QS Parallel Matrix Effects™ (4 independent stereo multieffect
processing busses)
MIDI Connections: MIDI In, MIDI Out/Thru
Audio Outputs: Stereo Left and Right outputs, 1/4” unbalanced
Power Requirements: 9 VAC, 5 Volt Amps external Transformer, UL and CSA
Approved
Dimensions: (WxHxD) 5.5” x 1.5” x 4.5”
Weight: 1.25 lbs.
What They Mean When They Say “64 Voices”
Once upon a time it was simple. A “voice,” in synth parlance, meant a single
note of polyphony. A five voice instrument like the Sequential Circuits Prophet
5™ could play five simultaneous notes. A 16 voice instrument like the Yamaha
DX7™ could play 16 notes. And so on.
Then things got complicated, when synth programmers got deep into digital
design and figured out how to create even more complicated and interesting
–––––––––––––––––––––––––––––––––––––––––––––––––––––––––––––––––
––––––
24 NanoBass Reference Manual
Page 25

sonic textures by stacking voices together in combination. Suddenly the “number
of voices = polyphony” equation didn’t directly apply anymore.
In one program on an instrument, for example, playing a single key might trigger
a flute voice and a choir voice simultaneously: one note, two voices. Another
program in the same instrument might stack another two voices into the mix:
one note, four voices. If such an instrument had 16 voices to start with, playing
just four notes would max it out.
It’s important for you to understand that interaction.
The NanoBass is a 64-voice instrument. Some of its programs trigger only one
voice per note played. With those programs, you’ll have 64 notes of available
polyphony. Other programs trigger two voices per note, giving you 32 voices of
available polyphony. Still others trigger four voices per note, allowing you 16
notes of polyphony.
Why In The World Would I Want 64 Voices Of Bass?
Excellent question. The answer, of course, is that making the NanoBass capable
of generating 64 simultaneous voices is a severe case of technical overkill. But
since Alesis had to design one basic Nano hardware package for all the products
in the line, and the others did need 64 voices, the engineers figured “What the
heck! Somebody out there might just feel like pushing the envelope.”
Off the top of my head, I can think of one definite benefit that having 64
available voices provides, and three experiments you ought to consider trying.
The definite benefit: Some of the programs use multiple voices per note, making
for a fatter, richer sound.
Experiment #1: Along that line, you might try sending the same Note On
message repeatedly, at increments only a few MIDI ticks apart. Depending on
how many Note Ons you send, you can thicken the sound (or blur its attack) in
interesting ways. Yamaha DX7 owners use to do this deliberately by routing the
DX7’s MIDI OUT jack directly into the instrument’s MIDI IN jack, which caused
voices to automatically double up on playing.
Experiment #2: Explore the upper registers of programs. Just because a
program is useful for bass lines doesn’t mean it is automatically devoid of useful
–––––––––––––––––––––––––––––––––––––––––––––––––––––––––––––––––
––––––
NanoBass Reference Manual 25
Page 26

high notes. Play around with the full range of the clavinet programs, for
example, and you’ll see what I mean.
Experiment #3: Here’s a radical idea — chords! They worked for Chris Squire
and Jaco Pastorius, didn’t they?
–––––––––––––––––––––––––––––––––––––––––––––––––––––––––––––––––
––––––
26 NanoBass Reference Manual
Page 27

The Front
The front of the NanoBass has two indicator LEDs and five knobs. Taking them
from left to right...
POWER: This indicator will glow whenever the NanoBass is hooked up to a live
electrical outlet.
MIDI: This indicator will flash whenever the NanoBass is either receiving or
sending MIDI data. (You’ll notice that it lights up when the unit is playing its
onboard demo sequence.)
VOLUME: This knob controls the stereo output volume. All the way to the left is
off. All the way to the right is full on. For maximum audio quality I recommend
turning the volume knob to full on, and lowering the NanoBass’s signal to proper
levels at your mixer or amp input.
EFFECT: Although many NanoBass programs have more than one effect built
into them, each program has one specific effect that can be adjusted in real time
from this knob. Turning it all the way to the left lowers the specified effect to
nothing, while turning it all the way to the right takes the effect to its maximum
programmed level. (The other effects in any given program are also adjustable,
but only via MIDI.)
CHANNEL: This knob sets which MIDI channel the NanoBass will respond to,
from 1 to 16. (It also has an impact on the function of the MIDI indicator LED,
which will only flash if there is MIDI data coming in over the selected channel.
Data coming in over other channels will be ignored.)
CATEGORY: This knob has no printed name on the front panel — there wasn’t
room — but its function should be rapidly apparent once you start playing around
with it. The 256 programs in the NanoBass are organized in 16 sets of 16
programs each. This is the knob you turn to select which set the PROGRAM
knob will be selecting from.
PROGRAM: You’ll turn this one a lot. It selects which program in a given
category will play in response to incoming MIDI data.
–––––––––––––––––––––––––––––––––––––––––––––––––––––––––––––––––
––––––
NanoBass Reference Manual 27
Page 28

The Back
The back of the NanoBass has five connectors: one for power, two for MIDI, and
two for audio.
POWER: This jack supplies electricity to the NanoBass through the 9-volt AC
adapter supplied by Alesis.
MIDI OUT/THRU: The only original MIDI messages sent out by this 5-pin DIN
jack are certain responses to commands from an external source (sequencer,
editor/librarian, etc.). At all other times what it does is automatically echo and retransmit any MIDI data entering through the MIDI IN jack.
MIDI IN: This 5-pin DIN jack receives incoming MIDI data from external sources
and controllers.
LEFT/RIGHT OUTPUT: These are the main audio outputs of the NanoBass.
Use the Left output alone if you need a mono output.
–––––––––––––––––––––––––––––––––––––––––––––––––––––––––––––––––
––––––
28 NanoBass Reference Manual
Page 29

The Programs and ROM Sounds
On the following pages you will find reference charts for all 256 NanoBass
programs, organized by category. The chart shows the MIDI bank select
command and MIDI program number for each program, its number on the front
panel PROGRAM knob, and its name.
There is also a space for you to write in notes of your own regarding what you
think of each sound, or any ideas you might have for using it.
–––––––––––––––––––––––––––––––––––––––––––––––––––––––––––––––––
––––––
NanoBass Reference Manual 29
Page 30

Acoustic
BANK
SELECT
0 or 1 000 1 Acoustic 1
0 or 1 001 2 StereoAcou
0 or 1 002 3 VeloAcoust
0 or 1 003 4 Acoust Prs
0 or 1 004 5 Prc Acoust
0 or 1 005 6 Acoustic 2
0 or 1 006 7 UpriteJazz
0 or 1 007 8 Acoustic 3
0 or 1 008 9 Upright 1
0 or 1 019 10 Upright 2
0 or 1 010 11 UprightVel
MIDI
PROGRAM
KNOB
NUMBER
PROGRAM
NAME
0 or 1 011 12 Pick Me
0 or 1 012 13 PickMeLite
0 or 1 013 14 Stinger
0 or 1 014 15 AcouPickup
0 or 1 015 16 VelAcouSlp
–––––––––––––––––––––––––––––––––––––––––––––––––––––––––––––––––
––––––
30 NanoBass Reference Manual
Page 31

PROGRAM
NAME
Acoustic 1
StereoAcou
VeloAcoust
Acoust Prs
Prc Acoust
Acoustic 2
UpriteJazz
Acoustic 3
Upright 1
Upright 2
UprightVel
NOTES
Pick Me
PickMeLite
Stinger
AcouPickup
VelAcouSlp
–––––––––––––––––––––––––––––––––––––––––––––––––––––––––––––––––
––––––
NanoBass Reference Manual 31
Page 32

Fretless/Harmonic
BANK
SELECT
0 or 1 016 1 Fretless 1
0 or 1 017 2 Fretless 2
0 or 1 018 3 WalkinBass
0 or 1 019 4 Fretless 3
0 or 1 020 5 Don'tFret1
0 or 1 021 6 Don'tFret2
0 or 1 022 7 ChrFretles
0 or 1 023 8 Fret Not
0 or 1 024 9 Reggae
0 or 1 025 10 Ballad
0 or 1 026 11 Popless
MIDI
PROGRAM
KNOB
NUMBER
PROGRAM
NAME
0 or 1 027 12 Missisippi
0 or 1 028 13 SteelBass1
0 or 1 029 14 Harmonics1
0 or 1 030 15 Harmonics2
0 or 1 031 16 Harmonics3
–––––––––––––––––––––––––––––––––––––––––––––––––––––––––––––––––
––––––
32 NanoBass Reference Manual
Page 33

PROGRAM
NAME
Fretless 1
Fretless 2
WalkinBass
Fretless 3
Don'tFret1
Don'tFret2
ChrFretles
Fret Not
Reggae
Ballad
Popless
NOTES
Missisippi
SteelBass1
Harmonics1
Harmonics2
Harmonics3
–––––––––––––––––––––––––––––––––––––––––––––––––––––––––––––––––
––––––
NanoBass Reference Manual 33
Page 34

Elec 1
BANK
SELECT
0 or 1 032 1 Jaco
0 or 1 033 2 Stanley
0 or 1 034 3 JazzFingr1
0 or 1 035 4 JazzFingr2
0 or 1 036 5 JazzPick 1
0 or 1 037 6 Jazz Pick 2
0 or 1 038 7 PrecisThmb
0 or 1 039 8 Pea Bass 1
0 or 1 040 9 Jazz Velo
0 or 1 041 10 Cutter
0 or 1 042 11 JazzPick 3
MIDI
PROGRAM
KNOB
NUMBER
PROGRAM
NAME
0 or 1 043 12 ClearFrets
0 or 1 044 13 Pea Bass 2
0 or 1 045 14 Fingered
0 or 1 046 15 StudioBass
0 or 1 047 16 Deep Bass
–––––––––––––––––––––––––––––––––––––––––––––––––––––––––––––––––
––––––
34 NanoBass Reference Manual
Page 35

PROGRAM
NAME
Jaco
Stanley
JazzFingr1
JazzFingr2
JazzPick 1
Jazz Pick 2
PrecisThmb
Pea Bass 1
Jazz Velo
Cutter
JazzPick 3
NOTES
ClearFrets
Pea Bass 2
Fingered
StudioBass
Deep Bass
–––––––––––––––––––––––––––––––––––––––––––––––––––––––––––––––––
––––––
NanoBass Reference Manual 35
Page 36

Elec 2
BANK
SELECT
0 or 1 048 1 SteelBass2
0 or 1 049 2 Fat Bass
0 or 1 050 3 5 String
0 or 1 051 4 5 String V
0 or 1 052 5 MW Xfade
0 or 1 053 6 Thunk
0 or 1 054 7 Big Pick
0 or 1 055 8 SurfBassMW
0 or 1 056 9 Muted Bass
0 or 1 057 10 PaperFrets
0 or 1 058 11 3VeloLayr1
MIDI
PROGRAM
KNOB
NUMBER
PROGRAM
NAME
0 or 1 059 12 3VeloLayr2
0 or 1 060 13 3VeloLayr3
0 or 1 061 14 Slp/Studio
0 or 1 062 15 Slap/Harm
0 or 1 063 16 Slap/Pop
–––––––––––––––––––––––––––––––––––––––––––––––––––––––––––––––––
––––––
36 NanoBass Reference Manual
Page 37

PROGRAM
NAME
SteelBass2
Fat Bass
5 String
5 String V
MW Xfade
Thunk
Big Pick
SurfBassMW
Muted Bass
PaperFrets
3VeloLayr1
NOTES
3VeloLayr2
3VeloLayr3
Slp/Studio
Slap/Harm
Slap/Pop
–––––––––––––––––––––––––––––––––––––––––––––––––––––––––––––––––
––––––
NanoBass Reference Manual 37
Page 38

Elec 3
BANK
SELECT
0 or 1 064 1 Pfilter 1
0 or 1 065 2 Pfilter 2
0 or 1 066 3 Pfilter 3
0 or 1 067 4 SharpStick
0 or 1 068 5 SharpStik2
0 or 1 069 6 StickComp2
0 or 1 070 7 Harm/Stick
0 or 1 071 8 FlangeBass
0 or 1 072 9 FlangeBas2
0 or 1 073 10 Dist Bass
0 or 1 074 11 Fuzz Bass
MIDI
PROGRAM
KNOB
NUMBER
PROGRAM
NAME
0 or 1 075 12 Harmn/Pop
0 or 1 076 13 Pop'nFresh
0 or 1 077 14 BostonPops
0 or 1 078 15 Slide
0 or 1 079 16 Release
–––––––––––––––––––––––––––––––––––––––––––––––––––––––––––––––––
––––––
38 NanoBass Reference Manual
Page 39

PROGRAM
NAME
Pfilter 1
Pfilter 2
Pfilter 3
SharpStick
SharpStik2
StickComp2
Harm/Stick
FlangeBass
FlangeBas2
Dist Bass
Fuzz Bass
NOTES
Harmn/Pop
Pop'nFresh
BostonPops
Slide
Release
–––––––––––––––––––––––––––––––––––––––––––––––––––––––––––––––––
––––––
NanoBass Reference Manual 39
Page 40

Funk
BANK
SELECT
0 or 1 080 1 JazzSlaps
0 or 1 081 2 Slap Combo
0 or 1 082 3 PeaBassPop
0 or 1 083 4 AcousSlap
0 or 1 084 5 GothamBass
0 or 1 085 6 Fuzz Slap
0 or 1 086 7 5StrngSlap
0 or 1 087 8 LowEndSlap
0 or 1 088 9 Velo Slap
0 or 1 089 10 Funkman
0 or 1 090 11 FretFuzz
MIDI
PROGRAM
KNOB
NUMBER
PROGRAM
NAME
0 or 1 091 12 Dubble FM
0 or 1 092 13 FM Bass1
0 or 1 093 14 FM Bass 2
0 or 1 094 15 Deep Clav
0 or 1 095 16 ClassiClav
–––––––––––––––––––––––––––––––––––––––––––––––––––––––––––––––––
––––––
40 NanoBass Reference Manual
Page 41

PROGRAM
NAME
JazzSlaps
Slap Combo
PeaBassPop
AcousSlap
GothamBass
Fuzz Slap
5StrngSlap
LowEndSlap
Velo Slap
Funkman
FretFuzz
NOTES
Dubble FM
FM Bass1
FM Bass 2
Deep Clav
ClassiClav
–––––––––––––––––––––––––––––––––––––––––––––––––––––––––––––––––
––––––
NanoBass Reference Manual 41
Page 42

Acid
BANK
SELECT
0 or 1 096 1 Funky Acid
0 or 1 097 2 Acidous
0 or 1 098 3 Fast Sweep
0 or 1 099 4 Super Rez
0 or 1 100 5 Gargoyle
0 or 1 101 6 Dragon
0 or 1 102 7 HyperActiv
0 or 1 103 8 RaveSaw MW
0 or 1 104 9 RaveSqr MW
0 or 1 105 10 Bad Acid
0 or 1 106 11 MW Sweep 1
MIDI
PROGRAM
KNOB
NUMBER
PROGRAM
NAME
0 or 1 107 12 Woozy
0 or 1 108 13 Heavy Rez
0 or 1 109 14 Syndicate
0 or 1 110 15 Oh3TomBass
0 or 1 111 16 Trance 1
–––––––––––––––––––––––––––––––––––––––––––––––––––––––––––––––––
––––––
42 NanoBass Reference Manual
Page 43

PROGRAM
NAME
Funky Acid
Acidous
Fast Sweep
Super Rez
Gargoyle
Dragon
HyperActiv
RaveSaw MW
RaveSqr MW
Bad Acid
MW Sweep 1
NOTES
Woozy
Heavy Rez
Syndicate
Oh3TomBass
Trance 1
–––––––––––––––––––––––––––––––––––––––––––––––––––––––––––––––––
––––––
NanoBass Reference Manual 43
Page 44

House
BANK
SELECT
0 or 1 112 1 Trance 2
0 or 1 113 2 VeloTrance
0 or 1 114 3 DeutschBas
0 or 1 115 4 Bessie
0 or 1 116 5 Woody
0 or 1 117 6 Triangle
0 or 1 118 7 UnderDub
0 or 1 119 8 Bombastic
0 or 1 120 9 In The Bag
0 or 1 121 10 HollowBass
0 or 1 122 11 501
MIDI
PROGRAM
KNOB
NUMBER
PROGRAM
NAME
0 or 1 123 12 Euro Bass
0 or 1 124 13 Quack
0 or 1 125 14 Ultra Deep
0 or 1 126 15 House
0 or 1 127 16 ArndsHouse
–––––––––––––––––––––––––––––––––––––––––––––––––––––––––––––––––
––––––
44 NanoBass Reference Manual
Page 45

PROGRAM
NAME
Trance 2
VeloTrance
DeutschBas
Bessie
Woody
Triangle
UnderDub
Bombastic
In The Bag
HollowBass
501
NOTES
Euro Bass
Quack
Ultra Deep
House
ArndsHouse
–––––––––––––––––––––––––––––––––––––––––––––––––––––––––––––––––
––––––
NanoBass Reference Manual 45
Page 46

–––––––––––––––––––––––––––––––––––––––––––––––––––––––––––––––––
––––––
46 NanoBass Reference Manual
Page 47

Rap
BANK
SELECT
2 000 1 SuperBoom
2 001 2 Super Saw
2 002 3 SuperNotch
2 003 4 Super Band
2 004 5 Super Sqr
2 005 6 BigAcoustic
2 006 7 T-Wah
2 007 8 Purrrr
2 008 9 DarkHelmet
2 009 10 Combo Mono
2 010 11 Uniperc V
MIDI
PROGRAM
KNOB
NUMBER
PROGRAM
NAME
2 011 12 Rez Pluck
2 012 13 Chirp 1
2 013 14 Chirp 2
2 014 15 Too Cool
2 015 16 Xtra Funky
–––––––––––––––––––––––––––––––––––––––––––––––––––––––––––––––––
––––––
NanoBass Reference Manual 47
Page 48

PROGRAM
NAME
SuperBoom
Super Saw
SuperNotch
Super Band
Super Sqr
BigAcoustic
T-Wah
Purrrr
DarkHelmet
Combo Mono
Uniperc V
NOTES
Rez Pluck
Chirp 1
Chirp 2
Too Cool
Xtra Funky
–––––––––––––––––––––––––––––––––––––––––––––––––––––––––––––––––
––––––
48 NanoBass Reference Manual
Page 49

Industrial
BANK
SELECT
2 016 1
2 017 2
2 018 3
2 019 4
2 020 5
2 021 6
2 022 7
2 023 8
2 024 9
2 025 10
2 026 11
MIDI
PROGRAM
KNOB
NUMBER
PROGRAM
NAME
Vel Sweep
Mega Rez
RubbrPhase
Lo Megarez
Hi Tek
IndstryRes
Sharpness
Thwap
Hyper
Tech 1
Tech 2
2 027 12
2 028 13
2 029 14
2 030 15
2 031 16
–––––––––––––––––––––––––––––––––––––––––––––––––––––––––––––––––
––––––
NanoBass Reference Manual 49
Tech 3
Res Tube
Stereo !
Nazty
CyberBass
Page 50

–––––––––––––––––––––––––––––––––––––––––––––––––––––––––––––––––
––––––
50 NanoBass Reference Manual
Page 51

PROGRAM
NAME
Vel Sweep
Mega Rez
RubbrPhase
Lo Megarez
Hi Tek
IndstryRes
Sharpness
Thwap
Hyper
Tech 1
Tech 2
NOTES
Tech 3
Res Tube
Stereo !
Nazty
CyberBass
–––––––––––––––––––––––––––––––––––––––––––––––––––––––––––––––––
––––––
NanoBass Reference Manual 51
Page 52

Synth 1
BANK
SELECT
2
2
2
2
2
2
2
2
2
2
2
MIDI
PROGRAM
032
033
034
035
036
037
038
039
040
041
042
KNOB
NUMBER
1
2
3
4
5
6
7
8
9
10
11
PROGRAM
NAME
Buzzz
BuzzStack
Wide Bass
Triple Osc
Press 5th
VeloFunk
Cognitive
SqrTrance
AnalogSqrV
VeloFilter
ResModWhl!
2
2
2
2
2
043
044
045
046
047
12
13
14
15
16
Filter Wow
SynthBass1
Fat Man
Shark
Bumper
–––––––––––––––––––––––––––––––––––––––––––––––––––––––––––––––––
––––––
52 NanoBass Reference Manual
Page 53

PROGRAM
NAME
Buzzz
BuzzStack
Wide Bass
Triple Osc
Press 5th
VeloFunk
Cognitive
SqrTrance
AnalogSqrV
VeloFilter
ResModWhl!
NOTES
Filter Wow
SynthBass1
Fat Man
Shark
Bumper
–––––––––––––––––––––––––––––––––––––––––––––––––––––––––––––––––
––––––
NanoBass Reference Manual 53
Page 54

–––––––––––––––––––––––––––––––––––––––––––––––––––––––––––––––––
––––––
54 NanoBass Reference Manual
Page 55

Synth 2
BANK
SELECT
2 048 1 Uni
2 049 2 Stevie
2 050 3 Uni Chords
2 051 4 Uni Pluck
2 052 5 Way Cool
2 053 6 Modular M
2 054 7 Chirp 3
2 055 8 SeqBass 1V
2 056 9 Fat Mini
2 057 10 Cool Fat
2 058 11 Trap Bass
MIDI
PROGRAM
KNOB
NUMBER
PROGRAM
NAME
2 059 12 Spike Bass
2 060 13 Ana Mega
2 061 14 Funk SynBs
2 062 15 Rezidue
2 063 16 Mute Bass
–––––––––––––––––––––––––––––––––––––––––––––––––––––––––––––––––
––––––
NanoBass Reference Manual 55
Page 56

PROGRAM
NAME
Uni
Stevie
Uni Chords
Uni Pluck
Way Cool
Modular M
Chirp 3
SeqBass 1V
Fat Mini
Cool Fat
Trap Bass
NOTES
Spike Bass
Ana Mega
Funk SynBs
Rezidue
Mute Bass
–––––––––––––––––––––––––––––––––––––––––––––––––––––––––––––––––
––––––
56 NanoBass Reference Manual
Page 57

–––––––––––––––––––––––––––––––––––––––––––––––––––––––––––––––––
––––––
NanoBass Reference Manual 57
Page 58

Synth 3
BANK
SELECT
2 064 1 FM Bass
2 065 2 Larger FM
2 066 3 Fuzz Pluck
2 067 4 Pulse Bass
2 068 5 Box Synth
2 069 6 AT Bass 1
2 070 7 Snappy M
2 071 8 AnaMonoPia
2 072 9 Crow Bass
2 073 10 Big Emo
2 074 11 Rogue Bass
MIDI
PROGRAM
KNOB
NUMBER
PROGRAM
NAME
2 075 12 AT Bass 2
2 076 13 AT Bass 3
2 077 14 Microwave V
2 078 15 SynthBass2
2 079 16 PressCog
–––––––––––––––––––––––––––––––––––––––––––––––––––––––––––––––––
––––––
58 NanoBass Reference Manual
Page 59

PROGRAM
NAME
FM Bass
Larger FM
Fuzz Pluck
Pulse Bass
Box Synth
AT Bass 1
Snappy M
AnaMonoPia
Crow Bass
Big Emo
Rogue Bass
NOTES
AT Bass 2
AT Bass 3
Microwave V
SynthBass2
PressCog
–––––––––––––––––––––––––––––––––––––––––––––––––––––––––––––––––
––––––
NanoBass Reference Manual 59
Page 60

Layer
BANK
SELECT
2 080 1 Lurker
2 081 2 CableRun
2 082 3 PurpleBass
2 083 4 Big Stick
2 084 5 FatHybrid
2 085 6 FatSynSlap
2 086 7 Rez Punch
2 087 8 TubeOBass
2 088 9 Pyro Bass
2 089 10 Saturnia
2 090 11 SwarmBass 1
MIDI
PROGRAM
KNOB
NUMBER
PROGRAM
NAME
2 091 12 Tundra
2 092 13 Additive
2 093 14 MetalNotch
2 094 15 8 Bit
2 095 16 Diamonds
–––––––––––––––––––––––––––––––––––––––––––––––––––––––––––––––––
––––––
60 NanoBass Reference Manual
Page 61

PROGRAM
NAME
Lurker
CableRun
PurpleBass
Big Stick
FatHybrid
FatSynSlap
Rez Punch
TubeOBass
Pyro Bass
Saturnia
SwarmBass 1
NOTES
Tundra
Additive
MetalNotch
8 Bit
Diamonds
–––––––––––––––––––––––––––––––––––––––––––––––––––––––––––––––––
––––––
NanoBass Reference Manual 61
Page 62

Drone
BANK
SELECT
2
2
2
2
2
2
2
2
2
2
2
MIDI
PROGRAM
096
097
098
099
100
101
102
103
104
105
106
KNOB
NUMBER
1
2
3
4
5
6
7
8
9
10
11
PROGRAM
NAME
TaurusSplt
PedalDrone
TaursSplt2
Flanged
8va
Big Fuzz
Synth Bite
The Sweep
SwarmBass2
Ana Tick
MeanMetal
2
2
2
2
2
107
108
109
110
111
12
13
14
15
16
The End
Millenium
Ominous
The Swell
Trem Rez
–––––––––––––––––––––––––––––––––––––––––––––––––––––––––––––––––
––––––
62 NanoBass Reference Manual
Page 63

PROGRAM
NAME
TaurusSplt
PedalDrone
TaursSplt2
Flanged
8va
Big Fuzz
Synth Bite
The Sweep
SwarmBass2
Ana Tick
MeanMetal
NOTES
The End
Millenium
Ominous
The Swell
Trem Rez
–––––––––––––––––––––––––––––––––––––––––––––––––––––––––––––––––
––––––
NanoBass Reference Manual 63
Page 64

–––––––––––––––––––––––––––––––––––––––––––––––––––––––––––––––––
––––––
64 NanoBass Reference Manual
Page 65

Effect
BANK
SELECT
2 112 1 S & H MW
2 113 2 MudPots
2 114 3 PulseFlute
2 115 4 Underground
2 116 5 Seek Pulse
2 117 6 Buzzerflex
2 118 7 Frankfurt
2 119 8 DiscoPulse
2 120 9 Quasar
2 121 10 FM Pulse
2 122 11 Rez Pulse
MIDI
PROGRAM
KNOB
NUMBER
PROGRAM
NAME
2 123 12 Ripples
2 124 13 Bellicose1
2 125 14 Bellicose2
2 126 15 Homer
2 127 16 CrackleNow
–––––––––––––––––––––––––––––––––––––––––––––––––––––––––––––––––
––––––
NanoBass Reference Manual 65
Page 66

PROGRAM
NAME
S & H MW
MudPots
PulseFlute
Underground
Seek Pulse
Buzzerflex
Frankfurt
DiscoPulse
Quasar
FM Pulse
Rez Pulse
NOTES
Ripples
Bellicose1
Bellicose2
Homer
CrackleNow
–––––––––––––––––––––––––––––––––––––––––––––––––––––––––––––––––
––––––
66 NanoBass Reference Manual
Page 67

Sound ROM
This is a list of the sample families that are built in to the NanoBass’s 8
megabytes of sound ROM. They are the “raw materials” that the programs
combine, in different ways, to create the unit’s 256 programs.
–––––––––––––––––––––––––––––––––––––––––––––––––––––––––––––––––
––––––
NanoBass Reference Manual 67
Page 68

AcElec JayBs Fngd
JazzFingrd
B Bass 1
JACOBS
StudioBass
JayBs Pick
JazzPicked
Jazz Velo
Impossibl1
Impossibl2
Impossibl3
ImpossiblV
Muted Bass
Jaco Bass
FiveStrng1
FiveStrng2
FiveStrngV
JazzSlaps
ABass Slap
FiveStrSla
SlapBass3B
SklavSlap1
SklavSlap2
SklavSlapV
Slap Bass
PBasThmbdA
PBasThmbdC
Bass Pops
Fretless 1
Fretless 2
AcousBass1
AcousBass2
AcousBas3A
AcousBas3B
AcousBas3V
PFiltBass1
PFiltBass2
PFiltBass3
Stik Bass
BassHarm 1
BassHarm 2
Clavinet
ClavntWave
Pop 1
Pop 2
StringSlyd
Release
Harm/Pop
Pop/Harm
Harm/Stik
Stik/Harm
Pop/Slap
Slap/Pop
Slap/Harm
Slp/Studio
Studio/Hrm
VelAcoBass
3-VelBass1
3-VelBass2
3-VelBass3
FstEnv AnalogSqr1
AnalogSqr2
AnalogSqr3
AnalogSqr4
AnalogSqrV
AT Bass 1A
AT Bass 1B
AT Bass 1C
AT Bass 1V
AT Bass 2A
AT Bass 2B
AT Bass 2C
AT Bass 2V
AT Bass 3A
AT Bass 3B
AT Bass 3C
AT Bass 3V
Cool Bass
SynAcoustc
Elec Banjo
Tuned Pipe
–––––––––––––––––––––––––––––––––––––––––––––––––––––––––––––––––
––––––
68 NanoBass Reference Manual
Page 69

Fat Synth
FM Bass 1
MSweep
MicroWave1
Ana Kick1
oh8 Tom 1
oh8 Tom 2
oh8 Tom V
MicroWave2
MicroWave3
MicroWave4
MicroWaveV
Seq Bass
Seq BassV1
Seq BassV2
Rez Pluck1
Rez Pluck2
Rez Pluck3
Rez Pluck4
Rez PluckV
MicroPerc1
MicroPerc2
MicroPerc3
MicroPercV
UniPerc 1A
UniPerc 1B
UniPerc 1C
UniPerc 1V
UniPerc 2A
UniPerc 2B
UniPerc 2C
UniPerc 2V
Perc Organ
Percus 3rd
TranceBas1
TranceBas2
Velo Tranc
FM/TrncVel
Rez Zip 1
Rez Zip 2
Rez Zip 3
Rez Zip V
RezAttack1
RezAttack2
RezAttack3
Sweep AcidSweep1
AcidSweep2
AcidSweep3
AcidSweep4
AcidSweep5
VeloAcid 1
VeloAcid 2
VeloAcid 3
VeloAcid 4
Chirp Rez1
Chirp Rez2
Chirp RezV
KarnBass1
KarnBass2
KarnBass3
KarnBassV
MegaRez 1
MegaRez 2
MegaRez 3
MegaRez 4
MegaRez 5
MegaRez 6
MegaRez V1
MegaRez V2
oh3SawRez1
oh3SawRez2
oh3SawRez3
oh3SawRez4
oh3SqrRez1
oh3SqrRez2
oh3SqrRez3
oh3SqrRez4
HP Sweep 1
HP Sweep 2
HP Sweep 3
HP Sweep 4
RezAttackV
–––––––––––––––––––––––––––––––––––––––––––––––––––––––––––––––––
––––––
NanoBass Reference Manual 69
Page 70

HP Swp V1
HP Swp V2
UniBass 1
UniBass 2
UniBass 3
UniBass V1
UniBass V2
UniDist 1
UniDist 2
UniDist 3
UniDist V1
UniDist V2
Uni Rez 1
Uni Rez 2
Uni Rez 3
Uni Rez V
HPSaw Vel2
HPSaw Vel3
HPSaw Vel4
HPSaw Vel5
HPSaw Vel6
Velo Saw 1
Velo Saw 2
Velo Saw 3
Velo Saw 4
Velo Saw 5
VeloSawUK
MiniSquare
oh3Rez Sqr
Sqr Fltr 1
Sqr Fltr 2
Velo Sqare
oh3 Velo
Wave Pure Sine
Mini Tri
Tri Filter
Velo Tri
Mini Saw
Filt Saw
oh3 Saw
Diet Saw
Notch Saw
Band Saw
RezSaw UK
RezSaw USA
Saw Fltr 1
Saw Fltr 2
Saw Fltr 3
Saw Fltr 4
Saw Fltr 5
Saw Fltr 6
Saw Fltr 7
HipassSaw1
HipassSaw2
HipassSaw3
HipassSaw4
HPSaw Vel1
Bass Wave1
Bass Wave2
Bass Wave3
FretlsTone
HP Wave 1
HP Wave 2
HP Wave 3
HP Wave 4
HP Wave 5
HP Wave V1
HP Wave V2
HP Wave V3
HP Wave V4
10% Pulse
20% Pulse
50% Pulse
Velo Pulse
BrightSync
Hard Sync
Rectanglar
HSync/Rect
Metal Wave
OctLoc Wav
Rez Sync
Ring Mod
–––––––––––––––––––––––––––––––––––––––––––––––––––––––––––––––––
––––––
70 NanoBass Reference Manual
Page 71

RingMod V1
RingMod V2
Additive 2
Cognitive
Inharmonic
Digital 1
Digital 2
Digital 3
Digital 4
VeloDigitl
Science 2
Science 4
J Pad
M Pad
X Pad
Velo Pad 1
Velo Pad 2
Velo Pad 3
MWave
–––––––––––––––––––––––––––––––––––––––––––––––––––––––––––––––––
––––––
NanoBass Reference Manual 71
Page 72

4: MIDI RULES
The Basics
The Not-So-Basics
MIDI Implementation Chart
–––––––––––––––––––––––––––––––––––––––––––––––––––––––––––––––––
––––––
72 NanoBass Reference Manual
Page 73

The Basics
The NanoBass receives on one MIDI channel at a time, which is set by the
CHANNEL knob on the front panel.
During MIDI playback you can change categories and programs at any time,
either by sending Bank Select or Program Change messages, or by turning the
CATEGORY or PROGRAM knobs on the front panel.
There are 256 programs in the NanoBass. But there are only 128 MIDI program
numbers (000-127). To make it possible to activate any of the 256 programs via
MIDI, they have been separated into two BANKS of 128 programs each.
The first bank is selected by sending a Controller 0 command (Bank Select) with
a value of either 0 or 1. This bank consists of the eight categories listed on the
right side of the CATEGORY knob:
Acoustic
Fretless / Harmonic
Elec 1
Elec 2
Elec 3
Funk
Acid
House
The second bank is selected by sending a Controller 0 command (Bank Select)
with a value of 2. This bank consists of the eight categories listed on the left side
of the CATEGORY knob:
Rap
Industrial
Synth 1
Synth 2
Synth 3
Layer
Drone
Effect
–––––––––––––––––––––––––––––––––––––––––––––––––––––––––––––––––
––––––
NanoBass Reference Manual 73
Page 74

PLEASE NOTE: It’s possible to get confused here, if you don’t pay attention, by
the interaction of the CATEGORY knob and incoming MIDI Program Change
commands.
First, when you send Bank Select and Program Change commands, the front
panel knobs don’t move. This means that you could easily be playing ACID 1 via
MIDI, say, while the two knobs point toward RAP 12. Don’t be fooled.
Secondly, the latest Bank Select command that the NanoBass receives, either
from its front panel or over MIDI, is what it pays attention to. For an example of
this, consider the following situation. Using MIDI, you select Bank 1 and a certain
program you like. Then someone comes along (while you aren’t looking) and
turns the CATEGORY knob to one of the Bank 2 categories. Now Bank 2 is
selected, and if all you send the NanoBass is a Program Change command
(instead of a Bank Select followed by a Program Change) you won’t get the
program you wanted. Instead, you’ll get the same-numbered program in Bank 2.
TIP: Because of this, I suggest that you always send both a Bank Select
command and a Program Change command, together, when controlling your
NanoBass via MIDI.
CONTROLLER 0 vs. CONTROLLER 32: Some sequencers automatically use
Controller 32 commands for selecting banks on an instrument. Please be aware
that the NanoBass does not respond to Controller 32 commands. The only way
to select banks on a NanoBass via MIDI is to use Controller 0.
The Not-So-Basics
I mentioned earlier that using MIDI gives you real-time control over lots more
program parameters than you can adjust from the front panel. Here I’d like to
encourage you to experiment with just that.
Sending Mod Wheel data, for example, does some very neat things in various
programs. In some (like most of the electric pianos) it will adjust tremolo. In
organs it will speed up and slow down the lezlie speaker effect. In other
programs it will open the filter for a nice waaah sound. Try it and see.
–––––––––––––––––––––––––––––––––––––––––––––––––––––––––––––––––
––––––
74 NanoBass Reference Manual
Page 75

But don’t stop there. The four MIDI controllers used across the board in the
Alesis QS series of synthesizers will yield great results, too. These controllers
are 12 (often filter control), 13, 91 (often envelope length), and 93.
–––––––––––––––––––––––––––––––––––––––––––––––––––––––––––––––––
––––––
NanoBass Reference Manual 75
Page 76

MIDI Implementation Chart
Transmitted Recognized Remarks
BASIC Default 1-16 1-16
CHANNEL Changed 1-16 1-16
MODE Default X Modes 3, 4
Messages X All Notes Off
Altered X X
NOTE X 0-127
NUMBER True Voice X 0-127
VELOCITY Note On X O 7-bit Resolution
Note Off X O
AFTERTOUCH Key’s X O
Ch’s X O
PITCH BENDER X O
CONTROL 1 X O Mod Wheel
CHANGE 7 X O Volume
10 X O Panning
11 X O Expression
64 X O Sustain Pedal
123 X O All Notes Off
Effect Knob X O CC #12*
(see note, next page)
PROGRAM
CHANGE True # X 0-127
SYSTEM EXCLUSIVE O O
SYSTEM Song Pos X X
COMMON Song Sel X X
Tune X X
SYSTEM Clock X X
REAL TIME Message X X
AUX Local Control X X
All Notes Off X O
–––––––––––––––––––––––––––––––––––––––––––––––––––––––––––––––––
––––––
76 NanoBass Reference Manual
Page 77

Active Sense X X
Reset X X
Notes: * The setting of the effect knob responds to Controller #12
by default on Power-Up. This Controller number may be changed
to 0-120 by SysEx.
X= YES
O= NO
–––––––––––––––––––––––––––––––––––––––––––––––––––––––––––––––––
––––––
NanoBass Reference Manual 77
Page 78

5: CREATIVE TIPS
Those of you familiar with my monthly “Creative Options” essay in Keyboard
magazine know that my take on the world is somewhat different than most folks.
Please read the following with that in mind. There are a ton of books out there
which will teach you how to play bass, and write good solid bass lines. But when
you want to take that one step further and make your work really personal,
you’re going to have to go a little further out on the limb...
Fair warning. This is not about slurs, slides, slaps, scales, or signal-processors,
except indirectly. It is not about the “how-to” of bass lines, but the “what-to,” and
— more importantly — the “why-to.”
A good bass line can’t hide, can’t slide to one side or another of the point, can’t
tell anything but the simple truth. It can’t distract or dissemble. It can’t, in fact,
play by any of the rules of Proper Behavior that human beings use to grease the
friction of everyday life. That doesn’t mean it has to be aggressive and forward;
but it can never be polite.
It’s the nature of the beast. Pianists can hide a multitude of sins behind chord
clusters, arpeggiations, blitzkrieg runs, and over-pedaling. A stumped sax player
can squeal, squawk, and roar his way out of a musical cul-de-sac like a drunk
brawling his way out of a bar. Violinists can pretend to be fiddlers. Drummers
can sweat with great drama and bash out seizures, rockslides, or both. None of
these are really thrilling, any more than jelly donuts are really tasty, but putting
up with players who do things badly is the price we pay to have the Chopins and
Coltranes who did them well. It is the depressing flipside of technique that
pyrotechnics can be used to blow some pretty thick smokescreens. On the bass,
however, there are fewer ways to fake it, and tricks which would be easy outs on
other instruments become dangerous traps. That trivial three-chord Telecaster
chucka-chucka? Mud on an electric bass; virtually impossible on an upright.
Speed-of-light piano arpeggiations? Messy, indistinguishable, fret-noise-plagued
blurs. The relentless arena-style backbeat of a gated snare? Boooooooooring.
Thus, the bass: low in range, limited in timbre, unwieldy to the hand. Thank
goodness. Because when those hard limits are pushed by someone who knows
how, extraordinary things happen.
What it comes back to is the difference between “how” and “what.” Between
saying something...anything...and actually having something to say.
–––––––––––––––––––––––––––––––––––––––––––––––––––––––––––––––––
––––––
78 NanoBass Reference Manual
Page 79

The bass — or so you’ve been told so many times some of you believe it — is
part of the rhythm section. Its primary job is to pump the beat, its secondary job
is to reinforce the dominant, and its tertiary job is to stay out of the way of its
sonic betters. But it can be so much more, even while doing all those things
superbly.
To help keep you out of the rut, I offer you the following brief set of reassuring
facts, factoids, tips, and outright cheats. My music teachers won’t recognize any
of these, but they’ve proven awfully useful in the real world.
* If it doesn’t work the first time, do it again (brevity may be the soul of wit, but
repetition is the soul of recognition).
* If it works the second time, go for three.
* If it works the third time, do something else. You are a guest in your audience’s
head, and the adage about fish and visitors applies.
* There are no wrong notes, chords, or rhythms. Only incomplete ones.
* When in doubt, play forcefully. When assured, play light.
* If you have a trick you especially love, DON’T USE IT.
* Use effects sparingly, like pepper in rich soup.
* Melody is what happens when you write a sentence using notes.
* Harmony is what happens when “words” in your sentences have two meanings.
* Structure is what happens when other people think you know what you’re
doing, whether you really do or not.
* Your mother will still love you at tempos below 160.
* Do that other thing. You know — that one.
* Listen to a bass player you hate, and then never do anything that they do.
* Listen to a bass player you really really like, and then never do anything that
they do.
–––––––––––––––––––––––––––––––––––––––––––––––––––––––––––––––––
––––––
NanoBass Reference Manual 79
Page 80

* Study the bass role in other musical forms: like the bass clarinet and bassoon,
or trombone and tuba, in orchestral writing; or the bass voice in vocal works
(Handel’s Messiah; anything by the Bobs, the Nylons, or Bobby McFerrin; any
doo-wop groups or barbershop quartets); or the synth bass in dance music.
* Break your favorite bass lines and solos down into small sections. Put those
sections on flash cards, shuffle the cards, and follow their lead.
* Play either a high-hat or bass drum with one foot while playing your bass lines.
When this is no longer challenging, sit down and use your two feet to play both.
* Focus on smaller and smaller elements. Play a single note repeatedly, trying to
pull some meaning out of the rhymic and timbral variations. Or play quarter
notes at a relentlessly slow tempo and search out melodies that are interesting to
you anyway.
* Edit your sequences to remove one of the “strings,” losing all the notes that
would have been played on a real bass minus its E, A, D, or G..
* Deliberately listen to music you don’t like, and force yourself to understand
something in it (you can make this rationalization up if you want; in fact, more
points if you do).
* Set yourself challenges, like playing against sequenced music with chord
clusters so massive there is no clear tonal center, or changes in tempo or rhythm
that are tough for you to track. And, of course, as soon as they get easy —
make’em worse!
* Play beat the clock. Set a timer and give yourself five seconds to improvise a
valid musical statement. Record all attempts for later assessment,
embarassment, and enlightenment. Give yourself more and more time, in five
second intervals, until you can hold a coherent musical thought for a full 60
seconds. Then go back to the short stuff.
* Set up a loud, simple drum machine riff in a time signature you are not
comfortable with, and play along with it. For hours.
* Wear a blindfold (and then edit out the clunker notes).
–––––––––––––––––––––––––––––––––––––––––––––––––––––––––––––––––
––––––
80 NanoBass Reference Manual
Page 81

* Pretend you aren’t you. Play the way you’d imagine a character from a book or
movie might play (Luke Skywalker, Raymond from Rain Man, Captain Ahab,
Charles Foster Kane, Joan of Arc, Louis XIV, all three Musketeers or all three
Marx Brothers).
* Stare at someone you love all night long, without sleeping, and then play.
* Be glad you have fingers.
–––––––––––––––––––––––––––––––––––––––––––––––––––––––––––––––––
––––––
NanoBass Reference Manual 81
Page 82

6: CREDITS
SOUND ROM DEVELOPMENT
Erik Norlander
Taiho Yamada
Mike Peake
Bob Grey
Mike Struble
Athan Billias
PROGRAM DEVELOPMENT
Erik Norlander
Taiho Yamada
Mike Peake
Andrew Schlesinger
Eric Moon
SOFTWARE
Grant Kraus
Marcus Ryle
Michel Doidic
MECHANICAL DESIGN
David Douglass
Ron Roberts
Rick Souffle
ELECTRICAL DESIGN
Chris Asmus
John Hancock
Mike Murphy
ASIC DESIGN
Frank Thomson
Grant Kraus
TECHNICAL ASSISTANCE
Craig Devin
...and thanks to KEITH BARR, for believing in the vision.
–––––––––––––––––––––––––––––––––––––––––––––––––––––––––––––––––
––––––
82 NanoBass Reference Manual
Page 83

–––––––––––––––––––––––––––––––––––––––––––––––––––––––––––––––––
––––––
NanoBass Reference Manual 83
 Loading...