

Page 1

DM8
HIGH-DEFINITION DRUM MODULE
WITH DYNAMIC ARTICULATION
QUICKSTART GUIDE
::: ENGLISH ( 3 – 6 ) :::
MANUAL DE INICIO RÁPIDO
::: ESPAÑOL ( 7 – 10 ) :::
GUIDE D’UTILISATION RAPIDE
::: FRANÇAIS ( 11 – 14 ) :::
GUIDA RAPIDA
::: ITALIANO ( 15 – 18 ) :::
KURZANLEITUNG
::: DEUTSCH ( 19 – 22 ) :::
Page 2

Page 3
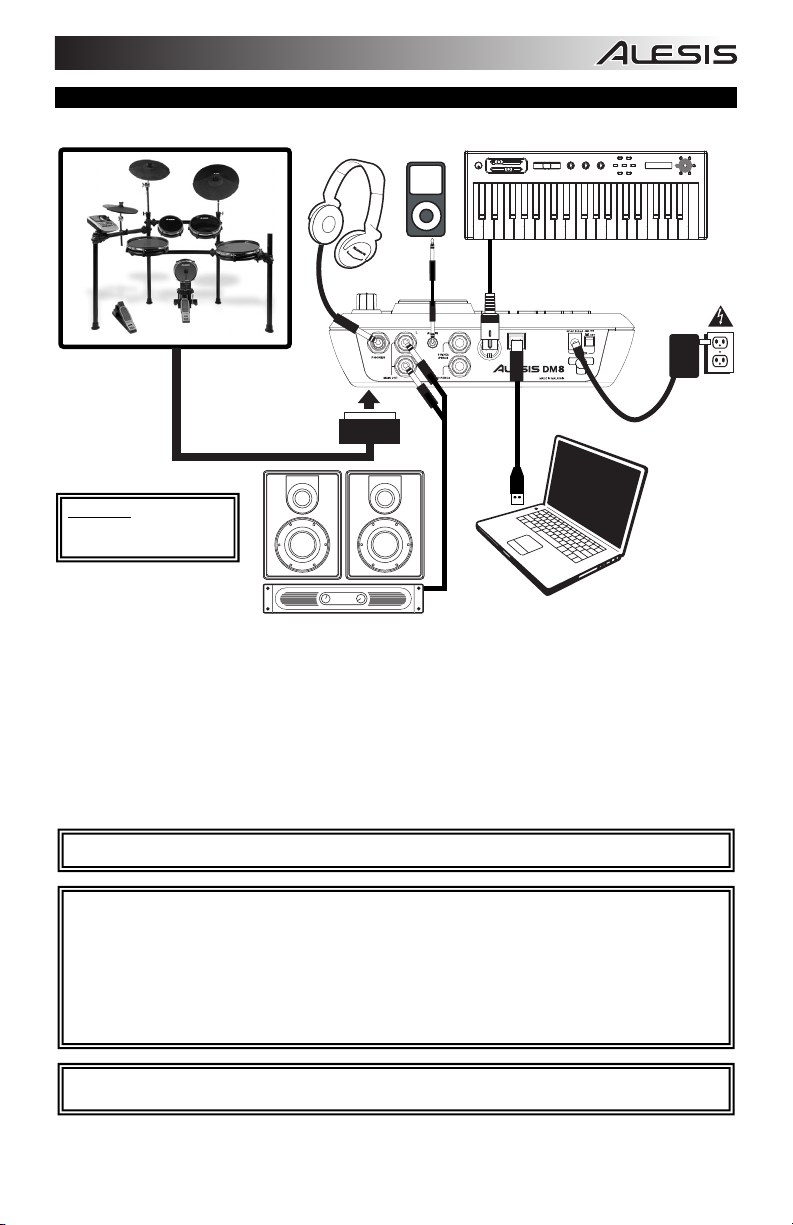
CONNECTION DIAGRAM
WARNING: Use only the
included Alesis power supply
with the DM8 module.
DRUM KIT
HEADPHONES iPod*
MIDI KEYBOARD
p
s
r
s
o
s
e
m
g
t
p
a
r
octave
-
xyz
+
tap
accomp
phrase
latch
m1
m2
volume
pitch
u
push
c
g
o
i
f
analog modeling synth
n
p
r
h
a
s
s
y
t
n
t
m
t
r
e
h
store
POWER
• Connect the 1/4" cables of your kit's cable snake to the drum pads and cymbal pads of your kit. Each cable is labeled
with its proper trigger.
• If you have additional drum pads, cymbal pads, or other triggers, you can use standard 1/4" cables to connect them to
the "RIDE 2/PERC1" or "PERC2" TRIGGER INPUTS on the module's rear panel. Dual-zone pads or cymbals (e.g., a
drum with head and rim triggers or a cymbal that can produce bow and bell sounds) will require TRS cables to trigger
both zones.
• Plug 1/4” TRS cables from the MAIN OUT to an amplifier, mixer, or speaker system. (For mono sound, connect a cable
to the Left output.)
• You can connect a set of 1/4” TRS headphones to the PHONES output.
• You can connect another audio device to the AUX IN using a standard 1/8" stereo cable.
* iTunes and iPod are trademarks of Apple, Inc., registered in the U.S.A. and other countries.
Headphones, iPod*, keyboard, amp, and computer not included.
HOUSE AMP
COMPUTER
See the included assembly poster for further instructions on setting up the DM8Kit and connecting it to the DM8 module.
NOTE: Out of the box, the DM8 module is write-protected, so you will be unable to save any changes you make to the Kits,
Instruments, Sequences, etc. To turn write protection off:
1. Press UTILITY.
2. Press SYS (F4).
3. Press O/S (F3).
4. Press MEM (F4).
5. Press VALUE DOWN or move the VALUE DIAL counterclockwise until the "WriteProt" field says "OFF."
6. Press DRUM KIT to return to the main page.
IMPORTANT: THE DM8 MODULE MAY BE AFFECTED BY STATIC ELECTRICITY. IF THIS OCCURS, SIMPLY TURN
THE MODULE OFF AND WAIT AT LEAST A FEW SECONDS BEFORE TURNING IT ON AGAIN.
3
Page 4
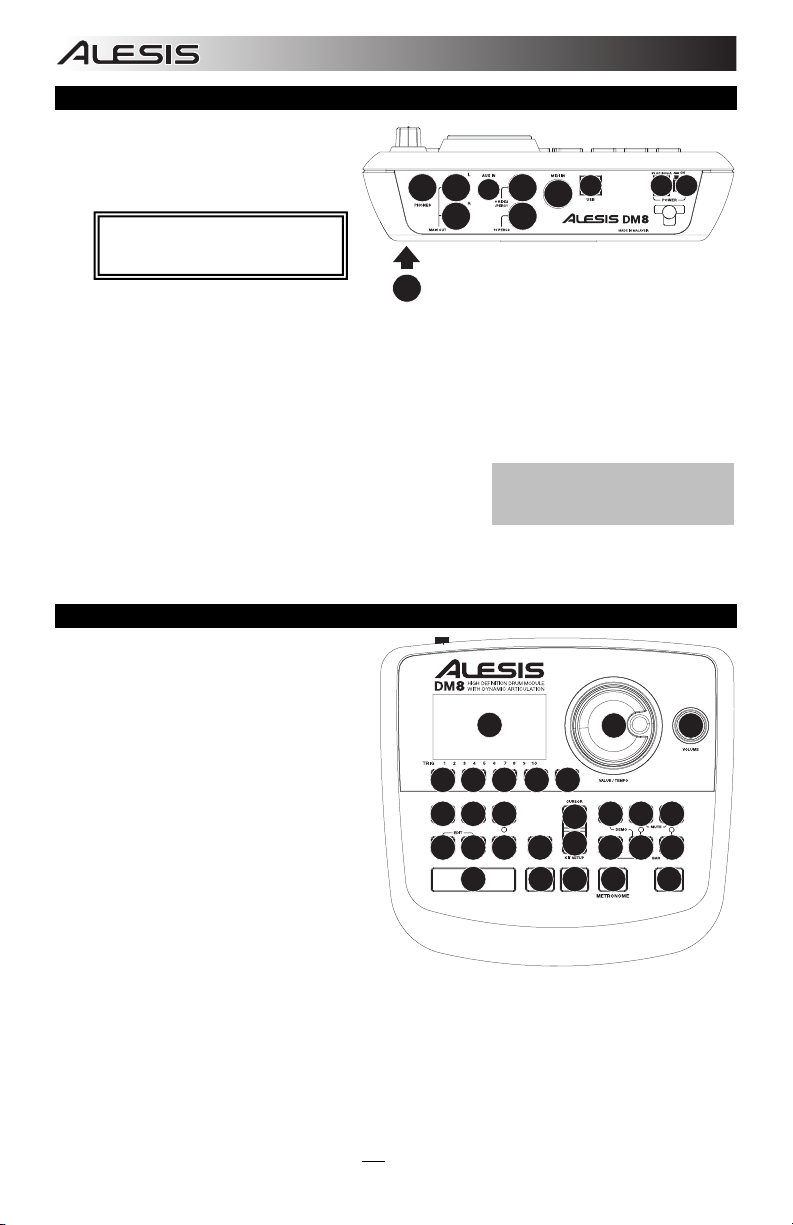
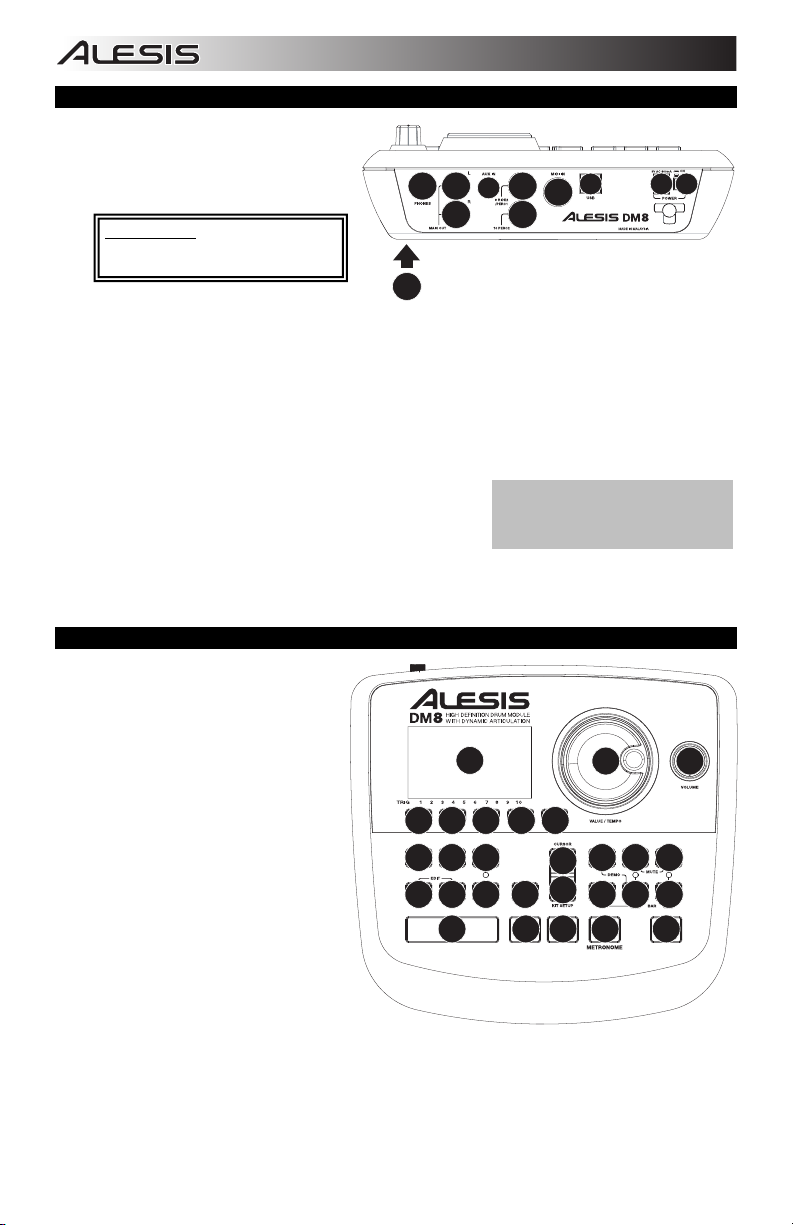
REAR PANEL FEATURES
1.
POWER SWITCH – Turns the module on
and off.
2. POWER IN – Connect the included AC
adapter to this input, then connect the
adapter to a power source.
WARNING: Use only the included
Alesis power supply with the DM8
module.
3. MAIN OUT – Use 1/4" TRS cables to
connect these outputs to an amplifier or
speaker system. The volume of these outputs is controlled by the VOLUME knob on the top panel.
4. AUX IN – Connect an external sound source, such as a CD player, to this input using a stereo 1/8" cable.
5. USB – Use a standard USB cable to connect the module to your computer via this USB port. This connection
allows the module to send MIDI messages via USB to an external drum software module. You can also
transmit SysEx files over this connection.
6. MIDI IN – Use a standard five-pin MIDI cable to connect this input to the MIDI OUT of an external MIDI device.
7. CABLE SNAKE CONNECTION – Connect the included cable snake to this connector, then connect the cables
to their respective triggers.
8. TRIGGER INPUTS – If you have additional drum pads, cymbal
pads, or other triggers, you can use standard 1/4" cables to
connect them to the "RIDE 2/PERC1" or "PERC2" TRIGGER
INPUTS. Dual-zone pads or cymbals (e.g., a drum with head and
rim triggers or a cymbal that can produce bow and bell sounds)
will require TRS cables to trigger both zones.
9. HEADPHONES OUTPUT – Connect your 1/4" headphones to this output. You can adjust the volume of this
output with the VOLUME knob on the module's top panel.
3
9
3
8
4
8
7
Note: The module's HI-HAT CONTROL
TRIGGER INPUT does not support
keyboard-style expression pedals.
5
6
2
1
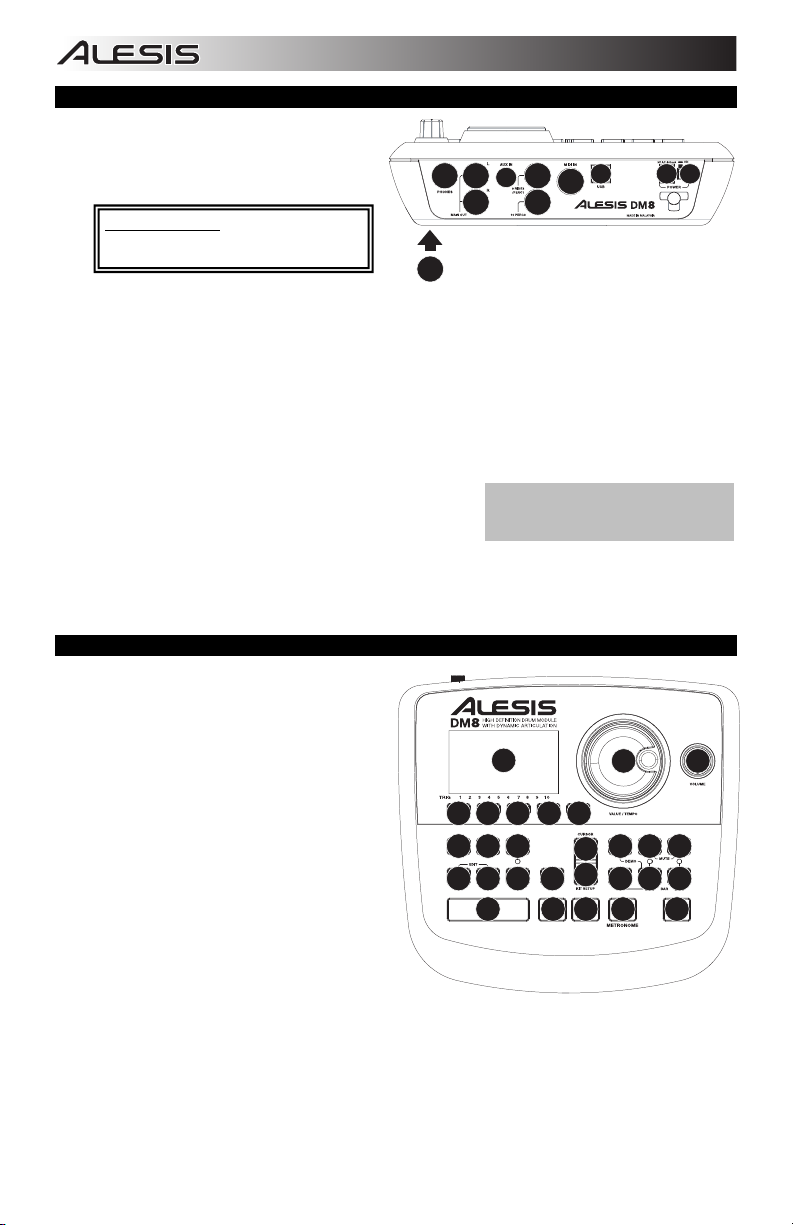
TOP PANEL FEATURES
1. VOLUME – Adjusts the volume level of the
MAIN OUT and HEADPHONES OUTPUT.
2. METRONOME ON / OFF – Turns the
metronome on or off.
3. LCD – Displays system menus, parameters,
and other settings as you use the DM8.
4. F-BUTTONS (1-4) – These buttons allow you
to navigate the menus shown in the LCD.
Press an F-BUTTON to select the "virtual"
button or tab shown above it in the LCD.
5. CURSOR UP / DOWN – Use these buttons to
move (vertically) through the available
parameters shown in menus in the LCD.
Note: Pressing CURSOR DOWN from the
Main Screen allows you to adjust overall
parameters for the current Kit.
6. VALUE DIAL – Turn this wheel to increase
and decrease values and settings shown in
the LCD.
7. VALUE UP / DOWN – Use these buttons to
increase and decrease values and settings shown in the LCD. These may be easier to use than the VALUE
DIAL when making incremental adjustments to your parameters.
8. EXIT – Press this button to return to the previous menu shown in the LCD.
9. DRUM KIT – Returns the LCD to the Main Screen. From here, you can select the current Kit with the VALUE
DIAL or VALUE UP / DOWN buttons.
10. UTILITY – Enters the Utility Menu, which allows you to set certain "global" parameters that affect the DM8's
overall operation (e.g., tempo, MIDI, output routing, trigger sensitivity, etc.). (See the Reference Manual for
more information.)
11. EXT TRIG – Allows you to adjust parameters related to triggering. Customizing these parameters changes the
feel and responsiveness of the Kit.
Note: Changes to these parameters will affect ALL
Kits.
4
3
444 4
10 11 12
13 14 15 16
9
8
5
5
77
6
17 18 19
20 21 22
23
2
1
Page 5
e
:
12. NOTE CHASE – Turns Note Chase on or off. When Note Chase is on, striking a trigger automatically selects it
for editing. Alternatively, you can select a trigger by highlighting the trigger field in the LCD with the CURSOR
UP / DOWN buttons then using the VALUE UP / DOWN buttons or VALUE DIAL.
13. EDIT INST – Press this button to edit the Instrument assigned to a trigger input. While editing, pressing it
toggles between the two Layers of the trigger. The current Layer (A or B) will be highlighted on the top-right
corner of the LCD.
14. EDIT ACCOMP – Press this button to adjust the settings for your Accompaniment. The adjustable parameters
will be shown in the LCD.
15. PREVIEW – Press this button to preview the sound of the current trigger. This can be useful when
programming the DM8 if it is not connected to your drum kit, if it is not convenient to strike the pads, etc.
16. STORE – Press this button to save changes made to the current Kit, Sequence, trigger settings, or global
settings. Use the VALUE DIAL or VALUE UP / DOWN buttons to select a destination where the current Kit or
Sequence will be stored. When saving a Kit, its Instruments and all its parameters will also be stored. When
saving a Sequence, it will remember its corresponding Kit and Accompaniment.
17. SEQ – Press this button to access the module's Sequencer where you can create and edit drum and
accompaniment patterns.
18. MUTE DRUMS – Press this button to mute the drum track of a Sequence.
19. MUTE ACCOMP – Press this button to mute the Accompaniment track of a Sequence.
20. STOP – Stops playback of the current Sequence. Hold down STOP and turn the VALUE DIAL to "scrub"
forwards and backwards through the Sequence. Hold down STOP and press VALUE UP / DOWN to "step"
forwards or backwards through each "event" in the Sequence. While navigating the Sequence in these ways,
you will hear the Sequence play as you move through it.
21. PLAY / – Plays the current Sequence. You can also hold down STOP and press this button to move back to
the previous bar in the Sequence.
22. RECORD / – Records a new Sequence. You can also hold down STOP and press this button to move to
the next bar in the Sequence.
23. TAP TEMPO – Tap this button at the desired rate to enter a new tempo for the Sequence. You can also
change the tempo by holding down the TAP TEMPO button and using the VALUE DIAL or VALUE UP / DOWN
buttons.
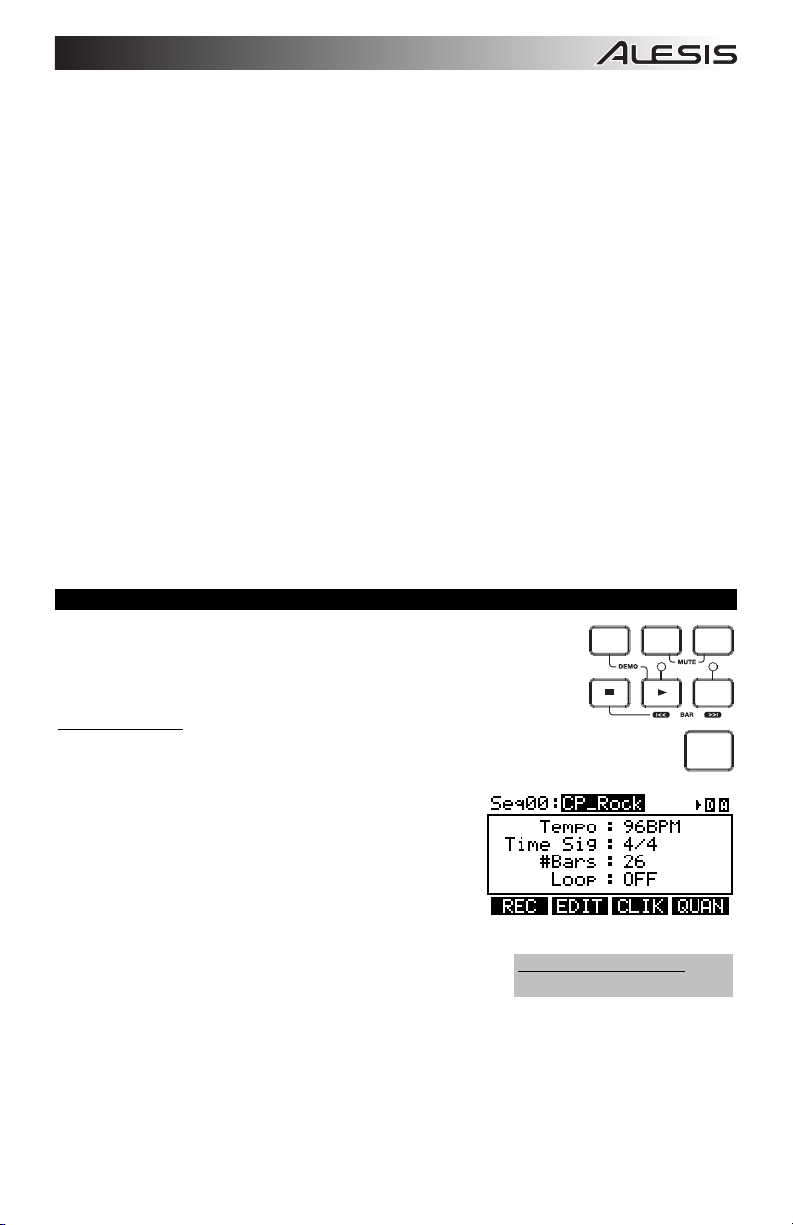
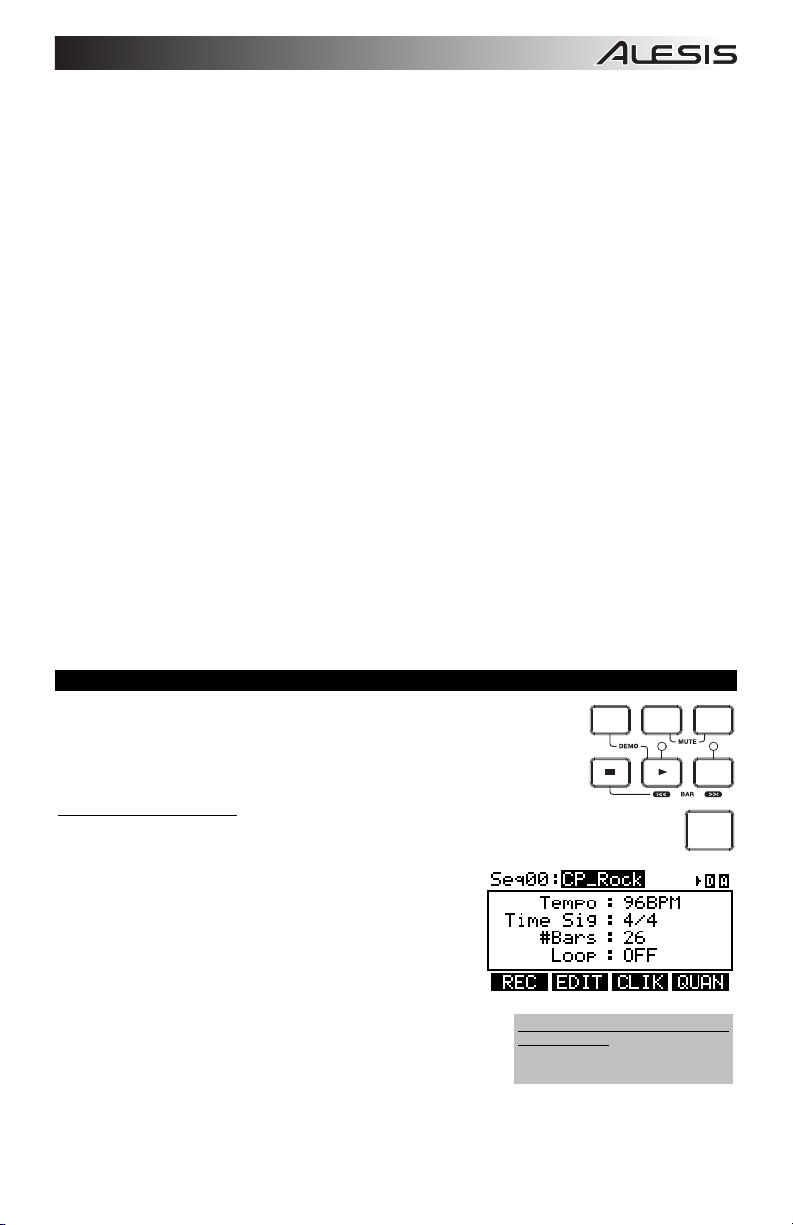
PLAYING SEQUENCES
A Sequence is a recorded pattern stored in the DM8 module that includes drums and
Accompaniment. The drum part of the Sequence includes the Kit sounds (Instruments)
as well the recorded pattern itself. Sequences can be recorded, edited, and looped, and
you can mute the drum part and/or Accompaniment while playing a Sequence. See the
Operator's Manual for more information on Sequences and Accompaniment.
To play a Sequence:
1. Press SEQ to enter the main screen of the Sequencer.
2. The Sequence field should be highlighted. Use the VALUE UP / DOWN buttons or
VALUE DIAL to select a Sequence.
3. The Sequence's tempo (in BPM or beats per minute) will be
shown on the LCD. Use the CURSOR UP / DOWN buttons to
select the Tempo field, then use the use the VALUE UP / DOWN
buttons or VALUE DIAL to set the new tempo. (You can also
press the TAP TEMPO button several times at the desired
tempo.)
4. To allow the Sequence to play continuously, use the CURSOR
UP / DOWN buttons to select the Loop field, then use the use the
VALUE UP / DOWN buttons or VALUE DIAL to turn Loop "On."
5. Press PLAY to play the Sequence.
To mute the drums or Accompaniment in the Sequence, press the
MUTE DRUMS or MUTE ACCOMP button, respectively. (This is a
useful tool when you want to play your own drum patterns to the
Accompaniment or vice versa.)
To play the Demo Sequenc
hold down SEQ and press PLAY.
SEQ DRUMS ACCOMP
REC
TAP
TEMPO
Simply
5
Page 6
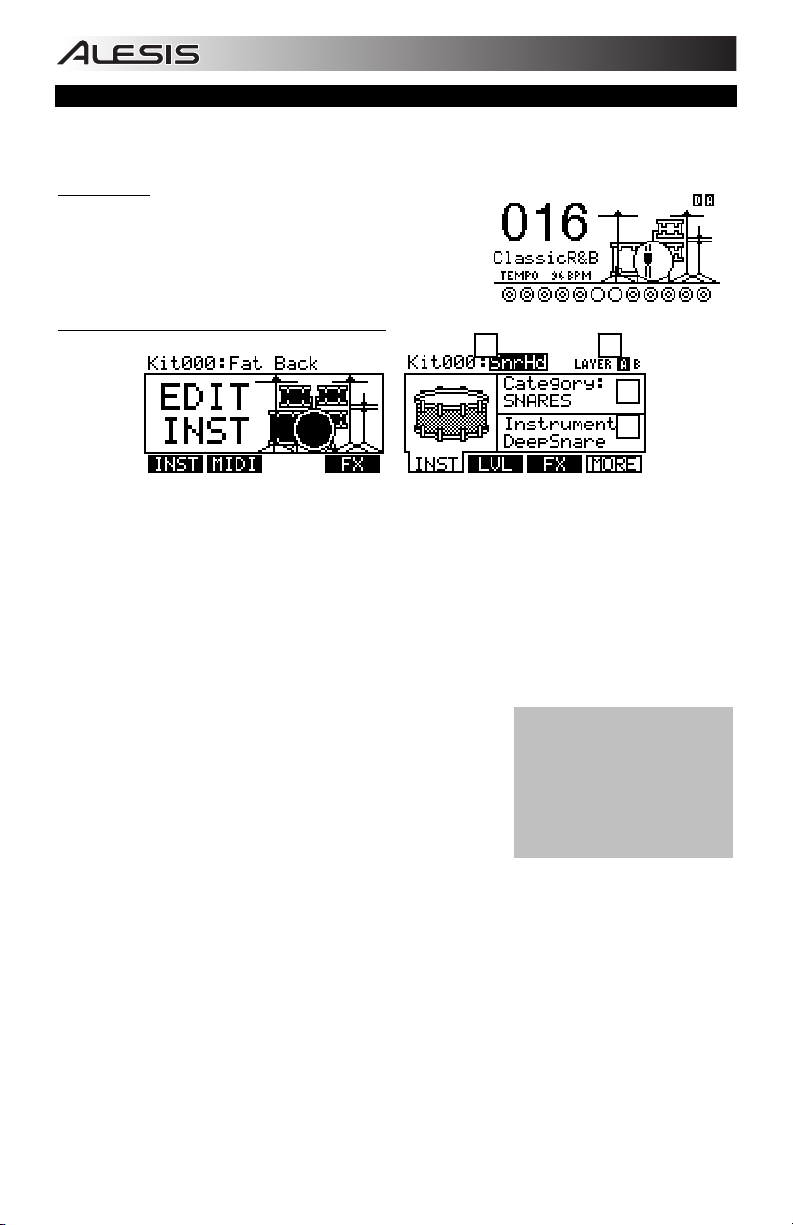
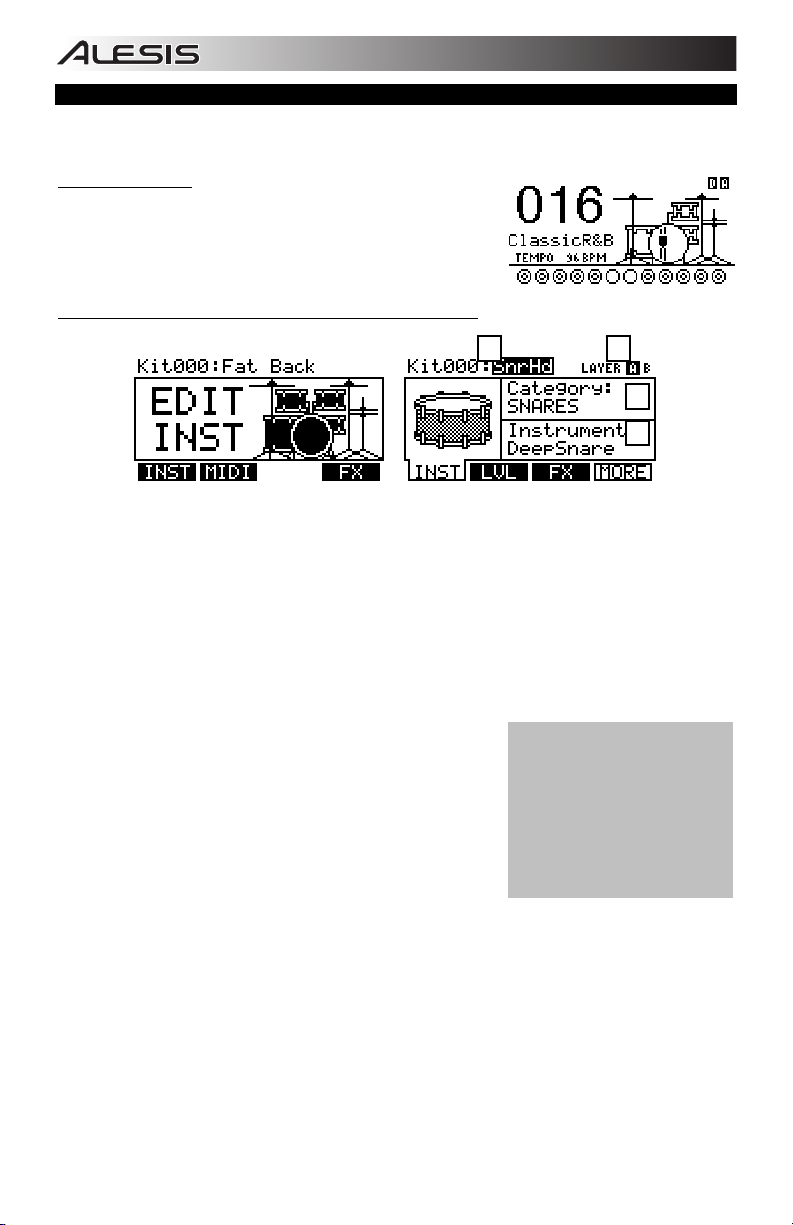
SELECTING AND EDITING KITS
The DM8 Module has 100 Preset Kits and 100 User Kits, which you can select from the Main Screen. You can adjust
the sounds, tuning, volume, panning, etc. for each Kit as well as their individual pad sounds. In addition, you may
choose a different Accompaniment for each Kit.
To select a Kit:
1. Press the DRUM KIT button to bring up the Main Screen.
2. Use the VALUE UP / DOWN buttons or the VALUE DIAL to select
3. Hit the triggers to try out the sounds of the Kit.
To edit the drum Instruments (trigger voices) in a Kit:
a Kit.
a b
c
d
#2 #3
1. Press DRUM KIT to go to the Main Screen.
2. Press EDIT INST. The top of the screen will show the number and name of the Kit whose Instruments (drum
voices) you will be editing.
3. Press INST (F1). The new screen will show:
a. the trigger you are editing (the Kit number and name of the trigger)
b. the Layer (each trigger sound consists of two layers, each with its own Instrument)
c. the Category (the type or "class" of drum voice currently assigned to that Layer)
d. the Instrument (the drum voice for that Layer)
4. Select the trigger input whose Instrument you want to change by pressing NOTE CHASE then striking the
trigger. Alternatively, you can highlight the trigger (next to the Kit number) using the CURSOR UP / DOWN
buttons and use the VALUE UP / DOWN buttons or VALUE DIAL to select a trigger to edit.
5. Select which Layer of that trigger you will edit by pressing EDIT INST.
It will toggle between Layer A and B.
6. Select the Category you want to assign to that trigger by pressing
CURSOR UP / DOWN to highlight the Category field, then use the
VALUE UP / DOWN buttons or VALUE DIAL to change it.
7. Select the Instrument for that Layer by pressing CURSOR UP /
DOWN to highlight the Instrument field, then use the VALUE UP /
DOWN buttons or VALUE DIAL to change it. To hear the currently
selected sound, strike the trigger or press PREVIEW on the module.
8. To edit other trigger settings, use the other F-BUTTONS (F2, F3, etc.)
to access additional tabs and adjust their parameters with the VALUE UP / DOWN buttons or VALUE DIAL.
For more information, please see the Reference Manual.
Note: For Layer A of the hi-hat and ride
cymbal triggers, you can not select a
different Category. Also, the available
Instruments for that Category are a predefined set of sounds designed to work
together (since the hi-hat and ride can
trigger a variety of different sounds).
However, you can assign Layer B to a
Category or Instrument you like for
those triggers.
6
Page 7
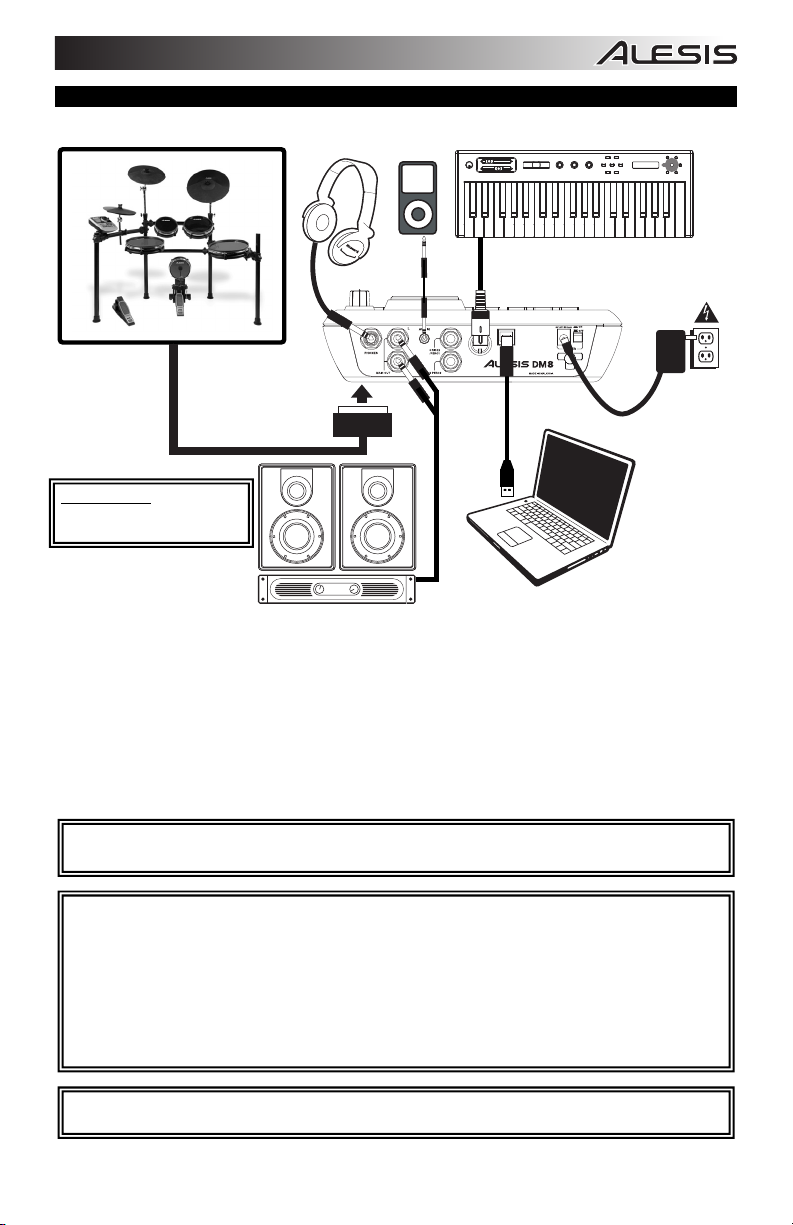
DIAGRAMA DE CONEXIÓN
ADVERTENCIA:Use únicamente
la fuente de alimentación Alesis
suministrada con el módulo DM8.
BATERÍA TECLADO MIDI
AURICULARES iPod*
p
s
r
s
o
s
e
m
g
t
p
a
r
+
store
SUMINISTRO
ELÉCTRICO
push
r
h
y
analog modeling synth
u
c
g
o
i
f
n
p
a
s
s
t
n
t
m
t
r
e
h
octave
xyz
-
tap
accomp
phrase
latch
m1
m2
volume
pitch
AMPLIFICADOR DE
• Conecte los cables de 1/4" del cables del multicable “snake” de su kit a los pads de tambor y platillos del kit. Cada
cable está rotulado con su disparador apropiado.
• Si tiene pads de tambor o platillos adicionales u otros disparadores, puede usar cables de 1/4" estándar para
conectarlos a las ENTRADAS DE DISPARO "RIDE 2/PERC1" o "PERC2" del panel trasero del módulo. Los pads o
platillos de dos zonas (por ej., un tambor con disparadores de parche y borde o un platillo que puede producir sonidos
de arco y campana) requieren cables TRS para disparar ambas zonas.
• Enchufe los cables TRS de ¼” de las salidas MAIN OUT (Principal) a un amplificador, mezclador o sistema de
altavoces. (Para lograr sonido monofónico, conecte un cable a la salida izquierda.)
• Es posible conectar a la salida HEADPHONES (Auriculares) un juego de auriculares TRS de 1/4".
• Puede conectar otro dispositivo de audio a la entrada AUX IN (Auxiliar) mediante un cable estéreo de 1/8" estándar.
VEA EL PÓSTER DE ARMADO INCLUIDO PARA OBTENER INSTRUCCIONES ADICIONALES SOBRE LA
INSTALACIÓN DEL KIT DM8 Y SU CONEXIÓN AL MÓDULO DM8.
AUDITORIO
* iTunes e iPod son marcas registradas de Apple, Inc., registradas en EE.UU. y otros países.
No incluye auriculares, iPod*, teclado, amplificador ni computadora.
NOTA: El módulo DM8 se entrega protegido contra escritura, de modo que no es posible guardar los cambios que se
hagan a los kits, instrumentos, secuencias, etc. Para desactivar la protección contra escritura:
COMPUTADORA
1. Pulse UTILITY.
2. Pulse SYS (F4).
3. Pulse O/S (F3).
4. Pulse MEM (F4).
5. Pulse DOWN (Disminuir valor) o mueva el CUADRANTE VALUE en sentido antihorario hasta que en el
campo "WriteProt" (Protección contra escritura) aparezca "OFF" (Desactivado).
6. Pulse DRUM KIT para volver a la pantalla principal.
IMPORTANTE: LA ELECTRICIDAD ESTÁTICA PUEDE AFECTAR AL MÓDULO DM8. SI ESTO OCURRE,
SIMPLEMENTE APAGUE EL MÓDULO Y ESPERE UNOS SEGUNDOS ANTES DE ENCENDERLO NUEVAMENTE.
7
Page 8
CARACTERÍSTICAS DEL PANEL TRASERO
1. INTERRUPTOR DE ENCENDIDO – Enciende
y apaga el módulo.
2. ENTRADA DE ALIMENTACIÓN – Conecte a
esta entrada el adaptador de CA incluido y
luego conecte el adaptador al suministro
eléctrico.
ADVERTENCIA: Use únicamente la fuente
de alimentación Alesis suministrada con el
módulo DM8.
3. SALIDA PRINCIPAL – Use cables TRS de
1/4" para conectar estas salidas a un amplificador o sistema de altavoces. El volumen de estas salidas se controla
mediante la perilla de volumen (VOLUME) del panel superior.
4. ENTRADA AUXILIAR – Conecte a esta entrada un dispositivo de sonido externo, tal como un reproductor de CD,
mediante un cable estéreo de 1/8" estándar.
5. USB – Use un cable USB estándar para conectar el módulo a la computadora por este puerto USB. Esta conexión
permite que el módulo envíe mensajes MIDI por USB a una biblioteca de sonidos externa. Por esta conexión se
pueden transmitir también archivos SysEx.
6. ENTRADA MIDI – Use un cable MIDI estándar de cinco pines para conectar esta entrada a la SALIDA MIDI de un
dispositivo MIDI externo.
7. CONEXIÓN DEL MULTICABLE – Conecte a este conector el multicable (“snake”) incluido y luego los cables a sus
disparadores respectivos.
8. ENTRADAS DE DISPARO - Si tiene pads de tambor o platillos
adicionales u otros disparadores, puede usar cables de 1/4" estándar
para conectarlos a las ENTRADAS DE DISPARO "RIDE 2/PERC1" o
"PERC2". Los pads o platillos de dos zonas (por ej., un tambor con
disparadores de parche y borde o un platillo que puede producir
sonidos de arco y campana) requieren cables TRS para disparar
ambas zonas.
9. SALIDA PARA AURICULARES – Conecte sus auriculares de ¼” a esta salida. Es posible ajustar el volumen de esta
salida con la perilla de volumen (VOLUME) del panel superior del módulo.
3
9
3
8
4
8
7
Nota: La ENTRADA DE DISPARO DE
CONTROL DE HI-HAT CONTROL del
módulo no es compatible con pedales de
expresión tipo teclado.
5
6
2
1
CARACTERÍSTICAS DEL PANEL SUPERIOR
1. VOLUME – Ajusta el nivel de volumen de la
SALIDA PRINCIPAL y la SALIDA PARA
AURICULARES.
2. METRÓNOMO SÍ / NO – Activa y desactiva
el metrónomo.
3. LCD – Muestra menús, parámetros y otros
ajustes del sistema cuando se usa el DM8.
4. BOTONES F (1-4) – Estos botones permiten
navegar por los menús que aparecen en la
pantalla LCD. Pulse un botón F para
acceder al botón o pestaña "virtual"
mostrado arriba del mismo en la pantalla
LCD.
5. CURSOR ARRIBA / ABAJO – Use estos
botones para moverse (verticalmente) por
los parámetros disponibles mostrados en los
menús de la pantalla LCD. (Nota: Al pulsar
CURSOR ABAJO en la pantalla principal, es
posible ajustar los parámetros generales del
kit actual.)
6. CUADRANTE DE VALORES – Gire esta
rueda para aumentar y disminuir los valores
y parámetros mostrados en la pantalla LCD.
7. AUMENTAR / DISMINUIR VALOR – Use
estos botones para aumentar y disminuir los
valores y parámetros mostrados en la pantalla LCD. Estos botones permiten hacer ajustes incrementales más precisos
a sus parámetros que el CUADRANTE VALUE (Valores).
8. SALIR – Pulse este botón para volver al menú anterior mostrado en la pantalla LCD.
9. KIT DE SONIDOS – Regresa la LCD a la pantalla principal. Desde aquí, es posible seleccionar el kit actual con el
CUADRANTE VALUE o los botones UP / DOWN.
10. UTILIDADES – Para entrar al menú Utility, que permite ajustar los valores de tempo (secuencias globales o
individuales), los valores de parámetros MIDI, el enrutamiento de salida, la sensibilidad de disparo y otros parámetros,
así como enviar datos SysEx. (Para más información consulte el Manual de referencia.)
8
3
444 4
10 11 12
13 14 15 16
9
77
8
5
5
6
17 18 19
20 21 22
23
2
1
Page 9

11. DISPARO EXTERNO – Cuando se editan sonidos de pads, al pulsar este botón es posible ajustar los parámetros
relacionados con el disparo. La personalización de estos parámetros varía la sensación y responsividad del kit. (Nota:
Los cambios a estos parámetros afectan a todos los kits.)
12. NOTE CHASE – Activa y desactiva la función Note Chase. Cuando Note Chase está activada, al golpear un disparador
se lo selecciona automáticamente para edición. Como alternativa, es posible seleccionar un disparador resaltando el
campo del mismo en la pantalla LCD con los botones CURSOR ARRIBA / ABAJO y usando luego los botones UP /
DOWN (Aumentar/disminuir valor) o el CUADRANTE VALUE.
13. EDITAR INSTRUMENTOS – Pulse este botón para entrar a un menú a fin de ajustar los parámetros globales que
afectan a los "instrumentos" asignados a las diversas entradas de disparo. Si se pulsa nuevamente, es posible editar
los instrumentos de la batería. En esta ventana, al pulsarlo se conmuta entre las dos capas del instrumento. La capa
actual (A o B) se resalta en la esquina superior derecha de la pantalla LCD.
14. EDITAR ACOMPAÑAMIENTO – Pulse este botón para editar los instrumentos de acompañamiento. En esta ventana,
al pulsarlo se conmuta entre las dos capas del instrumento. La capa actual (A o B) se resalta en la esquina superior
derecha de la pantalla LCD.
15. VISTA PRELIMINAR – Pulse este botón para ver una vista preliminar del disparador actual. (Esto resulta útil cuando se
editan voces de disparo sin Note Chase activada.)
16. ALMACENAR – Pulse este botón para guardar los cambios efectuados al kit, acompañamiento o secuencia actuales.
Use el CUADRANTE VALUE o los botones UP / DOWN para seleccionar un destino donde se almacenará el kit o
secuencia actuales. Cuando se guarda un kit, se almacenan también sus instrumentos y parámetros. Cuando se
guarda una secuencia, se almacenan también con ella el kit y el acompañamiento.
17. SECUENCIA – Pulse este botón para acceder al secuenciador del módulo, donde es posible crear y editar patrones
(secuencias) de batería y acompañamiento. También es posible editar diversos parámetros que afectan a estas
secuencias en este menú.
18. SILENCIAR BATERÍA – Pulse este botón para silenciar los sonidos de batería de una secuencia.
19. SILENCIAR ACOMPAÑAMIENTO – Pulse este botón para silenciar el acompañamiento de una secuencia.
20. PARAR – Para detener la reproducción de la secuencia actual. Mantenga pulsado STOP y gire el CUADRANTE
VALUE para "barrer" hacia delante y atrás a lo largo de la secuencia. Mantenga pulsado STOP y pulse UP / DOWN
para "dar pasos " hacia delante o atrás a lo largo de cada "evento" de la secuencia. Mientras navega por la secuencia
de estas maneras, oirá cómo se reproduce la secuencia a medida que se mueve por ella.
21. REPRODUCIR / – Para reproducir la secuencia actual. También puede mantener pulsado STOP y pulsar este botón
para retroceder a la barra anterior de la secuencia.
22. GRABAR / – Para grabar una nueva secuencia. También puede mantener pulsado STOP y pulsar este botón para
avanzar a la barra siguiente de la secuencia.
23. TAP TEMPO – Golpee este botón al ritmo deseado para ingresar un nuevo tempo para la secuencia. También es
posible cambiar el tempo manteniendo pulsado el botón TAP TEMPO y usando el CUADRANTE VALUE o los botones
UP / DOWN.
CÓMO REPRODUCIR SECUENCIAS
Una secuencia es un patrón grabado almacenado en el módulo DM8 y que incluye batería y
acompañamiento. La parte de batería de la secuencia incluye los sonidos (instrumentos) del kit,
como también el patrón grabado propiamente dicho. Las secuencias se pueden grabar editar y
colocar en loops, como también es posible silenciar la parte de batería y/o acompañamiento
cuando se reproduce una secuencia. Para más información sobre secuencias y
acompañamiento, consulte el Manual del operador.
Para reproducir una secuencia:
1. Pulse SEQ para entrar a la pantalla principal del secuenciador.
2. Se debe resaltar el campo Sequence (Secuencia). Use los botones UP / DOWN o el
CUADRANTE VALUE para seleccionar una secuencia.
3. El tempo de la secuencia (en BPM o beats por minuto) aparece en la
pantalla LCD. Use los botones CURSOR ARRIBA / ABAJO para
seleccionar el campo Tempo y luego ajuste el nuevo tempo con los
botones UP / DOWN (Aumentar/disminuir valor) o el CUADRANTE
VALUE. (También puede pulsar el botón TAP TEMPO varias veces al
tempo deseado.)
4. Para permitir que la secuencia se reproduzca continuamente, use los
botones CURSOR ARRIBA / ABAJO para seleccionar el campo Loop
y luego active el loop con los botones UP / DOWN o el CUADARNTE
VALUE.
5. Pulse REPRODUCIR para reproducir la secuencia.
Para silenciar la batería o el acompañamiento en la secuencia, pulse el
botón MUTE DRUMS o MUTE ACCOMP, respectivamente. (Ésta es una
herramienta útil cuando usted desea reproducir sus propios patrones de
batería como acompañamiento o viceversa.
Para reproducir la secuencia demo:
Mantenga pulsado SEQ y pulse
REPRODUCIR.
SEQ DRUMS ACCOMP
REC
TAP
TEMPO
9
Page 10
CÓMO SELECCIONAR Y EDITAR LOS KITS
El módulo DM8 tiene 100 kits predeterminados y 100 kits del usuario, que se pueden seleccionar en la pantalla principal. Es
posible ajustar los sonidos, afinación, volumen, balance, etc. de cada kit, como también sus sonidos de pads individuales.
Asimismo, puede elegir un acompañamiento diferente para cada kit.
Para seleccionar un kit:
1. Pulse el botón DRUM KIT para abrir la pantalla principal.
2. Use los botones UP / DOWN o el CUADRANTE VALUE para seleccionar
un kit.
3. Golpee los disparadores para probar los sonidos del kit.
Para editar los instrumentos de batería (voces de disparo) de un kit:
a b
c
d
#2 #3
1. Pulse DRUM KIT para abrir la pantalla principal.
2. Pulse EDIT INST. La parte superior de la pantalla muestra el número y el nombre del kit cuyos instrumentos (voces o
sonidos de batería) va a editar.
3. Pulse INST (F1). La nueva pantalla muestra lo siguiente:
a. el disparador que está editando (el número de kit y el nombre del disparador)
b. la capa (cada sonido de disparo consiste en dos capas, cada una con su propio instrumento)
c. la categoría (tipo o “clase” de voz de batería asignada actualmente a esa capa)
d. el instrumento (la voz de batería correspondiente a esa capa)
4. Seleccione la entrada de disparador cuyo instrumento desea cambiar pulsando NOTE CHASE y luego golpeando el
disparador. Como alternativa, puede resaltar el disparador (que está al lado del número de kit) usando los botones
CURSOR ARRIBA / ABAJO y utilice los botones UP / DOWN o el CUADRANTE VALUE para seleccionar el disparador
a editar.
5. Seleccione la capa de ese disparador que va a editar pulsando EDIT
INST. Conmutará también entre las capas A y B.
6. Seleccione la categoría que desea asignar a ese disparador pulsando
CURSOR ARRIBA / ABAJO para resaltar el campo Category (Categoría)
y use luego los botones UP / DOWN o el CUADRANTE VALUE para
cambiarlo.
7. Seleccione el instrumento correspondiente a esa capa pulsando
CURSOR ARRIBA / ABAJO para resaltar el campo Instrument
(Instrumento) y use luego los botones UP / DOWN o el CUADRANTE
VALUE para cambiarlo. Para oír el sonido seleccionado actualmente,
golpee el disparador o pulse PREVIEW (Vista preliminar) en el módulo.
8. Para editar otros valores de disparadores, use los demás BOTONES F
(F2, F3, etc.) para acceder a pestañas adicionales y ajustar sus
parámetros con los botones UP / DOWN o el CUADRANTE VALUE. Para más información, consulte el Manual de
referencia.
Nota: En la capa A de los disparadores
de platillos hi-hat y ride, no es posible
seleccionar una categoría diferente.
Además, los instrumentos disponibles
para esa categoría son un conjunto de
sonidos predefinidos diseñados para
funcionar en conjunto (puesto que el hihat y el ride pueden disparar una
variedad de sonidos diferentes). No
obstante, es posible asignar la capa B a
la categoría o instrumento que desee
para estos disparadores.
10
Page 11

SCHÉMA DE CONNEXION
ENSEMBLE DE BATTERIE CLAVIER MIDICASQUE
MISE EN GARDE : Utilisez le
module DM8 uniquement
avec le bloc d’alimentation
Alesis fournie.
D'ÉCOUTE
iPod*
p
s
r
s
o
s
e
m
g
t
p
a
r
octave
-
xyz
+
tap
accomp
phrase
latch
m1
m2
volume
pitch
u
push
c
g
o
i
f
analog modeling synth
n
p
r
h
a
s
s
y
t
n
t
m
t
r
e
h
store
ALIMENTATION
AMPLIFICATEUR
* ® iTunes et iPod sont des maques de commerce enregistrées de Apple, Inc., enregistrées aux États-Unis et dans d’autres pays.
• Branchez les câbles ¼ po du câble multipaire aux pads percussion et aux pads cymbale. Chaque câble est marqué
avec le trigger correspondant.
• Si vous avez des pads percussion, des pads cymbale ou d’autres triggers supplémentaires, vous pouvez utiliser des
câbles ¼ po standard pour les connecter aux entrées TRIGGER INPUTS « RIDE 2/PERC1 » ou « PERC2 » à l’arrière
du module. Pour les pads ou les cymbales à double zone (p. ex., une caisse dotée de triggers centre et rimshot ou une
cymbale pouvant produire des sons bell et bow), des câbles TRS seront nécessaires pour gérer les deux zones.
• Branchez les câbles TRS des sorties MAIN OUT à un amplificateur, une console de mixage ou un système de hautparleurs. (Pour un son mono, branchez un câble à la sortie gauche).
• Vous pouvez brancher un casque d’écoute TRS 1/4 po à la sortie HEADPHONES OUTPUT.
• Vous pouvez brancher un autre appareil audio à l’entrée AUX IN à l’aide d'un câble stéréo 1/8 po standard.
REPORTEZ-VOUS AU GUIDE D’ASSEMBLAGE INCLUS POUR LES DIRECTIVES DE MONTAGE DE L’ENSEMBLE DE
BATTERIE ÉLECTRONIQUE ET DU MODULE DM8.
Casque, iPod*, clavier, ampli, ordinateur ne font pas partie de la fourniture.
ORDINATEUR
REMARQUE : Dès la sortie de la boîte, le module DM8 est protégé en écriture, vous ne pouvez donc pas sauvegarder les
modifications que vous effectuez aux ensembles de sons, aux instruments, aux séquences, etc. Pour désactiver la
fonction de protection :
1. Appuyez sur Utility.
2. Appuyez sur SYS (F4).
3. Appuyez sur O/S (F3).
4. Appuyez sur MEM (F4).
5. Appuyez sur la touche des valeurs du bas ou tournez la molette dans le sens des aiguilles d’une montre
jusqu’à ce que le champ « WriteProt » indique « OFF ».
6. Appuyez sur la touche DRUM KIT afin de retourner au menu principal.
IMPORTANT : LE MODULE DM8 PEUT ÊTRE AFFECTE PAR L’ÉLECTRICITÉ STATIQUE. DANS CE CAS, ÉTEIGNEZ
SIMPLEMENT LE MODULE ET ATTENDEZ AU MOINS QUELQUES SECONDES AVANT DE LE RALLUMER.
11
Page 12
CARACTÉRISTIQUES DU PANNEAU ARRIÈRE
1. L'INTERRUPTEUR D'ALIMENTATION – Met
l’appareil sous et hors tension.
2. POWER IN – Branchez le câble d’alimentation
à cette entrée, puis l'autre extrémité à la prise
électrique.
MISE EN GARDE : Utilisez le module DM8
uniquement avec le bloc d’alimentation
Alesis fournie.
3. MAIN OUT – Branchez des câbles TRS ¼ po à
ces sorties afin de raccorder un amplificateur, une console de mixage ou à un système stéréo. Le volume de
ces sorties est commandé par le bouton VOLUME du panneau supérieur.
4. AUX IN – Branchez une source audio externe, telle qu’un lecteur CD, à cette entrée à l’aide d'un câble stéréo
1/8 po standard.
5. USB – Branchez un câble USB à ce port afin de raccorder le module à votre ordinateur. Cette connexion
permet au module d’acheminer des messages MIDI à une bibliothèque de sons externe via USB. Vous pouvez
également acheminer des fichiers SysEx via cette connexion.
6. MIDI IN – Vous pouvez brancher un câble MIDI à cinq broches à cette entrée et à la sortie MIDI OUT d’un
appareil MIDI externe.
7. CONNECTEUR POUR LE CÂBLE MULTIPAIRE – Branchez le câble multipaire à ce connecteur, puis les
extrémités aux capteurs correspondants.
8. ENTRÉES TRIGGER - Si vous avez des pads percussion, des
pads cymbale ou d’autres triggers supplémentaires, vous
pouvez utiliser des câbles ¼ po standard pour les connecter aux
entrées TRIGGER INPUTS « RIDE 2/PERC1 » ou « PERC2 ».
Pour les pads ou les cymbales à double zone (p. ex., caisse
dotée de triggers centre et rimshot ou cymbale pouvant produire des sons bell et bow), des câbles TRS seront
nécessaires pour gérer les deux zones.
9. HEADPHONES – Un casque d'écoute peut être branché à cette sortie de ¼ po. Le niveau du signal de cette
sortie est commandé par le bouton VOLUME du panneau supérieur.
3
9
3
8
4
8
7
Remarque: L’entrée HI-HAT CONTROL
TRIGGER INPUT ne supporte pas les
pédales d’expression de type clavier.
5
6
2
1
CARACTÉRISTIQUES DU PANNEAU SUPÉRIEUR
1. VOLUME – Permet d'ajuster le niveau du volume de
les sorties MAIN OUT et HEADPHONES.
2. METRONOME ON / OFF – Touche permettant
d'activer ou de désactiver le métronome.
3. ACL – Écran ACL indiquant les menus système, les
paramètres et d’autres réglages du DM8.
4. TOUCHES F (1 à 4) – Ces touches vous permettent
de parcourir les menus affichés sur l’écran ACL.
Appuyez sur la touche F située en dessous de la
touche virtuelle ou l’onglet de l’écran.
5. TOUCHES DE DÉPLACEMENT – Ces touches
permettent de déplacer le curseur (verticalement) afin
de parcourir les différents menus de l’écran.
(Remarque : Appuyer sur la touche de déplacement
du bas à partir du menu principal vous permet de
régler les paramètres généraux de l’ensemble de
sons sélectionné.)
6. MOLETTE DES VALEURS – Cette molette permet
d’augmenter ou de diminuer les valeurs et les
paramètres affichés.
7. TOUCHES DES VALEUR UP / DOWN – Ces
touches permettent d’augmenter ou de diminuer les
valeurs et les paramètres affichés. Ces touches vous permettent de faire des ajustements incrémentaux des
paramètres plus précis que la molette.
8. EXIT – Cette touche permet de retourner au menu précédent.
9. DRUM KIT – Cette touche permet de retourner au menu principal. À partir de là, vous pouvez sélectionner l’ensemble
de sons en cours à l’aide de la molette ou des touches UP / DOWN.
10. UTILITY – Permet d’accéder au Utility Menu, vous permettant de modifier les paramètres du tempo (généraux ou pour
les séquences individuelles), les paramètres MIDI, l’acheminement des sorties, la sensibilité des capteurs, et d'autres
paramètres, ainsi que l’envoi de données SysEx. (Pour de plus amples informations, veuillez consulter le guide de
référence.)
3
444 4
10 11 12
13 14 15 16
9
8
5
5
77
6
17 18 19
20 21 22
23
2
1
12
Page 13
11. EXT TRIG – Lors de la modification des sons des pads, cette touche vous permet de modifier les paramètres
concernant les capteurs. La modification de ces paramètres permet de changer le rythme et la réponse de l’ensemble
de sons. (Remarque : La modification de ces paramètres affecte tous les ensembles de sons.)
12. NOTE CHASE – Cette touche permet d’activer ou de désactiver la fonction Note Chase. Lorsque la fonction Note Chase
est activée, le capteur frappé est automatiquement sélectionné aux fins de modifications. Vous pouvez également
sélectionner un capteur en le mettant en surbrillance à l'aide des touches de déplacement, puis en utilisant les touches
UP / DOWN ou la molette.
13. EDIT INST – Cette touche permet d’accéder au menu des paramètres généraux qui affectent les « Instruments »
assignés aux différentes entrées. Pour modifier les instruments de la batterie, appuyez une deuxième fois sur la touche.
Si vous appuyez sur la touche à partir de cette fenêtre, cela vous permet de commuter entre les deux niveaux de
l’instrument. Le niveau en cours (A ou B) est en surbrillance dans le coin supérieur droit.
14. EDIT ACCOMP – Cette touche permet de modifier les instruments accompagnateurs (Accompaniment Instruments). Si
vous appuyez sur la touche à partir de cette fenêtre, cela vous permet de commuter entre les deux niveaux de
l’instrument. Le niveau en cours (A ou B) est en surbrillance dans le coin supérieur droit.
15. PREVIEW - Cette touche permet d'écouter le son du capteur sélectionné. (Ceci est utile lors de la modification des sons
de capteur lorsque la fonction Note Chase n'est pas activée.)
16. STORE – Cette touche permet de sauvegarder les modifications apportées à un ensemble de sons, à
l'accompagnement ou à la séquence en cours. Utilisez la molette ou les touches UP / DOWN afin de sélectionner la
destination de sauvegarde de l’ensemble de sons ou de la séquence. Lors de la sauvegarde d’un ensemble de sons,
ses instruments et tous ces paramètres sont également sauvegardés. Lors de la sauvegarde d’une séquence,
l’ensemble de sons et l’accompagement utilisés sont également sauvegardés.
17. SEQ – Cette touche permet d’accéder au séquenceur du module d’où vous pouvez créer et modifier les enchaînements
de batteries et des instruments d’accompagnement (Sequences). Vous pouvez également modifier les paramètres qui
affectent ces séquences à partir de ce menu.
18. MUTE DRUMS – Cette touche permet de mettre en sourdine les sons de batterie d’une séquence.
19. MUTE ACCOMP – Cette touche permet de mettre en sourdine les sons d’accompagnement d’une séquence.
20. STOP – Cette touche permet d’arrêter la lecture de la séquence en cours. Maintenez la touche STOP tout en tournant la
molette afin d'avancer ou de reculer la séquence. Maintenez la touche STOP enfoncée tout en appuyant sur les touches
UP / DOWN afin d'avancer ou de reculer la séquence par incréments en parcourant tous les « évènements » de la
séquence. En parcourant la séquence, vous pouvez entendre défiler la séquence.
21. PLAY / – Cette touche permet de faire la lecture de la séquence en cours. Vous pouvez également maintenir la
touche STOP enfoncée tout en appuyant sur cette touche afin de retourner à la mesure précédente.
22. RECORD / – Cette touche permet d’enregistrer une nouvelle séquence. Vous pouvez également maintenir la touche
STOP enfoncée tout en appuyant sur la cette touche afin de passer à la mesure suivante.
23. TAP TEMPO – Tapez cette touche au rythme désiré afin de régler un nouveau tempo pour la séquence. Vous pouvez
également modifier le tempo en maintenant la touche TAP TEMPO enfoncée tout en utilisant la molette ou les touches
UP / DOWN.
UTILISATION DES SÉQUENCES D’ENCHAÎNEMENTS
Une séquence est un enchaînement contenant des sons de batterie et d’instruments
sauvegardés dans la mémoire du module DM8. La partie batterie de la séquence inclut aussi
bien l’ensemble de sons (instruments) que l’enchaînement lui-même. Les séquences peuvent
être enregistrées, modifiées, utilisées en boucle. De plus, vous pouvez mettre en sourdine les
sons de batterie et/ou d’accompagnement lors de la lecture. (Pour de plus amples informations
sur les séquences et l’accompagnement, veuillez consulter le guide d’utilisation.)
Pour faire jouer une séquence :
1. Appuyez sur la touche SEQ afin d’accéder au menu principal du séquenceur.
2. Le champ Sequence devrait être en surbrillance. Sélectionnez une séquence à l’aide de
la molette ou des touches UP / DOWN.
3. Le tempo de la séquence (en battement par minute) devrait s’afficher.
Utilisez les touches de défilement UP / DOWN pour mettre le champ
Tempo en surbrillance, puis utilisez les touches UP / DOWN ou la
molette afin de programmer le nouveau tempo. (Vous pouvez
également taper la touche TAP TEMPO au tempo désiré.)
4. Afin de faire jouer la séquence en continu, utilisez les touches de
défilement UP / DOWN pour mettre le champ Loop en surbrillance,
puis utilisez les touches UP / DOWN ou la molette afin d’activer la
fonction de bouclage.
5. Appuyez sur la touche PLAY afin de faire jouer la séquence.
Pour mettre les sons de batterie ou d’accompagnement de la séquence en
sourdine, appuyez sur les touches MUTE DRUMS ou MUTE ACCOMP
respectivement. (Ceci est un outil très pratique lorsque vous désirez jouer
vos propres enchaînements de batterie sur la séquence
d’accompagnement ou vice versa.)
Pour faire jouer la séquence de
démonstration : Appuyez sur la
touche SEQ et appuyez sur la touche
PLAY.
SEQ DRUMS ACCOMP
REC
TAP
TEMPO
13
Page 14

e
:
LA SÉLECTION ET LA MODIFICATION DES ENSEMBLES DE SONS
Le module DM8 est doté de 100 ensembles de sons programmés et de 100 ensembles de sons utilisateur qui peuvent être
sélectionnés à partir du menu principal. Vous pouvez effectuer le réglage des sons, de l’accordage, du volume, du
panoramique, etc. pour chacun des ensembles de sons et ainsi que des sons individuels des pads. De plus, vous pouvez
sélectionner un accompagnement différent pour chacun des ensembles de sons.
Pour sélectionner un ensemble de sons de batterie :
1. Appuyez sur la touche DRUM KIT afin d’accéder au menu principal.
2. À partir de là, vous pouvez sélectionner l’ensemble de sons à l’aide de la
molette ou des touches UP / DOWN.
3. Frappez les capteurs afin d’écouter les sons de l’ensemble de sons.
Pour sélectionner les instruments de batterie (sons) d’un ensemble de sons :
a b
c
d
Nº 2 Nº 3
1. Appuyez sur la touche DRUM KIT afin d’accéder au menu principal.
2. Appuyez sur la touche EDIT INST. Le haut de l’écran affichera le numéro et le nom de l’ensemble de sons duquel les
instruments seront modifiés.
3. Appuyez sur la touche INST (F1). La nouvelle fenêtre affichera :
4. Sélectionnez l’entrée du capteur pour lequel vous désirez modifier l’instrument en appuyant sur la touche NOTE
5. Sélectionnez lequel des deux niveaux de capteur vous désirez modifier en
6. Sélectionnez la catégorie que vous désirez assigner à ce capteur en
7. Sélectionnez l’instrument que vous désirez assigner à ce niveau en
8. Pour modifier les autres paramètres des capteurs, utilisez les touches F
a. le capteur en cours de modification (le numéro de l'ensemble de sons et le nom du capteur)
b. le niveau (le son de capteur est composé de deux niveaux, chacun doté de son propre instrument)
c. la catégorie (le type ou la classe de son de batterie assigné à ce niveau)
d. l’instrument (le son de batterie assigné à ce niveau)
CHASE, puis frappez le capteur. Vous pouvez également mettre en surbrillance le capteur (à côté du numéro de
l’ensemble de sons) à l’aide des touches de déplacement et utilisez ensuite les touches UP / DOWN ou la molette afin
de sélectionner un capteur à modifier.
appuyant sur la touche EDIT INST. Elle permet de commuter entre le
niveau A et B.
appuyant sur les touches de défilement UP / DOWN pour mettre le champ
Category en surbrillance, puis utilisez les touches UP / DOWN ou la
molette afin de le modifier.
appuyant sur les touches de défilement UP / DOWN pour mettre le champ
Instrument en surbrillance, puis utilisez les touches UP / DOWN ou la
molette afin de le modifier. Pour entendre le son sélectionné, frappez le
capteur ou appuyez sur la touche PREVIEW du module.
(F2, F3, etc.) afin d’accéder aux autres onglets et modifier les paramètres à
l’aide des touches UP / DOWN ou de la molette. Pour de plus amples informations, veuillez consulter le guide de
référence.
Remarqu
capteurs pour les cymbales Charleston
et Ride, il n'est pas possible de modifier
la catégorie. De plus, les instruments
disponibles pour cette catégorie sont
un ensemble de sons prédéfinis
agencés pour fonctionner ensemble
(comme les cymbales Charleston et
Ride peuvent produire une gamme de
sons différents). Cependant, vous
pouvez assigner le niveau B pour ces
capteurs à une catégorie ou un
instrument de votre préférence.
Pour le niveau A des
14
Page 15

A
:
SCHEMA DEI COLLEGAMENTI
SET BATTERIA TASTIERA MIDICUFFIE iPod*
p
s
r
s
o
s
e
m
g
t
p
a
r
octave
xyz
-
tap
accomp
phrase
m1
m2
volume
pitch
ALIMENTAZIONE
u
+
push
c
g
o
i
f
n
store
p
r
h
a
s
s
y
t
n
t
m
t
r
e
h
latch
analog modeling synth
AVVERTENZ
dell'alimentazione Alesis in dotazione
con il modulo DM8.
Servirsi unicamente
COMPUTER
AMP
• Collegare i cavi da 1/4" del fascio di cavi del set ai pad per batteria e ai pad dei piatti del kit. Ciascun cavo è etichettato
con il giusto trigger.
• Qualora si disponesse di ulteriori pad per batteria, pad per piatti o altri trigger, è possibile servirsi di cavi standard da 1/4"
per collegarli agli INGRESSI TRIGGER "RIDE 2/PERC1" o "PERC2" a livello del pannello posteriore del modulo. Pad o
piatti a doppia zona (ad es. una percussione con trigger di testata e rullante o un piatto in grado di produrre suoni arco e
campana) richiederanno cavi TRS per poter attivare entrambe le zone.
• Collegare cavi TRS da ¼” dall'uscita MAIN ad un amplificatore, mixer o impianto di altoparlanti. (Per ottenere un suono
mono, collegare un cavo all'uscita di sinistra.)
• È possibile collegare un set di cuffie TRS da 1/4" all’USCITA CUFFIE.
• È possibile collegare un altro dispositivo audio all’ingresso AUX servendosi di un cavo stereo da 1/8".
PER MAGGIORI INFORMAZIONI IN MERITO ALLA CONFIGURAZIONE DEL KIT DM8E AL COLLEGAMENTO CON IL
MODULO DM8 SI VEDA IL POSTER DI MONTAGGIO ACCLUSO.
* iTunes e iPod sono marchi di fabbrica di Apple, Inc., registrati negli Stati Uniti e in altri paesi.
Cuffie, iPod*, tastiera, ampli e computer non in dotazione.
NOTA BENE: Fuori la casella, la DM8 modulo è protetto da scrittura, quindi non sarà in grado di salvare le eventuali
modifiche apportate al Kit, strumenti, sequenze, ecc Per attivare protezione da scrittura di chiusura:
1. Premere UTILITY.
2. Premere SYS (F4).
3. Premere O/S (F3).
4. Premere MEM (F4).
5. Premere VALUE DOWN o spostare il VALUE DIAL antiorario fino a quando il "WriteProt" campo dice "OFF".
6. Premere DRUM KIT per tornare alla pagina principale.
IMPORTANTE: IL MODULO DM8 PUÒ ESSERE DISTURBATO DALL'ELETTRICITÀ STATICA. QUALORA CIÒ
DOVESSE ACCADERE, SPEGNERE IL MODULO E ATTENDERE ALCUNI SECONDI PRIMA DI ACCENDERLO
NUOVAMENTE.
15
Page 16

A
:
CARATTERISTICHE PANNELLO POSTERIORE
1. INTERRUTTORE DI ALIMENTAZIONE –
Accende e spegne il modulo.
2. INGRESSO DI ALIMENTAZIONE – Collegare
l’adattatore CA in dotazione a questo ingresso,
quindi collegare l’adattatore ad una sorgente di
alimentazione.
AVVERTENZ
dell'alimentazione Alesis in dotazione con il
modulo DM8.
3. USCITA MAIN (principale) – Servirsi di cavi
TRS da 1/4" per collegare queste uscite ad un
amplificatore o impianto di altoparlanti. Il volume di queste uscite è regolato della manopola VOLUME posta sul pannello
superiore del modulo.
4. INGRESSO AUX – Collegare a questo ingresso una sorgente sonora esterna quali ad es. un lettore CD servendosi di
un cavo stereo da 1/8".
5. USB – Servirsi di un cavo standard USB per collegare il modulo al computer tramite questa porta USB. Questo
collegamento consente al modulo di inviare messaggi MIDI tramite USB and una libreria sonora esterna. Tramite questo
collegamento si possono anche trasmettere file SysEx.
6. INGRESSO MIDI – Servirsi di un cavo MIDI standard a cinque poli per collegare questo ingresso all’uscita MIDI di un
dispositivo MIDI esterno.
7. COLLEGAMENTO PER IL FASCIO DI CAVI – Collegare il fascio di cavi in dotazione a questo connettore, quindi
collegare i cavi ai rispettivi trigger.
8. INGRESSI TRIGGER – Qualora si disponesse di ulteriori pad per
batteria, pad per piatti o altri trigger, è possibile servirsi di cavi standard
da 1/4" per collegarli agli INGRESSI TRIGGER "RIDE 2/PERC1" o
"PERC2". Pad o piatti a doppia zona (ad es. una percussione con
trigger di testata e rullante o un piatto in grado di produrre suoni arco e
campana) richiederanno cavi TRS per poter attivare entrambe le zone.
9. USCITA CUFFIE – Collegare a questa uscita le proprie cuffie da ¼”. Si può regolare il volume di questa uscita
servendosi della manopola VOLUME posta sul pannello superiore del modulo.
servirsi unicamente
3
9
3
8
4
8
7
Nota bene: l'ingresso TRIGGER HI-HAT
CONTROL del modulo non supporta i
pedali di espressione a tastiera.
5
6
2
1
CARATTERISTICHE PANNELLO SUPERIORE
1. VOLUME – Regola il livello del volume dell’USCITA
PRINCIPALE e dell'USCITA CUFFIE.
2. METRONOMO ON / OFF – Accende e spegne la
funzione metronomo.
3. LCD – Mostra a display menu di sistema, parametri
e altre configurazioni mentre utilizzate il DM8.
4. TASTI F (1-4) – Questi tasti vi consentono di
navigare all’interno dei menu illustrati sullo schermo
LCD. Premere un TASTO F per selezionare il tasto
“virtuale” o linguetta illustrata al di sopra di esso sullo
schermo LCD.
5. CURSORE SU / GIÙ – Servirsi di questi tasti per
spostarsi (verticalmente) attraverso i parametri
disponibili illustrati nei menu sullo schermo LCD.
(Nota bene: Premendo CURSORE GIÙ dalla
schermata principale è possibile regolare i parametri
generali del kit corrente.)
6. MANOPOLA VALUE (valore) – Girare questa
manopola per aumentare e diminuire valori e
impostazioni illustrati sullo schermo LCD.
7. VALUE UP / DOWN (valore su / giù) – Servirsi di
questi tasti per aumentare e diminuire valori e
impostazioni illustrati sullo schermo LCD. Questi consentono di apportare regolazioni a incrementi più precise ai
parametri rispetto alla manopola VALUE.
8. EXIT (esc) – Premere questo tasto per tornare al menu precedente illustrato sullo schermo LCD.
9. DRUM KIT – Fa tornare lo schermo LCD alla schermata principale. Da qui, è possibile selezionare il kit corrente
servendosi della manopola VALUE o dei tasti VALUE UP / DOWN.
10. UTILITY – Entra nel menu utilità, che consente di regolare le impostazioni relative al tempo (sequenze globali o
individuali), MIDI, al convogliamento delle uscite, la sensibilità dei trigger e altre impostazioni, oltre a inviare dati SysEx.
(Si veda il Manuale di riferimento per maggiori informazioni.)
11. EXT TRIG – Al momento di modificare i suoni dei pad, premendo questo tasto si possono regolare i parametri collegati
all’attivazione dei trigger. La personalizzazione di questi parametri modifica la sensazione e la reattività offerte dal Kit.
(Nota bene: le modifiche apportate a questi parametri influiranno su tutti i Kit.)
3
444 4
10 11 12
13 14 15 16
9
8
5
5
77
6
17 18 19
20 21 22
23
2
1
16
Page 17

12. NOTE CHASE – Accende o spegne la funzione Note Chase. Quando Note Chase è attivo, battendo un trigger lo si
seleziona automaticamente per la modifica. Alternativamente, si può selezionare un trigger evidenziando il relativo
campo sullo schermo LCD con i tasti CURSORE SU / GIÙ e quindi servirsi dei tasti VALUE UP / DOWN o della
manopola VALUE.
13. EDIT INST – Premere questo tasto per entrare in un menu per regolare i parametri generali che influenzano gli
“strumenti” assegnati ai vari ingressi dei trigger. Premendolo nuovamente potrete modificare gli Strumenti. In questa
finestra, la sua pressione fa commutare tra i due strati dello strumento. Lo strato attuale (A o B) verrà evidenziato
nell’angolo in alto a destra dello schermo LCD.
14. EDIT ACCOMP – Premere questo tasto per modificare gli strumenti di accompagnamento. In questa finestra, la sua
pressione fa commutare tra i due strati dello strumento. Lo strato attuale (A o B) verrà evidenziato nell’angolo in alto a
destra dello schermo LCD.
15. PREVIEW (anteprima) – Premere questo tasto per ottenere un’anteprima del suono del trigger corrente. (Questo è utile
al momento di modificare le voci dei trigger senza attivare la funzione Note Chase.)
16. STORE – Premere questo tasto per salvare le modifiche apportate al kit, all’accompagnamento o alla sequenza.
Servirsi della manopola VALUE o dei tasti VALUE UP / DOWN per selezionare una destinazione dove memorizzare il Kit
o la Sequenza corrente. Quando si salva un Kit, saranno anche memorizzati tutti i suoi strumenti e parametri. Quando si
salva una Sequenza, vengono anche memorizzati il Kit e l’Accompagnamento.
17. SEQ – Premere questo tasto per accedere al Sequenziatore del modulo, in cui è possibile creare e modificare pattern di
batteria e accompagnamento (Sequenze). In questo menu si possono inoltre modificare vari parametri che influiscono
su tali Sequenze.
18. MUTE DRUMS (silenziatore batteria) – Premere questo tasto per silenziare l’audio di batteria di una Sequenza.
19. MUTE ACCOMP (silenziatore accomp) – Premere questo tasto per silenziare l’accompagnamento di una Sequenza.
20. STOP – Ferma la riproduzione della Sequenza corrente. Tenere premuto STOP e girare la manopola VALUE per
effettuare uno "scrub" avanti e indietro lungo la sequenza. Tenere premuto STOP e premere VALUE UP / DOWN per
effettuare "passi" avanti o indietro in ciascun "evento" della Sequenza. Quando si naviga lungo la Sequenza in questo
modo, si sentirà la riproduzione della Sequenza man mano che ci si sposta lungo di essa.
21. PLAY / – Riproduce la Sequenza corrente. Si può anche tenere premuto STOP e premere questo tasto per tornare
alla battuta precedente nella Sequenza.
22. RECORD / – Registra una nuova Sequenza. Si può anche tenere premuto STOP e premere questo tasto per passare
alla battuta successiva nella Sequenza.
23. TAP TEMPO – Battere il pulsante al tempo desiderato per inserire un nuovo tempo per la Sequenza. Si può inoltre
cambiare il tempo tenendo premuto il pulsante TAP TEMPO e servendosi della manopola VALUE o dei pulsanti VALUE
UP / DOWN.
RIPRODUZIONE DI SEQUENZE
Una Sequenza è un pattern registrato memorizzato nel modulo DM8 che include percussioni e
accompagnamento. La parte di batteria della Sequenza include i suoni del Kit (Strumenti) e il
pattern registrato stesso. Le sequenze possono essere registrate, modificate e riprodotte a loop;
inoltre, è possibile silenziare la parte di batteria o l’accompagnamento mentre si riproduce una
Sequenza. Per maggiori informazioni sulle Sequenze e l’Accompagnamento, si veda il Manuale
per l’uso.
Per riprodurre una Sequenza:
1. Premere SEQ per entrare nella schermata principale del sequenziatore.
2. Il campo Sequenza deve essere evidenziato. Servirsi dei tasti VALUE UP / DOWN o della
manopola VALUE per selezionare una Sequenza.
3. Il tempo della Sequenza (in BPM o battiti al minuto) apparirà sullo
schermo LCD. Servirsi dei tasti CURSORE SU / GIÙ per selezionare il
campo “Tempo”, quindi servirsi dei tasti VALUE UP / DOWN o della
manopola VALUE per impostare il nuovo tempo. (si può anche
premere il tasto TAP TEMPO più volte al tempo desiderato.)
4. Per permettere alla sequenza di essere riprodotta in maniera continua,
servirsi dei tasti CURSORE SU / GIÙ per selezionare il campo “Loop
field”, quindi servirsi dei tasti VALUE UP / DOWN o della manopola
VALUE per accendere il Loop.
SEQ DRUMS ACCOMP
REC
TAP
TEMPO
5. Premere PLAY per riprodurre la Sequenza.
Per silenziare le percussioni o l’accompagnamento nella Sequenza,
premere rispettivamente il tasto MUTE DRUMS o il tasto MUTE ACCOMP.
(Questo strumento è utile quando si desidera riprodurre i propri pattern di
batteria con l’accompagnamento o viceversa.)
Per riprodurre la sequenza Demo:
tenere premuto SEQ e premere PLAY.
17
Page 18

SELEZIONARE E MODIFICARE I KIT
Il Modulo DM8 è dotato di 100 Kit Preset e di 100 Kit Utente, selezionabili dalla schermata principale. Si può regolare suono,
sintonia, volume, panning, ecc. di ciascun Kit oltre che il suono dei singoli pad. Inoltre, per ogni kit si può scegliere un diverso
accompagnamento.
Per selezionare un Kit:
1. Premere il tasto DRUM KIT per richiamare la schermata principale..
2. Servirsi dei tasti VALUE UP / DOWN o della manopola VALUE per
selezionare un Kit.
3. Battere i trigger per provare i suoni del Kit.
Per modificare gli strumenti batteria (trigger voci) in un Kit:
a b
c
d
#2 #3
1. Premere DRUM KIT per pasare alla schermata principale.
2. Premere EDIT INST. La parte superiore dello schermo mostra numero e nome del Kit i cui Strumenti (voci) verranno
modificati.
3. Premere INST (F1). La nuova schermata mostrerà:
a. Il trigger che state modificando (il numero di Kit e il nome del trigger)
b. lo strato (ciascun suono dei trigger è composto da due strati, ciascuno con il proprio strumento)
c. la categoria (il tipo o “classe” di una voce attualmente assegnata a tale strato)
d. lo strumento (la voce per quello strato)
4. Selezionare l’ingresso del trigger il cui Strumento si desidera modificare premendo NOTE CHASE e quindi battendo il
trigger. Alternativamente, è possibile evidenziare il trigger (di fianco al numero di Kit) servendosi dei tasti CURSORE SU
/ GIÙ e servirsi dei tasti VALUE UP / DOWN o della manopola VALUE per
selezionare un trigger da modificare.
5. Selezionare quale strato di quel trigger si modificherà premendo EDIT
INST. Commuterà tra lo strato A e B.
6. Selezionare la Categoria cui si desidera assegnare quel trigger premendo
CURSORE SU / GIÙ per evidenziare il campo Categoria, quindi servendosi
dei tasti VALUE UP / DOWN o della manopola VALUE per modificarlo.
7. Selezionare lo Strumento per quello strato premendo CURSORE SU / GIÙ
per evidenziare il campo Strumento, quindi servendosi dei tasti VALUE UP
/ DOWN o della manopola VALUE per modificarlo. Per ascoltare il suono
selezionato, battere il trigger oppure premere PREVIEW (anteprima) sul
modulo.
8. Per modificare altre configurazioni dei trigger, servirsi degli altri TASTI F
(F2, F£, ecc.) per avere accesso a ulteriori schede e regolarne i parametri servendosi dei tasti VALUE UP / DOWN o
della manopola VALUE. Per maggiori informazioni, consultare il manuale di riferimento.
Nota: per lo strato A dei trigger dell’hi-
hat e del rullante non è possibile
selezionare una categoria diversa.
Inoltre, gli strumenti disponibili per
quella categoria sono un set di suoni
predefinito concepito per lavorare
insieme (poiché l’hi-hat e il rullante
possono attivare tutta una serie di
suoni diversi). Tuttavia, è possibile
assegnare lo strato B alla categoria o
allo strumento desiderato per questi
trigger.
18
Page 19

ANSCHLUSSDIAGRAMM
WARNUNG: Verwenden Sie
mit dem DM8 Modul nur das
mitgelieferte Alesis-Netzteil.
SCHLAGZEUG MIDI-KEYBOARD KOPFHÖRER iPod*
p
s
r
s
o
s
e
m
g
t
p
a
r
octave
-
xyz
+
tap
accomp
phrase
latch
m1
m2
volume
pitch
u
push
c
g
o
i
f
analog modeling synth
n
p
r
h
a
s
s
y
t
n
t
m
t
r
e
h
store
NETZ
HOUSE-VERSTÄRKER
COMPUTER
• Schließen Sie die 1/4"-Kabel der Kabelschlange an die Drum-Pads und Becken-Pads Ihres Kits an. Jedes Kabel ist mit
seinem dazugehörigen Trigger beschriftet.
• Wenn Sie zusätzliche Drum-Pads, Becken-Pads oder andere Trigger haben, können Sie handelsübliche 1/4"-Kabel
verwenden, um sie an die TRIGGER-EINGÄNGE "RIDE 2/PERC1" oder "PERC2" an der Rückseite des Moduls
anzuschließen. Dual-Zonen-Pads oder Becken (z.B. eine Drum mit Kopf- und Rim-Triggers oder ein Becken, dass
Bow- und Bell-Klänge erzeugen kann) werden TRS-Kabel benötigen, um beide Zonen zu triggern.
• Verbinden Sie den HAUPTAUSGANG über 1/4"-TRS-Kabel mit dem Verstärker, Mixer oder Lautsprechersystem. (Für
Mono schließen Sie ein Kabel an den linken Ausgang an.)
• An den Ausgang HEADPHONES OUTPUT kann ein Kopfhörer mit 6,3 mm TRS-Kabeln angeschlossen werden.
• Ein weiteres Audiogerät kann mit gewöhnlichen 3,5mm Stereokabels an den Ausgang AUX IN angeschlossen werden.
AUF DEM BEILIEGENDEN BAUPLAN-POSTER BEFINDEN SICH WEITERE ANWEISUNGEN ZUM AUFBAU DES DM8KITS UND DESSEN ANSCHLUSS AN DAS DM8-MODUL.
* iTunes und iPod sind geschützte Warenzeichen von Apple, Inc., registriert in den U.S.A. und anderen Ländern.
Kopfhörer, iPod *, Keyboard, Verstärker und Computer sind nicht im Lieferumfang enthalten.
HINWEIS: Zu Beginn ist das DM8-Modul schreibgeschützt, daher können keine Änderungen an Kits, Instrumenten,
Sequenzen usw. vorgenommen werden. Um den Schreibschutz abzuschalten, muss:
1. zunächst die Taste UTILITY gedrückt werden,
2. dann die Taste SYS (F4),
3. dann die Taste O/S (F3),
4. dann die Taste MEM (F4).
5. Dann die Taste WERT AB drücken oder den VALUE-REGLER gegen den Uhrzeigersinn drehen, bis im Feld
"WriteProt" der Wert "OFF" angezeigt wird.
6. Zum Schluss die Taste DRUM KIT drücken, um auf die Startseite zurück zugelangen.
WICHTIG: DAS DM8 MODUL KANN STATISCH AUFGELADEN SEIN. SOLLTE DIES DER FALL SEIN, SCHALTEN SIE
DAS MODUL EINFACH AB UND WARTEN EINIGE SEKUNDEN, BEVOR SIE ES WIEDER EINSCHALTEN.
19
Page 20

BEDIENELEMENTE GERÄTERÜCKSEITE
1. EIN-/AUSSCHALTER – Zum Ein- und Ausschalten
des Moduls.
2. NETZ EIN – An diesen Eingang den beiliegenden
Wechselstromadapter und diesen dann an eine
Stromquelle anschließen.
WARNUNG: Verwenden Sie mit dem DM8
Modul nur das mitgelieferte Alesis-Netzteil.
3. MAIN OUT – Diese Ausgänge mit 6,3 mm TRS-
Kabeln an ein Verstärker- oder Lautsprechersystem
angeschließen. Die Lautstärke dieser Ausgänge wird mit VOLUME bezeichneten Drehregler auf der Oberseite des
Geräts gesteuert werden.
4. AUX IN – Hier eine externe Tonquelle, wie z. B. einen CD-Player, mit 3,5mm TRS-Kabeln anschließen.
5. USB – Das Modul mit einem gewöhnlichen USB-Kabel über diesen USB-Anschluss an den PC anschließen. Über diese
Verbindung können MIDI-Signale per USB an eine externe Tondatenbank gesendet werden. Die Verbindung eignet sich
auch zum Transfer von SysEx-Dateien.
6. MIDI IN – Mit einem gewöhnlichen fünfpoligen MIDI-Kabel diesen Eingang mit dem MIDI AUSGANG eines externen
MIDI-Geräts verbinden.
7. KABELSCHLANGE-EINGANG – Verbinden Sie die inkludierte Kabelschlange mit diesem Anschluss, und verbinden Sie
dann die Kabel mit ihren entsprechenden Triggern.
8. TRIGGER-EINGÄNGE - Wenn Sie zusätzliche Drum-Pads, Becken-Pads
oder andere Trigger haben, können Sie handelsübliche 1/4"-Kabel
verwenden, um sie an die TRIGGER-EINGÄNGE "RIDE 2/PERC1" oder
"PERC2" anzuschließen. Dual-Zonen-Pads oder Becken (z.B. eine Drum
mit Kopf- und Rim-Triggers oder ein Becken, dass Bow- und Bell-Klänge
erzeugen kann) werden TRS-Kabel benötigen, um beide Zonen zu triggern.
9. KOPFHÖRERAUSGANG – Hier die Kopfhörer mit einem 6,3 mm Klinkenstecker anschliessen. Die Lautstärke kann mit
dem mit VOLUME bezeichneten Drehregler auf der Oberseite des Geräts gesteuert werden.
3
9
3
8
4
8
7
Hinweis: Der HI-HAT CONTROL-
TRIGGER-EINGANG des Moduls
unterstützt keine Expression-Pedale im
Keyboard-Stil.
5
6
2
1
BEDIENELEMENTE GERÄTEOBERFLÄCHE
1. HAUPTLAUTSTÄRKE (VOLUME) – Hier wird die
Lautstärke des Ausgangs MAIN OUT und
KOPFHÖRERAUSGANG eingestellt.
2. METRONOME ON / OFF – Dient zum Ein- und
Ausschalten des Metronoms.
3. LCD – Hier werden Menüs, Parameter und andere
Einstellungen während des Einsatzes des DM8
angezeigt.
4. F-TASTEN (1-4) – Diese Tasten dienen zur
Navigation der im LCD-Bildschirm angezeigten
Menüs. Beim Drücken einer F-Taste kann die
"virtuelle" Taste oder der auf dem darüber
befindlichen LCD-Bildschirm angezeigte Tab
abgerufen werden.
5. CURSOR AUF / AB – Diese Tasten dienen zur
vertikalen Navigation der Parameter der auf dem
LCD-Bildschirm erscheinenden Menüs. (Hinweis:
Wird die Taste CURSOR DOWN vom
Hauptbildschirm gedrückt, können die allgemeinen
Parameter des augenblicklich gewählten Kits
geändert werden.)
6. VALUE-REGLER – Bei Betätigung diese
Drehreglers können im LCD-Bildschirm angezeigte Werte und Einstellungen erhöht, vermindert und geändert werden.
7. WERT AUF / AB – Mit diesen Tasten können die auf dem LCD-Bildschirm angezeigten Werte erhöht und vermindert
werden. Damit können wesentlich feinere Parametereinstellungen als mit dem VALUE-REGLER vorgenommen werden.
8. EXIT – Mit dieser Taste kann zu dem im LCD-Bildschirm zuletzt angezeigten Menü zurückgekehrt werden.
9. DRUM KIT – Ruft im LCD-Bildschirm das Hauptmenü auf. Von hier aus kann das augenblickliche Kit mit dem VALUE-
REGLER oder den Tasten WERT AUF / AB aufgerufen werden.
10. UTILITY – Hier wird auf das Dienstprogramm zugegriffen, mit welchem viele Einstellungen darunter jene für das Tempo
(allgemeine oder individuelle Sequenzen), MIDI, Ausgaberouting, Triggerempfindlichkeit vorgenommen und auch
SysEx-Daten gesendet werden können. (Weitere Informationen dazu finden Sie in der Anleitung.)
11. EXT TRIG – Beim Editieren von Pad-Tönen können mit dieser Taste die auf das Triggering bezogenen Parameter
eingestellt werden. Anpassen dieser Parameter verändert den Klang und die Ansprache des Kits. (Hinweis:
Veränderungen dieser Parameter wirken sich auf alle Kits aus.)
20
3
444 4
10 11 12
13 14 15 16
9
8
5
5
77
6
17 18 19
20 21 22
23
2
1
Page 21

12. NOTE CHASE – Zum Ein- und Ausschalten der Funktion Note Chase. Ist diese Funktion aktiviert, führt ein Anschlag
automatisch zu dessen Editiermodus. Alternativ kann ein Trigger auch dadurch gewählt werden, dass mit den Tasten
CURSOR UP / DOWN im LCD-Bildschirm ein Trigger gewählt wird, während die Tasten WERT AUF / AB oder der
VALEU-REGLER verwendet werden.
13. EDIT INST – Mit dieser Taste wird auf ein Menü zugegriffen, das die allgemeinen Parameter, welche die den
verschiedenen Triggereingängen zugeordneten "Instrumente" einstellt. Bei erneutem Drücken können die DrumInstrumente editiert werden. In diesem Fenster führt ein Drücken zum Umschalten zwischen den zwei Ebenen des
Instruments. Die augenblicklich gewählte Ebene (A oder B) wird in der rechten oberen Ecke des LCD-Bildschirms
angezeigt.
14. EDIT ACCOMP – Diese Taste dient zum Editieren der Begleitinstrumente. In diesem Fenster führt ein Drücken zum
Umschalten zwischen den zwei Ebenen des Instruments. Die augenblicklich gewählte Ebene (A oder B) wird in der
rechten oberen Ecke des LCD-Bildschirms angezeigt.
15. PREVIEW – Diese Taste dient zur Vorschau des Tons des augenblicklichen Triggers. (Das ist immer dann nützlich,
wenn Triggerstimmen editiert werden, ohne dabei die Funktion Note Chase zu verwenden.)
16. STORE – Mit dieser Taste werden am Kit, der Begleitung oder der Sequenz vorgenommene Änderungen abgespeicher.
Zur Bestimmung, wo das augenblickliche Kit oder die Sequenz abgespeichert werden sollen, könen der VALUEREGLER oder die WERT AUF / AB Tasten verwendet werden. Beim Abspeichern eines Kits, werden auch dessen
Instrumente und alle Parameter gespeichert. Wird eine Sequenz abgespeichert, werden auch das Kit und die
Begleitung mit der Sequenz abgespeichert.
17. SEQ – Mit dieser Taste kann auf den Sequenzer des Moduls zugegriffen werden, dort können Drum- und Begleitmuster
erstellt und editiert werden (Sequenzen). Es können auch verschiedene Parameter, die die Sequenzen beeinflussen in
diesem Menü eingestellt werden.
18. MUTE DRUMS – Mit dieser Taste können die Schlagzeugtöne einer Sequenz ausgeblendet werden.
19. MUTE ACCOMP – Mit dieser Taste kann die Begleitung einer Sequenz ausgeblendet werden.
20. STOP – Hält die Wiedergabe der augenblicklichen Sequenz an. Wird STOP heruntergedrückt und gehalten, kann mit
dem VALUE-REGLER vorwärts oder rückwärts druch die Sequenz "gefahren" werden. Wird STOP heruntergedrückt
und gehalten, kann durch Drücken auf WERT AUF / AB stufenweise jedes "Ereignis" der Sequenz vorwärts oder
rückwärts "durchsprungen" werden. Beim Navigieren einer Sequenz auf diese Weise ist diese zu hören.
21. PLAY / – Gibt die augenblickliche Sequenz wieder. Es kann auch die Taste STOP heruntergedrückt und gehalten
werden und mit dieser Taste zurück auf den vorherigen Takt in der Sequenz navigiert werden.
22. RECORD / – Dient zur Aufnahme einer neuen Sequenz. Es kann auch die Taste STOP heruntergedrückt und
gehalten werden und mit dieser Taste zum nächsten Takt in der Sequenz navigiert werden.
23. TAP TEMPO – Durch Antippen dieser Taste in einem gewünschten Takt kann ein neues Tempo für eine Sequenz
eingegeben werden. Das Tempo kann auch gewechselt werden, indem man die Taste TAP TEMPO herunterdrückt und
hält und den VALUE-REGLER oder die WERT AUF / AB Tasten betätigt.
SEQUENZEN SPIELEN
Eine Sequenz ist ein gespeichertes Muster, dass im DM8-Modul abgespeichert ist und sowohl
Drums als auch Begleitung enthält. Der Drums der Sequenz beinhalten die Kit-Töne
(Instrumente) sowie auch das aufgezeichnete Muster. Sequenzen können aufgenommen,
editiert und geloopt werden, auch können die Drums oder die Begleitung während des
Abspielens einer Sequenz ausgeblendet werden. Weitere Informationen befinden sich unter den
Abschnitten Sequenzen und Begleitung in der Bedienungsanleitung.
Um eine Sequenz zu spielen, muss:
1. die Taste SEQ gedrückt werden, um das Hauptmenü des Sequenzers aufzurufen.
2. Mit den WERT AUF / AB oder dem VALUE-REGLER bei angewähltem Sequenzfeld eine
Sequenz gewählt werden.
3. Das Sequenztempo (in BPM oder Beats pro Minute) wird auf dem
LCD-Bildschirm angezeigt. Mit den Tasten CURSOR AUF / AB wird
das Tempofeld gewählt und dann mit den Tasten WERT AUF / AB
oder dem VALUE-REGLER das neue Tempo eingestellt. (Das
Gleiche kann auch erreicht werden, indem man die Taste TAP
TEMPO mehrere Male im gewünschrten Tempo drückt.)
4. Um die Sequenz fortwährend zu spielen, mit den Tasten CURSOR
AUF / AB das Loopfeld wählen und dann mit den Tasten WERT AUF /
AB oder dem VALUE-REGLER Loop auf "On" setzen.
5. Taste PLAY drücken, um die Sequenz zu spielen.
Um die Drums oder die Begleitung der Sequenz auszublenden, die Tasten
MUTE DRUMS oder MUTE ACCOMP drücken. (Das bietet sich immer
dann an, wenn man eigene Drum-Muster zur Begleitung oder andersherum
spielen will.)
Abspielen der Demosequenz:
Einfach die Taste SEQ gedrückt halten
und die Taste PLAY drücken.
SEQ DRUMS ACCOMP
REC
TAP
TEMPO
21
Page 22

AUSWAHL UND EDITIEREN VON KITS
Das DM8-Modul besitzt 100 vorprogrammierte Kits und 100 Anwender-Kits, auf welche über den Hauptbildschirm zugegriffen
werden kann. Die Töne, Klänge, Lautstärken, Verschiebungen usw. für jedes Kit können genauso wie deren individuelle PadTöne eingestellt werden. Darüber hinaus kann für jedes Kit eine verschiedene Begleitung gewählt werden.
Um ein Kit zu wählen, muss:
1. Die Taste DRUM KIT gedrückt werden, um das Hauptmenü aufzurufen.
2. mit den Tasten WERT AUF / AB oder dem VALUE-REGLER ein Kit
gewählt werden.
3. Die Trigger angeschlagen werden, um die Täne des Kits zu testen.
Editieren von Drum-Instrumenten (Trigger-Stimmen) in einem Kit:
a b
c
d
#2 #3
1. Taste DRUM KIT drücken, um das Hauptmenü aufzurufen.
2. Taste EDIT INST. drücken. Im oberen Bereich des Bildschirms wird die Nummer und der Name des Kits angezeigt,
dessen Instrumente (Drum-Stimmen) editiert werden.
3. Taste INST (F1) drücken. Der Bildschirm zeigt jetzt:
a. Den Trigger, der editiert wird (die Kit-Nummer und der Name des Triggers)
b. Die Ebene (jeder Trigger-Ton besteht aus zwei Ebenen, davon hat jeder seine eigenen Instrumente)
c. die Kategorie (die Art oder "Klasse" von Drum-Stimme, die diesem Layer im Augenblick zugeordnet ist)
d. das Instrument (die Drum-Stimme für diese Ebene)
4. Mit der Taste NOTE CHASE den Trigger-Eingang des Instruments wählen, das geändert werden soll und dann den
Trigger anschlagen. Alternativ kann der Trigger auch mit den Tasten CURSOR AUF / AB gewählt werden und dann mit
den Tasten WERT AUF / AB oder VALUE-REGLER ein Trigger, der editiert werden soll, gewählt werden.
5. Mit EDIT INST. wählen, welche Ebene des Triggers editiert werden soll,
wobei hier zwischen Ebene A und B umgeschaltet werden kann.
6. Um die Kategorie zu wählen, welche dem Trigger zugeordnet werden soll,
mit den Tasten CURSOR AUF / AB das Kategoriefeld anwählen und dann
mit den Tasten WERT AUF / AB oder VALUE-REGLER ändern.
7. Um das Instrument für diese Ebene zu wählen, mit der Taste CURSOR
AUF / AB das Instrumentfeld anwählen und dieses dann mit den Tasten
WERT AUF / AB oder dem VALUE-REGLER ändern. Um den
augenblicklich gewählten Ton zu hören, den Trigger anschlagen oder die
Taste PREVIEW am Modul drücken.
8. Um andere Triggereinstellungen zu editieren, die weiteren F-TASTEN (F2,
F3 usw.) verwenden, mit denen auf zusätzliche Tabs zugegriffen werden
kann und deren Parameter mit der Taste WERT AUF / AB oder dem
VALUE-REGLER ändern. Weitere Informationen hierzu können in der
Anleitung gefunden werden.
Hinweis: Für Ebene A des Hi-hat und
des Ride-Beckens kann keine
verschiedene Kategorie gewählt
werden. Darüber hinaus sind die
verfügbaren Instrumente für diese
Kategorie eine vorprogrammierte, zum
Zusammenspiel entworfene
Sammlung von Tönen (nachdem Hi-hat
und Ride eine Reihe von
verschiedenen Tönen triggern können).
Ebene B kann allerdings einer
gewünschten Kategorie oder einem
Instrument für diese Trigger zugeordnet
werden.
22
Page 23

THIS DEVICE COMPLIES WITH PART 15 OF THE FCC RULES. OPERATION IS SUBJECT TO THE
FOLLOWING TWO CONDITIONS: (1) THIS DEVICE MAY NOT CAUSE HARMFUL INTERFERENCE, AND
(2) THIS DEVICE MUST ACCEPT ANY INTERFERENCE RECEIVED, INCLUDING INTERFERENCE THAT
MAY CAUSE UNDESIRED OPERATION.
Page 24

www.alesis.com
7-51-0332-A
 Loading...