

Page 1

FuturePlus Systems Corporation
USB Analysis Probe
Users Manual-FS4100
For Agilent Logic Analyzers
Revision 2.7
FuturePlus Systems is a trademark of FuturePlus Systems Corporation
Copyright 1998 FuturePlus Systems Corporation
Page 2

HOW TO REACH US 4
PRODUCT WARRANTY 5
Limitation of warranty 5
Exclusive Remedies 6
Assistance 6
INTRODUCTION 7
How to Use This Manual 7
ANALYZING THE UNIVERSAL SERIAL BUS 9
Duplicating the Master Diskette 9
Accessories Supplied 9
Minimum Equipment Required 10
Revisions 10
Signal Naming Conventions 10
The USB Analysis Probe Switches and Diodes 10
The Slow Speed Only Switch and LED 10
USB Busy LED 10
Ready LED 10
VCC LED 10
Connecting to the USB Analysis Probe 11
Installing the USB Analysis Probe 11
Setting up the Analyzers installed in the 16500 mainframe. 12
Setting up the 167xx Analyzer 12
Setting up the 1680/90/900 Analyzer 13
1680/90/900 licensing 13
Loading 1680/90/900 configuration files 13
1680/90/900, 167xx Configuration files 15
Offline Analysis 15
The Format Menu 18
2
Page 3

The STAT variable 19
The ADDR and DATA variables 19
The PID variable 19
The CTLCMD variable 21
COMBINATION MODE 22
Bad EOP Detection 22
Low Speed/High Speed detection 23
STATE ANALYSIS 25
Installation Quick Reference 25
Acquiring Data 26
The State Display 26
Analysis Probe related error messages 27
USB CRC and Serial Bit Errors 27
Installation Quick Reference 29
Acquiring Data 30
POD 3 Description 30
End of Packet State Machine 31
Load Byte Count State Machine 32
USB Analysis Probe Test Points 33
POD 4 Description 34
The Waveform Display 34
GENERAL INFORMATION 35
Characteristics 35
Standards Supported 35
Power Requirements 35
Logic Analyzer Required 35
Number of Probes Used 35
Supported speeds 35
Signal loading 35
Operations 35
Environmental Temperature 36
Altitude 36
Humidity 36
Testing and Troubleshooting 36
Servicing 36
Signal Connections 36
3
Page 4

How to reach us
For Technical Support:
FuturePlus Systems Corporation
36 Olde English Road
Bedford NH 03110
TEL: 603-471-2734
FAX: 603-471-2738
On the web
For Sales and Marketing Support:
FuturePlus Systems Corporation
TEL: 719-278-3540
FAX: 719-278-9586
On the web
FuturePlus Systems has technical sales
representatives in several major countries. For an up
to date listing please see
http://www.futureplus.com/contact.html.
Agilent Technologies is also an authorized reseller of
many FuturePlus products. Contact any Agilent
Technologies sales office for details
http://www.futureplus.com
http://www.futureplus.com
.
.
4
Page 5

Product Warranty
This FuturePlus Systems product has a warranty
against defects in material and workmanship for a
period of 1 year from the date of shipment. During
the warranty period, FuturePlus Systems will, at its
option, either replace or repair products proven to be
defective. For warranty service or repair, this product
must be returned to the factory.
Limitation of warranty
For products returned to FuturePlus Systems for
warranty service, the Buyer shall prepay shipping
charges to FuturePlus Systems and FuturePlus
Systems shall pay shipping charges to return the
product to the Buyer. However, the Buyer shall pay
all shipping charges, duties, and taxes for products
returned to FuturePlus Systems from another country.
FuturePlus Systems warrants that its software and
hardware designated by FuturePlus Systems for use
with an instrument will execute its programming
instructions when properly installed on that
instrument. FuturePlus Systems does not warrant that
the operation of the hardware or software will be
uninterrupted or error-free.
The foregoing warranty shall not apply to defects
resulting from improper or inadequate maintenance
by the Buyer, Buyer-supplied software or interfacing,
unauthorized modification or misuse, operation
outside of the environmental specifications for the
5
Page 6

product, or improper site preparation or maintenance.
NO OTHER WARRANTY IS EXPRESSED OR
IMPLIED. FUTUREPLUS SYSTEMS SPECIFICALLY
DISCLAIMS THE IMPLIED WARRANTIES OF
MERCHANTABILITY AND FITNESS FOR A
PARTICULAR PURPOSE.
Exclusive Remedies
Assistance
THE REMEDIES PROVIDED HEREIN ARE BUYER’S
SOLE AND EXCLUSIVE REMEDIES. FUTUREPLUS
SYSTEMS SHALL NOT BE LIABLE FOR ANY
DIRECT, INDIRECT, SPECIAL, INCIDENTAL, OR
CONSEQUENTIAL DAMAGES, WHETHER BASED
ON CONTRACT, TORT, OR ANY OTHER LEGAL
THEORY.
Product maintenance agreements and other customer
assistance agreements are available for FuturePlus
Systems products. For assistance, contact the
factory.
6
Page 7

Introduction
The USB Analysis Probe module provides a complete
interface between any point on the USB and an
Agilent Logic Analyzer. The Analysis Probe interface
receives the USB serial bit stream and converts it to
an understandable parallel bus that is then acquired
by the logic analyzer.
The USB Analysis Probe is a passive bus monitor
which does not assert any signals on the USB . The
USB signals are received with a USB compliant
transceiver. The power for the Analysis Probe logic
and transceiver is taken from the logic analyzer. Thus
the Analysis Probe does not draw power from the
USB wire.
The USB Analysis Probe software configures all the
logic analyzer menus for compatibility with the USB
Analysis Probe. When the configuration file is loaded
and the analyzer is set to STATE mode, an inverse
assembler is also loaded which decodes USB packets
into easy to read mnemonics.
The USB Analysis Probe also provides access to the
actual USB wire for both digital and analog
measurements. D+, D-, GND, USB Power and the
transceiver outputs of VP, VM, and RCV are also
provided on the test points.
How to Use This Manual
7
This manual is organized to help you quickly find the
information you need.
• Analyzing the Universal Serial Bus chapter
introduces you to the USB Analysis Probe and lists
the minimum equipment required and accessories
supplied for USB analysis. Characteristics
common to state and timing analysis are also
detailed.
Page 8

• The State Analysis chapter explains how to
configure the USB Analysis Probe to perform state
analysis on your USB .
• The Timing Analysis chapter explains how to
configure the USB Analysis Probe to perform
timing analysis on your USB .
• The General Information chapter provides some
general information including the operating
characteristics for the USB Analysis Probe module
and the cable header pinout.
8
Page 9

Analyzing the Universal Serial Bus
This chapter introduces you to the USB Analysis
Probe and lists the minimum equipment required and
accessories supplied for Universal Serial Bus
analysis. This chapter also contains information that
is common to both state and timing analysis.
Before you use the USB Analysis Probe software,
Duplicating the Master Diskette
make a duplicate copy of the master diskette. Then
store the master diskette and use the back-up copy to
configure your logic analyzer. This will help prevent
the possibility of losing or destroying the original files
in the event the diskette wears out, is damaged, or a
file is accidentally deleted.
To make a duplicate copy, use the Duplicate diskette
Accessories Supplied
9
operation in the disk menu of your logic analyzer. For
more information, refer to the reference manual for
your logic analyzer.
The USB Analysis Probe product consists of the
following accessories:
• The USB Analysis Probe interface hardware
• The inverse assembly and configuration software
on a 3.5 inch diskette.
• This operating manual
Page 10

Minimum Equipment Required
The minimum equipment required for analysis of a
Universal Serial Bus consists of the following
equipment:
• A 166x, 167x , 1680/90, 1671x , 1674X, 1655x or
1675x logic analyzer
Revisions
Signal Naming Conventions
The USB Analysis Probe Switches and Diodes
The Slow Speed Only Switch and LED
• The USB Analysis Probe Product
• A USB target wire
This manual applies to Hardware revisions ACE or
later and software revision 3.0 or later.
This operating manual uses the same signal notation
as the UNIVERSAL SERIAL BUS SPECIFICATION REVISION 1.0.
The USB Analysis Probe contains one switch and four
LEDs
The slow speed switch should be in the ON position
(LED ON) when the USB Analysis Probe is on a slow
speed only wire or slow speed only segment of the
USB. When attached to a high speed segment or
mixed segment (slow speed and high speed traffic)
the switch should be in the OFF position (LED OFF).
USB Busy LED
Ready LED
VCC LED
10
The USB Busy LED is lit when the USB Analysis
Probe is actively receiving packets from the USB
wire. The LED may appear dim if the traffic load is
light.
The Ready LED indicates that the on board serial
ROM has successfully loaded the FPGA and that the
USB Analysis Probe is ready for USB analysis.
The VCC LED on the USB Analysis Probe indicates
that power is applied from the logic analyzer to the
USB Analysis Probe logic. For correct operation of
the USB Analysis Probe the VCC LED must be lit.
Page 11
Connecting to the USB Analysis Probe
The following explains how to connect the logic
analyzer to the USB Analysis Probe for either state or
timing analysis:
1. Remove the probe tip assemblies from the
logic analyzer cables.
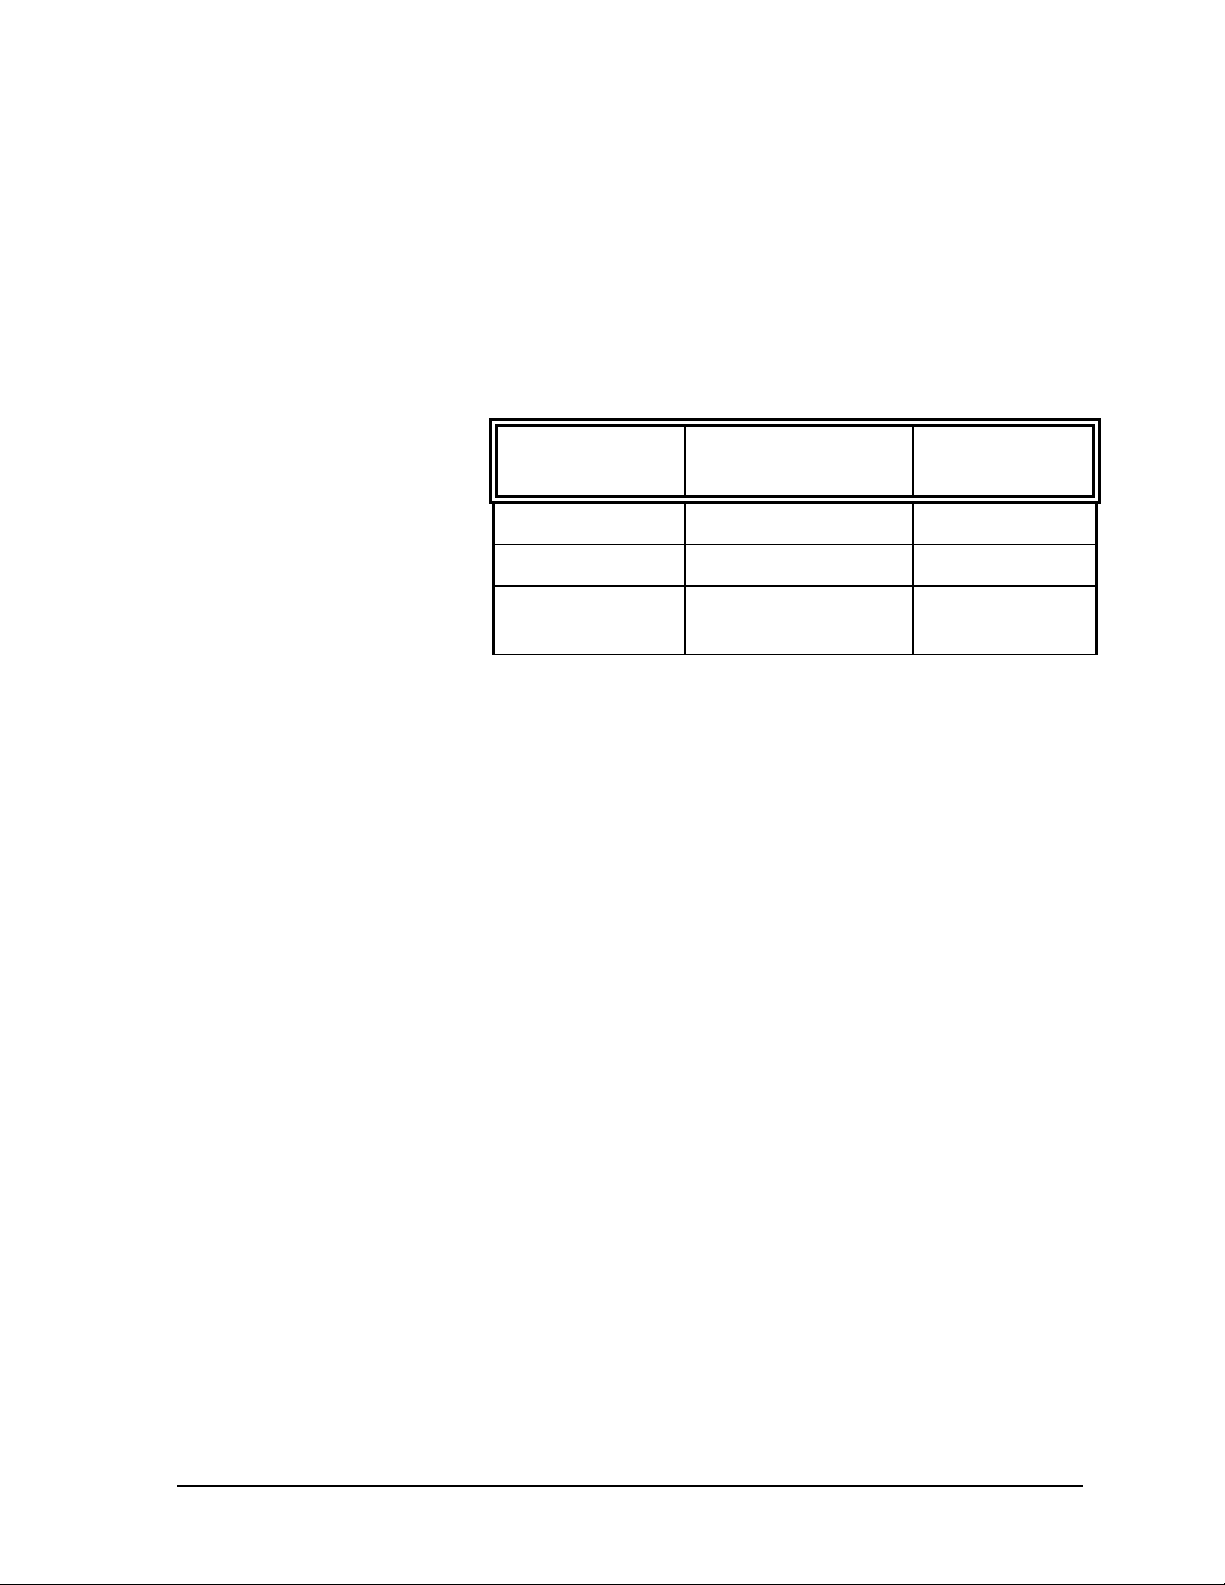
2. Plug the logic analyzer cables into the USB
Analysis Probe cable headers as shown in the
appropriate following tables.
Installing the USB Analysis Probe
Logic Analyzer USB Analysis
Comment
Probe
Master POD 1 Header 1 State analysis
POD 2 Header 2 State analysis
POD 3 Header 3 Timing
analysis
The USB Analysis Probe can be installed in any
segment of the Universal Serial Bus. However, to
view all packets from the Host the USB Analysis
Probe must be placed between the Host and the USB
Hub or USB device. The following steps explain how
to install the USB Analysis Probe onto the Universal
Serial Bus.
1. Install the logic analyzer cables as described in
the previous section.
2. Plug the USB Analysis Probe IN cable to the
upstream Host or Hub. The USB Analysis
Probe OUT connector can be connected down
stream to either a Hub or device or it can be
left unconnected.
3. Turn on the logic analyzer on so that the VCC
and READY LEDs on the USB Analysis Probe
are lit.
NOTE: Connect the USB Analysis Probe to
the USB wire as described in step 2 prior to
powering up the logic analyzer.
11
Page 12
Setting up the Analyzers installed in the 16500 mainframe.
The logic analyzer can be configured for USB analysis
by loading the USB configuration file. Loading this file
will load the Universal Serial Bus inverse assembler
and configure your logic analyzer for USB analysis.
1. Install the 16500 USB Analysis Probe Software
for the FS4100 flexible diskette in the disk drive
of the logic analyzer.
2. Configure the menu to “Load” the analyzer with
the appropriate configuration file (see table
below).
Logic Analyzer File name
16555, 16710/1/2 USB555
166x USB660
16550 USB550
3. Execute the load operation to load the file into
the target logic analyzer. NOTE: Do not select ALL
or SYSTEM as the target of the load operation,
select the logic analyzer that is connected to the
USB Analysis Probe.
Setting up the 167xx Analyzer
The 16600/16700 requires a special install procedure
to install the FS4100 software. To accomplish this,
insert the diskette labeled 16700/702 Installation
disk for the FS4100 into the 16700/702 diskette
drive. From the SYSTEM ADMINISTRATION TOOLS
select INSTALL under SOFTWARE. From the
SOFTWARE INSTALL screen select the FLEXIBLE
DISK and APPLY. The package FS4100 will now
appear. Select it and then select INSTALL. This
procedure does not need to be repeated. It only
needs to be done the first time the USB Analysis
Probe is used.
When this has completed restart the logic analysis
session and either invoke the Setup Assistant from
the logic analyzer screen or load the appropriate
configuration file from the
Configs/FuturePlus/FS4100 directory. The Setup
Assistant will guide you in configuring the logic
analyzer. Select FuturePlus from the list on the left of
the Setup Assistant screen and then USB from the list
that then appears. If you prefer to load the
12
Page 13

configuration file yourself, see table below for a list of
analyzers and corresponding configuration files.
Note: The Logic Analysis System’s Operating System
must be version A.01.40.00 with patches 034 and 035
or higher to be compatible with the software provided
on the installation diskette for the 167xx.
The 1680/90/900 Analyzer is a PC based application
that requires a PC running the Windows OS or a
16900 frame.
Setting up the 1680/90/900 Analyzer
1680/90/900 licensing
Before installing the protocol decoder for the USB
protocol on a PC you must install the Agilent logic
analyzer software. Once the Agilent logic analyzer
software is installed, you can install the FS4100
protocol decoder by placing the CD-ROM disk into the
CD-ROM drive of the target computer or Analyzer and
executing the .exe setup program that is contained on
the disk. The .exe setup file can be executed from
within the File Explorer PC Utility. You must navigate
to the .exe file on the CD-ROM disk and then double
click the .exe file name from within the File Explorer
navigation panel.
The installation procedure does not need to be
repeated. It only needs to be done the first time
the Analysis Probe Adapter is used.
The USB Inverse Assembler is a licensed product that
is locked to a single hard drive. The licensing process
is performed by Agilent. There are instructions on this
process on the SW Entitlement certificate provided
with this product.
Loading 1680/90/900 configuration files
13
When the software has been licensed you should be
ready to load a configuration file. You can access the
configuration files by clicking on the folder that was
placed on the desktop. When you click on the folder it
should open up to display all the configuration files to
choose from. If you put your mouse cursor on the
name of the file a description will appear telling you
what the setup consists of, once you choose the
configuration file that is appropriate for your
configuration the 16900 operating system should
execute. The protocol decoder automatically loads
when the configuration file is loaded. If the decoder
does not load, you may load it by selecting tools from
Page 14

the menu bar at the top of the screen and select the
decoder from the list.
After loading the configuration file of choice, go into
the format specification of the configuration by
choosing Setup from the menu bar and then selecting
Bus/Signal in the drop down menu. When the format
specification appears press Define Probes at the
bottom of the screen. The Define Probes feature will
describe how to hook the analyzer cards to the
connections on the target. The following figure shows
what the Define Probes screen looks like. The figure
below may differ from your display; this is an example
of how the display looks in general.
Note: In the above picture under Logic analyzer pods, the first
pod goes to the Odd pod and the second goes to the Even pod
of the termination adapter (e.g. Pod B1 goes to odd termination
adapter pod and B2 goes to the even termination adapter pod).
14
Page 15

1680/90/900, 167xx Configuration files
167xx Analyzer 169xx Analyzer File Name
16550 / 16710/1/2 CUSB41_1
16555/6/7 CUSB41_2
16715/6/7, 1674x, 1675x CUSB41_3
1680/90 (State) 1680/90, 16750/1/2,
1680/90 (Timing) 1680/90, 16750/1/2,
Offline Analysis
CUSB41_6
1691x (State)
CUSB41_7
1691x (Timing)
Data that is saved on a 167xx analyzer in fast binary
format, or 16900 analyzer data saved as a *.ala file,
can be imported into the 1680/90/900 environment for
analysis. You can do offline analysis on a PC if you
have the 1680/90/900 operating system installed on
the PC, if you need this software please contact
Agilent.
Offline analysis allows a user to be able to analyze a
trace offline at a PC so it frees up the analyzer for
another person to use the analyzer to capture data.
If you have already used the license that was included
with your package on a 1680/90/900 analyzer and
would like to have the offline analysis feature on a PC
you may buy additional licenses, please contact
FuturePlus sales department.
In order to view decoded data offline, after installing
the 1680/90/900 operating system on a PC, you must
install the FuturePlus software. Please follow the
installation instructions for “Setting up 1680/90/900
analyzer”. Once the FuturePlus software has been
installed and licensed follow these steps to import the
data and view it.
From the desktop, double click on the Agilent logic
analyzer icon. When the application comes up there
15
Page 16

will be a series of questions, answer the first question
asking which startup option to use, select Continue
Offline. On the analyzer type question, select cancel.
When the application comes all the way up you
should have a blank screen with a menu bar and tool
bar at the top.
For data from a 1680/90/900 analyzer, open the .ala
file using the File, Open menu selections and browse
to the desired .ala file.
For data from a 16700, choose File -> Import from the
menu bar, after selecting import select “yes” when it
asks if the system is ready to import 16700 data.
After clicking “next” you must browse for the fast
binary data file you want to import. Once you have
located the file and clicked start import, the data
should appear in the listing.
After the data has been imported you must load the
protocol decoder before you will see any decoding.
To load the decoder select Tools from the menu bar,
when the drop down menu appears select Inverse
Assembler, then choose the name of the decoder for
your particular product. The figure below is a general
16
Page 17

picture; please choose the appropriate decoder for
the trace you are working with.
After the decoder has loaded, select Preferences if
required, from the overview screen and set the
preferences to their correct value in order to decode
the trace properly. This is a general requirement,
some decoders do not have preferences, if this is the
case then no preference setting is necessary.
17
Page 18

The Format Menu
The USB Analysis Probe diskette sets up the format
menu as shown in the following table. This format is
the same for both Timing and State Analysis. Pods 1
and 2 are for STATE analysis and POD 3 is useful for
Timing analysis.
Label Pod 4 Pod 3 Pod 2 Pod 1
STAT
ADDR
DATA
ADR
ENDPNT
PID
CTLCMD
MCLK
15:11 16
10:0
15:0 15:0
10:4
3:0
15:11 16
15:11 16:8
16
CLK12
MDATA
SOFTIC
EOP2_1
LBC3_0
RESRVD
FEOPR
FEOSYN
LSDET
UNUSED
VP
VM
RCV
16
15
14
13:11
10:7
6:4
3
2
1
0
2
1
0
18
Page 19

The STAT variable
The ADDR and DATA variables
The STAT variable is used by the USB inverse
assembler to decode USB transactions. It should not
be changed or deleted from the format menu.
The ADDR variable is the address and endpoint as
decoded from the USB serial bit stream. The DATA
variable is the Data associated with a Data0 or Data1
packet.
For ease of triggering the address and endpoint seen
in the token packets Setup, In and Out are latched by
the USB Analysis Probe and held through the
reporting of the data for the DATA0 and DATA1
packets.
The PID variable
The PID variable describes the PID and various errors
detected by the USB Analysis Probe. This variable is
most effectively used for triggering and are available
to be used in combination with any other variable
defined in the FORMAT menu.
Symbol Binary Code Comment
IDLE 000000 IDLE STATE
SETUP 000001 SETUP
IN 000010 IN
OUT 000011 OUT
SOF 000100 START OF FRAME
DATA0 0X0101 DATA0
CTL DATA0 1X0101 CTL_DATA0
DATA1 0X0110 DATA1
CTL DATA1 1X0110 CTL_DATA1
CRC DATA 000111 CRC DATA
PRE 011000 PREAMBLE
ACK 011001 ACKNOWLEDGE
NCK 011010 NO ACKNOWLEDGE
STALL 011011 STALL
USB RESET 111111 USB RESET
19
Page 20

Symbol Binary Code Comment
RESET END 111001 RESET DEASSERTS
INVALID 011101 INVALID PID
RECEIVED
BAD PID 011110 BAD PID RECEIVED
SUSPEND 111110 SUSPEND CONDITION
DETECTED
RESUME 111101 RESUME CONDITION
DETECTED
KEEP ALIVE 111011 KEEP ALIVE
SETUP SBS
ERROR
001001 SETUP PACKET WITH
SERIAL BIT STUFFED
ERROR DETECTED
IN SBS ERROR 001010 IN PACKET WITH
SERIAL BIT STUFFED
ERROR DETECTED
OUT SBS
ERROR
001011 OUT PACKET WITH
SERIAL BIT STUFFED
ERROR DETECTED
SOF SBS
ERROR
001100 START OF FRAME
SERIAL BIT STUFFED
ERROR DETECTED
DATA0 SBS
ERROR
001101 DATA0 PACKET WITH
SERIAL BIT STUFFED
ERROR DETECTED
DATA1 SBS
ERROR
001110 DATA1 PACKET WITH
SERIAL BIT STUFFED
ERROR DETECTED
CRC DATA
SBS ERR
001111 CRC DATA WITH
SERIAL BIT STUFFED
ERROR DETECTED
SETUP CRC
ERROR
010001 SETUP PACKET WITH
CRC ERROR
DETECTED
IN CRC ERROR 010010 IN PACKET WITH CRC
20
Page 21

Symbol Binary Code Comment
ERROR DETECTED
SOF CRC
ERROR
010100 START OF FRAME
PACKET WITH CRC
ERROR DETECTED
OUT CRC
010011 OUT PACKET WITH
CRC ERROR
ERROR
CRC DATA
CRC ERR
010111 CRC DATA WITH CRC
DETECTED
ERROR DETECTED
ANY ERROR 111000 ERROR SUMMARY BIT
SLOW SOF 011111 SOF TOKEN
DETECTED AT SLOW
SPEED
RESUME SE0 111100 SE0 SENT AT END OF
RESUME SIGNALING
RESUME
JSATE
111010 JSTATE SENT AT END
OF RESUME
SIGNALING
The CTLCMD variable
POSSIBLE BAD
EOP
110111 DETECTED
INCORRECT J STATE
AS EOP SIGNALING AT
SLOW SPEED.
The CTLCMD variable decodes the Setup Data into
the appropriate command.
Standard Device Requests
GET_STATUS
CLEAR_FEATURE
SET_FEATURE
SET_ADDRESS
GET_DESCRIPTOR
SET_DESCRIPTOR
21
Page 22

Standard Device Requests
GET_CONFIGURATION
SET_CONFIGURATION
GET_INTERFACE
SET_INTERFACE
SYNCH_FRAME
COMBINATION MODE
Bad EOP Detection
The default mode set up by the software shipped with
the Analysis Probe is the following configuration.
If the FS4100 operating in full speed mode, detects a
valid SE0 for at least 60ns but a valid J_STATE does
not follow, it will do the following.
1. Detect an end of packet (FEOPR TRUE in Timing
mode).
2. Pass the packet up to the logic analyzer.
3. Pass a “ POSSIBLE BAD EOP” status to the
analyzer.
If the FS4100 operating in slow speed mode, detects
a valid SE0 for at least 300ns but a valid J_STATE
does not follow, it will do the following.
1. Detect an end of packet (FEOPR TRUE in Timing
mode).
2. Pass the packet up to the logic analyzer.
22
Page 23

3. Pass a “POSSIBLE BAD EOP” status to the
Analyzer.
A status of “POSSIBLE BAD EOP” should be treated
as cautionary and the user would be advised to view
the received signals in timing mode by doing the
following.
1. Attach POD 3 of the analyzer to POD 3 of the USB
Analysis Probe.
2. Attach a flying lead set to stake pins RCV, VP and
VM.
3. In state mode trigger on PID “ POSSIBLE BAD
EOP”. Using the arming control trigger the timing
Analyzer from the State Analyzer.
4. Once the State Analyzer Triggers switch to Timing
Analyzer Waveform 2.
Low Speed/High Speed detection
The USB Analysis Probe can switch automatically
from high speed to low speed upon the detection of
the Preamble PID. The Analysis Probe then detects
only low speed traffic. Upon the receipt of a low
speed acknowledge or an internal time-out (greater
than 16 low speed bit times). The Analysis Probe will
switch back to high speed. The following explains in
more detail the sequences the Analysis Probe looks
for in making the decision whether to switch from high
speed to low speed and back.
Sequence 1
1. Detection of a PREAMBLE - switch to low speed
2. Look for SETUP or OUT packet in low speed then
switch back to high speed.
3. Look for PREAMBLE - upon detection switch to
low speed.
4. Look for a single DATA packet or handshake or
time-out.
5. On receipt of a DATA packet look for a handshake
or time-out .
6. On receipt of a handshake or the occurrence of a
time-out the pre-processor switches back to high
speed.
23
Page 24

Sequence 2
1. Detection of a PREAMBLE - switch to low speed
2. Look for IN packet and a following DATA packet
and then switch back to high speed. If a DATA
packet is not received within the time-out period
(18 bit times), the Analysis Probe will switch back
to high speed.
3. In high speed look for PREAMBLE and handshake
If the Analysis Probe is placed on a low speed only
segment the low speed only switch must be placed in
the on position (LED lit). This is because on a low
speed only segment the Host or Hub will not send a
Preamble PID. NOTE: The low speed only switch
need only be placed in the ON position if the
Analysis Probe is placed on a LOW SPEED ONLY
SEGMENT (no high speed traffic present).
If users are on a mixed high speed/low speed
segment and suspect that low speed/high speed USB
specification protocol is not being adhered to, the
following steps should be taken.
1. Acquire USB traffic with the Analysis Probe Low
Speed only switch in the OFF position.
2. Acquire USB traffic with the Analysis Probe Low
Speed Only switch in the ON position.
3. Note any differences and refer to timing mode to
determine any out of specification conditions.
24
Page 25

State Analysis
This chapter explains how to configure the USB
Analysis Probe to perform state analysis on the
Universal Serial Bus. The configuration software on
the flexible diskette sets up the format specification
menu of the logic analyzer for compatibility with the
USB Analysis Probe. The next chapter explains how
to configure the USB Analysis Probe to perform timing
analysis.
Installation Quick Reference
The following procedure describes the major steps
required to perform measurements with the USB
Analysis Probe module.
The following explains how to connect the logic
analyzer to the USB Analysis Probe for state analysis:
1. Remove the probe tip assemblies from the
logic analyzer cables.
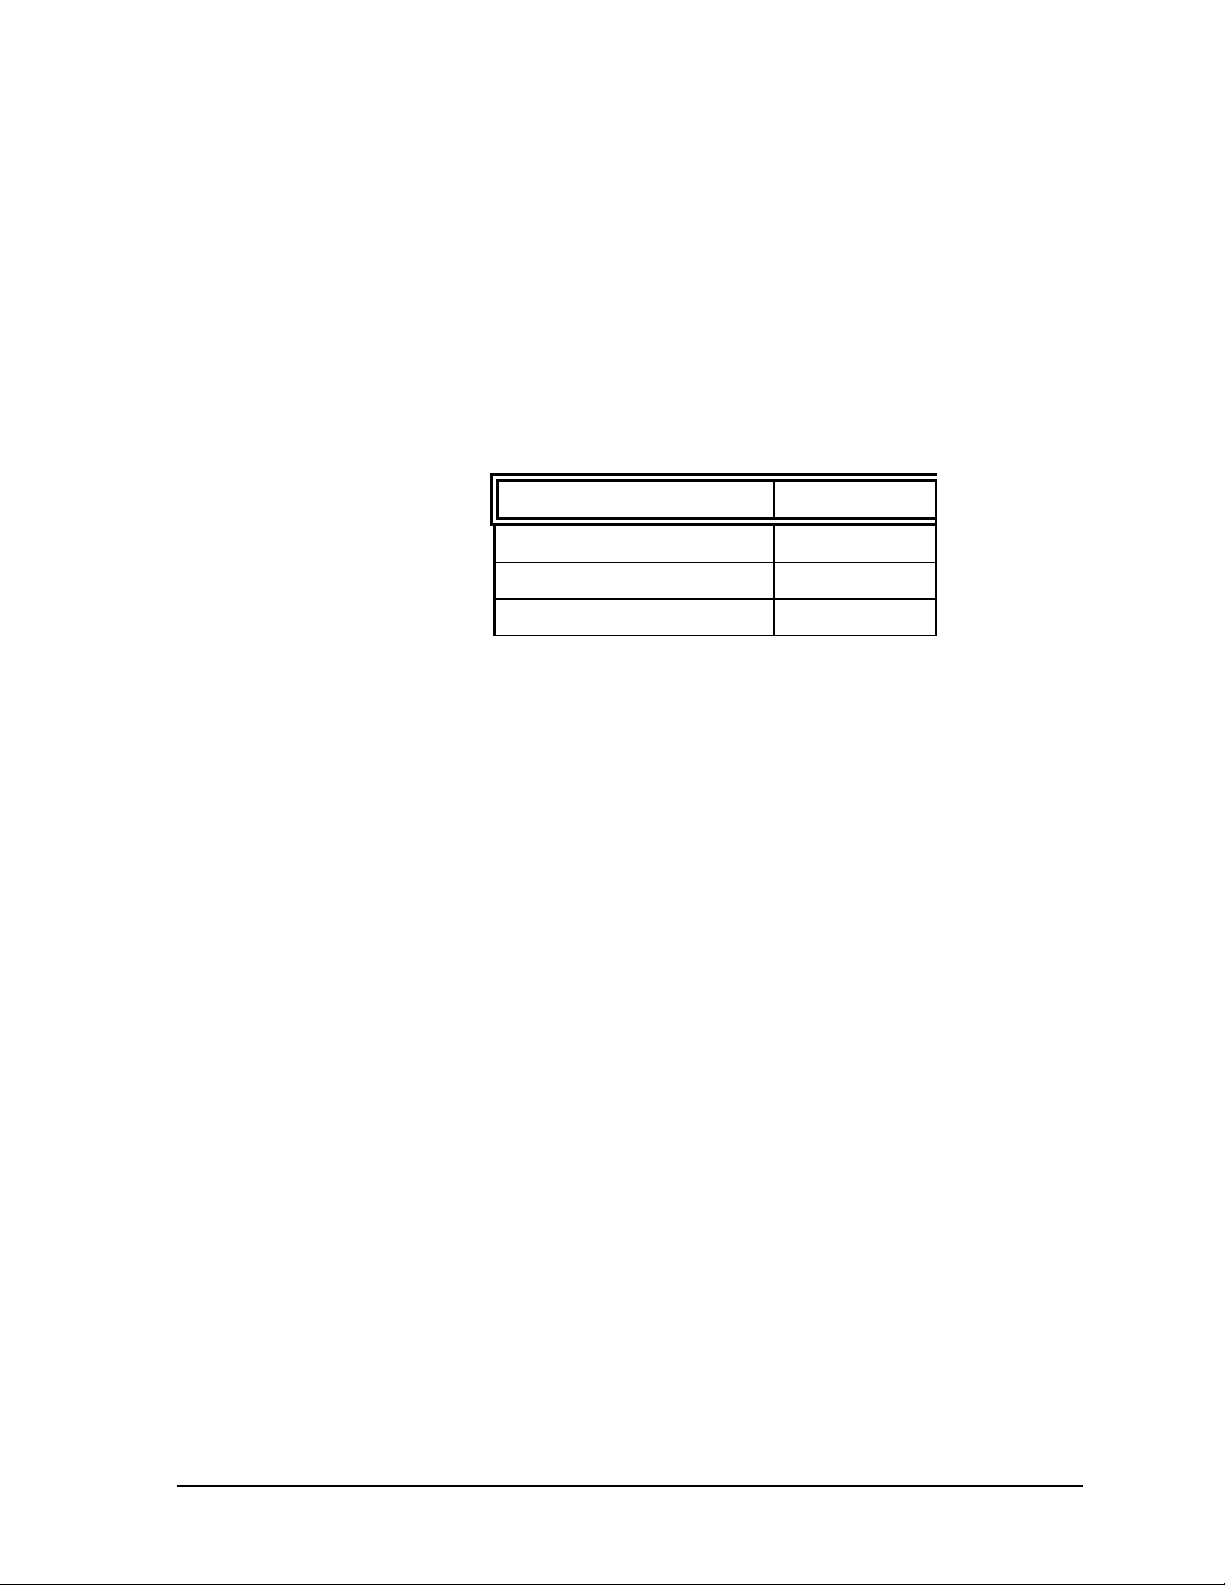
2. Plug the logic analyzer cables into the USB
Analysis Probe cable headers as shown in the
following table.
Logic Analyzer USB Analysis
Probe
Master POD 1 Header 1 State analysis
POD 2 Header 2 State analysis
Comment
(USB_ST)
(USB_ST)
3. Plug the USB Analysis Probe IN cable to the
upstream Host or Hub. The USB Analysis
25
Page 26

Probe OUT connector can be connected down
stream to either a Hub or device or it can be
left unconnected.
4. Turn on the logic analyzer so that the VCC and
READY LEDs on the USB Analysis Probe are
lit. NOTE: Connect the USB Analysis Probe
to the USB wire as described in step 2 prior
to powering up the logic analyzer.
5. Load the USB Analysis Probe software for the
appropriate logic analyzer
The logic analyzer is now ready for STATE analysis.
Acquiring Data
State Display
The
Touch RUN and as soon as there is activity on the
bus, the logic analyzer will begin to acquire data. The
analyzer will continue to acquire data and will display
the data when the analyzer memory is full, the trigger
specification is TRUE or when you touch STOP.
The logic analyzer will flash “Slow or Missing Clock” if
the USB Analysis Probe provided master clock signal
is not being detected by the logic analyzer. This will
occur if the USB is IDLE or in an extended suspend
state. To accurately determine the state of the USB
refer to the Timing analysis chapter in this manual.
Captured data is as shown in the following figure.
The following figure displays the state listing after
disassembly. The inverse assembler is constructed
so the mnemonic output closely resembles the actual
commands, status conditions, messages and phases
specified in the Universal Serial Bus specification.
Symbols on the PID variable have also been defined
to help aid in analysis. The non-disassembled state
listing displays USB mnemonics in addition to data.
All data, address, endpoint and frame number fields
are displayed in hex.
26
Page 27

Analysis Probe related error messages
The following Analysis Probe related error messages
are reported by the USB inverse assembler.
FAILED TO IDENTIFY PID
This error will be reported by the inverse assembler if
the USB Analysis Probe hardware reports a status
code that is undefined. If this error occurs please
contact the FuturePlus Systems factory.
USB CRC and Serial Bit Errors
27
By design the USB Analysis Probe will detect and
report CRC and serial bit stuffed errors. The PID
variable chart details the CRC and serial bit stuff
errors detected.
It is a protocol violation to omit the stuffed zero when
the last 6 bits of a packet are ones although the
packet data is correct and complete. The Analysis
Probe may not indicate that a serial stuffed bit error
occurred in this scenario.
Page 28

The USB Analysis Probe will also detect invalid PIDS,
bad PIDS and SOF tokens sent at slow speed. The
Analysis Probe implements an error summary status
called ANY ERROR, this status will be sent to the
Analyzer if any of the above error conditions is
detected by the Analysis Probe.
28
Page 29

Timing Analysis
Pod 3 of the USB Analysis Probe contains signals that
describe in more detail the actual state of the USB
wire.
Installation Quick Reference
The following procedure describes the major steps
required to perform timing analysis measurements
with the USB Analysis Probe module.
1. After removing the probe tip assemblies, plug
2. Plug the USB Analysis Probe IN cable to the
logic analyzer header 3 into Analysis Probe
header 3.
upstream Host or Hub. The USB Analysis
Probe OUT connector can be connected down
stream to either a Hub or device or it can be
left unconnected.
3. Position the LOW SPEED ONLY switch to the
ON position (LED lit) if the USB Analysis Probe
is on a low speed only segment. Position the
LOW SPEED ONLY switch to the off position
(led doused) if the USB Analysis Probe is on a
full speed link.
4. Turn on the logic analyzer so that the VCC and
READY LEDs on the USB Analysis Probe are
lit.
NOTE: Connect the USB Analysis Probe to the
USB wire as described in step 2 prior to powering
up the logic analyzer.
29
Page 30

Acquiring Data
POD 3 Description
Touch RUN and the logic analyzer will begin to
acquire data. The analyzer will continue to acquire
data and will display the data when the analyzer
memory is full, the trigger specification is TRUE or
when you touch STOP.
The logic analyzer will flash “Waiting for Trigger” or
“occurrences remaining in level x” where x is number
of the unsatisfied trigger level if the trigger condition is
not satisfied.
Pod 3 was included in the USB Analysis Probe to give
the user a detailed look at the USB wire. The USB
Analysis Probe interface contains its own fully
compliant USB serial interface engine (SIE). The
state bits for the USB state machines for this SIE are
available on POD 3. In addition the recovered clock,
recovered data, start of frame, end of packet, end of
sync and low speed/high speed detect signals are
available. These signals are useful for :
• Shadowing the state of the target USB SIE when
that SIE state is unavailable.
• Comparing the state of the target USB SIE with
that of the Analysis Probe SIE.
• Making accurate time measurements of USB
events.
• Accurate USB protocol violation detection.
• Accurate USB signaling violation detection.
POD 3 channel Signal Name Description
16 CLK12 Recovered
Clock
15 MDATA Recovered
Serial Data
30
Page 31

POD 3 channel Signal Name Description
14 SOFTIC Start of Frame.
1 millisecond
timer generated
from recovered
start of frame
13:11 EOP2_0 End of Packet
state machine
10:7 LBC3_0 Load Byte State
Machine
6:4 RSRVD Reserved
3 FEOPR End of packet
2 FEOSYN End of Sync
End of Packet State Machine
1 LSDET Low Speed
Detect
0 unused
The end of packet state machine state encodings are
as follows:
State Name State Encoding Description
IDLE 000 Idle state
SEO_FIRST 100 First sample of
the single ended
zero condition
SEO_SECOND 010 Second sample
of the single
ended zero
condition
SEO_THIRD 110 Third or more
sample of the
single ended
zero condition
31
Page 32

State Name State Encoding Description
EOPR_STATE 001 J state transition
detected. Valid
end of packet
SLOW_SEO_FI
RST
SLOW_SEO_S
ECOND
BAD_EOPR_ST
ATE
101 First slow speed
single ended
zero condition
detected
011 First slow speed
single ended
zero condition
detected
111 Incorrect
transition for
single ended
zero detected.
NOTE: FEOPR
will be
generated in this
case so that the
next packet can
be detected.
Users can look
for this state if
they suspect a
bad end of
packet condition
occurring on the
USB.
Load Byte Count State Machine
32
The load byte count state machine is encoded as
follows.
State Name State Encoding Description
IDLE 0000 IDLE
PID 0001 Have received
end of sync and
currently
receiving PID
State Name State Encoding Description
Page 33

DELAY_1 0010 State delayed
by one clock tic
DELAY_2 0011 State delayed
by two clock tics
SOF_OR_ADR 0100 Receiving
address for
token packet or
Frame number
SOF_OR_EP 0101 Receiving
endpoint for
token packet or
the remainder of
the frame
number for start
of frame
CRC 0110 Receiving CRC
data
PRE_DATA 0111 About to receive
data
USB Analysis Probe Test Points
DATA 1000 Receiving data
D+, D-, VP, VM, RCV, USB Power and GND are
available to be viewed with spare probes from the
logic analyzer or a scope probe.
The format menu has been configured to include
POD4. Pod 4 allows the user by means of attaching a
flying led set to the stake pins to view the signals that
33
Page 34

POD 4 Description
the transceiver is generating in response to the USB
traffic.
POD 4 channel Signal Name Description
0 RCV Differential data
signal from the
USB transceiver
1 VM VM Signal from
the USB
transceiver
2 VP VP Signal from
the USB
transceiver.
The Waveform Display
Captured data is displayed as shown in the following
figure.
34
Page 35

General Information
This chapter provides additional reference information
including the characteristics and signal connections
for the USB Analysis Probe module.
Characteristics
Standards Supported
Power Requirements
Logic Analyzer Required
Number of Probes Used
Supported speeds
Signal loading
The following operating characteristics are not
specifications, but are typical operating characteristics
for the USB Analysis Probe.
The Universal Serial Bus Specification Revision 1.0
The USB Analysis Probe does not draw power from
the USB wire. All power is provided by the logic
analyzer.
166x, 167x, 1655x
USB State Analysis - 2 PODS
USB Timing Analysis - 3 PODS
The USB Analysis Probe supports both full speed and
low speed operation.
The USB Analysis Probe presents one USB
transceiver load onto the USB. The Analysis Probe
IN and OUT connectors (D+, D-, GND and VCC) are
daisy chained so that the USB traffic is not
interrupted.
All signal etch length, trace velocity and impedance is
within specification.
Operations
35
All Universal Serial Bus operations supported.
Page 36

Environmental Temperature
Altitude
Humidity
Testing and Troubleshooting
Servicing
Operating: 0 to 55 degrees C (+32 to +131 degrees F)
Non operating:-40 to +75 degrees C (-40 to +167
degrees F)
Operating: 4,6000m (15,000 ft)
Non operating: 15,3000m (50,000 ft)
Up to 90% non condensing. Avoid sudden, extreme
temperature changes which would cause
condensation on the Analysis Probe module.
There are no automatic performance tests or
adjustments for the USB Analysis Probe module. If a
failure is suspected in the USB Analysis Probe
contact the factory or your FuturePlus Systems
authorized distributor.
The repair strategy for the USB Analysis Probe is
replacement. However, if parts of the USB Analysis
Probe module are damaged or lost contact the factory
for a list of replacement parts.
Signal Connections
The USB Analysis Probe module monitors signals for
both state and timing analysis. The below figure
displays how the cable headers are numbered.
39 37 35 33 31 29 27 25 23 21 19 17 15 13 11 9 7 5 3 1
40 38 36 34 32 30 28 26 24 22 20 18 16 14 12 10 8 6 4 2
The following tables list the USB Analysis Probe cable
headers and the corresponding Universal Serial Bus
signals.
36
Page 37

Analysis Probe
Cable Header and
Pin number
Logic Analyzer
channel number
USB Analysis
Probe Signal
name
Header 3 pin 3 CLK/16 CLK12
5 no connect
7 15 MDATA
9 14 SOFTIC
11 13 EOP<2>
13 12 EOP<1>
15 11 EOP<0>
17 10 LBC<3>
19 9 LBC<2>
21 8 LBC<1>
23 7 LBC<0>
25 6 Reserved
27 5 Reserved
29 4 Reserved
31 3 FEOPR
33 2 FEOSYN
35 1 LSDET
37 0 unused
37
Page 38

Analysis Probe
Cable Header and
Pin number
Logic Analyzer
channel number
USB Analysis
Probe Signal
name
Header 2 pin 3 CLK/16 MCLK
5 no connect
7 15 STAT4
9 14 STAT3
11 13 STAT2
13 12 STAT1
15 11 STAT0
17 10 ADR06
19 9 ADR05
21 8 ADR04
23 7 ADR03
25 6 ADR02
27 5 ADR01
29 4 ADR00
31 3 ENDPNT03
33 2 ENDPNT02
35 1 ENDPNT01
37 0 ENDPNT00
38
Page 39

Analysis Probe
Cable Header and
Pin number
Logic Analyzer
channel number
USB Signal name
Header 1 pin 3 CLK/16 STAT5
5 no connect
7 15 D15
9 14 D14
11 13 D13
13 12 D12
15 11 D11
17 10 D10
19 9 D09
21 8 D08
23 7 D07
25 6 D06
27 5 D05
29 4 D04
31 3 D03
33 2 D02
35 1 D01
37 0 D00
39
 Loading...