

AEG HM634200MB User Manual

HM634200MB
User manual Induction Hob
Notice d'utilisation Table de cuisson à
induction
Benutzerinformation Induktions-Kochfeld
2 Contents
Thank you for choosing one of our high-quality products.
To ensure optimal and regular performance of your appliance please read this
instruction manual carefully. It will enable you to navigate all processes perfectly
and most efficiently. To refer to this manual any time you need to, we recommend
you to keep it in a safe place. And please pass it to any future owner of the
appliance.
We wish you much joy with your new appliance.
CONTENTS
SAFETY INFORMATION 2
INSTALLATION INSTRUCTIONS 3
PRODUCT DESCRIPTION 6
OPERATING INSTRUCTIONS 8
Automatic Switch Off 8
The Automatic Heat Up 9
Switching the Power function on and off
9
Timer 9
STOP+GO 10
Lock 10
The child safety device 11
Deactivation and activation of the sounds
HELPFUL HINTS AND TIPS 11
CARE AND CLEANING 12
WHAT TO DO IF… 13
ENVIRONMENT CONCERNS 14
Packaging material 14
Subject to change without notice
SAFETY INFORMATION
For your safety and correct operation of the appliance, read this manual carefully before
installation and use. Always keep these instructions with the appliance even if you move or
sell it. Users must fully know the operation and safety features of the appliance.
General safety
WARNING!
Persons (including children) with reduced physical sensory, mental capabilities or lack of experience and knowledge must not use the appliance. They must have supervision or instruction for the operation of the appliance by a person responsible for their safety.
Child safety
• Only adults can use this appliance. Children must get supervision to make sure that they
do not play with the appliance.
• Keep all packaging away from children. There is a risk of suffocation.
• Keep children away from the appliance when it is on.
11
Installation instructions 3
WARNING!
Start the child safety device to prevent small children and pets from an accidental activation of the appliance.
Safety during operation
• Remove all packaging, stickers and layers from the appliance before the first use.
• Set the cooking zones to "off" after each use.
• Risk of burns! Do not put metallic objects, for example cutlery or saucepan lids, on the
cooking surface, as they can become hot.
• Users with an implanted pacemaker must keep their upper body minimum 30 cm from
induction cooking zones that are switched on.
WARNING!
Fire danger! Overheated fats and oils can catch fire very quickly.
Correct operation
• Always monitor the appliance during operation.
• Only use the appliance for domestic cooking tasks!
• Do not use the appliance as a work or a storage surface.
• Do not put or keep very flammable liquids and materials, or fusible objects (made of
plastic or aluminium) on or near the appliance.
• Be careful when you connect the appliance to the near sockets. Do not let electricity
bonds touch the appliance or hot cookware. Do not let electricity bonds tangle.
How to prevent a damage to the appliance
• If the objects or cookware fall on the glass ceramic, the surface can be damaged.
• Cookware made of cast iron, cast aluminium or with damaged bottoms can scratch the
glass ceramic if you move them on the surface.
• Do not let cookware boil dry to prevent the damage to cookware and glass ceramics.
• Do not use the cooking zones with empty cookware or without cookware.
• Do not cover the parts of the appliance with aluminium foil.
Leave a ventilation space of 5 mm between the worktop and front of the unit be-
•
low it.
WARNING!
If there is a crack on the surface, disconnect power supply to prevent the electric
shock.
INSTALLATION INSTRUCTIONS
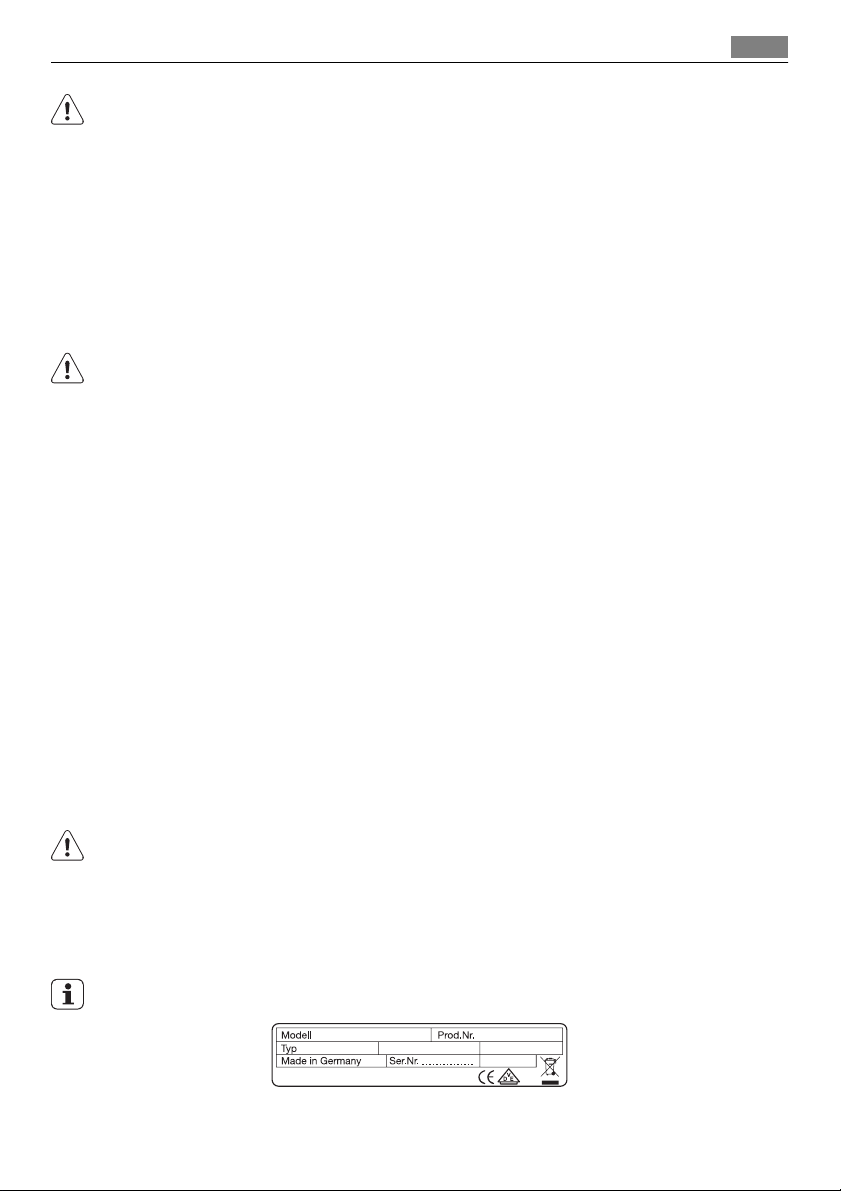
Before the installation, note down the serial number (Ser. Nr.) from the rating plate.The
rating plate of the appliance is on its lower casing.
HM634200MB
58 GAD C7 AU
AEG-ELECTROLUX
220-240 V 50-60-Hz
949 593 220 01
Induction 7,4 kW
7,4 kW
4 Installation instructions
Safety instructions
WARNING!
You must read these!
Fully obey the laws, ordinances, directives and standards in force in the country where you
use the appliance (safety regulations, recycling regulations, electrical safety rules etc.)!
Only a qualified electrician must install the appliance!
Keep the minimum distances to other appliances and units!
Install anti-shock protection, for example install the drawers only with a protective floor
directly below the appliance!
Protect the cut surfaces of the worktop against moisture with a correct sealant!
Seal the appliance to the work top with no space left with a correct sealant!
Protect the bottom of the appliance from steam and moisture, e.g. from a dishwasher or
oven!
Do not install the appliance adjacent to doors and below windows! If not, hot cookware can
be hit off the hob when you open doors or windows.
WARNING!
Risk of injury from electrical current.
The combination appliance is live.
• Observe electrical safety rules.
• Rated voltage of the combined appliances must match.
• Fit plug and socket connections together properly.
• Install correctly to give anti-shock protection.
• Loose and incorrect plug and socket connections can make the terminal become too hot.
• A qualified electrician must install the clamping connections correctly.
The appliance must have the electrical installation which lets you disconnect the appliance
from the mains at all poles with a contact opening width of minimum 3 mm.
You must have correct isolation devices: line protecting cut-outs, fuses (screw type fuses
removed from the holder), earth leakage trips and contactors.
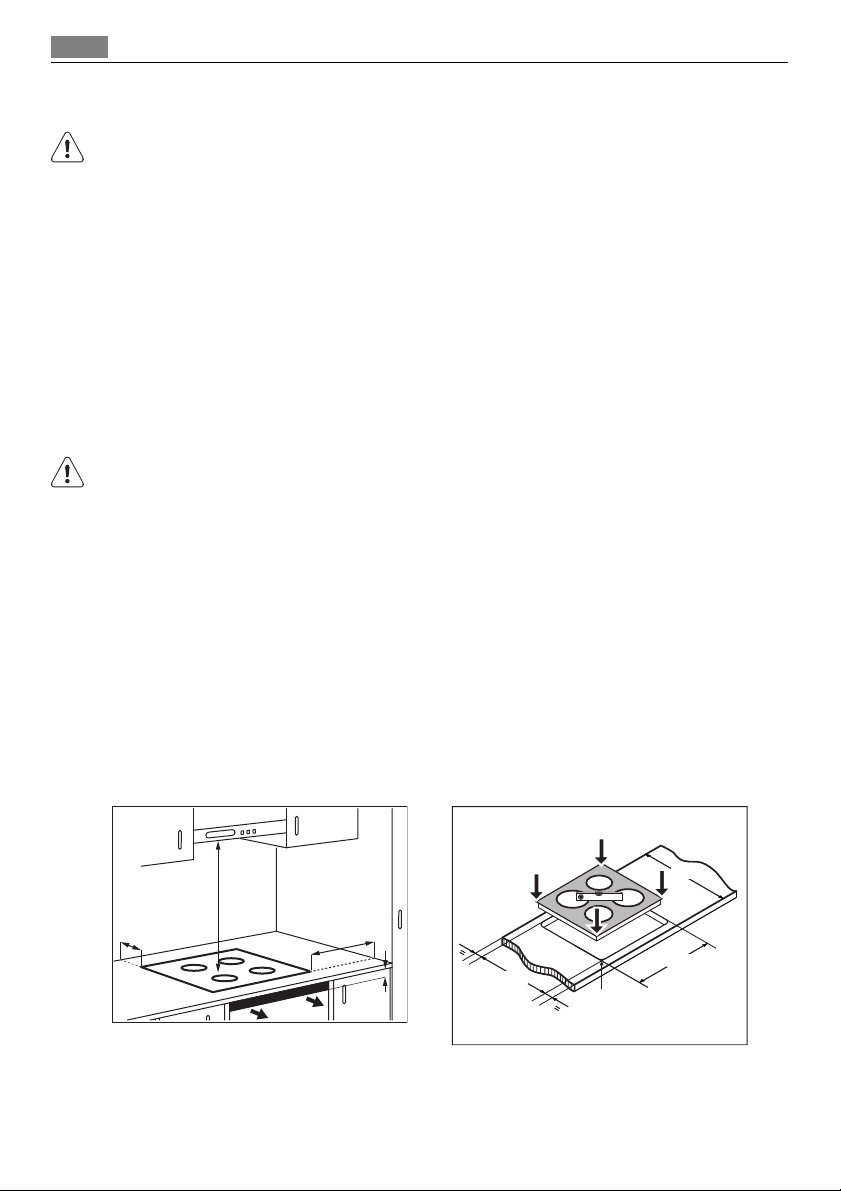
Assembly
min.
50mm
min.
500mm
min.
50mm
min.
5mm
600
560+1
490+1
R5

Installation instructions 5
min.
38 mm
min.
5 mm
Removal
6 Product description
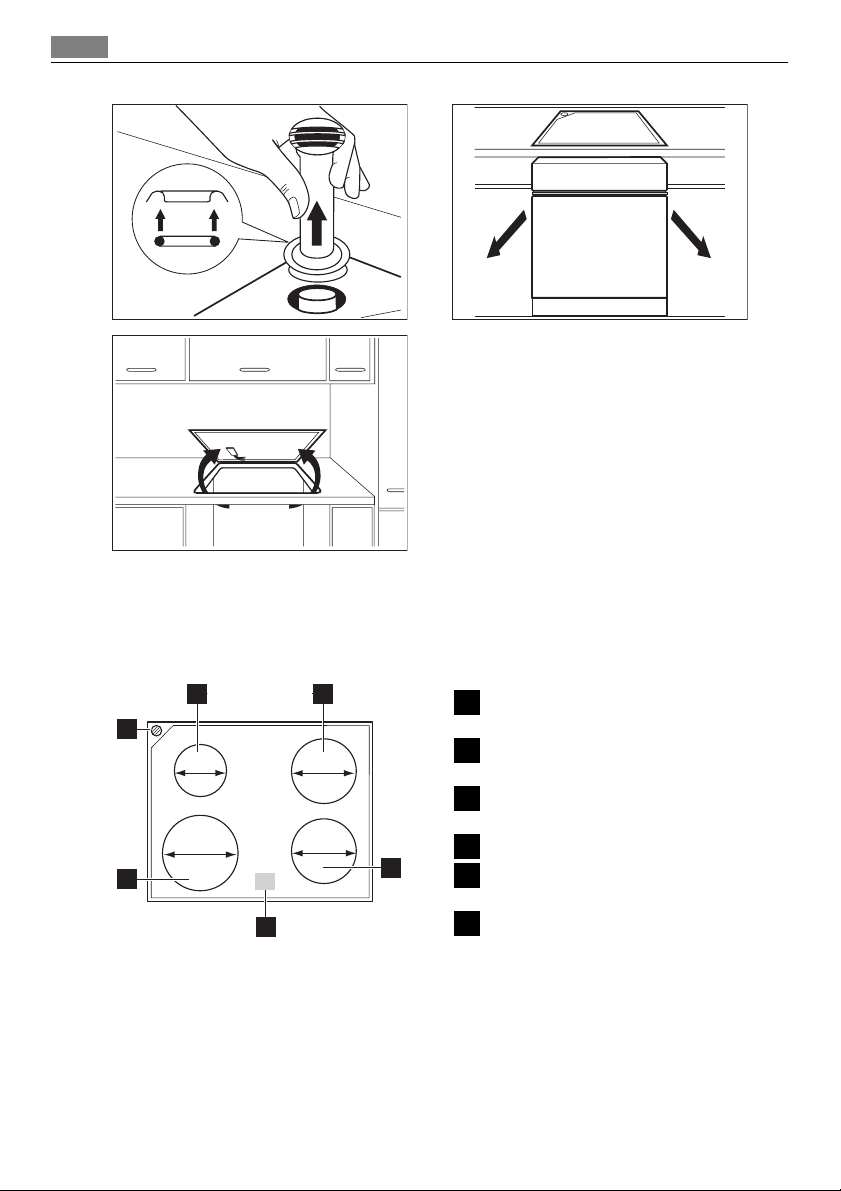
PRODUCT DESCRIPTION
Cooking surface layout
1 2
6
145
mm
210
5
mm
Induction cooking zone 1400 W, with
1
the Power function 2500 W
Induction cooking zone 1800 W, with
180
mm
2
the Power function 2800 W
Induction cooking zone 1800 W, with
3
Power function 2800 W
180
mm
3
Control panel
4
Induction cooking zone 2300 W, with
5
the Power function 3700 W
Steam outlet
4
6
Product description 7
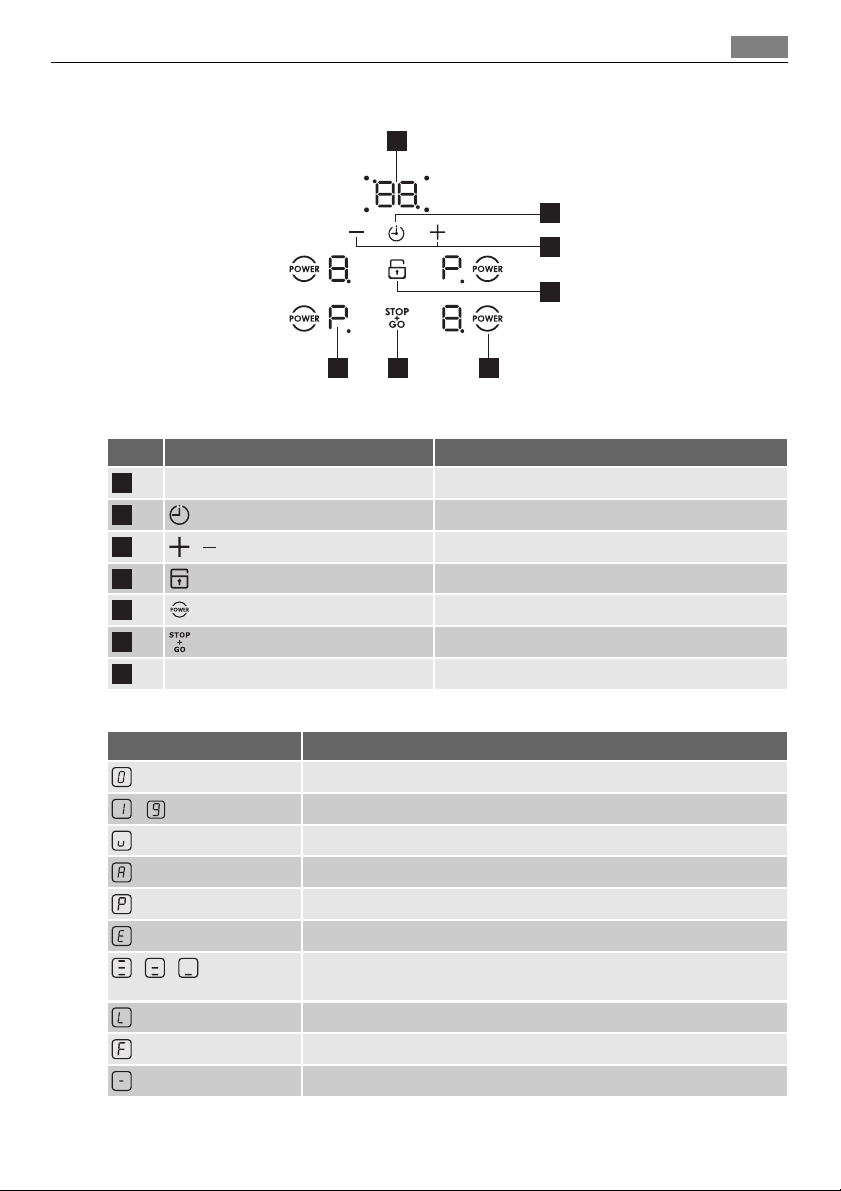
Control panel layout
1
2
3
4
567
Use the sensor fields to operate the appliance. Indicators, displays and sounds tell which
functions operate.
sensor field function
the timer display shows the time in minutes
1
2
3
4
5
6
7
/
a lock
a heat setting display shows the heat setting
selects the cooking zone
increases or decreases the time
starts and stops the key lock or child lock
activates power function
starts and stops STOP+GO
Heat setting displays
Display Description
-
+ digit
/ /
The cooking zone is off
The cooking zone operates
Keep Warm
The automatic heat-up function is on
Power function
There is a malfunction
OptiHeat Control (3 step Residual heat indicator): still cooking / keep
warm / residual heat
Lock/Child safety function is on
Cookware unsuitable or too small or no cookware on the heating zone
The automatic switch off is on
8 Operating instructions
OptiHeat Control (3 step Residual heat indicator)
WARNING!
\ \ Risk of burns from residual heat!
OptiHeat Control indicates the level of the residual heat. The induction cooking zones make
the heat necessary for cooking directly in the bottom of the cookware. The glass ceramic is
heated by the heat of the cookware.
OPERATING INSTRUCTIONS
You operate the hob with the knobs of the oven and control panel of the hob. The
Operating Instructions chapter for the oven tells how to operate the knobs.
When a cooking zone operates, it hums for a short time. This is typical of all ceramic glass
cooking zones and does not show that the appliance operates incorrectly.
Automatic Switch Off
The function stops the hob automatically if:
• all cooking zones are off
• you do not set the heat setting after you start the hob.
• you cover a sensor field with an object (a pan, a cloth, etc.) for longer than 10 seconds.
The sound operates until you remove the object.
• the hob gets too hot (e.g. when a saucepan boils dry). Before you use the hob again, the
cooking zone must be cool.
• you use incorrect cookware.
zone stops automatically.
• you do not stop a cooking zone or change the heat setting. After some time
and the hob stops. See the table.
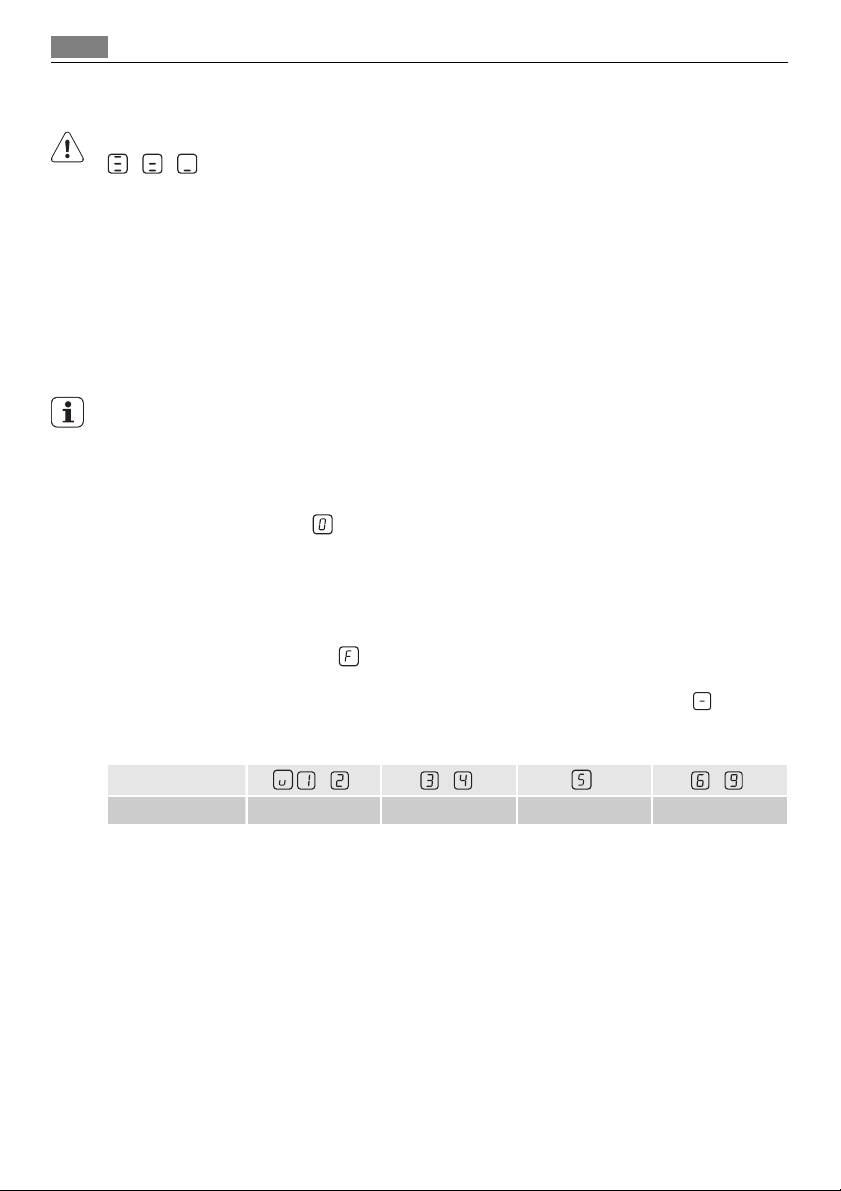
Automatic Switch Off times
Heat setting
Stops after
.
comes on in the display and after 2 minutes the cooking
- - -
6 hours 5 hours 4 hours 1.5 hours
comes on
99
Operating instructions 9
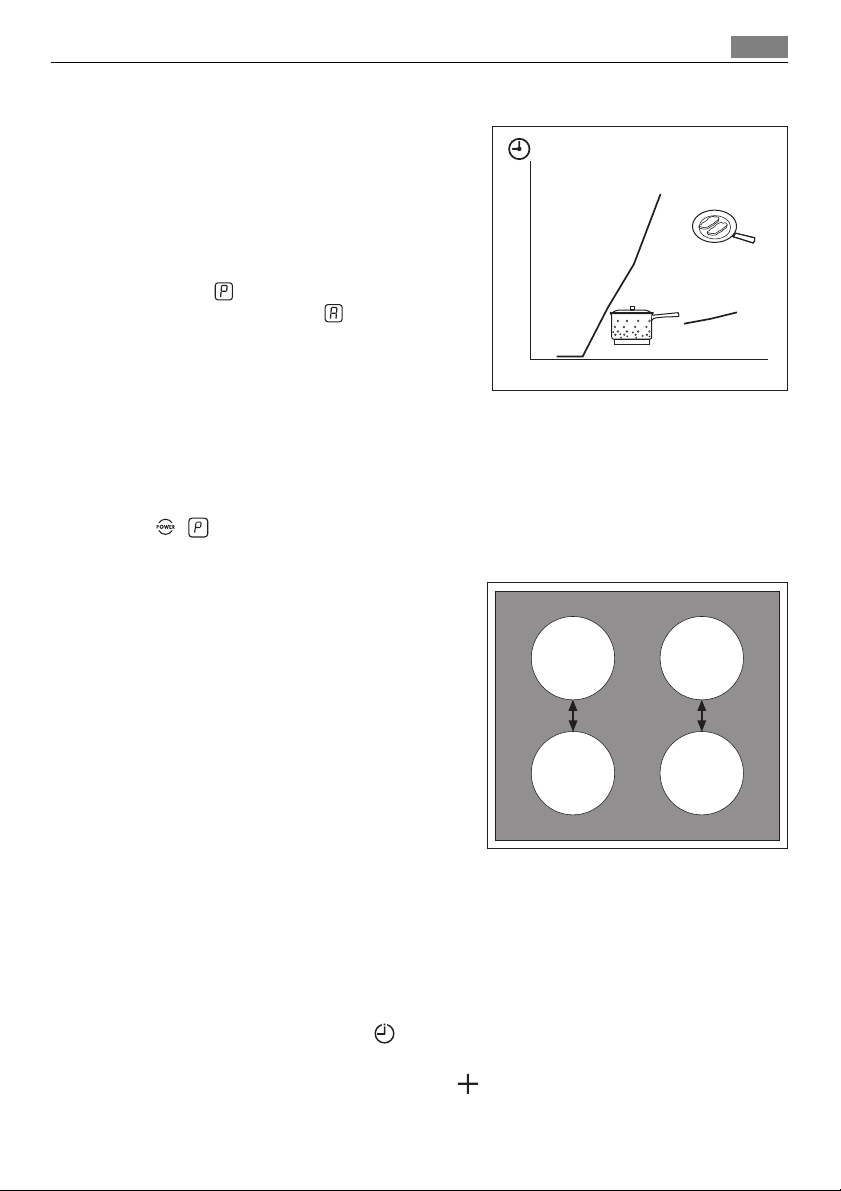
The Automatic Heat Up
You can get a necessary heat setting in a shorter
time if you activate the Automatic Heat Up function. This function sets the highest heat setting
for some time (see the graphic), and then decreases to the necessary heat setting.
To start the Automatic Heat Up function for the
cooking zone turn the knob to the right until the
display shows
heat setting. After 2 seconds
. Then set immediately necessary
comes on.
To stop the function turn the knob to the left and
set a lower heat setting.
11
10
9
8
7
6
5
4
3
2
1
0
123456789
Switching the Power function on and off
The Power function makes more power available to the induction cooking zones. The Power
function is activated for 10 minutes at most. After that the induction cooking zone automatically switches back to heat setting 9. To switch on, select heat setting with knobs, than
touch
, comes on. To switch off, change the heat setting.
Power management
The power management divides the power between two cooking zones in a pair (see the figure). The power function increases the power to
the maximum level for one cooking zone in the
pair and automatically decreases in the second
cooking zone to a lower power level. The display
for the reduced zone alternates.
Timer
Count Down Timer
Use the Count Down Timer to set how long the cooking zone operates for only this one
time.
Set the Count Down Timer after the selection of the cooking zone.
You can set the heat setting before or after you set the timer.
• To set the cooking zone: touch
cooking zone comes on.
• To activate the Count Down Timer: touch
minutes). When the indicator of the cooking zone start to flash slow, the time counts
down.
again and again until the indicator of a necessary
of the timer to set the time ( 00 -
00
10 Operating instructions
• To see the remaining time: set the cooking zone with . The indicator of the cooking
zone starts to flash quickly. The display shows the remaining time.
• To change the Count Down Timer: set the cooking zone with
• To deactivate the timer: set the cooking zone with
counts back to
also touch
When the countdown comes to an end, the sound operates and
zone deactivates.
• To stop the sound: touch
CountUp Timer ( The count up timer)
Use the CountUp Timer to monitor how long the cooking zone operates.
• To set the cooking zone (if more than 1 cooking zone operate ) : touch
and again until the indicator of a necessary cooking zone comes on.
• To activate the CountUp Timer: touch
tor of the cooking zone starts to flash slow, the time counts up. The display switches
between
• To see how long the cooking zone operates: set the cooking zone with
cator of the cooking zone starts to flash quickly. The display shows the time that the
cooking zone operates.
• To deactivate the CountUp Timer: set the cooking zone with
deactivate the timer. The indicator of the cooking zone goes out.
Minute Minder
You can use the timer as a Minute Minder while the appliance is activated and the cook-
ing zones do not operate (the heat setting display shows
• To activate the Minute Minder: Touch
The display of the cooking zones deactivates automatically after 10 seconds. When the
time comes to an end, the sound operates and
• To stop the sound: touch
• To deactivate the Minute Minder: Activate and deactivate the left front cooking zone
for a short time.
The Minute Minder function has no effect on the operation of the cooking zones.
. The indicator of the cooking zone goes out. To deactivate you can
00
and at the same time.
of the timer comes on. When the indica-
and counted time (minutes).
. Touch or of the timer to set the time.
.
. Touch . The remaining time
).
flashes.
. Touch or .
flashes. The cooking
00
and touch or to
again
. The indi-
STOP+GO
The function sets all cooking zones that operate to the Keep Warm setting ( ).
function does not stop the timer function.
The
• To activate this function touch
• To deactivate this function touch
When you change the heat settings, the function stops and the displays show the new heat
settings.
. The symbol comes on.
. The heat setting that you set before comes on.
Lock
You can lock the sensors on the hob when the cooking zones operate.
First set the heat setting.
To activate this function touch
The Timer stays on.
. The symbol comes on for 4 seconds.

Helpful hints and tips
To deactivate this function touch . The heat setting that you set before comes on.
When you change the heat setting, you deactivate this function.
When you deactivate the appliance, you also deactivate this function.
The child safety device
This function prevents an accidental operation of the hob.
To activate the child safety device
• The appliance is deactivated.
• Touch
• Touch
To deactivate the child safety device
• The appliance is deactivated.
• Touch
• Touch
Overriding the child safety device for one cooking session
• Activate the cooking zone. The symbol
comes on.
• Set the heat setting from position
• The child safety operates after you deactivate the appliance.
for 4 seconds until the symbol flashes.
in the time when symbol flashes, the symbol comes on for 4 seconds.
until the symbol flashes.
in the time when symbol flashes, the symbol comes on for 4 seconds.
comes on. Touch until the symbol
in less than 4 seconds. You can operate the hob.
Deactivation and activation of the sounds
Deactivate the appliance.
Touch
onds.
Touch
When the sounds are off, you can hear sounds only when:
• the Minute Minder comes down
• The Count Down Timer comes down
• you put something on the control panel.
for 3 seconds, sound operates. Touch , sound operates. Touch for 3 sec-
comes on, the sound is on. Touch , comes on, the sound is off.
again to activate the sounds.
11
HELPFUL HINTS AND TIPS
Use the induction cooking zones with suitable cookware.
Cookware for induction cooking zones
In induction cooking a powerful electromagnetic field generates an almost instant heat inside the cookware.
Cookware material
• correct: cast iron, steel, enamelled steel, stainless steel, a multi-layer bottom (marked as
correct by a manufacturer).
• not correct: aluminium, copper, brass, glass, ceramic, porcelain.
Cookware is correct for an induction hob if …
• ... some water boils very quickly on a zone set to the highest heat setting..
• ... a magnet pulls on to the bottom of the cookware.

12 Care and cleaning
The bottom of the cookware must be as thick and flat as possible.
Cookware dimensions: induction cooking zones adapt to the dimension of the bottom of
the cookware automatically to some limit. But, the magnetic part of the bottom of the
cookware must have a minimum diameter of approximately 3/4 of the cooking zones.
Operating noises
If you can hear
• cracking noise: cookware is made of different materials (Sandwich construction).
• whistling: you use one or more cooking zones with high power levels and the cookware
is made of different materials (Sandwich construction).
• humming: you use high power levels.
• clicking: electric switching occurs.
• hissing, buzzing: the fan operates.
The noises are normal and do not refer to any defects.
Energy saving
• If possible, always put the lids on the cookware.
• Put cookware on a cooking zone before you start it.
• Stop the cooking zones before the end of the cooking time to use residual heat.
• The bottom of pans and cooking zones must have the same dimension.
Öko Timer (Eco Timer)
To save the energy, the heater of the cooking zone switches itself off earlier than count
down timer signal. The heating time reduction depends on cooking level and cooking time.
The Power function is best to heat up large quantities of water.
Information on acrylamides
Important! According to the newest scientific knowledge, if you brown food (specially the
one which contains starch), acrylamides can pose a health risk. Thus, we recommend that
you cook at the lowest temperatures and do not brown food too much.
CARE AND CLEANING
Clean the appliance after each use.
Always use cookware with clean bottom.
WARNING!
Sharp objects and abrasive cleaning agents will damage the appliance.
For your safety, do not clean the appliance with steam blasters or high-pressure cleaners.
Scratches or dark stains on the glass ceramic have no effect on how the appliance operates.

What to do if… 13
To remove the dirt:
1. – Remove immediately:melted plastic, plastic foil, and food with sugar. If not, the
dirt can cause damage to the appliance. Use a special scraper for the glass . Put the
scraper on the glass surface at an acute angle and move the blade on the surface .
– Remove after the appliance is sufficiently cool:limescale rings , water rings, fat
stains, shiny metallic discolorations. Use a special cleaning agent for glass ceramic
or stainless steel.
2. Clean the appliance with a moist cloth and some detergent.
3. At the end rub the appliance dry with a clean cloth.
WHAT TO DO IF…
Problem Possible cause and remedy
You cannot activate the appliance or operate it.
A Sound operates and the appliance deactivates.
A sound operates when the appliance is deactivated.
The residual heat indicator does
not comes on.
The Automatic Heat Up function does not operate.
The heat setting changes between two levels.
The sensor fields become hot. The cookware is too large or you out it too near to the controls.
There is no signal when you
touch the panel sensor fields.
flashes
comes on
• Activate the appliance again and set the heat setting in 10
seconds.
• You touched 2 or more sensor fields at the same time. Only
touch one sensor field.
• The Stop+Go operates. See the chapter Operating instructions.
• There is water or fat stains on the control panel. Clean the
control panel.
You put something on one or more sensor fields. Remove the object from the sensor fields.
The cooking zone is not hot because it operated only for a short
time. If the cooking zone should be hot, speak to the service centre.
The highest heat setting is set. The highest heat setting has the
same power as the Automatic Heat Up function.
The Power management is activated. See the section Power management.
Put large cookware on the rear cooking zones if it is necessary.
The signals are deactivated. Activate the signals (see OffSound
Control).
The Automatic Switch Off operates. Deactivate the cooking zone
and activate it again after 60 seconds.
If after 60 seconds
tre.
The Child Safety Device or the Lock operates. See the chapter Op-
erating instructions.
comes on again speak to the service cen-
14 Environment concerns
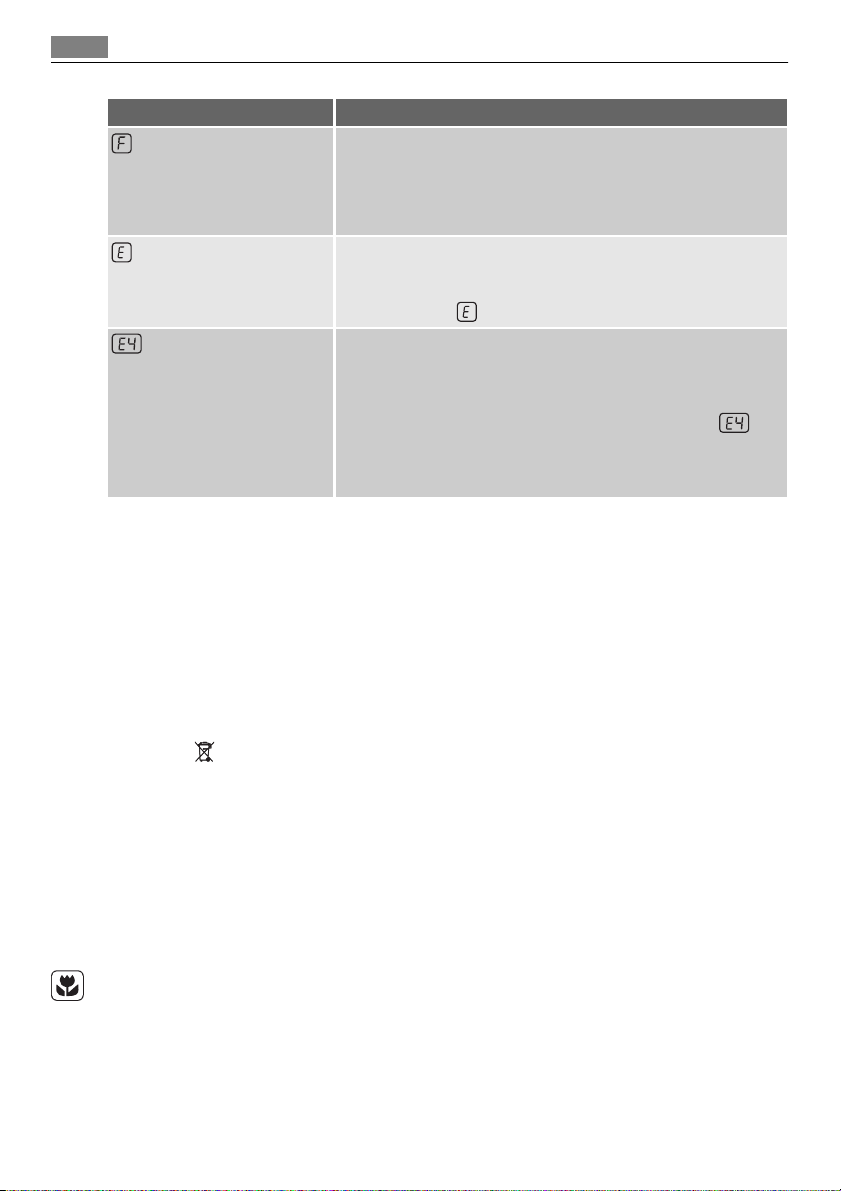
Problem Possible cause and remedy
comes on
and number comes on.
comes on
• No cookware on the cooking zone. Put cookware on the cooking zone.
• Not correct cookware. Use the correct cookware.
• The diameter of the bottom of the cookware is too small for
the cooking zone. Move cookware to a smaller cooking zone.
There is an error in the appliance.
Disconnect the appliance from the electrical supply for some
time. Disconnect the fuse from the electrical system of the house.
Connect again. If
There is an error in the appliance, because a cookware boils dry.
The protection against become too hot for the cooking zone operates. The Automatic Switch Off operates.
Deactivate the appliance. Remove the hot cookware. After, ap-
proximately 30 seconds activate the cooking zone again.
should go out of the display, residual heat indicator can stay. Let
the cookware become sufficiently cool and check it with the section Cookware for the induction cooking zone.
comes on again, speak to the service centre.
If you tried the above solutions and cannot repair the problem, speak to your dealer or the
Customer Care Department. Give the data from the rating plate, three-digit-letter code for
the glass ceramic (it is in the corner of the cooking surface) and an error message that
comes on.
If you operated the appliance incorrectly, the servicing by a customer service technician or
dealer will not be free of charge, even during the warranty period. The instructions about
the customer service and conditions of guarantee are in the guarantee booklet.
ENVIRONMENT CONCERNS
The symbol on the product or on its packaging indicates that this product may not be
treated as household waste. Instead it should be taken to the appropriate collection point
for the recycling of electrical and electronic equipment. By ensuring this product is
disposed of correctly, you will help prevent potential negative consequences for the
environment and human health, which could otherwise be caused by inappropriate waste
handling of this product. For more detailed information about recycling of this product,
please contact your local council, your household waste disposal service or the shop where
you purchased the product.
Packaging material
The packaging materials are friendly to the environment and can be recycled. The plastic
components are identified by marking: >PE<,>PS<, etc. Discard the packaging materials as
household waste at the waste disposal facilities in your municipality.
 Loading...